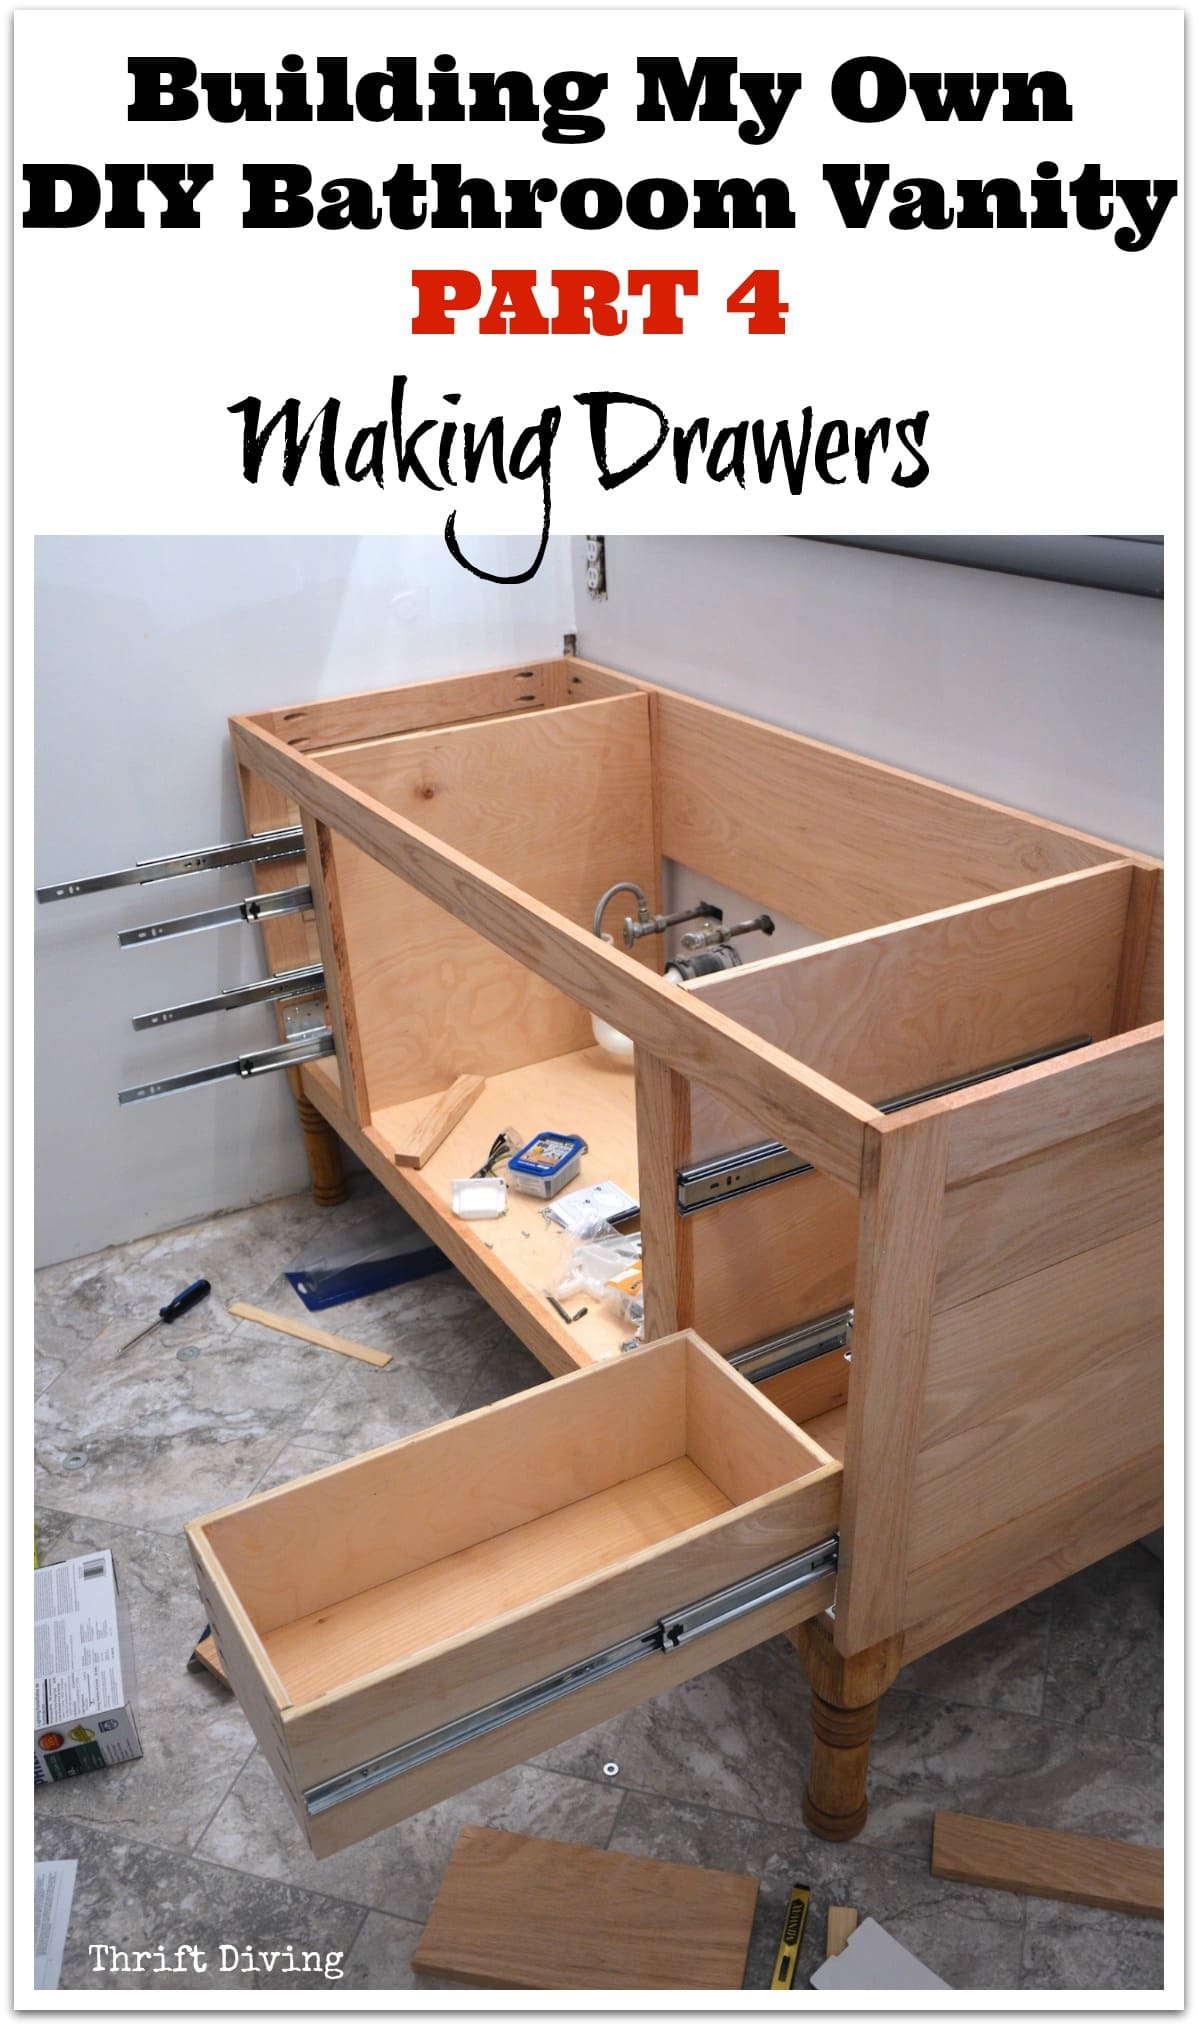
Build a DIY Bathroom Vanity – Part 4 – Making Drawers
This post is Part 4: Making Drawers in the series where I thought of this crazy idea to build my own 60″ DIY bathroom vanity from scratch. Be sure to check out the other parts in this tutorial series:
- Part 1: Attaching Legs and a Base
- Part 2: Attaching the Sides
- Part 3: Creating the Partitions
- Part 4: Making Drawers
- Part 5: Making Cabinet Doors
- Part 6: Fitting the Granite Vanity Top
- Part 7: Finishing the Oak Vanity
- BEFORE & AFTER: The Final Master Bathroom Makeover Reveal!
SKIP AROUND THIS POST
No time to read this whole post? Just click to skip around to each section!
Materials Used
STEP 1: Take Accurate Measurements
STEP 2: Installing the Drawer Slides
STEP 3: Creating the Drawers
Measuring For Drawers
Cutting and Routing Drawers
Adding the Slider Hardware
Test Fitting the Drawers
Then the Problem Happened
Adding More Support
Read the Entire Bathroom Makeover Series
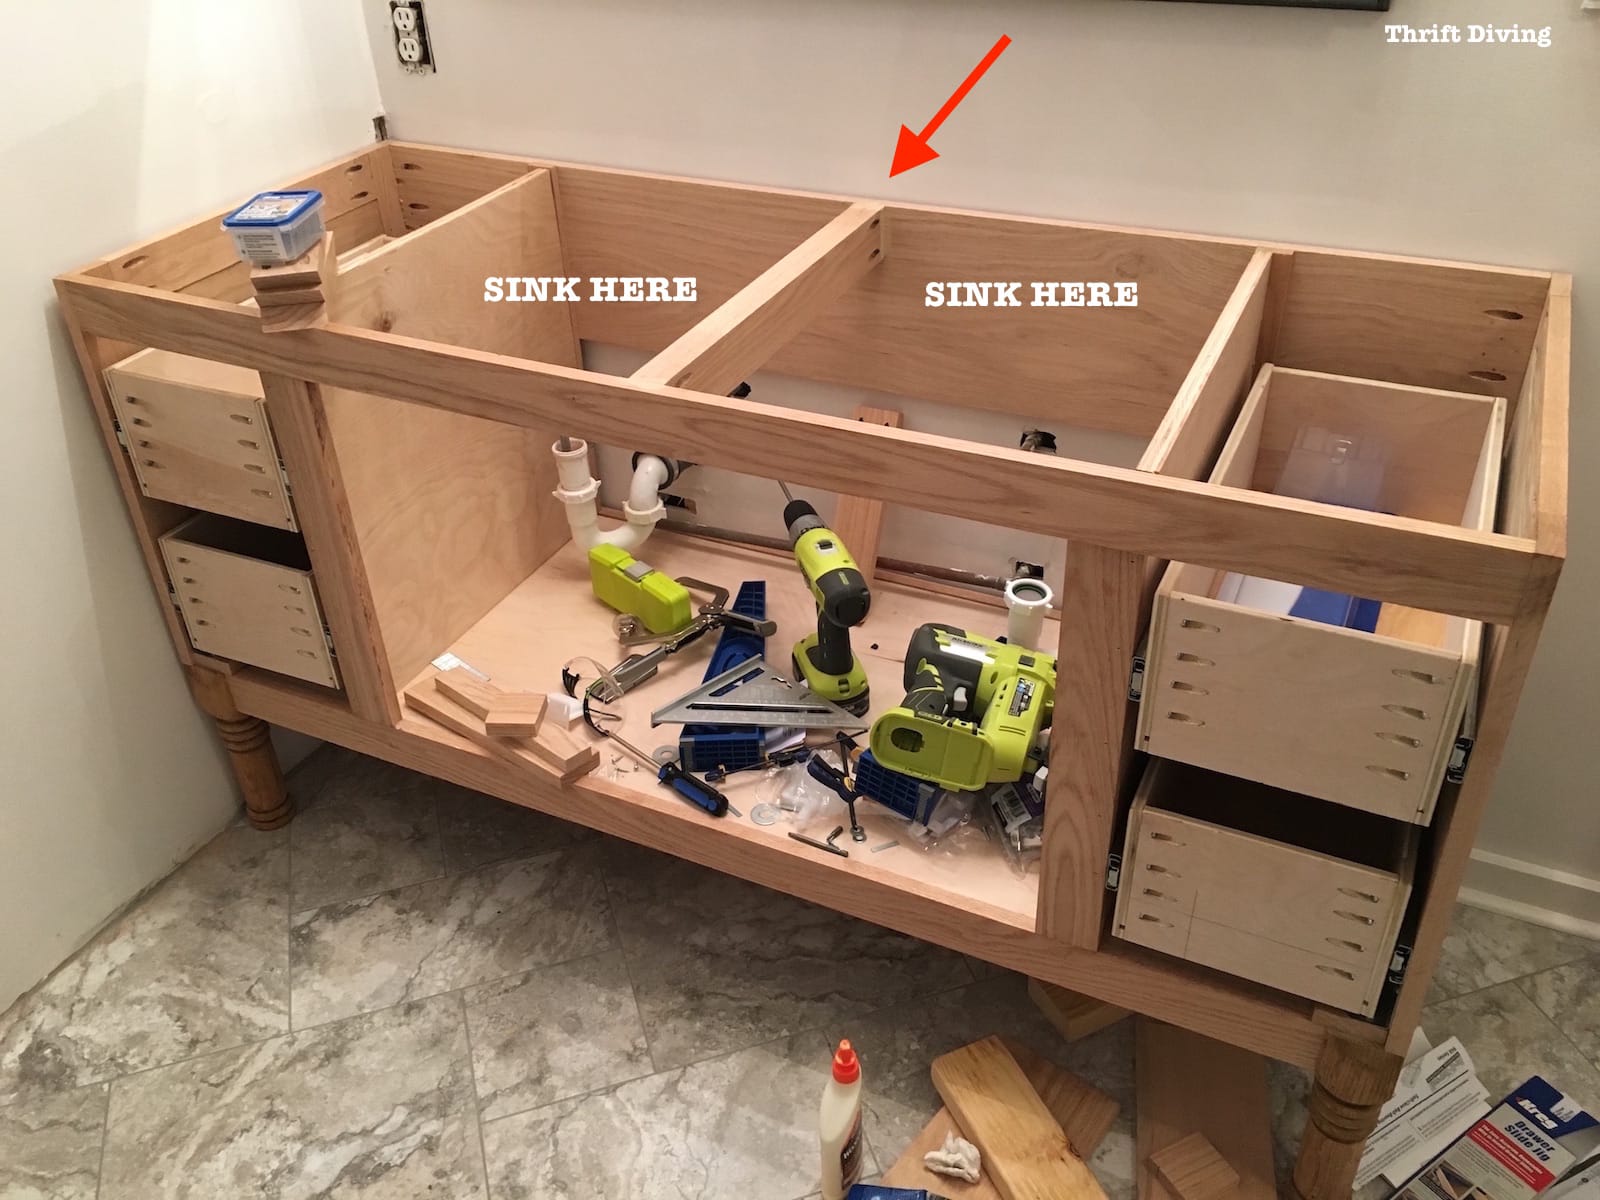
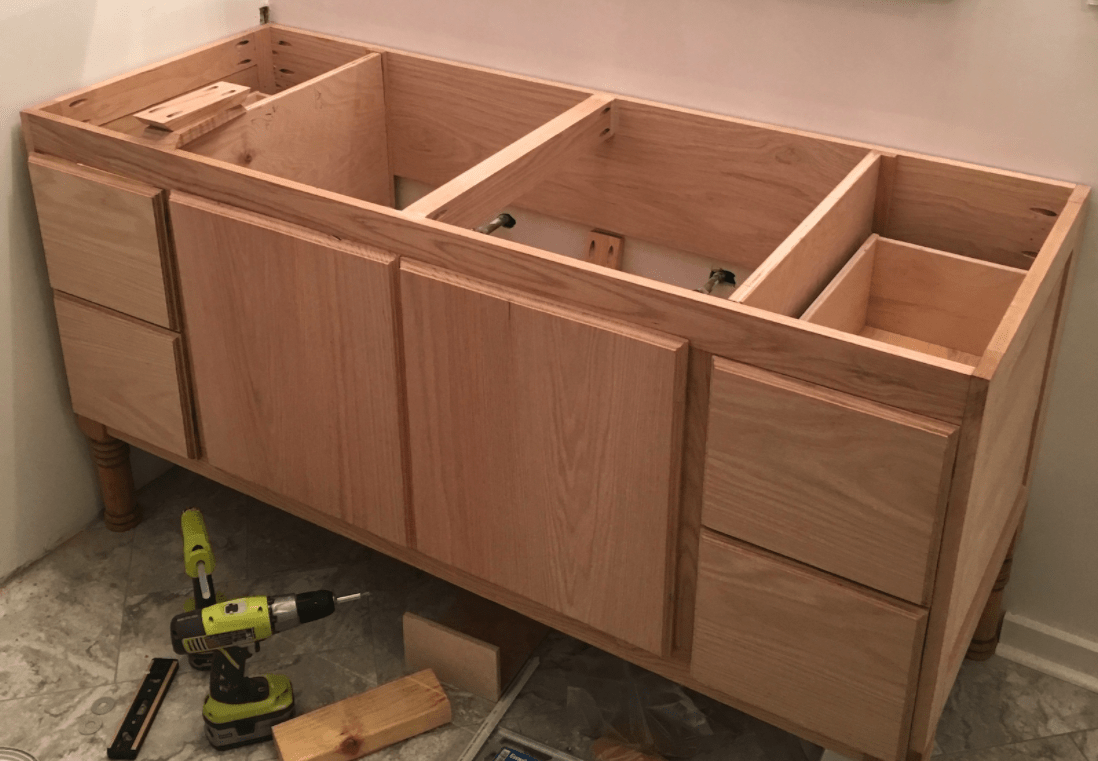
I left off in my last post telling you about how I installed the partitions in the DIY vanity. Now that the partitions were in, I had something on which to attach the drawer slides and could create the drawers from scratch.

This was the part I was super nervous about.
First of all, I knew that I had issues with my vanity being “square” and plumb. That is a big deal when it comes to building furniture, which I quickly learned. 😉
And the kind of side-mounted drawer slides you get from The Home Depot require such accuracy and can be quite finicky if you don’t have your measurements “just so.”
But I figured I would just do my best and roll with the punches! After all, this vanity was an experiment to answer the question: Can I build a DIY bathroom vanity from scratch??
And of course, I did run into some problems, which I share with you below!
Build a DIY Bathroom Vanity: Creating the Drawers
Materials Used
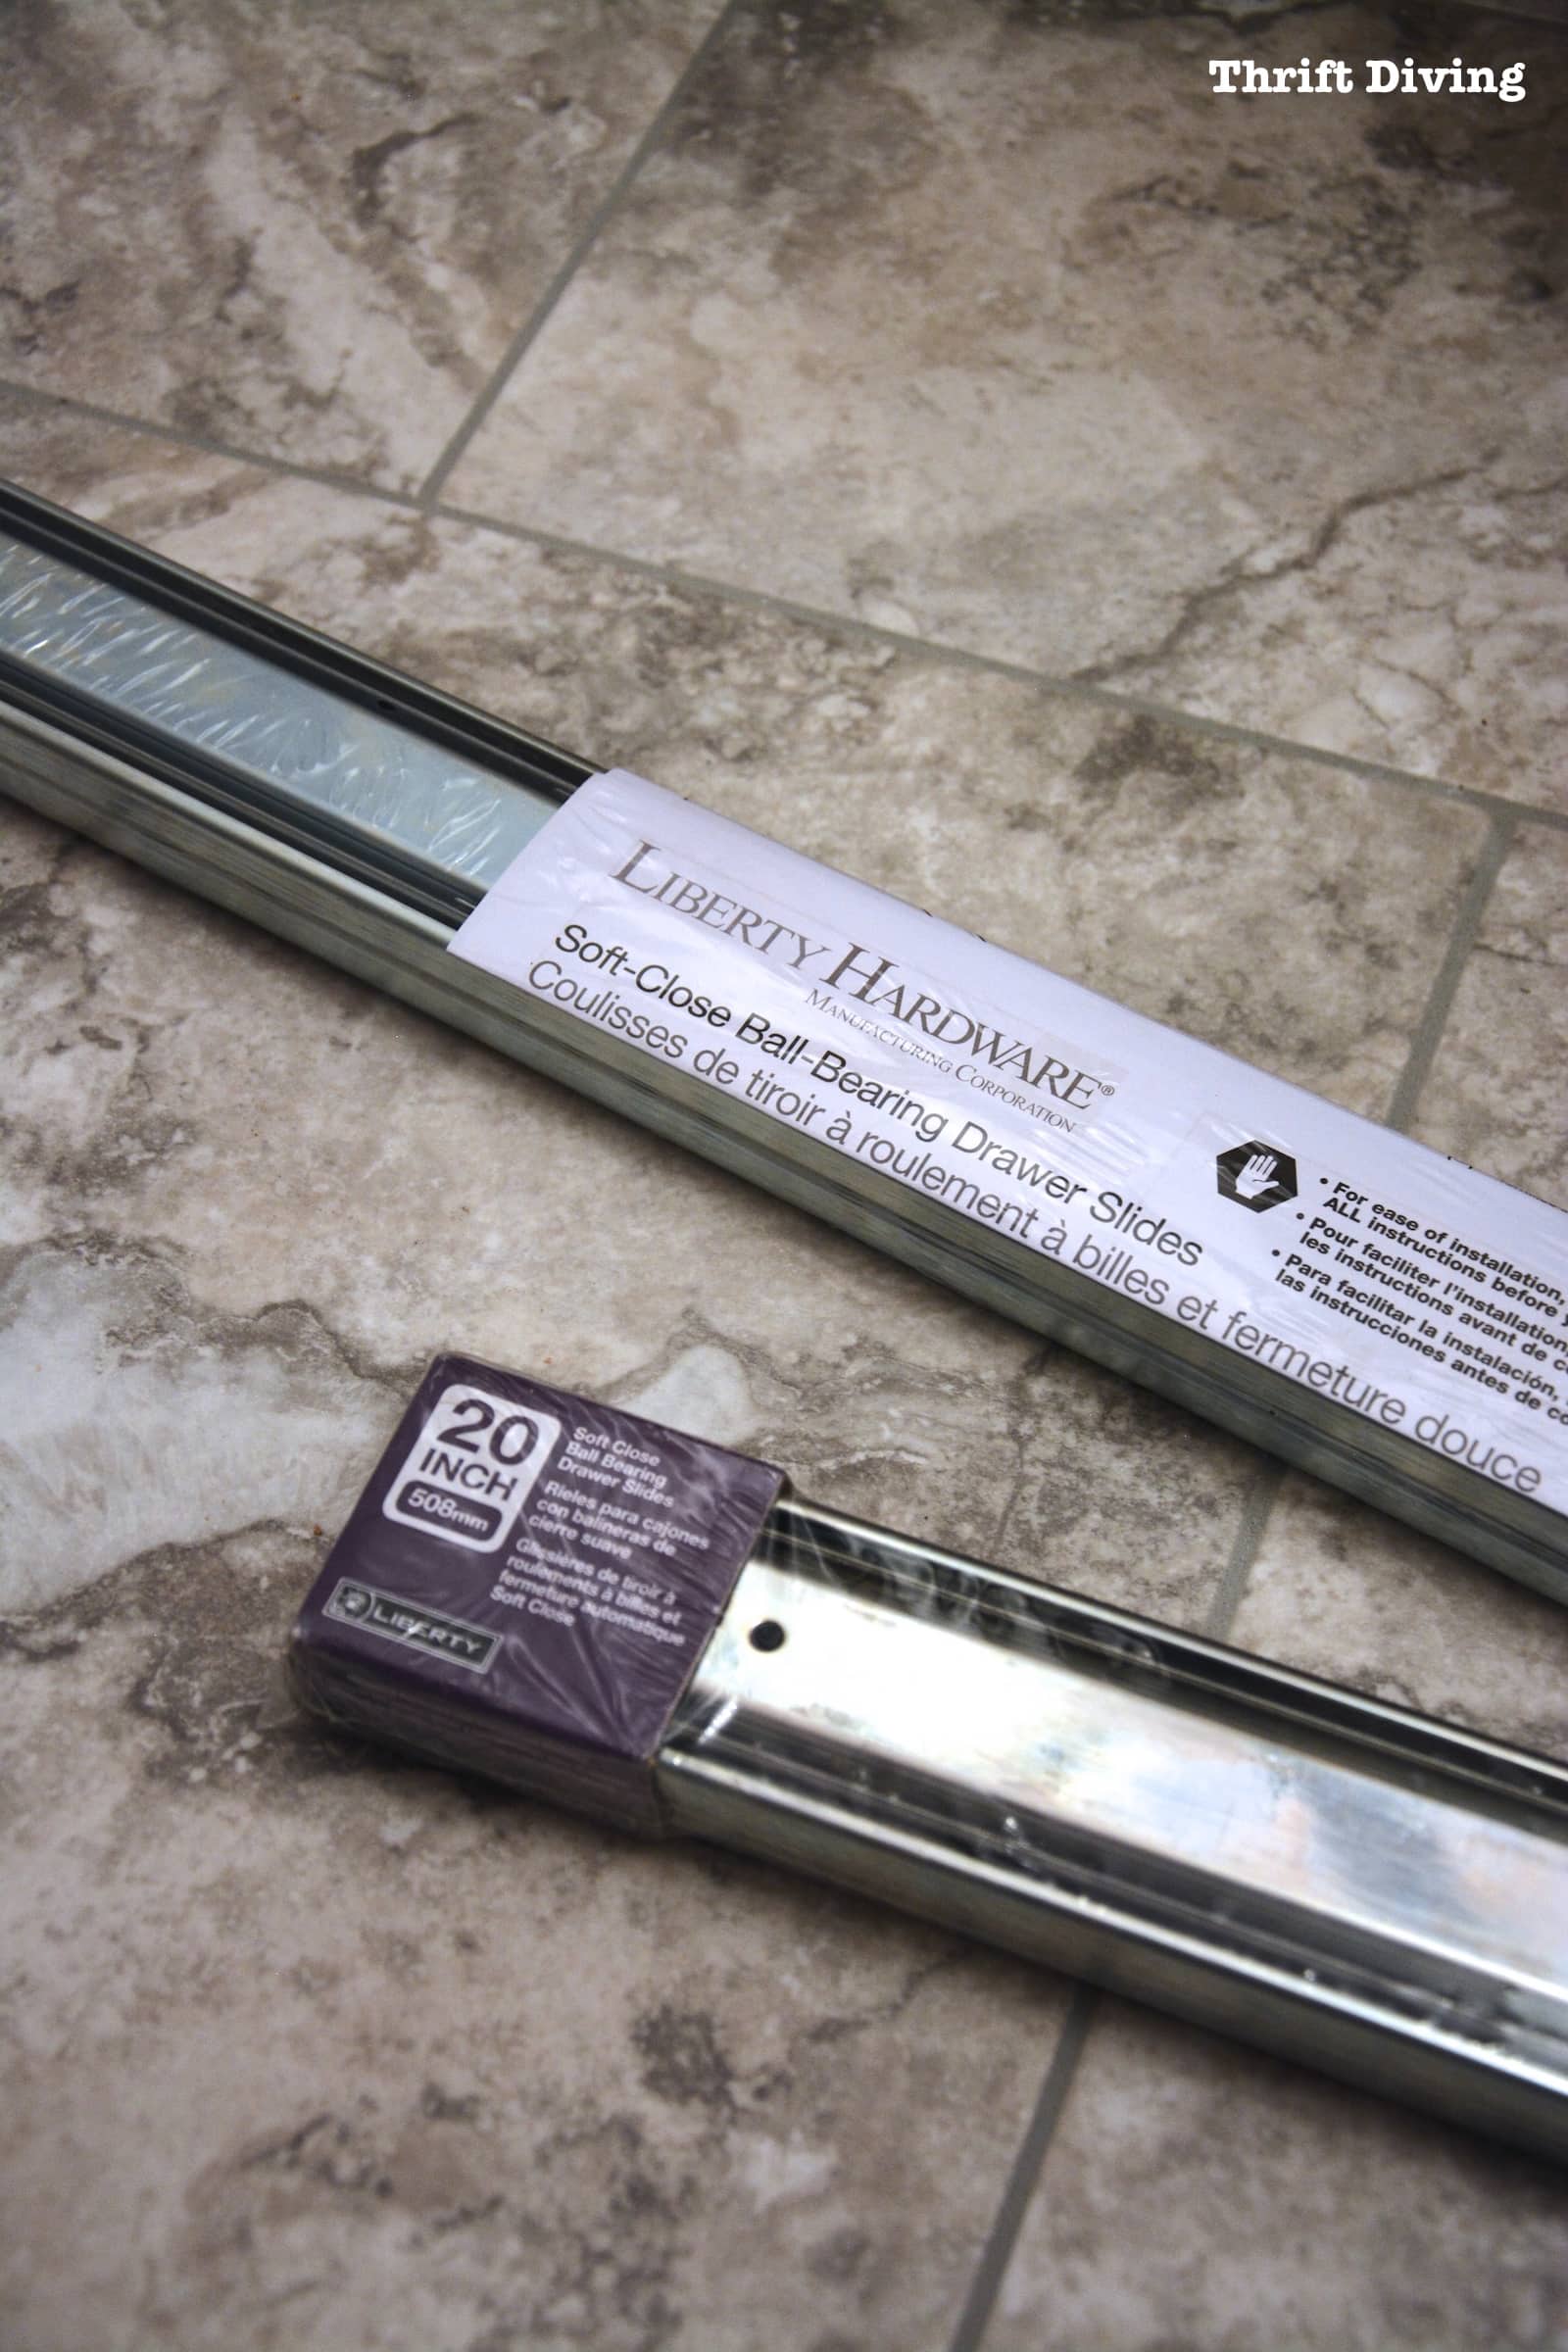
- Liberty 20″ Soft Close Drawer Slides (4 each)
- 1/2″ thick birch plywood (I think I used one 4′ x 8′ sheet)
- 1/4″ thick birch plywood for the drawer bottoms (one 2′ x 4′ sheet)
- Tape measure
- RYOBI power drill
- Small washers (optional)
- Scraps of wood (optional)
- Router
- Router bits (optional)
- Kreg pocket hole jig
- Pack of Kreg 1″ Course screws for soft woods
- Kreg Cabinet Drawer Slide Jig (optional)
- Small level
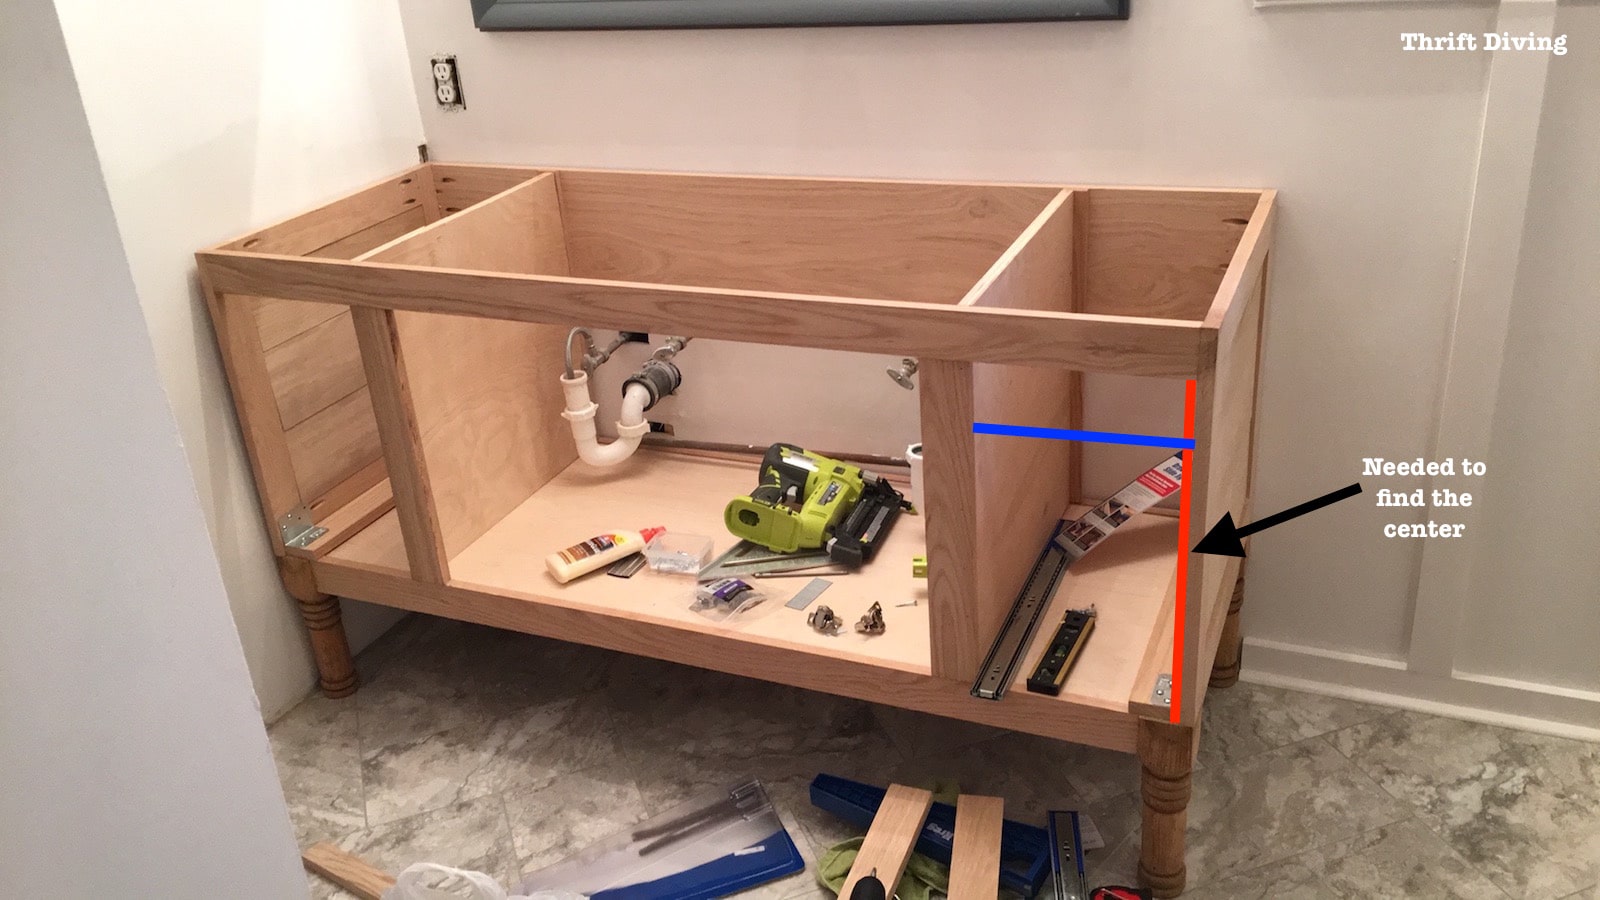
STEP 1: Take Accurate Measurements
I had never make drawers before, but it didn’t seem too hard. The challenging part for me, though, was figuring out where to place the drawer slides. There are many tutorials online that show you how but don’t tell you how to measure to place them accurately.
So here’s what I did:
- First, measured the height of the drawer opening.
- Second, measured the width of the drawer opening.
- Next, marked the center of the height, since this center is where I would want the drawers to meet.
- Used scrap wood and just held one of the drawer slides up to the slide to figure out where I would want the bottom drawer to be, and then made sure the top would be evenly placed to match the bottom drawer.
IMPORTANT: Be sure you don’t install the drawer slides too high on the partition without knowing where your sink will be placed if you’re using an under-mount sink. Otherwise, the sink may get in the way of the drawers. Trust me, I speak from experience, as you’ll see in an upcoming post in this series… ;).
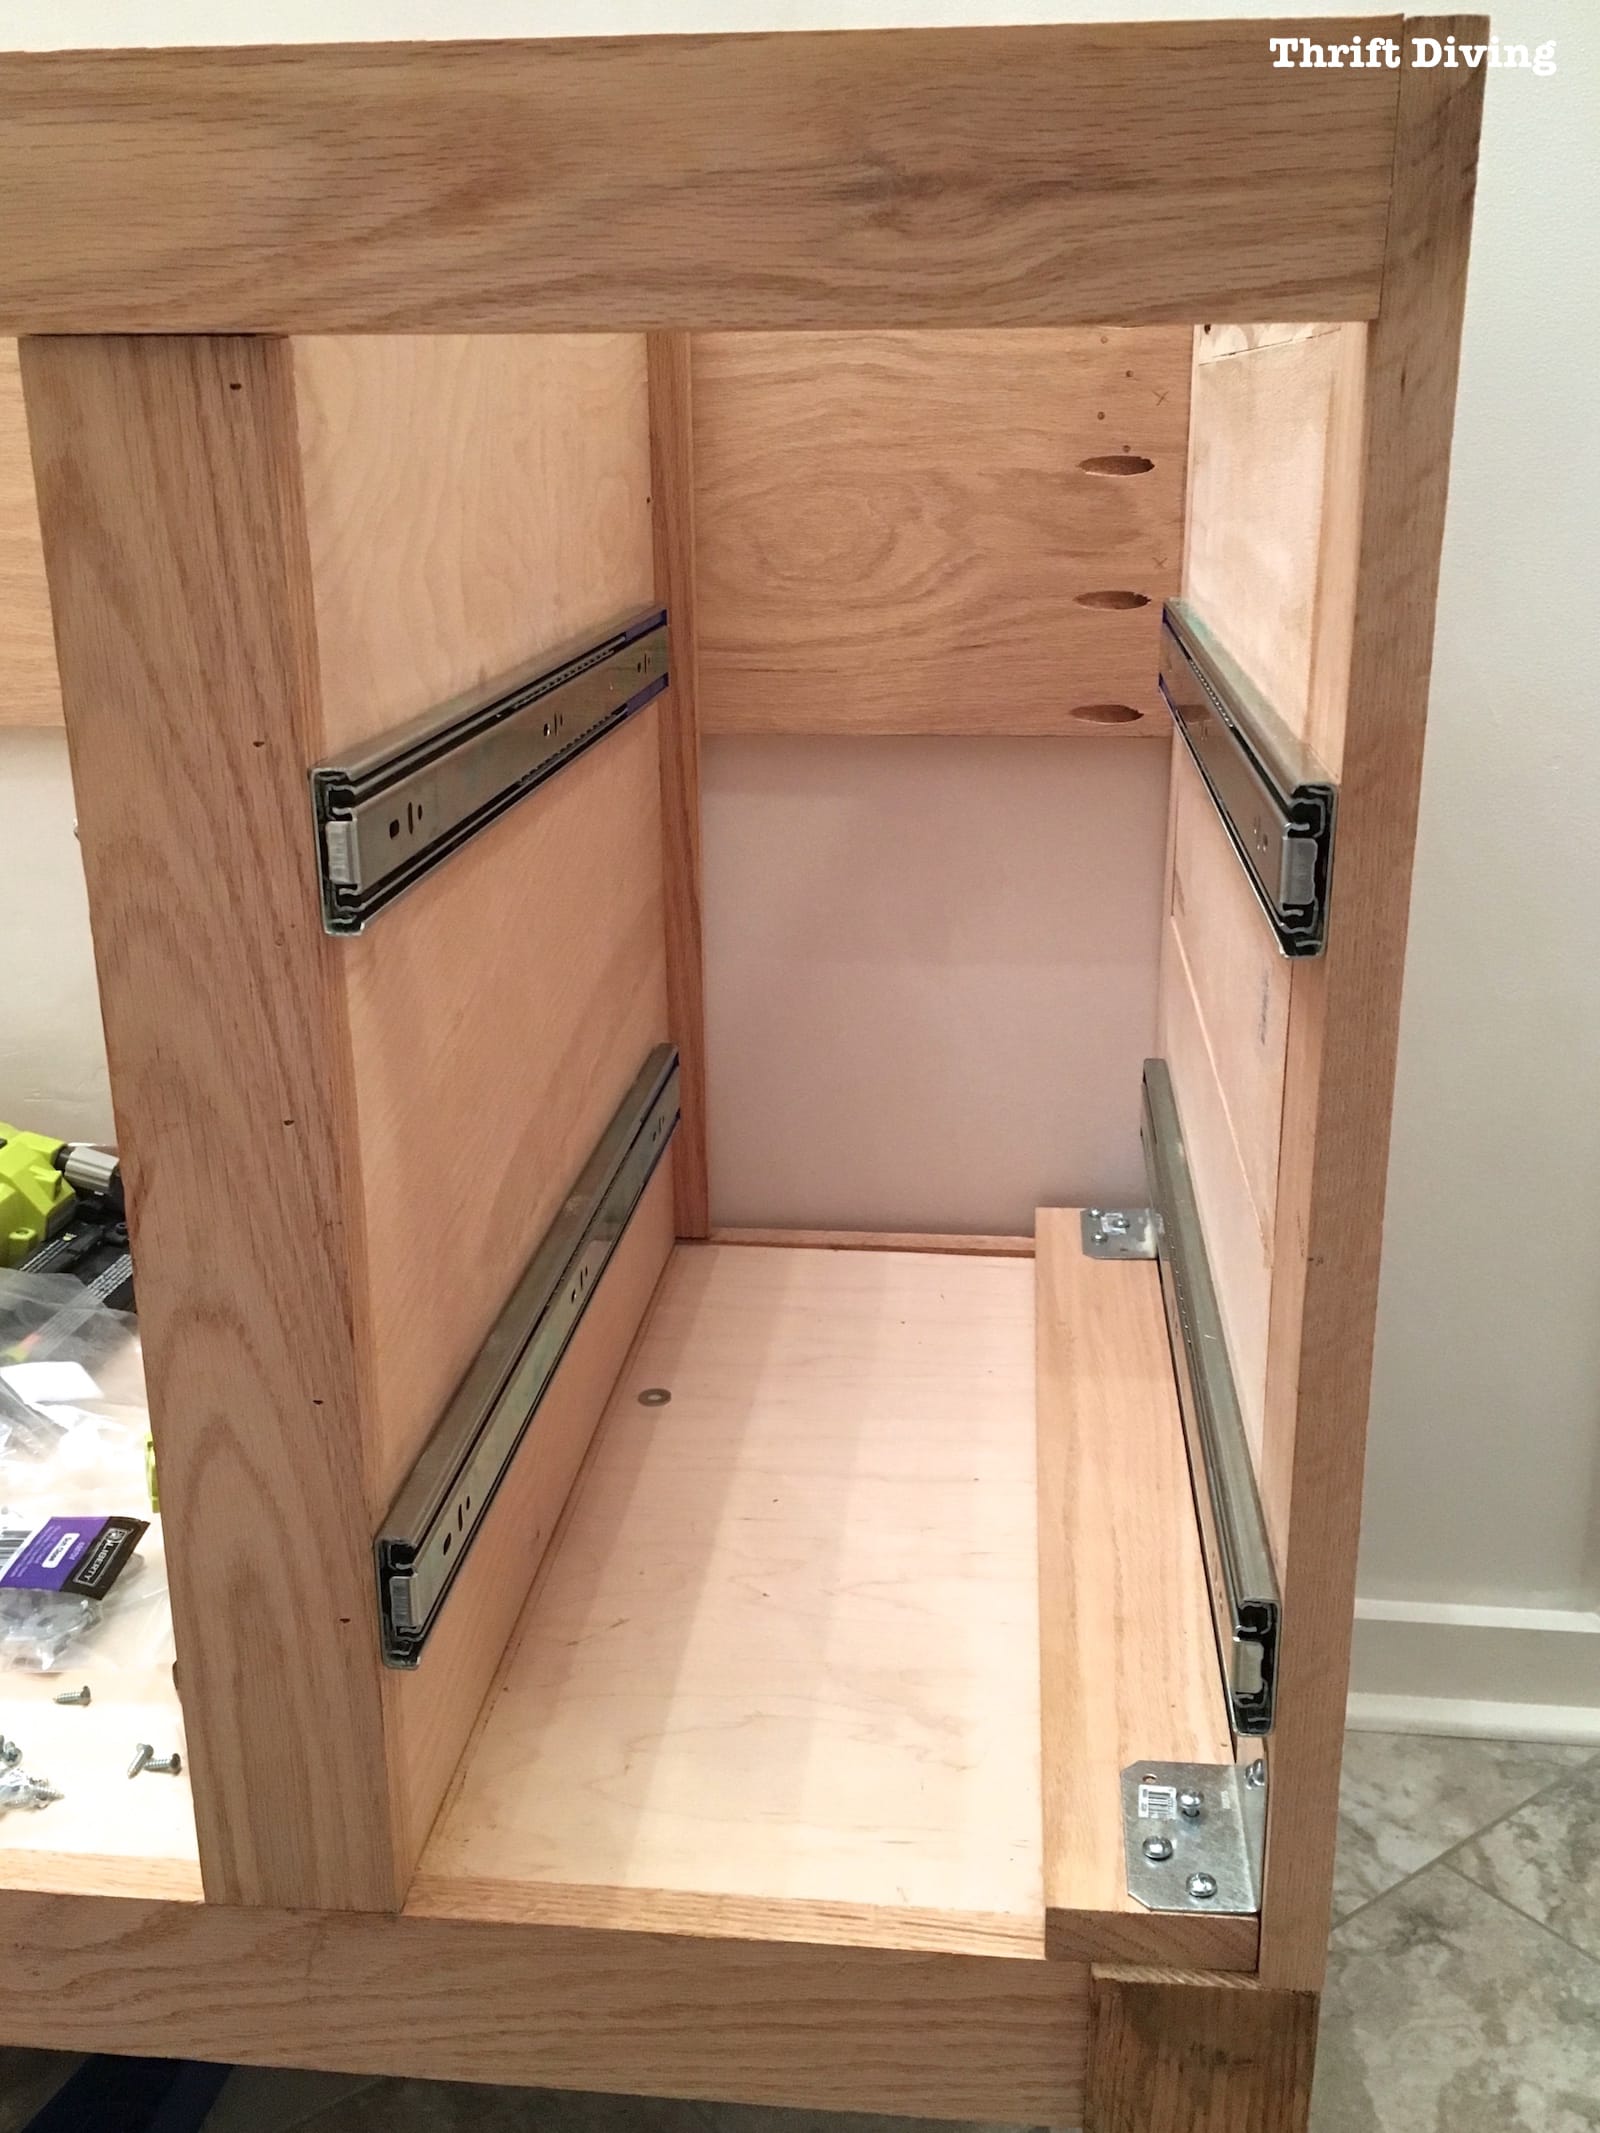
STEP 2: Installing the Drawer Slides
I used four total soft-close drawer slides.
Since my vanity depth was just over 22″, the 20″ side-mounted drawer slides were the best option. (They only come in 16″, 18″, 20″, and 24″ lengths).
I had no idea how high I should mount the drawer slides.
But I figured I would need to have enough clearance at the top and bottom, plus allow for a 1/8″ gap between the drawers to allow for Kreg Cabinet Drawer Slide Jig.
Figuring out where to place the drawer slides was a bunch of me just sitting on the floor with scrap wood and figuring, “Hmmm, if the drawer slide were HERE, what size would I need the drawer to be in order for it to cover the opening and meet in the middle…?”
Here’s an example of the type of “dry fitting” I did.
I pretended this big piece of wood was a drawer, and I just experimented with having the drawer slide in various places.
What I learned is there is no one correct formula on where to place drawer slides, as long as they’re straight and even, and that they won’t get in the way of the sink. Otherwise, just experiment and see where you want to place them for your own vanity.
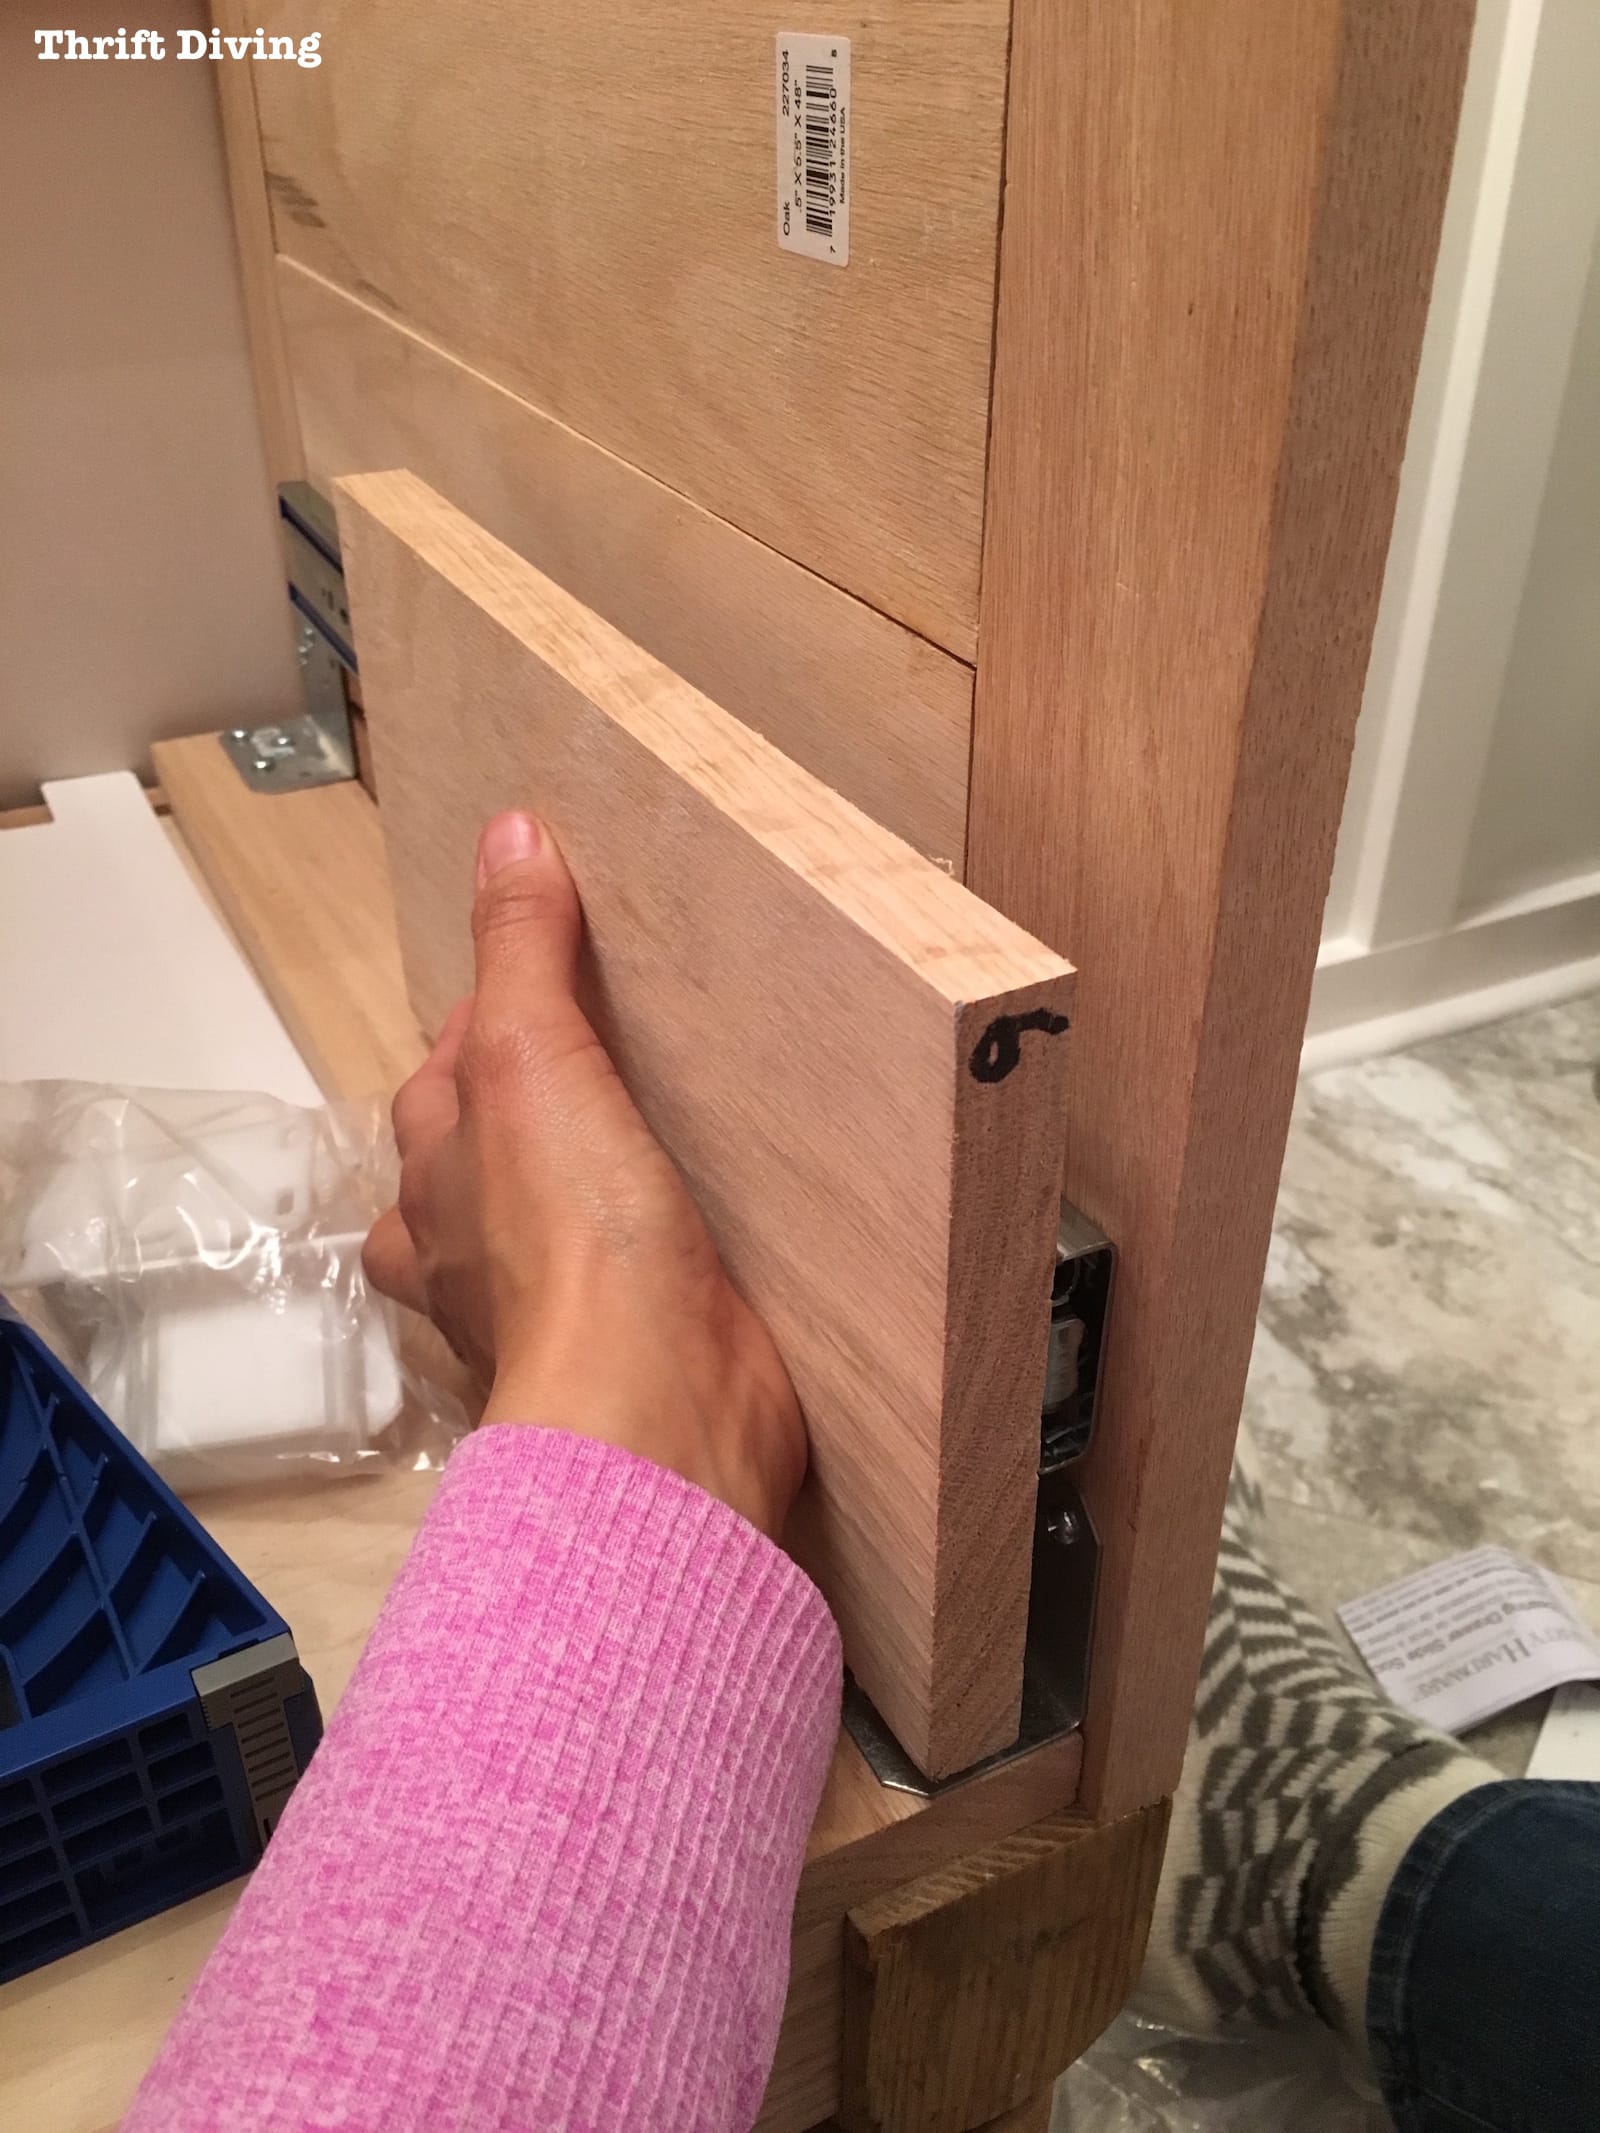
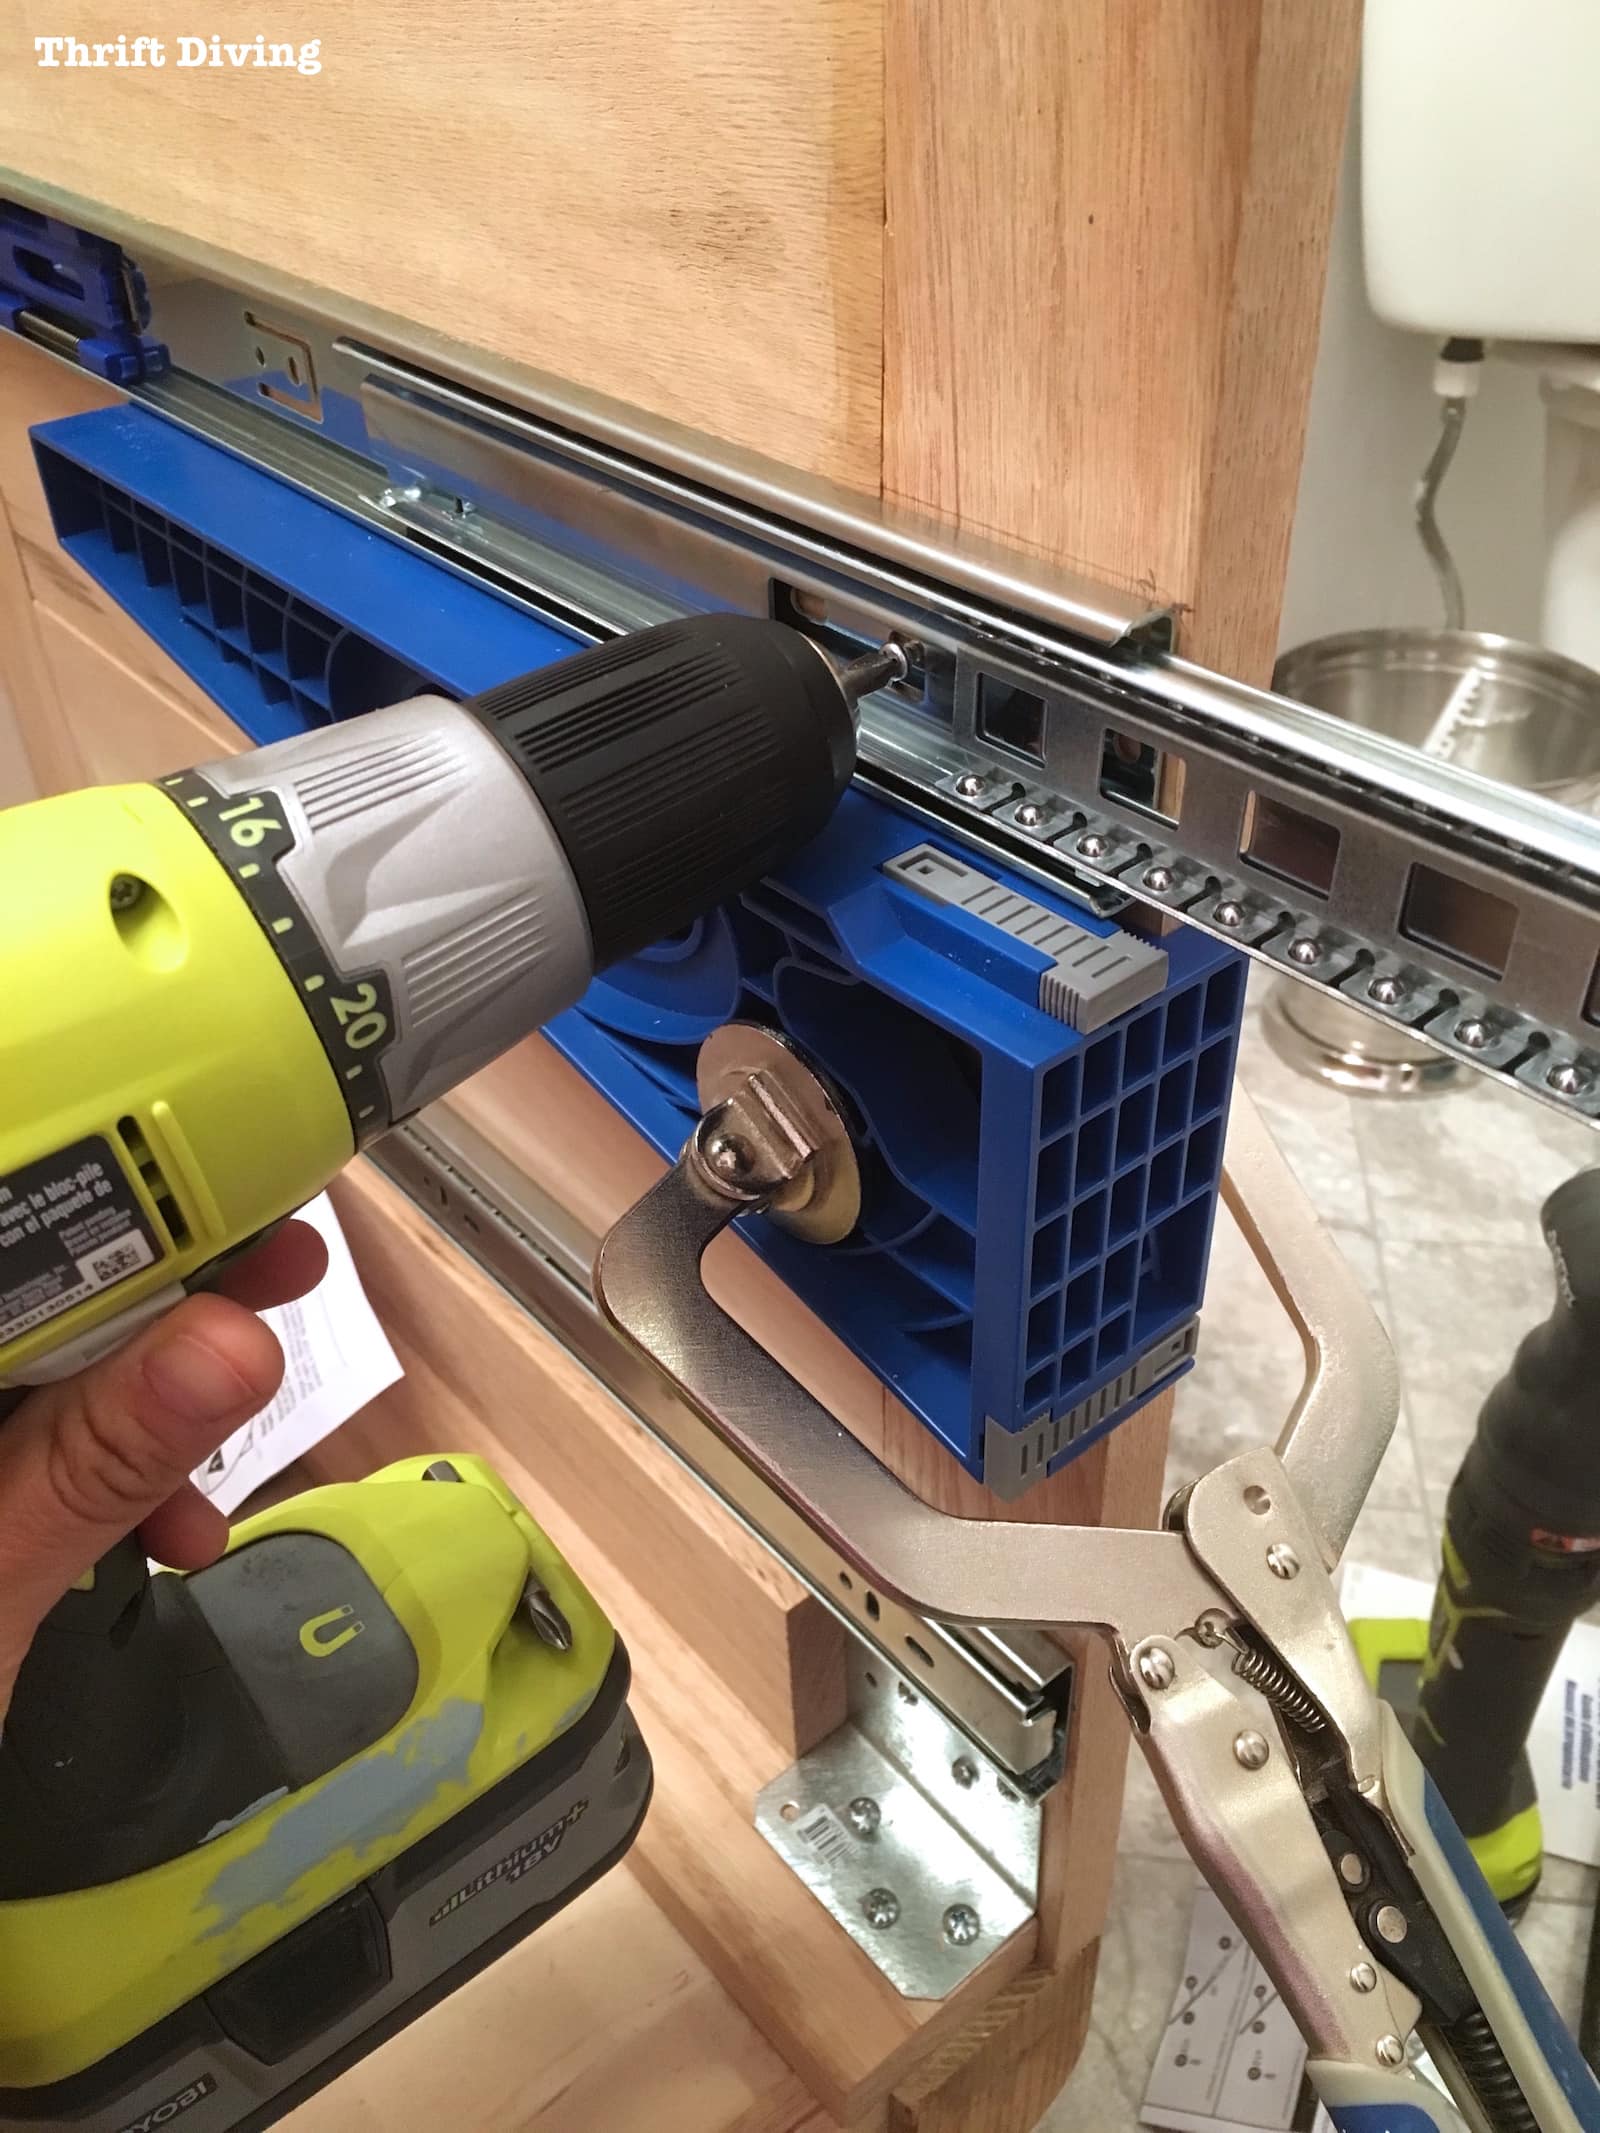
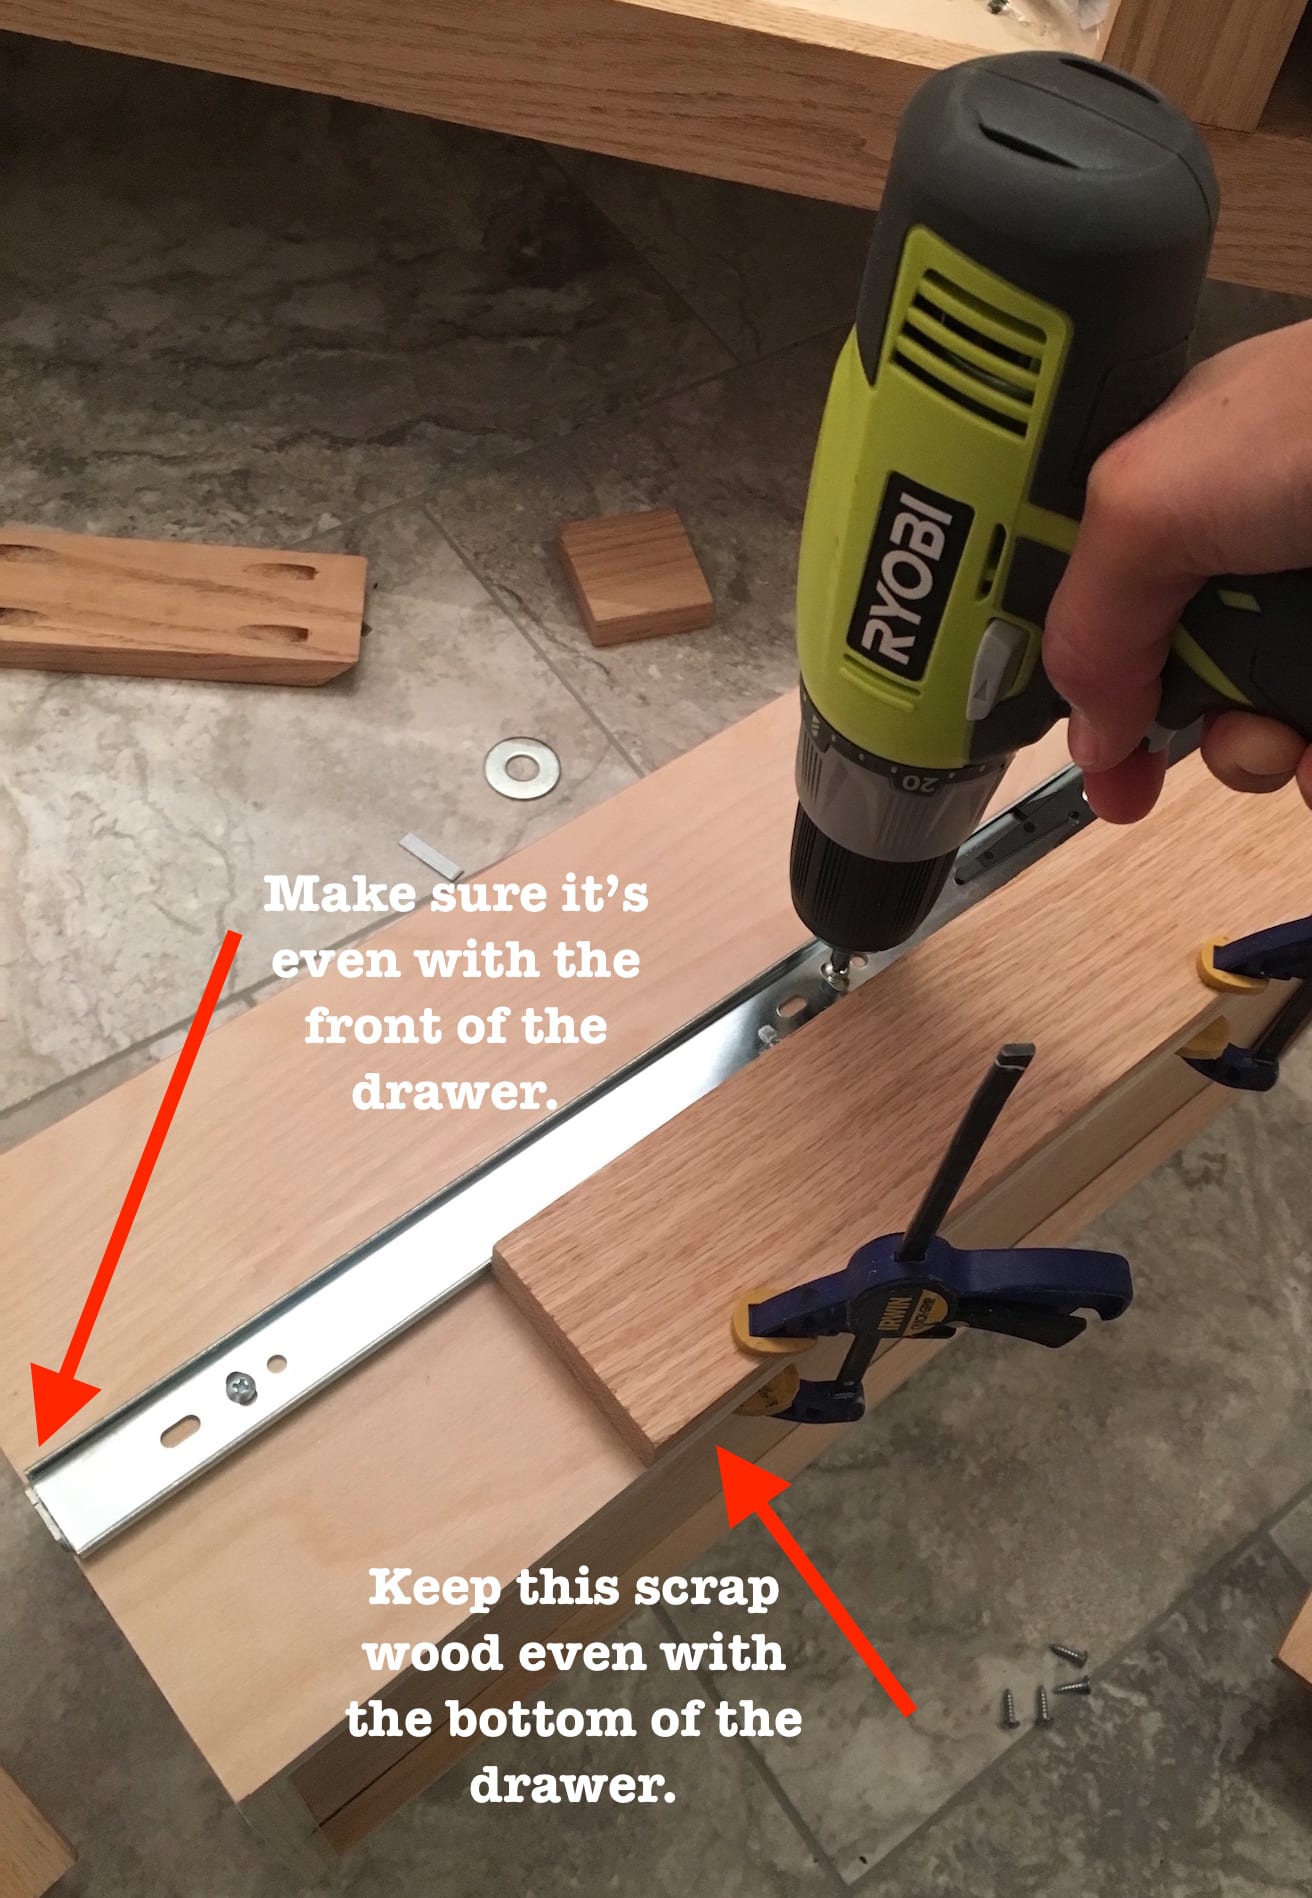
When I was ready to fit the drawer slides into position, I used a scrap piece of wood to hold up the bottom slider, which was the perfect height right over the metal bracket.
And I used the Kreg Drawer Slide Jig with a Kreg clamp to hold up the other one (click here to watch the video on using the drawer slide jig, which was helpful at times).
The slider instructions said to mount each slider 1/8 back from the edge, so I measured and marked, using pencil marks to keep me mindful of it. Keep in mind that if I were doing inset drawers and wanted them flush with the edge of the vanity, I probably would have set these back further. But my drawers weren’t going to be inset, per se. So I just followed the instructions.
Also keep in mind that the slides are designed to allow you to make minor adjustments if needed because of the way the slides are designed with oblong screw holes.
I won’t get into all the nitty-gritty details about how to install them because this post is already soooo long. (Are you still even reading?? 😉 LOL). This video on YouTube on How to Install Drawer Slides in Cabinets helped me see how they were installed, which was easy to follow.
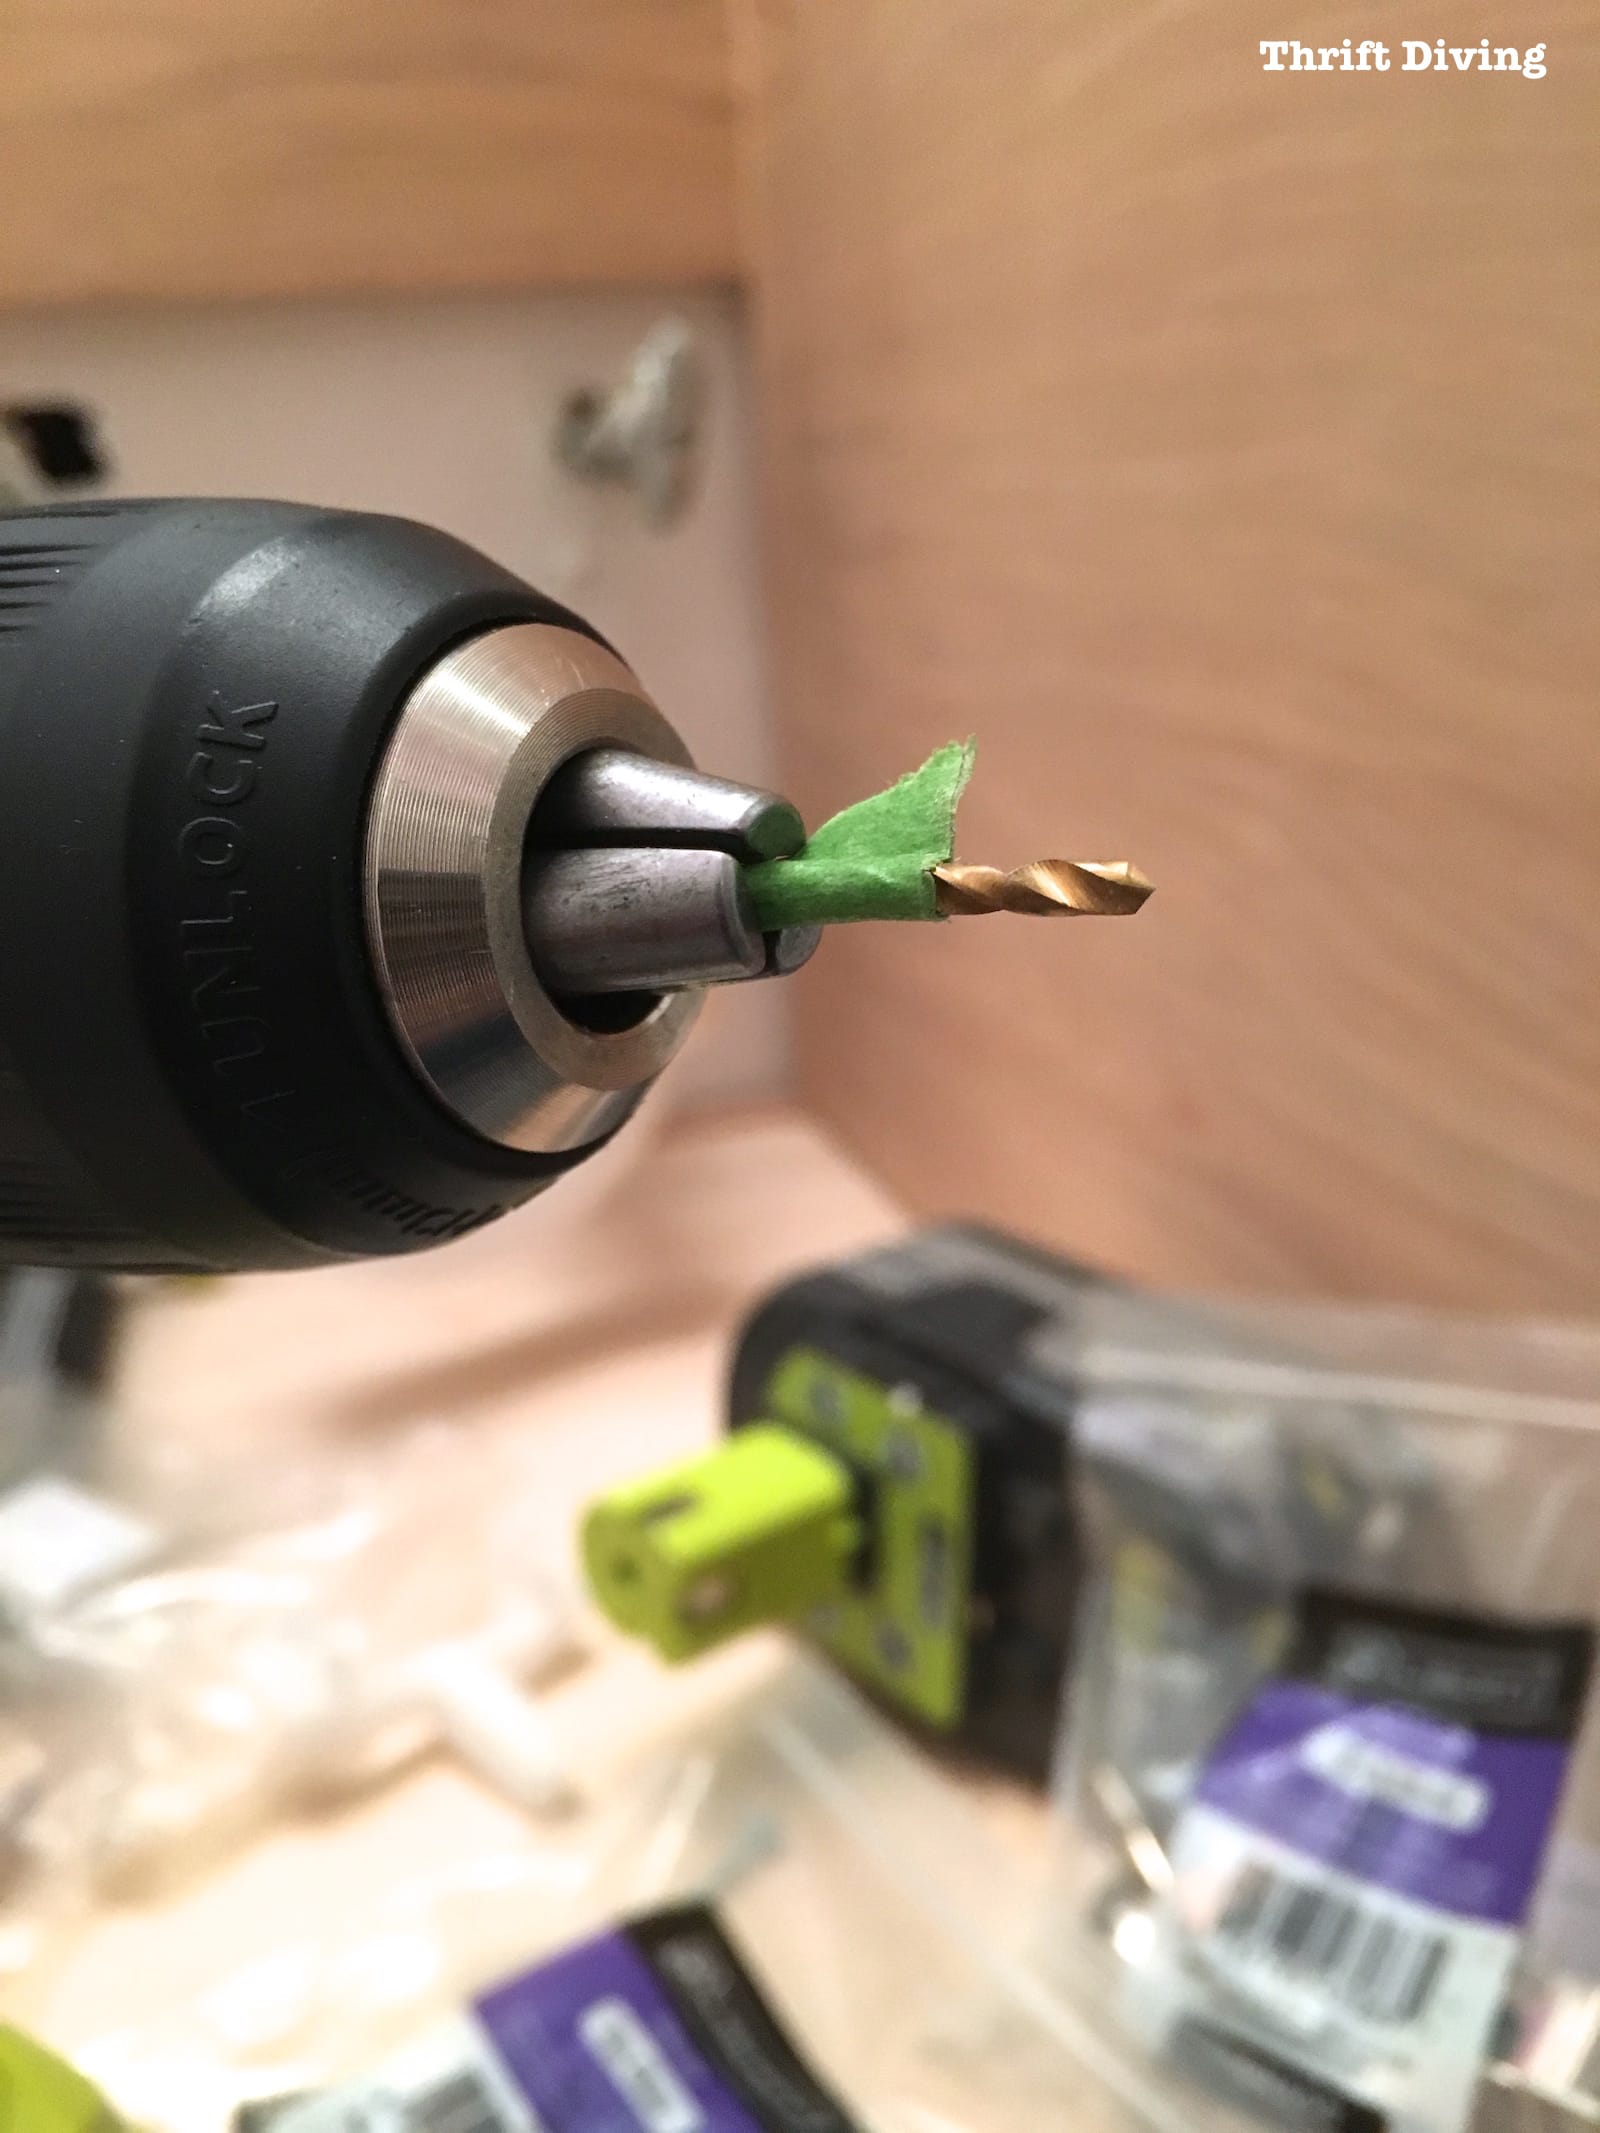
The important thing to point out, though: I drilled small pilot holes first before inserting any screws into the vanity. Red Oak can be finicky and crack if you try to drill into it without pre-drilling pilot holes.
I just put a little tape on the drill bit as a visual reminder of when to STOP drilling so I didn’t drill all the way through. 🙂 Love that trick!
To install the slider, remove the part that will be attached to the drawer (see instructions on the slider directions if you need help with that) and only install the part that will be adhered to the vanity wall.
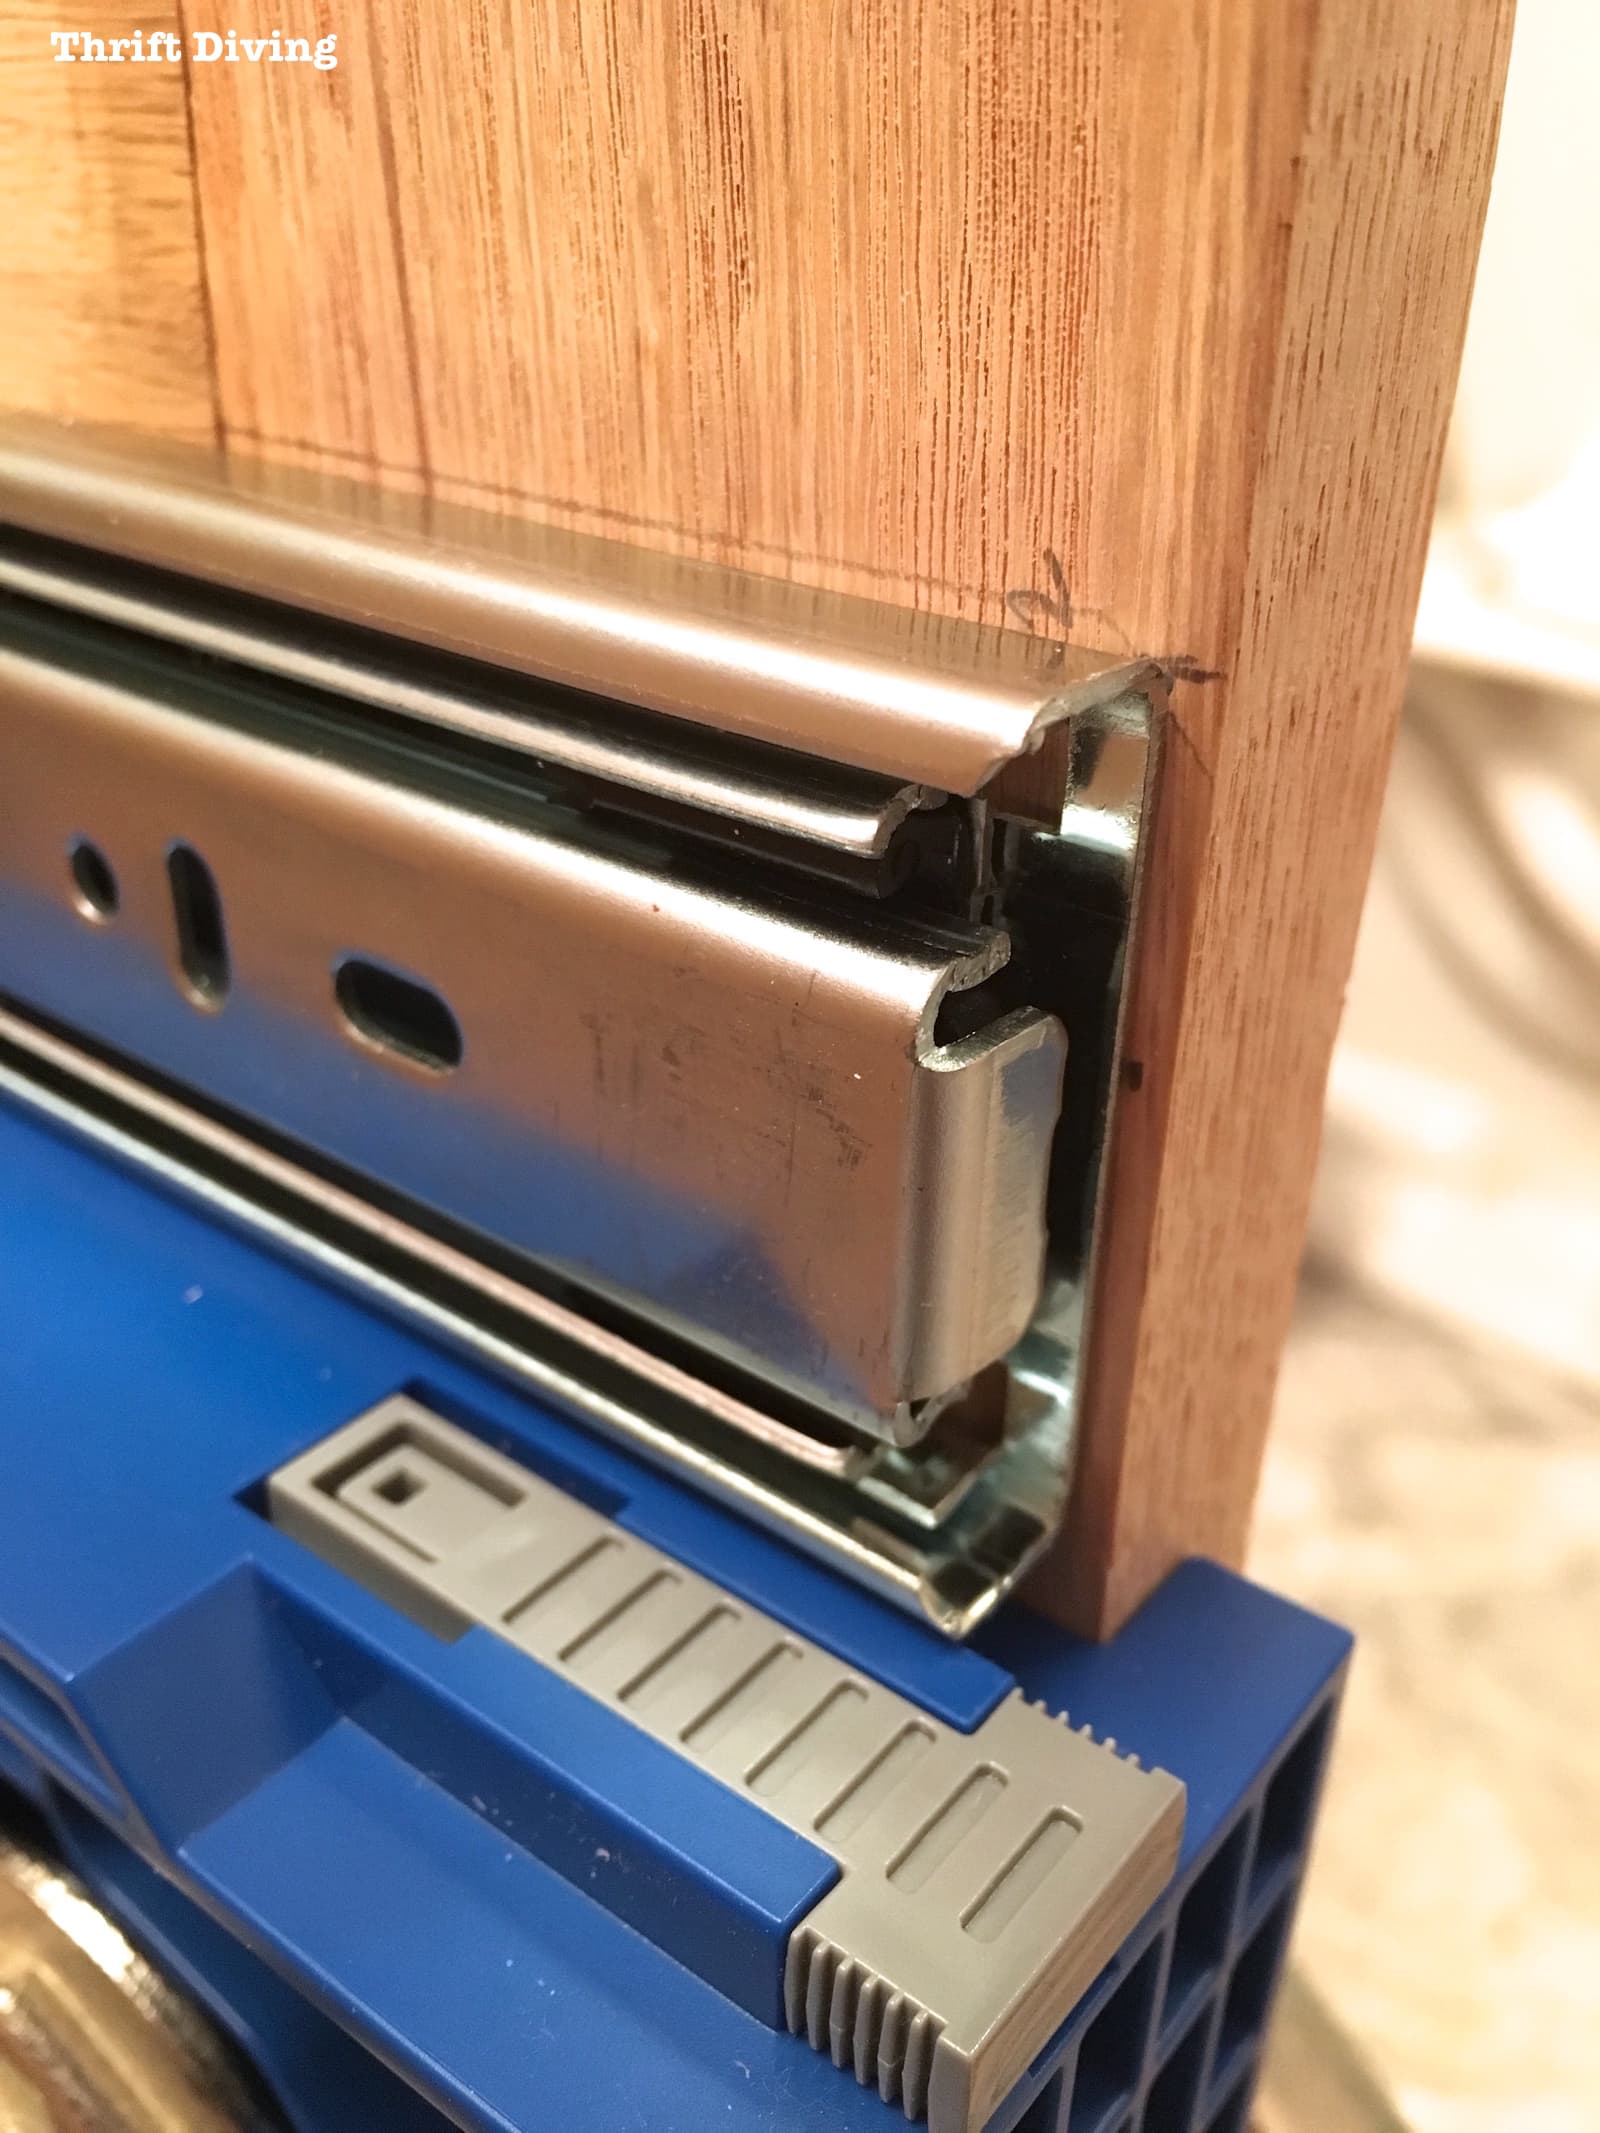
Using my RYOBI power drill, I used the screws that came with the slider, and following the instructions, placed the screws where they told me to, making sure that the slider stayed 1/8th of an inch from the edge.
I was pretty proud when I saw these two were installed with no issues.
Just be sure to use a small level and check that you installed them straight!
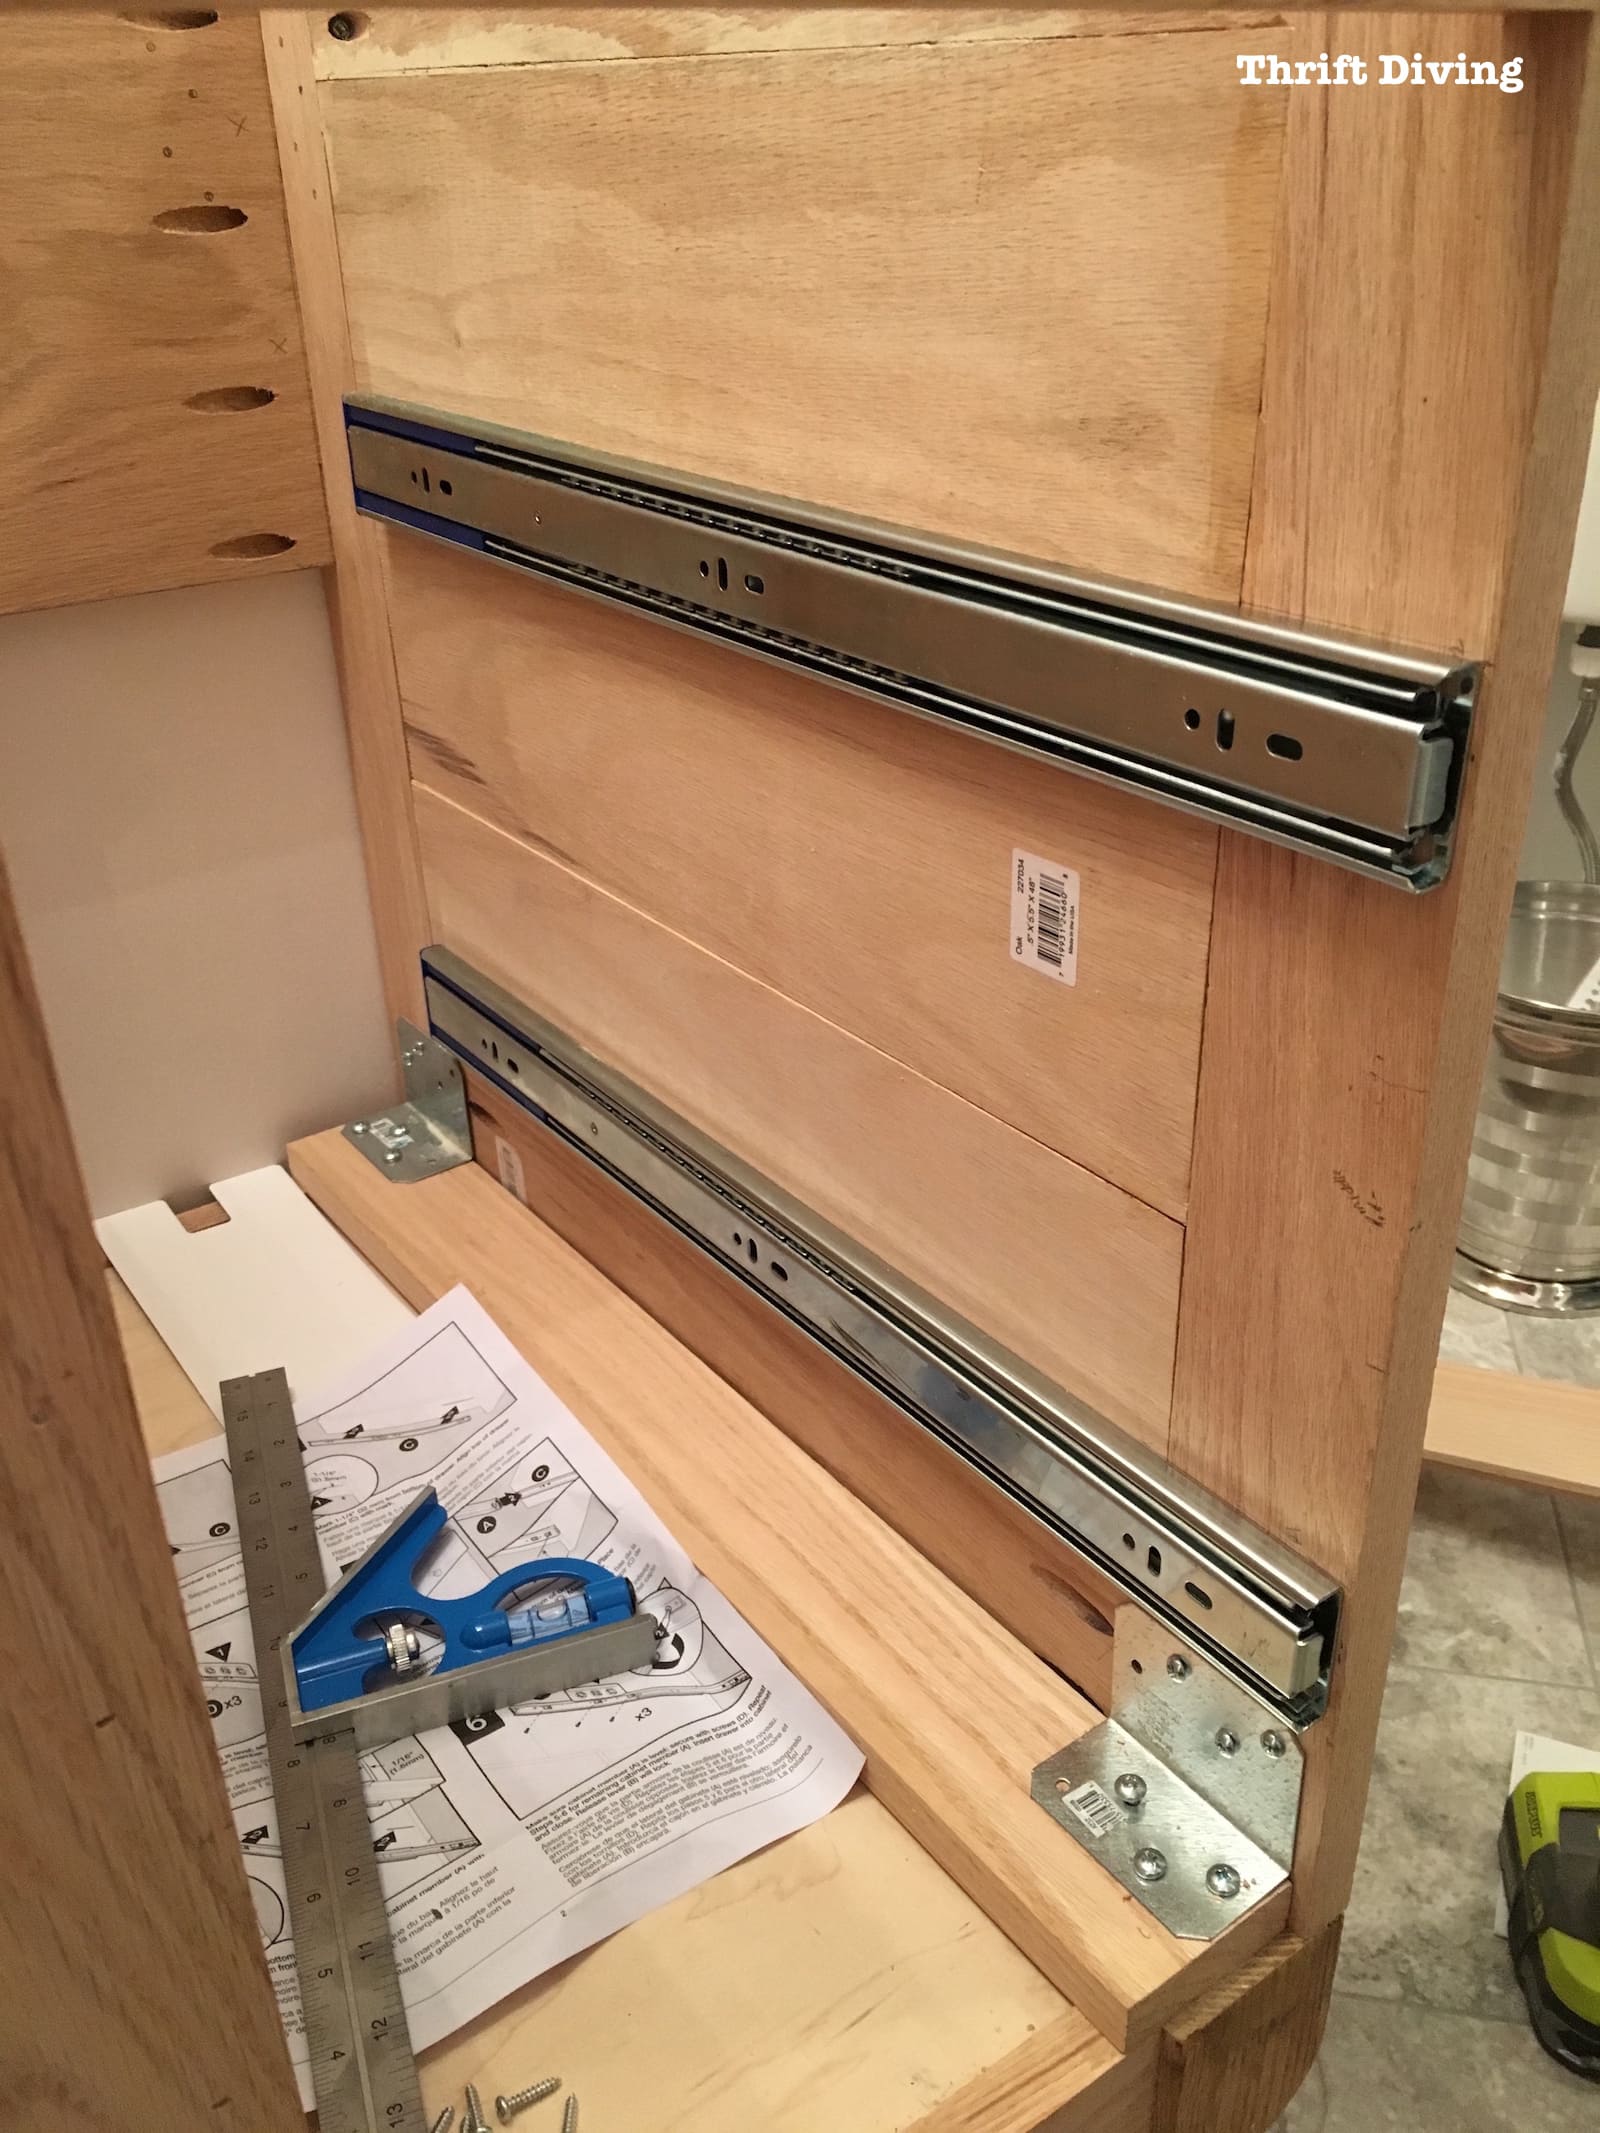
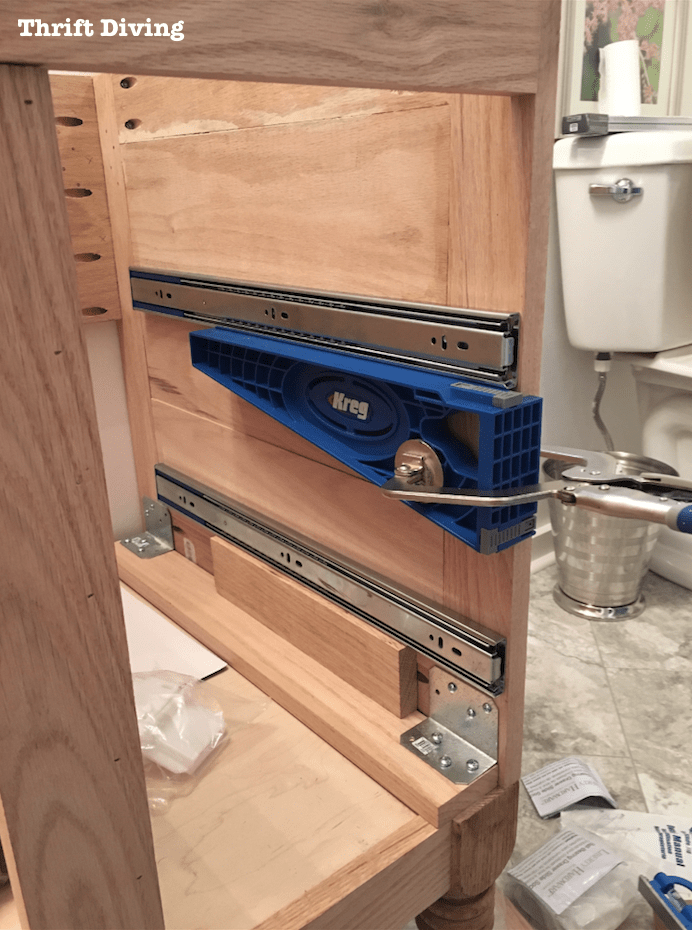
I went ahead and installed the other two on the other side.
But what I did differently was to use whatever scrap wood and washers to help hold up the drawer slide so that it was level with the other one.
I’ll admit, it was quite a contraption! LOL
I used my level multiple times to make sure it was level, then screwed it into place.
The same process was used for the other two drawers on the other side of the DIY vanity, as well.
The level showed me that the two parallel slides were even.
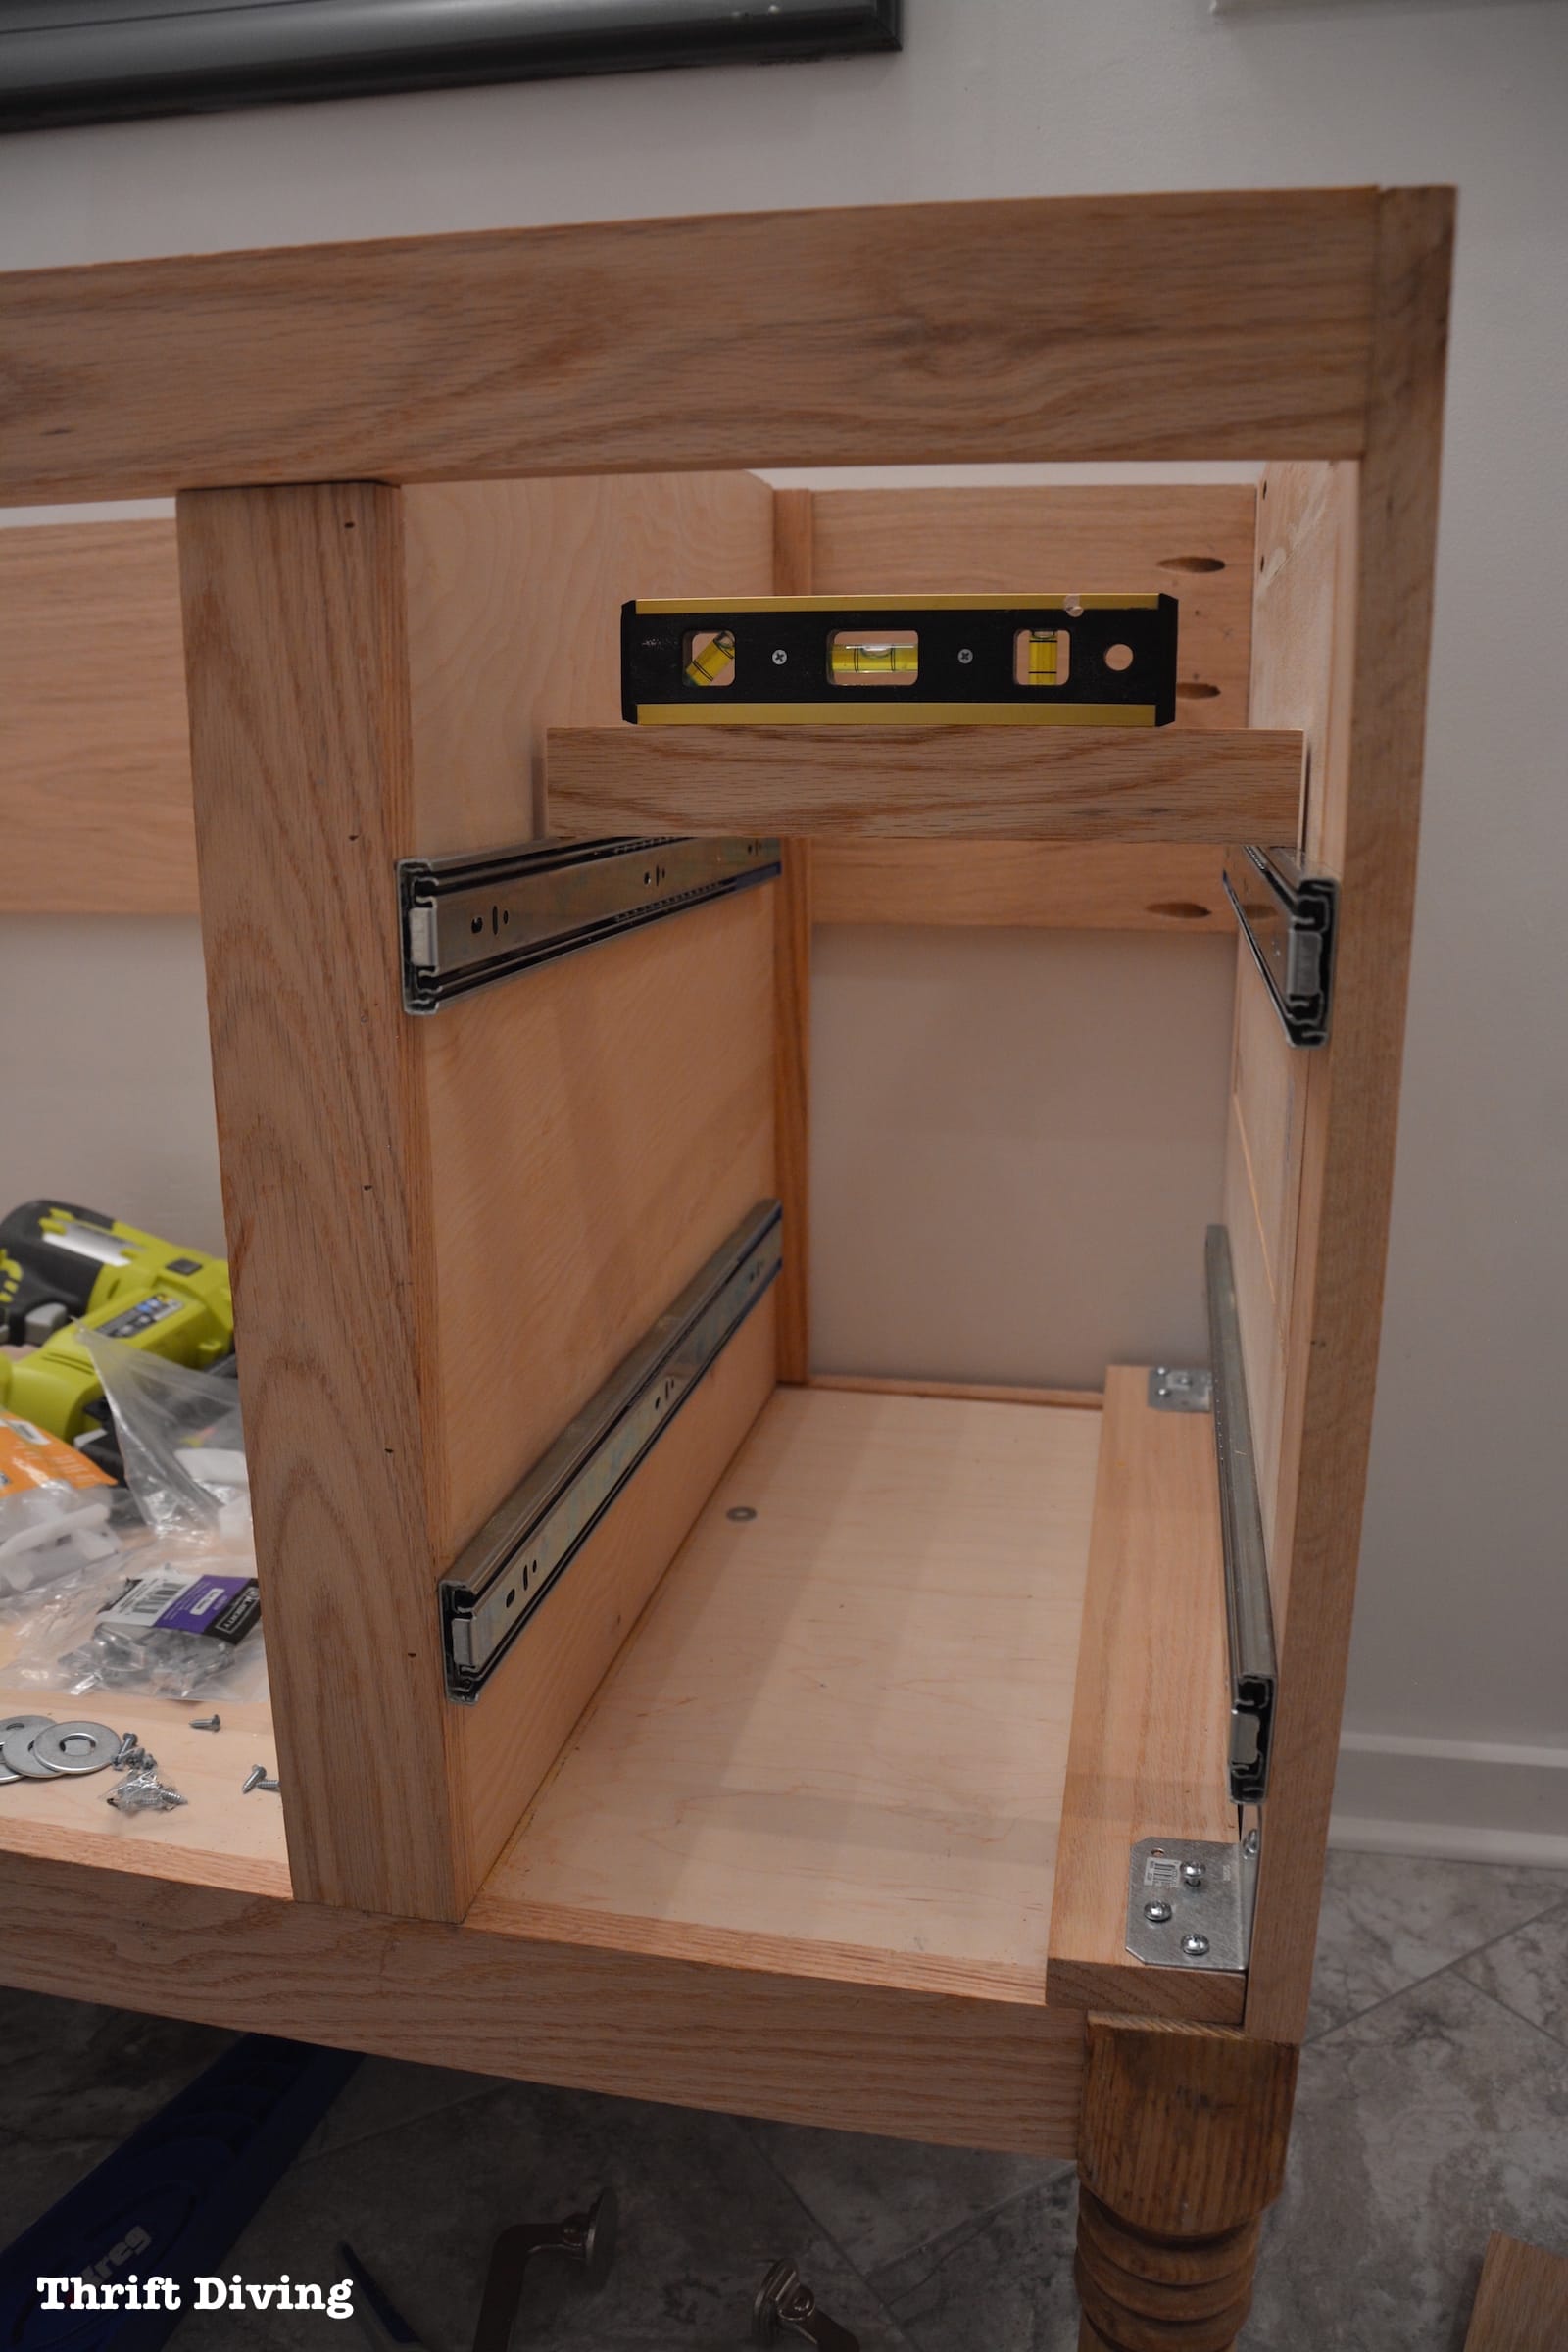
This method of using scraps to hold up the sliders worked well because after all the sliders were installed and checked for level, I was pleasantly surprised to see that they were all pretty straight!
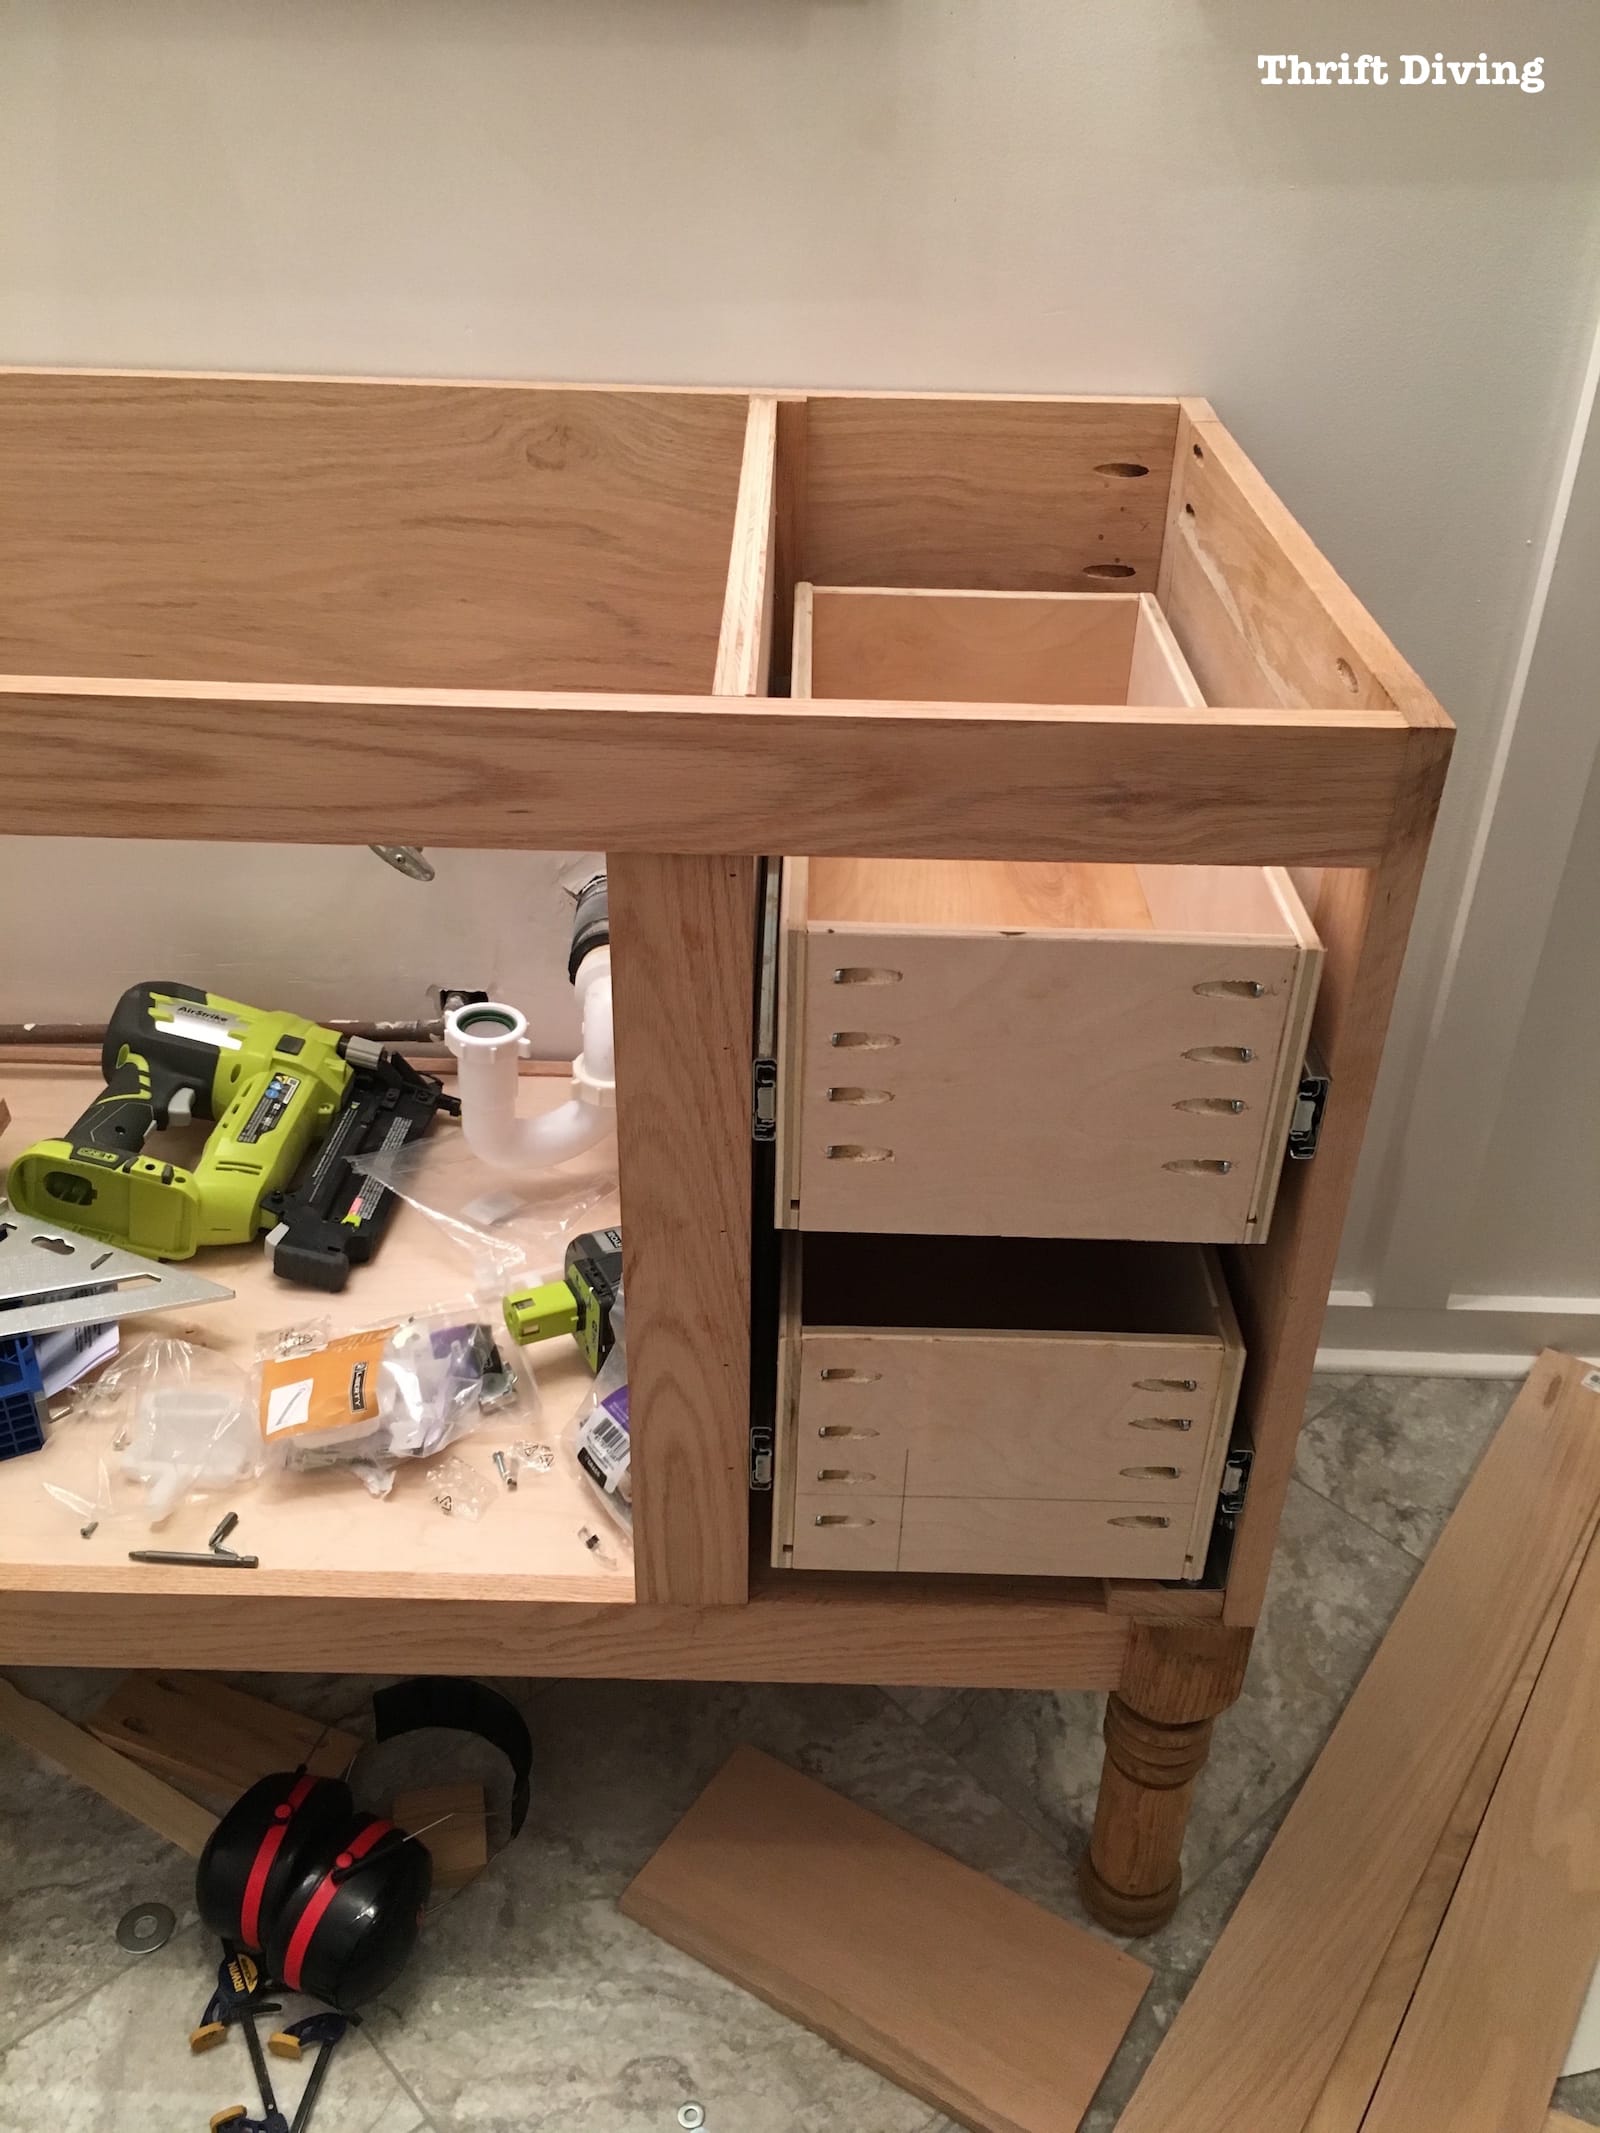
STEP 3: Creating the Drawers
After the drawer slides were installed, I could start creating the drawers.
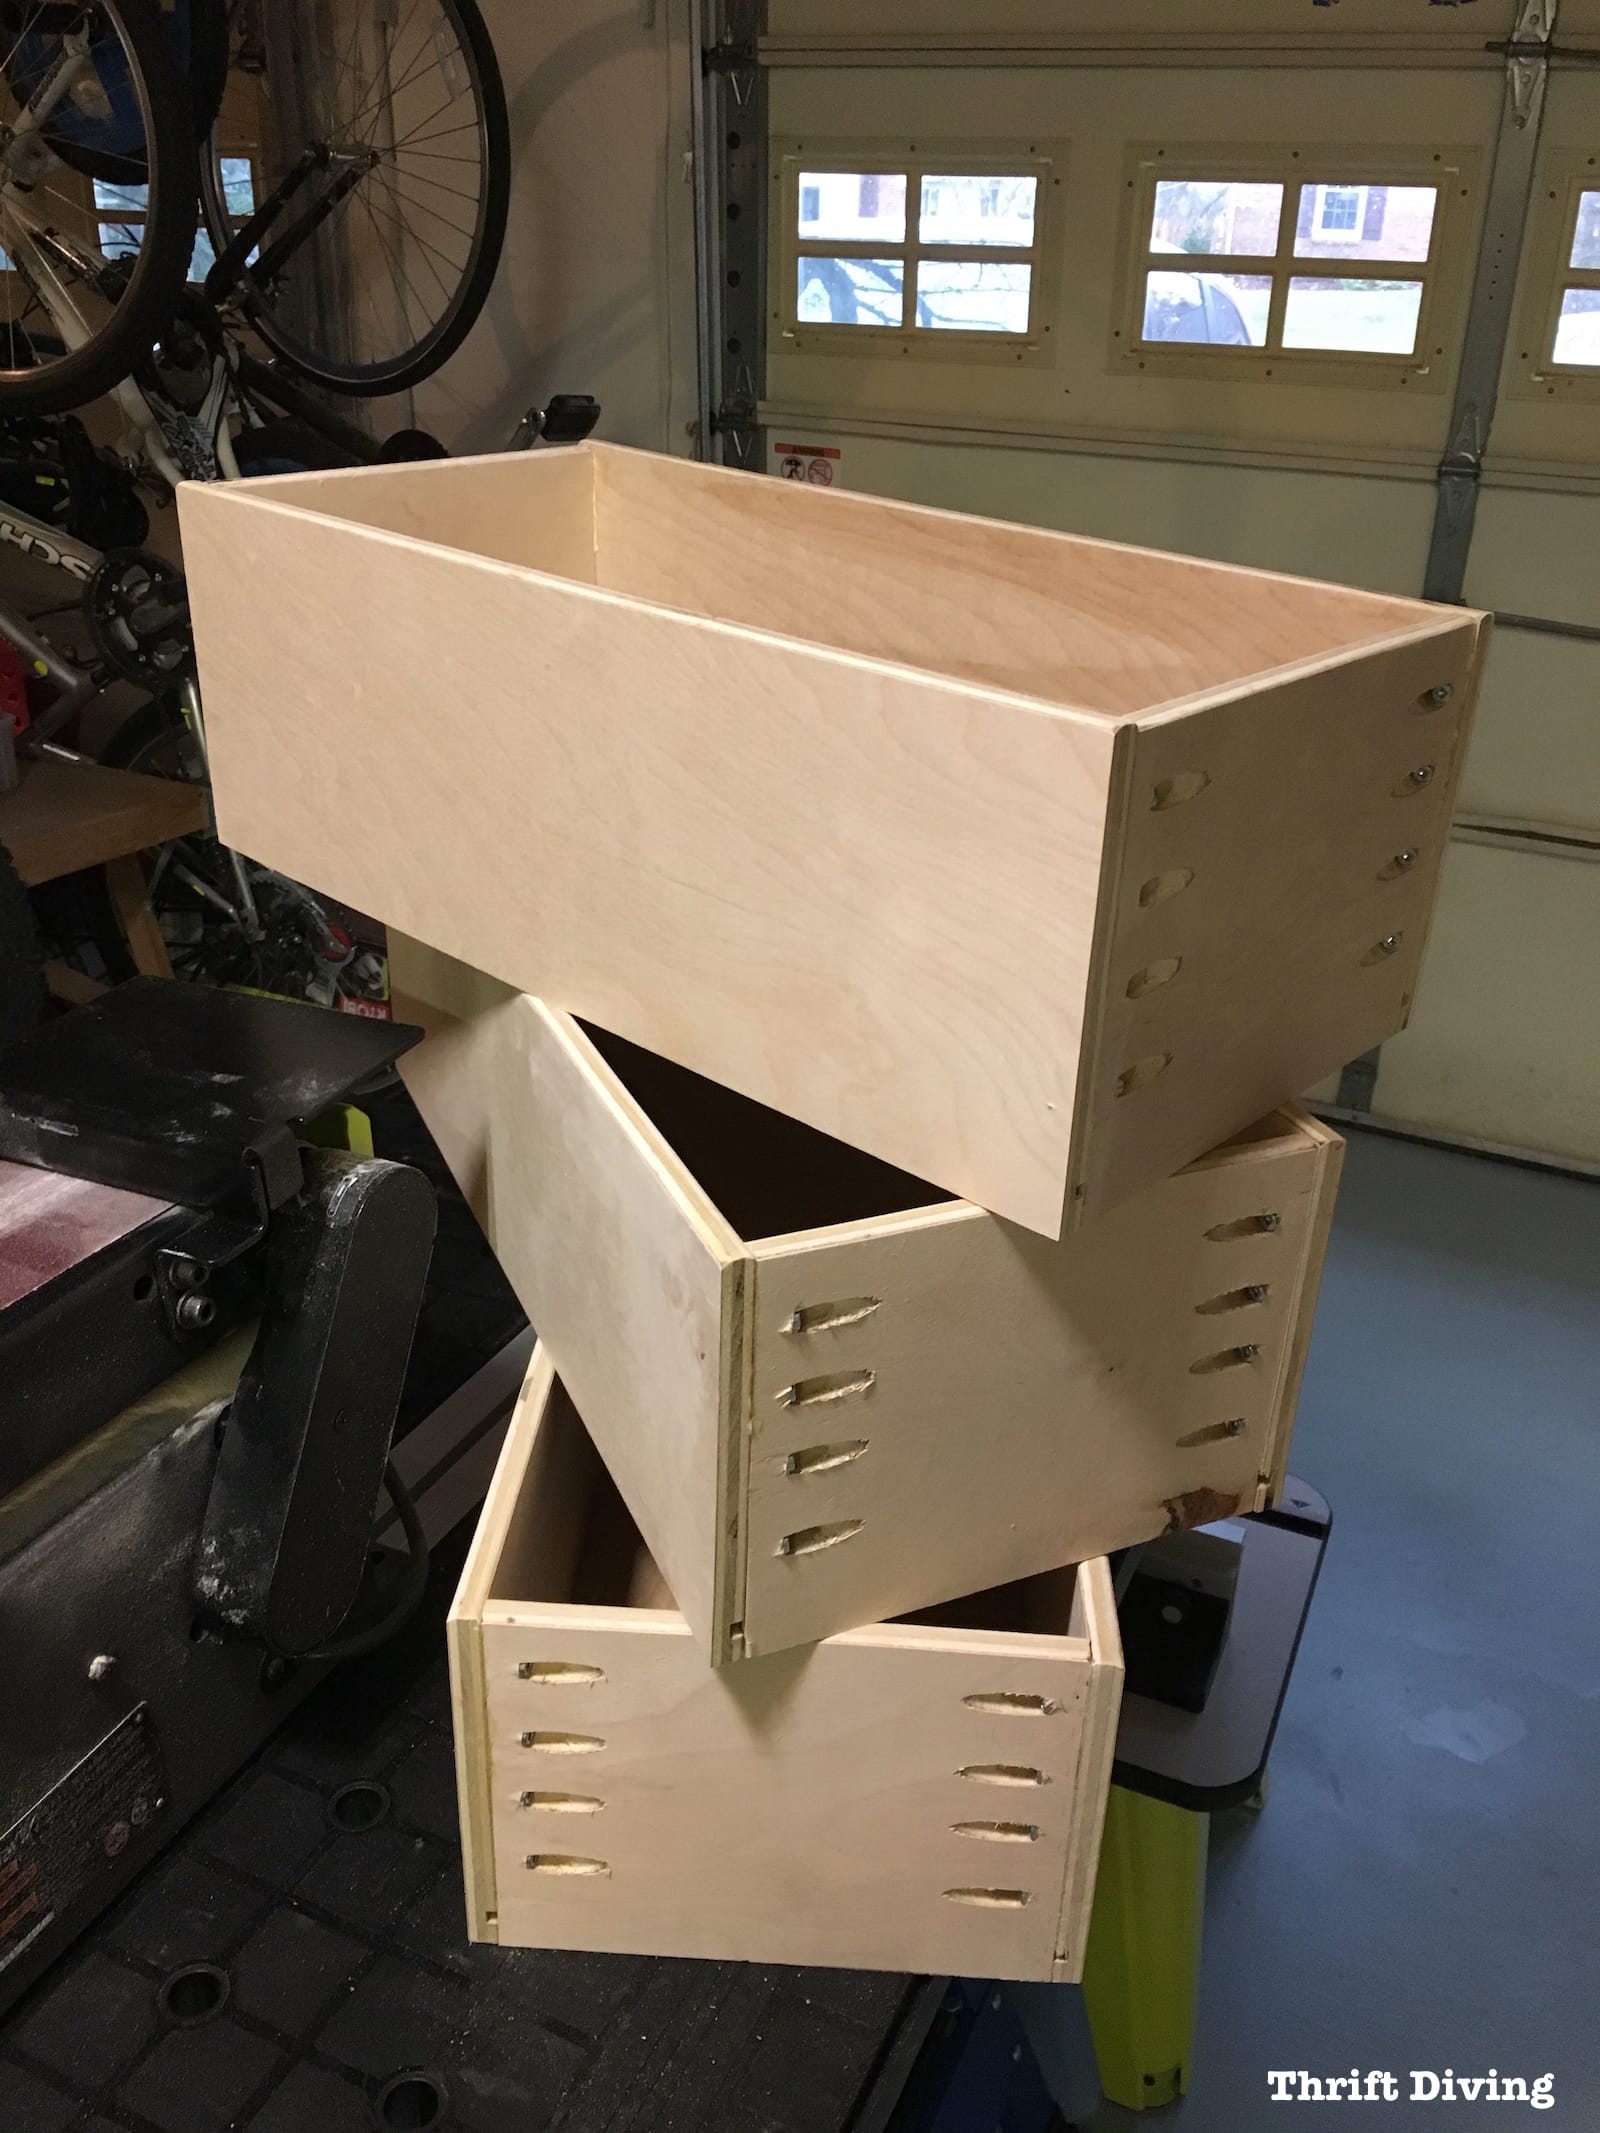
I decided to do one “test” drawer first to make sure I knew what I was doing! LOL. I figured if it fit, I could continue and make the remaining three drawers.
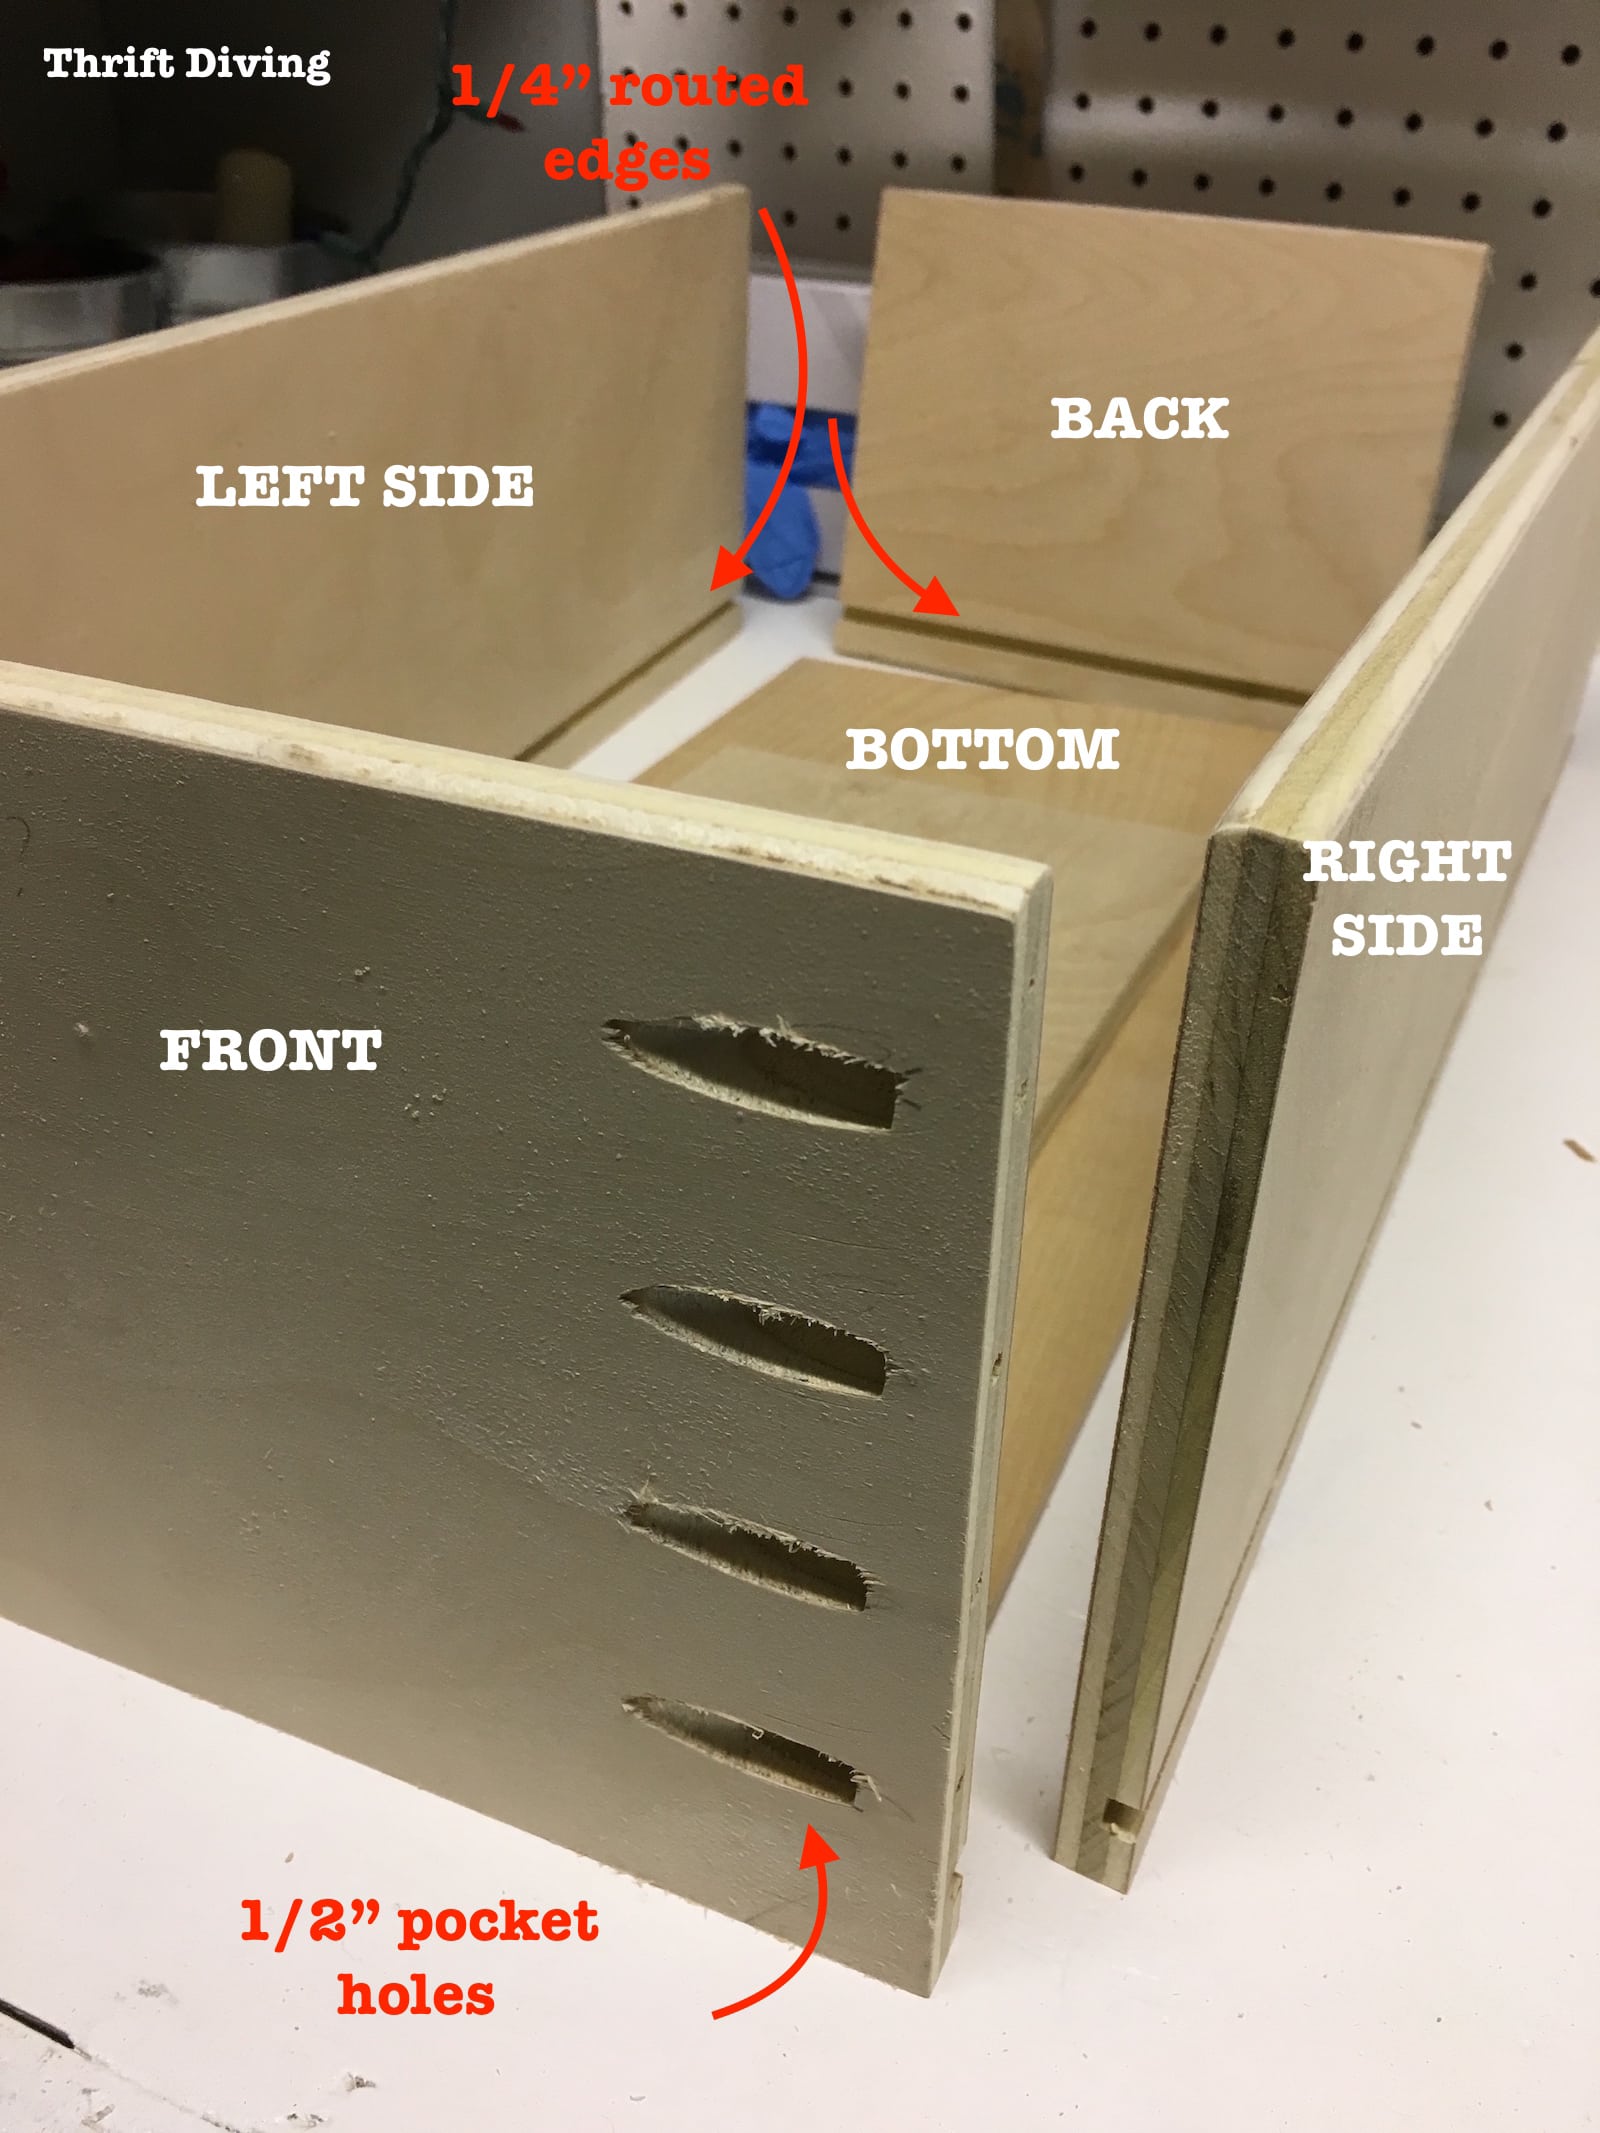
Essentially, these were the parts of a drawer, using 1/2″ thick birch plywood for the sides, front, and back, and 1/4″ thick plywood for the bottom of the drawer, which slid into little grooves that I cut for it.
(Oops! The pic below shows the Right Side turned backward. Make sure it’s turned inwards).
Let me walk you through the steps I took for creating the drawer.
Measuring For Drawers
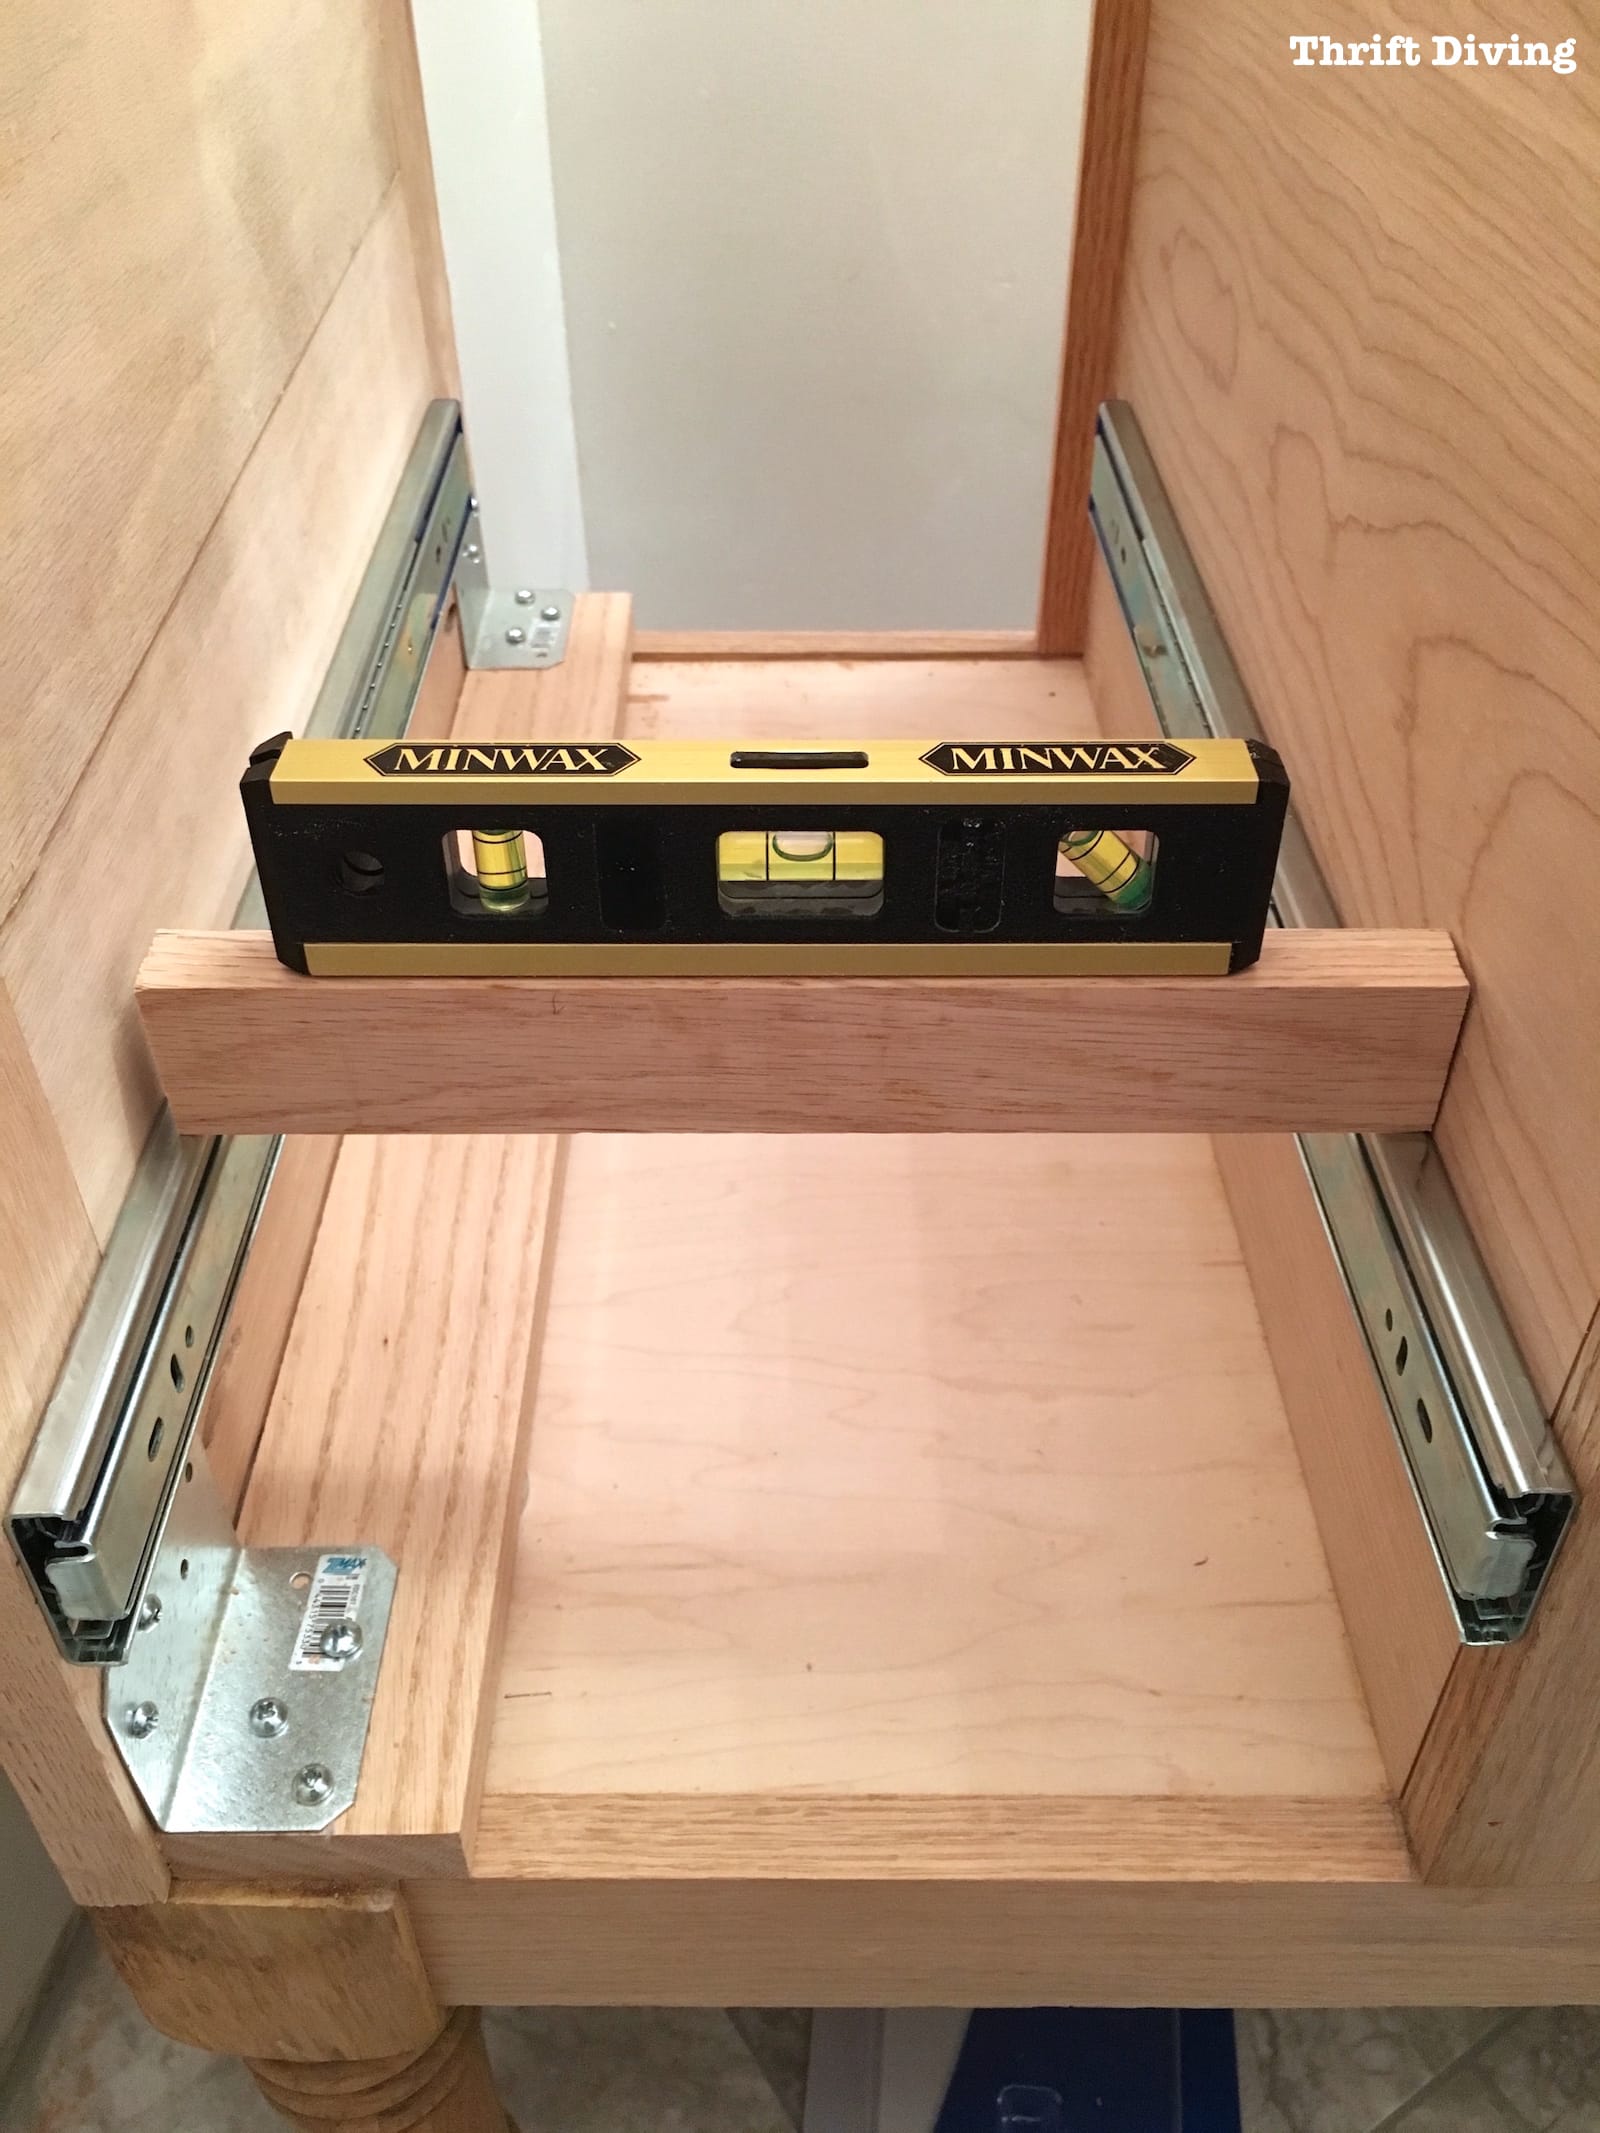
Now that I had my drawer slides installed, I could then figure out how wide to create my DIY vanity drawers.
With the drawer slides in place, I measured from drawer slide to drawer slide, like you see below.
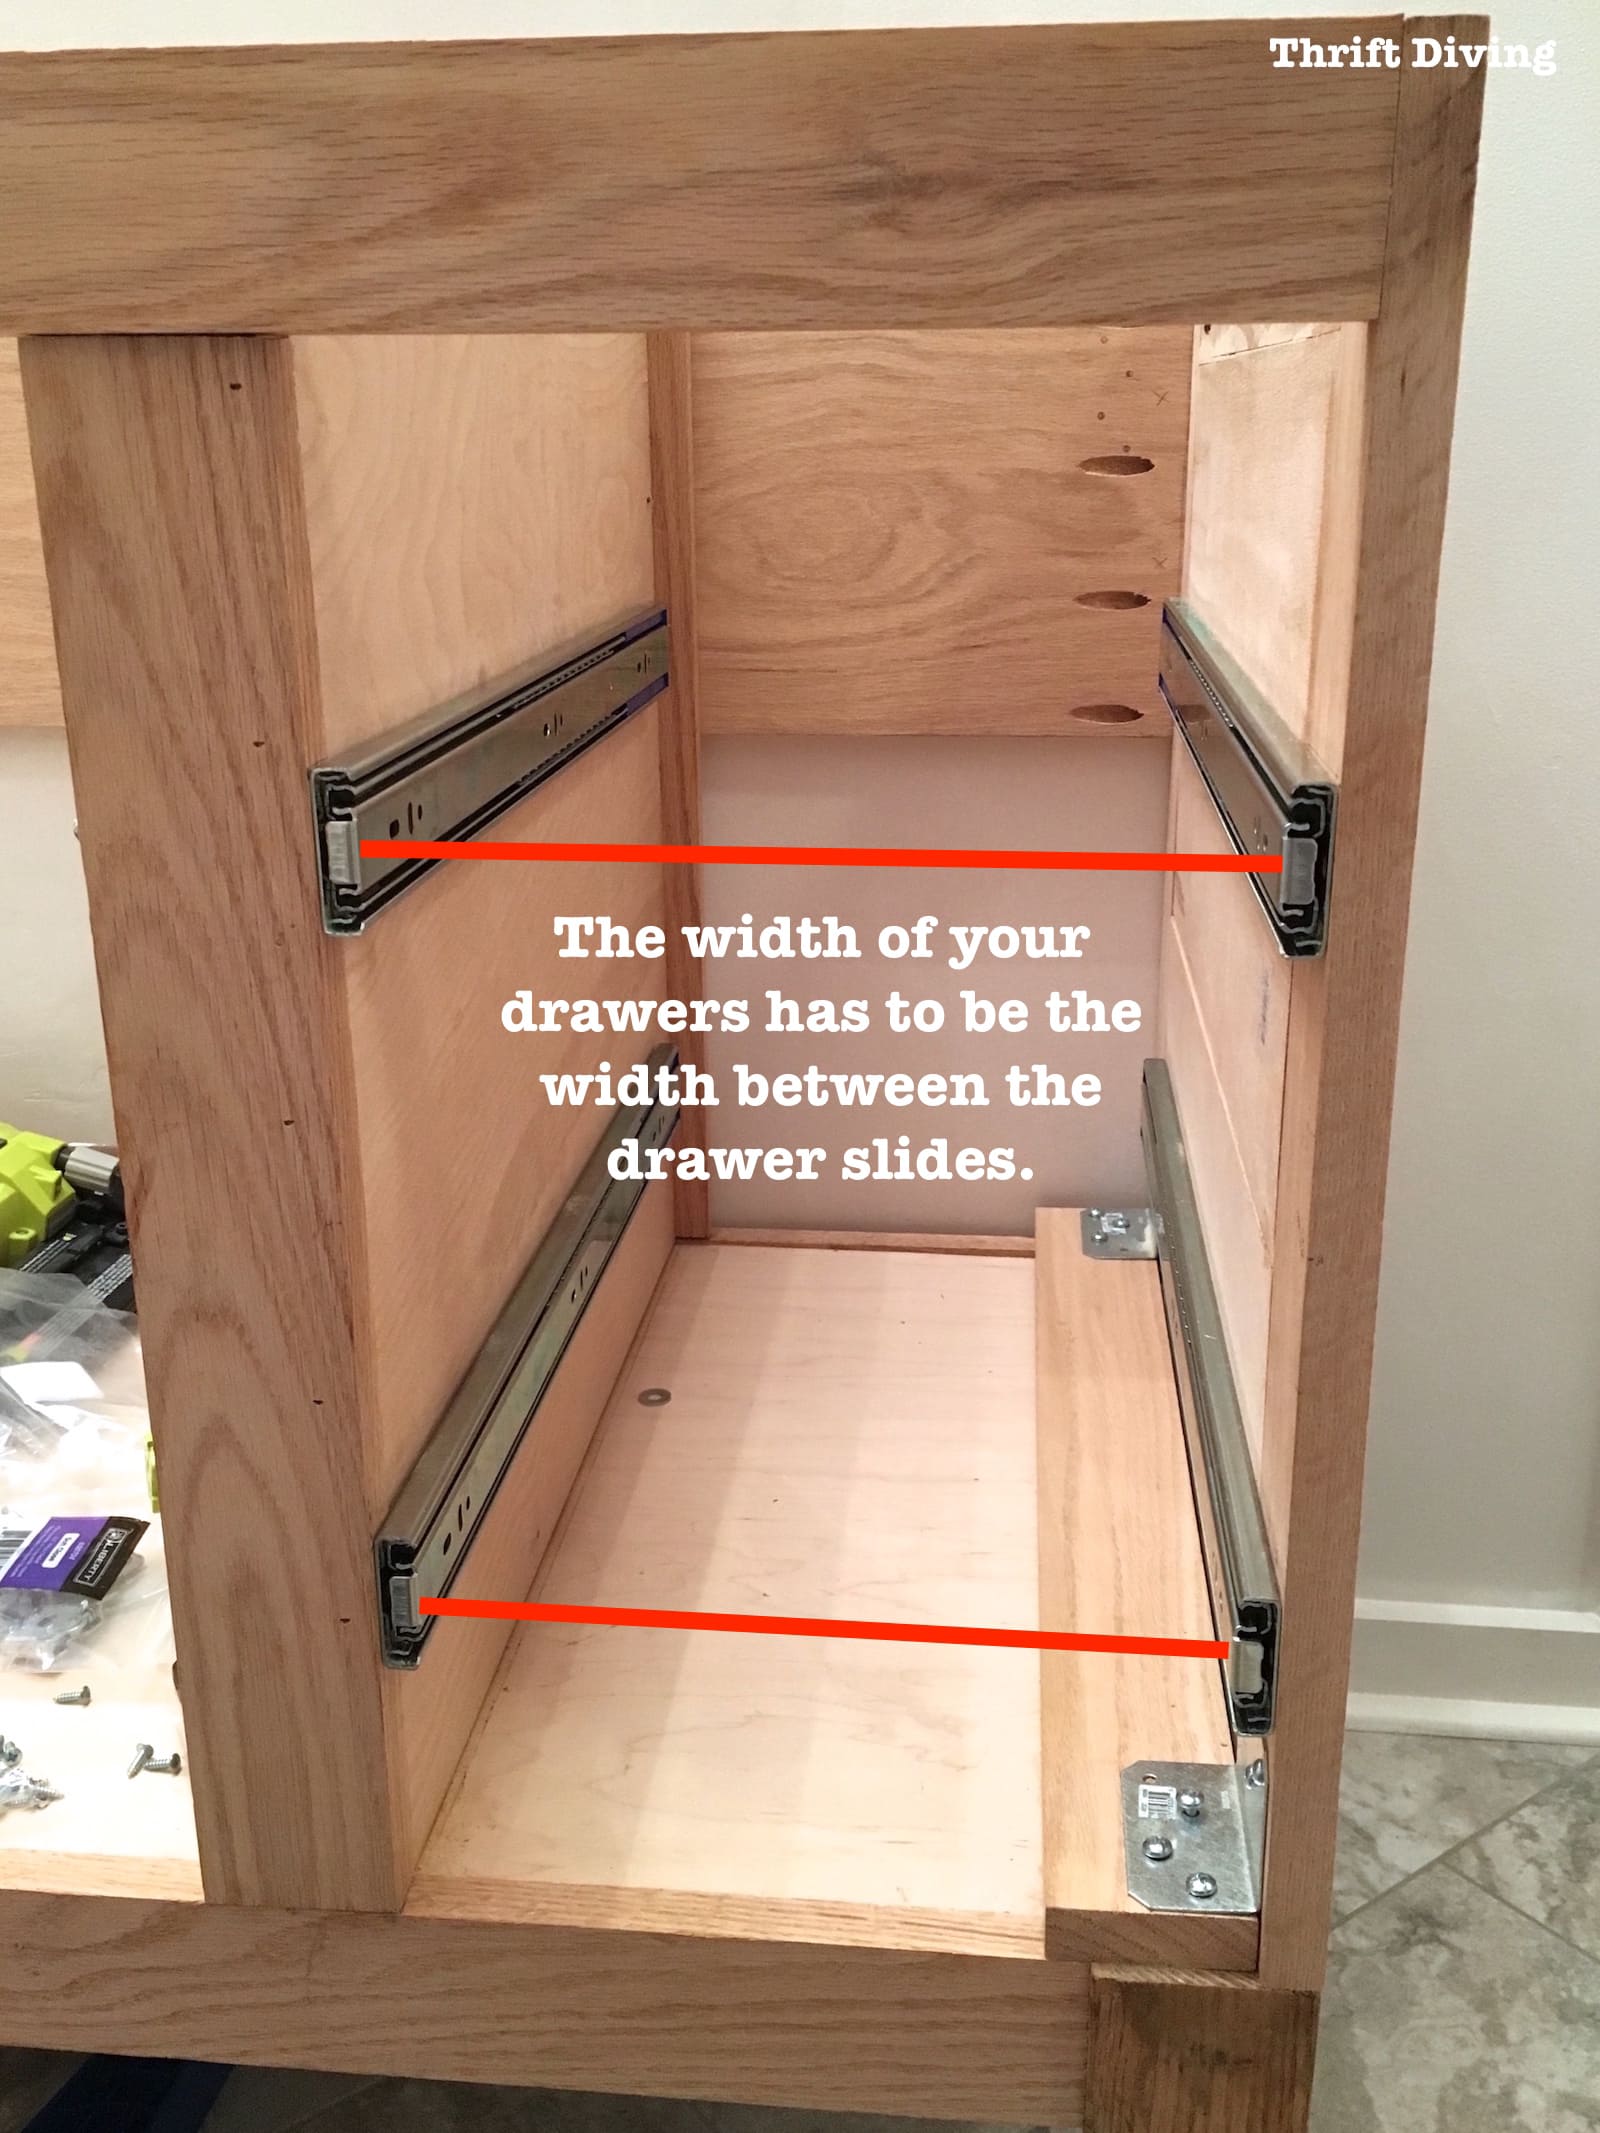
I won’t bother you with the exact measurements since I don’t even remember at this point. LOL Plus, your vanity will likely be different than mine, so you’ll have your own measurements.
But the process is the same: the width of your drawers will be the width between the drawer sliders.
The length of my drawers was going to be the length of the drawer slides.
Cutting and Routing the Drawers
I used a circular saw to cut pieces of plywood.
Then I used a router with a straight router bit to create a 1/4″ groove in my sides, front, and back pieces. The groove looks similar to this:
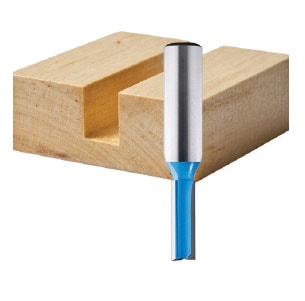
For each of the four pieces of wood I cut (two sides, a front, and a back), I routed the groove about 1″ from the bottom of the pieces on my RYOBI router table, which uses a RYOBI router mounted to the bottom.
And on the front of each drawer front, I created pocket holes, using my Kreg pocket hole jig.
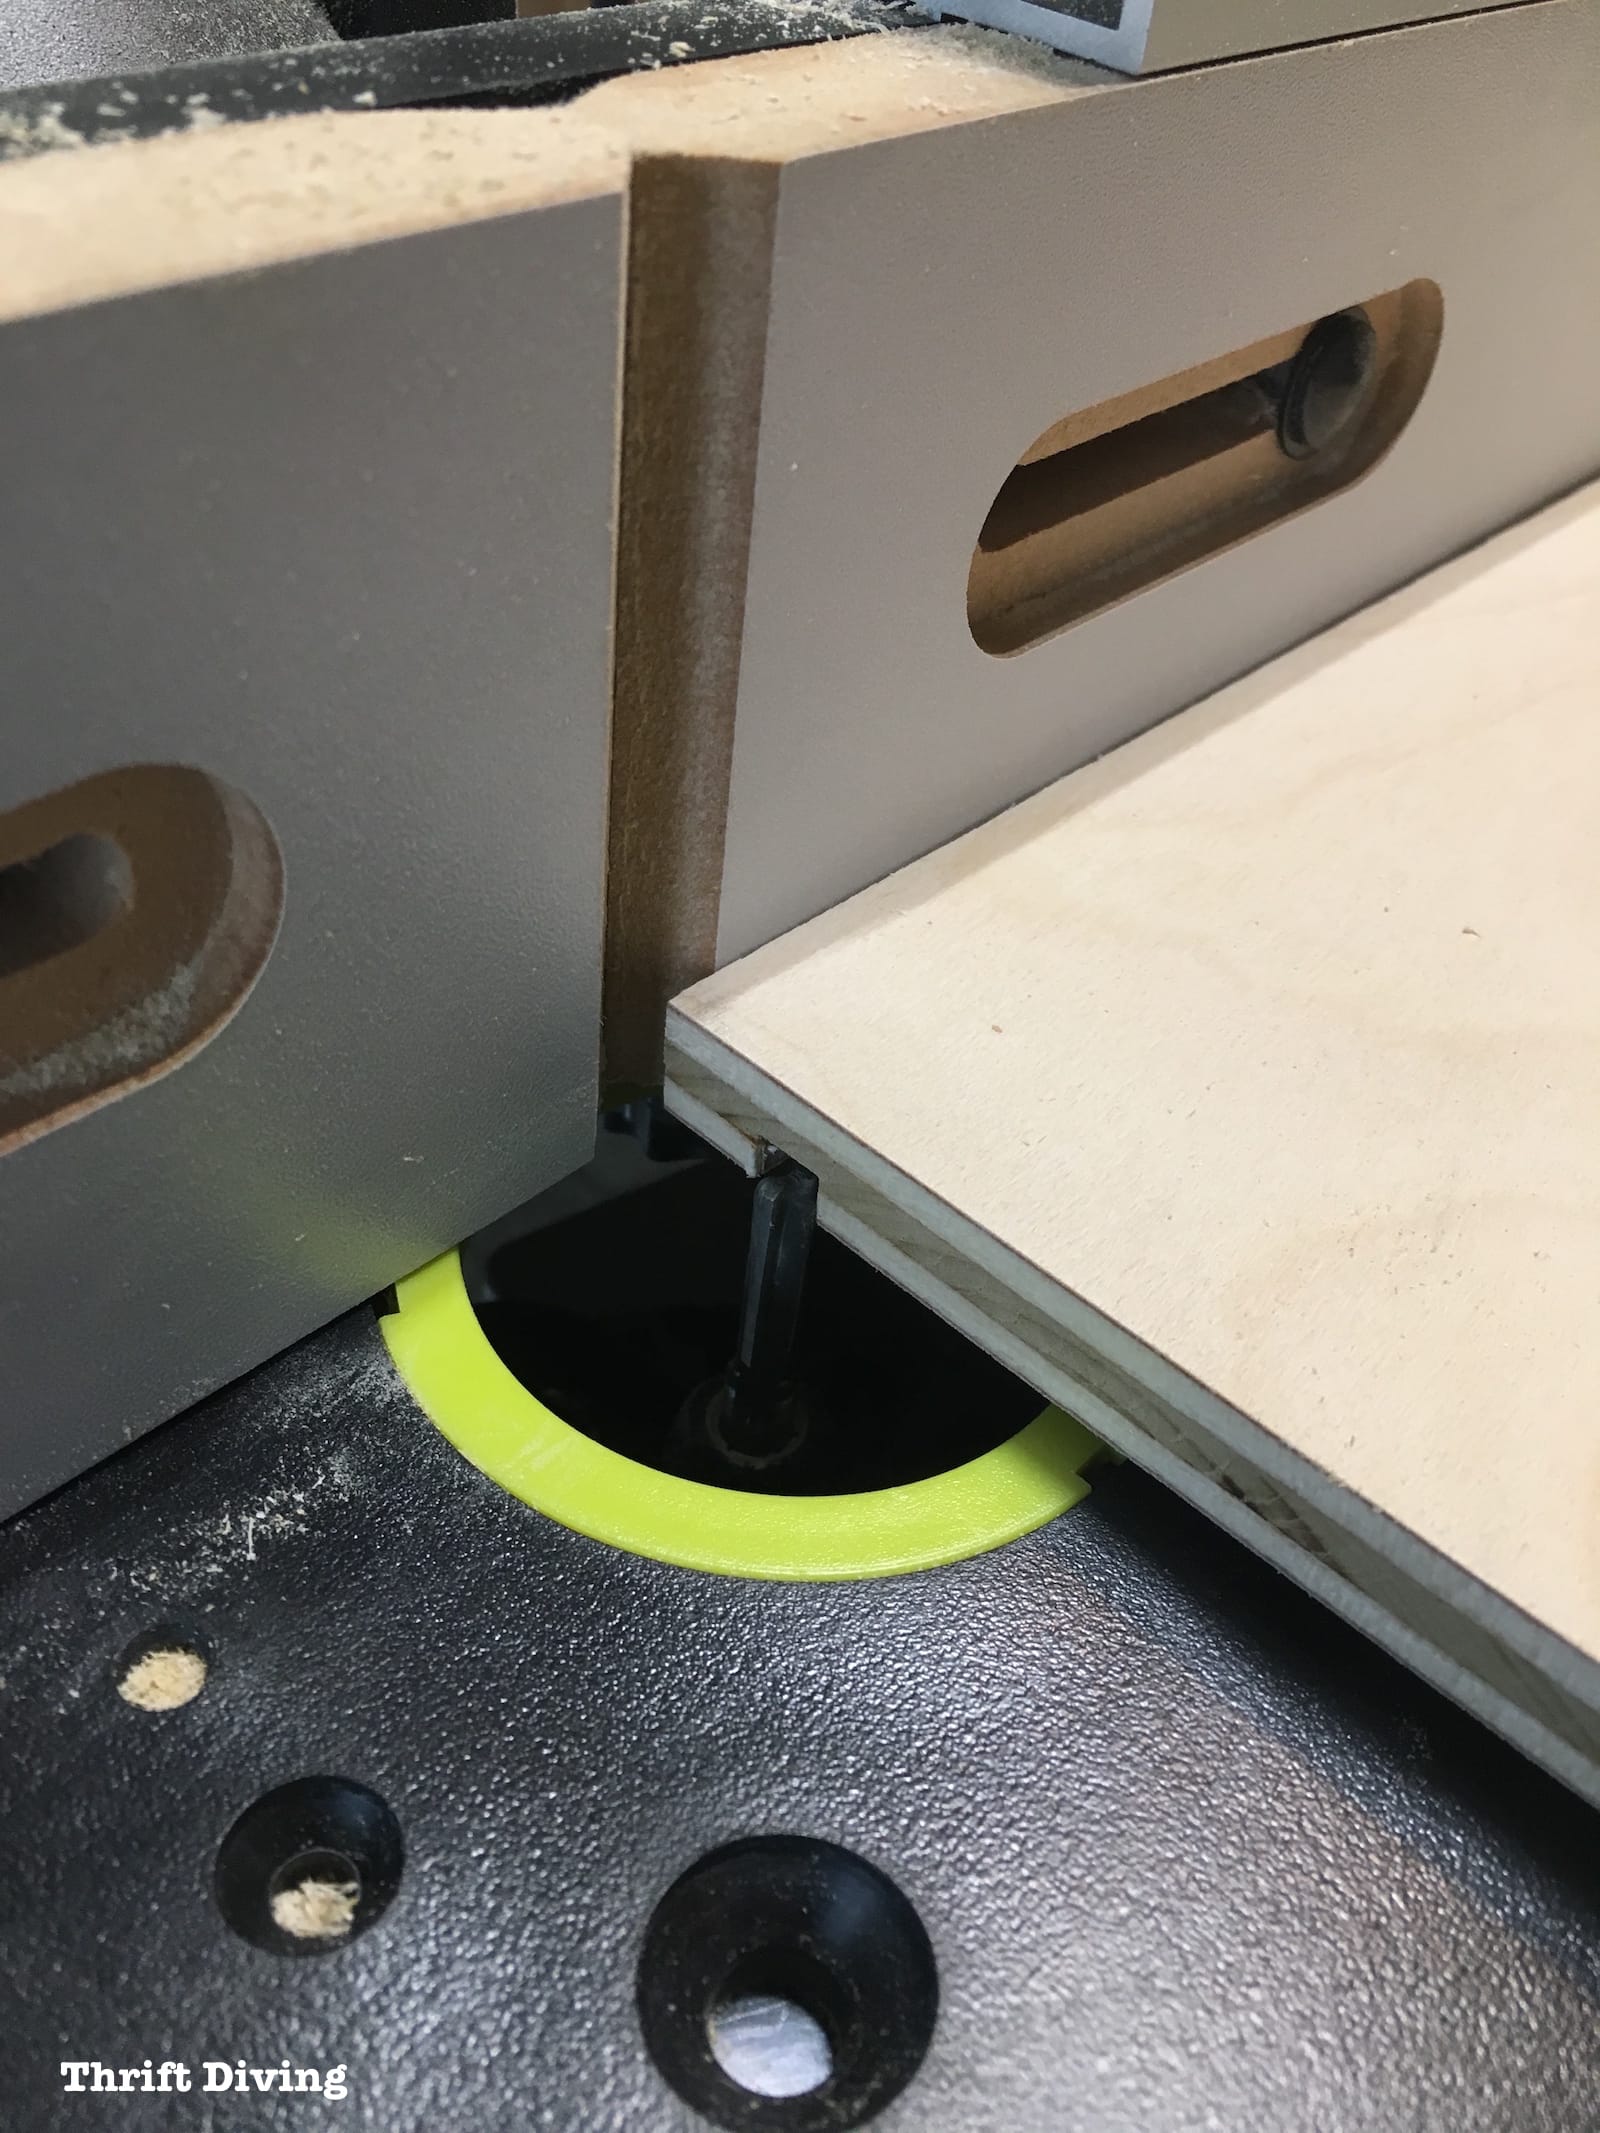
I also used a round over router bit to round out the edges of the drawer. You could easily round with sandpaper and use only glue to create these drawer boxes if you didn’t have a router.
Most drawers that are professionally done will have nice, rounded edges, I learned in my research on “drawer making.” 🙂
I stood up the drawer on its front and started gluing all the parts together.
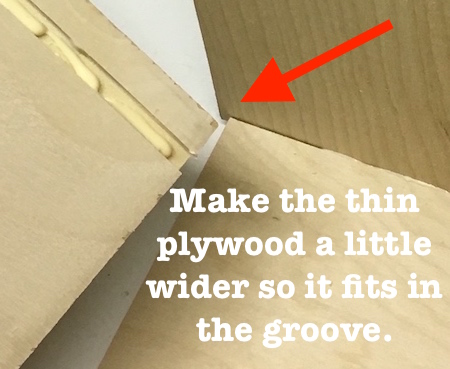
These grooves allowed the thin plywood bottom to slide right in, creating a nice looking drawer. I used wood glue in the groove to make sure the bottom plywood stayed put.
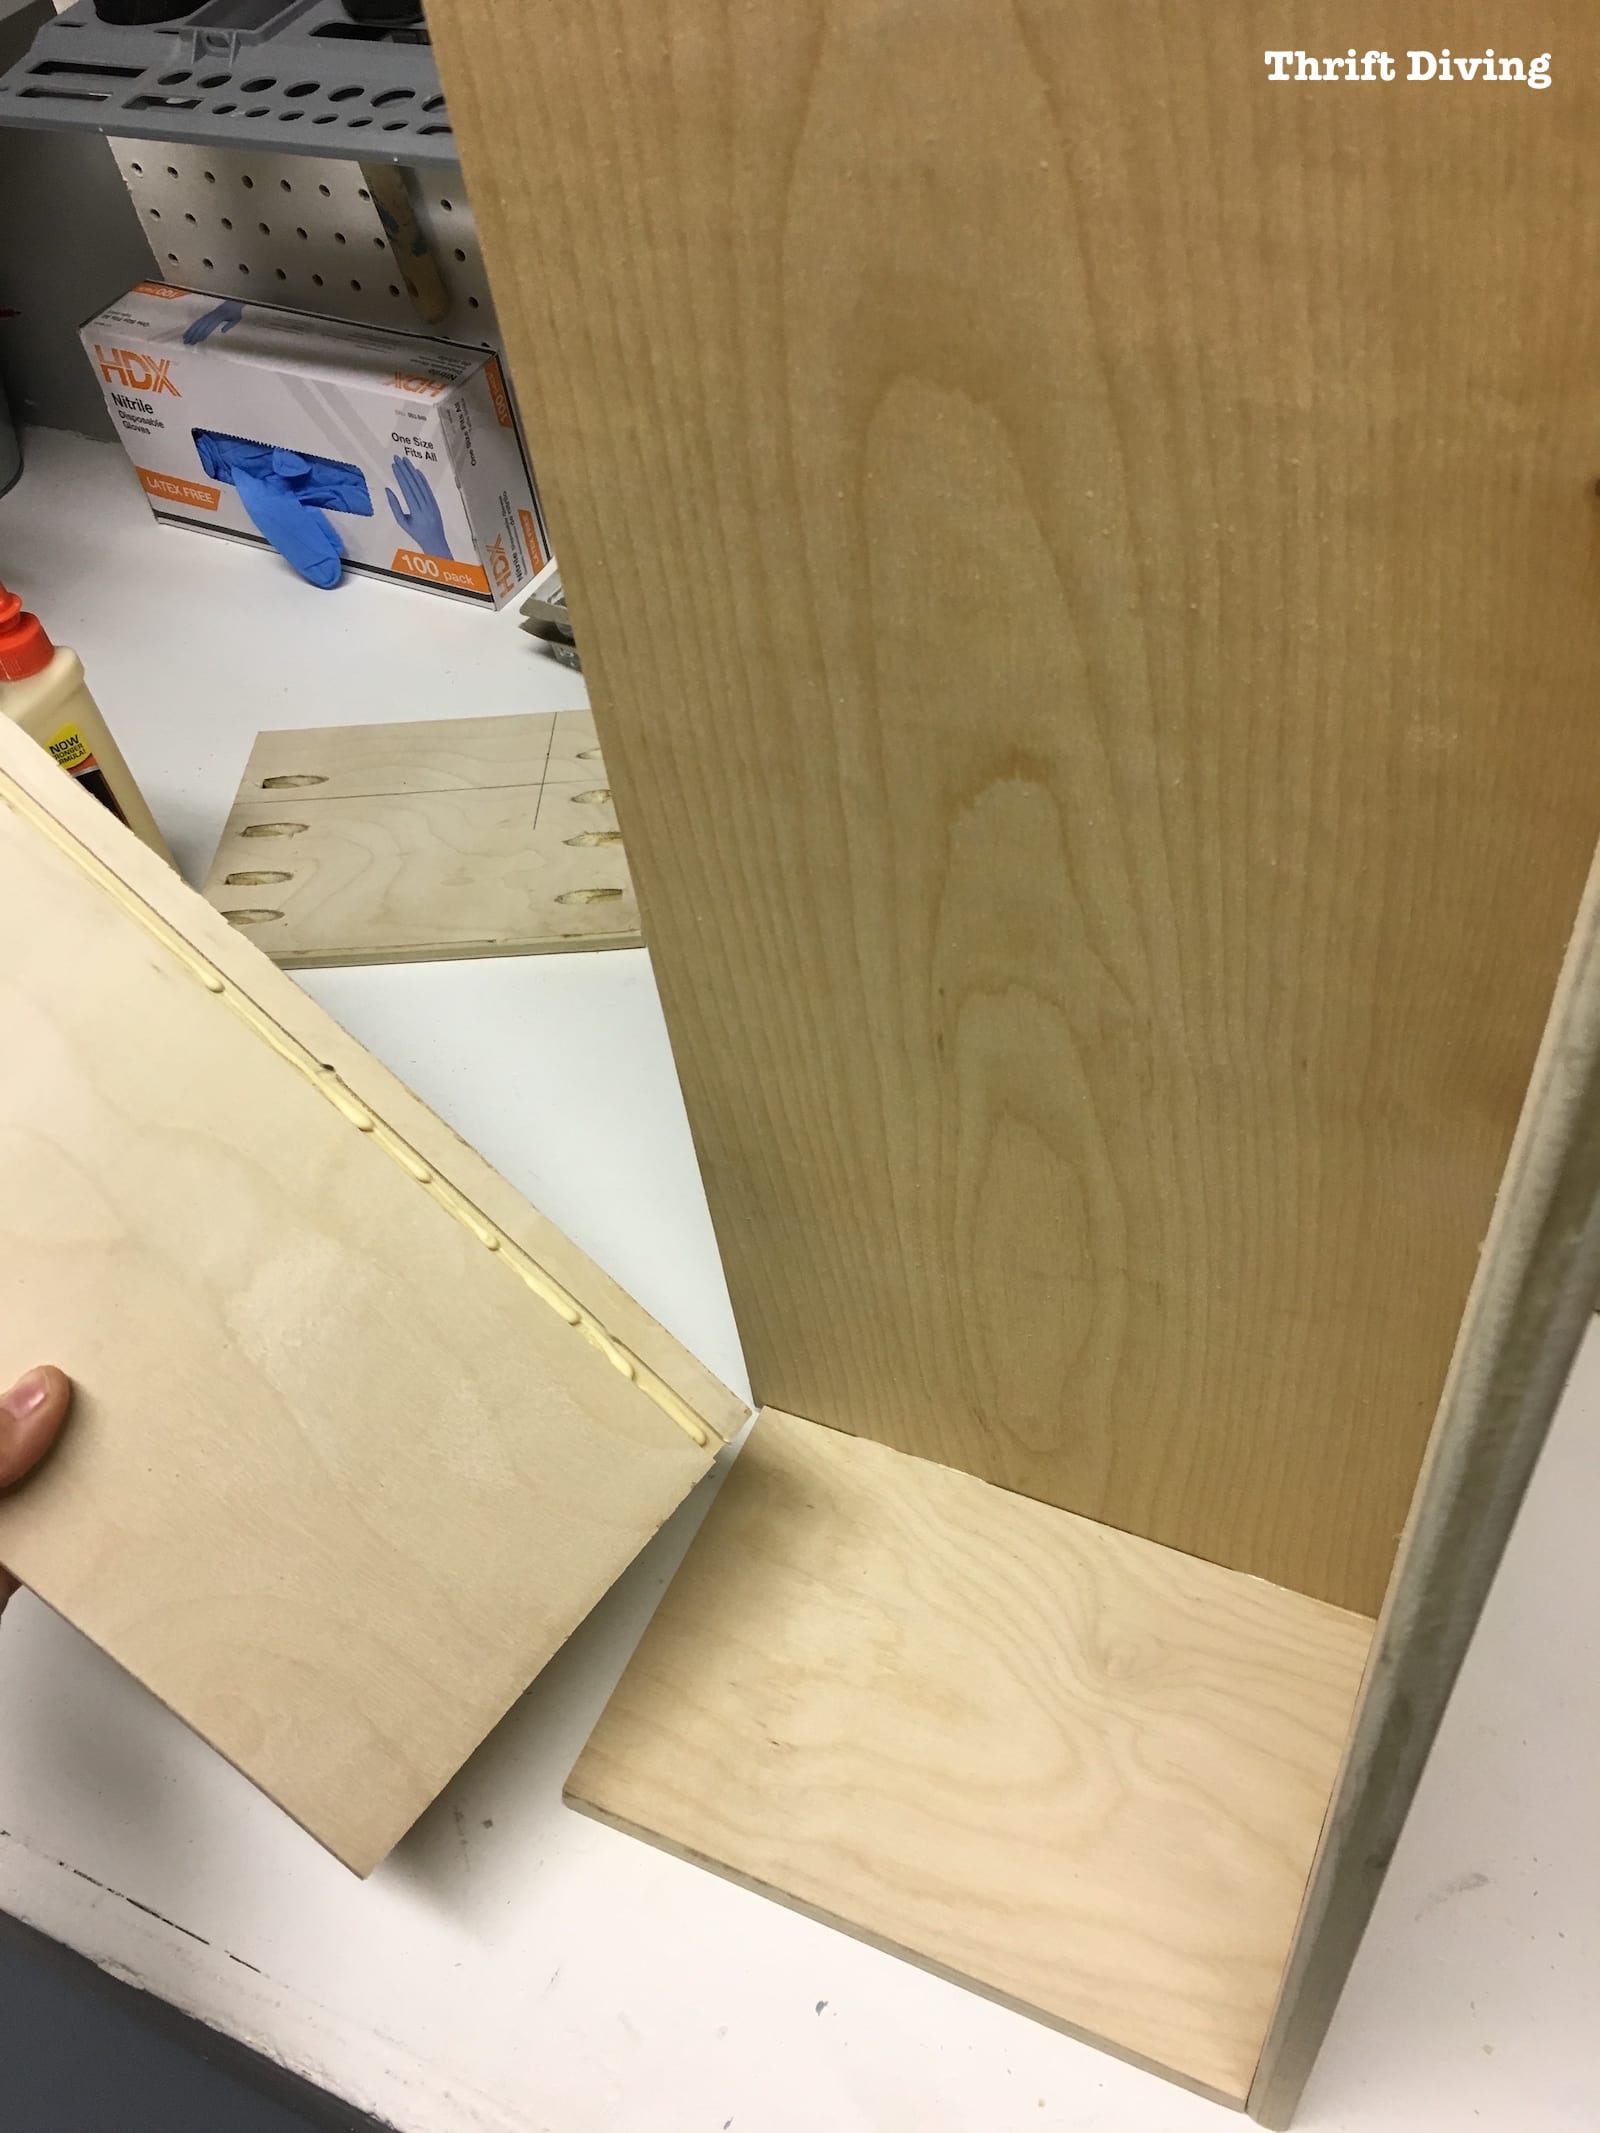
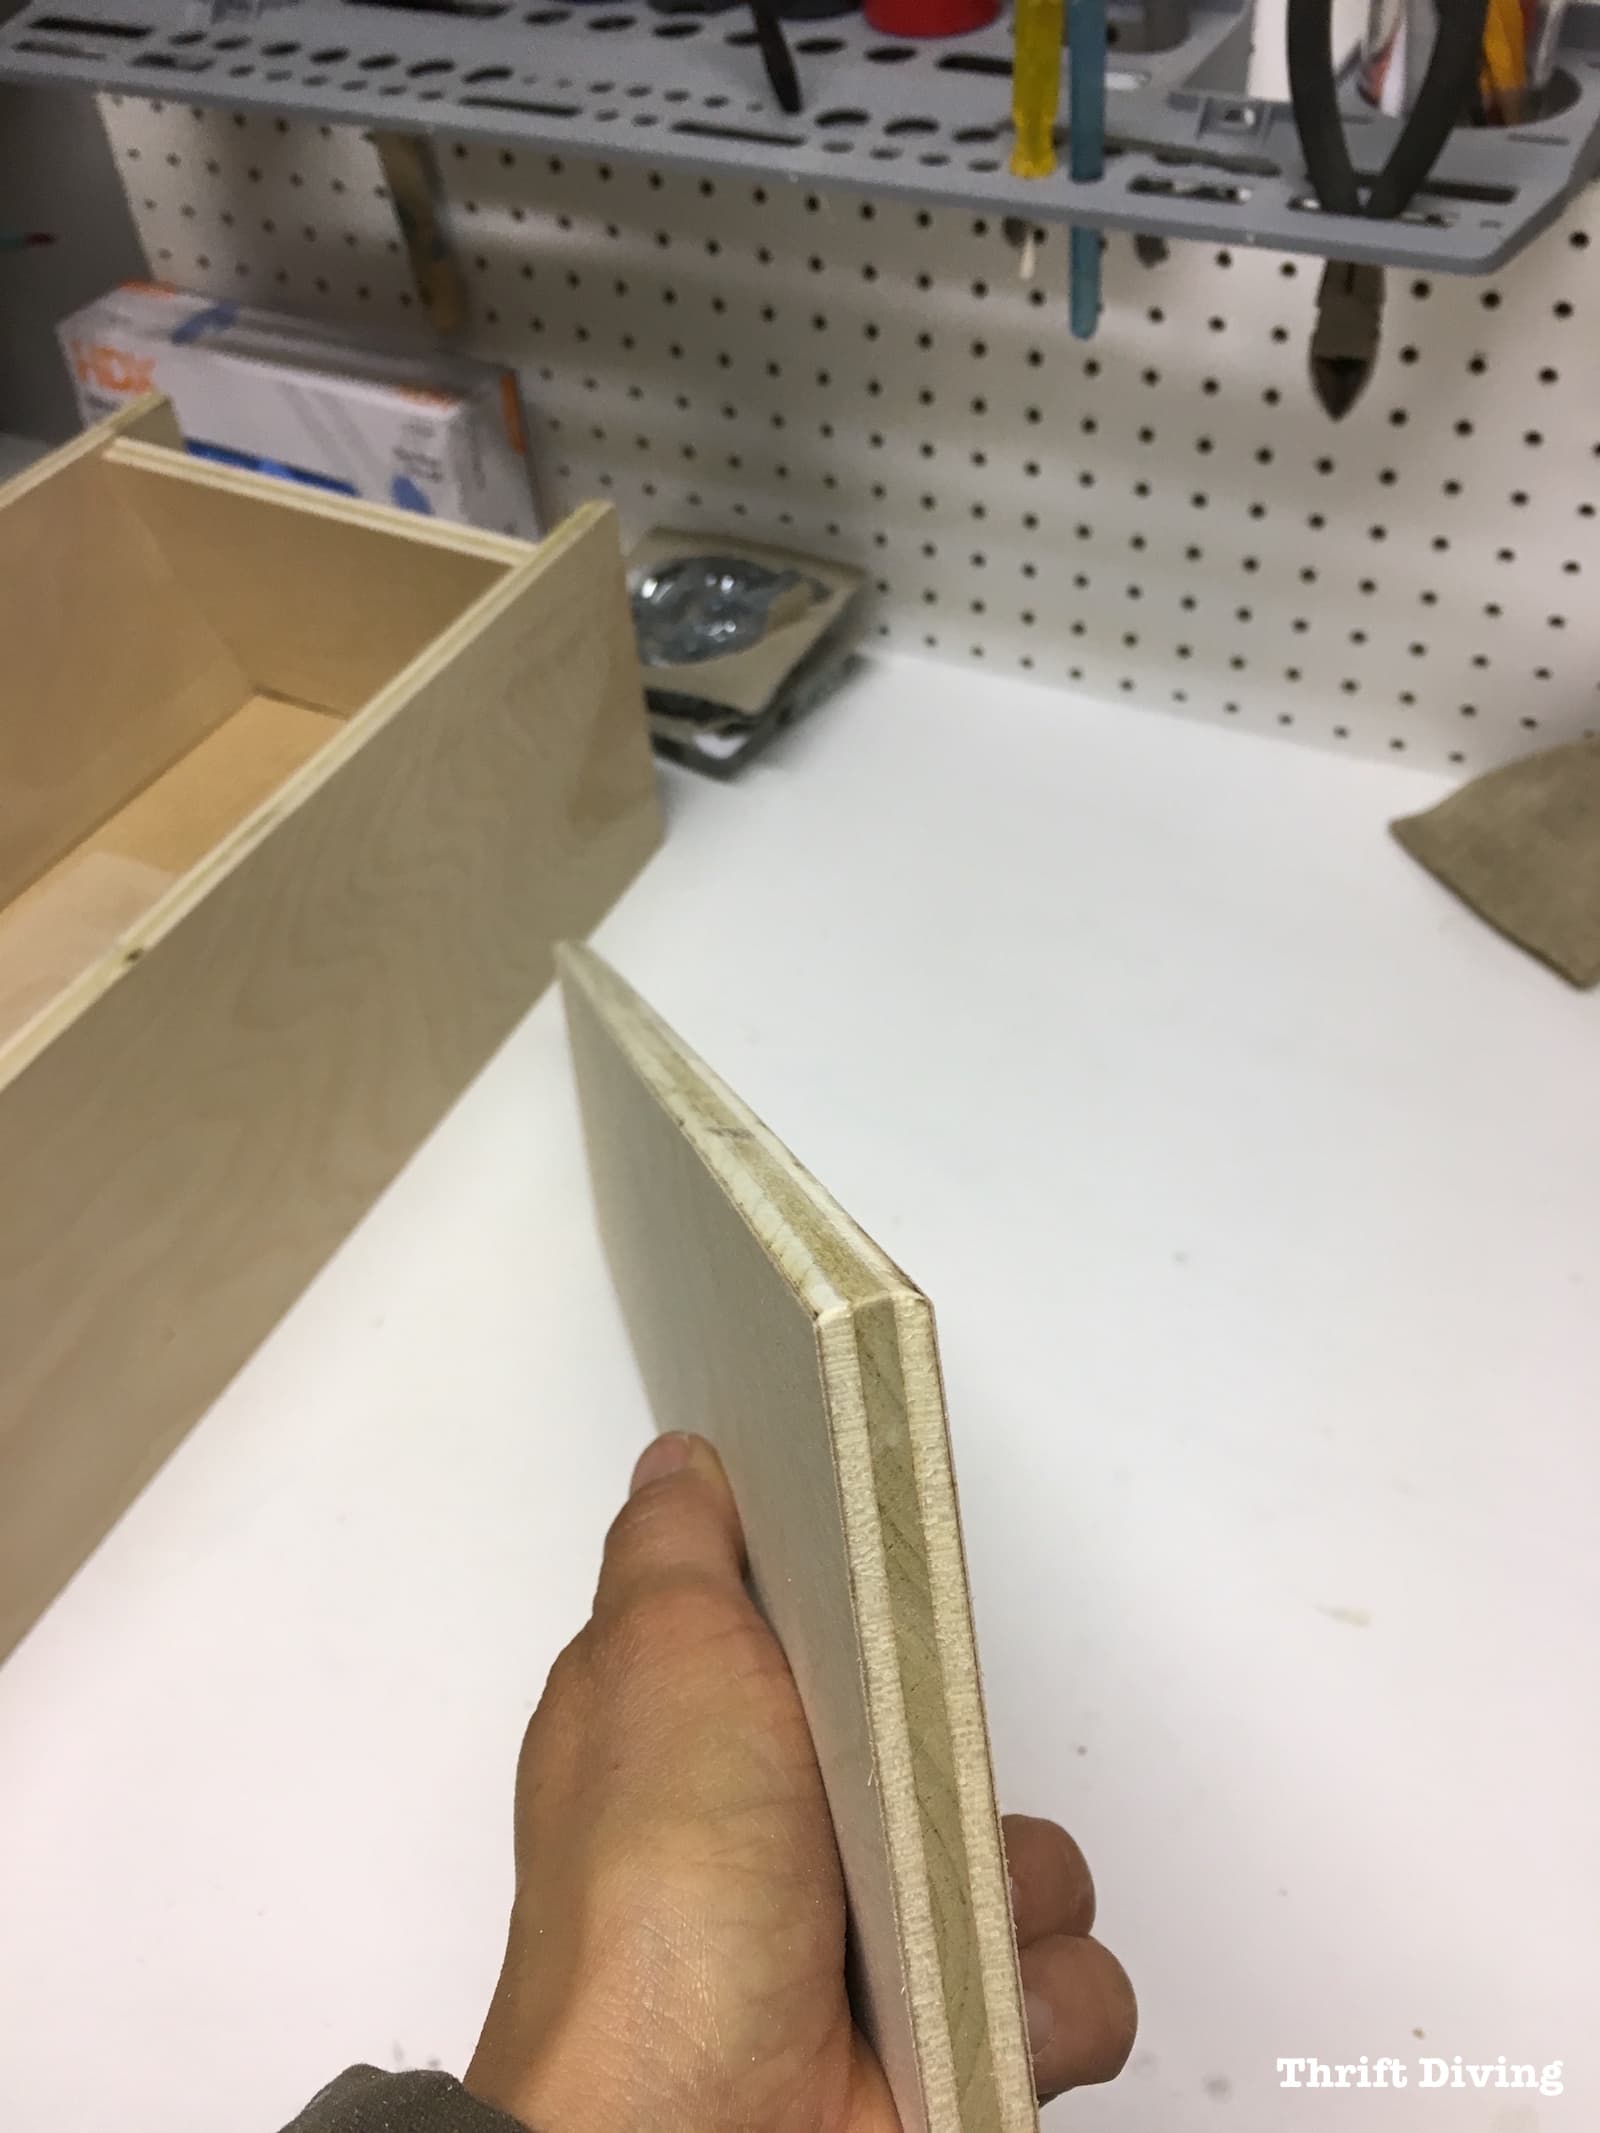
Keep in mind that the thin plywood will have to be cut a little longer and wider since it’s going to slide into the groove. Since it’s a 1/4″ groove, 1/4″ wider on either side will be good to create a tight, even fit.
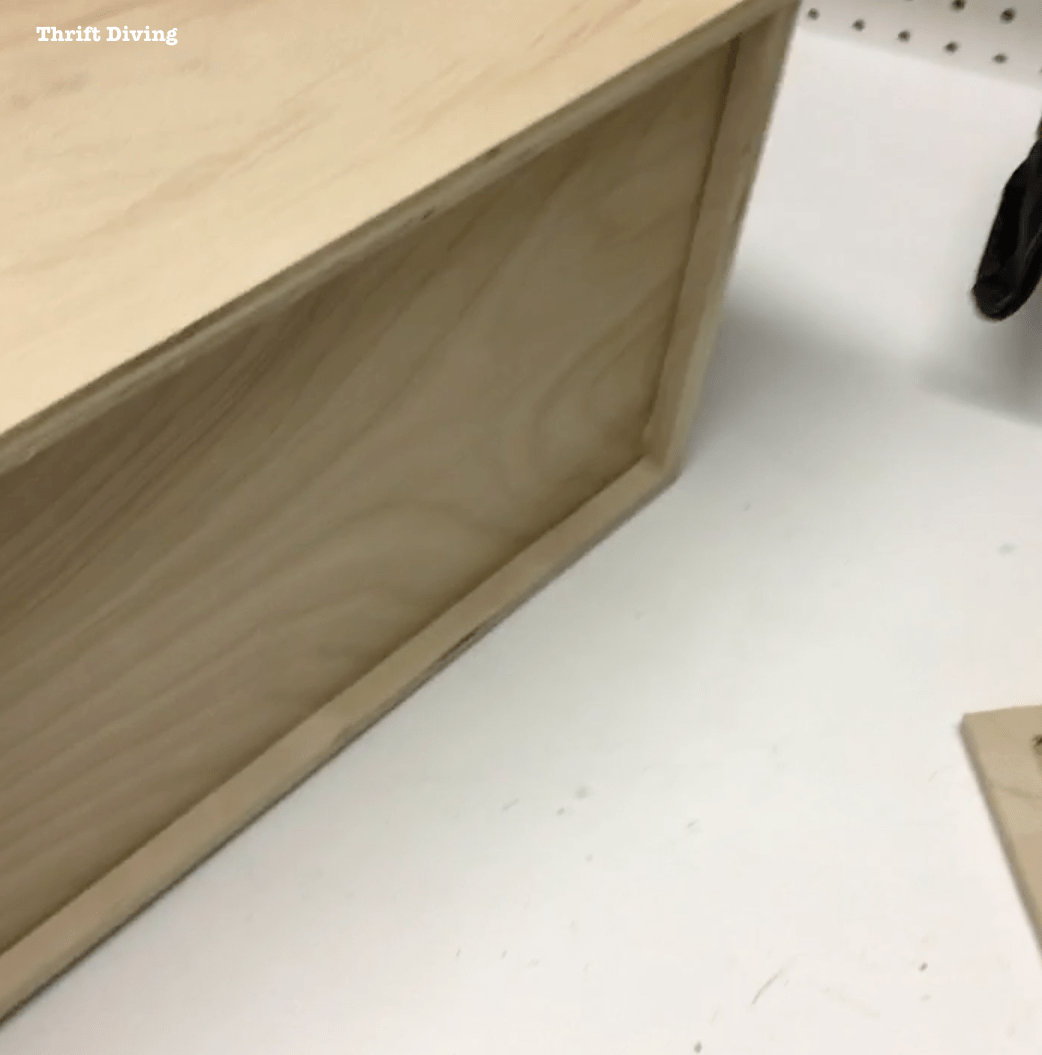
If you look at the bottom of the drawer after putting it together, this is what it looked like.
Most professional cabinet drawers look like this on the bottom, so I was happy I could create it!
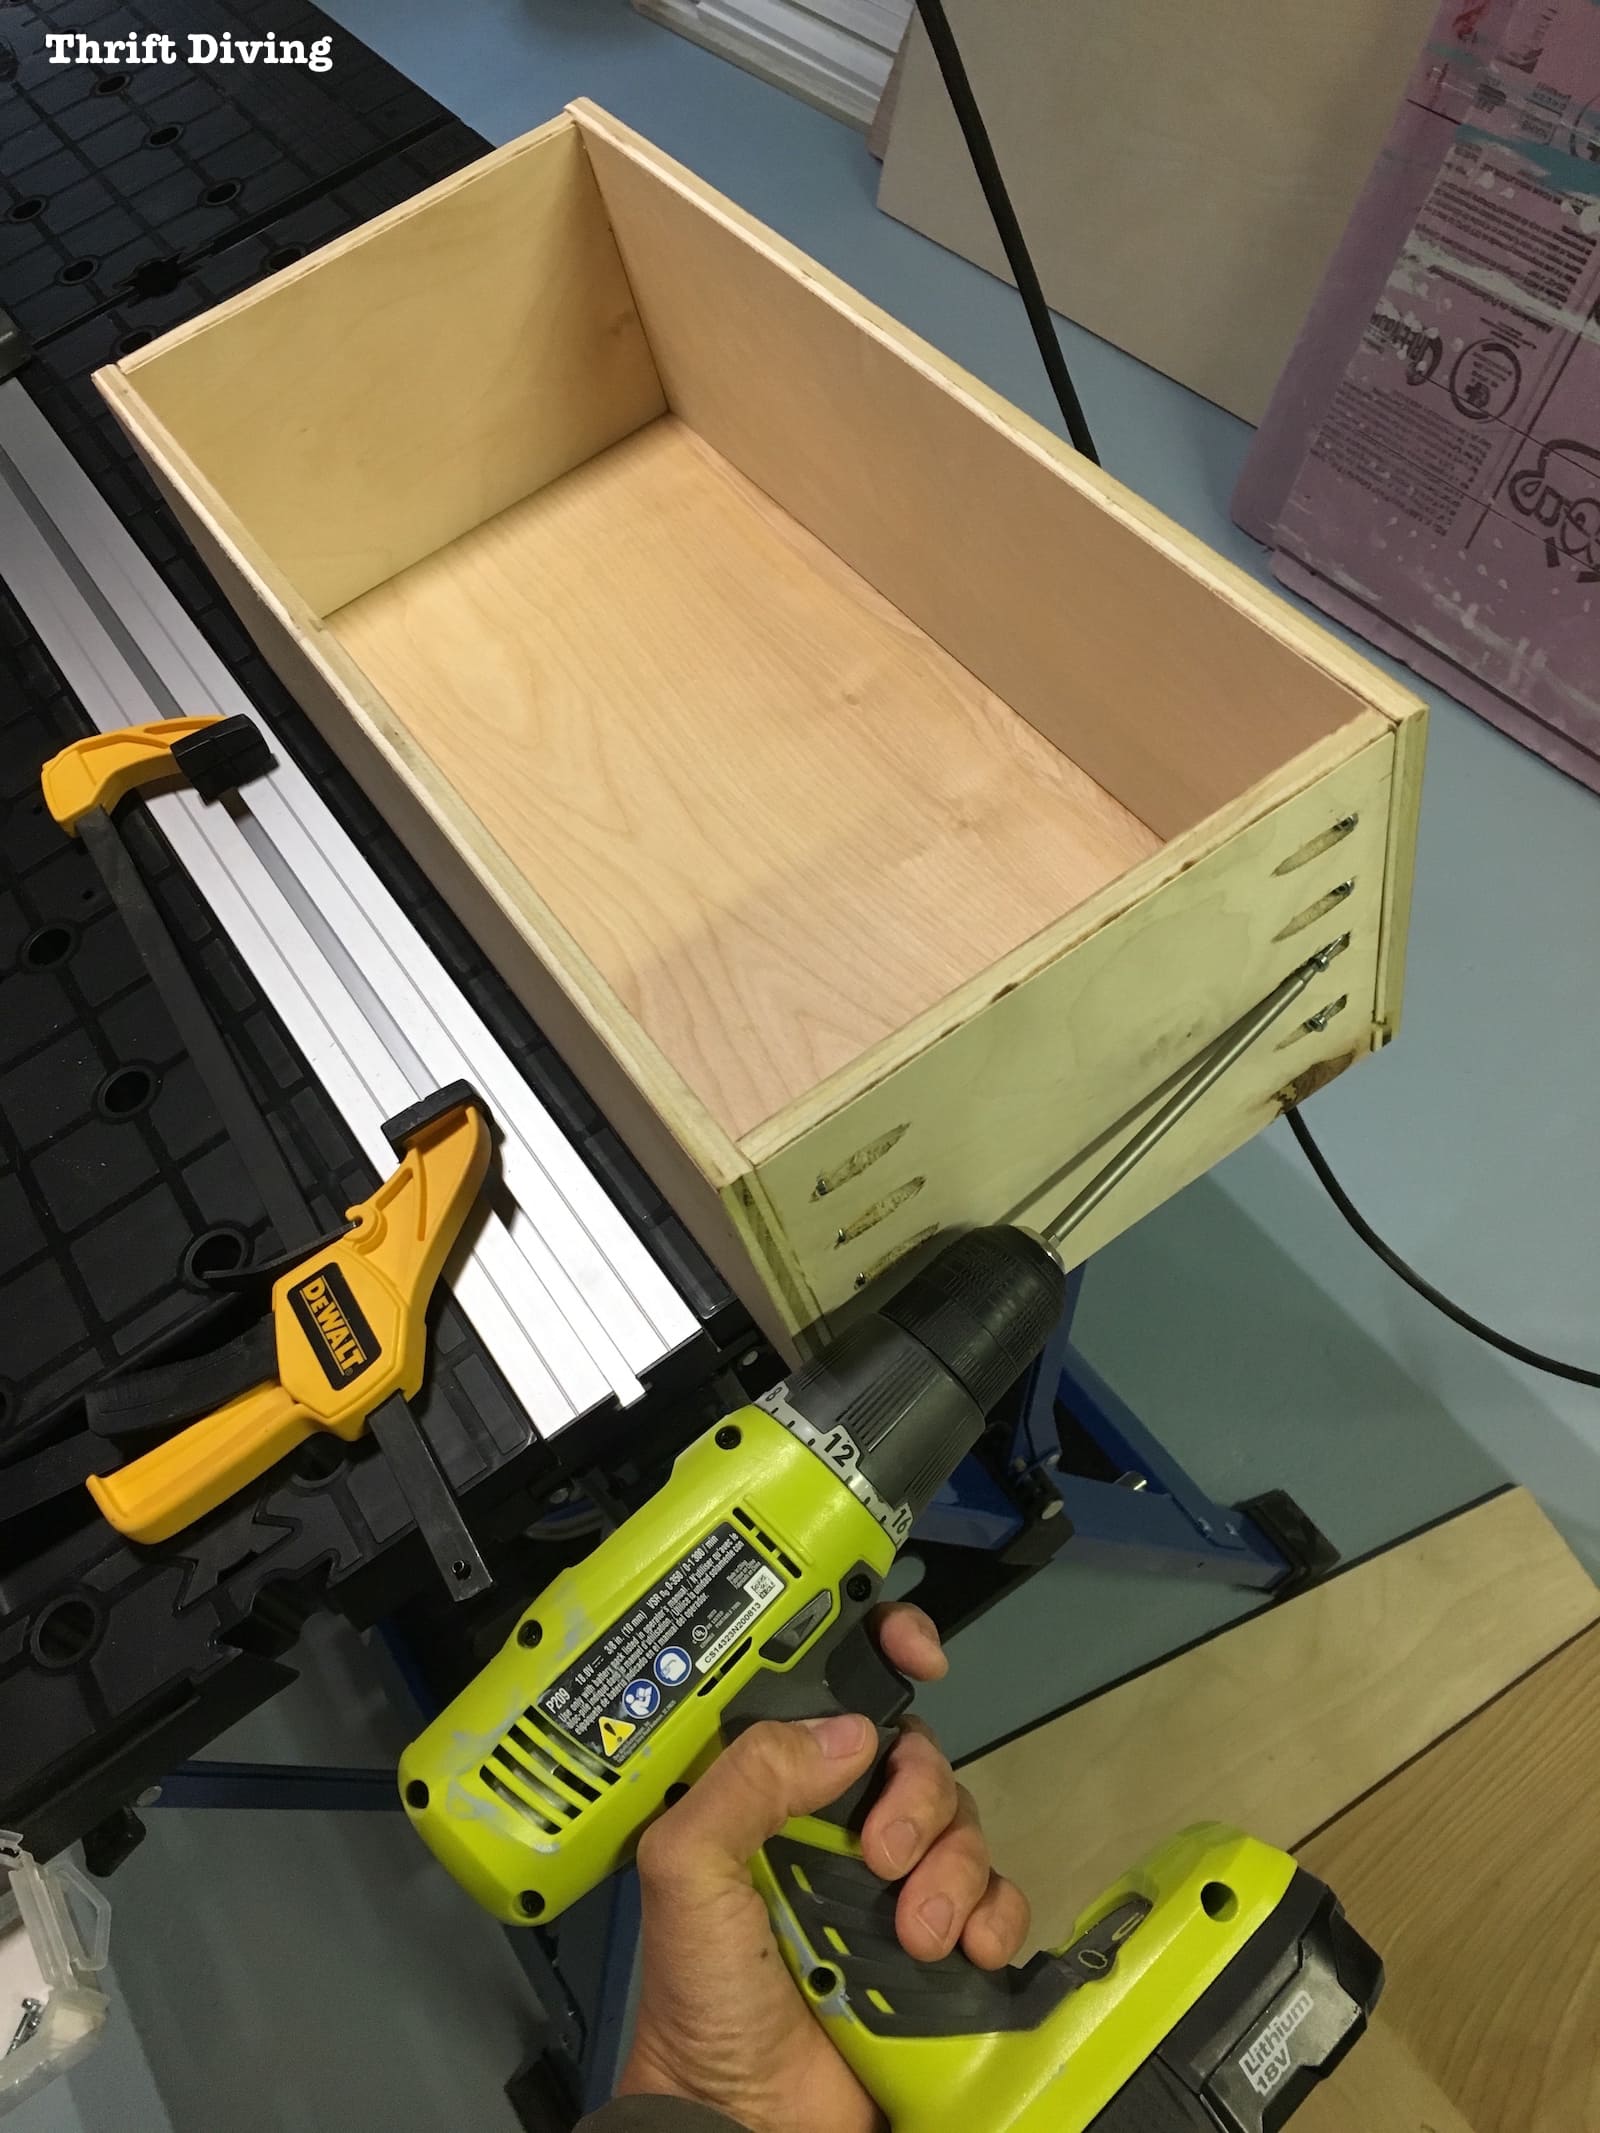
I glued the entire box together, and once it was dry, I screwed 1″ pocket hole screws into the eight pocket holes that I had already created before assembling it. As I mentioned, each front piece of the drawers had eight 1/2″ pocket holes.
The problem: 1/2″ pocket holes SUCK. I couldn’t get the screws to go in all the way without coming out the sides, so I left the screws not very tight.
Plus, a little bit of the screw head stuck out of the pocket hole. I worried that when I tried to attach a Red Oak drawer front that it wouldn’t allow the drawer front to attach evenly.
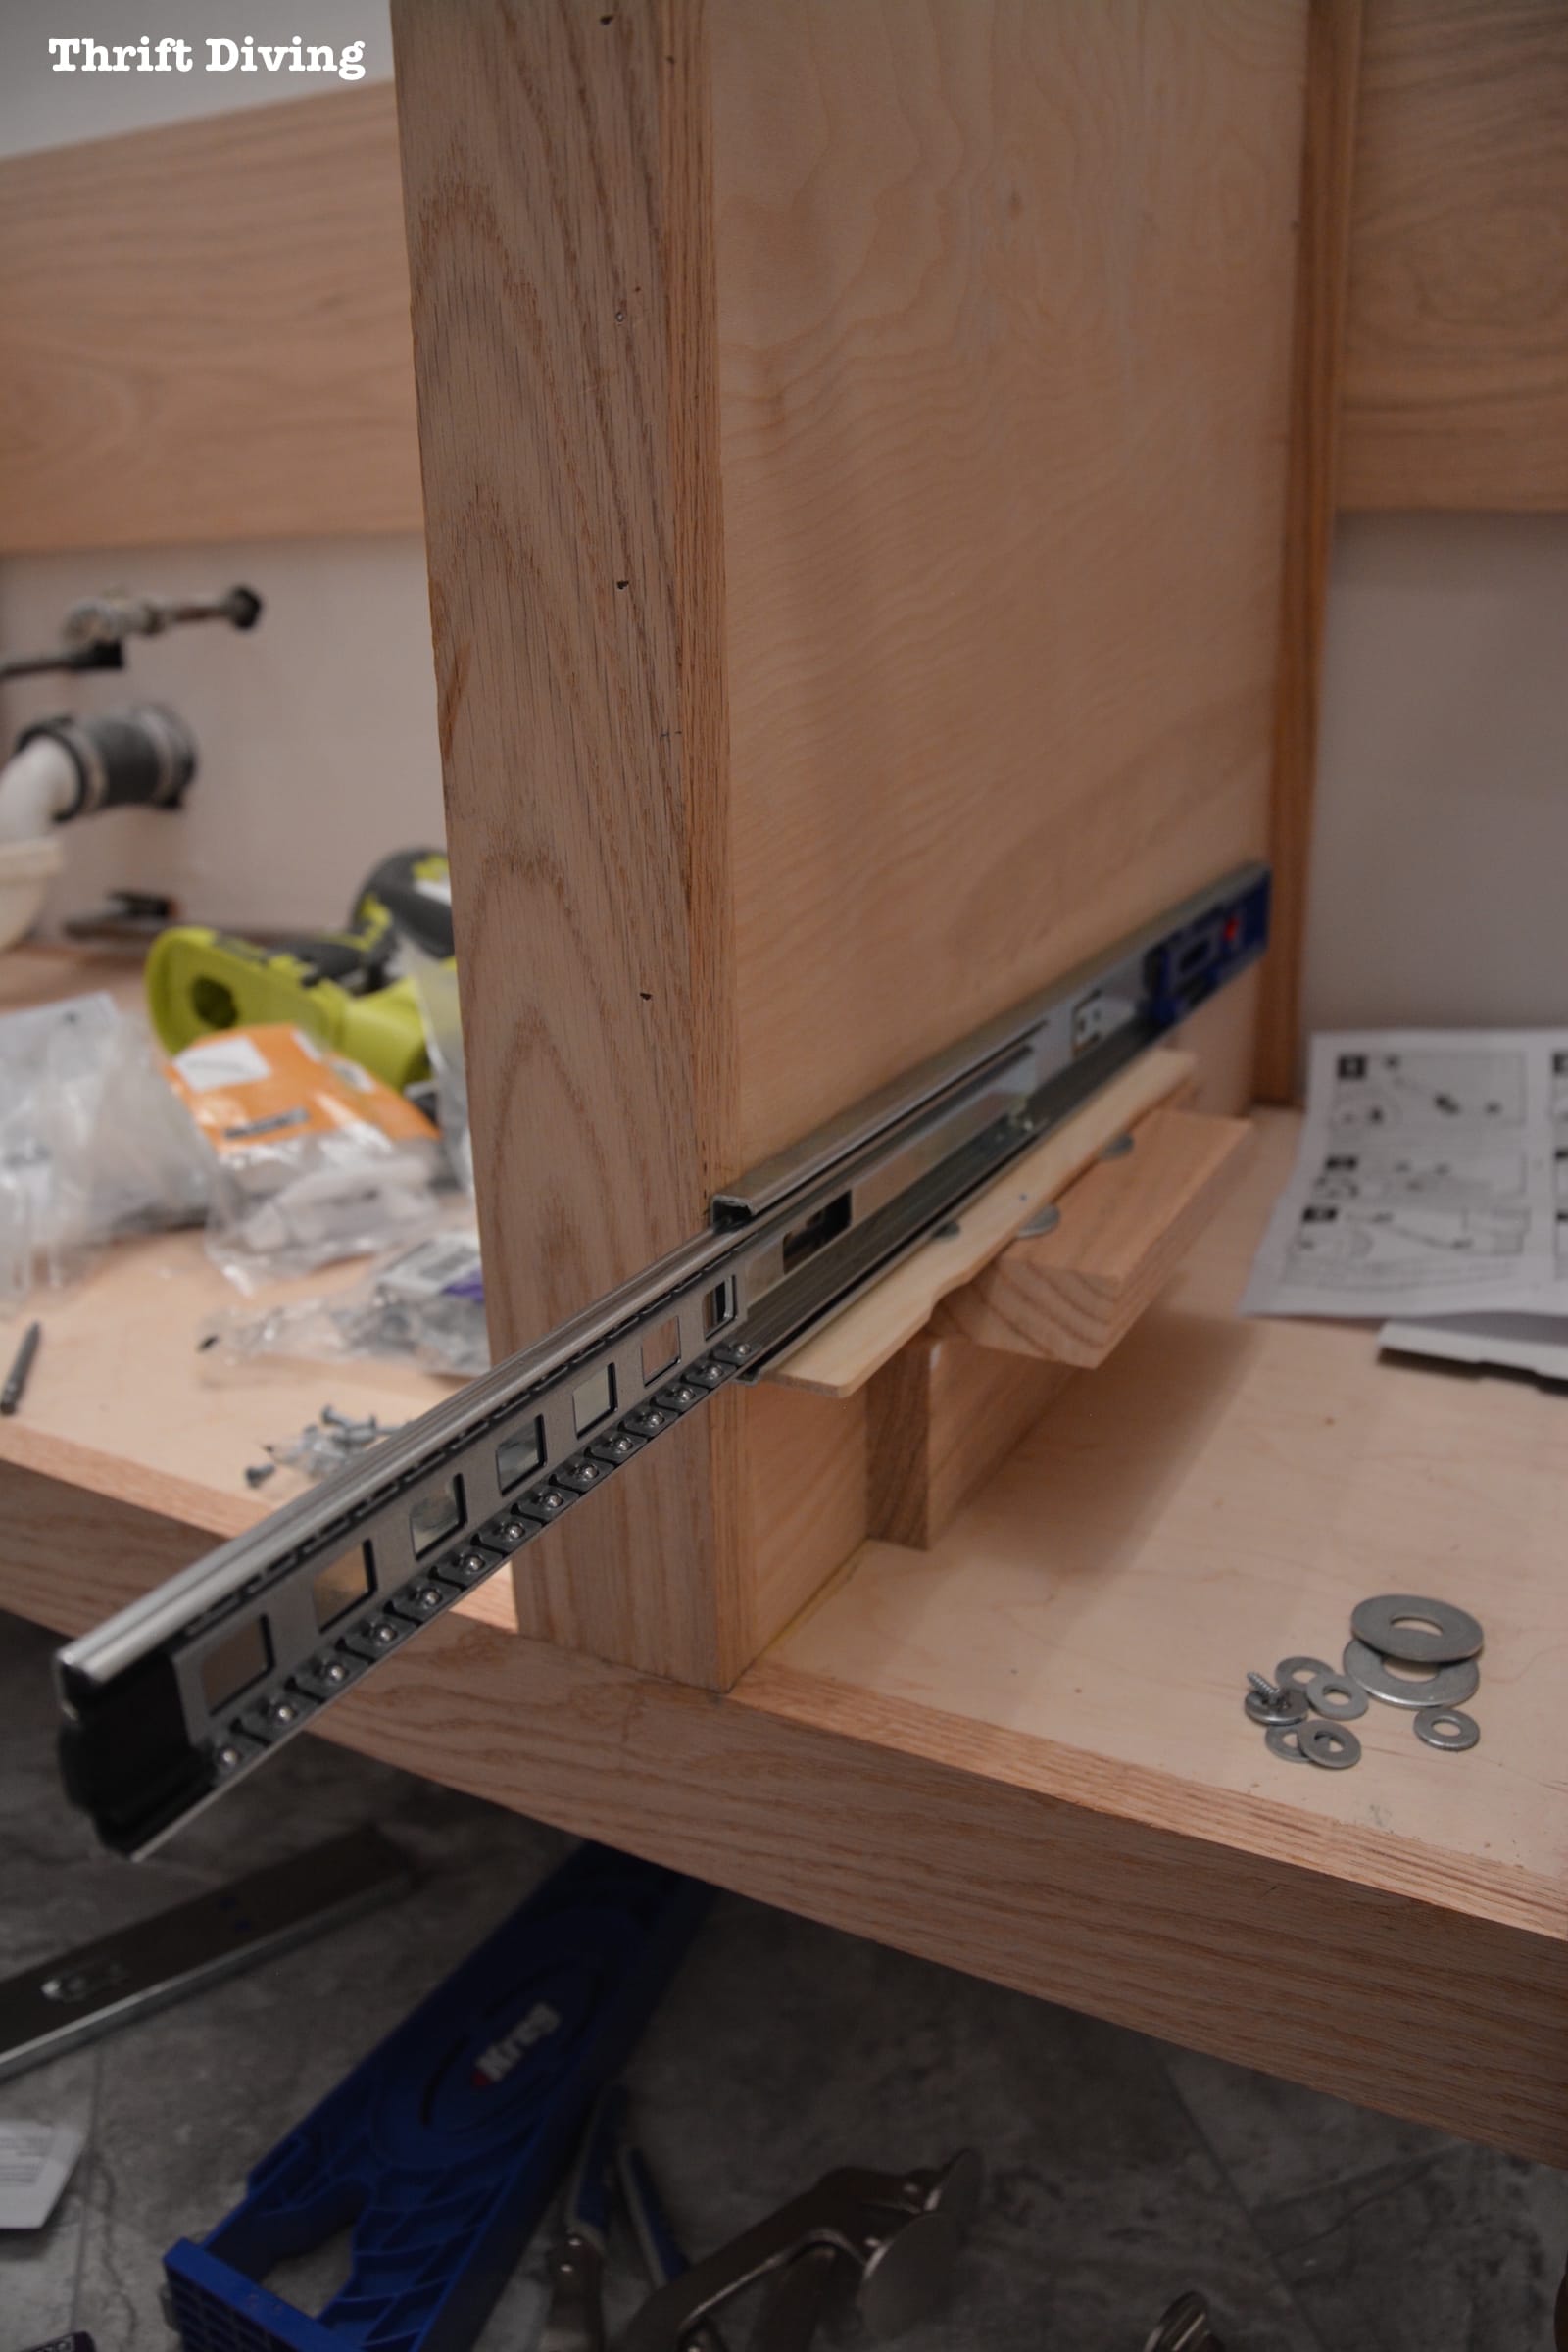
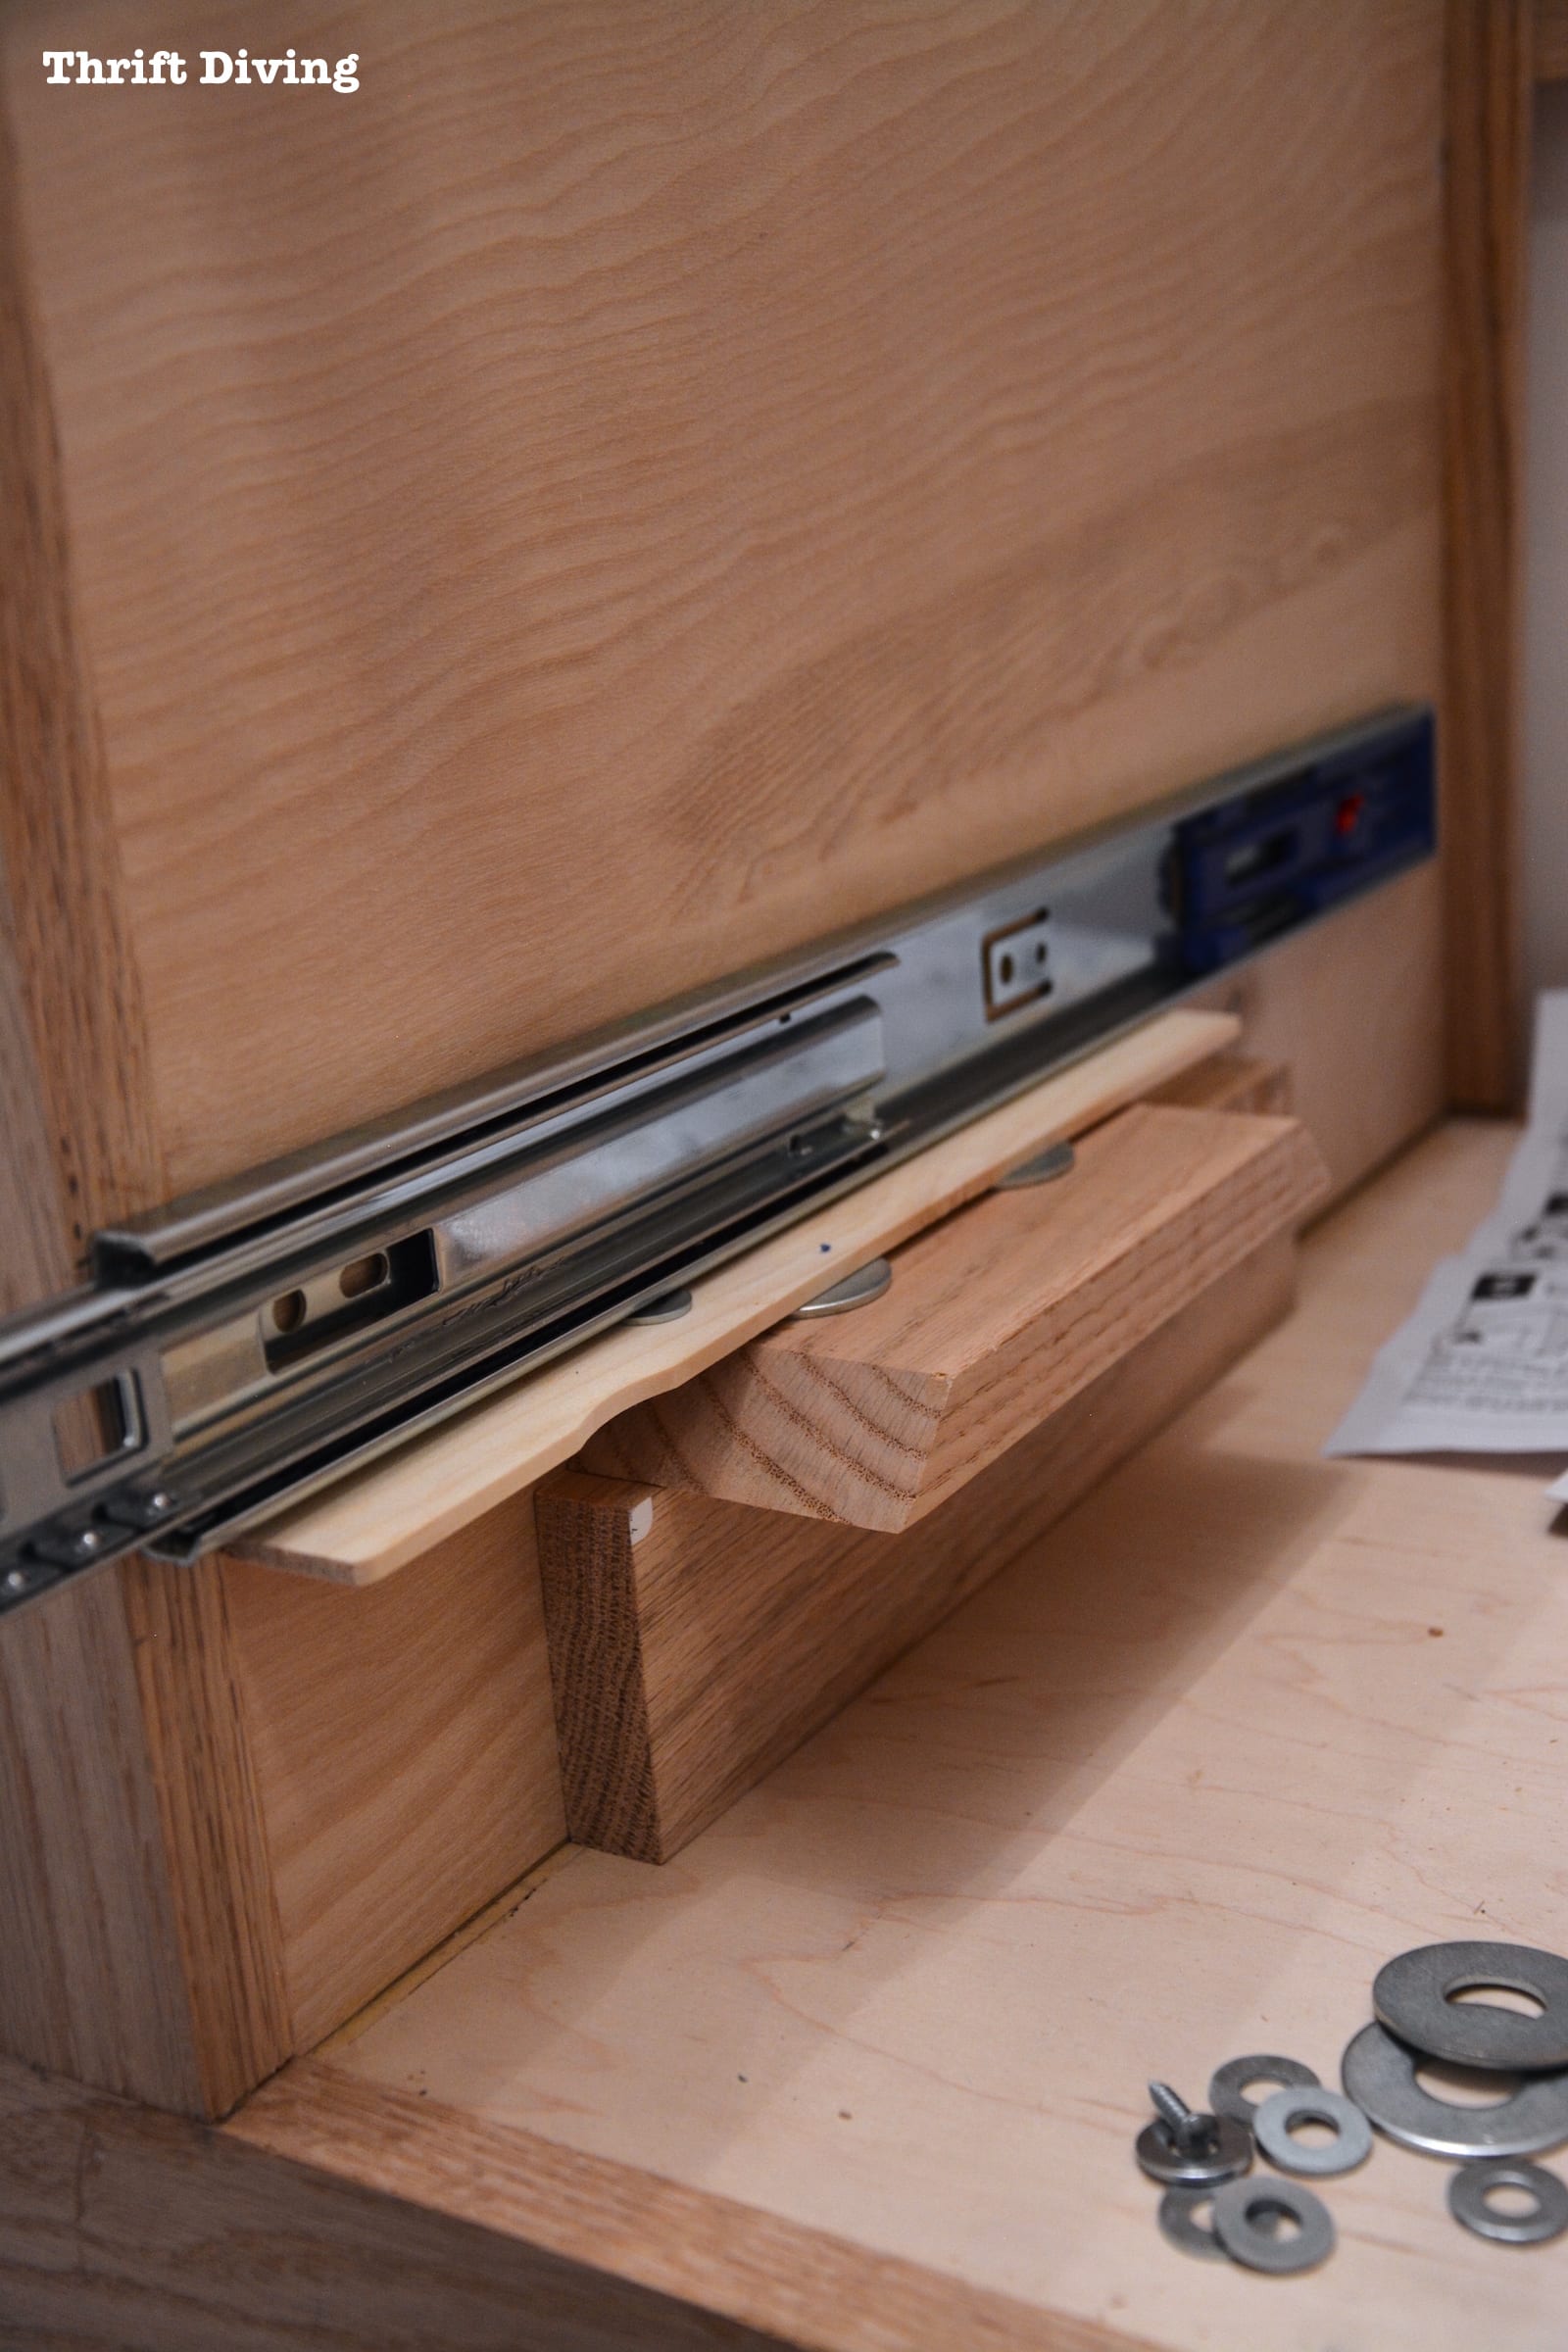
Adding the Slider Hardware
When sitting on my bathroom flooring, testing everything out, I figured that I would want the drawer-mounted piece of the slider about the middle of the drawer.
To keep it straight and consistent, I used a scrap piece of wood and clamped it to the bottom of the drawer.
Then I followed the instructions on adding the screws from the slider kit.
I used the same scrap wood on the other side so that the drawer slides were evenly attached.
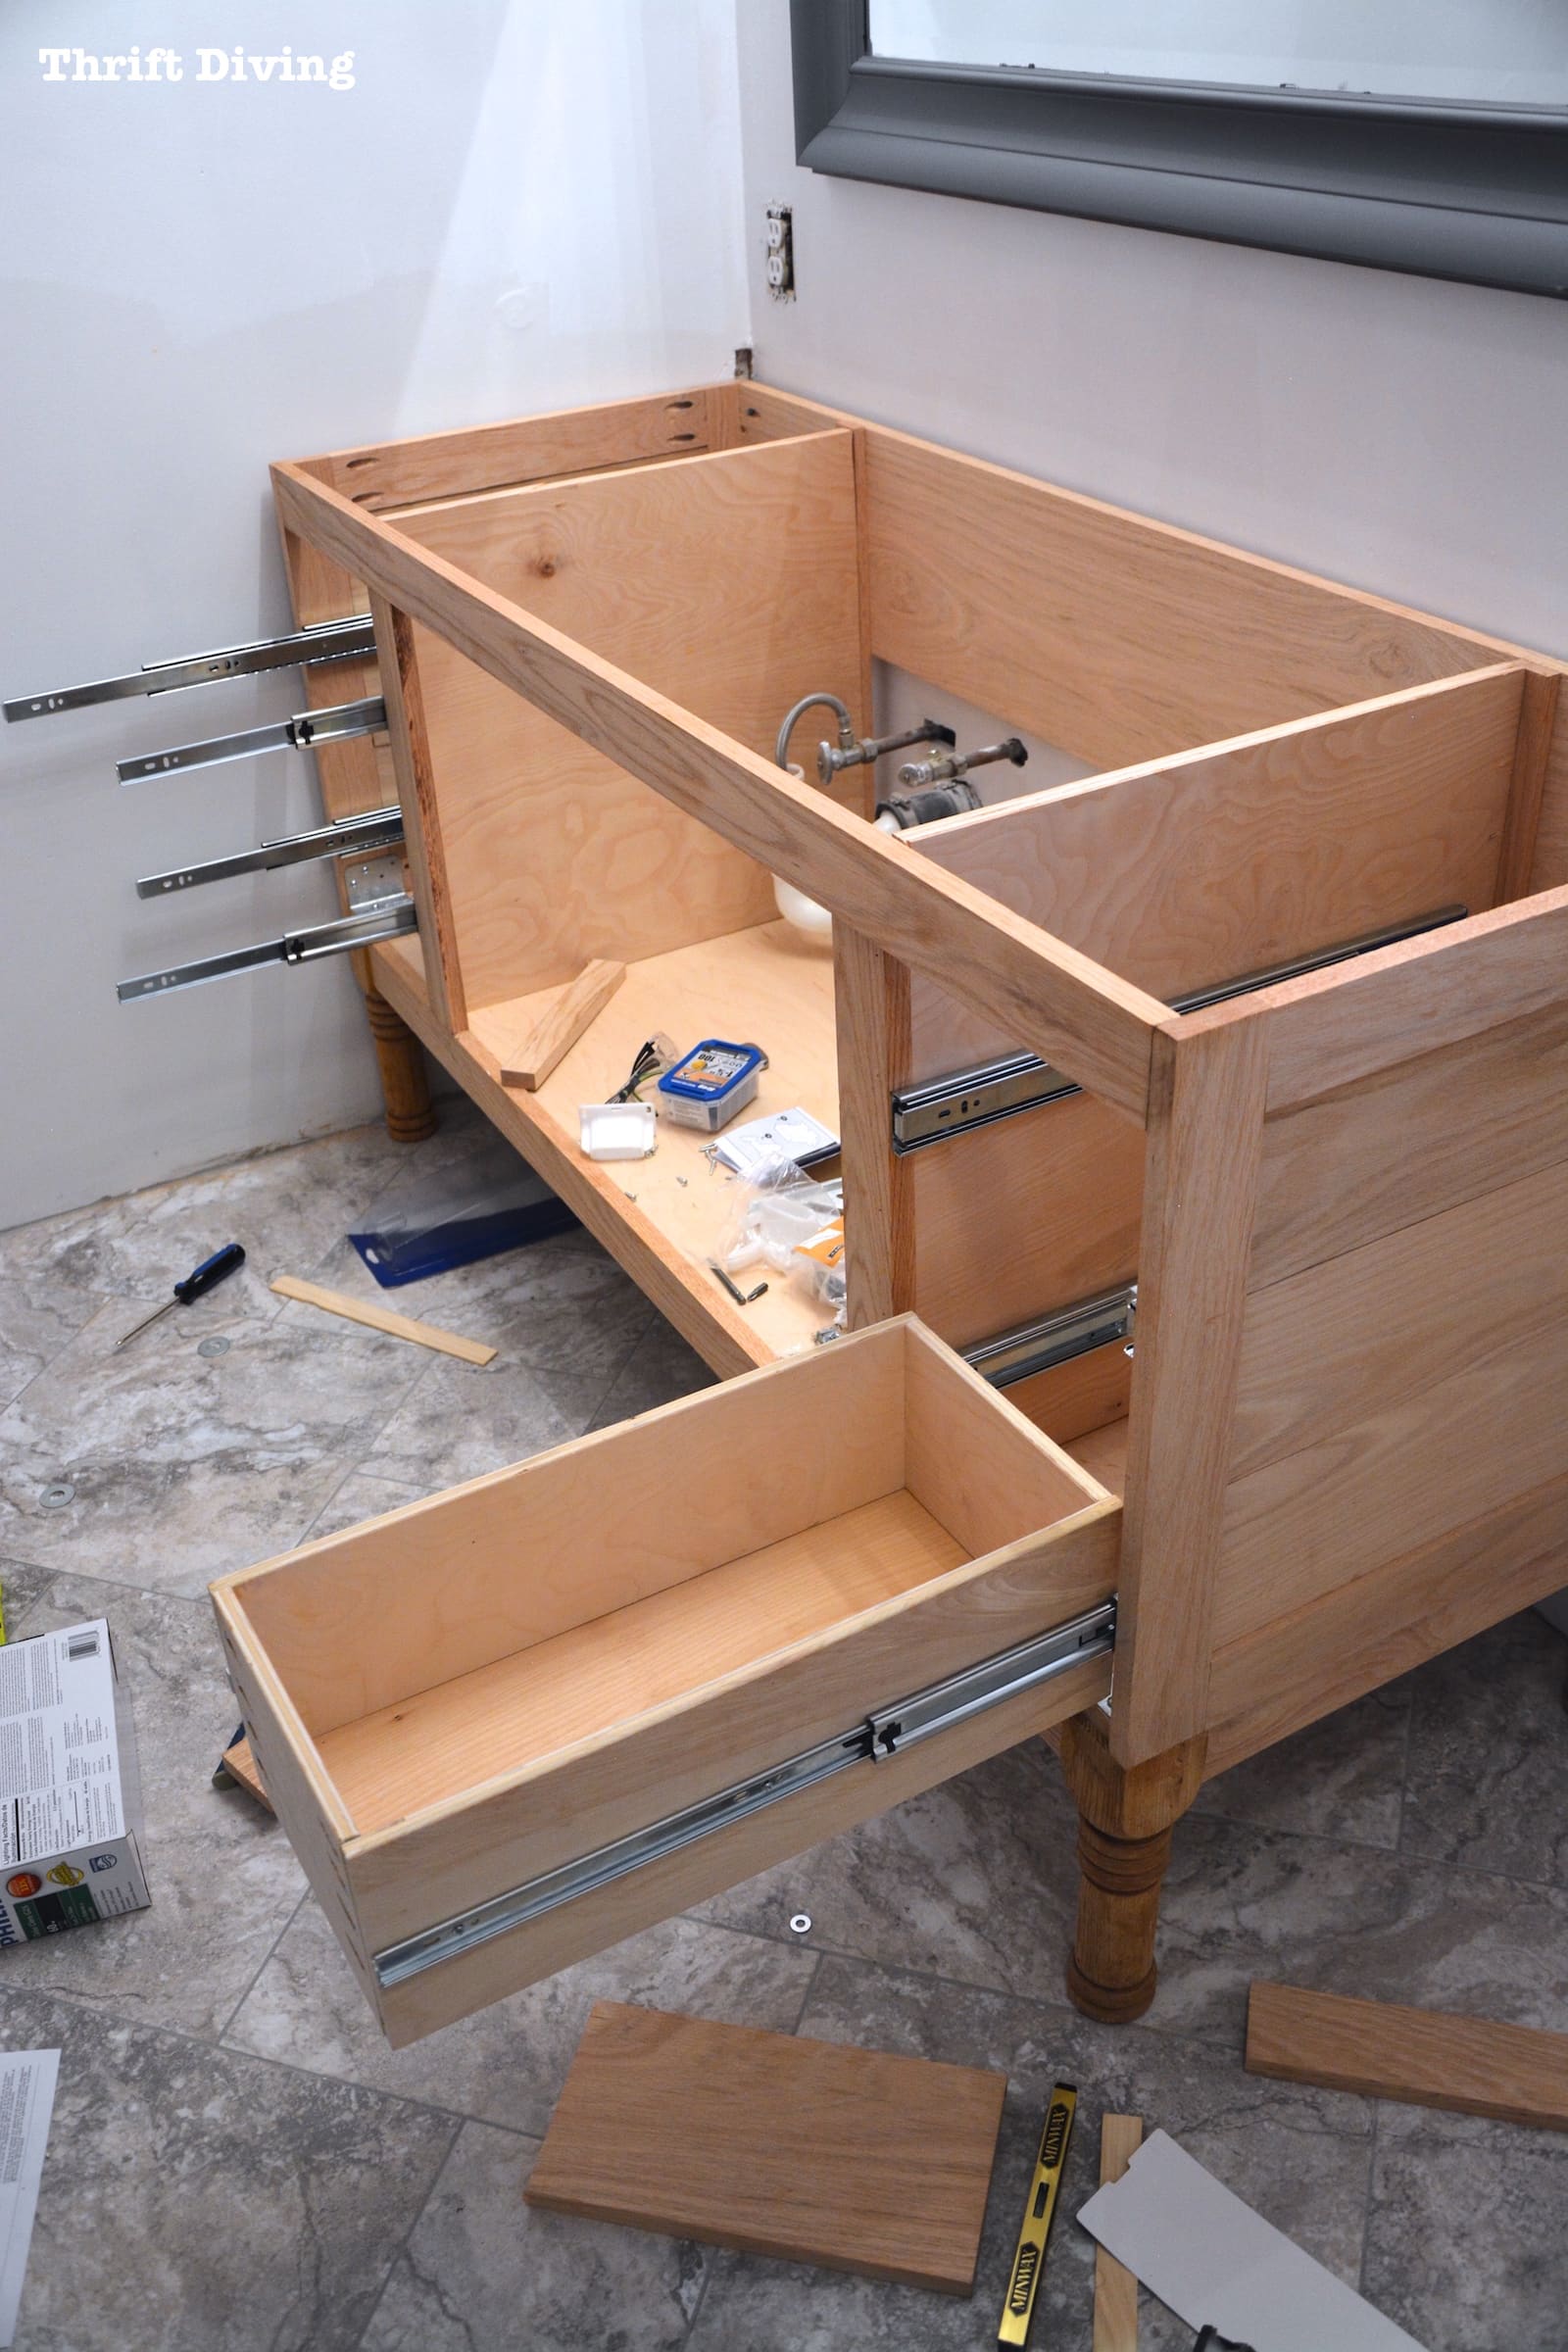
Test Fitting the First Drawer
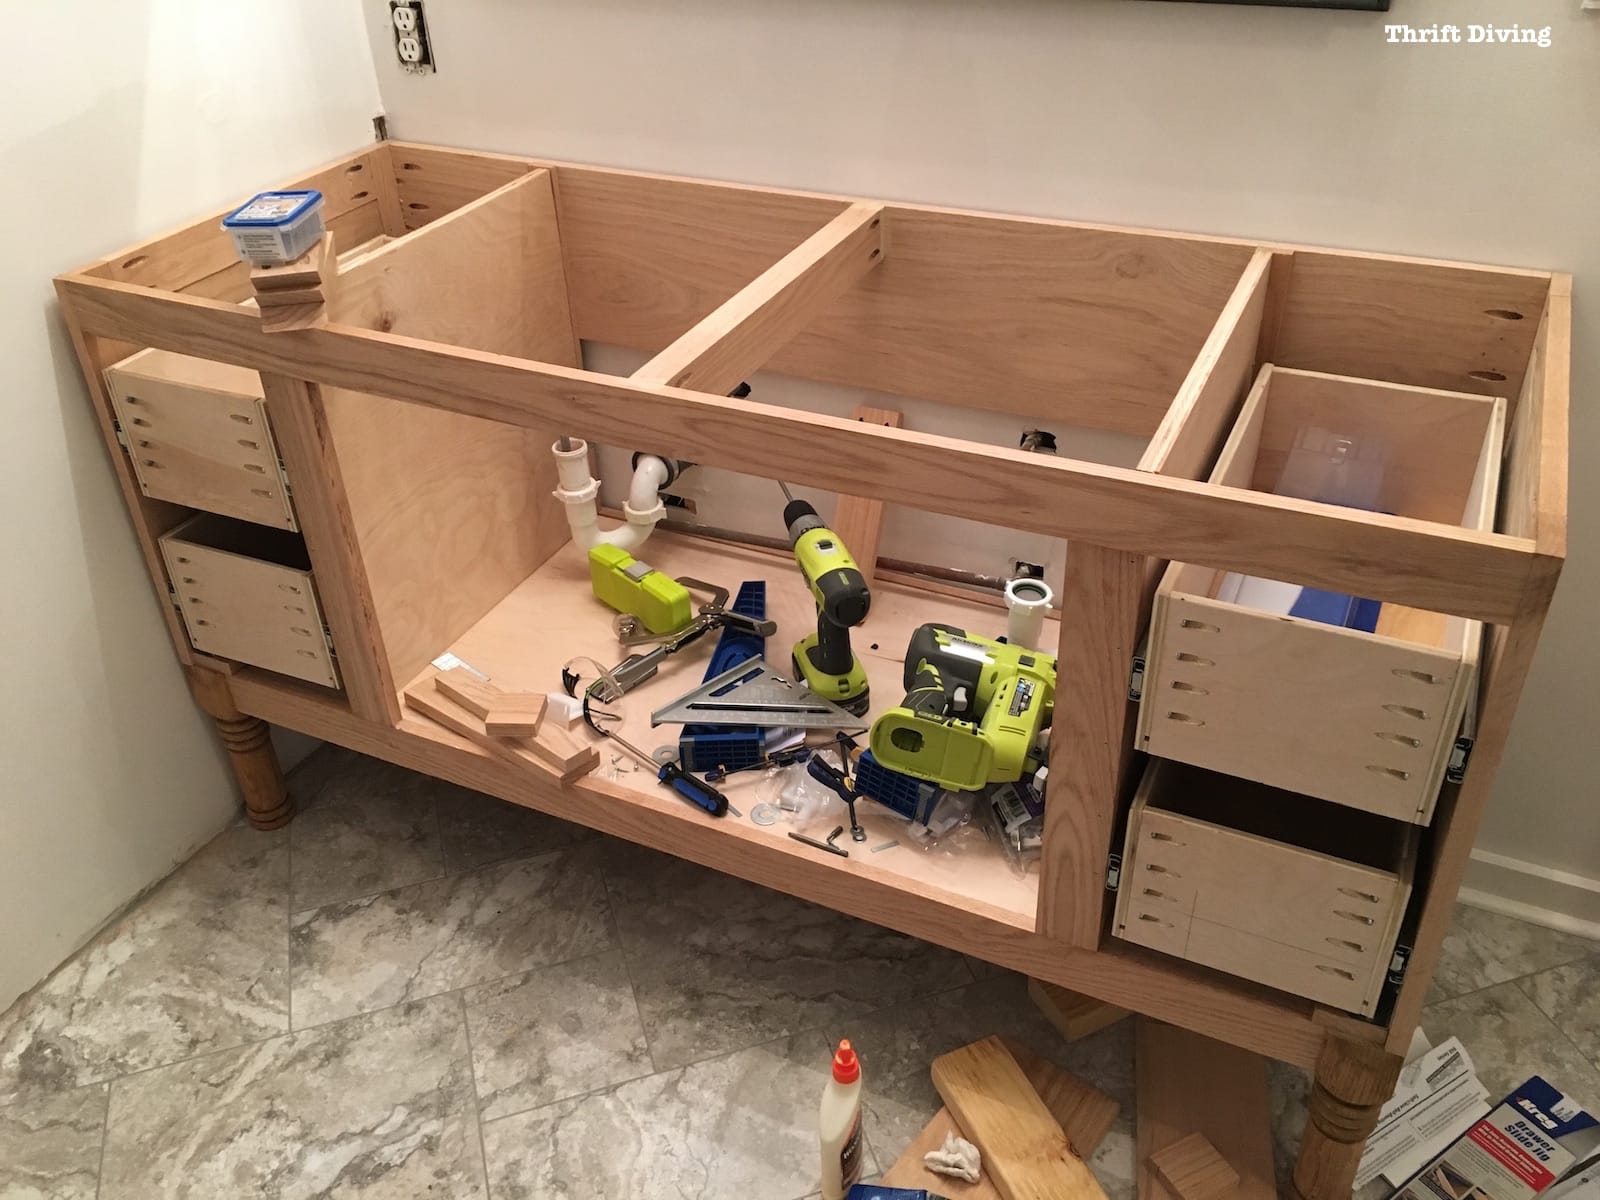
Once the sliders were attached to the drawer, I could “test” this drawer out to see if I did this whole process correctly. And I was pleasantly pleased that it fit!
The soft-closing mechanism even worked!
I went on to make three more drawers just like the “test” drawer that fit so perfectly…..thinking, “Oh, yeah, I got this!”
(Insert scary music……) I found out later that a couple of my boxes would not fix!
Keep reading….
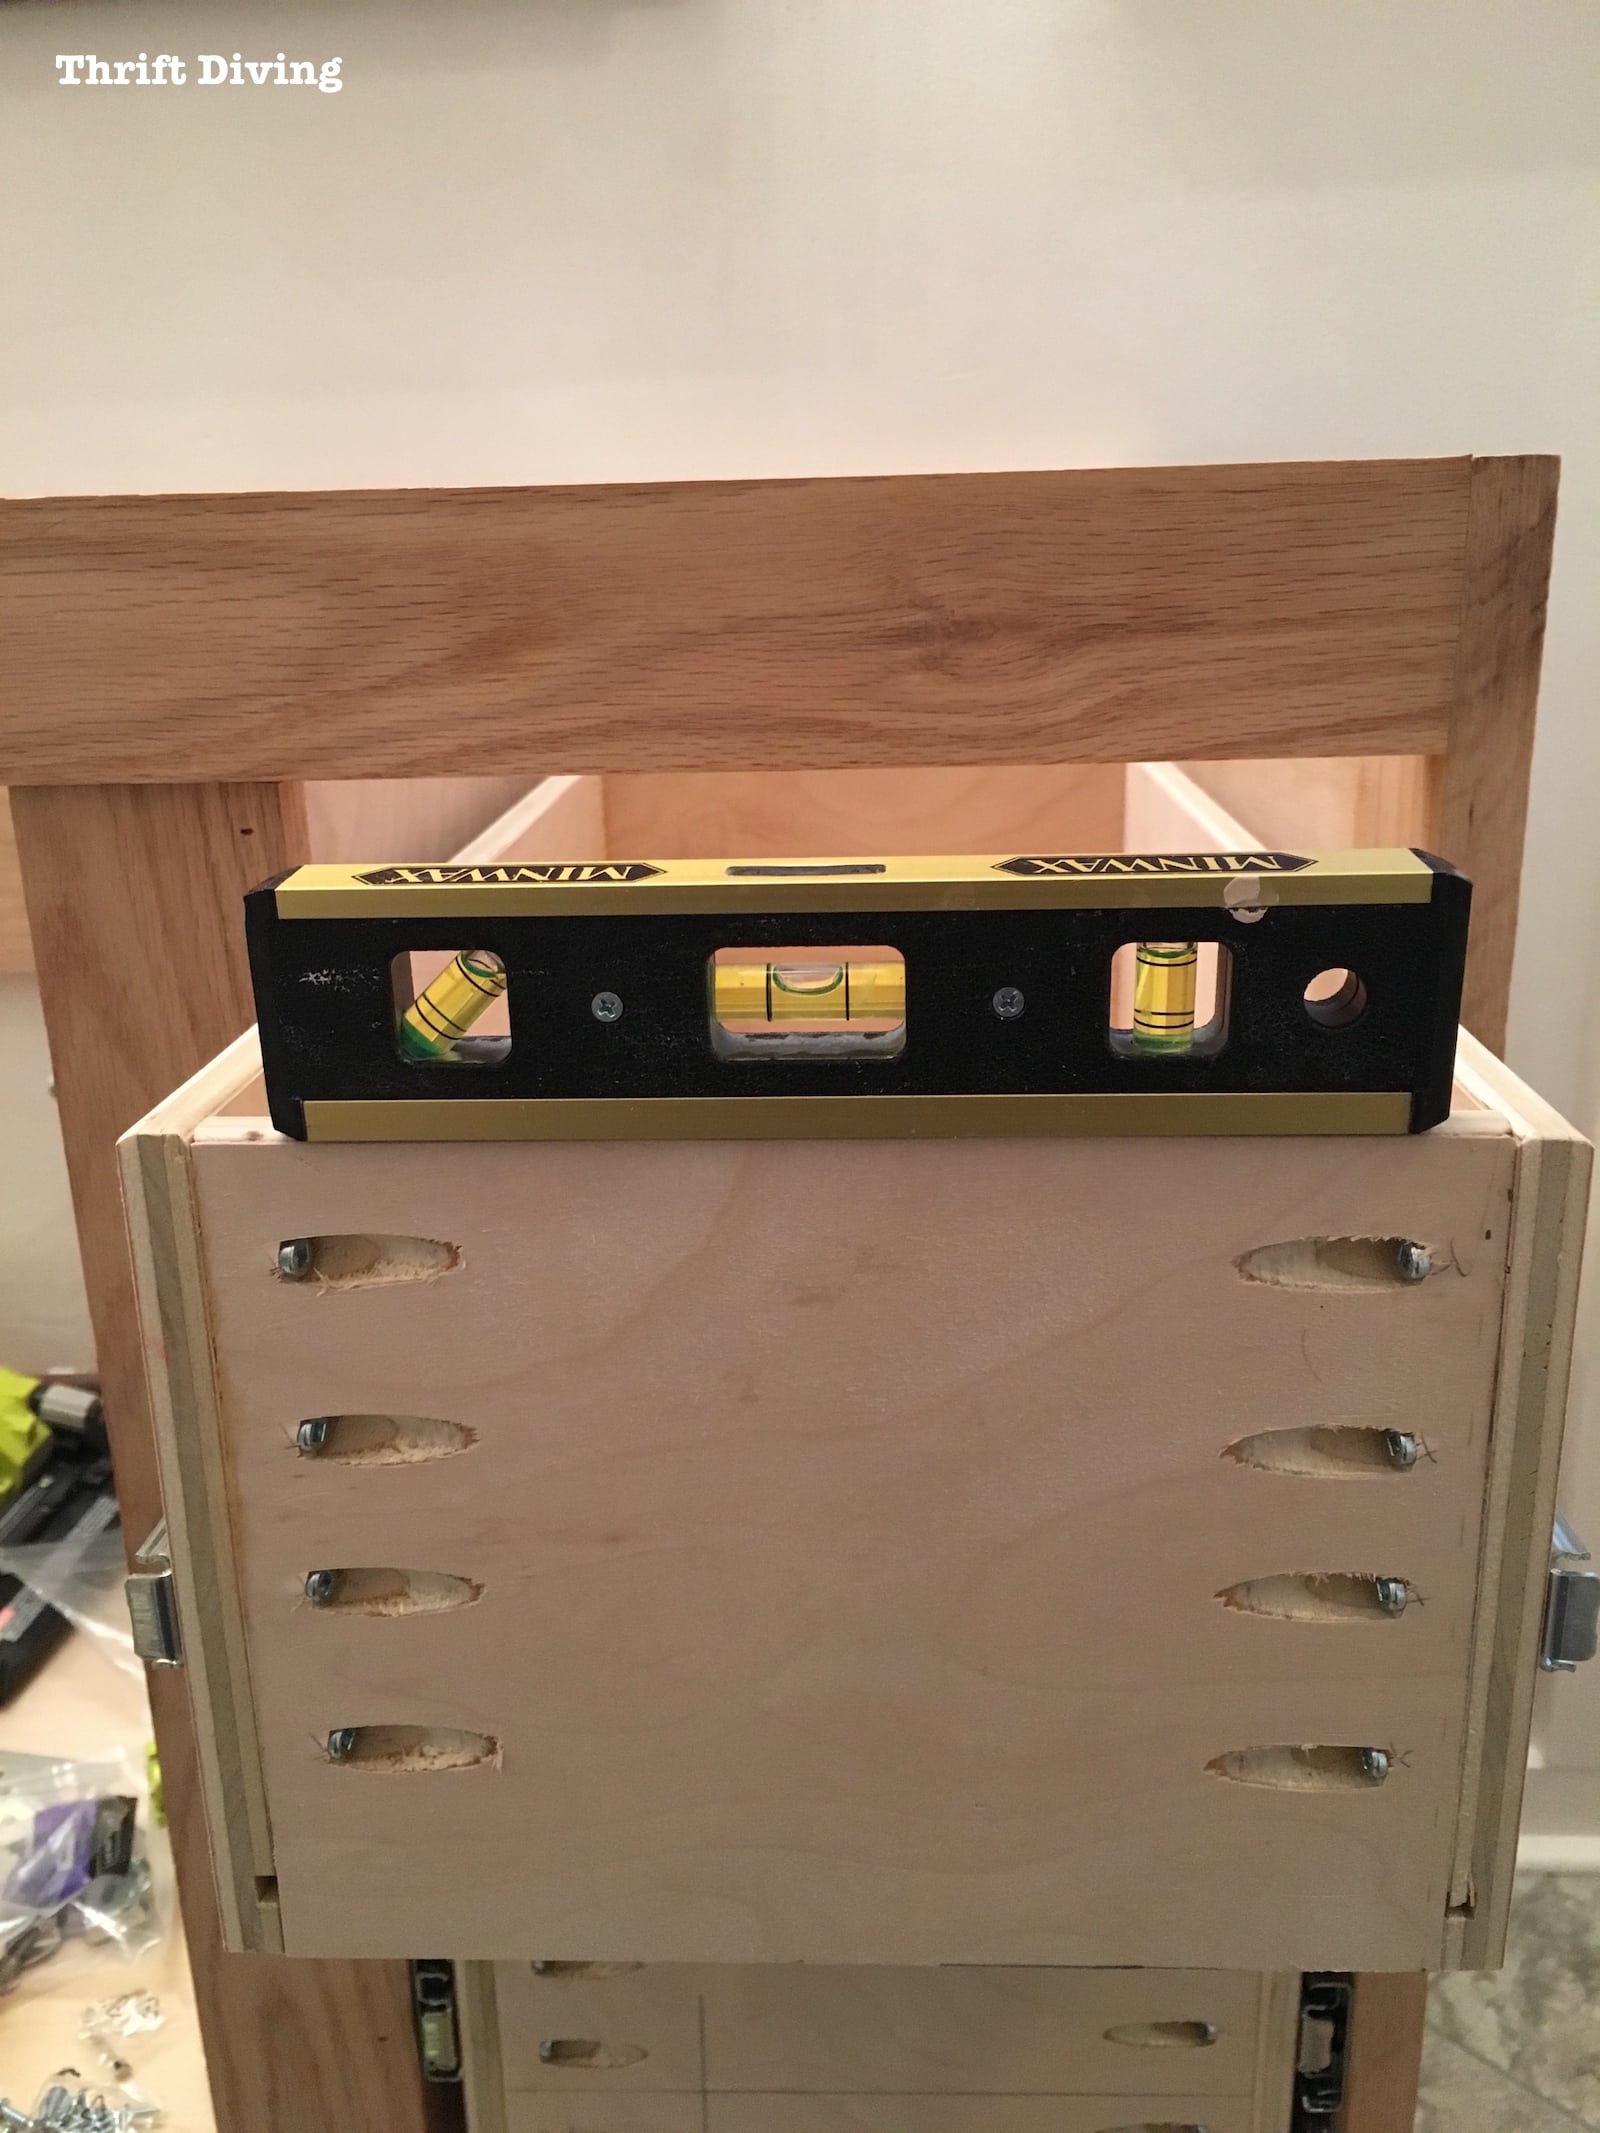
The right side worked out well! I tested them for level and they were good to go!
Then the Problem Happened…
Imagine my horror when I went to install the left hand drawers and–GASP!–they wouldn’t fit properly.
YIKES!
The top drawer was very snug. I was able to sand it down a little to help it fit better.
But the bottom drawer??
I couldn’t get it in any further than this point. Then it just STOPPED.
The problem was that one of my partitions was–OH NO!--slightly crooked, where you see the black arrows!!
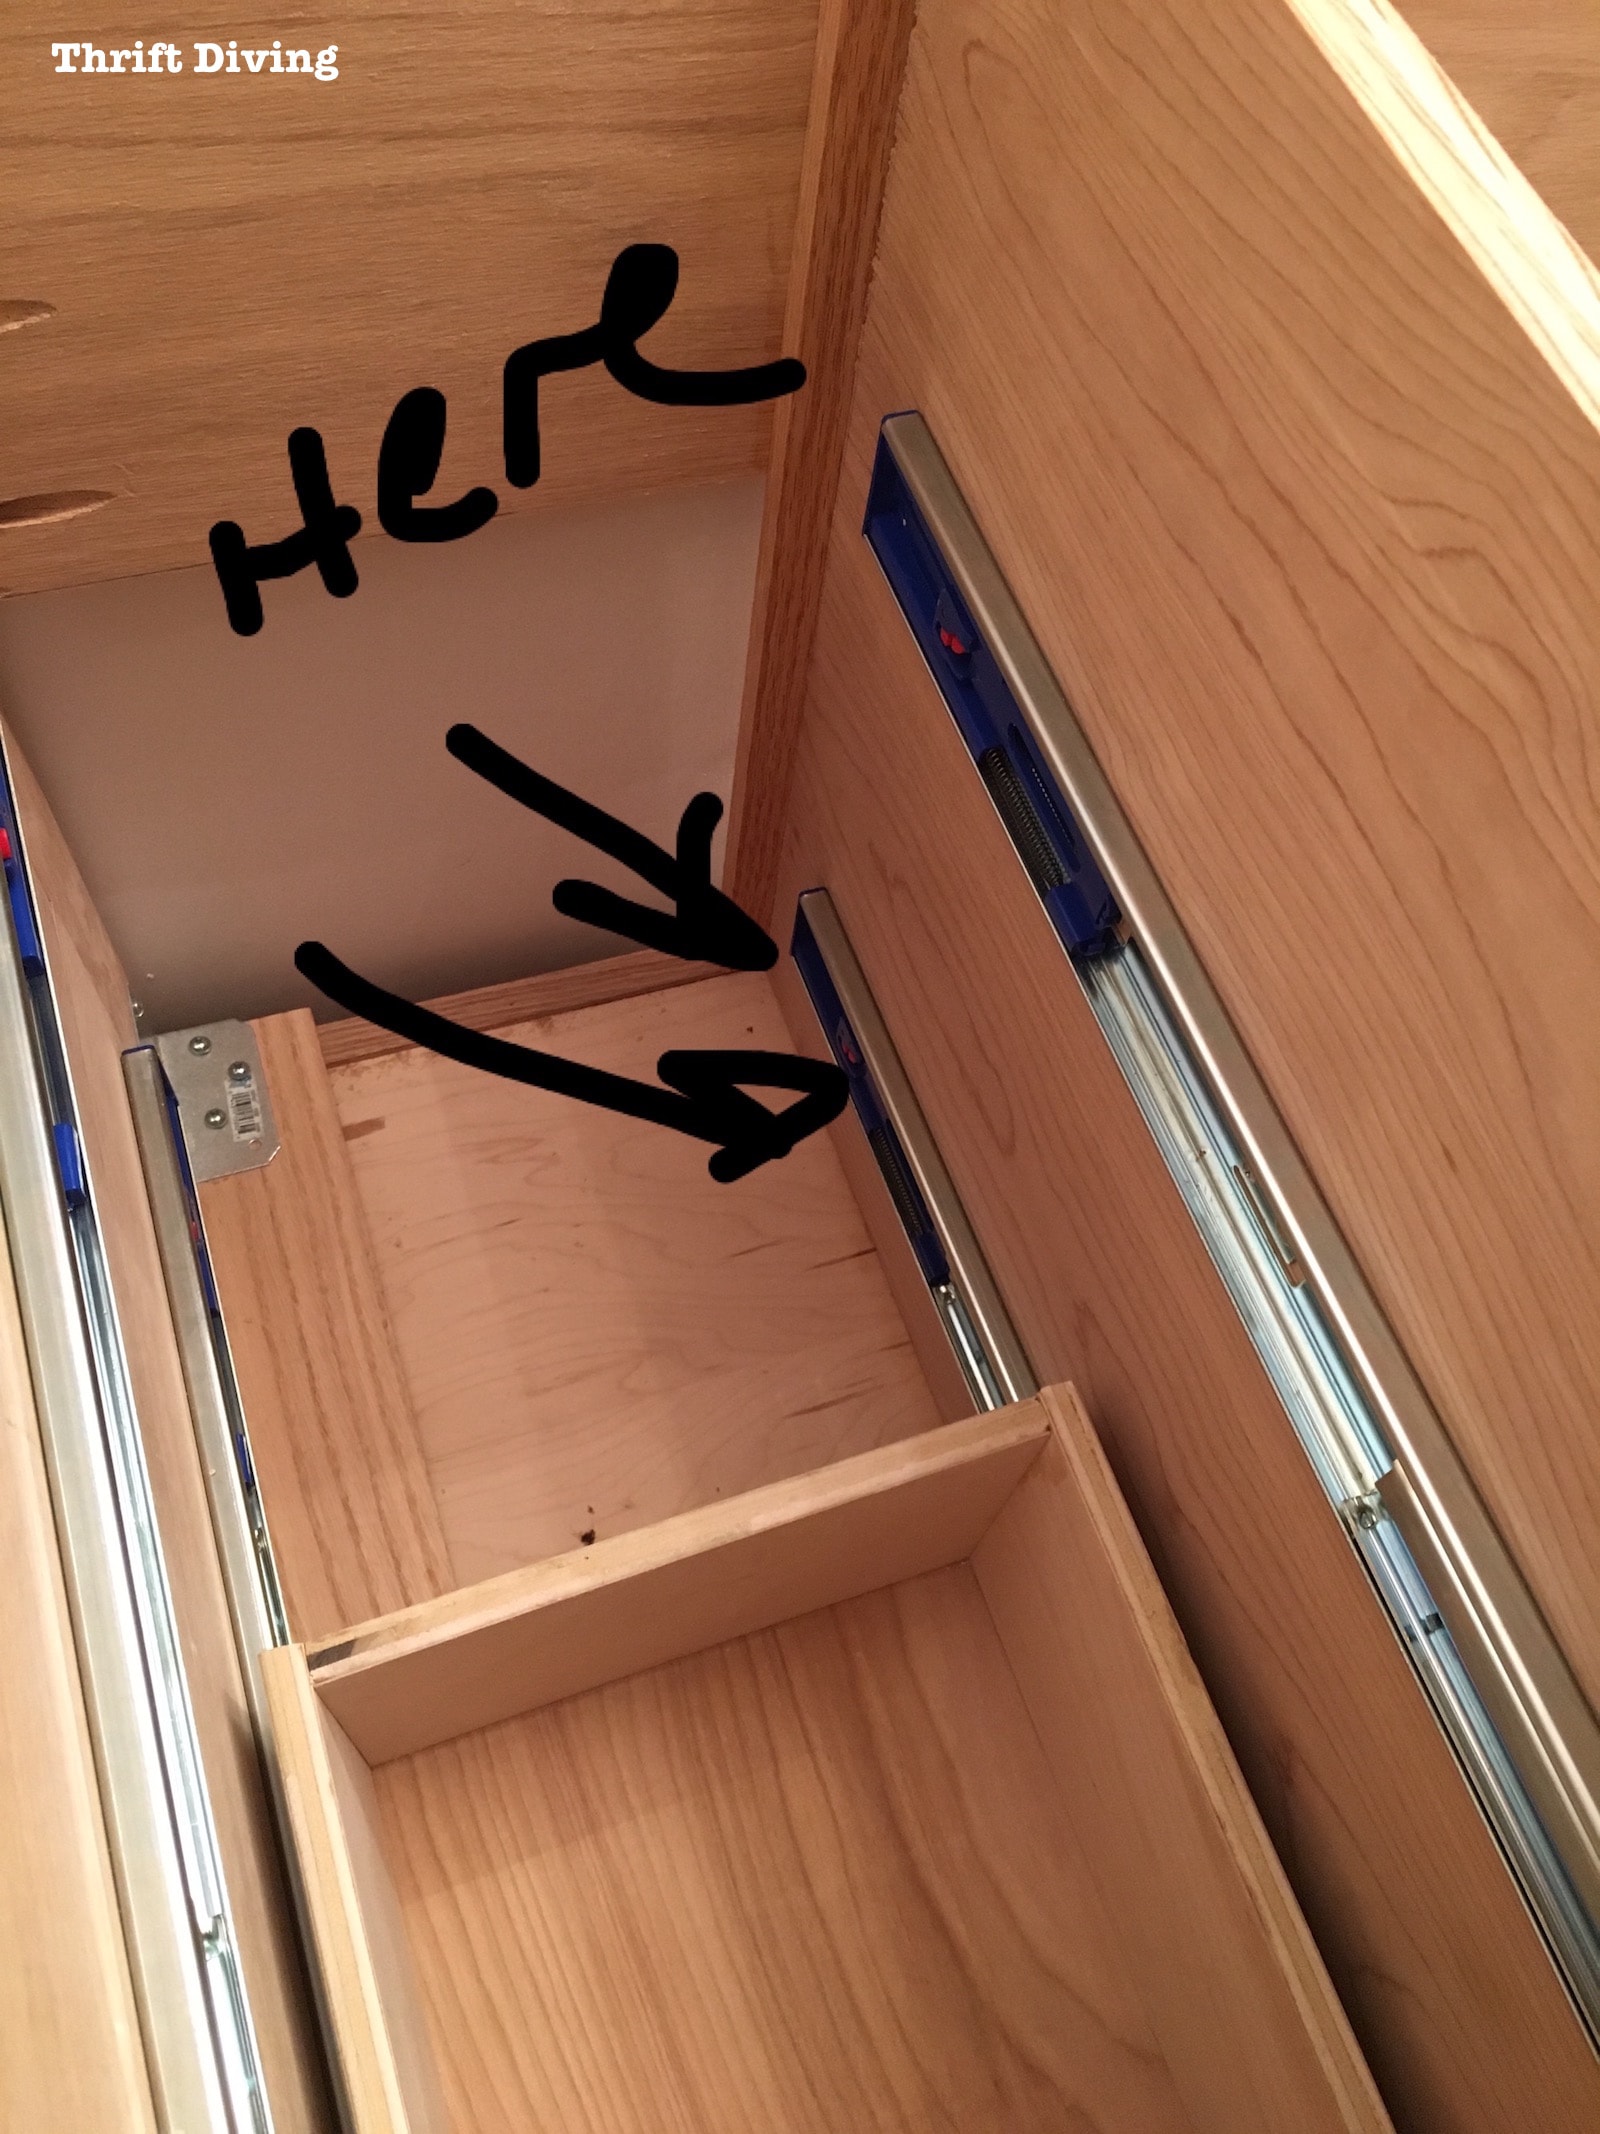
Remember how I said that using these drawer slides, you’ve got to be 100% accurate with your measurements??
What I didn’t realize is that one of the partitions in Part 3 of this series must have gotten pushed in about 1/4″ or less, which was juuuuust enough to prevent this drawer from sliding in.
There was no way in heck I was removing that partition!
So I ended up sanding the HECK out of that drawer, then added small washers to help even it out.
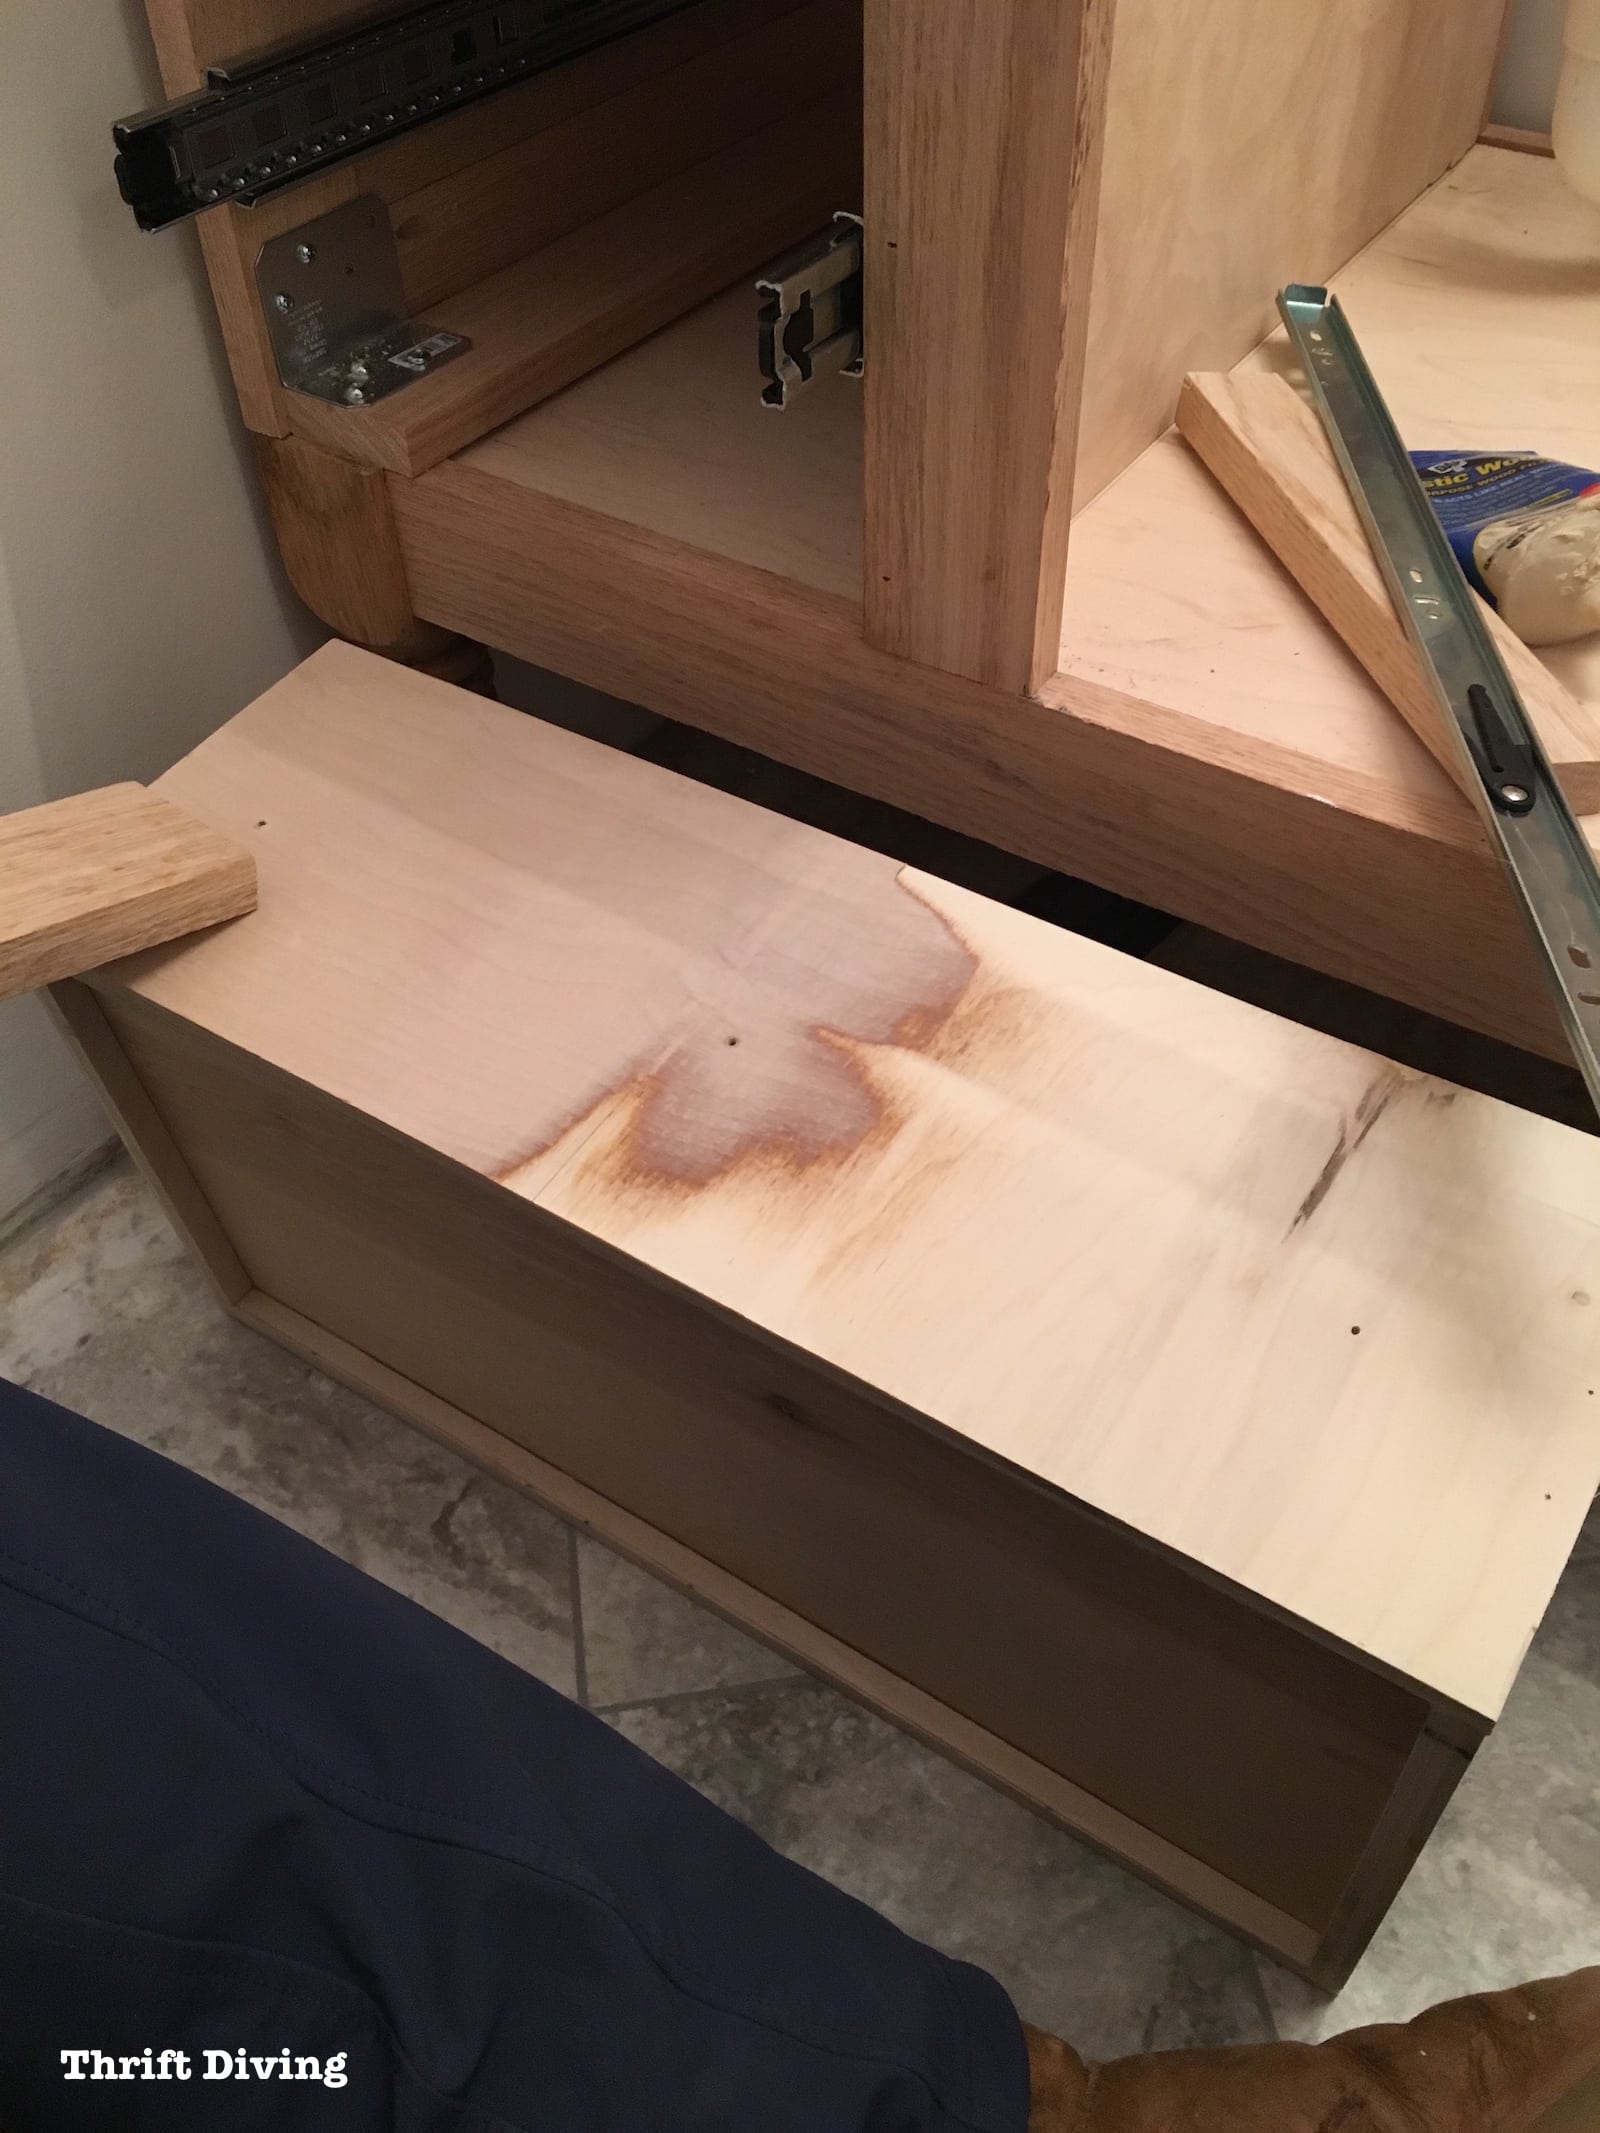
Through the magic of sanding (or….maybe praying?? lol), I was able to get them to fit.
By sanding, I removed a lot of the bulk of the drawer thickness to account for the wonky partition. WHEW!
The soft-close mechanism doesn’t quite work well, but who cares? I’m just happy to have DRAWERS, after the fear of them not fitting!
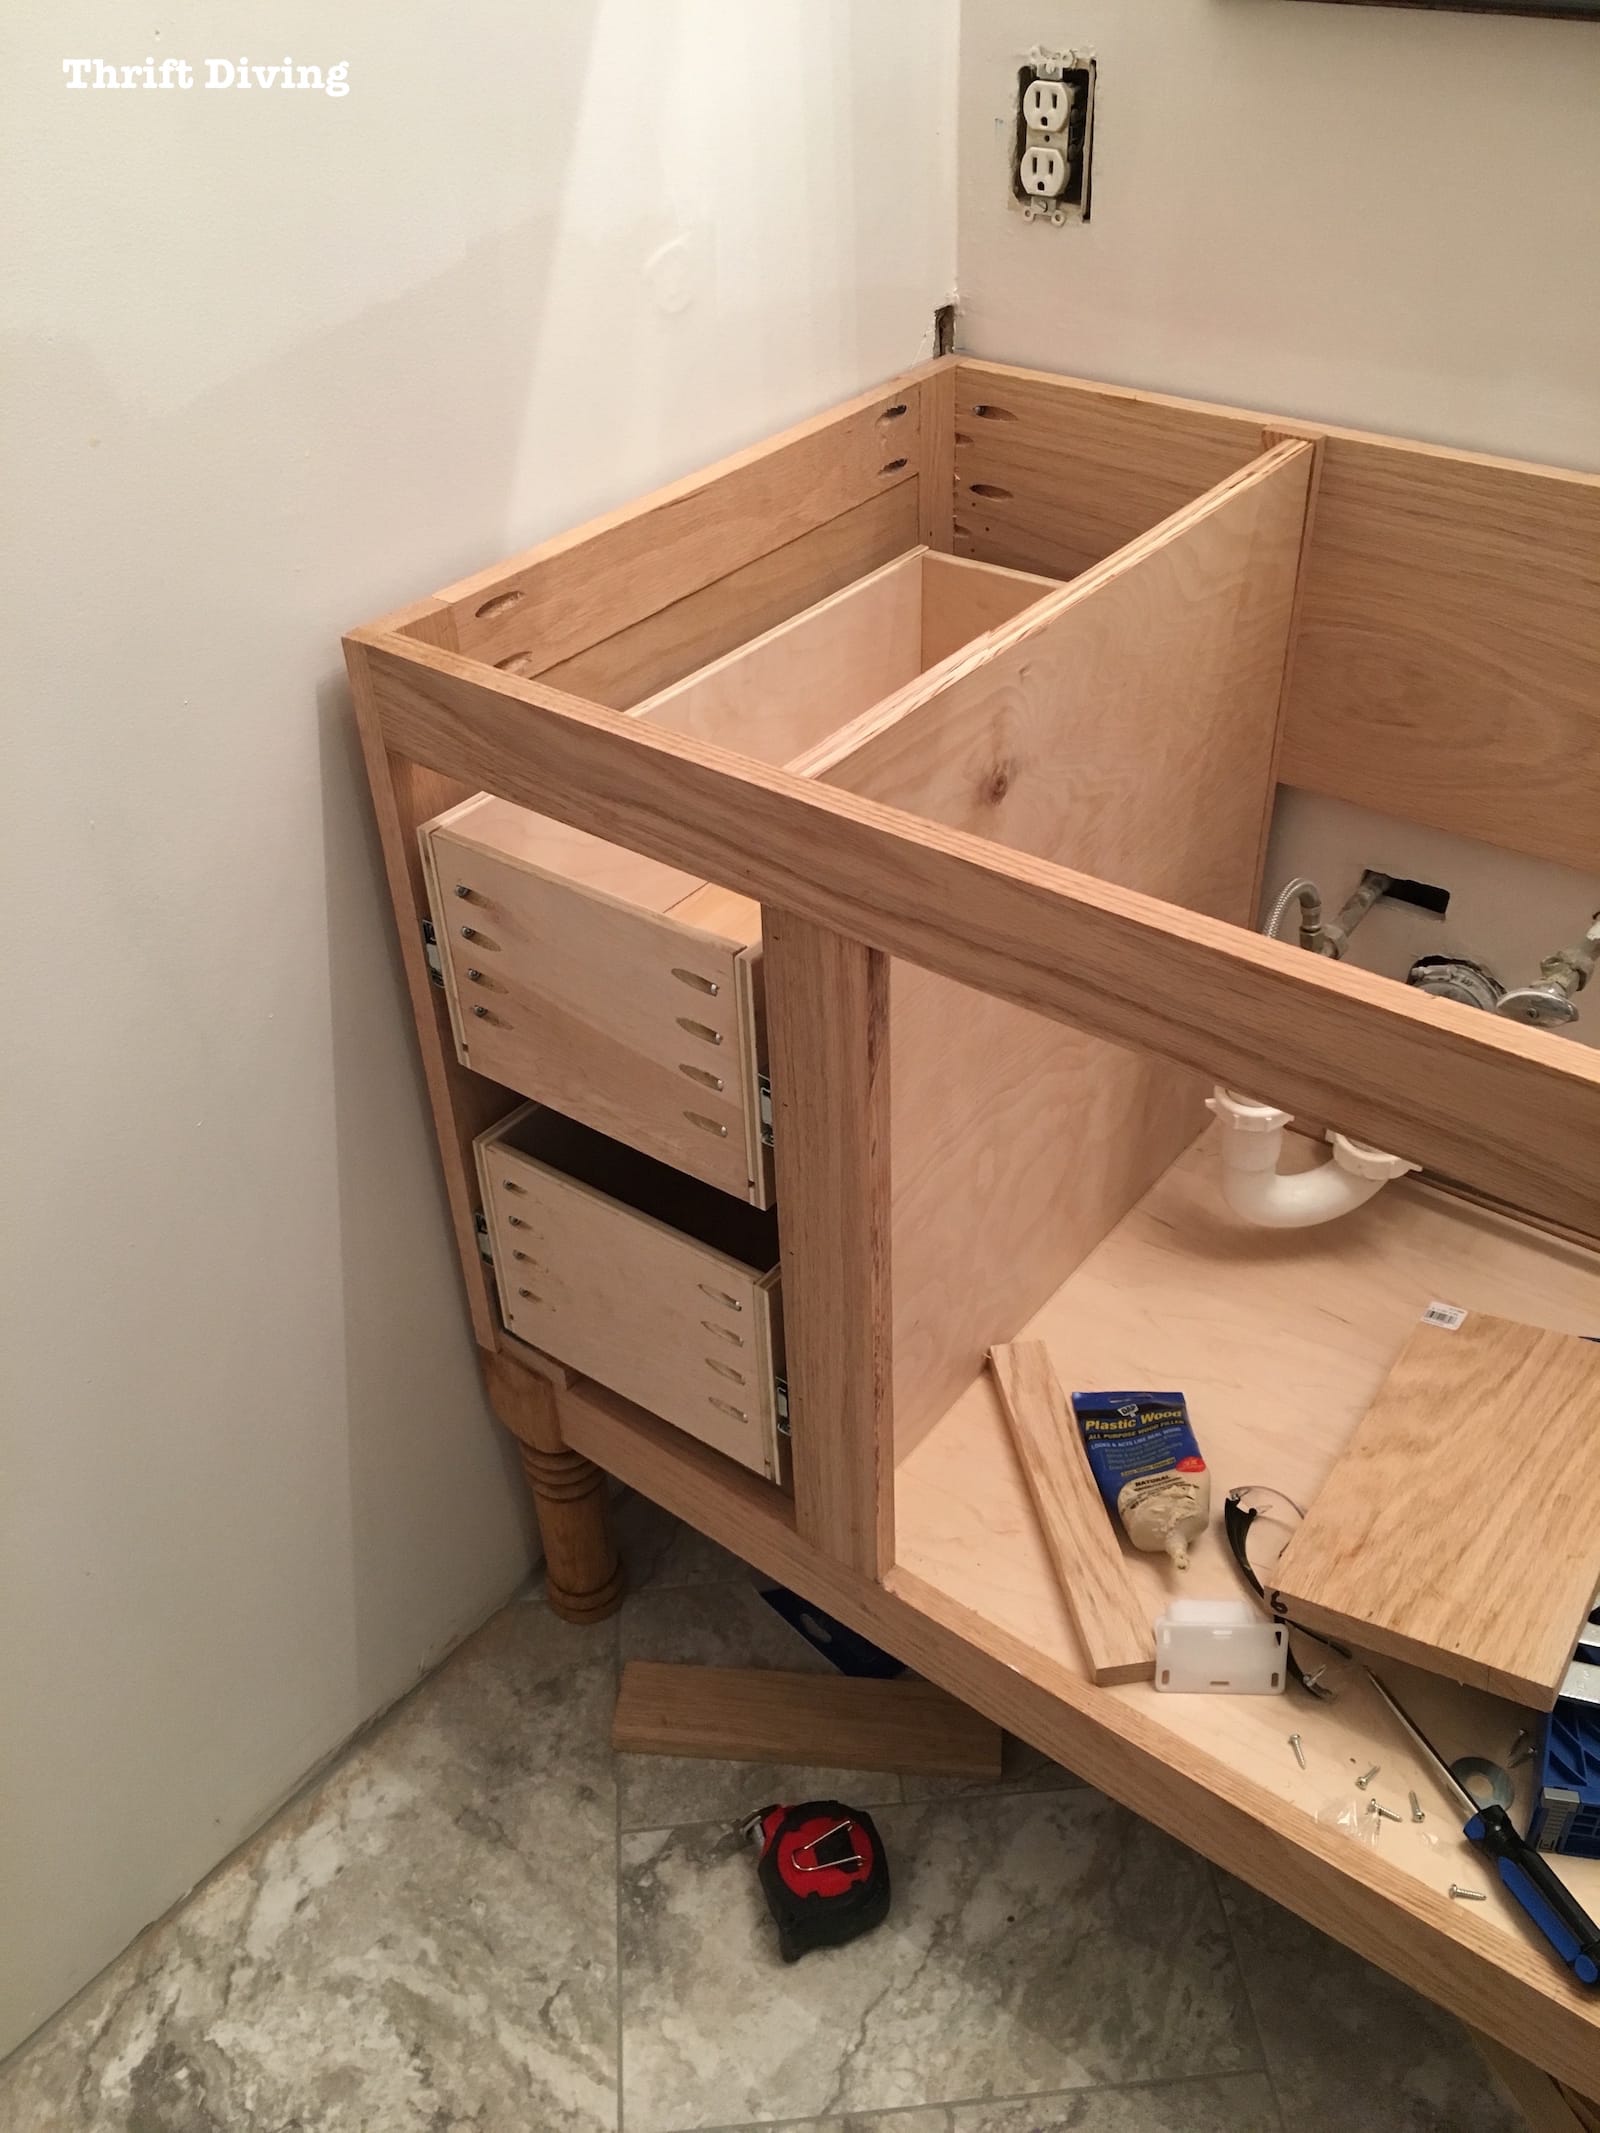
Adding More Support
One other thing I did was add some additional center support.
I kept having this fear that the whole DIY vanity would crack or bow under the weight of granite countertop when it was installed, so I glued two Red Oak boards together and created a strong center support, attached it with pocket holes and wood glue.
Since this was going to be a 60″ DIY bathroom vanity with dual sinks, I knew that a center support would be helpful.
So that, my friends, is the looooonnngggg process I went through trying to add drawer slides and to create drawers for this DIY bathroom vanity!
The worry I still had was how the drawer fronts would fit and how the cabinet doors would fit, too.
I’m sharing that with you in the next part!
Enjoyed this post? Click HERE to pin this series for later!
![]()
Read the Rest of this Bathroom Makeover Series!
DAY 1: The Evolution of a Master Bathroom Makeover
DAY 4: Picking Out New Flooring: Which One Do You Like?
DAY 6: How to Remove an Old Bathroom Vanity
DAY 27: Removing Wallpaper, Repairing Walls, and Removing an Old Toilet
DAY 29: Installing New Flooring in Our Master Bathroom
DAY 49: The Bathroom Makeover That Would Never End (An Update!)
Day 52: How to Remove a Toilet Yourself
DAY 57: How to Install a Toilet Yourself
Build a DIY Bathroom Vanity – PART 1 – Attaching Legs and Base
Build a DIY Bathroom Vanity – PART 2 – Attaching the Sides
Build a DIY Bathroom Vanity – PART 3 – Creating the Partitions
Build a DIY Bathroom Vanity – PART 4 – Making Drawers
Build a DIY Bathroom Vanity – PART 5 – Making Cabinet Doors
Build a DIY Bathroom Vanity – PART 6 – Adding a Granite Vanity Top
Build a DIY Bathroom Vanity – PART 7 – The Final Finishing Coat
BEFORE & AFTER: The Final Master Bathroom Makeover Reveal!

Download the 5 freebies!

Thrift Diving inspires women to decorate, improve, and maintain their home themselves...using paint, power tools, and thrift stores! Use these 5 printables, checklists, and ebooks to get started!
Hello I found youI was thinking and thinking and thinking of making cabinet. I want to make Gwyneth Paltrow pantry
Now I will try. Would appreciate if you could make similar instruction post attaching shelf units to the door and half width back shelves
I am fixated to her pantry cupboard
Thanks
Vijaya
Thank you for sharing, and being brutally honest. I am making my own drawers to fit kitchen undercabinets.. certainly is a trial by fire… I think I have all the details figured out… only to find out later… ah .. nope.. missed one ! Try again…. measuring all the minutia… twice… better yet 4 times! … getting everything to a thirty second… and test runs can not be over emphasized enough.. if at first, i don’t succeed… try, try…
HAHA, Wayne, I feel your pain!! That’s how it was for me through every step of building this vanity. The biggest things I learned is to take the right measurements–NOT just at one side, but along the entire length, and to use that speed square to make sure that everything is square. It’s fun figuring it out, but stressful as heck! LOL Good luck, and I hope your drawers turn out satisfactory! 🙂
Good Gosh Girl! You Rock in this nifty project. Love it and so glad you showed how to make drawers. I have a couple build ins that need drawers. So how about you come over to good ole SA and make mine. Free room and board and a nice tour of SA. LOL
Thanks for this great tutorial
How frustrating!! But it looks fabulous in the end. =) Great job!! I love how educational your posts are, and how you don’t just gloss over all the things that went wrong. This has been such an exciting build to watch – I guess all the viewers know that you’ll figure it out in the end! 😀
This is a very stupid question, but… I live in a seriously uneven nearly 100 year old farmhouse. Is it still possible to build level and square furniture? I’m guessing obviously, since people back in the good old days made it work, but what do you do? Use a square and level and make sure that checks out, no matter the surface?
Yeah, very obvious question, but I just built my bed and a few parts are a little less than square, so I was hoping – for future reference, y’know. 😀