How to Remove a Toilet Yourself: Stop Paying for Plumbers!
When I tell people that I know how to remove a toilet myself, they’re impressed. They think removing a toilet is a complex home maintenance project that only a strong man can do, but it’s not true.
We women are just as capable.
If you’re a homeowner, regardless of whether you’re a guy or a gal, everyone can learn how to replace a toilet, especially if the toilets in your house were like some of mine–ahem–avocado green! I’ve removed and replaced two toilets in my home.
The first toilet was a nasty green 1970’s avocado green one for my kids’ bathroom makeover.
The second one was my master bathroom makeover.
Sometimes we gotta get down and dirty. And this is actually one of those posts. LOL. If you can learn to do some of these things to maintain and improve your home yourself, you won’t have to call on a professional to do the easy things you can do yourself (which could cost you $125 – $260, and that’s not including the cost of the toilet!).
Who doesn’t like to save money??
How to Remove a Toilet Yourself: No Plumber Needed!

Materials Needed to Remove a Toilet
(I participant in the Amazon Services LLC Associates Program, an affiliate advertising program designed to provide a means for me to earn fees by linking to Amazon.com and affiliated sites).
- Wrench
- Flathead screwdriver
- Towels
- Bucket
- Gloves
- Hacksaw
- Small putty knife
WATCH: How to Remove and Install a Toilet Yourself
I removed my toilet in my half bathroom and installed a new one. See the installation from start to finish!
Click here to subscribe to my YouTube channel for furniture makeovers and home improvement!
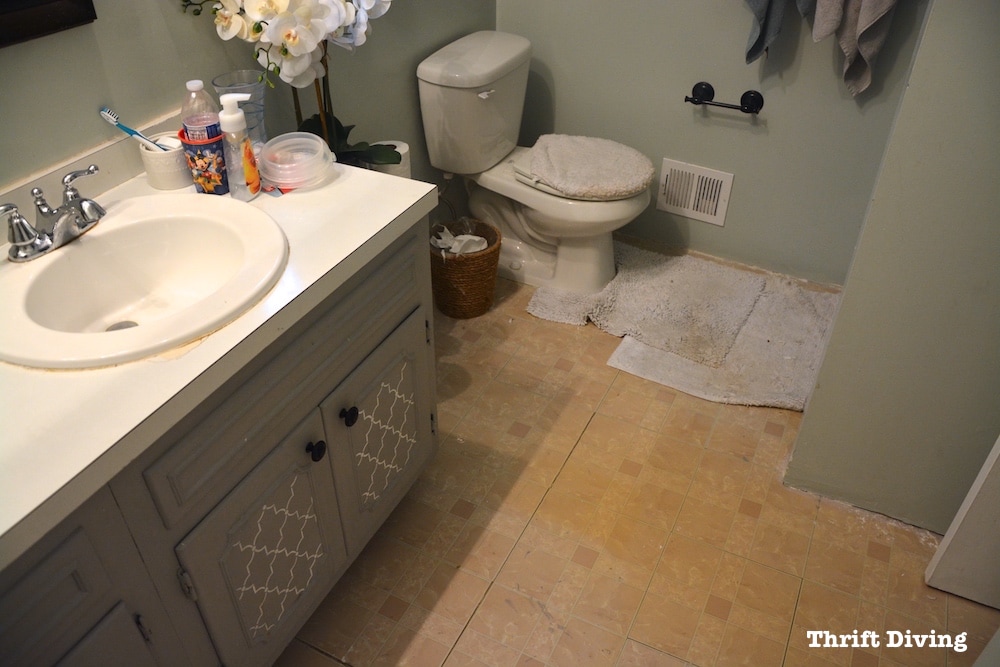
This, folks, was my toilet in my master bathroom. We were replacing the floor, so the toilet needed to come out. This was a great time for us to plan to replace it.

STEP 1: Shut off the water first!
Yeah, this is pretty important but easy!
See that little pipe behind the toilet? That’s the water pipe and water supply.

It’s just right behind the toilet. Turn the knob clockwise to shut it off.
Now flush. The tank won’t refill, which is what you want. You’ll likely need a sponge or towel to soak up the leftover water in the back of the tank.
Then unscrew the water supply line from the tank.

STEP 2: Loosen the plastic bolts to the tank.
The next step is to loosen the plastic bolts that are holding the back tank to the bowl.
You’ll want to have a small bucket to catch any water that comes out.
Use a wrench if the plastic bolt is too tight.

Once those bolts are removed, guess what?
You can now lift off the back of the tank!
WARNING: Be prepared when you lift off the back tank. If you have boys, I guarantee you’ll see some nastiness like I did (see below).
The best part, though, it finally being able to access the area behind the toilet if you’ve never been able to reach back there to paint behind the toilet!
When I made over this bathroom years ago, I was stupid and had no idea how to paint behind a toilet. I didn’t realize how easy it was to just remove the back tank (insert forehead slap here).
Now you know. 🙂
TIP: If you have young boys in your home, you might want to consider installing a new one-piece toilet in your bathroom, which eliminates the hiding spots where little boy pee can get trapped. I installed the Kohler Santa Maria 1-piece toilet in my boys’ bathroom. You find it at The Home Depot.

STEP 3: Pop Off the Caps
This is where things start really getting nasty. 🙂
If you’re removing the entire toilet (and not just removing the back tank to paint behind the toilet), you’ll need to remove the bolt caps.
Underneath there are the bolts that are holding the toilet to the floor.
Just use a flathead screwdriver to pop them off.

STEP 4: How to Remove Rusty Toilet Bolts
If your toilet is sooooooo old like mine, you might just find the toilet bolts to be very rusty.
…Maybe years of men peeing on them, perhaps?? LOL
But what I can tell you, though, is that first, you’ll need to use your adjustable wrench to see if you can loosen them.
Mine, however, just kept turning and turning.
If that’s the case, then you must cut them off. Yes….cut them off.
Don’t worry, it’s not hard, but you’ll need a little bit of strength.

Typically you’ll want to use a hacksaw, which are just small hand-held saws that will allow you to cut through the screw.

I didn’t have a hacksaw, per se, but I did use another small hand saw, which worked, thankfully! I was a little worried for a minute because it seemed like it didn’t want to give!
But it did, which you can see below!
It’s actually not too difficult to remove toilet bolts that are rusty because the bolts are pretty soft. Just keep sawing until it comes off.

STEP 5: Remove the Toilet
Once the two toilet bolts are cut off or loosened off, you’re now ready to remove the toilet!

They can be heavy, so get help if you need it.
And they’ll likely have a little bit of leftover water in them. I just tilted it over into the shower stall to remove it. You’ll need two people to lift it high, though. (I think I’ve already read that people recommend plunging any leftover water in the bowl before disconnecting it, but I didn’t try that).
I tend to try to be Super Girl, and do all the heavy lifting myself! This nasty toilet is going to get a bath and head to the salvage shop!

STEP 6: Quick! Cover With a Rag!
Toilets are stinky for a reason: they’re connected to sewers! Once you remove a toilet, you don’t want those sewer gases coming back up into the house. So just be careful and gently place a towel or old rag in the hole. Use a towel that’s large enough to not fall down the sewer line!

STEP 7: Scrape Away the Icky Wax!
It’s likely that you’ve got a bunch of leftover wax from the wax ring that was under the toilet, which helped to seal the connection and prevent leaking.
Just use a small putty knife to scrape away the waxy gunk. You’ll be needing a new wax ring anyhow.
TIP: I’ve heard that using a blow dryer to remove the old wax works well, too!
You’ll want to thoroughly clean the wax ring. You can use mineral spirits (which you can get from your home improvement store). I used my favorite heavy-duty cleaning wipes instead, which did a great job!
Click here to save this tutorial on Pinterest.
![]()
It’s That Simple
Pretty simple, right??
Be sure check out the next post on how to install a new toilet yourself!
If you don’t feel comfortable doing these DIY home improvement projects yourself, you can always hire a professional. Just be sure to ask yourself these 10 questions before hiring a contractor.

OPTIONAL – Sand and Paint Behind Your Toilet
In my case, I needed to sand and paint behind my toilet.
Use sandpaper or an orbit sander to smooth the area, and then paint.

That’s it! Removing a toilet really is that simple!
Leave a comment below and tell me–have you ever removed a toilet yourself? How did it go?
Catch up on this entire master bathroom makeover series!
DAY 1: The Evolution of a Master Bathroom Makeover
DAY 4: Picking Out New Flooring: Which One Do You Like?
DAY 6: How to Remove an Old Bathroom Vanity
DAY 27: Removing Wallpaper, Repairing Walls, and Removing an Old Toilet
DAY 29: Installing New Flooring in Our Master Bathroom
DAY 49: The Bathroom Makeover That Would Never End (An Update!)
Day 52: How to Remove a Toilet Yourself
DAY 57: How to Install a Toilet Yourself

Download the 5 freebies!

Thrift Diving inspires women to decorate, improve, and maintain their home themselves...using paint, power tools, and thrift stores! Use these 5 printables, checklists, and ebooks to get started!
All these years later, I own a home myself now, and immediately went back to this guide as a refresher on how to remove a toilet. 🙂 Doing it this afternoon – converting our guest bathroom into a laundry room since we have no laundry. Thank you so much, Serena!
Hi Zovesta!!! OMG, so good to hear from you! Wow, I hope the tutorial helped you! 🙂 How are you?
Thank you sooo much. U r the BOMB!!! I removed 3 of my toilets today with ur help. I will remove the last one after the other 3 r back in order so I have book marked ur page. Thank you so much. Amy
I love the tip on disposable cleaning wipes. I have remodeled a couple homes and that wax just grosses me out! Job well done and I love the pics!
Thank you for this tutorial. I am on a mission in life to learn to be as self sufficient as possible. I live alone and hate to pay for services that I can do myself. I am going to add this to my list. I have a bathroom floor to replace and don’t want to work around the toilet, I want to take it out.
You’re welcome, Karen! You should definitely take out the toilet. The hardest part is removing the bolts if they’re rusted over but it’s doable with the right tool! You’ll likely need help when putting the toilet in because you’ll want someone to make sure that the toilet is going right over the flange. 🙂 Good luck and you can do this!!
Hi, Serena
My first visit to your blog via Funky Junk’s party. I’ve looked at several of your posts and I’m impressed by the detailed descriptions in your tutorials. Your photos also show just what you’re describing. I do believe even I could remove a toilet now-ha!
Karen, that’s awesome!! YES! That’s exactly what I love to do: give you everything I can possibly imagine you’d need so that you could do it yourself! 🙂 The more details I can put, the better! So glad you’ve read several of my posts. Yep, they’re super long, but I wouldn’t have it any other way. 🙂 THANK YOU!! Hope to see you around again!
You make this look easy! Thank you for posting Serena.
Thanks, Tammy. It really is! It seems more complicated until you break down each step!
Thanks Serena for this detailed post..It was very helpful..
You’re welcome, Sarah! I am now working on the next one, about how to install your own toilet! 🙂
That does seem pretty simple! This is the sort of thing you used to have to buy a confusing, overly technical book for, have a family member do, or hire out. Now I can just bookmark this! 😀 This is so helpful and easy to understand without being overly simplified. Thanks Serena!!
Hey there, Zovesta! You are so right–it IS simple! It’s just a matter of having the confidence to try! But I found that after having done one before, this one was less anxiety-producing and I got it done faster because I knew what I was doing! 🙂 It’s fun adding these skills to the bucket of “Things I Know How To Do For Myself” list! 🙂