Build a DIY Bathroom Vanity – Part 1 – Attaching Legs and a Base
This post is Part 1: Attaching Legs and a Base in the series where I am got this crazy idea to build my own 60″ DIY bathroom vanity from scratch for my master bathroom. Be sure to check out the other parts of this tutorial series:
- Part 1: Attaching Legs and a Base
- Part 2: Attaching the Sides
- Part 3: Creating the Partitions
- Part 4: Making Drawers
- Part 5: Making Cabinet Doors
- Part 6: Fitting the Granite Vanity Top
- Part 7: Finishing the Oak Vanity
- BEFORE & AFTER: The Final Master Bathroom Makeover Reveal!
Build a DIY Bathroom Vanity: Attaching Legs and a Base
When I decided to build a 60″ DIY bathroom vanity, I wasn’t thinking further than, “Hmm, how hard can it be?”
But as I start building it…or should I say, as I started piecemealing it together…I realized that the real challenge would be explaining how I did it.
I wasn’t working from any building plans.
And I kept running into challenges that I kept thinking, “Crap. How am I going to explain this??”
I’m infamous for 2,000-word posts with 50 pictures, but I wanted to make this explanation as easy as possible.
Plus, I wanted to explain everything, from beginning to end. There’s no way to do that in just one post. That’s why this will be a series of posts.
Starting with the legs.
Why I Chose to Upcycle Legs for a 60″ DIY Bathroom Vanity
When I first decided to build the vanity, I hadn’t done any research yet.
There are tons of building plans out there that walk you through step-by-step, including measurements and all.
It’s sort of like using a sewing pattern: you simply cut, pin, and sew. And voila! If you followed the instructions correctly, you’ll get some semblance of a cute dress. Same thing with a DIY vanity.
But over Thanksgiving, I had decided to look for vanity legs, without knowing what I was really doing (read all about it here).
Upcycling is what I do best, and it’s always exciting turning this into that. Plus, the upcycling I do is what makes my projects special.
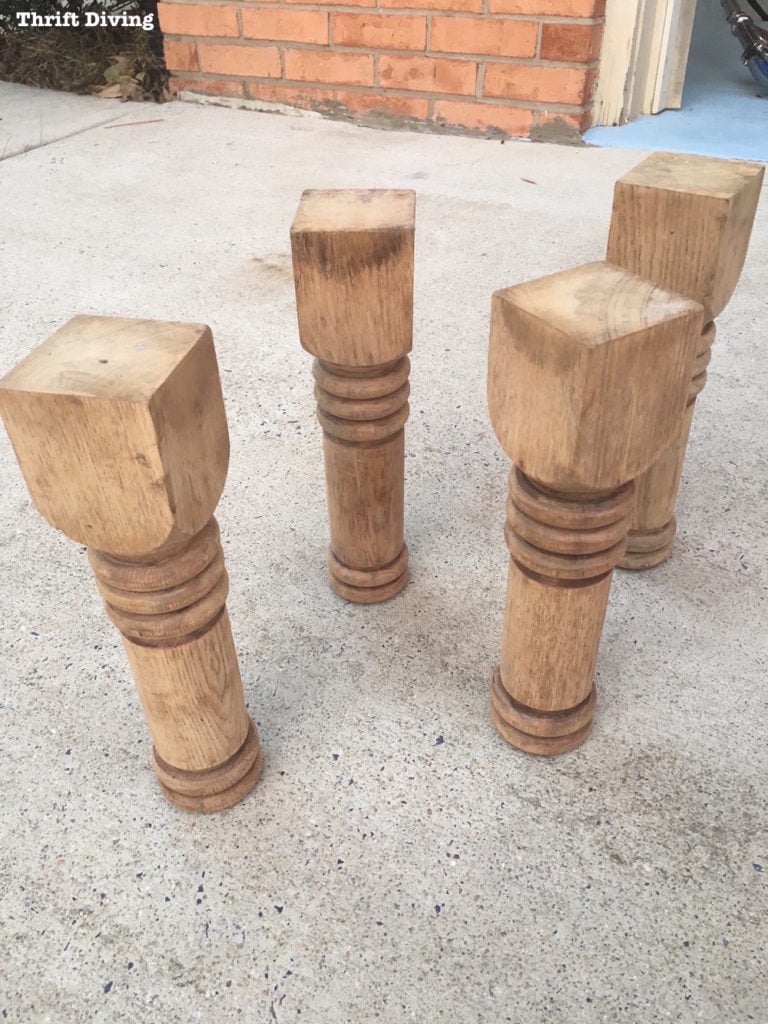
That’s when I stumbled upon these legs from a salvage shop.
I knew they’d be perfect for a vanity!
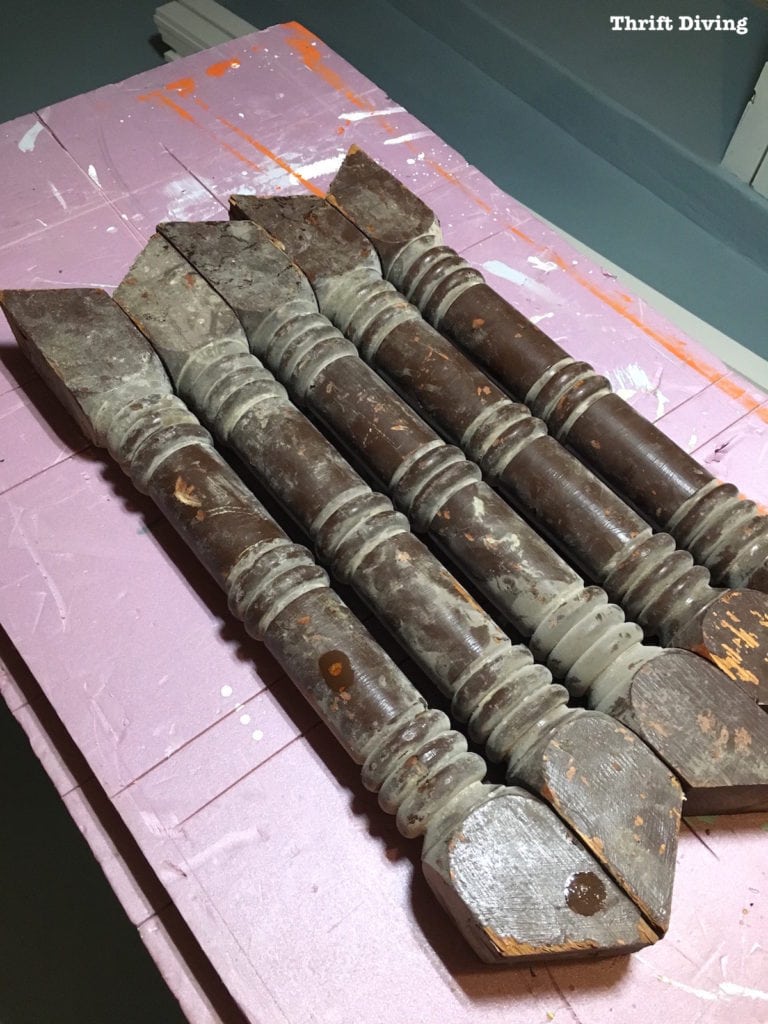
I decided to cut them down to about 11.5″ in order to make clearance for the bathroom plumbing. The tall height would have been way too tall.
After cutting them down with my miter saw and stripping them (read about that step here), they were ready for sanding.
It took a lot of work to get the residual stain and gunk off of the legs!
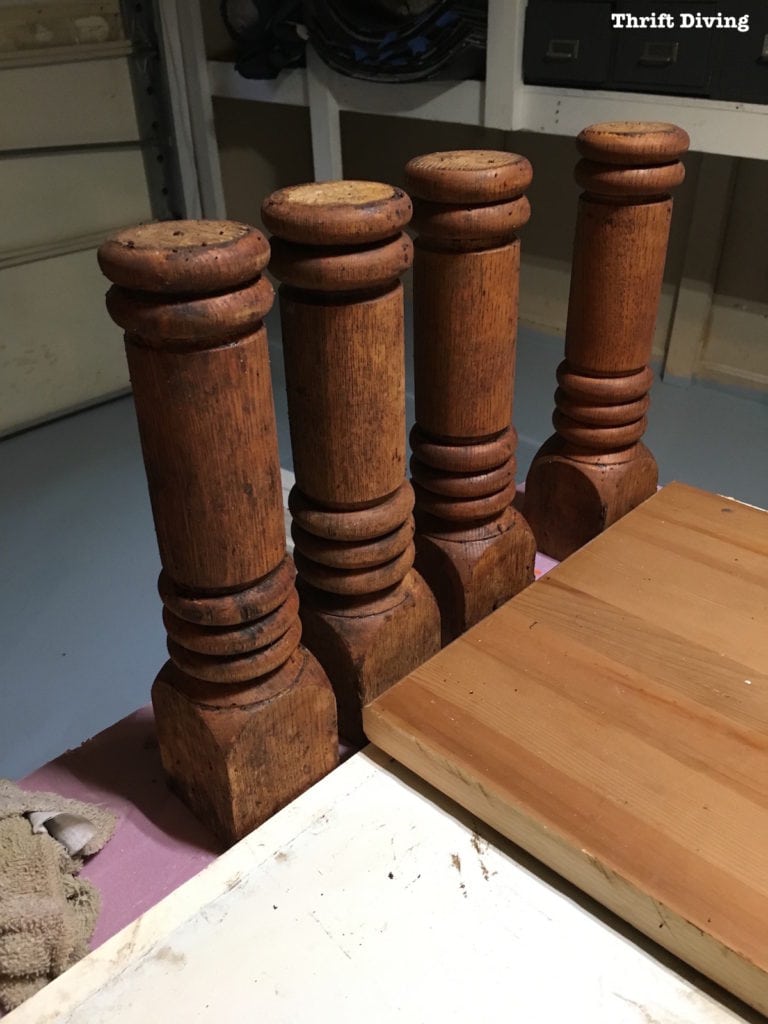
Here you can see how dramatic the difference was BEFORE and AFTER sanding.
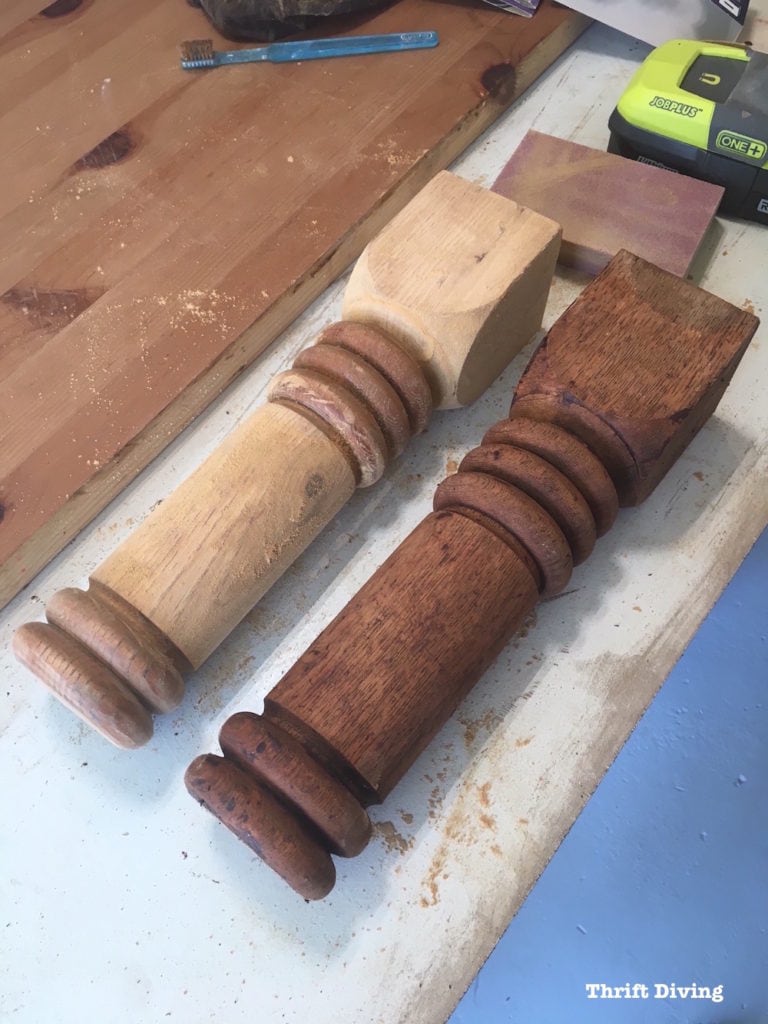
To get them this clean, I used a detail sander, like this tool from RYOBI, along with angled sanding sponge blocks, about 150-grit sandpaper.
TIP: The Dollar Tree sells angled sanding sponge blocks, too! Pick up a lot of them to keep on-hand for these types of projects!

Buying Pre-Fabricated Legs

Looking back, I would highly recommend that if you decide to make your own DIY bathroom vanity, buy pre-fabricated legs before you try to start getting super creative like I did. LOL
The whole project would have been faster and a lot easier to follow someone’s building plans using these legs.
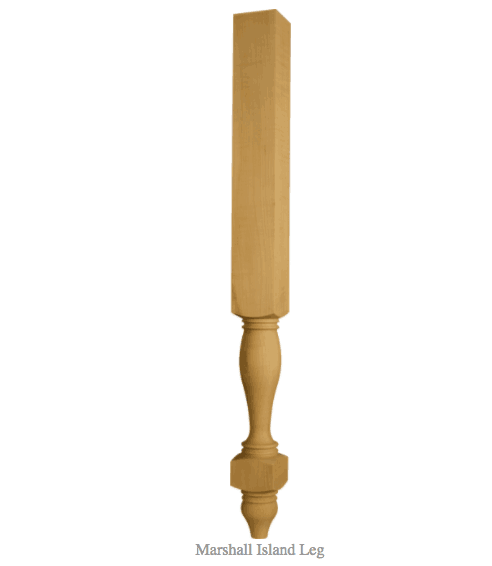
For example, although I wasn’t following Ana White’s DIY bathroom vanity tutorial exactly, I glanced at it often for reference.
These are the legs she used, from Osborne Wood.
Much easier to attach vanity sides to these legs!
But keep in mind that when using pre-fabricated legs, the cost will be higher.
For me to have bought these pre-fabricated legs, it would have cost nearly $200 for four of them!
Instead, I paid about $25 for these. 🙂
But it also meant that I was going to have to get creative about how to build a sound bathroom vanity on top of upcycled legs.
Choosing Red Oak Wood for the Bathroom Vanity
I’m not a wood expert, but those legs sure looked like oak because of the prominent grain.
They were perfect because I love the look of oak and how you can add white wax or liming wax to highlight oak’s deep grain. I believe they call this technique cerused oak.
I went to Home Depot and just bought a hodge-podge of red oak, in varying lengths and widths.
It’s crazy because you should know how much materials you need before you start a project, but since I had never done this before, and wasn’t working from a plan, I was just winging it.
Home Depot is my second home, so I figured if there is something I missed, I would just head back there to exchange or replace with the correct materials.
Attaching the Vanity Legs
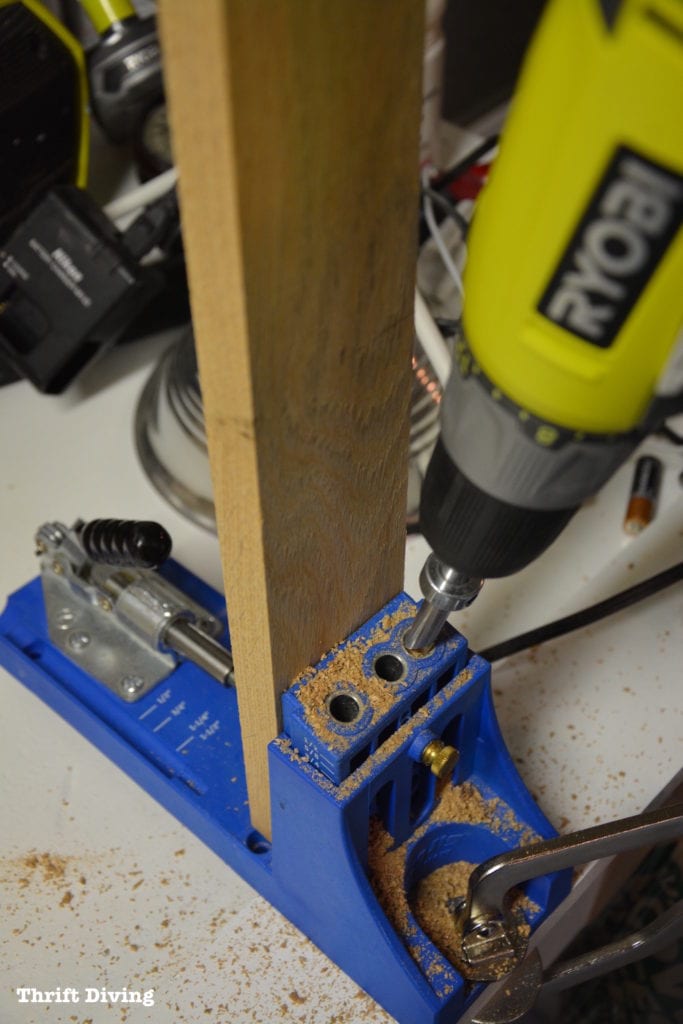
The way that I planned to build this vanity was to use pocket holes on most of the wood.
You have probably seen a lot of DIY builders using a Kreg Pocket Hole Jig in order to strongly join pieces of wood together easily and without a lot of fuss. It’s become a DIY builder’s dream tool!
And you’d be surprised how strong the joint is when joined together with pocket screws!
TIP: Watch this video to learn more about how to use the Kreg Pocket Hole Jig.
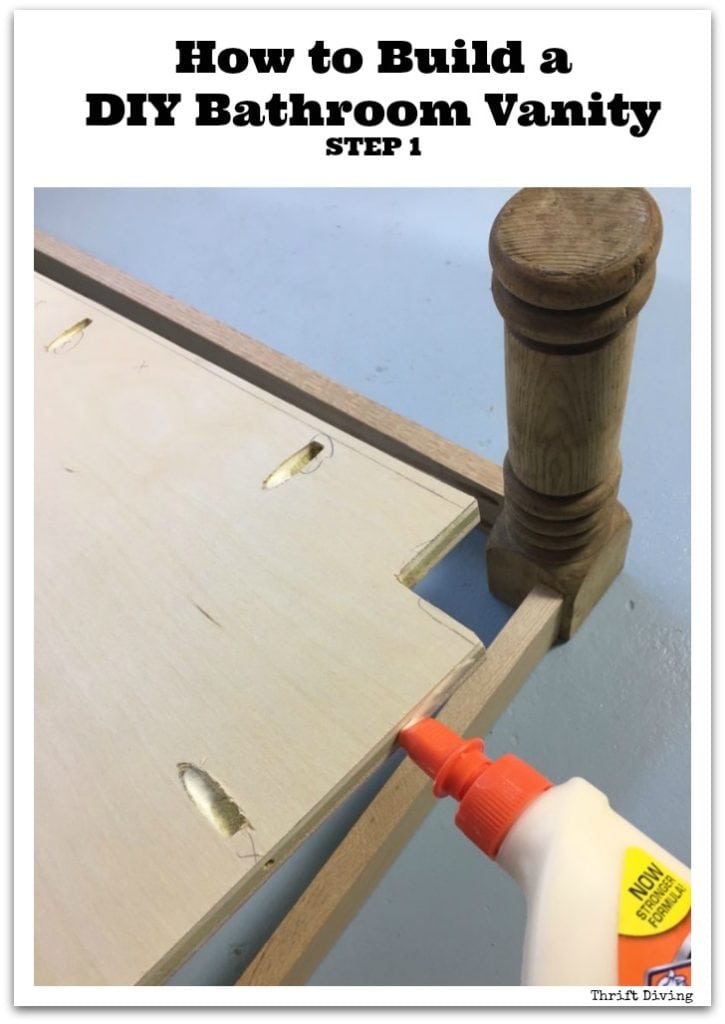
First, I laid out my legs and some 1 x 4 red oak boards to connect to the legs. I believe these pieces of panels are called aprons. But I’m not sure if that term is only used when building tables, desks, or other furniture, or if it applies to vanities, too.
Anyhow…
This looked about right!
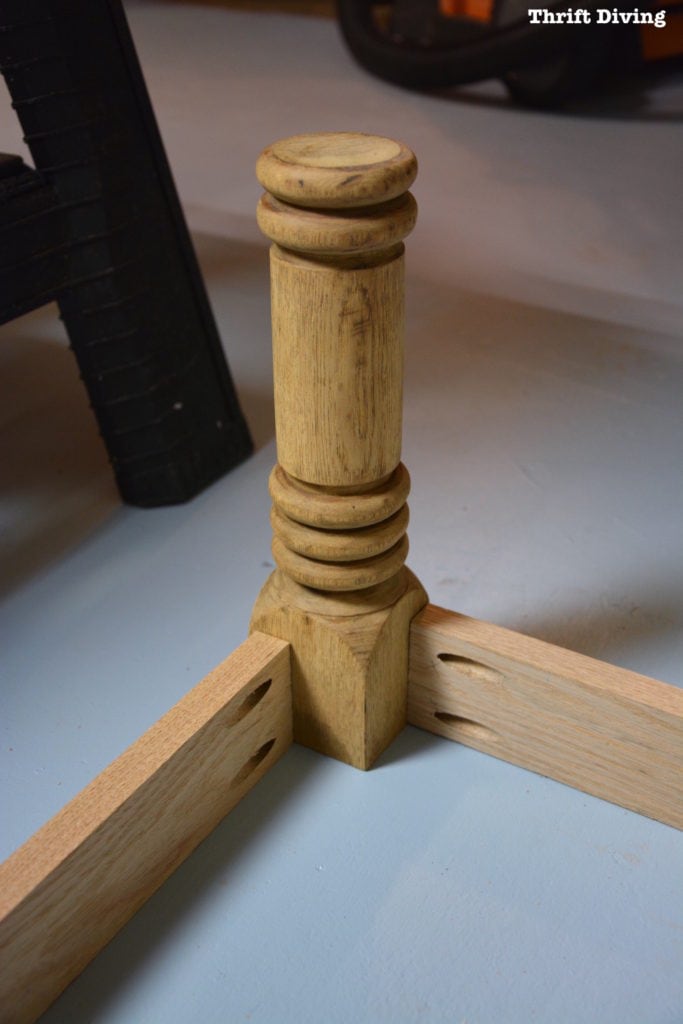
I figured that I would want to set it in about 1/4″ since that’s how I have seen other tables and vanities and stools and everything constructed this way.
Then I drilled the pocket holes on the end of the boards and repositioned them again to make sure I would be securing them properly.
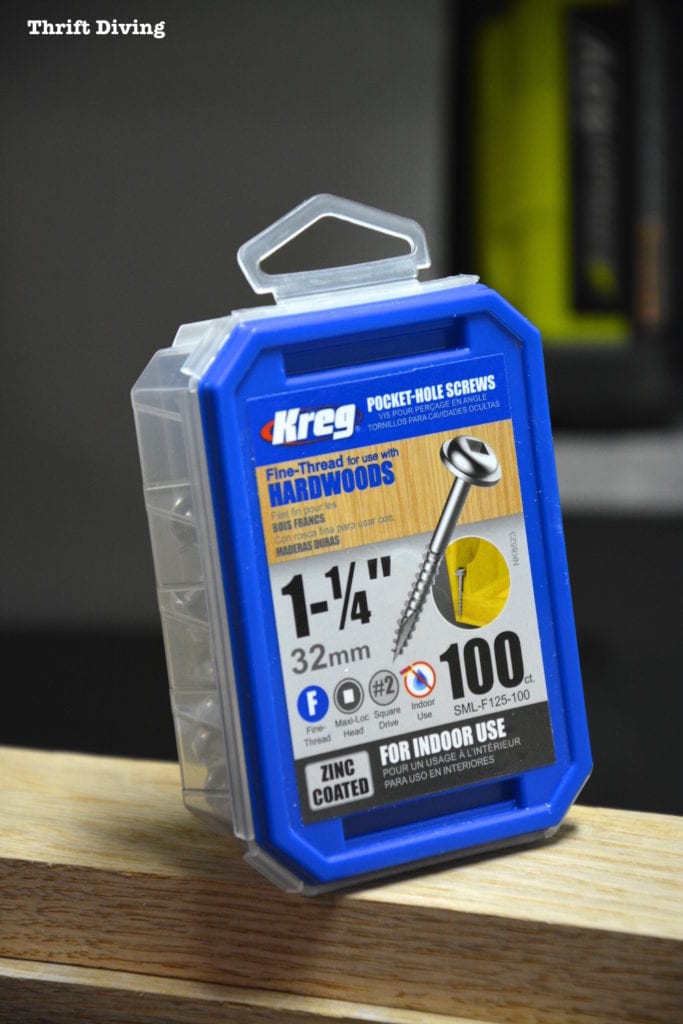
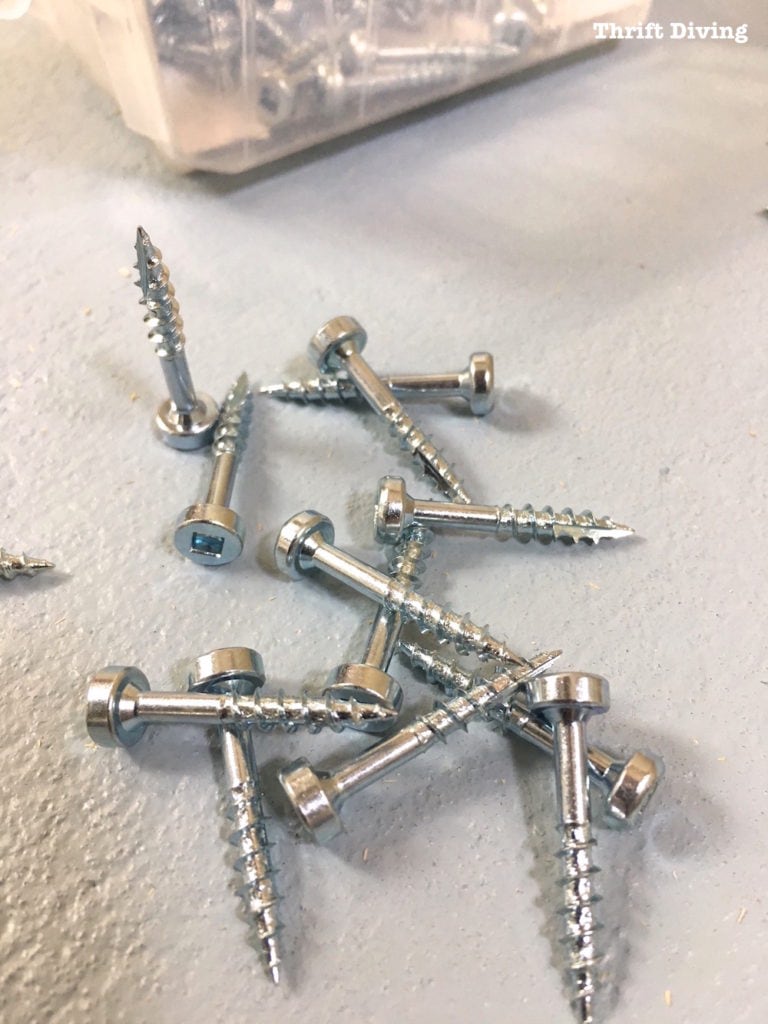
But here’s the thing: you have to make sure you use the right screw.
Since I was working with red oak, which is a hardwood, I had to use the Fine-Thread screws for Hardwoods. It’s labeled right on the package.
And since my wood is 3/4″ thick, the size screw needed to be 1 – 1/4″ long.
TIP: If you’re using soft woods, like pine or plywood, use the Softwoods screws and make sure to check out this chart for knowing which size screw to use, depending on the thickness of your material.
I added a bit of wood glue to help secure the aprons to the upcycle legs, then screwed in several of the screws.
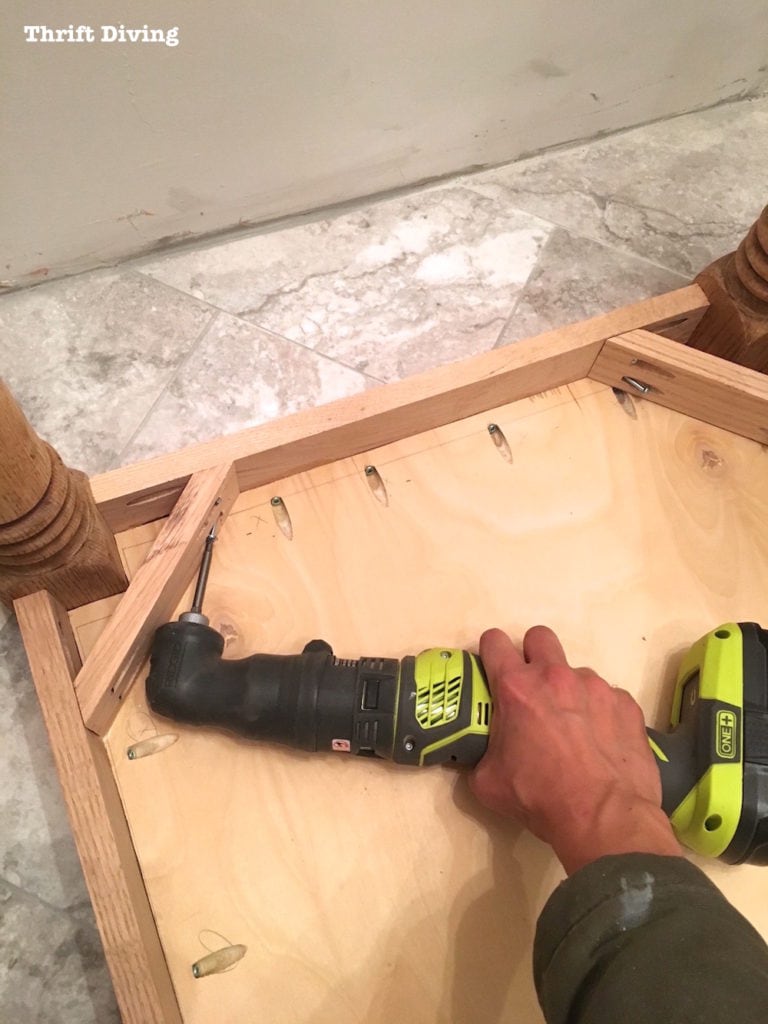
Adding a Shelf Panel
My phone was broken and had to be replaced halfway through this project, so some important pictures got lost. Forgive me if there’s anything missing.
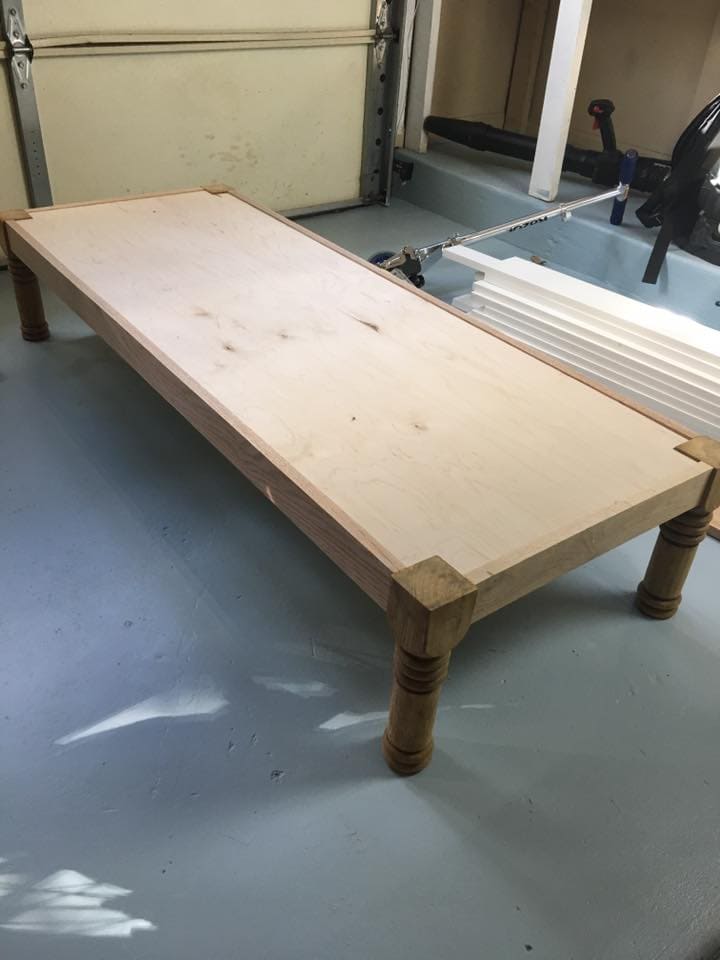
Anyhow, once the bottom was built with legs and panels, I needed to attach 1/2″ plywood.
The first piece I cut was all wonky and didn’t fit, unfortunately! I tried to take accurate measurements and somehow I must have done a crappy job. LOL
Then I got smart and decided for the next attempt, I’d just lay the frame on top of the plywood and trace out the shape, which worked perfectly!
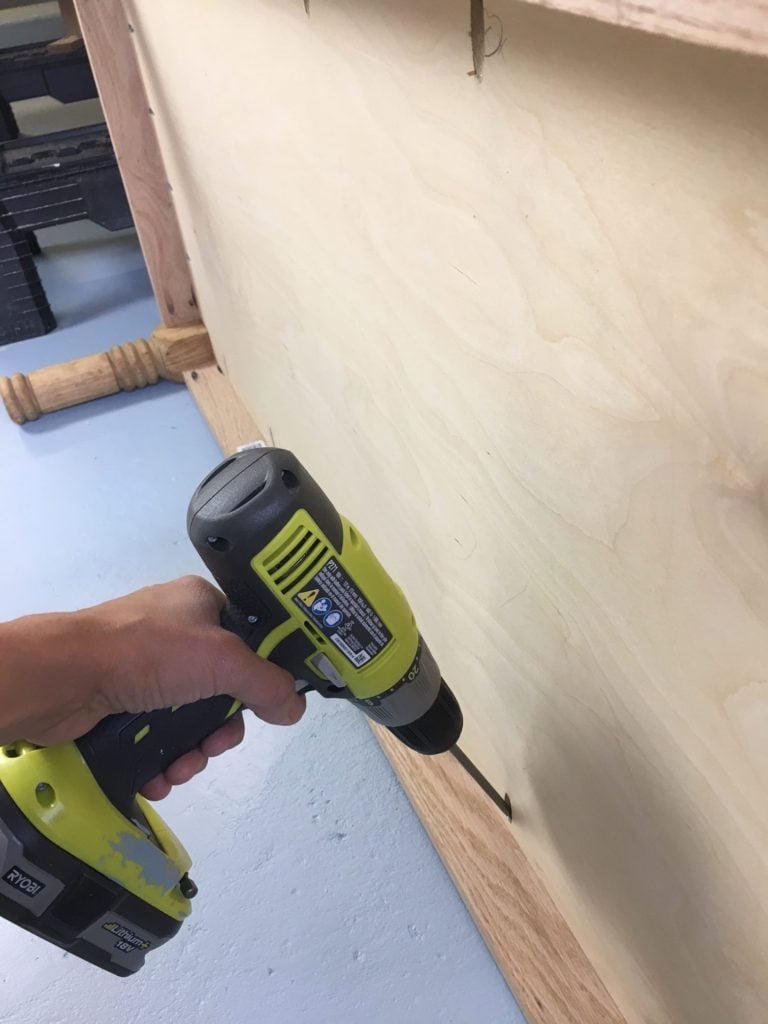
Next, pocket screws were drilled in the same way I did the other pocket screws.
I used a circular saw and jig saw to cut out the plywood.
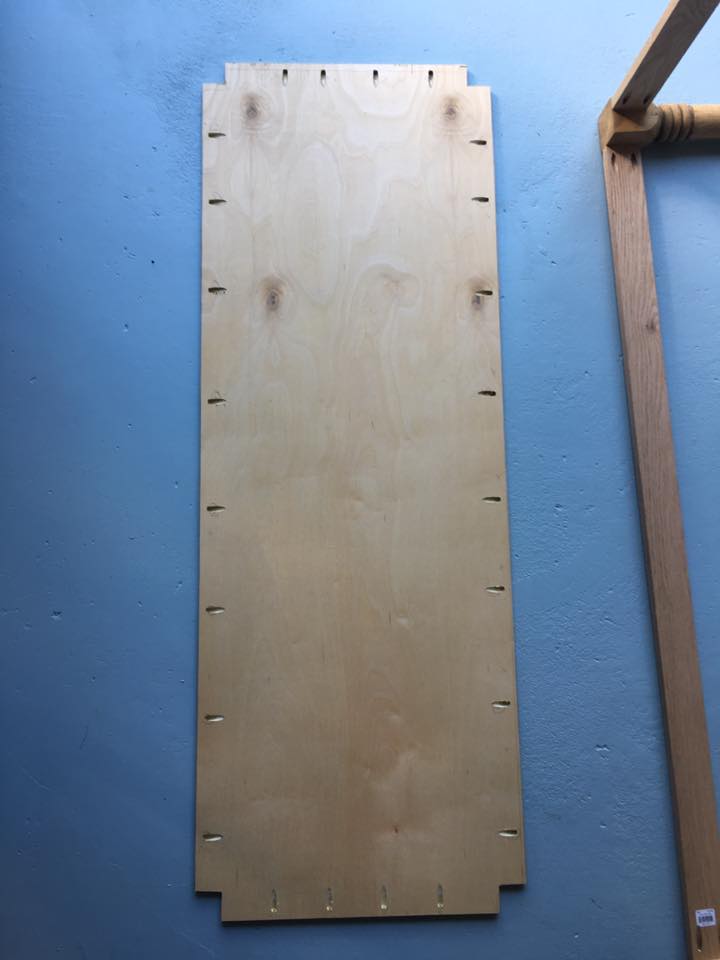
I test-fitted it first to make sure it fit, which it did, thankfully!
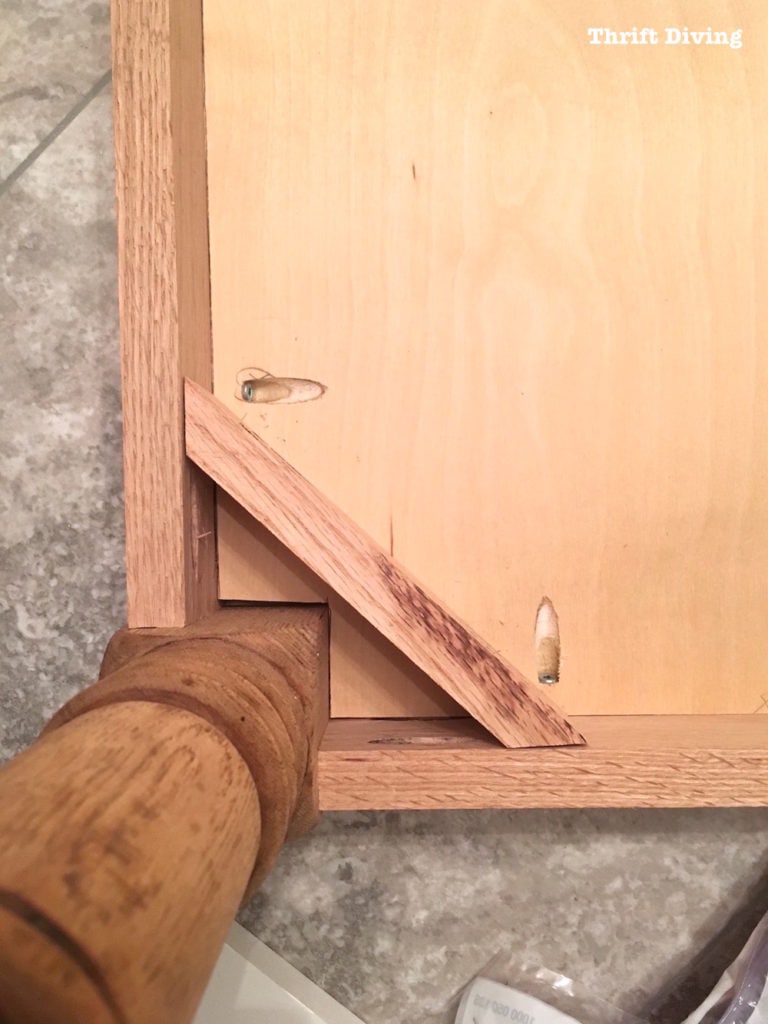
The problem I ran into was that the 1/2″ plywood was a different thickness than the 3/4″ aprons.
Because I was trying to join two pieces of wood with different thicknesss, I wasn’t sure which screws to use.
Some of the screws kept wanting to break through to the other side of the apron, too.
After a bit of trial and error, I decided to go with the 1″ screws for softwoods and to drill them in very slowly, so as not to crack the oak.
I made sure to add a layer of wood glue, which is even stronger than wood, to help reinforce everything.
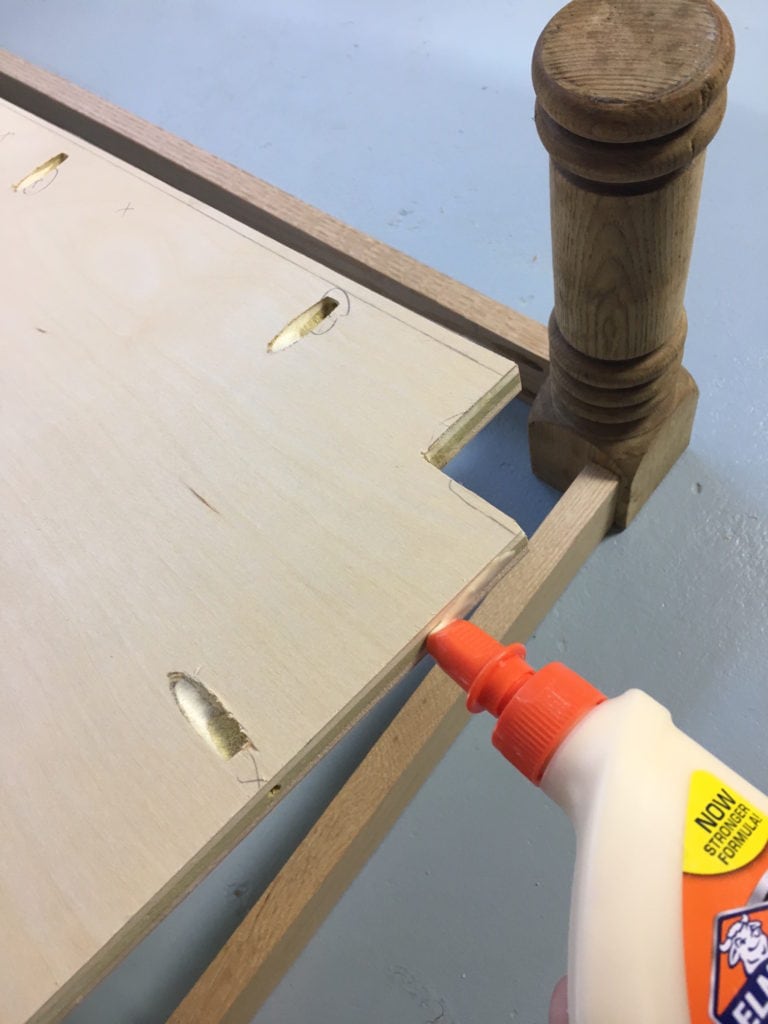
I used the long 6″ square driver that comes in the Kreg Pocket Hole kit to drill in the Kreg pocket hole screws.
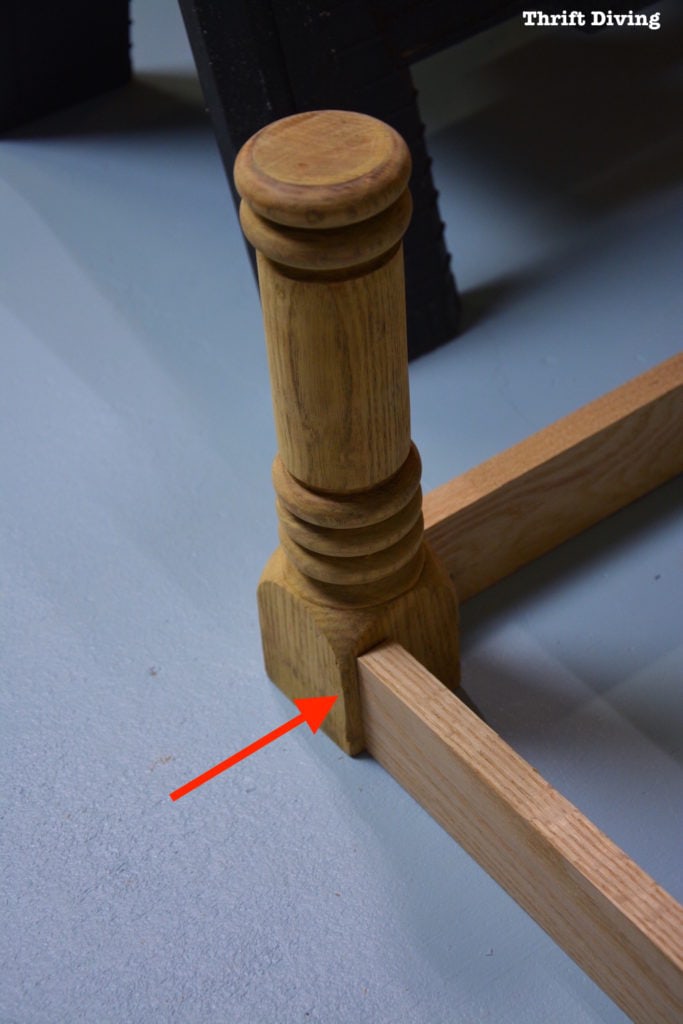
I ended up leaving about 1/8″ inch edge around the base of the vanity where the oak meets the plywood.
The reason why is because if I tried to make the two edges flush and even, the screws would blow out the other side! It was so frustrating!
The reason why this happened is because the plywood was a different thickness than the oak. Trying to join two boards that aren’t the same can pose challenges.
But I discovered that if I kept the plywood a little lower than the edge of the oak, I could connect the two boards more easily without the screws poking through. I guess there was more surface area for the screw to latch in to.
If you look closely, you’ll see the plywood is a few hairs shy of the top edge of the oak.
Sort of hard to explain, but–hey–I figured out a solution, so I’m happy. 🙂
Whatcha Got Underneath??
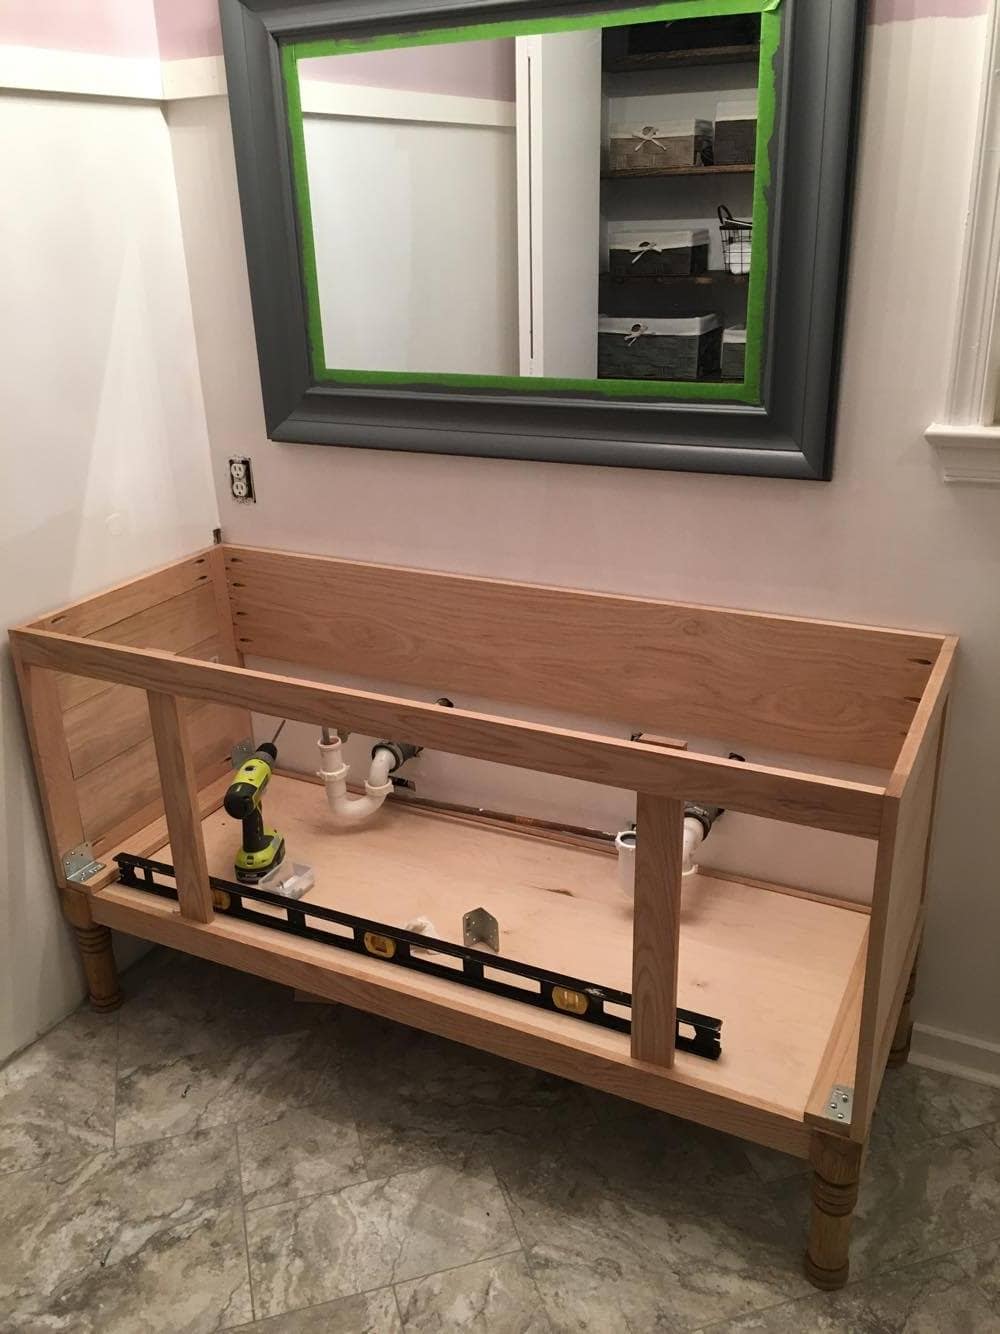
My biggest concern with building this 60″ DIY bathroom vanity is that it would either warp, crack or split!
It bothered me that I didn’t have any support underneath of the vanity.
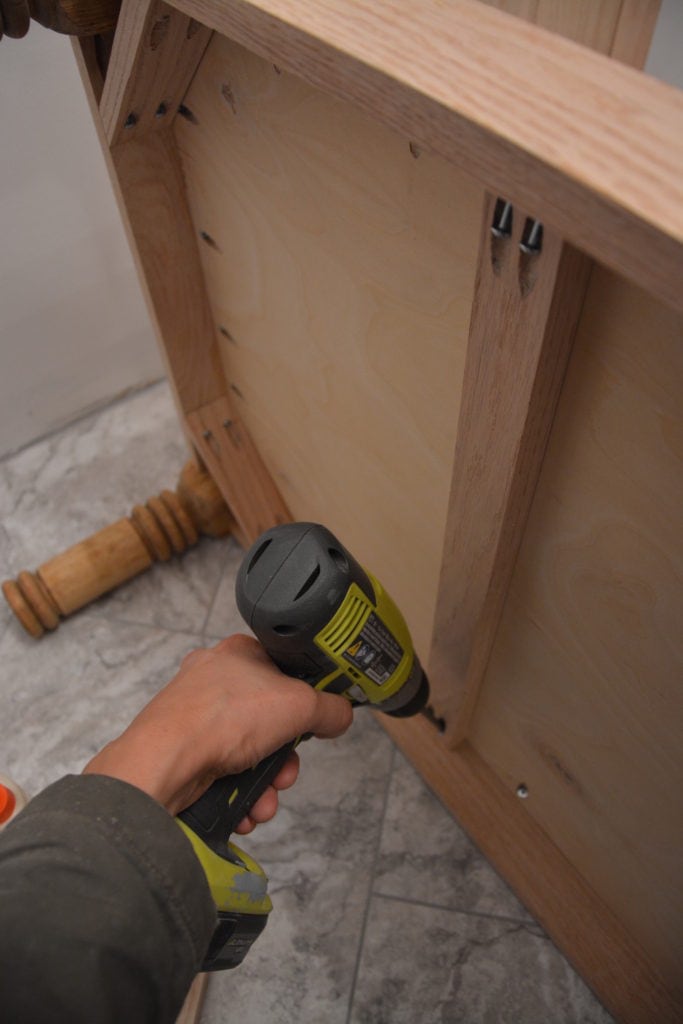
I decided to cut some braces to add to the bottom.
I’ve seen some DIY dining room tables and other furniture with them, so I knew they’d be helpful in this project, too.
Hardwoods are expensive, so I could have used cheaper wood, but I wanted to the best.
So I cut pieces of braces by cutting each side on my miter saw at 45 degrees, then adding pocket holes on the longer side.
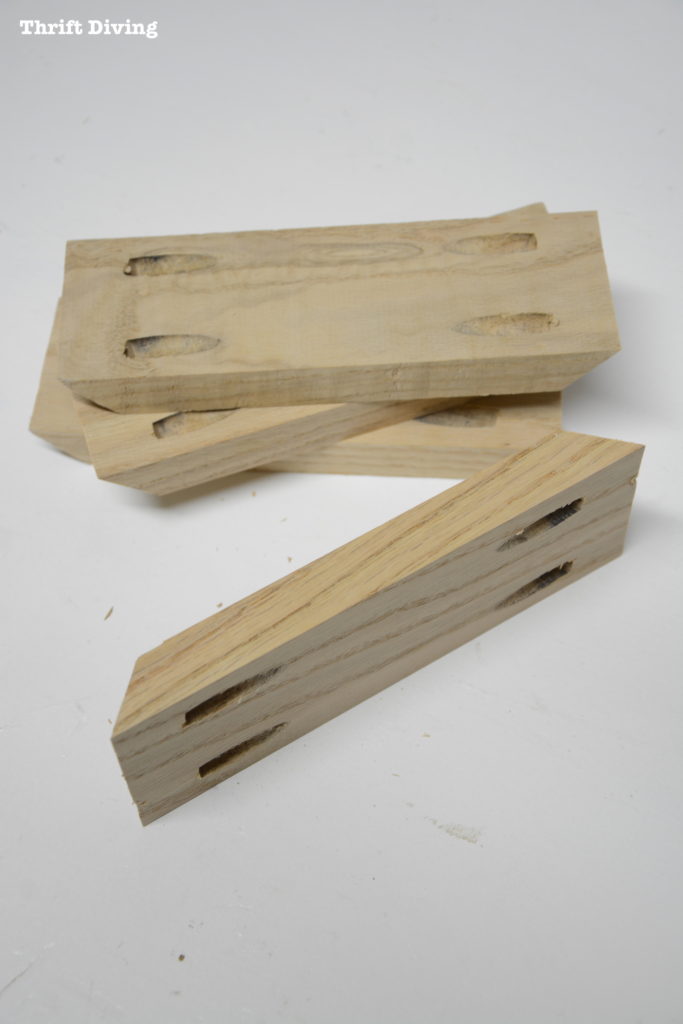
Wood glue was added to make sure it was strong.

Then I used my RYOBI One + JobPlus multi-tool with the screwdriver head to screw in the screws.
I couldn’t get my regular screwdriver angled enough to screw in the screws. So I was glad to have this tool nearby, which fit perfectly in the tight space under the vanity.
Later, I also added a few of these 1 x 2 oak boards to the bottom of the base for extra reinforcement. I just measured, cut with a miter saw, added pocket holes, glued, then added 1 – 1/4″ pocket hole screws.
So that’s exactly how I built the base of this DIY bathroom vanity!
What I realized is that with these instructions, you could easily build a table….and even a cute upholstered bench! So many pieces of furniture start off this same way.
It was fun to build this and see all the possibilities!
In the next post, I’ll share with you how I added the sides to this 60″ DIY bathroom vanity and how I made sure they were extra secure!
Read the Rest of this Bathroom Makeover Series!
Catch up on this entire master bathroom makeover series!
DAY 1: The Evolution of a Master Bathroom Makeover
DAY 4: Picking Out New Flooring: Which One Do You Like?
DAY 6: How to Remove an Old Bathroom Vanity
DAY 27: Removing Wallpaper, Repairing Walls, and Removing an Old Toilet
DAY 29: Installing New Flooring in Our Master Bathroom
DAY 49: The Bathroom Makeover That Would Never End (An Update!)
Day 52: How to Remove a Toilet Yourself
DAY 57: How to Install a Toilet Yourself
Build a DIY Bathroom Vanity – PART 1 – Attaching Legs and Base
Build a DIY Bathroom Vanity – PART 2 – Attaching the Sides
Build a DIY Bathroom Vanity – PART 3 – Creating the Partitions
Build a DIY Bathroom Vanity – PART 4 – Making Drawers
Build a DIY Bathroom Vanity – PART 5 – Making Cabinet Doors
Build a DIY Bathroom Vanity – PART 6 – Adding a Granite Vanity Top
Build a DIY Bathroom Vanity – PART 7 – The Final Finishing Coat

Download the 5 freebies!

Thrift Diving inspires women to decorate, improve, and maintain their home themselves...using paint, power tools, and thrift stores! Use these 5 printables, checklists, and ebooks to get started!
I wanted to comment every step of the way with things like: good idea, oh, ya, I forgot about that, or way to go! Every single picture, every step, I was with you. Thanks. Can’t wait to see what this vanity looks like in the end but we all know that it won’t warp, crack or spit!!!! Hate that the phone broke, but that has happened to all of us too.
Nice job and great tutorial!
Thanks so much, Theda! 🙂
Wow! Serena, you have a good mind for visualizing things spatially then translating them into a real object! Great job!
Lots of good information in this post. I have only a postage stamp size counter area, literally about 12″ x 24″, in my kitchen and keep wondering how I can add to that. The apartment across the parking lot in back has a square, heavy (4×4 legs) table sitting outside the back door and I keep looking at it and imagining. . . my floor space is also very tiny, but I keep wondering whether I could find/modify/build some kind of kitchen cart similar to that table, but with wheels so I can move it around. It could only be about 3×3 maximum and would need to be light, but sturdy. Shelves and/or drawers would be super helpful as well. It takes me a long time to digest an idea and decide if I can make it work, so this is something that will certainly be a year or so out, especially since I have some more necessary goals for 2017 to accomplish first. But I’m thinking your bathroom vanity project is going to provide some really good ideas as I meditate on a kitchen cart. Would also need to buy some more tools for such a project.
This is what I love about your blog. You share your projects, ideas, and learning experiences, then we get to use them for a springboard to create something that fills a need for us. This is what makes you a great teacher! Love it!
Teckla, you know what comes to mind when I think about what you need? That IKEA kitchen cart that I had found at the thrift store and transformed: https://thriftdiving.com/how-to-repurpose-a-kitchen-cart/
If you look at it closely, something similar would be easy to make. You wouldn’t have to get fancy with making it. You could repurpose old wood, or buy the cheaper pine boards. And you’d be surprised how strong wood glue is!! It says on the bottle that it’s stronger than wood, and it’s true!! Some parts of whatever you build you could simply glue together. You would just want to stack something heavy or buy some clamps and clamp it tight so that glue has time to set and harden.
You might even be able to find old legs on an old table from the thrift store, unscrew them, and use them for the legs of your little kitchen work area! 🙂
Oooh, the ideas are flowing now!