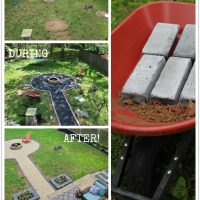
BEFORE & AFTER: Outdoor Makeover Reveal!
This outdoor makeover is part of our Outdoor Overhaul Makeover Challenge, which was sponsored by RYOBI Outdoor Tools. All opinions belong to Thrift Diving.
I’ve never been as happy to come to the end of a makeover challenge as I have with this outdoor makeover. In all the years (since 2014) that I have tackled our yards, bedrooms, basements, and laundry rooms for my challenges, this makeover is the one that did me in. So much so that I fervently vowed to my blogger friends, “If I ever do another Outdoor Overhaul makeover challenge again, you better believe I’m hiring help!”
That’s unlike my usual “go-get-‘er” Superwoman attitude. Tell me I can’t do something, and I’ll prove to you that I can. Tell me it can’t be done in 30 days and I’ll be working up until Day 29 at 11:59 p.m. to prove that makeovers can be completed in 30 days.
But this makeover was different.
It was back-breakingly different.
This outdoor makeover involved much more digging…more sweating…more swearing…and more anxiety each day I realized that I couldn’t pull off the aspirational outdoor makeover plans that I had in my head. With each pile of dead leaves I scraped out from under my hedges, my impatience grew because I knew the bigger, more exciting projects would likely not get done on time.
Then I looked at the calendar.
This RYOBI Outdoor Overhaul Makeover Challenge 2.0 (the Hangout Challenge), was actually just 3 weeks (not my typical 4 weeks). Throw in a 4-day trip to Atlanta…toss in an unproductive “Take Your Child to Work Day”…and a couple of other DIY projects that needed to get done…–don’t forget rain!–and I realized that I actually didn’t get 30 days for this makeover. It was much less. Days, even.
I say all that to say that this outdoor makeover challenge deserves more time–time to do more than clean out the hedges and clip the grass.
This challenge deserves an additional 3 weeks, and that’s exactly what I’m giving us here at Thrift Diving! These next 3 weeks I’ll get to do some of the more creative projective projects, and I can’t wait!
I am excited to show you what I was able to accomplish with the limited time I had! Are you ready to jump into it?!

BEFORE
This is what my outdoor makeover as part of the challenge looked like before I got started. If you remember, I built the DIY fire pit last year. It was a kit that was easy to put together. But without a seating area around it, it looked like it was just floating around out there.
Well, there were chairs around it, (you see that pile to the right??), but over the past couple of years, the elements tore those chairs down to the screws and they simply crumbled. Basically, they became a pile of firewood.
I wanted a fire pit seating area that would define the area and be a gathering place in my yard.

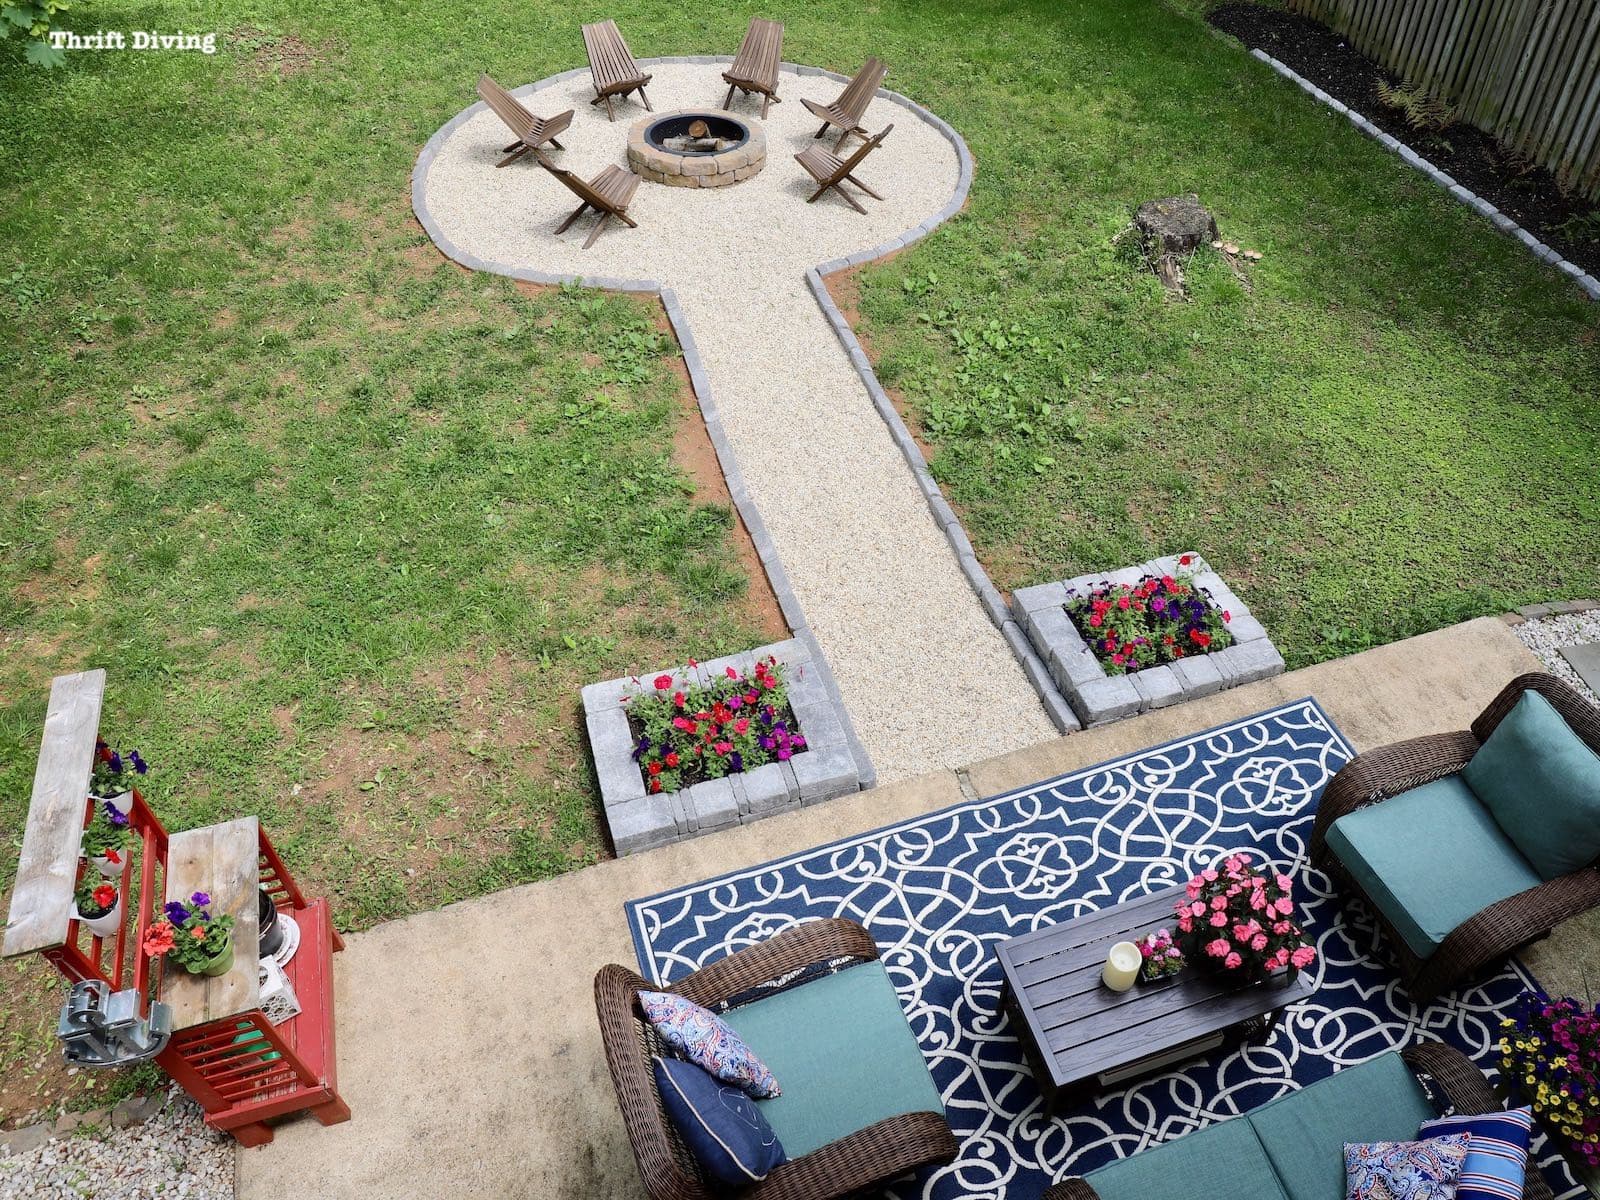
AFTER! – Outdoor Makeover
It was a lot of work, but the final result looks amazing! I’ve got some new fire pit chairs coming, a new patio rug being delivered, and I need some fire pit lighting solutions.
The fire pit finally feels like it belongs in the yard instead of just floating amongst the weeds. HA!
BEFORE
One thing that’s always bothered me about my yard is all the weeds and lack of grass (which makes doing an outdoor makeover challenging because I can’t ever seem to tackle the weeds!). Carving out a bunch of those weeds and creating a more manicured outdoor yard feels much nicer!

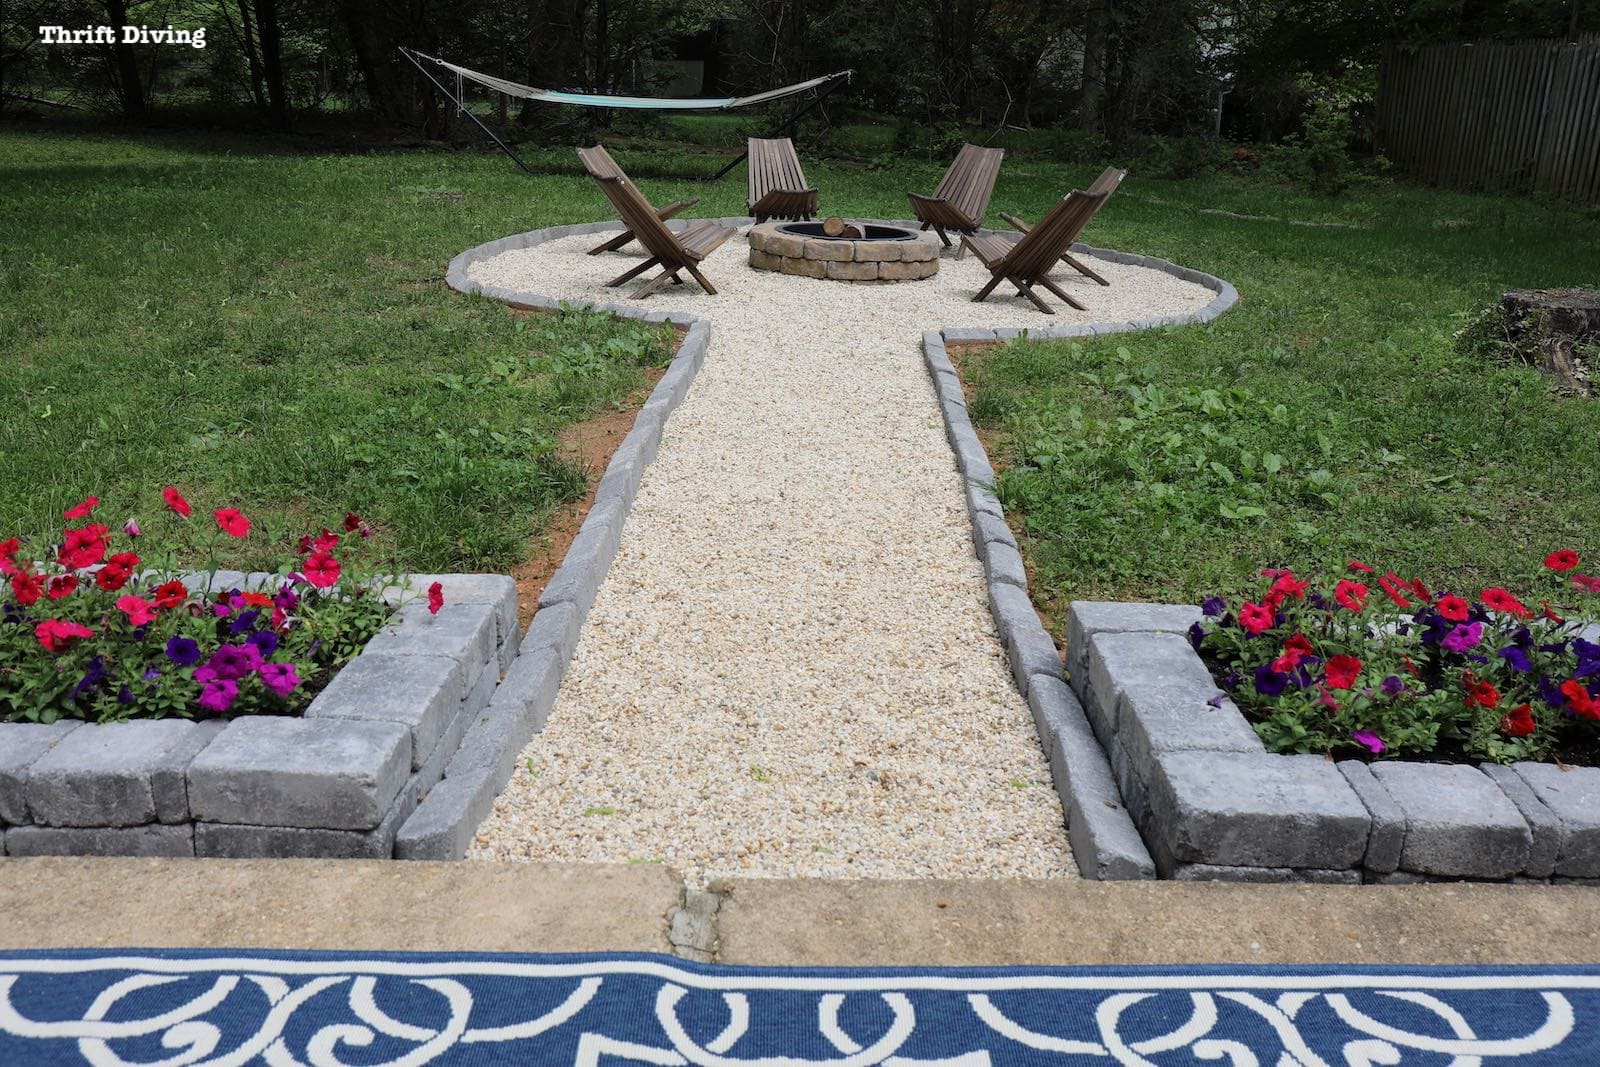
AFTER!
Doesn’t this look nice?! The Pavestone Rumblestone edgers from The Home Depot (affiliate link) helped to define the area, and I filled it in with pea gravel. The Home Depot sponsored the Pavestone edgers, which you’ll get to see the tutorial in the next blog post and video on my YouTube channel! You’ll get to see this outdoor makeover in action.

BEFORE

AFTER!
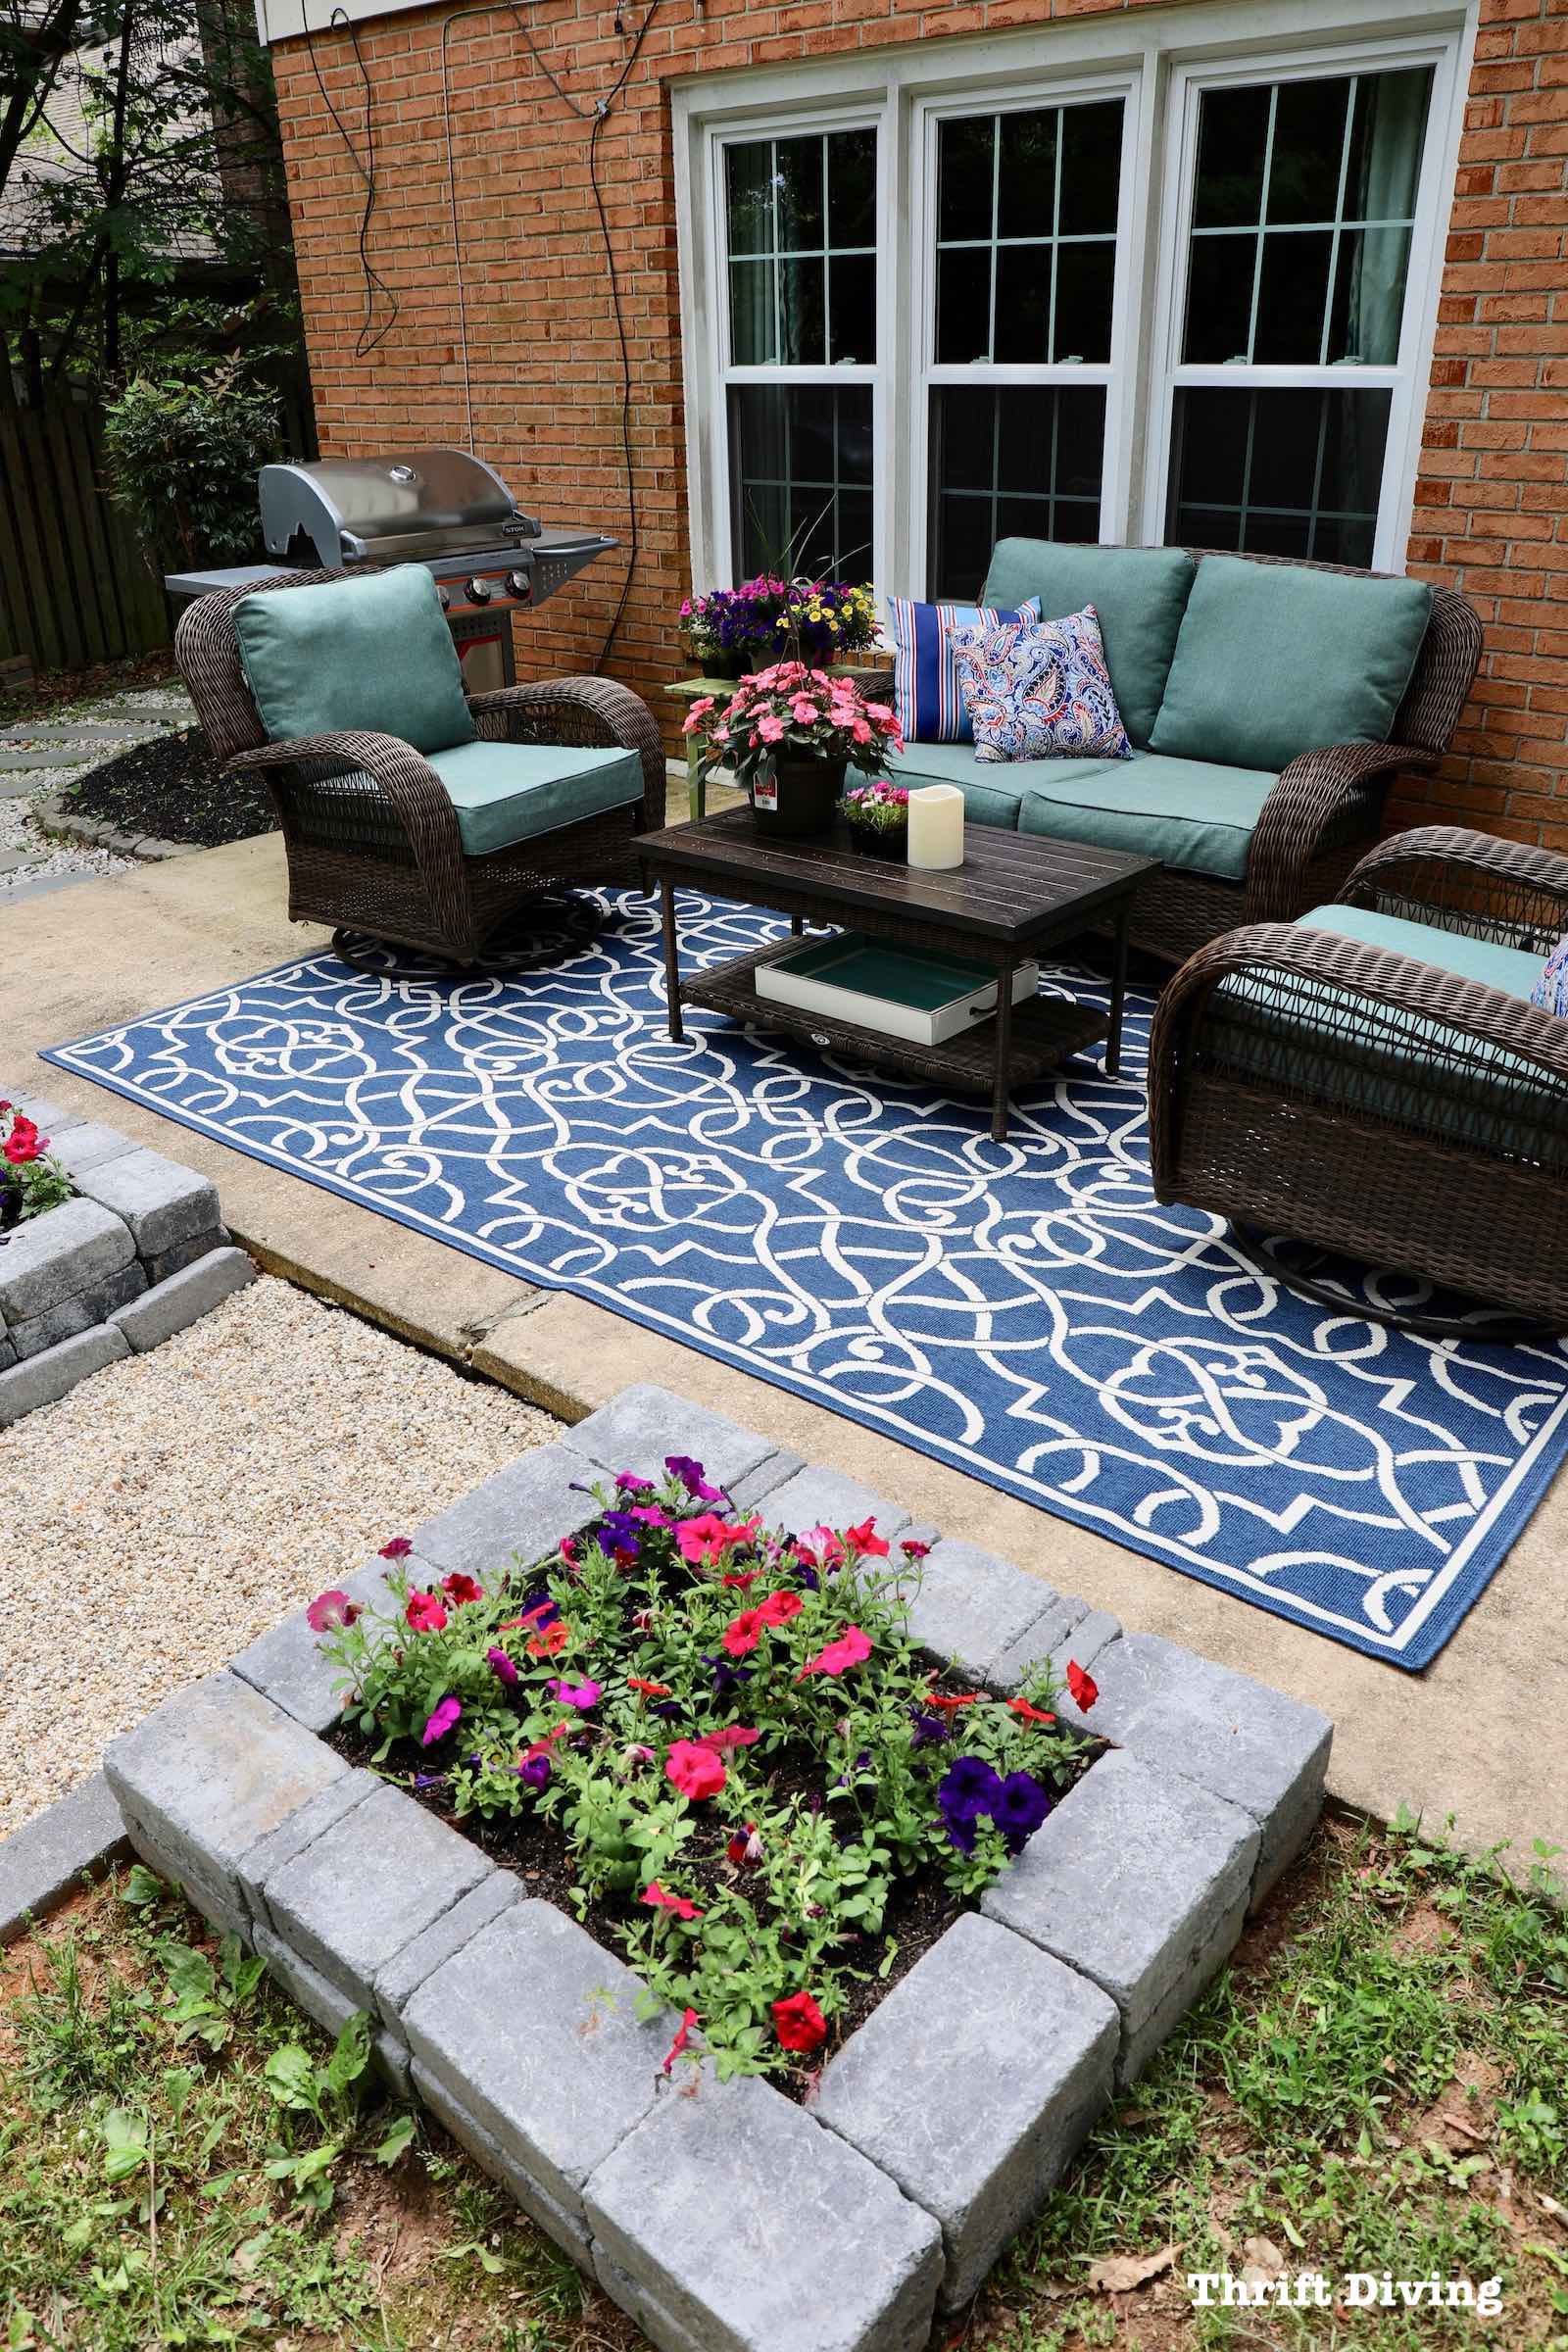
I had some additional stones and wanted to make some cute little planters for this outdoor makeover. I placed them right along the edge of the patio to frame the new walkway to the fire pit, and to have something pretty to look at while sitting on the patio.
As much as I like the old patio rug, it’s really hard to keep clean because it’s tan. Actually, someone on Instagram implied that my rug was dirty. HA! They’re right. My patio doesn’t get a lot of sunlight so any amount of moisture back there tends to get moldy and dirty quickly, despite pressure washing. I do hate being wasteful when it comes to getting rid of things before their time. But it was time for a new outdoor rug.
I ordered this new indoor-outdoor rug from Wayfair in a navy blue so that dirt can be camouflaged more easily. This rug is so nice I could easily see using it indoors somewhere! Maybe a foyer??

This rug out on the patio looks soooo good! I just need to figure out how to photoshop those damn cable wires hanging down! Or some way to disguise them! Shutters, perhaps? 🙂

BEFORE
My backyard was the first thing I saw when we came to visit this house in 2010. The privacy of the yard has always made me smile. But a lack of landscaping and patchy weeds (and tons of mosquitoes!) deterred us from actually using the backyard! Well, this summer, that’s not going to be the case! We will be using this backyard–just you wait!

AFTER!
Now that it looks like this and becoming closer to what I have always envisioned, I’m getting excited about expanding our living areas!


The only thing I worry about is that the neighborhood strays will use my new fire pit seating area as a litter box. HA! I’ll be on the lookout for…ahem…little surprises.
I’ll be doing a tutorial on how I actually created this fire pit seating area, too! So stay tuned for that!

Each week of this Outdoor Overhaul Makeover Challenge, I walked you through all the things I had been doing in my yard, including the
WEEK 1: Walk My “BEFORE” Walk-Through!
My yard was hideous and needed a lot of cleaning up! Take a walk through and see what I was dealing with at the beginning of this outdoor makeover challenge.
WEEK 2: DIY Mailbox Makeover
Although the focus of this challenge was creating an awesome hangout spot, I decided to tackle my mailbox because curb appeal matters, right? When people pull up to the house, it’s embarrassing that my mailbox was badly chipped and over-run with weeds.
Of course, I blocked out my address, but you can still see how amazing it looks for a fresh coat of spray paint! I also made an address plaque and hung it with a couple of eyelet screws and pieces of chain links.

Watch My DIY Mailbox Makeover in Action!
Want to see my mailbox makeover from start to finish? You can watch it here and on my YouTube channel!
WEEK 3: 5 Reasons You Need an Electric Lawn Mower
During Week 3 of the challenge, I did a bunch of mowing and pulled out my RYOBI 40V electric lawn mower to get the job done. If you’ve ever questioned why you should switch to an electric mower, this blog post, 5 Reasons You Need an Electric Lawn Mower will lay out the reasons to try it.


WEEK 3 – 4: The Reveal!
Technically, there were about 3 weeks of this challenge. I could have used the extra days to add all the finishing touches to the patio. But even without all the trimmings, I think the patio and fire pit look amazing! I still need an extra cushion for one of the chairs. And for the life of me, I can’t figure out how to hide those cable wires hanging off the house. I’ll figure it out. 😉
Let’s take another look at the “BEFORE.”
BEFORE
AFTER!
Finally, my hard is coming together! I still need to work on the grass–uhhh, I mean the weeds. But at least it’s green.

I am also planning to put up an awning over the patio and screen it the seating area to help keep out mosquitoes and stray cats that would make a playground out of the patio furniture. 😉 You’ll get to see that in an upcoming blog post and video!
(This was the old rug).


Love this project? Click here to SAVE it on Pinterest!
![]()

Be sure to check out my blogger friends’ outdoor makeovers, too!
Thanks for checking out my outdoor makeover BEFORE and AFTER! And a big thanks to RYOBI Outdoors for sponsoring this challenge. Be sure to check them out over on RYOBI Landscapes!

Download the 5 freebies!

Thrift Diving inspires women to decorate, improve, and maintain their home themselves...using paint, power tools, and thrift stores! Use these 5 printables, checklists, and ebooks to get started!

It looks really nice. You did great even though it is back breaking work. Now I’m rethinking the pebble rocks since we have lots of neighborly visitors in our yard.
Great job
I saw the wires instantly and started thinking on what would I do…. I’m thinking lights either several strings criss crossing or those net lights you find at Christmas to drape over bushes and hedges. It would create nice lighting at night and camouflage the wires
I loved your ideas, the back yard fire pit path was cute and loved your mail box and flowers.. Yes maybe shutter, tall ones like you see on old houses would look really cute back there
Wow it looks fantastic Serena! You’ve put in a ton of really hard work and it shows. Beautiful job.
GREAT JOB SERENA LOOKS GREAT 👍👍 ! You Super Woman you!! HAPPY MOTHER’S DAY!
Serena,
You did an absolute beautiful redo on your backyard!!!! I can’t believe you did all that HEAVY lifting, moving dirt and all that HARD WORK by yoursef. I’ve done yard work with my hubby and it was hard on both of us. I don’t know how your body actually stood the stress. You really did a beautiful job. I love everything about it, even THE RUG!!!!! Ha Ha All I can say is it is beautiful and I admire you for all YOUR HARD WORK!!!! I love reading your post and look forward to what all you are up to. Can’t wait to see what else you do for the summer. Take care of your body; we only have 1!!!!!!
your blog friend,
jean
This looks awesome! You crack me up🤣🤣, the dirty rug comment. People…btw Happy Mother’s Day!