How to Strip Furniture and Stain Wood: A Complete Guide
Long before crazy do-it-yourselfers like me came along with paint brushes in hand to paint over wood–GASP!– furniture stripping with chemicals and other furniture strippers helped people bring old furniture and wood back to life.
But not long ago, painted furniture became wildly popular and even ya girl (ahem–I’ll admit it) slapped paint on nearly every piece of thrifted wood furniture I rescued and lugged home.
It was fun! And it’s still fun to paint furniture. There’s nothing like seeing an old beat-up piece of furniture get a fresh new look.
Over the years, though, if you haven’t noticed, there’s been an emergence of “wood lovers” again who think that paint ruins the value of wood furniture. Wood is making a comeback. What’s old is new again, right?
Now that I understand wood so much better now (I wrote a blog post called 7 Things You MUST Know Before You Refinish or Build Your Next Project), I’m much more adverse to painting “good wood” that has beautiful grain and wood tones.
When it’s in bad shape, I have begun to welcome the challenge of a good furniture stripping project!
If you’re reading this blog post, you might want to bring back to life a beautiful piece of wood, too, but aren’t sure how to strip furniture, and you’re not even sure what products are safe to use for stripping.
Hopefully, after you’re done with this post, you’ll be one step closer to restoring your old pieces of furniture instead of just painting them. 🙂
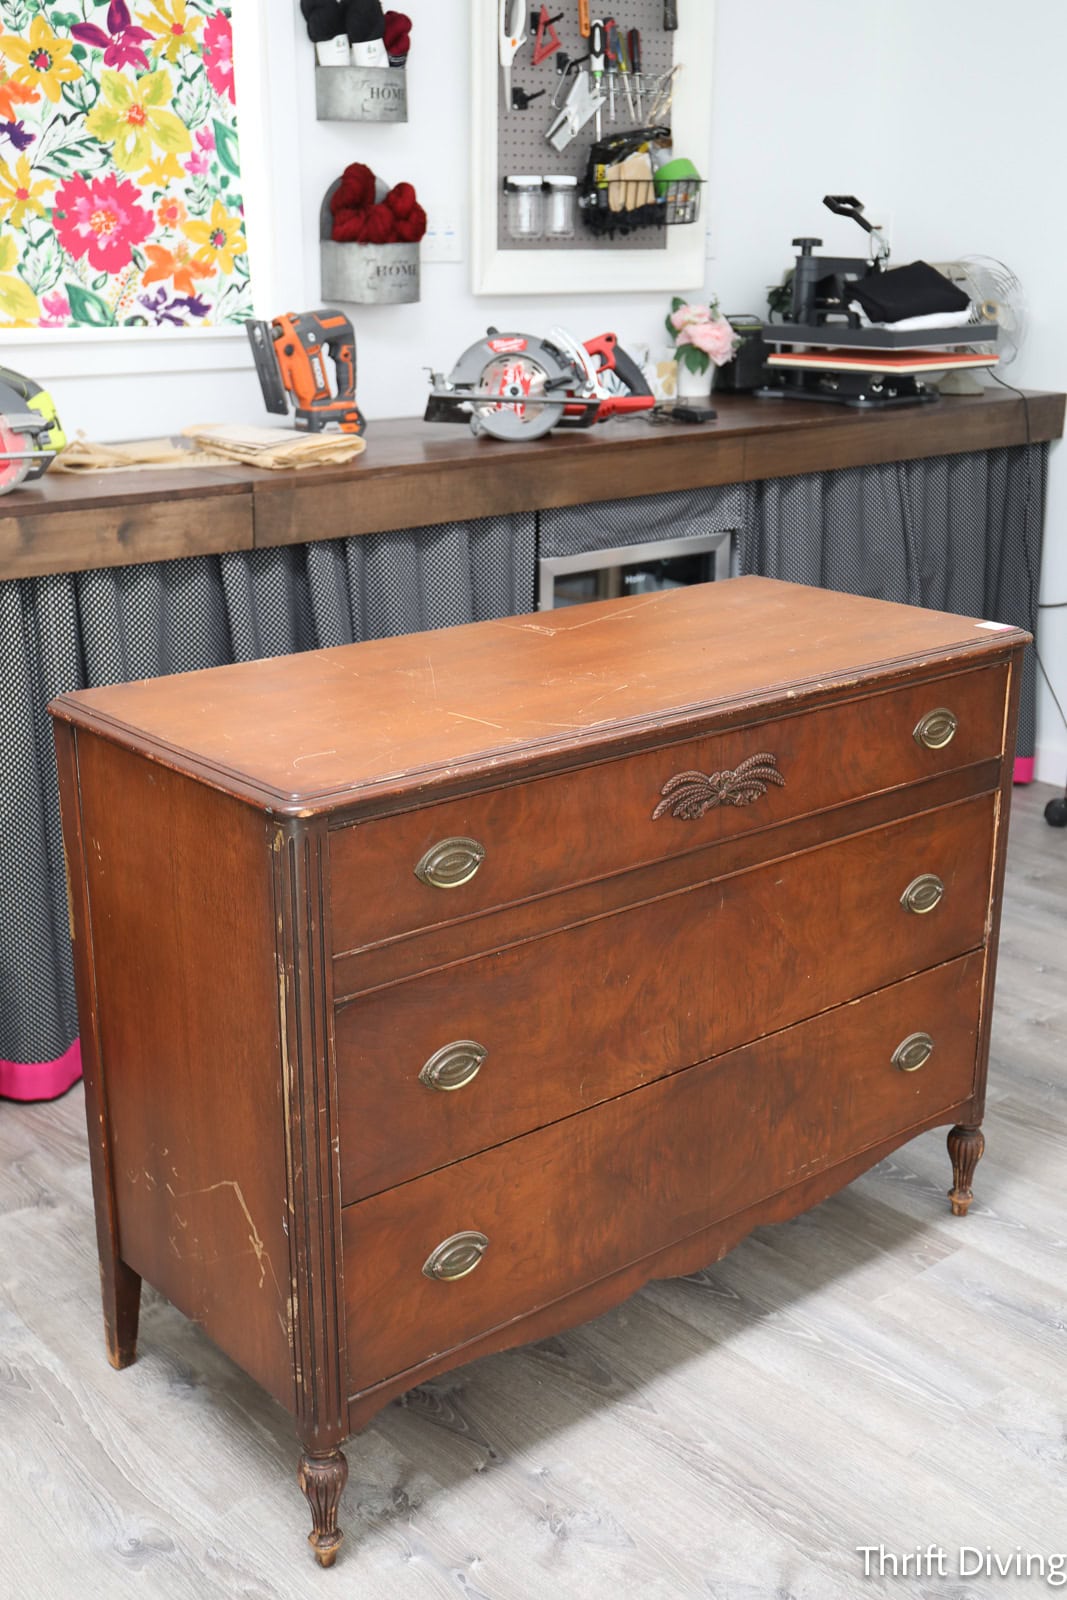
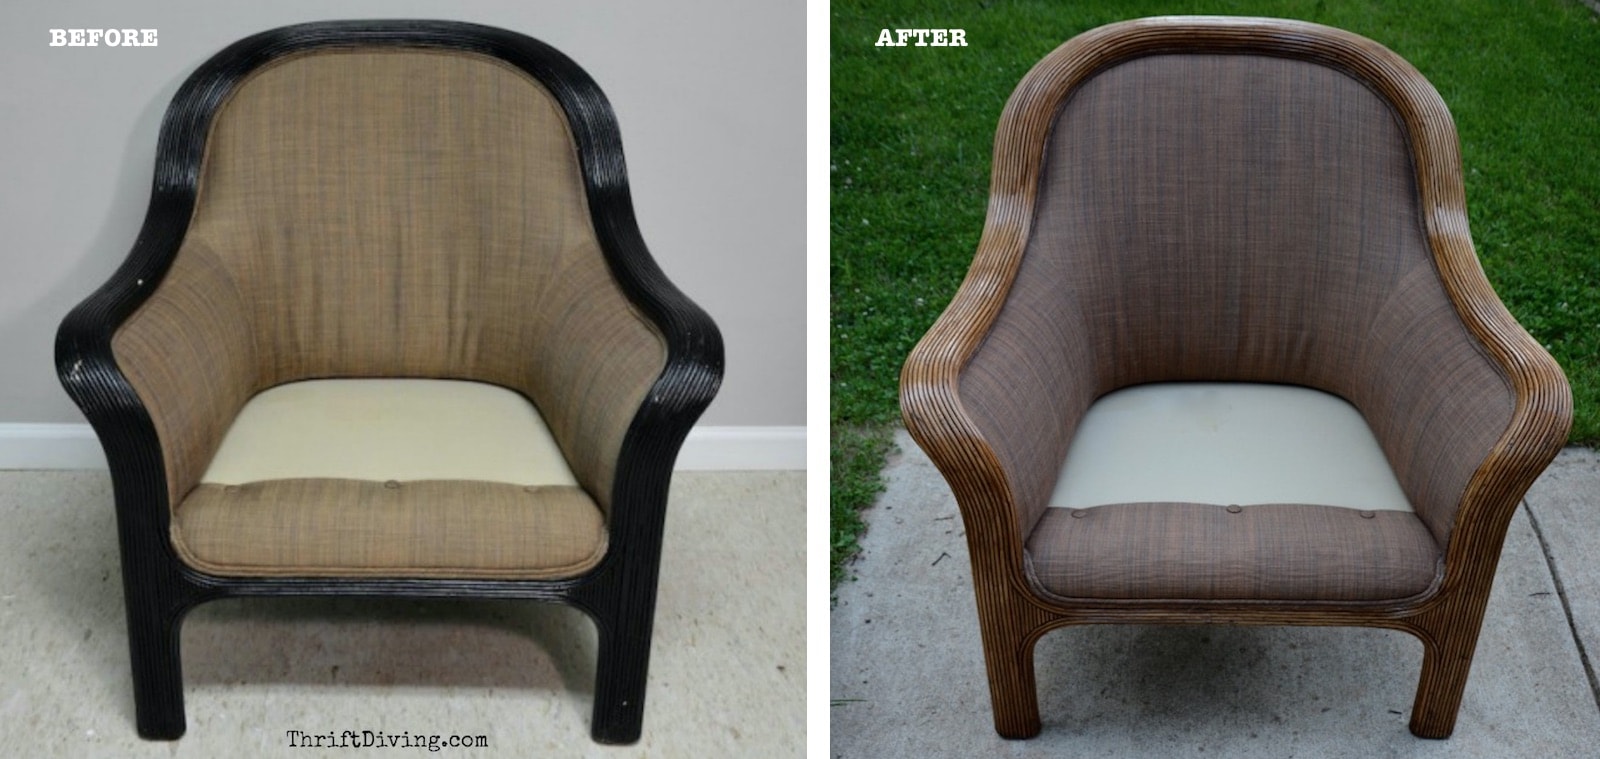
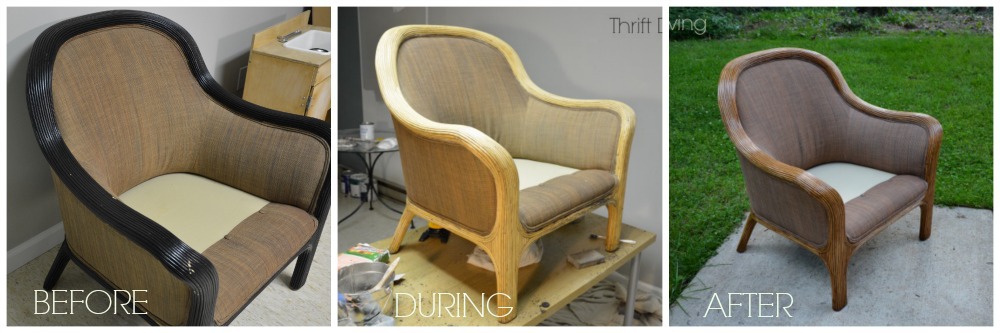
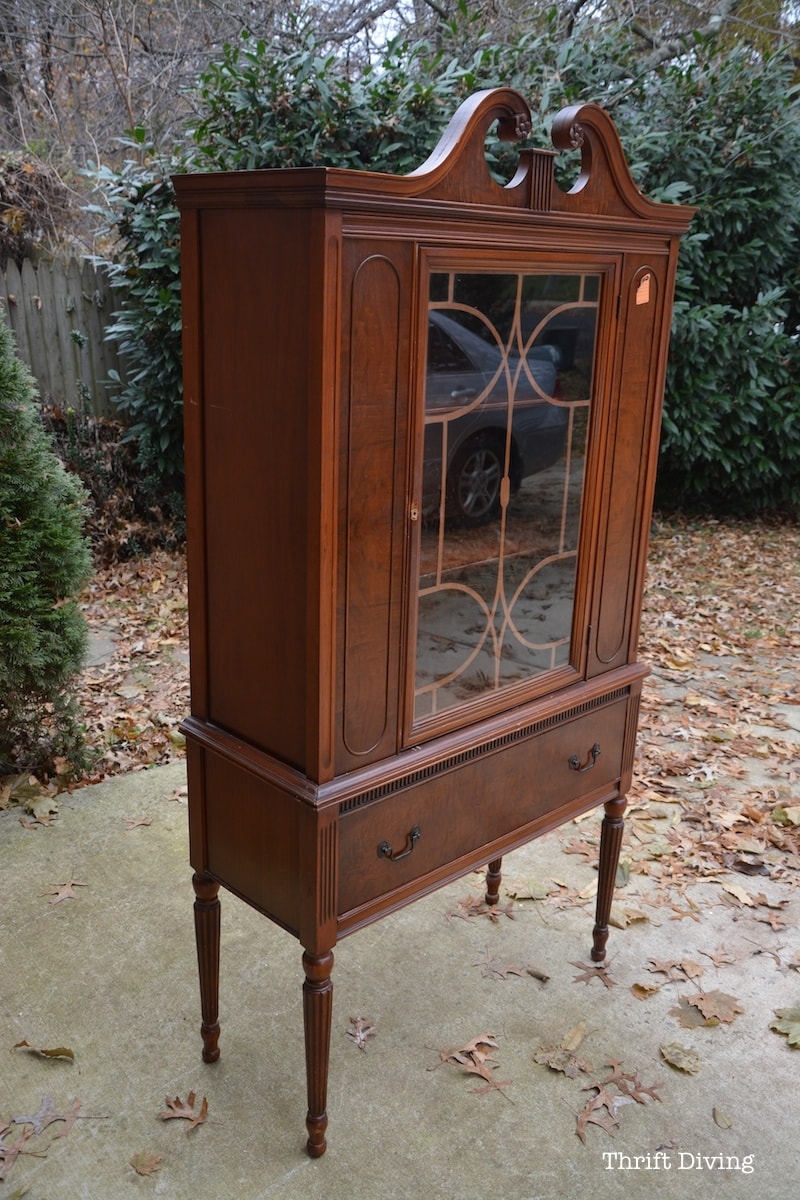
BEFORE
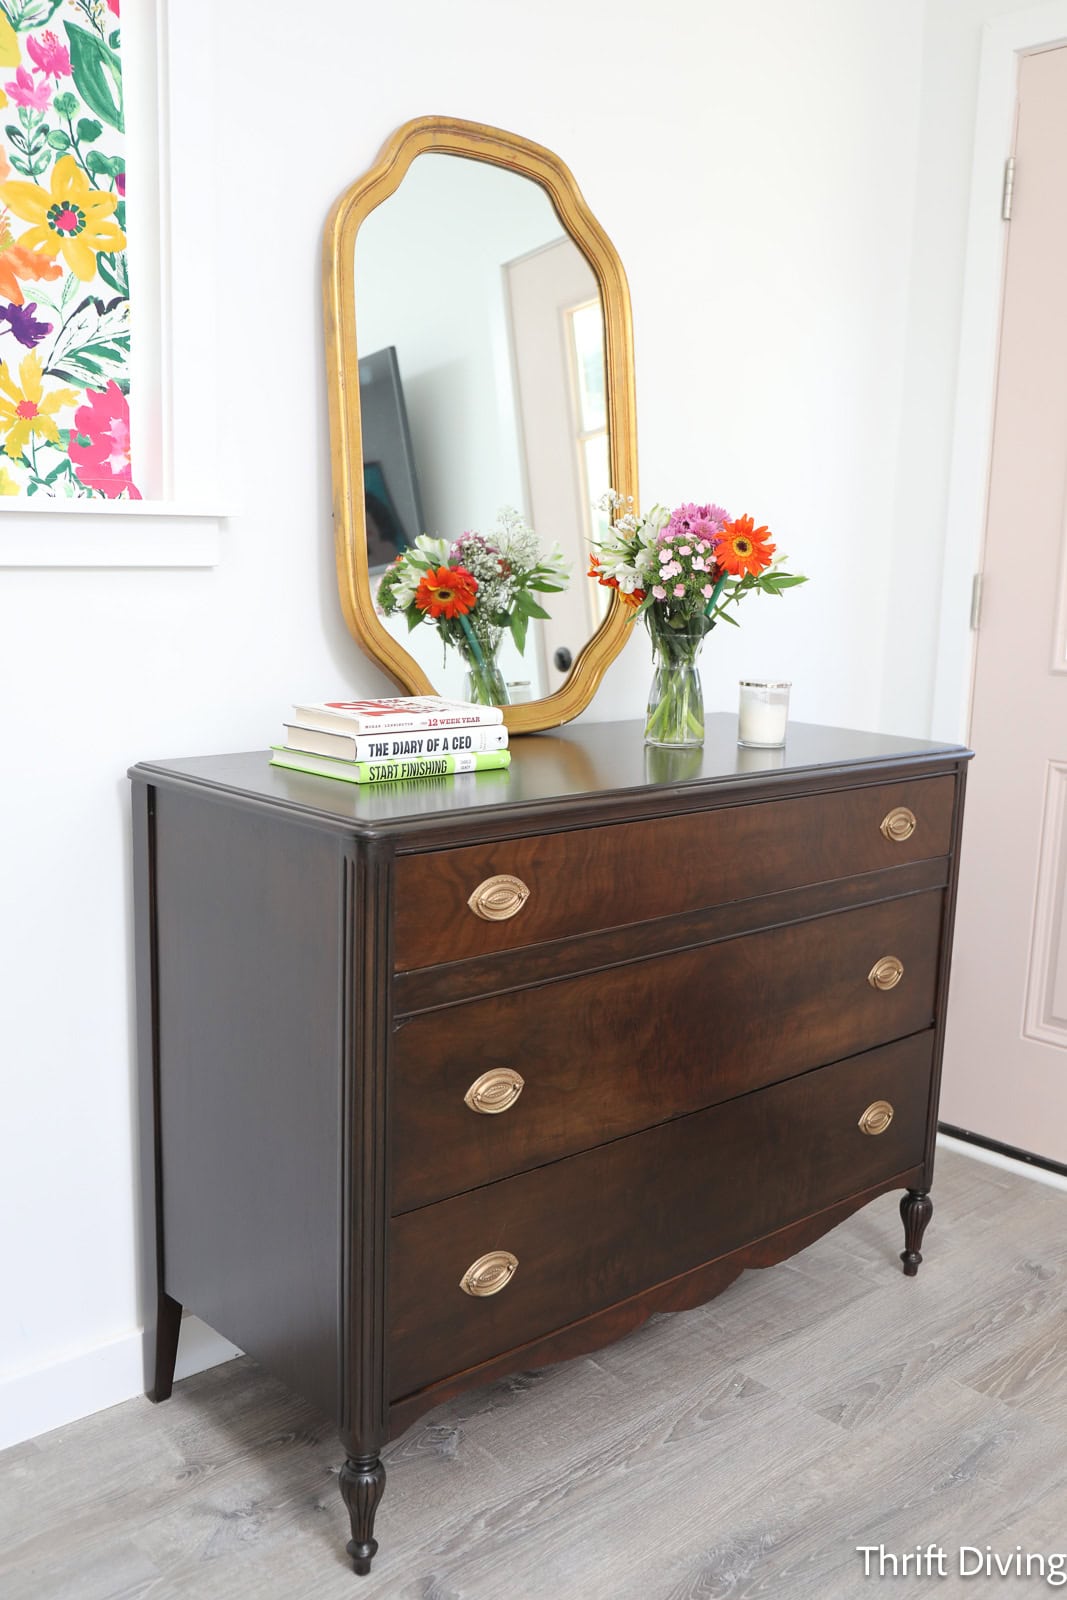
AFTER!
When to Strip Wood Furniture
Before we jump into the how of stripping furniture, let’s talk about when to strip furniture.
I bet you never even considered this question before, have you? We get so caught up in “how” to do it that we forget that not every piece of wood furniture needs to be stripped.
Here are some examples when to strip furniture and when not to strip furniture:
Strip Furniture If:
- It’s previously painted. This is pretty obvious. If you want to restore a piece of furniture back to its original wood stain or to go natural on the furniture, and it’s painted, you’ll definitely need to strip away the paint with a chemical stripper. (WARNING: Please read this safety article about the dangers of certain chemical strippers that are dangerous and have lead to a couple of young men’s deaths due to a chemical in certain strippers called methylene chloride).
- It’s really scratched or beat up. If you want to restore the wood but it’s pretty beat up, then stripping is a great idea.
- You want to change the color/shade. If the wood is dark and you want to go light, consider stripping it down to “start fresh.”
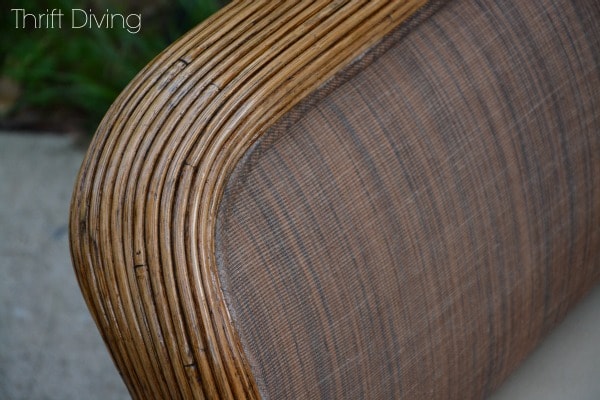
- There are lots of nooks and crannies. If a piece of wood furniture has a lot of detailed, ornate areas, you’ll need to use a chemial stripper to reach those places. Simply taking sandpaper to them won’t work. However, keep in mind that detailed areas like these usually increase the amount of time the whole job is going to take! (Believe me–I know! My latest strip-and-stain took the entire month!).
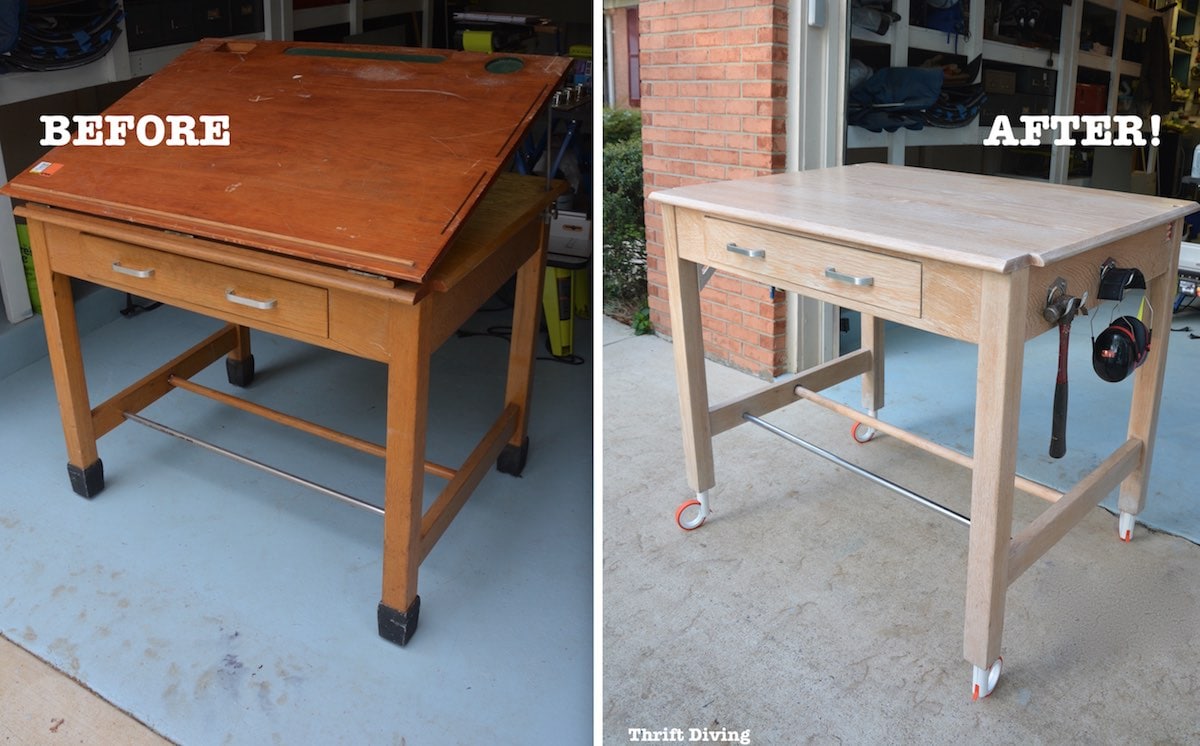
RELATED: Drafting Table Makeover: Stripped to Natural Wood
DON’T Strip Furniture If:
- It’s only got a few dents. Instead, check out videos on YouTube on how to remove dents from wood with steam and an iron! Pretty cool!
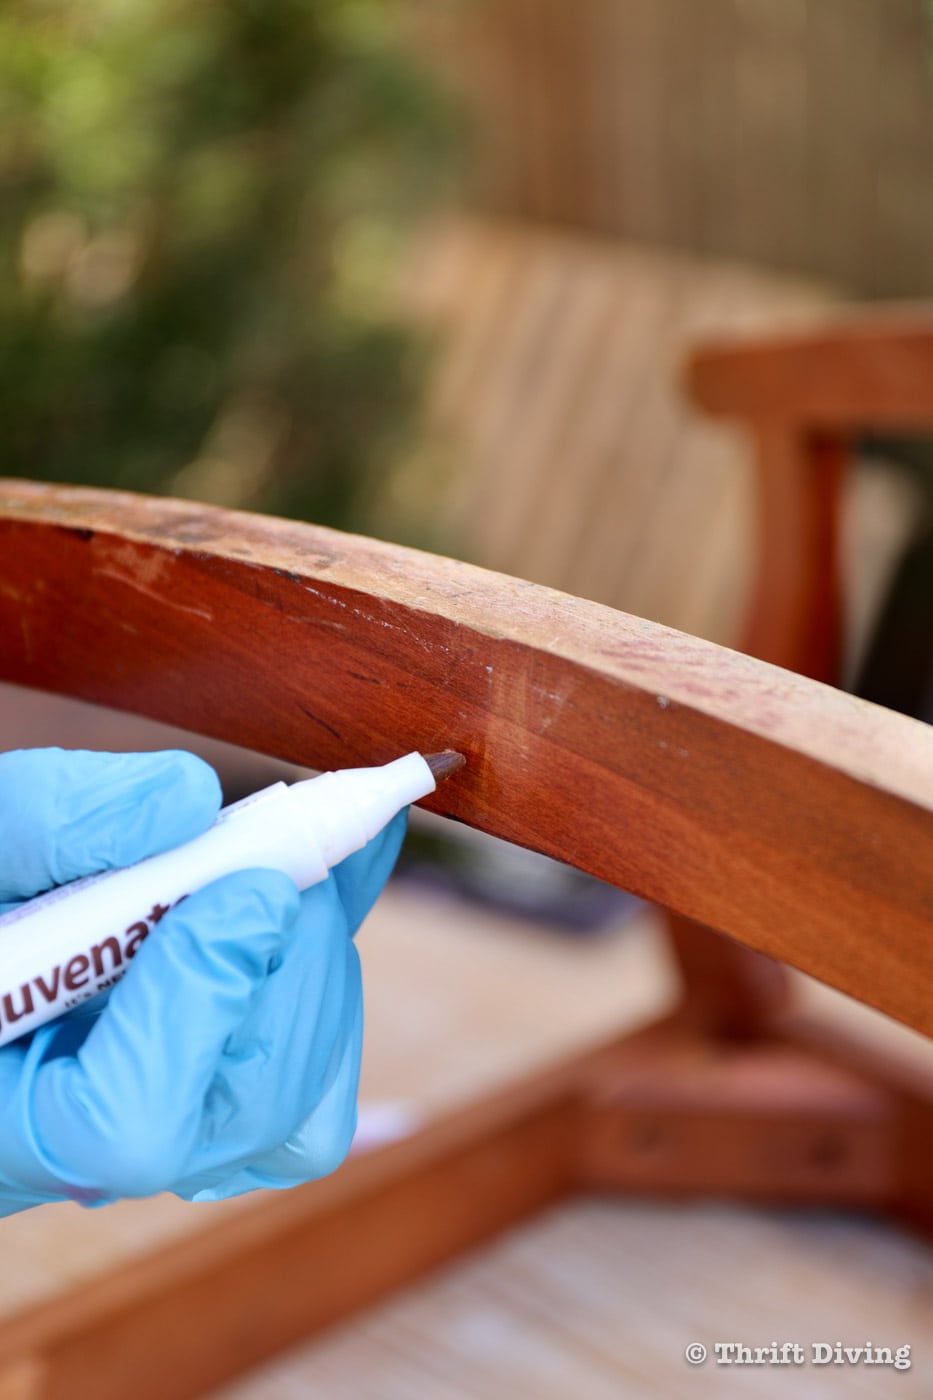
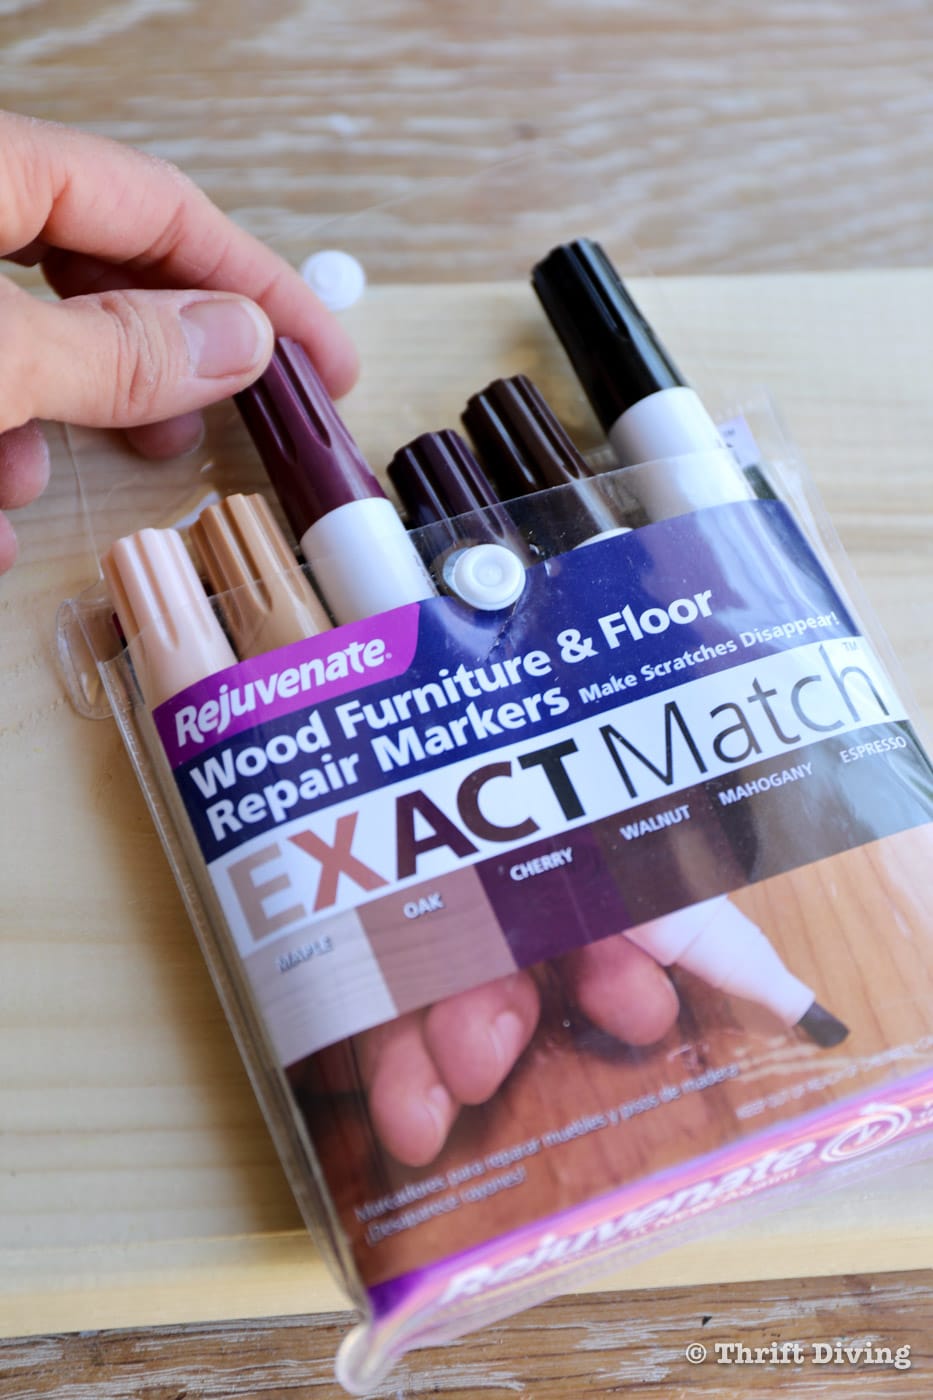
- It only has a few scratches. You can easily use wood repair markers to fix scratches in wood. Check out this project with a thrifted $20 wooden rocking chair that I restored using wood repair markers. Fill in the scratches and then seal the wood. Watch the tutorial here.
- It needs a lot of wood filler. If your furniture has a bunch of cracks, chips, or gouges that require wood filler, it will be hard to disguise all that wood filler under a coat of stain. Wood filler (the kind you buy in a tub or tube), despite being marketed as “stainable,” never blends in very well when you stain over it. If your wood furniture needs a bunch of wood filler to repair it, go ahead and use the wood filler, but plan on painting the furniture instead of re-staining it. The paint will hide the filler. Another option would to be make your own wood filler by taking some of the wood dust from sanding the piece of furniture and mixing it with wood glue to make a “custom” wood filler suitable for that piece of furniture. I did that when I refinished this vintage dresser and it worked pretty well.
- You’re planning to paint the furniture. You don’t have to strip furniture before painting it. 🙂
- You want to go darker. If you want to change the furniture from light wood to dark wood and it’s in pretty good condition otherwise, you might just be able to use a gel stain over the existing light wood tones. No stripping needed.

Related: What’s the Best Paint For Furniture?
Strip vs. Sand Old Furniture
Can you strip furniture by sanding? Well, if you’ve never stripped furniture before, you may be wondering how easy it is to strip furniture without chemicals, or thinking that chemical strippers are the only option for removing the existing finish.
Not true, my friend!
You can, in fact, simply use an orbital sander to strip furniture, especially on wood.
In the case of this mid-century modern dresser makeover, I did use a chemical stripper and then followed with an orbital sander in order to remove the last bit of remaining old stain.
However, I have refinished several dressers where I simply sanded the top down or the body and skipped the chemical strippers. The only issue you run into with this strategy is that the orbital sanding discs will get really “gummed” up. Meaning, all the old finish will quickly build up the sanding disc, which can then begin to scratch your wood, or simply not be effective in removing any more finish once the build-up occurs.
The price of sanding discs are expensive, though, and so while you can technically skip using liquid finish removers, you’ll pay more by using way more sanding discs than you would have if you had used chemical strippers. The chemical strippers do the hard work to remove the existing layers, and then the orbital sander helps to clean up the wood, removing the last bit of stain left.
And for the record, the key to getting good results when sanding wood with an orbital sander is to make sure you’re moving slowly, about 1 inch per second.
Any faster and you risk getting those swirly marks otherwise known as “pigtails.” Many times you won’t see them until you later add stain and then–SHOOT!–they’re visible all over your gorgeous “new” stripped wood!
Oh, the obscenities you’ll spew out of your mouth… LOL
Here are the times when it’s okay to use a sander and skip the chemical stripper:
- When you’re stripping large, flat surfaces. However, if you’ve got curves or nooks and crannies, go with the chemical strippers which can get into those tight spots. Use the bristled brushes for those hard-to-reach places.
- When you’re totally intimidated by chemical strippers and you’d rather just stick to something you know: orbital sanders!
- When it’s only a small area and you can knock it out quickly with a sander.
- You prefer to strip furniture without chemicals.
- You have lots of orbital sanding discs, since sanding without stripping can cause a build-up of old finish, requiring you to change sanding discs often.
Just keep this in mind:
- Work your way down from a rough grit sandpaper such as a P80-grit “rough” grit…..to a P150-grit “medium” grit…and at times, you may finish with the P220 “very fine” grit, although you may not need it.
- Do your final sanding by hand to remove any last little bit of swirly marks.
- Don’t tilt your sander to spot-remove any finish; instead, keep the sander flat on the surface, working it over the surface evenly under an even layer is removed. Otherwise, you risk sanding “bald spots” in your veneer or wood, which will not accept wood stain well, and will be noticeable. That’s what happened to this vanity top that I sanded and mistakenly got overzealous in one spot:

Thankfully, I got creative with the bald spot and disguised it with a painted stenciled flower. LOL. But you may not be so lucky to have your boo-boo land in the right spot for that!
What Kind of Stripper to Use?
I’ve been refinishing and painting furniture since 2010. And in all those years, there has been a move towards safer products, including chemical strippers. In fact, chemical strippers have gotten “safer” over the years. I wrote a blog post called I’ve Been Using Toxic Paint Stripper Gel For Years! where I discovered that my favorite paint remover at the time still contained harmful ingredients.
(WARNING: Please don’t use chemical strippers that contain methylene chloride, such as brands like Klean Strip, Goof-Off, Strypeeze, Jasco, among others. Read this article on the dangers of those strippers with methylene chloride).
I started out using Citristrip stripping gel for many years, which you can pick up from any big box store.
Here are the important things to know about Citristrip stripping gel:
- Has a citrus smell.
- Can be left up to 24 hours and will stay wet.
- Can be used indoors….so they say…
- Smells sickly sweet and strong, despite the claim that it can be used indoors. I wouldn’t want to use it indoors because it still smells, but it’s not as harsh-smelling as other strippers I have used.
- It’s easily found at many home improvement centers and online.

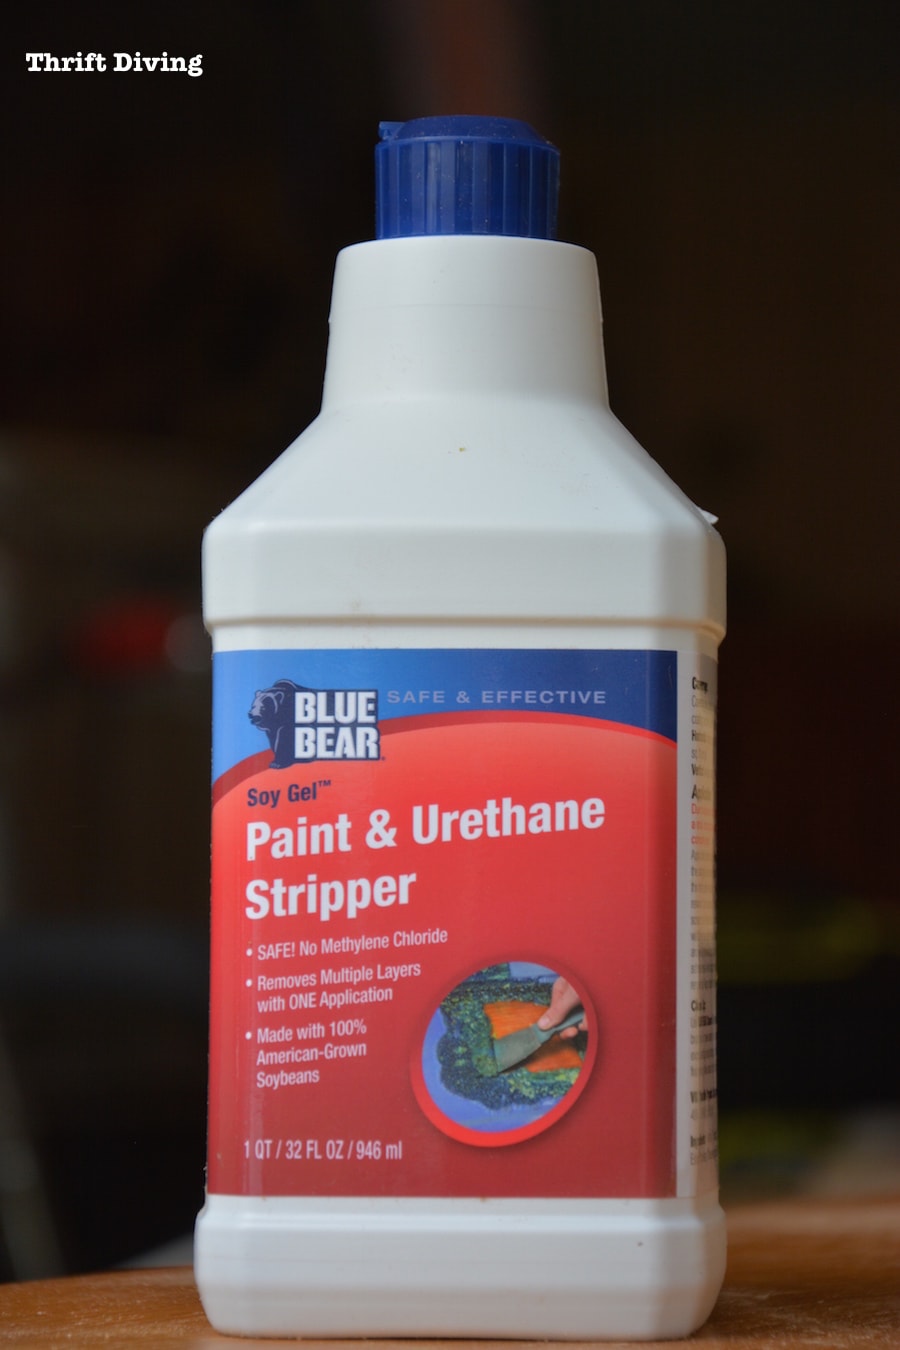
The other stripping gel that I had used for years for DIY projects was Blue Bear Paint & Urethane Stripper. I think their marketing was misleading, making consumers believe that because it is soy-based and didn’t have Methylene Chloride that it was “natural.”
But as I uncovered at the time of my research, Blue Bear Paint & Urethane Stripper still contained a toxic chemical called NMP (N-Methyl-2-Pyrrolidone; it’s also found listed as N-Methylpyrrolidone). It appears that they’ve since released another option of chemical stripper called Safenol that says it has no methylene chloride or NMP.
NMP, according to the California Department of Industrial Relations, can hurt your reproductive system, your nervous system, and can irritate your eyes, nose, throat, or skin. It can enter your body through contact with products that contain it, or through breathing it in. So it’s best to simply not use paint strippers that have NMP listed in its ingredients.
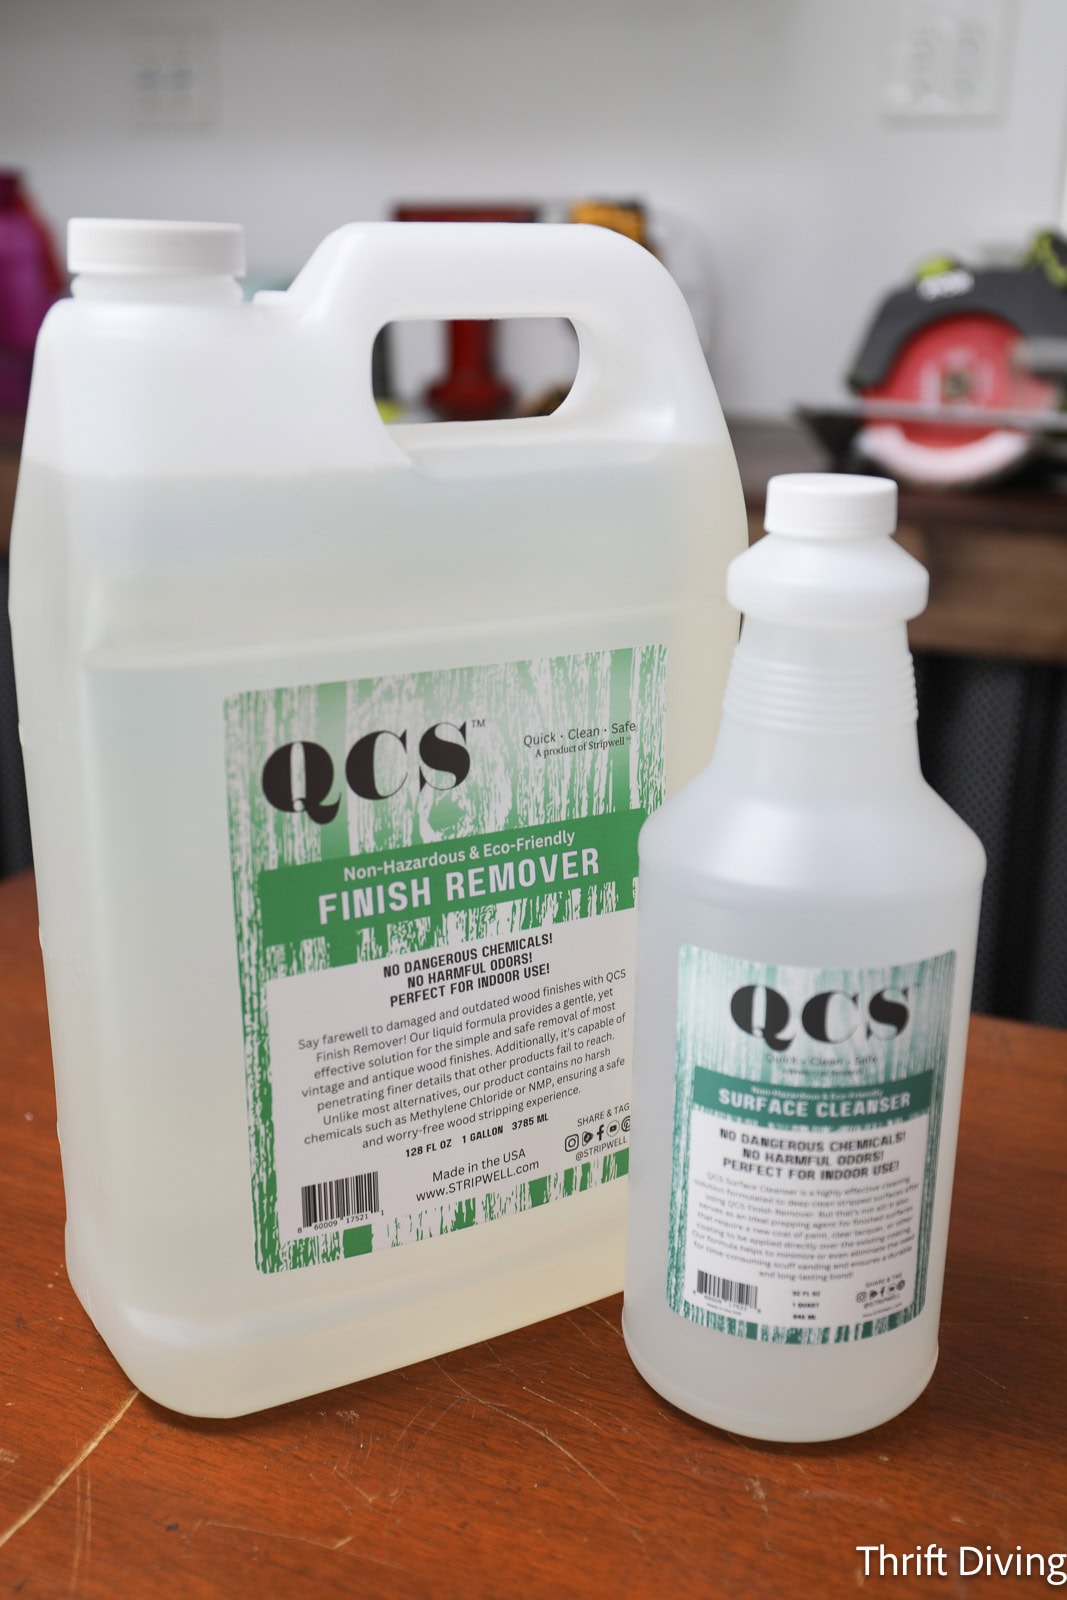
What I prefer to use now for stripping furniture is QCS (Quick, Clean, Safe) Finish Remover, from Stripwell. In fact, the owner of the company agreed to come on my podcast to talk about the toxicity of chemical strippers if they have methylene chloride or NMP in them (listen to the episode here: I’ve Been Using Toxic Paint Strippers For Years! – Episode #49)
In fact, after that episode, I dug into the whole wonderful world of chemical strippers and wrote a blog post about paint strippers that still have hidden NMP in them, which you can read in the post I’ve Been Using Toxic Paint Strippers For Years. It’s an educational read!
Materials Needed to Strip Furniture
To strip furniture, you obviously need some supplies, including the finish remover I just talked about above.
But what about all the other tools and materials needed?
Here’s what I recommend:
(NOTE: I am a participant in the Amazon Services LLC Associates Program, an affiliate advertising program designed to provide a means for us to earn fees by linking to Amazon.com and affiliated sites).
- QCS Finish Remover
- QCS Surface cleaner
- Pre-stain (use the oil-based pre-stain if you’re using an oil-based stain; use a water-based pre-stain if using a water-based stain).
- Stain (I prefer using water-based stains because they’re low-VOC and have less toxicity, clean up easily with water, and don’t leave lasting stinky odors. I like General Finishes Water-based stain).
- Water-based General Finishes Extender – This helps
- Wire brush set.
- Drop cloth or plastic sheeting
- Synthetic brushes.
- 6-inch putty knife
- Gloves
- Empty box or container for old finish that’s removed.

Extra Supplies Needed
- Old milk jug or cardboard box
- Mask for sanding
- Sandpaper and speciality sanding tools (see below)
- Various grits of sandpaper
- Tack cloth or microfiber towels
- Plastic sheeting or drop cloth to protect floors
- Gloves
- Furniture finish Repair Markers – These are great to have on hand for really small touch-ups, especially if you later realize you missed a spot when stripping and re-staining wood furniture.
How to Strip Furniture Easily in 10 Steps
Stripping furniture is tedious, but once you’ve restored something that you absolutely love, you forget about how much effort went into the process. Kind of reminds me of giving child birth. 😉 In other words, the results are worth the pain and strain. HA!
Let’s jump into the process!

RELATED: Dip and Strip 101: Everything You Wanted to Know About Professional Furniture Stripping
A Word of Caution Before You Begin
Before I walk you through this stripping furniture tutorial, let’s talk about safety and disposal. First of all, never ever use a paint stripper that contains methylene chloride, as mentioned above. In fact, the Environmental Protection Agency (EPA) banned this chemical in strippers because some people died from using them. The chemical strippers I recommend below do not have methylene chloride, by the way. If you’ve got some old stripper under your sink, get rid of it and buy the environmentally friendly stuff.
Speaking of getting rid of…make sure you properly dispose of your chemical strippers and the gunk that you remove. Check your local recycling to see when the hours are for you to drop it off. I’d recommend disposing of it in a clean paint can with a lid (you can buy blank metal paint cans from Home Depot). Don’t throw it away and don’t dump it in the grass.
Lastly, make sure you thoroughly let your old rags dry flat and separated before tossing them. Stains, strippers, and other chemicals typically used in stripping are a fire hazard and can spontaneously combust on their own if tossed in a trash can while wet. To dry them, simply spread them out to dry outdoors on a surface, and once thoroughly dry, you can toss them in the trash.
Happy stripping! 🙂
Step 1: Get the Right Tools
Put down your kids’ old toothbrush. 😉 If you’re going to strip furniture, you need to get the right tools, like a good set of wire brushes for getting into cracks and crevices (see the materials list above). The worst part of doing projects is when you don’t have what you need. Stopping a project in the middle sucks. Get the right tools and have them on hand before getting started with stripping and restaining wood furniture.
Step 2: Find the Perfect Spot
You can’t just strip furniture in just any ‘ole place in your house. It’s a dirty job. Even with a drop cloth, I guarantee you’ll have a mess everywhere.
Choose a place where it’s okay to dirty up. Garages are best. Basements also work well, as long as it’s not carpeted. For those of you that live in apartments, maybe you’ve got a balcony.
Make sure the space is ventilated. Again, no matter how environmentally-friendly some of these chemicals claim to be, they’re still chemicals that can make you feel yucky if you breathe them for too long. Use a fan to circulate the air, too.
When I was working on my $16 vintage dresser, I was stripping it in my “she shed,” with windows cracked, and my Jet air filtration turned on, especially during the sanding.

Step 3: Prep Your Furniture
You can’t jump right into stripping and re-staining furniture. There are a few things you should do to prep your furniture. Let’s go through those things.
- Clean everything. I know, I know…you’re going to strip the wood, so what’s to clean?? But it’s good habit to clean furniture (especially before you load it up in the your car from the thrift store!). If you’re restoring and old dresser, for example, cleaning out the interior before you get started makes sense, too. 🙂
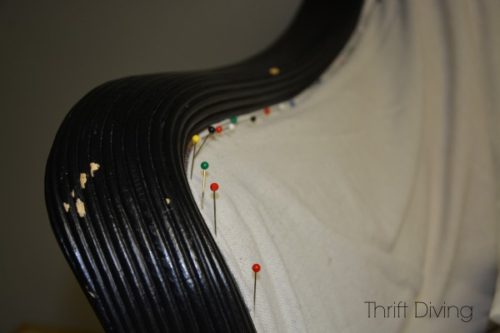
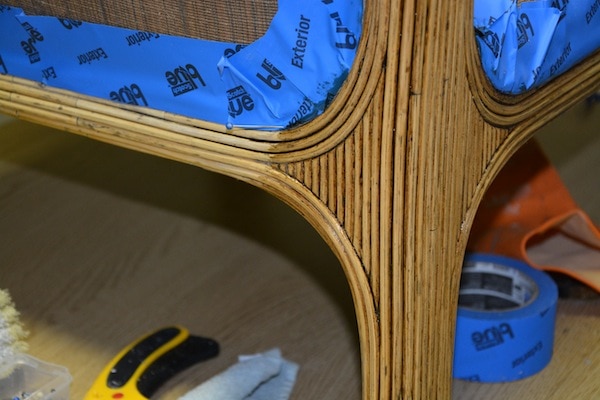
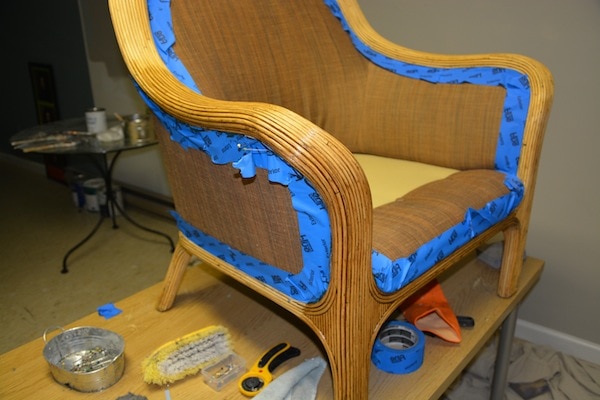
- Protect upholstered areas. Some pieces of furniture you’re trying to strip and stain may be upholstered, which can be super challenging. Be sure to cover the exposed areas so you don’t destroy the fabric. Use a drop cloth to cover the upholstery, holding it in place with straight pins.

- Remove all the hardware. If there are any handles, knobs, hinges on your piece, remove it all. Don’t take the lazy route and try to just go around them. Remove everything, including appliques or moldings. You’ll save yourself time by not having to fix stupid mistakes later.

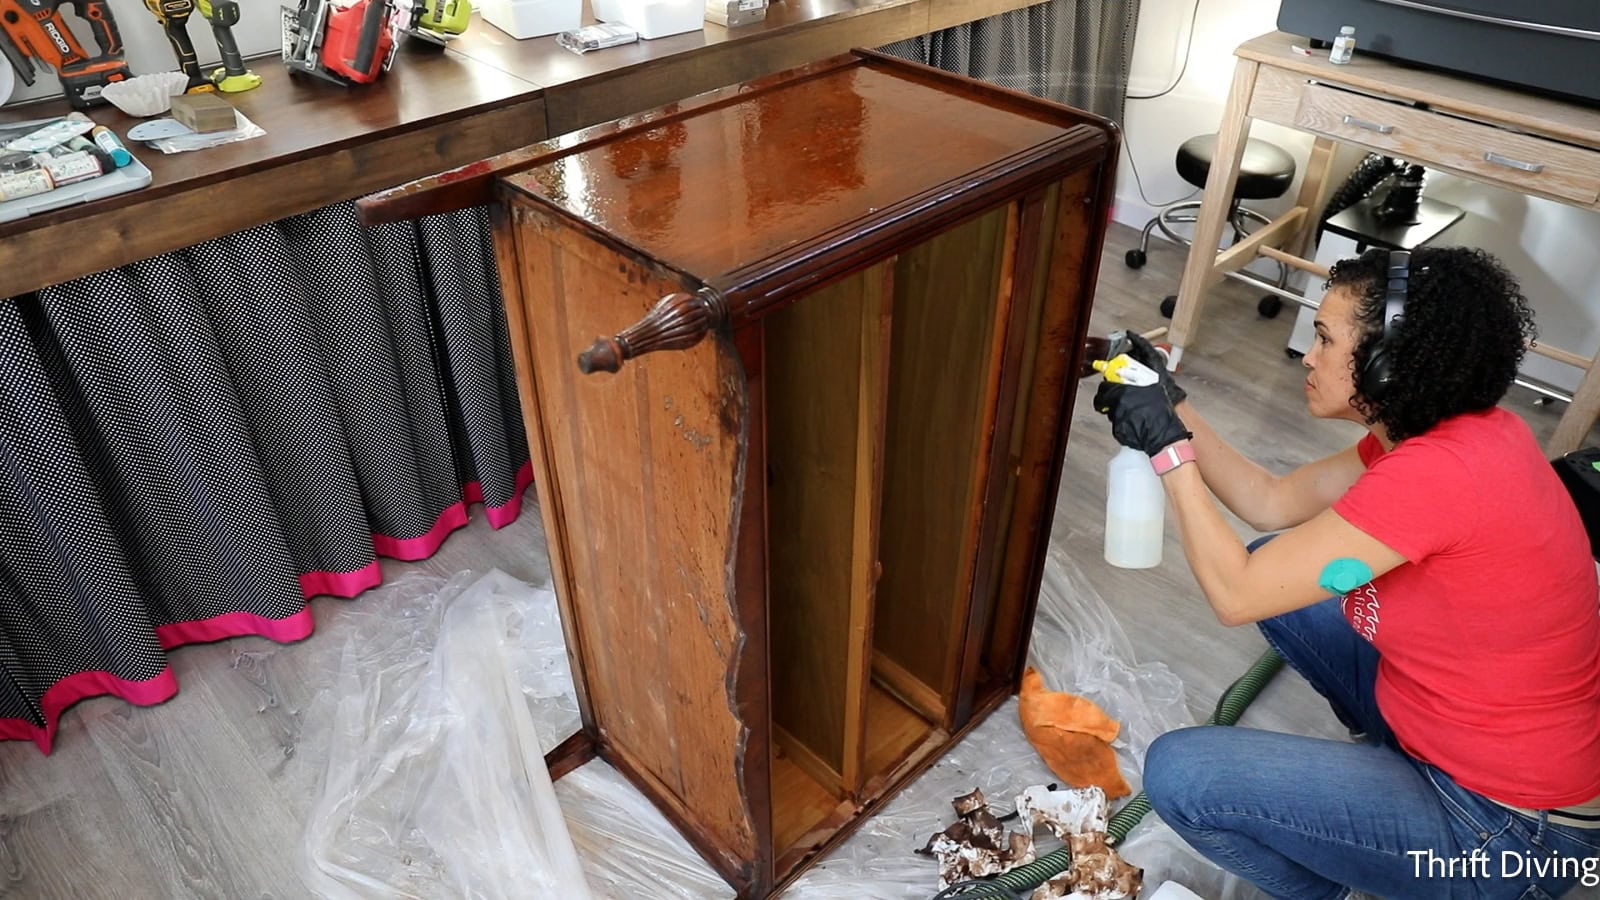
Step 4: Apply the Stripper
QCS finish remover is sprayed on. I like to use a paint brush to spread it around evenly. It takes time to work, so don’t rush this process. I like to leave QCS finish remover on for about 30 minutes to 1 hour before scraping it off. I try not to let it dry, which makes it harder to remove, so I will go back before it dries and apply more layers, to keep it wet.

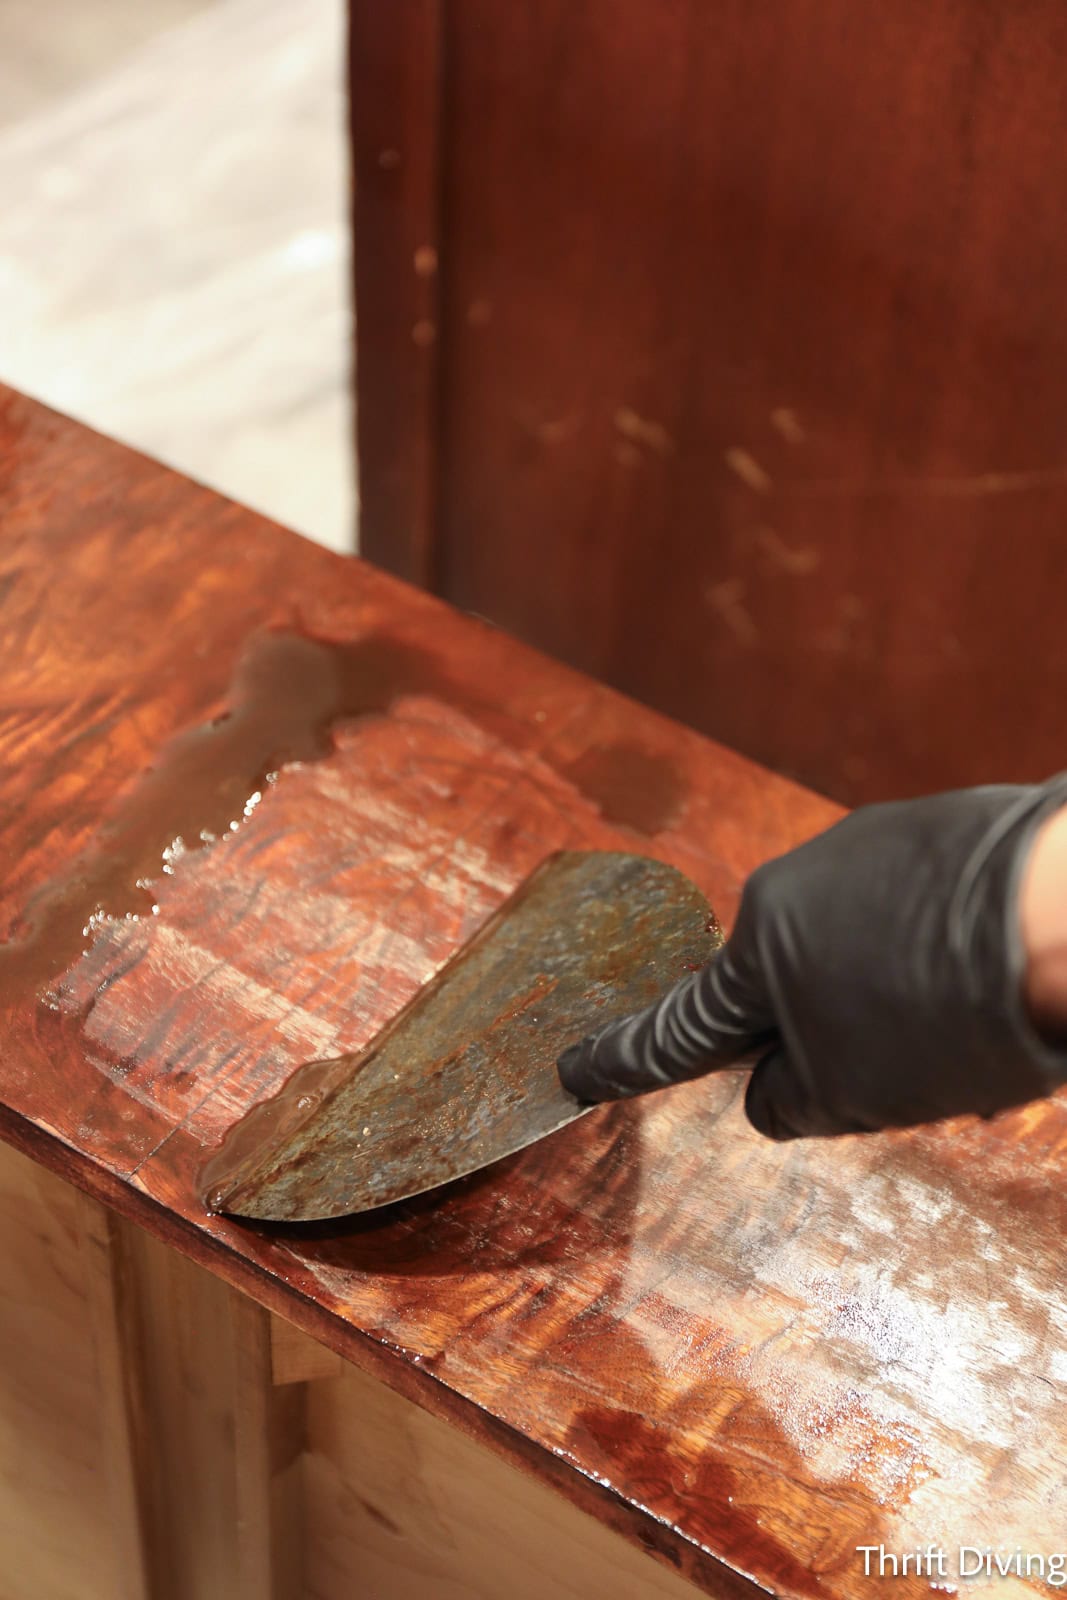
Step 5: Scrape Off the Old Paint, Varnish, or Stain
I use a metal putty knife when stripping furniture, but be careful, because it may gouge your wood. You can also use plastic putty knives. If all you have is a metal putty knife, run the sharp edges over the sidewalk or a piece of rough sandpaper in order to round it out and dull it. That is less likely to gouge your wooden furniture.
This is where another tin bucket comes in handy (and the drop cloth!). You’ll scrape off so much nastiness that you will need a place remove it from your scraper.
Work in sections and try not to skip around. It will be tempting, but if you stick to one small section at a time, you’re less likely to be overwhelmed by all the stuff you have to scrape off. And try, try, try not to let any get on the floor. Yes, you’ll have your drop cloth to catch it, but in the event some gets on the floor, it can strip off the varnish on floors.
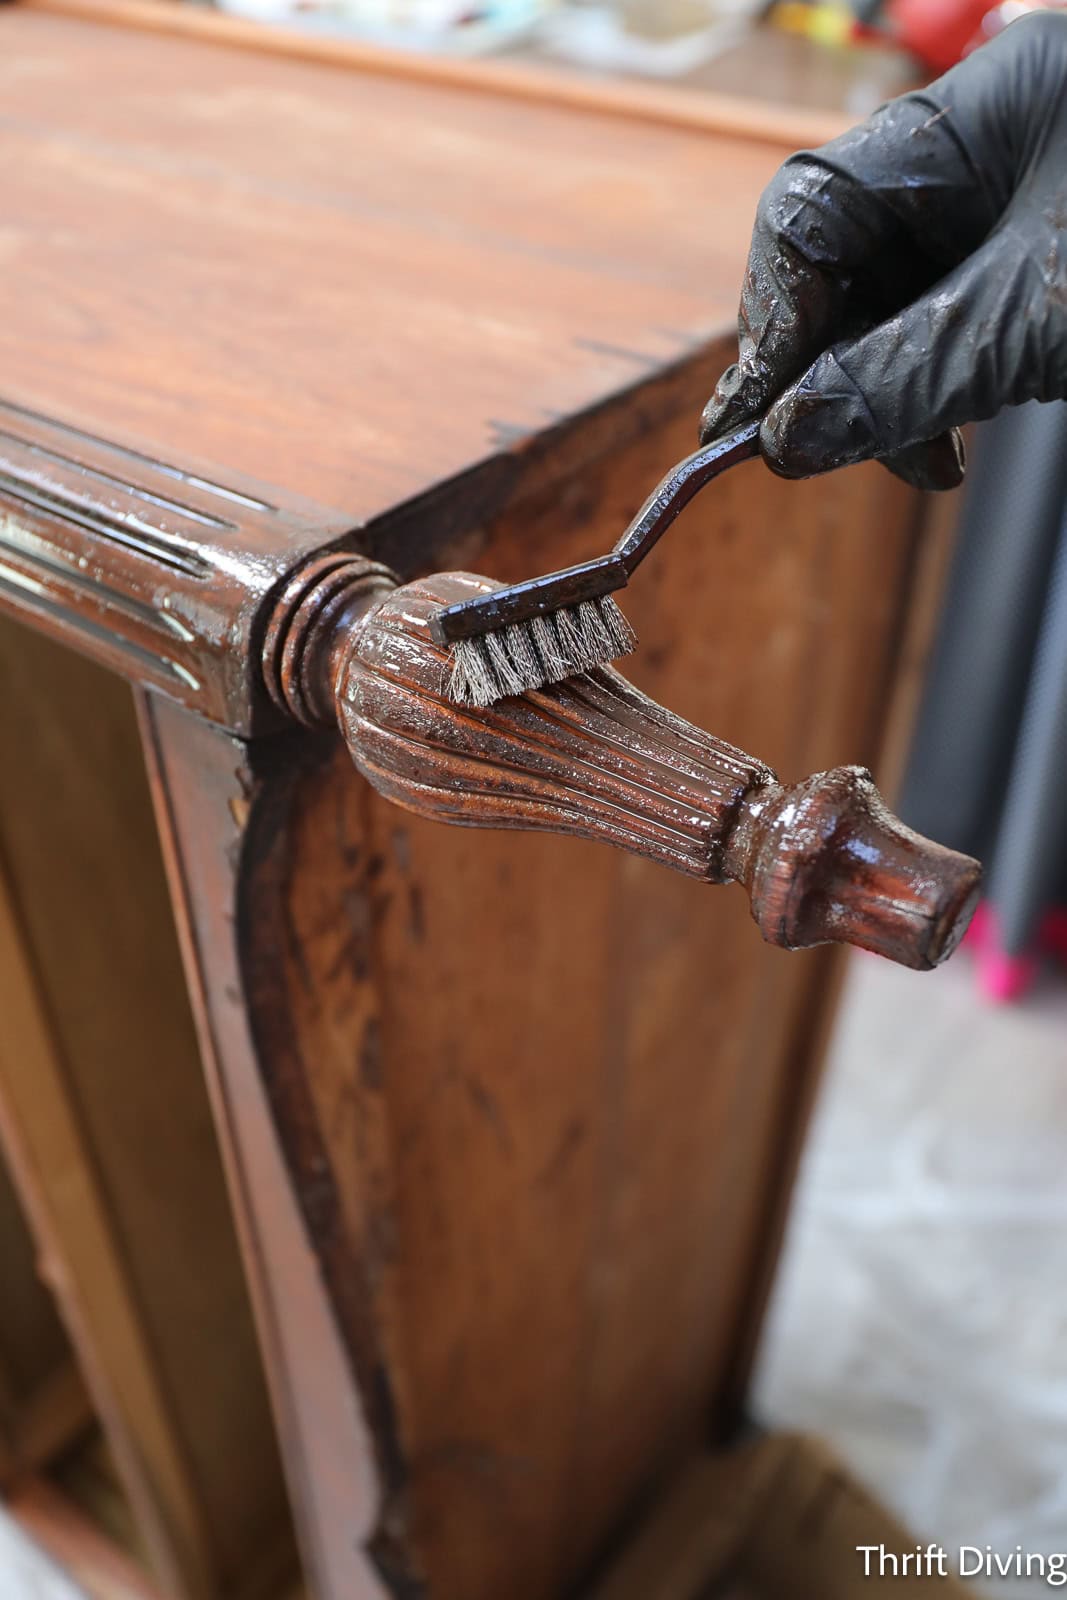
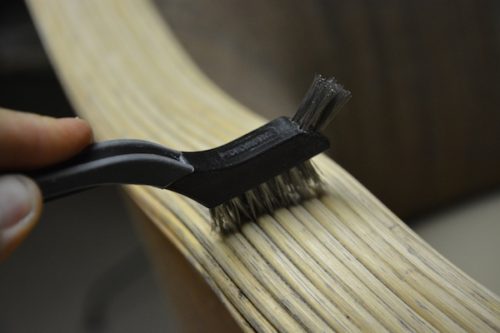
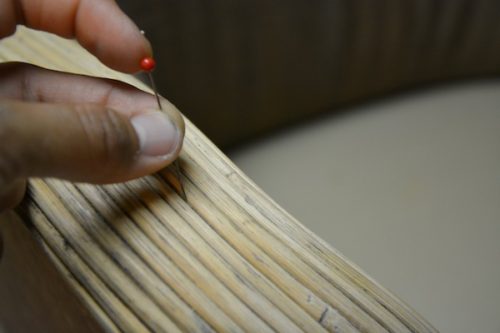
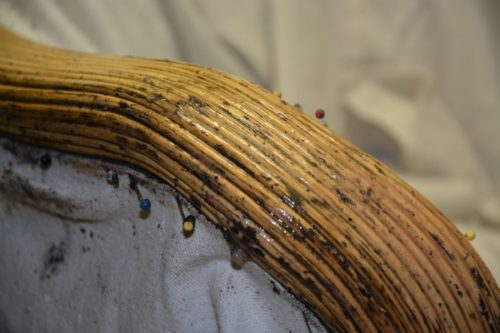
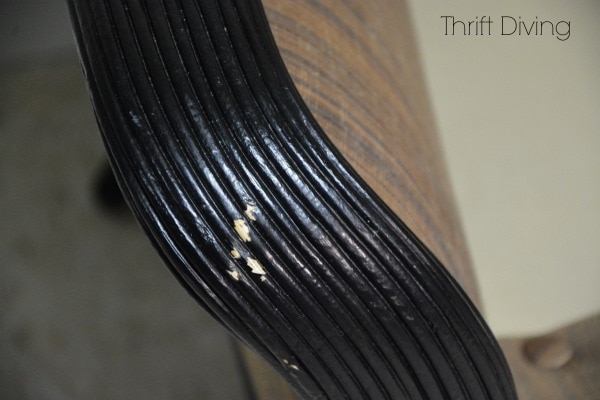
Step 6: Get Into the Nooks and Crannies
I’ll admit it–I despise stripping furniture that has decorative legs and feet. Those details take much more time to get clean. I usually save those for last because they’re the most frustrating and difficult to get clean. But once a bulk of the larger surface areas are clean, wired brushes work awesome for those nooks and crannies. Oh–and straight pins are a godsend for deep, deep grooves!
Step 7: Apply a Second Coat of Stripper.
Use an old cloth to wipe away the leftover stripper and residue. You probably forget a couple areas. Or some areas were stubborn. It’s okay to apply more stripper to those areas. In fact, it’s usually recommended to do a couple applications of paint stripper than to try to get it all off in one go ’round.
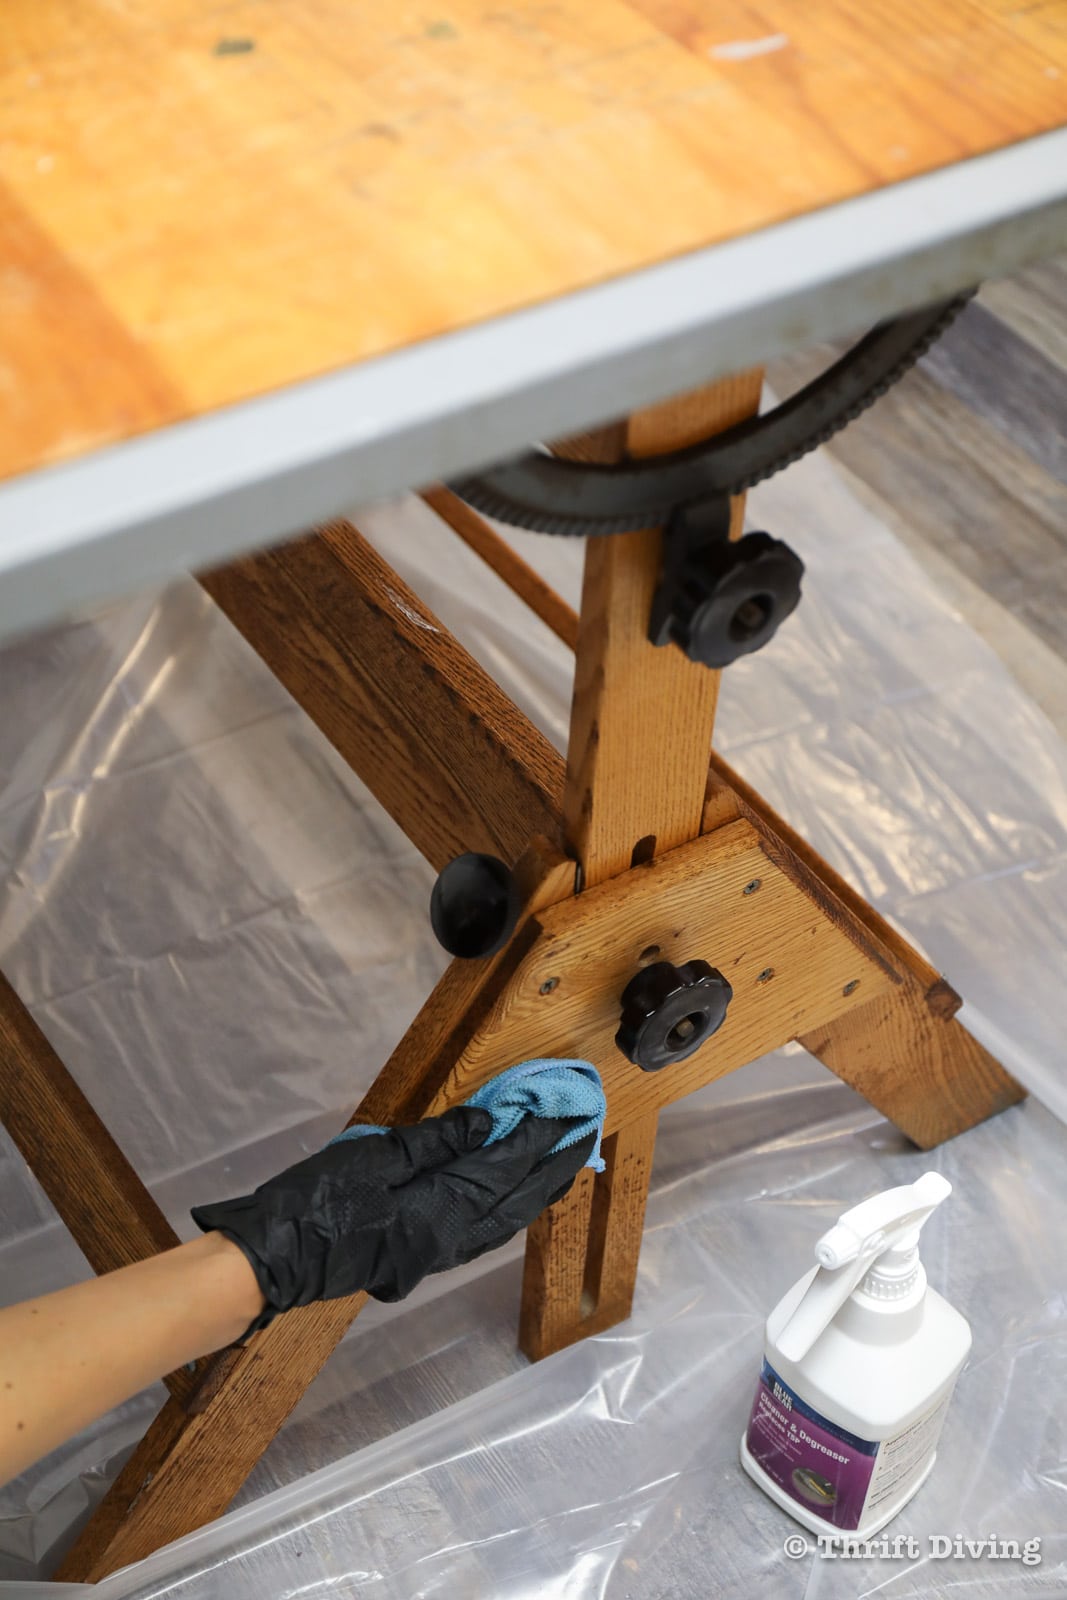
Step 8: Use Surface Cleaner to Remove Any Residue
After stripping furniture, you’ll need something to help clean the residue from the surface. You can also use mineral spirits (the odorless one) bit after switching to QCS, I’ve started using their surface cleaner instead. It’s safer. You’ll not want to skip this part, because the cleaner the surface, the less gunk build-up you’ll have caught in your orbital sanding discs when sanding.

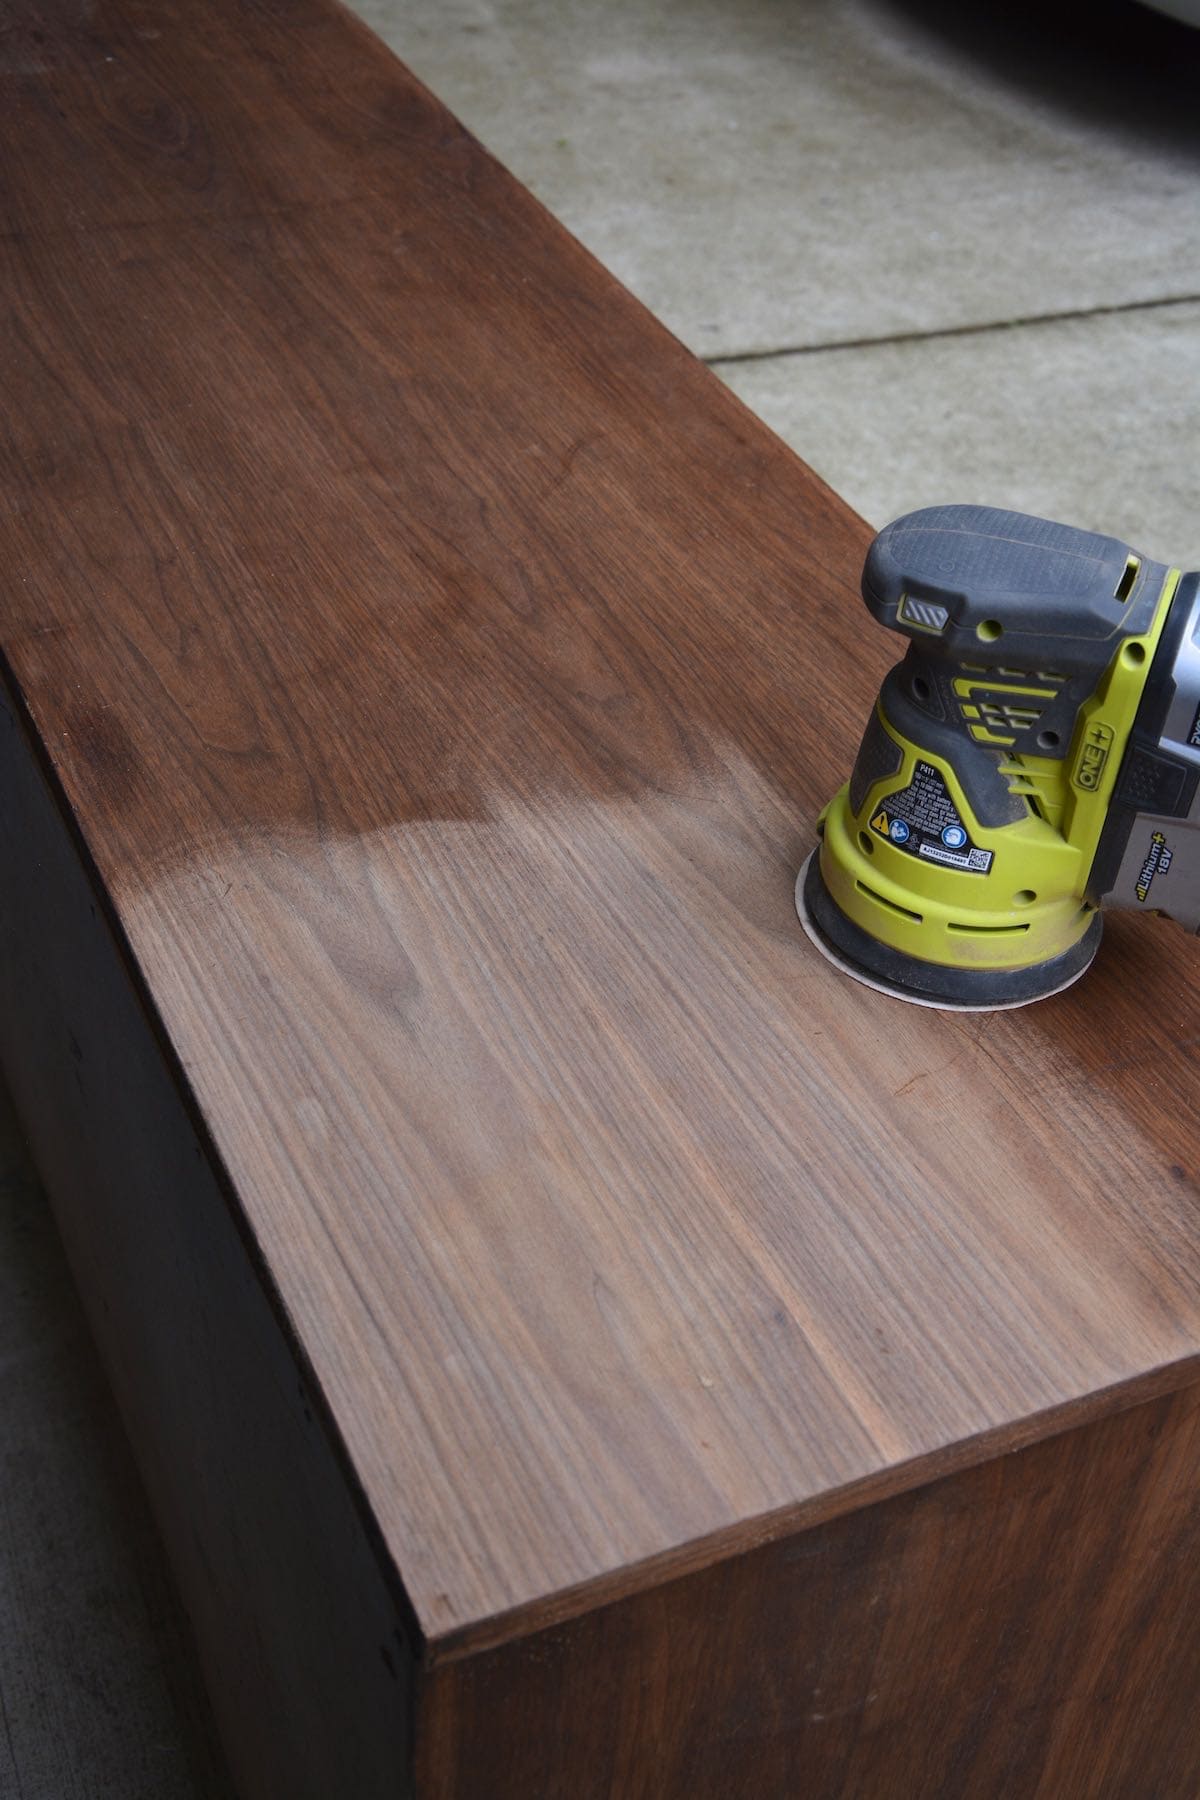
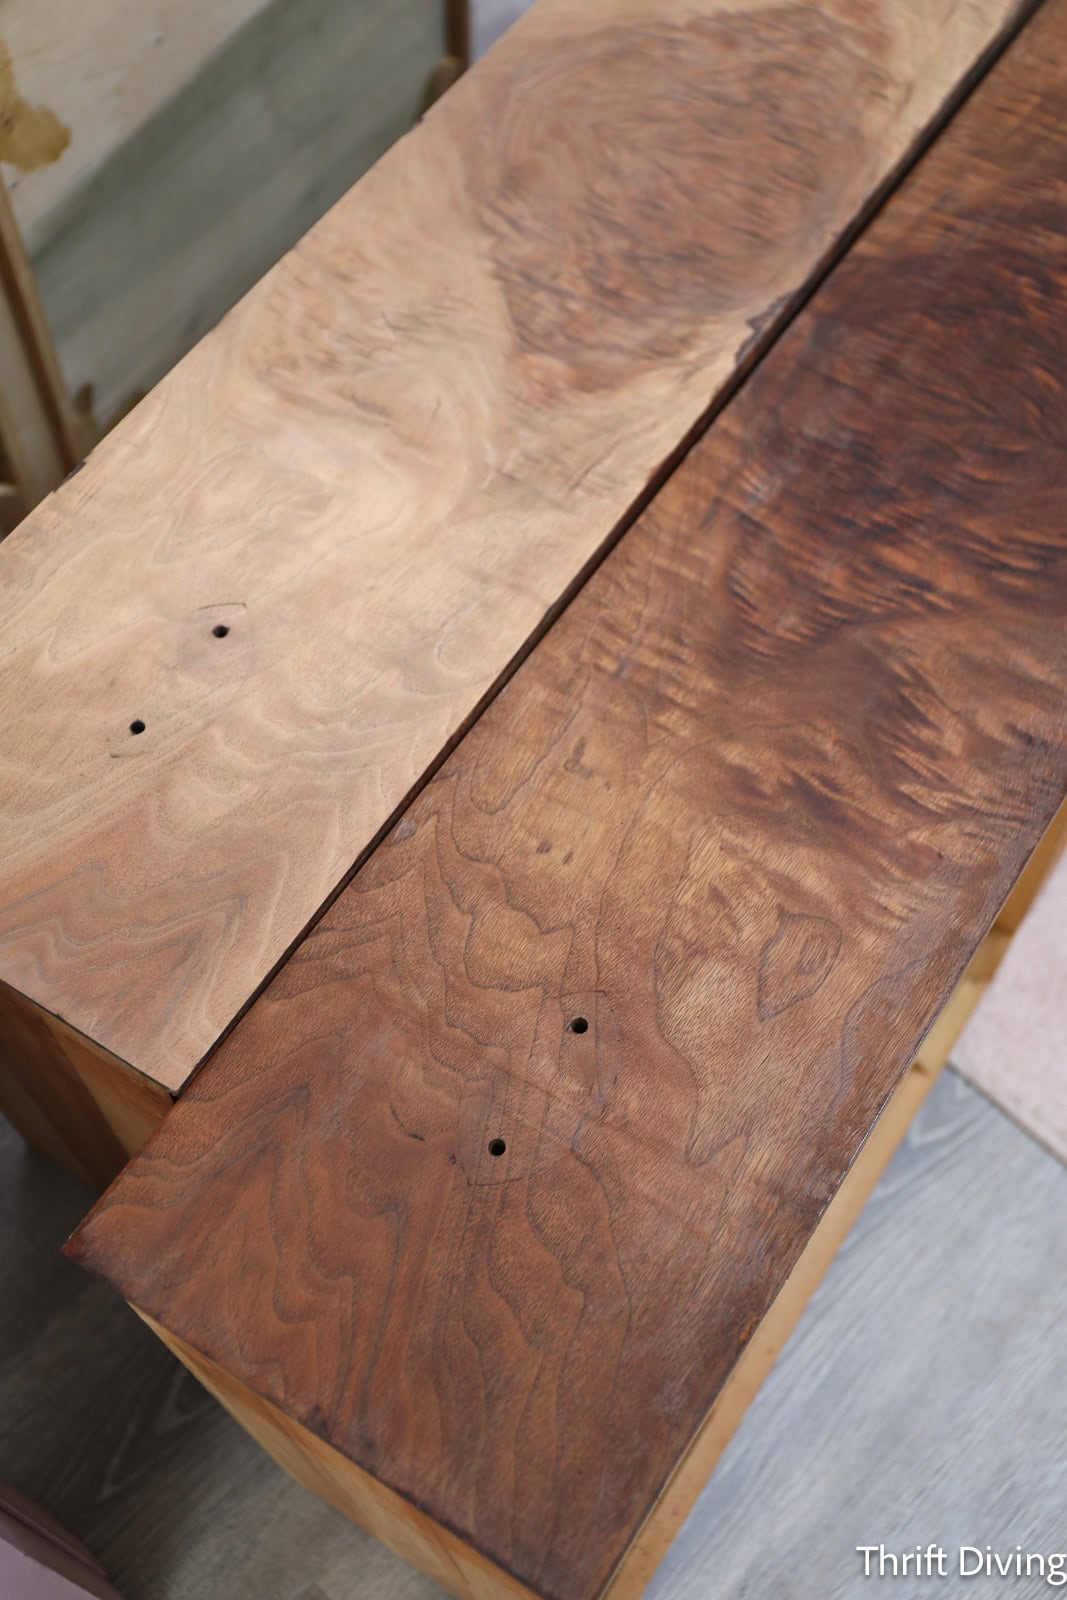
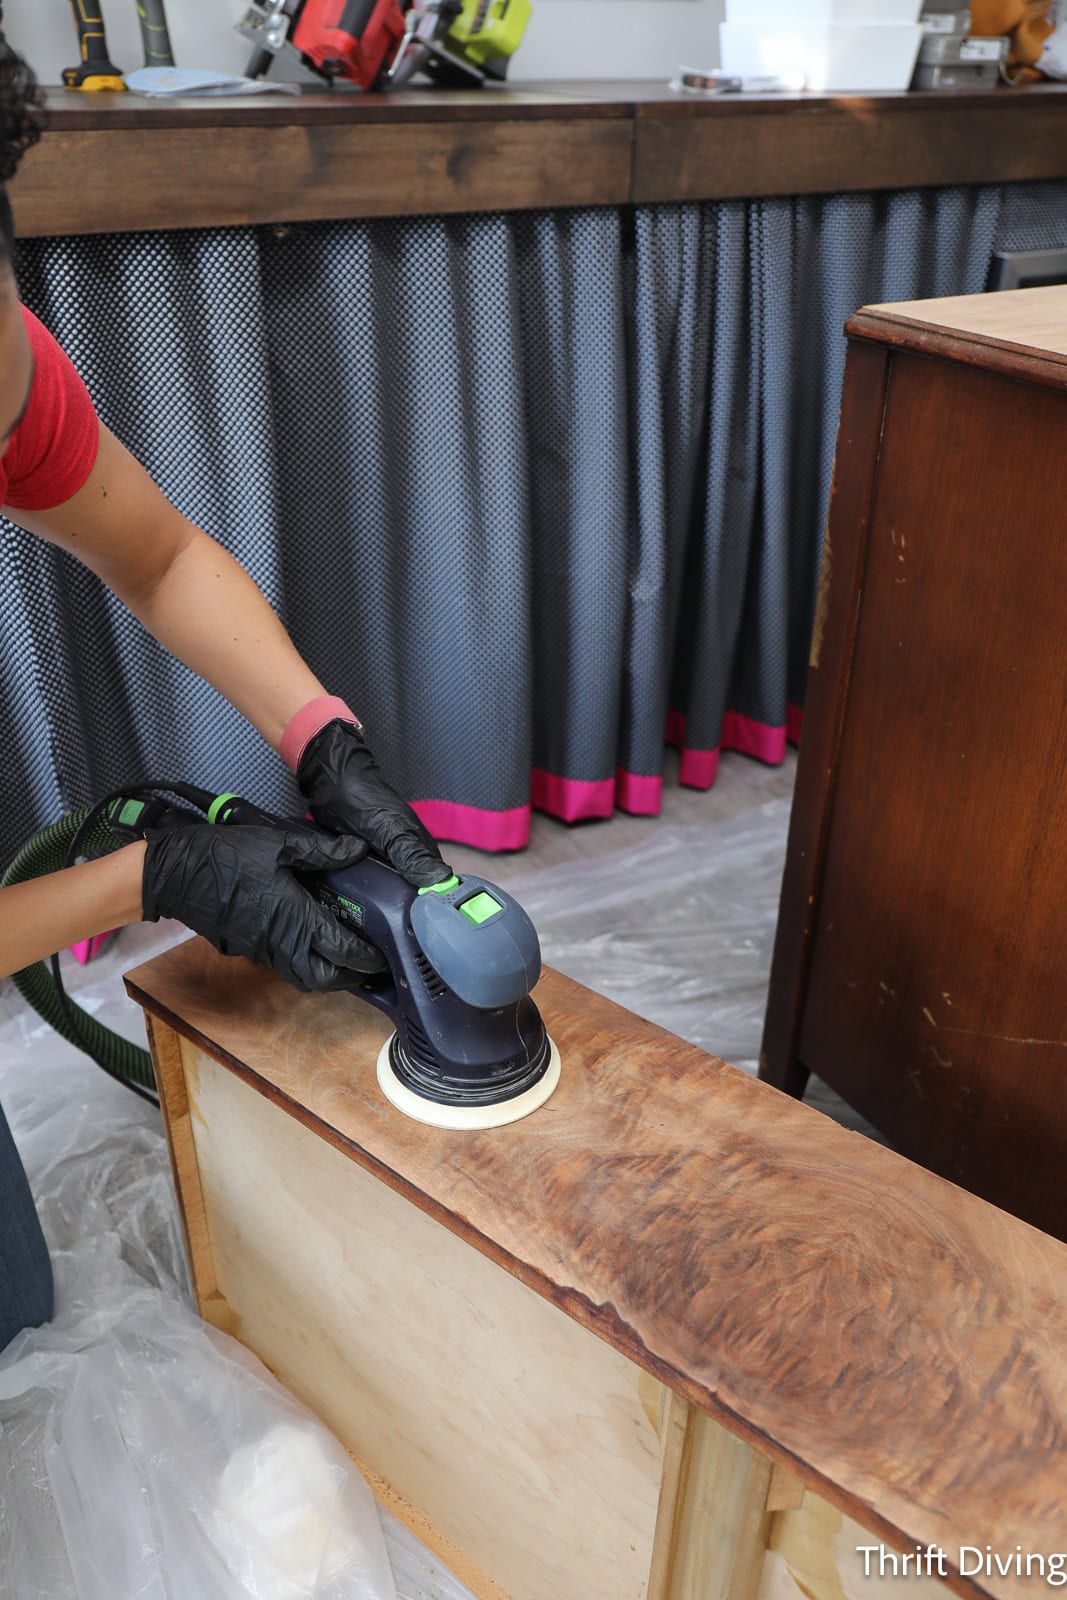
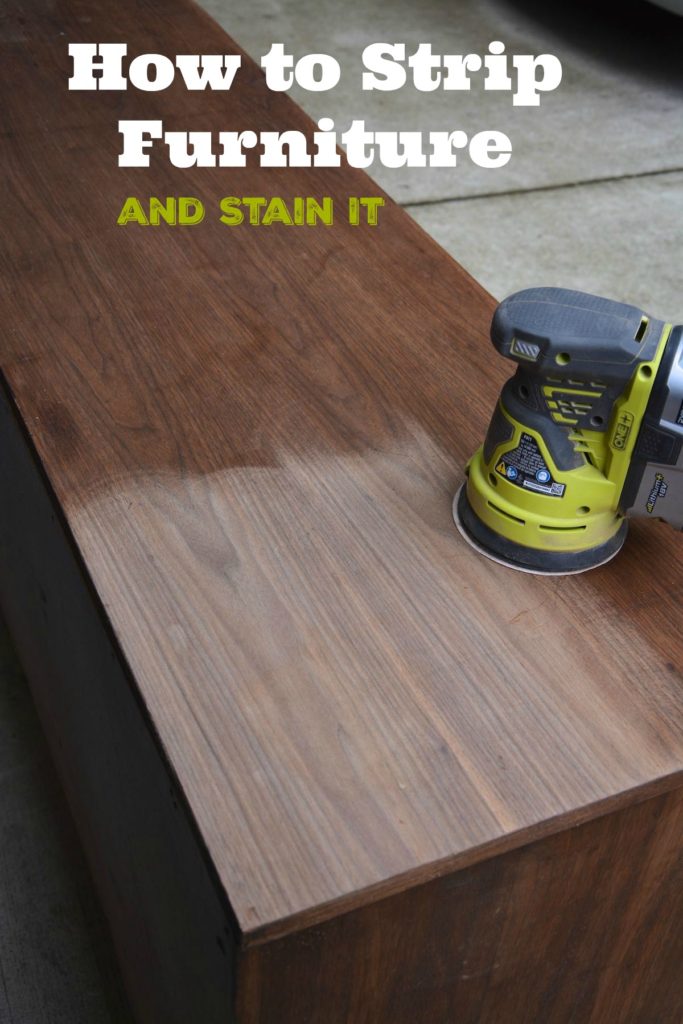
Step 9: Sand Down the Wood with an Orbital Sander
Typically when stripping furniture, after you’ve removed the old paint, stain, or varnish, your wood will still be slightly stained. Sanding helps to remove that residual staining, but you may not be able to sand it down to a perfectly raw wood finish. Sanding also helps to smooth out the wood and creates an abrasive surface upon which the pigment in the stain will lie.
I prefer to use an orbital sander with 150-grit “medium” sandpaper to start, followed by 220-grit fine sandpaper. The final sanding I’ll do by hand, with the grain, to smooth out scratches. Don’t forget to use a tack cloth or microfiber towel to remove the leftover sanding dust. You don’t want that ending up in your stain and varnish.
(WARNING: Wood dust is toxic! Be sure to wear a dust mask, keep a fan running, a window open, use a dust extractor, or connect your sander to a dust vac.
The dresser drawer on the left has been sanded. The dresser drawer on the right has been stripped, but hadn’t been sanded. You’ll notice how much cleaner the sanded drawer is. Sanding is a vital step in stripping wood furniture before staining so you’ll get the best results!
Depending on what your wood furniture looks like, and depending on the decorate areas, you may also benefit from having some of these detail sanders:
- RYOBI Corner Cat – Great for getting into corners that round orbital sanders can’t reach.
- Oscillating Tool – The triangle-sanding heads can get into small areas.
- Micro sander – For skinny areas that are too small to fit larger sanding heads.
- Sanding block – When sanding by hand, these work well for large, flat surfaces. Look for the angled sanding blocks, too.
- Contour sanding grips – LOVE these! Especially when there are grooves, edges, moldings, and rounded parts.
- Dremel rotary tool – This allows you to sand in small places. One of my favorite tools!

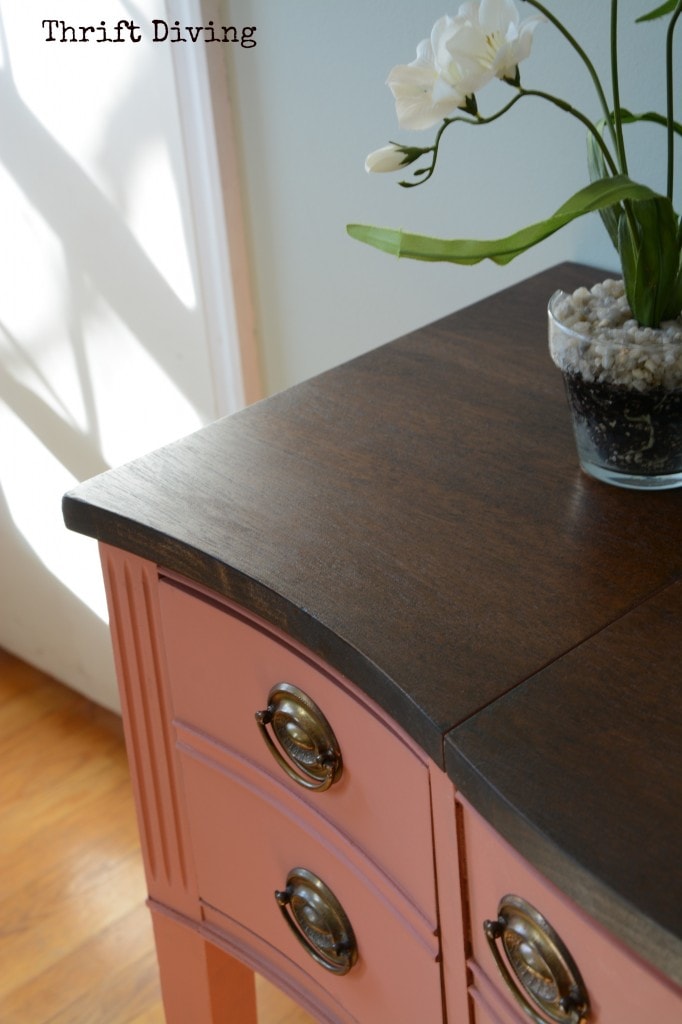
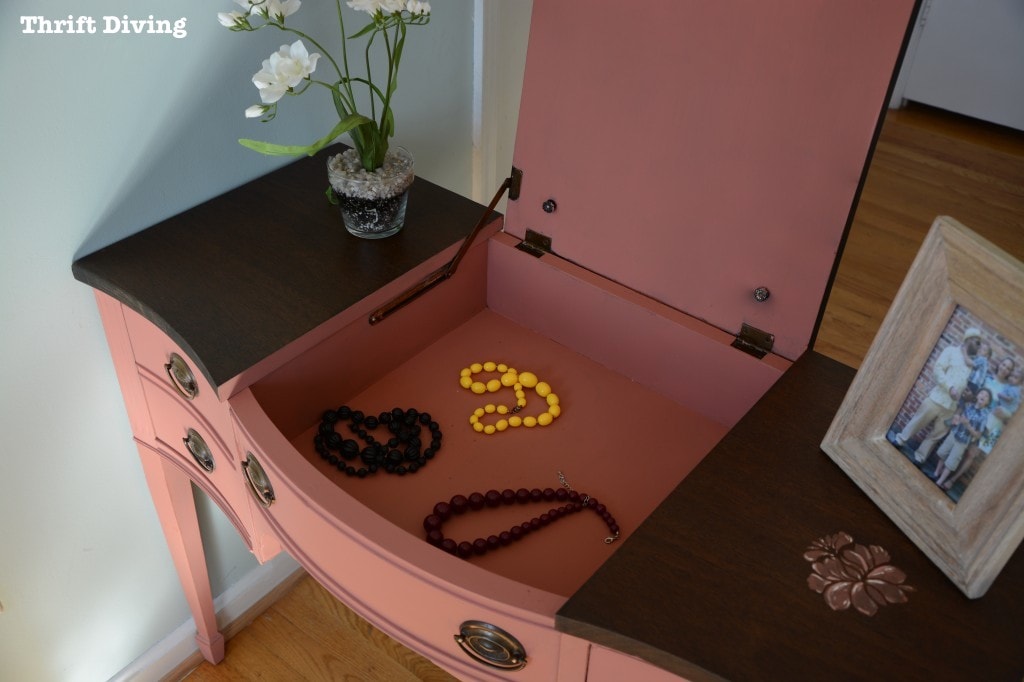
How to Stain Furniture After Stripping
Now that the old stain or paint is off, it’s time to stain your furniture. I have to admit, I love staining! Seeing the rich color come alive back into wood that looked pretty awful is very rewarding. Plus, stain just lasts longer than paint. I don’t think I have ever painted any piece of furniture that hasn’t started to wear thin in highly used areas–even with a couple coats of clear topcoat or wax. But with stain, that stuff is tough and it takes a lot to wear down.
Oil-based Stain or Water-based Stain?
Sigh…..there’s no right answer here, but for me, the biggest determining factor is toxicity. While oil-based stains work well, they are stinkier than water-based stains. They also leave remnants of odor after the project is done. I have an air quality indicator that I keep in my “she shed” and when I was using oil-based stains inside the area, I noticed that the formaldehyde levels were slightly elevated. When I was using water-based stains, the reading on my device didn’t register any elevated levels of formaldehyde.
Here are some other reasons you may decide to use oil-based stains versus water-based stains:
- Oil stains have a longer “open time,” which allows you spread it for longer over wood since it doesn’t dry as quickly as water-based stains. (Water-based stains require to add an Extender so it doesn’t dry so quickly on the wood).
- Water-based stains don’t have much odor, versus oil-based stains, which are much stinkier. The smell will linger with oil-based stain, but water-based stains don’t leave odors.
Step 1: Do You Need Pre-Stain?
Whenever you’re staining raw wood, especially soft woods, it’s always a good idea to pre-treat it with pre-stain. It helps condition the wood so that the stain evenly soaks in and doesn’t turn out blotchy. But do you have to add pre-stain to stripped wood?
Yes, you should use pre-stain if you’re stripping and re-staining pine, fir, poplar, and other soft woods (read the back of the can for directions on the additional woods for which it’s recommended). Add a coat and wipe it off before it dries. You should add your project stain soon after using the pre-stain. Read the instructions to make sure you get best results.
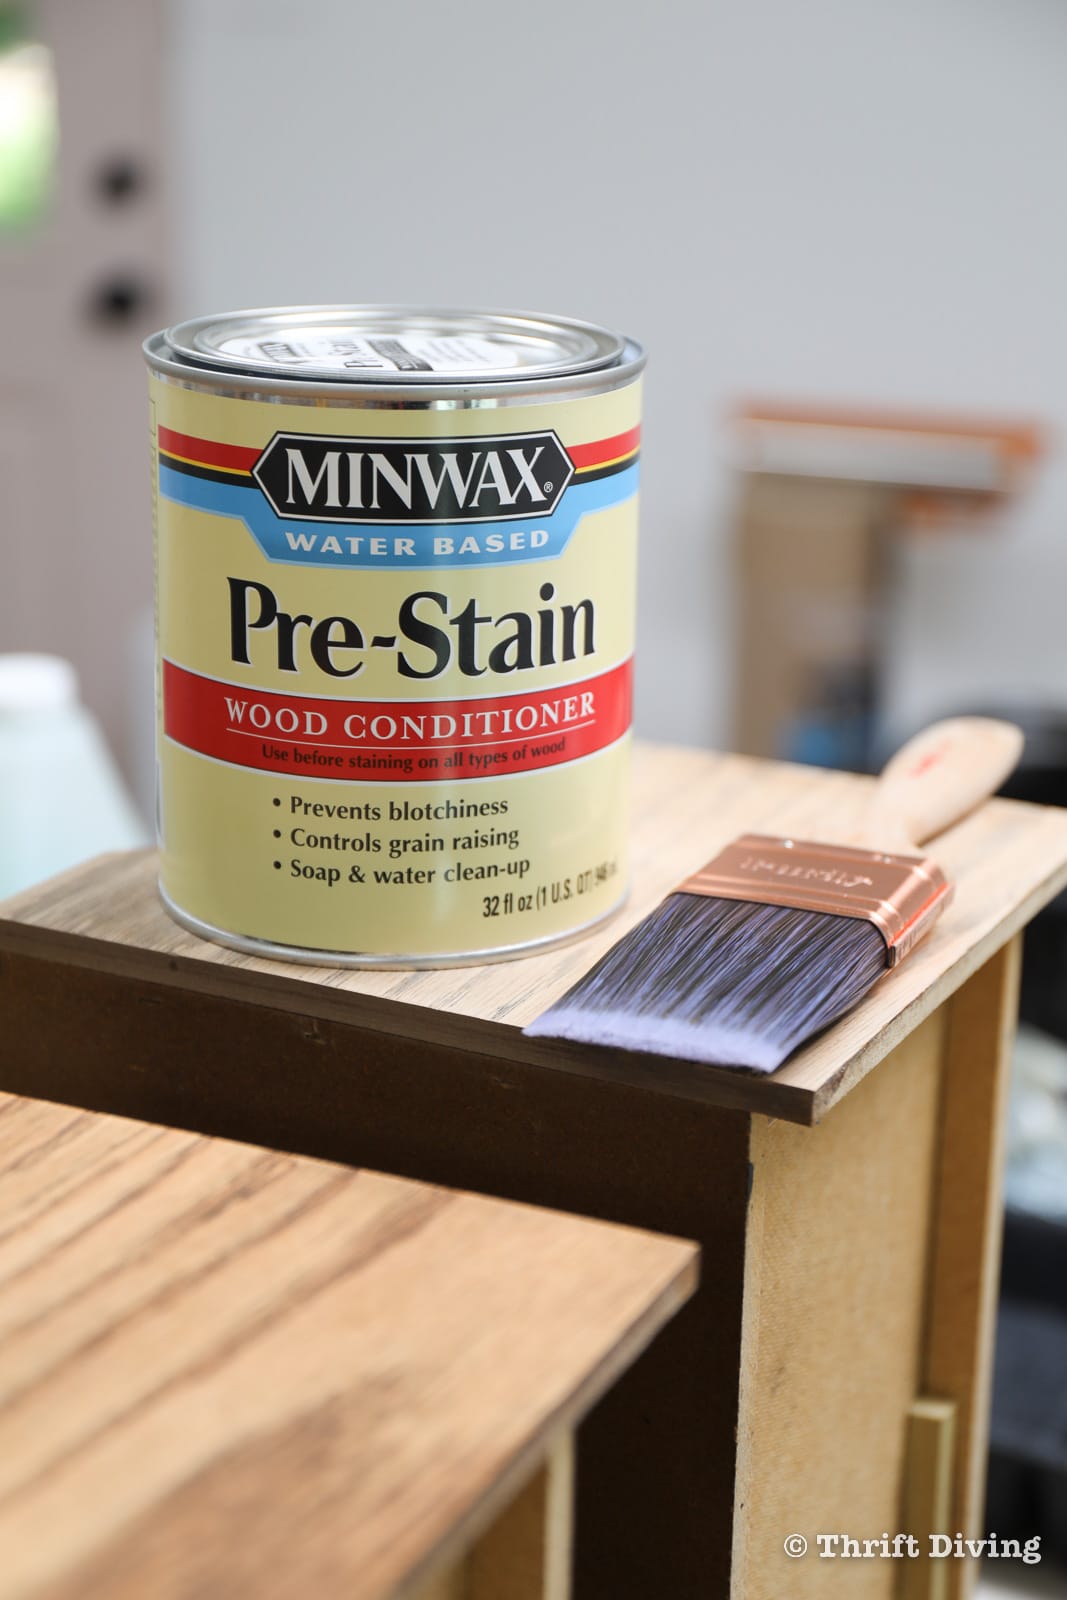
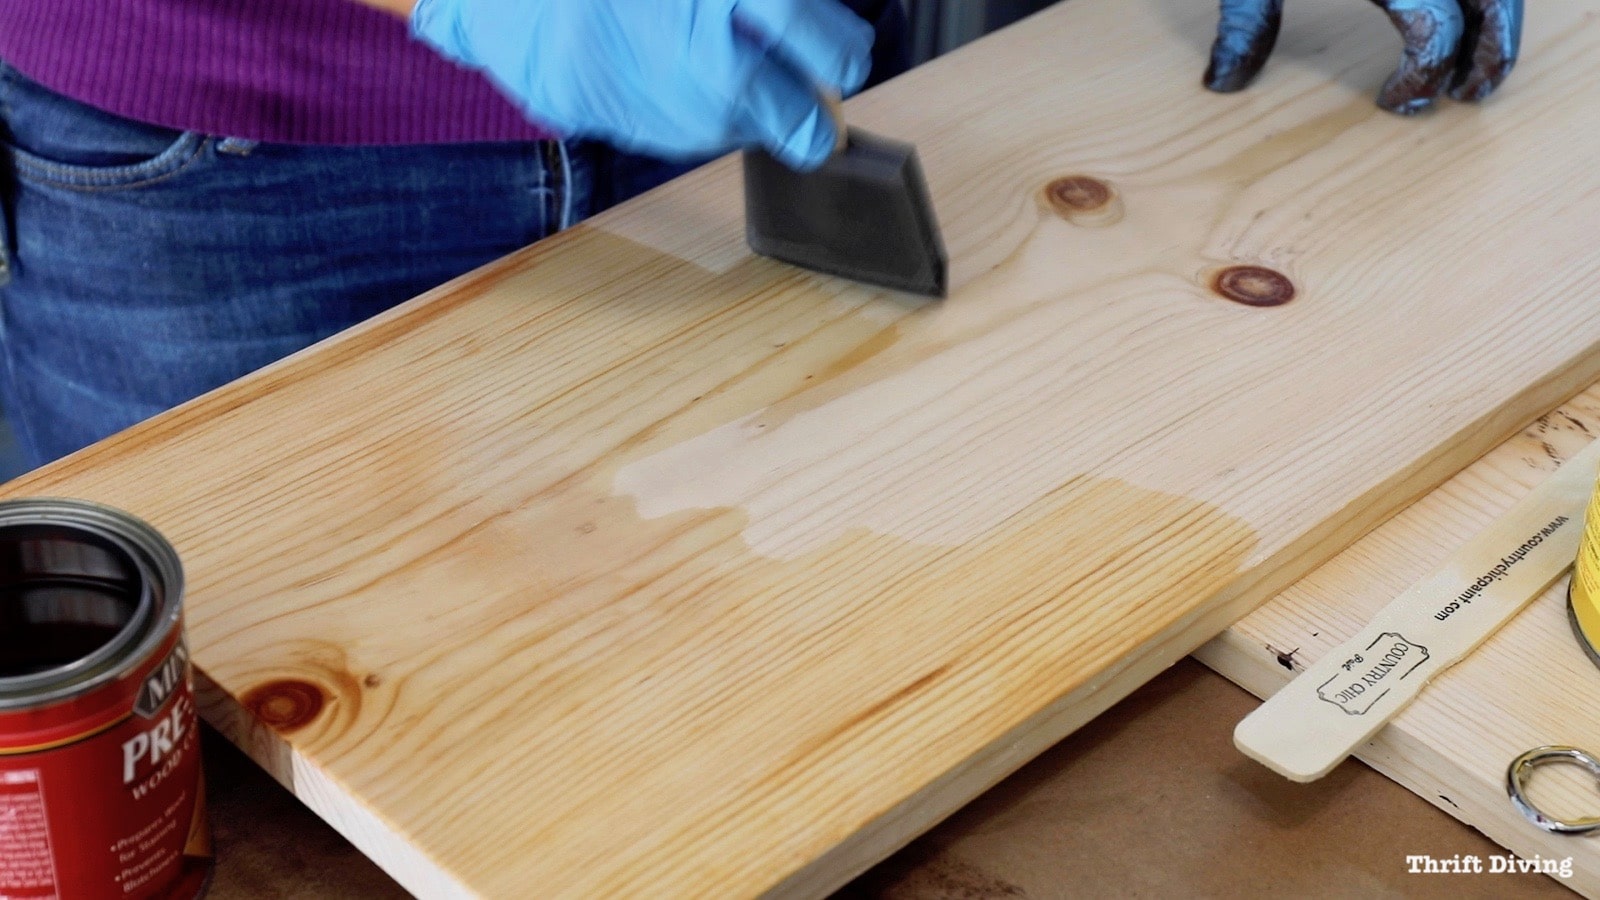
Watch This Video on Using Pre-Stain!
If you’re not sure why you would need to use pre-stain on your pine, fir, and other soft or porous woods, just watch this quick clip.
STEP 2: Don’t Skip the Test Area!
Apply a coat of stain to your furniture and then wipe it off. I wiped it off after a few moments. I loved how the stain is a little thicker than regular stain and it settled into the grooves like glazing.
STEP 3: Apply 1-2 Coats of Stain
Use medium grit sandpaper (such as P150) and sand lightly after the first coat has dried. Use a tack cloth to remove the sanding dust.
STEP 4: Lightly Sand Between Coats
STEP 5: Add the Top Coat
STEP 6: Add the Hardware.
Related: Understanding Wood Finishing: 10 Things I’ve Learned

Did you find this guide helpful? If so, click here to SAVE it on Pinterest!
![]()
I hope that this blog post and the YouTube tutorials of how to strip furniture and stain wood furniture gives you a starting point for tackling a furniture stripping and staining project! It’s scary if you’ve never done it before, but the possibilities of beautiful furniture are endless!
Have you ever stripped furniture before? How did it turn out? If you have any tips, leave your tip below and add to the conversation!

Download the 5 freebies!

Thrift Diving inspires women to decorate, improve, and maintain their home themselves...using paint, power tools, and thrift stores! Use these 5 printables, checklists, and ebooks to get started!

Loved the video. It was really helpful as I’m stripping a dark stained mirror back to natural then want to put a light or white wash stain.
megalis 10 reviews tadalafil 5 mg mexico
Thanks for lots of good info. You said at one place you don’t have to remove varnish to paint, is that right, can I paint on top of varnish?
Yes, that’s correct, Julie! Many people will just paint right over furniture that has existing stain and varnish. 🙂 No sanding or priming, as long as you’re using a good quality furniture paint and the existing surface is in good condition. Hope that helps! 🙂
Hi I’ve enjoyed your videos and advice, thanks for sharing. My history is one of refinishing and some small reupholstering, this said, I came across a solid piece of furniture and I don’t know what to do with it. The problem is…..it’s an original finish, French provincial with bench. The vanity has a great beveled mirror, good hardware, oak wood, just some small paint chips! I do not want to insult the piece or perform an injustice but, I need advice , do I clean up , reupholster seat and sell or paint and decal the stuffing out of it and sell for huge money?. I am trying to supplement my retirement income, but don’t usually hesitate. I need advice. Please your opinion is respected.
Hi Julie! Sounds like a great set of furniture you have! I’d love to see a picture of it. If it’s got paint chips, and in its original finish, you might not get as much for it when you sell it in its original condition. But if you fix it up, you can get more money. However, the amount of time and effort you put into it, you might still not get a LOT more for it. But if you enjoy the effort you put into it, then it will be worth it because you’ll enjoy the process. Personally, I think you should make it pretty first and then sell it! It sounds like it would be a fun project!
It looks splotchy and uneven? Looks like worn/bleached spots all around the chair? I would have gone with a general finishes in a darker stain so the chair would look evenly stained.