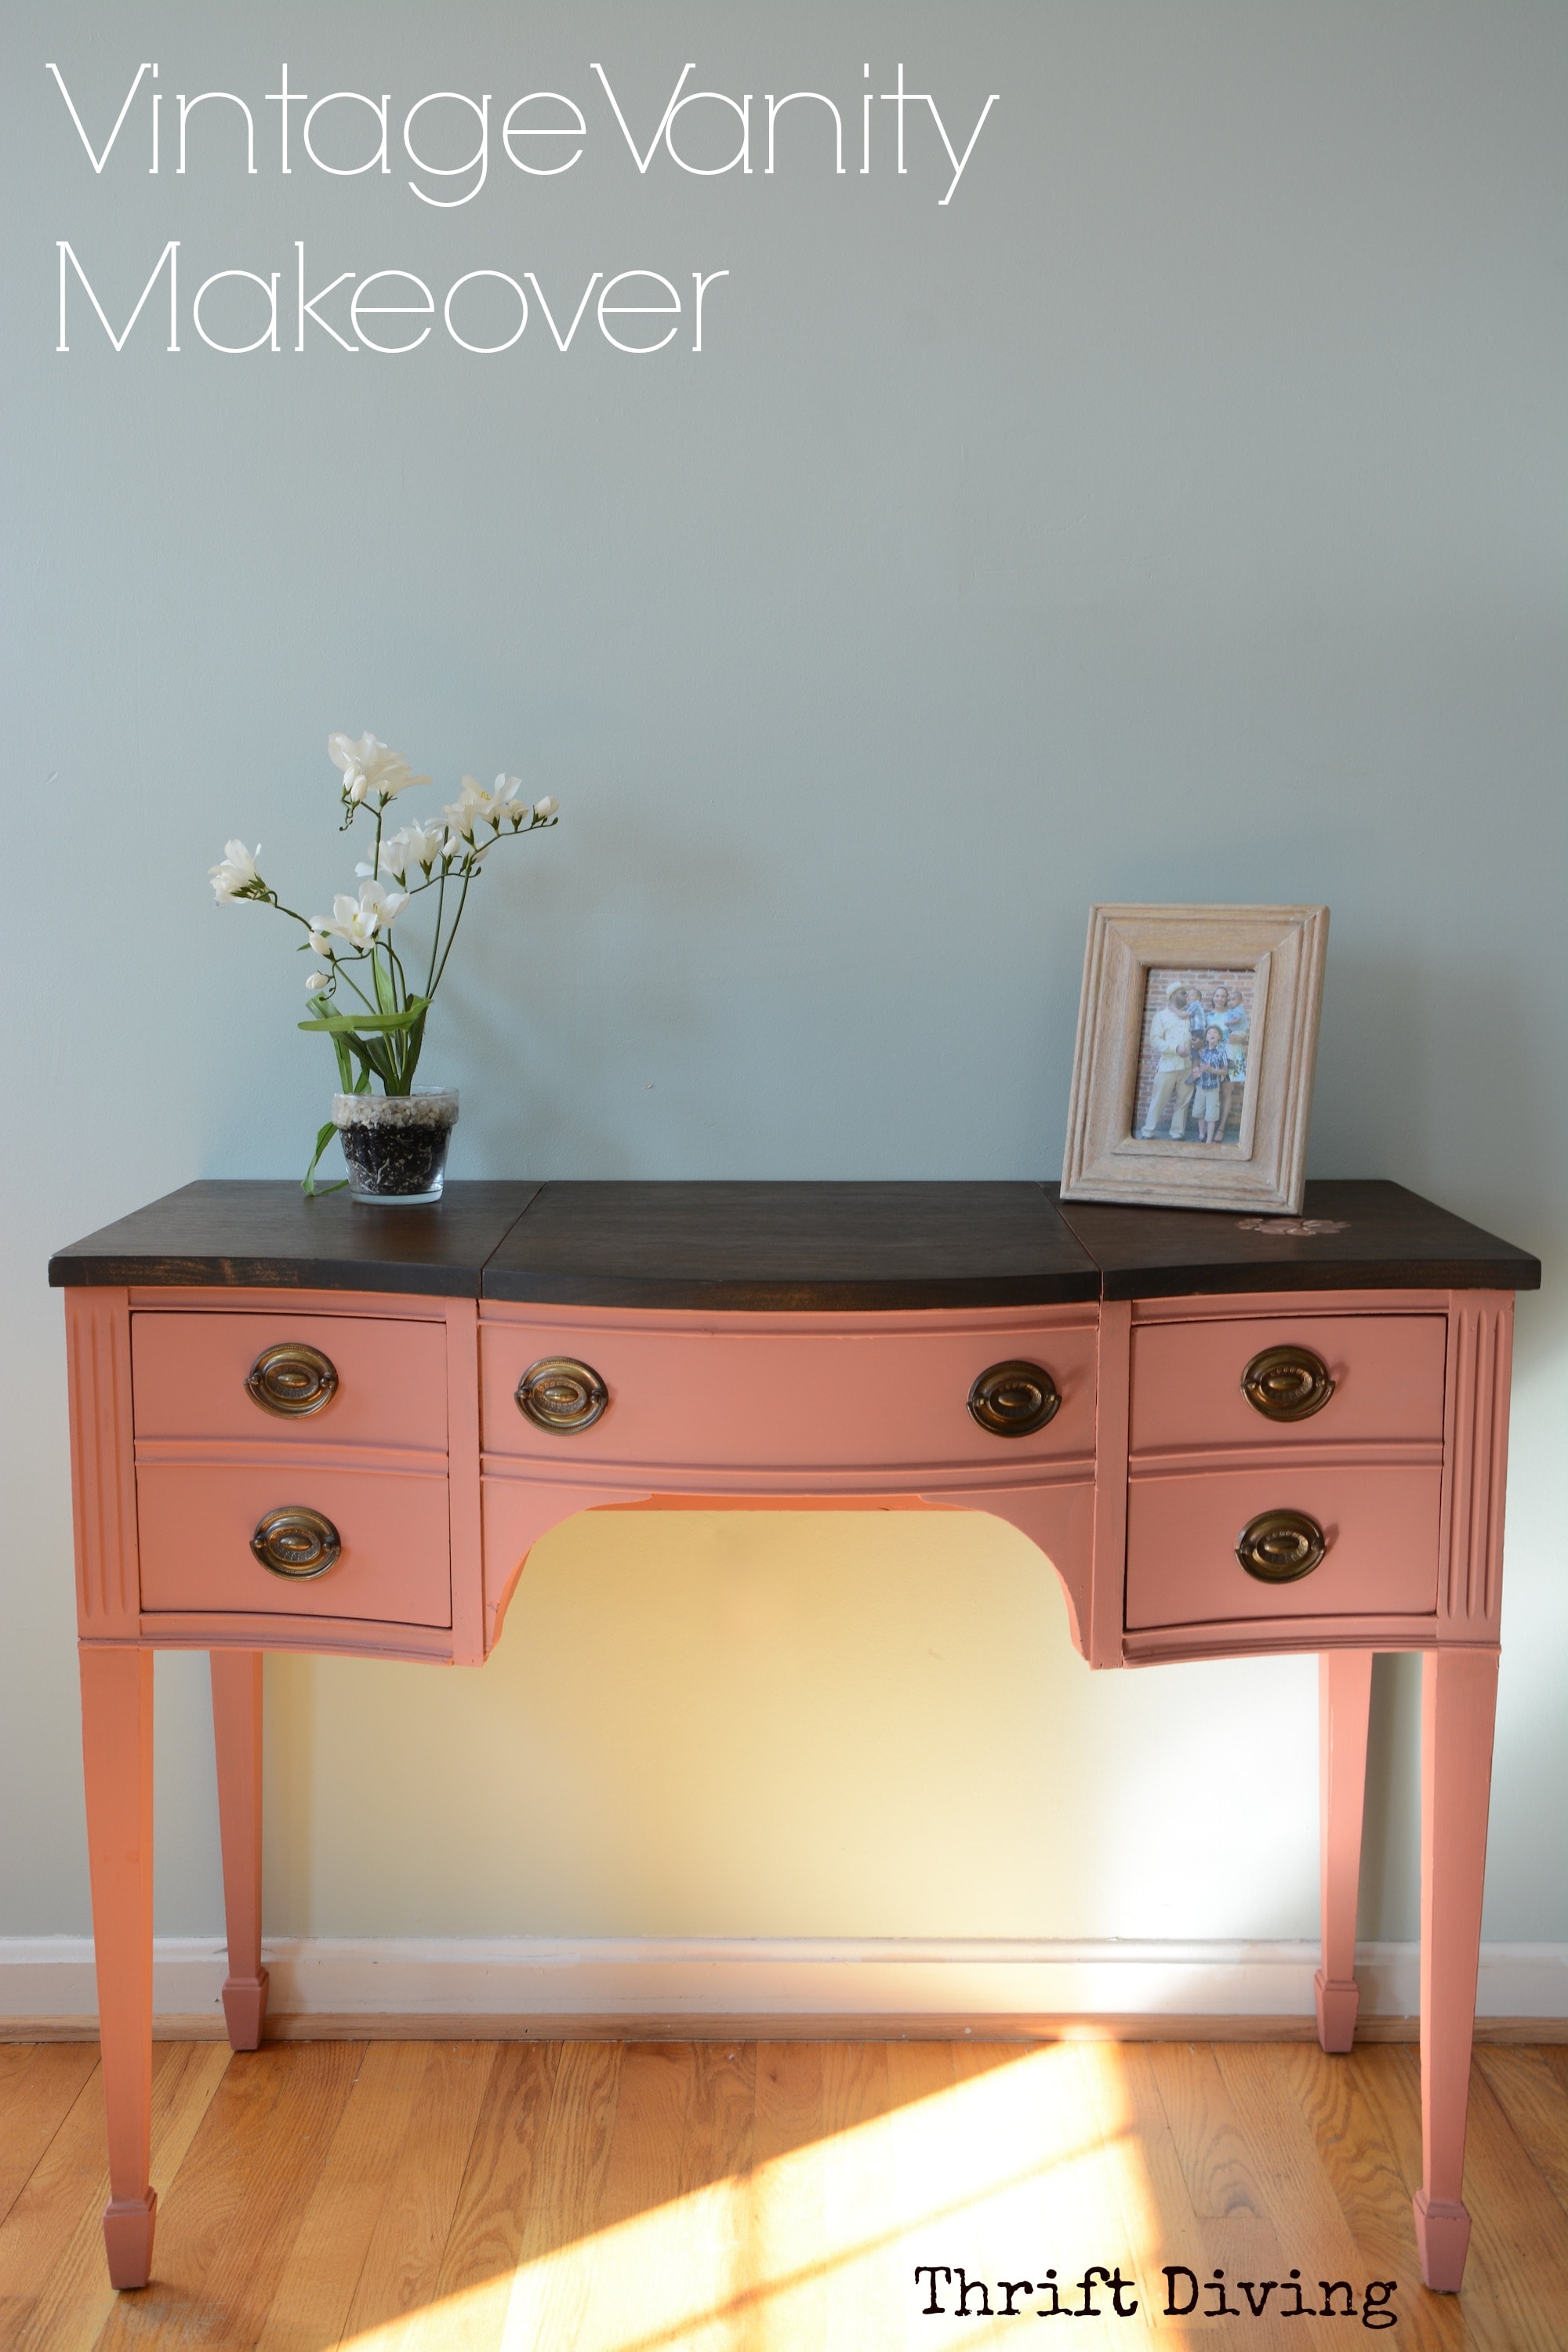
The Gorgeous $16 Vintage Dresser I Almost RUINED With Paint!
I used to hate wood furniture……..Okay, okay…..”Hate” is a strong word, but I thought it was ugly, depressing, and had no place in my home. When I would find wood furniture at the thrift store or roadside, my first thought wasn’t, “How can I restore this vintage furniture?” but rather, “Now that would be amazing with furniture paint!”
Every piece I found to fill my house, I slathered on a couple coats of paint. I had a vision of a light-filled home, and dark furniture was not part of that imaginary “mood board” that I had created in my mind.
I’d paint it regardless of whether it was in good condition, or if it looked to be one-step away from being firewood.
I’d paint it regardless of whether it was cheap ‘ole particle board, or whether it had a stunning veneer under the surface that would make any woodworker gasp at its beauty.
It all got painted, like my china cabinet makeover that some people told me I had ruined with paint.
No questions asked. No hesitations. This was my home, my taste, and my style. I posted all of my “before and after” furniture makeovers right here on the blog and on my YouTube channel, where I loved to share the joy and excitement of how something turned out so pretty.
And if someone protested (mostly men, by the way…), I considered them to be just “wood-loving” internet trolls who loved to say that I “ruined” an “antique” from the year 2000. HA!
(Which, technically, by definition, something is only considered “antique” if it’s at least 100 years old; something that’s “vintage” is old, yes, but is less than 100 years old).
But as the years carried on and I learned how to use power tools, I delved into learning how to build furniture…..with–ahem–wood.
When I built my own bathroom vanity from scratch, I began to have a better appreciation for wood as a living, breathing, expanding thing. Through that project, I had to coax the wood surface into behaving the way I wanted it to, by sanding here…smoothing there…shellac’ing…mixing wood dye to get juuuuust the right color I was going for…
Dude…it was a process. And don’t mess up the wood…..because then it’s back to the store to buy a new 4’x8’sheet for–gulp–$50. (Of course, with prices as they are now, that same 4’x8′ sheet of red oak plywood is now $84!!).
The expense of it, the work of it, including the beauty of the grain–none of it was lost on me.
Because of that experience, I started to appreciate the wood furniture I found at the thrift store. It didn’t mean I never painted wood furniture again. It meant that I would at least ask the question: Should I paint this wood, or strip and refinish it? I even wrote a guide on how to strip and stain furniture in case other people wanted to restore vintage furniture.
I started to see its beautiful grain under a marred surface covered with superficial imperfections that could simply be stripped and sanded out, followed by a fresh coat of stain and a silky top coat.
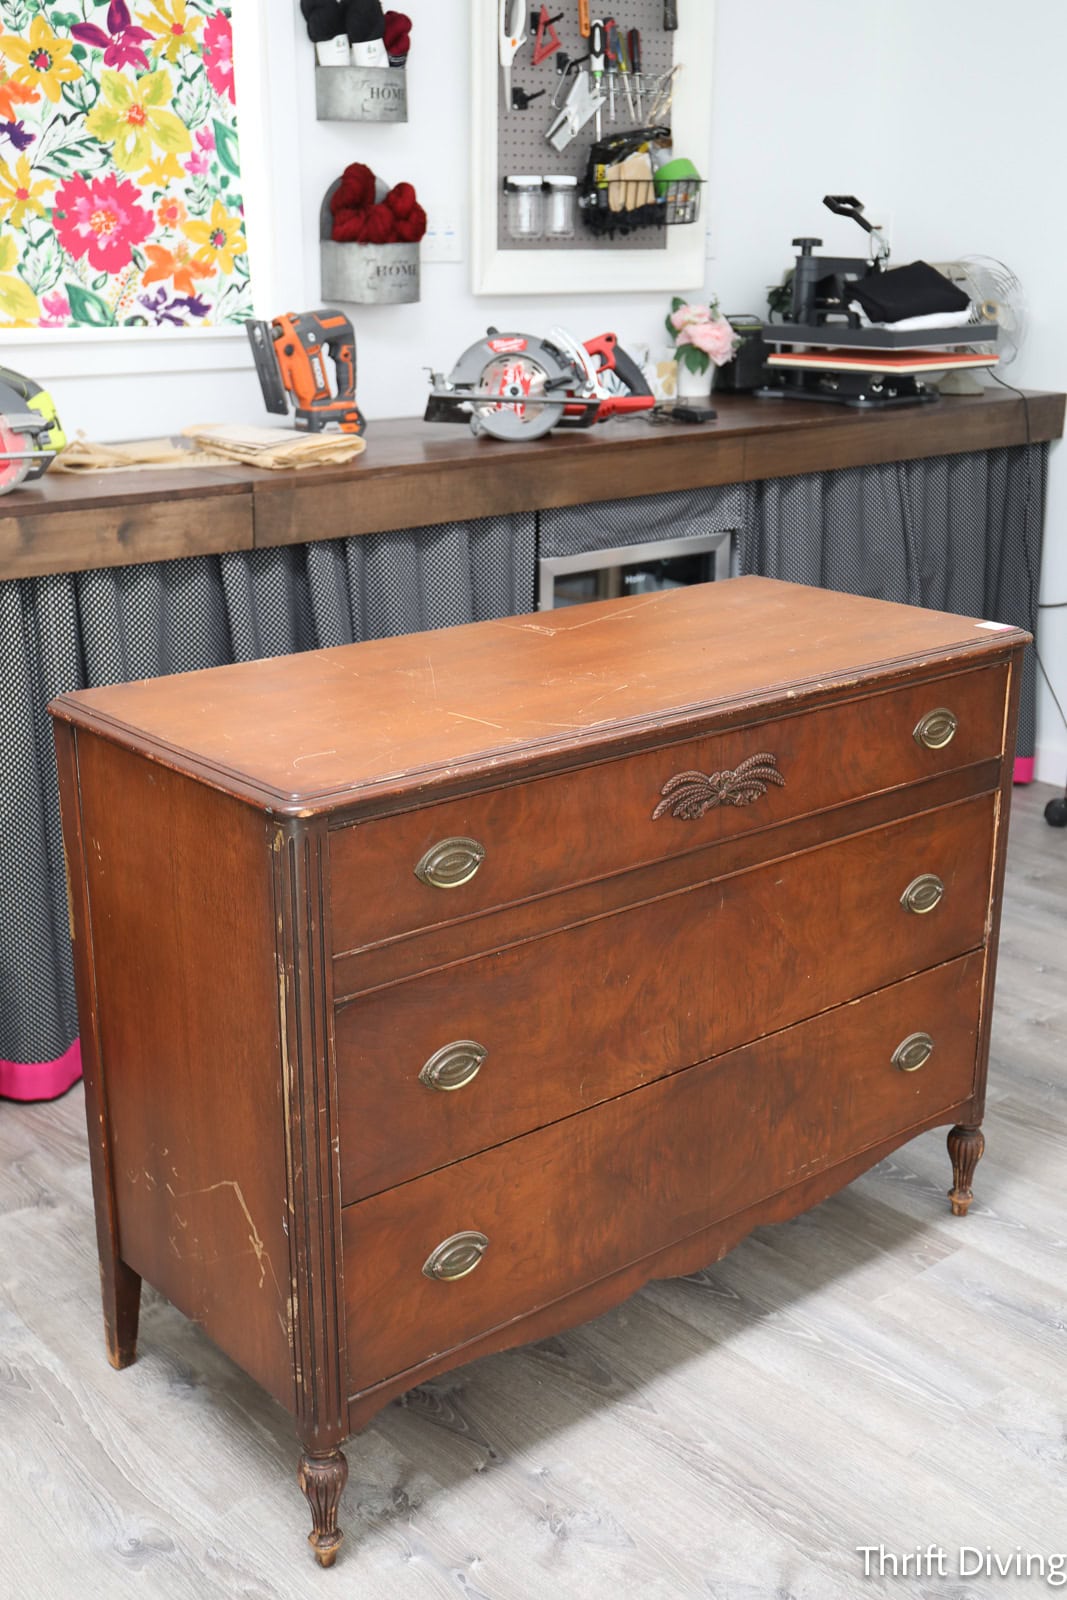
That’s how I looked at this vintage $16 dresser (no lie–$16!!!) that I found at the thrift store months ago: a beauty that was begging to be stripped and refinished.
Click here to SAVE this project on Pinterest!
BEFORE
I wasn’t too keen on the color of this dresser, and there were a lot of scuff marks everywhere. Not to mention the fact that the surface was dull.
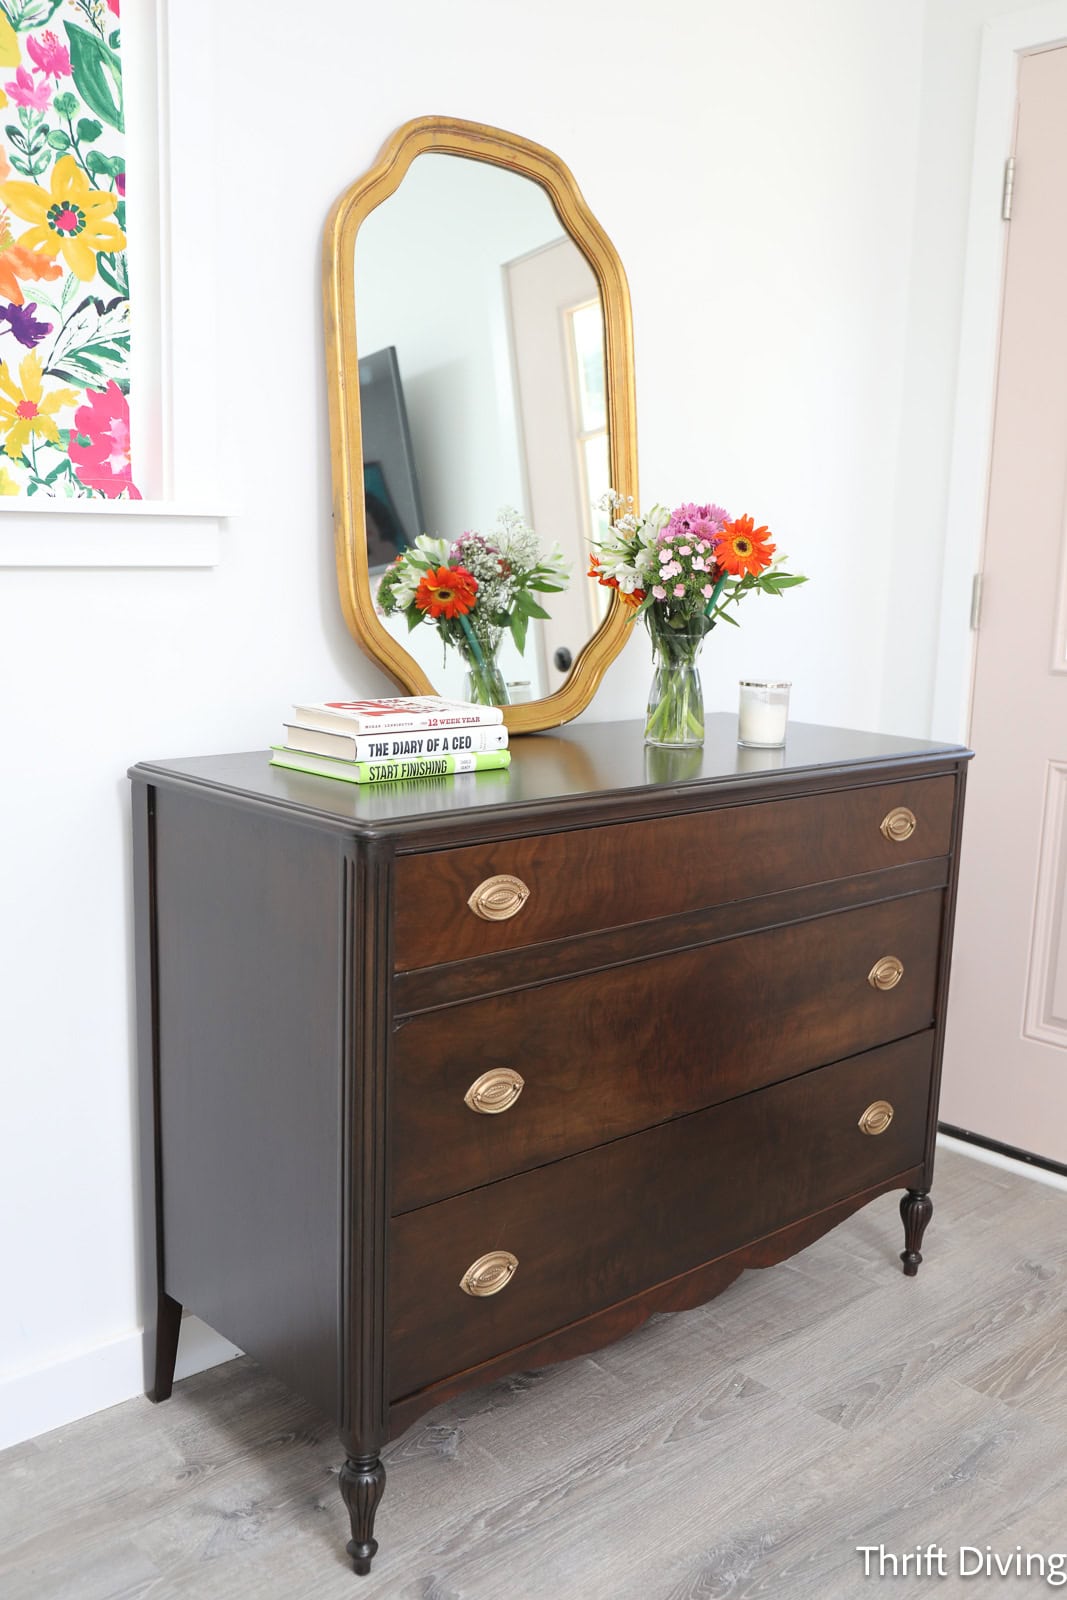
AFTER!
And while paint would have given this vintage dresser some “pizazz,” can we just acknowledge for a moment how stunning new stain and top coat made this dresser?! I mean…it’s a statement piece now! It feels classy, satiny, and doesn’t go out of style when the latest painted furniture craze goes belly up (who knows when that will be, because painted furniture is still fun, right?).
This Dresser Was Begging to Be Restored…
At the very least, I thought the drawers should be stripped and refinished, because that walnut veneer was to die for! I wanted to see more of it. The richness needed to be preserved. I couldn’t have imagined painting over those.
BEFORE
The unique grain of walnut gets lost under a dull surface. You can’t focus on anything except everything that’s wrong, scratched, and marred.

But little did I know, at the end of this project, the entire dresser would look amazing being restored, not just the drawers!
AFTER!
I chose not to add the decorative, wooden applique back onto the dresser because I just kinda liked it without it. Not to mention that it was broken. Look how amazing the grain is!

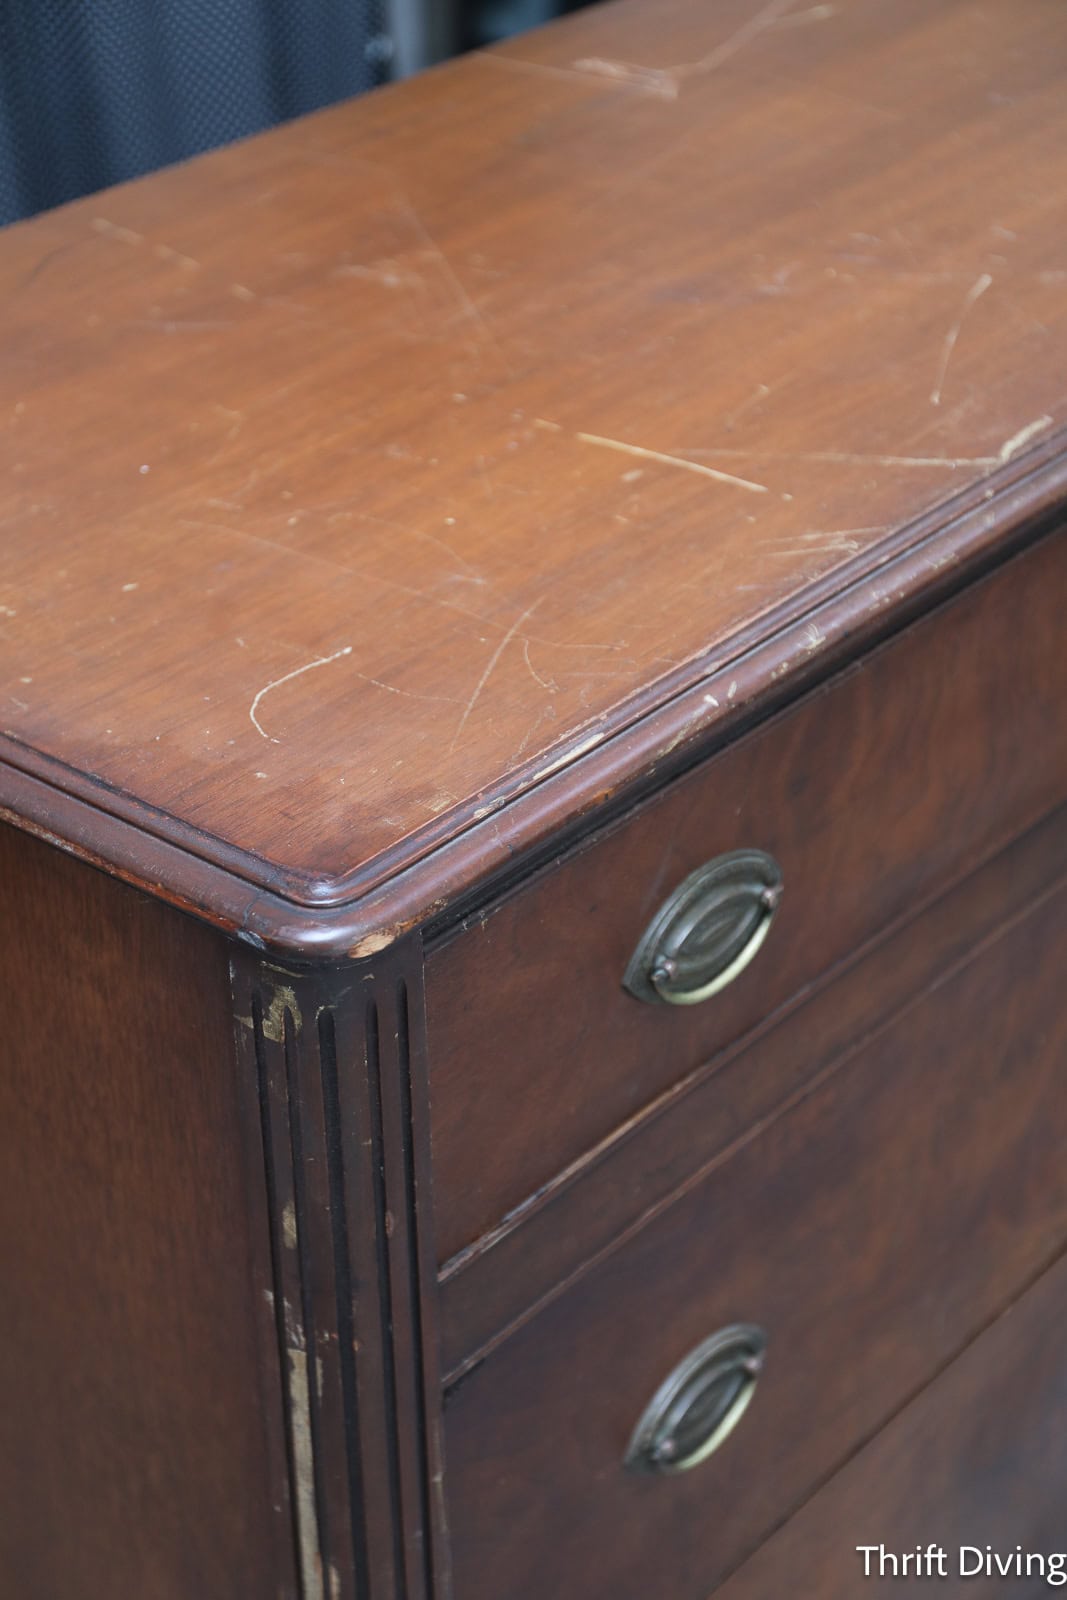
What caused me hesitation were those feet. Ugh…..you have no idea how much I hate stripping and sanding nooks and crannies. Not just those feet, but the grooved wood along the edge of the dresser.
BEFORE
Sanding in those tight spots are tough to do, and it takes time. This wasn’t a “let’s get ‘er done this weekend” type of project. I think it literally took me all of February, in spurts here and there. LOL

AFTER
But it was all worth it when I saw the outcome! Surprisingly, once I started sanding, I was committed to a beautiful restoration of this dresser and I didn’t mind the time it took for sanding. It’s simply the initial “Oh my…am I really going to attempt this detailed sanding?? You know how you hate this part, Serena!” But if you can get over the dread of sanding, turn on a good Hulu documentary, and just enjoy the thrill of restoring furniture, you can get through it!

BEFORE
Even sanding the top edge of wood furniture feels like such a chore. While there are sanding tools that can help make the job easier, it still felt like…..work. And besides, the top of the dresser had a deep scratch in the veneer that wouldn’t be improved with sanding. In those cases, it has always felt easier to simply fill it with wood filler, sand it smooth, and then paint over it.
AFTER
But I’m soooo glad I didn’t decide to just paint over this with a pretty turquoise or white furniture paint like I have other wood furniture, and instead, restored this vintage dresser back to (or rather, as close to!) its original glory! That shine on top–isn’t it amazing?!

I even posted about this deep gouge over in a woodworking, tools group on Facebook, asking what my options would be for fixing this area, and I was told to either:
- Remove the entire veneer top and replace it (not happening–sorry!)
- Mix some of the sanding dust with wood glue to make a custom filler. (Okay….that’s a possibility. I’ve done that before…)
- Use an iron over a wet towel over it to raise the grain, then sand it down; it should fill it in. (Now that sounds like a magic trick, but I was curious to try).
For the record, no one mentioned, “Oh, just fill it with wood filler and paint over that baby.” HA!
I even asked people on Instagram if I should paint it, do a combination of paint on the body and strip the drawers, or to strip and refinish the entire thing. There was a unanimous consensus that strip and refinish was the only way to go.
BEFORE

AFTER!
And while I’ve got some items on the top, “staging” the dresser, you can’t even see (towards the back) where the deep gouge even was!

The deep gouge was towards the back of the dresser, but now, it’s not really noticeable!

Watch This Project on YouTube!
Want to see the complete transformation? Check it out here!
How to Restore a Vintage Dresser
So now that you’ve seen how amazing this $16 thrifted vintage dresser turned out, let’s talk about how I actually restored it. It took a lot of time, only because I spent what felt like an obscene amount of time trying to sand it down as much as possible. The quality of the prep works really dictates the quality of the finished piece.
I don’t consider myself to be a “professional furniture restorer.” Those are people who have been doing it for yeeearrss, and it’s all they do. Me–I do a little bit here and there, and learn as I go. Then I share with you what worked, what didn’t, and what I would do differently next time, so that when you want to restore a vintage dresser, you learn from my “wins” and “missteps.”
So let’s jump into it!

Materials Needed to Restore a Vintage Dresser
Here’s everything I used to restore my vintage dresser:
Note: As an Amazon Affiliate, I earn a commission from qualifying purchases.
- QCS Finish Remover
- QCS Surface Cleaner
- General Finishes Water-based Stain (Provincial)
- Orbital sander with sanding discs (150-, 180-, 220-grit sanding pads)
- 6″ putty knife
- Box or container for discarding old finish off the putty knife
- Plastic sheeting to cover floors
- Sheets of sandpaper for sanding by hand (150-, 180-, 220-grit)
- Sanding blocks
- Wire brushes
- Paint brush
- Plastic to protect floors
- Air filtration (or open windows)
- Dust extractor (or use a box fan with a filter taped to it, trapping small particulates)
- Detail sanders
- Screwdriver for removing hardware
- Odo-Ban Spray (for the stinky smell in the dresser)
- Plastic baggie for holding existing hardware and screws
- Wood glue
- Rub ‘n Buff (to restore the existing hardware)
- Rags
- Dust mask, gloves, eye protection
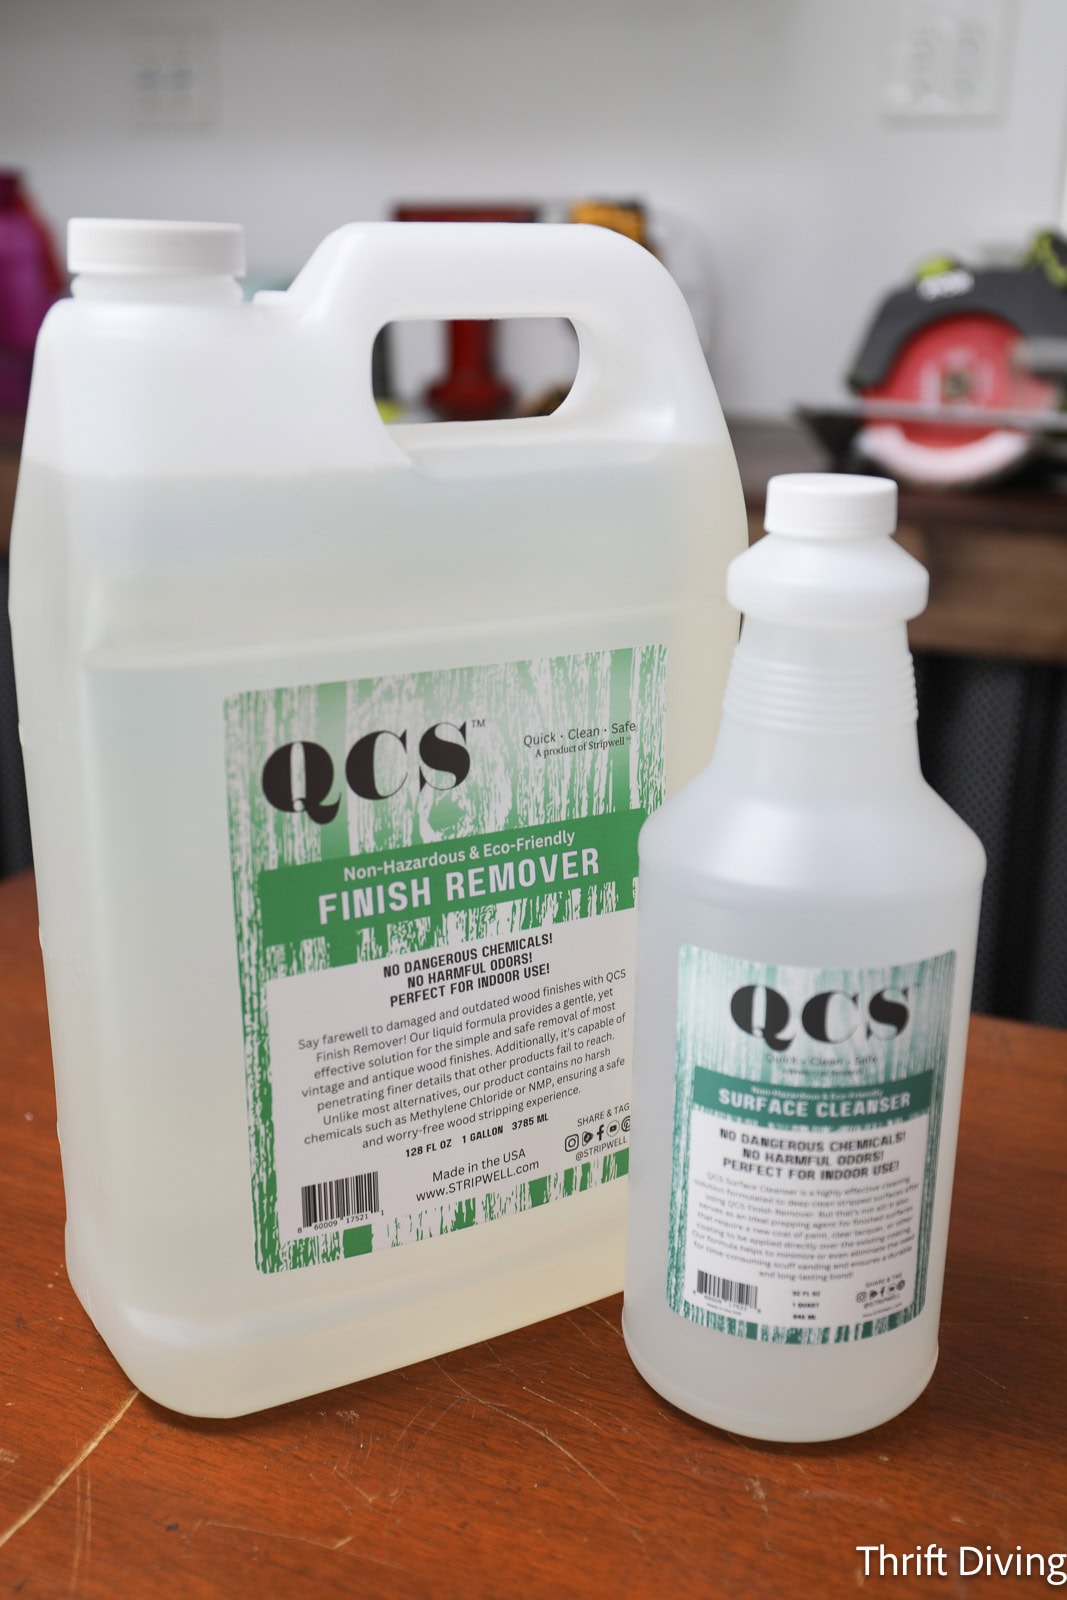
A few years ago I switched finish removers once I learned that even the ones I bought at the big box stores that I thought were “safe” still have harmful chemicals. I even did a postcast on The Thrift Diving podcast to talk about toxic strippers. (Listen to that episode here: “I’ve Been Using Toxic Paint Stripper For Years!” – Episode #49).
Since that time, I’ve been using QCS Finish Remover. They’re not paying me for this project, although they did provide me with this container of finish remover and surface cleaner. They also provided an affiliate link, where I earn a commission if you purchase with my link. 🙂

STEP 1: Removing the Hardware
I definitely planned to use the existing hardware on this dresser. Not just because it keeps costs low, but it’s pretty great hardware that keeps this vintage dresser looking like the 1930’s or 1940’s era it comes from. If I had painted it, I probably would have gotten new knobs. But since we’re trying to restore this, let’s keep the existing hardware and restore that, too (with Rub n’ Buff). Store the handles and screws in a plastic baggie. I am notorious for losing a screw! LOL
TIP: Be sure to cover your floors with plastic sheeting. Stripping furniture is messy!!!

STEP 2: Applying the Finish Remover
I’m jumping around in this blog post, because in the video, I actually started with stripping the top of the dresser first. There’s no right or wrong answer here. You can start however you like. But the key is to spray the finish remover onto the wood and let it do its job. I like to use a paint brush to spread it around evenly, then I leave it for 30 minutes or so, to break through the existing finish.
Let’s Talk About Smell…
QCS doesn’t stink, per se…..nor does it smell good. The important thing is that it’s not toxic. It’s still got a smell, though, that you won’t want to linger if you’re stripping indoors, the way I was stripping inside of my “she shed.” I opened a couple of windows so that the smell would dissipate faster. (Oh, and I should have been wearing gloves, too. Oops!).

STEP 2: Scraping Off the Old Finish
This is the satisfying part, isn’t it?! I love seeing the old finish coming off! I’m using a 6″ putty knife, but I’m also being careful not to gouge the wood when scraping. Keep in mind that you may want to go through 2-3 processes of adding the finish remover….letting it sit for 30 minutes or so….then scraping. It depends on how much old finish you’ve got to remove. This is where a box or a container is helpful for off-loading the “gunk” from your furniture. Just make sure the box doesn’t LEAK (….ask me how I know…..) and that you’ve got plastic on the floor.
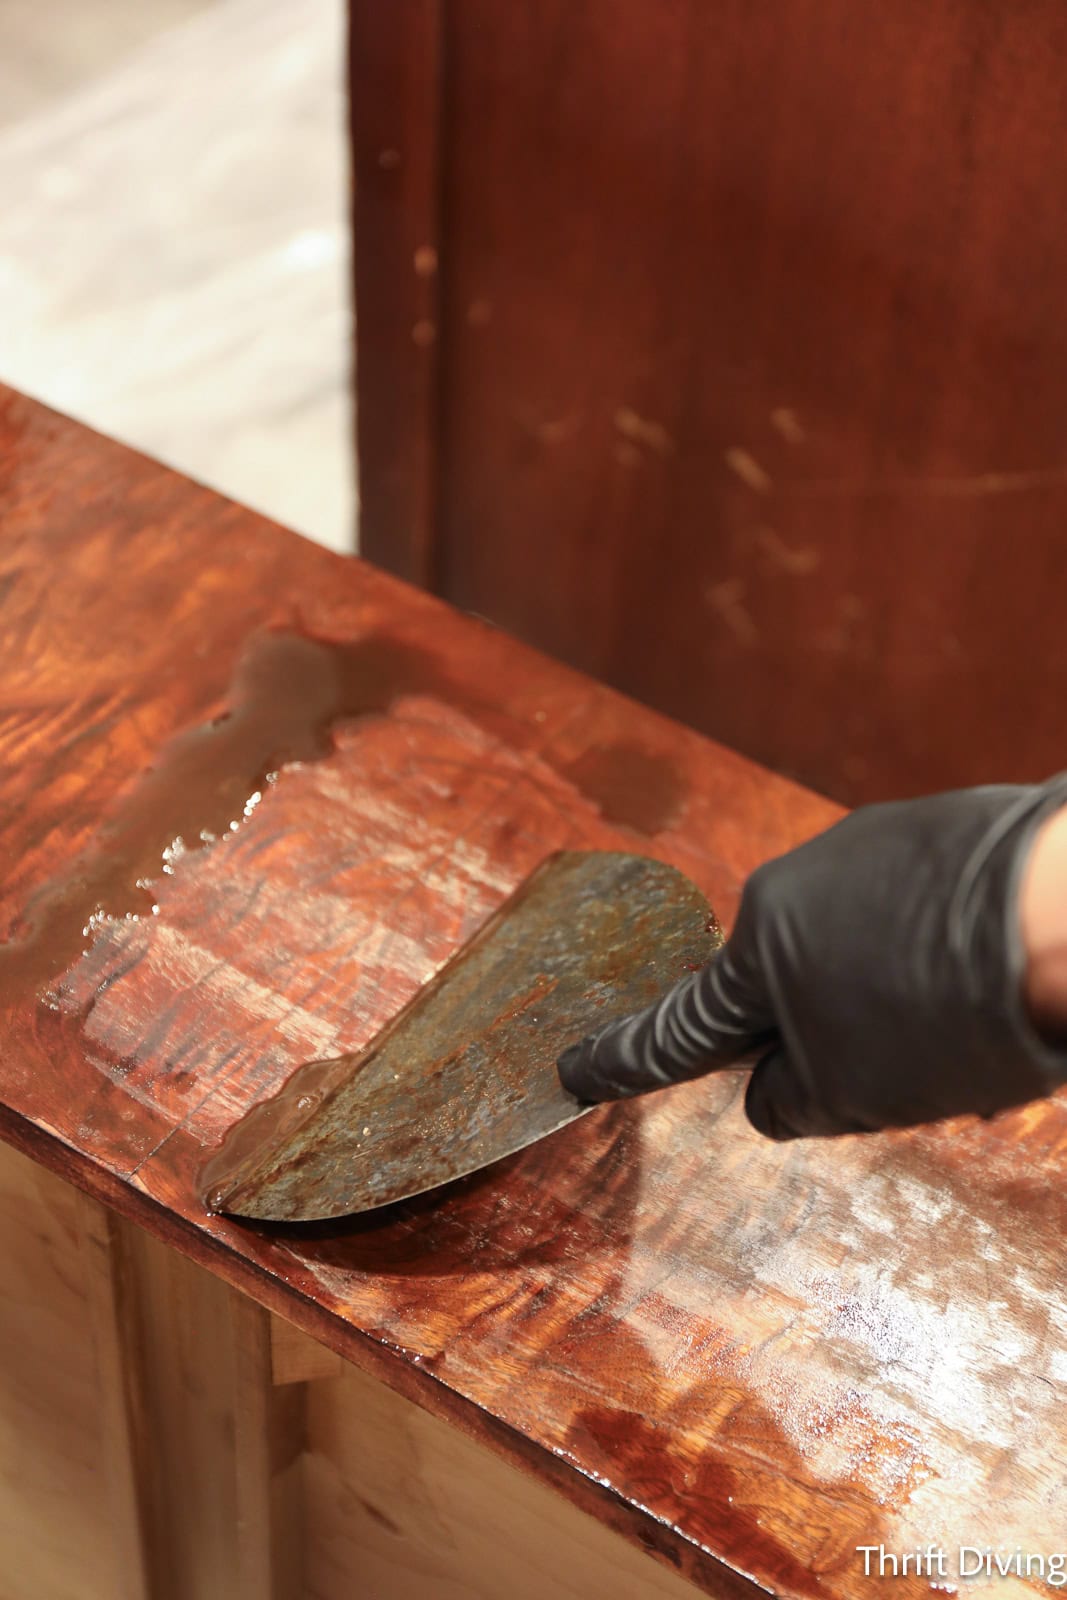
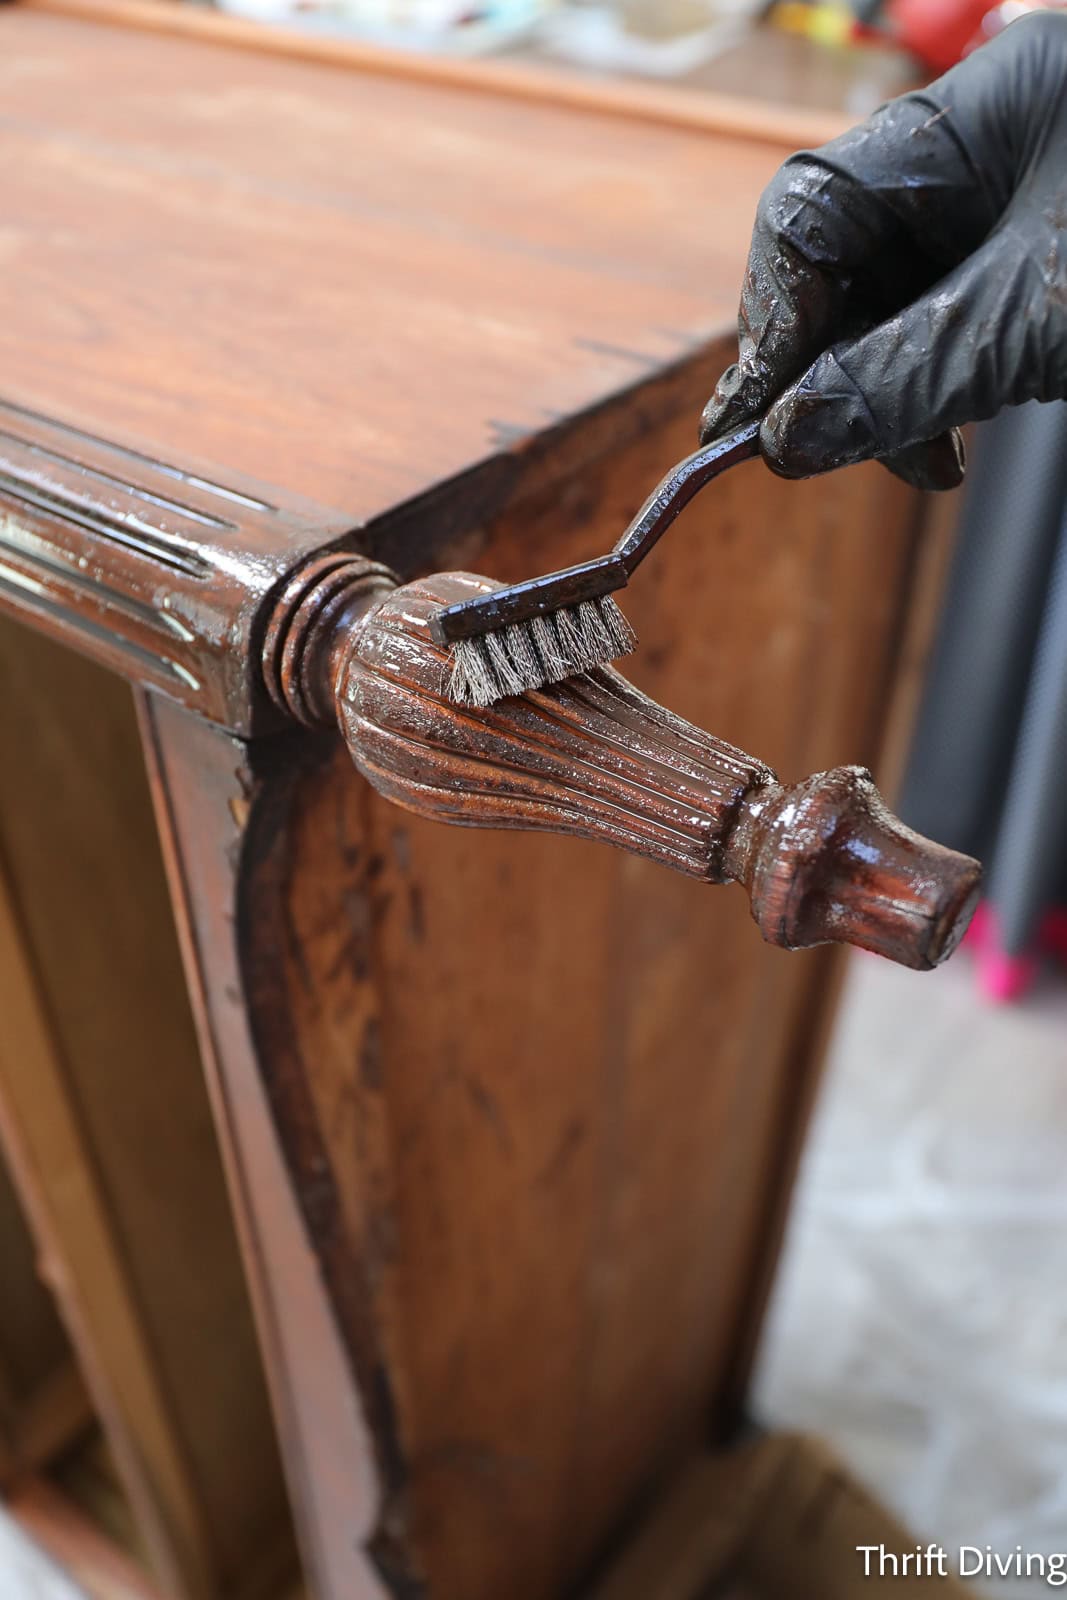
This is the part I hate with….a….passion: removing stain from nooks and crannies, like feet and decorative parts! Wire brushes are your friends. But still….it’s a pain in the butt!
STEP 3: Clean the Wood
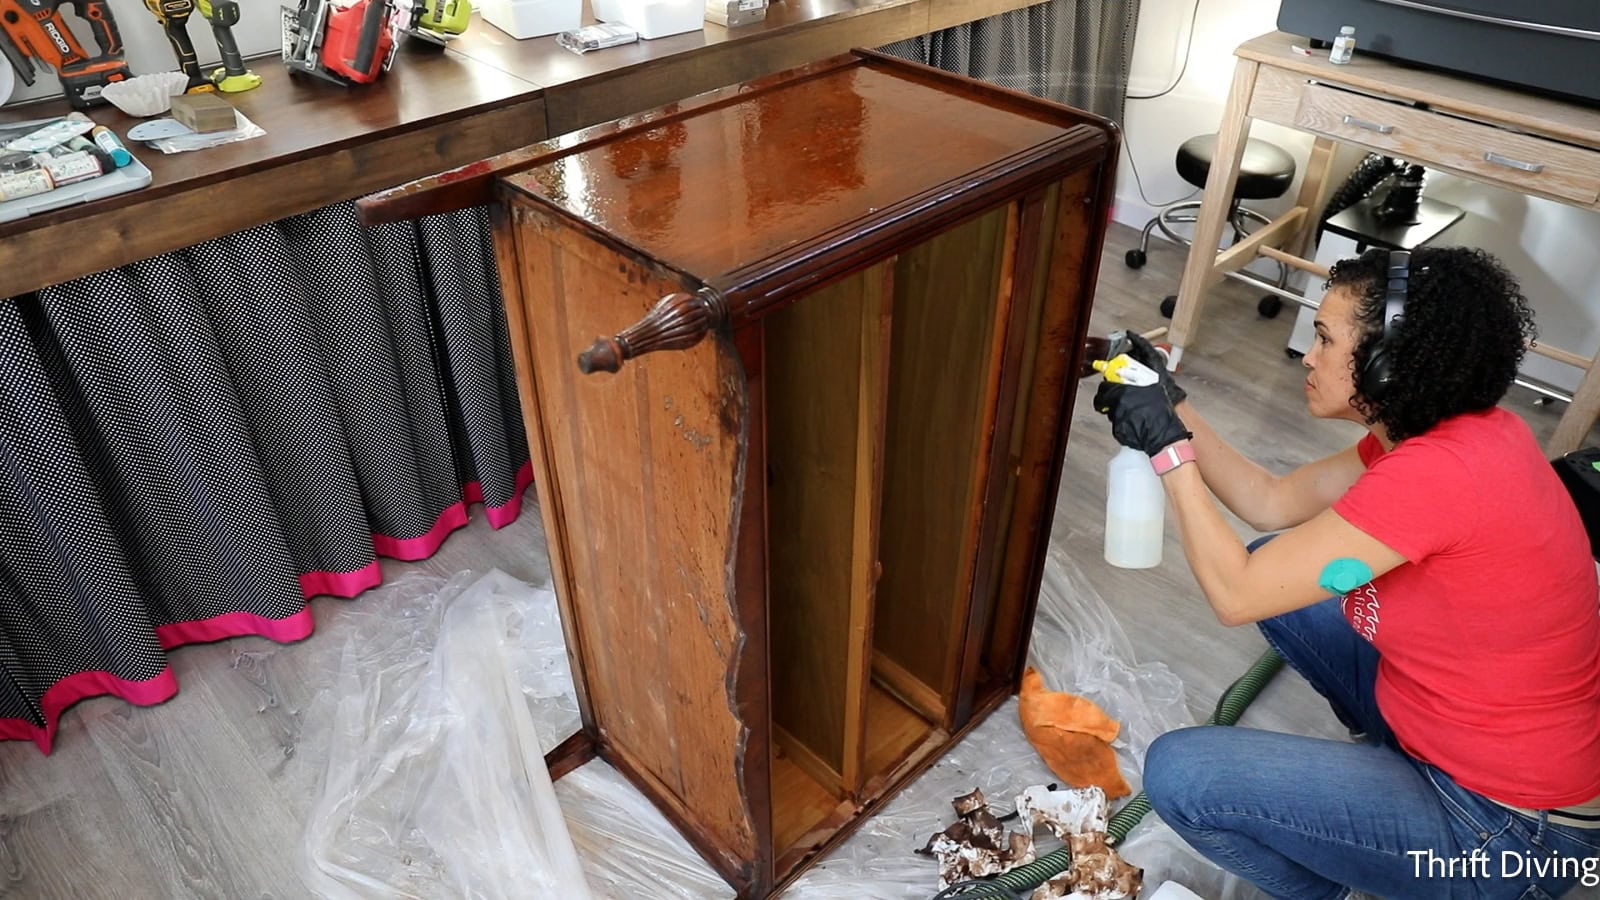
Wood that has finish remover on it can get “gunky” after you’ve scraped it and the surface has dried. When you start sanding, all that “gunk” with gunk up your orbital sanding pad. Do you know how expensive those pads are??! It’s best to have as clean of a surface as possible. That’s where the surface cleaner comes in handy. Use an old towel. ‘
I didn’t realize, though, that this surface cleaner can actually be used on surfaces that you’re about to paint! Say what?!?!? I guess you can consider it a “liquid sandpaper” for roughing up, or “prepping” a surface before painting. I’m going to have to try that!

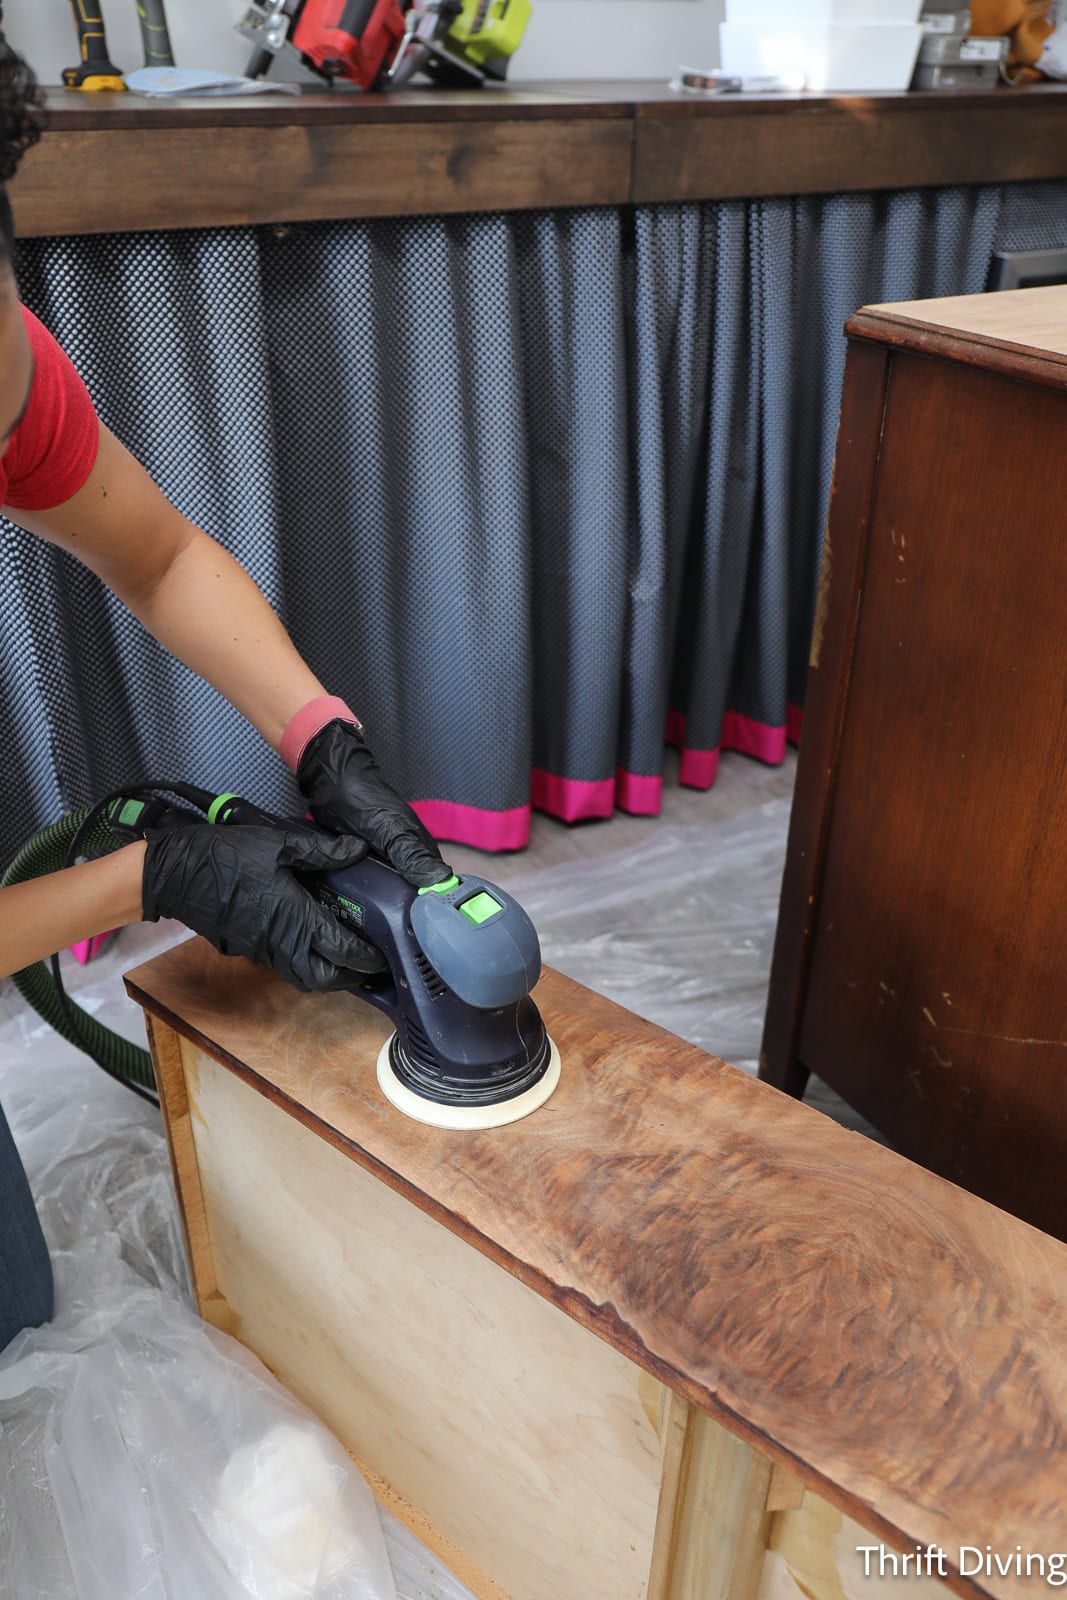
STEP 4: Sanding the Wood – (BE CAREFUL HERE)
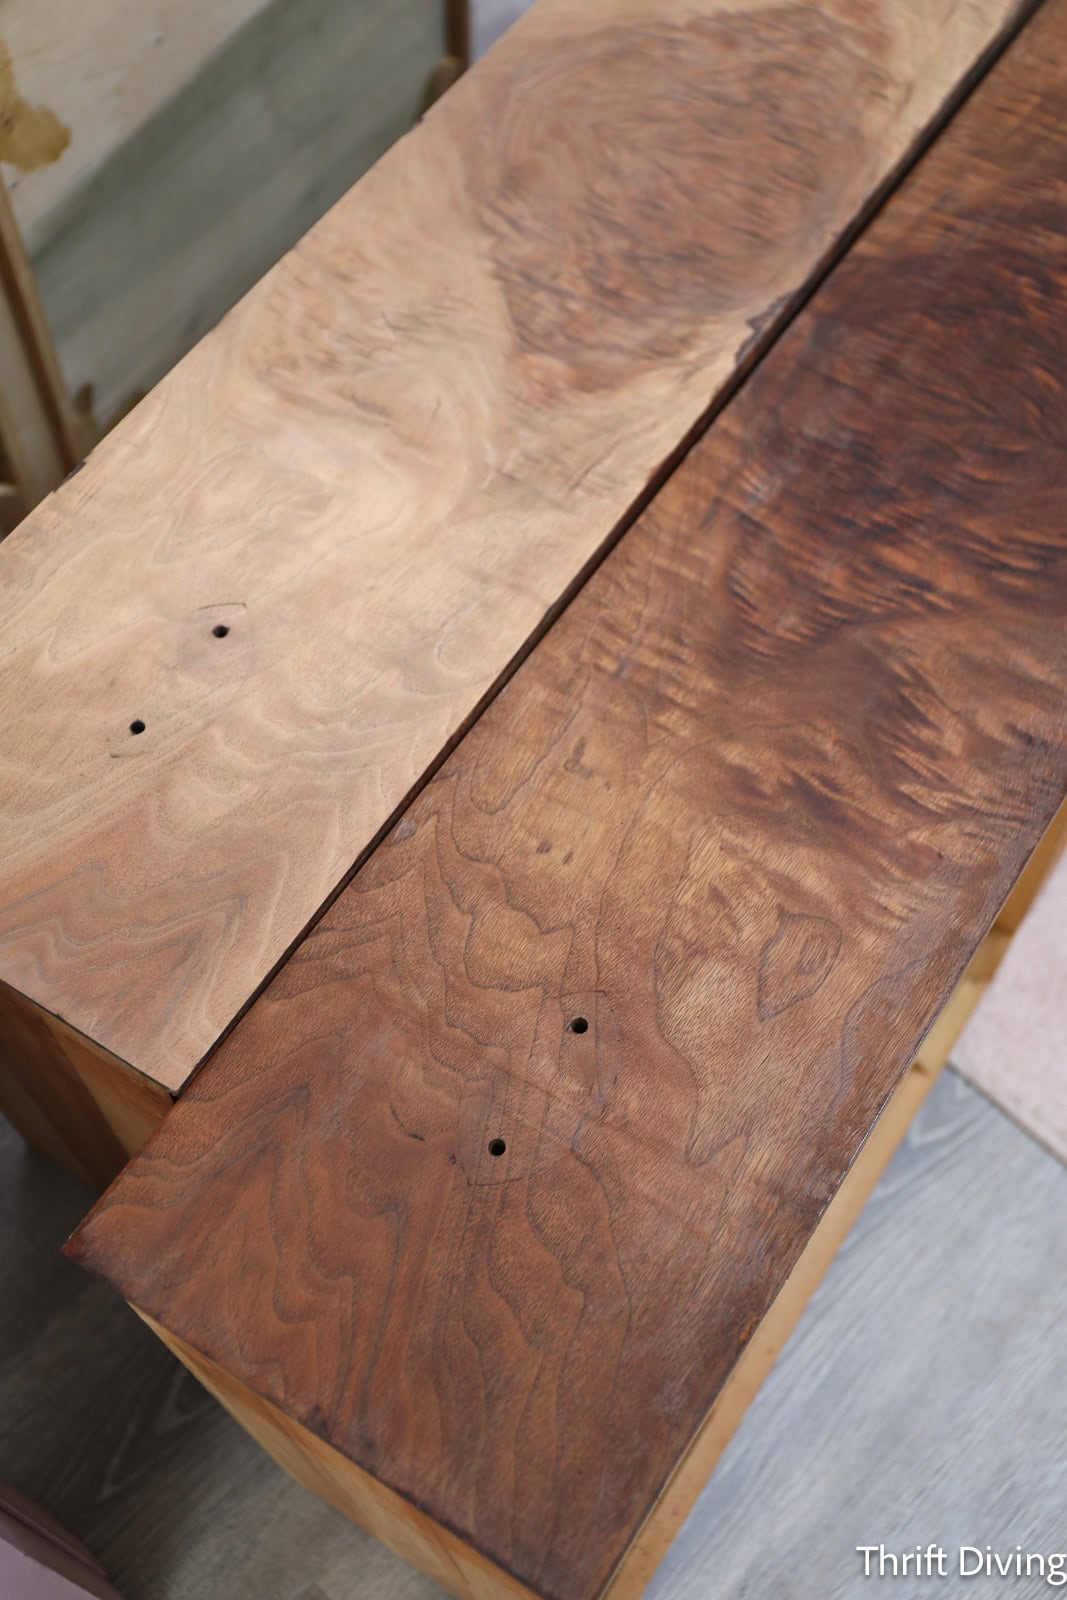
Wood that’s been stripped and cleaned still needs to be sanded. It will still hold some of the discoloration of the previous stain. Check out the difference between a drawer that’s been stripped and sanded (left), compared to one that’s been stripped but not sanded yet (right).
That’s where orbital sanders are amazing. Several years ago, I switched a lot of my tools to the Festool brand. They’re more expensive (back when I had the money to switch!), but they have a top-notch dust extraction system that eliminates so much dust that power tools create, especially when sanding. Especially since I am working indoors in my shed, having all that dust floating in the air isn’t acceptable. And if you’ve ever used an orbital sander, you know it creates a lot of dust!

Let’s Talk About the Dangers of Sanding Wood Furniture…
Even though I’m using a dust extractor attached to my sander (and by the way, you could attach dust collection with a hose to other brands of orbital sanders, like a RYOBi sander, and you should), sanding by hand still creates a lot of dust, which can float into the air and linger for hours.
If you’re sanding outdoors, and wearing a mask, it’s not a big deal. The particles will float away. But when you’re indoors, those particles can linger. And they can be very toxic.
I recently bought this 10-in-1 indoor air quality monitor because I was worried about air quality when I’m in my shed for hours every day (my CO2 levels get high when I’m in here for long periods of time). I noticed when I was sanding this vintage dresser by hand and creating a lot of dust, by the time I was done a couple hours later, my indoor air quality monitor was showing that I was in the YELLOW zone for a measurement labeled HCHO mg/m3, which is formaldehyde. (Whaaaatt?! I had no idea!)

According to Cancer.org.au for the Australian site, wood dust and formaldehyde can cause cancer. It’s easy to forget those things when you’re in the throes of an exciting project. So this little Air Quality meter could save lives.
To lower my exposure to formaldehyde, I made sure to:
- Turned on my JET air filtration machine and kept it turned on for a while after I was done sanding.
- Open a couple of windows while sanding to always have fresh air coming in (sand outdoors, if you can).
- Clean up as much dust throughout my shed when I was done.
- Wear gloves so that my hands weren’t touching the dust.
- I wore a mask while sanding and afterwards, when there are still particles in the air.
- Use the vacuum hose next to my hand-sanding to suck up dust while I was sanding, to prevent it from spreading everywhere.
- Changed my clothes when I was done sanding and put them in the wash.
- Showered after sanding.

You might even want to consider always wearing eye protection (even the ones that have the side protection, too) and wearing a hat to prevent the wood dust from getting into your hair.
So yes……technically you can strip furniture indoors, and doing so with a safe finish remover like QCS is a good idea. But that’s just one part of the equation. All the other safety things need to be done, too. 🙂
Sanding a Wood Dresser: Step-by-Step
So let’s talk about the actual process of sanding a wood dresser:
- STEP 1 – Start with 120- or 180-grit sandpaper using an orbital sander, after using the finish remover and surface cleaner. (By the way, the lower the number of grit, the rougher the sandpaper for removing existing finish. After the finish remover and cleaner, you’re just removing the last bit of discoloration and cleaning up the surface to make it smooth).
- STEP 2 – Continue with 150-grit sandpaper, preferably an orbital sander.
- STEP 3 – Hand-finish with 220-grit fine sandpaper.
- STEP 4 – Use speciality sanding tools to get into nooks and crannies, using the same grits in the order recommended.
This picture below is how wood looks when you sand it after using finish remover (left) and when you don’t use finish remover (right). As you can see, sanding after the finish remover really gives you a beautiful surface to apply new stain. You don’t want to leave it with the old layer of stain on the surface.


Fixing Any Gouges or Imperfections
This vintage dresser had a deep gouge in the wood, if you recall. I wasn’t sure how to address this because typically, using wood filler (the kind in the bottle) doesn’t allow you to stain over it without it being obvious. If you’re painting furniture, then yes…..you could use wood filler, sand it smooth, and then paint over it, and no one is the wiser. 🙂 But when you’re stripping and staining, you have to find other ways to fill it. I used some of the sanding dust, mixed with wood glue, and tried to fill it. Wasn’t the perfect patch, but it was good enough. (TIP: Fill the gouges after stripping, but before sanding).

Once everything is sanded, it should be wiped with a tack cloth. But tack cloths can please a residue on the surface, so a microfiber towel is probably best.

STEP 5: Apply the New Stain
I’ve typically used oil-based stain on my stripped and stained furniture makeovers. But over the years, I have become more aware of the toxicity of the products I am using, and I honestly hate the fumes of oil-based stains. When I started this project, however, I thought I would use either tung oil or an oil-based gel stain. But when I started getting terrible results with the tung oil and gel stain! Notice how one of the drawers (the small one) ended up really dark with reddish tones, and the other drawer was light and golden? Ugh…..
So instead, I used the water-based stain on the third drawer, and that was the right shade I was going for!

Not to mention, the air quality indicator in my shed started showing higher levels of toxins in the shed when I was using the oil-based products. So switching to the General Finishes Water-based stain was not only better environmentally, but it created the shade that I loved. Plus, no nasty smell lingering in my “she shed,” either!

For the two drawers that were mismatched, I ended up having to re-sand those and I started over with the General Finished Water-based Stain.
Using Water-based Stain: What You Need to Know!
I had no idea that water-based stains dry so quickly! I used to always use oil-based stains, for whatever reason, I don’t know. Maybe because those were the ones that seemed so readily available at big box stores? Oil-based stains dry much slower and allow you to work the stain onto the wood, taking your time in applying it. But water-based stains dry within seconds of applying it (or so it seems!), which can leave lap marks if you’re not applying it liberally or if you’re allowing the edges to dry before spreading it around.
As soon as I wiped it on, it started drying. A friend later told me that he uses the General Finished Extender with water-based stain, which when mixed with water-based stain, it gives you more time to apply without drying (the instructions recommend 1.5 oz of extender mixed with 1 quart of water-based stain). The extender also thins the stain a little bit, too. He also said he applies a coat of extender onto the wood before he starts applying the water-based stain.

STEP 6: Apply a Top Coat
My favorite top coat is General Finishes High Performance Topcoat in satin. OMG, I love, love, love this top coat! Look how the top coat brings out the beautiful color in the wood. But here’s the key to getting good results:
You cannot “overwork” this top coat. Simply apply it in thin coats, work quickly and evenly, and then let it dry. Sand it with 320-grit sandpaper when it dries. Then do another coat. (Oh–and don’t shake it before applying, only stir, or bubbles can get trapped in your top coat. :))

STEP 7: Sand Lightly in Between Coats
One layer of top coat usually isn’t enough. The magic of top coats is to build up the layers, sanding in between with very fine sandpaper, about 320-grit. I like to use a sanding block, and I don’t press down when sanding–just a light sanding, then removing the dust, and applying another coat. Typically I’ll do 2 coats, but 3-4 coats gives you a really nice finish, how when I built my custom closet organizer and added 3 coats to all the pieces of birch plywood to make them feel really silky smooth!

STEP 8: Add Final Top Coat
I also want to point out that water-based top coats can go on “milky” but don’t worry–they will dry clear. And you can add as many coats as you want. Just be sure to sand in between. It’s awesome that it cleans-up with water, too!

STEP 9: Restore the Hardware with Rub n’ Buff
If you’ve never used Rub n’ Buff…..gasp!…you don’t know what you’re missing! I have used it for so many DIY projects. It’s a colored wax that you rub onto a surface, such as metal or wood, and it completely transforms the surface. My favorite application for this is restoring hardware for furniture because it’s expensive to replace hardware when doing furniture makeovers. And sometimes the original hardware just needs a “pick-me-up,” not a full replacement. That was the case with this vintage dresser’s hardware. It was tarnished and just needed a quick coat of gold Rub n’ Buff. (By the way, read this article I wrote on 5 Ways to Use Rub n’ Buff).
BEFORE

AFTER!
With a thin coat of gold Rub n’ Buff, they’re ready to be reused for this restored vintage dresser. 🙂

A Vintage Dresser Restored!
I am so, so, so glad that I didn’t paint this dresser! While the “before” was nice enough, it was dull, lackluster, and really needed some TLC. While I didn’t think it would be as dark as it was, the walnut veneer with the Provincial, although dark, really turned out stunning!
BEFORE
AFTER!
I was worried about the dresser being too dark (remember what I said about “hating” dark, wood furniture….??). But when it turns out this good, it’s impossible to hate. The amazing wood patterns of the walnut are still visible, and the top has the perfect amount of shine with the satin topcoat without being too much.
When Should You Restore a Vintage Dresser or Paint It?
Ahhh….this is such a good question. It reminds me of a blog post I wrote about when you should not paint wood furniture. In a nutshell, here are my quick thoughts:
You should restore the vintage dresser when:
- Restoring it will restore its value.
- It’s been in your family for years and you would love to use it for another 40 years.
- The wood grain is very pretty! It’s not a boring ‘ole pine, but something with personality, like walnut or oak!
- You simply love the look of nature wood in your home.
You should considering painting the vintage dresser when:
- It may be vintage (i.e. less than 100 years old), but it’s not that valuable.
- You want to refinish it quickly, like a weekend, and not 2-3 weeks.
- The vintage dresser has a lot of nooks and crannies and it would be easier to paint instead of stripping.
- You love the idea of stripping the top, restaining the top, but painting the body.
- You don’t give a rat’s tail about what anyone thinks and it’s your dresser, no one else’s–you want to paint it!
Love this? Click here to SAVE it on Pinterest!
![]()

FAQ About Restoring a Vintage Dresser
You might still have some questions about restoring a vintage dresser, so I’ll try to answer your questions here. But also leave any questions below you might have, and I’ll answer them!
How about you? Do you prefer to paint vintage dressers or restore vintage dressers? I know it’s a lot more work, but the results are definitely worth it!

Download the 5 freebies!

Thrift Diving inspires women to decorate, improve, and maintain their home themselves...using paint, power tools, and thrift stores! Use these 5 printables, checklists, and ebooks to get started!
Great job! It is a lot of work, but restoring a fine old neglected piece of furniture can be so satisfying and a wonderful learning experience to boot. Of course sometimes the overall condition is so bad it makes restoration not worth it. In the end you probably aren’t saving money, but it can bring riches in joy. Keep up the great work Serena!
Satisfying is the right word, Tommy! I started the project with some trepidation, and it increased when I realized that I couldn’t quite figure out what finish to use on it, to get the best results. But wow…..once I was able to get through that part, I was amazed at how it turned out!! Thank you for following along! 🙂
I love that. Beautiful!! Great job. Lots of hard work.
Thank you so much, Linde! I am so pleased with how it turned out! I tell you–each project is a lesson learned…or MANY lessons, rather. Thank you!
You are The Woman! It’s beautiful!
LOL, thank you, Joanna! I am in love with it. I really want to sell it, despite how much I love it. Because I think it would be a nice way to kick off a teeny “restoration” business, and it will allow me to do many more projects like this. But I get so attached once I am done. LOL