How to Make a DIY Whiteboard For Under $30
This DIY whiteboard tutorial is brought to you by Gorilla Glue.
For more fun craft projects to keep you organized, be sure to check out my DIY wood journal, DIY notebooks made with scrapbook paper, and DIY pegboard organizers.
When I decided to make over my kids’ bedroom, I knew it must include one thing: a big DIY whiteboard!
Why hadn’t I made one before for the kids? My mom turned 60 years old a few years ago and I made her one to keep her organized. And when I did my office makeover, I created a big whiteboard to stay organized. Now that the kids are getting a room makeover, I knew they could use one, too! They’re super easy to make and can be customized with any type of wood trim. I love me some power tools, but for those of you who don’t have a miter saw, no worries–for this project, a miter saw is optional! 🙂
How to Make a Big Custom DIY Whiteboard for Under $30
I absolutely love this project because nobody’s got all weekend to make a project. But this project, you can knock out in an afternoon and still have time for all your other “To Dos.” Plus, there are at least a few rooms that need whiteboards: the kitchen, the office, kids rooms or playrooms–sooo many places. So if you can make one, you can easily make multiple boards for all the spaces in your house all in one afternoon. They make great gifts for birthdays, graduations, and even housewarming gifts!
Related: See the pink-trimmed DIY whiteboard I made for my pretty basement office!

Materials
DIY whiteboards are so easy to make and don’t require very many materials! If you’ve got about 1-2 hours, you can easily make one with the following materials:

- Gorilla Glue Clear Grip Adhesive
- Wood trim
- Tape measure
- Wood stain (or paint) and a clear topcoat
- Sticky strips
- Miter saw or a miter box
Other Materials
- Marker Board
- Clamps
- Washi tape
- Alphabet stickers
- Dry-erase markers
- Towels
- Sponge or brush for applying stain or paint
STEP 1: Buy a Piece of Marker Board
Any home improvement store sells these big marker boards for just under $10. At 2′ x 4′ they’re large enough to hold any list or calendar. If you’re making one for a kid’s space, like I am making for my kid’s room, it’s large enough for kids to get creative.

STEP 2: Cut, Measure, and Mark Your Wood Molding
The idea is to trim out your new DIY whiteboard with wood molding so that it looks polished and “finished.” Whatever molding you buy, get enough to go around the perimeter. I bought two 8′ pieces of molding and it was the perfect size for this whiteboard.
Just a warning–the molding may be more expensive than the board! Most molding is at least $1.00 or more per foot. You can DIY your own if you have scrap wood laying around your house. Or you can get pretty swanky and buy the more expensive stuff.
TIP: Get creative and thrifty with molding; try paint stirs, wood shims, or scrap wood.
When cutting molding for a DIY whiteboard, I like to start by cutting a piece of the molding 45-degrees and then using that sharp edge as the starting point for measuring.

The marker board is 2′ x 4′ but when measured, it was actually 48 1/8″. So measure your board just to be sure and then plan accordingly! 🙂

Cutting Your Molding
This is the most awesome tool ever. It’s called a miter box (only about $8.00 from the home improvement store). It comes with the yellow plastic tray and saw. What’s great is that it allows you to easily cut small pieces of wood at 45- and 90-degree angles. See those slits in the plastic? That’s how you line it up. (You can watch my tutorial on how to use a miter box to cut picture frames).

I have a big miter saw in my garage and the edges are much cleaner when using the saw, so that’s what I used for my whiteboard trim.
But everyone can’t afford to buy a miter saw or feels comfortable using power tools, so this miter box is perfect for a beginning DIYer or crafter!
TIP: Watch this video I filmed on how to cut wood molding with this miter box.

Each of the 4 sides of the whiteboard trim will be cut at a 45-degree angle. If your measurements are slightly off, this is what may happen: one side may be a little longer. However, if you watch this video on how to trim down your wood by 1/16th, you’ll get a near-perfect fit!
Too Long

Just Right!

STEP 3: Pretty Up Your Wood Molding
Unless you’re going for the natural look, now’s the time to pretty up your molding before gluing it to the whiteboard. I decided to stain mine because it would look more expensive and rich. For this whiteboard, I used a java gel stain. Make sure you wear gloves and use a safety mask if you’re spraying stains or topcoats. (Check out other DIY safety precautions).


After the gel stain dried, I sprayed it with clear topcoat so the kids don’t scratch it up. I loved how it made it shine.
STEP 4: Glue the Wood Molding
In the past, when I’ve made DIY whiteboards, I’ve always used Gorilla Glue that required longer drying times. But the Gorilla Glue Clear Grip Adhesive has a much shorter setting time, which means it doesn’t slip or slide around on the marker board while gluing the trim to the board. You have no idea how frustrating the sliding can be. But I had minimal sliding with the Clear Grip. Woo hoo! It’s also waterproof and can be used both inside and outside. I’m excited to try it outdoors! I’ve been wanting to make a WELCOME sign for the yard and this will be perfect for gluing the letters to the lawn stakes.

For the whiteboard, I started with gluing the top piece of trim to the whiteboard…then the left side…followed by the bottom…then the other side.
The key is to make sure that you’ve got a good fit before you glue it.
Also, make sure you don’t over-glue it. If you do, wipe away the excess. Trust me–you don’t want to be peeling dried glue off your project the next day. Been there, done that. 😉
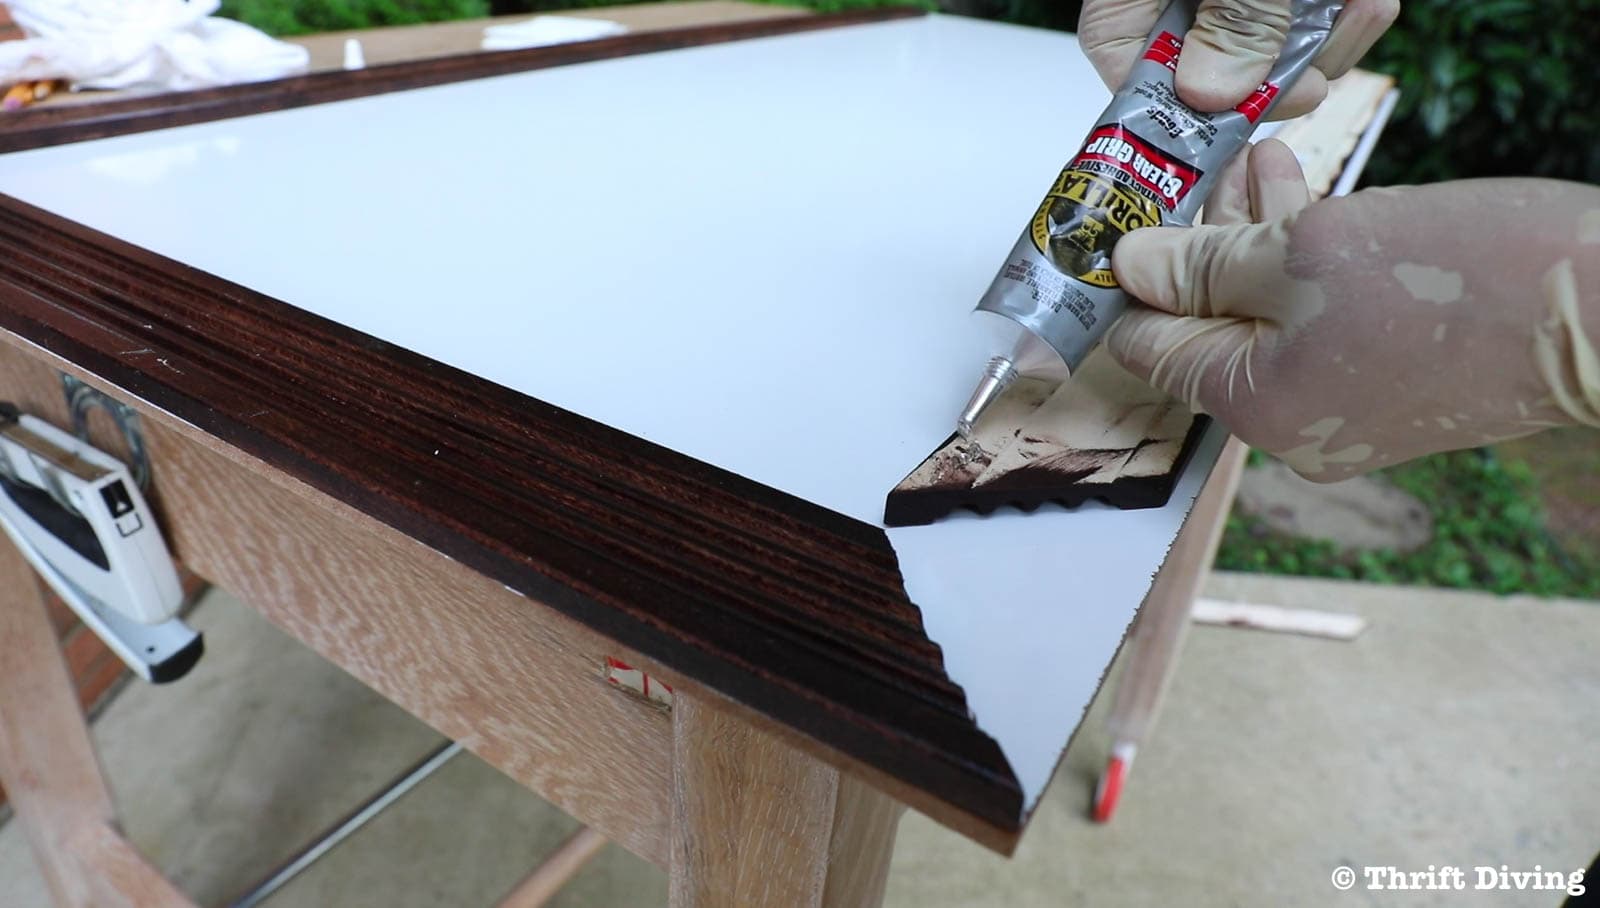
I added just enough to the sides to keep the trim tightly secured to the marker board.

I used small clamps for 24 hours and came back the following day to finish off by adding the sticky strips to the back.
Once it was all glued, it looked fabulous!!

STEP 5: Add Sticky Strips to Mount the Whiteboard
The easiest way to mount the DIY whiteboard is to add sticky strips to the back. I like the ones with hooks that interloop when mushed together. Very easy to mount!
They only came in a pack of four, so order more so that you can add more strips across the back for added strength and stability.

Next, I used my level and mounted it easily on the wall in my kids’ room!
STEP 6: Get Creative!
I love adding things like washi tape or letters to whiteboards to organize and decorate the board. I used these pretty silver letters to add a little oomph to the whiteboard. I won’t be surprised if my kids peel them off within the first week. LOL


My Son’s Flowchart
My middle and youngest sons were so excited to see the board when they got home that they didn’t even ask for electronics right away; instead, they just started drawing! Closer to bedtime I went to tuck them in and my middle son was in his room creating this masterful flowchart on how he plans to set up his YouTube channel! You have no idea how happy this makes the goal-setting person inside of me!
While I don’t consider myself to be a great organizer most times, I love me a good flowchart and goal-setting plan. Seeing him create this from his own volition, makes me one proud mommy! I don’t see very many kids his age so determined to get what he wants when he wants it. That’s something I have to nurture in him. So if the kid wants to make videos, I’ll help him make videos. I have 100% confidence he will be successful at whatever he sets his determined mind to! 🙂

Total Cost
Okay, so the total cost (with taxes) came to under $30. Your cost may be different if you use a different molding and if you already have some materials on hand, too. But the point is that it will be a super affordable option than going out and buying an overly priced whiteboard from the store!
Do you want to make a DIY whiteboard too?
If you don’t have a lot of time for DIY projects, this project is sure to satisfy your craving to create, yet allow you to finish in about 1-2 hours (or less!). Be sure to check out Gorilla Glue’s Clear Grip Adhesive for getting your project done quickly!
Diggin’ this project? Save that baby right here!
![]()

Download the 5 freebies!

Thrift Diving inspires women to decorate, improve, and maintain their home themselves...using paint, power tools, and thrift stores! Use these 5 printables, checklists, and ebooks to get started!

As a homeschooling mom, a whiteboard was essential to our classroom, which also doubled as the dining room. However, in my “off” hours, I didn’t like “work” staring me in the face and didn’t want a big whiteboard on the wall reminding me of algebra, spelling words, or timelines.
My solution was a piece of Plexiglass and mirror hangar clips. The whiteboard is the same color as the wall color underneath and thus disappears when not needed. It will probably hang there until we move.
I am planning to build one for my Automotive Projects in my garage. Maybe another for yard and garden items.
This is perfect for my needs, thank you!
Exactly what I was looking for! Thanks so much for posting the tutorial!
I saw your link at the Party in your PJs Link Up. This whiteboard is such a fun idea! And like you said, it can go in so many different rooms. Thanks for sharing!
Wait, so step one to this $30 “DIY” whiteboard is…buy a $10 whiteboard?
Well, yes. You can hang a piece of whiteboard alone for $10, but if you want to add a frame, you’ll need to buy some trim pieces, which is where the additional cost comes into play. Most whiteboards aren’t just a piece of board. They all have frames. But those store-bought ones are pretty costly. You can make your own framed one for $30. But if you want to be cheaper, you can just buy a plain board and stick it up.
Well, you could just write on your wall as an option. For Free!
Wow, like the idea of doing this! Thanks for the instructions.
You’re welcome, Tammara! 🙂