BEFORE & AFTER: Dining Room Bench Makeover Using Beyond Paint
But it was one of those pieces of thrifted furniture that you bring into the house and it takes you years to make over.
Four years, to be exact.
I’m happy to say, though, that I finally completed this dining room bench makeover!
BEFORE

The dining room bench was solid, but the finish was horrible. It reminded me of that 1980’s orange desk I stripped and painted. This was like the little nephew to that desk. LOL
If you looked closely, it had a lot of surface imperfections and battle wounds.
I was hoping that giving it a good sanding down would remove much of that.

AFTER!
With the 1980’s orange stain gone, the body painted in a rich mocha-color, and the top stripped and kept natural, I love how it turned out!

It was refreshing doing a furniture makeover that didn’t take much time! Combined, this project only took about 2 hours!
Dining Room Bench Makeover
To complete this project, I had all of the materials on-hand. Beyond Paint sponsored this project so they provided the paint. But everything else I had in my garage. I love projects that don’t require multiple trips back to the store for supplies. 🙂
Materials
- Beyond Paint Mocha color
- Paint roller and tray (use a roller with 1/4″ nap)
- Sander
- Simple Green
- Paintbrush
- Topcoat
STEP 1: Clean Off the Furniture
Beyond Paint doesn’t require any sanding or priming (as long as the surface of the furniture is in good condition). But you do have to wipe it off first to remove any grease or dirt. Otherwise, paint won’t stick.
Once you’ve cleaned it with Simple Green, wipe it off with a fresh, clean damp rag.

STEP 2: Strip the Top of the Dining Room Bench
It’s getting harder and harder for me to willingly cover up a nice wooden top on a piece of furniture because I absolutely love the look of stripped wooden tops and painted bodies.
The same was true for this bench.
It was a no-brainer that I’d strip the top, but the question was, “What’s the best way to strip this dining room bench top?”
There is more than one way to strip furniture. I didn’t want to spend a lot of time on this project because my “To Do” list of other projects is longer than my arm.
So I decided to go with the quickest method of stripping furniture: a belt sander.

I should also tell you that a belt sander is super aggressive, so sand with caution, my friend.
While it does remove layers with uncanny quickness, my goodness–the risk of removing too much wood is pretty high.
Within seconds, layers were removed, revealing the fresh wood underneath.
I noticed that there were still some parts of unevenness, but I just assumed that it was just the wood.

I got a little too “sander happy” and ran into a couple of patches where the sander removed too much wood and left bare spots like you see here on the edge of the dining room bench.
When sanding over edges, it’s super important to keep the sander completely flat and fast-moving to avoid this very thing happening.
If you’re sanding and get bright, bare-wood spots, too, it’s impossible to stain the wood because those bare spots won’t accept stain and they’ll be even more noticeable the darker the stain used.

But for this bench, if I kept the top light and natural, not only would it look great with the dark painted base, but it would help to disguise the bright spots.

STEP 3: Paint the Body Using Beyond Paint Mocha
I’ve used Beyond Paint for many projects, including these five favorites:
- China Cabinet Makeover
- Repurposed Toddler Bed Turned Into a Potting Bench
- Vintage Dresser Makeover
- Eat-in Kitchen Table Makeover
- French Provincial Dresser Makeover

But one color I had never used…..ever….is Beyond Paint Mocha.
I’m not a “brown furniture” kind of person, so I was a little unsure how it would look on my dining room bench.
But life is boring–if you never venture outside of what you already know, how do you discover new things??
So, mocha it is!

I’ve used a lot of furniture paints in my day (find out my about my experience with furniture paints), and while I like painting furniture, it can take so long as you try to work the paint over the surface, hoping it doesn’t drip and look horrible.
What I like about Beyond Paint is that it has what I call “spreadability.”
It doesn’t drip, and when worked with a small roller (to eliminate brush strokes), you get a smooth finish that doesn’t take long.

It only took about 10 minutes to paint this entire base and bottom of the bench with a coat of Mocha.


I left the bench to dry overnight since I was running out of daylight. The following day, I added a second coat of Mocha for even coverage.

STEP 4: Add Two Coats of Clear Topcoat
It was so hard to figure out what to do with this dining room bench top.
I debated on whether to just paint the top to cover up the bright spots due to sanding, or to just leaving the top natural.
Natural won!
I had some topcoat leftovers in my garage and used a paintbrush to apply two coats of satin sealer.

The topcoat brought out the warmth in the wood without being too overwhelming orange.
Plus, the color of the wood complemented the new Mocha base!

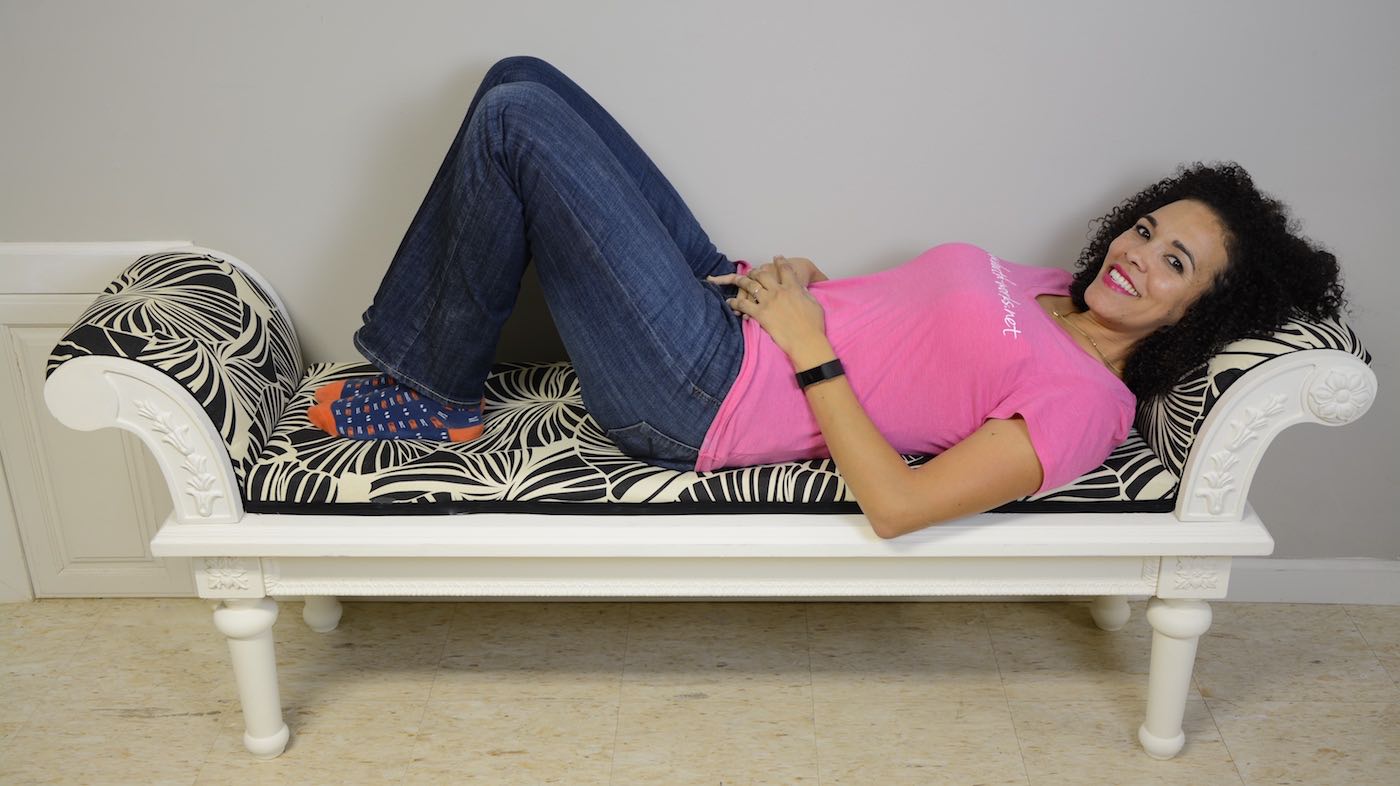
BEFORE

AFTER!
I absolutely love the after!
The top seems a bit spotty, and I’m not sure if that’s due to sanding or if it’s the nature of the wood.
But regardless, it looks a million times better and that contrast on the dining room bench between the dark base and light top makes me very happy.

What’s even more shocking is that hubby told me he likes the bench! GASP!
If you’ve been reading this blog for any length of time, you’d know that he’s nearly impossible to impress. He doesn’t hand out compliments very easily, so for him to offer a compliment that the bench looks getter–whoa! Success!

Do you like this project? Click here to SAVE it for later!
![]()
If you liked this dining room bench makeover, be sure to check out Beyond Paint for the mocha furniture paint!

Download the 5 freebies!

Thrift Diving inspires women to decorate, improve, and maintain their home themselves...using paint, power tools, and thrift stores! Use these 5 printables, checklists, and ebooks to get started!

WOW! Instant class!
It’s a beautiful transformation. I like the idea of combining both techniques. I’ve been sharing some of your projects with my friend Marlene, another blogger living in Oregon. I’m so impressed with your projects and with he way you’ve carved out a new career with Thrift Diving.
Thank you Serena… You have opened doors for me…. I’m loving the paint.
Awesome project! So simple, yet effective. I have a bookcase painting project coming up, and I am glad to get the recommendation for a paint that will make it easy. Thanks! Getting some Beyond Paint in black for my project.
Love it! I’m not into browns, either (blue’s more my go-to), but I definitely like this. The bench like this has almost a Frank Lloyd Wright look to it. Really nice!
Beautiful job Serena!!! I love the contrast of the colors.
gail
boy, it looks brand new! I’ve seen your “Beyond Paint” projects before, so now I’m even more likely to buy it. I am always painting something!
Hi, Linda!! Yeah, I really like Beyond Paint. I was rushing to get through the paint job because the light was fading and every time I use that paint, I’m amazed how quickly I’m able to get through it. It just doesn’t take a lot of effort to paint something with BP. 🙂 I haven’t tried their black and a few other colors, so I’m going to see if I can use those next! My favorite is the Nantucket and I LOVE the blue, although I think that was a specialty color they don’t often carry.
Another winner!
Thank you, Susan!! 🙂 So glad you like it!
Awesome makeover!! I love it, looks so beautiful, thanks for sharing it with us!
Awww, thanks, Isadora! I appreciate the love!
This looks great! I love the two tone
Thank you, Haley!! I love it, too. I had a hard time figuring out what to do with this bench. I didn’t want to paint that nice slab of wood. I love the natural look with the dark mocha contrast! 🙂 Hope you’re doing well and the girls are good!