BEFORE and AFTER: Makeover of a Wooden Play Kitchen!
If you had walked past this beat up wooden play kitchen at the thrift store, would you have stopped? Would it have caught your eye? Well, how about if you had known it could look like THIS??

When I saw this wooden play kitchen., I stopped in my tracks–eeeerrrcchhh!–total thrift score! This isn’t the first time I have come across a kid’s piece of furniture that turned out totally cute! Remember that $5.00 thrift store kid’s desk that I made over? I just love kid’s furniture! Here are a few more shots of what it looked like before. Seriously, it looked like something that someone’s kid’s had DOGGED.
BEFORE


The biggest mistake people make at the thrift store is walking past something that’s UGLY because they can’t imagine how beautiful or cute something could really be with just a little bit of paint and creativity (such as this ugly lamp I found at the thrift store and made it pretty).
It’s amazing how new this wooden play kitchen looks now!
AFTER

I’m so excited to share this with you because it took me about a week and a half. It was a lot more work than I thought it would be, but it was so worth it! I found that little wooden play kitchen on President’s Day, when my favorite thrift store was having 50% off.
Get this— at first it was marked $14.97…..then someone marked it down to $4.97…..add 50% off to that deal….and well, they were nearly giving it away! I had been feeling a little bummed that day because I hadn’t found anything really good, and felt like the 50% off day was such a waste. Then right as I was about to walk out, there it was. (Seriously, don’t you hate when you go to the thrift store and can’t find anything good? It doesn’t happen often, but when it does, it sucks). So thankfully, I found it and could see past the ugliness and foresee the beauty underneath!
So How Did I Make Over This Wooden Play Kitchen?
This project was a lot of work–some things were totally new to me, so they took a little bit extra time, but you know what?? I’m a happy girl! And I recorded some short little videos of the process, so check those out, too!
1. Clean Off the Old Gunk
Better yet, scrub, scrub, scrub! It’s no surprise that thrift store furniture is dirty. Who knows how long it has been sitting in someone’s nasty basement or garage? So the first thing I wanted to do is wipe it down really good. Ideally, you should clean it good well you even put it in your van. Um…..I always forget to do this. But yeah, it’s a good idea! Maybe carry a container of baby wipes, or even Lysol wipes! Note to self….

2. Removed Stickers with Home Right Heat Pro Deluxe Heat Gun
Look at those cracked and worn burners. No wonder people just kept walking by this thing! I used my awesome Home Right Heat Pro Deluxe II ![]() , which is sort of like a blow dryer, but heats up to super hot temps so you can remove stickers, caulking, paint and varnish, wallpaper, and tons of other stuff. So in this case, I needed to scrape those stickers off. Worked like a charm! I also sanded out the sticky parts with medium grit sandpaper.
, which is sort of like a blow dryer, but heats up to super hot temps so you can remove stickers, caulking, paint and varnish, wallpaper, and tons of other stuff. So in this case, I needed to scrape those stickers off. Worked like a charm! I also sanded out the sticky parts with medium grit sandpaper.

3. Chose the Perfect Paint Colors
I knew immediately that I wanted this little play kitchen to look a bit more vintage and retro. Plus, I wanted some colors that were more “boy friendly.” After all, boys can cook, too, right?! For this project, I used Annie Sloan Antibes Green on the outside, and Annie Sloan Napoleonic Blue for the inside. The colors were so complimentary!
Related: What’s the Best Paint for Furniture?


4. Painted Furniture On All Sides
I have a little secret to tell you:
I rarely paint the bottom of furniture!
Do you? Or do you take shortcuts like me and skimp on the paint?
When you’re selling a piece of furniture, you should paint the bottom. Imagine how embarrassing it would be for someone to turn over the piece while loading it into their van and they see the ugly ‘old crusty rotten brown side of what they just paid you a handsome penny to purchase! I think I would be mortified! If something is just for you, by all means, cut corners if you want. But if this is something you’re a) selling, b) giving away as a gift, or c) really need to impress “Joe Schmoe,” then, by all means, don’t embarrass yourself–paint every surface.
I painted the bottom AND back of this wooden play kitchen, and I even added my signature. Now I feel like a legit artist :).

5. Created a Panel Door With Mitered Trim
If you don’t have power tools, don’t worry. There’s a really cool accessory you can buy called a miter box. It’s so easy to use! Now you can do projects where you can cut miters at 45-degree angles really easily.
 Check out this video on my YouTube channel that shows you how to use a miter box. It really takes the guess-work out of cutting miter edges. And if you ever wanted to make your own picture frames, these miter boxes are perfect when you don’t have power tools.

6. Vintage Fabric Cut Outs
I had found this old vintage tablecloth nearly a year ago, from the thrift store (of course!), for about $2.00. I loved the green and blue, but I had no idea what I was going to use the fabric for (pillows, maybe??) So when I found this little wooden play kitchen and knew that I wanted to paint it green, I got that “Aha!” moment and ran off to find the fabric. Funny how it matched my colors perfectly!

I cut out 2 rectangles…..

Then I fit the fabric and the wood trim to the doors, to make sure it all fit properly. It did, after some necessarily trimming!

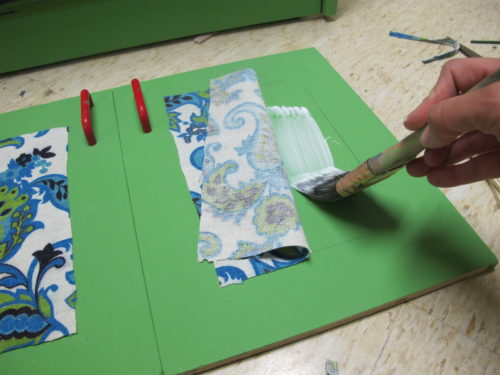
7. Glued Fabric to Wood
Next, I used Mod Podge![]() which is one of my favorite DIY products (because it’s so versatile!) to adhere pretty much anything to anything. In this case, I used Mod Podge to glue the fabric down to the wooden door, using my brayer
which is one of my favorite DIY products (because it’s so versatile!) to adhere pretty much anything to anything. In this case, I used Mod Podge to glue the fabric down to the wooden door, using my brayer![]() to squeeze out any pockets of air that may have gotten trapped underneath the fabric.
to squeeze out any pockets of air that may have gotten trapped underneath the fabric.
Here’s a video showing how to glue fabric to wood using Mod Podge:
8. Glued Wood Trim to Door
Have you ever used Gorilla Glue? Good lawd! That stuff is tough! Here’s a piece of advice: when the pack of the Gorilla Glue instructions say to only use a thin strip of it when gluing because it expands to 3-4 times its size–follow the instructions! 🙂
I used way too much!

It doesn’t look like much, but if you over-glue with Gorilla Glue, it will result in the glue expanding out of the edges of your projects. That’s what happened with this project.
I ended up having to cut it out with my Dremel Multi-Max oscillating tool ![]() (amazing tool!), but man if I wasn’t PO’ed at myself for that added unnecessary work on this project!
(amazing tool!), but man if I wasn’t PO’ed at myself for that added unnecessary work on this project!

Looking back on this project, I should have used just plain ‘ole Elmer’s wood glue and just clamped it down.
And I also used wood filler to fill in the gaps around the edge of the new panels, to close up any ugly seams between the panel and the door. Worked like a charm! Then I painted over the wood filler.
9. Painted Oven Dials & Attached Cup Hooks
I thought the “before” dials were uninspiring. I liked the idea of adding “LO” and “HI” temp gauges, as well as using a chalk pen to draw little lines on them.
BEFORE
Also, I went to the home improvement store and bought cup hooks, then drilled holes in the side and screwed them in. I love that!! Oh– and those measuring spoons are from–where else??–the thrift store, for just a few bucks 🙂
Just drill a little pilot hole and then screw them in.

AFTER

10. Cut Vinyl With My Silhouette Cameo
The Silhouette Cameo is a personal cutting machine that can cut vinyl, stencils, and more. Seriously, this machine is awesome. (I also own a Cricut, which you can see the unboxing on my YouTube channel).
Look how perfect those burners look! I wouldn’t have been able to paint or stencil anything as precise and professional as that!

The Silhouette Cameo was so easy to use, it’s silly to think how nervous I was to use it.

11. Painted White Trim Detailing
So that last step you see there is a white trim border I added all along the top of the stove to give it a little bit more “oomph.” Sometimes it’s the small things that really “make” a piece, and this is one of those “small things.” I knew I wanted it with rounded corners (see above), so I cut mini templates with the vinyl that I attached to the corners, so they’d be round. And then I used Frog Tape ![]() (my favorite because it produces cleaner lines than that blue tape!) to extend the 1/4″ (give or take) all the way around. I used Annie Sloan Chalk Paint “Old White.”
(my favorite because it produces cleaner lines than that blue tape!) to extend the 1/4″ (give or take) all the way around. I used Annie Sloan Chalk Paint “Old White.”

The result was clean lines, rounded corners, and fun little temperature dials!

The “AFTER” of the $2.50 wooden play kitchen!
I love how it turned out! There’s something I love about making over children’s furniture. (Oh, and pssst–all those pans inside came from–where else??–the thrift store, too, for just a few bucks. 🙂
My boys think it’s “cool” and love making “Cheerios Stew” LOL

And to think Mommy only paid $2.50 for that…..! Don’t you love a good deal?!


Do you love this project? Click here to SAVE it!
![]()

Other Kids Furniture Makeover Projects You’ll Love
- Kid’s Wood Play Sink Makeover
- The Makeover of a $5.00 Thrifted Kid’s Desk
- BEFORE & AFTER: Kids Bathroom Makeover Reveal!
- I Repurposed a Changing Table Into a Desk
- Turn a Toddler’s Bed Into a Potting Bench
So what do you think of this fun kid’s wooden play stove makeover?

Download the 5 freebies!

Thrift Diving inspires women to decorate, improve, and maintain their home themselves...using paint, power tools, and thrift stores! Use these 5 printables, checklists, and ebooks to get started!
This is too cute! You are AMAZING!! Everything you TOUCH! Great job.
My question for you is what kind of paint did you use for the stencil project you did in your bathroom?
I found a stencil I want to use and didn’t know if I have to use chalk paint. Please advise
Love it. You are very clever. I believe in painting the back and bottom too.
Wish I had your area’s thrift stores because you find awesome things.