BEFORE & AFTER: Using Liming Wax on an Oak Wood Chest
For more liming wax projects, watch this tutorial on how to use liming wax.
The first time I saw a piece of wood furniture with liming wax on oak, I melted. All this time I’ve been painting furniture, covering up that beautiful wood grain, and not even realizing that white liming wax had the transformational power to make me fall in love with wood!
Ever since I built my custom bathroom vanity from scratch (I used red oak), I discovered how magical liming wax on raw wood can look. I also learned how expensive red oak is. So when I was at the thrift store months ago and saw this amazing oak chest for $40, I knew it could be beautiful with liming wax, just like my vanity does!
The best part is that I had a gift card for the thrift store because I had won a thrifting contest months before. There’s nothing like finding “free” furniture at the thrift store, am I right??
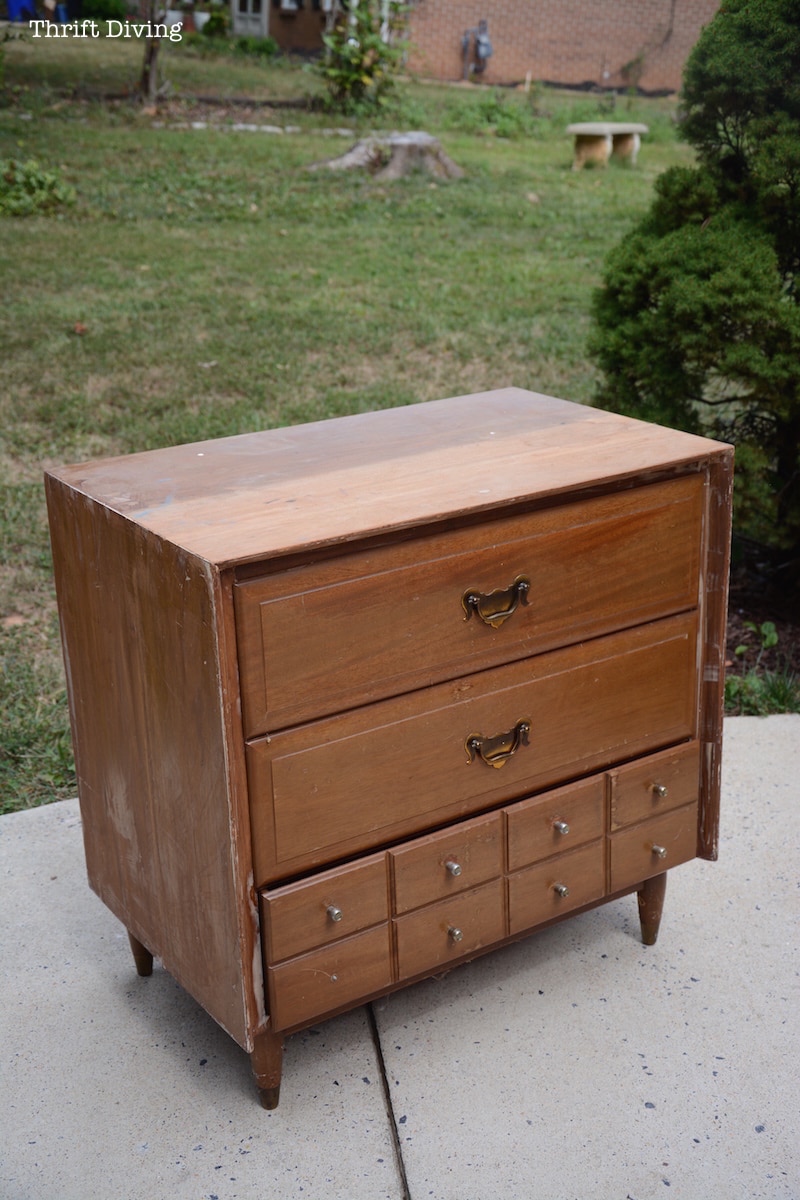
This is what it looked like when I was ready to refinish the wood chest. I’m not a fan of that outdated honey-colored oak. Not one bit.
BEFORE

I lugged that baby home with me, stored in the garage for a few months. And I’ll admit–as I pulled the oak chest out into the driveway to refinish it, I couldn’t shake the feeling that this chest looked an awful lot like–gasp!–a coffin! Would you believe I went online and started googling “coffins” just to see how similar mine was to an actual coffin. It was so morbid that I immediately closed the window and vowed to just keep moving forward, despite the–ahem–design challenges.
Although I think it still looks a tad bit like a coffin, let’s just say it’s a more modern and upscale coffin now! LOL
AFTER!

I monogramed my initials on the front out of aluminum sheet metal, too, which gives this wood chest a personal touch. If you can believe it, hubby said he actually likes this project (if you have known him, he tends to not really care much about my projects, LOL). But this project–he says I should have put his initials because he wants it. That’s a promising sign that I did something right!

Someone on my YouTube channel had a great idea: to replace the handles with something else more sleek. I love that idea. I had tried to remove these handles but they’re glued on. I would hav had to cut them off. Not impossible, but one extra step that I didn’t feel like doing. So refinishing them was the best option.

I dyed the inside of this wood chest, as well, to darken up the wood a bit. You can find all the details of this project on RYOBI Nation.

What I love about using liming wax is that the grain comes alive. On the “BEFORE,” there was nothing about the wood chest that stood out to me. It was good quality but very boring. But with the liming wax it looks….expensive. And that metal monogram takes it to a whole ‘nother level, if I do say so myself.

Watch This Project in Action!
Love this project? Click here to SAVE it on Pinterest!
![]()


Download the 5 freebies!

Thrift Diving inspires women to decorate, improve, and maintain their home themselves...using paint, power tools, and thrift stores! Use these 5 printables, checklists, and ebooks to get started!

Love it…so…I am assuming you stripped the old finish off and start on raw wood or…just go right over it? And thanks so much for responding to my earlier question about the Briwax Liming. I will keep you updated. It is a slow process around here. UGH!
What brand of liming wax and clear wax did you use?