How to Make a DIY Word Light Sign Out of Wood
If you love this word light sign DIY tutorial, be sure to check out how to make DIY picture frames, how to make a big DIY whiteboard, and how to make a DIY wooden journal!
WATCH: DIY Word Light Sign Tutorial
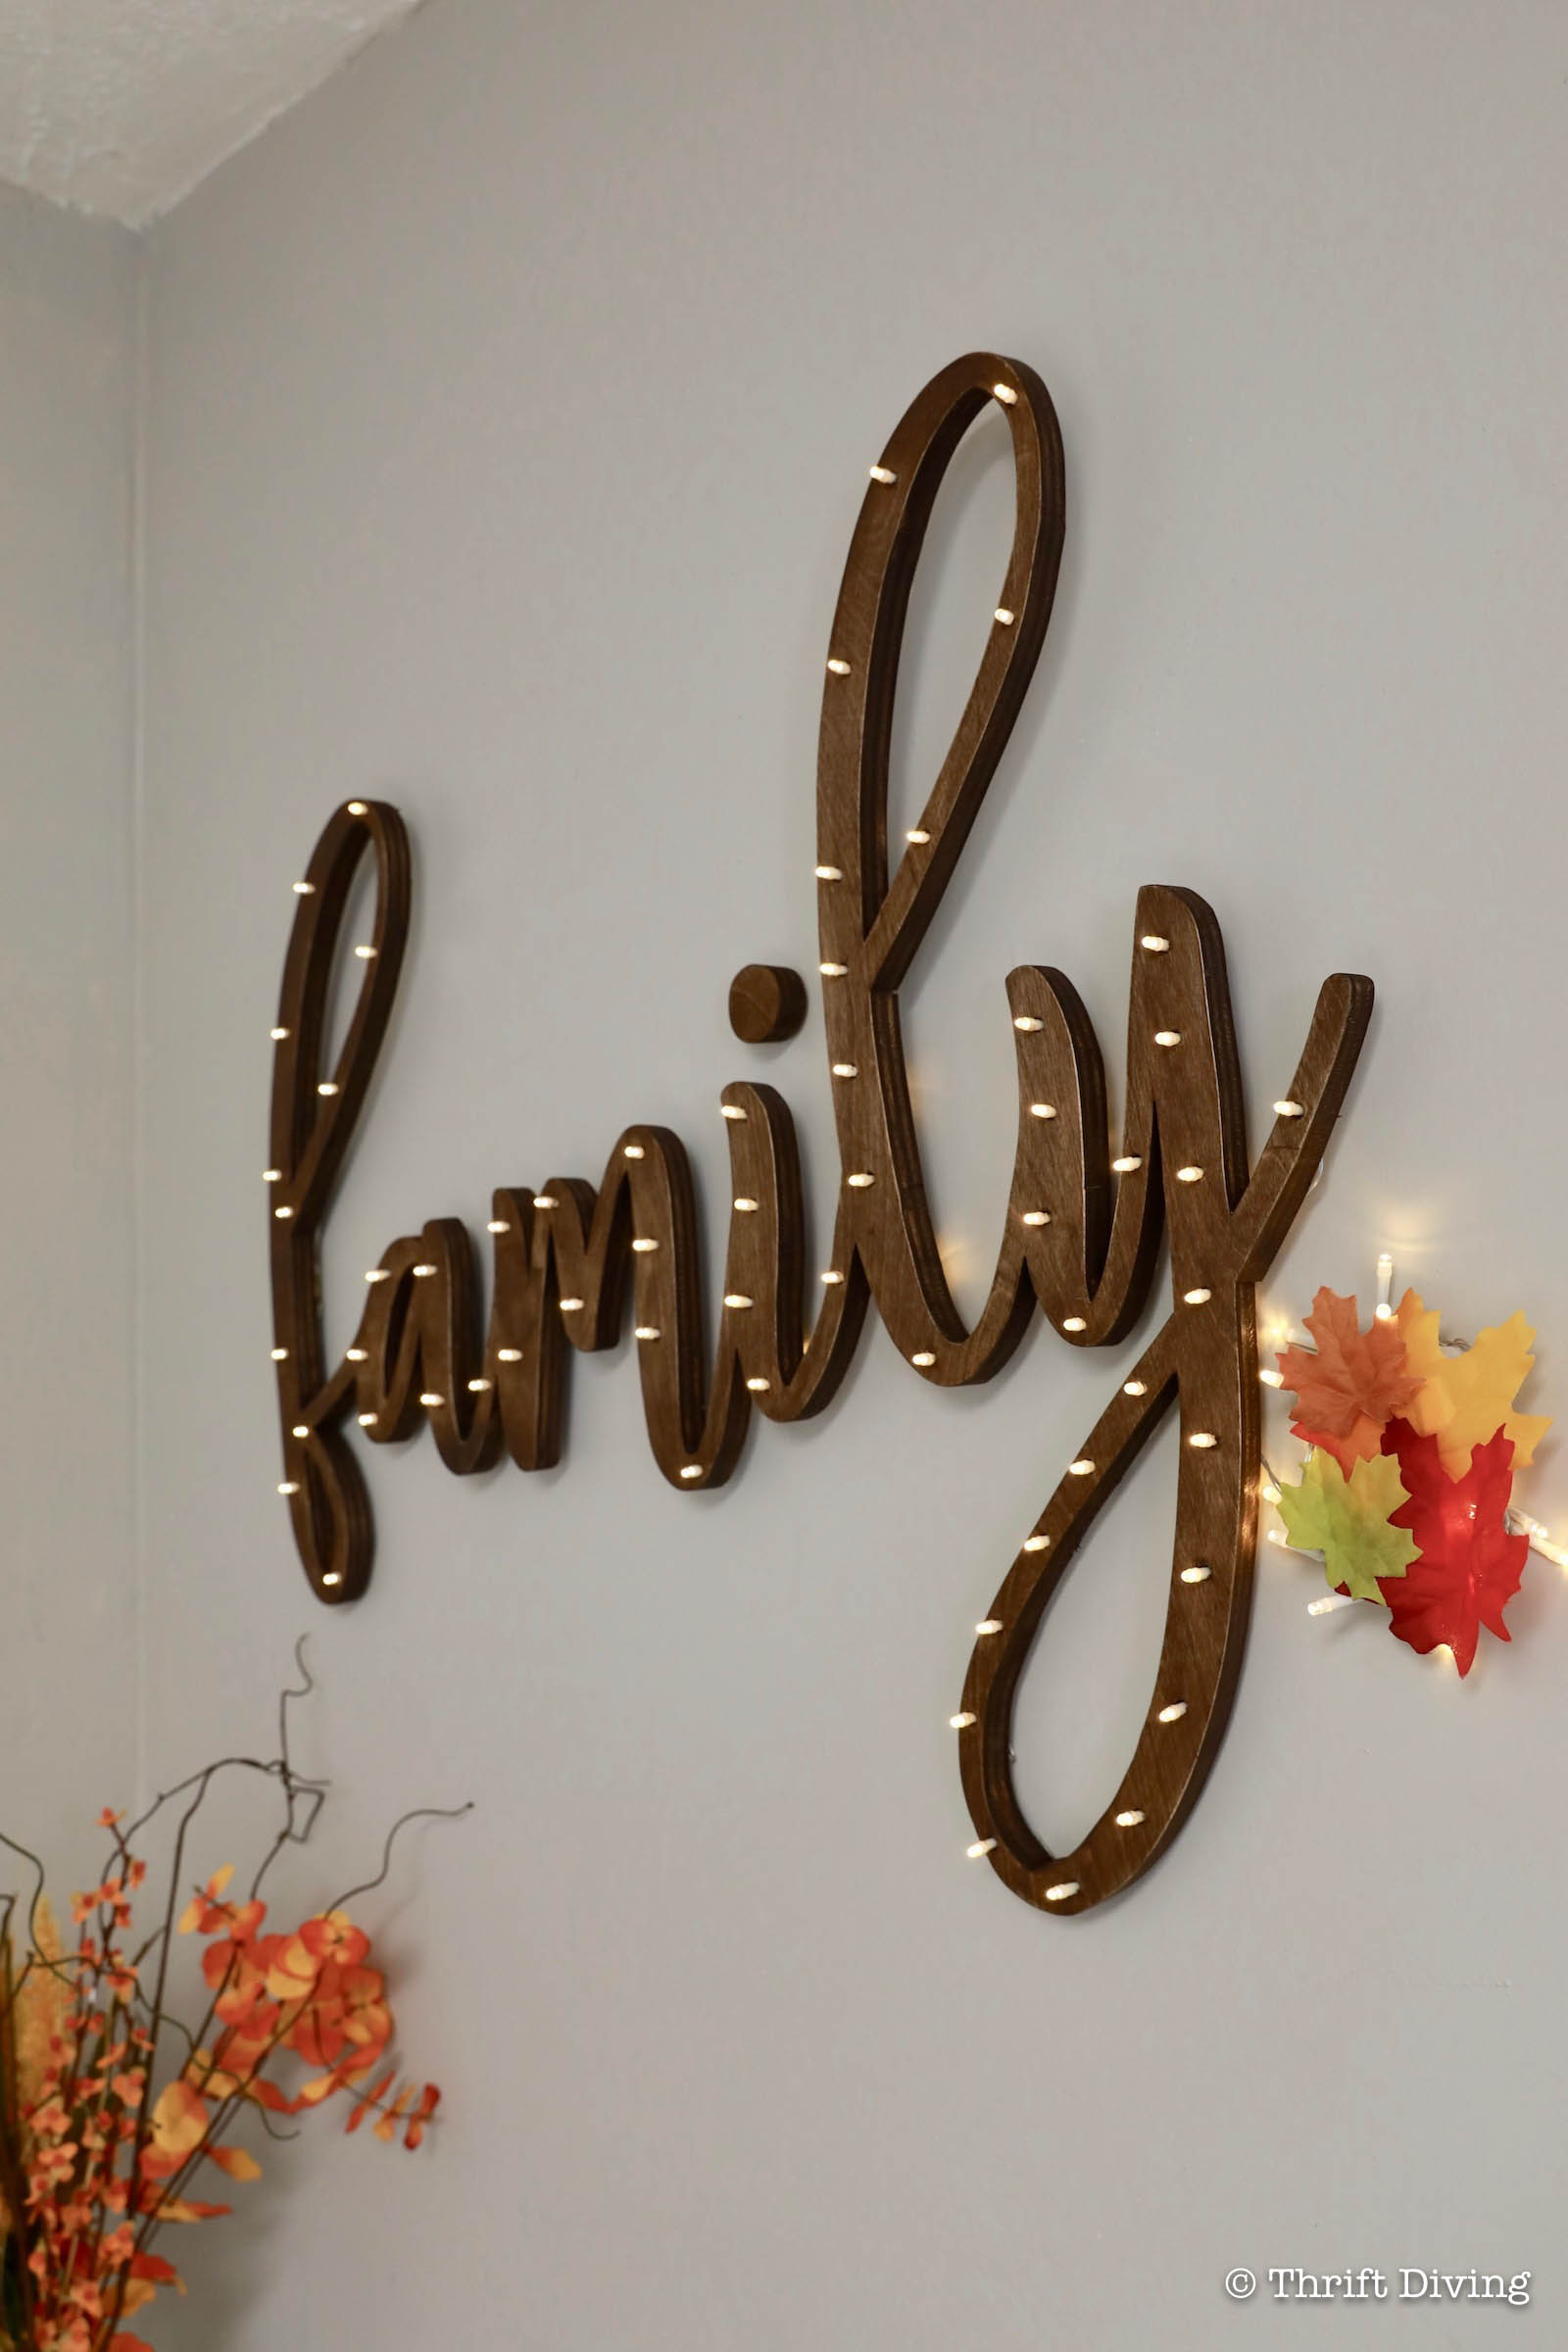
That’s what happened with this gorgeous wood stained word light sign! I didn’t expect it to turn out this nice, but it did. And now that it’s turned out so nice, I’ve made several of them–for myself, for others, and I’m even considering making one for family and friends for the Christmas holidays!
I’m excited to share this tutorial with you from start to finish. Be sure to check out the How to Make a Word Light Sign tutorial on my YouTube channel, too, and subscribe while you’re there! 😉
Here we go!

Materials for Word Light Sign
(I participant in the Amazon Services LLC Associates Program and other affiliate advertising programs designed to provide a means for me to earn fees by linking to Amazon.com and affiliated sites).
- 3/4″ plywood or MDF (the size you’ll need will depend on how large you want your word light sign).
- “Family” stencil (see instructions below)
- String lights (80-light strand set for medium word light signs)
- String lights (100-light strand for larger word light signs)
- Arrow Fastener Wire/Cable Staple Gun
- ⅜” wire cable staples
- T50X TacMate stapler for a frame
- 5/16” T50 staples
- Jigsaw
- Scroll blade for jigsaw so you can make swirly cuts
- Power drill
- Brad point drill bits and a large drill bit for pilot holes
- D-ring picture hangers
- Stain or paint
- Rags, natural bristle brush for staining, or foam brushes
- Sandpaper
- Dust mask
- Boards to make frame around word
- Miter saw or miter box for cutting boards for frame
- Scissors
- Paper cutter (optional)
STEP 1: Create Your Word Light Sign Word
When I first thought of doing this project, I wasn’t sure how I was going to get a stencil the size I wanted. I’ve got both a Cricut Maker and a Silhouette Cameo 3 cutting machine, which both allow me to cut out vinyl stencils, but I didn’t know how to cut large stencils like what I had in mind for this project. Plus, most people reading this word light sign tutorial aren’t going to have those types of crafting machines.
So I discovered a way to create the stencil with regular old paper! YAY!
First, head over to DaFont.com and download the free “Fabulous” font. Keep in mind that if you’re using this font for personal reasons, it’s free, but if you plan to use it for commercial reasons (like making these to sell on Etsy or something), you’ll need to pay for the commercial fee first. 🙂

Once the “Fabulous” font is downloaded, open a Word document and type the word “family.” Save the document (or screenshot the word) as a .jpg picture file. On a Mac, to take a screenshot, just hit Shift+Command+4 and you will be able to select “Family” to save it as a .jpg or .png file.
STEP 2: Enlarge Your Word
Next, head over to Rasterbator.net and follow the instructions to enlarge your .jpg or .png picture file. The website will create a PDF of multiple sheets that you can now print on your own printer in a large version of your word “family.” Cut out the word family and tape it together. When you’re done, it should look a little something like this:
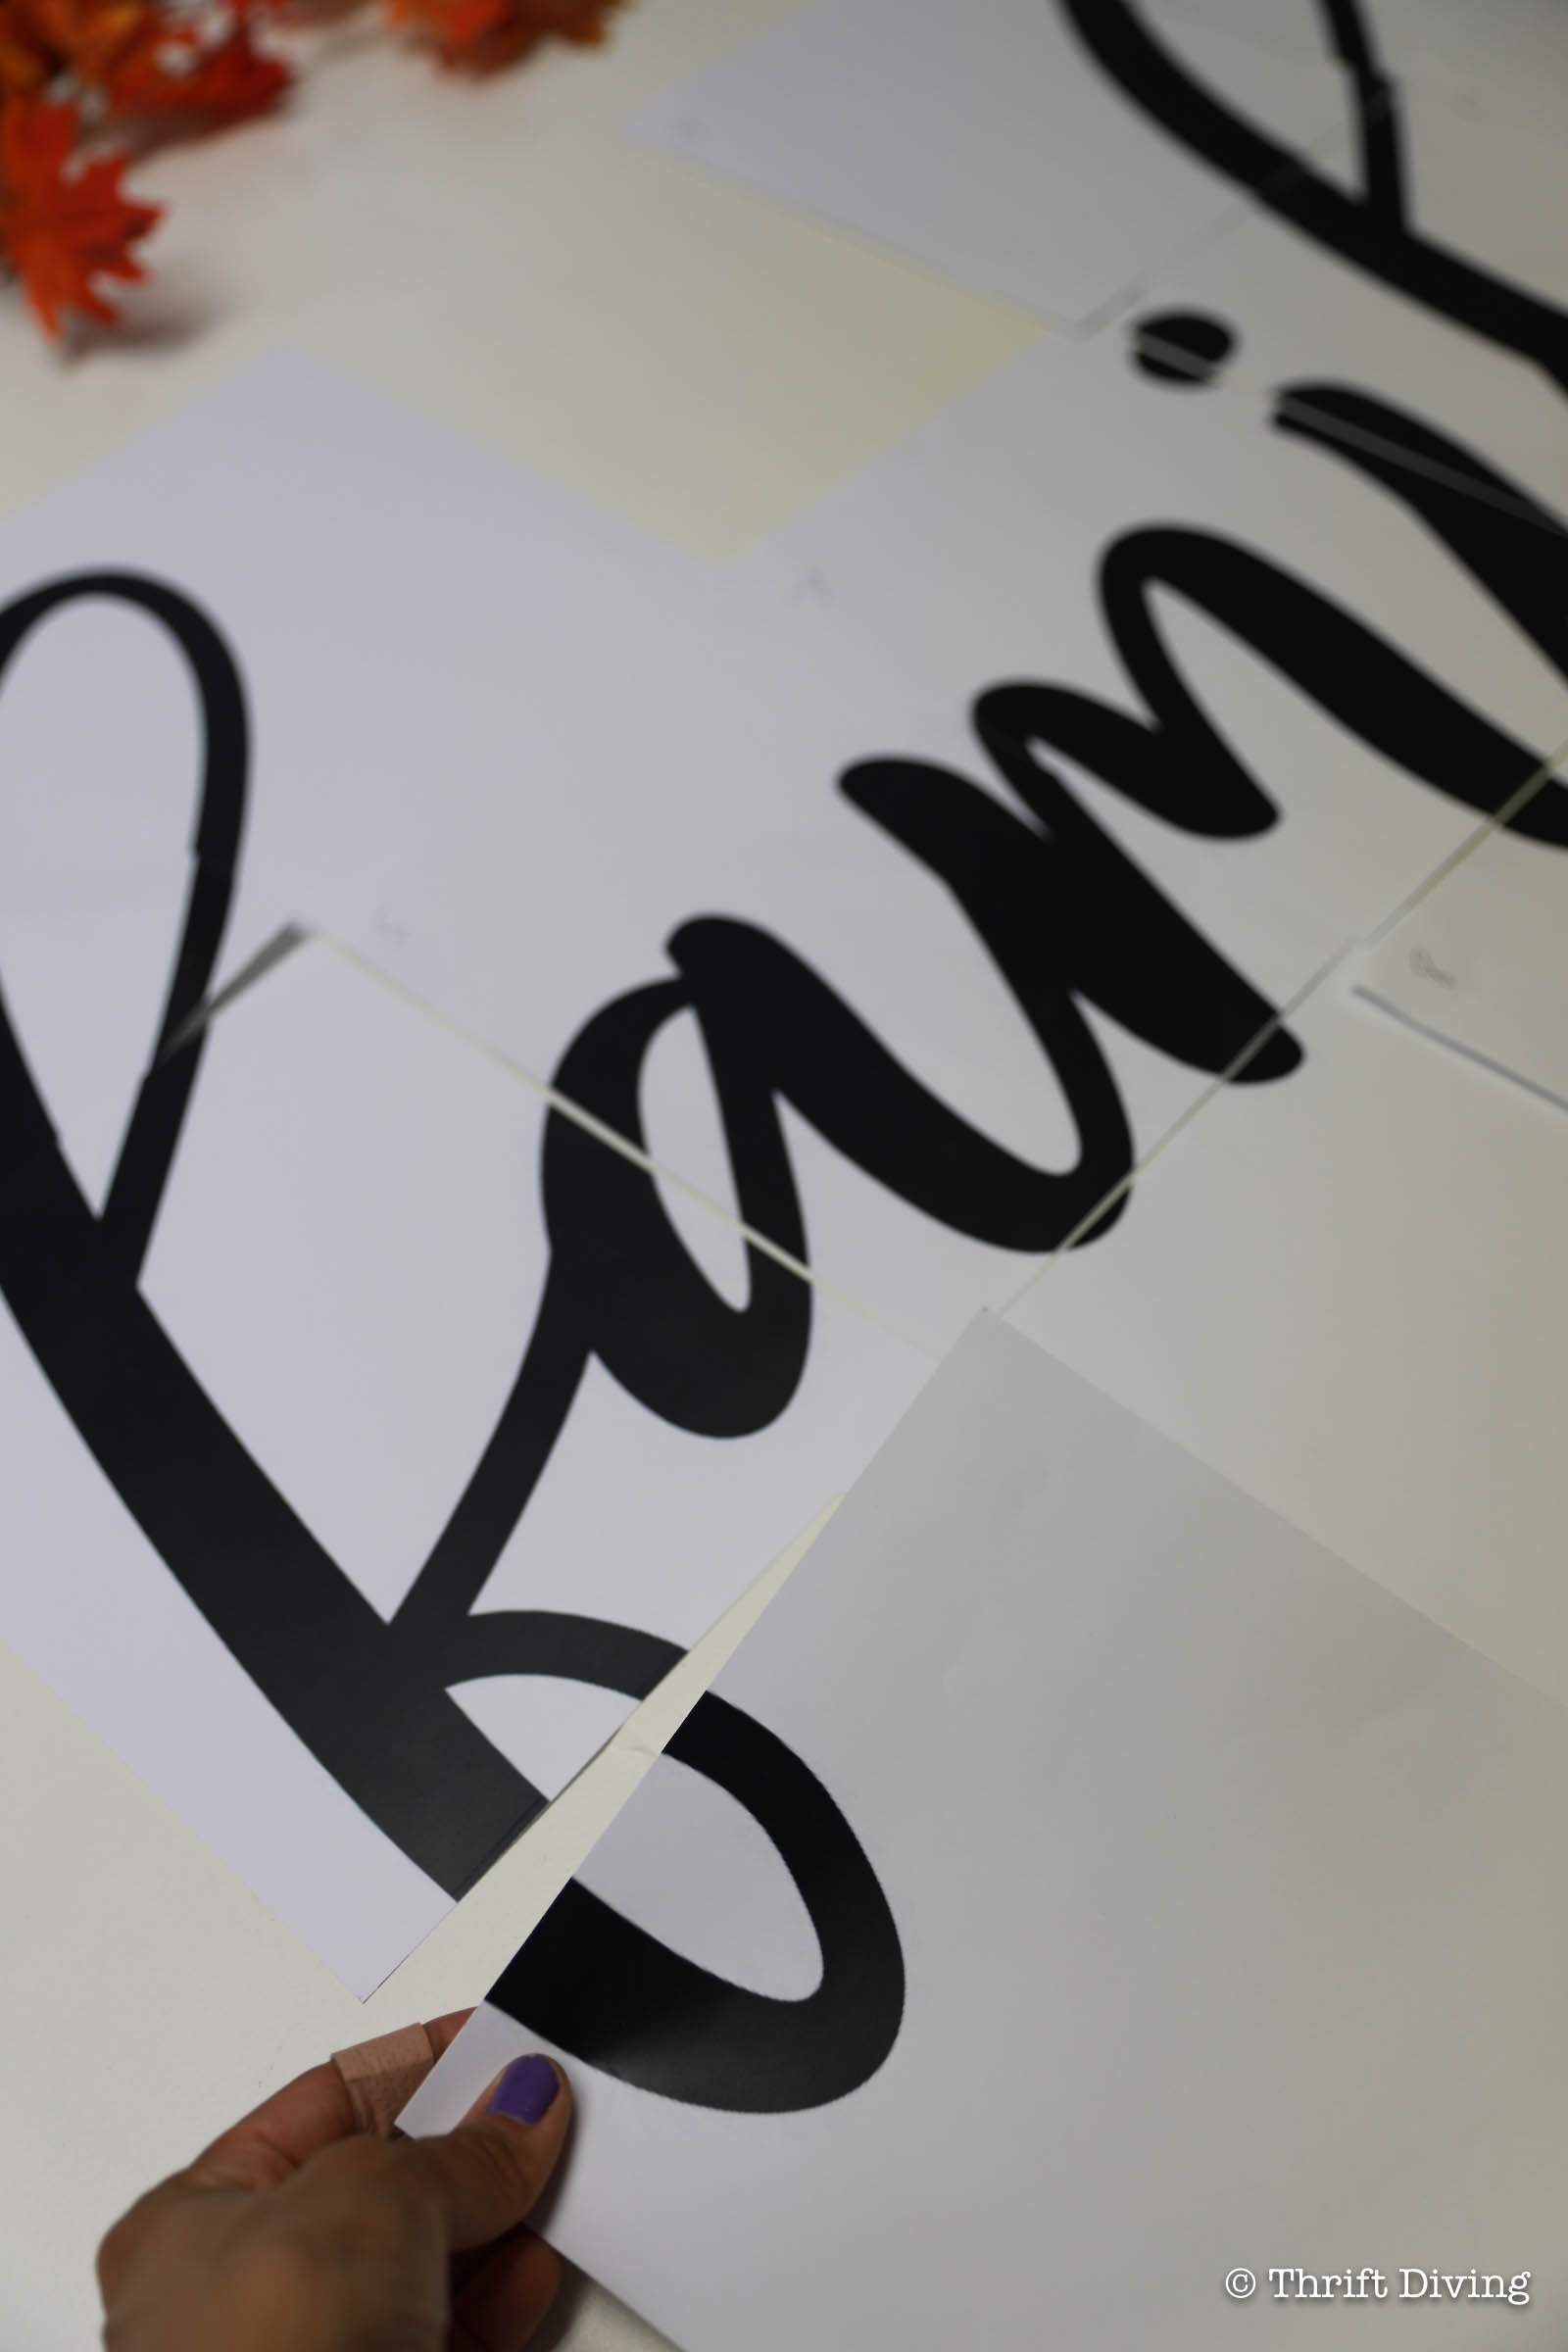
Be sure that you keep track of which papers go where. Number them and use a paper cutter because it’s easier to trim the sheets down to fit together. Tape the sheets together and then carefully cut out your large word sign with scissors. Here are some helpful tips:
- Use good quality paper! The thicker the printer paper you use, the more likely you’ll be able to use your word sign stencil over and over again without it falling apart. I used Hammermill Color Laser Gloss Paper which is pretty thick. I was able to use my stencil several times and it still looked good.
- Consider having it professionally printed. Since this uses a lot of ink (if you’re using an ink jet printer), look into having Staples or some other print shop service print it for you. FYI….It will print on 12-24 sheets of paper before you assemble and tape it together.

STEP 3: Trace Your Word Sign onto Wood
Now it’s time to trace your enlarged word sign onto your ¾” plywood or ¾” MDF board. You have to be super careful not to move it, though. Since it’s just paper, taking it down isn’t a good idea (and you don’t even want to think of gluing it down, either!). The best idea is to put objects on it to prevent it from sliding around. Yep, a cell phone, glue bottle, and paint pot work just as well. 🙂
TIP: If you’re planning to paint your word light sign, you can use MDF, which will be covered with paint. If you’re staining it, use 3/4″ birch plywood, which is furniture-grade plywood and will stain nicely. 🙂
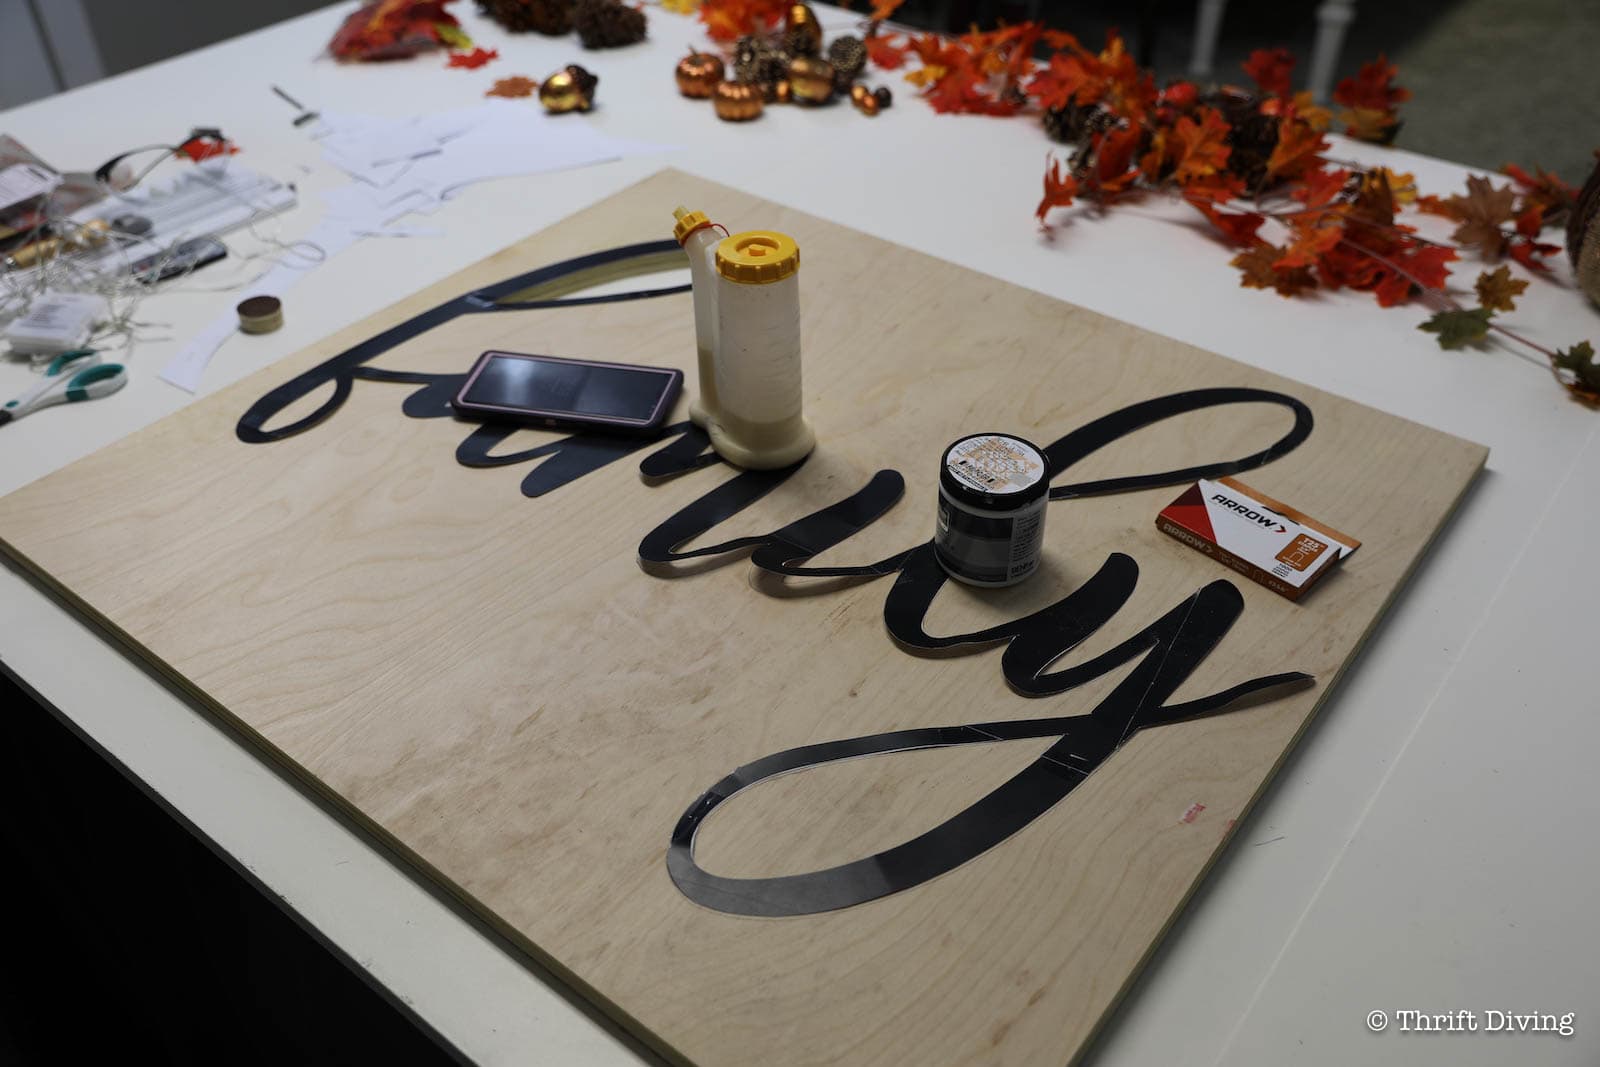
Just be careful when you’re tracing that it doesn’t move. But if it does, just careful guide it back into place and keep tracing until the entire thing is traced out.
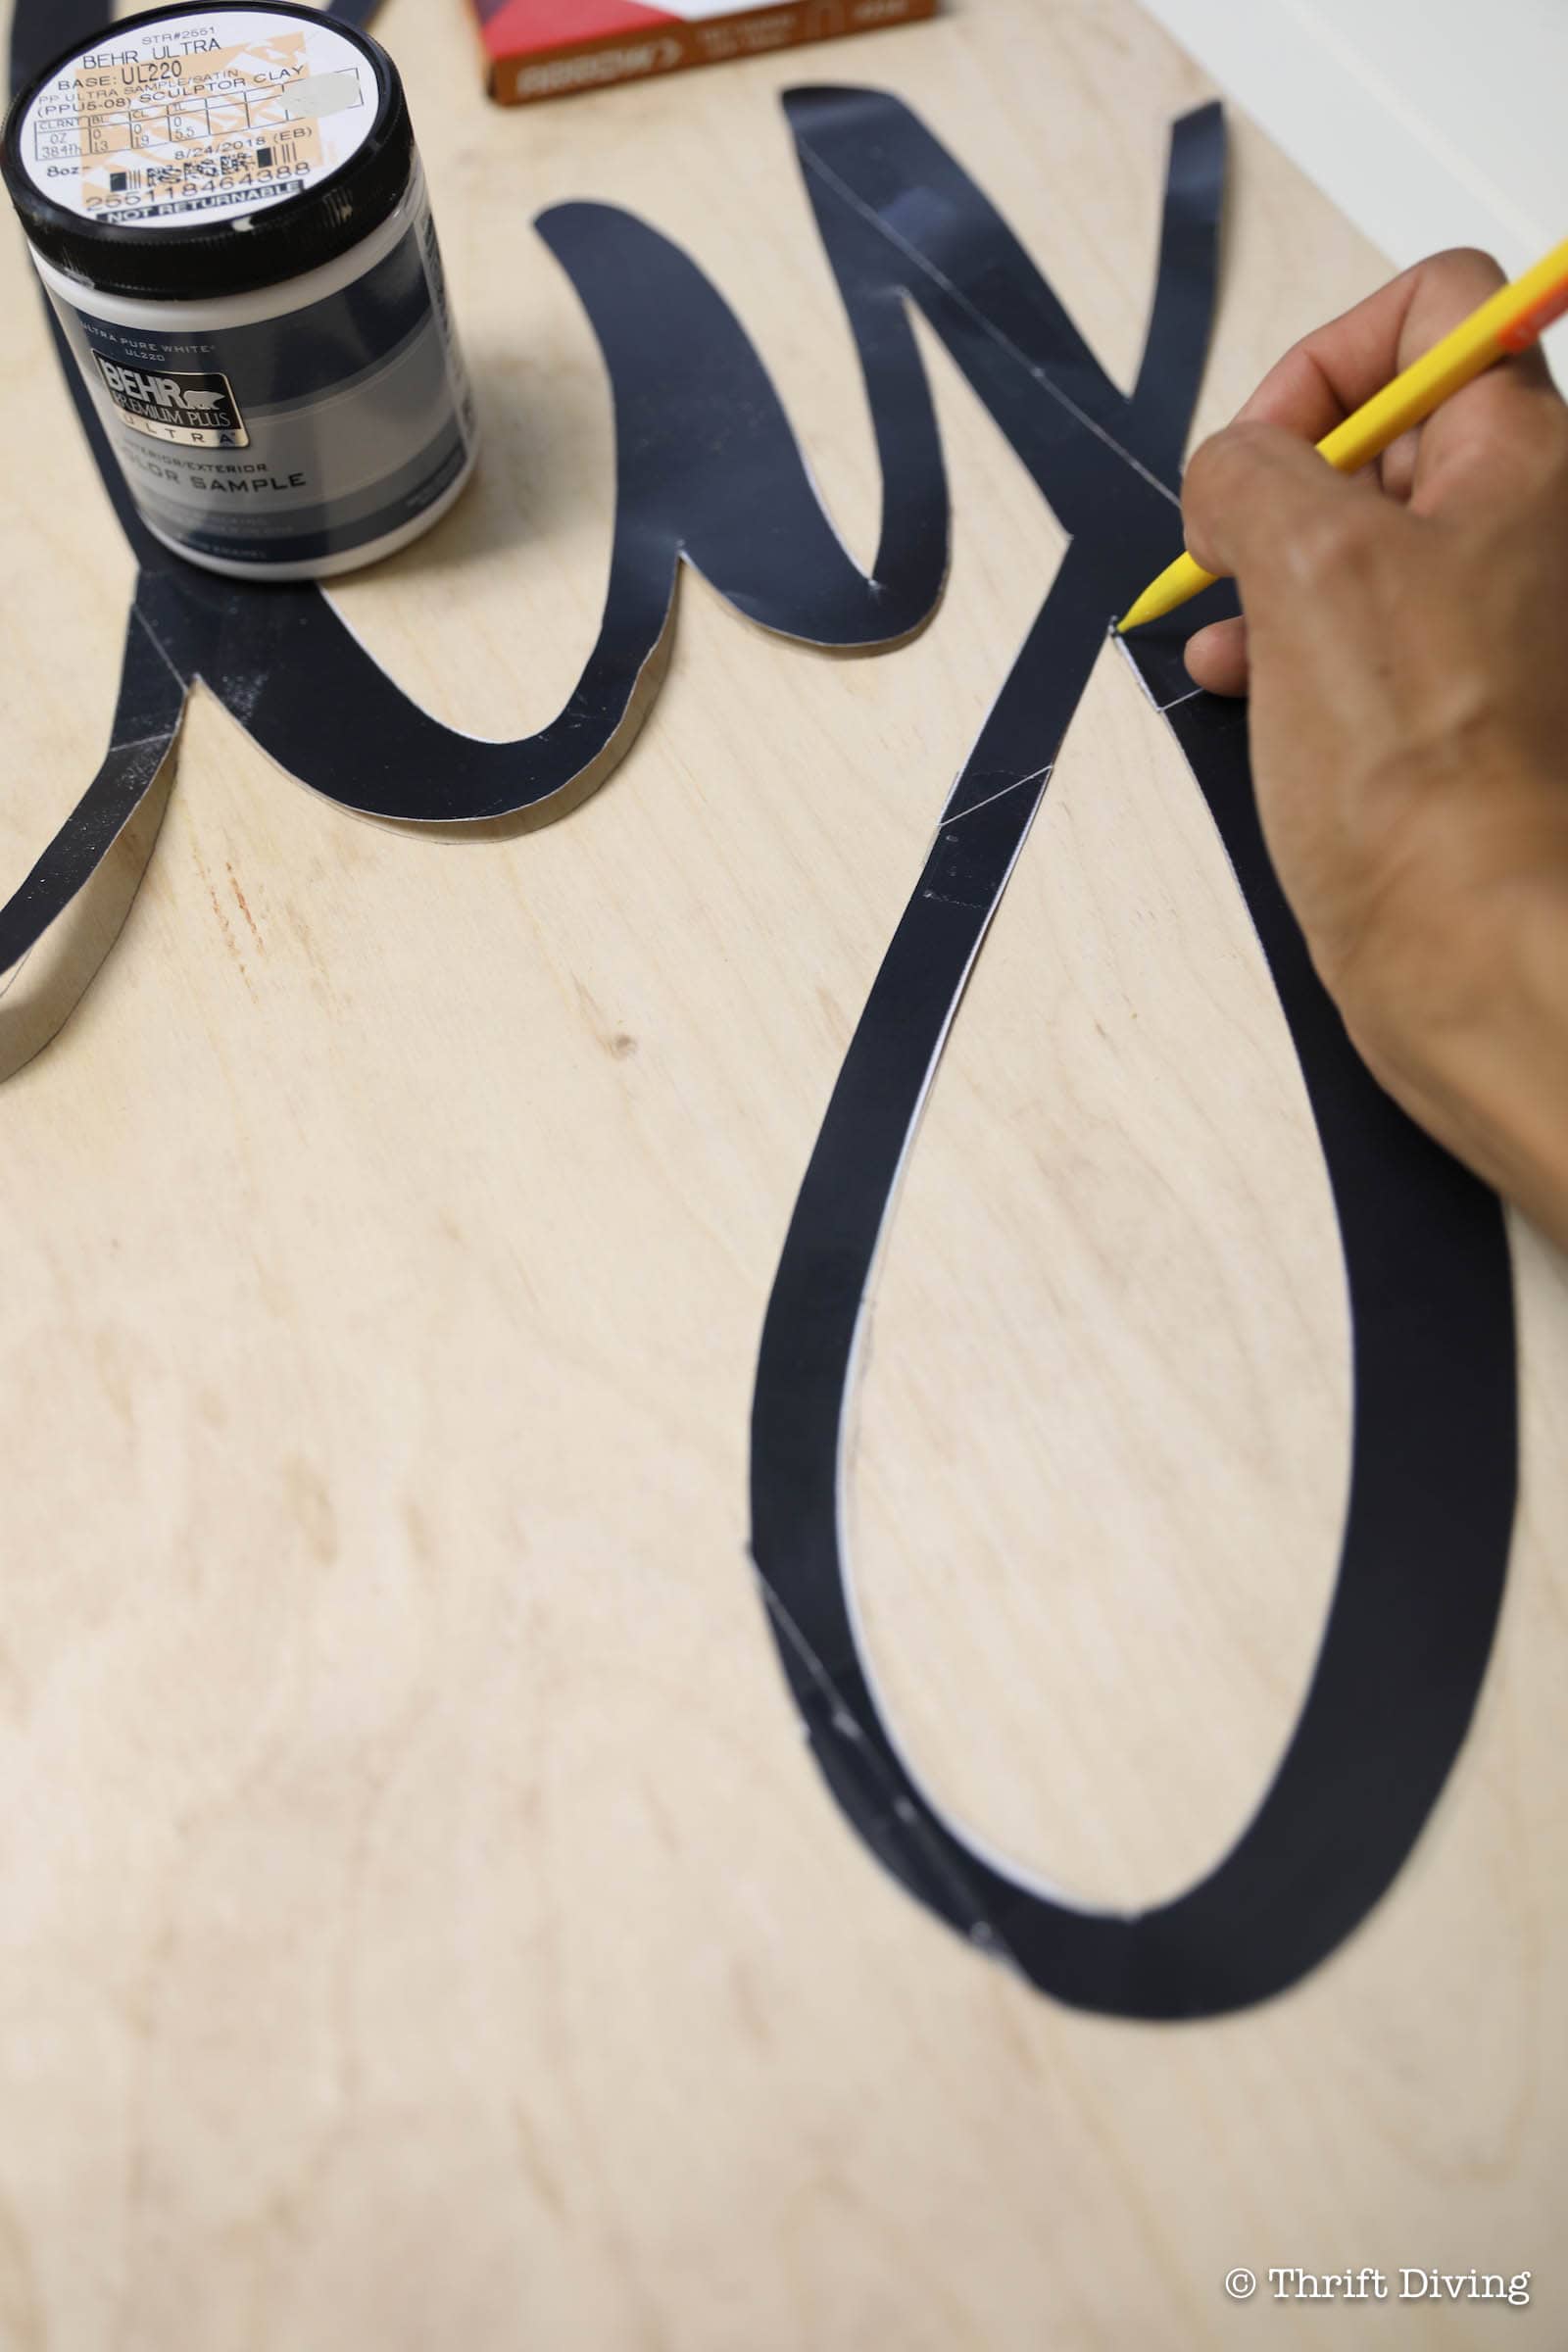
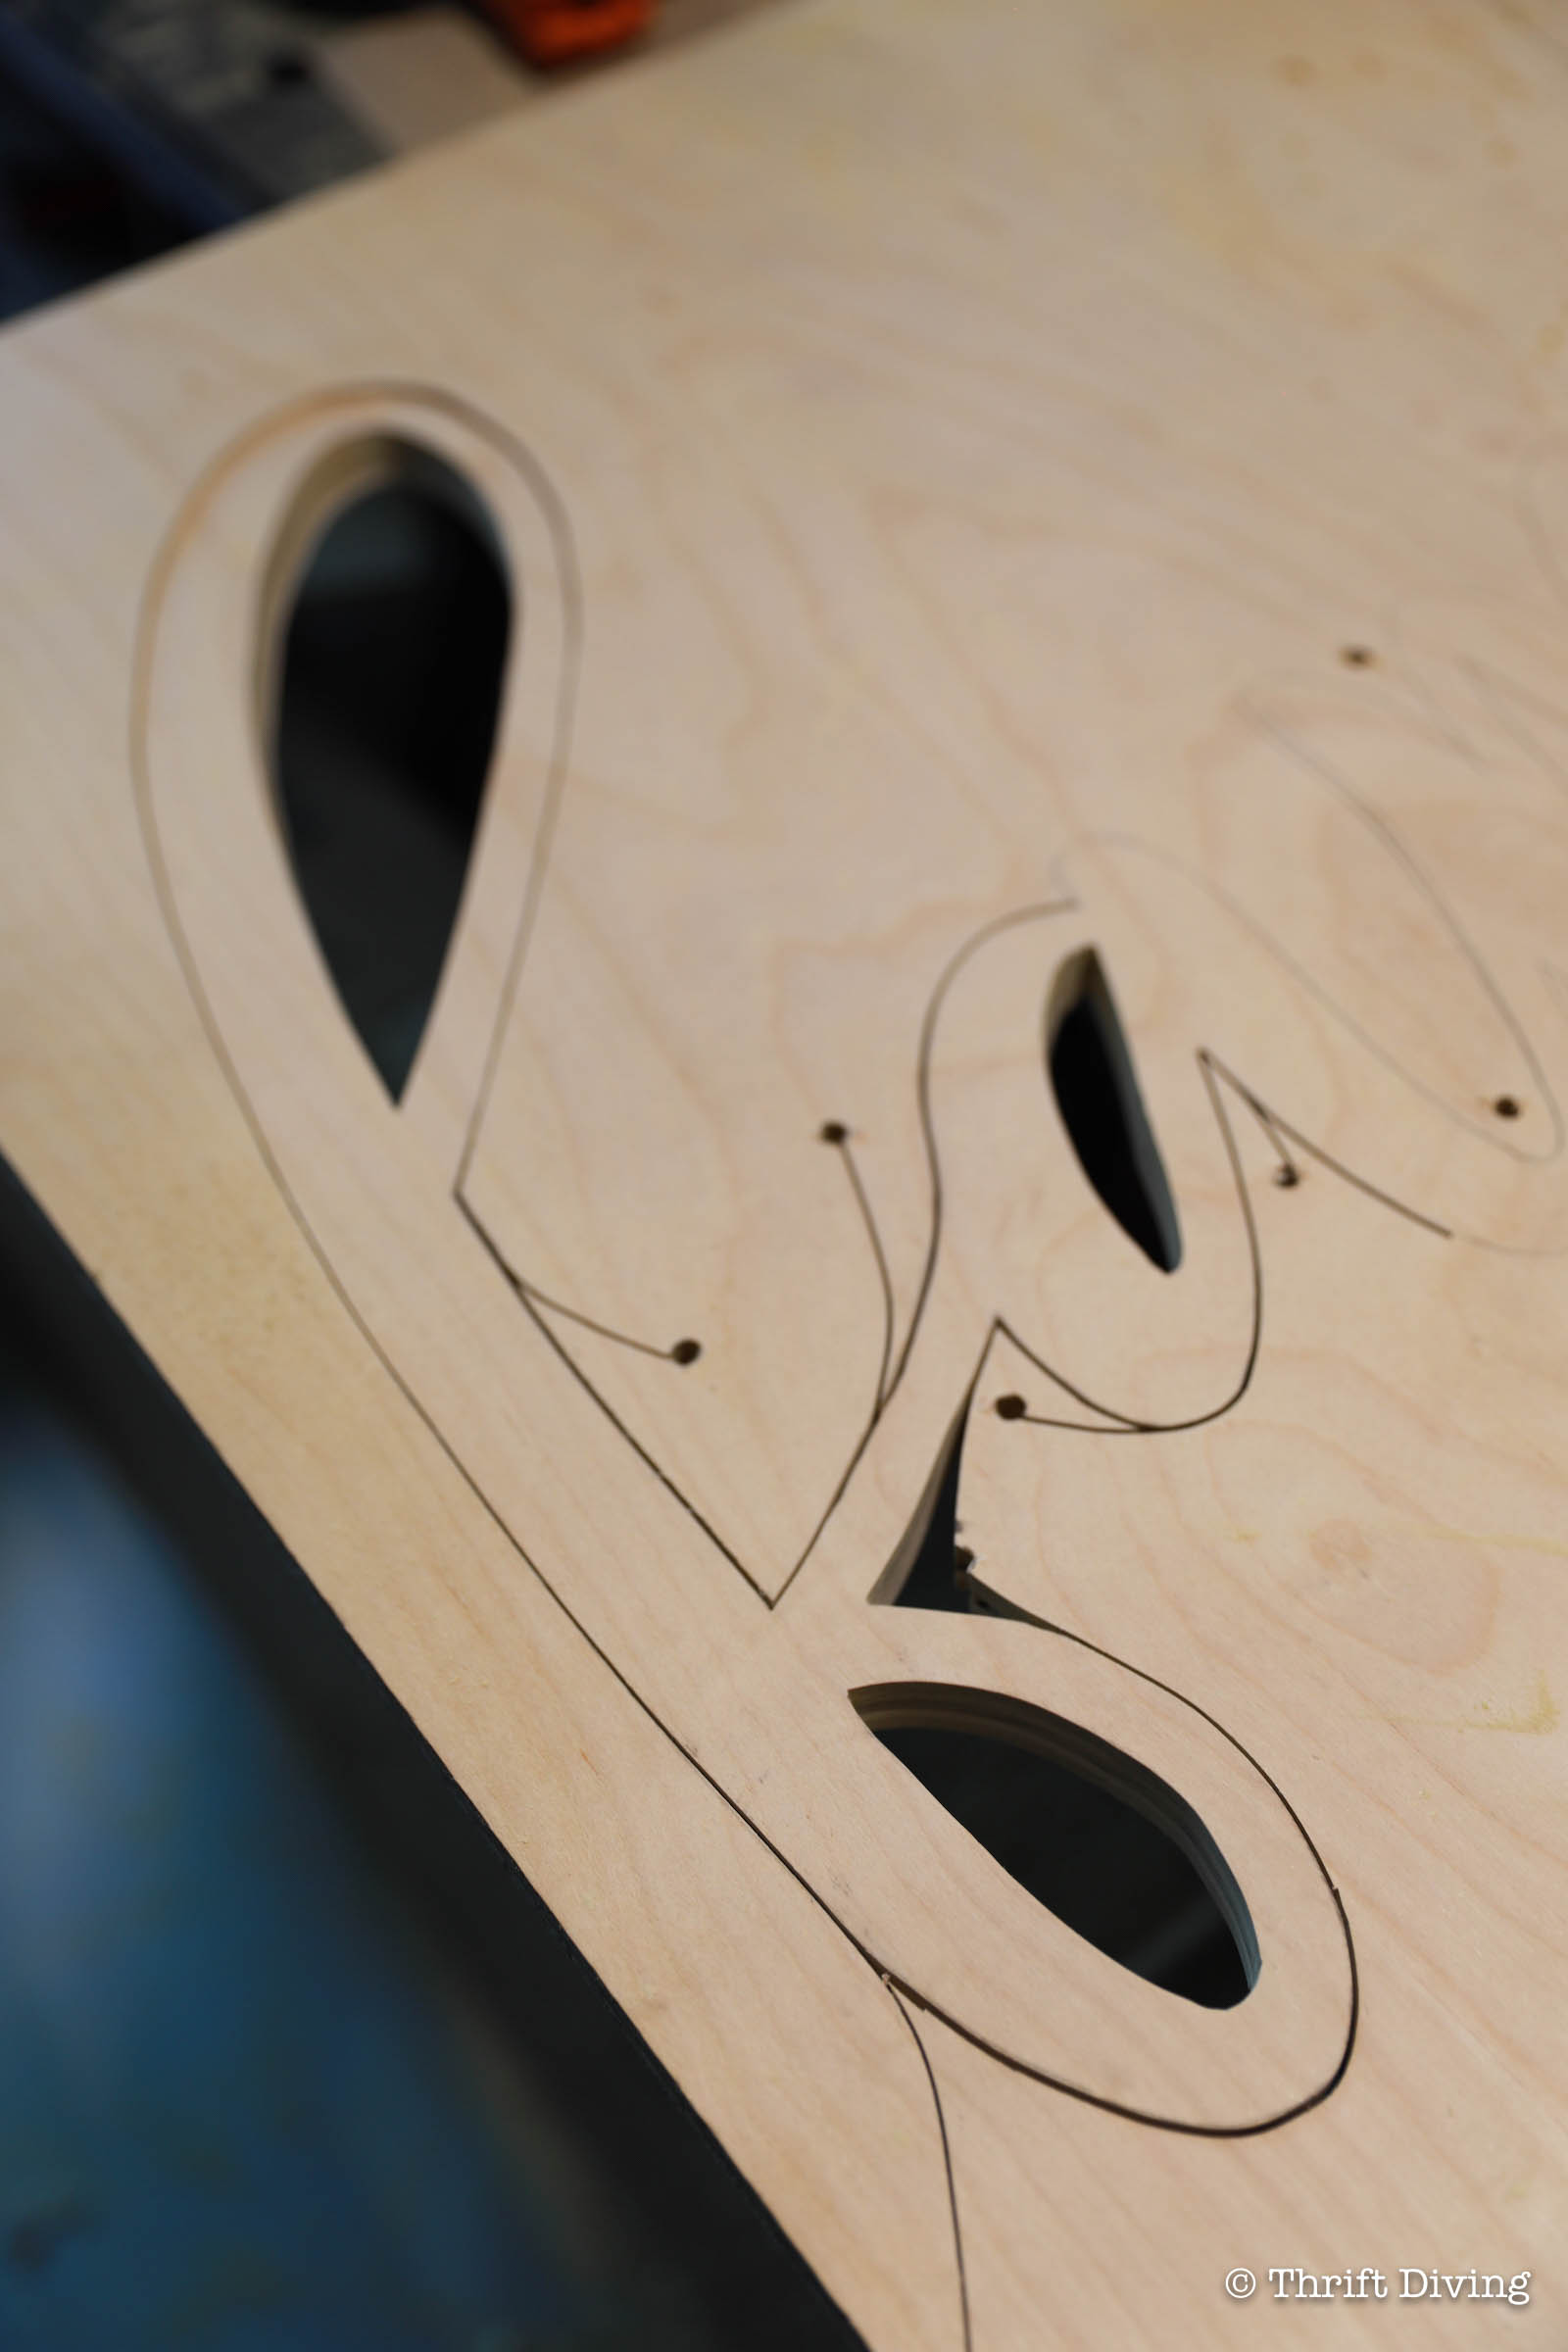
STEP 4: Cut Out Your Word Light Sign With a Jigsaw
If you’ve never used a jigsaw, seriously, don’t worry. It just means you have to go and watch my free 30-minute tutorial on How to Use a Jigsaw so that you get up to speed on how to use one. It’s the easiest tutorial for a newbie if you’re new to power tools. But I guarantee that after you watch it, you’ll feel comfortable making this DIY word light sign! That’s a promise.
But okay–let’s say you already know how to use a jigsaw–cool! Let’s keep going. 🙂
Here are a couple of things to keep in mind about cutting out this word light sign:
- First…..Cut around the outside of your traced lines. This way you don’t have any word sign parts that are too narrow and tiny.
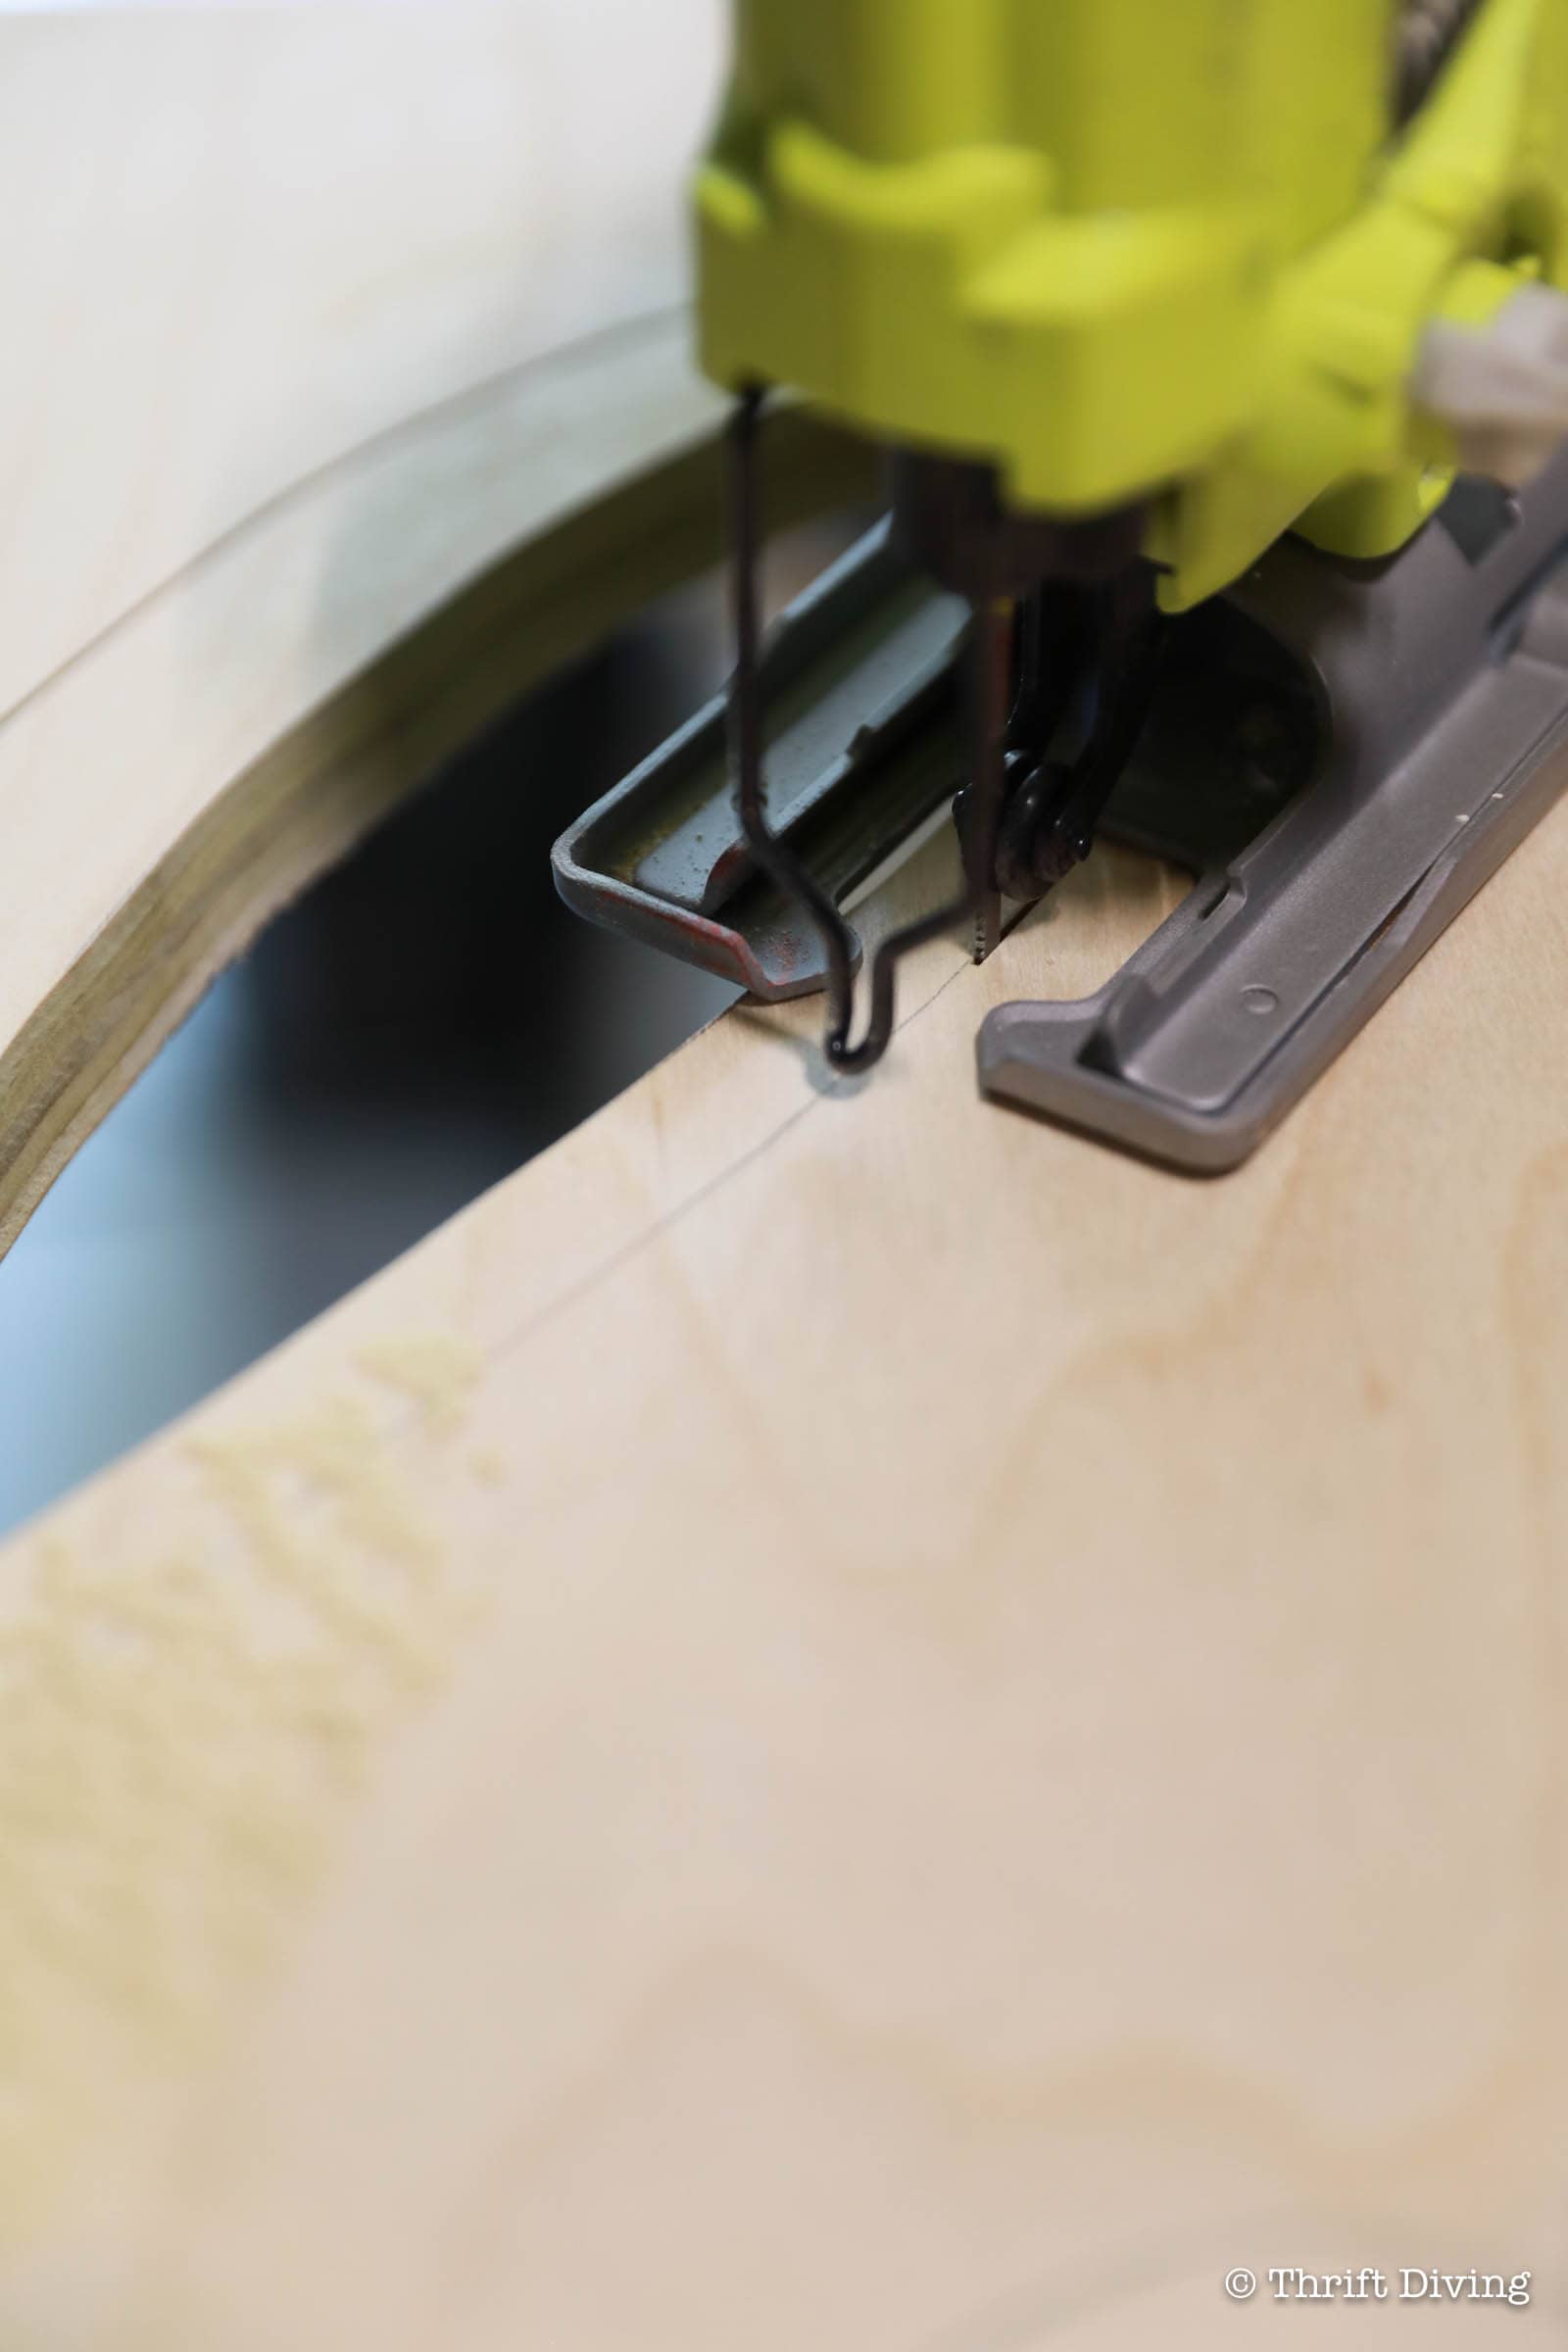
- Secondly…..Drill a lot of pilot holes. Getting around some of these corners is a tight fit. Pilot holes at various points around the word light sign will allow you to fit your jigsaw into those tight corners so that you can begin cutting. You’ll especially need pilot holes on the inside of the “F” and “a” letters. To drill the pilot holes, use a power drill with a drill bit that’s large enough to make a hole to fit the jigsaw blade.
- And third….use a scroll tooth jigsaw blade. The beauty of a jigsaw is that you can make irregular cuts and get really “fancy dancy” because you can swirl your jigsaw this way….and that way….But the only way that can happen is with the right blade and that’s a scroll blade. They’re skinnier and have more teeth. I wholeheartedly recommend the Starrett Dual Cut scroll blade because it cuts on the upstroke and downstroke, keeping both the top of the wood and the bottom of the wood both cleanly cut. Seriously, start using Dual Cut blades. They’re awesome!

STEP 4: Sand It Smooth
and trace out the entire word, being careful not to move it. Once traced out, use a jigsaw with a fine-cutting scroll blade to cut out the word “family.” Plan to spend about 1 hour cutting out the word. You’ll want to take your time around the corners, using drilled pilot holes in order to insert your jigsaw blade in the tight areas.

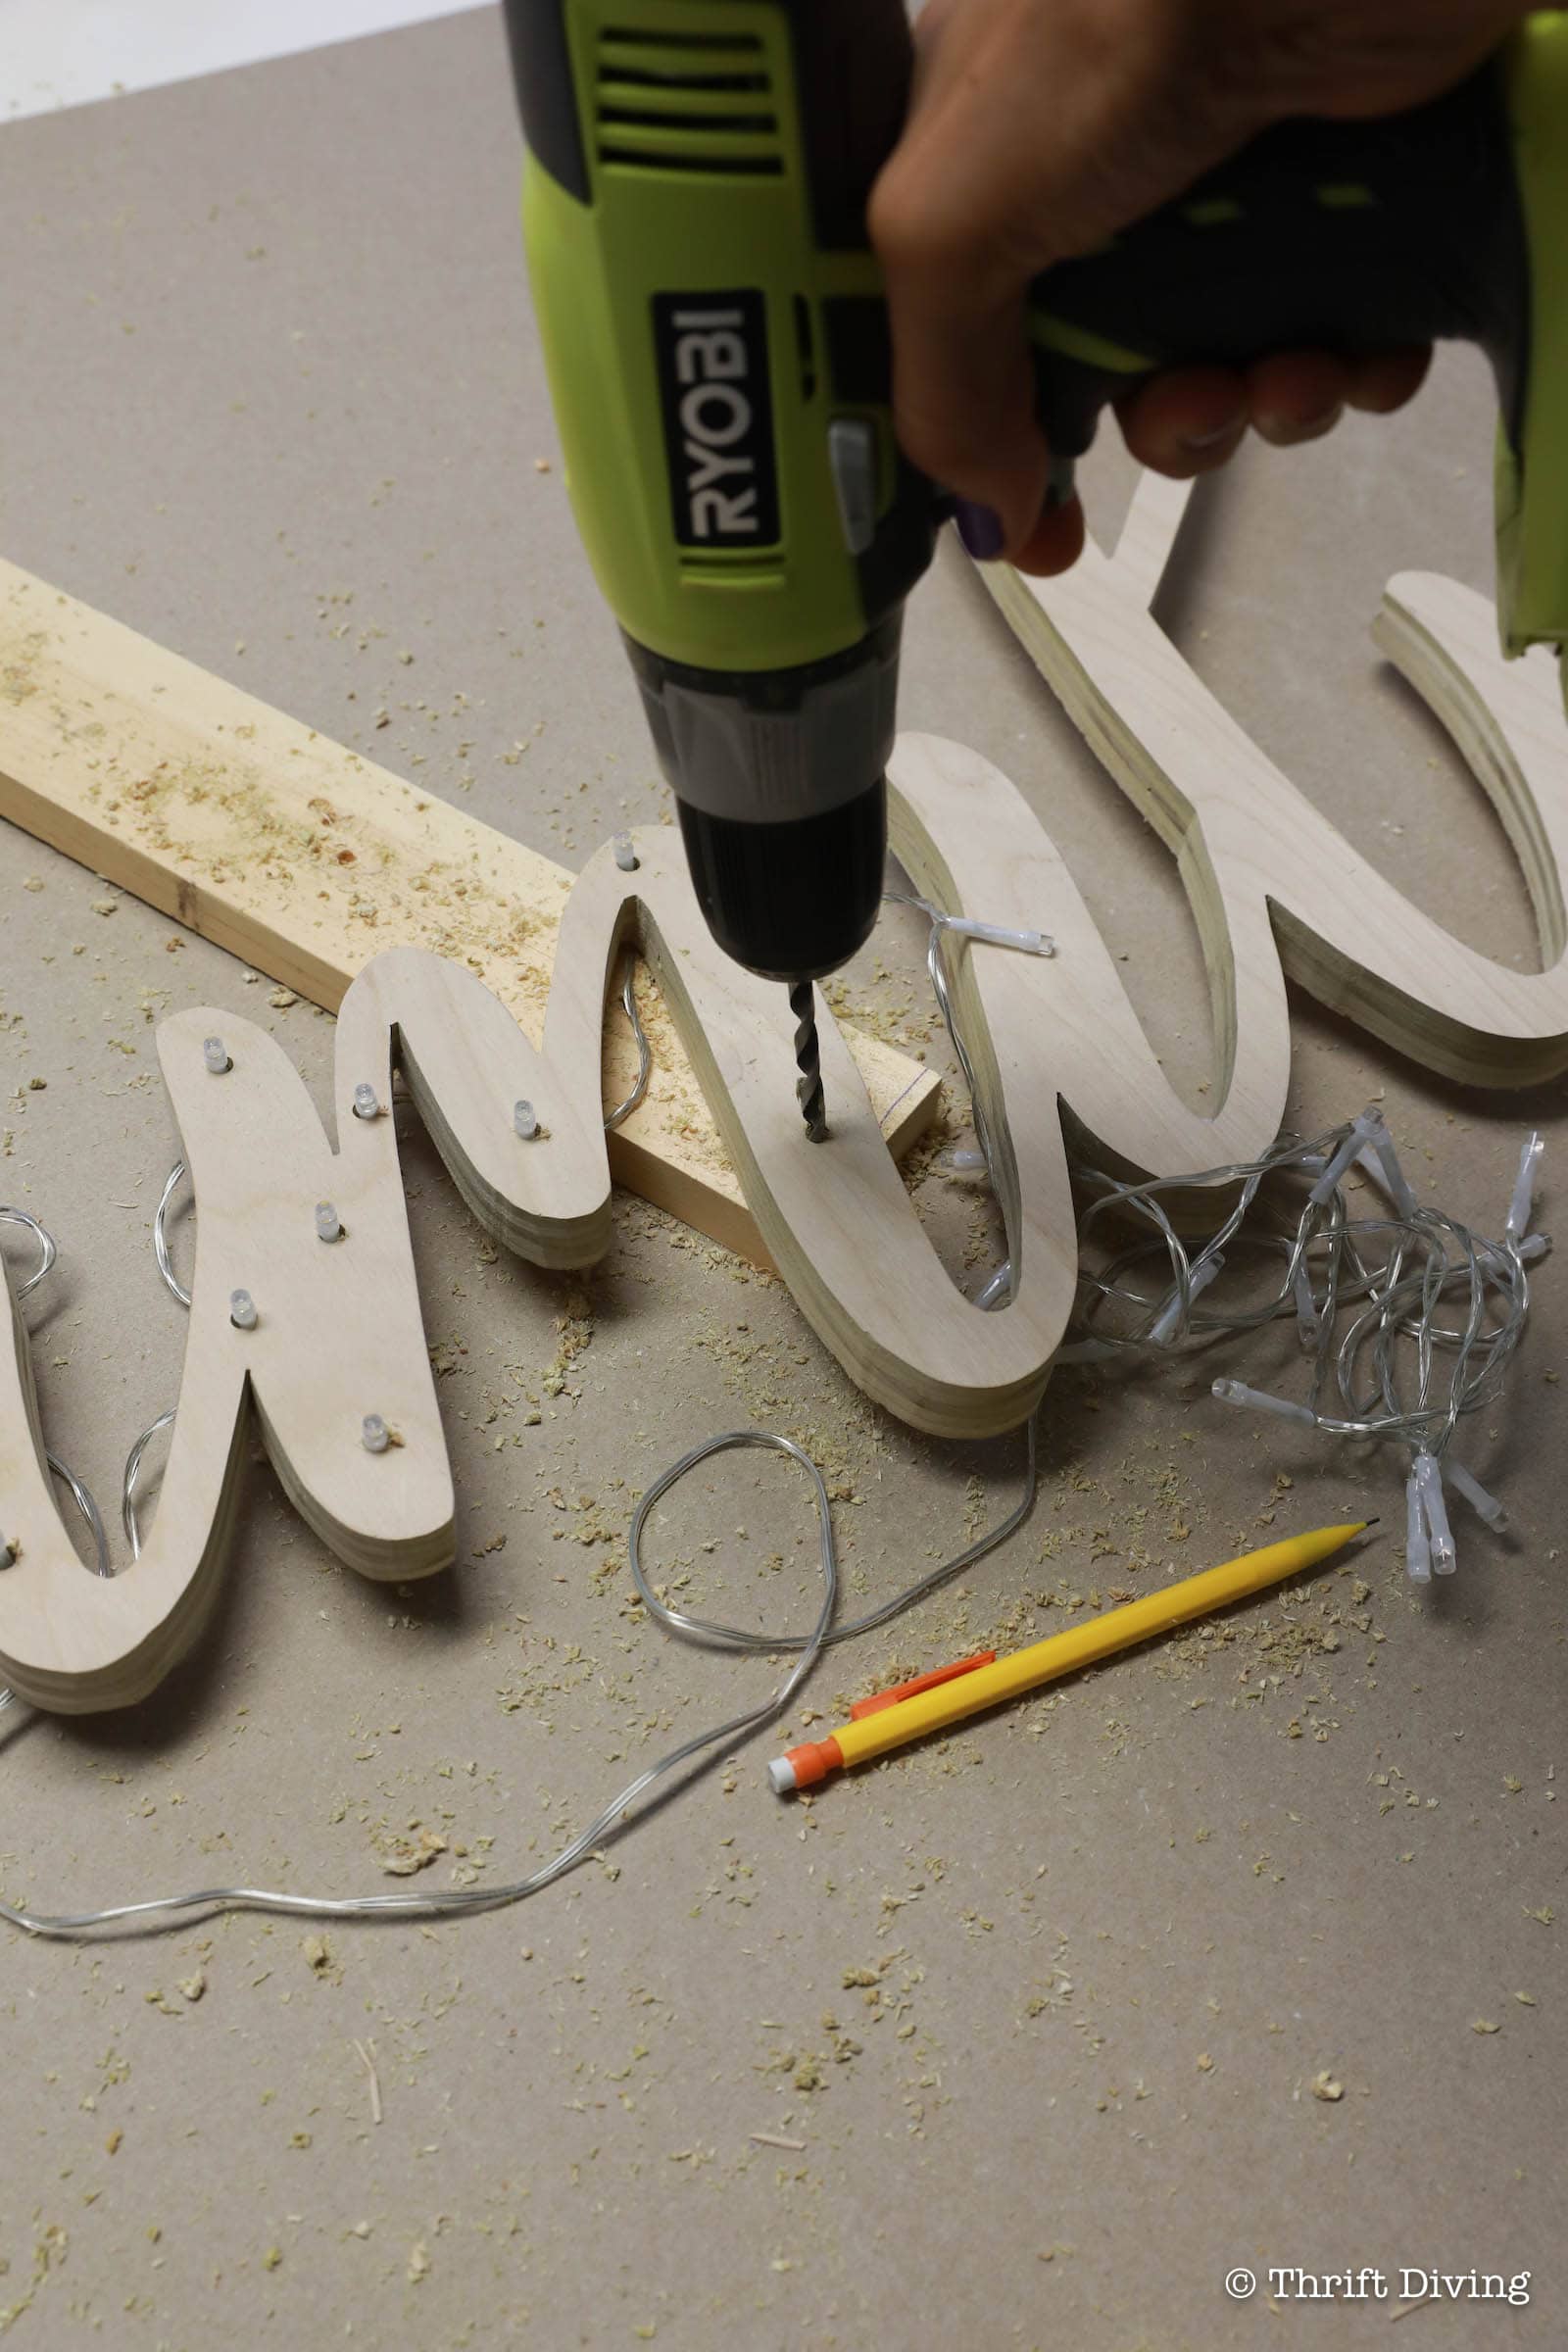
STEP 5: Drill Holes for the Lights
This is the fun part because we’re so close to being done! This DIY word light sign is taking shape. 🙂 But there are a couple things to keep in mind before drilling your holes.
- Plan where your lights will go. This means making sure that you’ve got a long enough strand of lights to reach the end of your word light sign. Make sure they’re evenly spaced.
- Use a brad point drill bit. They’ve got a sharp point on the end and you get a cleaner hole. The size of the drill bit you use will depend on the size of the lights you’re using. Be sure to do a test to make sure you know which size to use. In this case, I believe I used 5/16.
- Use a piece of scrap wood underneath. If you try to drill through the wood without a support/scrap piece of wood underneath, you’ll blow out the back of your word light sign. With support scrap wood underneath, you’ll get a nice, clean hole on the other side.
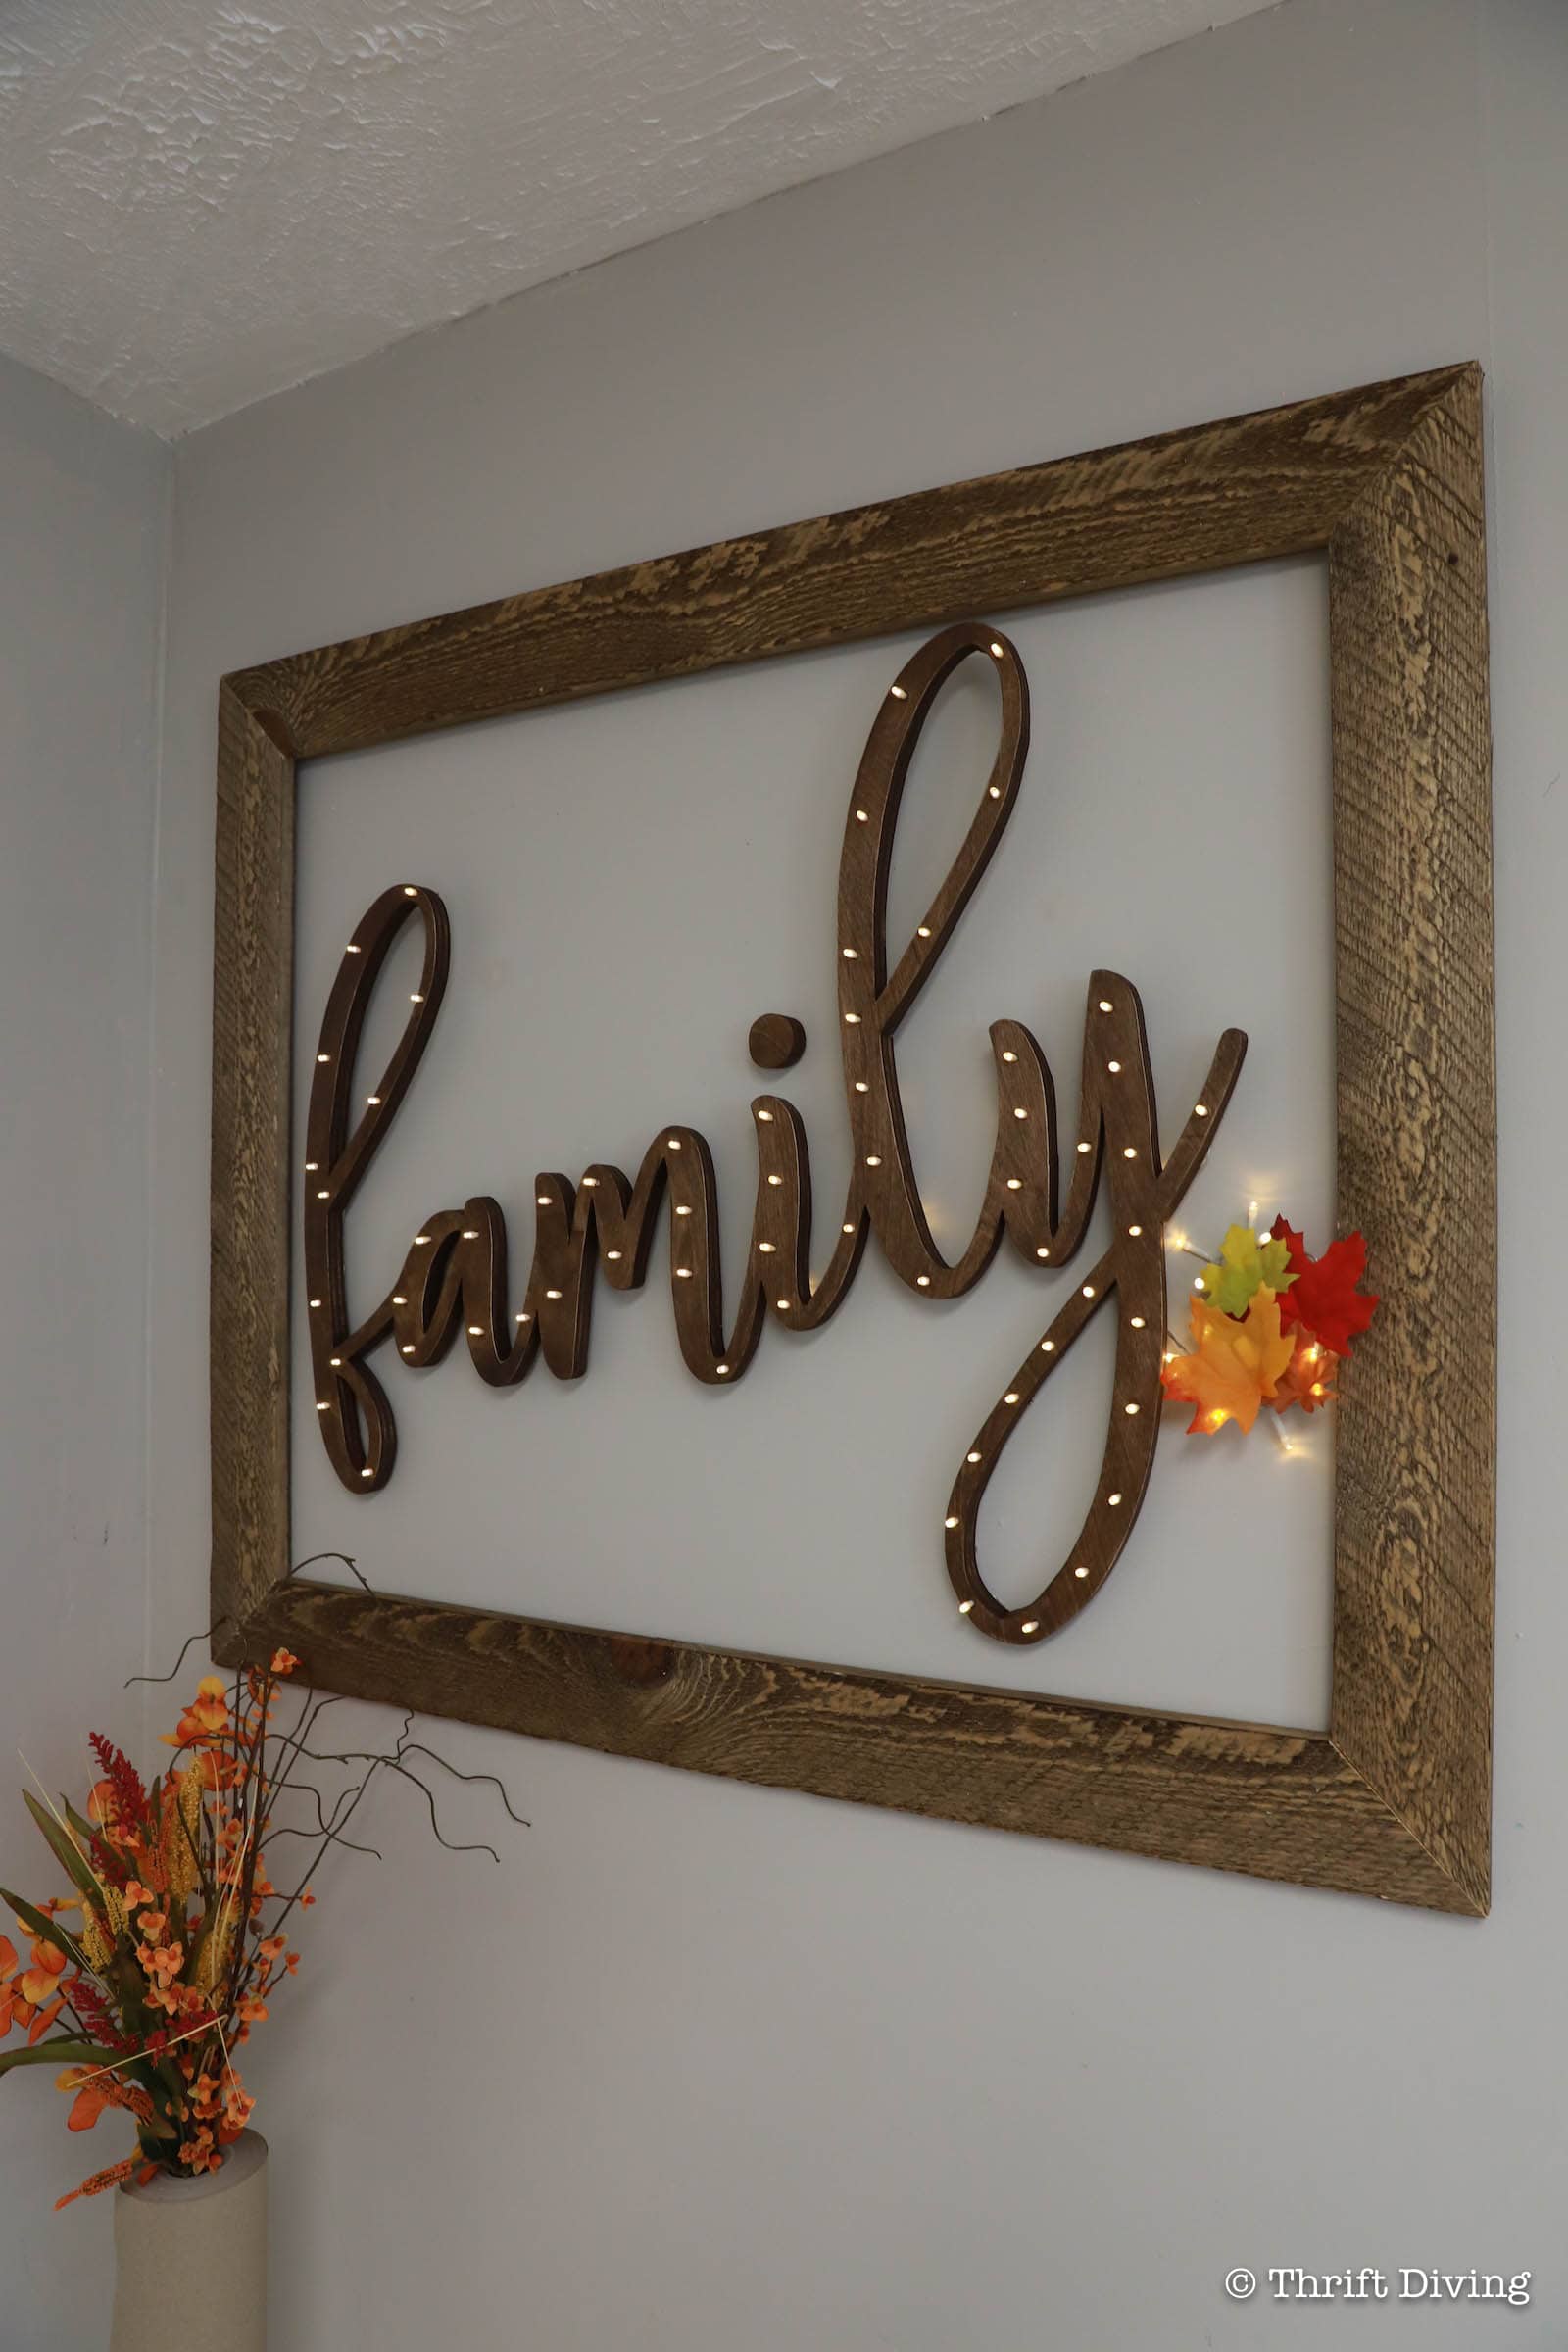
STEP 6: Stain Your Word Light Sign
You can also paint it, but in this case, I stained mine with a dark stain (try Espresso, Jacobean, or Java Gel for dark stains).

Use a craft sponge to get the stain into the little crevices between the letters. Also, when it dries, use fine sandpaper to sand the edges a bit to give it a little rustic feel. 🙂
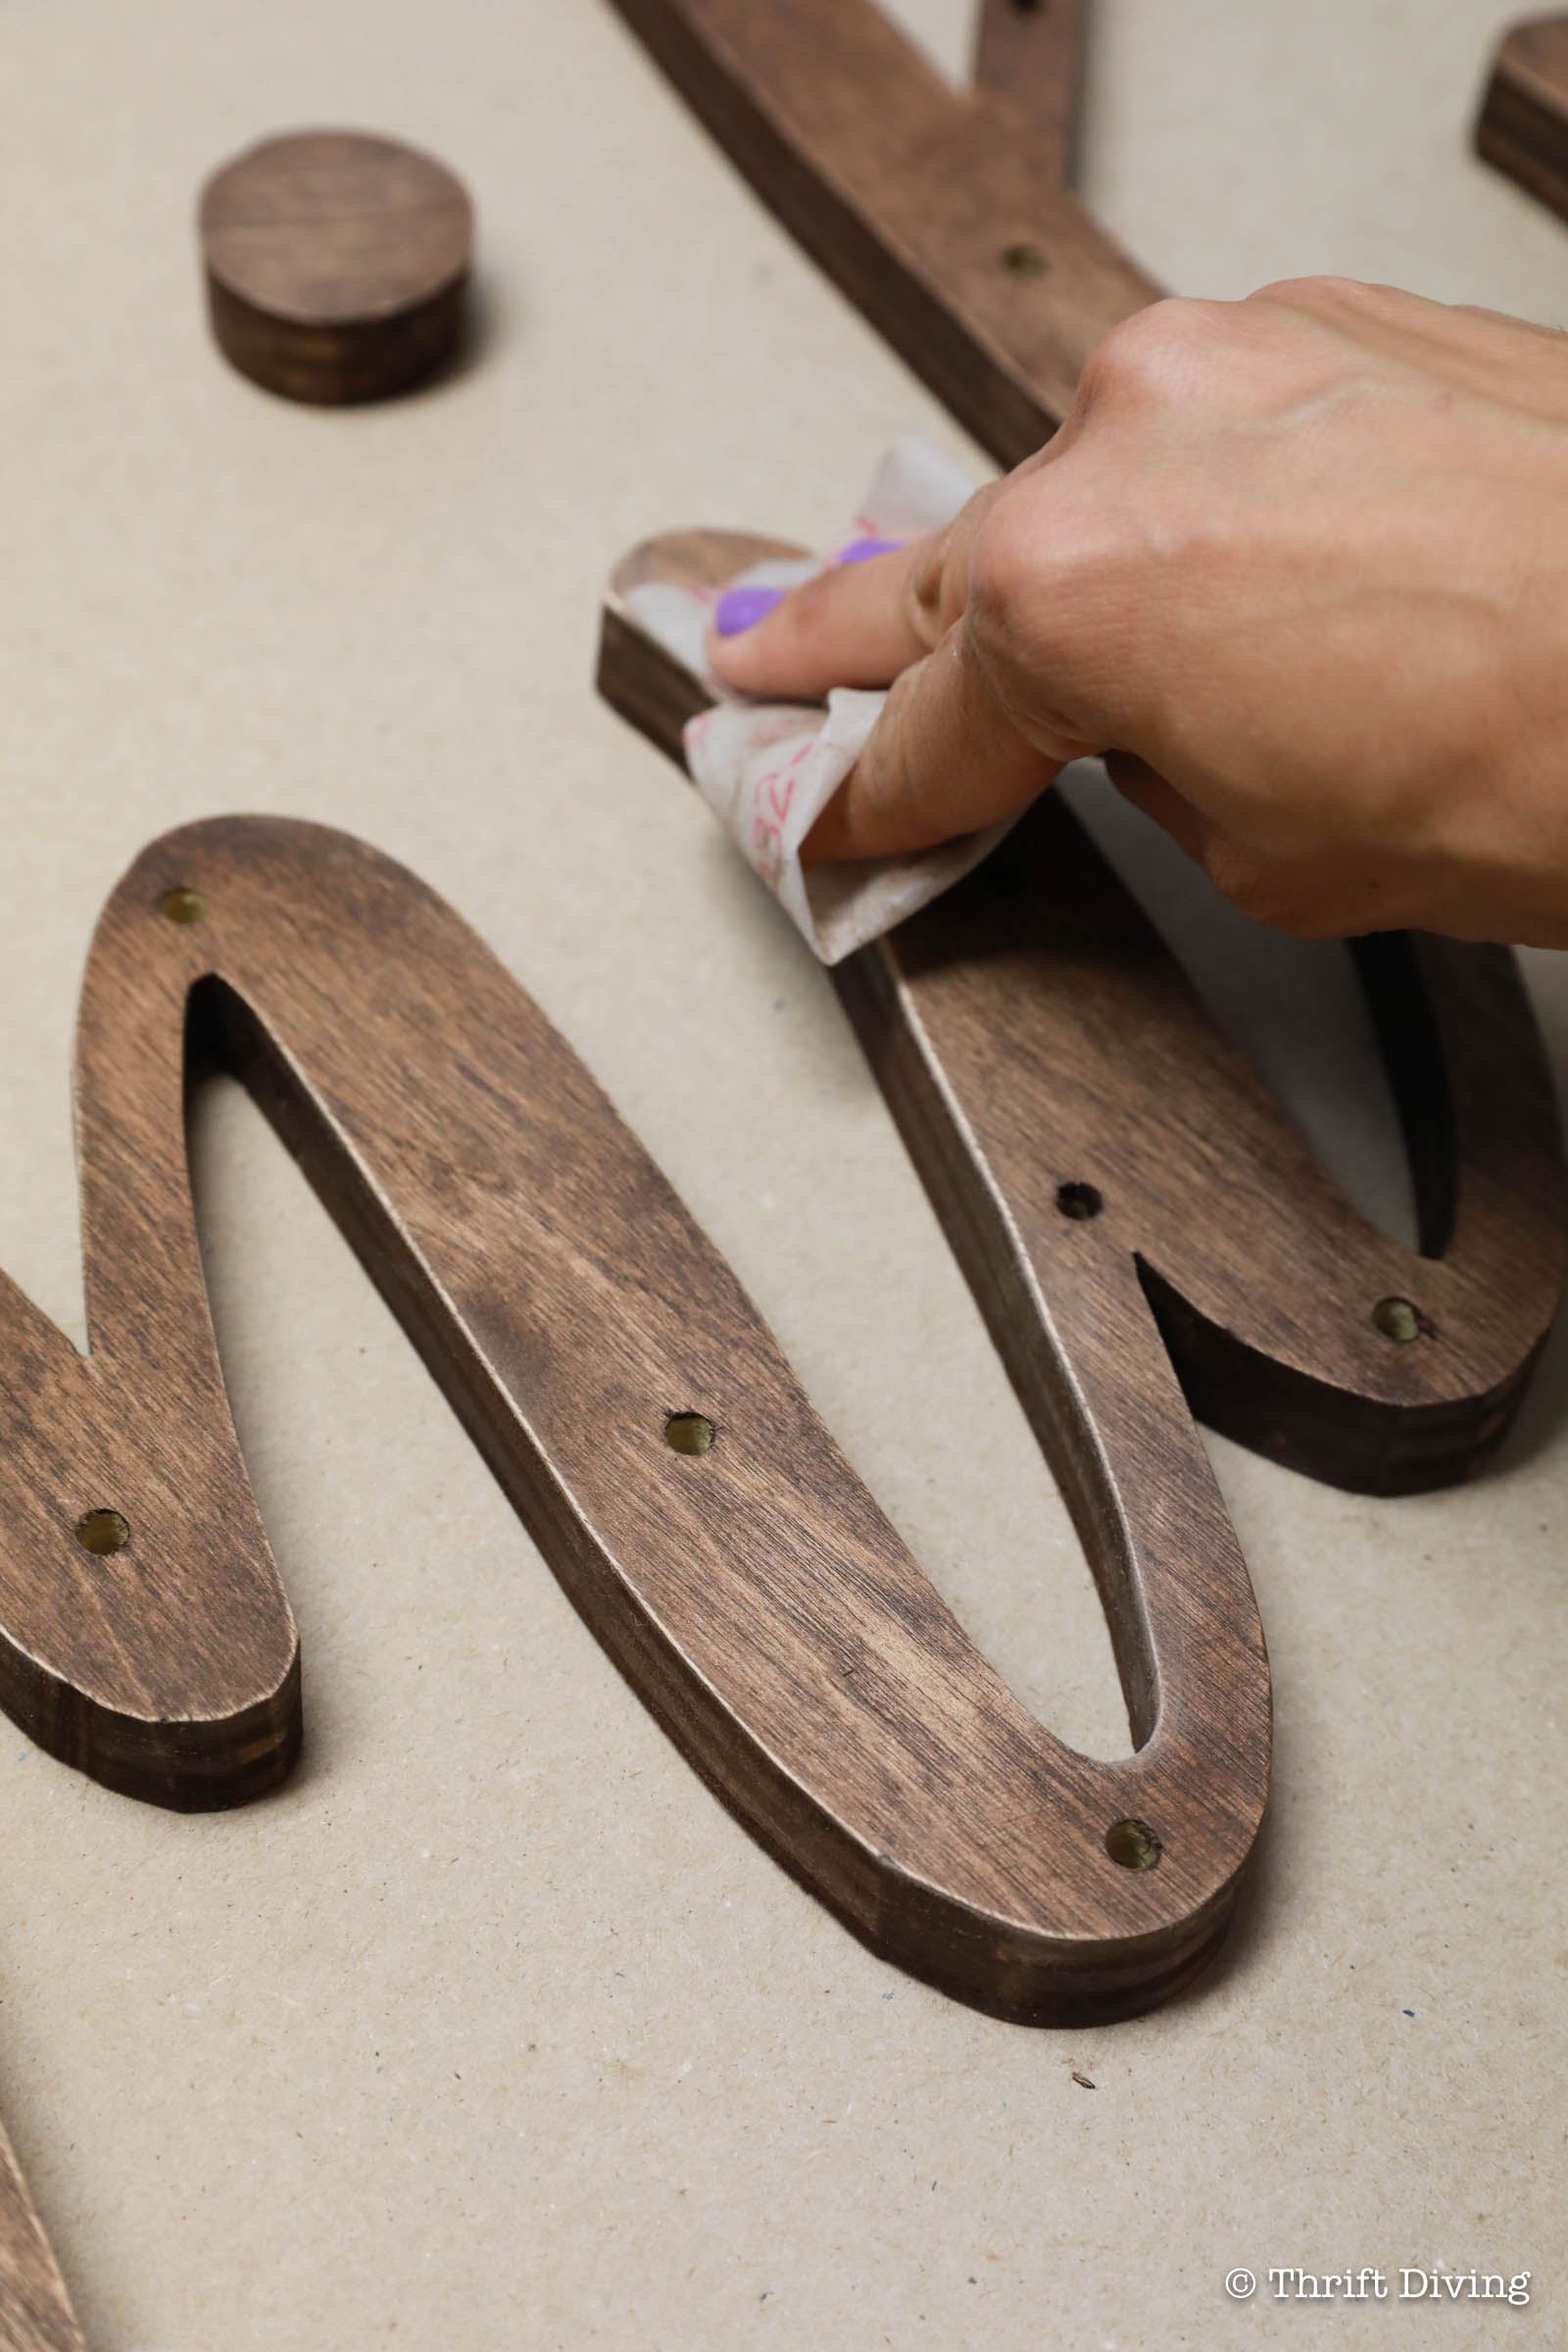
The result will be a deep stained “Family” word sign that looks a little worn around the edges. Now it’s ready for lights!

STEP 7: Add the Lights!
I used these string lights from Amazon. They’re awesome because they’re affordable (about $12), have a remote control, and have 8 different light patterns. Here is what I have determined about the lights:
- If your word light sign is small (smaller than 2 ft x 3 ft), use the 16-foot strand lights (40 lights).
- If your word light sign is medium or large, (2 ft x 3 ft or bigger), use the 36-foot strand lights (100 lights).
- And if you’re absolutely crazy to make a super large, huuuuggge lighted sign, try the 69-foot strand lights (200 lights).
The lights are about 1″ long, which is perfect for the 3/4″ plywood.

Insert the lights into the holes. Since we’ve already planned for the lights to fit, it should be as simple as stringing them in. I mentioned before that I think I used the 5/16″ brad point tip drill bit. The lights went right through, although some of them were a tight fit. But they went in!

STEP 8: Staple the Light Wires to the Back
For this project, we’re using a wire cable stapler that is perfect for low voltage projects. DON’T make the mistake and use a regular stapler that you’d use for small upholstery projects because those staplers use square staples. Square staples can pinch or split the wires. Instead, use the wire cable stapler with rounded wire cable stapler
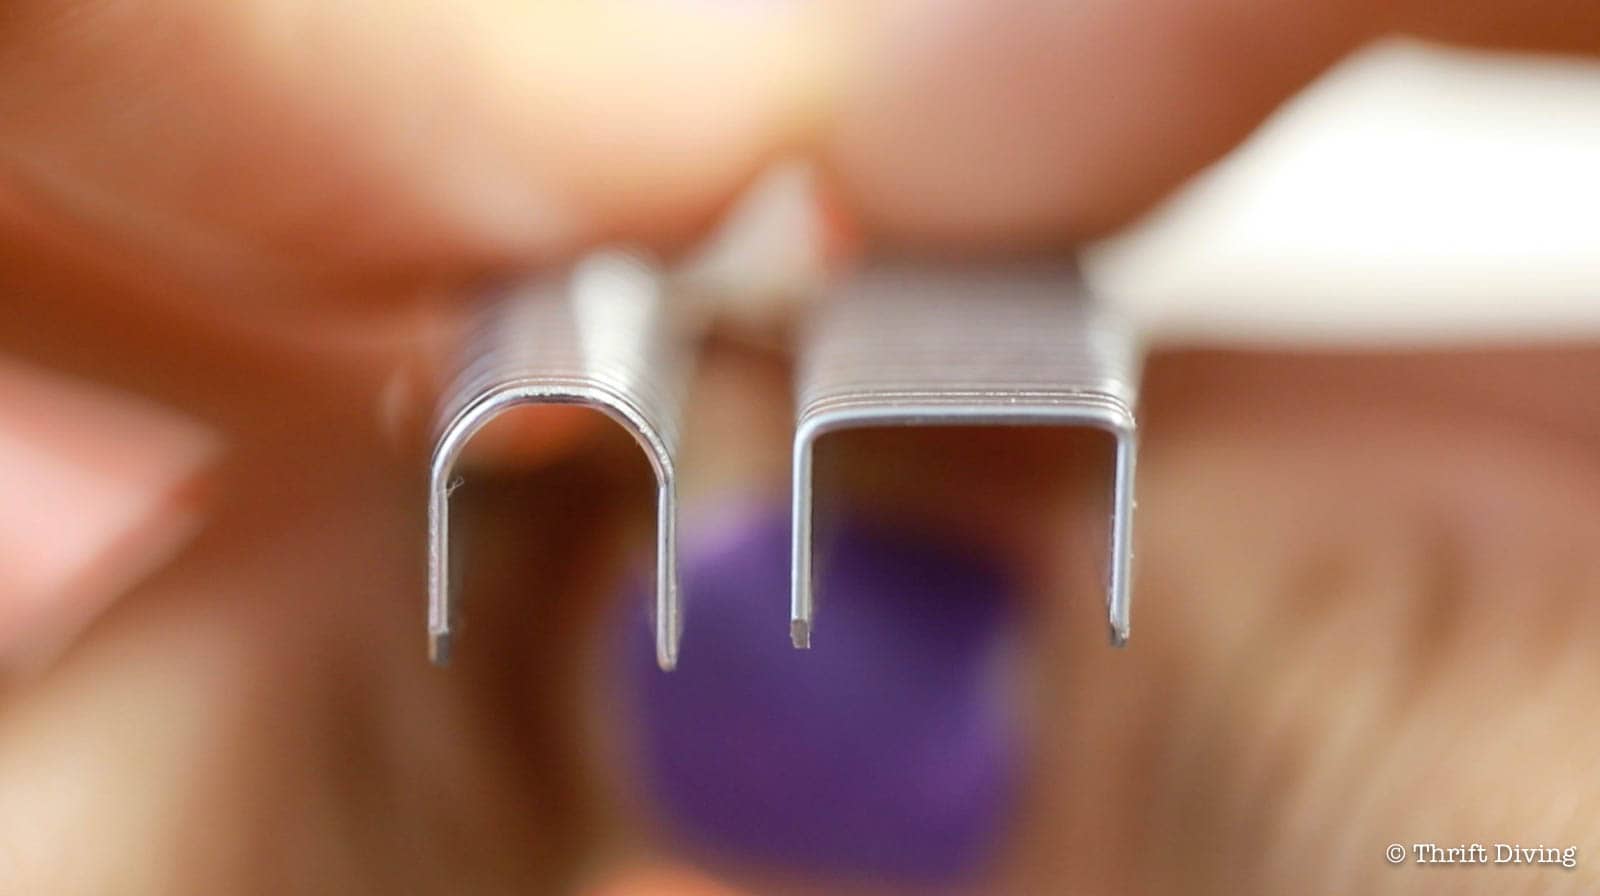
See how nicely the wire is protected under the arch of the wire cable staples? Yep, that’s what we want.

Now, depending on how you placed your wire, you might have some slack to secure to the back so it can’t be seen from the front. What I did was create loops and swirls for any wires that had a lot of slack, then stapled them into place, making sure that the wires can’t be seen from the front.

STEP 9: Hang Your Word Light Sign on the Wall
At this step, you might want to also plan where your D-rings will be attached at the back so you can hang it on the wall. You want to place it where it won’t get in the way of the lights and staples.
Also, keep in mind that where you place the D-rings will make a difference in how your word light sign hangs:
- If you want the light sign slanted upwards, the right side D-right should be placed lower on the back of the wood, so when it hangs.
- If you want the light sign to be level, the left and right D-ring should be placed about in the same location.
You’ll see what I mean once you go to hang it up. But you can see from the picture below where I have the D-rings placed. This location will result in a level sign, so adjust as you see fit. 🙂

STEP 10: Make a DIY Frame to Go Around Your Light Sign (Optional)
You don’t have to make a frame for your light sign, but it does give it a whole different look. I didn’t capture individual pics for instructions on this step (but you can watch the video tutorial which shows the frame construction), but the idea is to have enough wood to frame it. I used some replica barn wood from The Home Depot, and just cut the corners at 45 degree mitered cuts. I used a heavy duty stapler (try the T50 stapler) to staple the corners together, along with some wood glue in the joints. I added D-rings to the frame and hung it around the word light sign. Super easy!

Did you enjoy this word light sign tutorial? Click to save it on Pinterest!


Download the 5 freebies!

Thrift Diving inspires women to decorate, improve, and maintain their home themselves...using paint, power tools, and thrift stores! Use these 5 printables, checklists, and ebooks to get started!


is the battery pack hidden behind the leaves? thank you.
Your sign is beautiful! To save on ink you can print the word in light grey or choose “outline” in Word.
Great idea Monika! I’m going to try this!