How to Make a DIY Garage Door Screen With a Zipper
I’ve been wanting to make a garage door screen since the spring when the flare-up of crazy flying insects leaves me swatting, cursing, and running for cover.
But how this project came about was because I was >THISCLOSE< to paying someone a handsome amount of money to install a garage door screen in my garage–one of those fancy ones on a track. I even considered shelling out a couple thousand dollars for motorized ones. (Ugh…to think I almost went through with it…).
But once I realized how much garage screens would cost, I realized, “Dude….I’m a DIYer…I can make my own garage door screen!”
But there was always some other project that must get done first and my DIY garage door screen got pushed to the wayside.
Well, here in Maryland, in the spring and summer we’ve got mosquitoes and flies, and in the fall we’ve got stink bugs. Ewwwww!
It isn’t until you’re bombarded with bugs that you finally put “how to make a garage door screen” on the MUST.DO.NOW list!
Thus, here are my awesome garage door screen plans!
(And while you’re at it, go check out How to Make DIY Gazebo Screens using screen, Velcro, zippers, too, for my backyard!)
Watch This Project In Action: How to Make a Garage Door Screen
Materials Needed to Make a DIY Garage Door Screen:
(I participant in the Amazon Services LLC Associates Program, an affiliate advertising program designed to provide a means for me to earn fees by linking to Amazon.com and affiliated sites).
Here are all the materials I used to make my DIY garage door screen:
- A roll of fiberglass screen (the same type used in your windows)
- a #10 aluminum extra long heavy duty separating zipper with 2-handle double pull (optional) (Metal or plastic on Amazon).
- Velcro brand fastener (Outdoor Extreme)
- Sewing machine (optional)*
- Scissors or rotary cutter
- Measuring tape
- Satin blanket binding (optional)
- Tin snips
Alternative Materials
Here are some other materials you could use for your garage door screen:
- Velcro brand fastener (Low Profile) for keeping the screen closed instead of using a zipper. Just make sure it’s 10′ x 1″ long.
- Adhesive magnets for keeping the garage screen closed instead of a zipper.
*Keep in mind that you don’t need a sewing machine to make this project! You can easily use sticky hook and loop fastener to complete all parts of this project! But if you have a sewing machine, all the better.

Where to Buy a Garage Door Screen?
So you’re probably thinking, “Why not just buy a cheap garage door screen from the Home Depot or Amazon?” right?
(Heck, that’s where I buy everything).
But if you read the reviews, the cheapie garage door screens that sell at the Home Depot and on Amazon are:
- very flimsy,
- are held together with weak magnets that don’t hold together properly the minute there’s a strong breeze,
- they simply fall apart,
- full of gaps so you’re more likely to let in bugs and insects. (Of course, if you live somewhere with scorpions, snakes, and lots of spiders, these pests can still scurry their way in unless you have one of those super professionally installed garage door screens).
So yes, there are several places that sell garage door screens online, but you get what you pay for. Otherwise, you’ll have to spend a few hundred dollars to get a good one (or thousands for the professionally installed ones for).
Plus, the way garage door screens work (the professionally installed ones) is that they require you to have at least 5 feet of space available in front of where the screen would be sliding up and down.
(HA!…..What DIYer do you know that has 5 feet of space in front of their garage door??! Absurd! Don’t they know it’s full of furniture, wood, and supplies…??) 😉
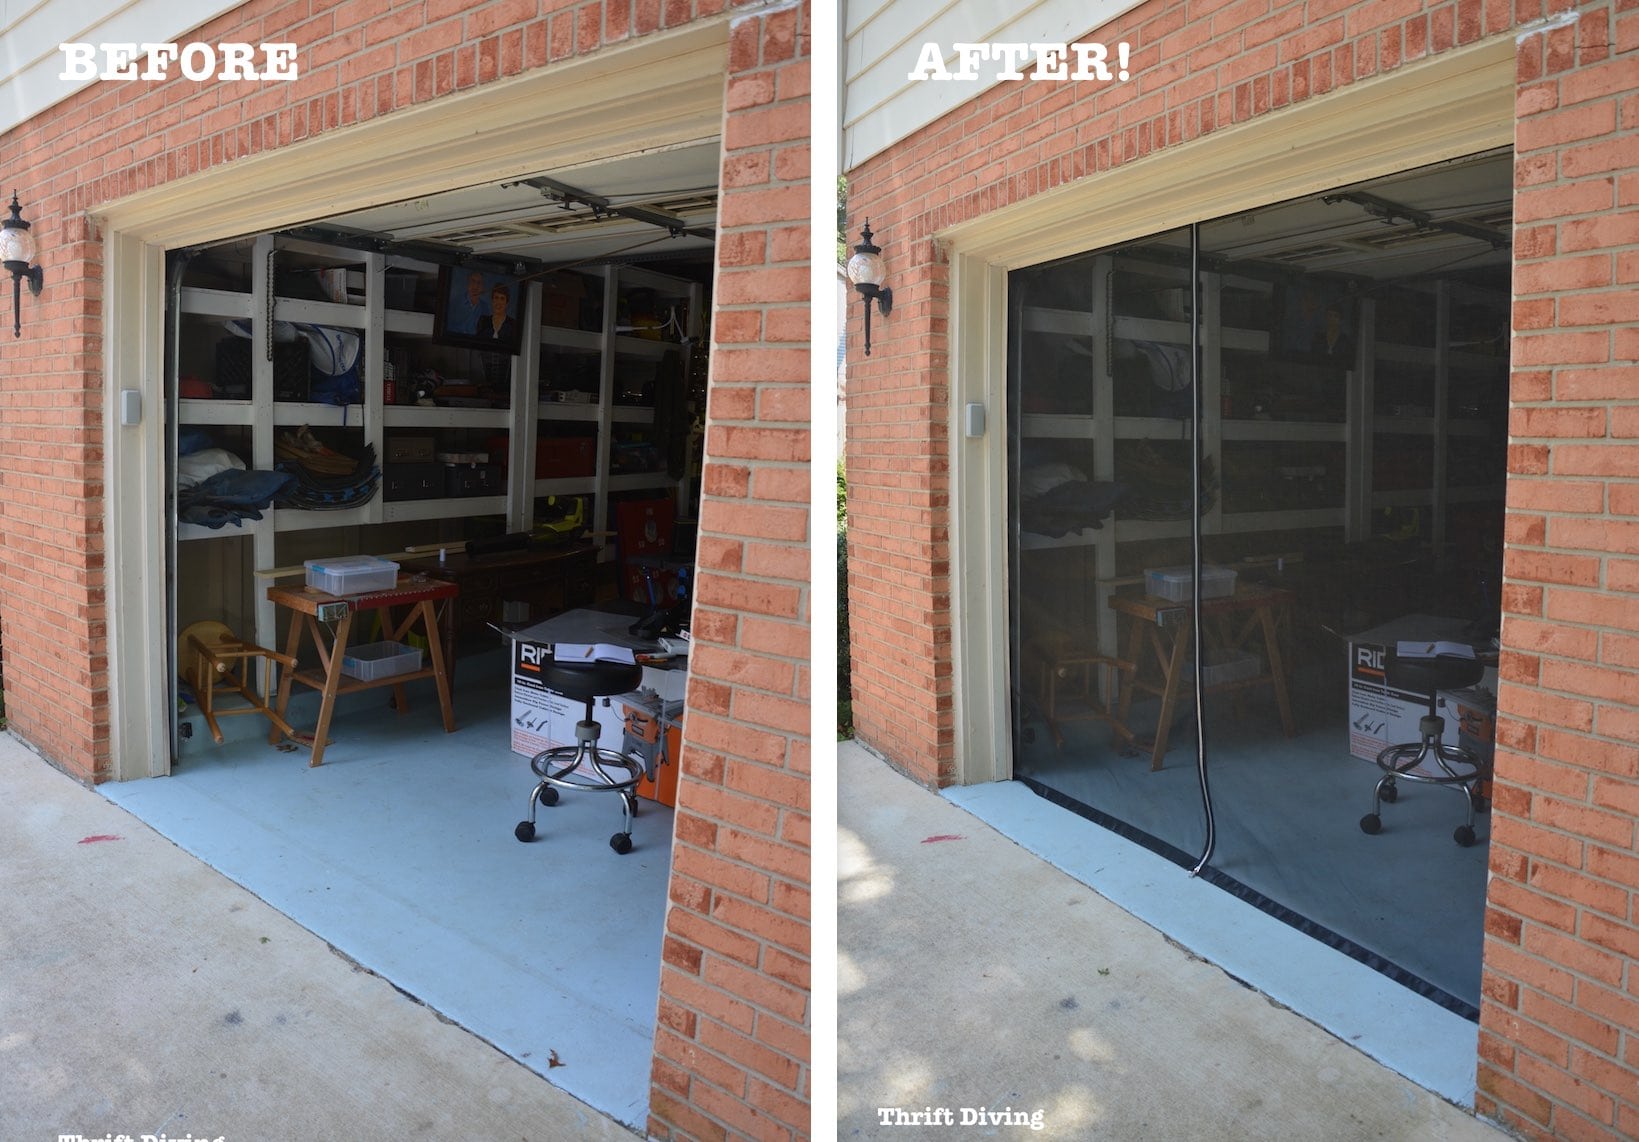
Anyhow, that’s where this tutorial comes in because you can make your own heavy-duty garage door screen with a zipper and it only takes 45 seconds to install and about 30 seconds to take down and neatly fold! 🙂
And the cost?
You can make your own garage door screen for about $85 or less. 🙂
How to Make and Install a Garage Door Screen With a Zipper
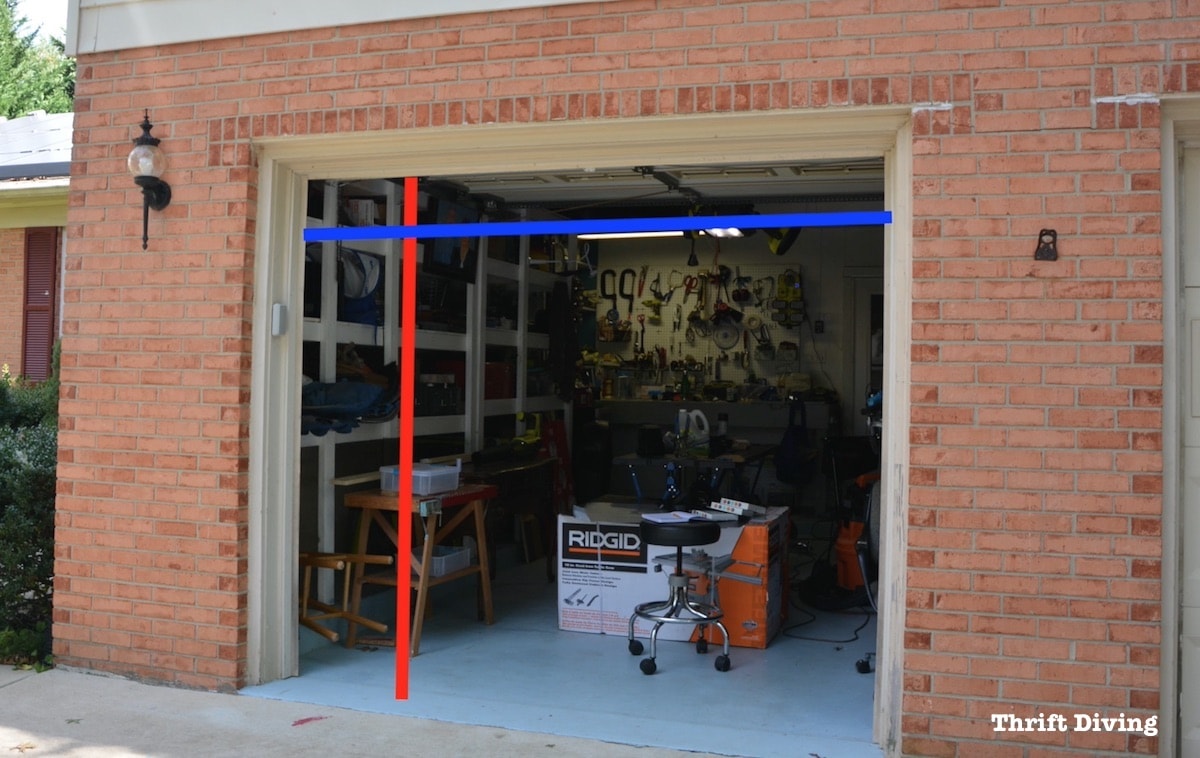
STEP 1: Measure Your Garage Door Opening
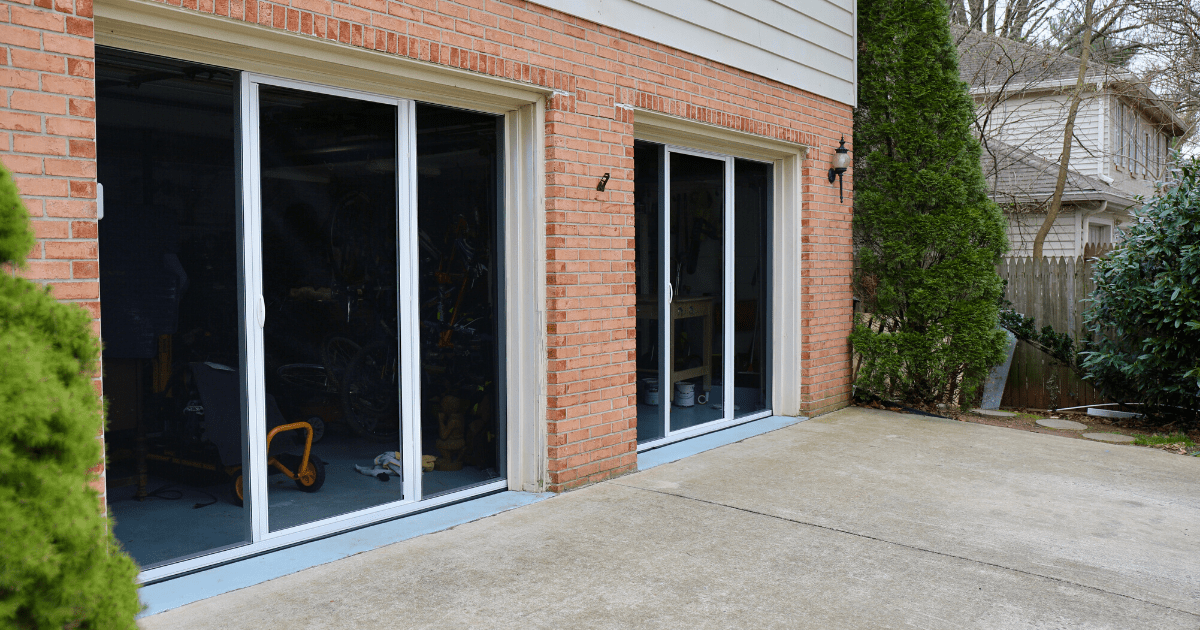
I needed a garage door screen for my 8×7 garage. But your measurements will depend on whether you want to mount your screen to the inside or outside of your garage.
The inside was best for me. The screen isn’t something I want hanging up all the time, so the garage screen installation was best for the edges along the inside.
After wiping it down with Simple Green (Velcro brand fasteners don’t stick to dirt!), I took the exact measurements.
STEP 2: Cut Out Garage Door Screen Panels to Fit Your Opening
I absolutely love working with fiberglass screen! Who knew that such a cool material could be easy to handle and doesn’t wrinkle up?!
The roll I ordered had 100 feet for about $53 but you definitely don’t need to order that much. I recommend buying the 48″ (4 FT) wide roll that has 25′ instead. It’s cheaper and should be enough for you to cut out 2-3 garage door screen panels for a one-car garage screen.
Find a large surface on which to work.
I rolled mine out in my driveway.

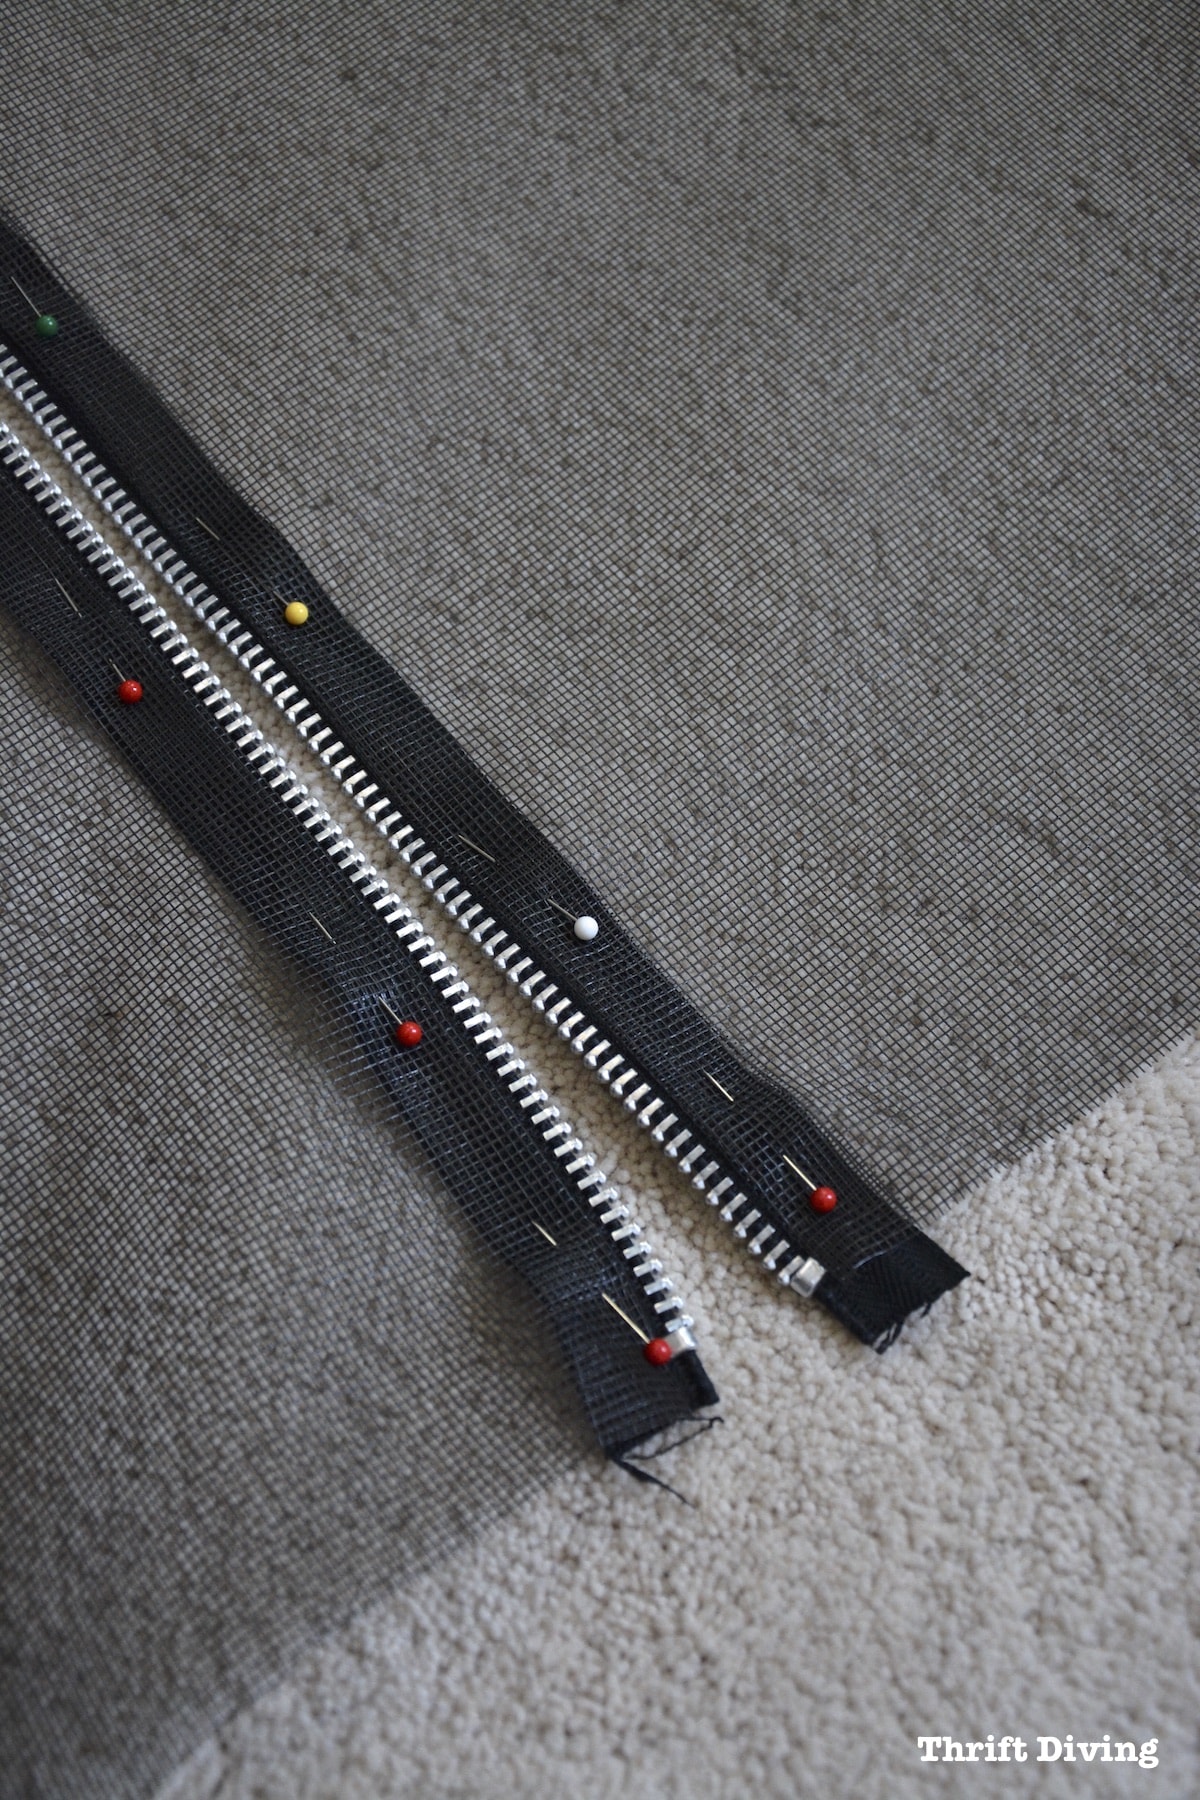
STEP 3: Pin Your Extra Long Zipper Between the Two Garage Door Screen Panels
Again, you don’t have to use a zipper, especially if you don’t have a sewing machine or your sewing skills suck.
Thankfully, I taught myself how to sew when I was 22, fresh out of undergrad and craving a creative outlet. Those skills have come in handy!
Use Velcro brand fastener or adhesive magnets to keep your garage door screen closed as an alternative.
If you’re sewing, fold under a 1/2″ seam along the zipper and pin.

After it’s all pinned, it should look like this.
STEP 4: Sew in the Zipper (Or Use Peel and Stick Fasteners)
The first thing I did was sew in the zipper.
Align the bottom edge of the screen to the zipper, sewing all the way up.
(By the way, you’ll have some zipper left over at the top. Don’t worry–we’ll snip this off afterward).
Keep in mind that if you’re sewing in the zipper, use a zipper foot, and be sure that the edge of the screen isn’t too close to the teeth. Otherwise, the screen will get caught in the zipper when you’re opening and closing it!

STEP 5: Test Fit the Garage Door Screen. Do You Need to Add a Bit to the Sides?
Since my roll of fiberglass screen was only 48″ (4 FT) wide, but my garage opening was 8′ 1/2″ wide, I knew I would have to add a little bit to each side in order to allow for the seams and fasteners.
I simply cut a small sliver of 3″ wide screen the length of the garage door screen and sewed a 1/2″ seam allowance along both the left and right side.
Now, the fit was perfect!
STEP 6: Attach the Bias Tape to the Bottom of the Garage Door Screen.
After folding in the seam allowance on the sides, I tucked the bottom and edges into the blanket bias tape for a finished look on the bottom.
Oops–one part of my bottom was super uneven. But just ignore that. 😉
(You can also add metal washers to the inside of the blanket bias tape if you want to give the garage door screen something to weight it down).

Once covered with the bias tape and sewn into place, the bottom looked finish and you couldn’t see any uneven imperfections. 🙂

STEP 7: Peel and Stick the Velcro Brand Fasteners to the Sides and Top
This is the Velcro brand fasteners that I used for this garage door screen.
What you can’t see is that on the back, it’s peel-and-stick, which makes it really convenient for installing the garage door screen.

I had emailed the Velcro brand people back in the spring and asked if they’d send me some of their Extreme Outdoor for this project, and they were nice enough to send me these 3 boxes. Considering that they’re about $13 for each box, this knocked about $40 off of my total project cost, which is awesome!
I chose the Extreme Outdoor because I wanted to make sure the humid (or wet) conditions of the garage wouldn’t affect its adhesion.
 to install garage door screen. Keep out flying insects, such as mosquitos, stink bugs, bees, moths, flies, and gnats. - Thrift Diving")
For this garage door screen, I used one box of fastener on the left side of the screen, one box on the right side, and one box for the top of the screen.
Be sure you get the 10′ x 1″ size so that it’s long enough to span across.
I also added a couple rows of stitches to the loop side of the tape to make sure it wouldn’t peel off the edges.

STEP 8: Snip Off the Extra Long Zipper
This is the super long 109″ zipper I used to make this garage door screen.
I wanted to make it so that we could unzip from either side of the screen–when you’re entering and leaving the garage.
That’s how sleeping bags and tents are zipped, so I ordered 2-handle double pull zipper from the Zipper Shipper. You can also get the metal zipper on Amazon, but I find that they’re more expensive if you ship from Amazon versus ordering them directly from their own site.

You can see here that I left the long tail of the zipper until the end after I had sewed the screen to it, along with after I applied the Velcro brand fastener to the back, as well.
I used my tin snips to cut the zipper.
Be sure to secure the top of the zipper with a few stitches over the zipper teeth to prevent the zipper from sliding off and to prevent the zipper from opening and unraveling at the top.
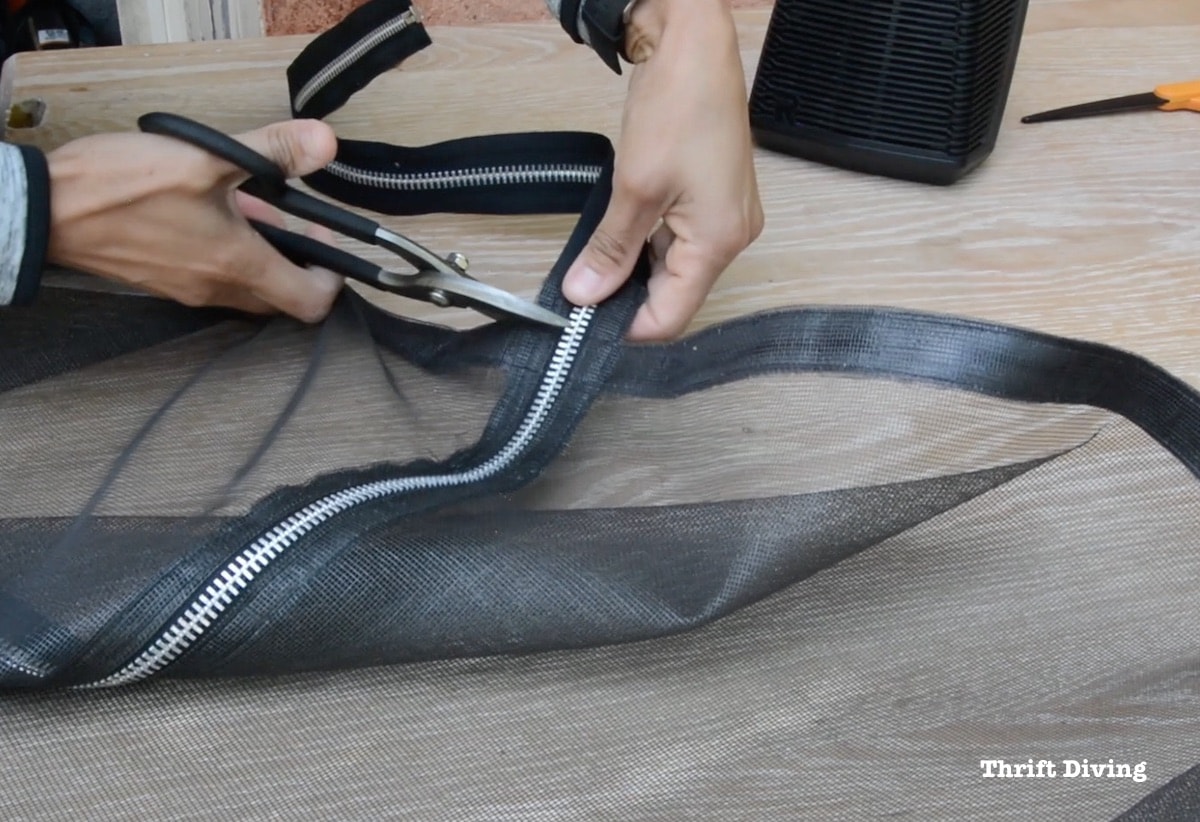
I didn’t have a new zipper stop to put on it the snipped zipper, but the fastener will help to create a stop so the zipper can’t slide off the snipped end. But again, make sure you add a few zigzag stitches done by hand (or with your sewing machine) to prevent the teeth from coming apart).

STEP 9: Stick on the Velcro Brand Fastener to the Garage Opening
Next, I peeled off the stick “hook” side of the fastener and applied it around the edge of the garage.

I did find that it’s best to apply a couple of staples to the fastener into the wall because it kept pulling off a little bit when I removed the garage door screen.

STEP 10: Installing the Garage Door Screen
I’m not kidding when I say it literally took 45 seconds to hang/install the garage door screen!
I’m tall, so reaching wasn’t a problem. If you’re a shortie, go grab a stool. 😉
I started at one corner and just matched the corner of the garage door screen with the Velcro’ed corner, easily pressing to latch the hook and loop.

Removing the garage door screen was just as easy!
It took all of 16 seconds to remove it, and just as little time to simply fold the screen into a manageable, neat little bundle. 🙂

So What Are the Advantages and Disadvantages to Making Your Own Garage Door Screen?
As you can see, I’m very “pro-make-your-own-garage-door-screen.” 🙂
Not only will it be better quality than the cheap ones bought online, but the pride and satisfaction of knowing you made it yourself will far surpass hitting the Amazon “Add to Cart” button.
The disadvantage is that it won’t keep out things like snakes, scorpions, spiders, etc. Those things can likely crawl or slither under. (Thank goodness I don’t live with snakes and scorpions!). In that case, you’d have to buy something more professional grade that has frames and panels that are sealed tight.
But if you’re just trying to keep bees, moths, flies, stink bugs, mosquitoes, gnats, or other flying insects out of your garage, you will definitely benefit from this DIY garage door screen!

Also, don’t forget–if you get a small hole or tear, you can easily buy a screen repair patch from Amazon and mend it–no need to make a new garage door screen. If you buy a screen, it may not be easy to replace or repair it.
Anyhow, I was sooooo excited that this DIY garage door screen turned out well!
It was exactly what I wanted and needed. I should have made this much sooner. I could have saved myself a lot of frustration over the years with flying insects invading my garage workspace.

So what do you think of my new garage door screen?!
Have you ever wanted to keep out flying insects like stink bugs, mosquitoes, flies, bees, and gnats from your garage, too?
Leave a comment below and let’s talk about it! 🙂
Did you love this project? Click here to SAVE it!
![]()
Other Garage Projects You Might Like
Here are some other posts to help you turn your garage into a pretty, functional workshop!
- How to Paint Your Garage Floor with 1-Part Epoxy Paint
- 6 Simple Garage Storage Solutions to Organize Your Garage
- How to Paint Your Garage Workbench Using Beyond Paint

Download the 5 freebies!

Thrift Diving inspires women to decorate, improve, and maintain their home themselves...using paint, power tools, and thrift stores! Use these 5 printables, checklists, and ebooks to get started!

Does this design work on metal-framed doors as well?
How did you get around sewing the Velcro without the sticky back causing issues with the thread of sewing machine? Seems that the glue from the Velcro makes the thread come out and leaves residue on the needles. Please advise.
Serena,
I have been buying cheap garage door screens every year but now, I will make your design and see if it will last for a few years. I am out in the garage every day so I am going to make some sort of tie back or “velcro” back in order to be able to raise and lower garage door without removing screen
This is super brillant!! Great idea and seems pretty easy to do on the sewing machine. Thank you!!
Great idea. You could add some metal washers to the binding to give it some weight so it doesn’t blow
Great idea, Eileen. I actually added one washer to one side, but “forgot” to add a washer to the other side. Then I realized that I may not have needed washers because the way the Velcro brand fastener holds it in place.
This is such a great idea! I never would have thought to DIY this.
Yeah, Haley! It’s been soooo helpful! I am hoping stink bug season is OVER now. But the good thing is that I discovered I can leave the screen up and still close the garage door! Super convenient!
A little beeswax/candle wax along the zipper should help it glide a little smoother for you. 🙂
Awesome job brilliant girl!!
This is brilliant! We’ve been talking about getting me a shed..a she shed for my tools if you can believe it! The mosquitoes will eat me alive tough. This is the perfect solution! Love your creativity my friend! Pinned and shared!
PS – Great idea about the binding, it provides weight and looks good too.
Serena, you crack me up! I too am afraid those darn stink bugs and that they will fly into my hair! What a fantastic idea and it will keep the bugs and those pesky Asian mosquitos (black/white) out of the garage while working. The mosquitos are soooo annoying!