How to Make Yarn Wall Art For Your Home: Easy Wall Art Ideas
It’s true: Craftin’ is like therapy, ain’t it? Well, in this case of this fun yarn wall art, it’s more like “a-KNIT?” Get it??
I wanted to create some yarn wood art with a piece of scrap wood and my power drill. I’ve been dying to weave yarn through wood since forever, but I didn’t know what kind of project to do until now. This knitted art is quick and should only take you about 1 hour, tops. You’ll need a piece of wood, stencils, yarn, a power drill, and tape!
Be sure to check out this other easy wall art with a thrift store canvas, as well as tips for photographing and printing your own floral photography wall art. If you want to make your own DIY picture frames, I’ve got that tutorial too. 🙂
….I mean, we could buy new, but why would we, right??
Let’s jump into it!
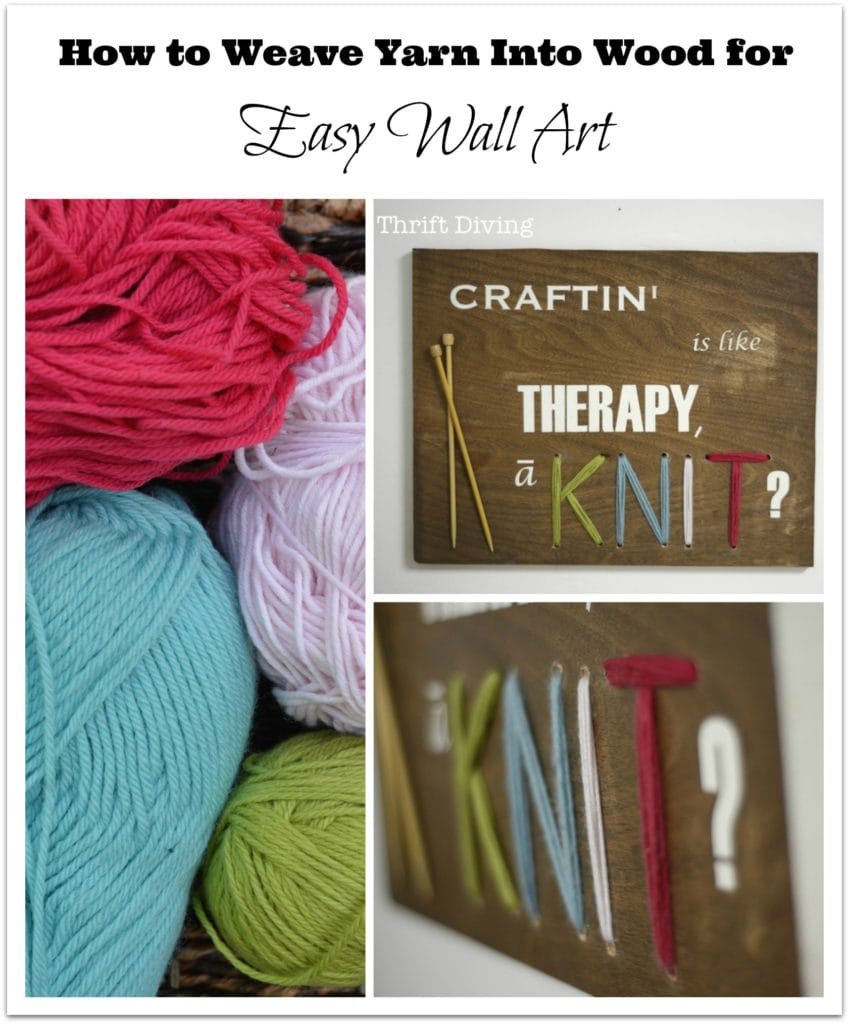
BEFORE – Pretty balls of yarn

AFTER! – Yarn and Wood Art!
With just holes drilled into a board, I could spell out anything I wanted and use colorful yarn to wrap through the wood holes. A totally crafin’, knitted art piece that only takes a drill make!

Flip Through the SlideShare
Craftin’ is like THERAPY, ain’t it?
Most people may not get it. I know…..sometimes you can be too clever that only yourself gets the joke. LOL. Hopeful you get it!

It’s now hanging up in my colorful basement office recently.

How To Make This Yarn Wall Art:
(I participant in the Amazon Services LLC Associates Program and other affiliate advertising programs designed to provide a means for me to earn fees by linking to Amazon.com and affiliated sites).
Go gather these materials:
- Power drill with a drill bit (any size drill bit want to use)
- Stencil (I used my Silhouette Cameo, but you can use any letter stencils you want).
- Colorful yarn
- Wood stain or paint for the wood
- Paint for the letters
- Old cloth to wipe off stain
- Masking Tape
- Hot Glue
- Size 10 knitting needles (or larger)
- D-ring picture hangers for hanging your wall art

STEP 1: Paint or stain your wood.
You can also use an old piece of wood that you already have lying around, like an old cabinet door or something! Wipe off the old stain with a cloth. Feel free to paint the board. Either way is fine.


STEP 2: Add your stencil to the wall art and paint it.
I used my Silhouette Cameo (I highly recommend eventually investing in a cutting machine like this when you’ve got the budget to do so. It makes stencils so much easier). But if you don’t have one, craft stores sell letter stencils. I chose to stencil “Craftin’ is like therapy, a’KNIT?”

STEP 3: Write the word “KNIT.”
Might be a little hard to see against the dark stain, but I wrote the word “KNIT.” And then at each point of the letter, I draw little dots to show me where to drill into the wood.


STEP 4: Drill at the points.
I started drilling at the “T” as you can see here. This is where you’ll weave the yarn into the wood to spell out the letters.

TIP: Here’s an excellent tip for drilling clean holes into your wood: be sure to have a scrap piece of wood underneath your wood art. The scrap piece of wood underneath the section you’re drilling helps to prevent something called tear out, which occurs when the drill bit rips out the splinters of wood on the backside of a hole. For more info on this, watch this YouTube video where I explain in detail how to prevent tear-out when drilling while working on my DIY word light sign.

Once all the points of the letters were drilled, this is what the yarn wall art was beginning to look like:

TIP: If you know exactly where you want your holes, I recommend drilling them before staining and stenciling. That way you can sand it down, clean it up nicely before staining. I messed up and did it the opposite way. Oh, and at this point, you probably should apply a polyurethane sealer, which I did not.
STEP 5: Tape the ends of the yarn.
This is how you’re going to weave the yarn through the wood. It’s just like the ends of a shoestring!

Tape both ends of the large piece that you cut. Cut enough so you have plenty to weave through.

Weave the yarn through the first letter.

Secure the end of the taped yard to back with more tape so that you can start weaving it through the rest of the wood and the yarn won’t come out.


The wall art started to look like this.

When you’re done your first letter, it will look like this. On the back of the wood, you’ll secure the other end of the knitted yard with more tape.
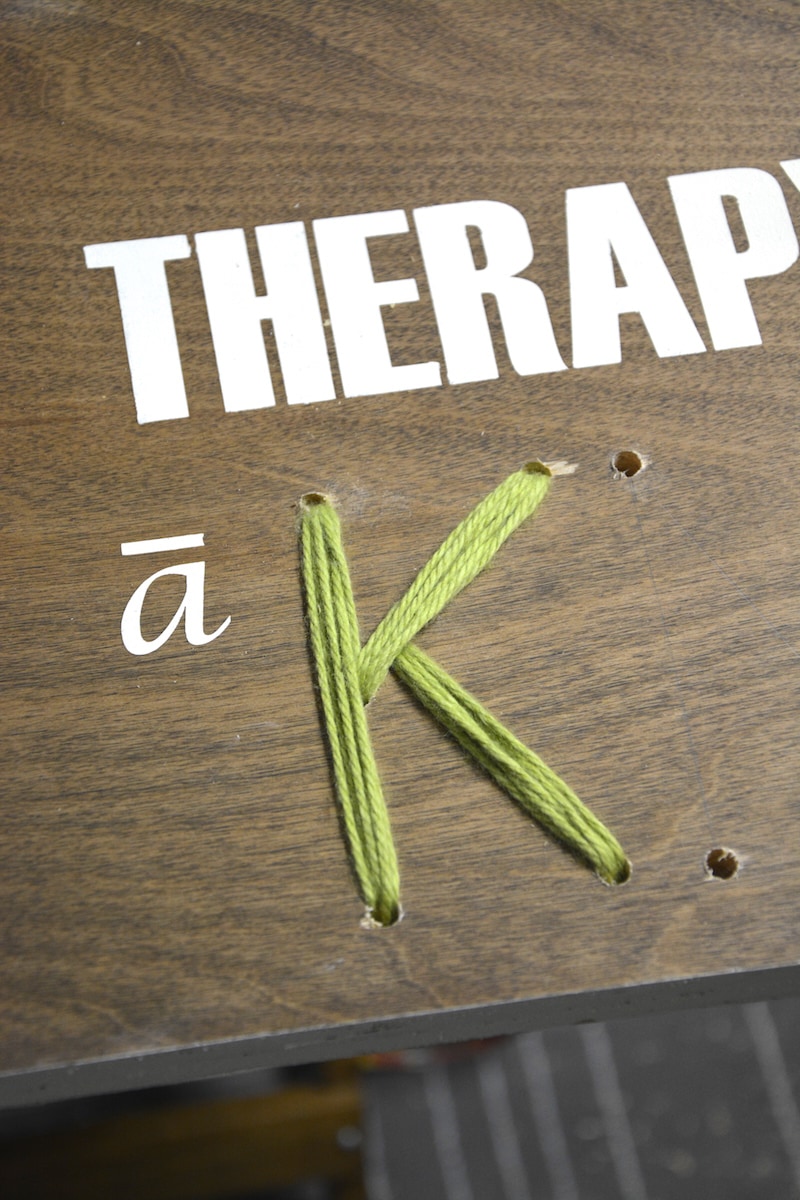
STEP 6: Weave all the letters with different colors of yarn.
With the second letter weaved into the wood, in a different color, it’s now looking like something. 🙂

STEP 7: Hot glue some knitting needles.
Using some hot glue, secure a couple of extra knitting needles to the wall art.

STEP 8: Add D-ring picture hangers.
Use your drill to easily add hardware to the back. (FYI, you may need wire cutters if you’re using wire and it’s too long).

STEP 9: Hang it on your wall!
I’ve got the yarn and wood wall art hanging in my office, but you can hang this anywhere in your home! A crafting room or office is best, though.


It’s amazing how just one little tool (a drill) and some wood and yarn can create a really unique piece of art for your wall! 🙂 I love it!
For More Wood Wall Art Ideas
If you love doing projects with wood, be sure to check out my DIY word light wall art tutorial!

Also, if you’re looking for another easy project to do with just a power drill, here’s a fun project that is super simple: upcycling an old knife block, to hold crayons, crochet hooks, makeup brushes, and more!

Have you ever made any yarn wall art for your home? Leave a comment below and tell me what you’ve made! 🙂

Download the 5 freebies!

Thrift Diving inspires women to decorate, improve, and maintain their home themselves...using paint, power tools, and thrift stores! Use these 5 printables, checklists, and ebooks to get started!
This is awesome Serena!! Such a creative idea… you have got my wheels turning!! And how amazing is that giant whiteboard organizer?!? Wow!!
Thanks, Krista! 🙂 I love my little space down here in the basement! 🙂 Glad I could get those wheels turning! I can’t wait to weave something else! 🙂 I could see this being a really cool gift, even smaller wooden plaques with knitted words!
I completely get it and think it’s super cute and creative! fun project for sure!
Thanks, Scottie!
Love all the cute ideas you come up with! Keep ’em coming!
Definitely! 🙂 Thanks for commenting!
This really made me grin. It is a playful craft – my favorite kind, really! Thanks for the fun and creative idea. Hope you have a nice week-end, too! (PS your yarn reminds me: if you enjoy fiber arts, like knitting, or like to peruse gorgeous yarns, have you ever heard of or went to the Maryland Sheep and Wool Festival? It is always the first week-end in May, and it is at the Howard County Fair Grounds. My kids and I just love it!)
Oh wow, I’ve never attended! Just now hearing about it. Thanks!! I’ve gone to Stitches, the annual conference. But I don’t think it’s been close enough to me to go. This one you mention is nearby, but did I miss it by a weekend? Crap! Lol. I’ll mark my calendar for next year, if so. So glad you like this project! I really loved the look of the yarn laced through. I’m thinking of the next weave I could do! Thanks, Beth!
Very clever idea and perfect art to have hanging in a craft room! It was fun doing this challenge with you.
Thanks, Marie! Yeah, I’m looking forward to the next challenge! :). Thanks for commenting!
That WAS a Very Creative Idea! Now I Know What To Do With All The Yarn I Have Been Saving!
Awesome Idea As Always!
Thanks, Deb! I’ve got a stash of it myself! I’ve been wanting to start a project but I’ve been so busy lately I haven’t had time. There’s nothing better than just working on stitches! 🙂 Thanks for leaving a comment!
You’ve got my creative thoughts running all over with this fun project! So creative!! What a neat way to use a power tool and have fun with words! Thanks for joining in on the One Power Tool Challenge!
Me, too, Wendi! I’m imagining some sort of pretty flower pattern with drilled holes, and all sorts of pretty colors running through it. I’m thinking of doing it!! It could be really cute! 🙂 Thanks for commenting, and for inviting me to take part. I’m excited to see what the next tool will be 🙂
Another cool project! And I LOVE the word play! Creative crafters rule!
Yes we do, Teckla! 🙂 And it truly is therapeutic. I love just working on a project and then turning on Showtime and just watching something for hours while my hands are at work. Love that! 🙂 Thanks for commenting!
Very, very clever! I love the quote and I never would have thought to weave yarn through wood! Great idea!
Thanks, Cher! Yeah, it’s been something I’ve been wanting to do for awhile. The funny back story is that my middle son was playing with some pegboard a couple months ago while I was working on a project, and he was pulling yarn through the holes. I was like, “ooooohhhh, I could do something with THAT…..” LOL Funny where we pull inspiration from!! 🙂
Hey chickie:) This is super cute! I love it! I’m going to try it but since my drill took a nose dive and died a horrible death, I am going to try this but use string art at the bottom. You know what I’m talking about putting the string around the nails to form the words? That’s the way this girl is gonna have to try this one:) You are just full of excellent ideas:)
Hey Heather! Yep, the string around the nails is a great idea. I did a project a couple months ago where I put chains on the wall and spelled out words, using nails to hold up the chain to spell it. That’s an option, too! Hope you get a new drill soon. I don’t know what I would do without mine! 🙂 Thanks for commenting!