How to Dye Wood And Use Lime Wax to Finish Oak
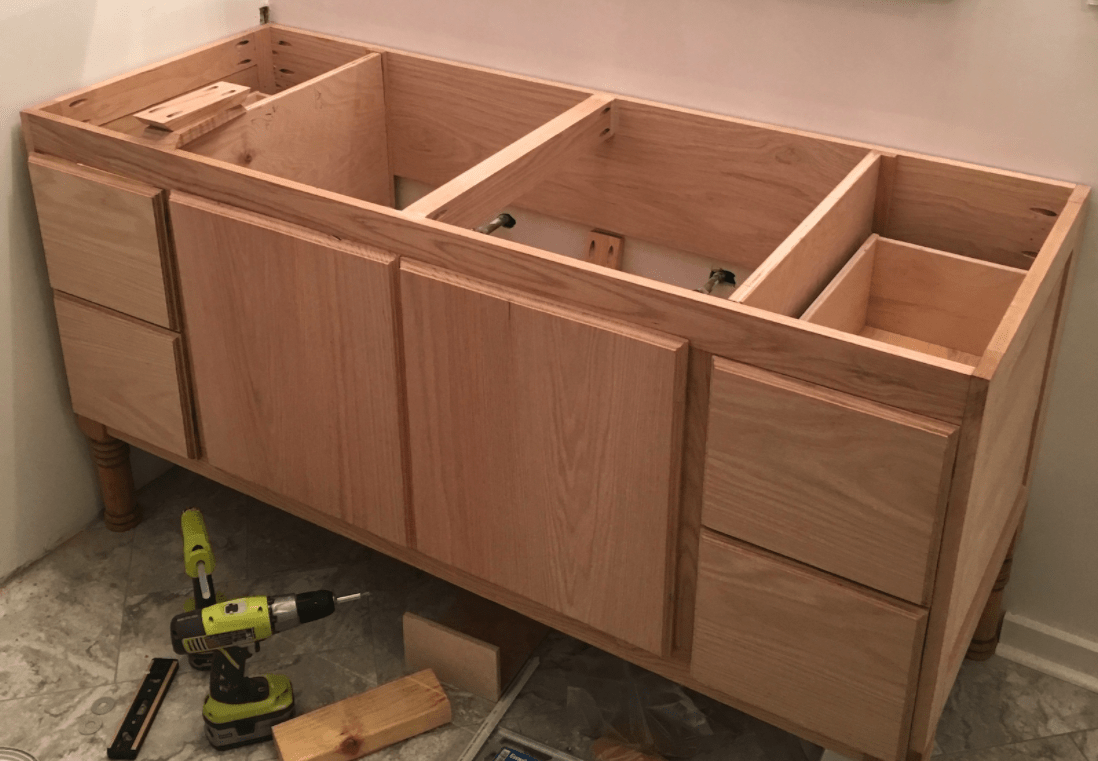
I’ve done a lot of research on how to finish oak so that I can complete my DIY bathroom vanity (which is made out of Red Oak).
In my last post, Understanding Wood Finishing: 10 Things I’ve Learned, I shared with you all of the exciting “new” products I discovered, like wood dyes and tips on how to use them.
I say “new” products because they’re not new at all.
Dyeing wood has been around for ages, but it’s new to me. As a DIY furniture painter, my experience with wood has been pretty limited. Who needed to know about wood when all you’re doing is painting it, right??
But it’s always bothered me that I didn’t know more. I couldn’t wait to get into my garage and start experimenting with some of the wood dyes because I knew the results would be dramatic!
Lately, I’ve had this intense desire to master the art of woodworking, building, construction, the understanding of wood, and recently, the desire to understand how to finish wood properly, too!
Let’s just call this “taking it to a whole ‘nutha level.”
Anyhow, after buying some exciting new products, I couldn’t wait to get started.
Today’s post is showing you how I learned to dye wood and use liming wax (along with some tips for alternative white grain fillers).
I was so excited by these results that I started texting everyone I know to show them pictures. HA!
What a DIY nerd….
Okay, on to the tutorial!
On the Go? Listen to This Blog Post: Push Play
SKIP AROUND THIS POST
No time to read this entire tutorial? Click to skip around!
Introduction
STEP 1: Prepare a Sample Board
STEP 2: Wet the Wood With Distilled Waer to Raise the Grain
STEP 3: Sand the Wood With 150-grit Sandpaper
STEP 4: How to Mix Water-Based Wood Dyes
STEP 5: Apply the Wood Dye with a Rag, Brush, or Sponge
STEP 6: Add a Very Thin Coat of Shellac Sanding Sealer
STEP 7: Add a Thin Coat of Briwax Liming Wax
STEP 8: Use Clear Wax to Remove the Liming Wax
Things You Need to Know
What’s Next in Finishing this Red Oak Bathroom Vanity
PIN THIS Article
Subscribe
How to Dye Wood and Use Lime Wax to Finish Oak
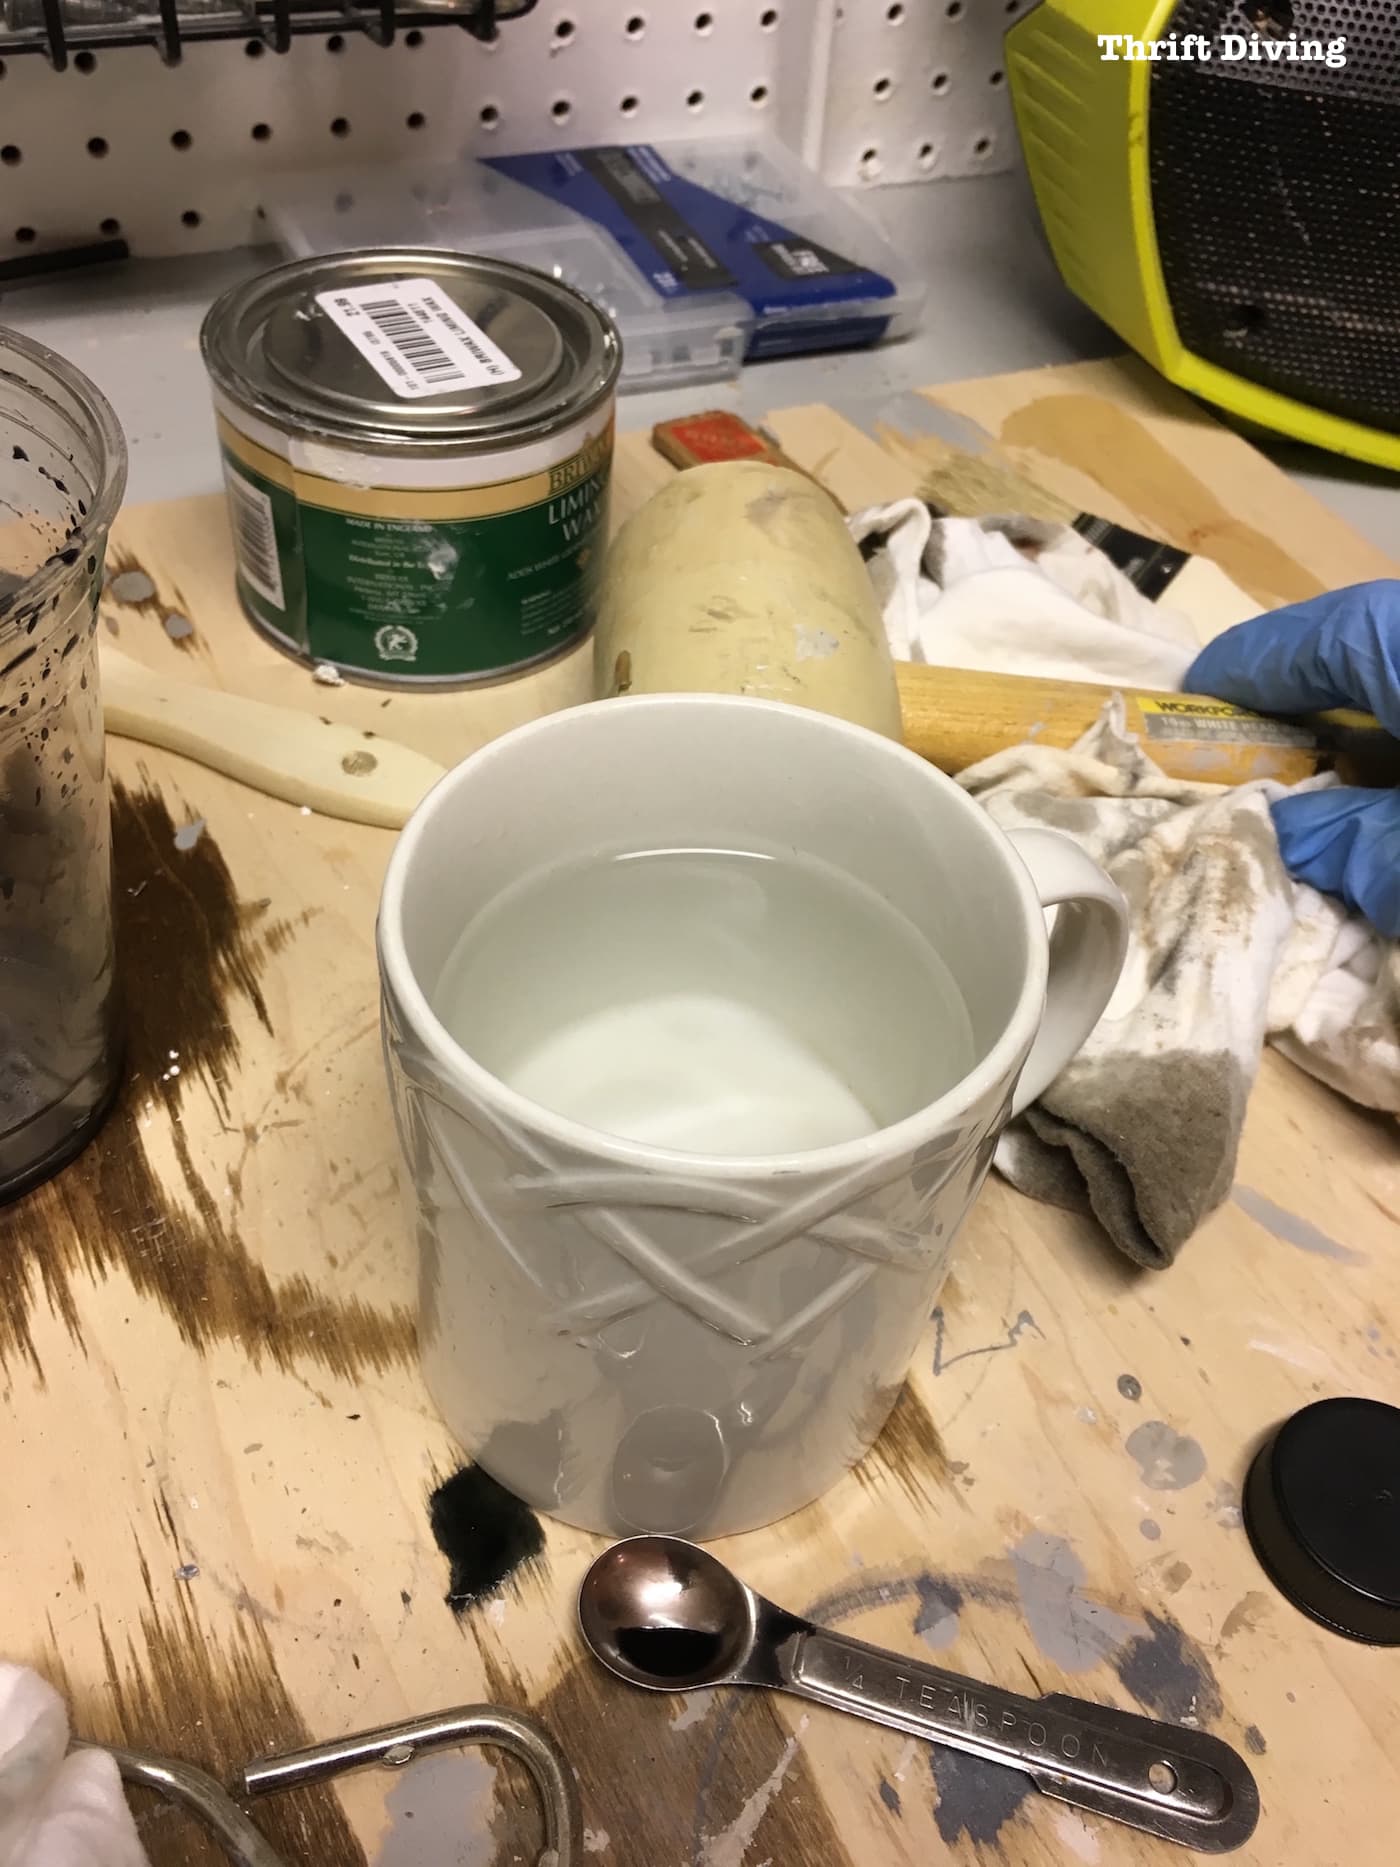
- Homestead TransFast water-based aniline dyes
- Hot water (not boiling)
- Spoon or measuring spoon
- Stir
- Lint-free rags
- Briwax Liming Wax
- Any clear wax
- Distilled water (get it from the grocery store)
- Sandpaper (150-grit and 180-grit)
- Gloves (so you don’t dye your fingertips! LOL)
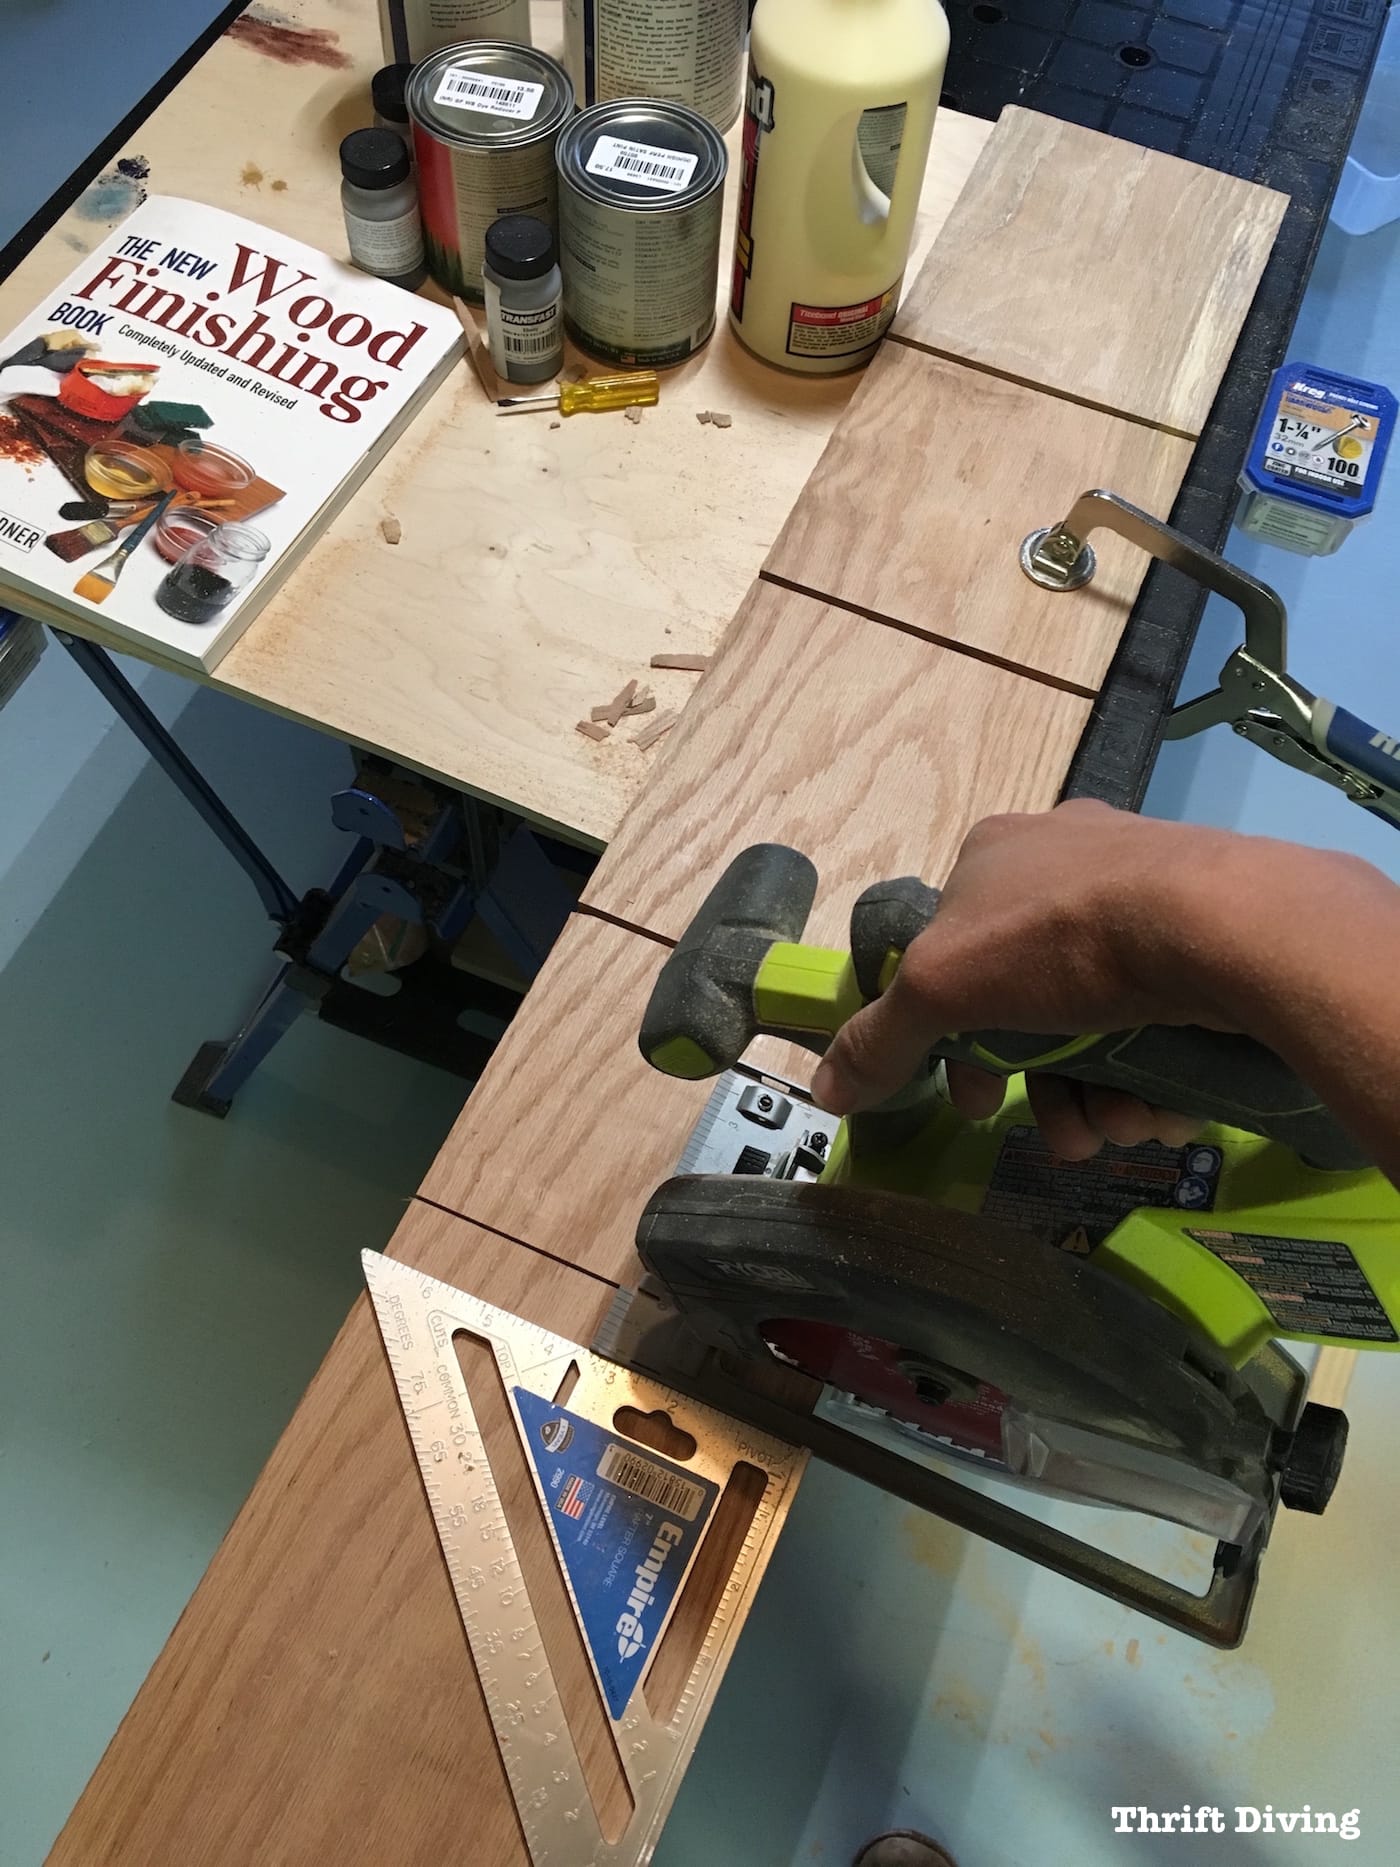
STEP 1: Prepare a Sample Board
The other day when I stopped by the Woodworking supply store, I took some time to leaf through the books. One of them had an awesome suggestion. It suggested that before you work on your real project piece, you should create a sample board on which to practice all of your wood finishes.
I would highly recommend you do the same before attempting to use try this wood finishing technique on your real projects.
I’m building a DIY bathroom vanity and I’ve done a gazillion sample boards just to finally figure out what technique and shade looks best!
Anyhow, to prepare a sample board, get a long piece Red Oak from The Home Depot. It doesn’t have to be super wide. Just wide enough so you can easily work on it and see the pattern.
The reason I’m using Red Oak is because it has an open pores that make it perfect for accenting grain!
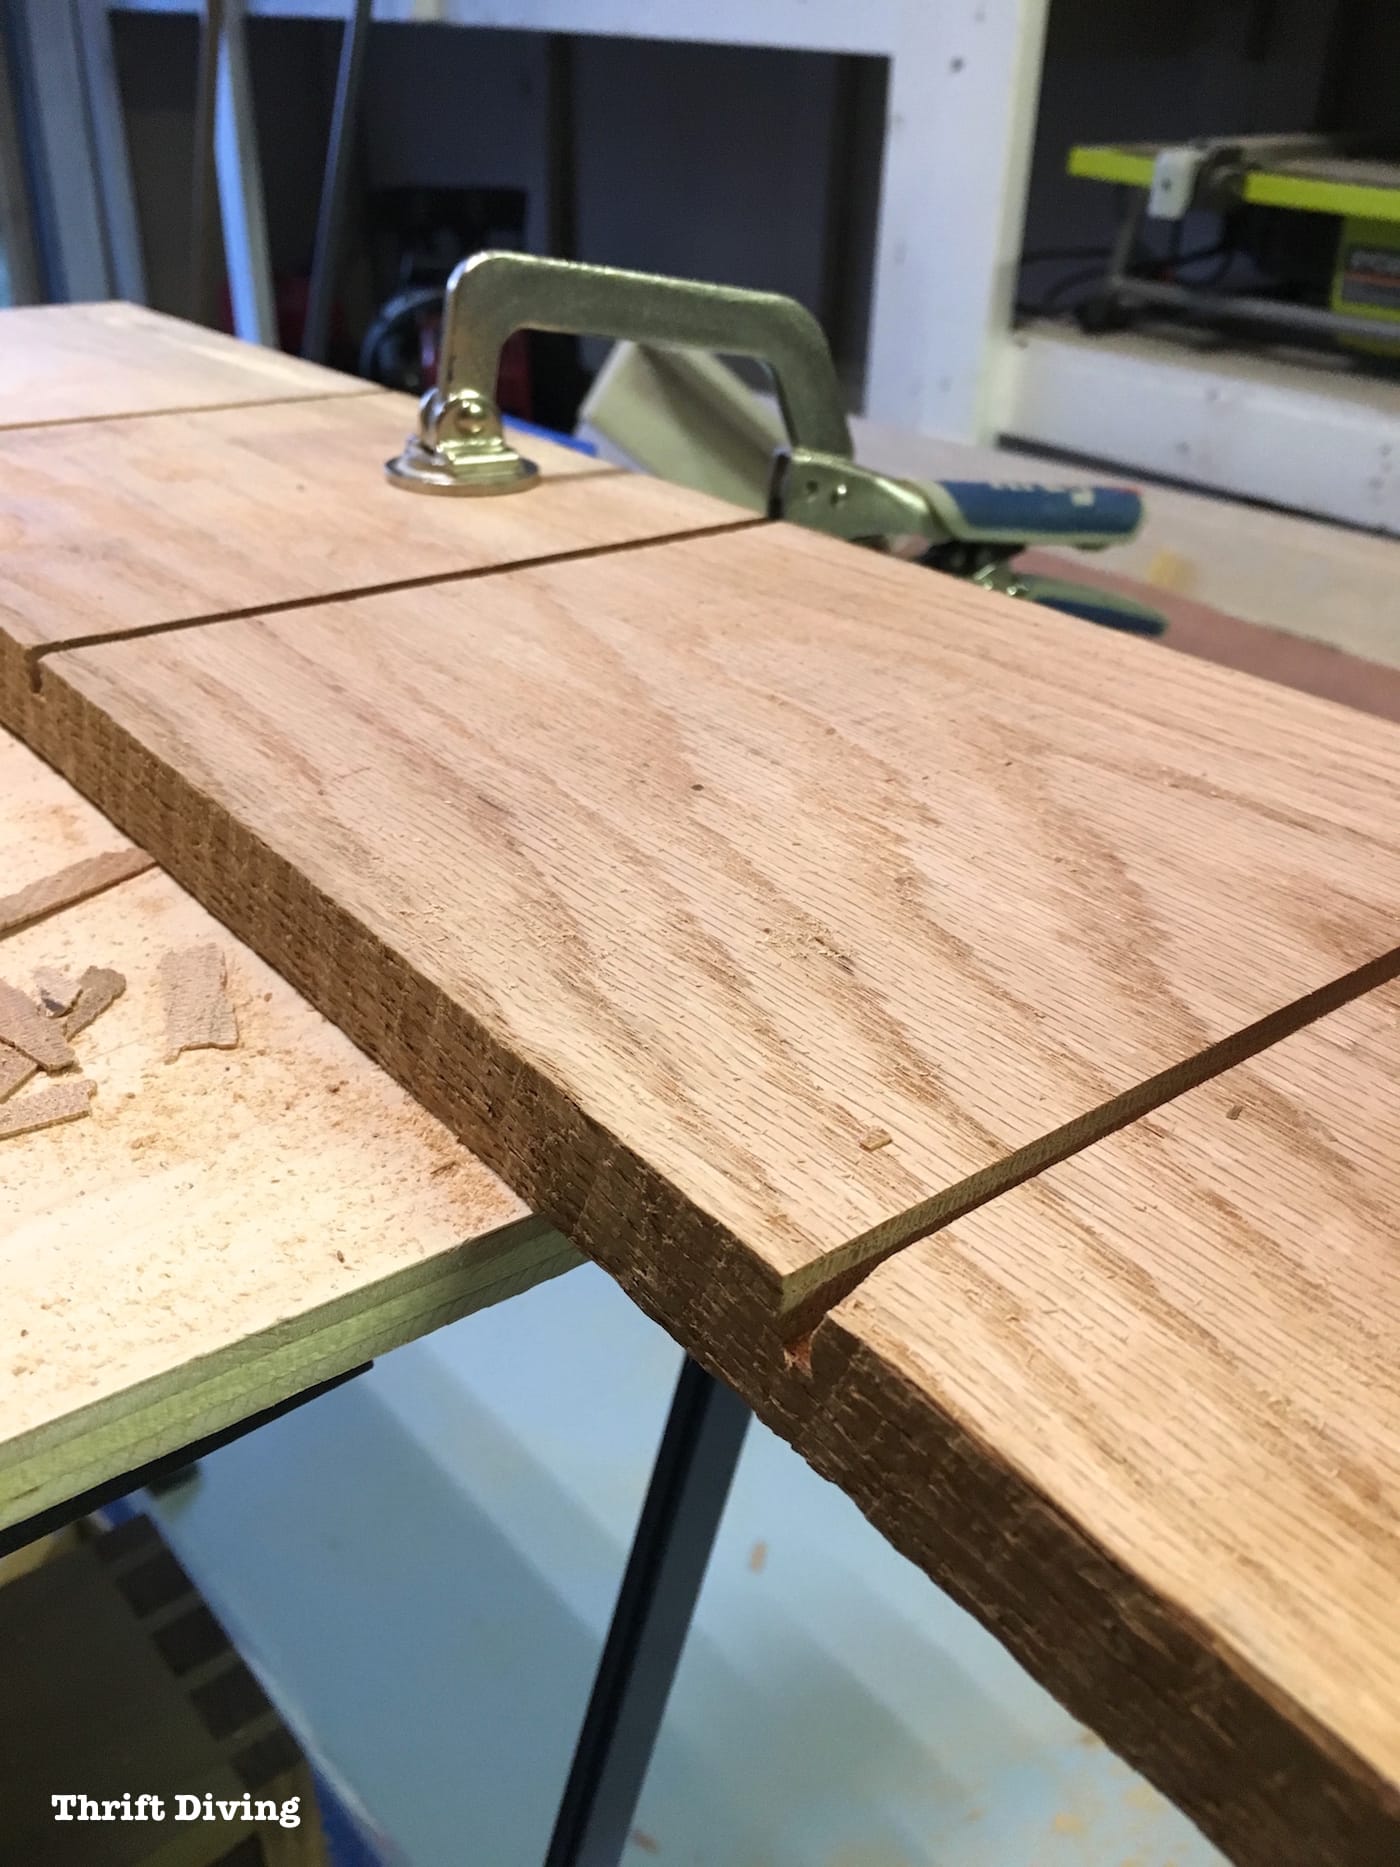
The book recommended cutting small kerfs (a kerf is a slit made from cutting) into your sample board to keep the samples separate from one another. This prevents the dyes from soaking into each other. It’s totally optional but very helpful.
You can also use painters tape. But be sure to use some space between the samples so they don’t bleed.
You can see here how the kerfs keep my samples separated.
STEP 2: Wet the Wood With Distilled Water to Raise the Grain First
When water touches wood, especially wood that has a lot of open pores, like Red Oak, it will raise the grain.
To give you an idea of what Red Oak looks like BEFORE and AFTER you raise the grain, this is a great picture to show you.
Notice on the bottom of this board, the grain is more closed and flat? It’s still porous, but smoother.
But the top, after I wiped on water, then wiped it off and let it dry, suddenly the grain is more pronounced and rough.
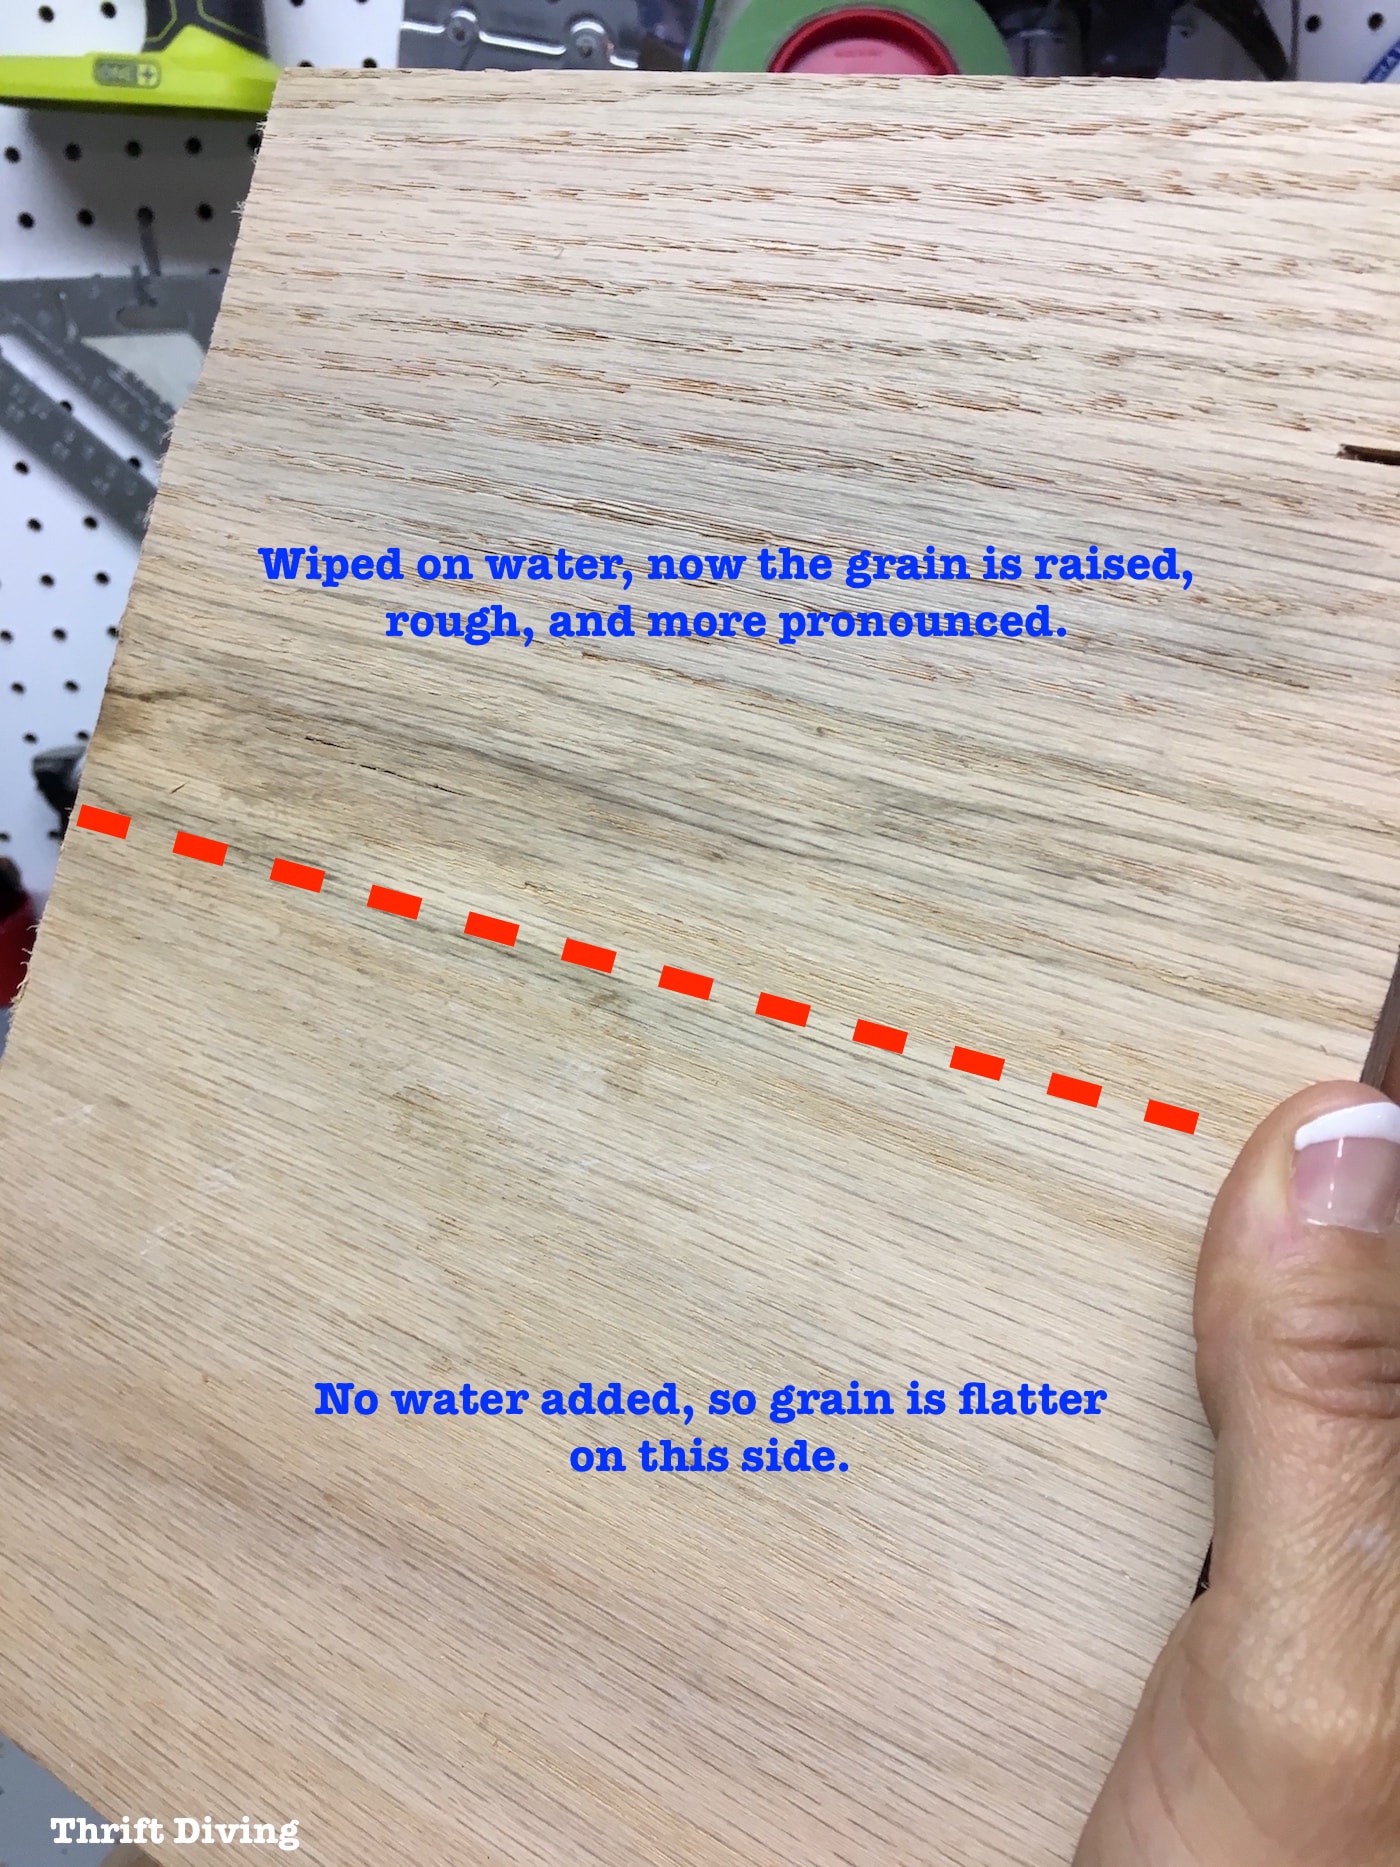
When you use water-based wood dyes, which are dissolved in water, this is what would happen to your wood when you apply them.
The grain would become open and more pronounced. And I believe this can affect the quality of the finish you get.
So to thwart the grain raising, you should pre-wet your wood first when using water-soluble wood dyes.
Just take a small brush or rag, wipe the water on.
Use a clean towel to wipe the water off, and then let it dry about 30 minutes or so, or longer if the wood still looks wet.
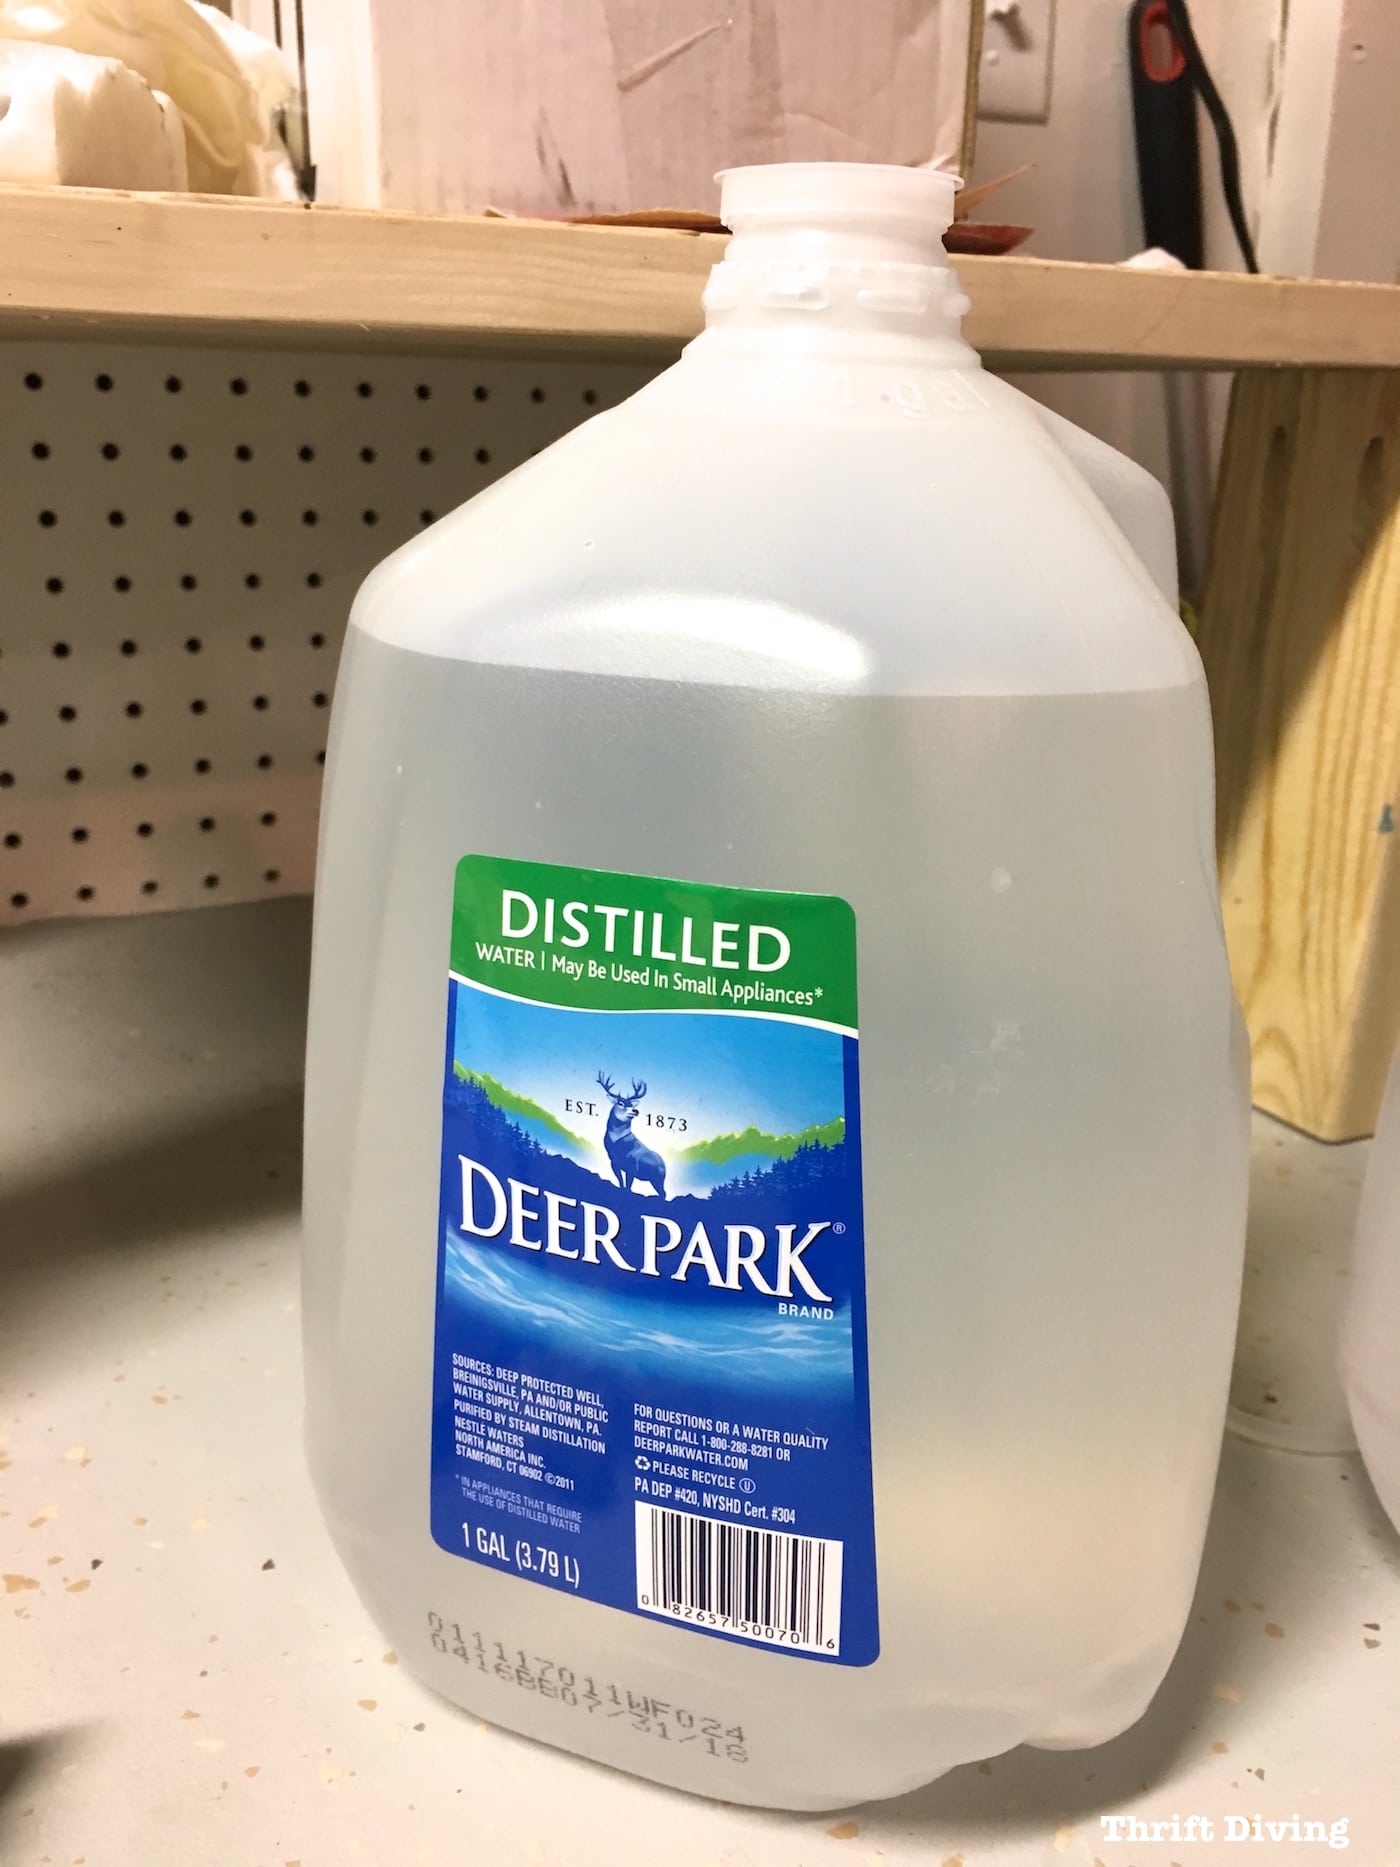
Be sure to use distilled water (water that is boiled to remove the contaminants) when using wood dyes so that no contaminants can interfere with how your dyes turn out.
You can just pick up a jug from your regular grocery store for a little over a buck.
STEP 3: Sand the Wood With 150-grit Sandpaper
Now that the wood is dry and the grain is raised, you just sand down the grain again.
It’s interesting to know that the grain on wood only really raises once. Isn’t that amazing??
So after you raise the grain and then sand it back down, if you put water or water-based products on it again, it won’t raise much. Good to know!
Anyhow, to sand it smooth, I discovered this little tip:
Take a pencil and draw a figure or markings on your wood.
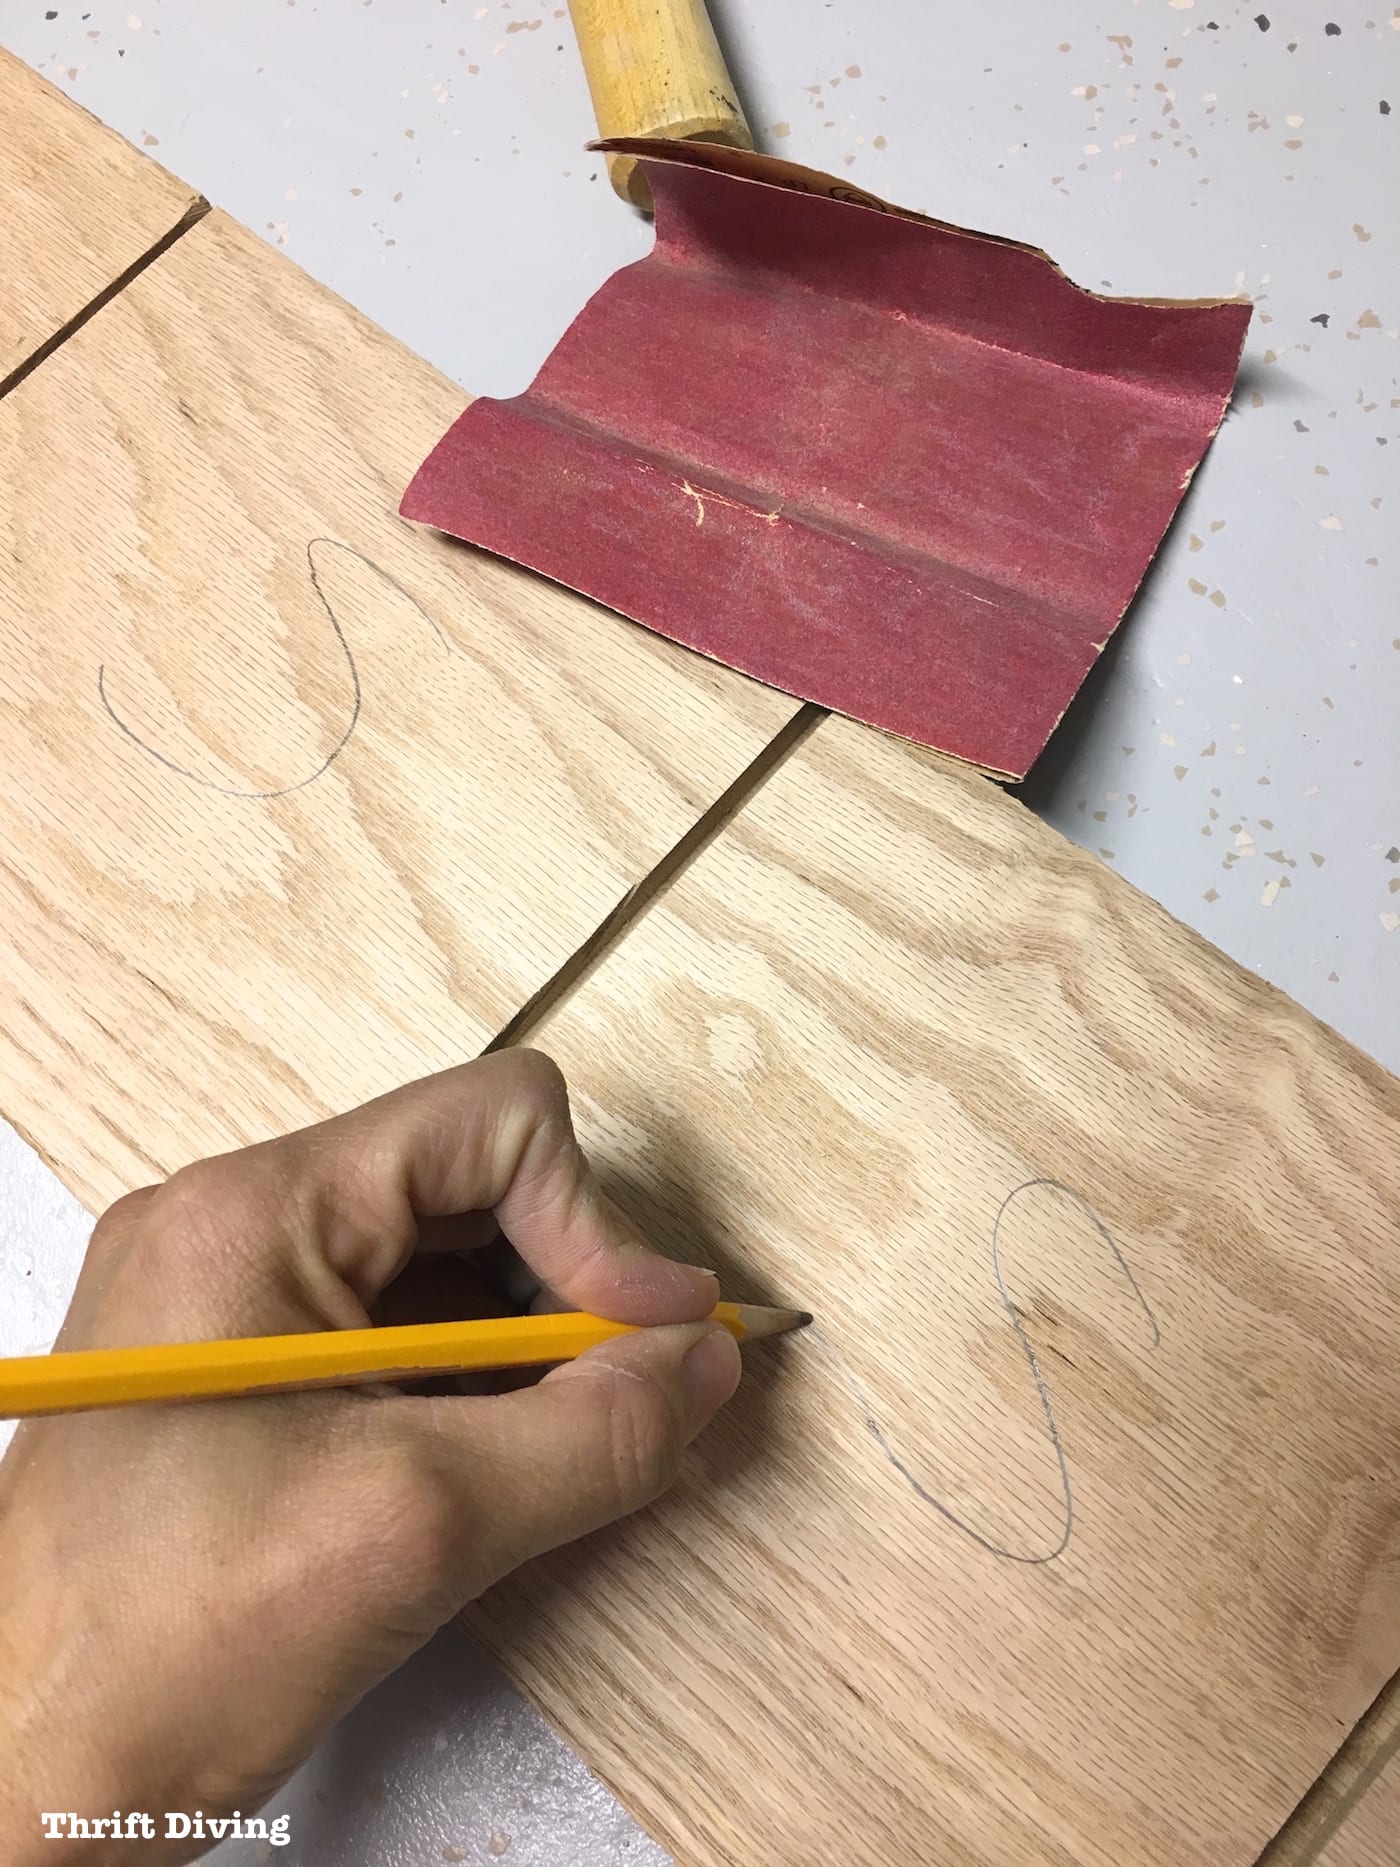
Start sanding with your 150-grit sandpaper.
You’ll see the pencil marks start to disappear.
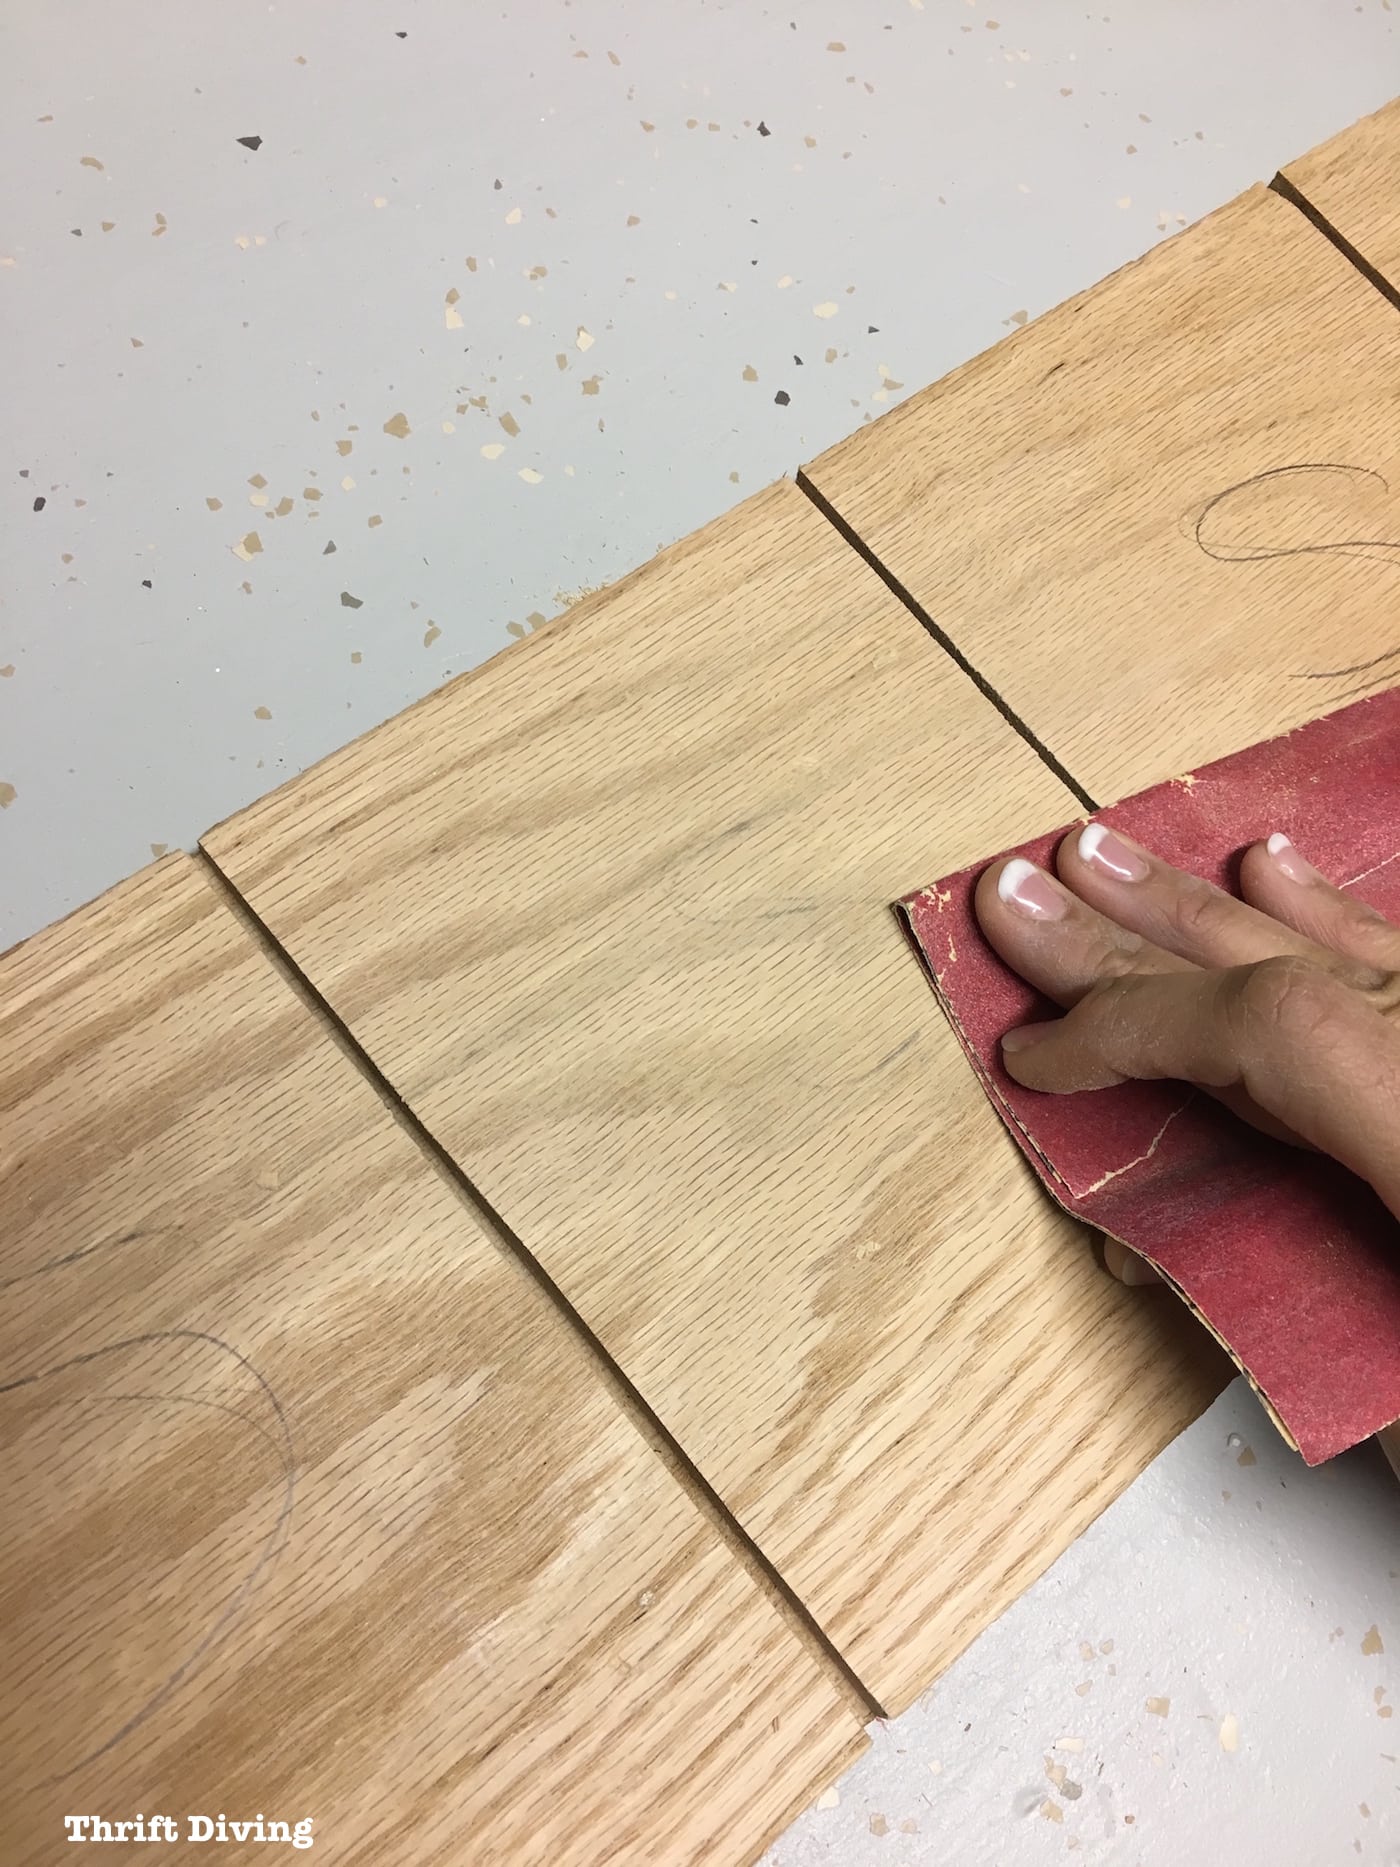
Once you’ve sanded down enough to where you can’t see the pencil markings anymore, you know it’s time to switch to the next finer grit sandpaper.
At that point, you’ll want to place another set of pencil markings and use the 180-grit sandpaper (which is finer) until you can’t see the markings anymore.
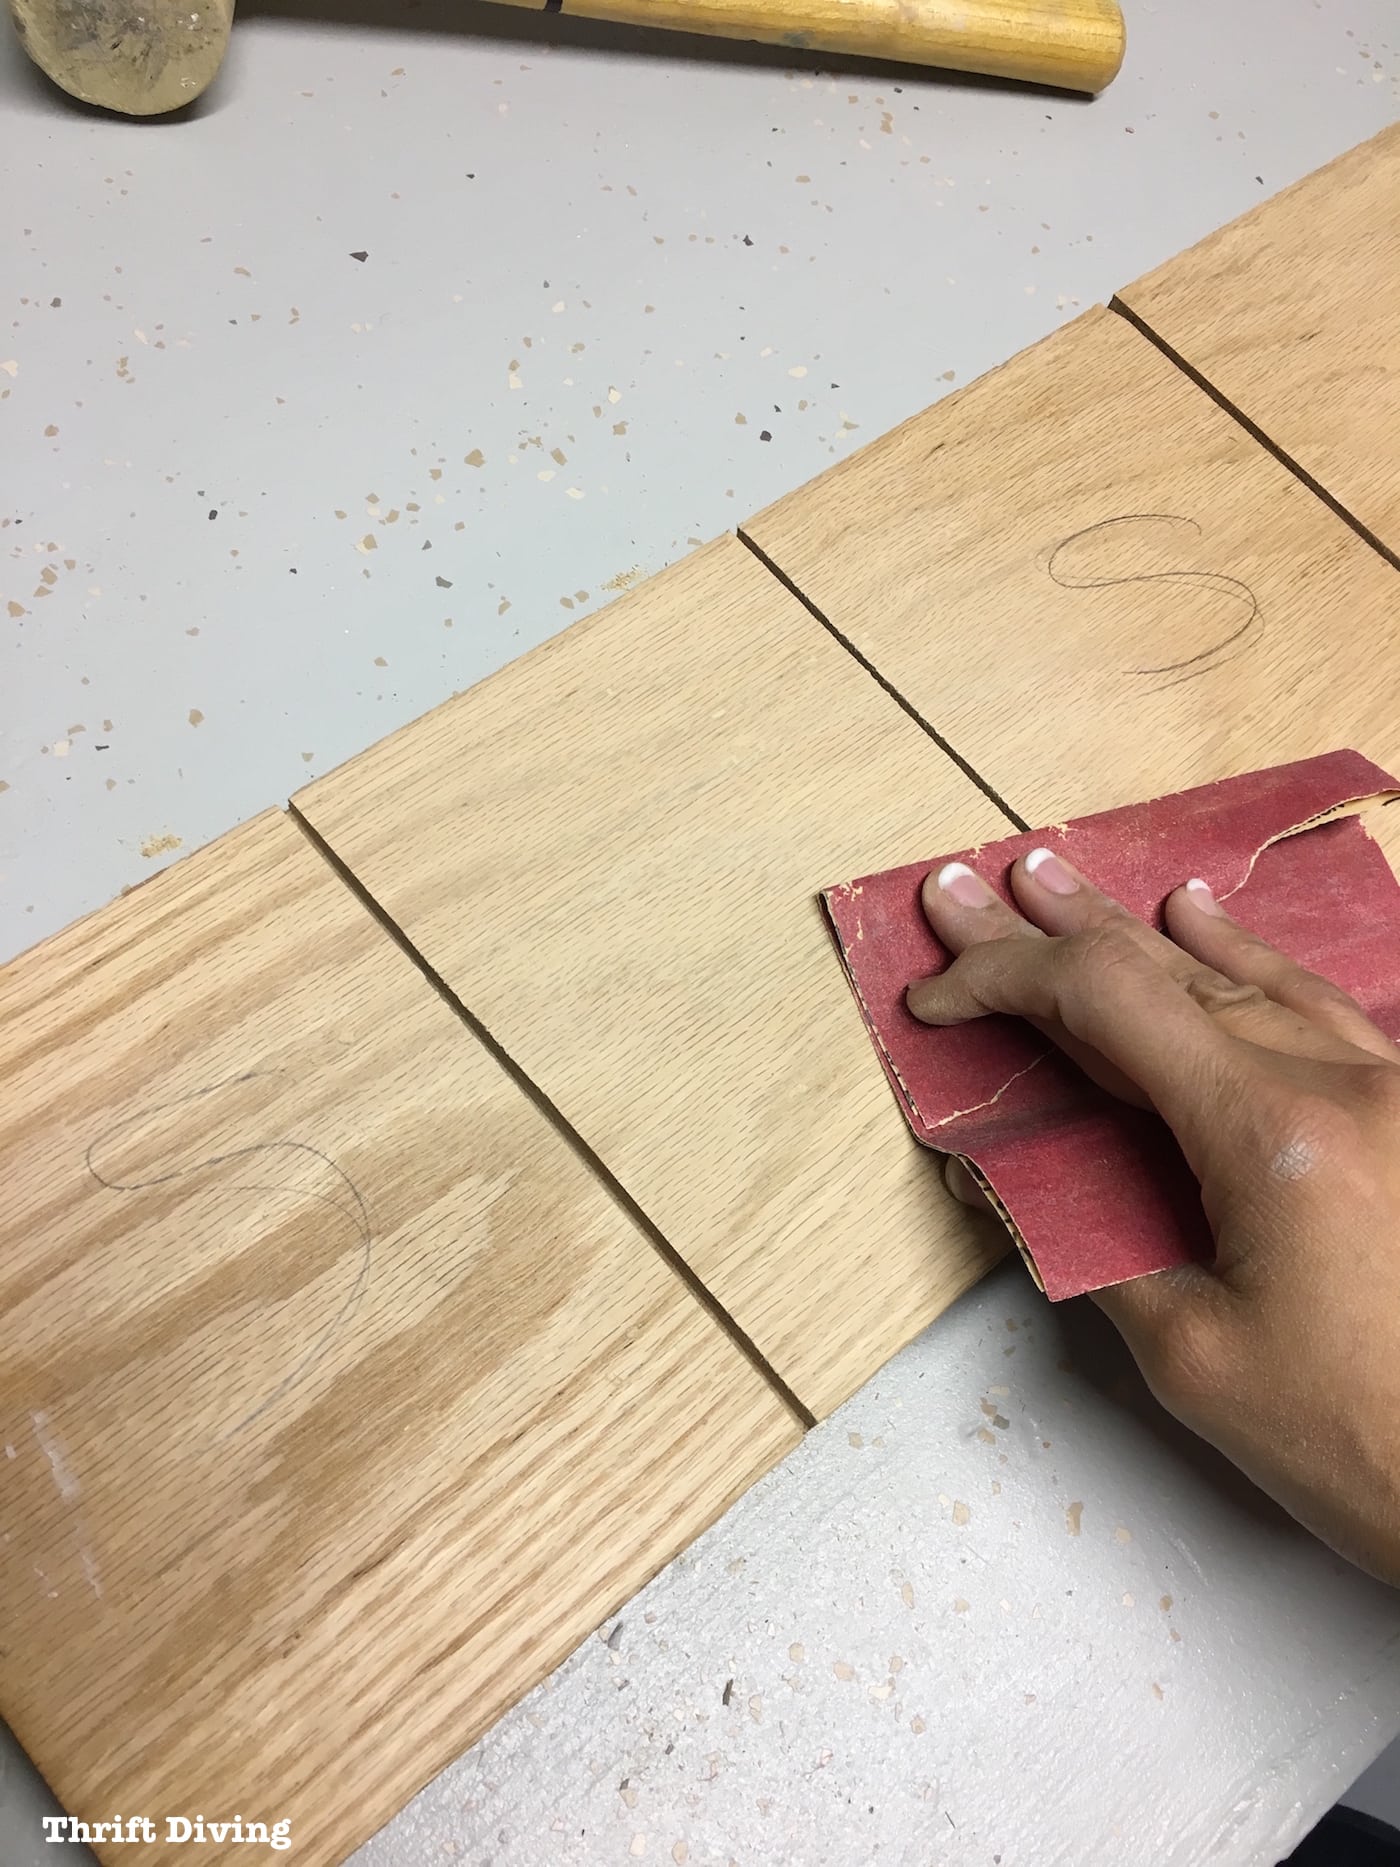
Be sure to wipe up (or vacuum) all the dust, because you don’t want that getting stuck in your finish!
STEP 4: How to Mix Water-Based Wood Dyes
Now that your wood is smooth again, it’s time to mix your dyes.
Every woodworking site I researched all suggested using water-based wood dyes (also known as aniline dyes, although apparently, they don’t contain the chemical aniline anymore). The reason why they’re easier to apply is because they don’t obscure the grain of the wood as much as other dyes, and are safer (since you’re only mixing them with water and not other solvents).
At the woodworking shop the other day I picked up a few of these TransFast powdered dyes (about $12.50 each).

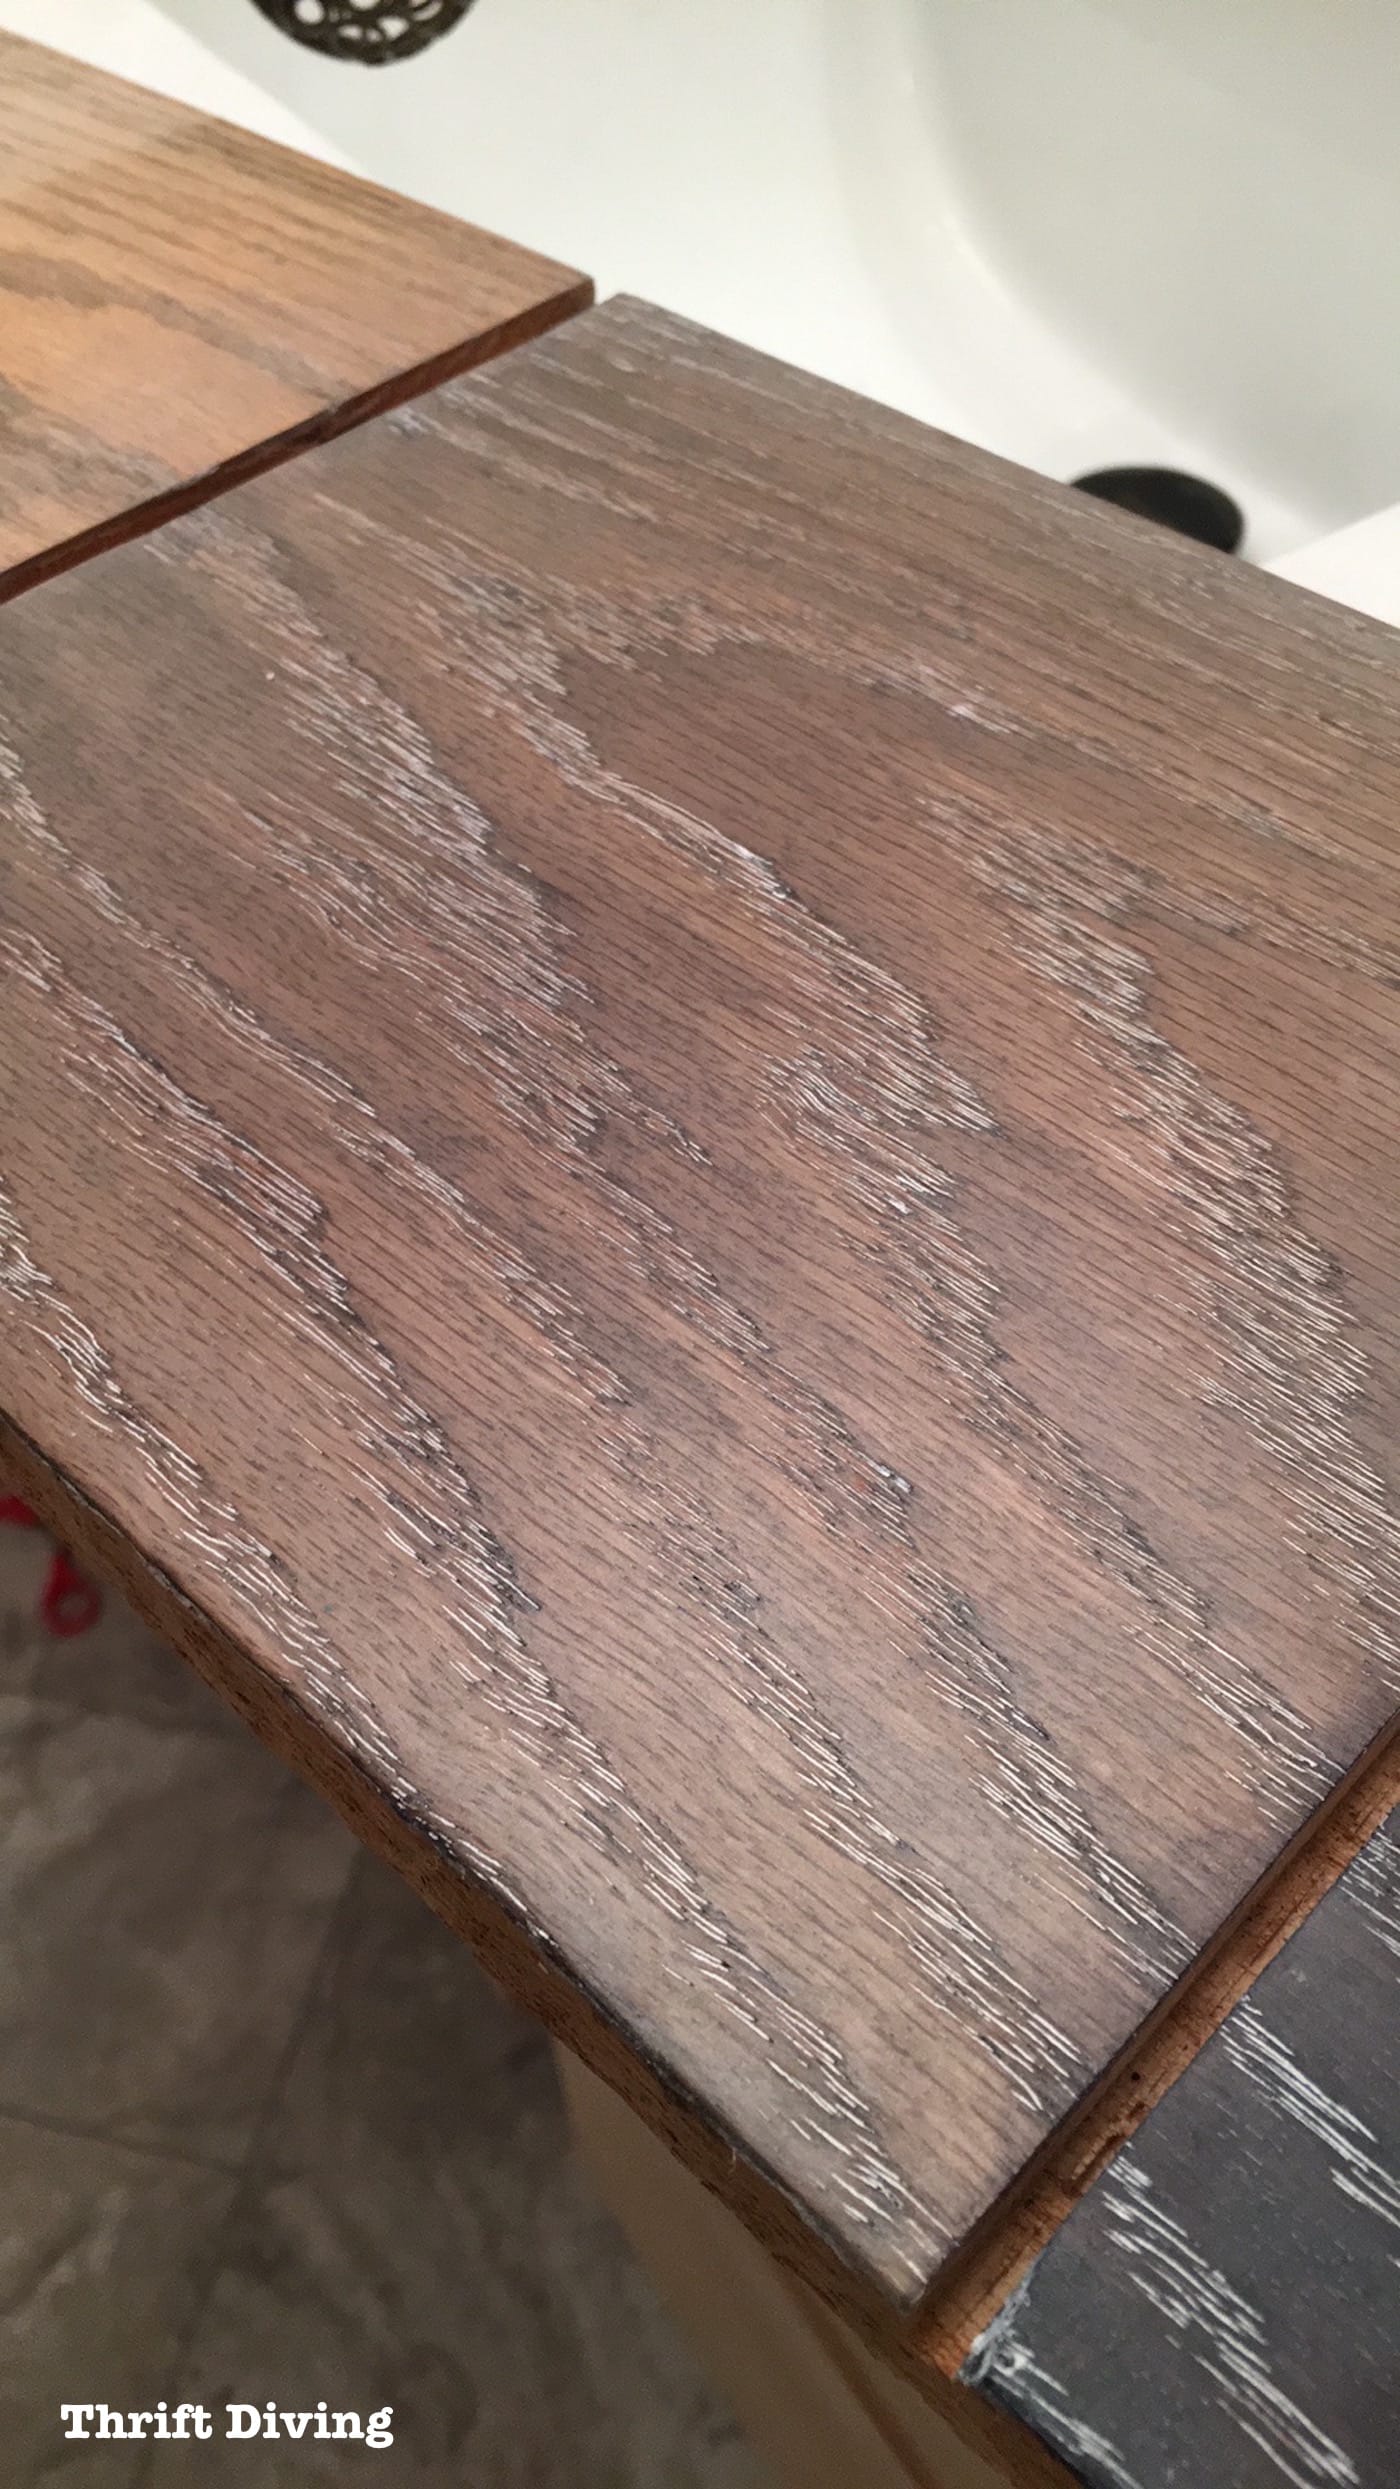
I decided to test out the Grey and Ebony on my sample board to see which one I may want to use for my DIY bathroom vanity.
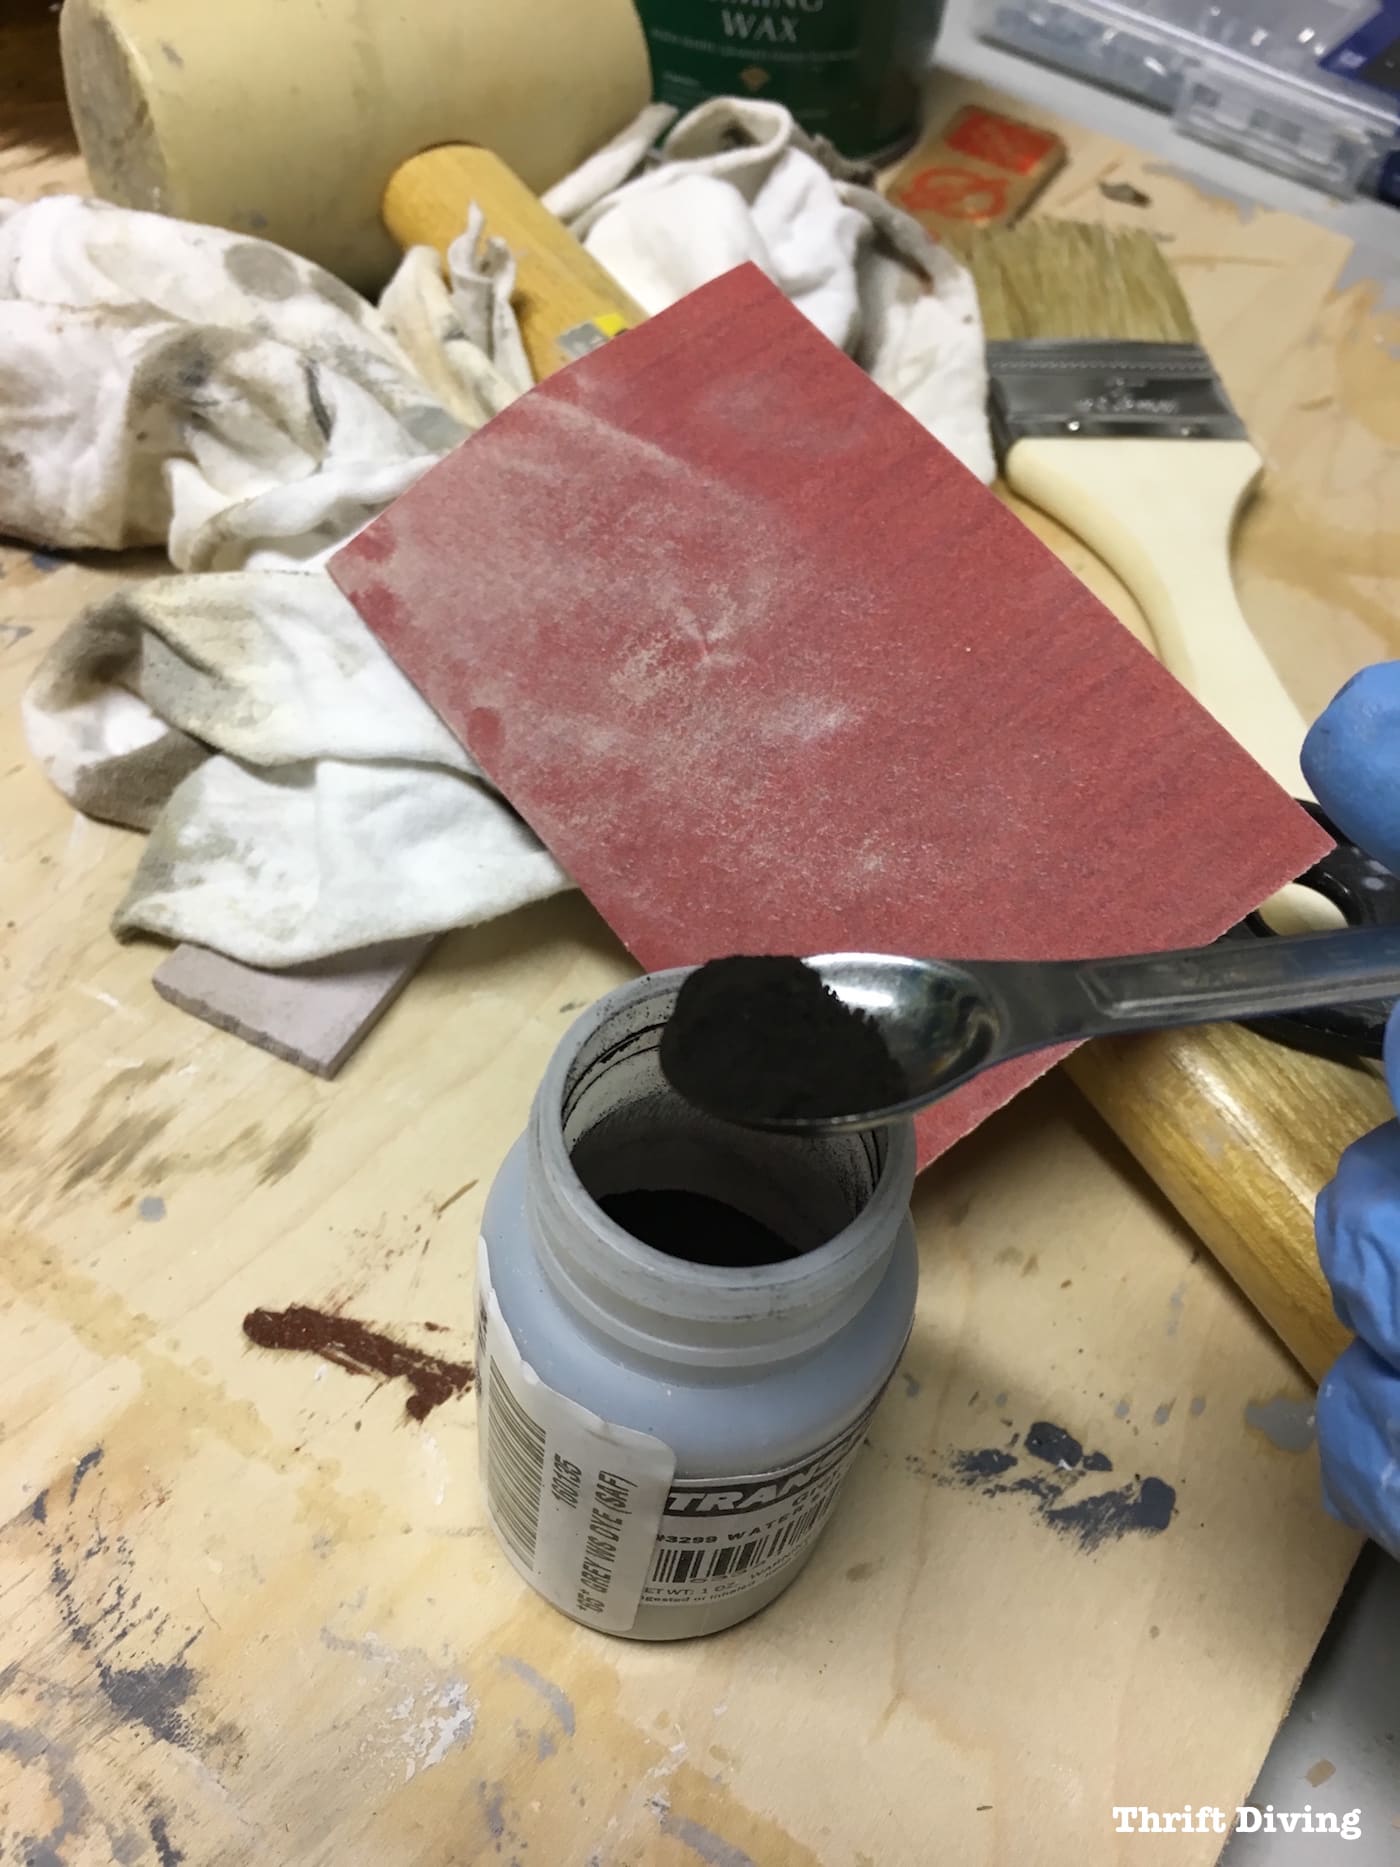
How to Mix Powdered Wood Dye
What the manufacturer recommends for these Homestead TransFast dyes is to mix 1 ounce of powdered dye in 2 quarts of hot (not boiling) water. (Hot water helps the powdered dye to dissolve better, but let the mixture cool down before you use it).
However, everything I’ve read online suggests mixing 1 oz. of dye in 1 quart of water. (The small containers of wood dye that I bought are exactly 1 ounce, by the way).
You can mix even smaller amounts for sample boards.
However, I later learned that you should always mix it stronger than the manufacturer suggests.
For example, instead of mixing 1 oz. of powdered wood dye in 1 quarts of hot water, try mixing 1 oz. of dye in 1 pint of hot water.
It’s not an exact science because it’s going to depend on how dark or light you want your wood to be (don’t over mix, however, or you’ll end up with a bunch of dye at the bottom and it could make your wood powdery).
But the reason you’d want to mix it more concentrated is that you can always later add water to lighten it to the exact shade you want.

I didn’t do this step, but it’s recommended to filter your mixed dye at his point, using a paint filter or maybe a coffee filter.
Good to know: Wood dye will last about 6 months once it’s mixed. Store it in a cool, dark place in a covered container or jar. In the powdered form, it lasts indefinitely. Check out these FAQ about the Homestead aniline dyes website.
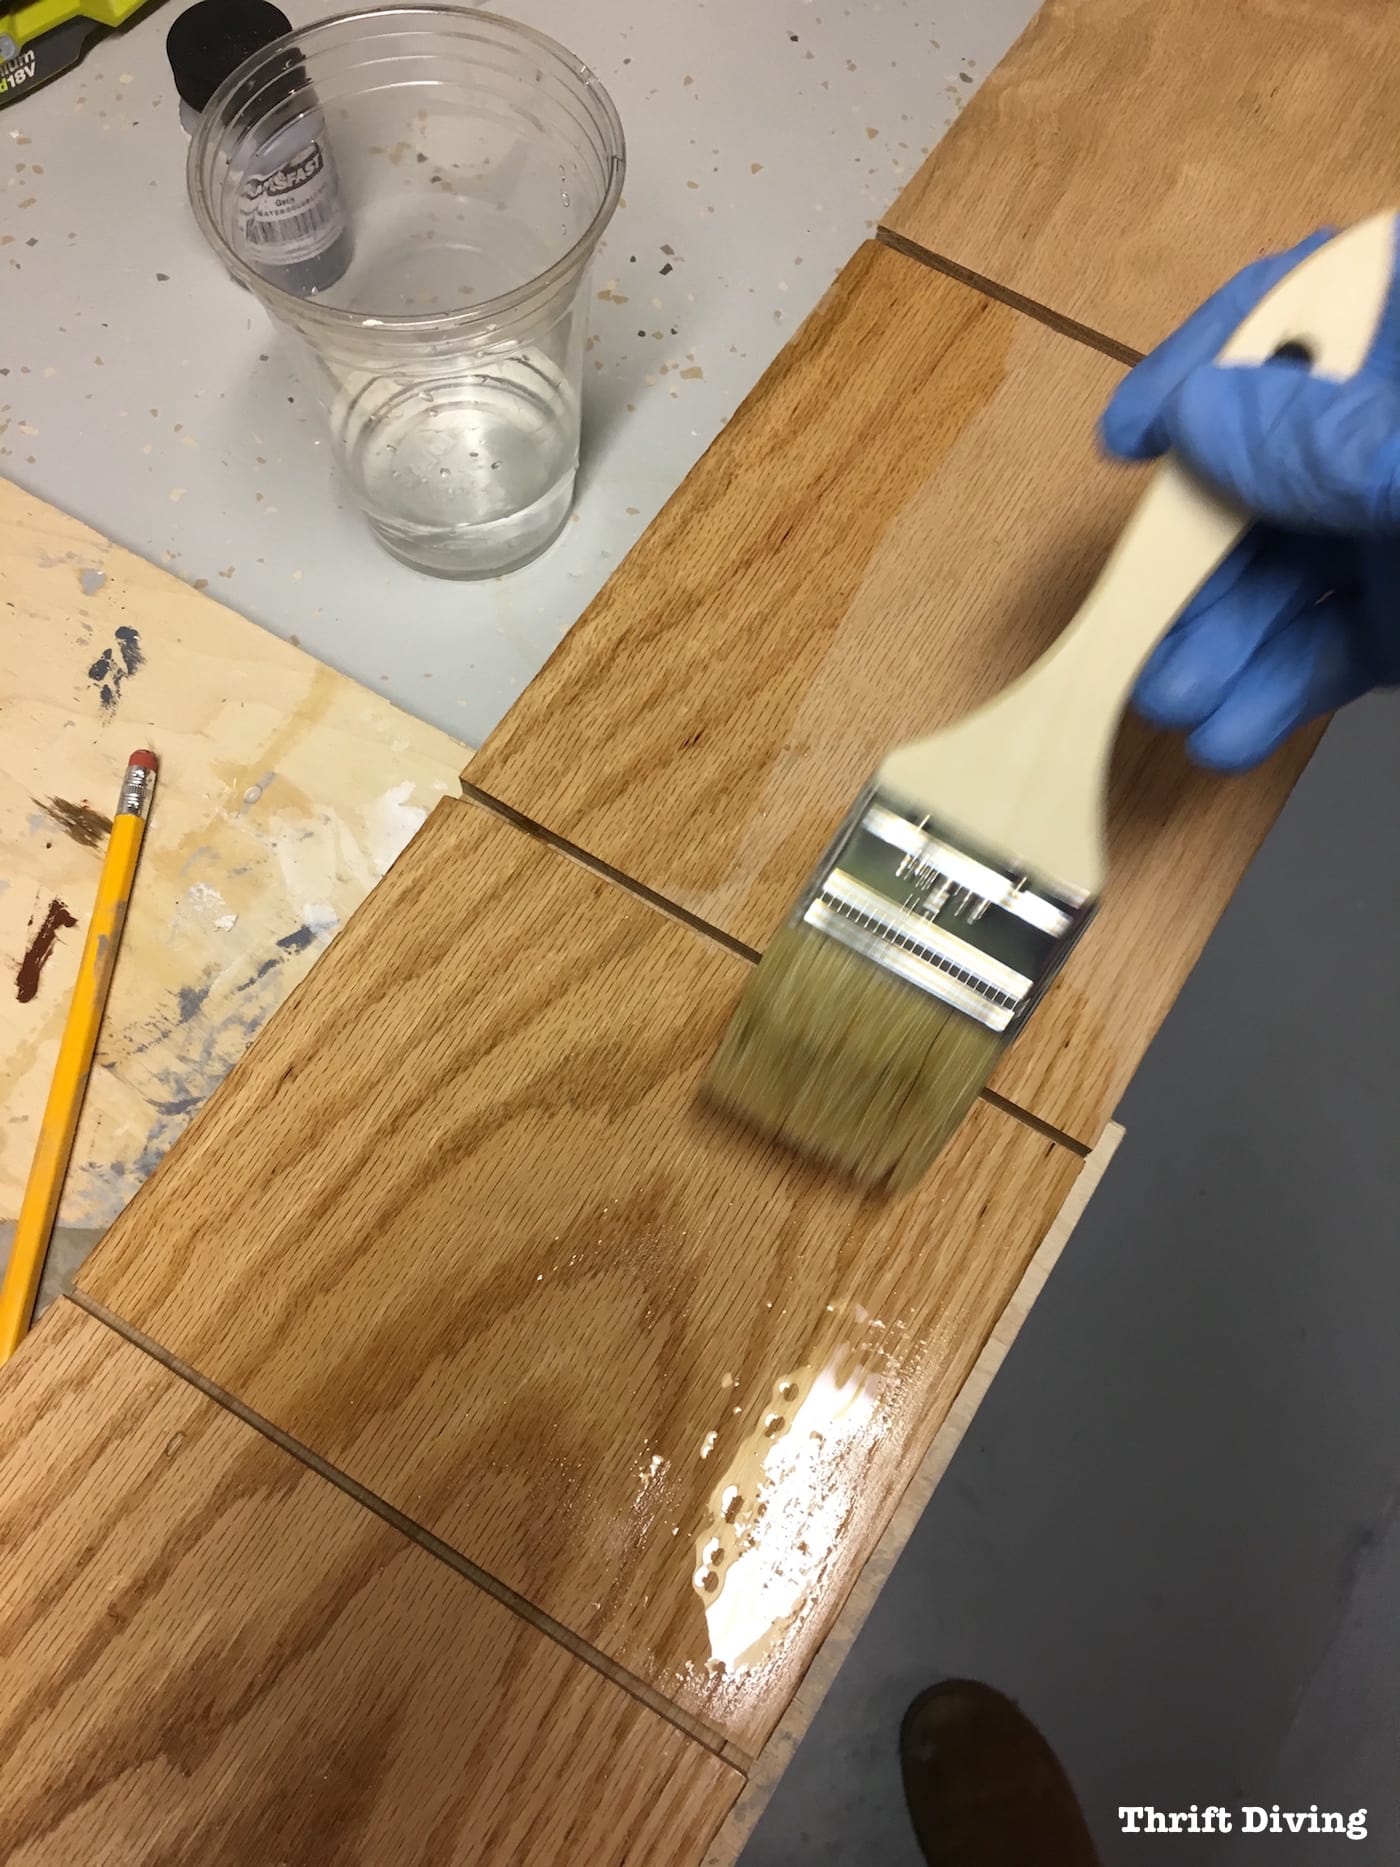
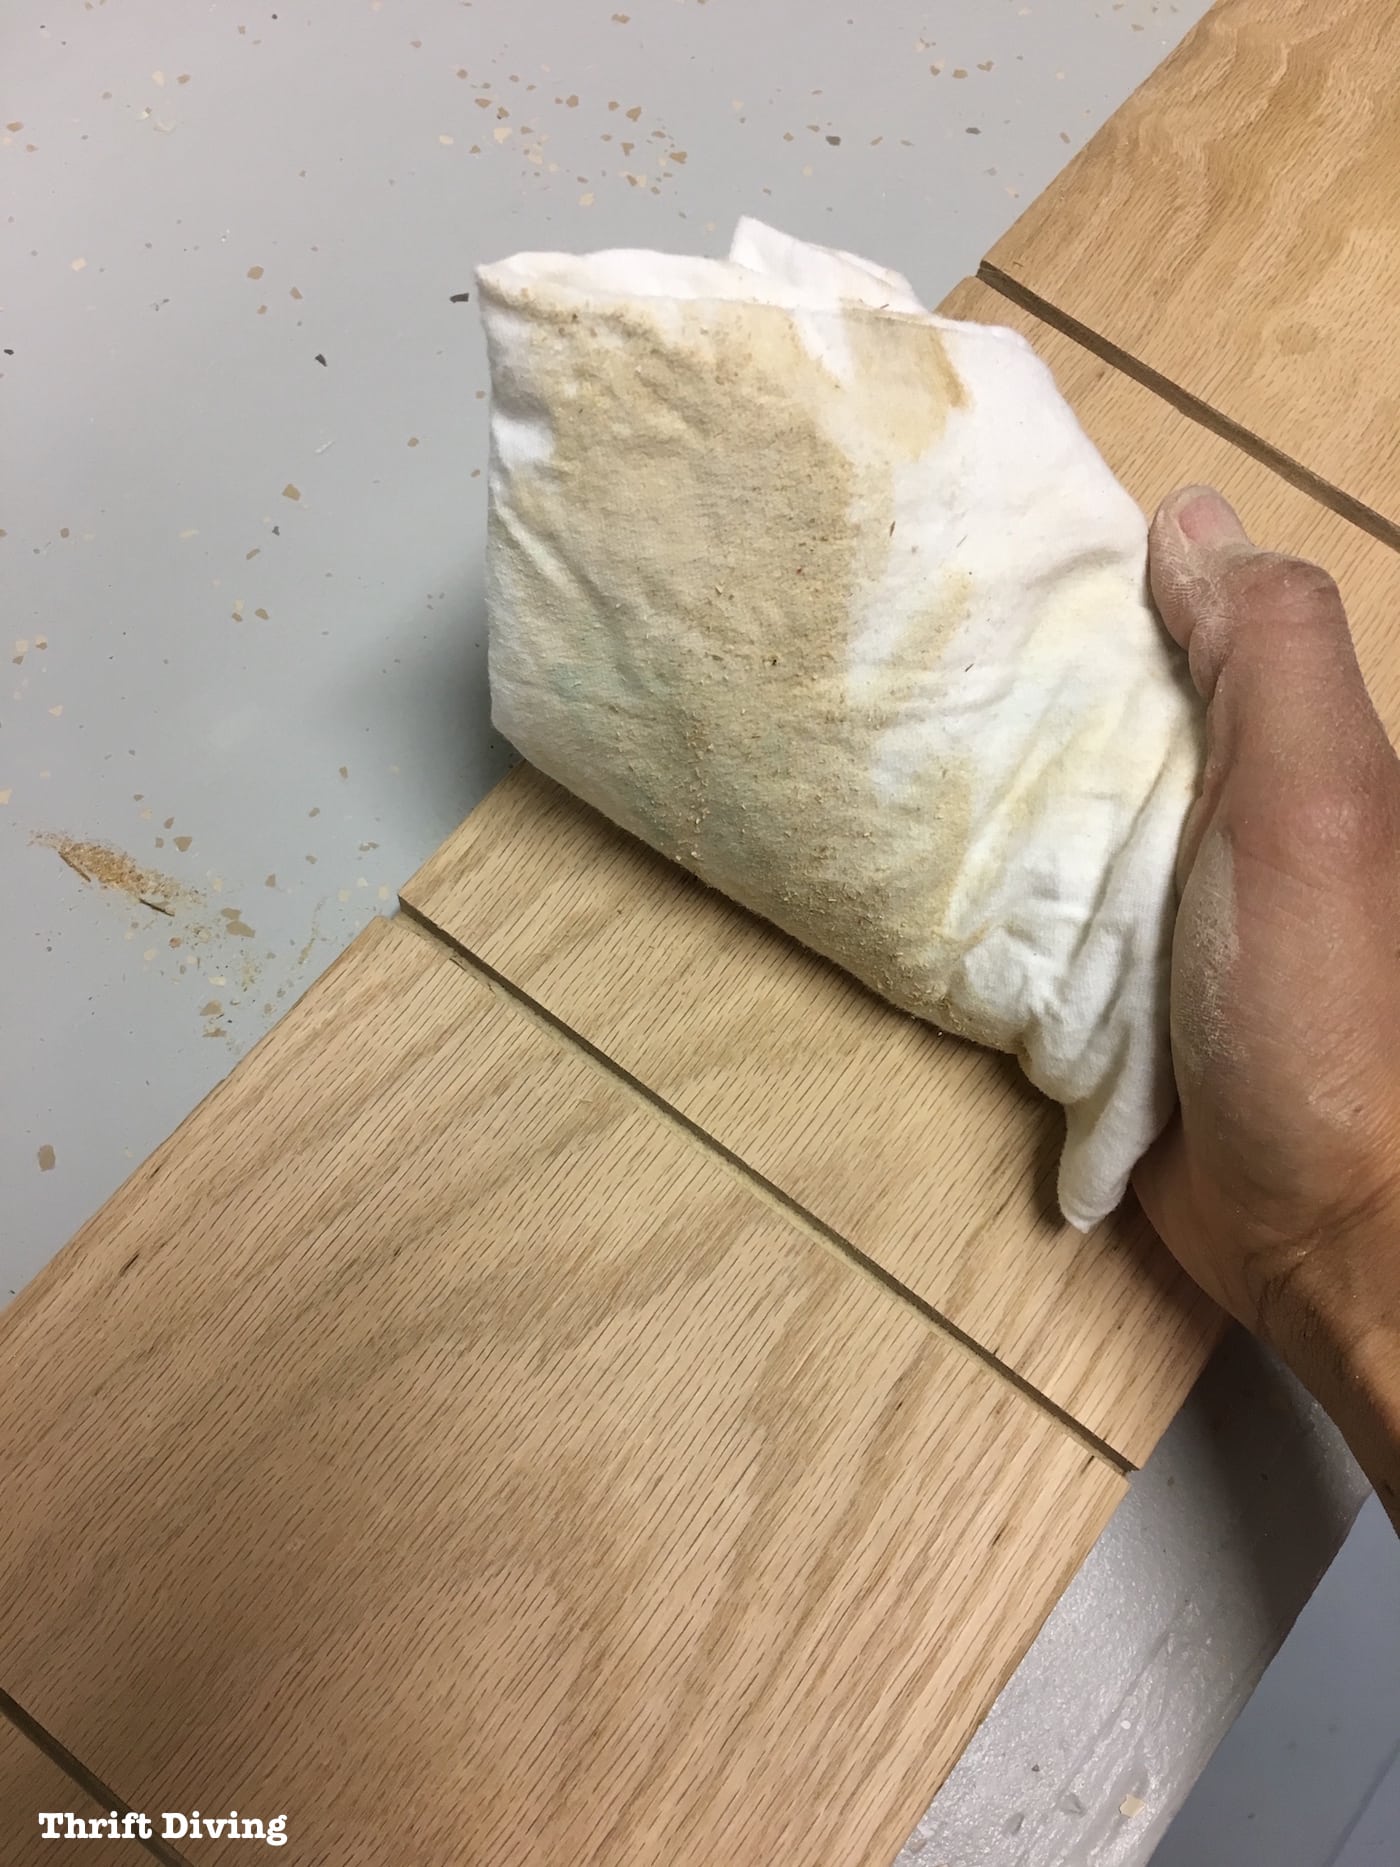
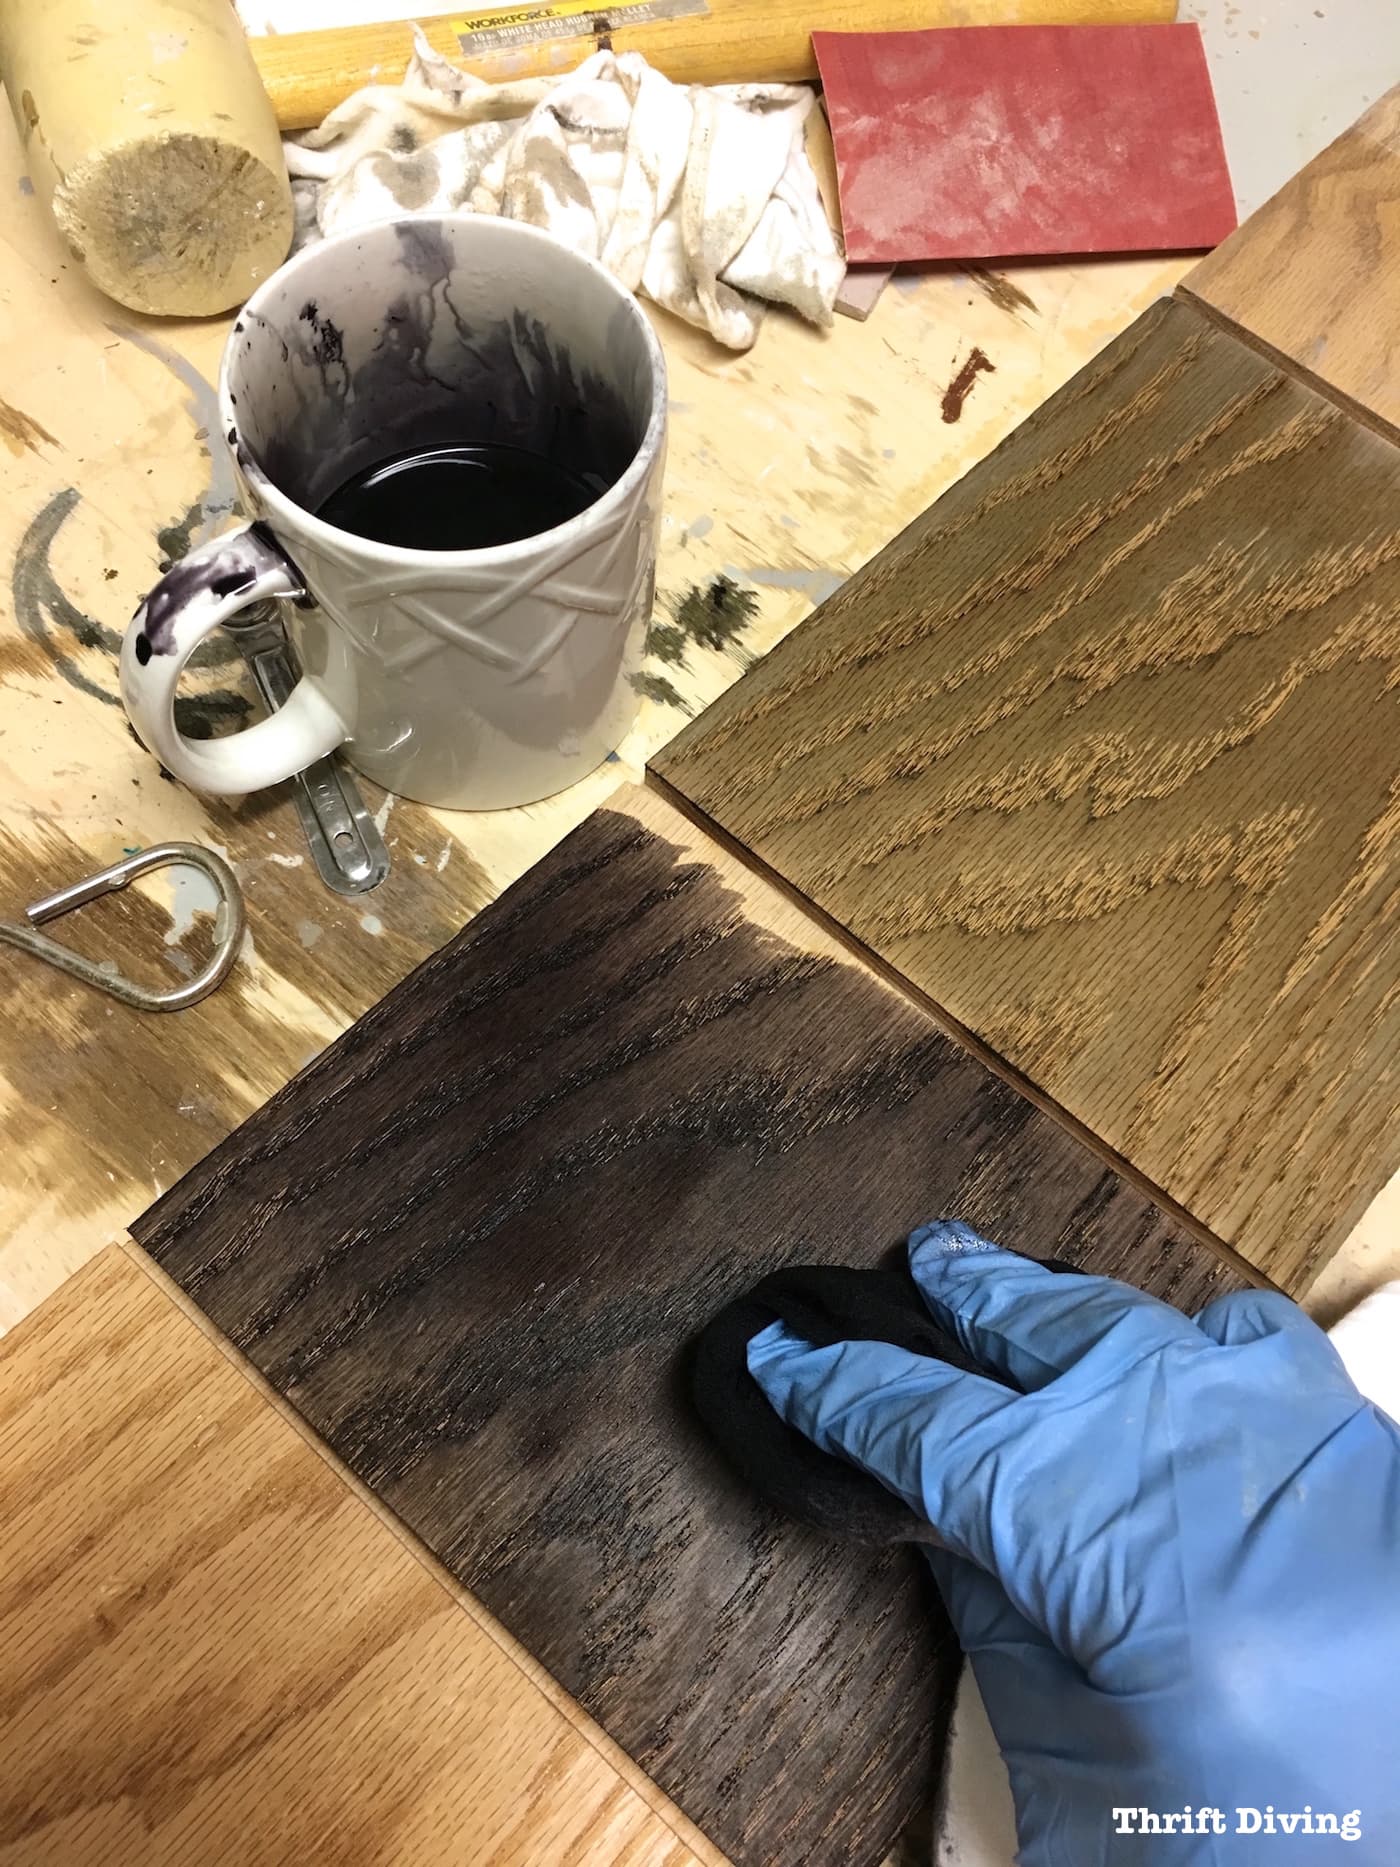
STEP 5: Apply the Wood Dye with a Rag, Brush, or Sponge
The first batch of wood dye that I mixed was waaaayyy too light.
I ended up adding more powdered dye, but honestly, I still don’t think it was as concentrated as it could have been because it went on lighter than I expected.
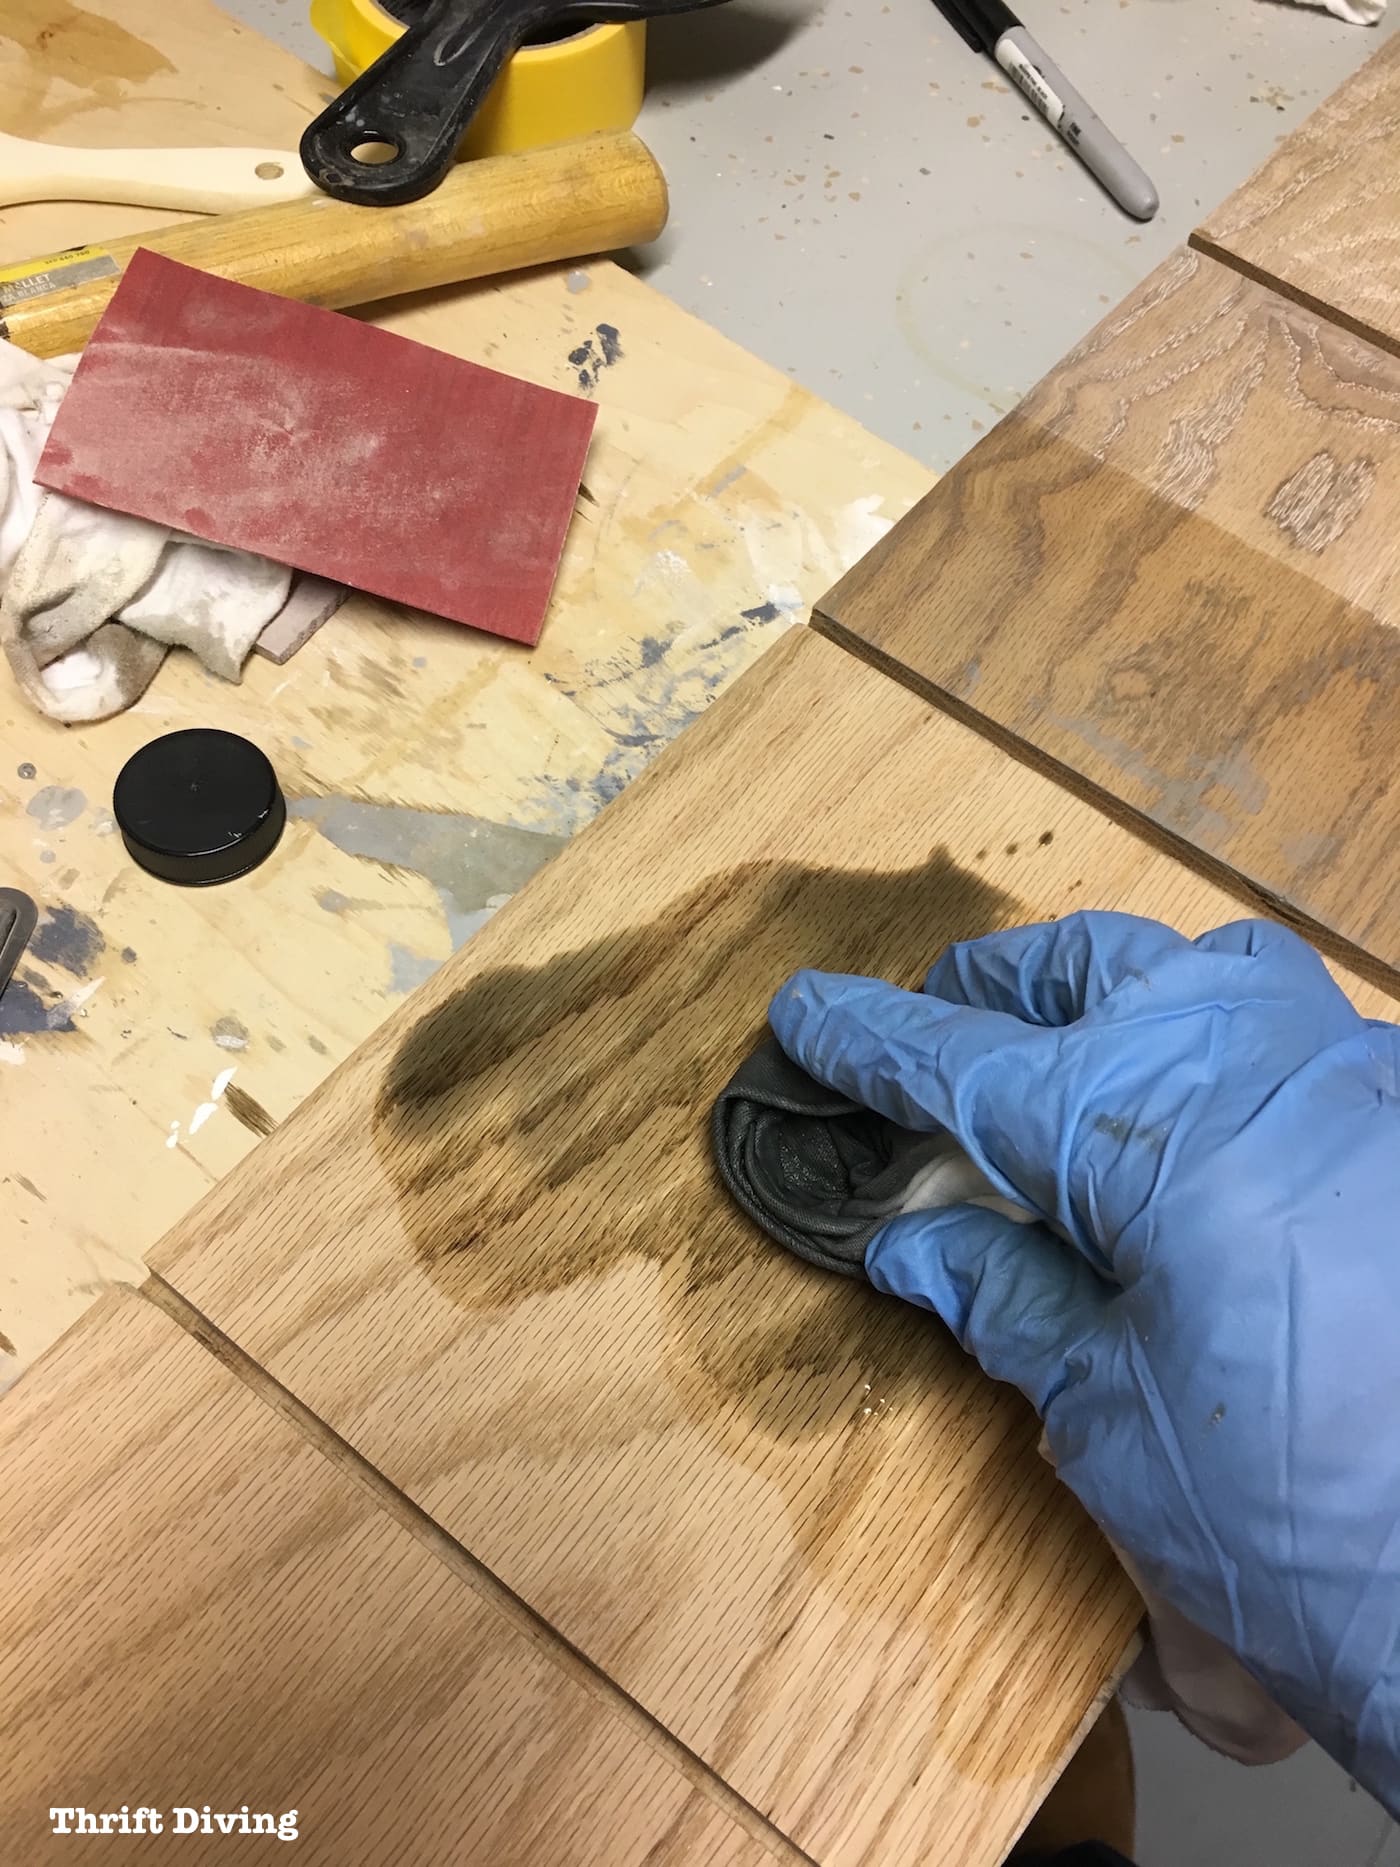
Since the color was too light, adding more powdered dye solved that problem.
If the color is too deep or intense on your wood, you can always wipe it with a wet cloth and instantly lighten it up (you can’t change the color of pigments stains very much once you’ve applied them). This is the good thing about water-based dyes: they dry more slowly, so you have more room to change their color or intensity.
Anyhow, after making it a bit more concentrated, I noticed that it did start to get darker.
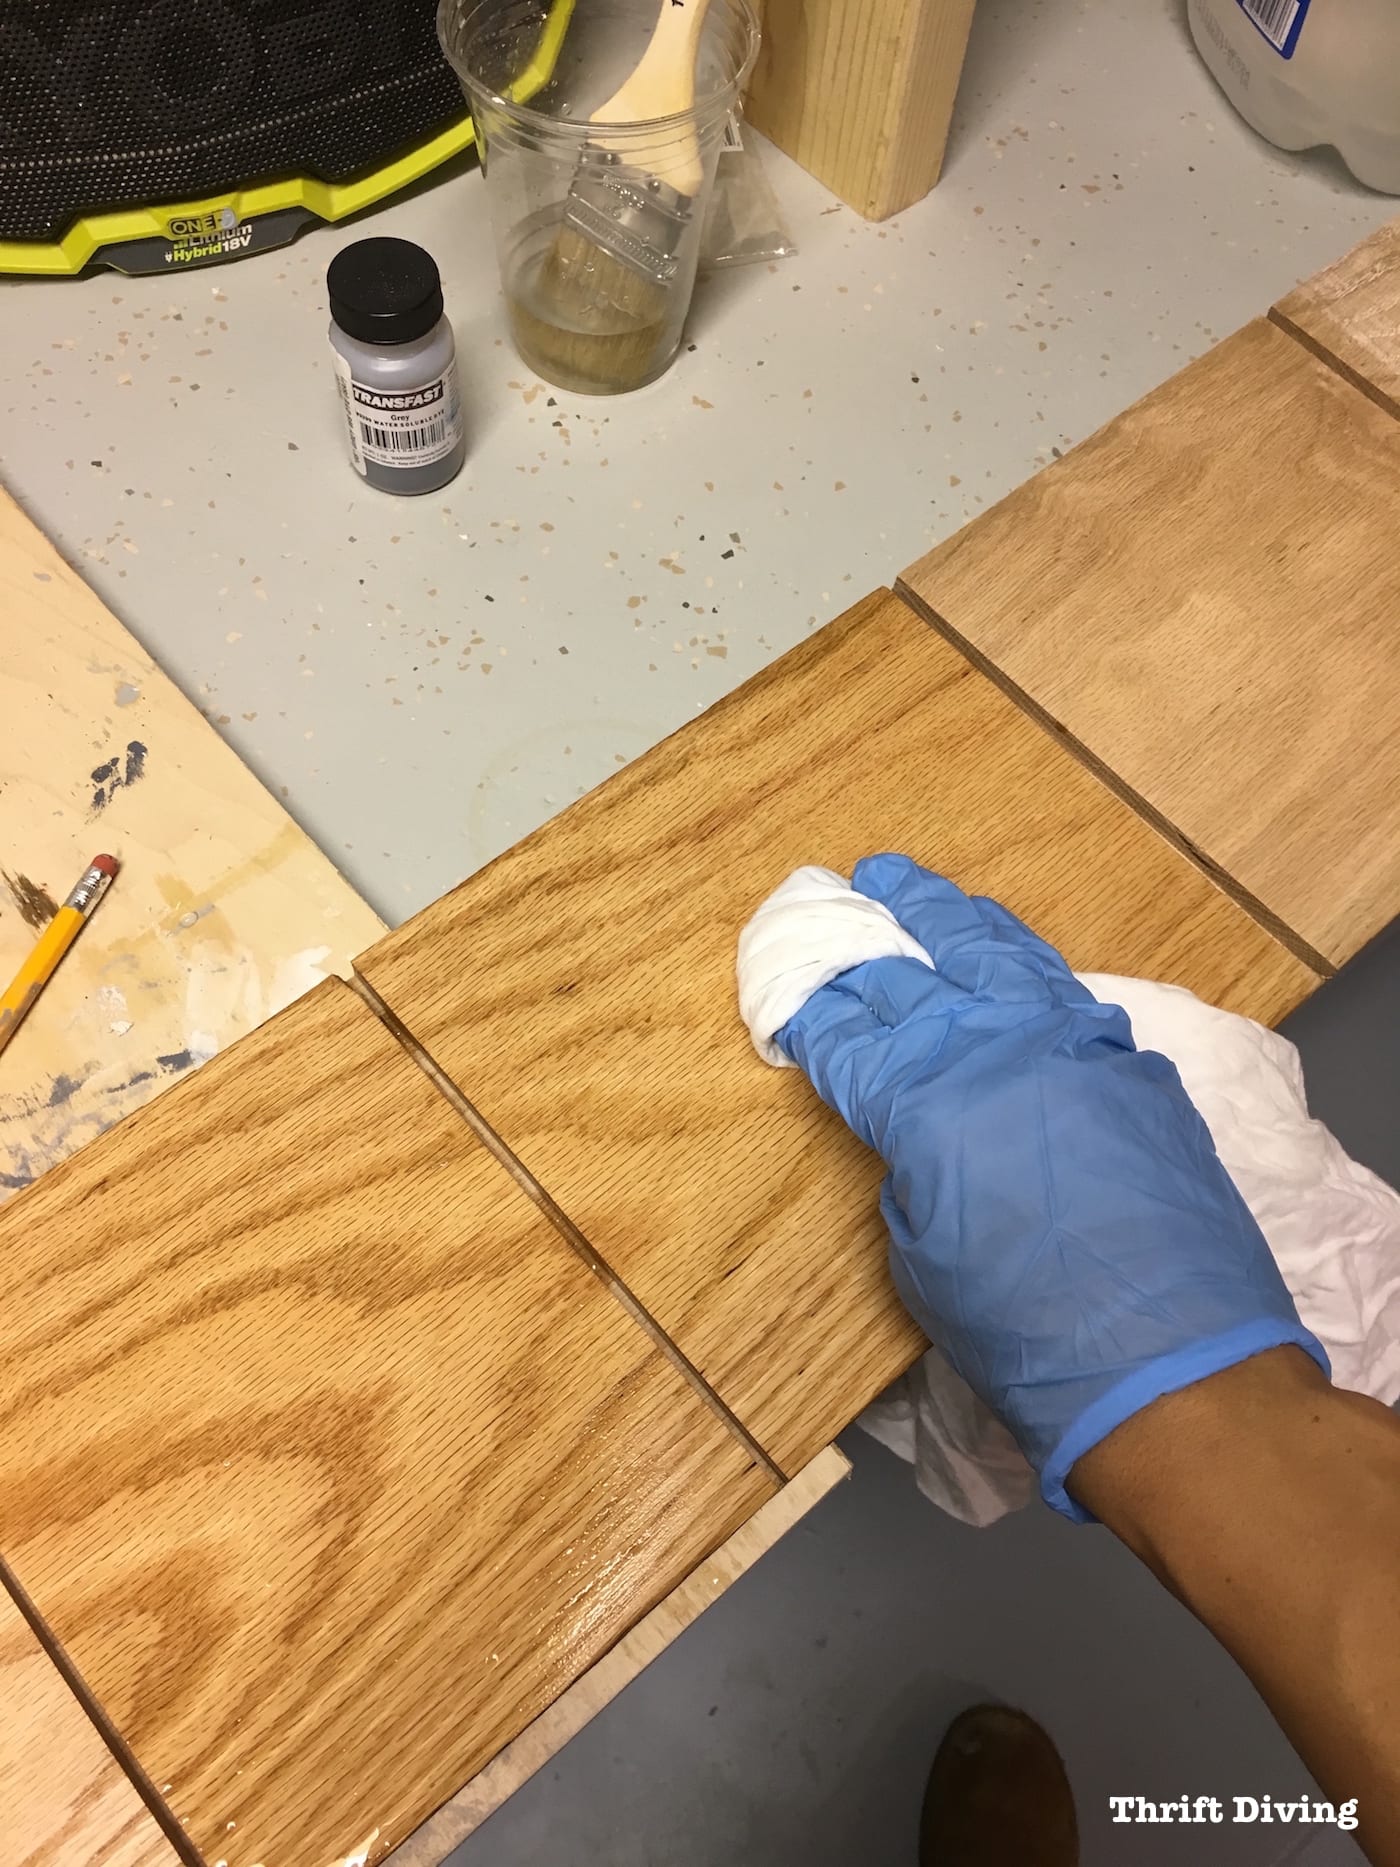
Once it’s all covered, wipe off the excess.
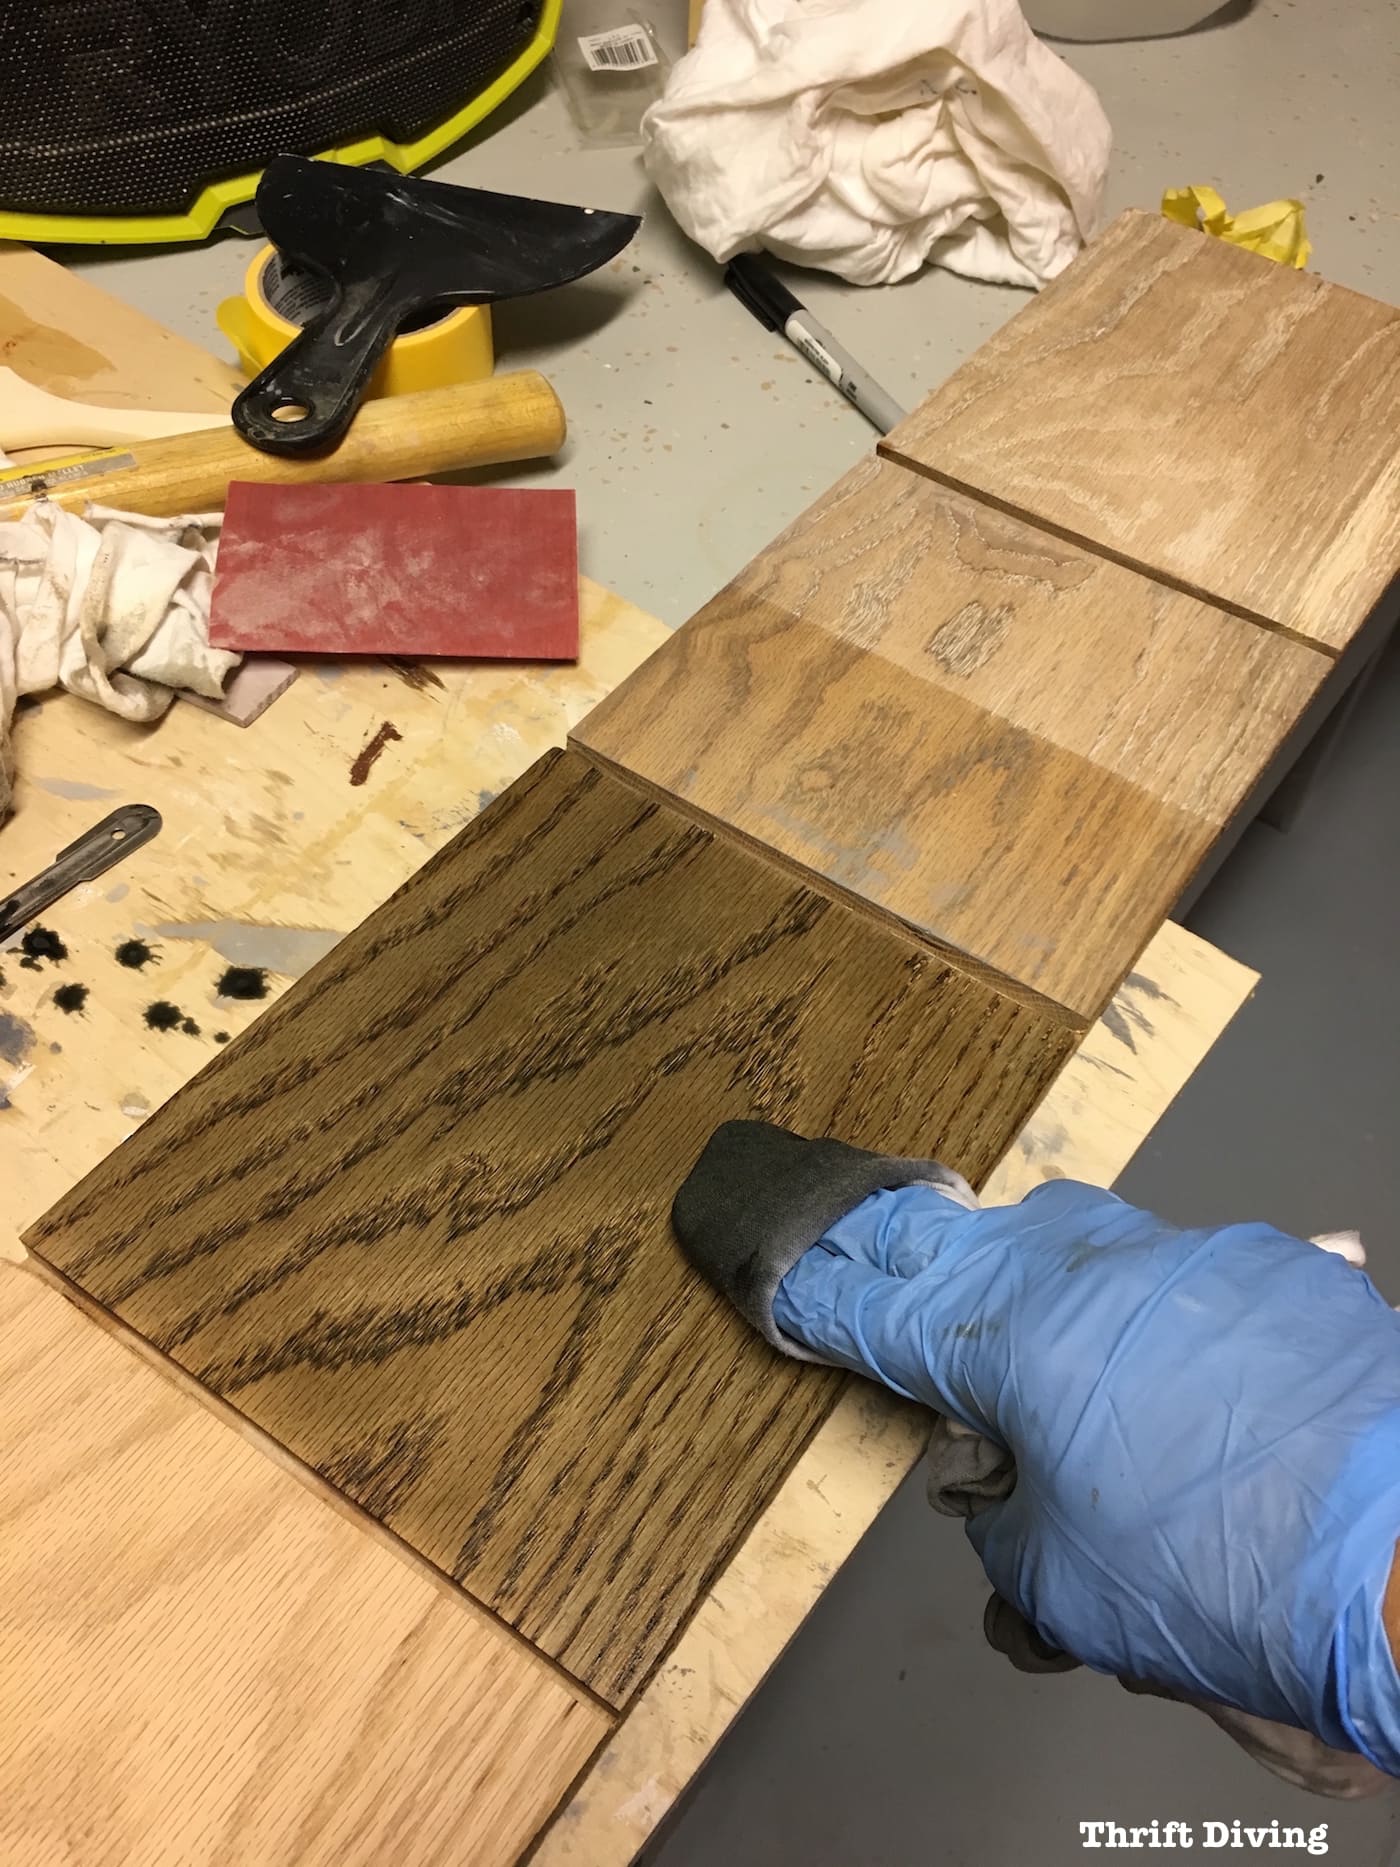
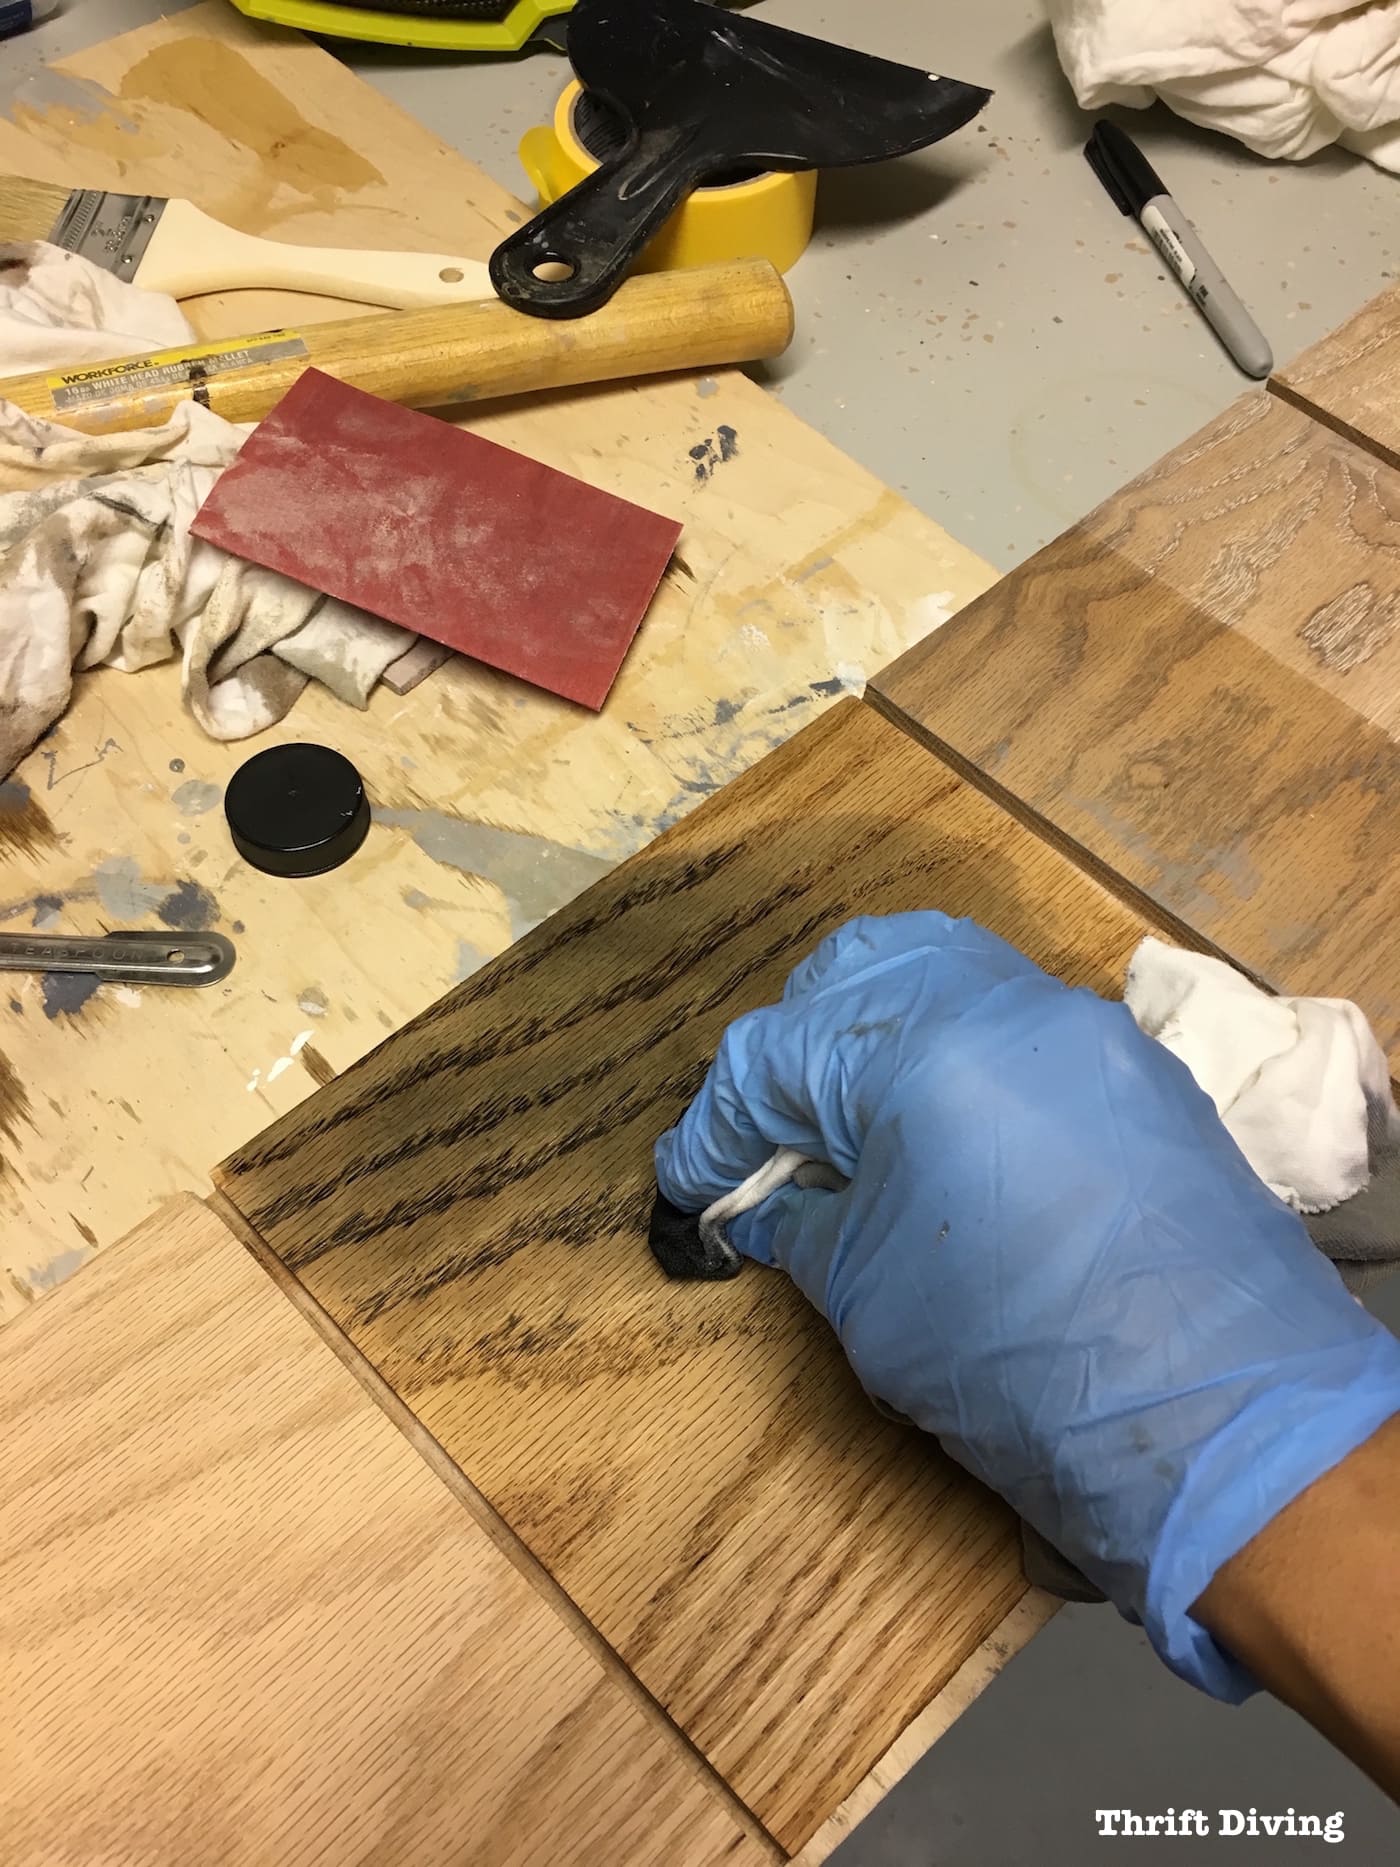
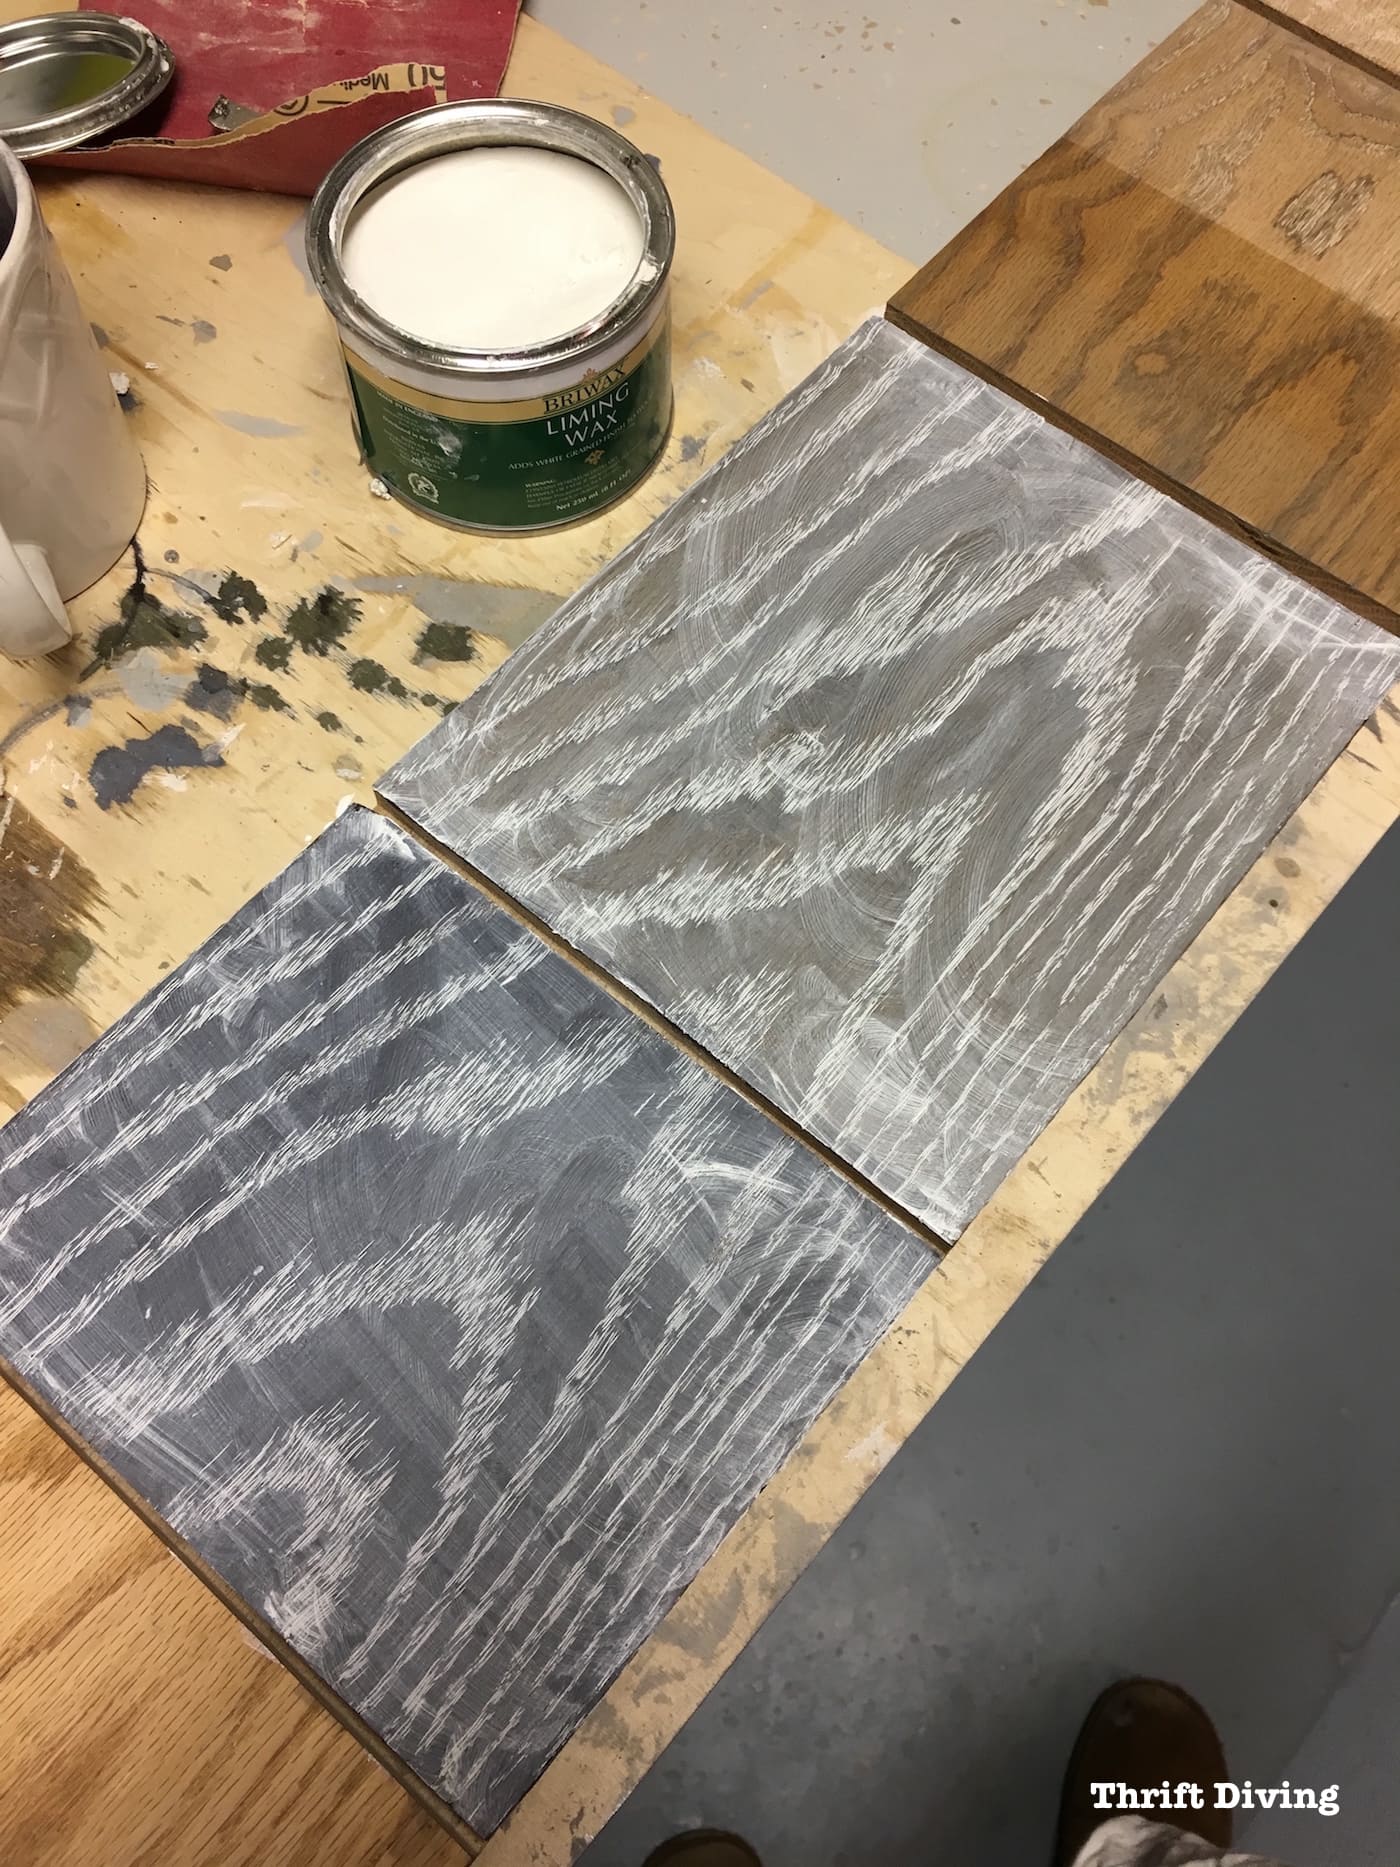
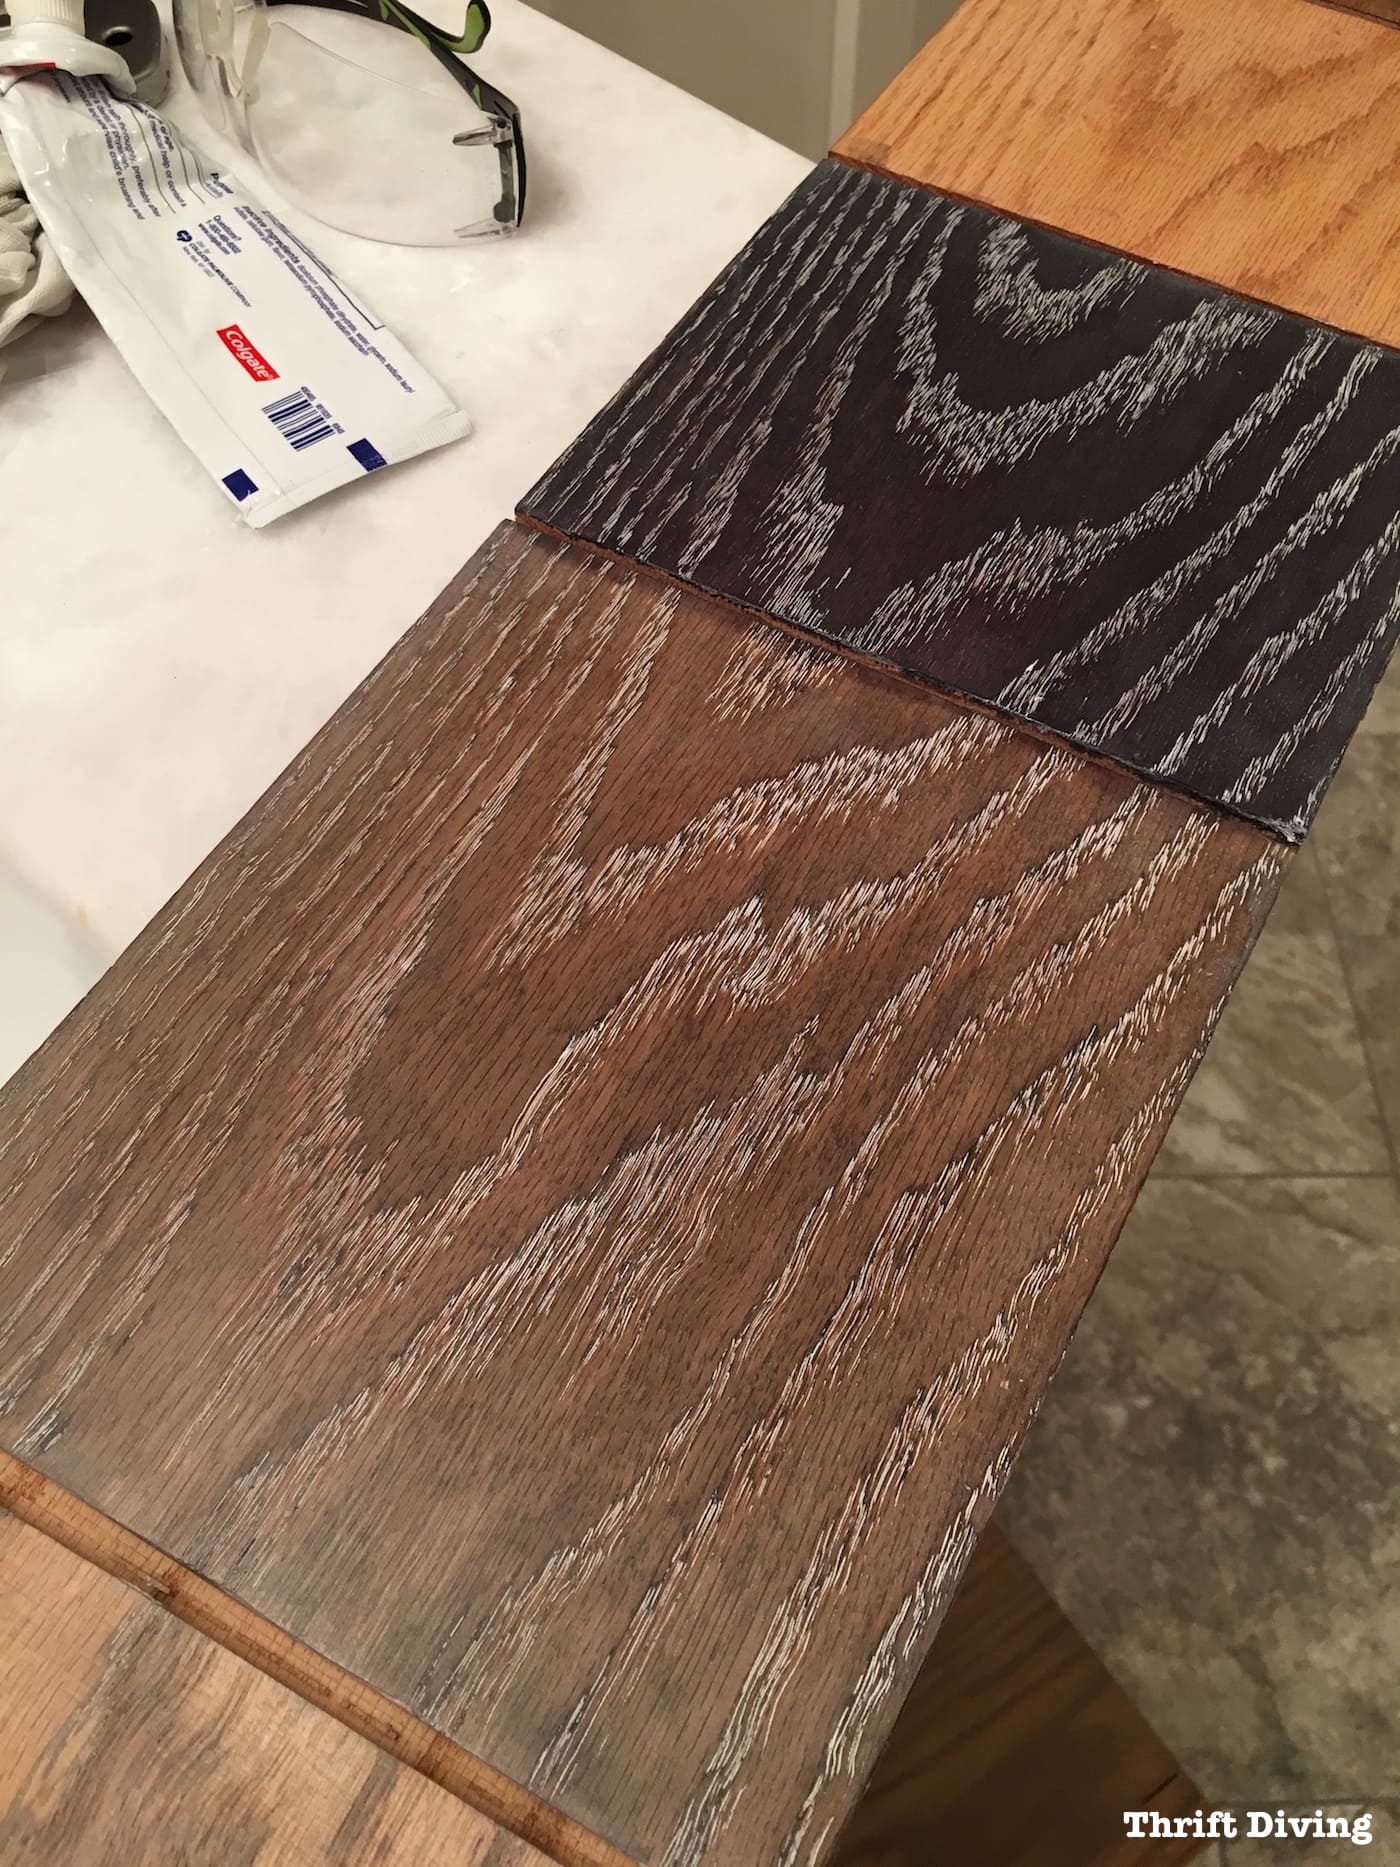
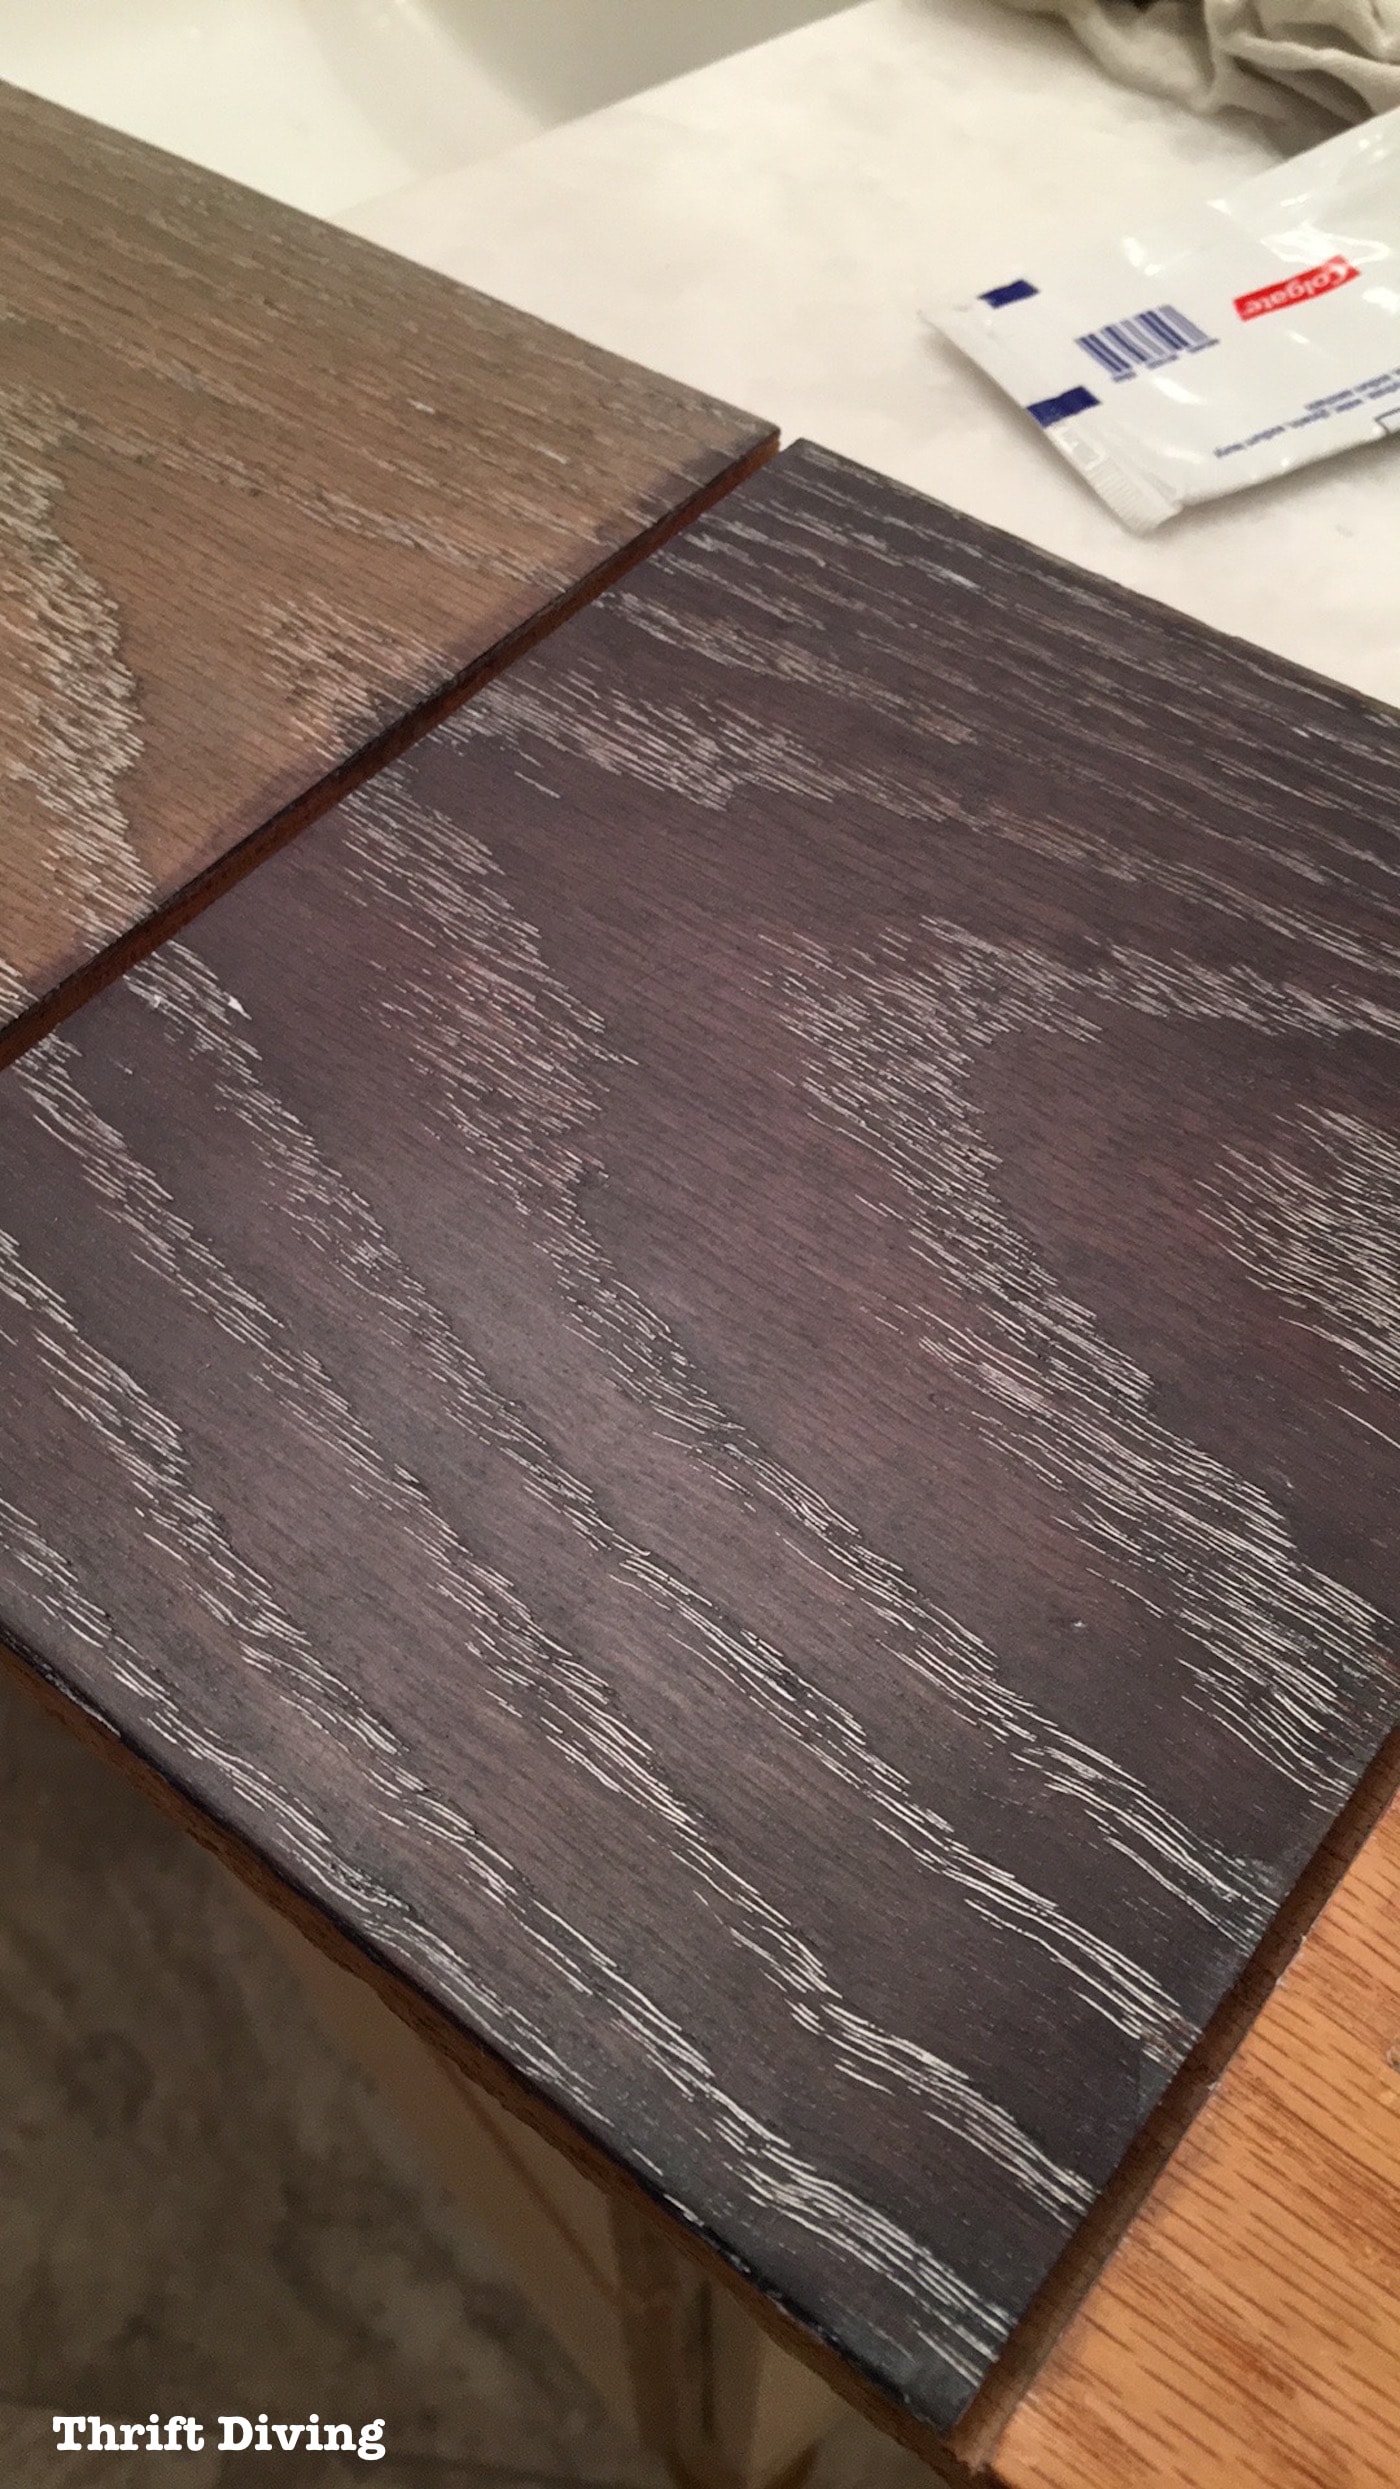
Next, I used the Ebony wood dye to do another side of the sample board. I mixed this one more concentrated, so you can see how much more rich the color became immediately.

How to Test How Dark Your Wood Will Be Once It Dries
Once the water in the wood dye mixture evaporates, it will leave behind the wood dye and your wood will look a bit darker.
But until the water evaporates, you have no way of really knowing how dark your project will be.
One way to test this is by wiping on a little bit of mineral spirits.
Water-based wood dyes don’t react to mineral spirits, so it won’t disturb your wood dye one bit.
What it will do is slightly darken the surface so you can “test” to see how dark the color will be once it dries. At that point, you can either decide to darken the dye by layering on a more concentrated color or you can lighten the dye by wiping it off with a wet towel. That’s a lot of flexibility right there!
Pretty cool, huh??
I didn’t test mine because I didn’t learn that little trick until after-the-fact, but you can bet I’ll try it the next time I do a test board with these wood dyes!
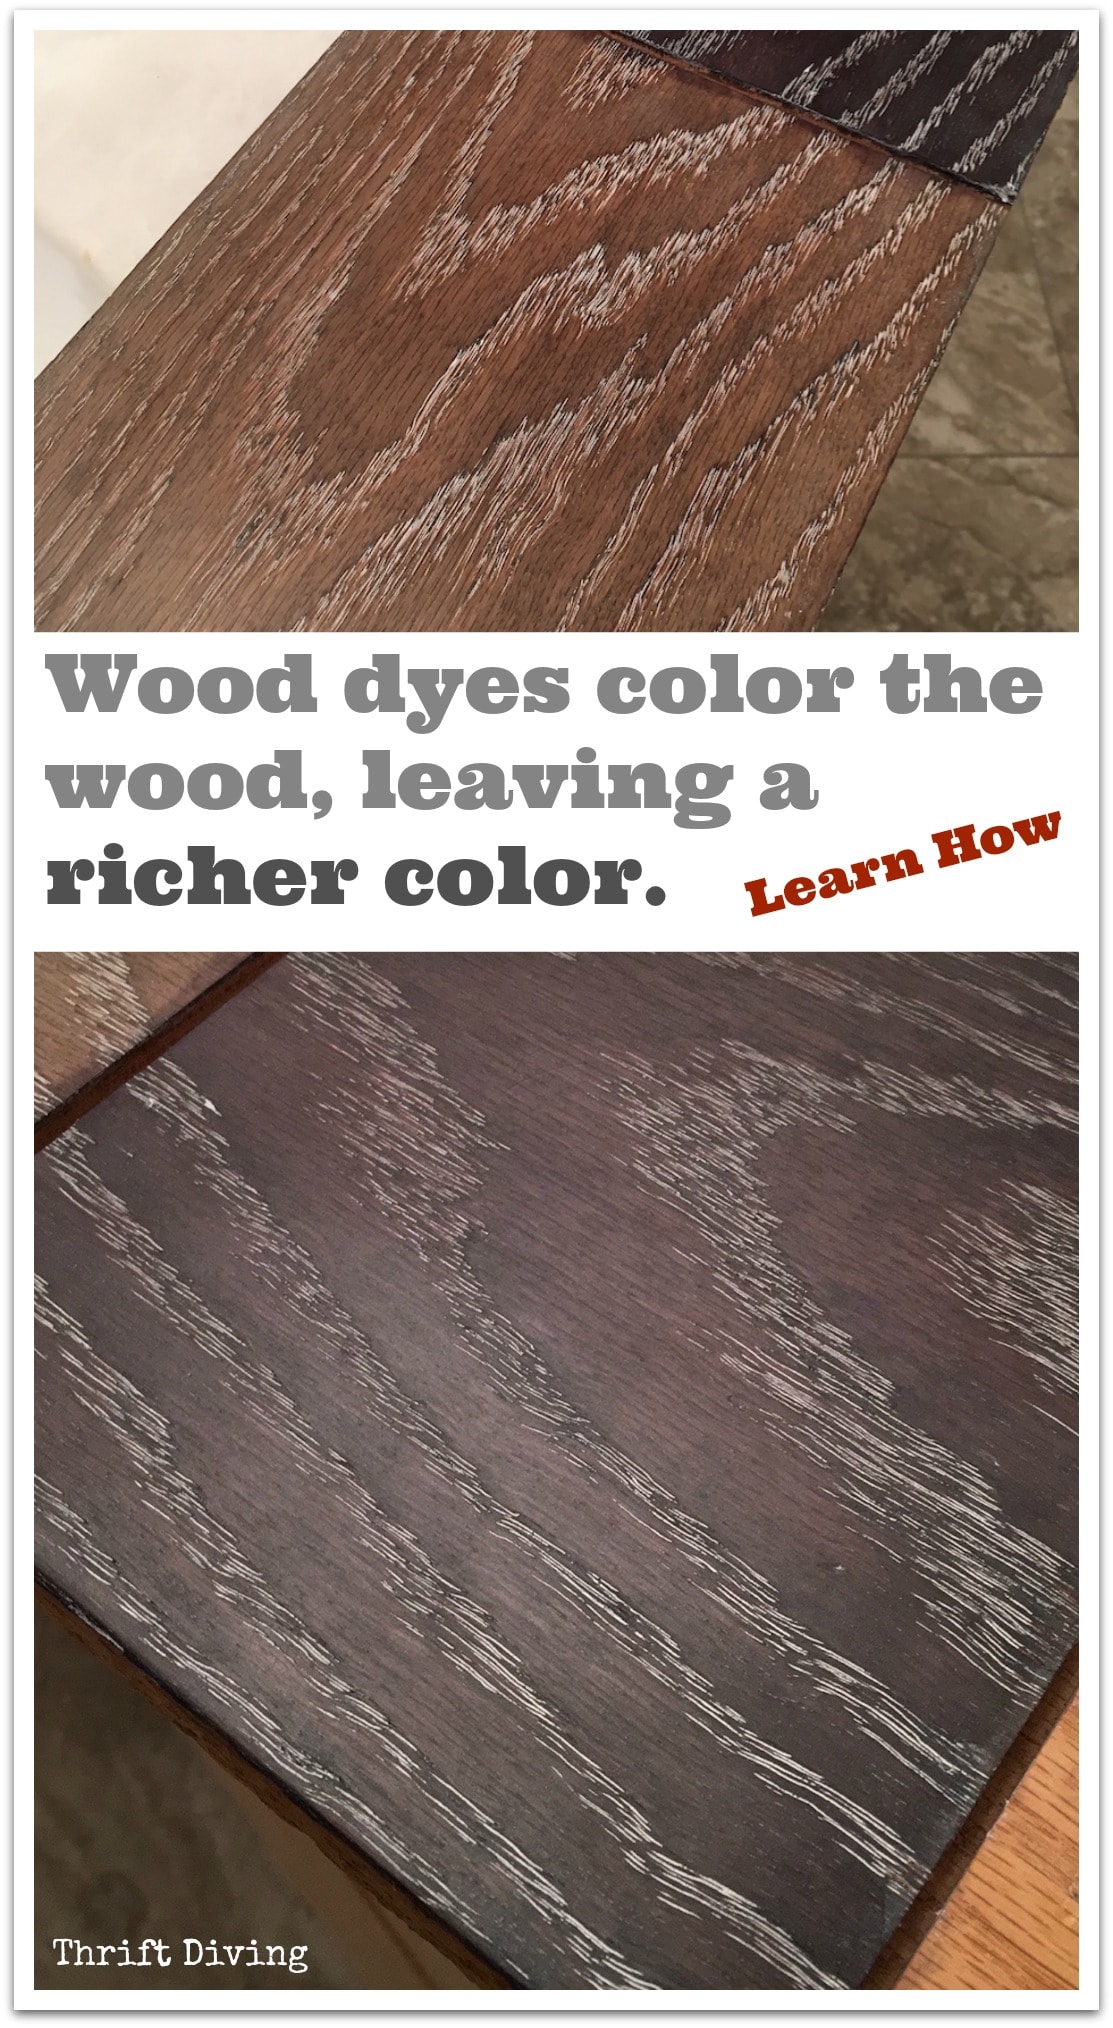
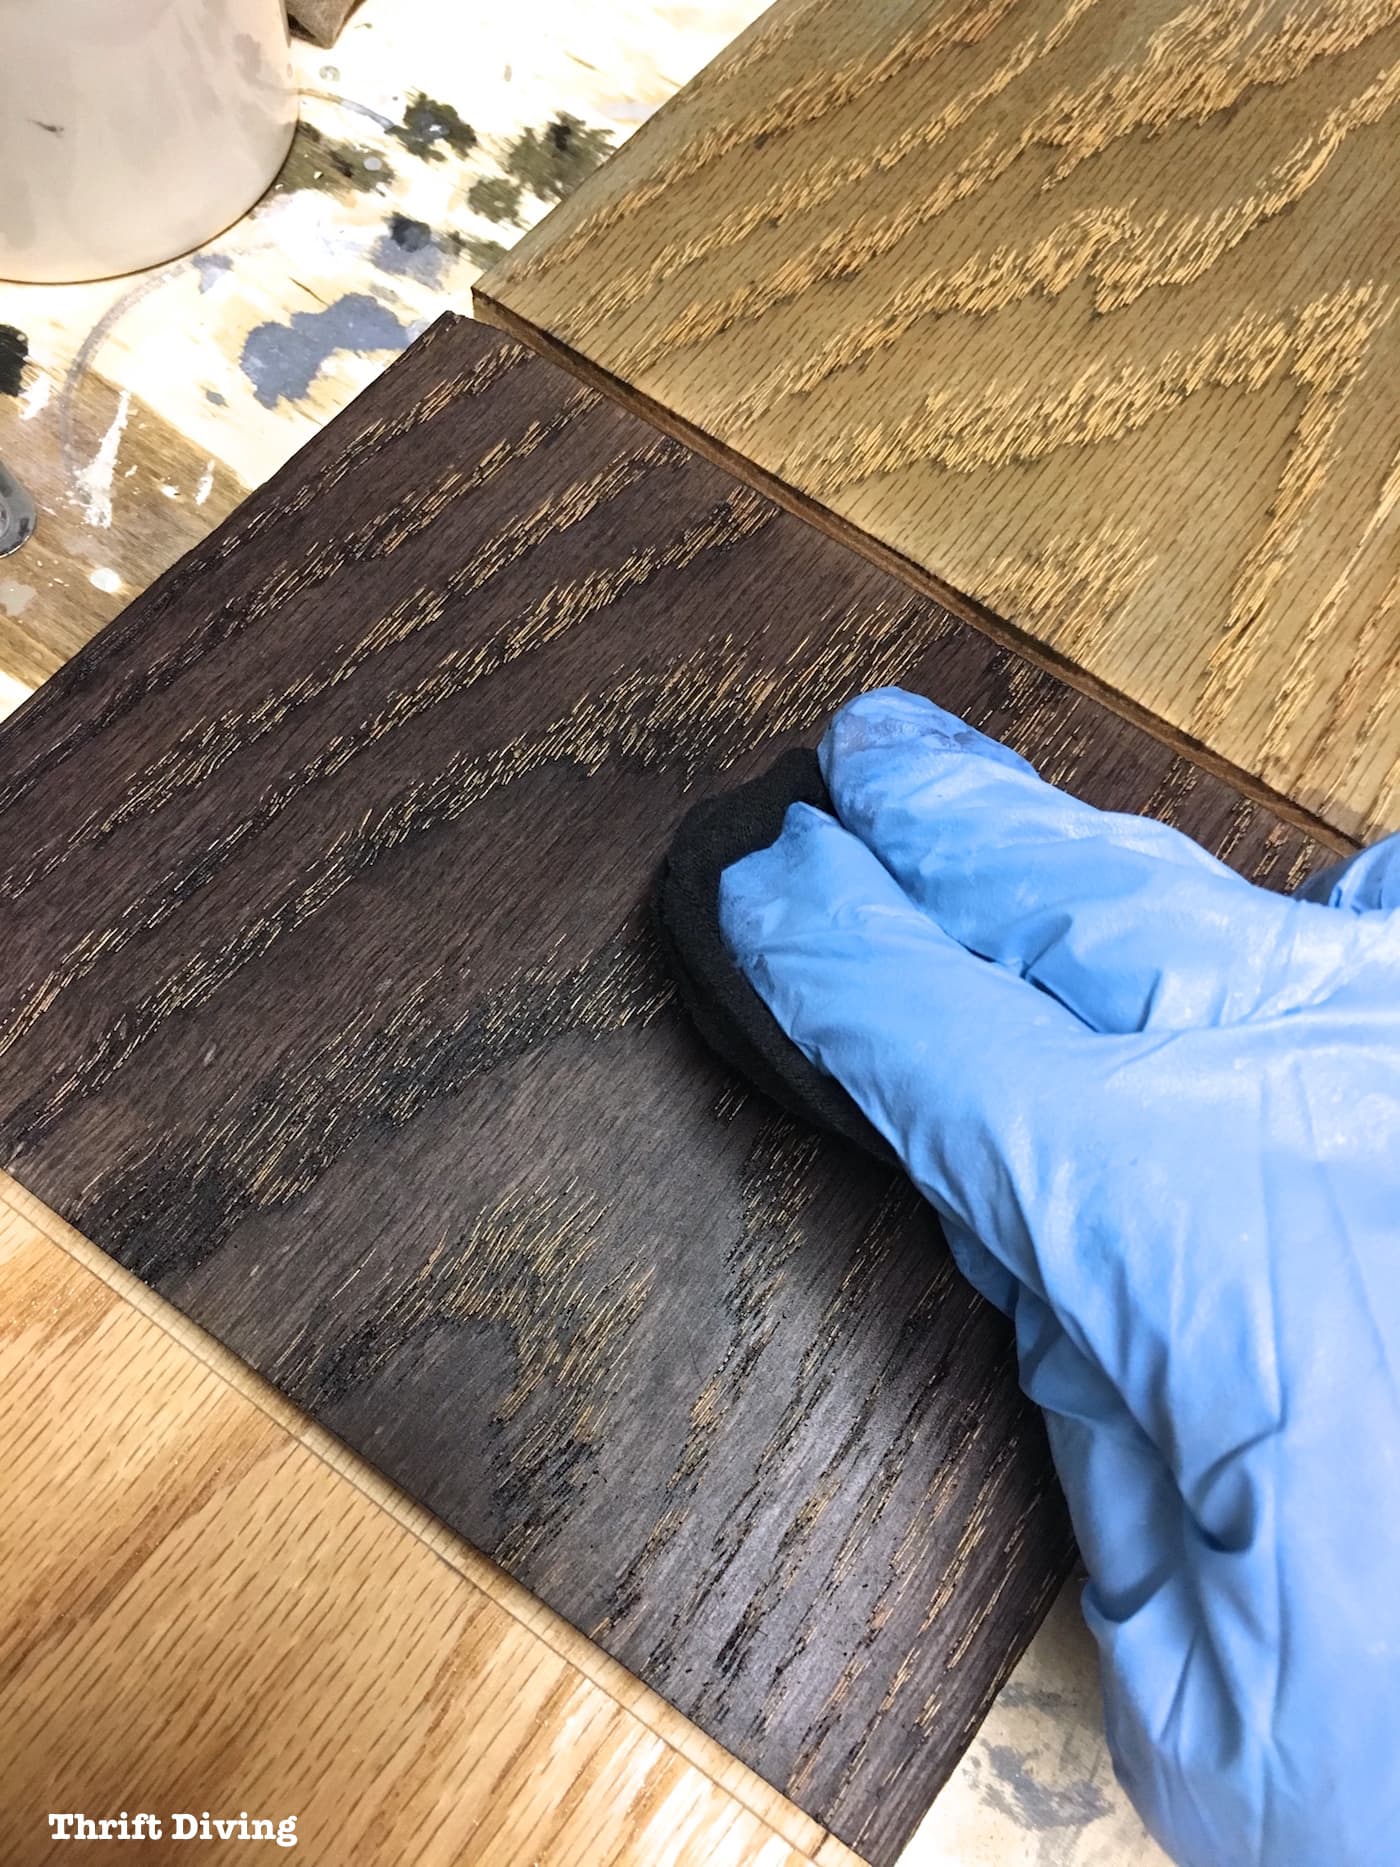
What’s the Difference Between Wood Dyes and Pigment Stains?
Another thing I want to point out is the difference between wood dyes and wood pigments (such as Minwax stains we all know).
Wood stains, such as Minwax, have pigments in them that simply lie on the wood, in cracks and crevices in the wood.
Wood dyes penetrate and actually color the wood.
Since this was my first time experimenting with wood dyes, the difference was so clear when I saw that the wood dyes didn’t obscure the grain of the wood.
Below, you can see that the grain is still visible and open, not filled with pigmented color.
This is actually pretty important because since I’m using a liming wax to highlight that pretty grain, I want the grain to be open and ready to accept the wax, not filled with pigments that are already taking up space in the grain.
I couldn’t wait to get some lime wax into those grains!
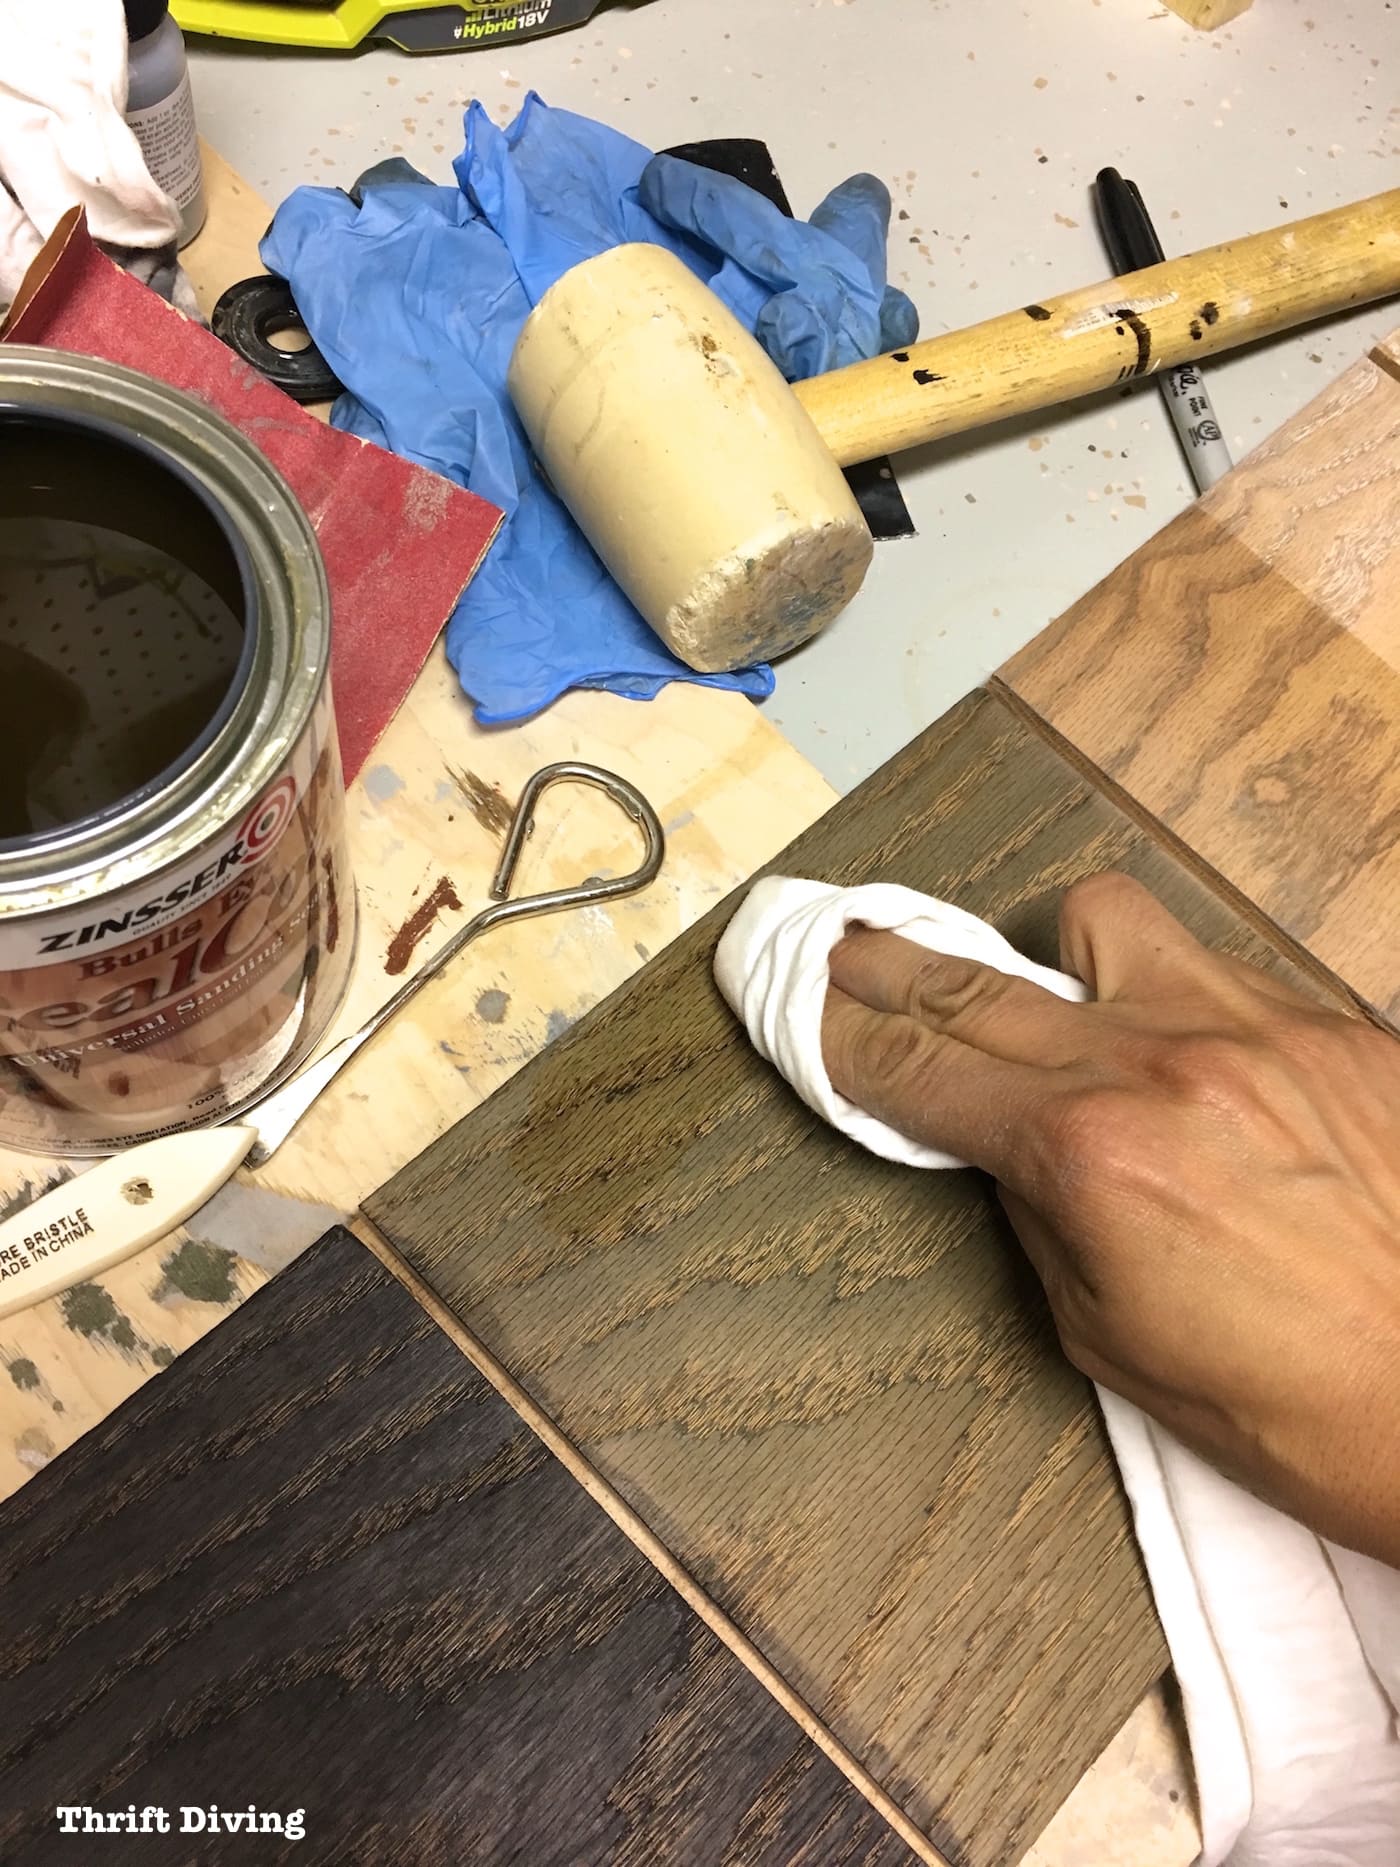
STEP 6: Add a Very Thin Coat of Shellac Sanding Sealer
It’s best to let your wood dry for about 24 hours. It might seem to be dry, but it can still be wet down inside the wood, so you shouldn’t rush this process.
Now it’s time to add a very thin layer of dewaxed shellac sanding sealer to help seal in the dye.

One reason why this is important is because–remember–these dyes are water-soluble.
If you add a coat of water-based polyurethane over water-soluble dye, it will start to active the dye again and it can mess up your dye. (In this case, we’re going to be using lime wax, but just so you know….).
But when you add a coat of sealer, you’re essentially locking in that dye, creating a barrier for what comes next.
Plus, sanding sealer doesn’t obscure the grain, so it will still allow us to use lime wax to create a nice, highlighted grain.
No need for a brush–only use a clean, lint-free cloth and put a very light coat with the grain.
Let the sealer dry for about 2-4 hours.
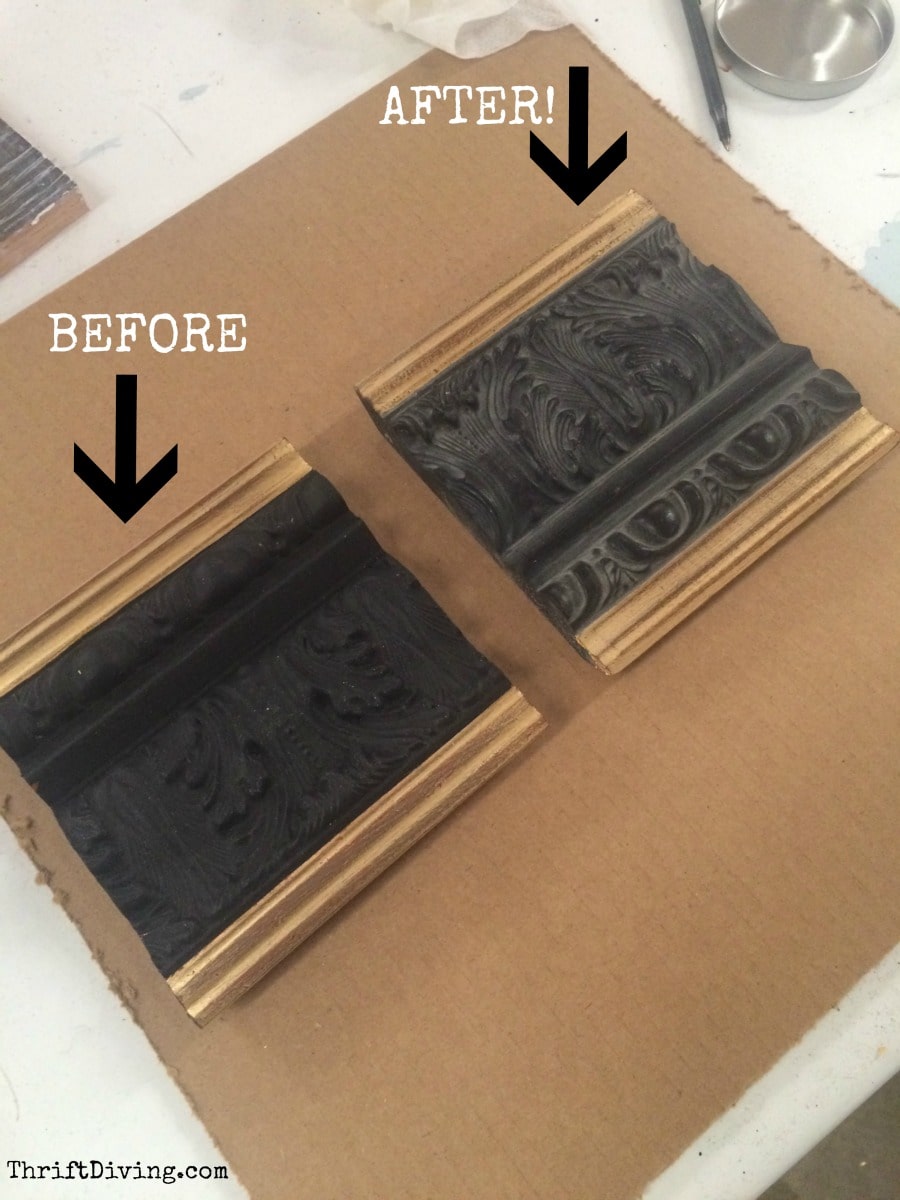
STEP 7: Add a Thin Coat of Briwax Liming Wax
Liming wax is amazing stuff.
People use liming wax to add white to the grains of very porous wood, like Red Oak, creating this gorgeous highlight in the grain.
If you were to ask me what consistency liming wax has, I would say it reminds me of Noxema.
Remember that skincare product that every teenager used religiously? HA!!
Well, it looks and feels exactly like that!
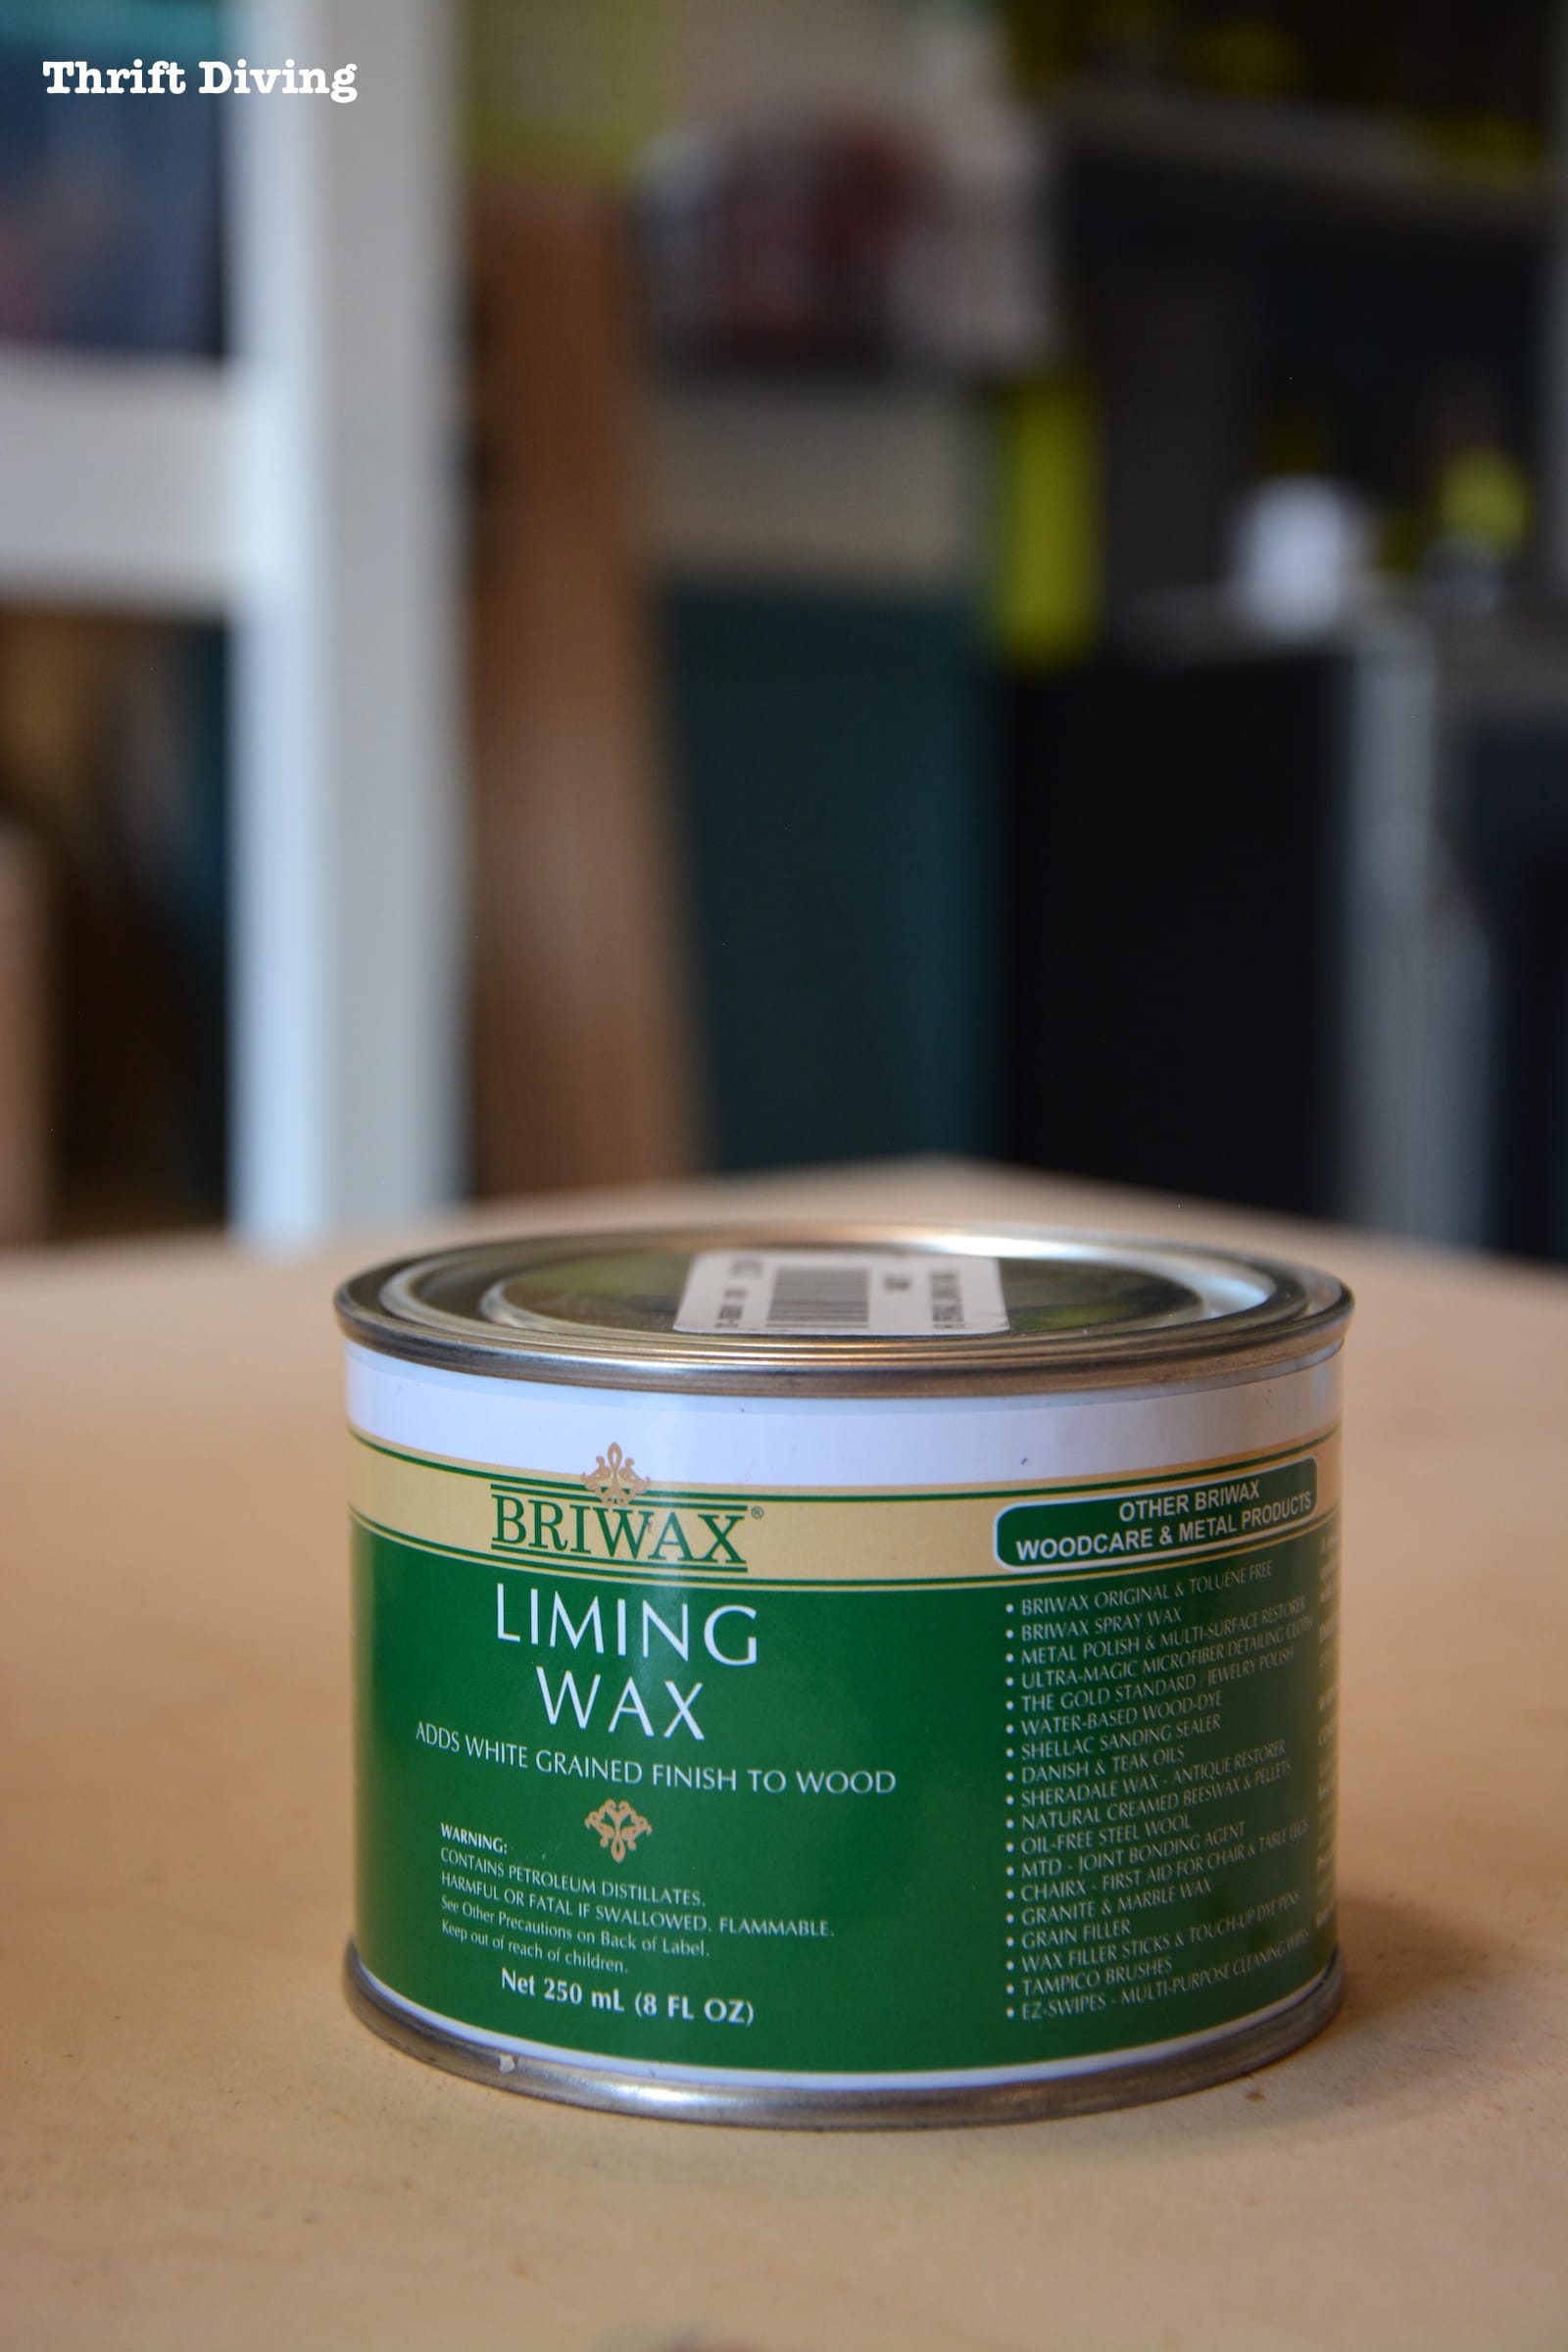
You don’t need a lot, so don’t slap on tons of it.
Just use a soft, lint-free cloth and push it into the grain.
You’ll start to see this awesome effect taking place right before your eyes: it’s the grain coming alive! 🙂
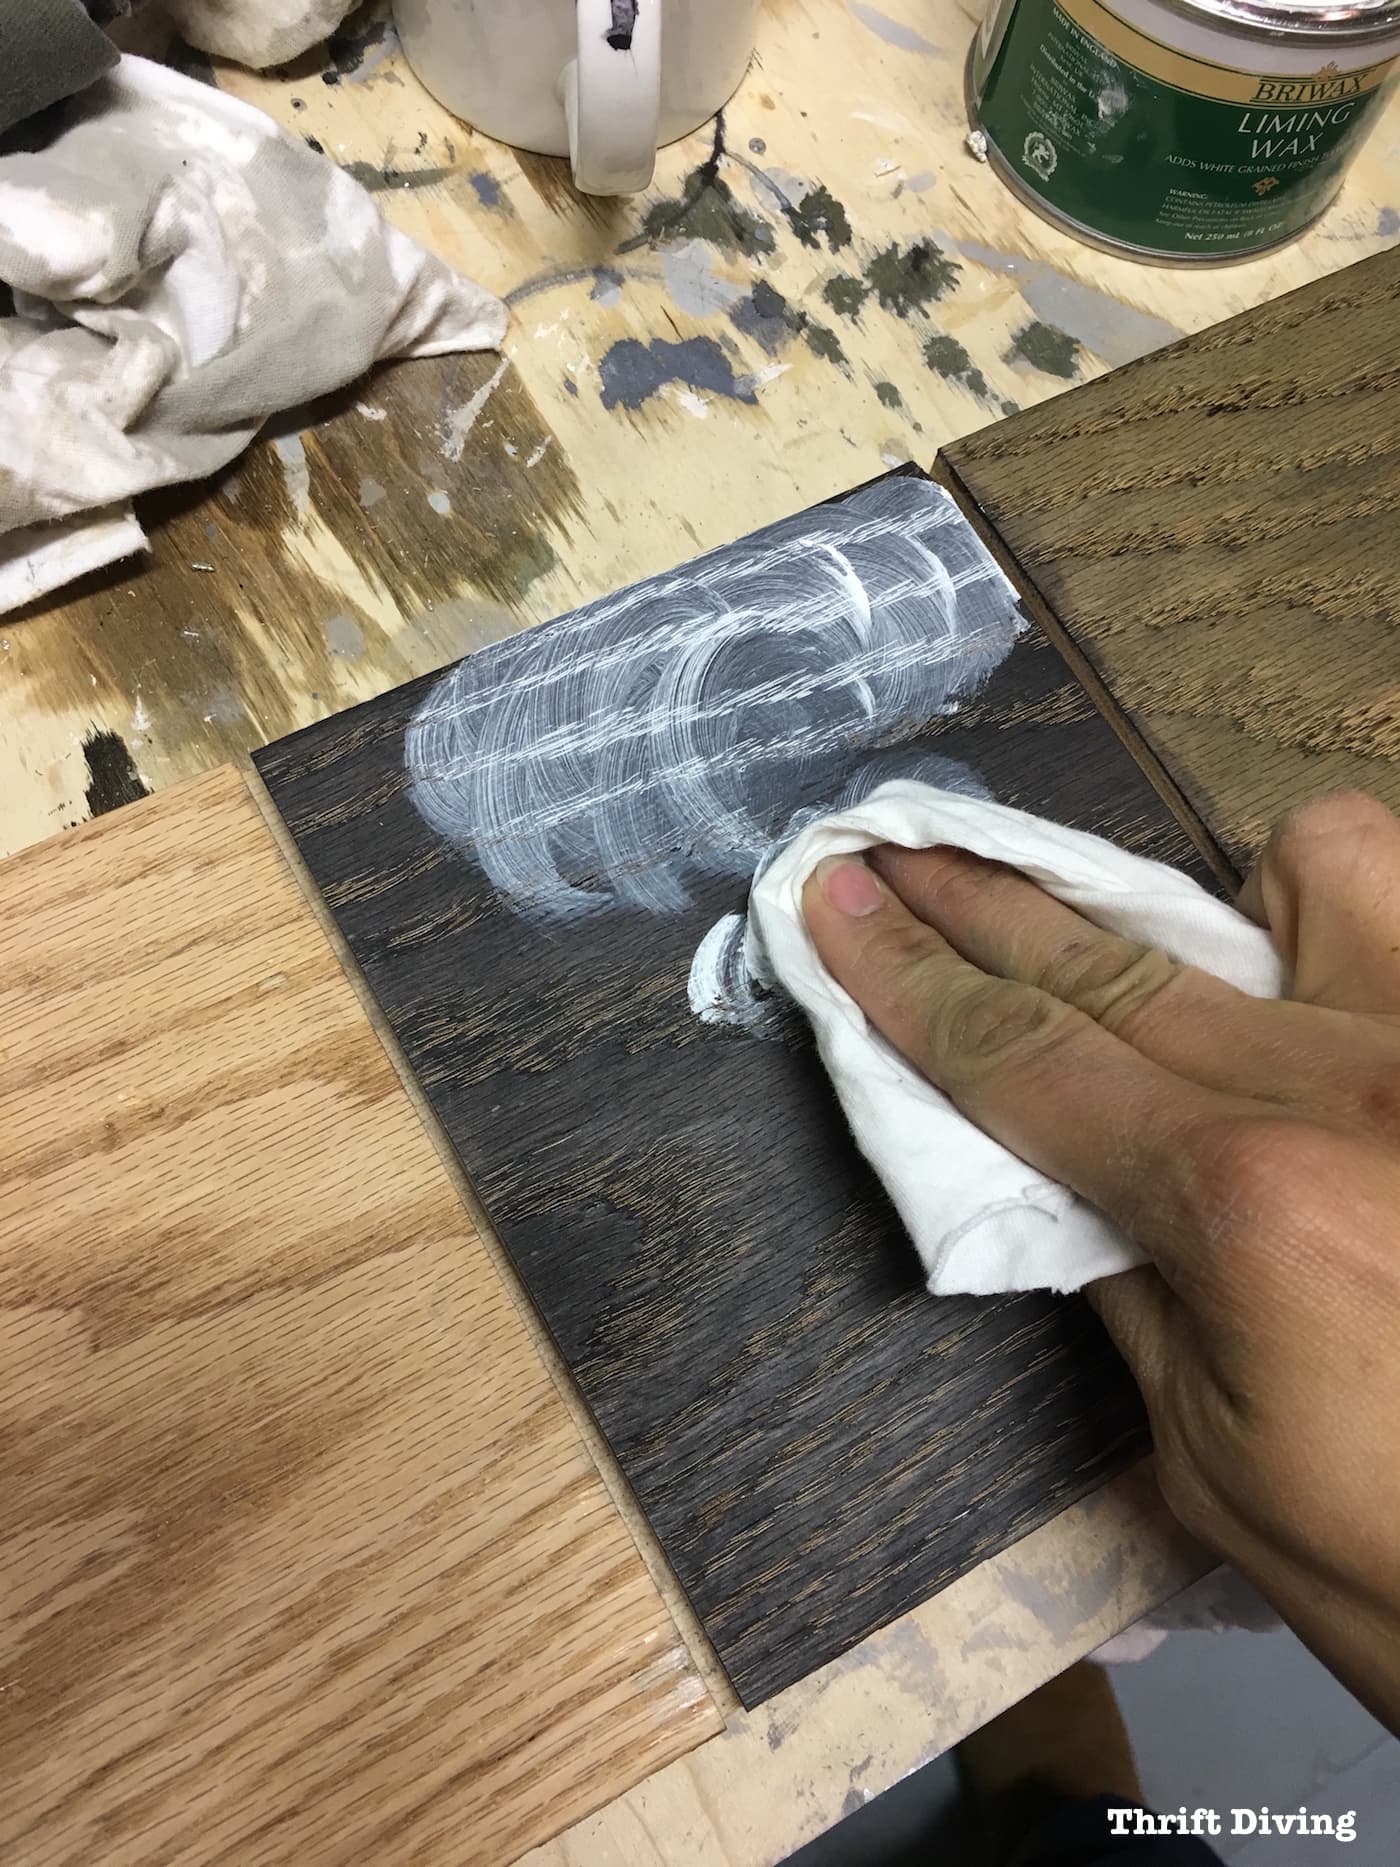
Leave the wax on for 3-5 minutes.
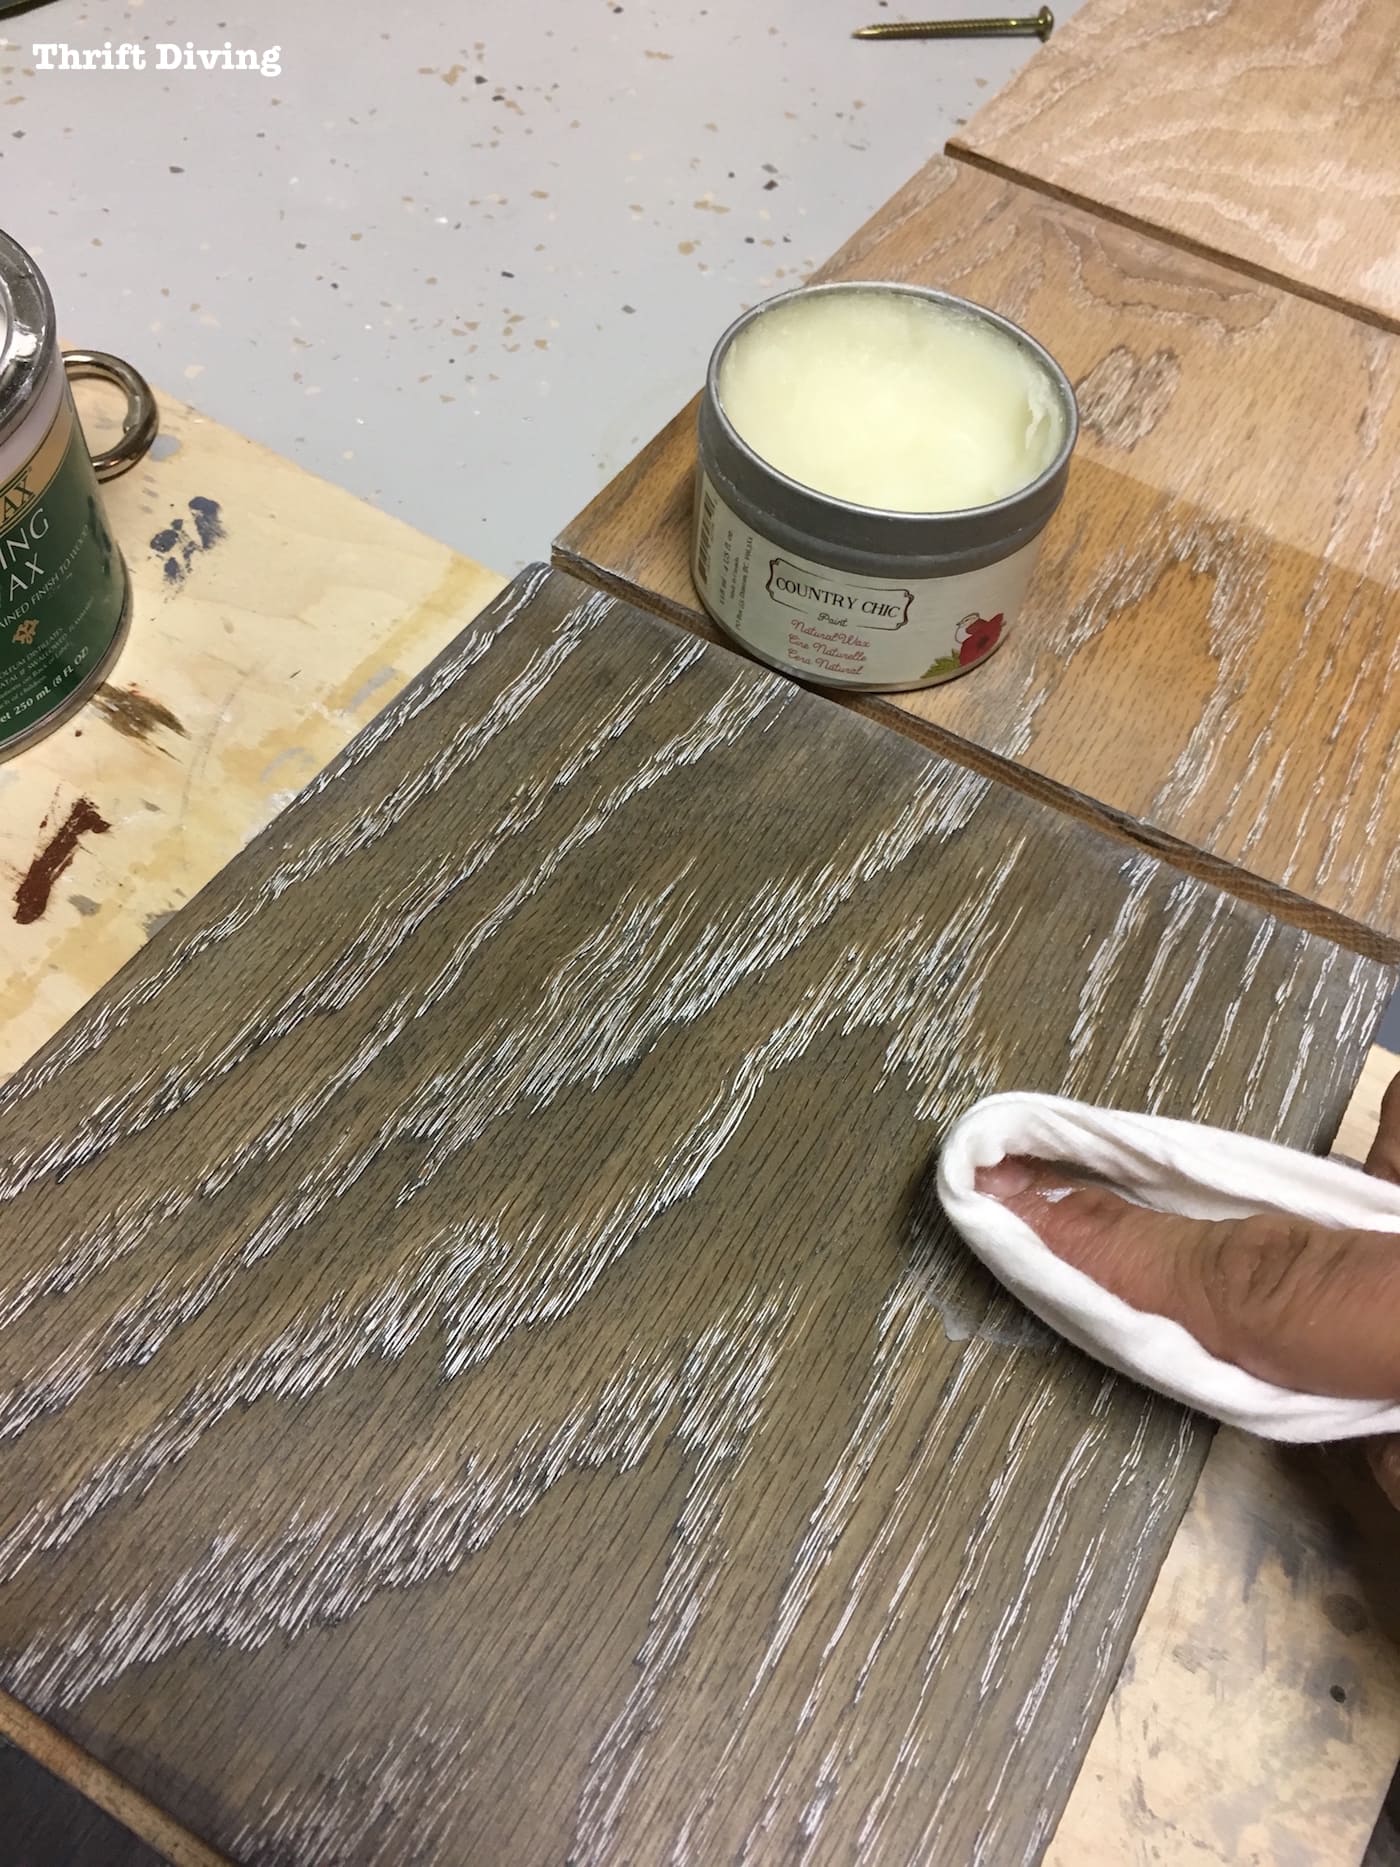
STEP 8: Use Clear Wax to Remove the Liming Wax
When I tried to wipe these boards clean, the liming wax left a whitewashed look, which is fine if that’s the look you’re going for.
However, because I don’t want to leave the boards white and I only want the grain to be white, I need to remove the liming wax from the rest of the board.
Because I used that thin coat of dewaxed shellac sanding sealer to create a barrier between the wood dye and the liming wax, it’s easier to remove the liming wax.
And to help me do it, I used use clear wax.
I didn’t get a great picture of this step, but what you do is rub clear wax over the lime wax, and it will start to come off very easily.
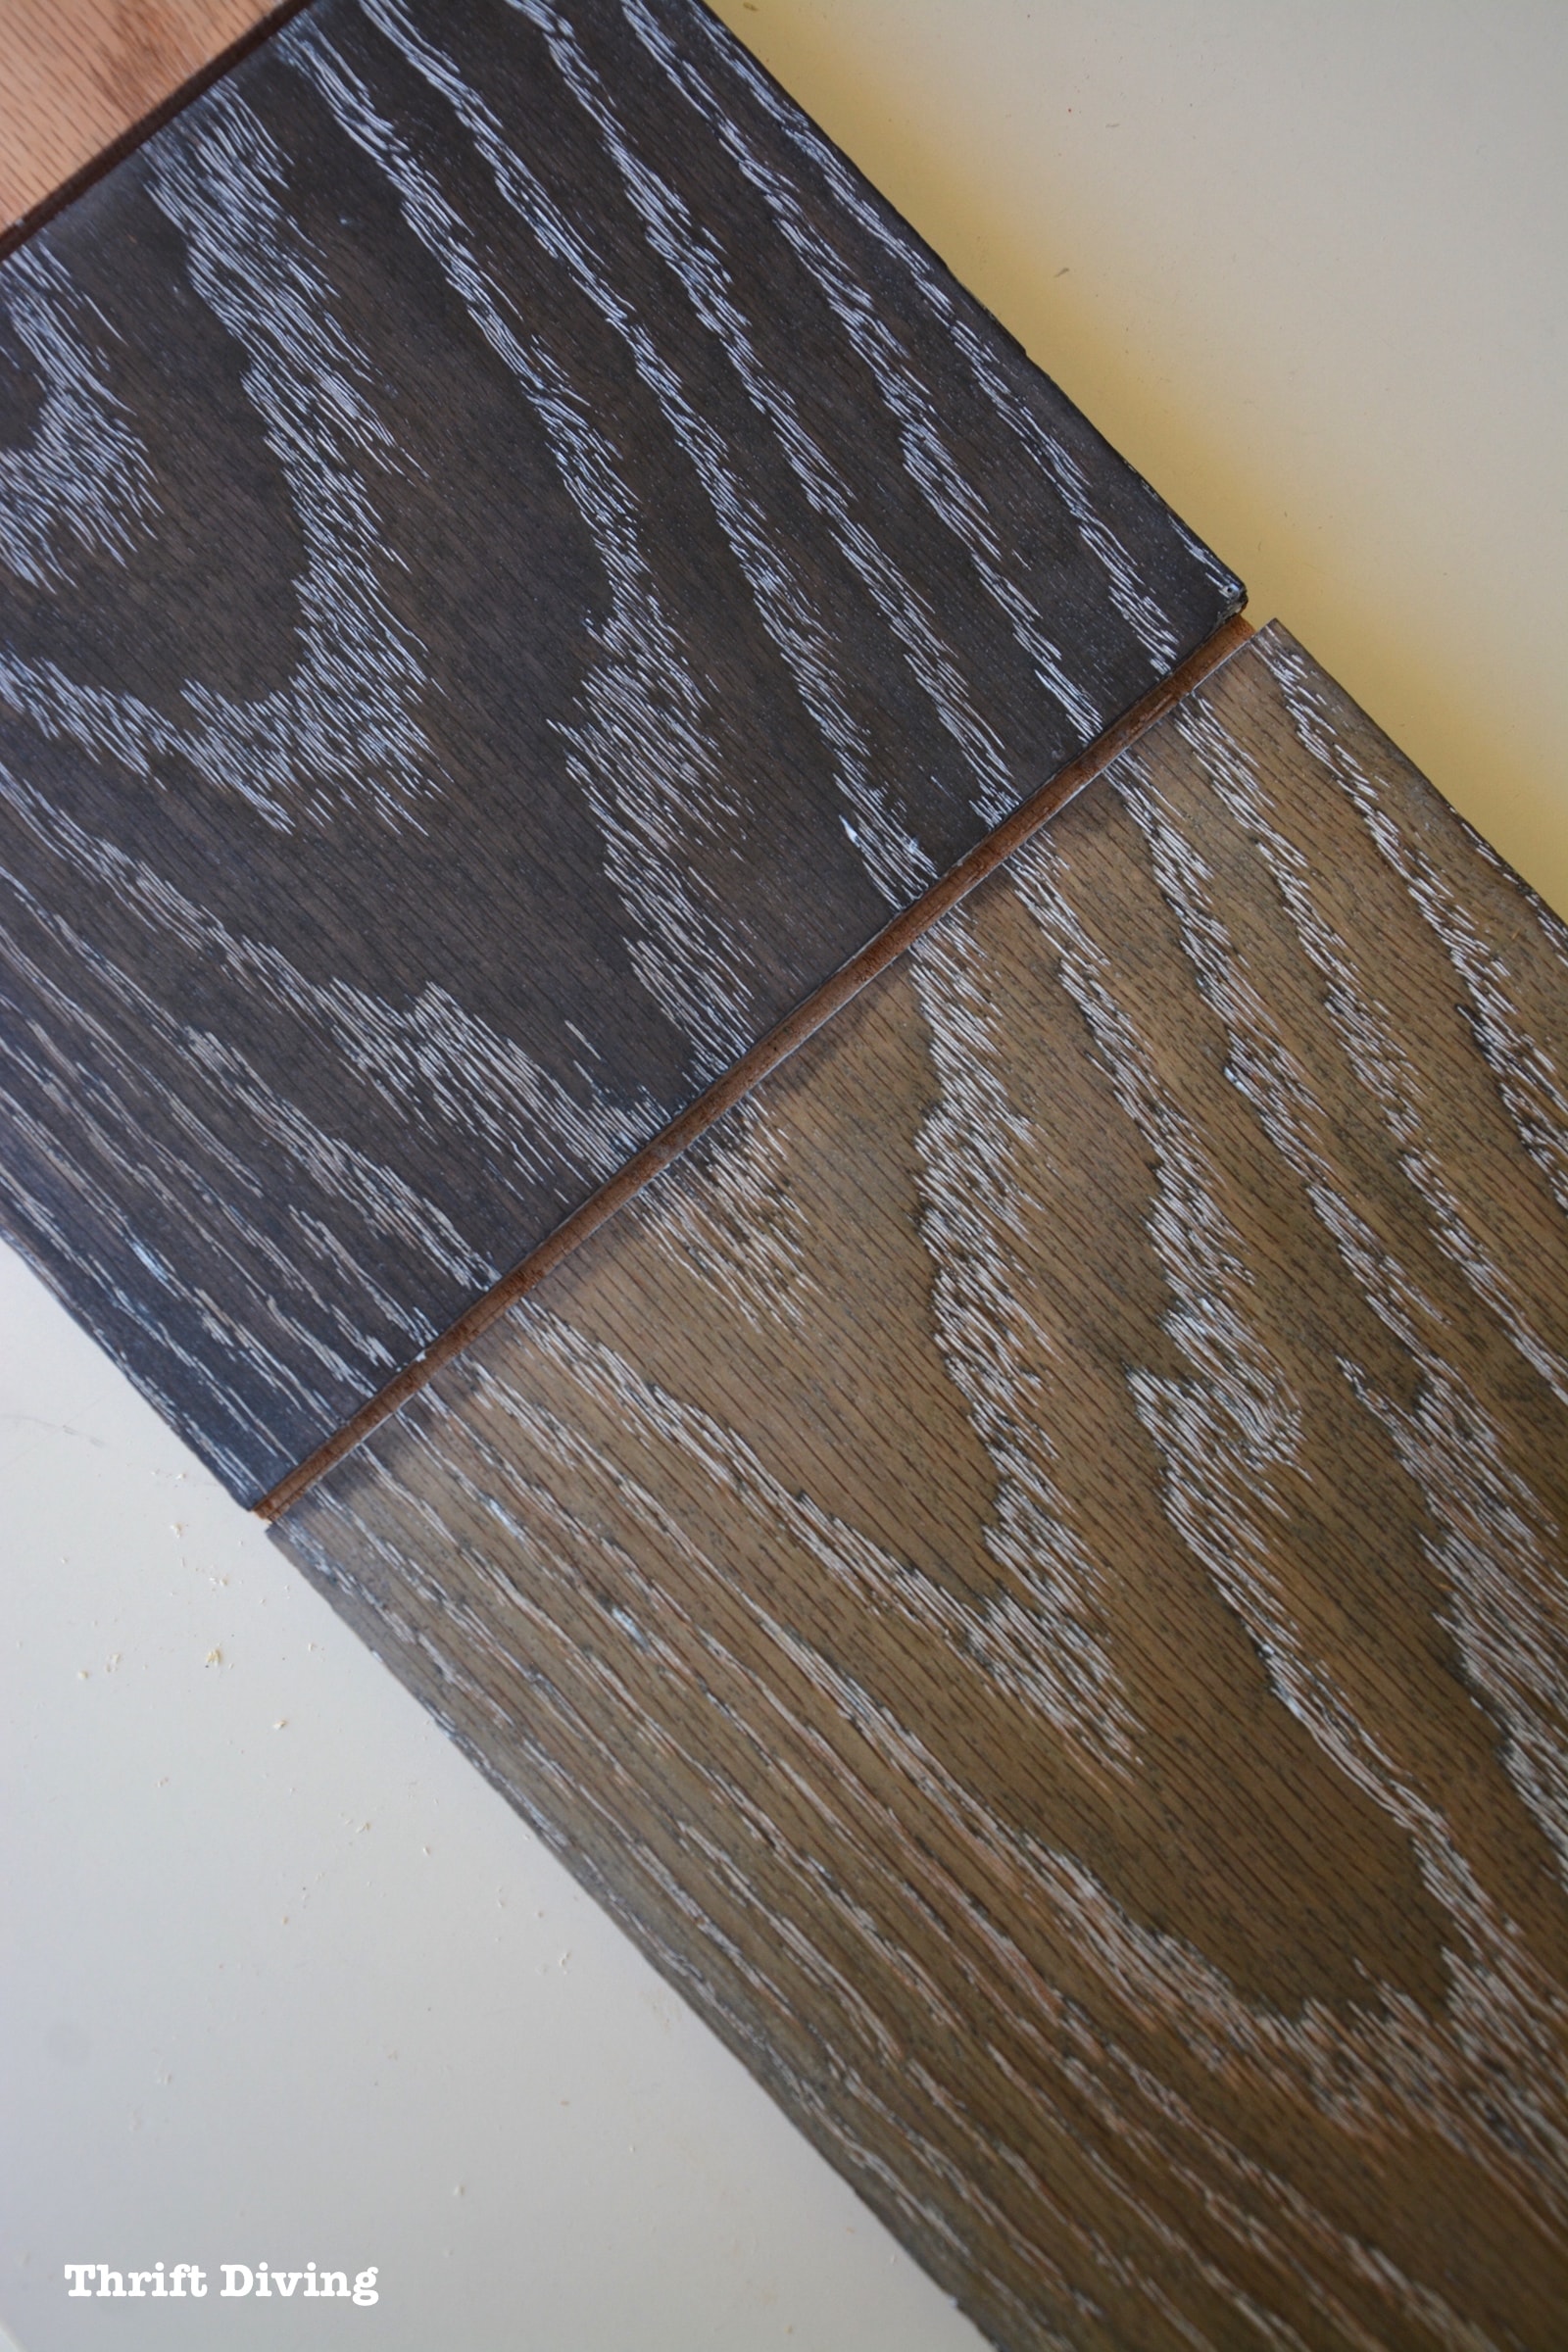
The liming wax stays put in the grain, leaving this gorgeous highlighted grain in the Red Oak!
What I’m left with is beautifully stained wood with liming wax highlighting the grain, creating the most beautiful Red Oak I have ever seen!
Since these are sample boards, I ended it at this point, but if this were a real project (such as my DIY bathroom vanity), I would come back after 24 hours and add another coat of clear wax and buff it to a shine.
Wax should be reapplied every 6 months to keep the wood protected and in good shape.
NOTE: If you’re using your wood in a moist place, like a bathroom, keep reading below (see Things You Should Know) to find out why wax wouldn’t be a good option to create this look.
Things You Need to Know
There are a few things to know about using wood dyes. Don’t forget that:
- Dyes are more likely to fade. Using dyes wouldn’t be a good idea on pieces of furniture or wood projects that will be used in direct sunlight or outdoors. Since my vanity isn’t in direct light, it’s fine, but keep this in mind for your furniture piece.
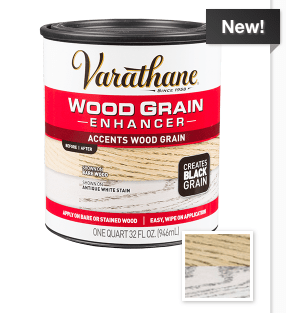
- You will not be able to add any other topcoat. When you use wax, you cannot use any other type of topcoat. You can only use wax on top. Therefore, if you are hoping to create the look of a white highlighted grain and you want to use a water-based topcoat, you would either have to use a water-based white grain filler or use white paint so that you could use a more durable topcoat. (This is likely the route I’ll have to go for my DIY bathroom vanity). Varathane just came out with a new product called Wood Grain Enhancer, but I think it’s so new that I can’t find it anywhere in stores, not even on Amazon! GASP! Looks like it cleans up easily with water, so this may be a good option for creating that pretty contrast in the oak and then being able to use a great water-based topcoat. I’ll keep you posted on this new product as soon as I’m able to try it out!
- Use a UV protective sealer if you’re not waxing. If you’re not highlighting the grain of the wood with liming wax (and you’re using a white grain filler or white paint) then be sure to use a UV protective top coat that can help protect the wood from fading.
- Dyes look best on unfinished wood. Not that I’ve used them enough to know first hand, but from my research, I’ve learned that wood dyes work best on unfinished bare wood because they’ve not been contaminated with anything else. This could be good for small projects you might make, picture frames, DIY wooden journals, or any other wood craft or DIY project you make.
What’s Next in Finishing This Red Oak Bathroom Vanity
I can’t tell you how nervous I am about finishing this vanity!
As I mentioned above, since this is a bathroom vanity, where there are moisture and water, I’ll want to use a more durable finish. Wax probably wouldn’t work in this case if I want this vanity to last long.
Have you ever finished oak before and using wood dyes and liming wax to create beautiful wood?
Leave a comment below and let’s chat about it!
Did you enjoy this post? Click to SAVE IT on Pinterest!
![]()

Download the 5 freebies!

Thrift Diving inspires women to decorate, improve, and maintain their home themselves...using paint, power tools, and thrift stores! Use these 5 printables, checklists, and ebooks to get started!


Hi, Serena! FABULOUS, & exactly what I have been looking for! Could you possibly approximate what color(s) & proportions of the wood dye & water you used to achieve that brownish/gray color? (right next to the ebony) I have a kitchen island I am refinishing to contrast white painted cabinets & that is exactly what I had in mind!! Thanks SO much for all the researching & work – LOVE this look!!
Wow!! This is so handy, I love it! So much useful information here, I’d never heard of half of this stuff. I love that I read a post where you used that wood dye right after asking if we were going to see you use it on a future project, hah! Now I can really see the difference between pigments and dyes… if you want to mess with the grain, looks like dyes are your best choice. That liming wax really made the grain pop over the Ebony, very cool combination.
By the way, the kerfs in your sample board make it look almost MCM, don’t they? Or is it just me? 😀
I’m learning right along with you, Zovesta! That’s the exciting part: learning about “new” products (which really aren’t new; they’re just new to me!). Wood dyes are awesome! I can’t wait to use them a bit more. And I promise you, I’ll make something with that ebony and liming wax. It’s to dye for! LOL. (Get it…? DYE for….?)
Bad pun! Bad pun! 😉 It’s true, I honestly had no idea there were so many products for wood. It’s so cool to learn about them!!
These techniques are beautiful! It would be great to refer our clients here for some different options when they’re looking for ideas on how to design their homes! Thank you for sharing! You do great work!
Yes, please do refer some of your clients. That would be awesome! Thanks!
Wow! I’m loving your finish! Kuddos to you for doing all the super research on how to get the perfect look. I can’t wait to try this new technique on something! Pinned!
Love…love…love it! I’ve been painting furniture for a while now but have been looking for the perfect way to get this so very popular finish. Thanks for being the “sponge” and soaking up all this knowledge for us. I have the perfect old table that is just screaming for this look. I’ll forward the results when I’m finished (don’t hold your breath though, this may take a while).
Hey there, Susan! I feel ya–I’ve been trying to get this look, too! I went to a painting session with Amy Howard paints last year and she showed us how to get the look with using paint first (maybe a watered-down version) and then using her brand of liming wax. But when I tried to get the look right, it just wasn’t working as well as I wanted it to. This worked perfectly! The only problem for me is trying to use this on my vanity and probably not being able to use a topcoat on it. But I’m still experimenting and will figure it out! 🙂 Yeah, let me know how that old table works! I won’t hold my breath because I know what it’s like getting around to a bunch of projects! 🙂
I have never heard of “wood dye” until you posted it and I have been refinishing wood for many, many years with my antiques. I am going to “bookmark” this. I love the white grain of the wood in contrast to the wood DYE. I always have used “stain.” I always use Watco stain. It is oil based and does not cover the wood grain. That is why I like it. Have you used that brand before? I like the liming wax look. I saw Miss Mustard Seed use a wax “resist” and then painted with a white milk paint. The milk paint peeled but stayed in the wood grain. I just saw that on her post. It seems wood dyes are a little “touchy” like the sun, moisture, etc. This white wood grain is a new look in finishing wood. Thank you
Hi, Sherry! I actually just started using Watco. I picked up some of their Danish oil and will probably get more of their products, especially since you said it doesn’t cover the wood grain. I’ll have to check out Miss Mustardseed’s post. I had never heard of a wax “resist.” Sounds interesting! The product I’m super excited to try is the one I mentioned in the post, the one by Varathane called Wood Grain Enhancer. It sounds like it does exactly what the liming wax does BUT it’s not wax, which means you’d be able to add a topcoat for more protection. I just can’t find it anywhere! (wah, wah). LOL.
I love how the white grain looks against the dark! Its beautiful ? im excited to see your end result! Thank you for the tutorial
Hey there, Eva! I agree–it looks so striking, doesn’t it? Since writing this post, I’ve been playing around with the look and trying to see if there is some way to add a topcoat after wiping off as much of the surface wax as possible. When I add a topcoat, it dulls the look of the white liming wax. Soooo…..not sure I’ll want to go this route, since I NEED to have a good topcoat to protect the vanity from moisture and water. SIGH….back to the drawing board! LOL
Wow! Great tutorial and great info – can’t wait to see what your vanity ends up like!! Pinning this to make sure I keep these instructions, excellent as usual!
What an awesome tutorial., Your love of working with wood just jumps off the page. Thank you for sharing and I am going to pin.
Aww, thank you! There is just so much to learn about the topic of WOOD and refinishing wood! I feel like a sponge, ready to absorb it all up. 🙂 I love painting furniture, but I also have so much respect for the craft of woodworking. Of course, it doesn’t replace my love of thrift! 🙂 But it’s awesome to be eclectic in many talents when it comes to DIY! I just wish there was more time in the day for all of it! Thanks for commenting and pinning!
Great tutorial. Since this is a dye, are you never able to “refinish” it in the future?
Great question, Kathy! You can. However, you’d probably want to use a wood bleach if you wanted to go back to raw wood. After wood is stripped, if would have some staining of the wood. But the videos I have seen, wood bleach just removed the stains. Also, pool chlorine does the same job. It wipes on, crystallizes as it dries, and then you just wipe it off. You wouldn’t want to sand bleach or chlorine because you don’t want that stuff in the air. I haven’t done it yet, but when I do, I’ll be sure to blog and film it! 🙂 And if you wanted to paint it later, most furniture paints I imagine would go right over it, as long as you clean it with a good degreaser like TSP or Simple Green. 🙂