BEFORE and AFTER: Vintage Bar Cart Makeover From the Thrift Store!
For the sake of ease, let’s just call this a vintage bar cart makeover from the thrift store.
(Although I am definitely aware that this is an old TV cart from the 60’s and 70’s, I much prefer to think of it as a bar cart or, as I will use it, a tea cart!).
But regardless what you call it, it’s a DIY project that made me dance around in my garage with glee because it turned out waaaaay better than expected!
And what’s surprising is that I didn’t have a single blunder during this bar cart makeover.
Not once did I throw down my tools in frustration, walk away in confusion, or yell a steady stream of obscenities out in my driveway. Ha!
Maybe I’m just learning how to be more cautious before jumping into projects with two feet. Or simply taking my time.
Whatever the reason, this bar cart makeover turned out right, and I couldn’t wait to tell you the story of how this makeover came together!
Watch My Bar Cart Makeover Tutorial!
Materials & Cost
Can we just marvel for a second that this rolling TV cart (which I’m now going to refer to as a “bar cart”) only cost $22 to make over? The cost would have been slightly higher if I had paid for a few of the materials, but that’s one of the perks of being a blogger–companies like to send us “free” stuff without having to pay bloggers for advertising. But that’s a whole ‘nutha topic…I will say it’s fun to try new products and when they work, I like to pass on the recommendation. So overall, I paid $22 out of pocket for the materials. Sweet!

Here’s the cost breakdown:
(I participant in the Amazon Services LLC Associates Program and other affiliate advertising programs designed to provide a means for me to earn fees by linking to Amazon.com and affiliated sites).
- Blue Marble paper ($12)
- Metal Rescue Gel rust remover
- Plastic to cover the rust remover ($0)
- Gorilla Glue Spray adhesive ($0)
- Tools: Circular saw, wrench, utility knife ($0)
- White Semi-Gloss Paint & Primer in one ($3.50)
- 1/4″ wood underlayment ($6)
- Fine sandpaper (220- and 800-grit)
- 0000 steel wool
Total cost: About $22.00 out of pocket!
STEP 1: Break Down the Bar Cart
This poor little cart sat in my garage for at least 3 years, like most furniture projects do, before I got my hands on it. At first glance, I knew I’d want to cover these shelves with some pretty paper because the condition of these old 1970’s shelves was bad.
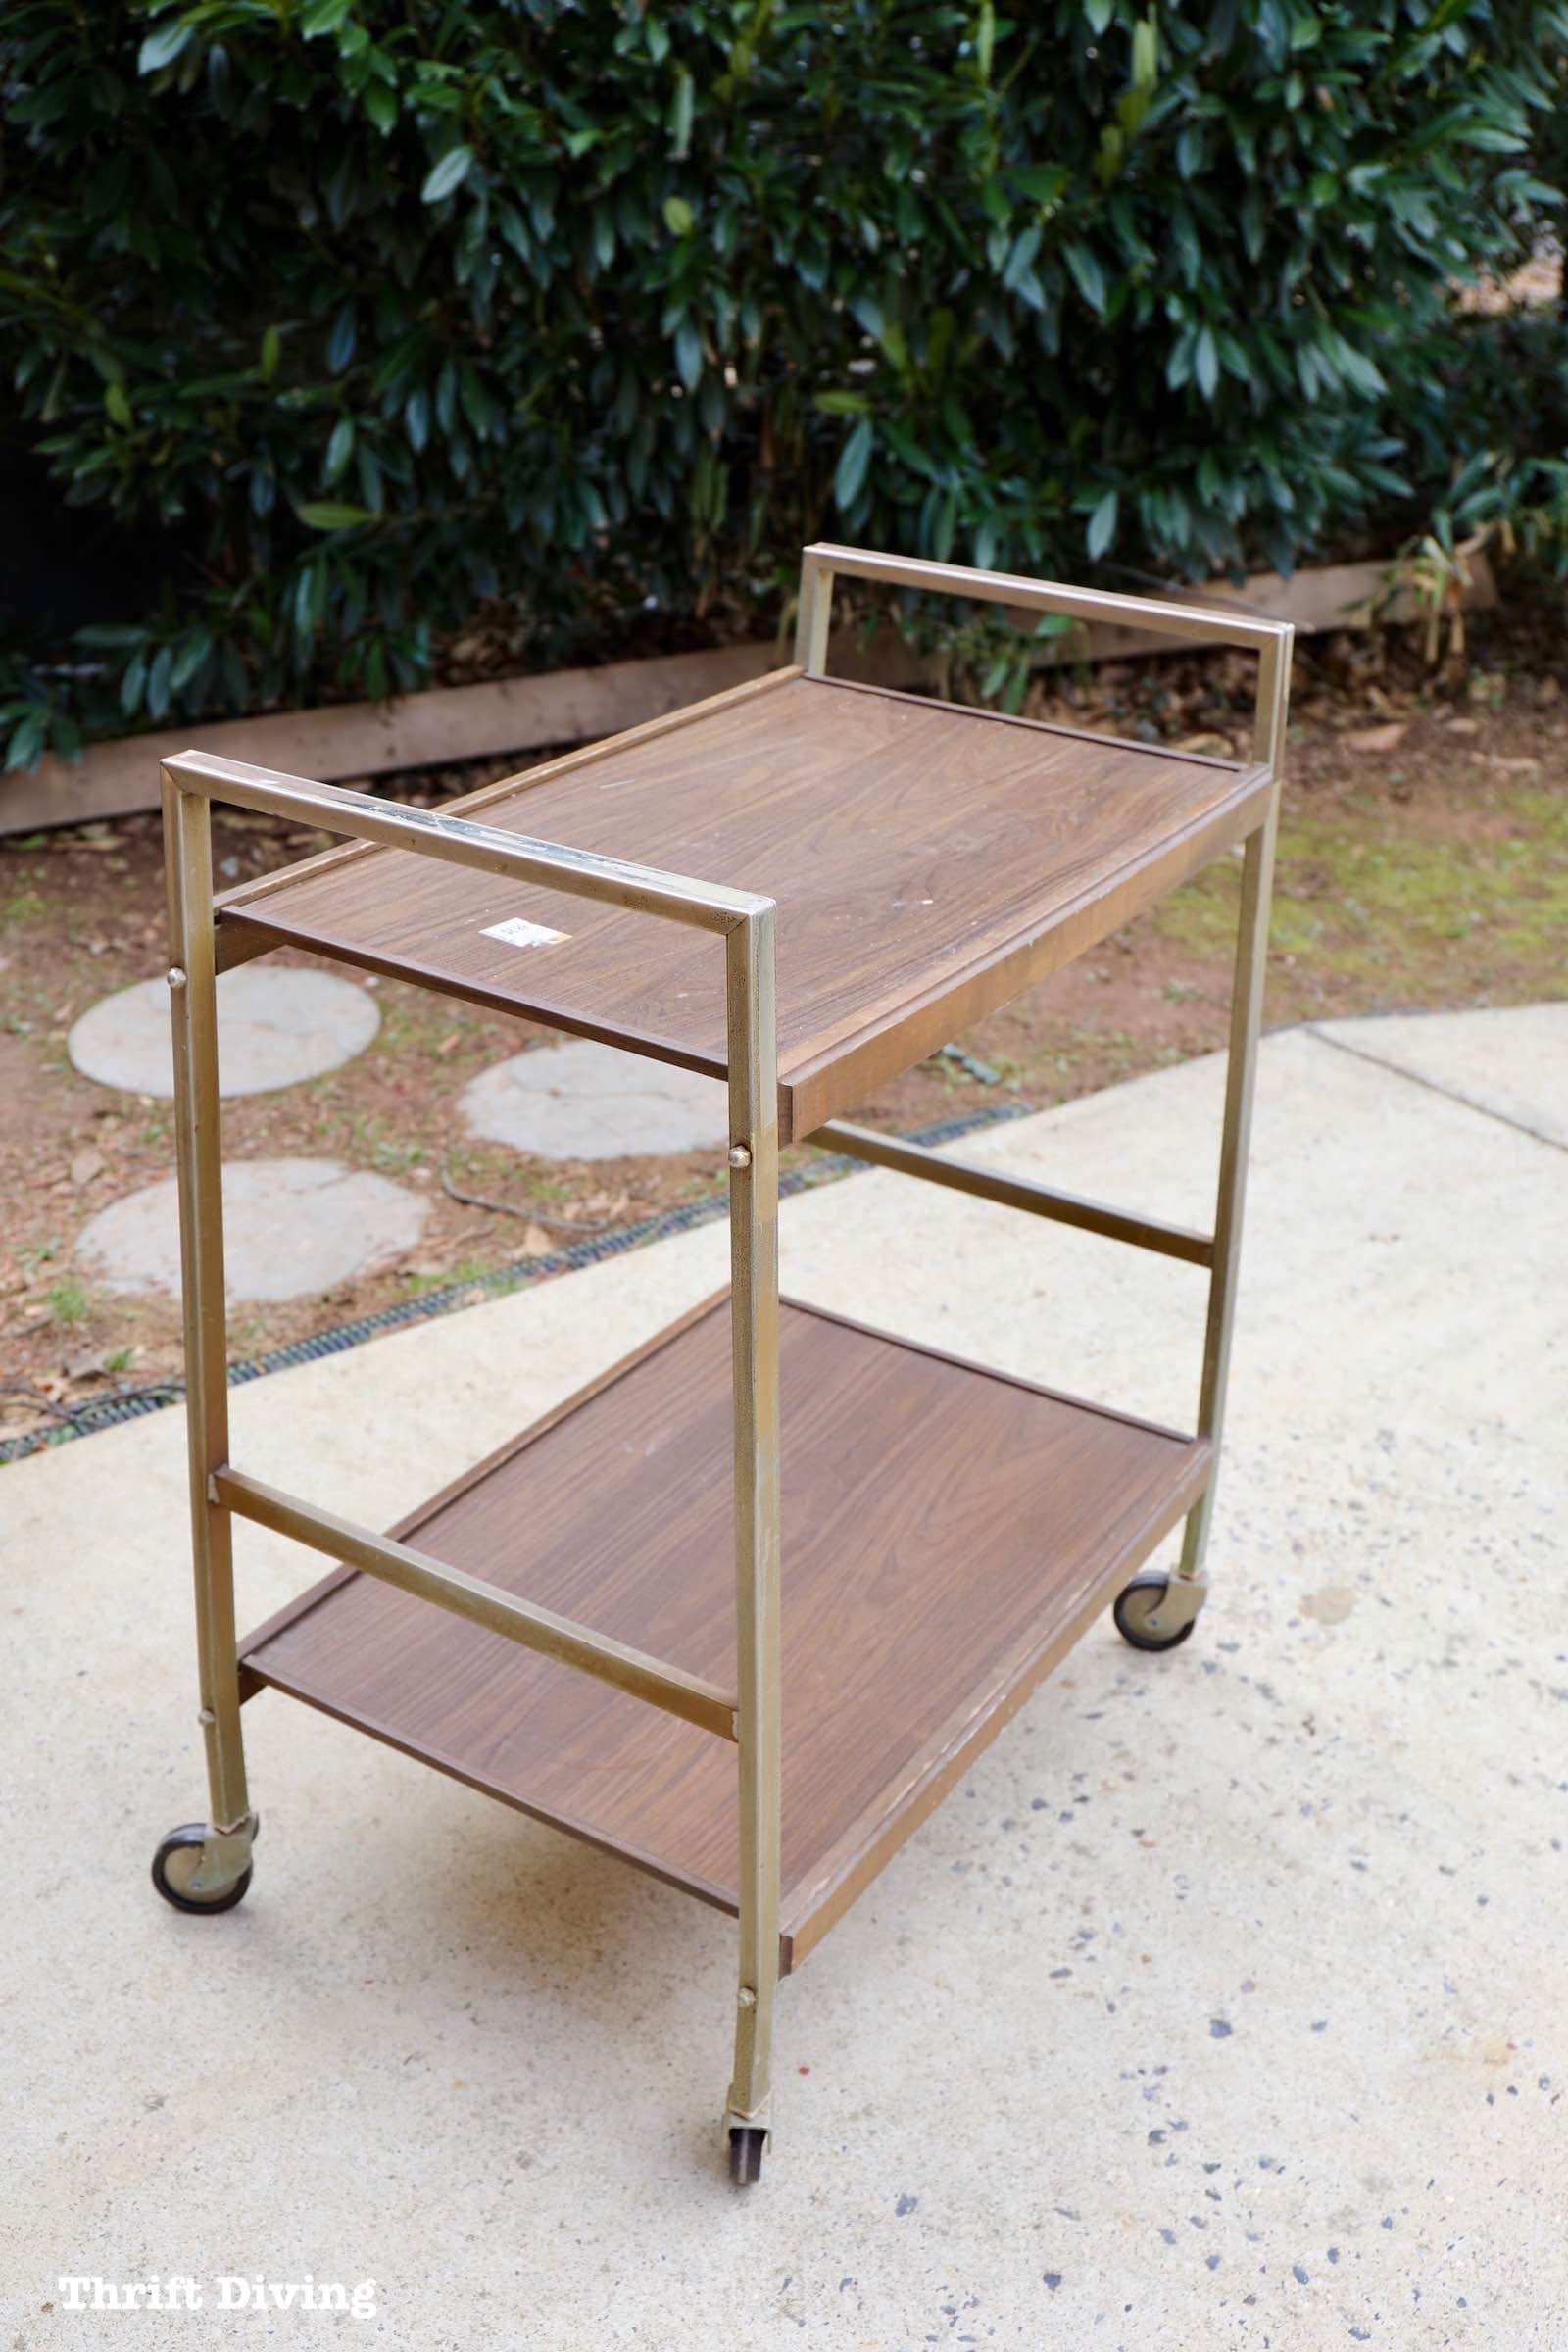
The legs were rusty and had old vinyl peel-and-stick strips on the legs. The shelves were also bowed. Who wants to sit coffee, tea, or glasses of wine on a cart that’s sinking in the middle?
So this whole bar cart was going to have to be dismantled.
(And yes, that sticker is correct: only $6.99! I probably had a coupon, though. LOL).

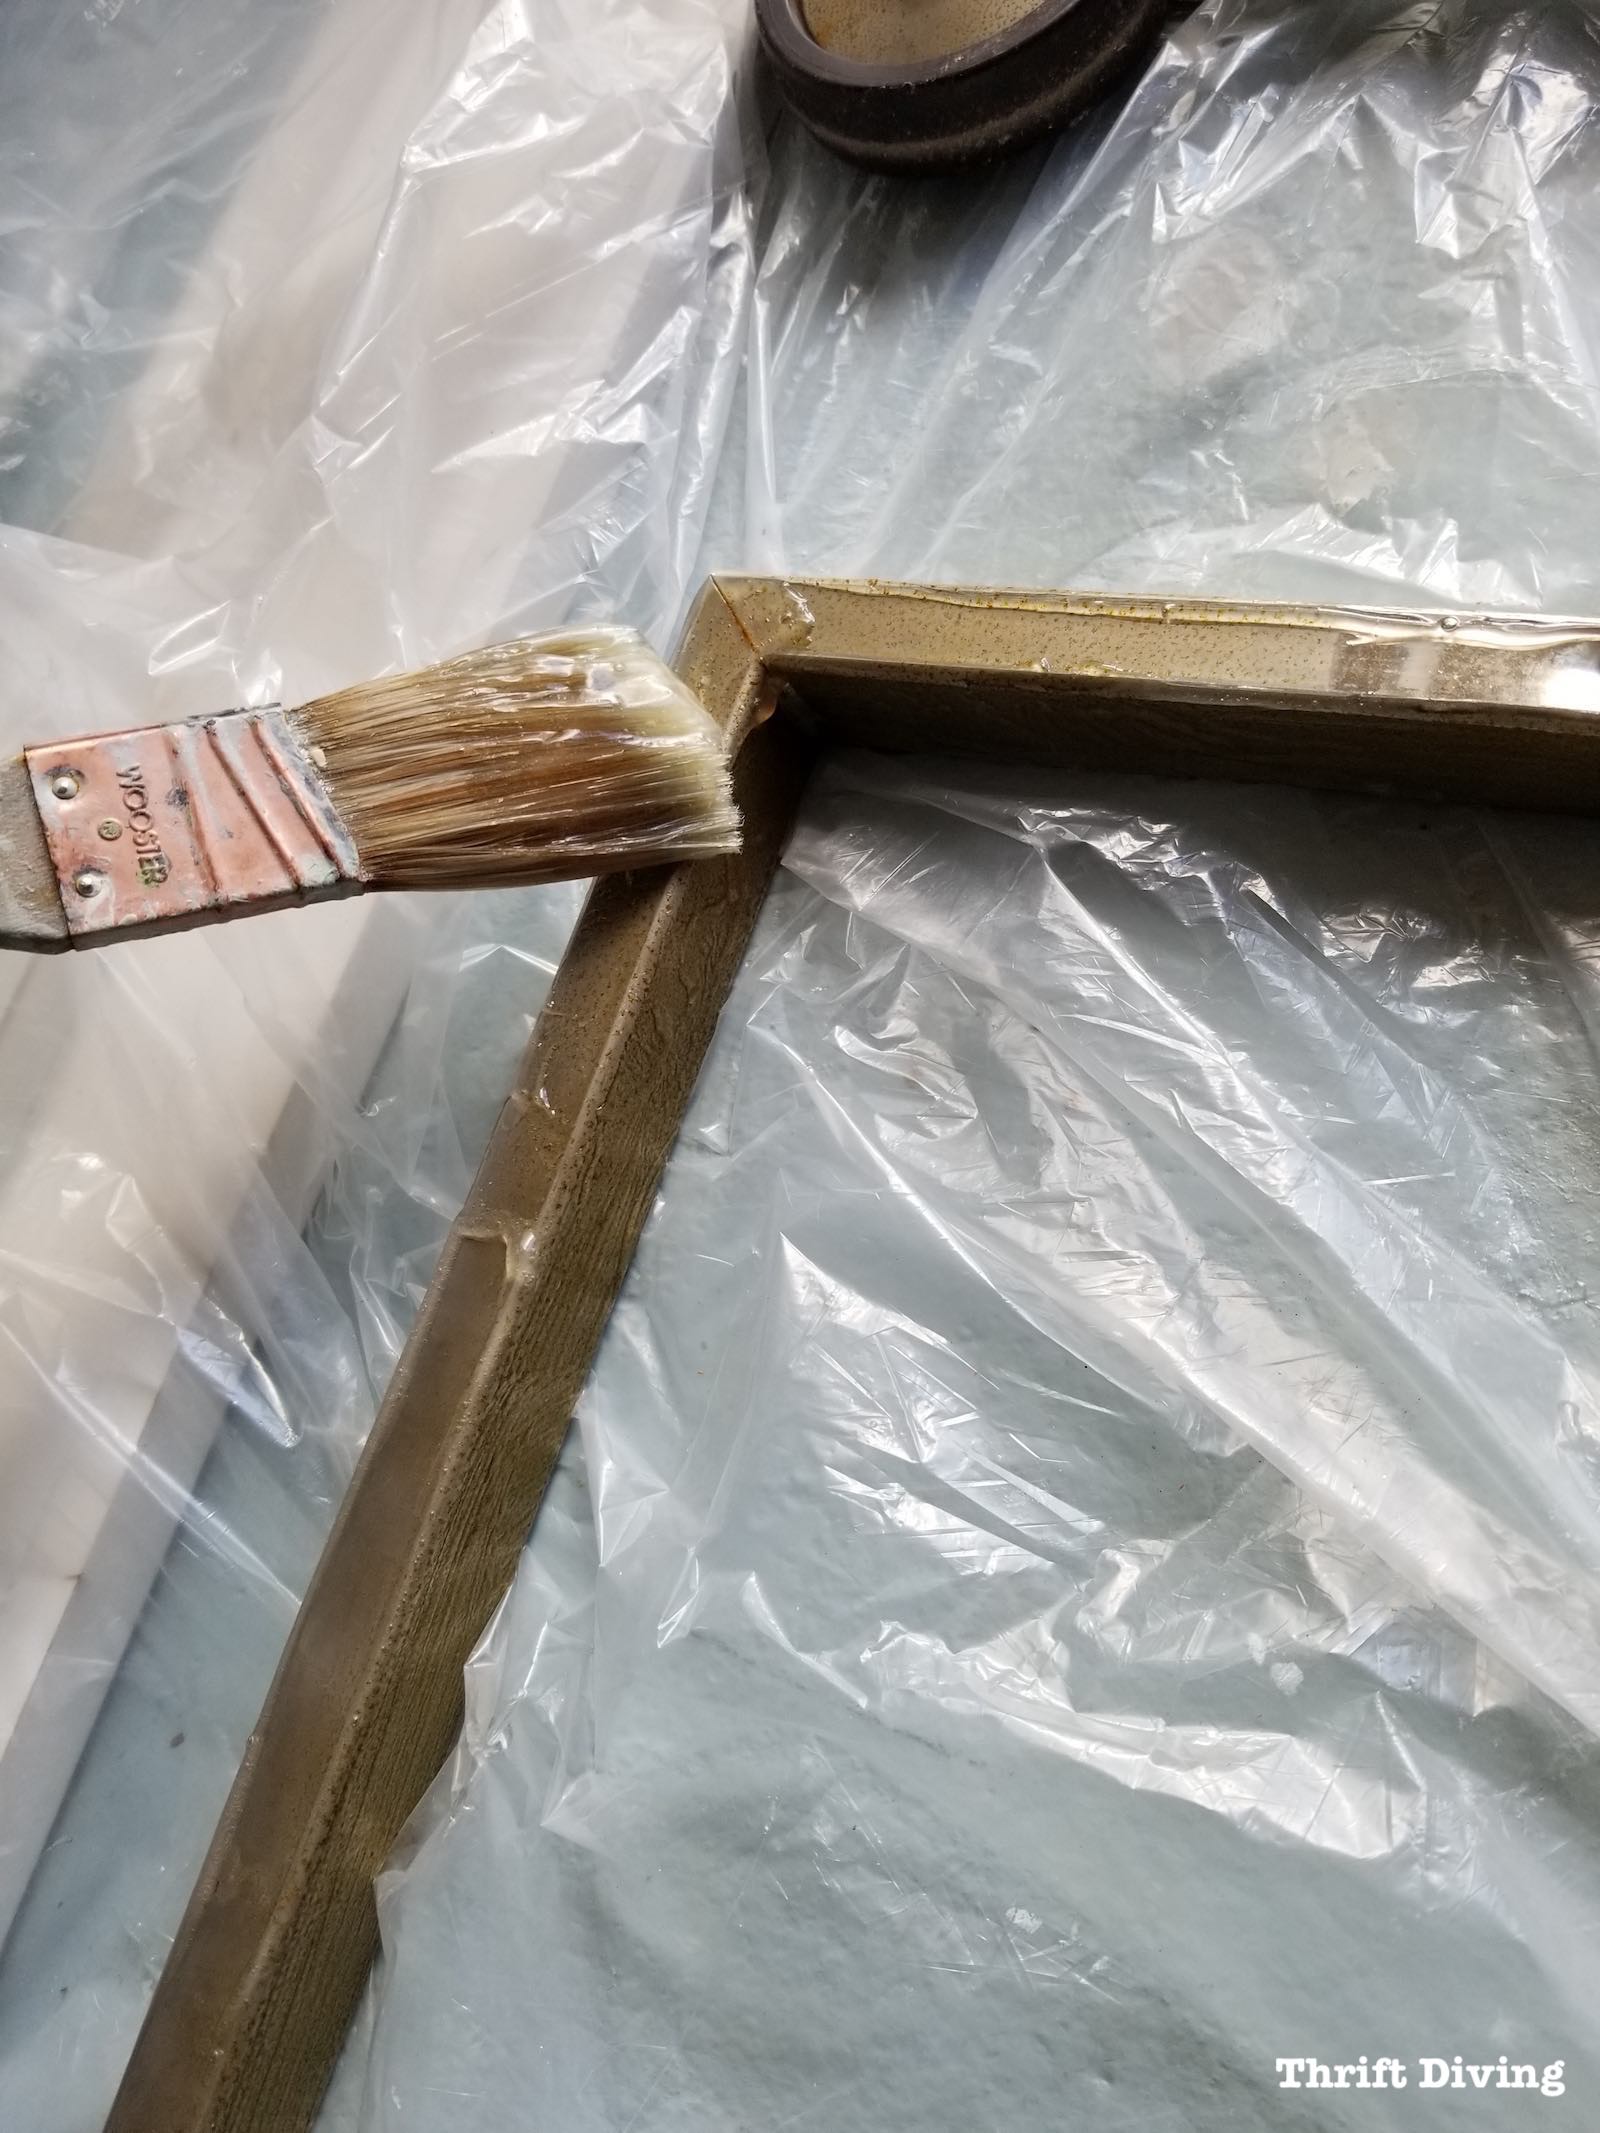
STEP 2: Apply the Rust Remover Gel
I’d never used rust remover before, so I was really curious how this would work.
The turn-off was that the rust remover would need to be wrapped up in plastic for a good 12-24 hours. SIGH….This wasn’t ideal when I just want to move, move, move on a project, you know?
But sometimes you’ve got to be patient with DIY. It must be done in steps. You gotta follow the instructions and take your time for the best results.
BEFORE
You could see the brown rust pooling on the surface of the metal! It didn’t require much elbow grease, thankfully. It just wiped off with hot water and a rag.

While the metal of the bar cart wasn’t perfect, it was a huge improvement! This rust remover gel worked so well that the rust simply slid off that metal like butter on a hot potato!
After seeing how well they turned out after cleaning them, I knew they’d be great to leave natural. No spray paint needed.
AFTER!
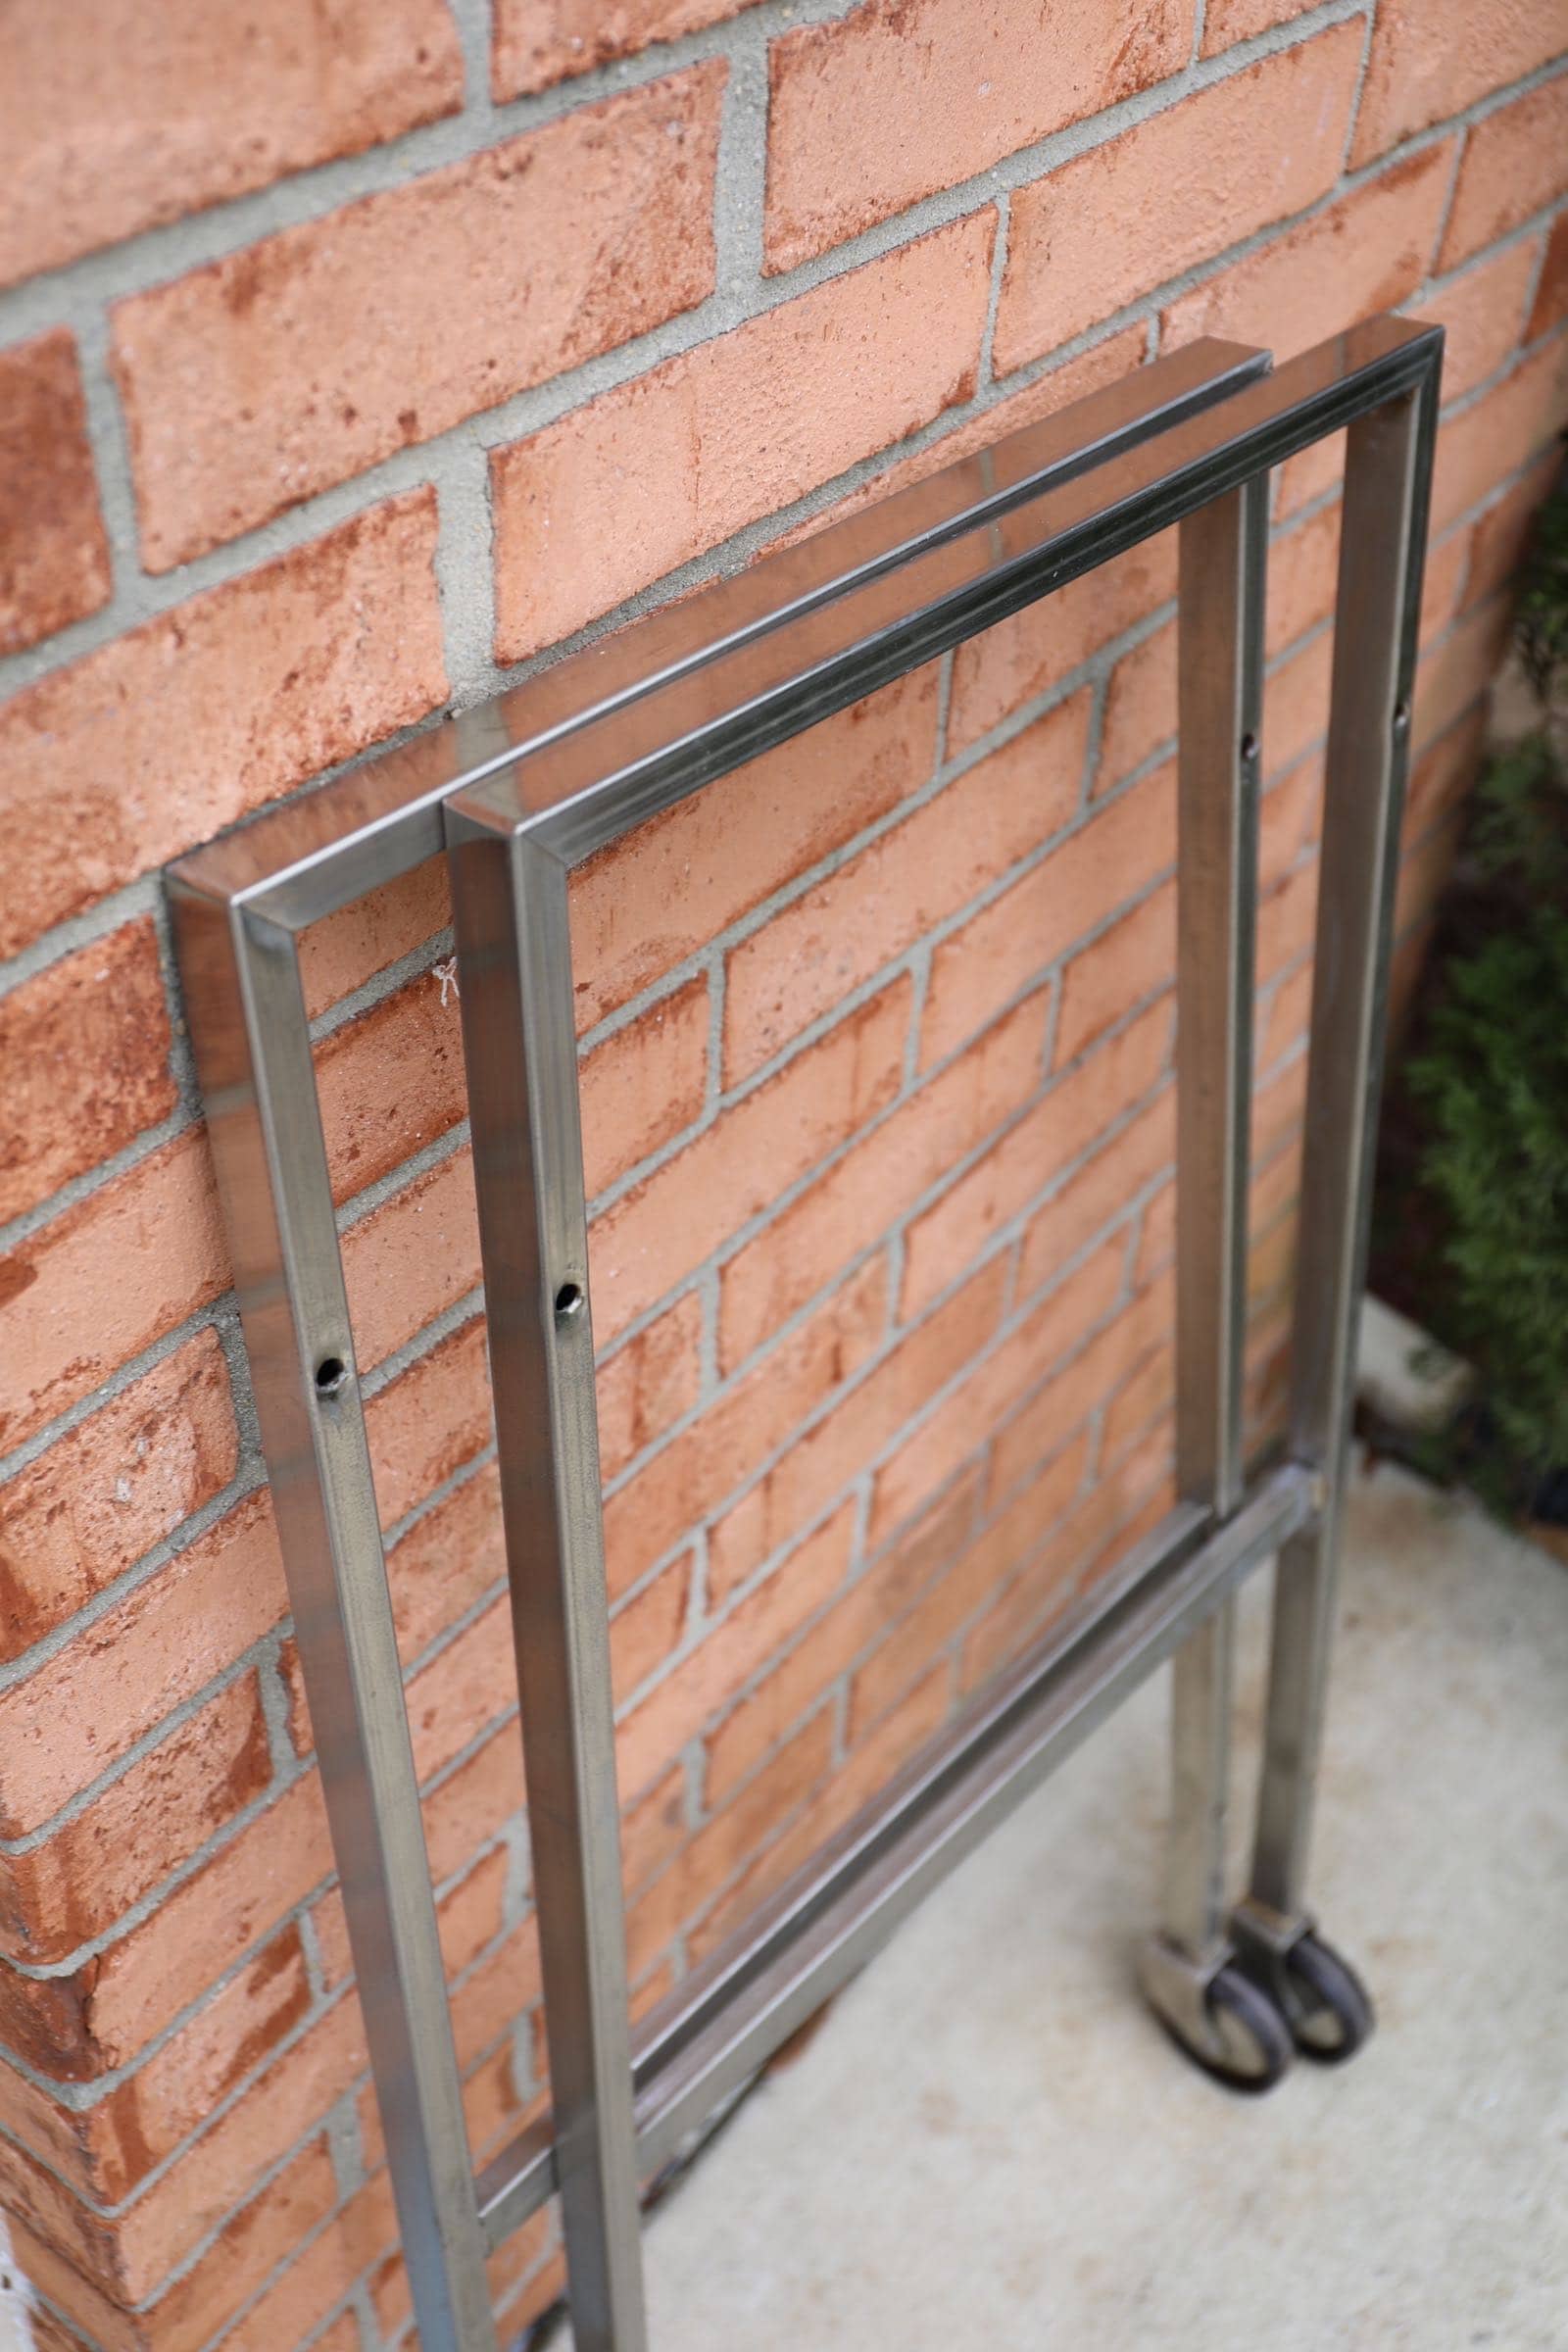
When the metal was dry, I used some Goo Gone to remove any sticky adhesive that the laminate stickers had left behind.
I followed with 0000 steel wool and even some super fine 800-grit sandpaper! I would have liked a bit more shine, but compared to what the original looked like, this was a big improvement!
The bolts and metal rods holding the cart together also got de-rusted.
STEP 4: Cut New Bar Cart Shelves
Have you bought wood lately?? It’s expensive as heck for some types!
The cheapest option for me was to buy this 1/4″ underlayment, which is typically used for under flooring. But it was large enough and thick enough to cut two pieces from it and still have enough left over for other projects.


Here, you can see on the original shelves that there was a groove, a ditch, where the side piece slides on to the shelf.
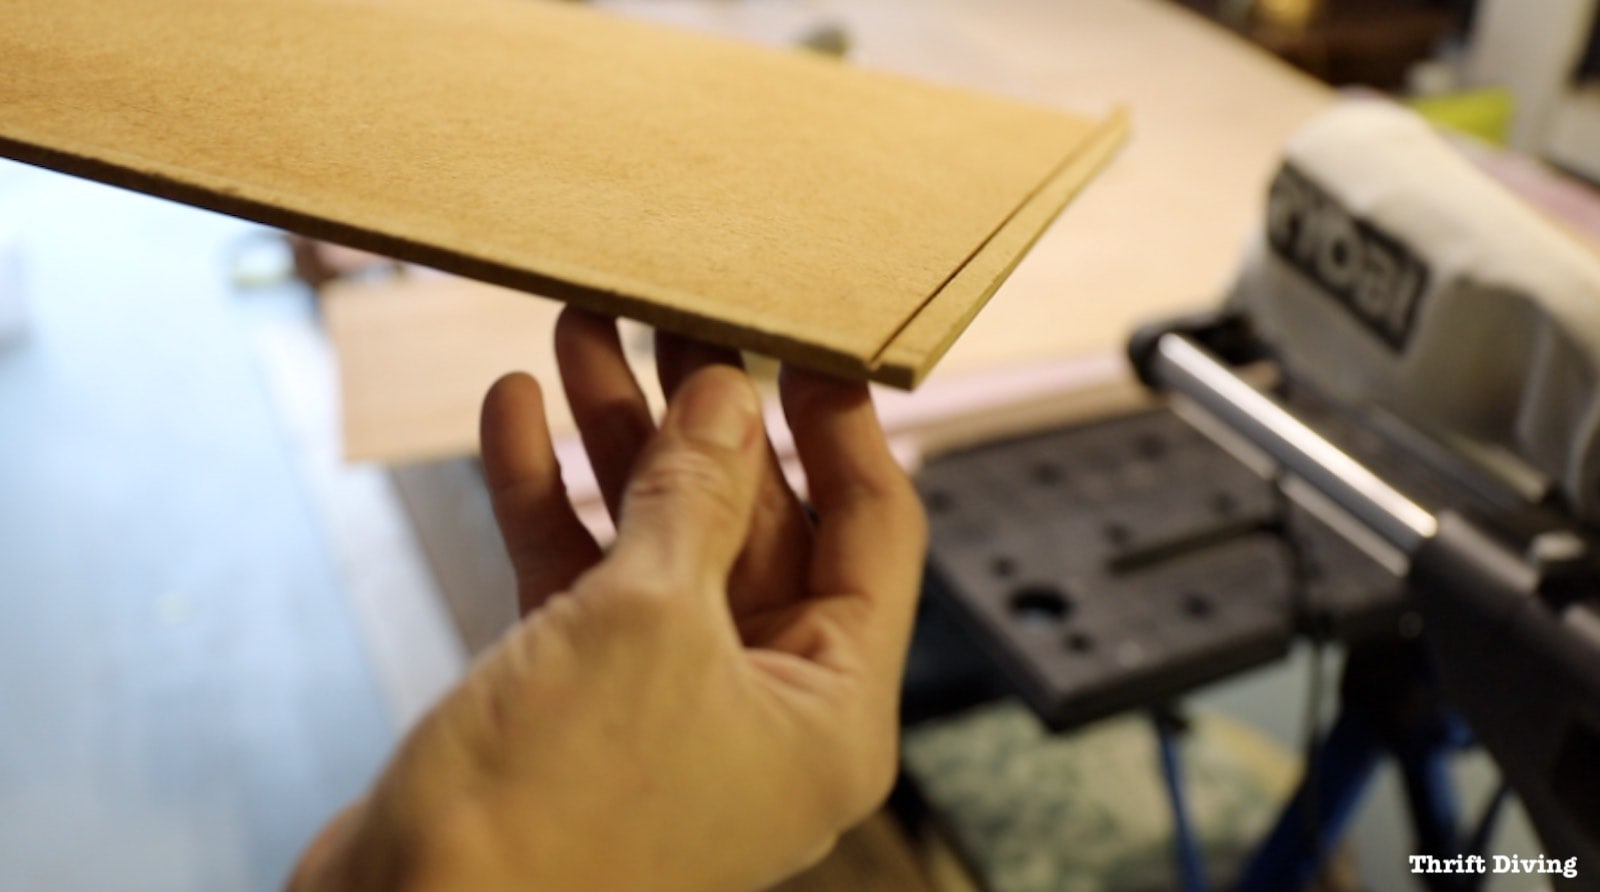
In order to re-create that for my new bar cart shelves, I had to set the depth of my circular saw really shallow to where it just barely grazed the wood. I could only hope I had done it properly so the end caps would fit on the new shelves.

STEP 5: Glue Paper to the Wood Shelves
This is where I needed to make sure I took my time. This marble paper at $8.00 a sheet, while it isn’t too expensive, wasn’t that cheap that I wanted to ruin it due to stupid errors, like applying it crooked or ripping it.
I bought the paper from Paper Source, which almost makes me drool whenever I go there and see what goodies they’ve got in stock! They’re handmade and are usually in limited supply, so I’ve learned that when you find a print you like, you must buy as much as you can afford. They usually don’t re-stock the same styles.
Related: See my UGLY lamp makeover using pretty paper on the lampshade.

Here is where you can buy the marbled fine paper from Paper Source, using my affiliate link.
The marbled sheets I used for this bar cart makeover had more white than blue, but both are equally stunning, wouldn’t you agree? And I love that it comes from a renewable source in Nepal! Makes this project even more unique. 😉

I used the spray adhesive on both the paper and the wood shelf, letting it sit for 1 minute before adhering them together.
The brayer, which is a hand tool with a roller on it, helped to remove any bubbles left behind. It was a nice, secure bond between the paper and the shelves.

STEP 6: Attach Wooden Sides
Because of the metal and wood pieces that capped the edges of the shelves, I had to do a few things to get those to fit. You can watch the video tutorial on my YouTube channel to see the details.
But overall, it turned out great!
I decided to go with a white semi-gloss for the wooden sides of the bar cart shelves. But at first, I wasn’t sure what color would look best, so I did some tests, which I explained in the bar cart makeover video, as well. I’d always recommend testing things out when you’re not sure what colors/styles look best together. Buy extra materials so you’ll be able to do those tests!

STEP 7: Re-Assemble the Bar Cart
Getting the cart back together was pretty simple. I just had to be careful I didn’t drop or scrap the fresh paint or to tear the new paper-lined wood shelves!
STEP 8: Add the Custom Glass
I stopped by my local Ace Hardware to get some glass cut (I don’t believe that Home Depot or Lowe’s cut glass). Surprisingly, it was only $20 total for the two pieces of glass! The glass added that extra “umphf!” I was looking to achieve, stepping it up and making it look more swanky and shiny.
Why I Didn’t Use Tempered Glass
Some people have criticized that this glass I used is window-pane glass and isn’t strong enough to withstand any kind of wear and tear and that if it breaks, it can be dangerous. I would agree with them–it’s definitely not ideal.
Tempered glass is what’s typically used for glass table tops, glass shelves, etc. But I did a quote online for custom tempered glass and–OMG–it was $238 total for two pieces of tempered glass 1/4″ thick in these dimensions!
That’s just not realistic for a $6.99 bar cart!
So, I’ll take into consideration that this glass could potentially be dangerous if the cart should tip over, or if something is slammed down onto it. I’ll keep those things in mind. Who knows, maybe I’ll decide to try to epoxy over it to achieve the same glassy finish. We shall see! But for now….
Let’s have another look the “before.”
BEFORE
And here’s the “after”!
AFTER: Bar Cart Makeover

BEFORE

AFTER!

I just can’t get over this marbled paper…it’s GOR-GEOUS! I feel like I could get lost in it, don’t you? It’s that good.

You’re probably wondering where I’m going to put this bar cart.
It will likely go in my dining room, but my dining room is waiting for a makeover. It’s been just “existing” since we moved in back in 2010. So it’s long overdue for a refresh. And this cart will go in there! I’ll likely use it for a tea cart since we’re big tea and coffee drinkers over here (although a ‘lil bit of wine every now and then is always a great idea….). 😉

When I look at the metal, I’m glad that I removed the rust and simply restored it. To have spray painted over the metal would have taken something away from the beauty of this vintage bar cart (or rather, TV stand, since most people probably used this as a TV stand back in the 70’s!).
I had to make a couple adjustments to the bottom shelf because I didn’t screw it together properly and it caused the edge of the glass to stick up. But that’s all been taken care of. 🙂


Want More??
And if you’ve enjoyed this bar cart makeover, check out my other projects where I’ve used paper creatively!
- How to Cover Ugly Ring Binders with Paper
- An Ugly Lamp From the Thrift Store Gets a Makeover!
- How to Make a Gift Box Out of Scrapbook Paper
- How to Make a DIY Journal Notebooks Out of Scrapbook Paper
- How to Make a Drawer Organizer Out of Scrapbook Paper

Do you love this bar cart makeover? Click here to SAVE it on Pinterest!

So what do you think?! Do you love this TV cart / bar cart makeover and marbled paper as much as I do?! Leave a comment and let’s chat about it!

Download the 5 freebies!

Thrift Diving inspires women to decorate, improve, and maintain their home themselves...using paint, power tools, and thrift stores! Use these 5 printables, checklists, and ebooks to get started!

Wow! I adore, just adore the blue marble paper!!! And adding the glass just gave it class!
I do have to say you have good eyes; I have never removed rust from anything and had it look half as good as your cart. I would have walked right by it and never thought it could look that perfect. What a wonderful before and after.
I’m with you, Elizabeth! I’d never removed rust, either, but now that I’ve done it, I would love to remove more! It’s a dramatic difference. Thank you!
Awesome and incredible Serena, you are so talented. My Mom had a tv stand like that but hers was really ugly like your original. Your bar cart turned out so wonderfully, is a beauty now. Love that marble paper, great choice.
Are you using your bar cart in your kitchen or dining room?
Sure can’t tell what it was before. You are a magician. So happy for you it turned out as you meant it to.
Happy Spring and Easter
Hi, Janeellen! The cart will be going in my dining room, but if I could use it in my kitchen that would be cool. I don’t think I have a good wall for it in the kitchen, though.
Wow, it DOES look fabulous! You forgot to tell us the product to remove the rust. I would like to get some. Thank you for another creative project that costs little. I am waiting for another “thrift store tour” with you, too.
Hey there, Sherry! The rust remover is in the materials listed. It’s called Workshop Hero Metal Rescue Gel. Works very well!
So pretty. I am always amazed by the quality of your work. Thank you for sharing!
Thank you, Elisa! 🙂 So glad you like it!!
Hi Serena. I was married in the 1970’s, and to the best of my recollection, this was a Tea Trolley, and not a TV stand. The TV’s back then were bulky and heavy, and this would not have held up, I am sure. Having said that, it turned out absolutely beautiful. Love, love, love the paper, and the colour. Awesome job!!
Hi, Janet! Great to know that this was a tea trolley! Some people on YouTube swore it was a TV cart! This helps to clean up the confusion. You are right about the weight of the tv! 🙂 Thanks, Janet!
dear friend,that’s how i think of you! not only do i so enjoy your projects(you are so talented and creative) what i love about you is your spirit,it’s so nice to have your blog pop into my box,you really lift my spirits! you make me think that even at this stage in my life i could be creative and take on some long overdo projects.have fun at class tomarrow
Awww, Christina!! Your comment has made my day! I’m so happy to hear this! I’m sorry that I haven’t been posting as much, due to life getting in the way. I’ll be sure to pop up in your inbox more often! 😉 Thank you!
You did a fabulous job! Love your blog.
Thank you, Sharon! 🙂 Means a lot!
Oh, I like that! Call it a tea trolley!
I like “tea trolley.” It sounds FANCY! 🙂
Bar cart or TV stand, it did turn out really well! I love the Paper Source too – perfect size paper, wasn’t it?
The paper size was PERFECT! 🙂 I was glad I didn’t have to do any seams!
hi Serena, it looks lovely. It is called a ‘tea trolley’ in the UK. I remember my mum made one in woodworking classes many many years ago. I wonder what happened to it.
I love the term “tea trolley”! And I wonder if your mom had donated it…?