BEFORE and AFTER: Utility Room Makeover!
These utility room ideas and makeover is sponsored by Filter Buy.
My home was built in 1973, and around every corner, I’m reminded that my house is 50 years old. {{GULP}}
From the ugly, outdated, original linoleum flooring in my basement utility room, to the dirty-stained cotton-candy pink insulation spilling out from between the ceiling floor joists, it’s a constant reminder that my home has literally become “middle aged” during the 13 years we’ve lived here.
Because it’s not an inviting area of my home, I’m rarely jumping for joy to go down there into the belly of my basement.
Toss in the fact that my basement utility room has got more spider webs than a haunted house at Halloween, I pretty much stay out of my utility room unless:
- I need to root for the holiday decorations,
- My leak detector starts beeping frantically, “WATER! There’s a leak! Come get this water–QUICK!”
- I remember to change the air filter in my furnace (the keyword here is: remeeeeeember).
Over the years, it’s become a forgotten place to dump discarded things that we didn’t want to let go of yet, but had no use for. I also stored excess craft supplies in my basement utility room, such as fabric, upholstery supplies, etc.
This is why it was so critical to find easy utility room ideas for my “middle-aged” utility room! HA! 🙂
Click here to save this project on Pinterest!
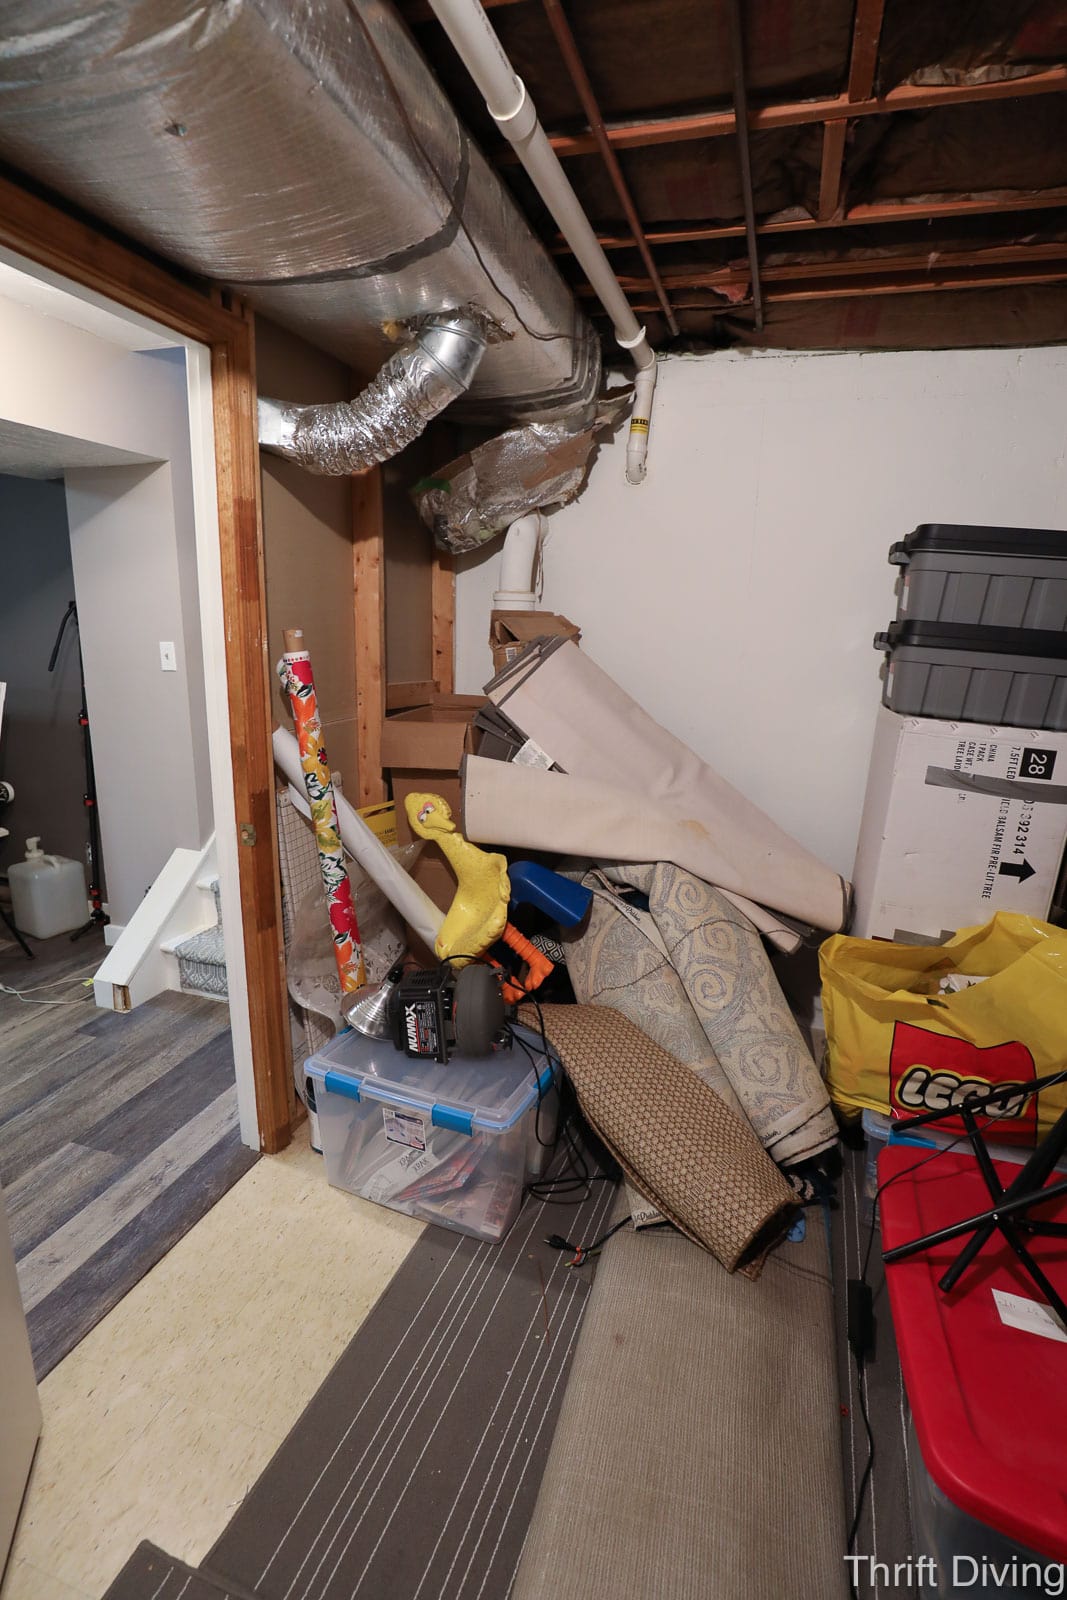
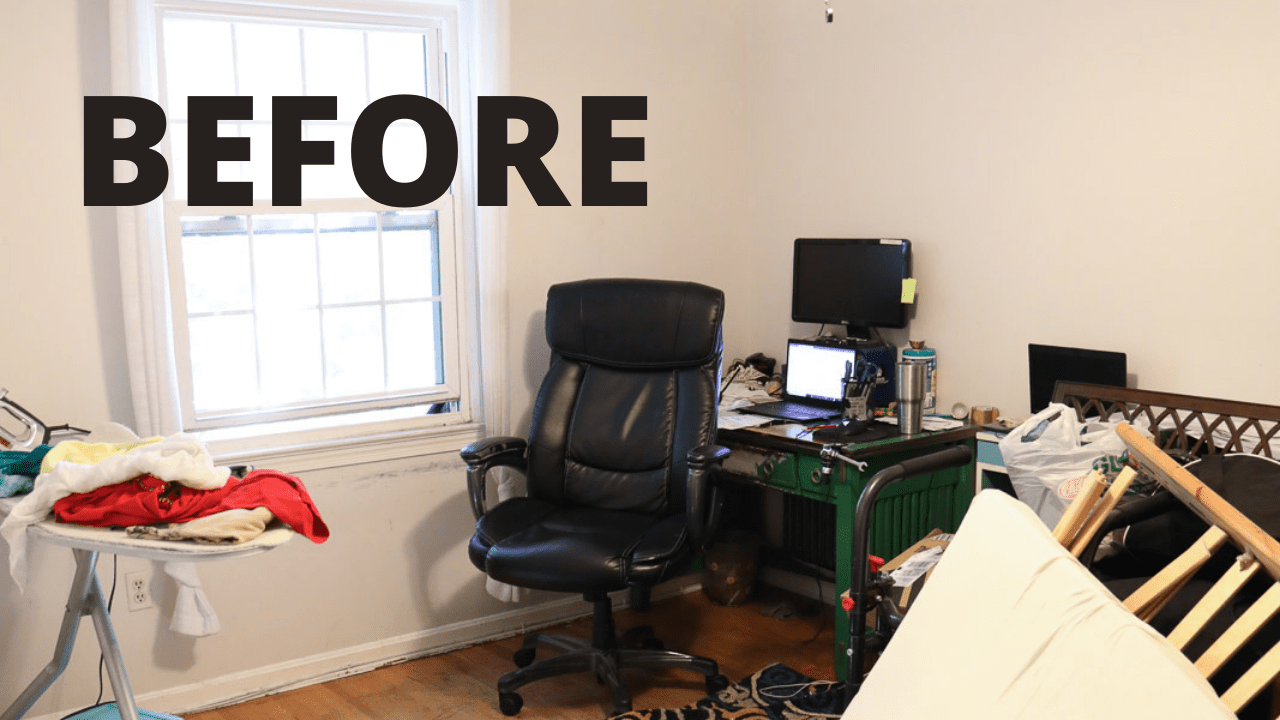
BEFORE
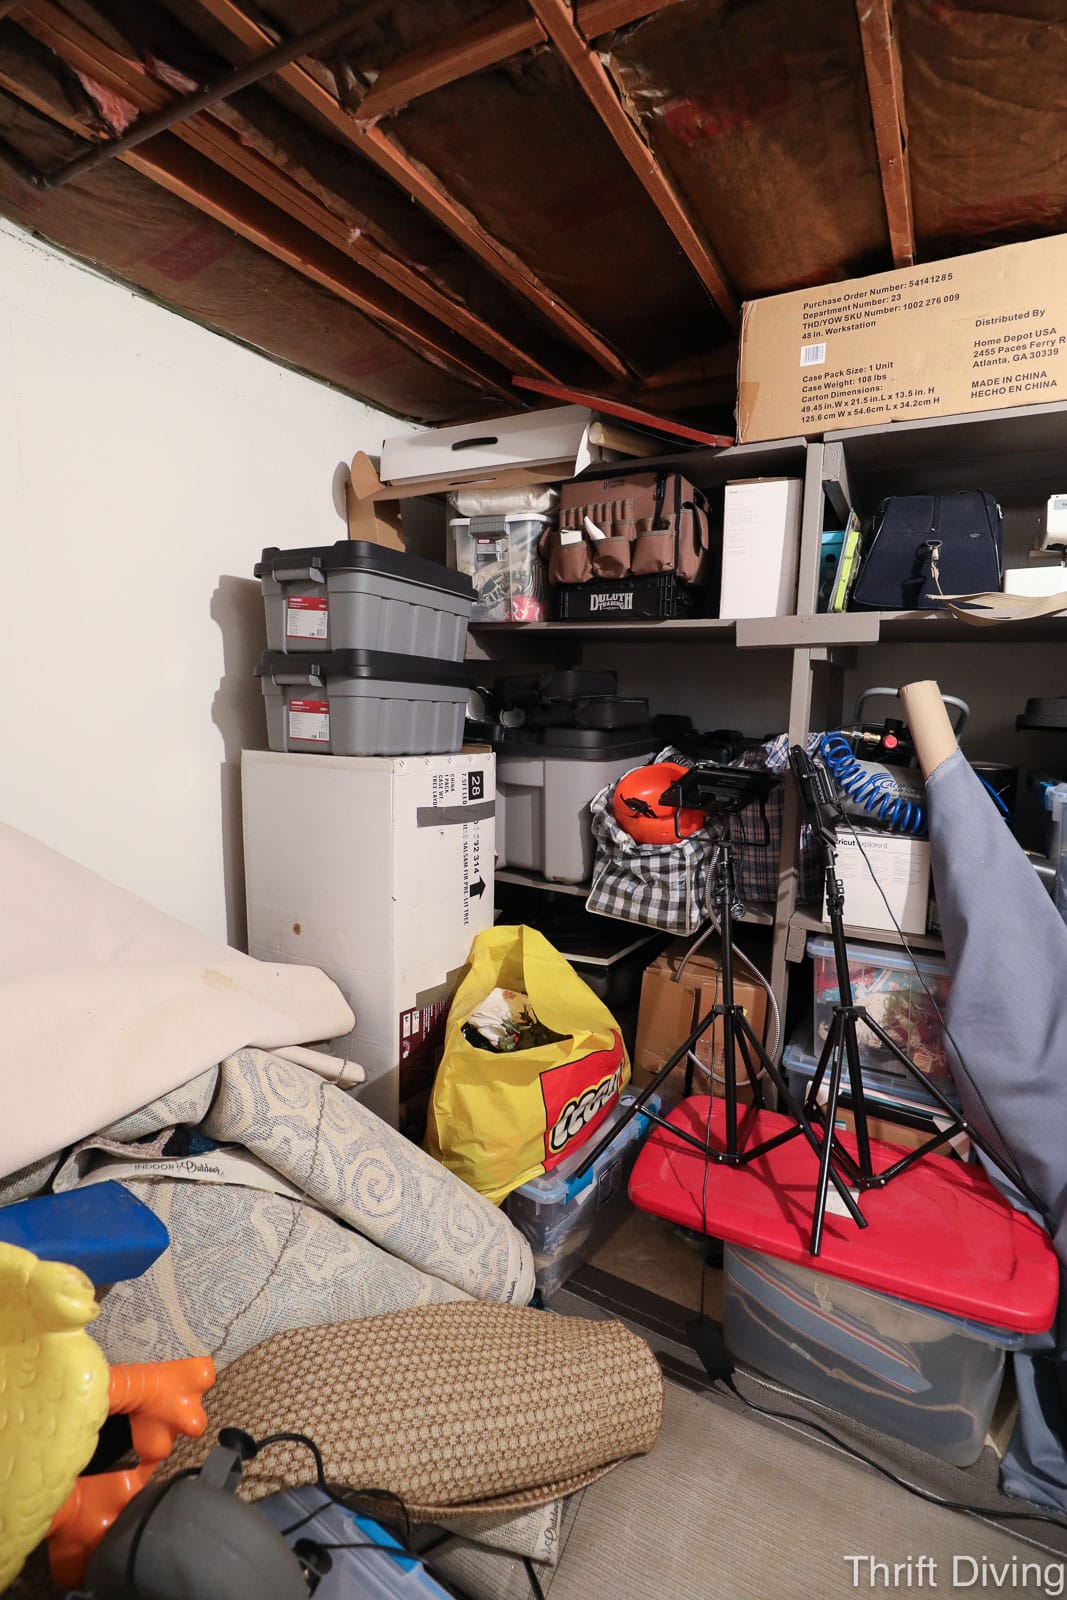
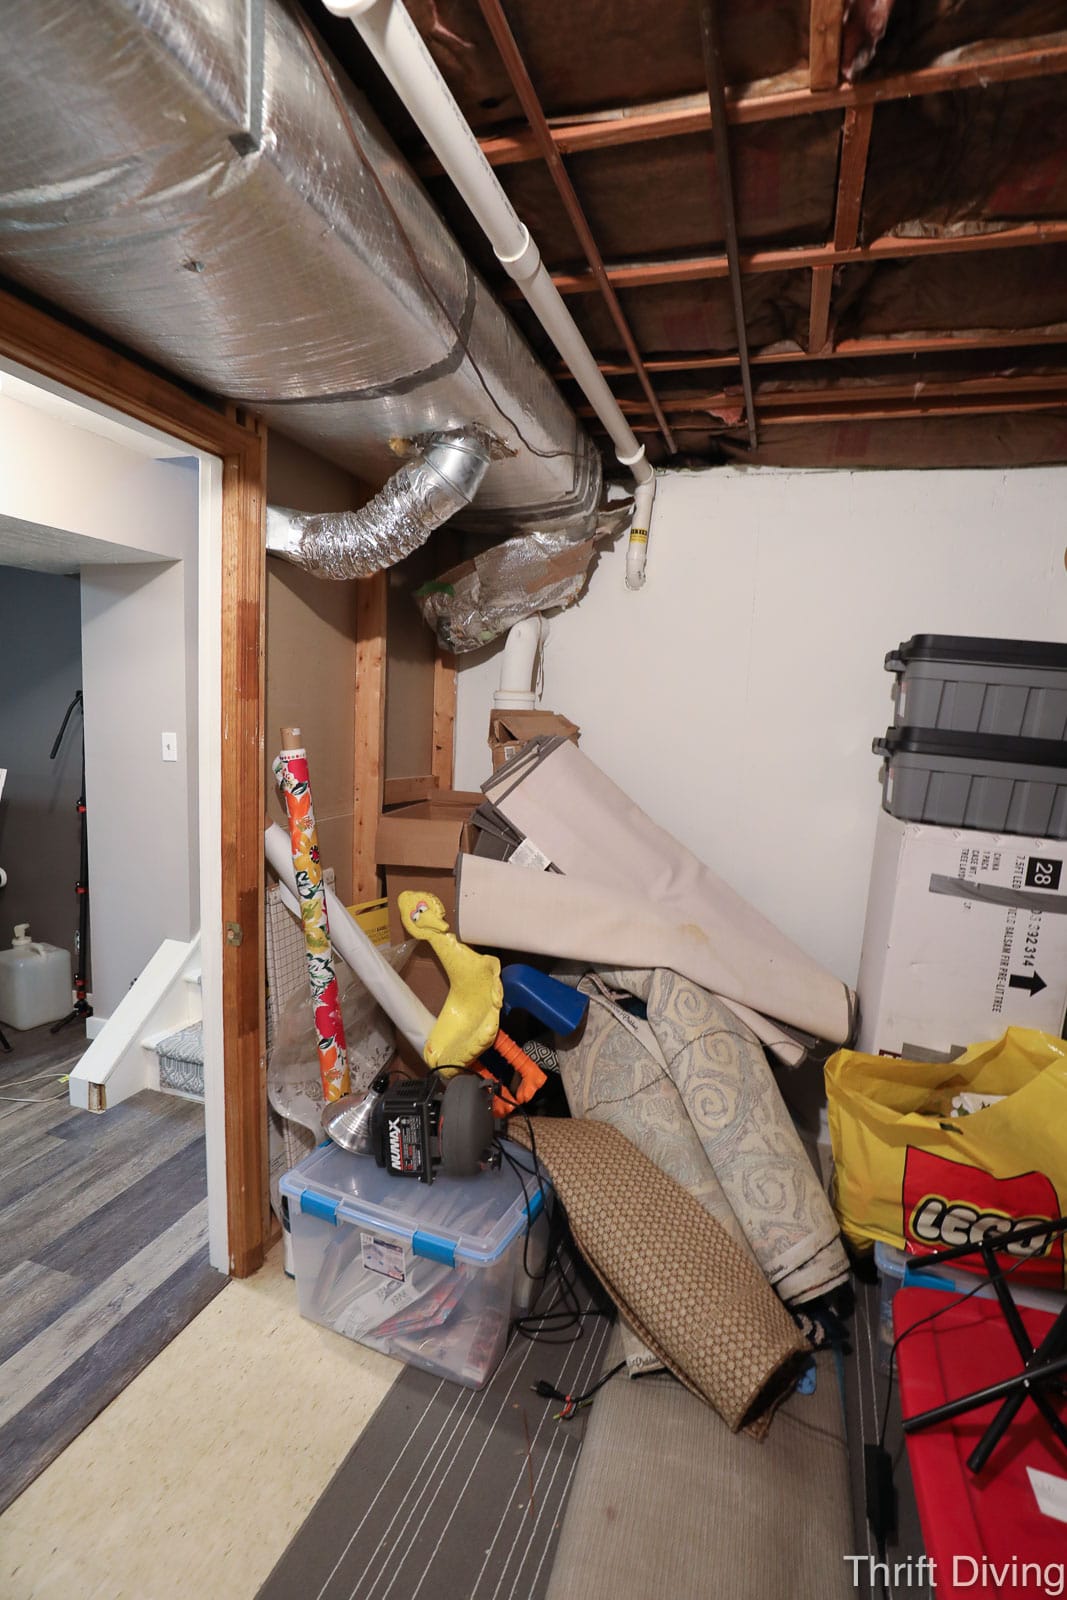
Walking into my basement utility room, I’d step over thick, heavy rugs, tripping and nearly crashing into things. It was dangerous! Imagine having to lug a Christmas tree out from beyond this mess, hoping not to break an ankle!
It has a huge storage shelving unit that a previous homeowner built, which is useful. But we had quickly filled that up, so the floor became the next place to store things, without any organization whatsoever.
So for this makeover, I was on the hunt to come up with more utility room ideas for this space!
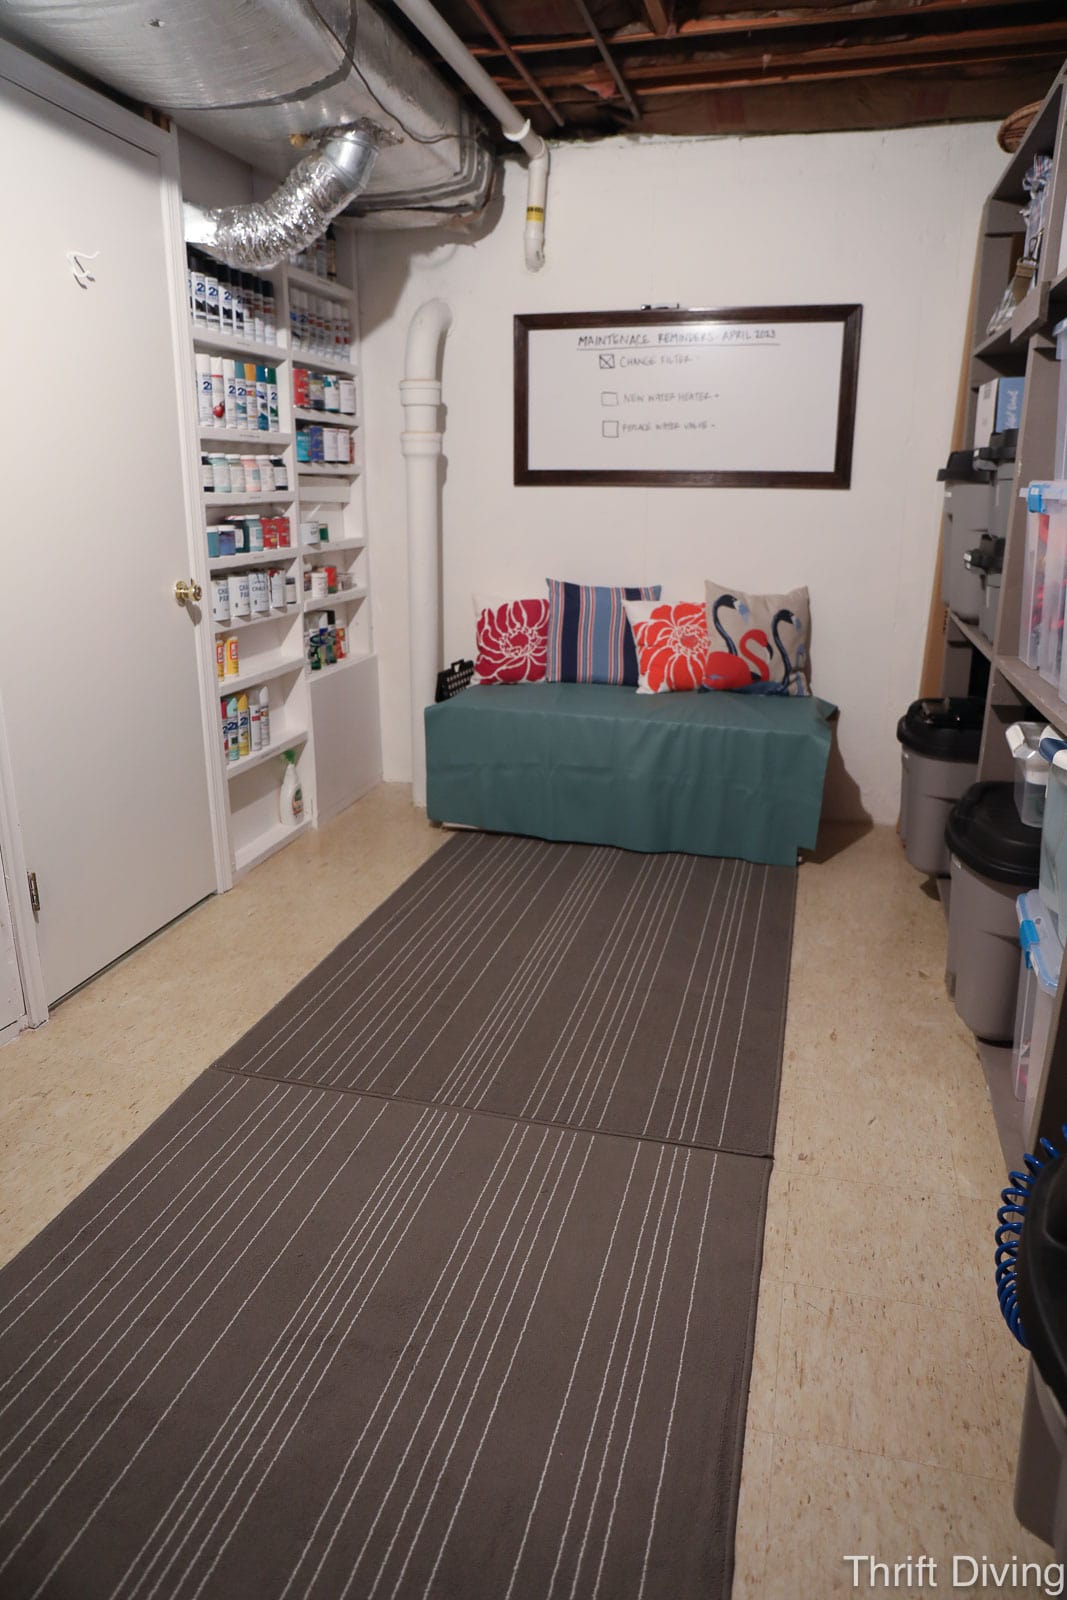
AFTER!
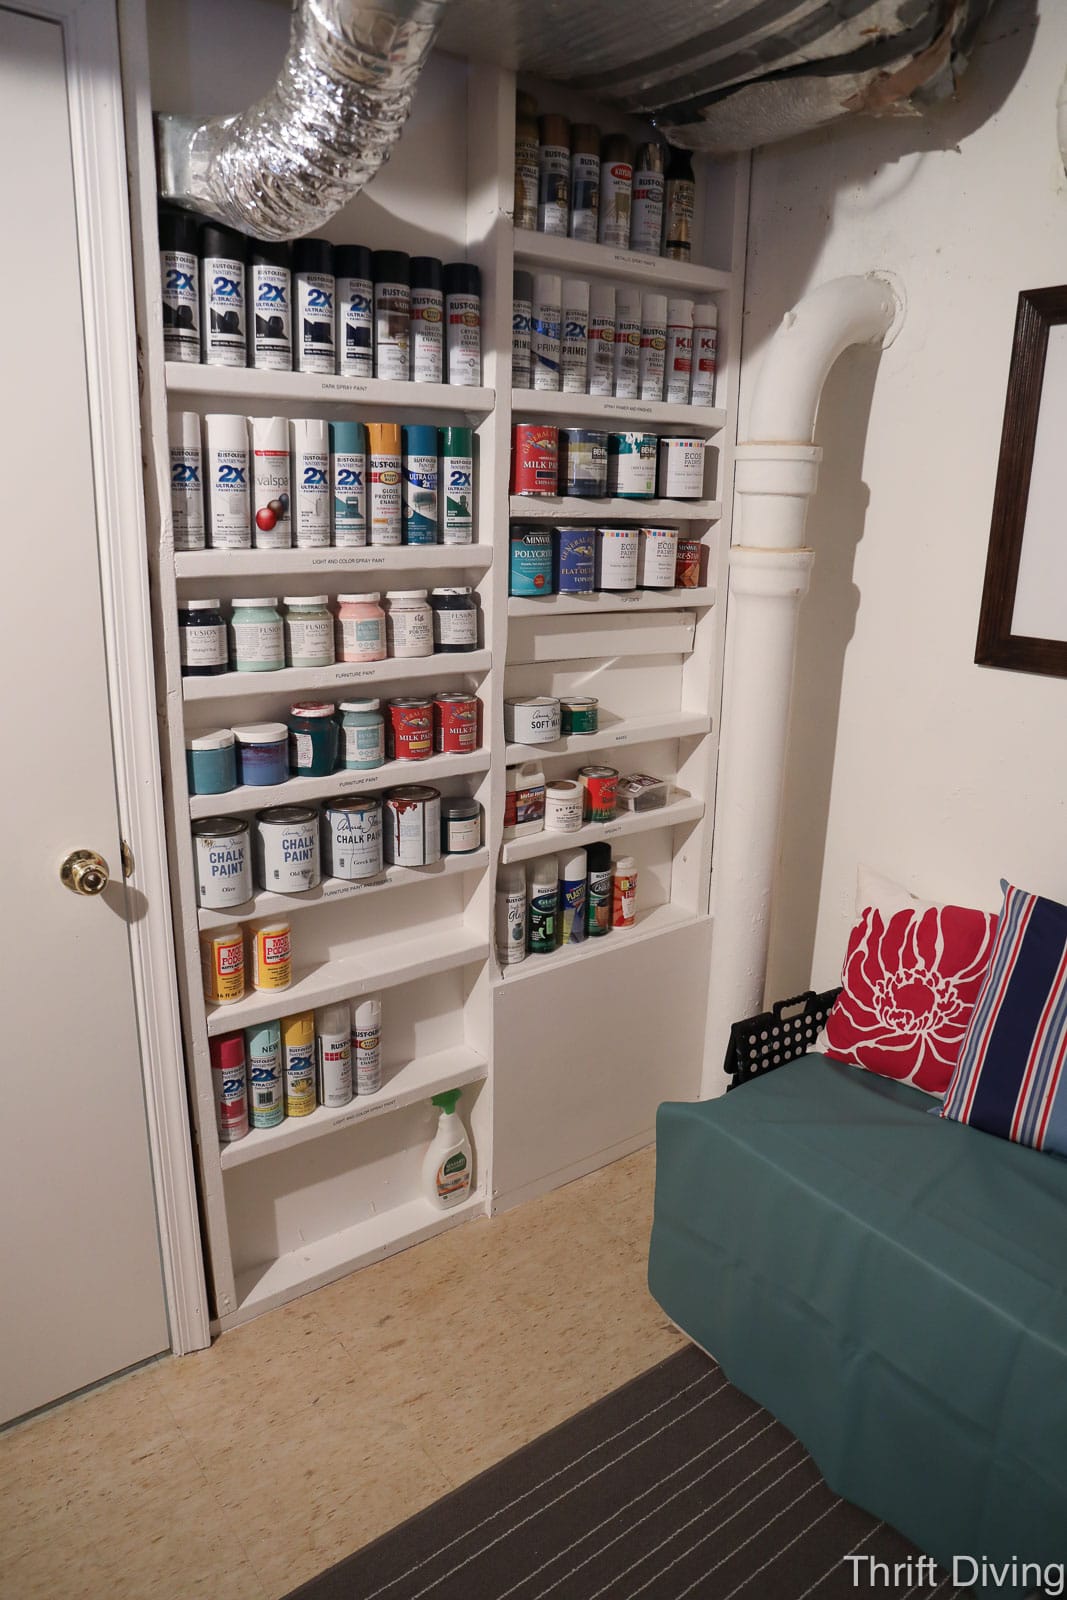
This doesn’t even look like the same basement utility room now! I was able to create more storage, get rid of things we no longer used or needed, and organize the basement shelving. Utility room ideas such as this storage shelf is easy to create, costs virtually nothing (just the cost of the 2x4s), but offers so much more storage!
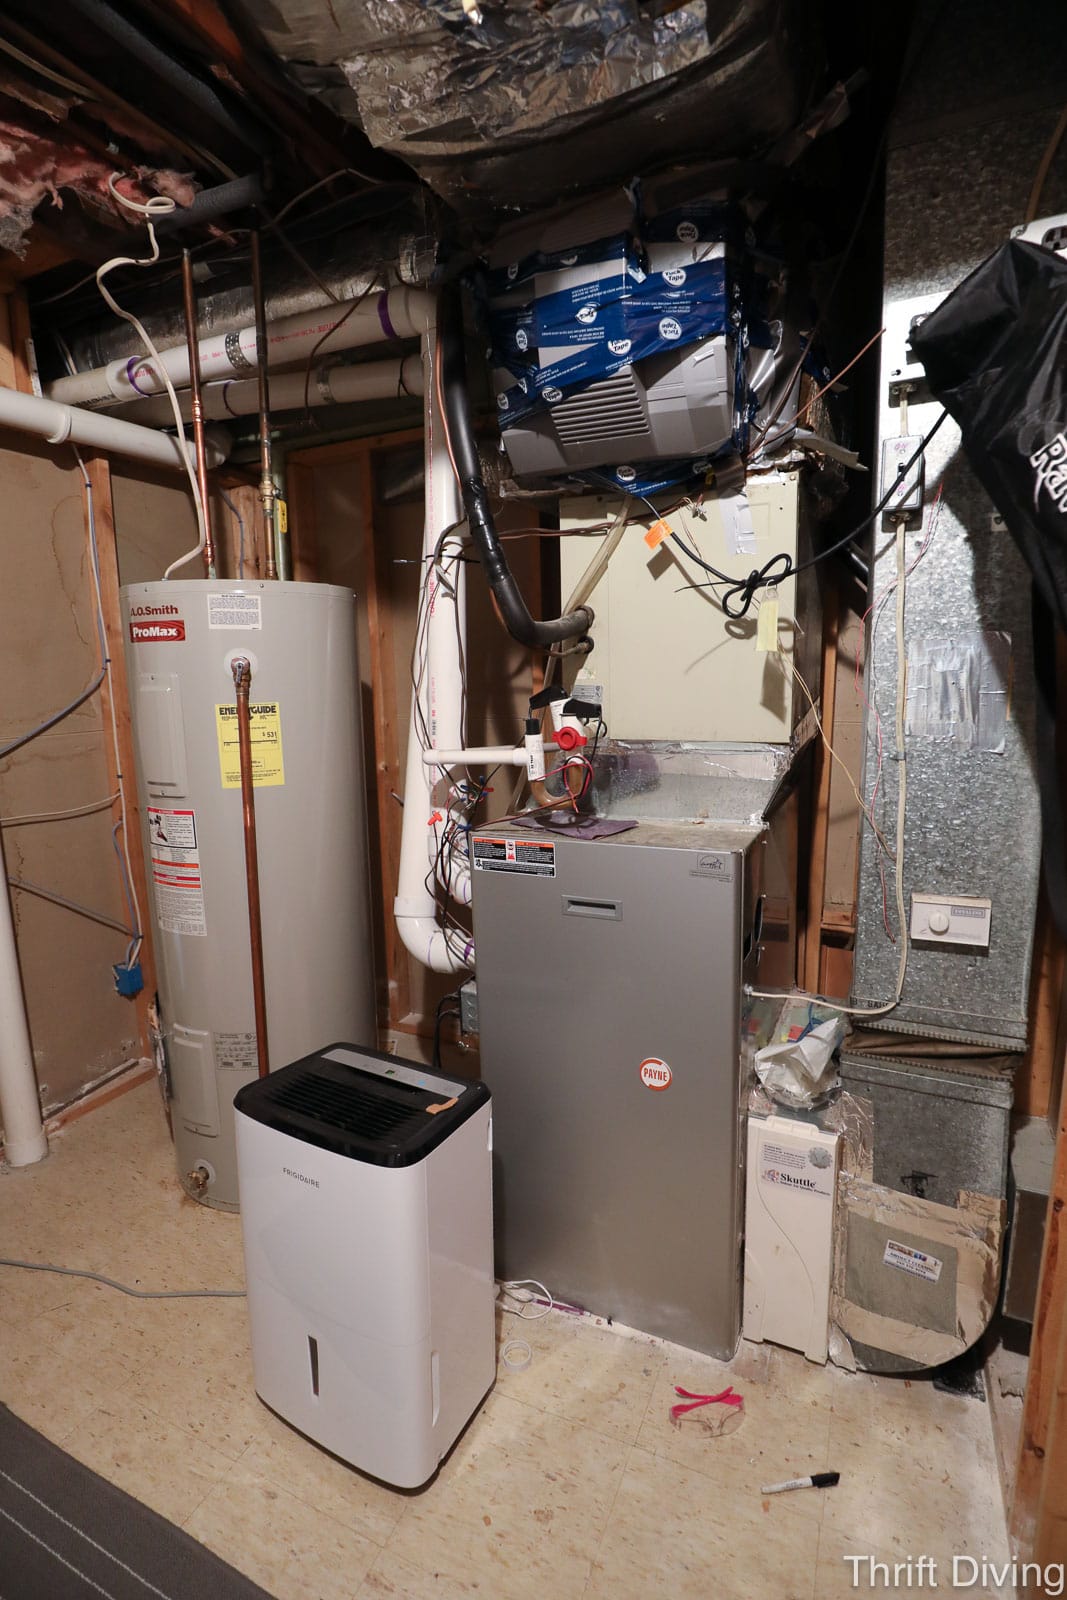
But even more important, the utility room is now safely accessible so that we can easily change the air filters every 3 months, retrieve holiday decorations safely, and there’s adequate space for repair companies to come and replace the water heater and change the water main valve, which needs to be done asap.


You might be wondering how I was able to come up with these utility room ideas and what tools and materials I needed. Here is what I used!
Watch This DIY Project in Action!
Materials
- Three 2×4 pine boards for shelving
- Miter saw (or you can use a jigsaw)
- Filter Buy air filters
- 2.5″ screws
- Impact driver
- Tape measure
- Level
- Label maker
- Paint
- Storage containers
- Pegboard
- Safety glasses
Your utility room is the heart and lungs of your house.
The utility room is like the heart and lungs of your home: it can contain the furnace with an air filter, a water heater, a humidifier, a dehumidifier, a radon remediation system, and a water main shut off valve (where the water main comes into your home).
All those important systems need routine maintenance and sometimes repairs. But with a cluttered, dirty utility room, it’s easy to overlook those things.
And that’s exactly what happened to me: I limited my time in this important area of my home, which means air filters weren’t being changed regularly, and repair and service companies couldn’t comfortably get through to make the necessary replacements we need to replace our water heater and main shut-off valve.
Looked pretty sad, dirty, and pathetic, if you ask me. I definitely needs some utility room ideas that would keep this area clean, organized, and not to intimidating.
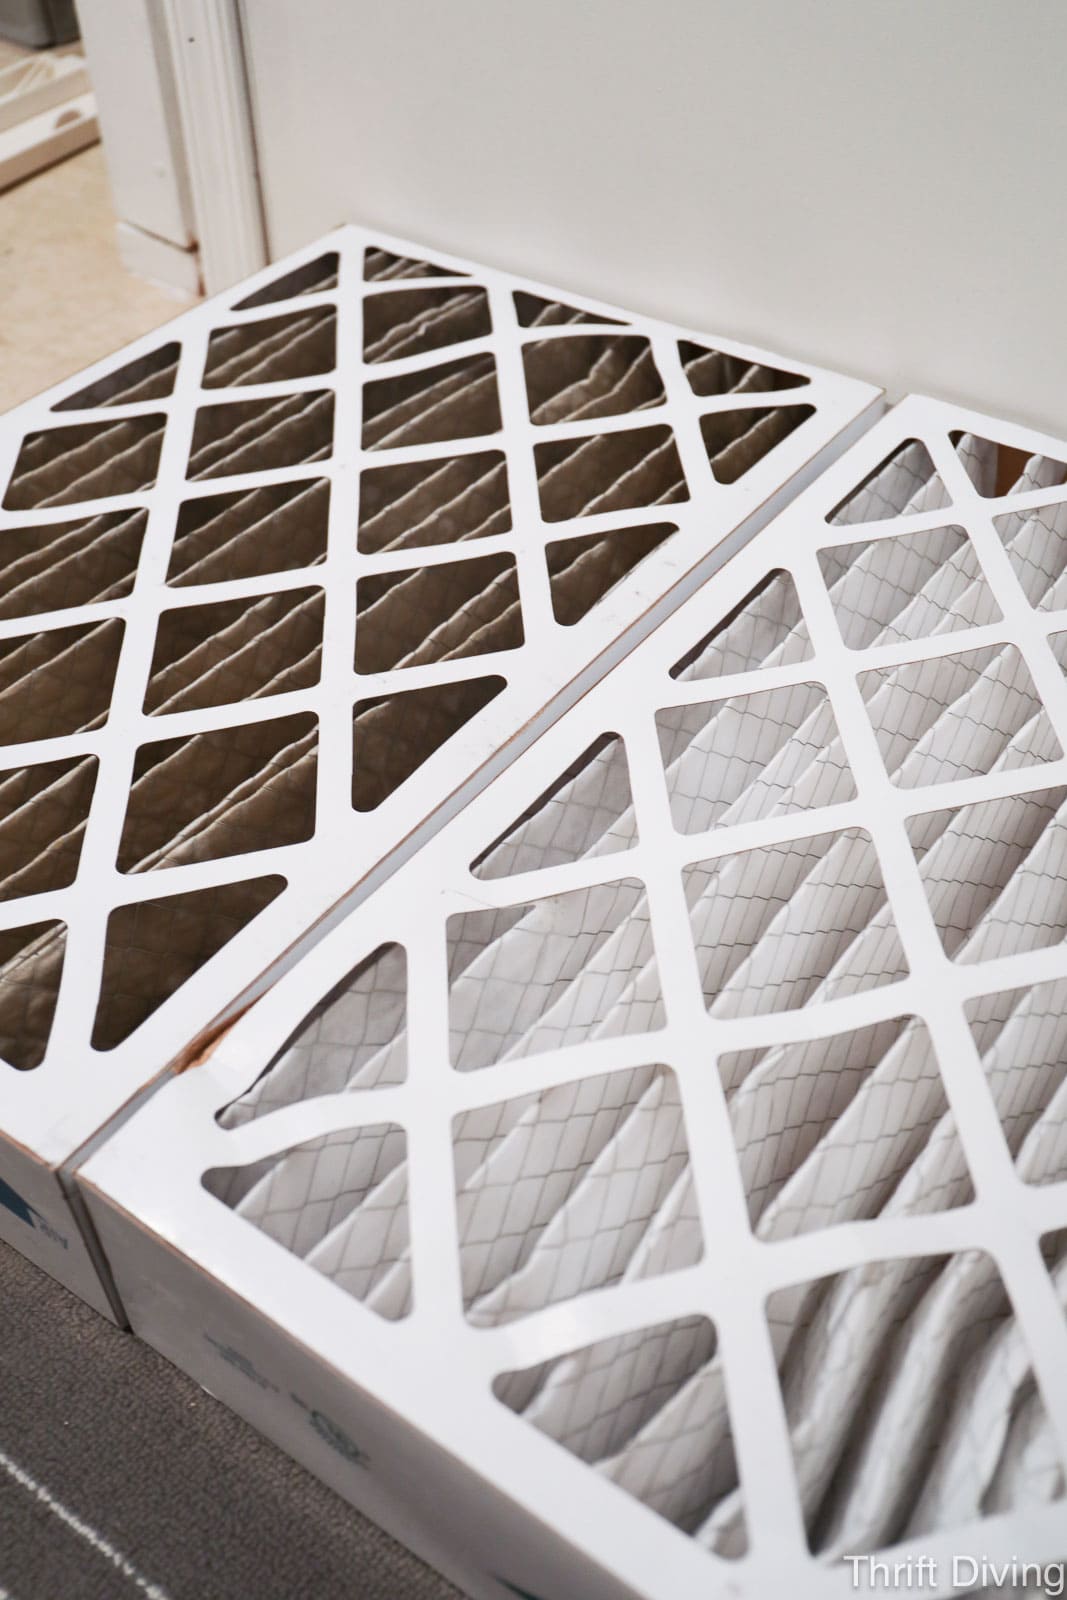
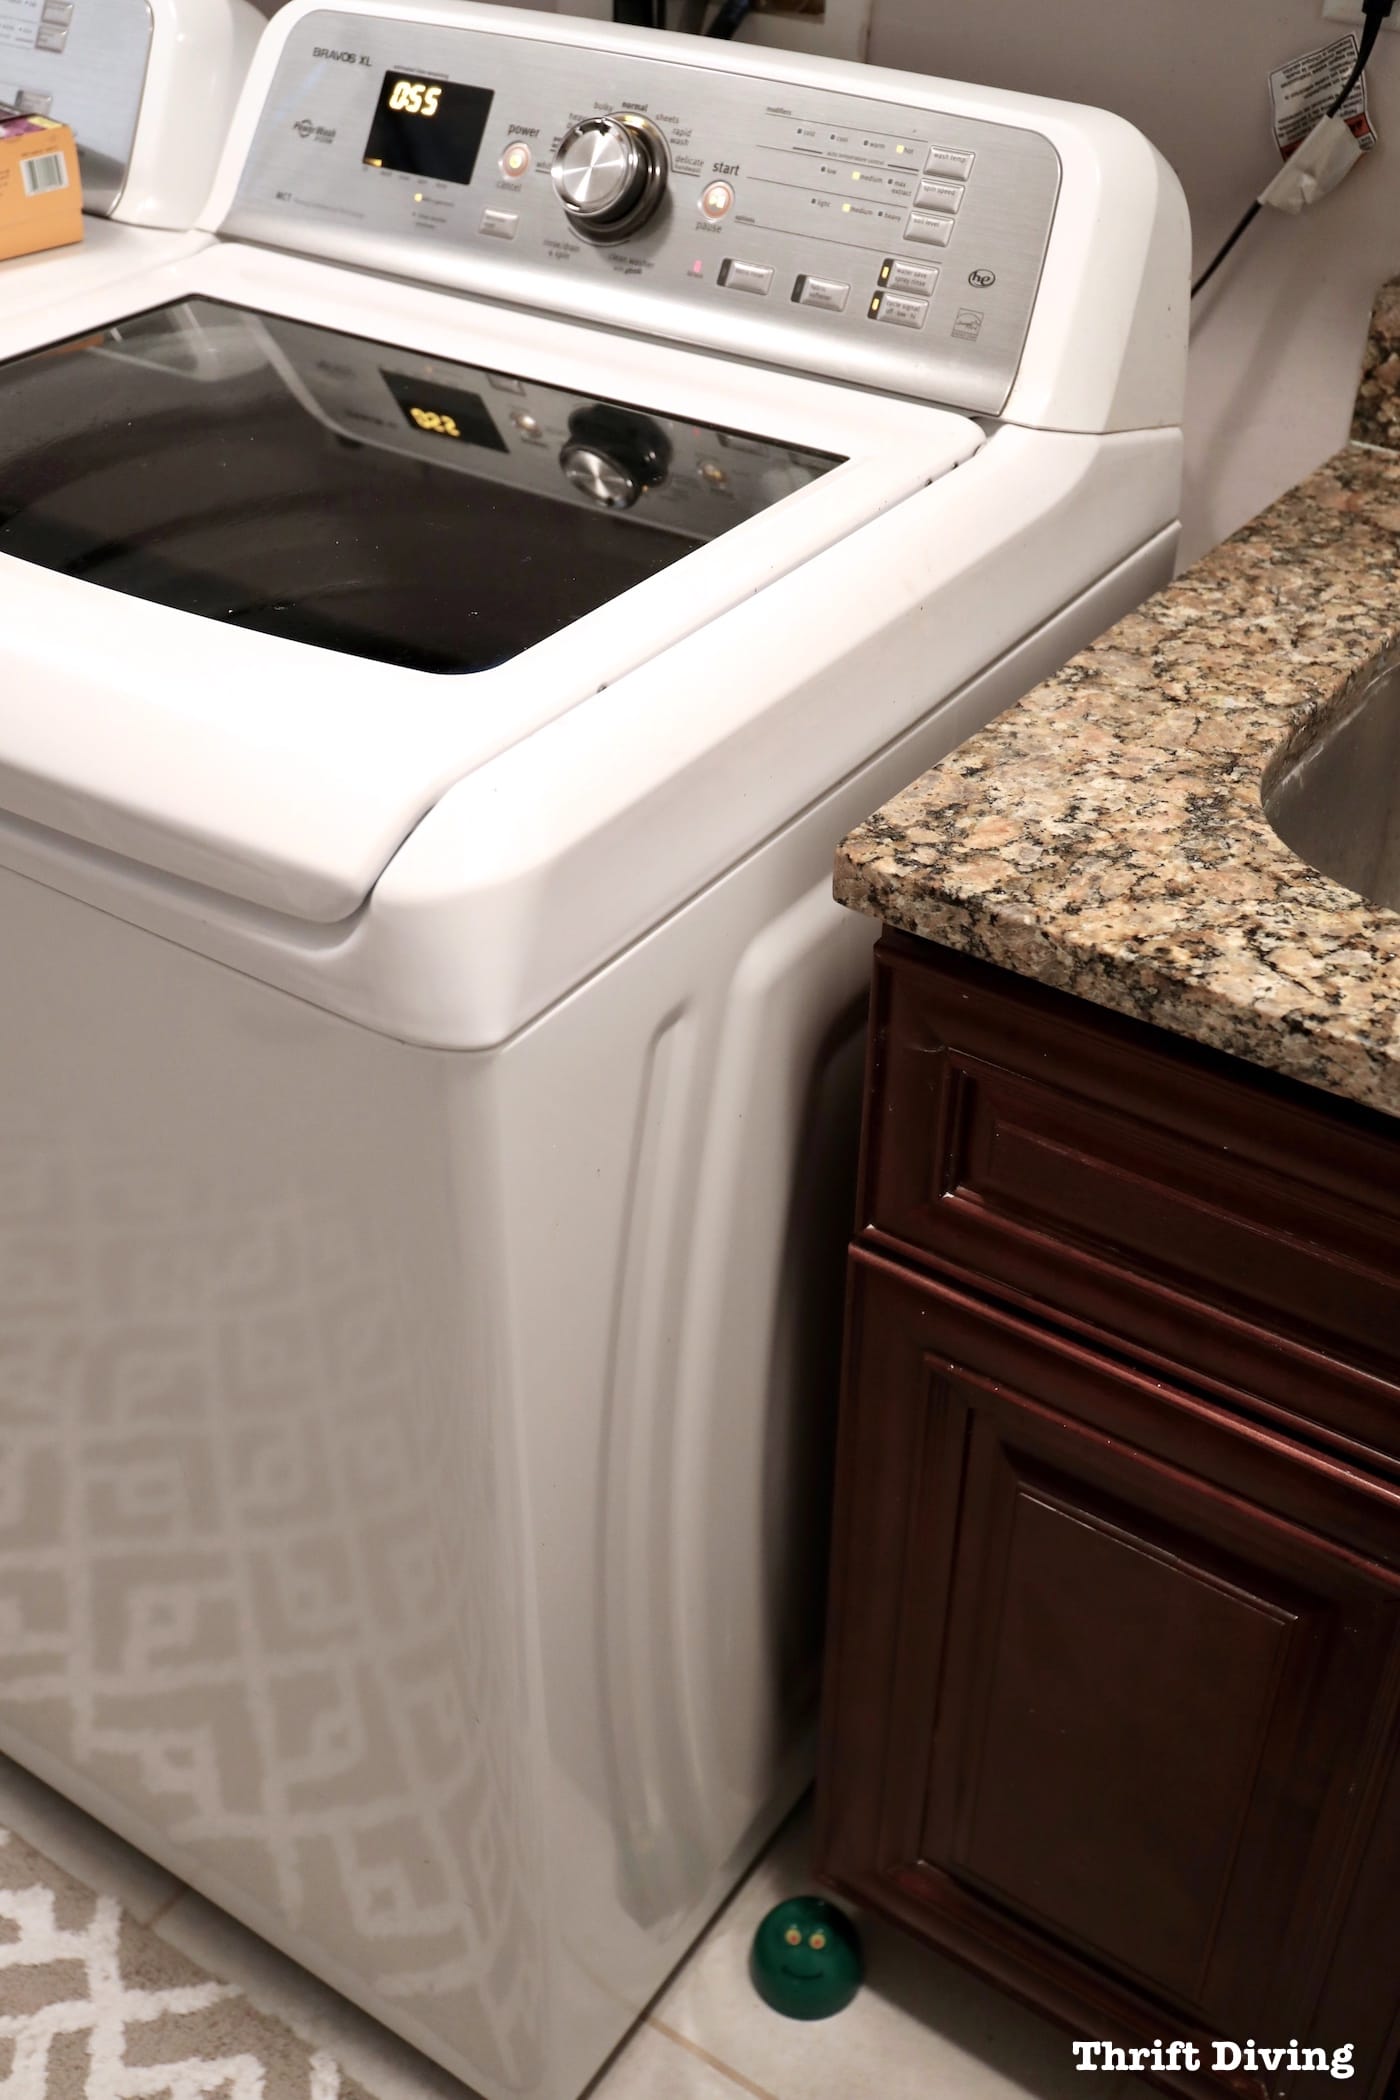
I Hadn’t Changed My Air Filter in 9 Months!
I’m shocked that when I did this utility room makeover and pulled out the old air filter in the furnace, it hadn’t been changed in 9 months!!
When I pulled it out and compared it to the brand new Filter Buy replacement air filter, it was evident that all that nasty dirt, dust, and allergens (and maybe even mold??) was just circulating back through the house. How disgusting.
It’s important to change your air filters every 3 months to keep the indoor air quality of your home optimal, so clearly, I was at least 2-3 changes overdue.
For this utility room makeover, I teamed up with Filter Buy, which is where I buy my filters from online. You’ll notice that my filters are a bit larger, but they have over 600 sizes available across 3 MERV rating + Odor Eliminator Filters. They’re also made in the US!

These air filters are MERV 13, which means minimum efficiency reporting value. It’s a rating on how much filtration your air filter is capable of. Filter Buy offers Merv 8, 11, and 13 ratings. The higher the number, the more dust, dirt, mold, pet dander, and other allergens can be filtered from the air in your home.

Going forward, I’m signing up with Filter Buy’s subscriptions program which will auto-ship filters, saving 5% of all subscription orders. If you order multiple filters to last you a whole year (like I have done) you can save even more. Just find a place to neatly store them up in your utility room. I’ve set reminders on my calendar to notify me every 3 months so that I don’t forget the routinely change the filter. 🙂

It’s very easy to change your air filter: just pull out the old one and insert the new one. (Just make sure you insert it with the proper orientation of the air flow direction).
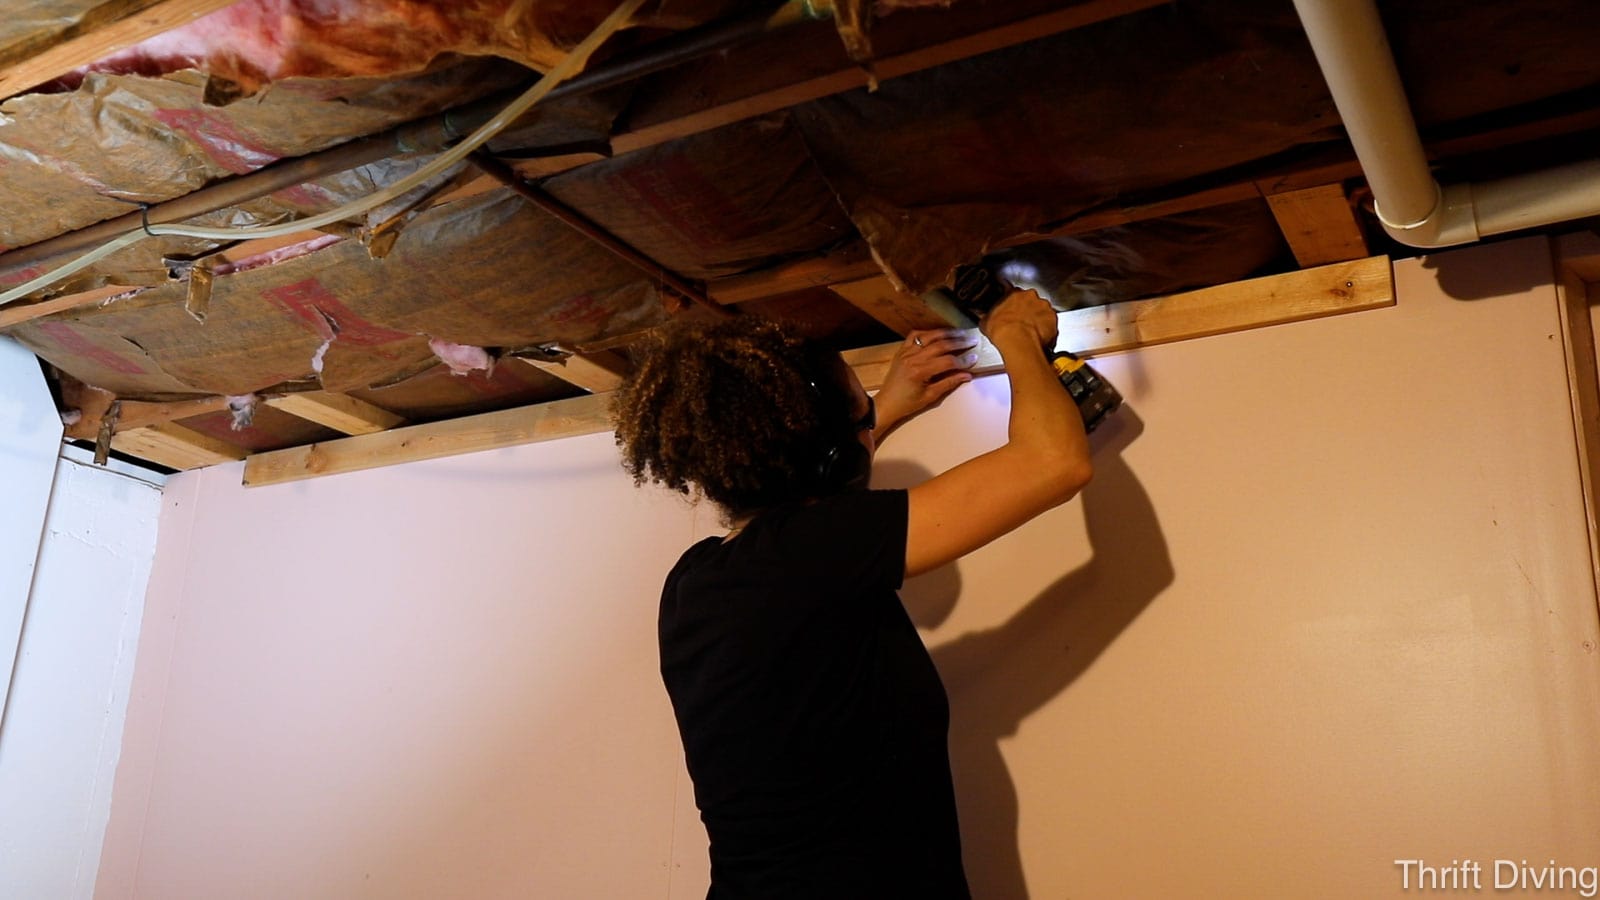
How to Create Shelves in Between Exposed Studs for Extra Storage!
Many basement utility rooms (and even unfinished garages) have exposed stud framing. But did you know that you can use these voids between the studs to create more storage?
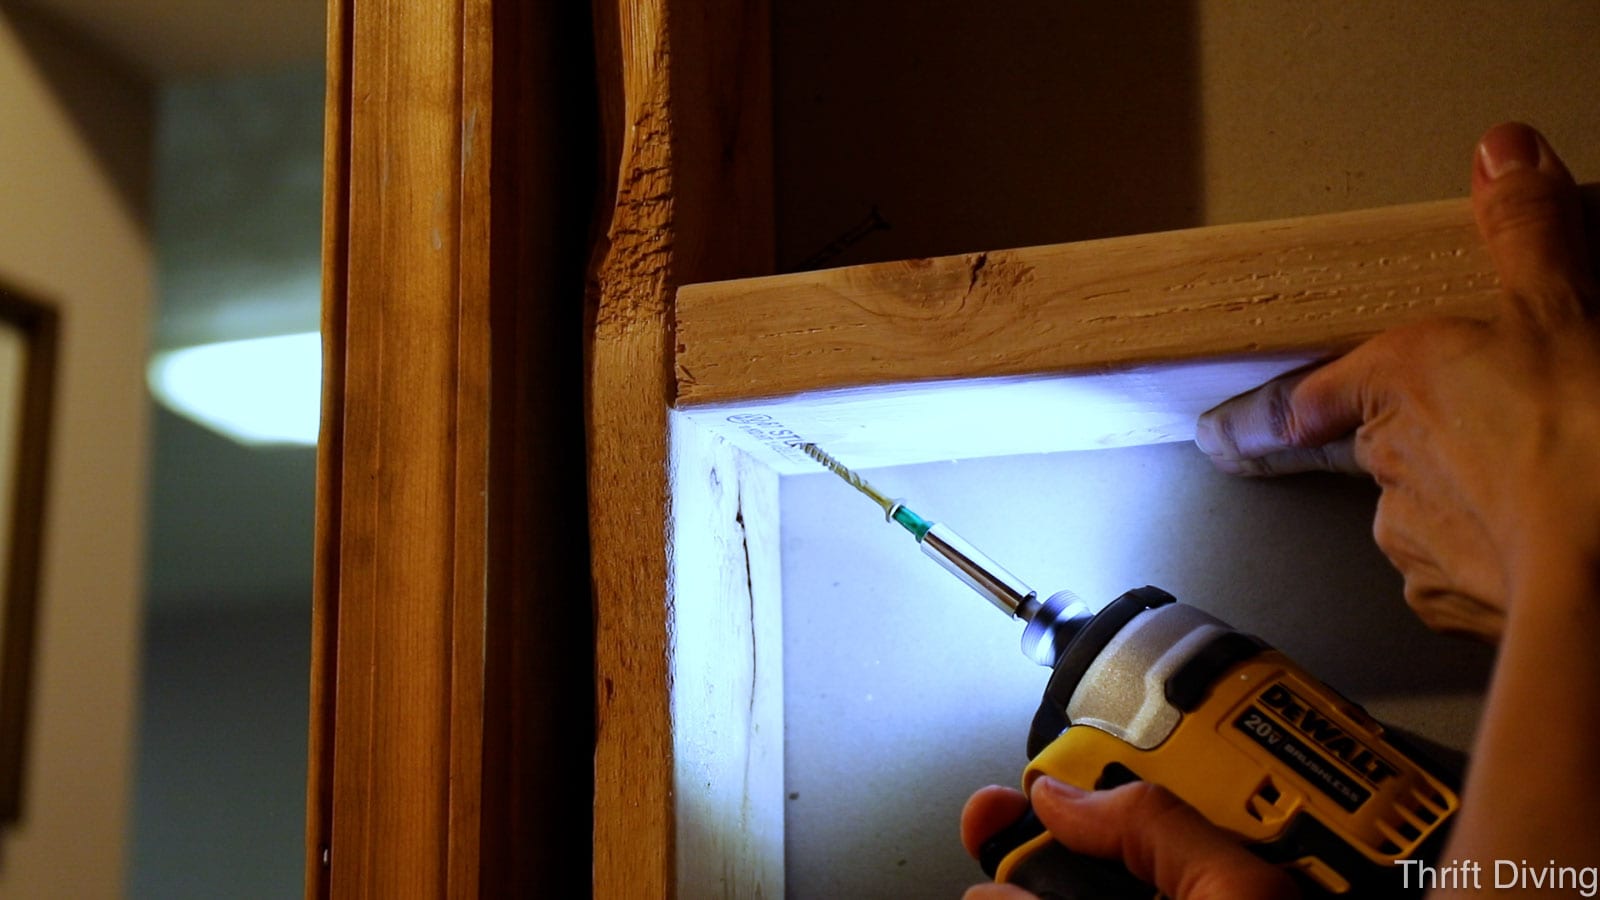
I used 2x4s and cut them to length with a miter saw (or you can use a jigsaw) to fit between the studs to create shelving.

To secure the 2×4, you’ll need to “toenail” a screw from the bottom at a 45-degree angle. Use an impact driver, which has the torque (the power) to secure the long screw.
Here’s the thing, though: Toenailing can cause the board to shift up when you’re screwing the 2×4 to the stud. This can make your 2×4 shelves crooked, even if you started with them marked to be level.

So here is a tip that I learned from an experienced carpenter during one of my Habitat for Humanity volunteer builds:
Temporarily screw another screw part of the way in, on the top of the board before you toenail from the bottom. This is just to prevent the board from shifting and “walking” when you’re screwing it in from the bottom.

Use a level to make sure you’re board is level, and then toenail in the bottom screw. Once your 2×4 shelf is secured on both sides, remove the temporary screws on top. Your shelf should be level. It’s that simple!
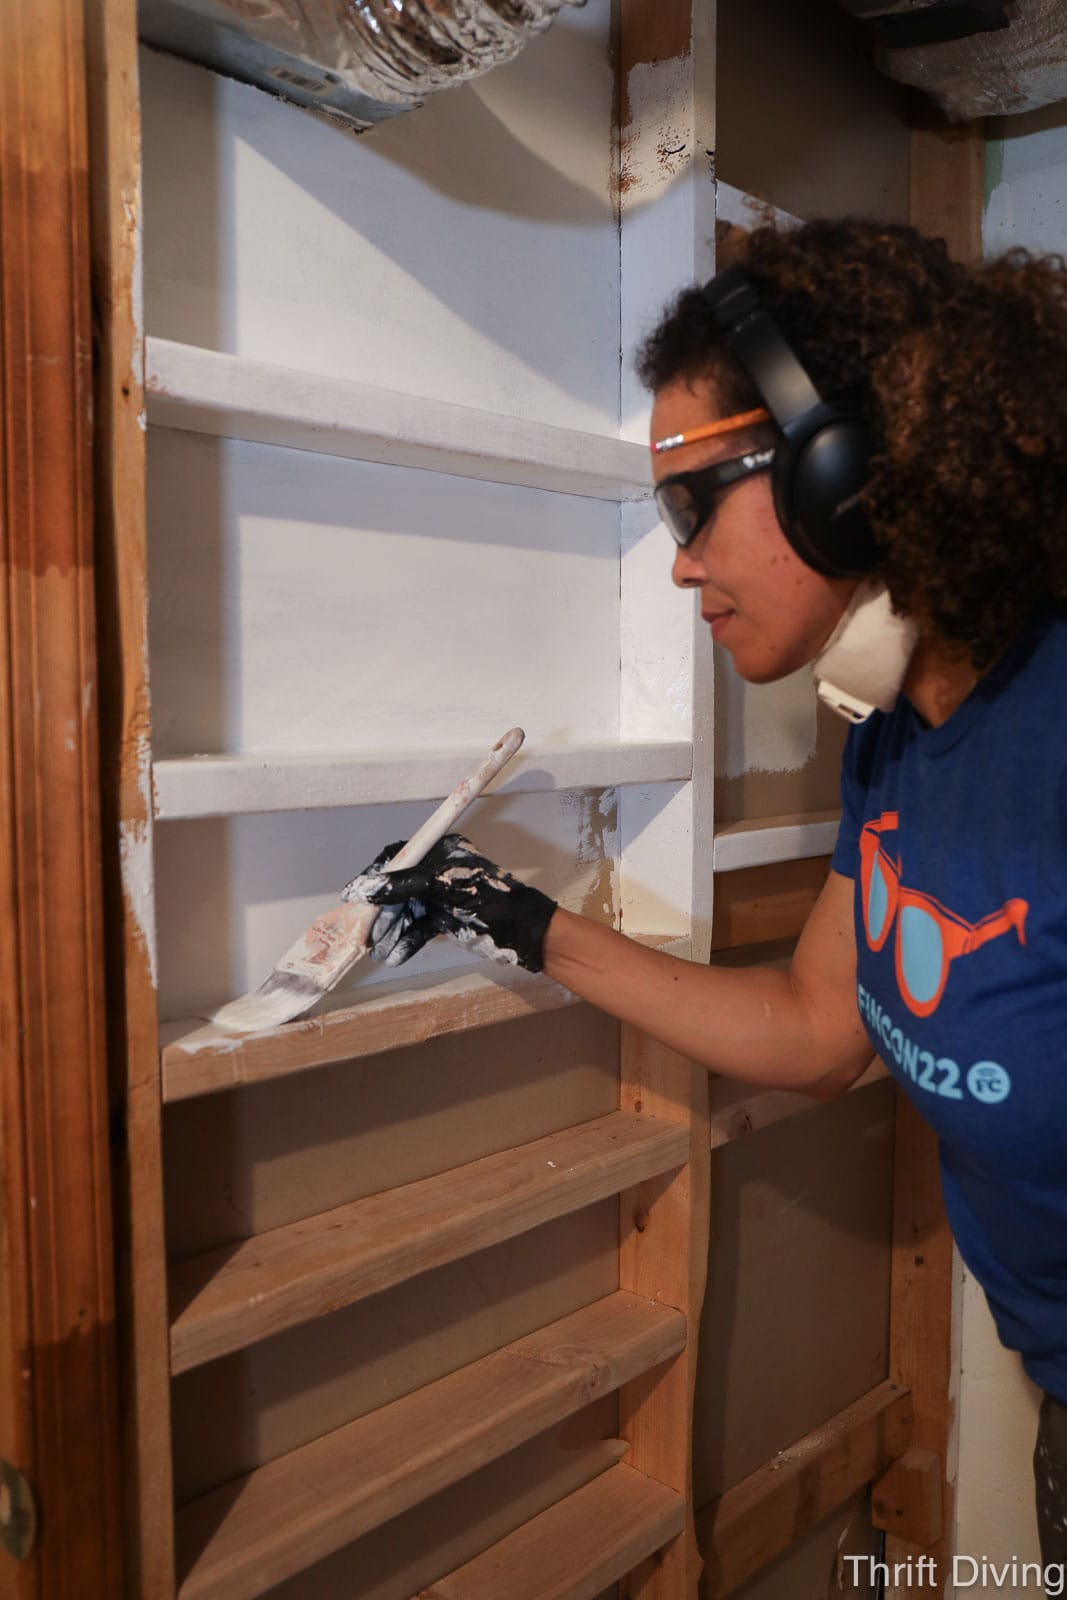
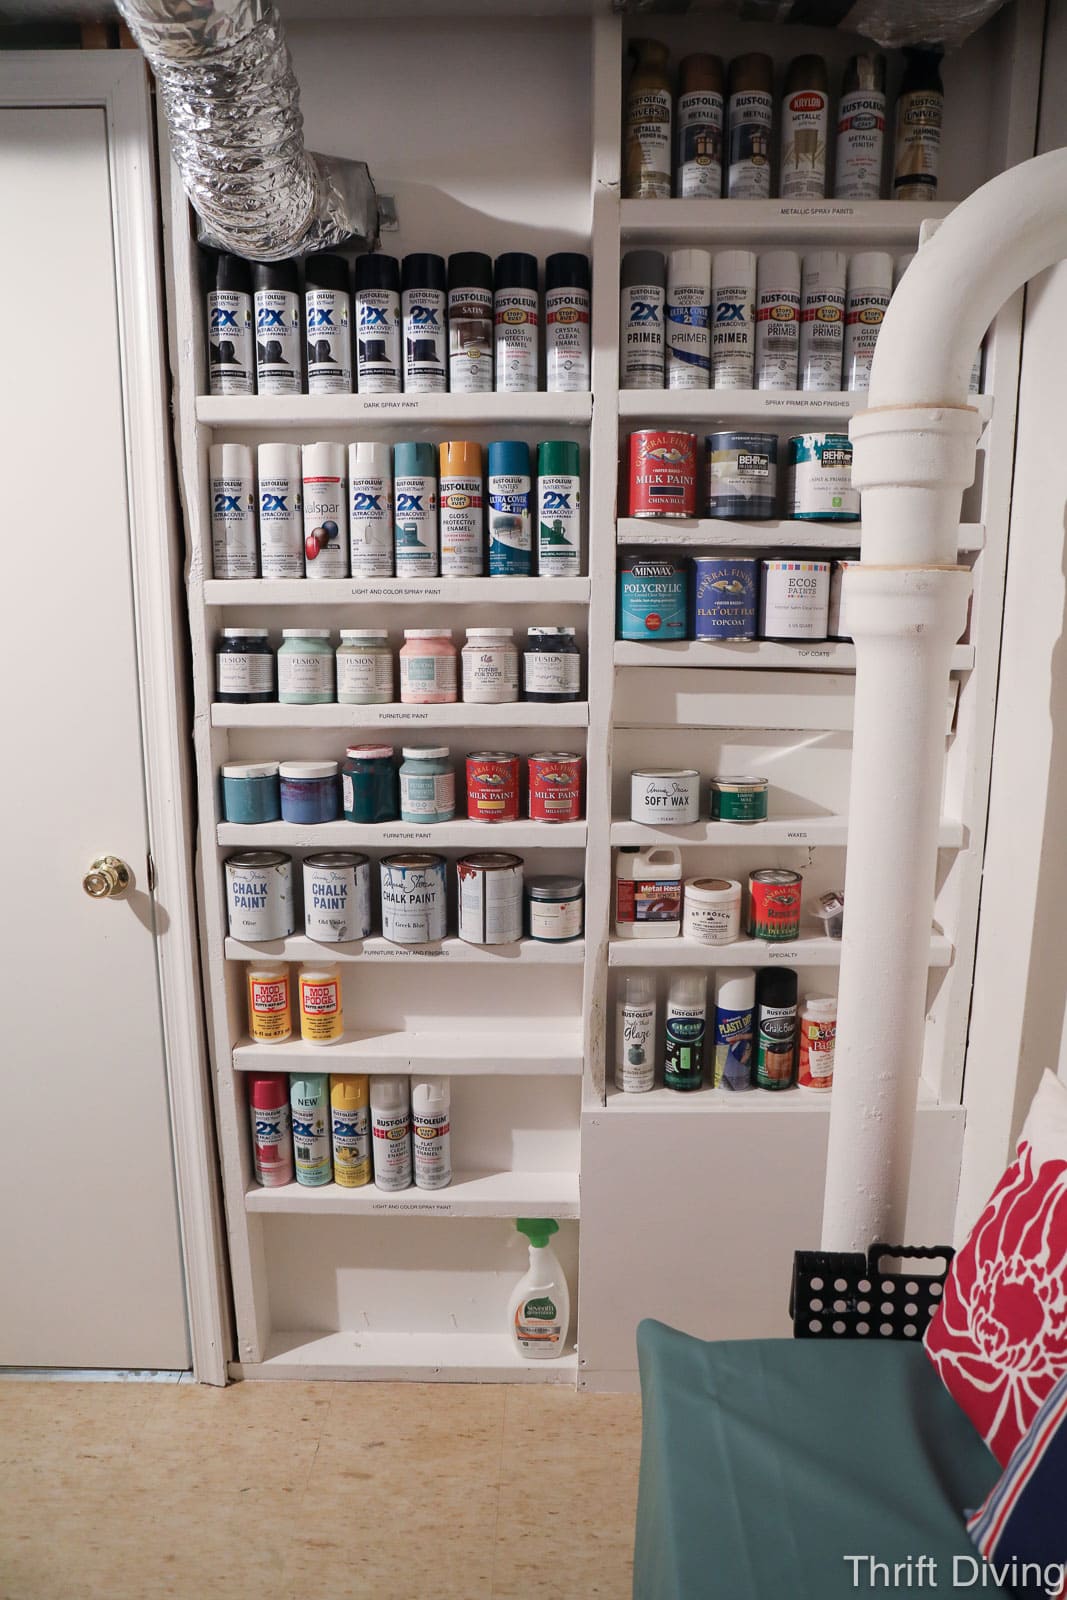
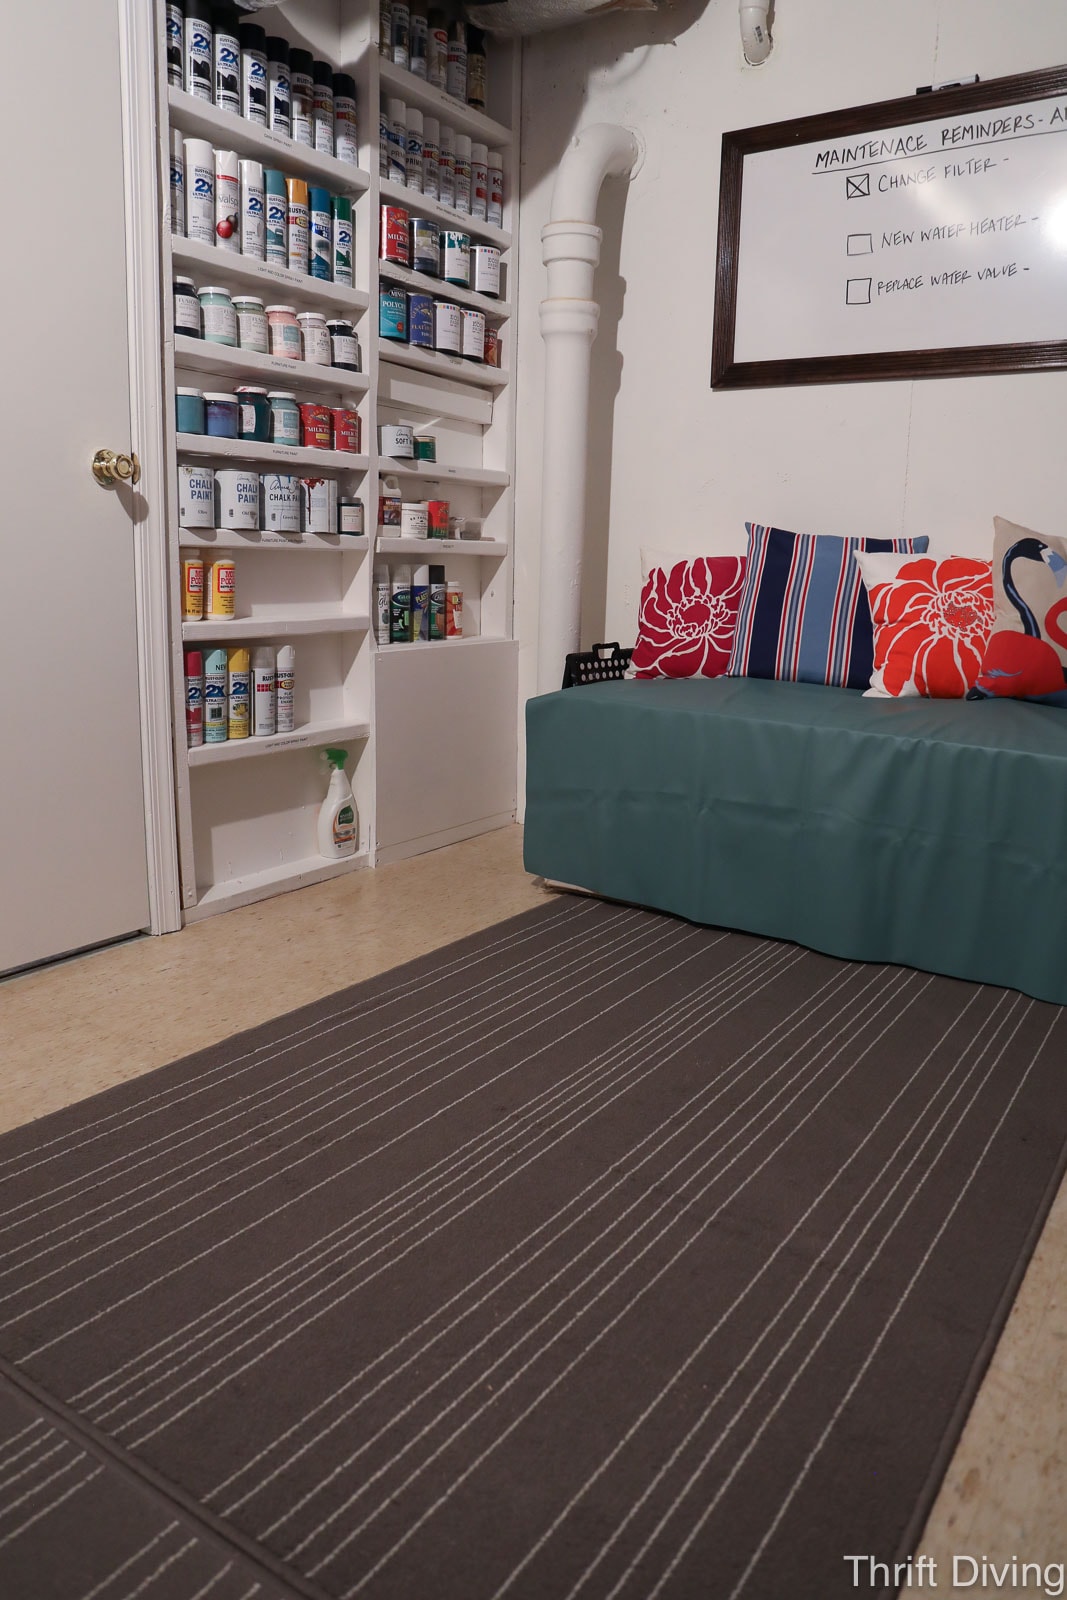
You can make the shelving as tall or short as you want, depending on what you plan to store on your utility room shelf. I planned to keep spray paints and furniture paint in my utility room, so I adjusted the shelves to accommodate those things.
Paint everything one color to match! I didn’t prime or anything; just did two coats of regular paint that has primer in it. You could sand if you wanted to, to smooth the wood first. I didn’t sand, though, and it still was fine. 🙂
Now it feels like I can properly see all the paints I have! I’ve wasted so much money on going to buy more spray paint without knowing that I already have 3 cans of it. {{{{insert eye roll here}}}}. Have you done that before, too??
This feels like I can “shop” my own collection and be more resourceful with what I already have on hand!
Make Sure You Lay Down Leak Detectors in Your Utility Room
Let’s face it: water leaks can happen to any home, new or “middle aged.” If you’re not going into your utility room, you may not know that you have a problem.
The best way to know if you’ve got a water leak (aside from actually checking on your utility room once in a while) is to use a leak detector. The really fancy ones will send you an email or a text alert if it detects water. But the plain ‘ole shrieking ones work well, too. I love the Leak Frog ones, but they don’t sell them anymore. Now they sell the Leak Bugs. But these leak detectors are cheaper on Amazon.

In fact, a Leak Frog is what alerted us to the fact that our water heater was leaking from the hot water pipe. The water collected on top of the water heater, spilling over the side, and pooled under the leak frog, which began to beep. Although that was an easy fix by a plumber, he informed us that our water heater is old and should be replaced soon, preferably before we end up with a couple inches of water on the utility room floor {{GULP}}. Which is why we soooo needed to get this utility room decluttered so that the repair guys can roll in a new water heater.
(Psst! I keep a leak frog near all the toilets, washers, and under the kitchen sink! If you have places in your utility room where water leaks happen, keep a leak detector near each one of them.)
Add a Pegboard for Even More Storage
A couple of years ago I made this awesome extra large these leak detectors that’s framed for my basement office. Eventually I thought I would move it into my “these leak detectors” once it was built, but its size was so large (4′ x 8′) that I felt it would take up too much space on the walls.
Instead, I decided to install it in the utility room along a back wall that was being wasted.

I used scrap 1×3 boards to mount to the top of the wall in the utility room, screwing them into the top plates of the wall framing. I am placing the pegboard up high so that the wall and flooring underneath the pegboard is maximized, as well.
I also mounted two scrap pieces of 1×3 pine to the wall 4-feet down, securing them to the studs and using a level to make sure they’re straight.

Next, my husband helped me lift the heavy 4′ x 8′ framed pegboard into place and I used screws to secure it to the pieces of wood. The wood allows the pegboard to sit away from the wall, creating space behind the pegboard so that the hardware can easily be slipped into the holes of the pegboard. If the pegboard didn’t have space behind it, the pegboard organizing hardware wouldn’t go through the holes.
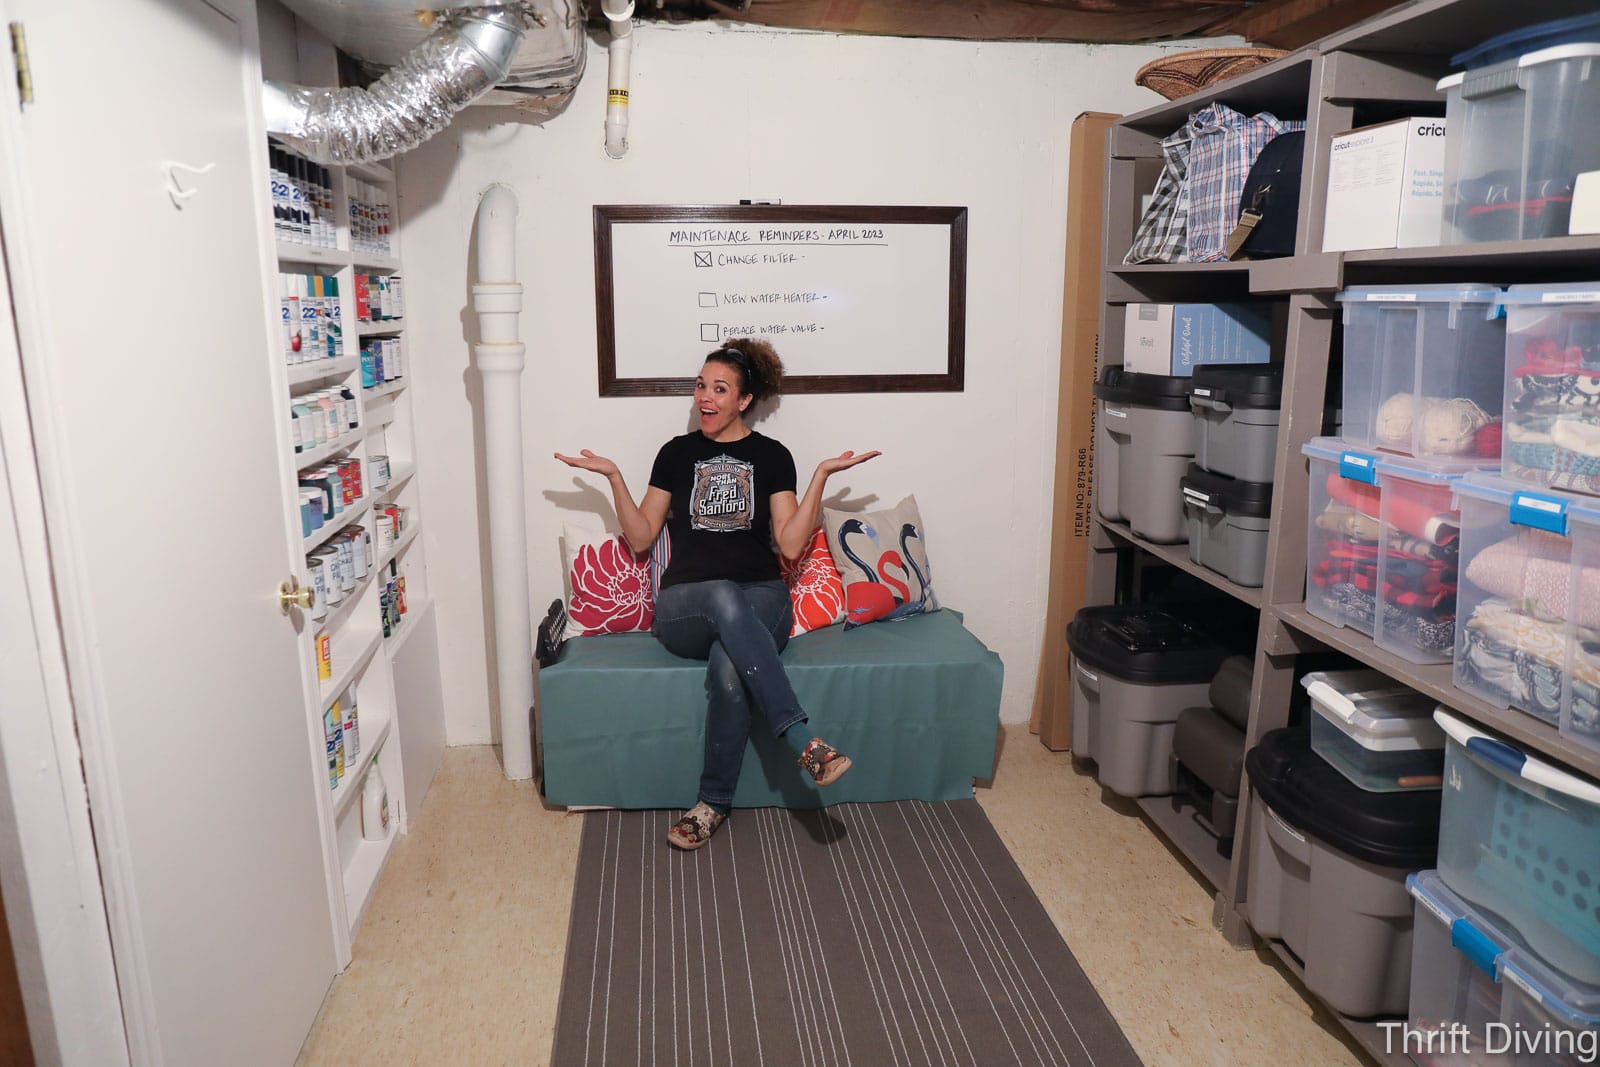
Hiding a Big ‘Ole Christmas Tree Box!
My Christmas tree is the biggest item stored in my utility room. It’s in its original box, which is an eye-sore. And it’s too big to fit on the shelving unit.
So to hide my Christmas tree box, I covered it with faux-leather from my fabric stash and added some pillows to it, making it look like a bench in my utility room! LOL
The tree will be easily accessible in the winter, without having to step over things to lug it out.
BEFORE
Let’s take another look at how my basement utility room looked before I made it over!
AFTER!
I added a DIY whiteboard in my basement utility room, as well, to keep track of maintenance things that need to be done (and when) in the utility room.
There ya have it!
Do you love this project? Click here to save it on Pinterest!
![]()

So what do you think??!
Is your basement utility room just as dark and dreary and cluttered as mine was?
A huge thanks to Filter Buy for sponsoring this utility room makeover!

Download the 5 freebies!

Thrift Diving inspires women to decorate, improve, and maintain their home themselves...using paint, power tools, and thrift stores! Use these 5 printables, checklists, and ebooks to get started!
My utility room looks like yours except it has more stuff in it…sigh. If I had not seen your make-over, I would not have believed it was possible. What you have done is really nice. And it is inspiring! Thank you for all the ideas and how-to’s
Awww, thanks, Kim! It’s definitely overwhelming when there is so much stuff in the area. I feel that same overwhelm with my garage. It’s a MESS. But you can do it. Take it in stages, and just do one thing or one area at time. Eventually, you finish! 🙂
Whew, I felt that change. Looks great, Serena! I need to do something with mine, that is on my list when I return home. It’s an odd basement but you have given me some ideas, thanks!
Hey Tammara! Awesome, so glad to inspire you! 🙂 Thanks for reading my blog!!!
My basement was 52 feet long by 24 feet wide. I hated it because it was dark and you guessed it spiders. During Hurricane Floyd my dehumidifier went out and my cellar flooded. Long story short I was covered by insurance so I had the steel 52 foot beam and the 3 steel pillars that had been rusty red painted white. I had the concrete walls painted white and the concrete slab floor acid washed then painted white. I had the cellar steps go from blue to a beachy tan. I also bought heavyweight shelving and did what you did with sorting them. Afterwards, It was so bright that I loved it.
Your utility room makeover is really nice. Painting really brightened the room. The fact that you did more than just clean up and put things on shelves really made it look so finished and bright.
Wow, Pam! I would love to see pictures of your basement “before” and “after” if you have it! It sounds like you have transformed it into livable space. It’s amazing what paint and organization will do! 🙂 Thank you for the compliments on my space!
That looks great, Serena! My utility room is basically my basement, which is also my laundry room. It’s small because my house is small, but it does have two full size windows above the laundry area and 8 foot ceilings, so it doesn’t feel like a dungeon. I’m thinking of just spraying the entire unfinished ceiling white (joists and pipes and ductwork and all) to make it even brighter. Did you consider doing this, and, if so, why did you decide against it?
Hey Gina! I love that idea of spraying the entire joists white! I didn’t consider doing it because it would have been more work than I was prepared for. I would have had to pull out all the insulation (which looks like it could use an upgrade, for sure!!!). But it was just too much work, and it wasn’t a space I was going to be spending time in where it mattered that much to me. But I think if you want to do it, I wholeheartedly think it will make a world of difference! I was also running late on getting my project posted, so I didn’t want to make the scope of the project any bigger than what it was. But I definitely LOVE that idea and would consider it for the future! Let me know how yours goes!