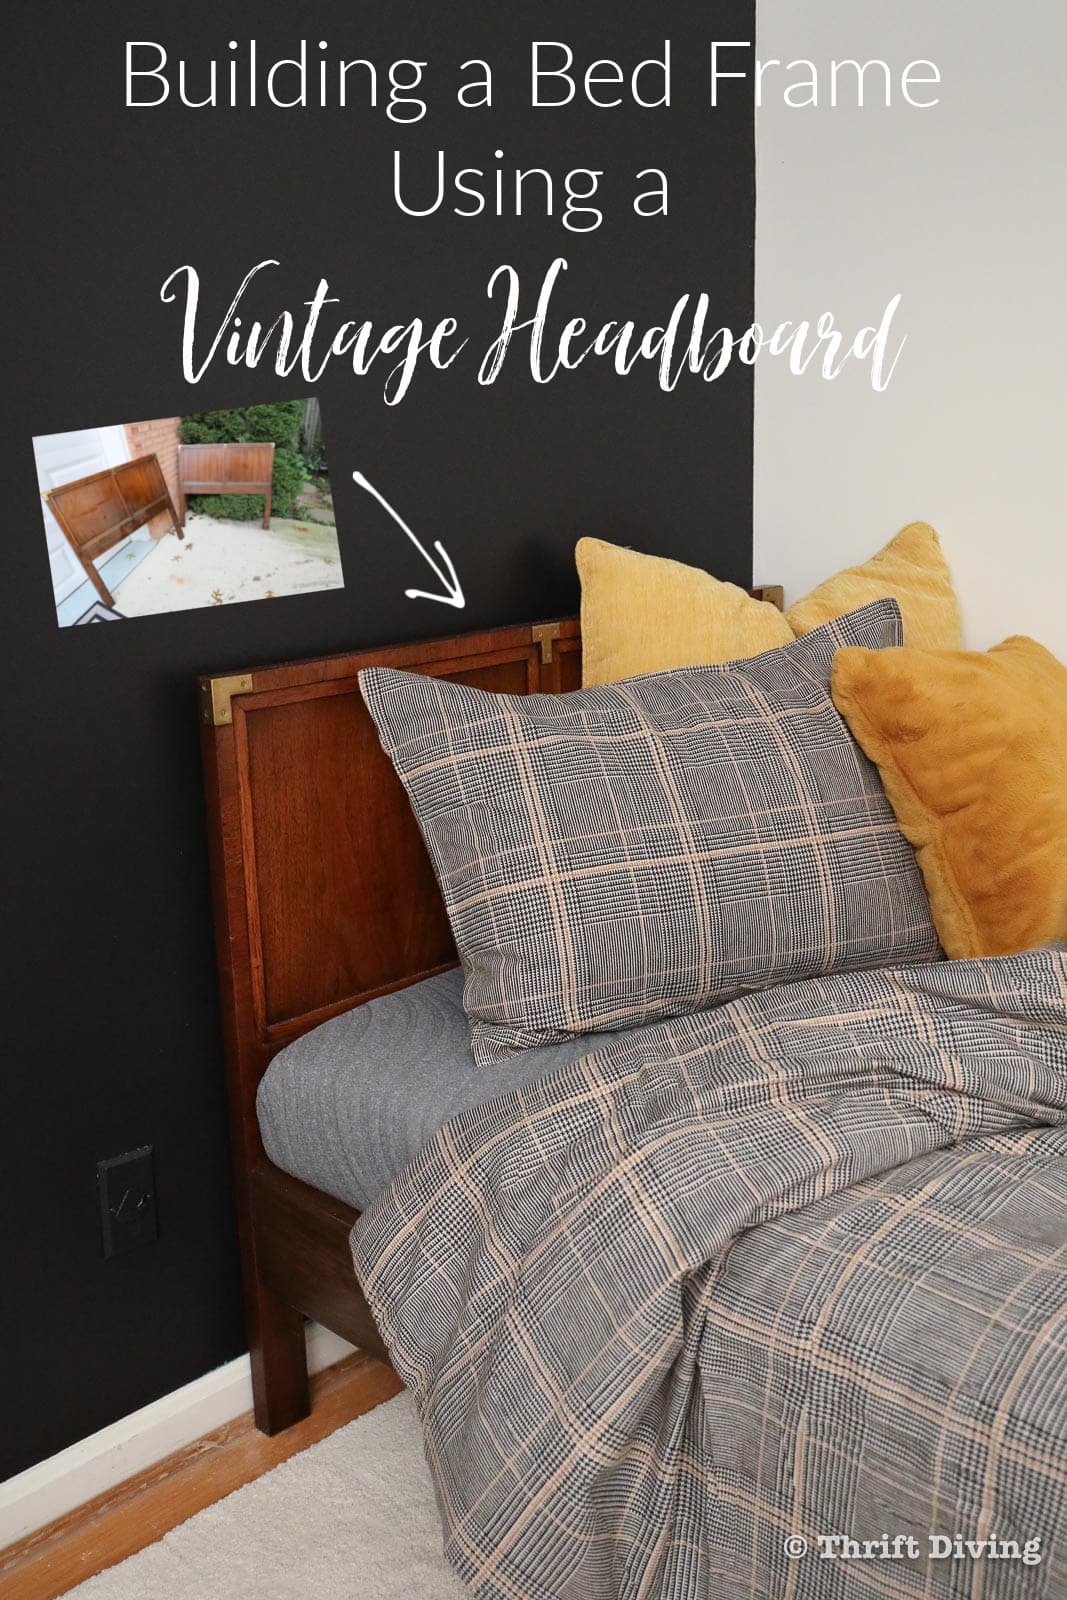
Building a Bed Frame Using a Vintage Headboard
This post is sponsored by Tekbond. All opinions are my own.
When I found these two vintage Henredon headboards at the thrift store, I knew that I’d eventually be building a bed frame for my sons’ room.
What I didn’t know was that these headboards were quite valuable. I may not know the brand names for all-things-vintage, but I know “quality” when I see it. And these campaign headboards screamed “Take us home!” and “Don’t you dare paint us!”
They were in great condition, with a little bit of chipping at the top of the headboard’s veneer. Thankfully, I wasn’t going to need to strip and refinish them.
What stumped me, though, was building a bed frame.
Click here to save this project on Pinterest!
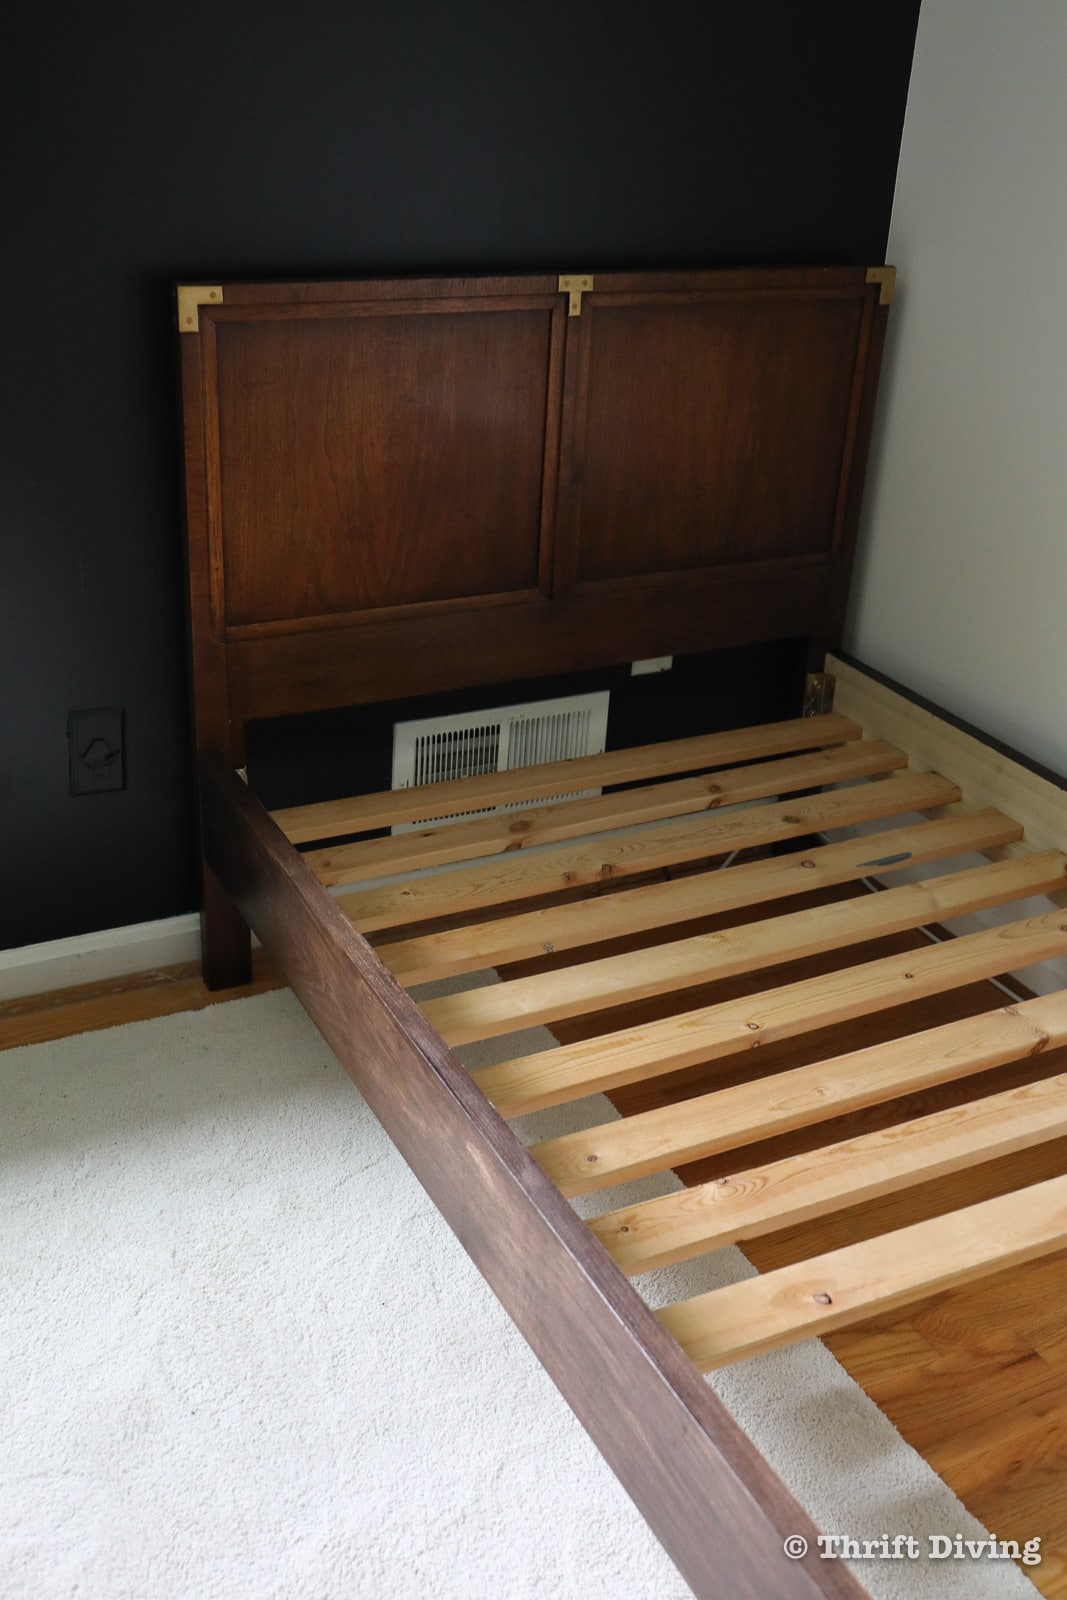
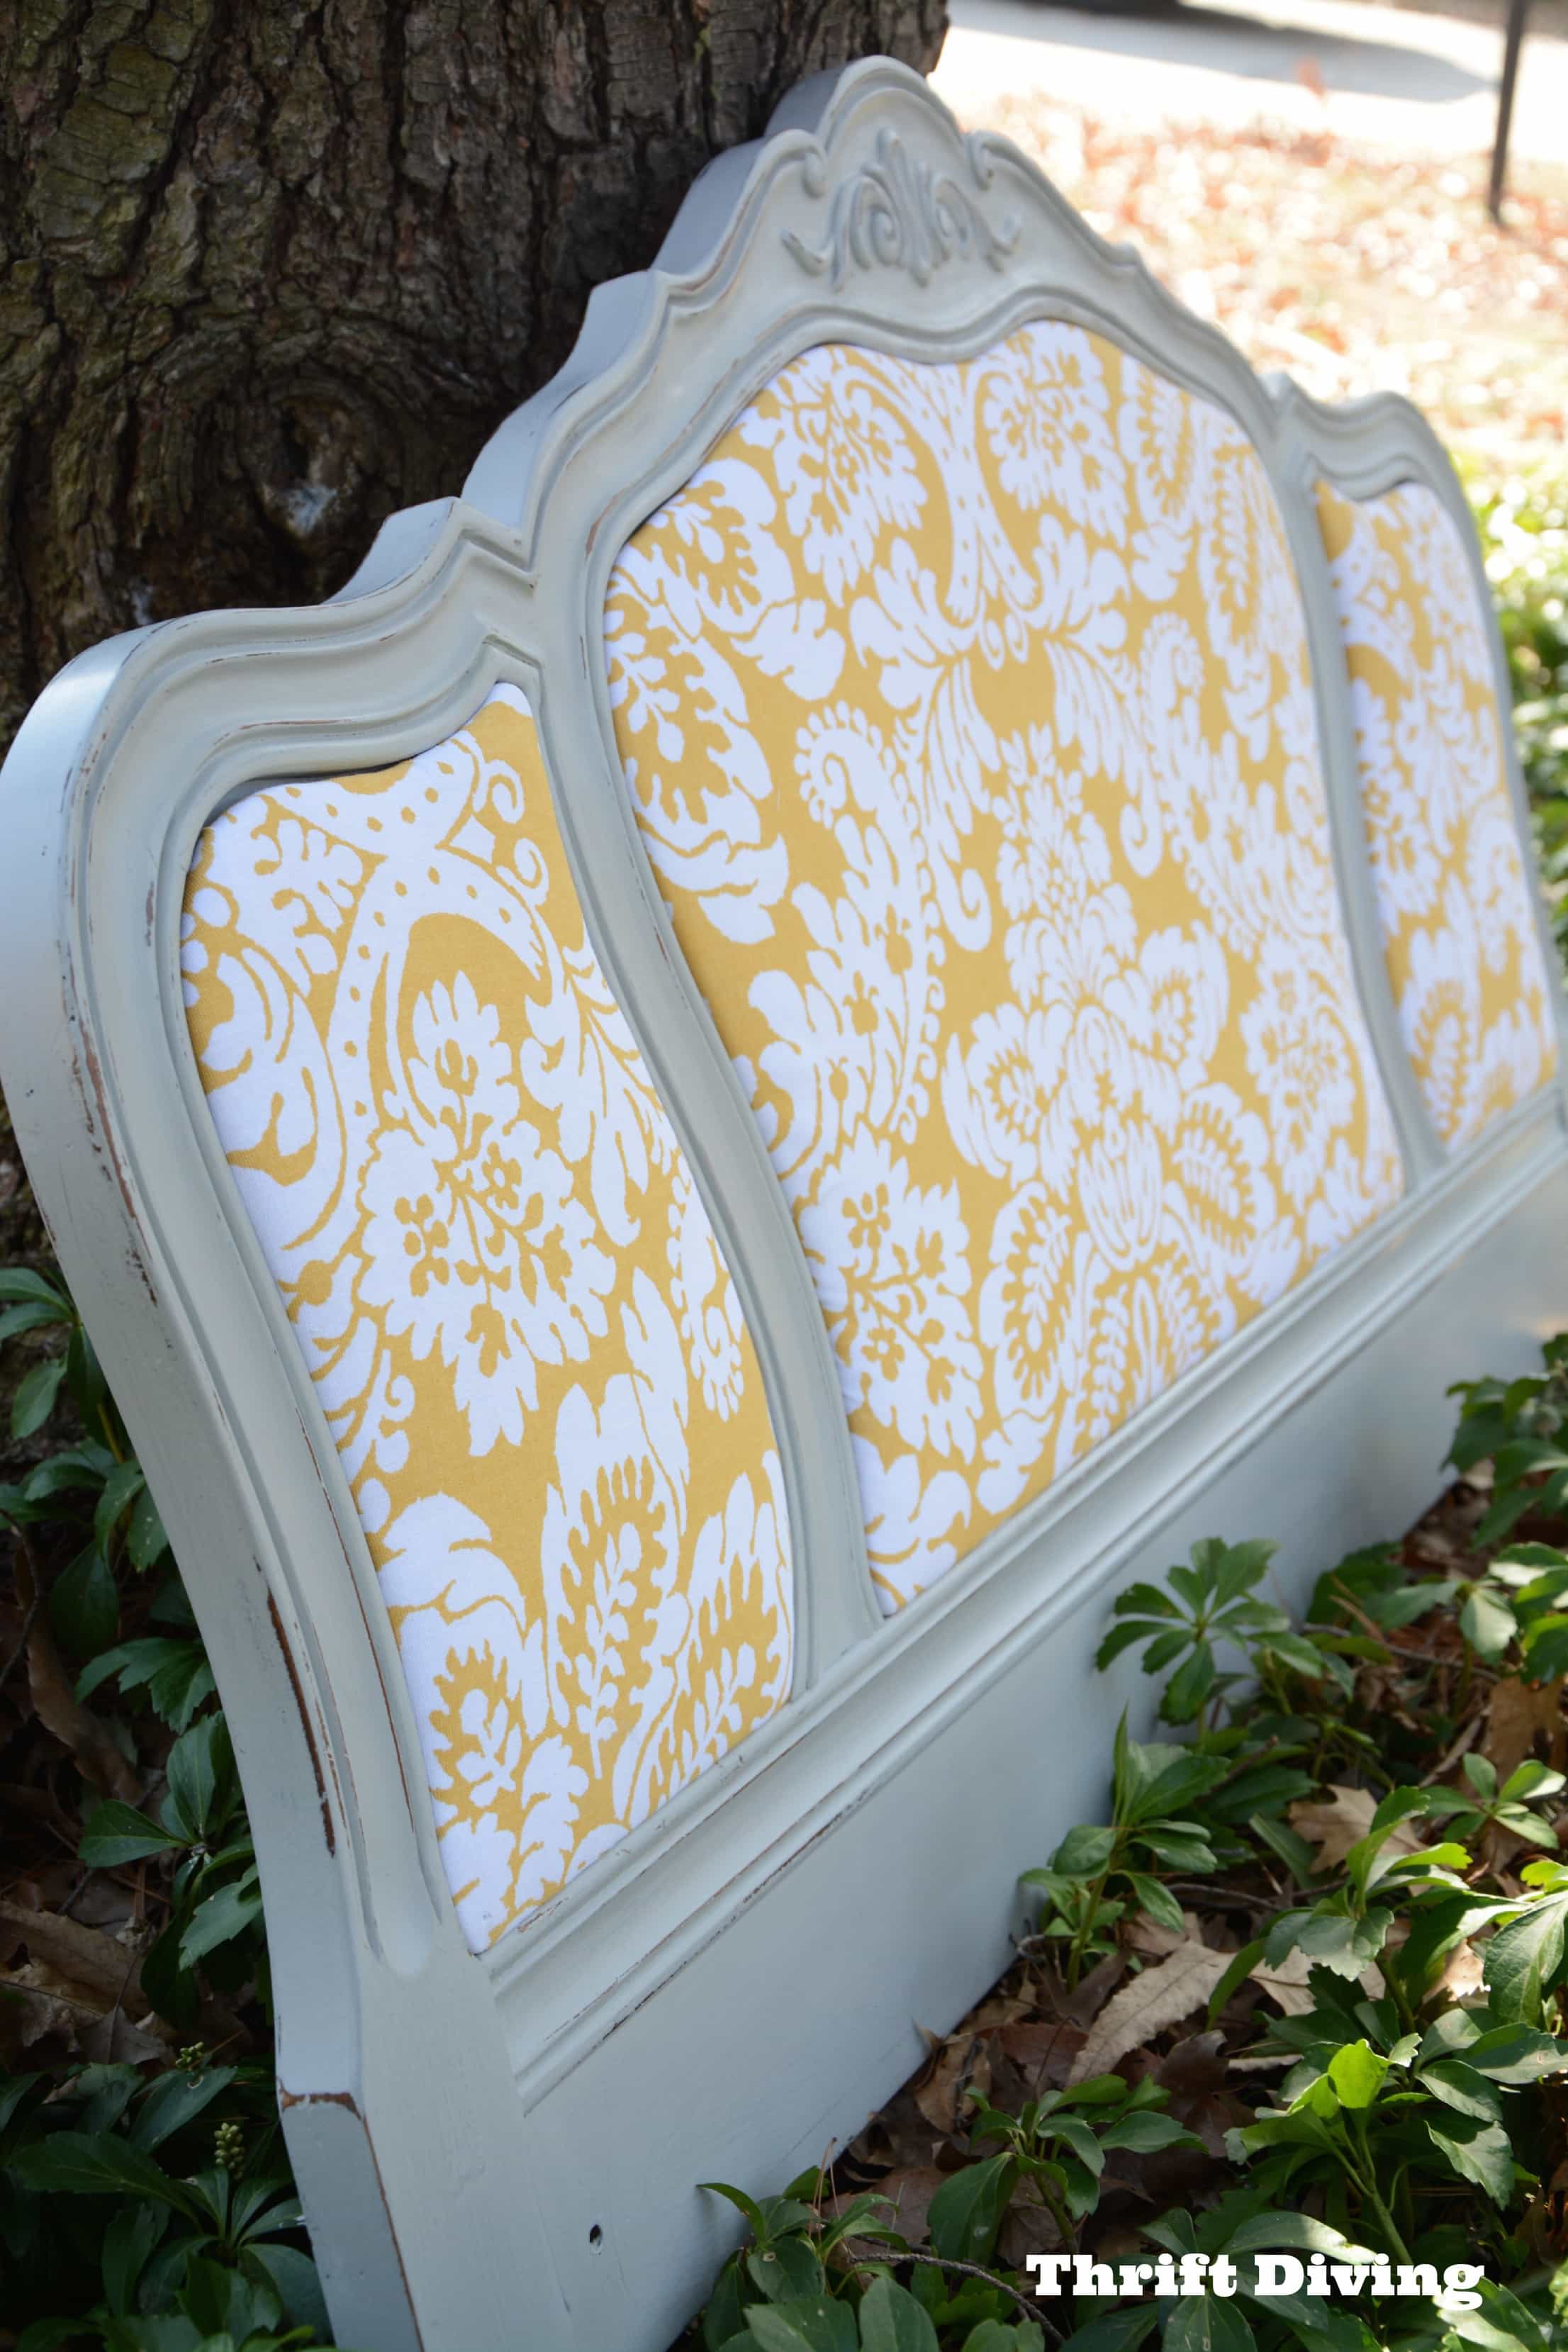
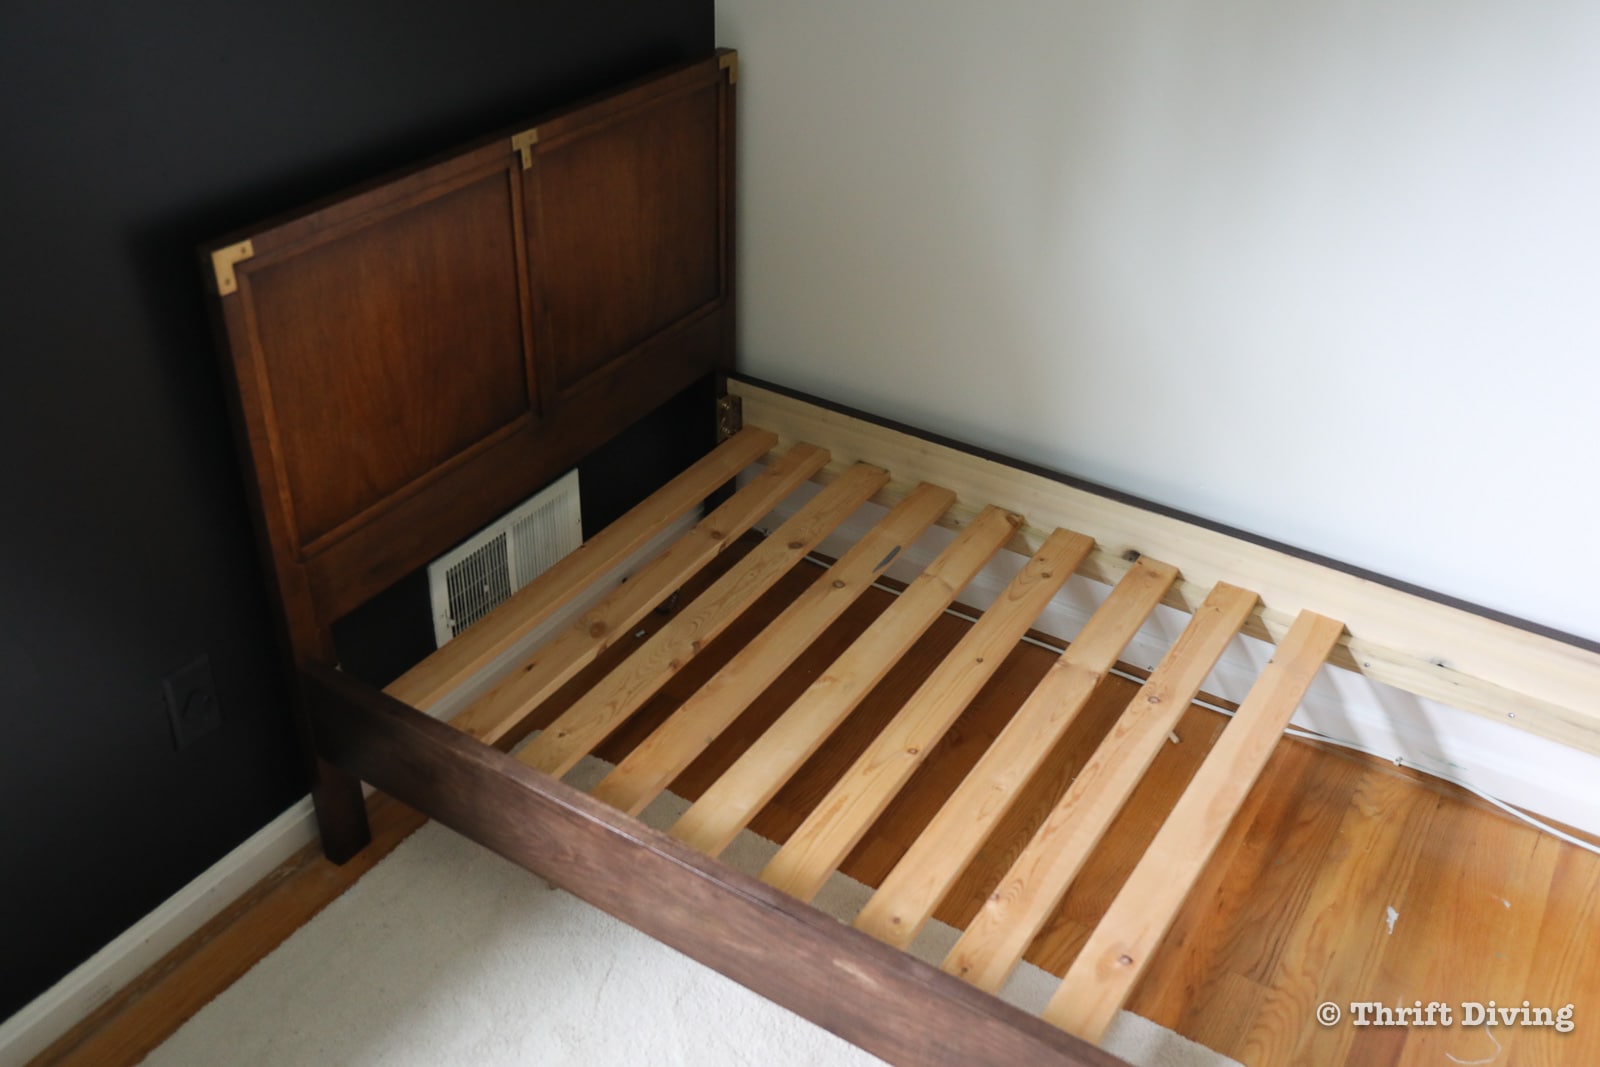
BEFORE

Since I have never tackled a project like this before (and was afraid it would crack the minute the kids sat on it), I was nervous going into this project because of the uncertainty and newness of the project.
But guess what?
It turned out fantastic!
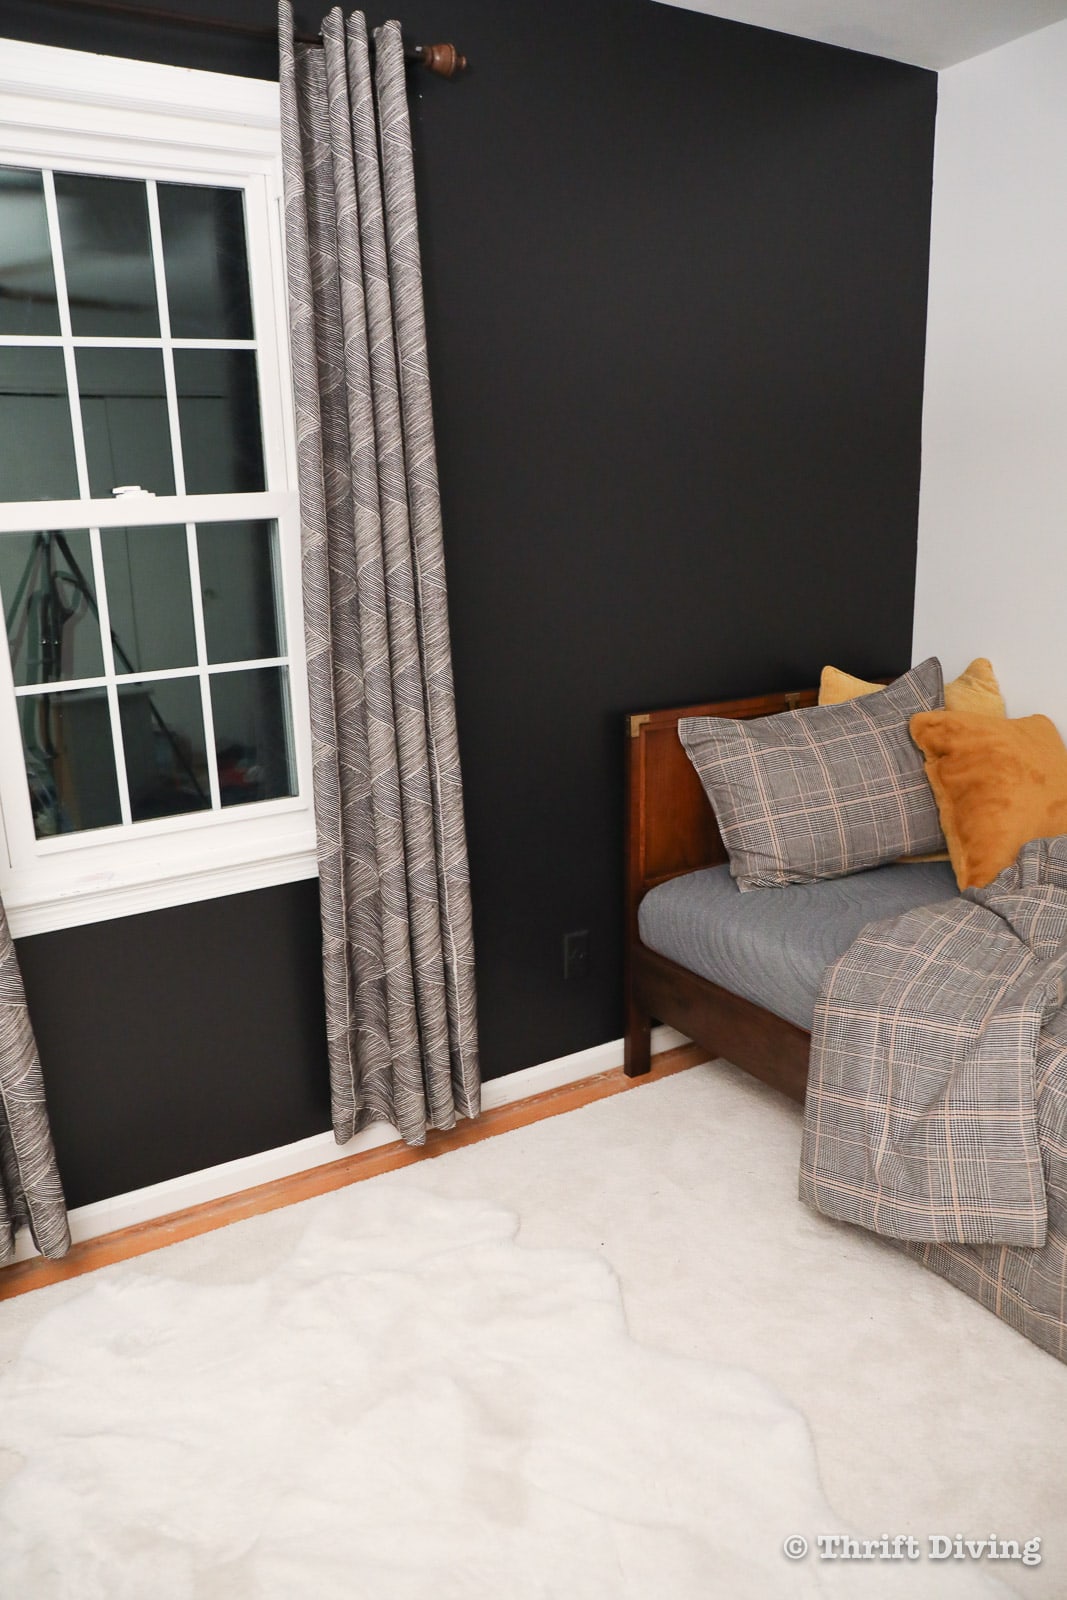
AFTER!

Building a Bed Frame on “Paper” First
One thing I have learned, especially when building my DIY walk-in closet organizer, is to spend a little time beforehand drafting up plans of what you’re planning to build. It doesn’t have to be fancy (although you can get pretty fancy using SketchUp).
Regardless of whether you’re using paper, a tablet, or a design software, don’t skip this step. You’ll recognize problems before they come up, which saves you from making mistakes that can cost money (if you ruin your materials).
I was able to draft what the bed would look, which was a pretty good rendition!

Once I figured out how to build the bed frame, it was time to gather materials. For this build, I wanted to make sure I had a good bonding wood glue, so I used Tekbond, which provides adhesives for every imaginable project!
Here’s what I used:
Tools and Materials
- Vintage Henredon headboards (or your choice of headboard)
- Poplar wood, pine, or your choice of wood
- Tekbond wood glue
- 1″x 3″ pine boards for slats
- Bed rail brackets
- Java Gel Stain
- Pre-conditioner
- Power drill
- Track saw (or circular saw)
- 1-3/4″ wood screws
- Kreg Pocket Hole Jig, Festool Domino, or another joiner method
- Clamps
- Rags
- Paint brush
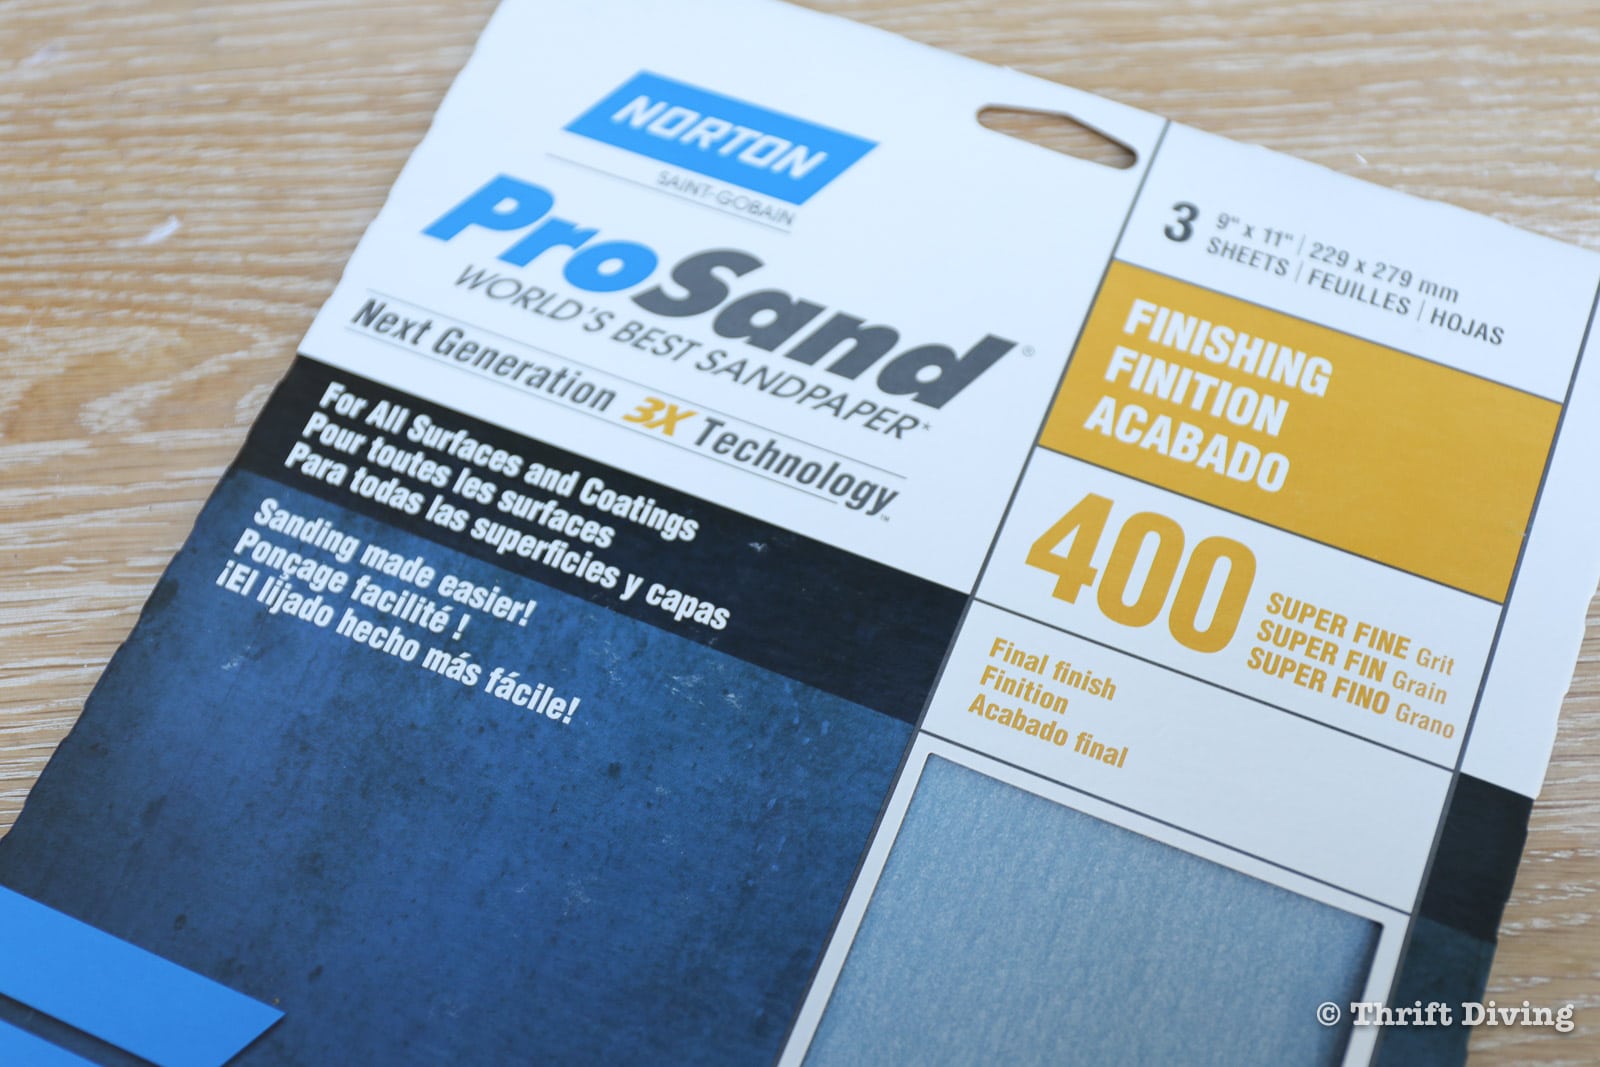
- Sandpaper (150-grit and 400-grit)
- Gloves
- Dust mask
- SketchUp software for drafting a plan of the bed frame (or pencil and paper)

Building a Bed Frame Using a Vintage Headboard
STEP 1: Clean the Vintage Headboard
Always clean your vintage headboard.
STEP 2: Decide How You’ll Refurbish the Headboard
Whenever I’m doing a refurbishing project, sometimes the biggest challenge is deciding how to refurbish it. I like to ask myself the following questions:
- How much work will it take, and do I have time to do it?
- Will I increase the value or destroy the value? (Research its value before starting)
- Do I have the materials needed to refurbish it?
With these vintage Henredon headboards, I actually procrastinated in the beginning stages of this project because I couldn’t decide how I wanted to refurbish them. They were in good condition, but I love stripping furniture and re-staining to bring new life into it. However, stripping furniture can be tedious, and isn’t really necessary if there’s no visible damage to the surface.
Here are the three options you have.
A. Strip and Stain
As previously mentioned, depending on the quality of your headboard, you might need to strip it and then re-stain it. If the surface is heavily marred with stains or knicks, or if the finish is chipped and cracked (due to age of the finish), you’ll want to consider stripping and re-staining. Read this post on how to strip and stain wood and go to my YouTube channel to watch how I stripped and re-stained my vintage drafting table.
B. Lightly Sand and Stain
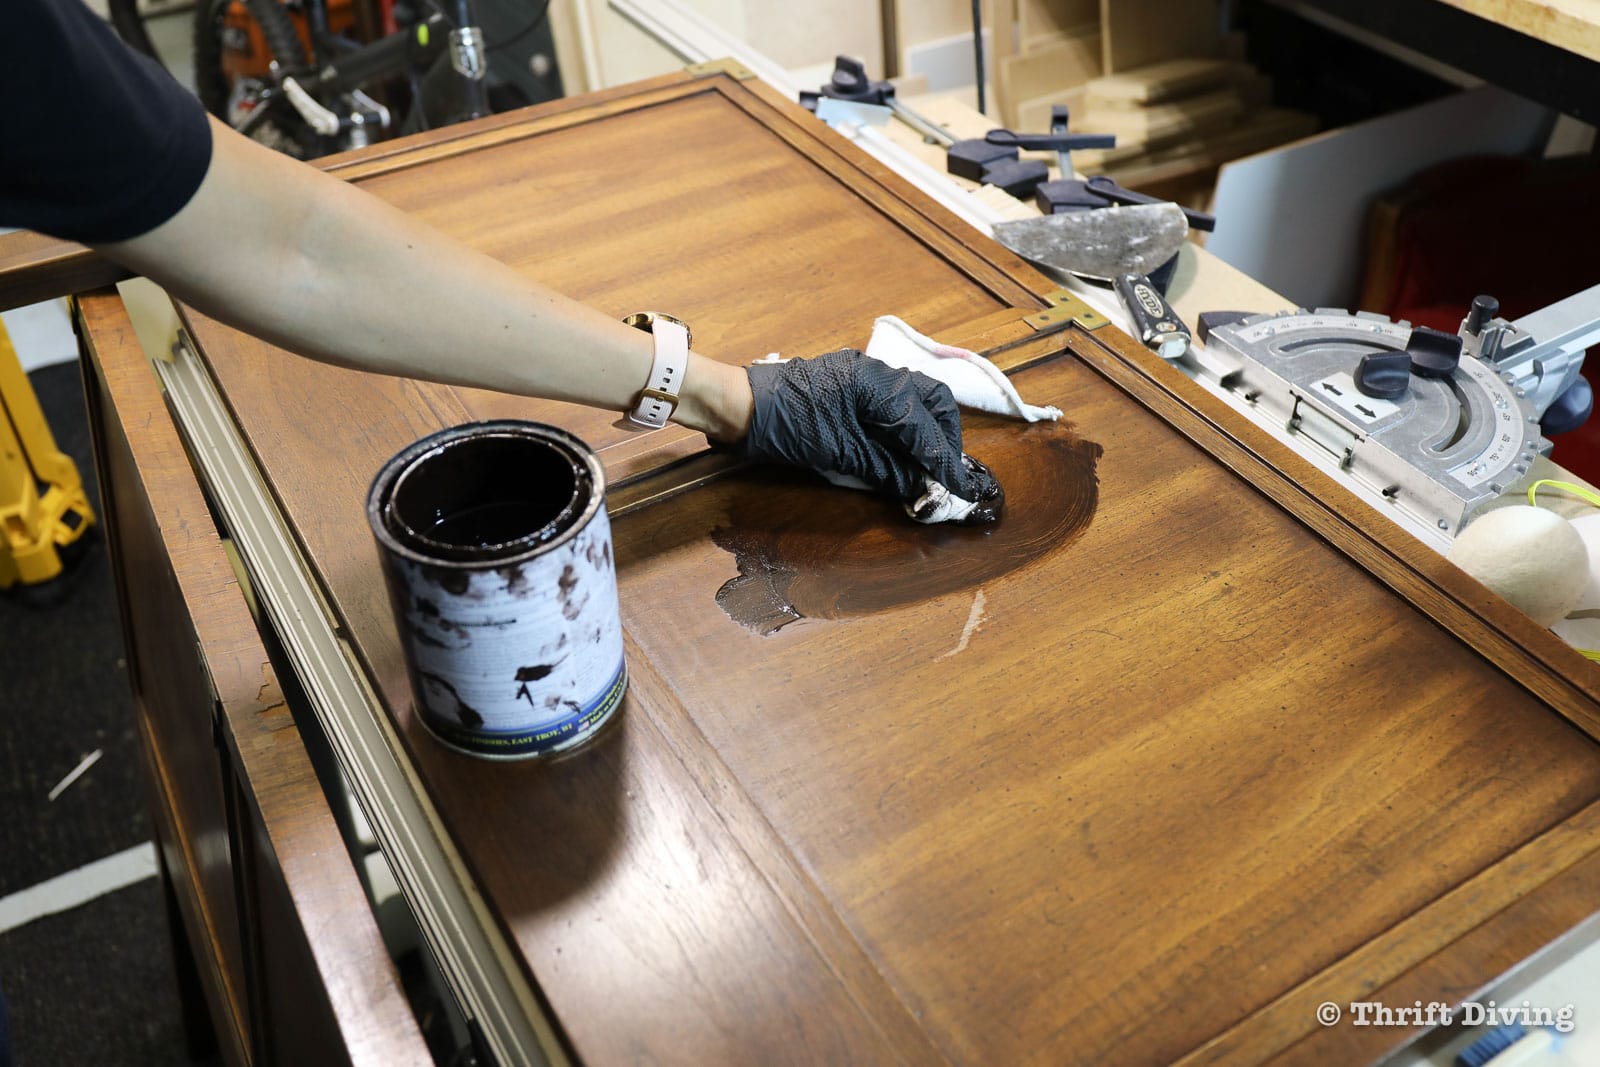
This headboard was in decent condition so I decided to just lightly sand it using Norton ProSand 400 Grit Sandpaper and then add a couple coats of Java Gel Stain.
Adding a couple coats of Java Gel Stain allowed me to deepen the color of the vintage headboards and to breathe new life into the pieces. Wipe it on and wipe it off immediately. Don’t allow it to dry before wiping it off.
C. Paint It
Painting is definitely an option for your headboard! However, I would make sure the headboard that you’re painting isn’t valuable. There are a few times when you should put down the paint brush and not ruin a good piece of wood. Read this post to learn more about when not to paint wood furniture.
If your headboard passes the “should I paint this?” paint test, go ahead and add a couple coats of furniture paint. Read more about the best furniture paints for your projects. And if you’ve never painted furniture before, you’ll want to read more about getting started with painting furniture.
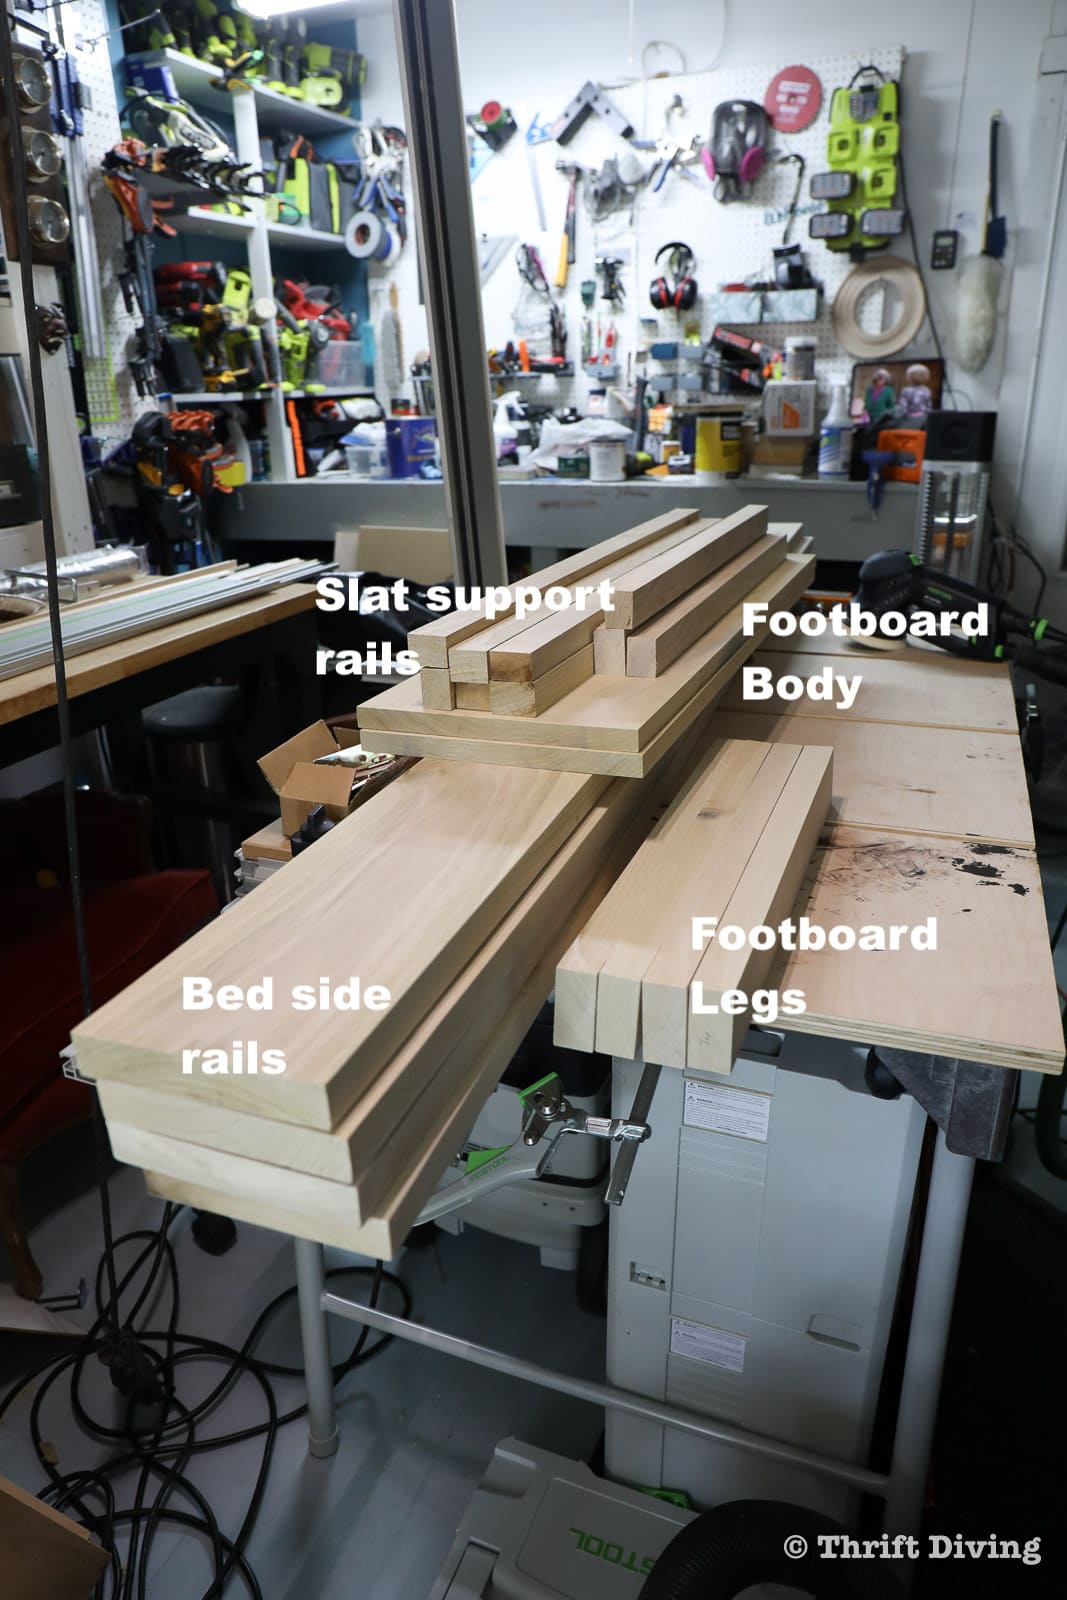
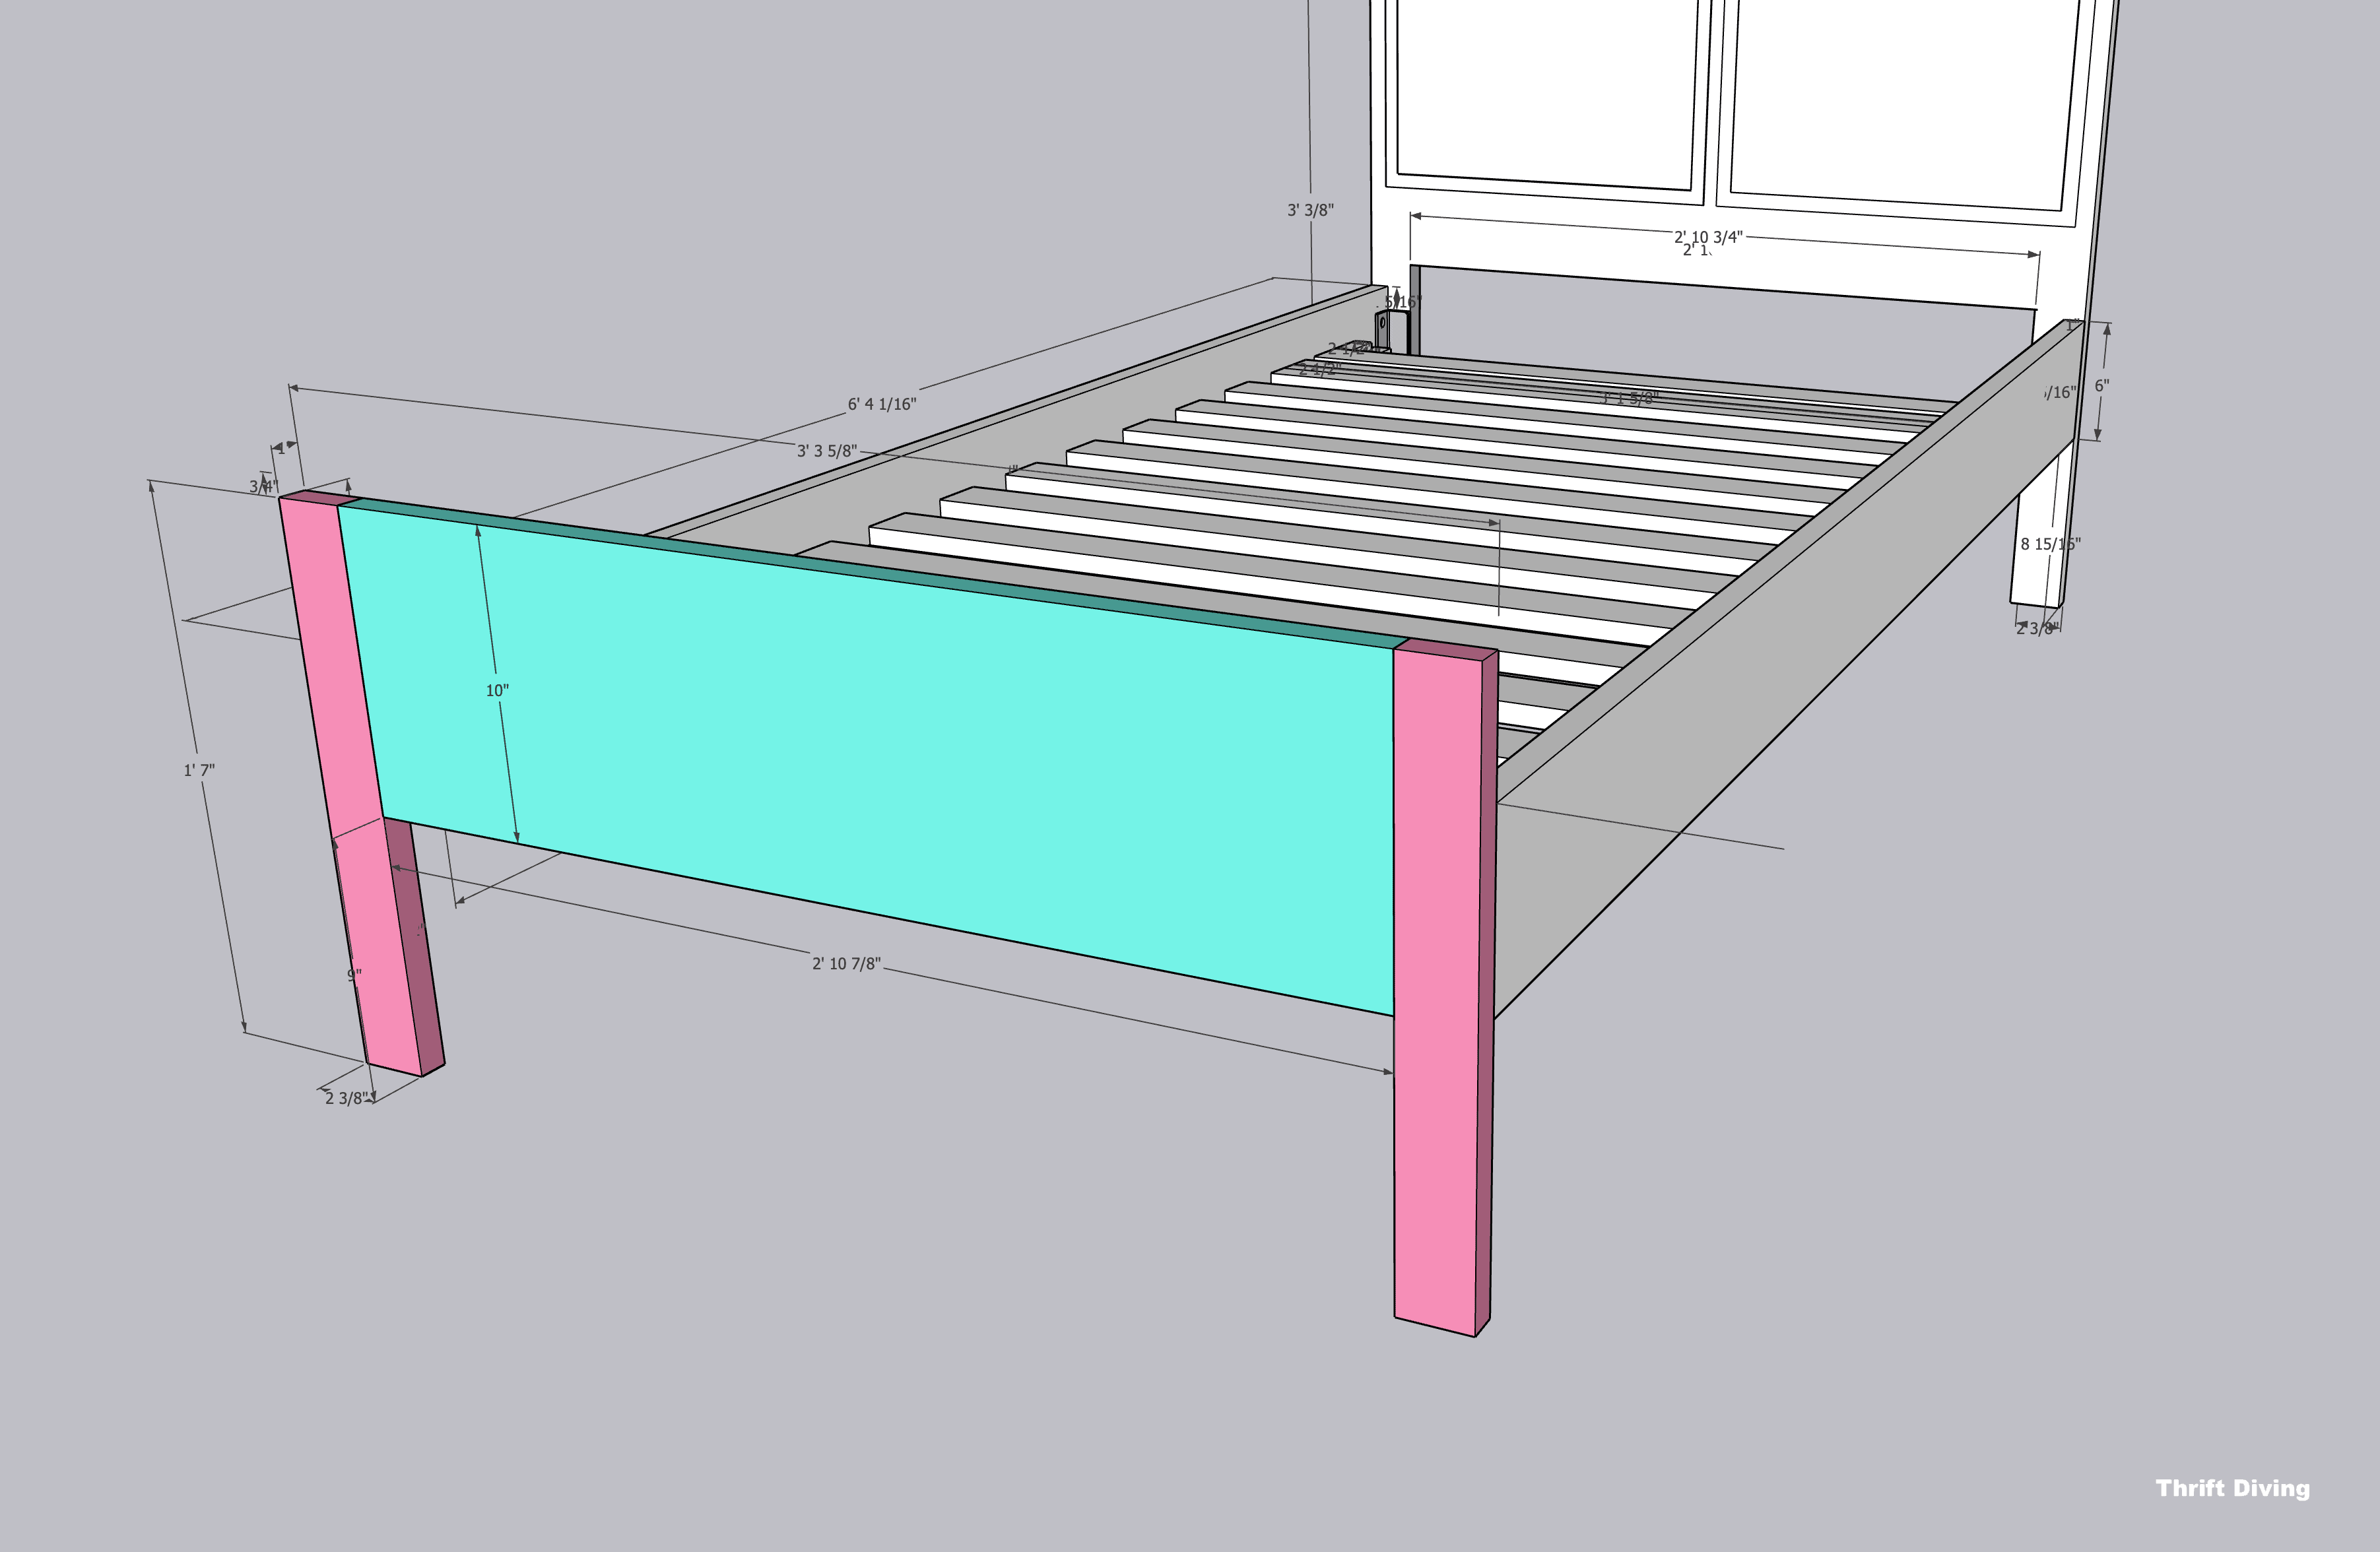
STEP 3: Cut the Pieces to Make the Side Rails and Footboard
Using a vintage headboard to make a bed frame will require the following pieces:
- 2 bed rails
- 1 Footboard body
- 2 Footboard legs
- 2 Slat Supports
- Slat spacers (the amount depends on the number of slats used).
- Slats (the amount depends on the spacing of the slats).
I’ll be completely honest: I think track saws are the best thing since sliced bread. 🙂 If you don’t have one, no sweat (although I will urge you to look into buying one, because it makes cutting wood so much safer and precise).
If you don’t have a track saw, you’ll need a circular saw or a miter saw. The wood used for the bed side rails is thick, around 1″ to 1.5″ thick. Wood that thick needs a thick blade. I used my track saw to cut each of the pieces needed for building a bed frame.
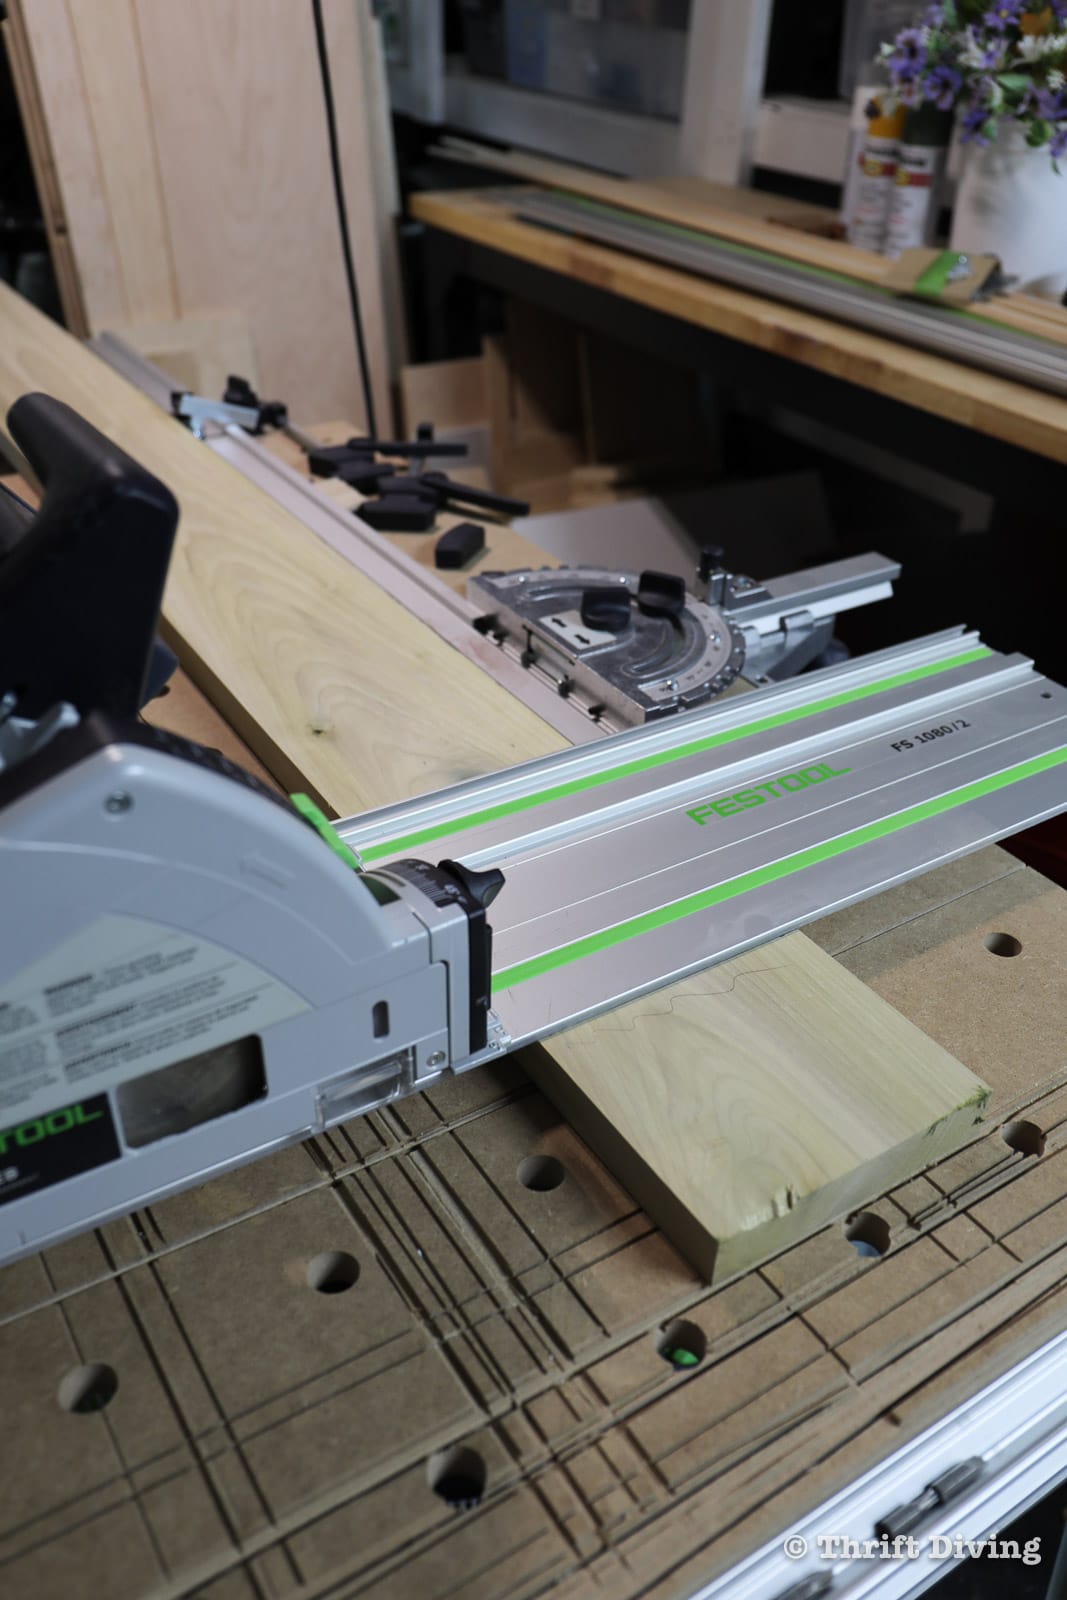
I used poplar because it was affordable and my local woodworking store recommended it. You can also use regular pine boards (1″ x 6″), but as the woodworking store pointed out, using pine boards that can be bought at any home improvement store, can often be bent, which throws off your project.
The woodworking store planed the bed rails for me, and I used my track saw to get the precision cuts I needed.
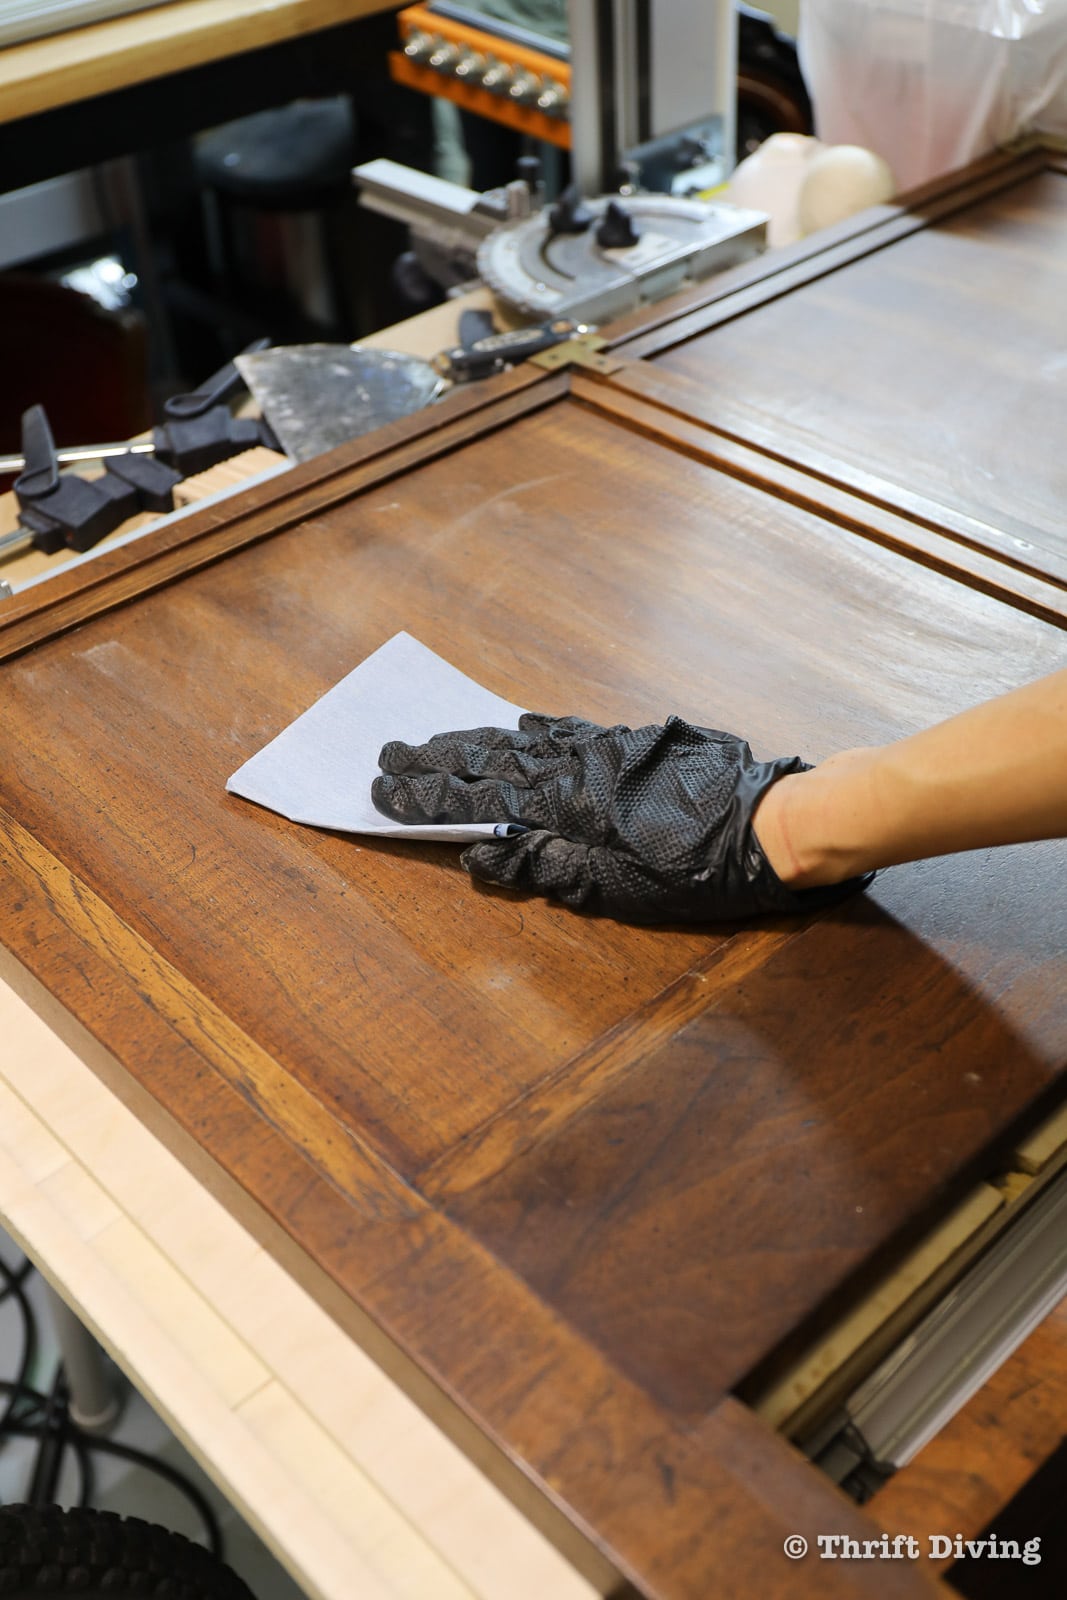
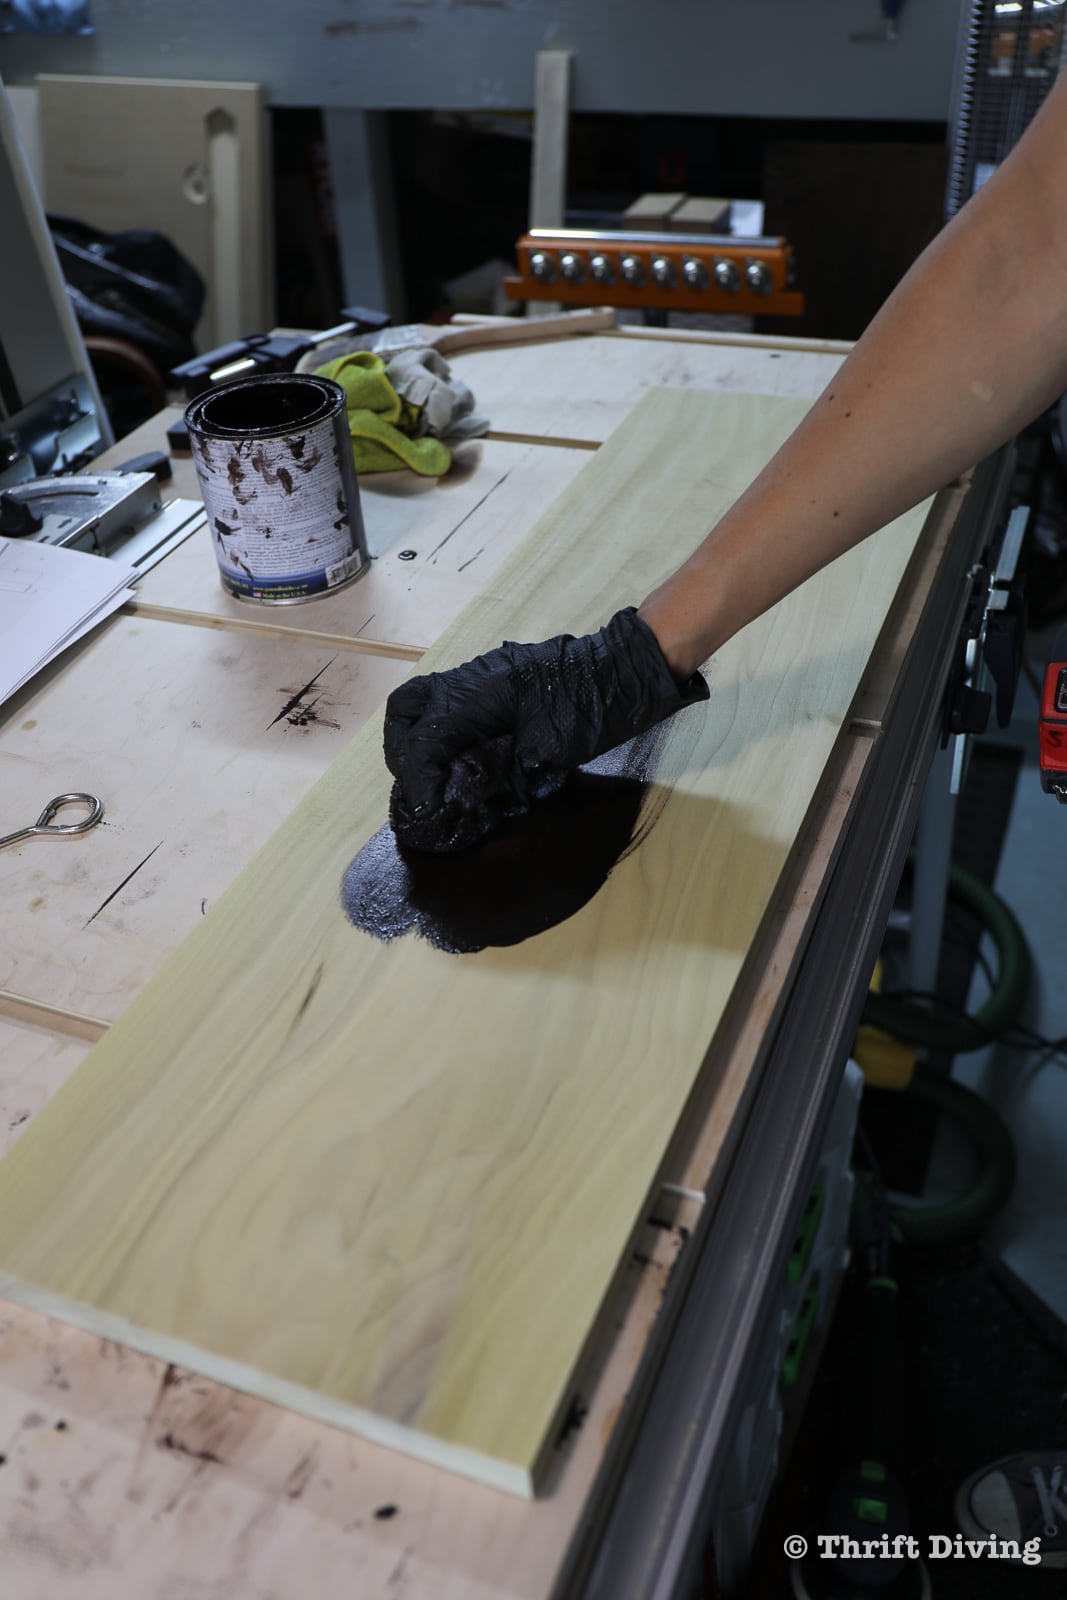
STEP 4: Apply Pre-Conditioner and Stain
Poplar is one of those types of wood that benefits from using a pre-conditioner. Pre-conditioner is wiped on porous wood such as poplar, pin, fur, etc., allowed to set for a few minutes, then wiped off. The pre-conditioner acts like foundation on skin, sealing the pores and allowing the wood stain to evenly stain the wood. Otherwise, you’ll get lots of blotchy areas.
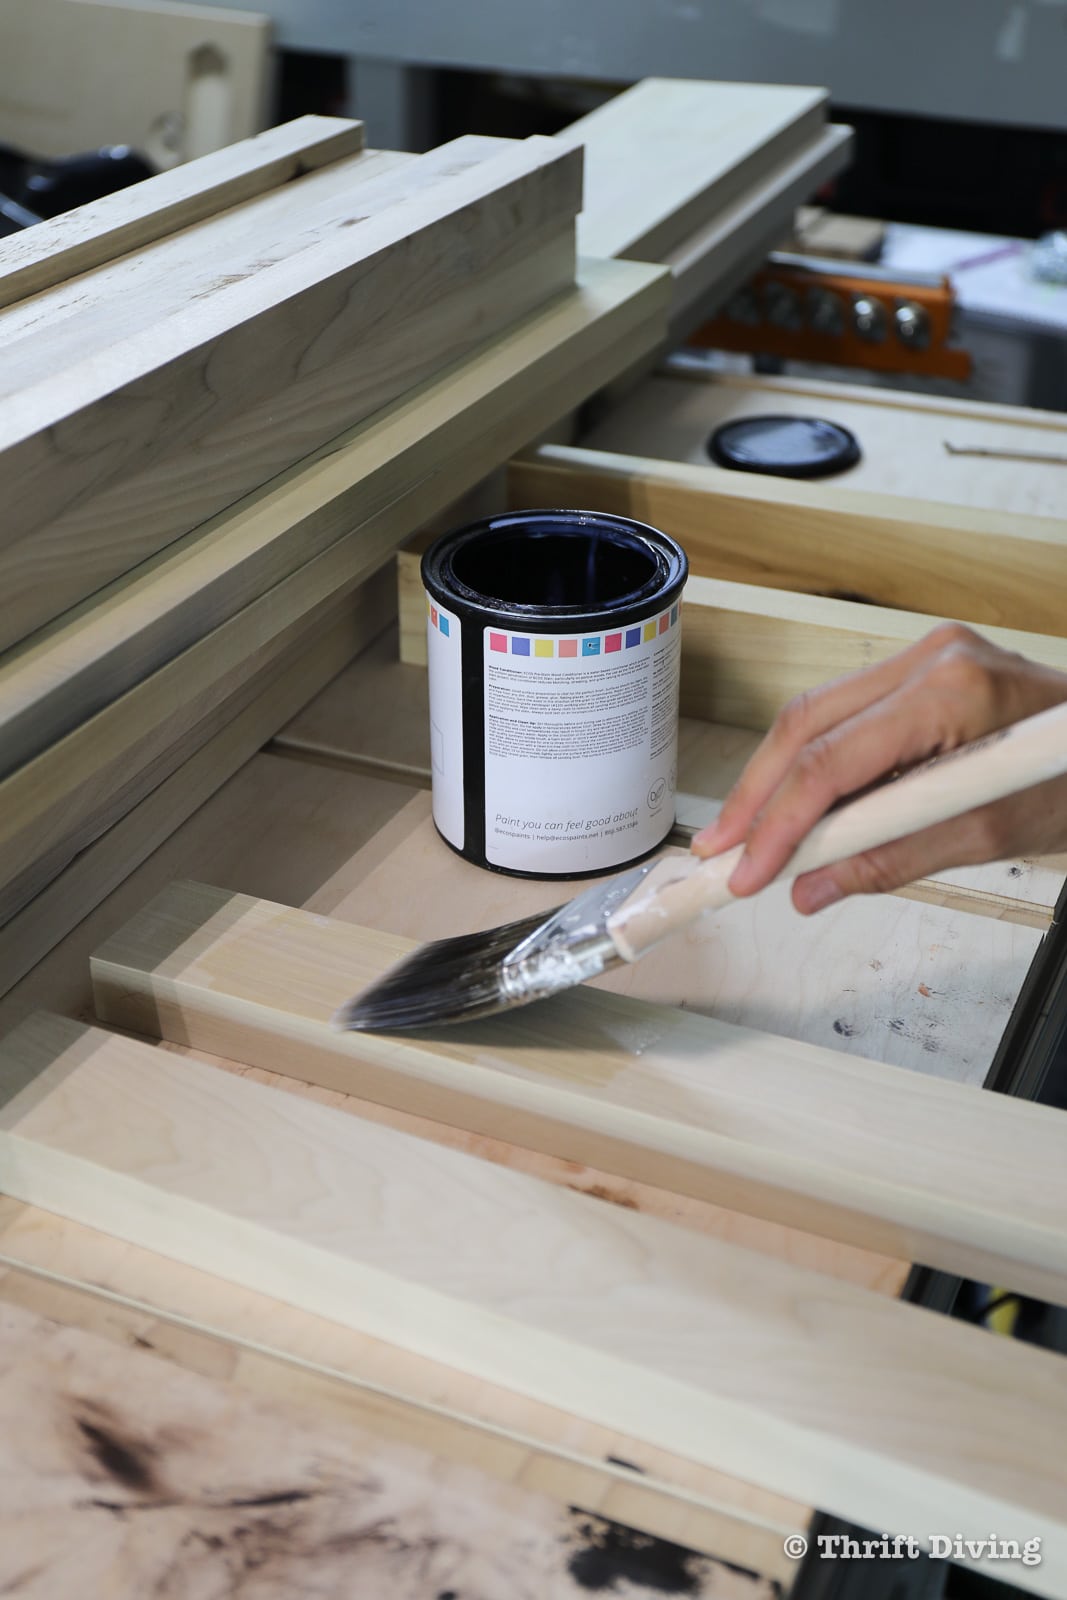
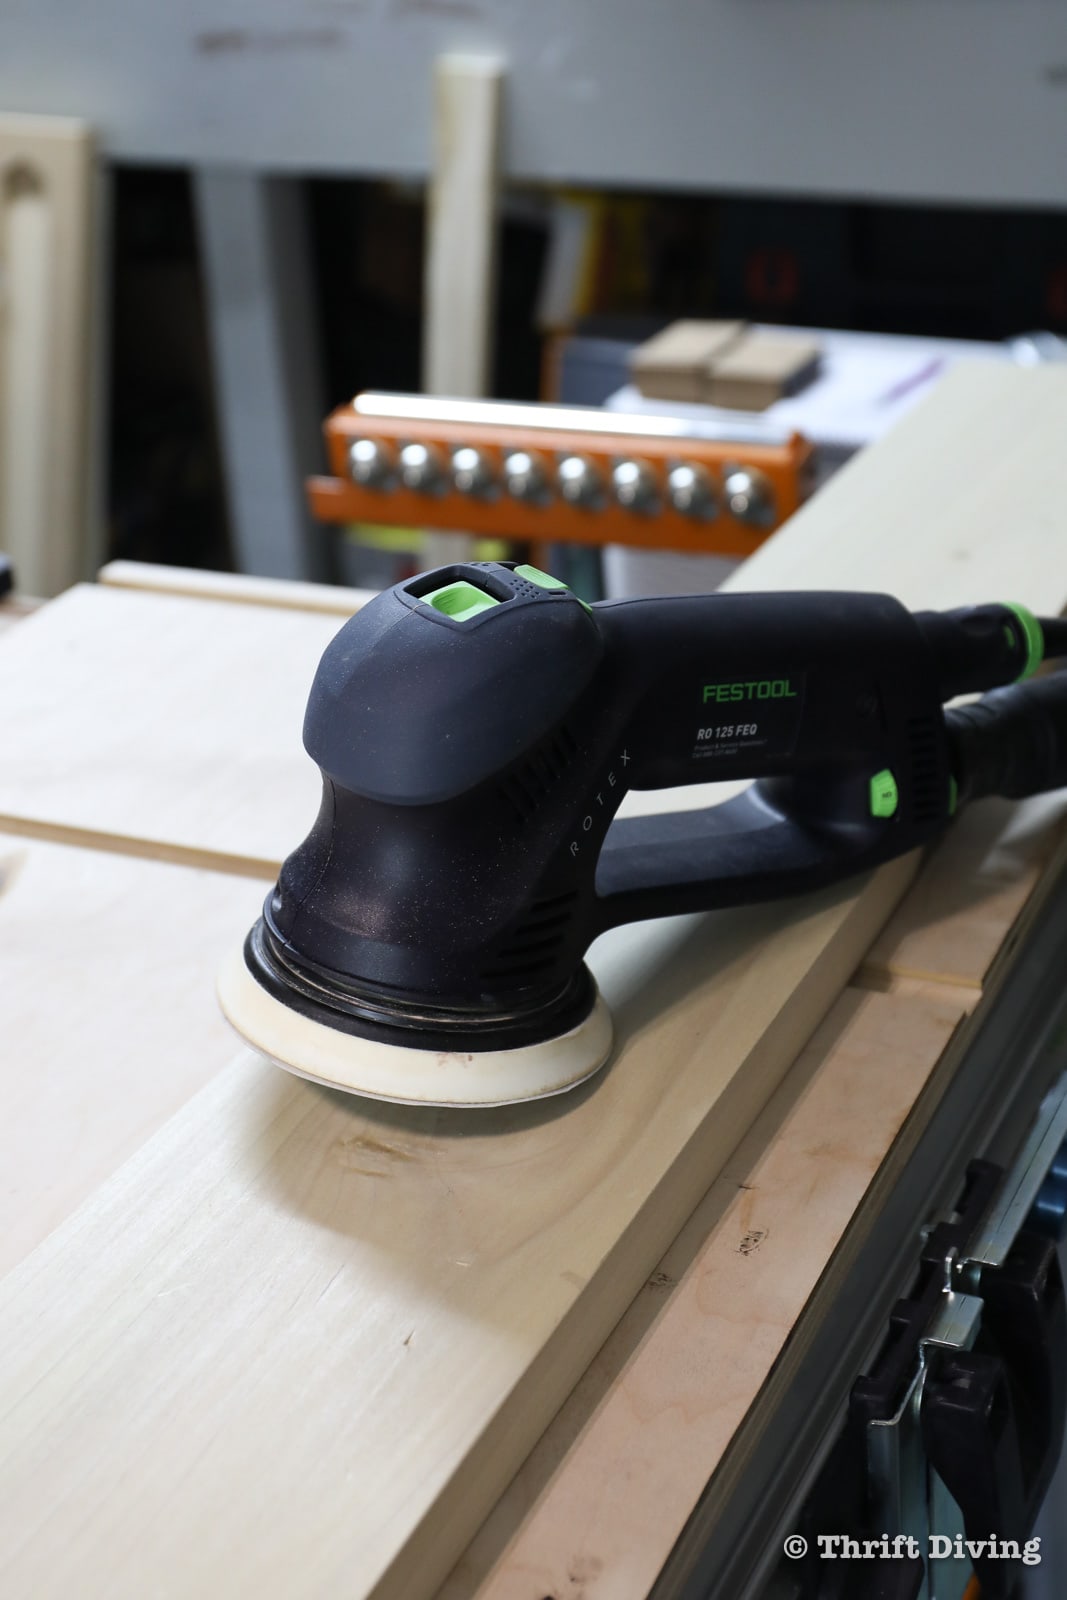
Once the pre-conditioner is wiped and it dries for 30 minutes, use an orbital sander with 220 or 400 grit sandpaper (or sand by hand) and sand in the direction of the grain. The wood is now ready to be stained evenly!
To apply the stain, wipe on in excess, then wipe off, leaving the stained wood behind.
IMPORTANT: For oil-based wood stains, when you’re finished with staining, always lay the rags flat and spaced out, allowing them to thoroughly dry before throwing them away. Otherwise, the rags could start a fire.
Should You Pre-Finish the Wood Pieces Before Assembly?
You’ll notice for this project I pre-finished the wood first and then assembled in the next step. But you can also assemble the bed frame first, and then pre-condition and stain.
I prefer to finish wood parts first because sometimes it’s hard to reach tight spots after assembly. However, if you pre-finish wood pieces, be sure NOT to apply wood stain on any edges or surfaces that will be glued. Wood glue is most effective on bare wood.
STEP 5: Assemble the Footboard
This footboard, as part of the bed frame, is very simple. It just consists of a main footboard and two legs attached on each side.
To assemble this bed frame, particularly the footboard, I needed to use two things:
- Tekbond Wood Glue
- Festool Domino
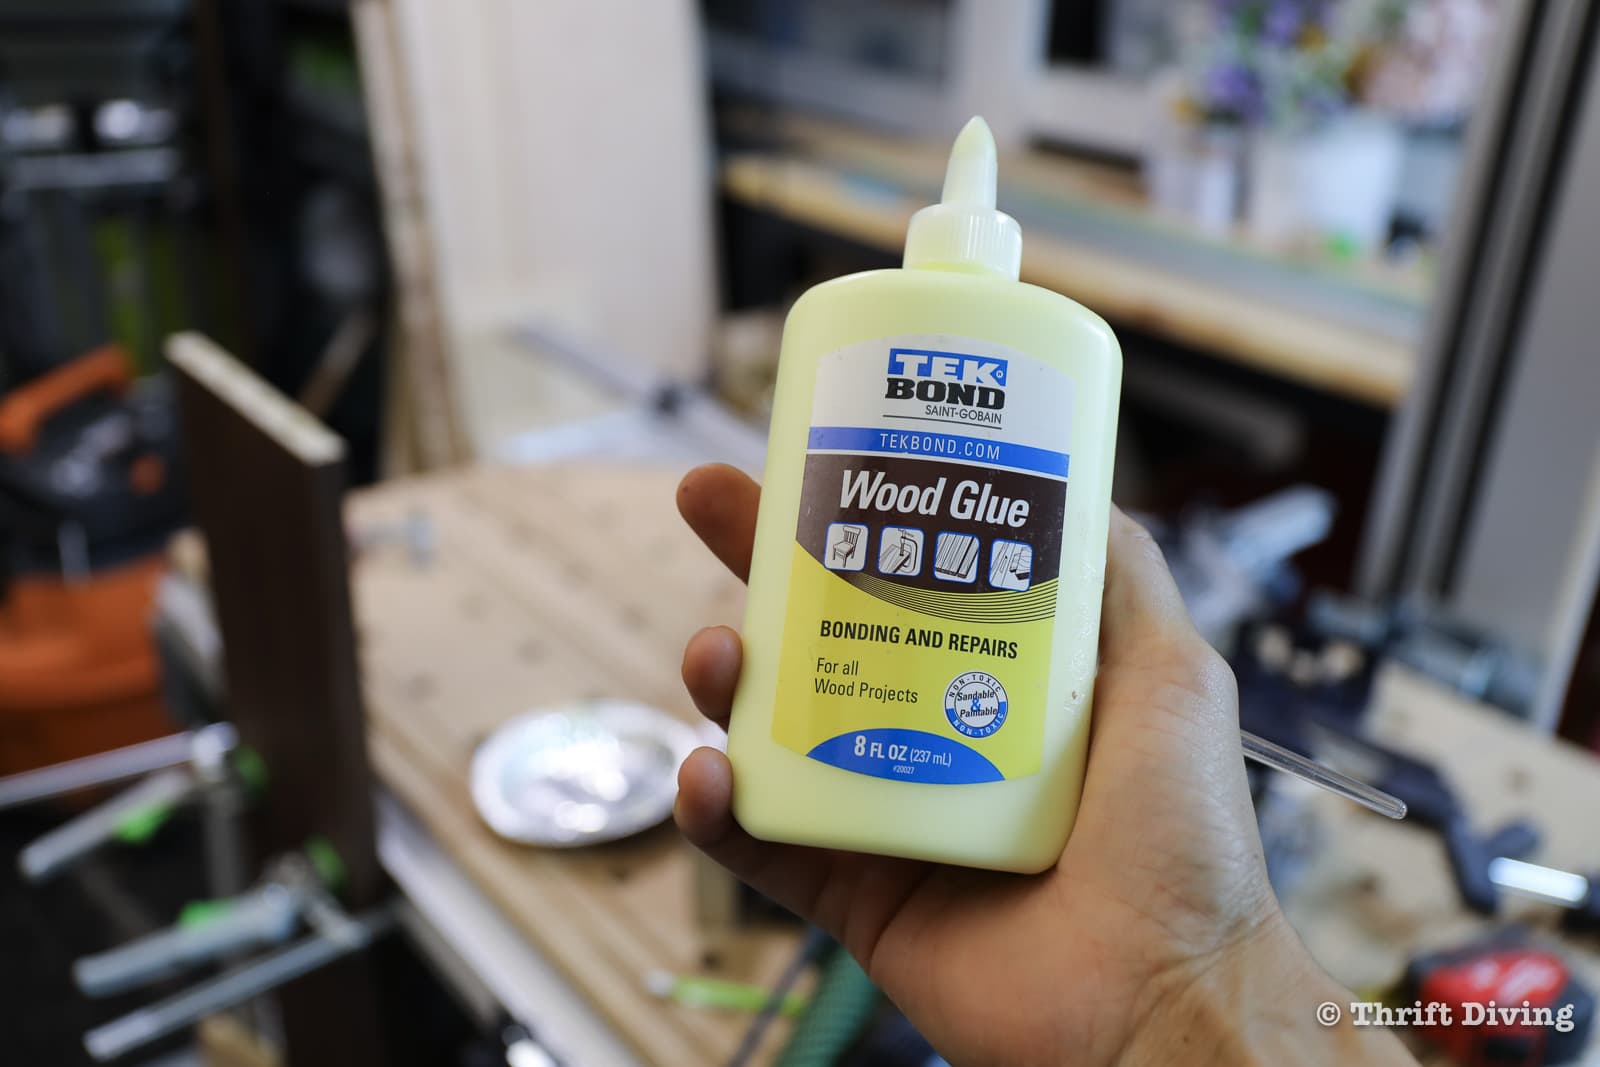
You can see my Domino in action when I made my DIY closet organizer. It’s a pretty fancy tool, on the expensive side, I’ll admit. A cheaper option is to use a biscuit joiner. However, dominos (in my opinion) are far superior because of the added strength they offer.
I used my Domino to create mortises on both ends of the footboard main body and on the footboard legs, so that the floating tenons would join them.
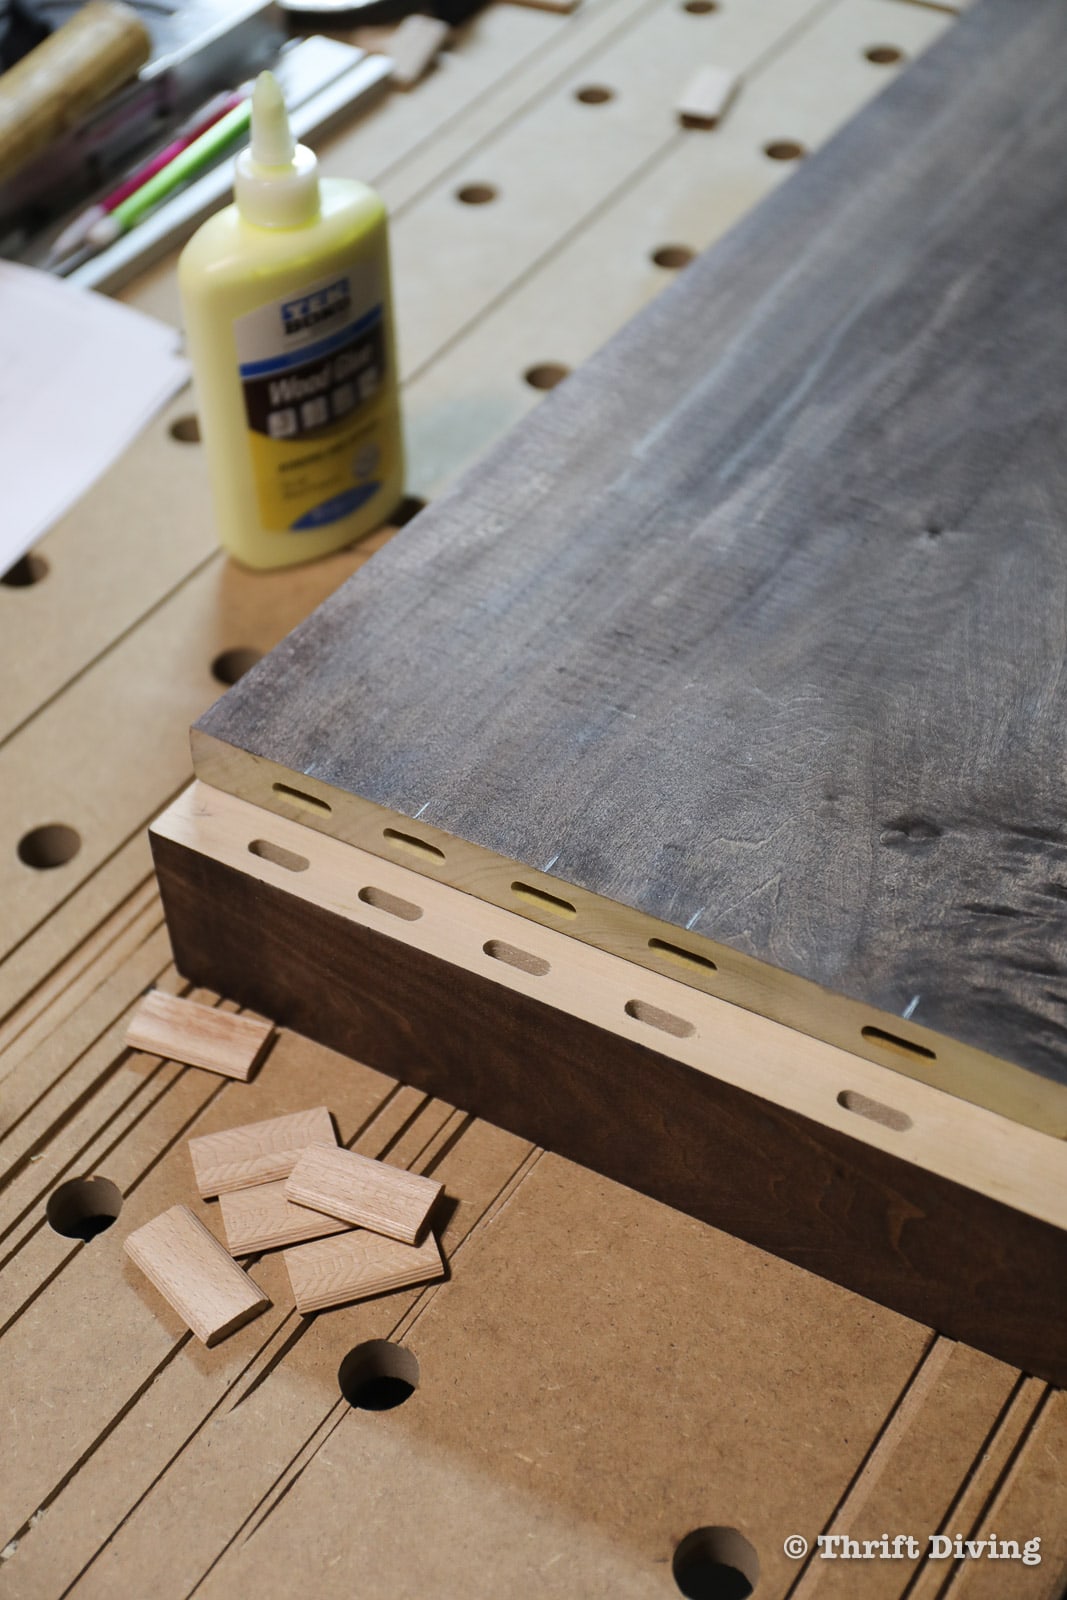
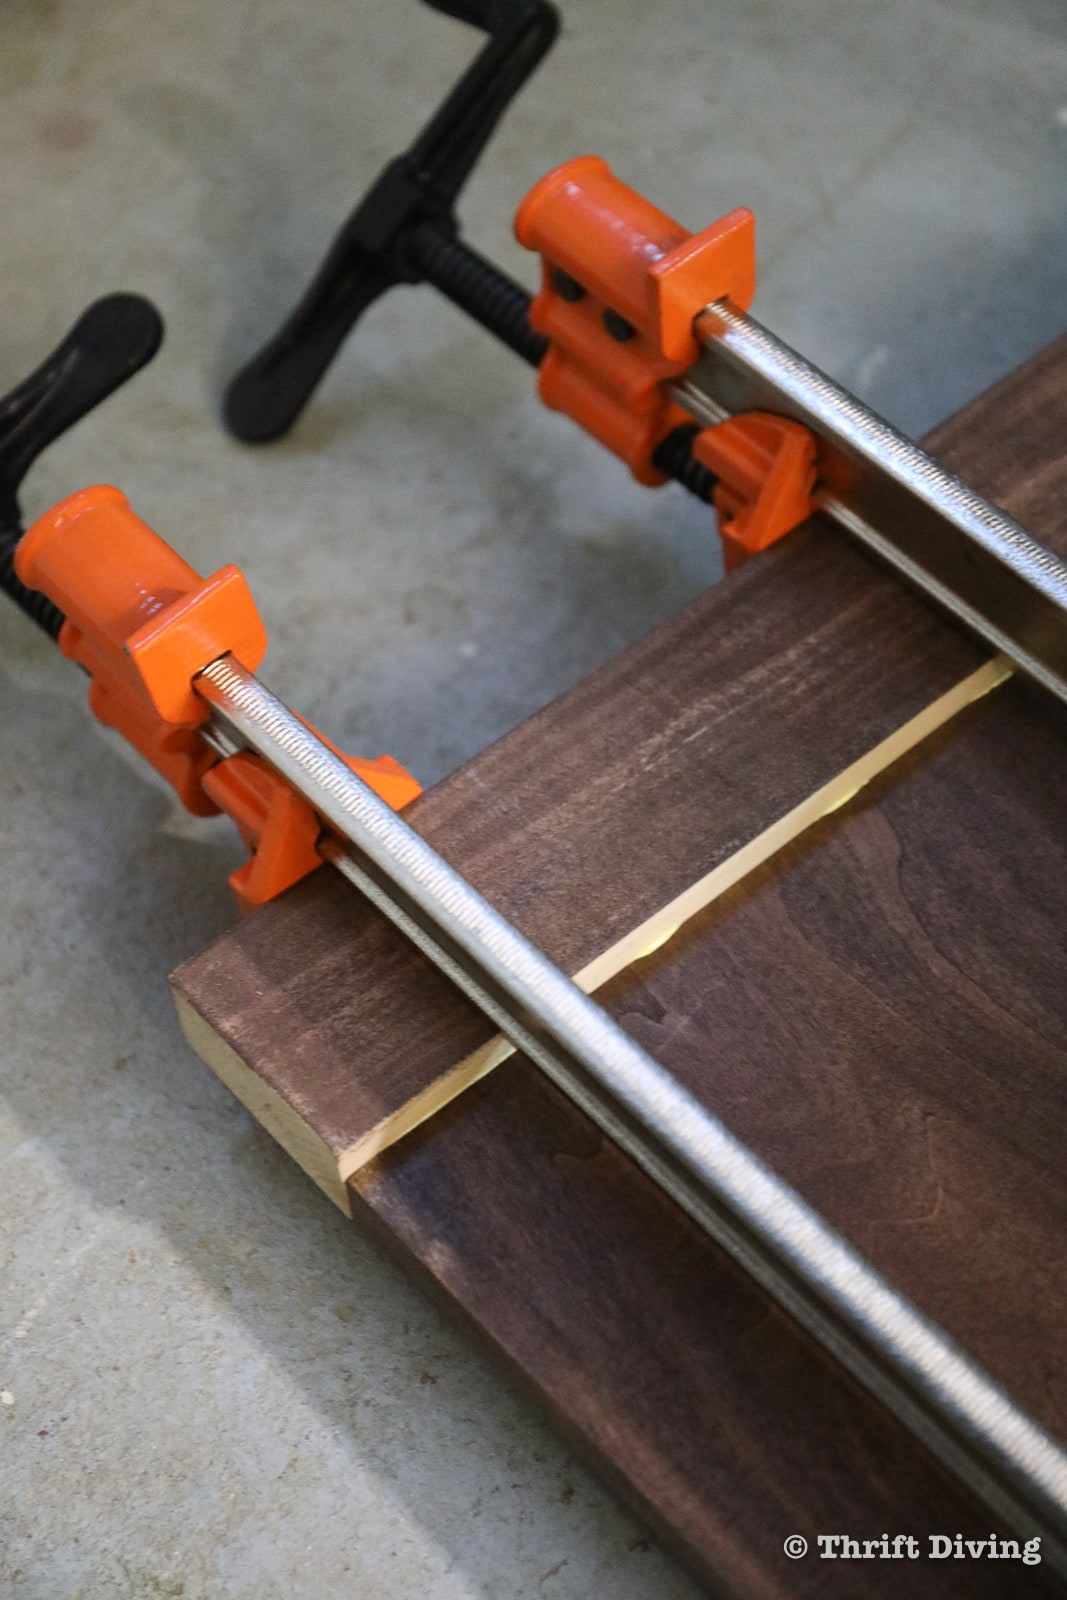
A big part of dominos aligning the wood and holding it securely in place is both Tekbond Wood Glue and clamps. I added some wood glue into the mortises, then inserted the tenons, and joined everything together.
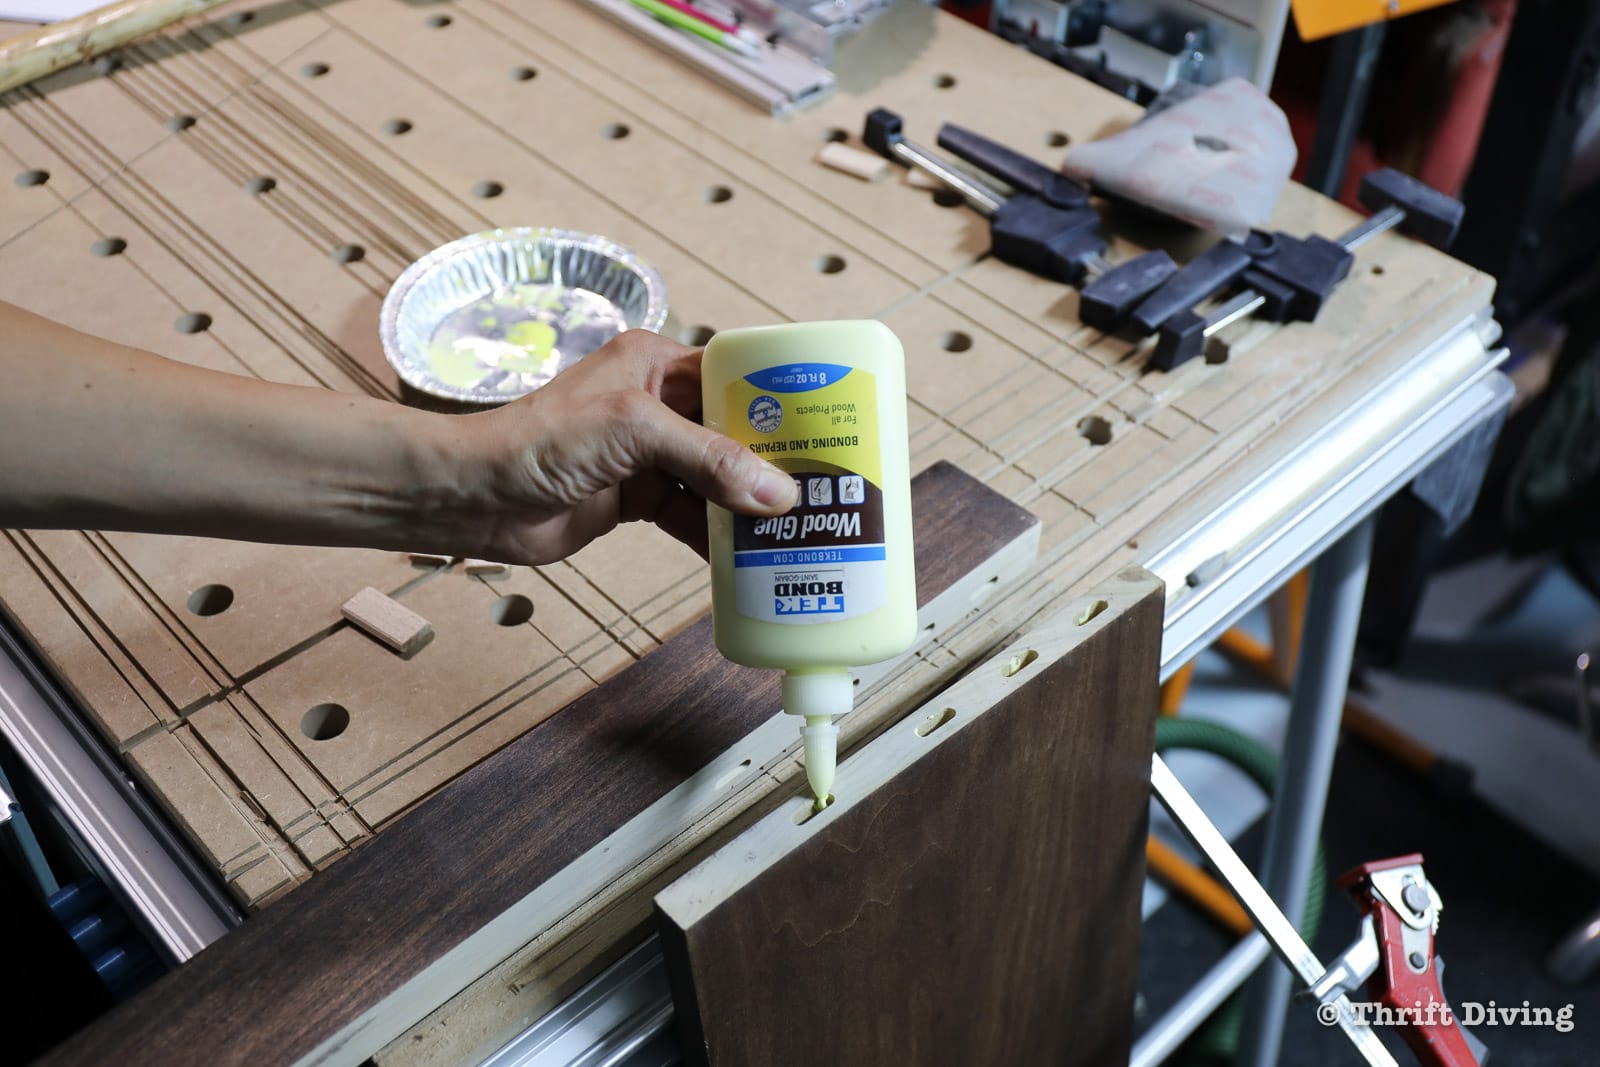
When clamped, the footboard will draw in tightly. You’ll also get glue seeping out of the seams. Use a wet cloth to wipe it away immediately on your finished surface. If your wood is unfinished, let the wood glue dry and then use a chisel to remove the glue after it dries.
IMPORTANT: Dried glue on a wood surface won’t accept wood stain. Therefore, thoroughly remove it before staining. You can also sand away any excess glue at joints.
STEP 6: Assemble the Bed Rails
The bed rails are attached to both the headboard and the footboard. There were a few things that need to be done to make sure the assembly is done properly:
- Know the measurements of your mattress size. I’m building bed frames for twin beds. Twin mattresses are typically 38″ x 75.” This means the area where the mattress will sit on the slats will need to accommodate the size of the mattress.
- Create a template on each end of the bed rail. Mark off each end of the bed rail where the brackets will be placed and screwed into. Use the same measurements on each end of the bed rails so that the hardware is consistent. This helps to prevent rocking of the bed.

Use Tekbond Wood Glue and attach the slat supports along the inside of the bed rail, then secure with screws. The length of the screws will depends on the wooden support size. Generally, a 2″x2″ board is recommended. If you don’t have one long piece to create the support for the slats, use a butt joint to butt them up against each other to create a longer support the length of the bed rail.
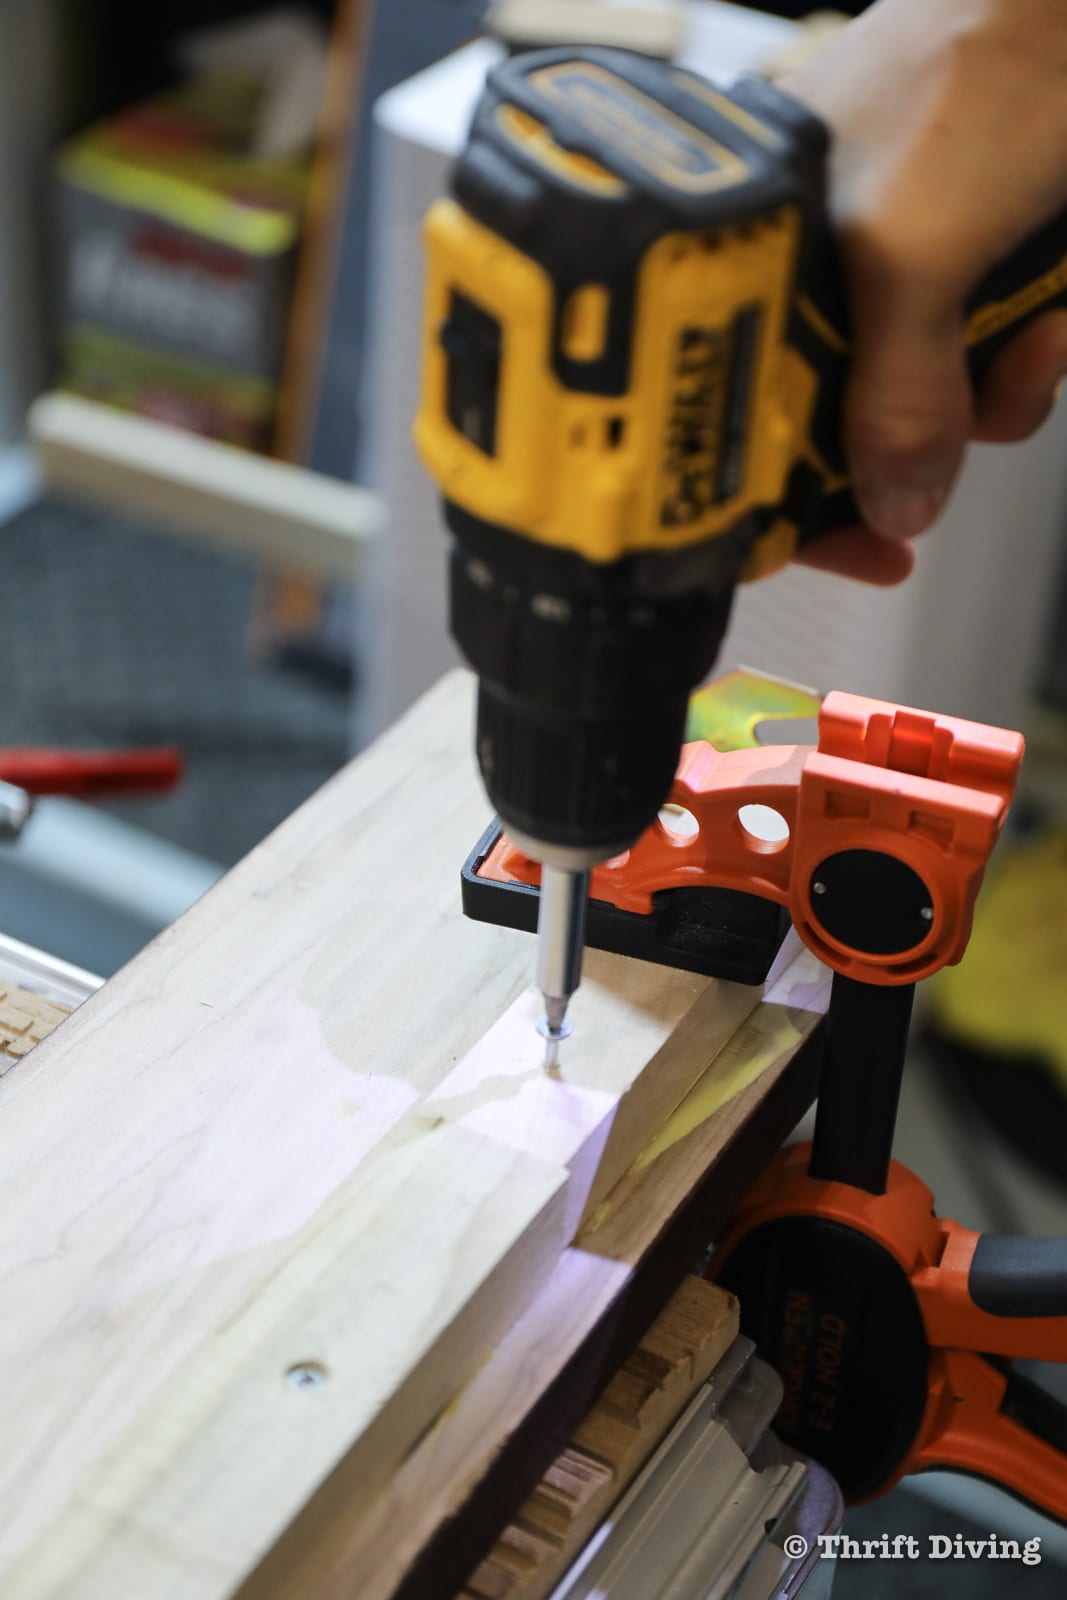
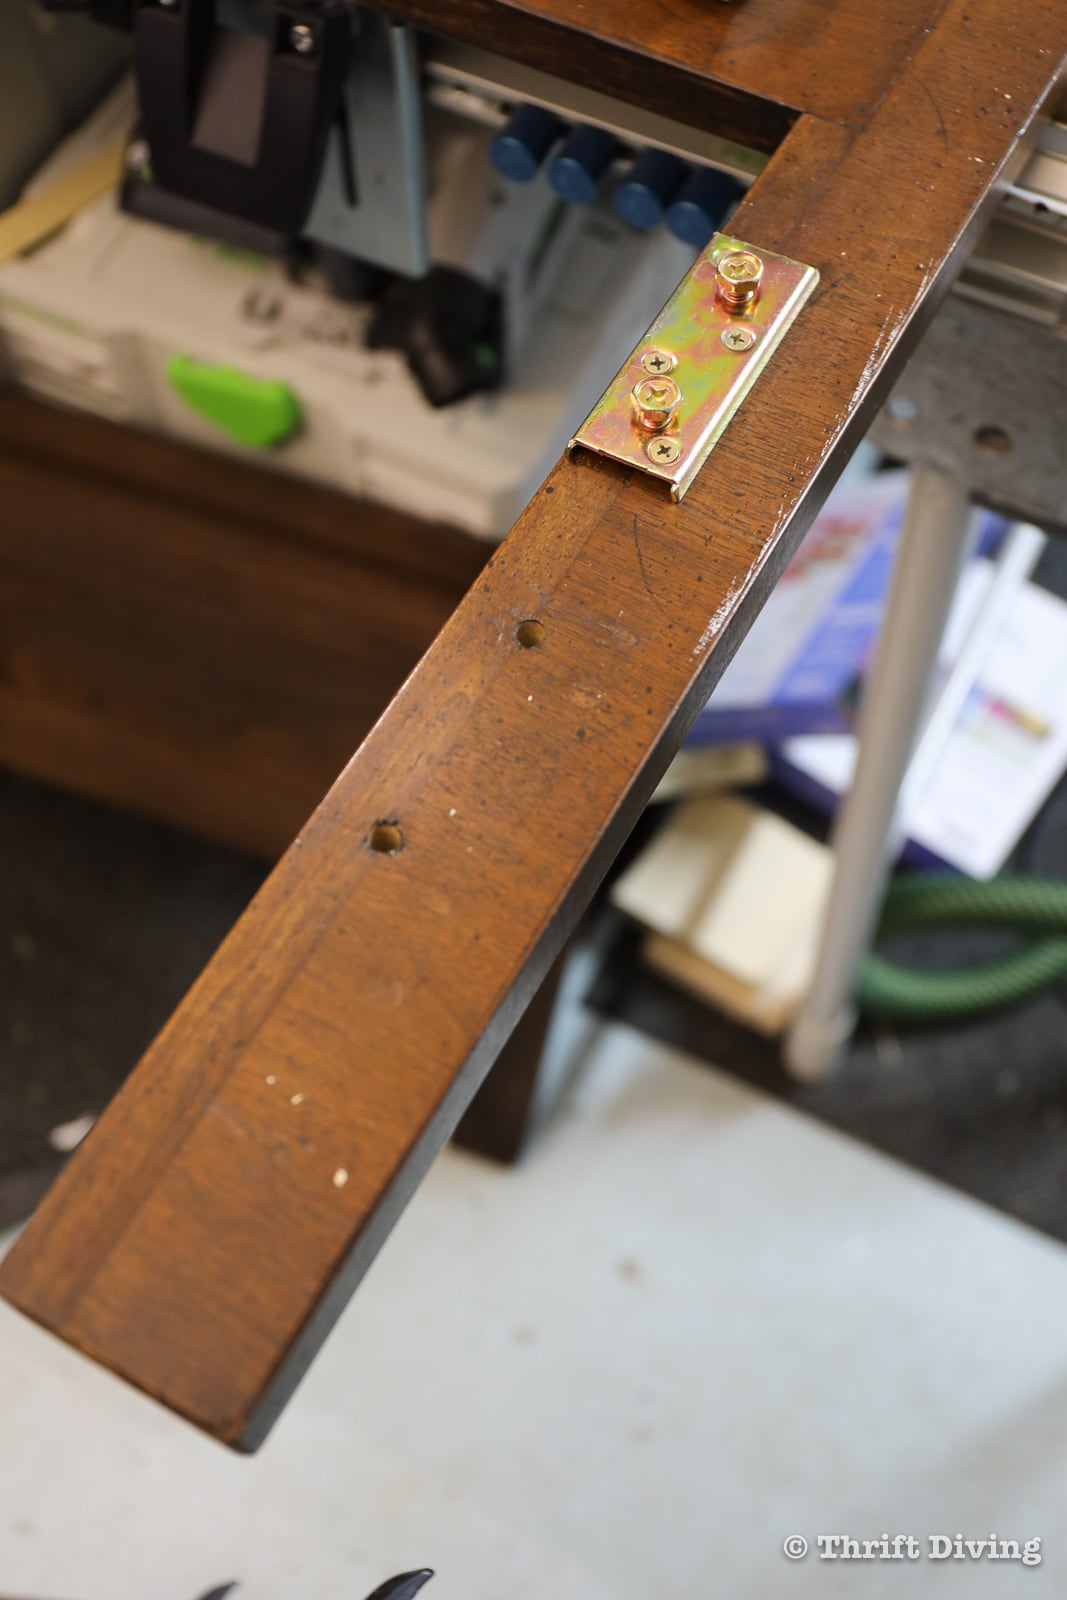
STEP 7: Attach Bed Rail Brackets
Place the hooked brackets on the end of the bed rails and secure with the screws included in the kit. Again, be sure that you use a template on each side for consistently.
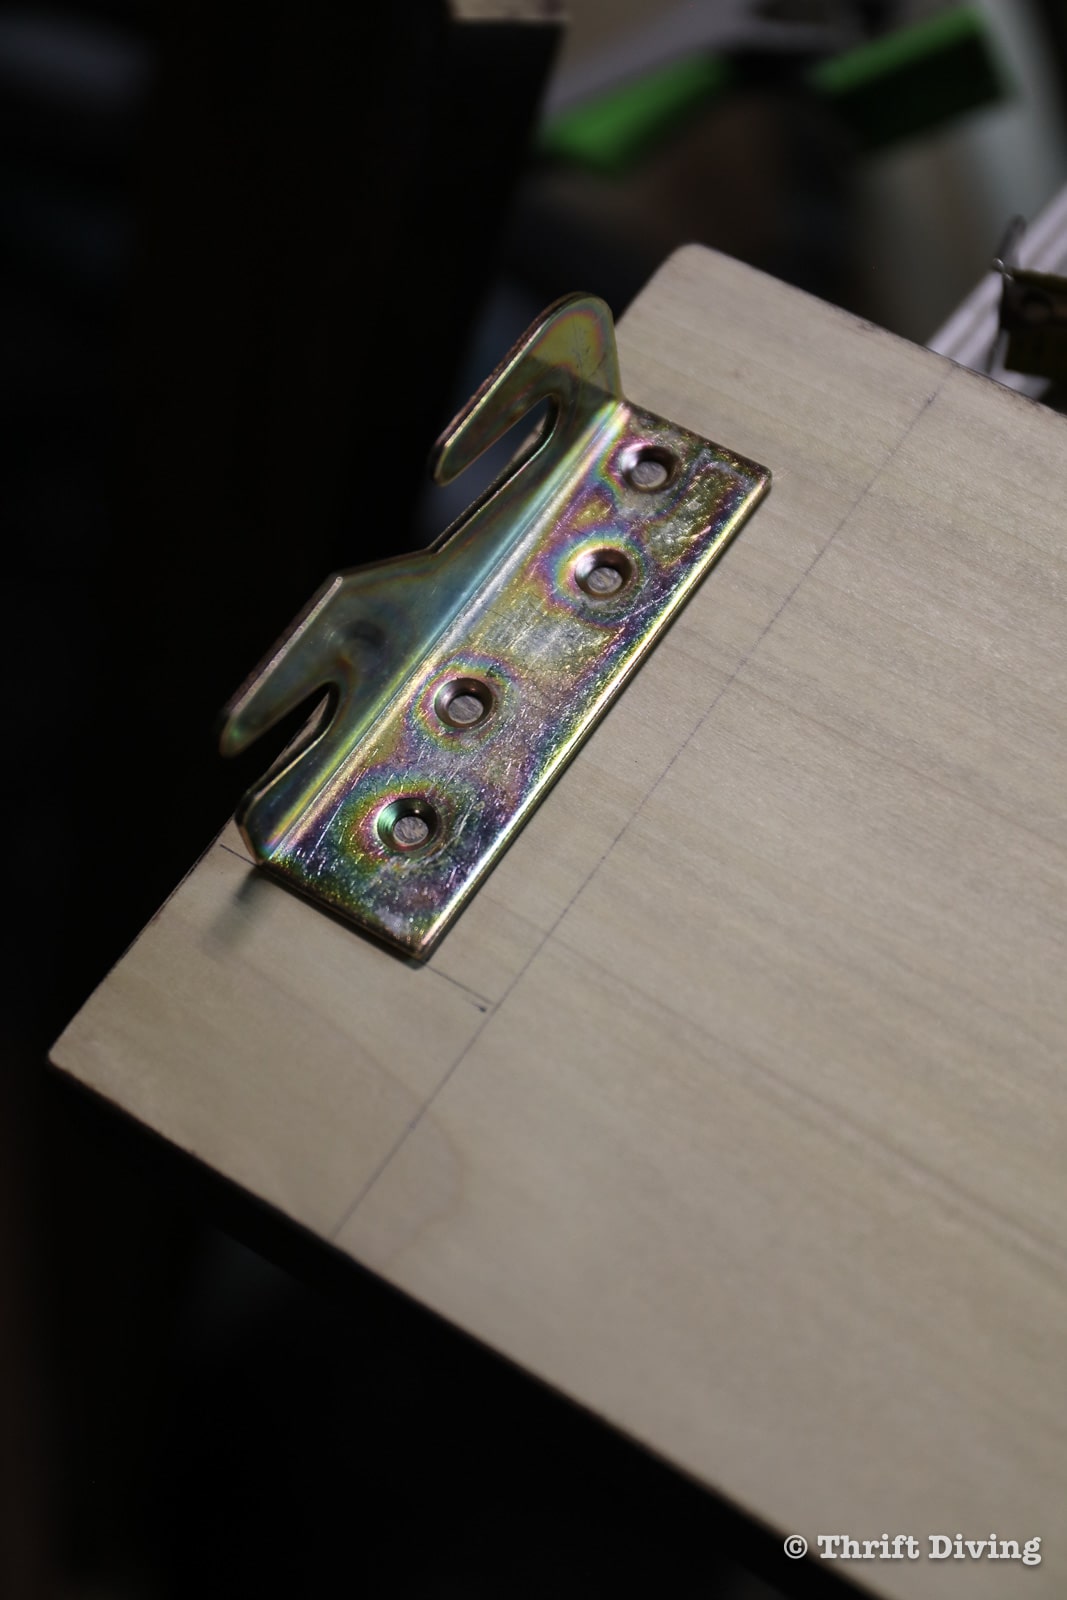
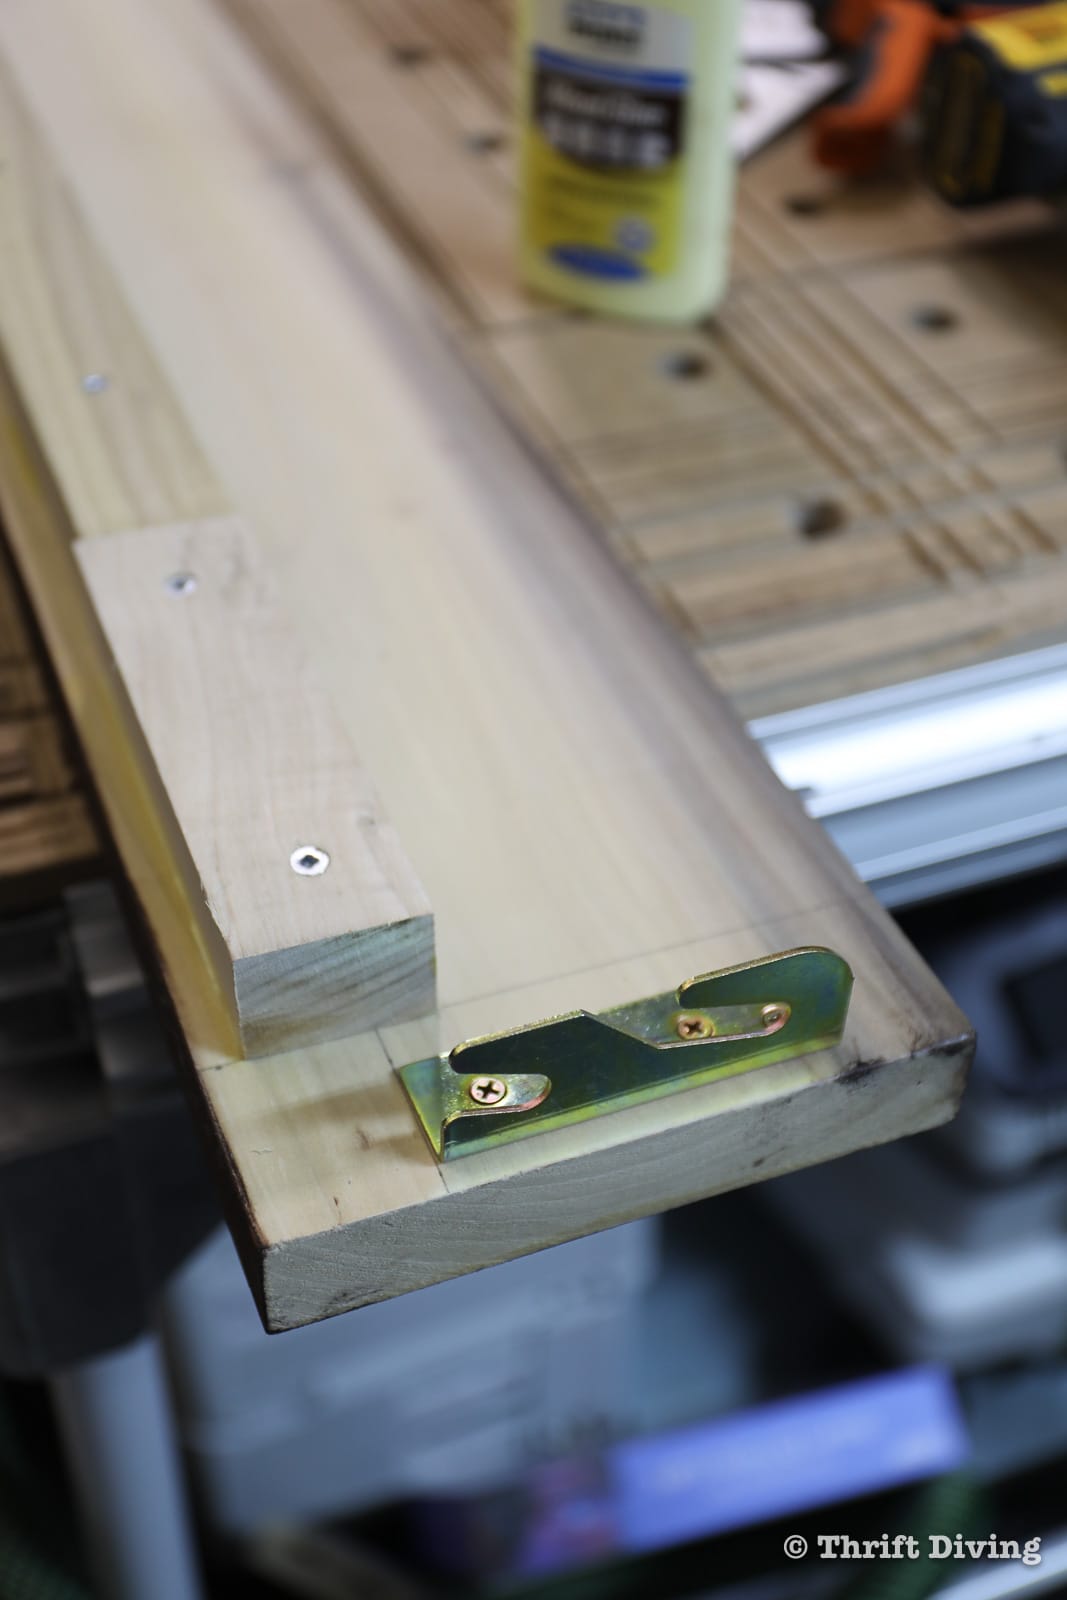
The important thing is to make sure that the brackets are placed consistently. I measured up 9.5″ from the bottom on all legs and placed the screwed bracket.
STEP 8: Building the Bed Frame
Once all the hardware is in place, it’s time to build the bed frame. First, attach the side rails to the headboard and footboard, creating a rectangle. Use a screwdriver or power drill to tighten the screws to secure the bed rail bracket to the headboard and footboard bracket.
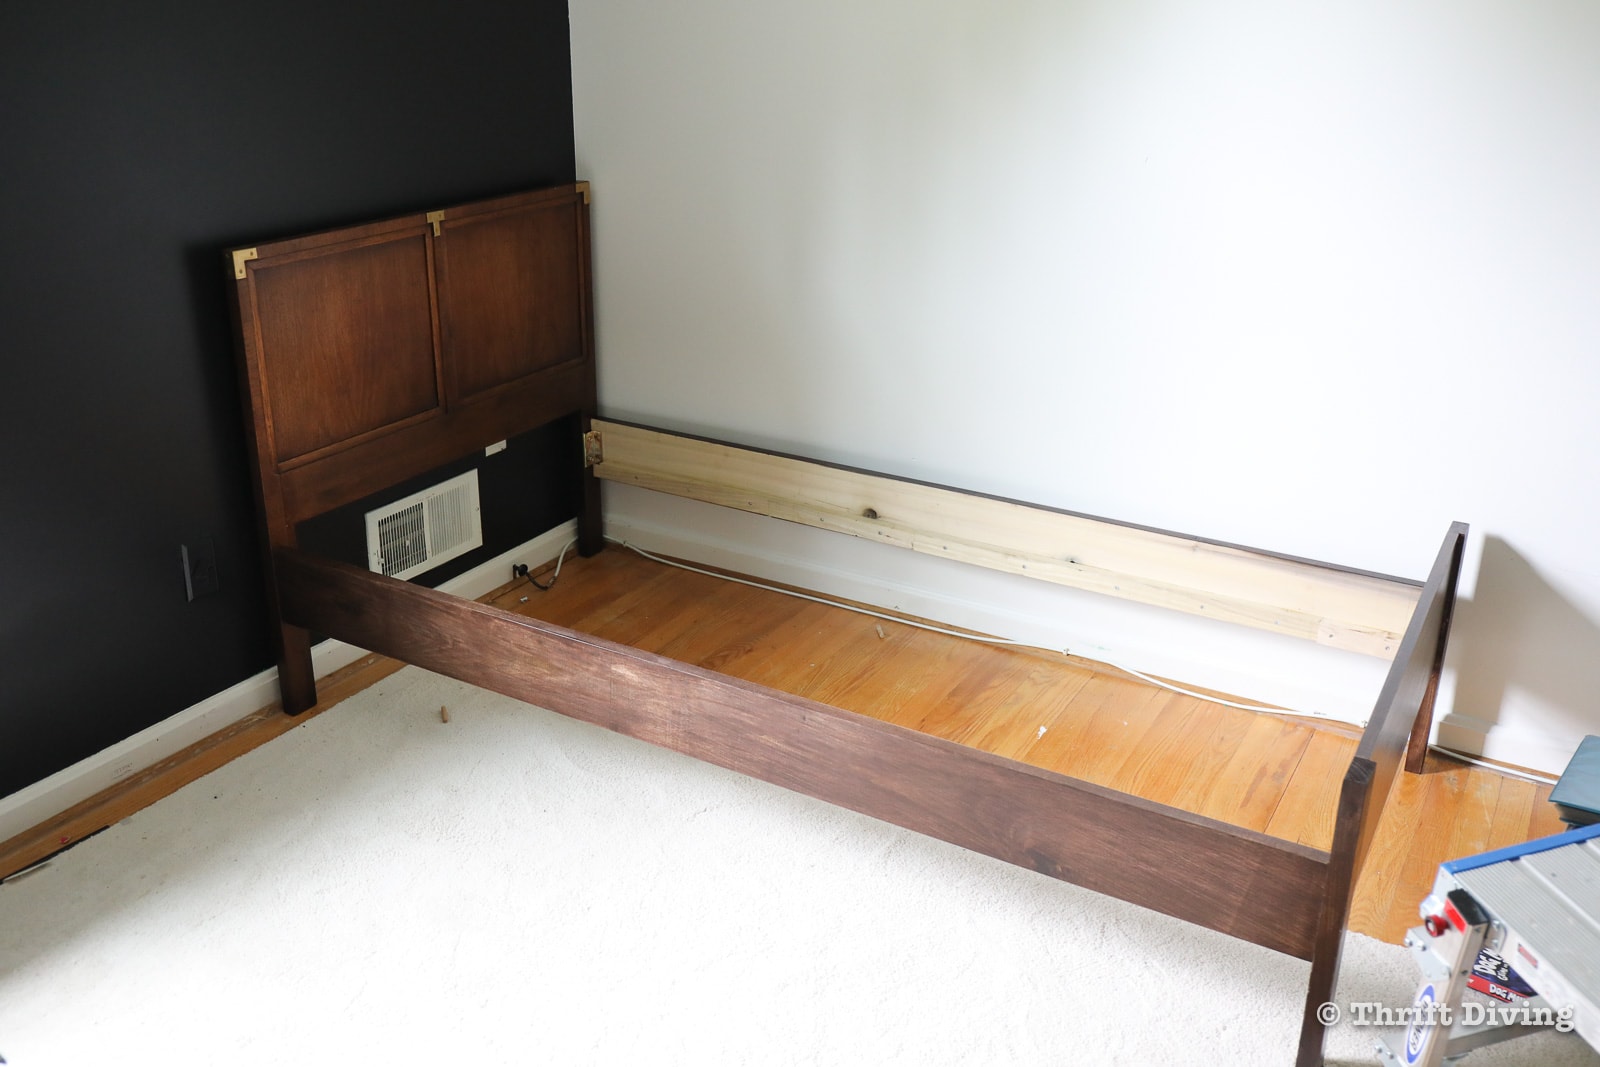
Next, add the slats to the bed frame. Be careful not to cut them too short. They should be snug, but not tight. My slats were actually left over slats from our old King-sized bed that was replaced. I had kept them and reused them for the kids’ beds, which worked perfectly!
You’ll want to use solid pine boards for the slats (I noticed that plywood slats were more bendable).
Use screws to secure the first slats in place for stability.
Next, use scrap wood evenly cut to create spacers in between the slats. Glue the spacers in place as you go so that after the glue dries, the slats won’t slip underneath the mattress.
Use screws to secure the last slat in place, too.
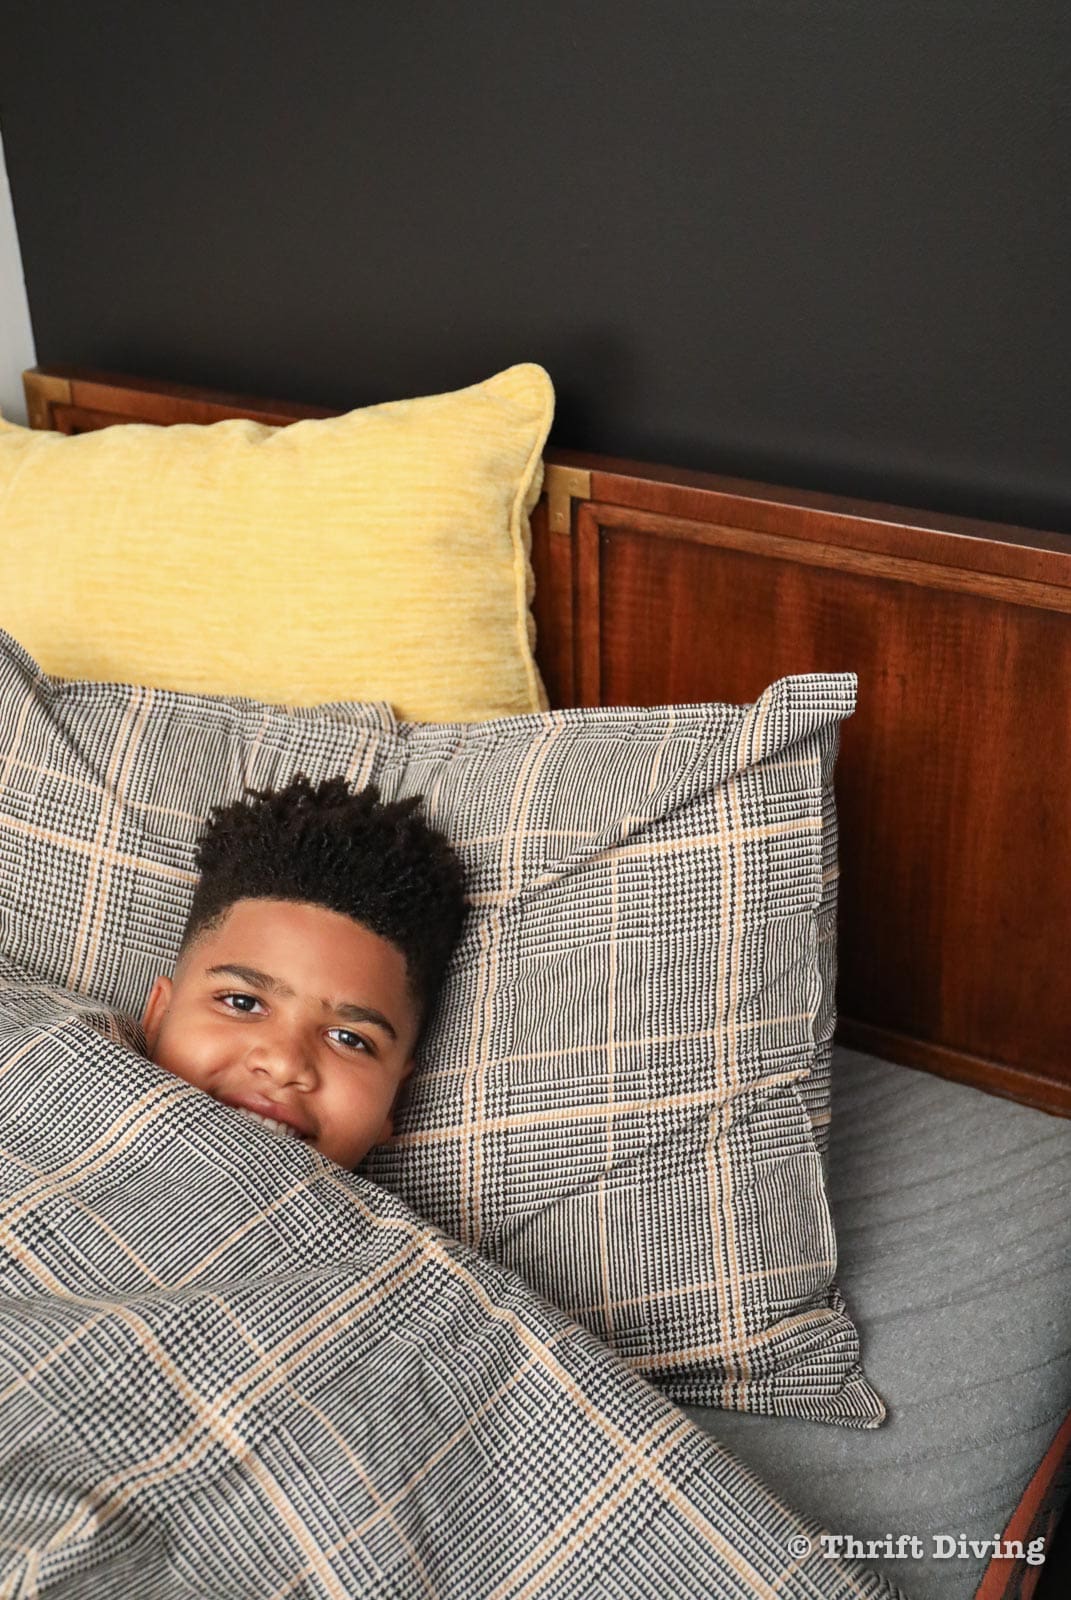
STEP 10: Add a Cozy Mattress and Bedding
Finally, the bed frames are done! I’ll admit that since this is my first time building bed frames, I practically tip toe to each bed and gingerly sit down, as if the bed is going to crash under my weight. 🙂 But with the security of the Tekbond wood glue (made for max strength) and all the screws I used, the bed frames feel very secure.
I do plan to go back and secure the bed rails with some additional screws where there are wood joints, too.
But I have to be honest: I absolutely adore these vintage Henredon headboards! What a perfect score from the thrift store!
I’m not completely done with the kids’ room makeover yet. I’ve got:
- Bedside tables to paint.
- Shelves to hang.
- A desk to….build?? Buy at the thrift store…?
- Pictures to hang.
- (Isn’t there always more?) 🙂
My youngest son was so excited to finally get to sleep in the new bed that I’ve been promising him! It’s the start of a new school year and I wanted to give them new beds and a new room for a new beginning. So definitely stay tuned to see the full room makeover!
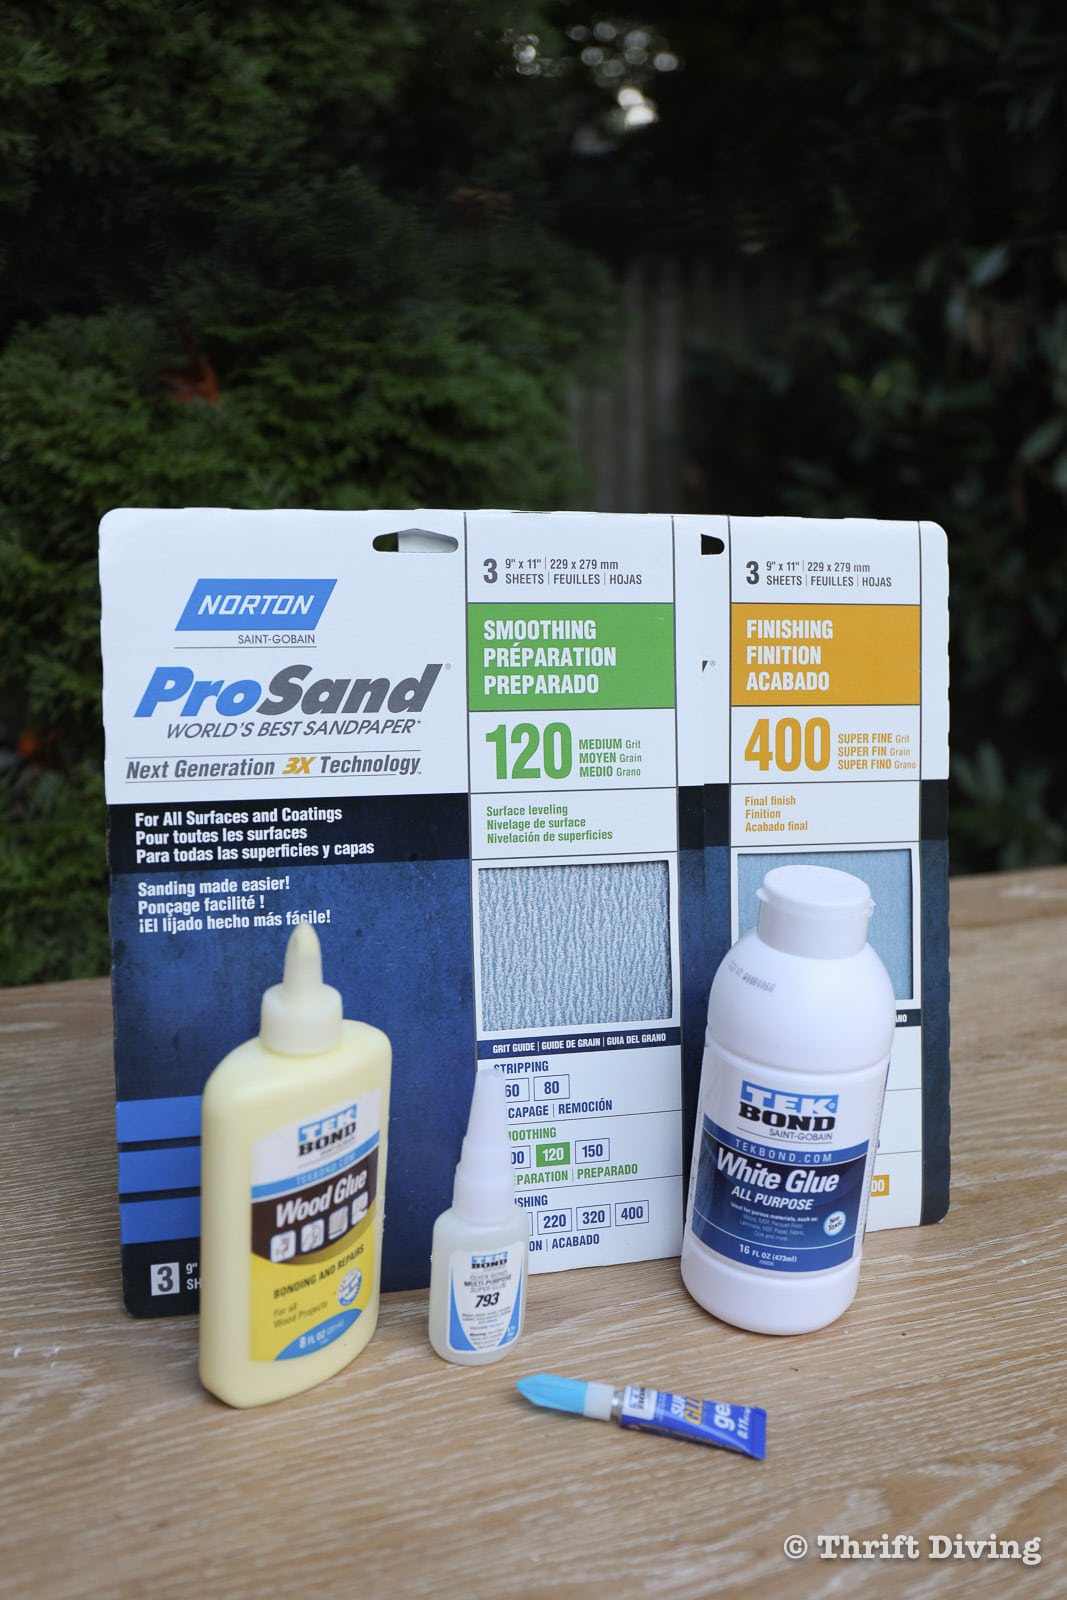
If you’re building a bed frame, too, grab some of these Tekbond products to get the job done. And a special thanks to them for providing products to help finish these bed frames for my boys. For your next woodworking or craft project, visit TekbondUSA.com and “Keep It Together with Tekbond.”
This post was sponsored by Tekbond.
Want to save this post? Click here to save it on Pinterest!
![]()

Download the 5 freebies!

Thrift Diving inspires women to decorate, improve, and maintain their home themselves...using paint, power tools, and thrift stores! Use these 5 printables, checklists, and ebooks to get started!


Really an amazing project. I was stunned at the ‘after’ picture. Your skills are legendary, I’ve learned so much from you; you make learning fun. All those little ‘gotchas’ like the wood pre-conditioner, you always inform us. How much frustration you’ve just saved me from?!! Thanks
Awww, thank you, Connie!! I do like to include as much info as possible so you can learn! 🙂 I always assume that people are beginners and may not know certain tips! 🙂
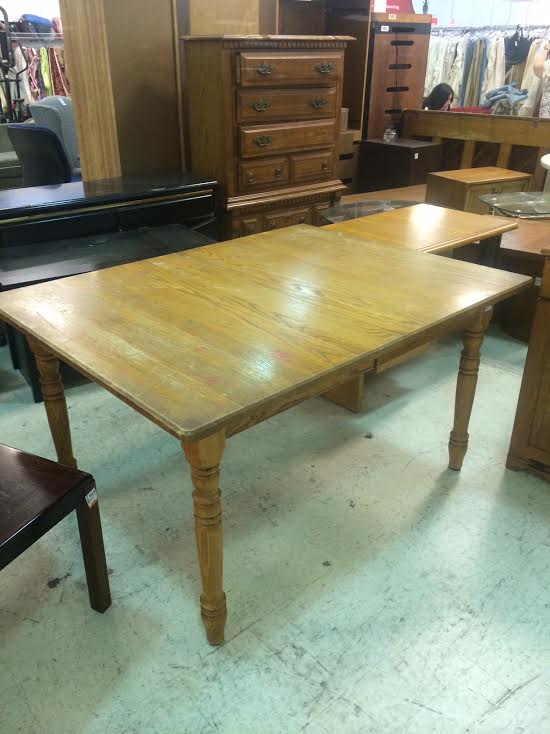
These are very handsome beds. You did a wonderful job preserving them. I myself just obtained a Henredon Dining table that extends 10ft and was at a lost at how to being to restore it. Your articles always seem to come just at the right time! Thanks again for all you do!
YAY! That’s awesome to hear, Kelly! Please let me know how it turns out! What a great find on such a big table. Thanksgiving dinner at Kelly’s! LOL 🙂
Thank you, Thank you, Thank you! Just like Val, I was about to have a cow thinking about you painting the beautiful wood….
Phew! And your project turned out wonderful! And that cute little face is a happy one too! Great job!
I have to admit, you had me going with the thought of painting those lovely headboards! Your project turned out so well!! I love the look of matching twin beds in a room. The charcoal and yellow color scheme with the plaid and the patterned drapes is so sophisticated and grown up, perfect for your sons! Glad l took the time to read this morning, l have so much catching up to do! Thank you for the inspiration! 💕
Thank you so much, Val! I appreciate you taking time to read about my project! I was worried it wasn’t going to turn out or that the beds would crack, but so far, they’ve been holding up nicely! 🙂 It came together much nicer than I expected!!
Great job Serena. I really love the way the beds turned out.
Happy Boys 🙂 Happy Mom 🙂
I’m so glad you like them, Zaeemah!! The best part is that they really like their room now. 🙂 Clean and fresh!
Serena, I can always count on you for inspiration. You did an excellent job and your DIY skills have gone pro DIY over the years. Thank you for being a woman who cares about everyone having a better quality of life. I appreciate you sincerely from my heart, because you are real and authentic.
Awwww, Audrey, you are so sweet! I appreciate YOU for taking the time to read through my post and to comment! That’s time invested that is invaluable to me. 🙂 As for the skills improving, I am amazed when I think about that scared little Serena who moved into a “big house” and was so unsure if I had what it took to manage a REAL HOUSE! lol. But time and practicing my DIY skills only proved that if you want to improve, you can! Mistakes and all. 🙂 Thank you!!
You go girl! My daughter loves what you do also! I’m so proud of you. 🥰🥰🥰👍👍👍