BEFORE & AFTER: Paint Bathroom Tile Instead of Replacing!
This post on how to paint bathroom tile is sponsored by Bathworks.
I’ve been friends with one of my besties, Hakimah, for nearly 15 years. And since I have known her, 3 things are true:
1) She’s never done a DIY project (and probably never would have, if I hadn’t sparked her to start this small bathroom makeover!).
2) She has always wanted to upgrade her home (like replacing her bathtub and ripping out her old bathroom tile floor), but didn’t know where to start or even have the budget for it.
3) She is the person that I have the most fun with because you never know what kind of crazy stuff is going to come out of her mouth!
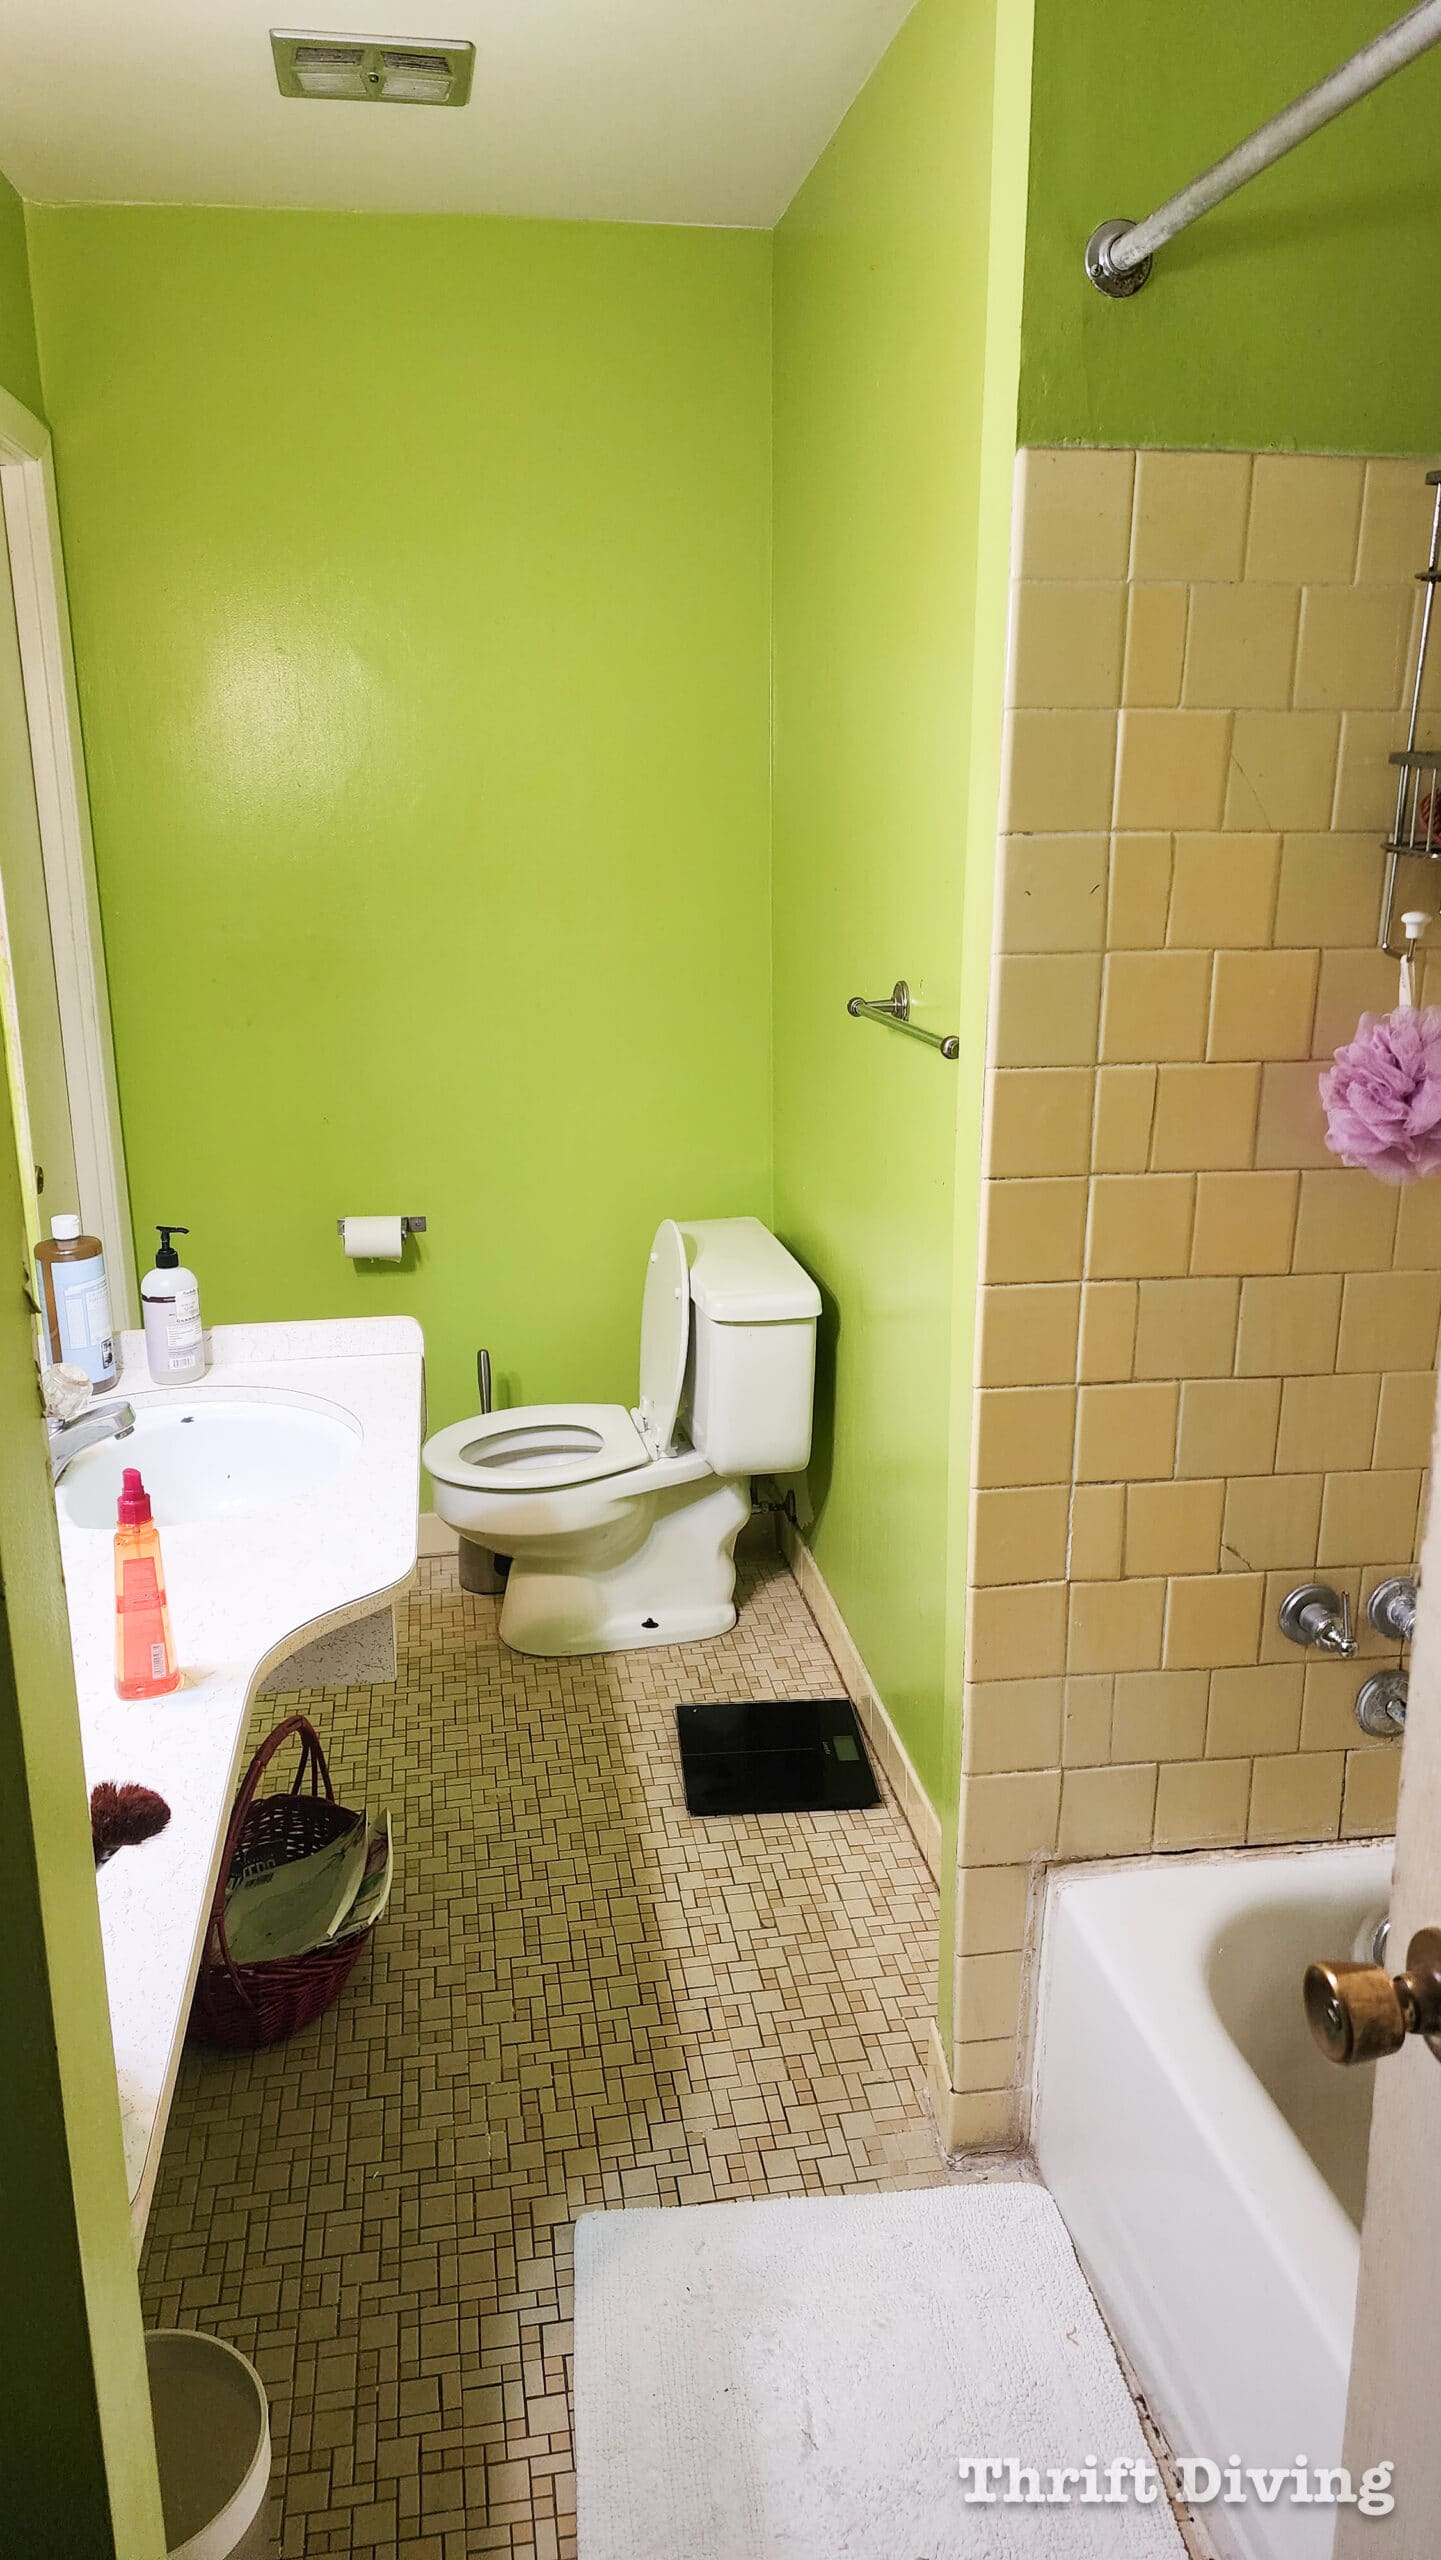
This is what her bathroom has looked like for years, with outdated old yellow bathroom tile on the shower surround walls, and a bathroom tile floor that was in good condition but just….well….dare I say ugly?
But I knew this small bathroom makeover would be amazing.
What I didn’t know (that I should have known….) is that it would 3X as much time as I had anticipated. Because DIY projects and room makeovers are just like that–however much time you think it will take, multiple by 3 for the real amount of time you think it will take. HA! (Truth!)
For this project, I was teaming up with Bathworks Tub and Tile Refinishing. We were going to paint the tile around her shower, refinish her stained bathtub, and paint the bathroom tile floor. And we were going to use all Bathworks products for this transformation.
She didn’t think this makeover was going to turn out, but boy……was she wrong! Look how fresh and modern her bathroom looks now!
BEFORE
AFTER!


BEFORE

AFTER!
A few of these pictures are just “in progress” pictures to show you how great the project was moving along! What could have been a very expensive project to hire a company to come in and rip out and replace her tile and bathtub, turned into the most affordable option for her small bathroom makeover!
Without even having painted the walls or bathroom tile yet, you can see how dramatic the outcome was for the shower tiles and tub, while the paint was still drying!!!

As we pulled the rest of the bathroom together, doing the final touches, the painted tile floor, which was coated with a layer of Bathworks original refinishing kit product, the bathroom was being transformed right in front of our eyes! As you can see, we were still installing new baseboards, to help pull the look together.

BEFORE

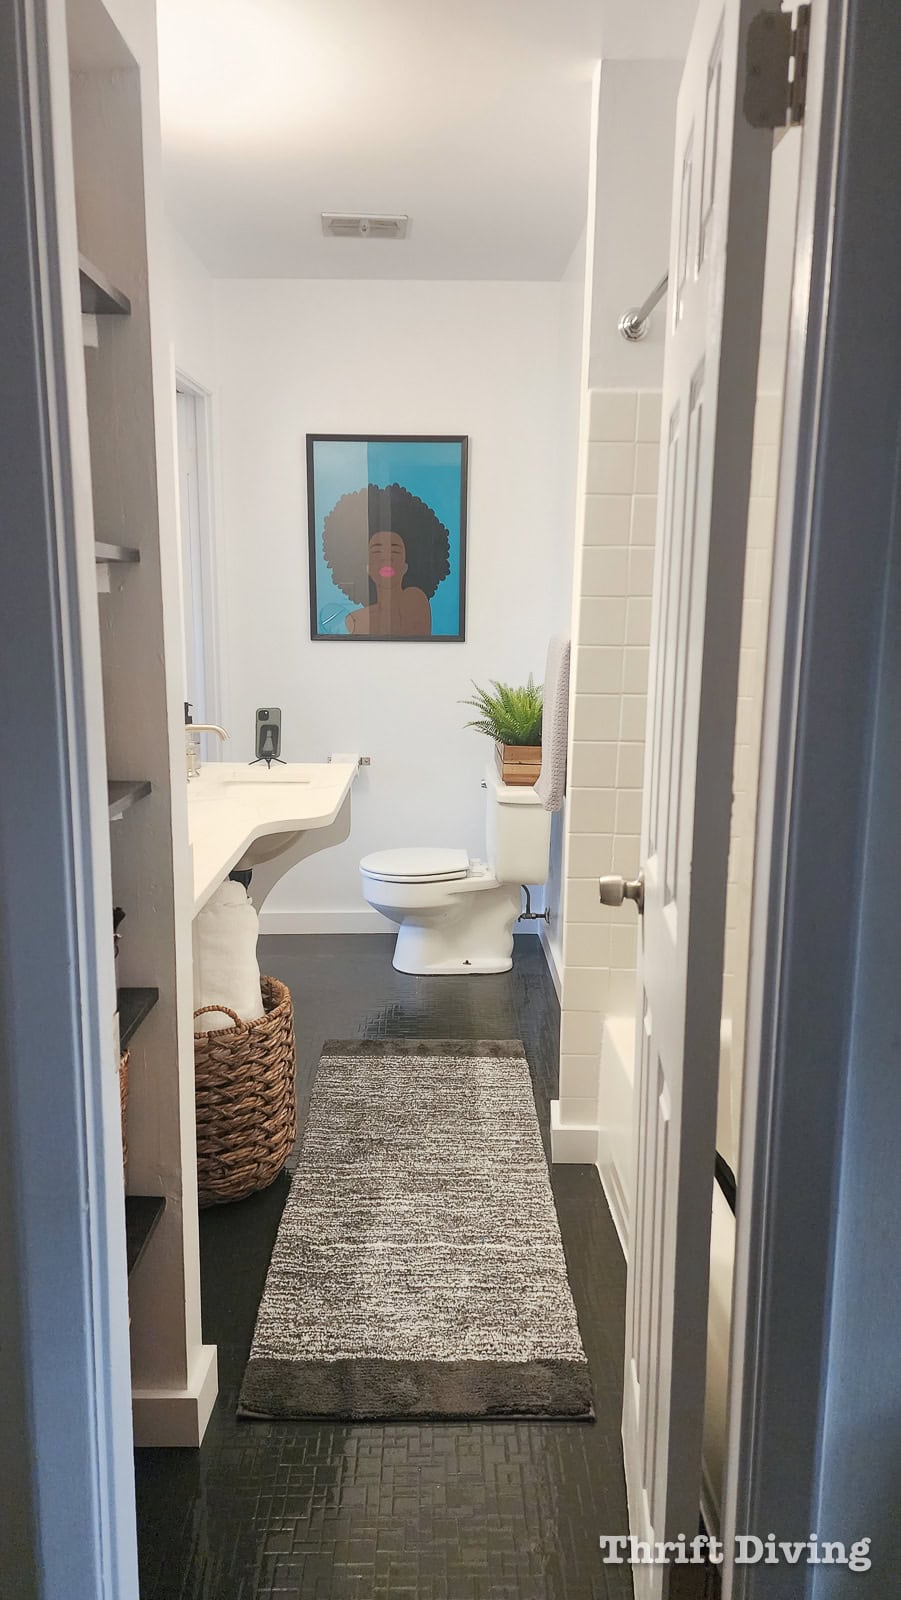
AFTER!
If Hakimah’s vanity countertop had been in good condition, we could have refinished that with Bathworks, as well. But it was in such poor condition that we really just needed to replace it. Thankfully, my friend Edmundo from E&C Granite DMV helped us out by replacing the original countertop with this beautiful remnant that he had on hand. (Give Edmundo a call if you need granite countertops in your kitchen or bathroom!! – 301-968-5738).

Yes, You Can Paint Bathroom Tile!
Hakimah was skeptical about being able to turn her bathroom around. As I mentioned before, she had never done any DIY, and felt so discouraged that we could make her bathroom look amazing. She thought everything would have to be gutted, including her old tile. But I reassured her that, yes, you can paint bathroom tile, Hakimah!
I knew that we wanted to start with the bathroom tile refinishing first, specifically the tile walls around the tub, and then the bathtub. This was going to be a huge bulk of the results we would get for the makeover.
We used the new Bathworks Tub and Tile Refinishing Kit, which is the exact same formula as the original Bathworks Roll-on Refinishing kit that you saw me use in my own bathroom to paint my 1970’s turquoise fiberglass shower.
(Pssst! This is what my 1970’s turquoise fiberglass shower looked like before I painted it (see the tutorial here). And the “AFTER” is what it looked like 7 years later! It hasn’t peeled or chipped! You can see the video showing you what it looks like).
BEFORE
Someone joked that my turquoise shower stall looked like a “porta potty.” And now I can’t unsee it! LOL

AFTER – 7 Years Later!
This is what my shower still looks like, 7 years after I refinished it. You can see it over on my YouTube channel.

However, this new spray kit that we were using to paint her bathroom tiles around her shower, including the tub, features a spray nozzle for a smooth brushless finish. So if you’re a “spray paint” kind of gal or guy, you might like the idea of spraying on the refinishing spray.
But don’t get confused, this is not spray paint. Bathworks is a two-part resin paint that, once dries, is highly resistant to chipping or peeling. This is the only product I stand behind for refinishing your bathroom tile or tub (and yes, you can refinish your sink and countertops with it, too!).
And because you now have the option to choose between the Original Bathworks Roll-on or the new Bathworks spray finishing kit, however you feel more comfortable applying it, it’s up to you.

Hakimah’s bathroom tile floor was in good condition, but just very outdated. We used the original Bathworks Tub and Tile Roll-on refinishing kit to paint it. But what’s really cool (and most people don’t know this), is that it can be color-matched to many Sherwin Williams colors! So we picked out SW Iron Ore!
If you want to customize your Bathworks refinishing kit, just contact them at Bath-Works.net and order directly from them.
BEFORE


Painting the tile floor was stressful only because I hadn’t done it before and was worried it wouldn’t turn out! I wanted Hakimah’s bathroom to be impeccable, and I was worried I wouldn’t know what I was doing.
But the process was so easy! (You can watch the bathroom makeover video on my YouTube channel to see how I refinished her bathroom tile floor).
Hakimah and I cleaned the floor, just as we had cleaned the wall tile before painting it, making sure we dried it thoroughly. Godwin, the videographer, pitched in and helped us use a heat gun to thoroughly dry the tile floor before painting it!

AFTER!
You’ll noticed that I ripped out the old tiles that served as a baseboard, and installed some PVC baseboards. (Learn everything there is to learn about how to install baseboards here).
If you love the artwork, watch my tutorial on how we created the DIY wall art with a Cricut vinyl cutting machine, craft paint, and a thrifted frame.

Ripping out and replacing a tile floor in a small 40 square foot bathroom may not seem like it would have been a big deal, but honestly, hiring someone to do a job that size would still probably have cost at least $3,000, if not more. I don’t know about you, but I don’t have money like that just lying around. And neither does Hakimah.
So, refinishing the floor was the most affordable option. And OMG, it turned out soooo nice! What was most exciting was seeing the look of surprise on Hakimah’s face at how we were able to transform it with just paint! All this time she thought she’s had to rip out everything, but that wasn’t the case. I love proving to a non-DIYer just how magical DIY really is. 🙂
Watch this video below on how to properly clean and prepare tile before painting. You will follow these instructions for both wall tile and floor tile before painting it. Don’t skimp on the prep work! The results you get will depend on how well you prep.
What You Didn’t See Behind the Scenes!
Hakimah and I had a great time doing this project! What was amazing is how much closer we had become during the project. She and I have been friends for years, but you know how time can fray the edges of friendship a bit. And when you look up, you realize it’s been weeks since you’ve spoken? It may have been months since you’ve hung out.
But doing this project, Hakimah and I were closer than we ever had been, with multiple trips to and from her house, to the store, discussing project details, listening to music while we painted, and just enjoyed getting in touch again, on a routine basis.
She’s the person who makes me laugh the most, and there was never a dull moment during this entire project! See the behind-the-scenes outtakes during the bathroom makeover!

Projects like this make you feel great, knowing that you helped a friend transform her bathroom with paint, power tools and a few thrifted items.
Can’t wait until we finish her bedroom makeover. Coming soon! 😉

Download the 5 freebies!

Thrift Diving inspires women to decorate, improve, and maintain their home themselves...using paint, power tools, and thrift stores! Use these 5 printables, checklists, and ebooks to get started!