BEFORE & AFTER: Replacing My Fiberglass Bathtub
My fiberglass bathtub replacement and new bathtub installation were sponsored by American Standard. All opinions belong to Thrift Diving.
Ripping out and replacing the old bathtubs and showers in my house has always been on my “MUST DO” list. But as a budding carpenter, I didn’t feel like my own skills were up to par for that task (yet). The alternative option, until I improved my skills, was to paint my old shower, which held up quite nicely!
But sometimes, you don’t just want to cover up the “old,” but rather, you want to replace it with something new and modern.
American Standard reached out to me months ago to see if I wanted to participate in their campaign to promote their upscale but affordable Passage Alcove shower collection. They were even offering to send their installers! Gasp!
That opportunity couldn’t have come at a better time! Not only would I be able to stand over their shoulders and stalk their every move (and film it, of course, to show you), but I would be able to “up” my own carpentry skills by watching how the pros remove an old fiberglass tub and install this new collection!
I eagerly sat back, aimed my camera, and recorded the entire installation!
WATCH: Removing and Replacing My Fiberglass Bathtub
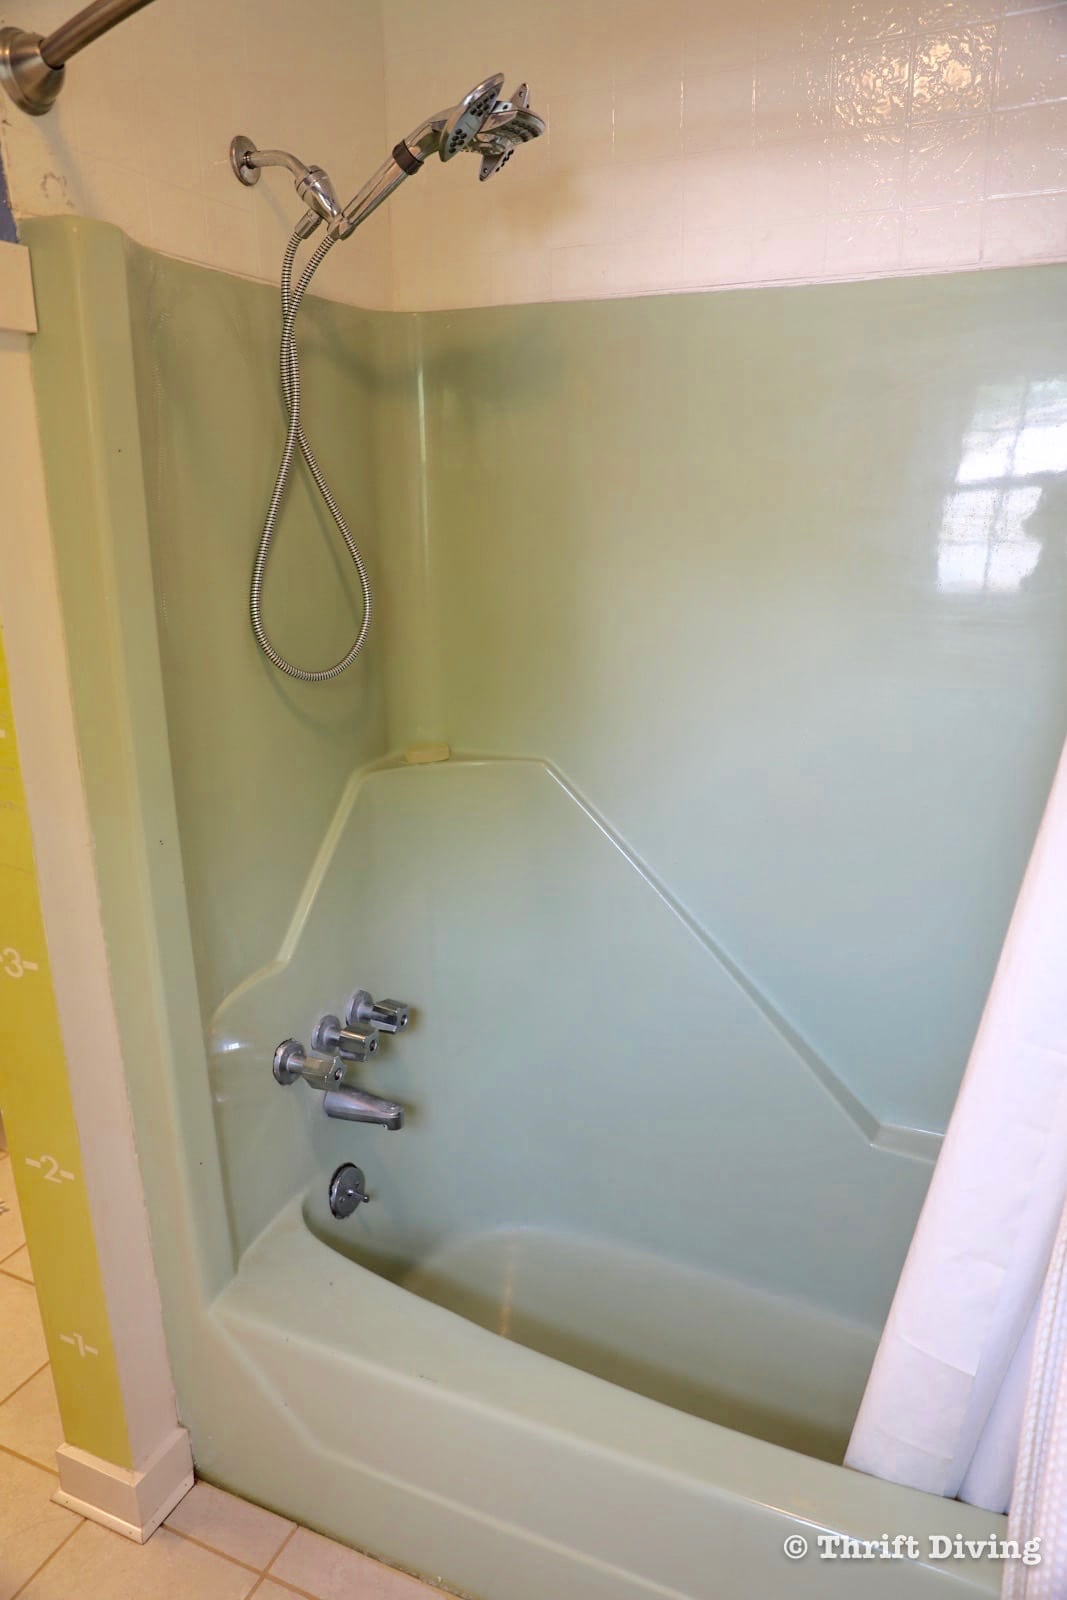
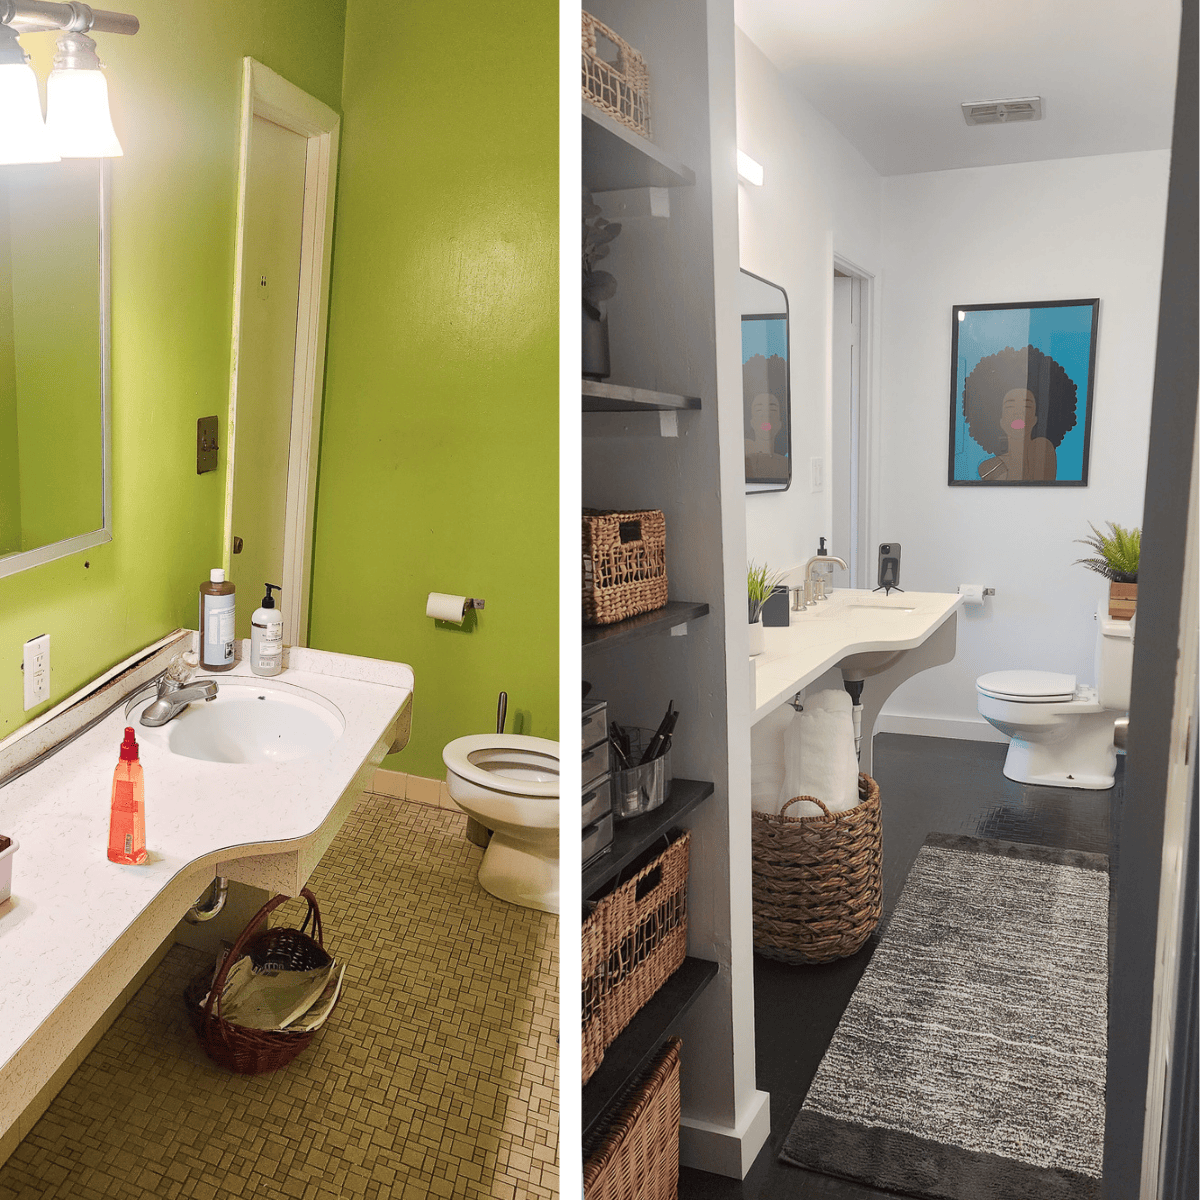
Years ago I tackled this bathroom makeover, removing and replacing the matching green toilet, painting the vanity, removing the wallpaper, adding new tile flooring over the vinyl, and even installing board and batten. It’s been quite a transformation! But one area I never touched was the kids’ avocado green fiberglass bathtub.
This is the bathtub that my kids have been bathing in since they were wee little babies. They’ve splashed here, pretended to snorkel, had “hold-your-breath” challenges, and had imaginative play time in a heap of bubbles. It served our needs for years.
Thankfully, though, it’s gone now, ready for years of updated bathtime!
BEFORE
Now, it looks fresh, modern, and still kid-friendly! It looks rather masculine, too, if I might add. 🙂 I have the kids to thank for that since they picked out the wall pattern from the various Passage collection options!
AFTER!

Why Painting My Bathtub Wasn’t an Option
Although I had painted my fiberglass shower (and it turned out fabulous and has lasted for the past 2.5 years since refinishing it), I wasn’t up for refinishing the kids’ bathtub. The reason why is because, with the amount of playing that goes on in this tub, I could only imagine how scratched up and damaged the paint would have become. Caring for a painted bathtub isn’t difficult, but running metal cars or heavy toys over refinished surfaces is a guaranteed “no-no.”
For me, it was easier to simply leave the green tub and decorate around it. And that’s what I did. I chose blues, greens, browns, whites–all colors that would compliment the outdated tub instead of drawing attention to it.
But now it was time for a change!
American Standard Passage Collection
For this kids’ bathroom, I wanted something that would be easy for the kids to clean (since they’re responsible for their own bathroom clean-up), yet something that would be more modern and decorative. After checking out The Home Depot for the color options (there are 5 natural finishes and tile options) and learning about its benefits (i.e. easy to install, inexpensive, high-quality, good ratings, etc.), I was confident it would work for our home.
American Standard sent their own installers to rip out the old fiberglass bathtub, which was a bit tedious! They wanted to minimize any damage to the surrounding walls, so they carefully cut out sections with a reciprocating saw, carrying the bathtub out in pieces.
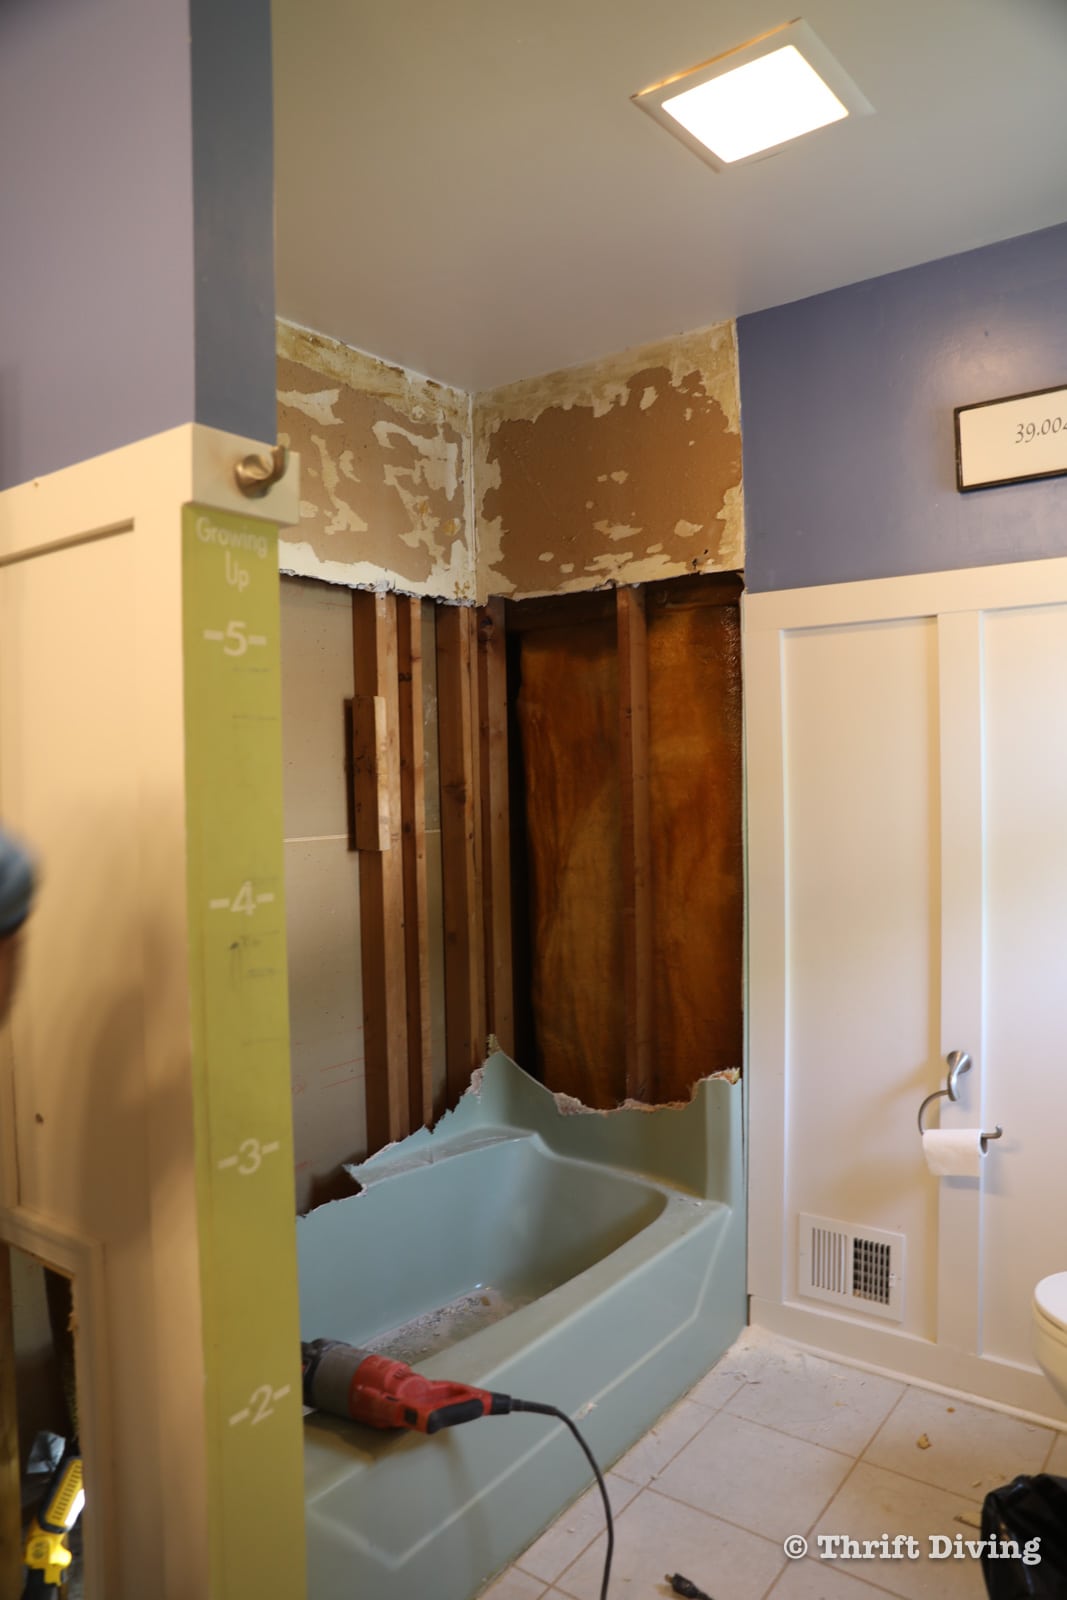
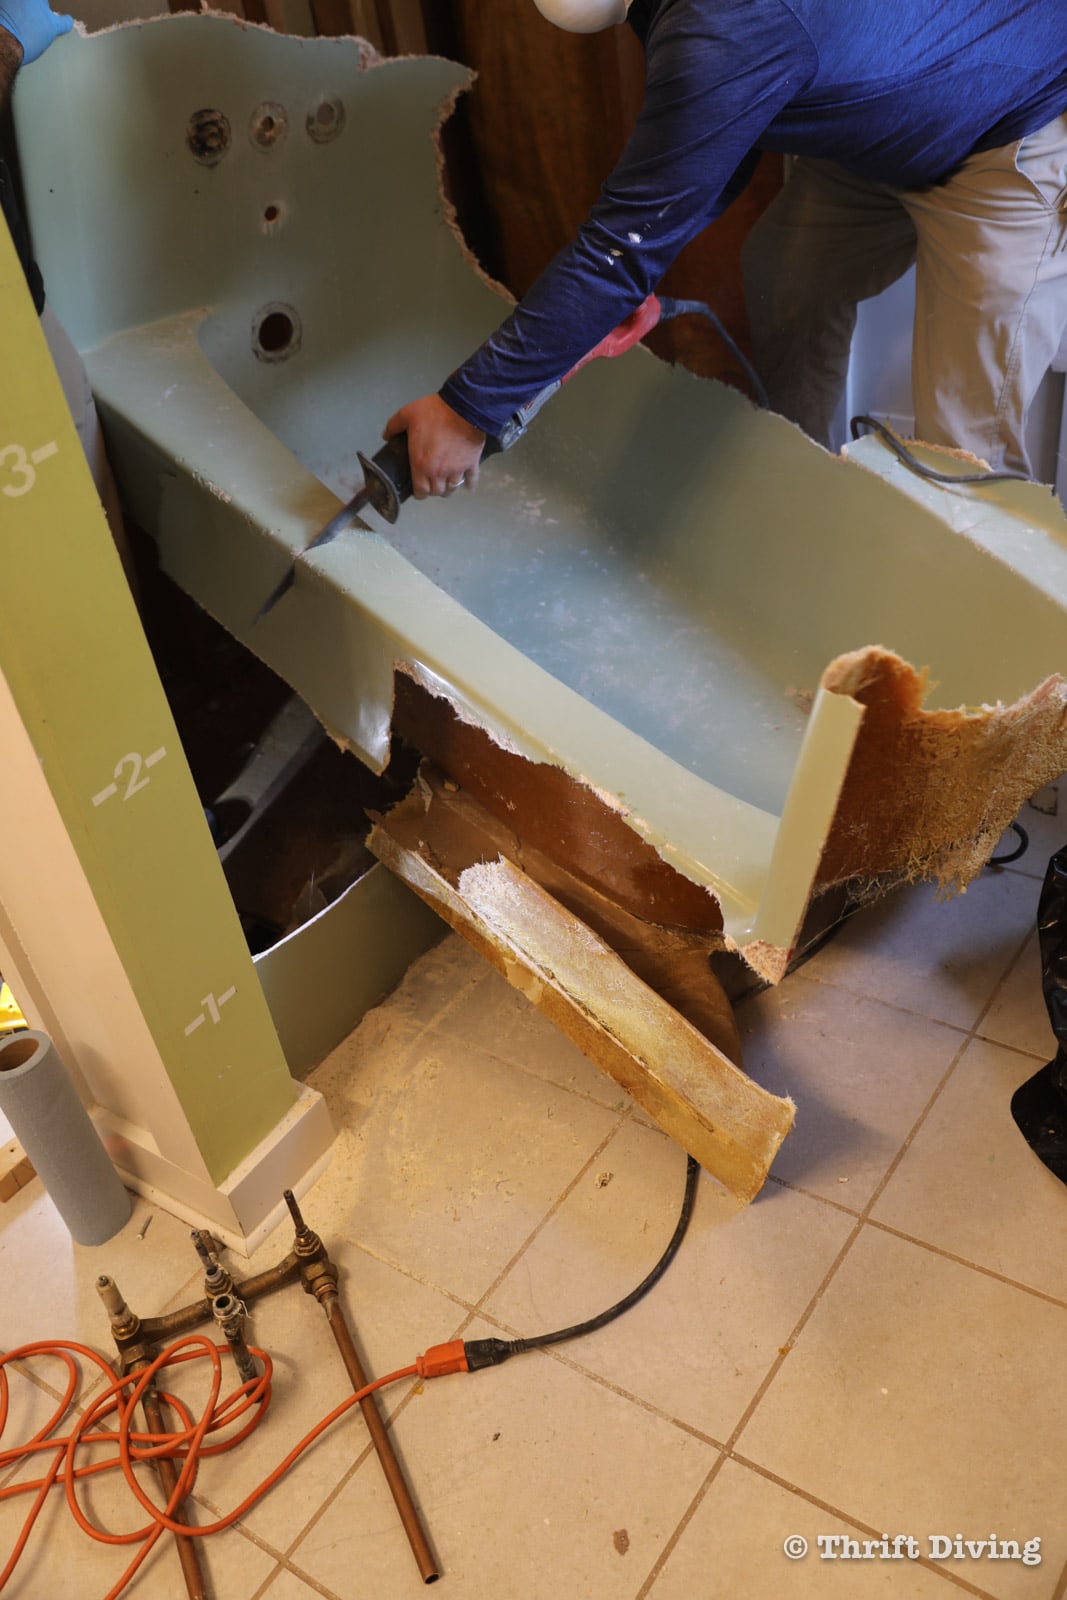
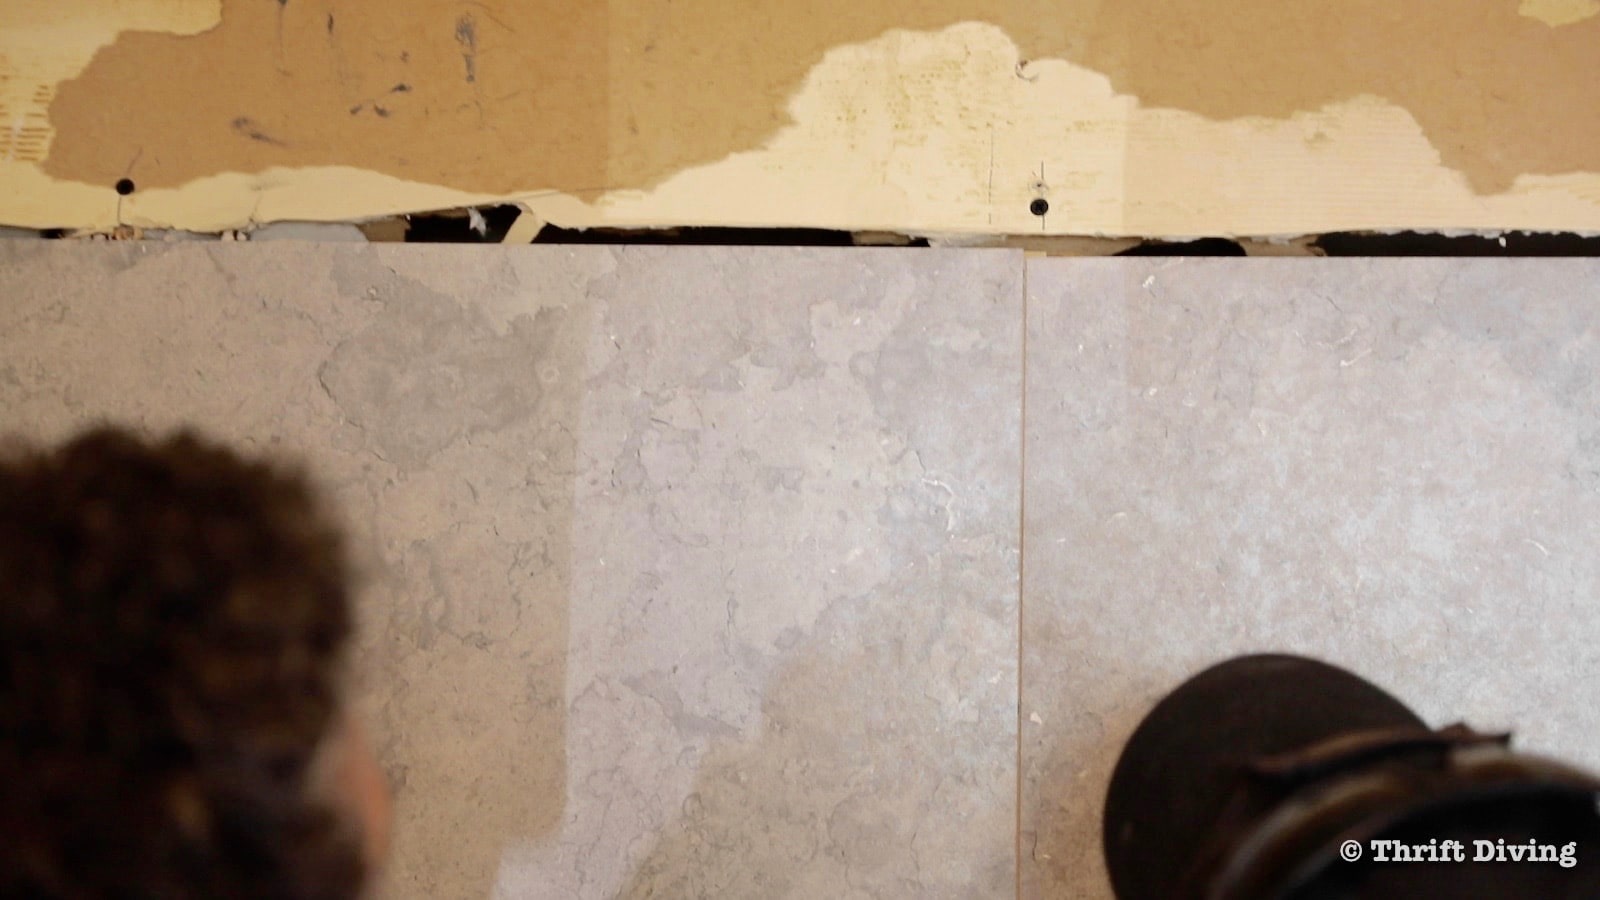
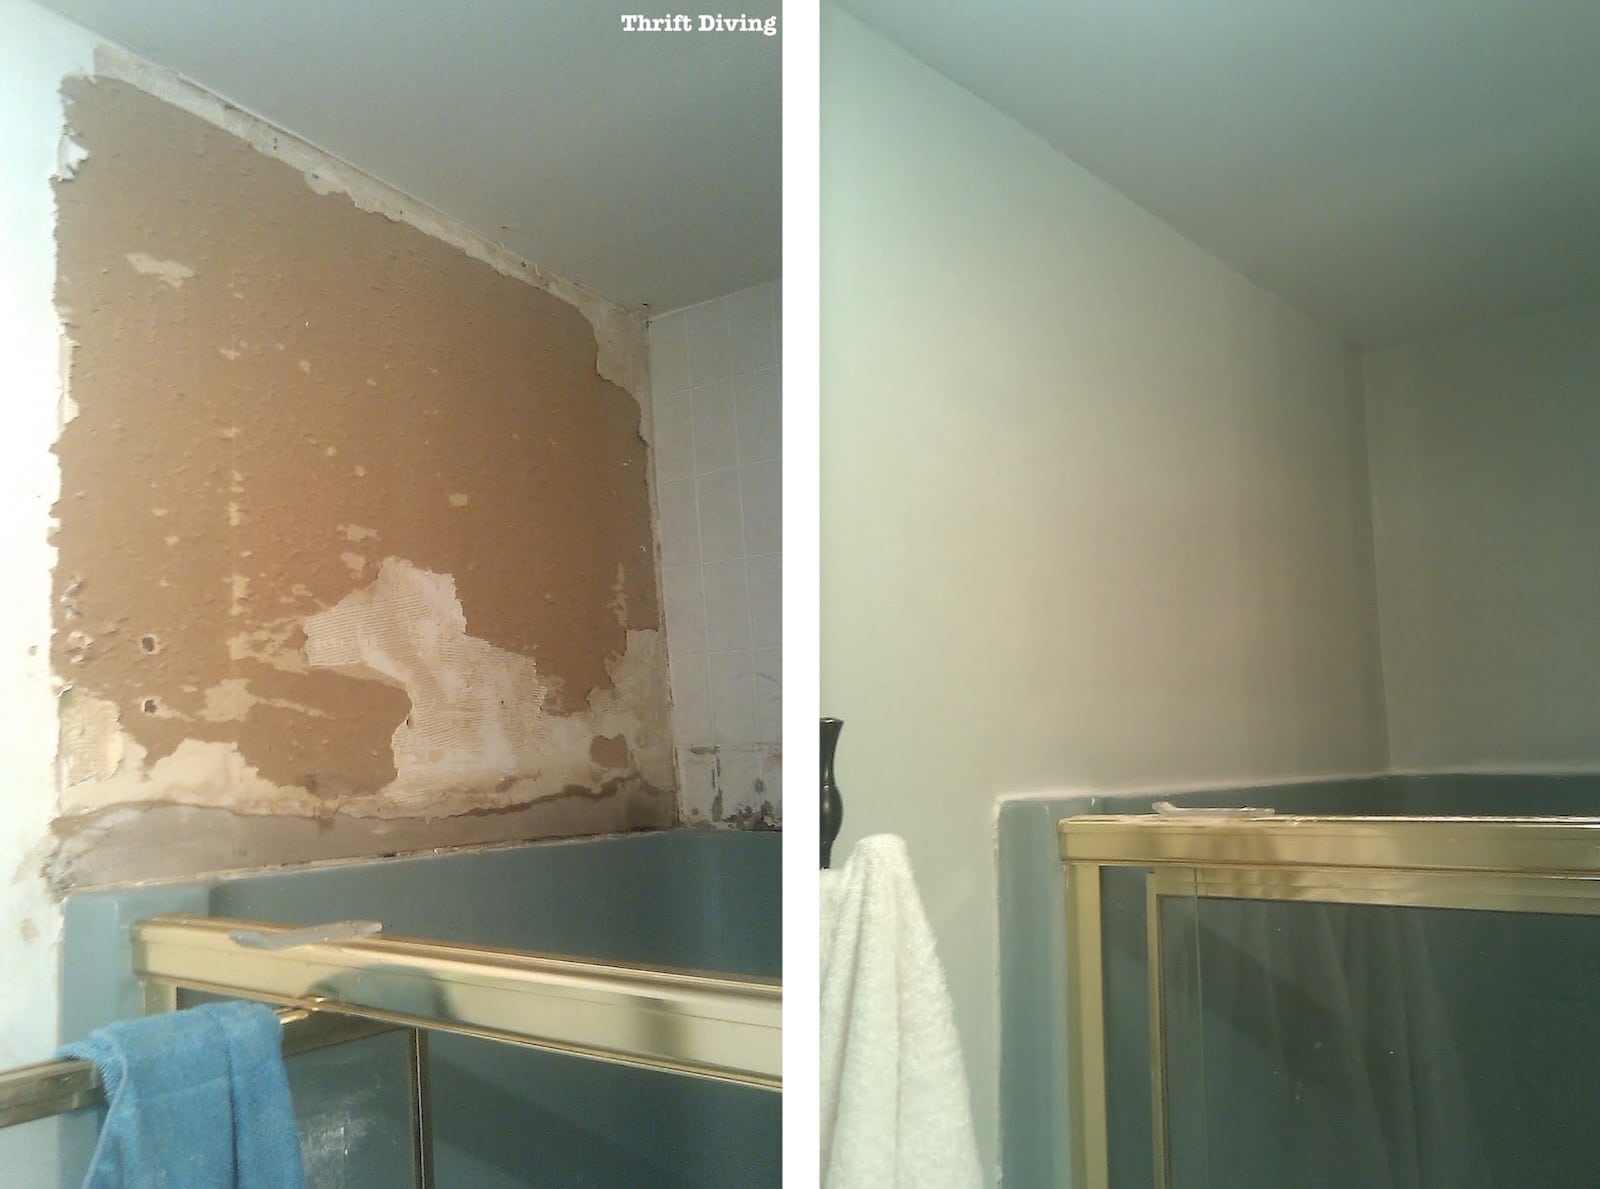
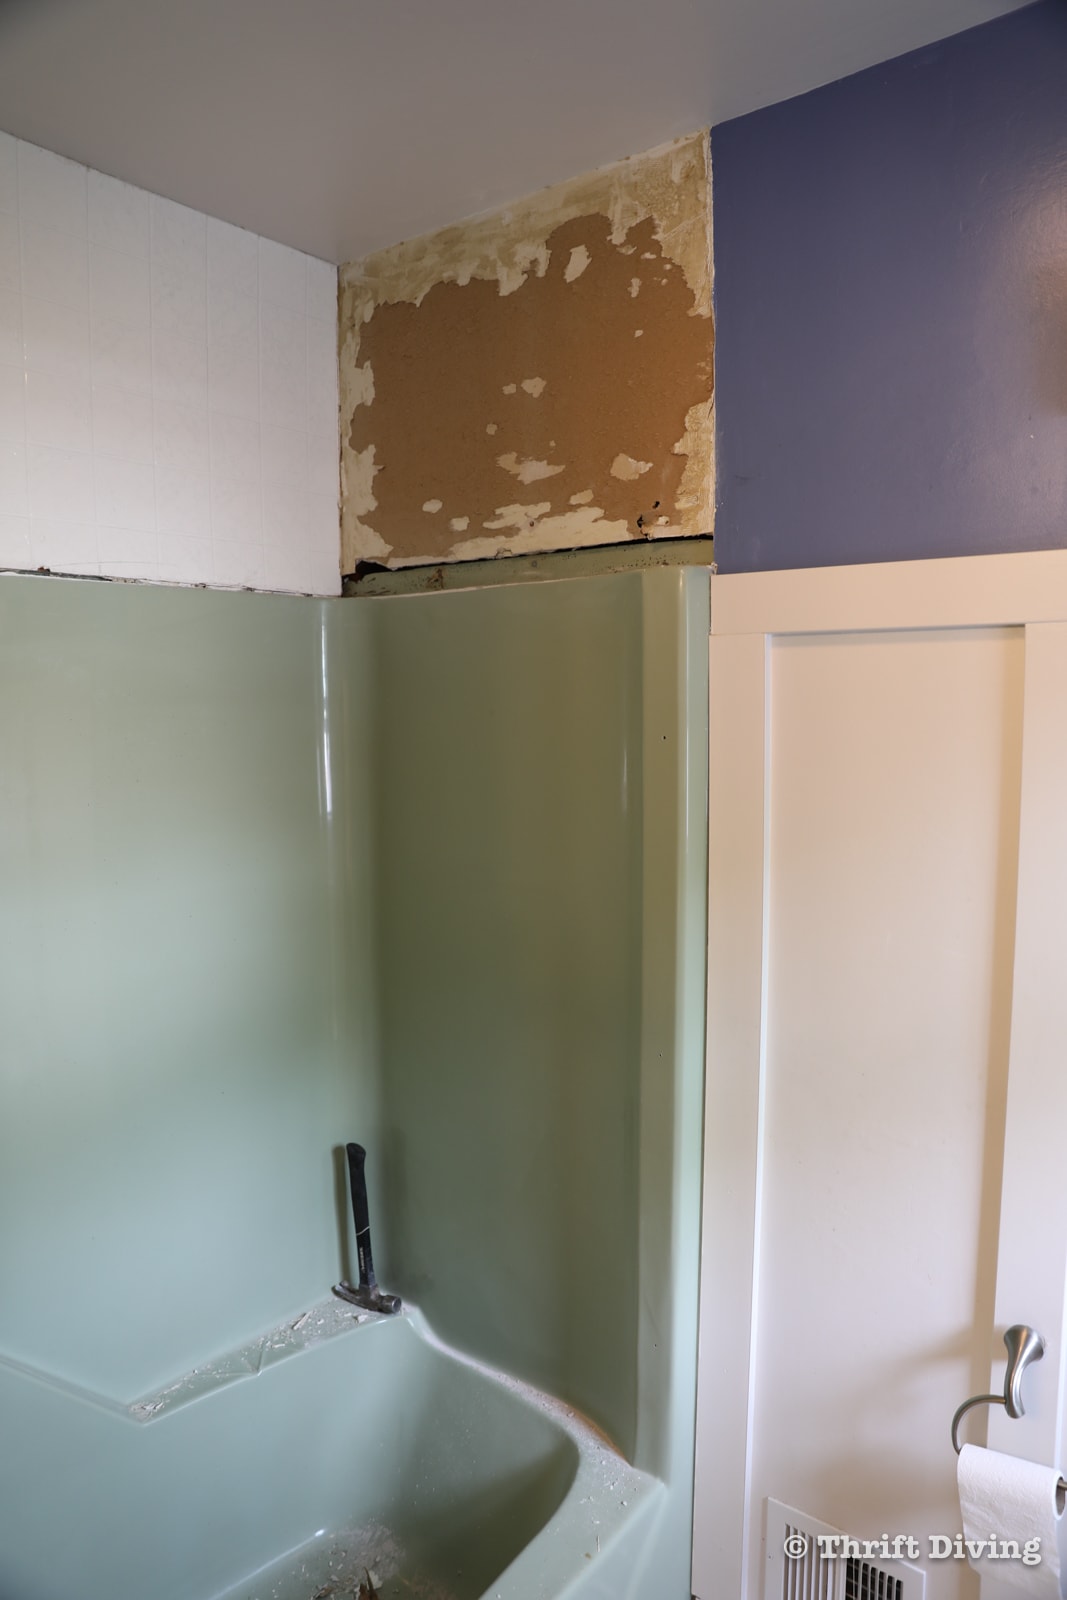
Because there were old panels of wallboard over the fiberglass tub, the walls above were damaged. Thankfully, the installers (shout-out to Rick!) were super nice and offered to cover up the damaged drywall with another waterproof material that wasn’t a part of the Passage collection but would still look attractive and minimize the drywall repair that would be needed.
And believe me–I have repaired drywall like this, so I know how much of a pain it is to skim coat and repair that drywall. I’m thankful to simply have it covered up once more!

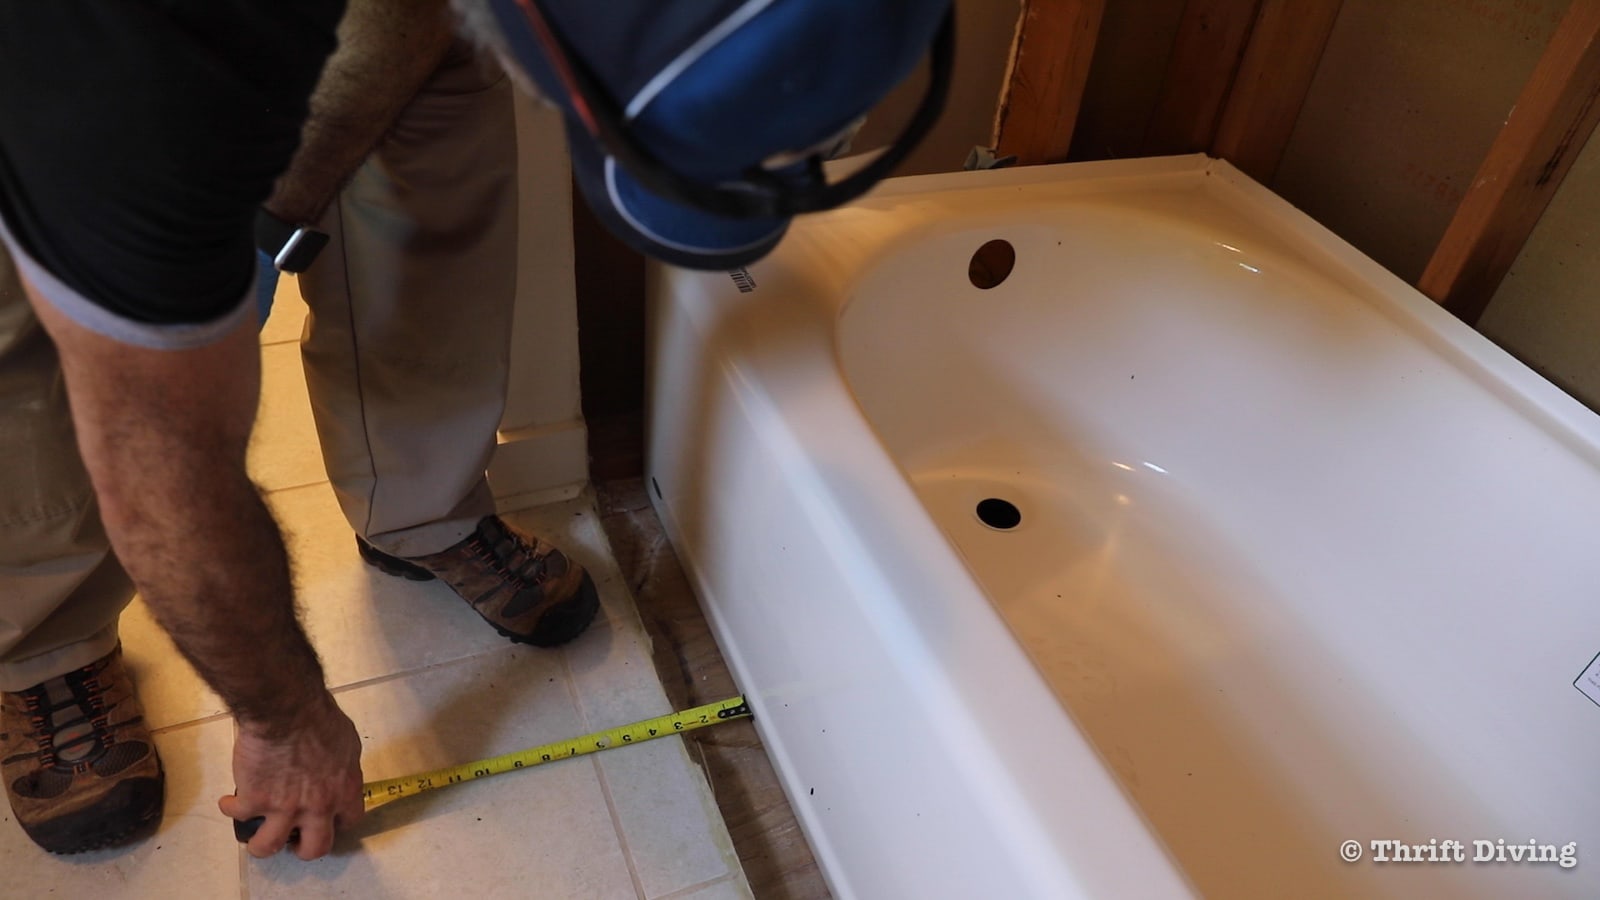
But first, the installers needed to set the tub into place (this is the Princeton tub). I was disappointed to see that it was a bit smaller in width than my 32″ tub. The new 30″ tub meant there would be some flooring repairs needed. But we would deal with that later.
For now, after leveling the tub and adding a few shims, it was time to get the drywall in place over the tub. Once the drywall was in place, they added some adhesive to the drywall. These wall panels in the Passage Alcove collection simply glue in place and have a groove along the edge to secure the panels together across the larger back wall area (it comes in 4 pieces total).
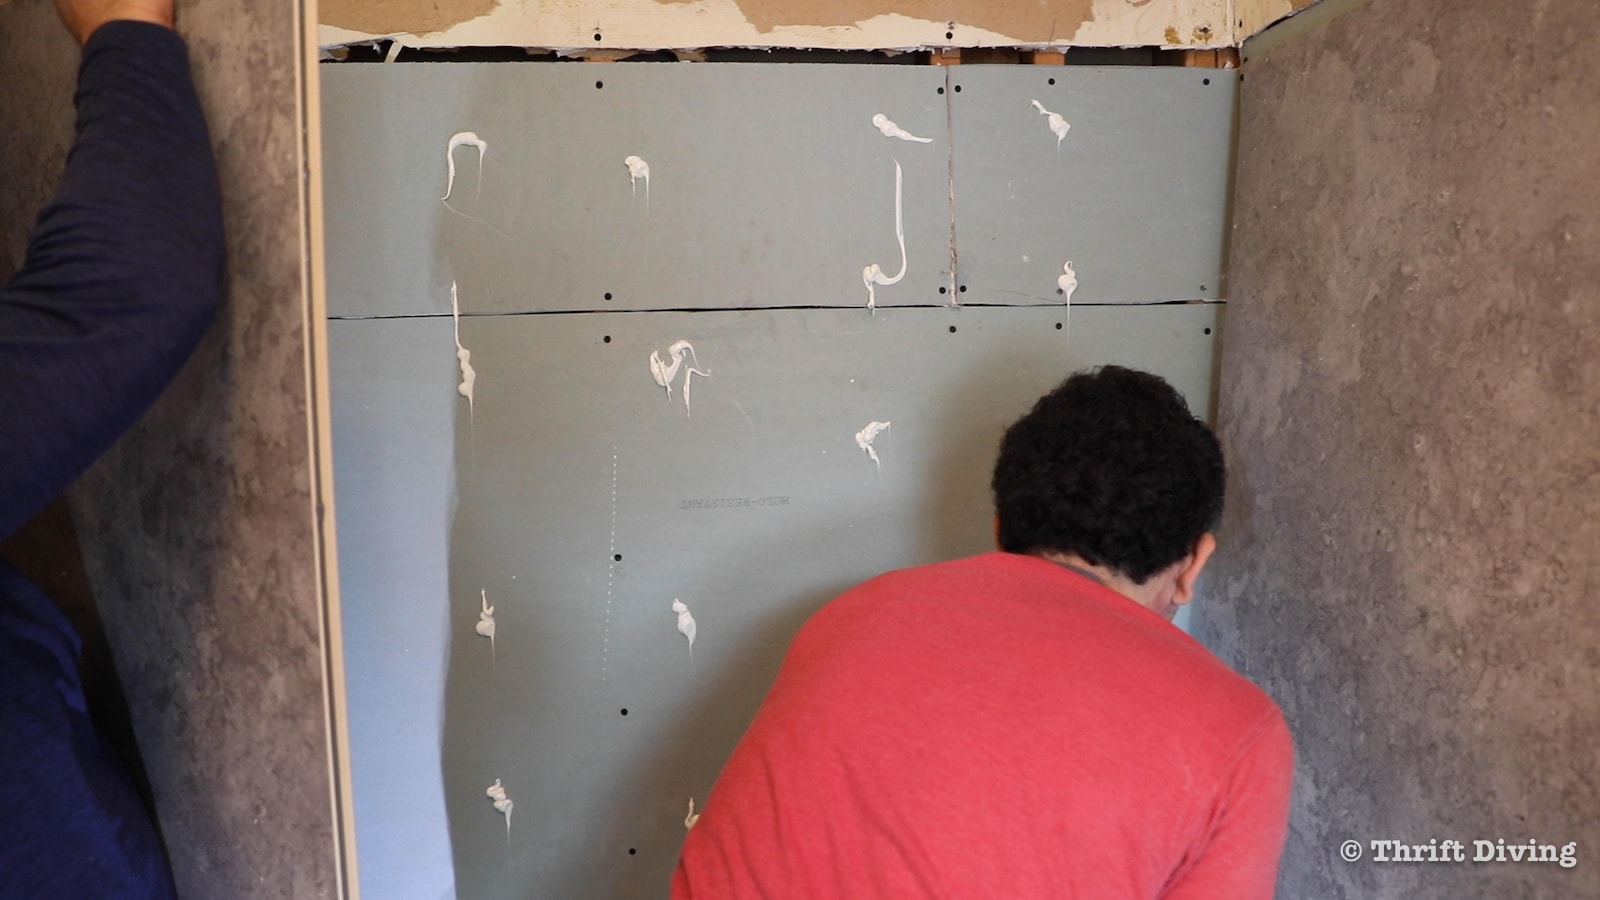
The panels created a seam in the wall.
With a crowbar, the installers were able to push the tongue-and-groove panels together so that the gap would be minimized and there would be no leaking.
These are the panels that the installer placed above the wall system. So if you’re getting this wall system installed, keep in mind that you may need to finish off the walls above the wall system!
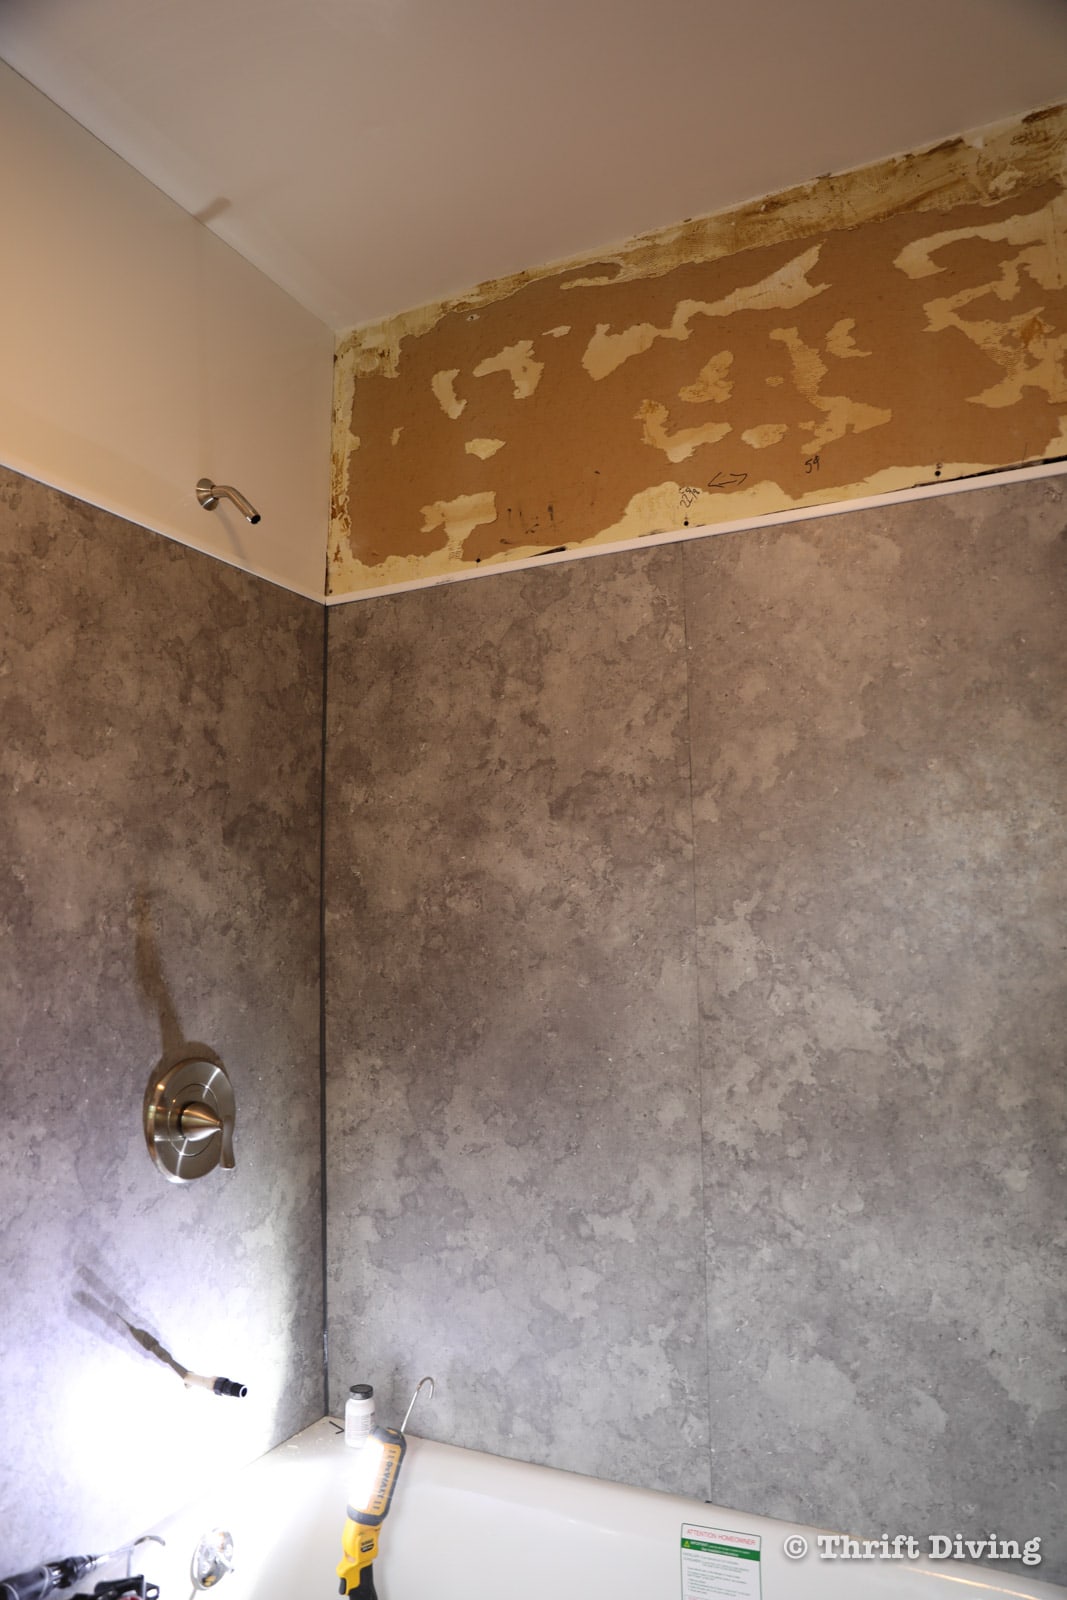
(FYI, this is the same problem I had years ago when I first made over my own master bathroom and had to remove similar old wallboard above the shower. If you run into this problem, to fix it: sand smooth the rough edges, spread out a thin layer of joint compound over the area (this is called skim coating), sand it smooth while wearing a mask, prime, then paint with a semi-gloss or satin paint).
To fix the gap in front of the tub, the installers built up the subfloor with plywood, removed the old vinyl layer, and used the few leftover ceramic tiles I was thankful to have on hand from the old flooring job I did years ago when I made over the kids’ bathroom!
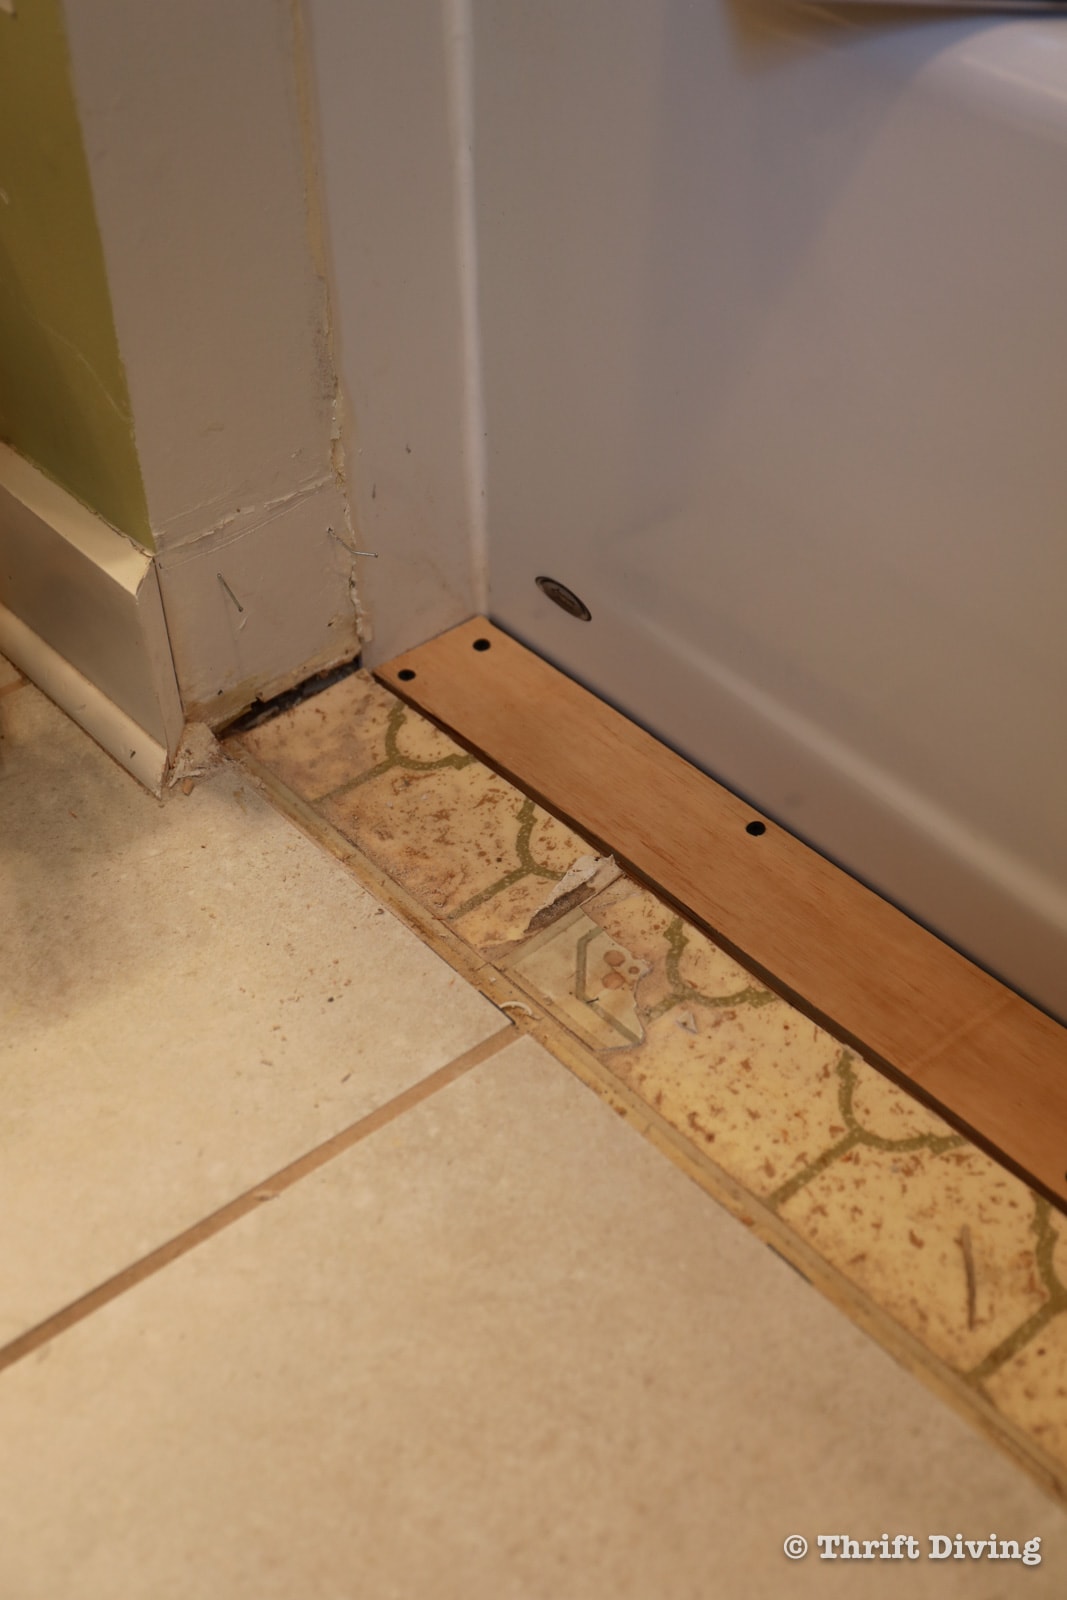
The flooring in front of the tub looks amazing now!

So we went from this outdated avocado-green bathtub and shower surround…
BEFORE
…to this modern and–dare I say?–handsome bathtub and shower surround that I think it perfect for my kids’ bathroom! I like that it will still be easy for the kids to clean. All they’ll have to do is spray and wipe it down–no scrubbing grout lines! And because their shampoo and conditioner are out of the way with the Passage corner shower shelf, there is less chance of them knocking into it and tripping over it while showering.

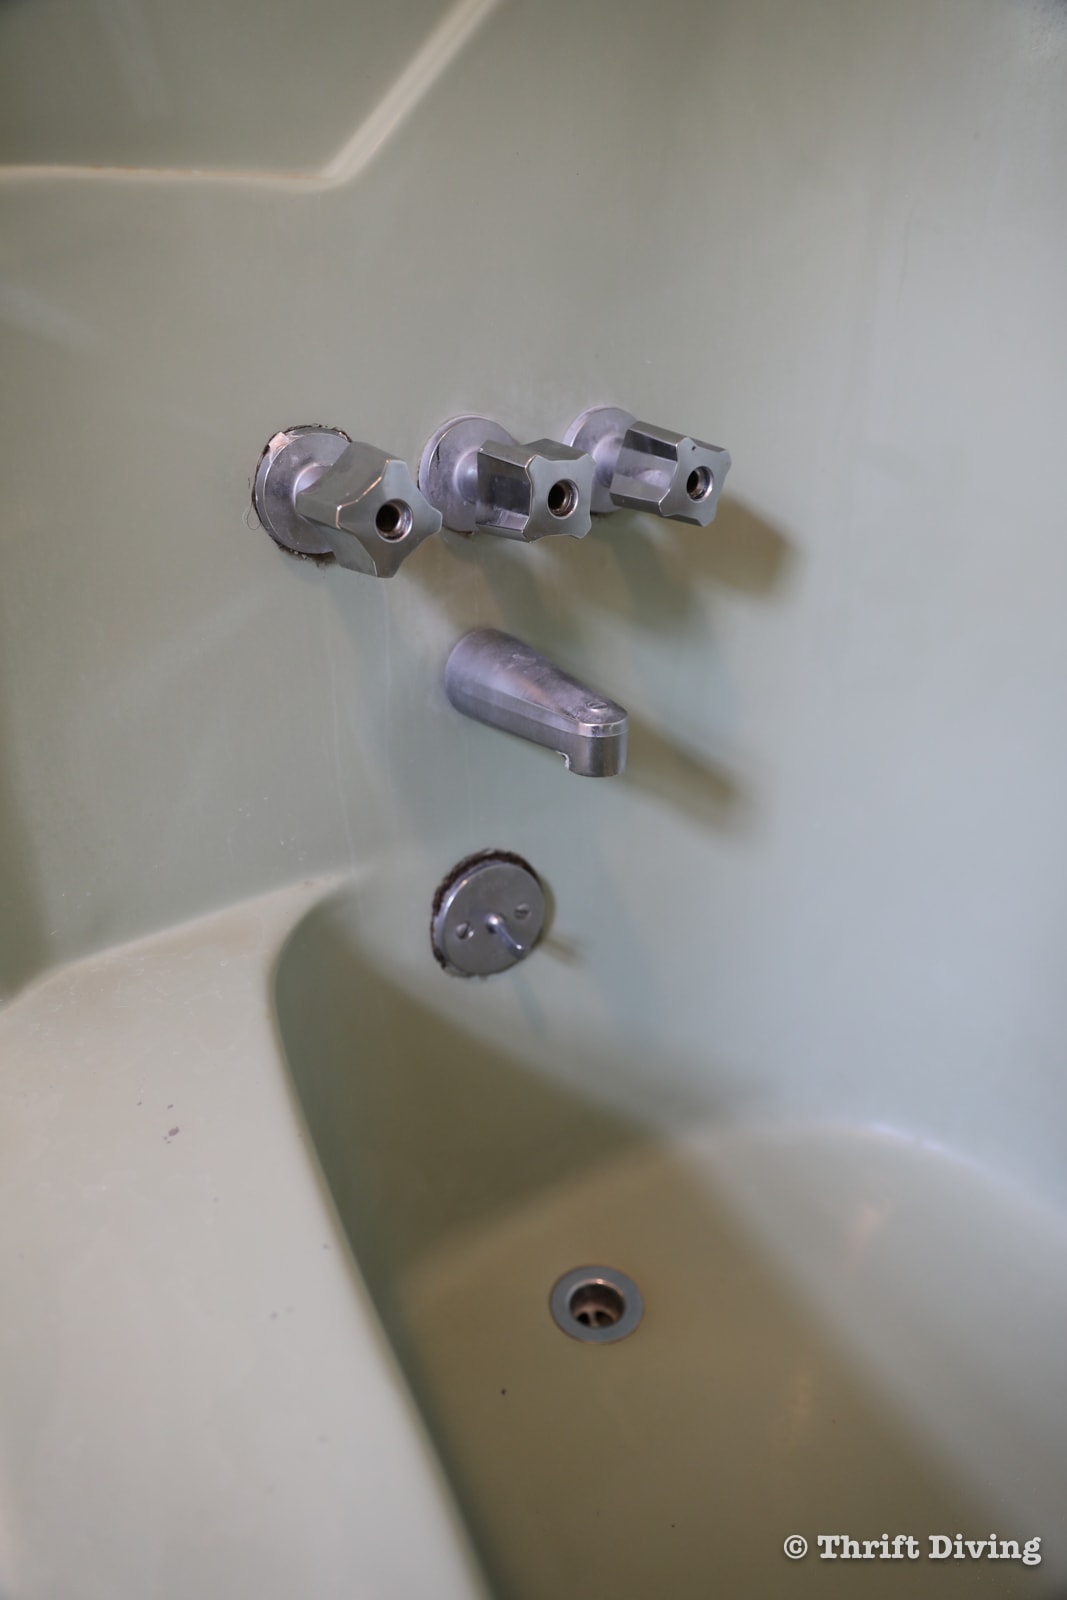
The old fixtures were disgusting and molded over, and full of soap scum–ICK! And honestly, three handles were too much. My oldest son knew how to turn the shower OFF and ON (and my middle son had learned). But my youngest was still confused about which knob was for what. All those knobs were confusing.
BEFORE
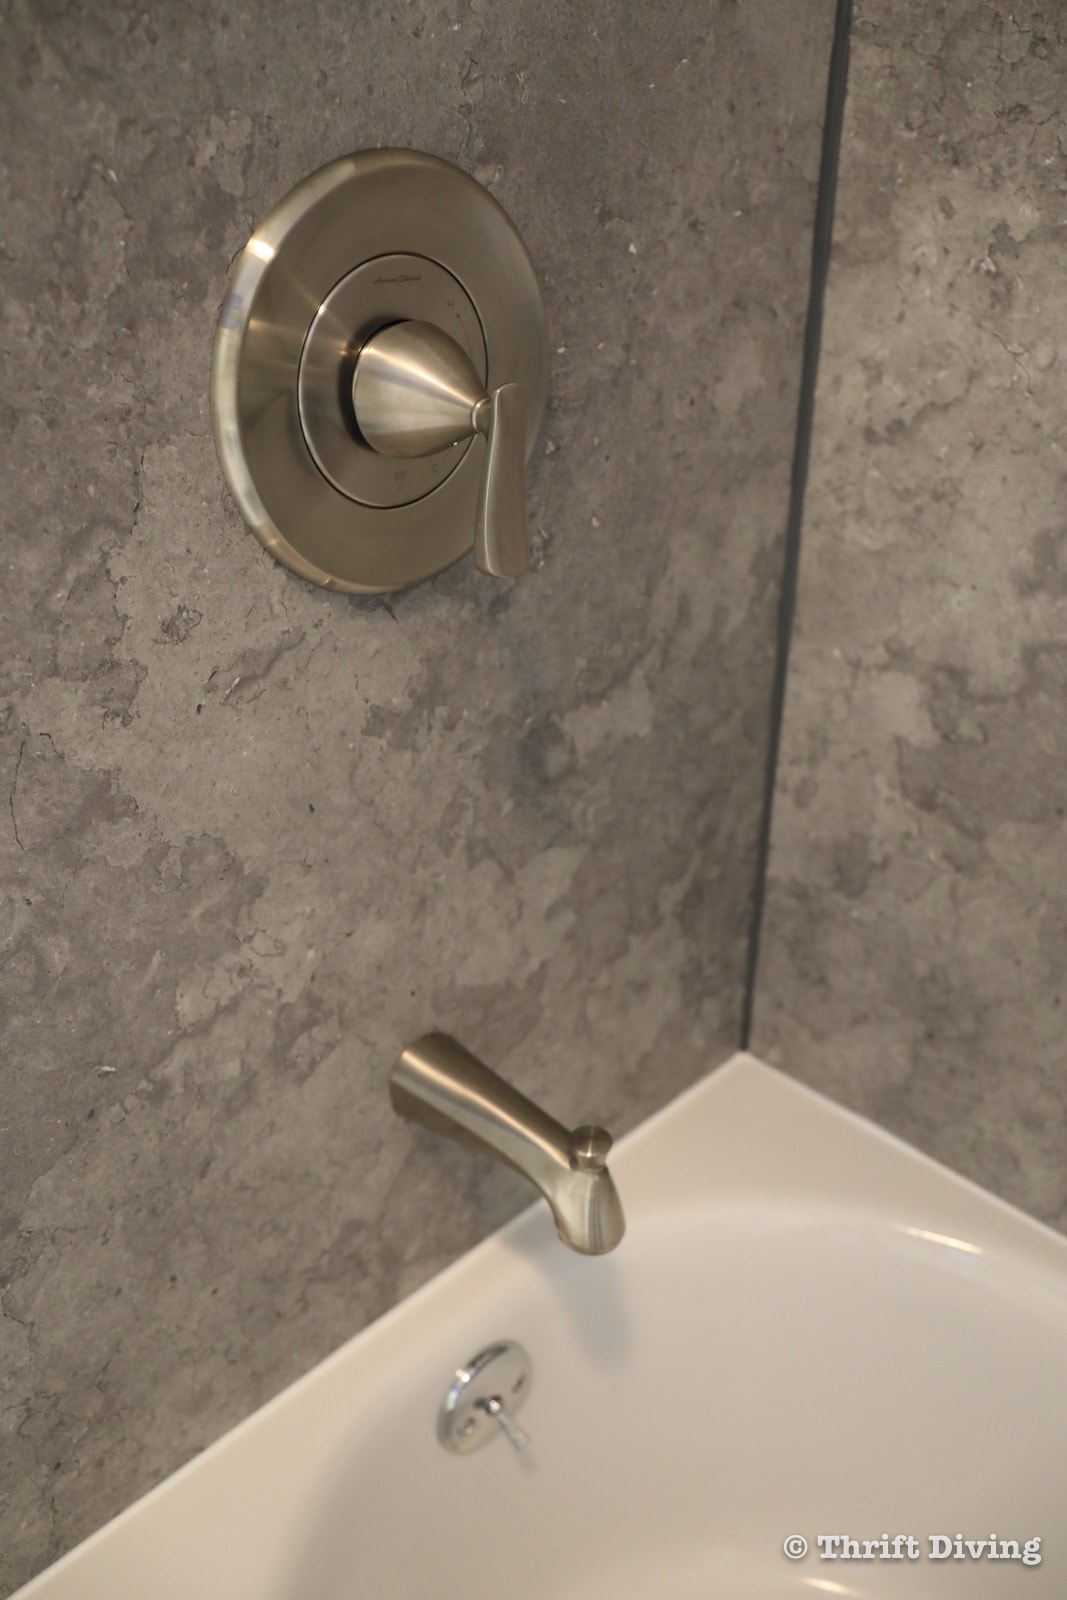
With a single faucet, it’s easier to figure out how to turn it on (and has the H and C)! It looks much cleaner, too, and more streamlined. This is the Chatfield Single-handle 3-spray tub and shower faucet.
AFTER!
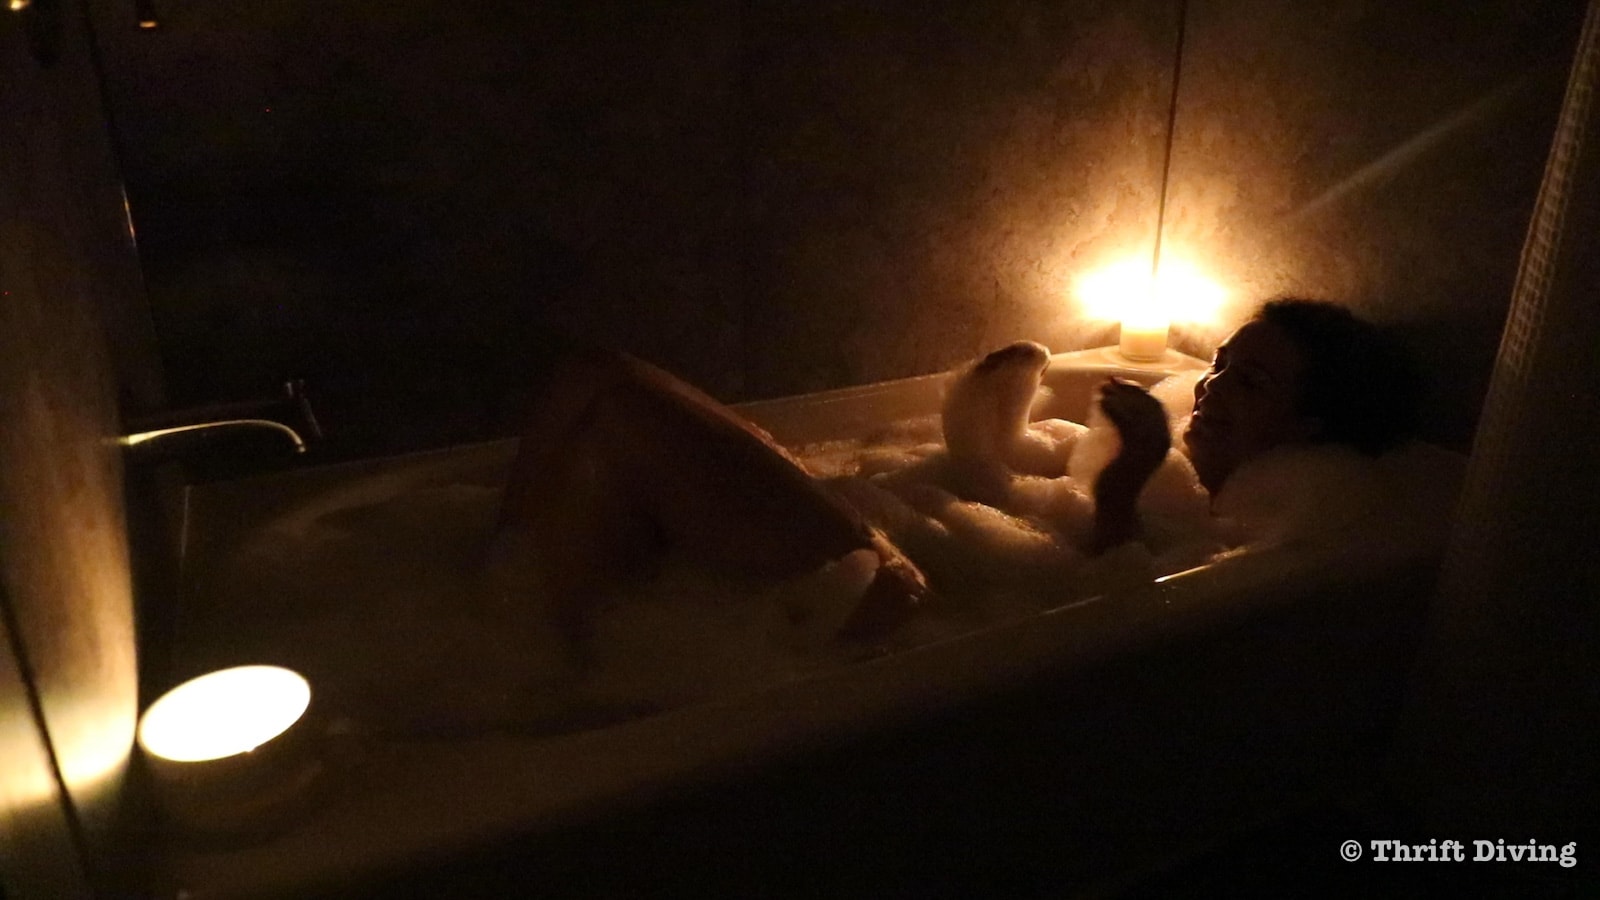
So I’ll admit that I haven’t taken a bubble bath in years. Soaking in the kids’ soap scummy bathtub wasn’t my idea of a relaxing evening. HA!
But once the bathtub was installed, you know I got first rights to it! I lit the candles, took a book in, and thoroughly enjoyed it! My only gripe is that being 5’10”, I don’t have much room for stretching out. Which makes me think at some point in my life, I vow to buy a home with a large soaking tub. But that’s another post on another day in another house. HA!
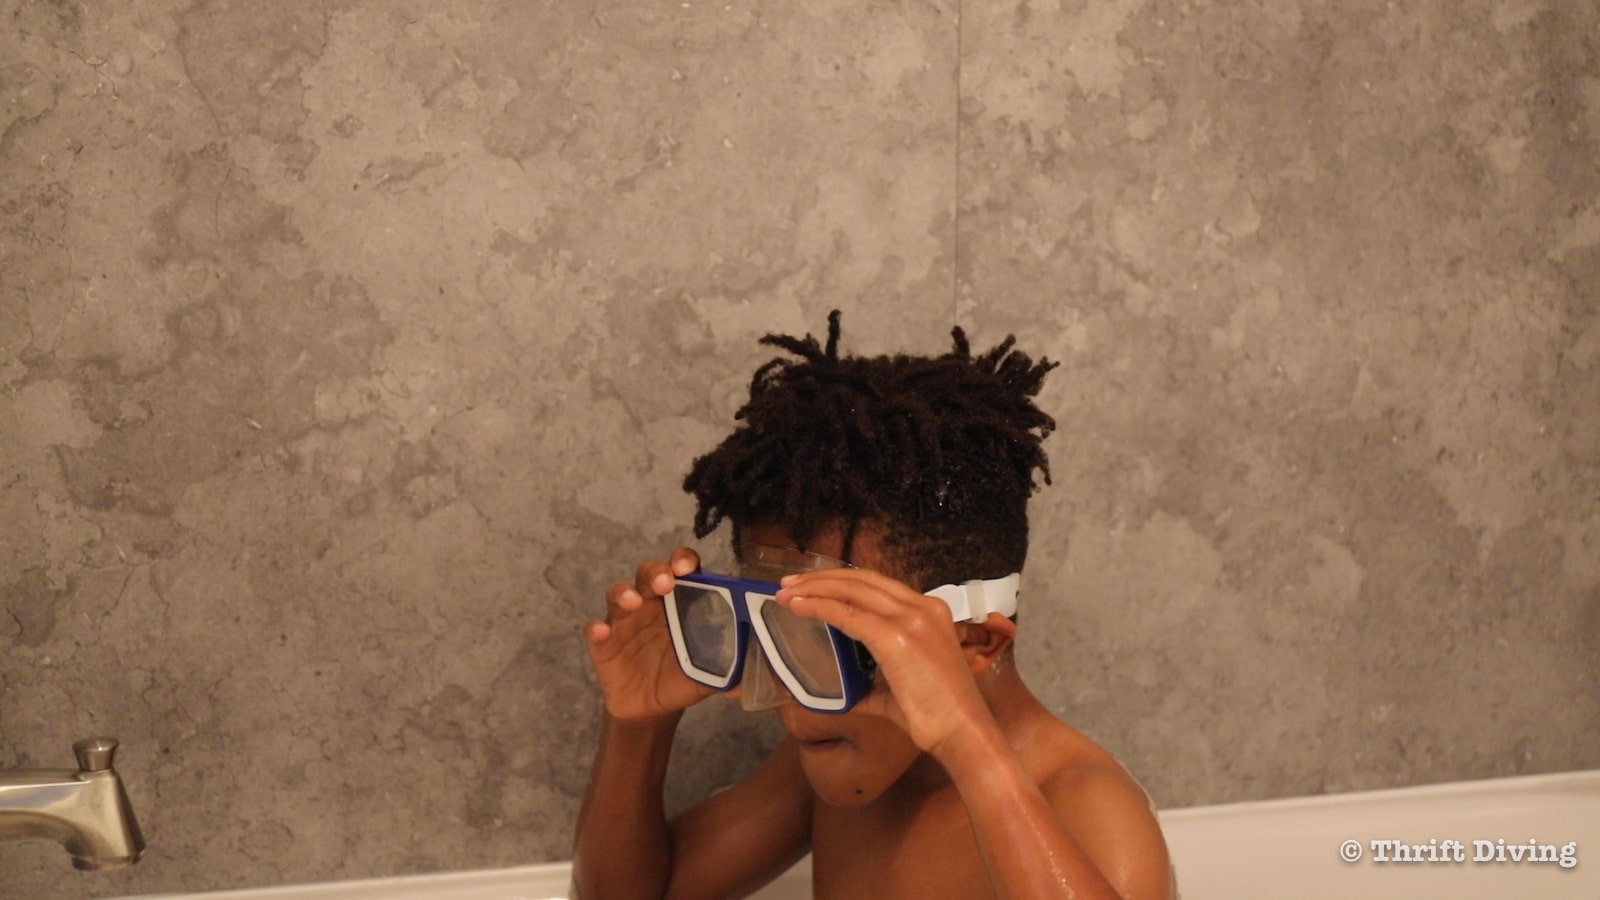
Soon after I started reading and enjoying the quiet, guess who pokes his head in, flips on the light, and asks when was it going to be his turn?
Yep–you can’t enjoy these things when kids are around. 🙂 So then it was my youngest son’s turn. He threw on the goggles and splashed around, and keeps asking for more bubble baths. 🙂
Overall, I’m pleased with this bathtub system! While it’s simple enough for a DIYer, you may have to do some plumbing updates (as my contractor did) due to the difference in bathtub sizes. Also, you might have to repair some of your drywall around the tub, including flooring repairs due to size differences. Just keep that in mind.
You can also hire installers to take care of it for you! This was supposed to take 1 day to install but due to the size difference in bathtubs and the flooring repair, it took 3 days total.
You’ll love it, though! And the best part is that it won’t break the bank. 😉
Did you enjoy this post? Click here to save it!
![]()
Keep Reading
- How to Paint Your Bathtub or Shower
- How to Build a DIY Bathroom Vanity From Scratch
- BEFORE & AFTER: My Half Bathroom Makeover
- How to Remove a Toilet Yourself
- How to Install a Toilet Yourself


Download the 5 freebies!

Thrift Diving inspires women to decorate, improve, and maintain their home themselves...using paint, power tools, and thrift stores! Use these 5 printables, checklists, and ebooks to get started!


Thank you for the video. I’m thinking of installing this system in my bathroom. Can you tell me what those panels above the shower walls are called? Can those be purchased at Home Depot, too? Thank you
Hey Rick! I’m not sure what those panels are called that area above the shower. The plumber had them on hand when installing the tub and installed them. But you can likely get something similar, like a bead board or a fiberglass panel that is waterproof. I’m sorry, I wish I had gotten the names!
We’ve been talking about remodeling our bathroom but I’m just not sure I’m up to all the work and mess. This looks great.
would this still work, with a shower that has a large window?