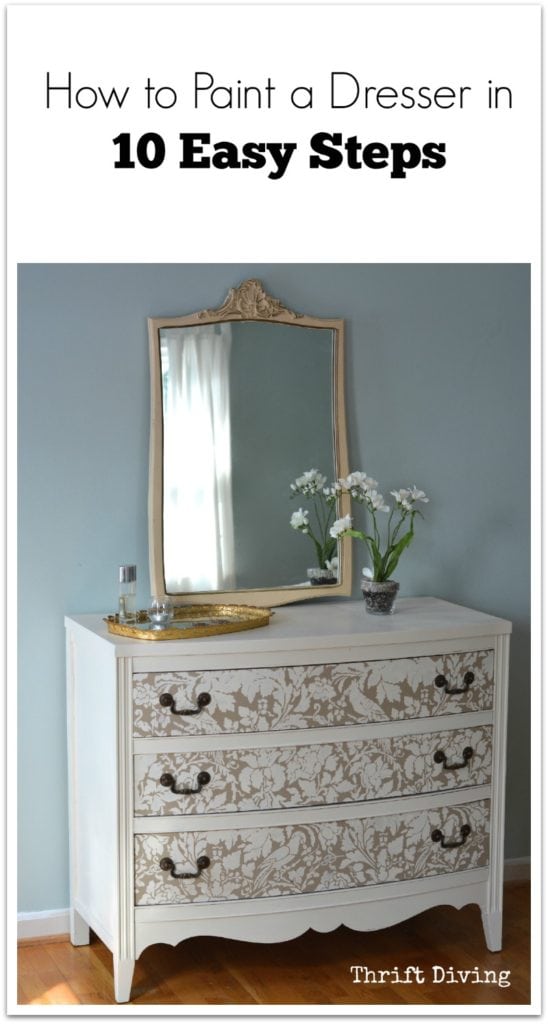
How to Paint a Dresser in 10 Easy Steps!
If you’ve got a spouse who complains about the amount of furniture you’ve got hoarded up in the garage, basement, spare bedroom, etc. go show them this post about how to paint a dresser in 10 easy steps. Seriously! I’ll wait.
[Insert Jeopardy theme song here].
They’ve got to see this because it’s the perfect example of how buying the right piece of furniture and then storing it for obscene amounts of time is totally worth it. Because one day, you’ll finally get to it. And when you do, it will be worth the wait!
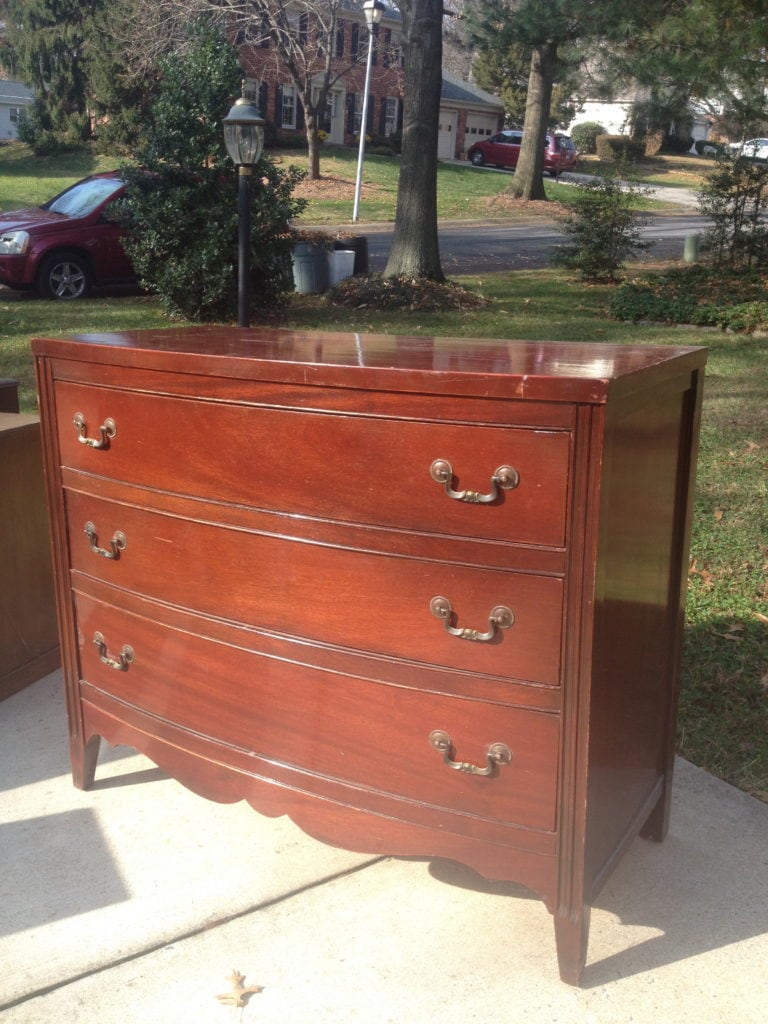
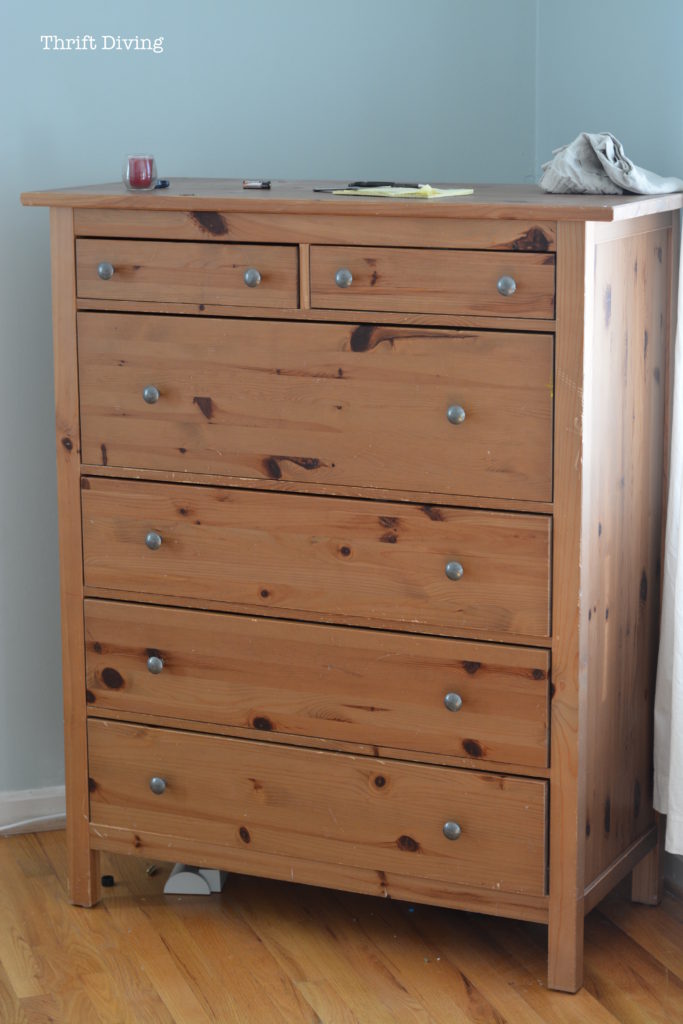
I’d found this vintage dresser at the thrift store years ago. For three years it’s taken up real estate in my garage, annoying my husband with the clutter.
Here’s what it looked in its “before” state. Yes, it was gorgeous, but a bit too “brown.”
BEFORE
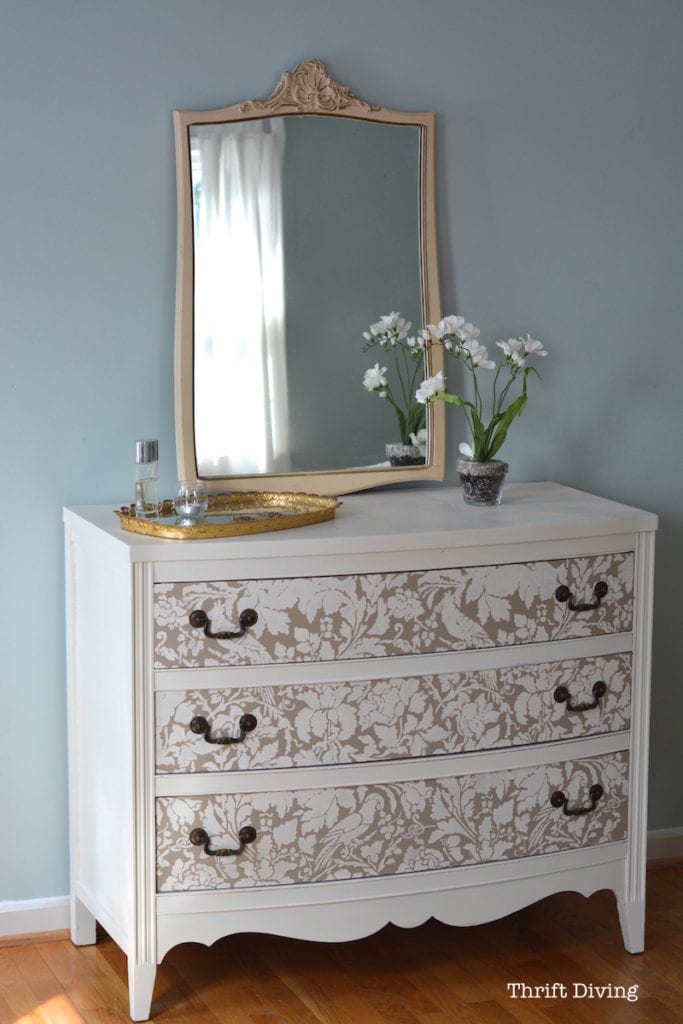
Last week I FINALLY had time to paint it and make it a pretty place to house a lot of my clothes!
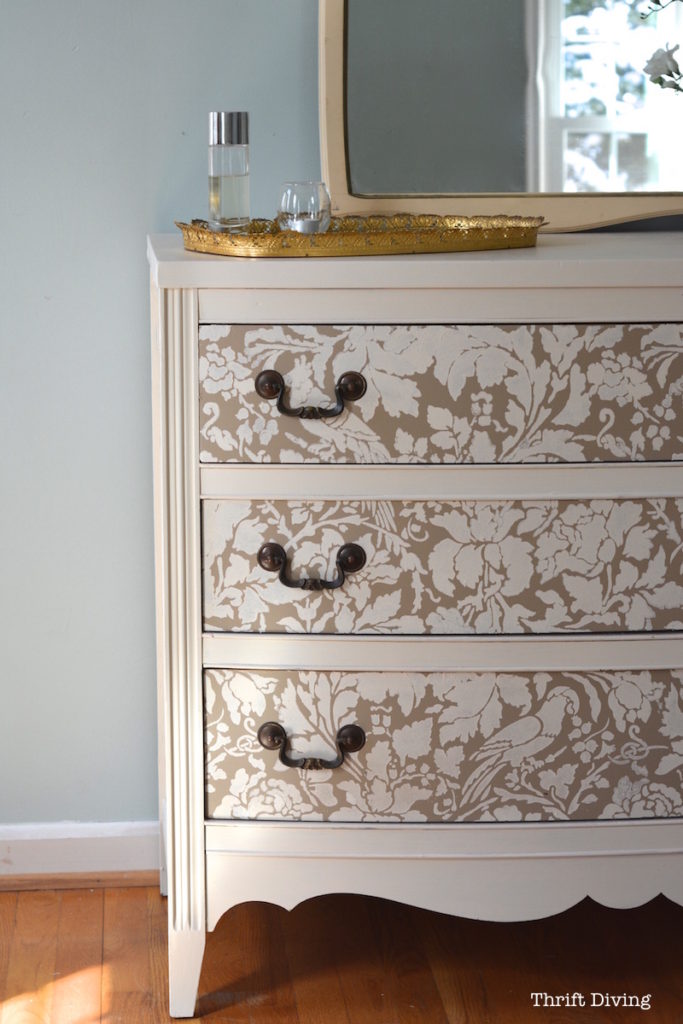
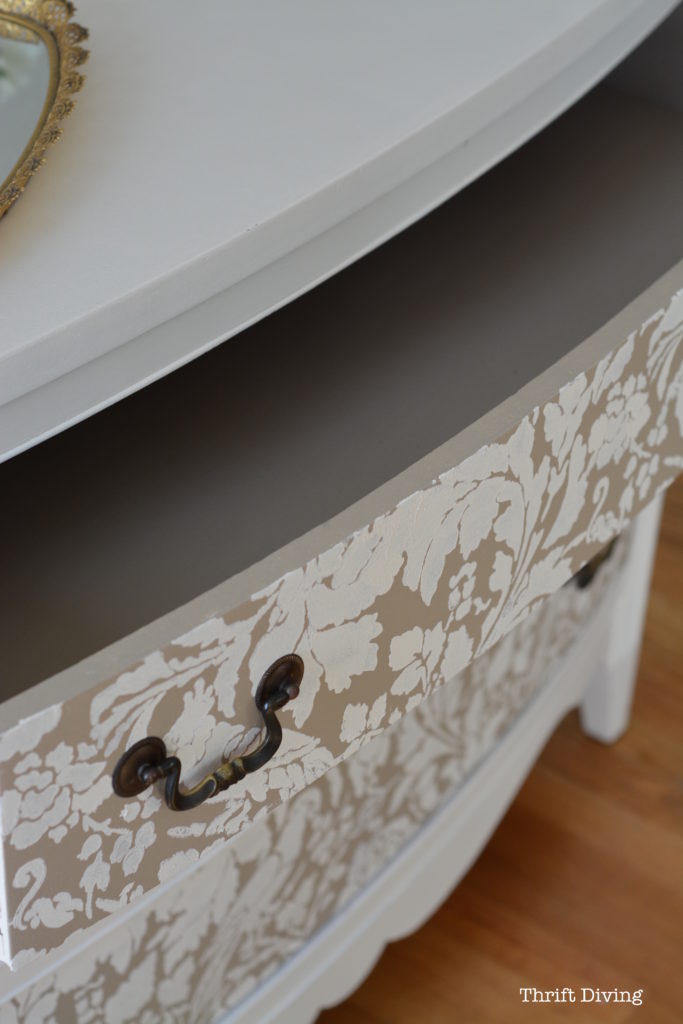
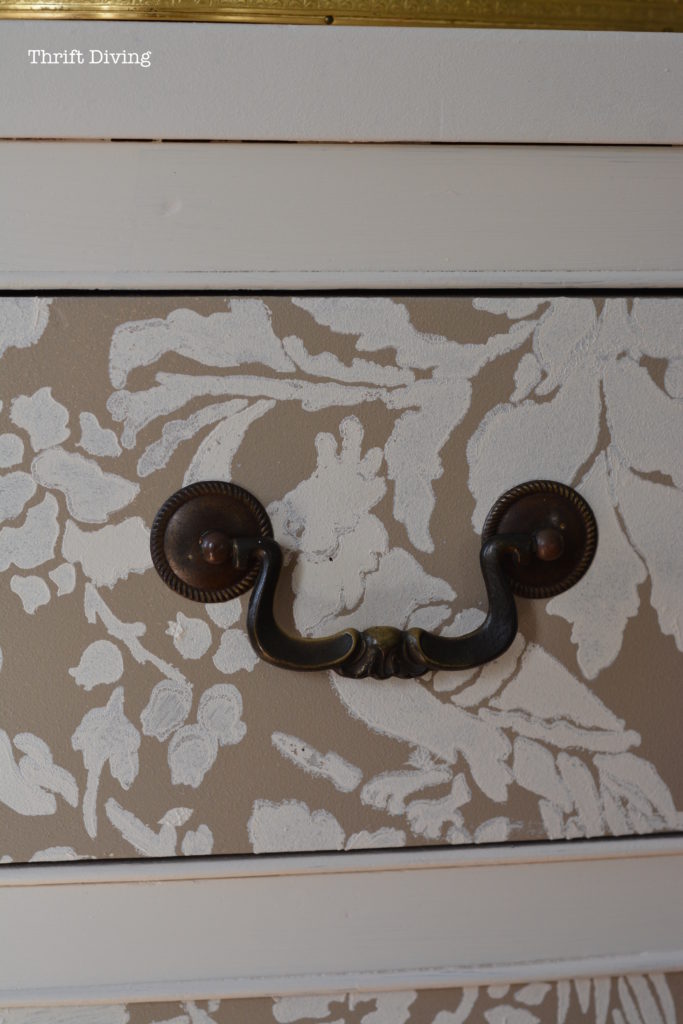
FYI…..I used this pretty stencil to paint the dresser drawers!
AFTER!
All the “wood haters” gonna be hatin’ on this piece, because it really wasn’t in bad condition. It had a few nicks on top, but for the most part, it was a solid piece that I could have used the way it was. But I’m not a fan of dark wood in my bedroom. I fantasize of having a pretty, light, and airy bedroom, not dark and dreary makes-you-want-to-stay-in-bed-depressed. LOL
And after I consulted my guidelines about when should you NOT paint wood furniture, the dresser passed the “Girl, go get your paint brush!!” test. 🙂
Do You Have to Sand or Prime Before Painting Furniture?
If you’re a newbie to painting furniture, let’s address this question because it always comes up. The answer to whether you have to sand or prime before paining furniture is that it depends on two things:
- The condition of your furniture, and
- The type of paint you’re using.
The Condition of Your Furniture
Does the furniture have lots of chips in the old finish? Is it bumpy on the surface with old stickers from kids? Are there gouges or scratches? If you answer yes to any of these, then you should sand your furniture before painting it. It doesn’t have to be a “sand-down-to-the-bare-bones;” it just has to be smooth to accept paint.
You’ll need a medium grit sandpaper of 150-grit, followed by a 220-grit fine sandpaper to smooth out the scratches. You can do this either by hand or using an orbital sander. Be sure to wear a dust mask, too. If you’ve got deep gouges, use a bit of wood filler to fill any gouges or scratches, then sand them smooth when the wood filler dries so it can be painted over. The surface should turn out very smooth!
The Type of Paint You’re Using
If you’re trying to paint furniture right out of the can that you bought from your local home improvement store, you’ll definitely need to prime first. However, if you’re using paint specially formulated for furniture (such as any of these furniture paints), then you won’t necessarily have to prime first.
Paints for your walls is much more “gummy” than furniture paint, due to the latex in it and how it performs when painted onto furniture. The paint needs something to stick to, which is where the primer comes in.
With a bit of sanding, then priming, the paint sticks better. However, using regular wall paint isn’t ideal because of all the extra steps required. That’s why more bloggers and DIYers use chalk paint or other specially formulated furniture paints, which don’t really require sanding or priming first.
However, if you decide to use regular wall paint for painting furniture, be sure to use the flat finish (it’s less gummy), and try using a product called BB Frosch which is a powder additive that can be mixed with any home improvement “flat finish wall paint” to create a “chalked paint” which will not require sanding and priming on good, clean surfaces. You can read about how I used BB Frosch on a bathroom vanity, which turned really great!
How to Paint a Dresser
Painting furniture is super easy. Don’t believe me? Just watch the transformation of this one in the video! (Are you subscribed to me on YouTube?)
Materials
Here are all the things you will find helpful when painting a dress (or any painted piece of furniture, for that matter). Don’t worry if you don’t have everything. Believe me, it takes time to build up your stash of DIY supplies and materials! I’ll talk more about materials down below. 🙂
(I participant in the Amazon Services LLC Associates Program and other affiliate advertising programs designed to provide a means for me to earn fees by linking to Amazon.com and affiliated sites).
- Off White Furniture Paint
- Linen Furniture Paint (check out this blog post about What’s the Best Paint For Furniture)
- Stencil (quality furniture stencils are usually found HERE at my favorite stencil shop!)
- Paintbrushes (synthetic or natural bristles)
- 1/4″ nap roller and small roller pan
- Simple Green or vinegar
- Old clothes you don’t mind getting paint on
- Dresser knobs
- Rub ‘n Buff (to spruce up your old knobs if you reuse them).
- Floor covering to protect your floor
- Paint can opener
- KILZ oil-based spray primer (only if your dresser stain is bleeding through)
- Sandpaper (optional)
STEP 1: Prepare to Paint Your Dresser
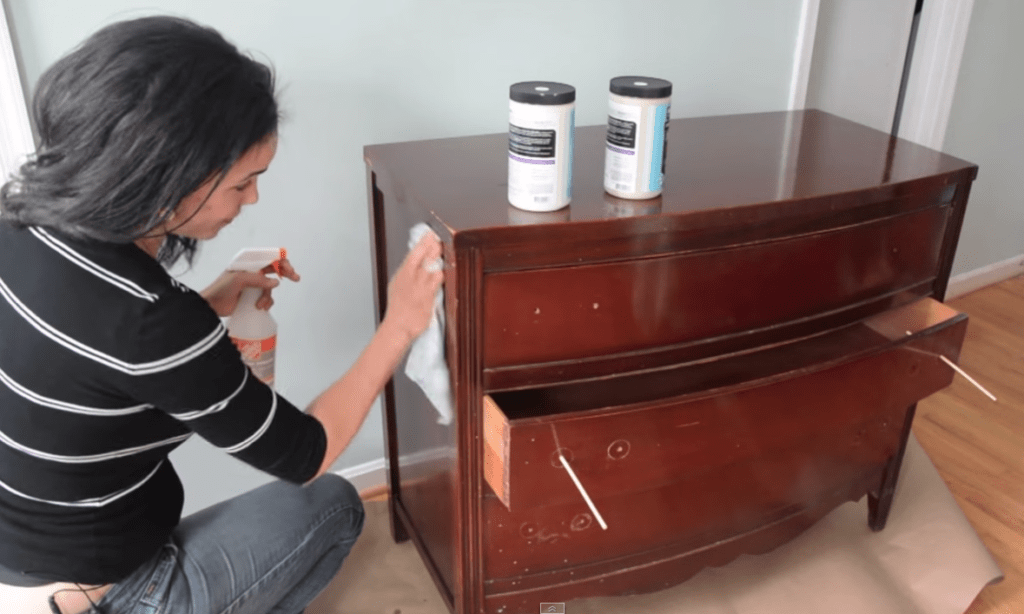
This is my least favorite part of painting a dresser (or any piece of furniture, for that matter). You just want to dig in and get started! But you have to clean it first, or the paint won’t stick. Plus, no one wants to use furniture that’s all dirty inside. Prepping shouldn’t take any more than 15 minutes or less!
If you’re using the right paint, it’s nearly impossible to mess up. Generally, I use chalk paint because it’s so smooth and goes on well in two coats, but Beyond Paint sent me some samples to do this piece (for this dresser, I used Off White and Linen). I’d used the paint before on this thrifted china cabinet and was interested in trying it again on this dresser.
STEP 2: Find a Place to Paint Your Dresser Indoors (or Outdoors)
Not everyone has a studio, basement, or garage where you can bang out projects. You might have to paint inside your house. That’s okay! The awesome thing about all brands of furniture paint nowadays is that they’re either no VOC, low VOC, or very low VOC. There aren’t any noxious fumes to worry about.
Now, don’t get me started on explaining VOCs (volatile organic compounds). But it’s the bad stuff that used to be in many paints, finishes, and stains that are harmful to you and the environment. Many latex-based paints today are low VOC, but check before using them. Most furniture paints, however, are at least low VOC, so you don’t have to be worried about using them inside or with children nearby.
Here are some places you can paint your dresser:
- Basement
- Unused dining room
- Patio
- Balcony
Picking Your Paint
There are tons of furniture paints on the market now (click here to see What’s the Best Paint for Furniture?). Seems like everybody and their mama has come out with furniture paint! That’s good for us creatives, but it can also be confusing because you don’t know which paint to select. They’re probably all just fine, but some are good for beginners.

STEP 3: Cover Your Floors
Don’t ruin your floors. I know it sounds very common sense, but I only include this because I have ruined some floors by trying to take the short cut and not cover the floor (umm…laziness??). Try plastic drop cloth, towels, or newspaper or something similar.
Here are some things you can use to cover your floors from spilled furniture paint:
- Old table cloth
- Cheap tarp
- Bedsheet
- Shower curtain you don’t use anymore
- Discarded cardboard boxes from shipments
- Newspapers or grocery store circulars
- Roll of brown craft paper (from Home Depot)
- Old dingy bath towels
STEP 4: Clean Off the Gunk From Your Dresser First
Dressers are gross. Wait, let me clarify that: thrifted dressers are gross! You’ll need to remove the drawers and use a solution of vinegar and water and wipe everything out. Try using a steam cleaner (I recommend the HomeRight Steam Machine) to get the deep down gunk out of the dresser. You can find a full video tutorial HERE for all of the Steam Machine’s uses, plus see how I used the steam cleaner to blast those dirty thrifted file cabinets I used in my basement home office DIY desk.
STEP 5: Test Your Furniture: Does the Stain Bleed Through?
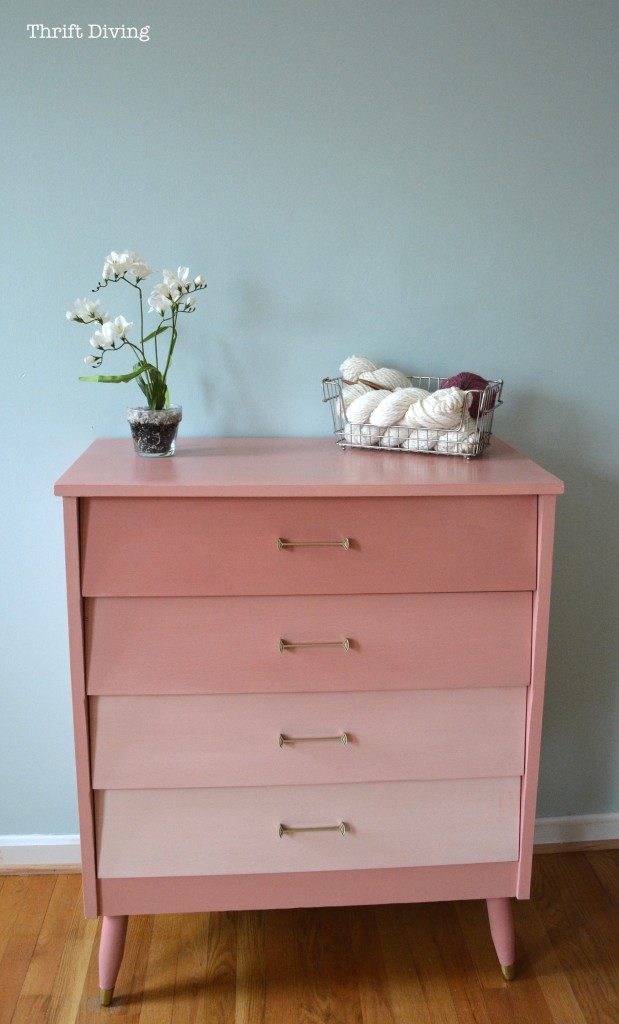
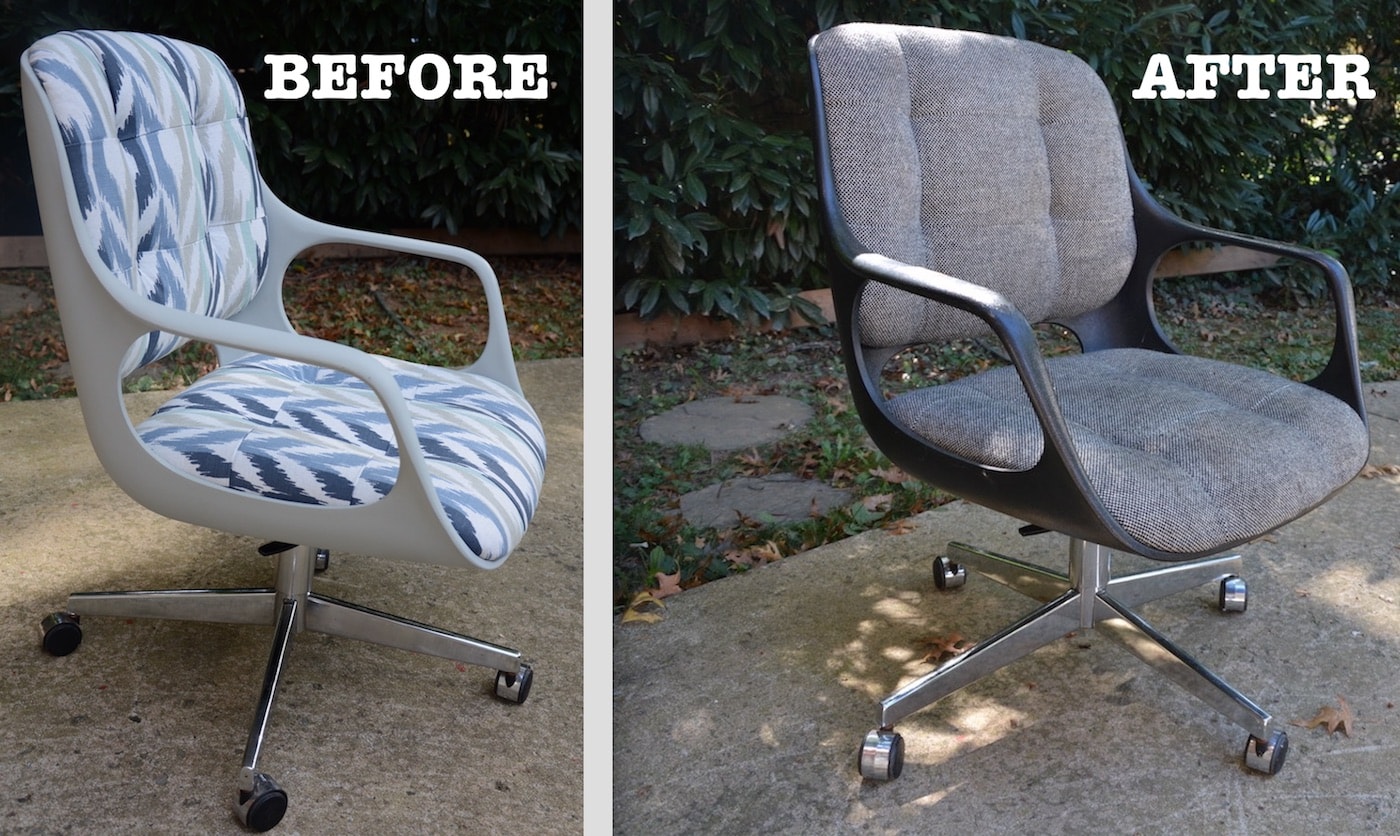
There’s nothing more frustrating than starting a dresser only to find that the old stain is bleeding through the new paint. With all the latest furniture paints out there, they all toot their horns that there’s no priming or sanding needed. What they don’t tell you is that no furniture paint is effective against…. THE DREADFUL BLEED! It tends to happen with mahogany stains (from my experience). Any reddish stain that doesn’t have a lacquer over it (or is badly chipped) will bleed right through, like what happened with this mid-century pink ombre mod dresser I refinished, as you can see below:
READ THIS: 10 Furniture Painting Mistakes and How to Avoid and Correct Them
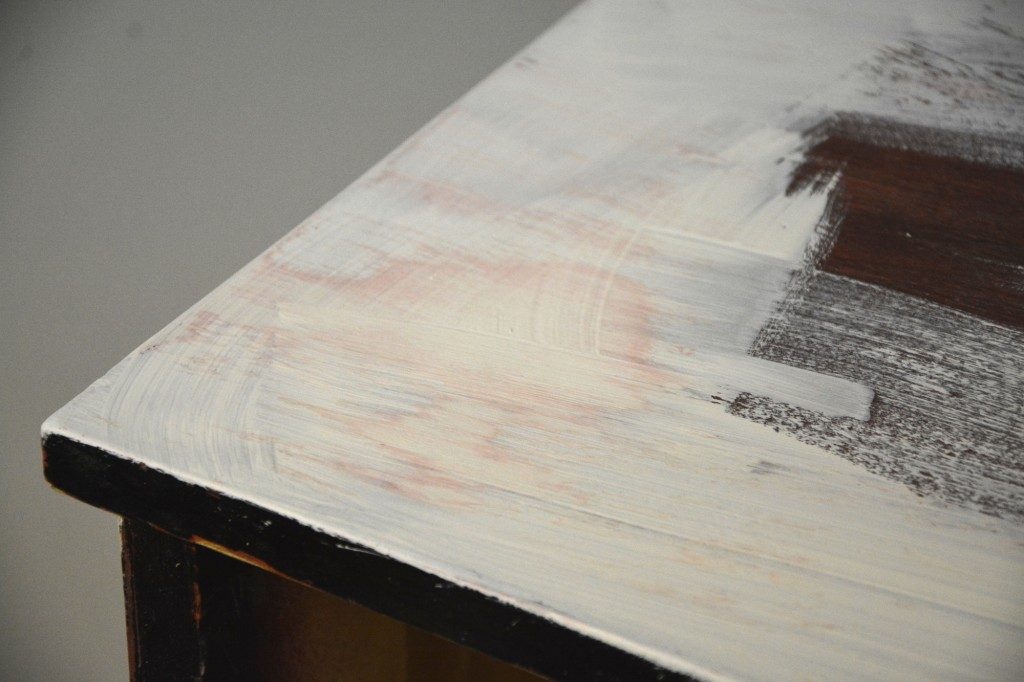
I had planned on painting the mid-century mod dresser white, but when I saw what was happening, I decided to paint it pink to disguise the bleed. It worked in my favor! The outcome was pretty!
What To Do If Your Furniture Bleeds
If you run into this problem, use an oil-based primer (try KILZ Original spray primer, and be sure to use it outdoors–it stinks) with 2 coats to cover the bleed. Be sure to let it dry completely in between the two coats. Then start painting once it fully dries. I’d let it dry 24 hours.
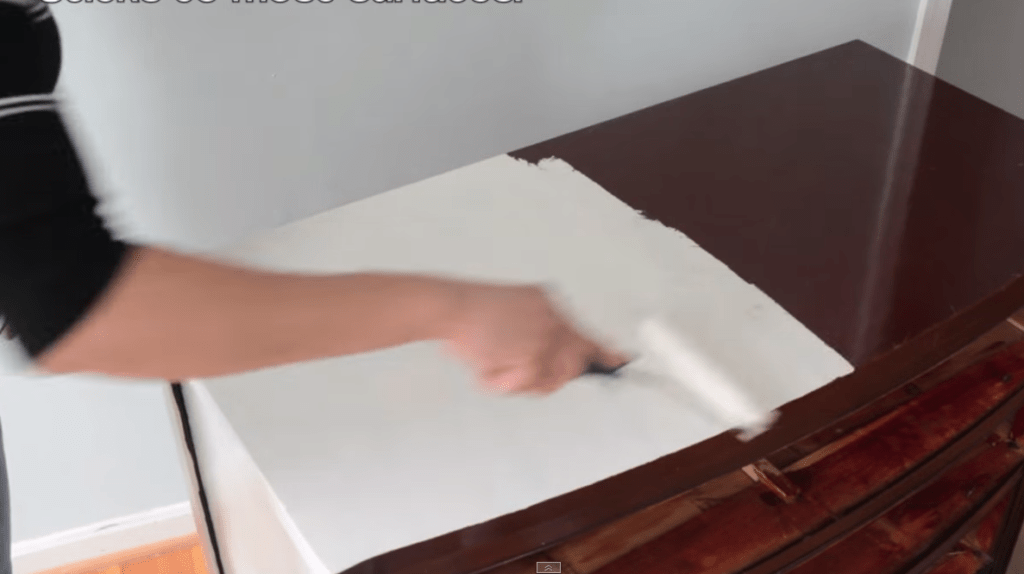
STEP 6: Applying Paint to Your Dresser
Some people like to use a roller, but I love using a brush or a paint sprayer (watch this video tutorial on how to use chalk paint in a paint sprayer).
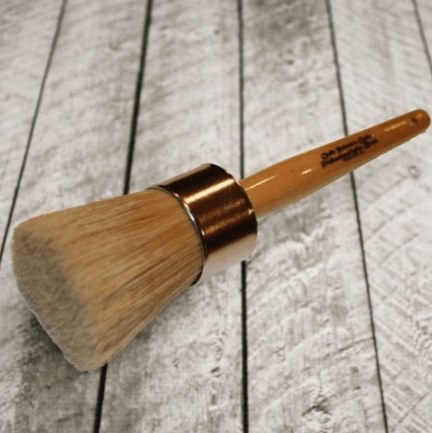
If you’re using a brush, try my favorite, the Purdy brush. They come in various sizes. I have a few in different sizes for different projects. Its angled bristles are so smooth and won’t fall off onto your wet finish! If you decide to use a roller, get one made for smooth surfaces.
Here are the things to remember about painting furniture with a brush, though:
- Synthetic brushes: If you want a smooth finish to your painted dresser, nylon/polyester brushes will give you a smoother appearance with fewer brush strokes. Also, most furniture paints allow you to mix in a little water if your paint gets too thick. Thick paint will give you more brush strokes, so thinning the paint with a little water, plus using a synthetic brush will give you a smoother result. Just don’t add too much water, or you’ll start to get a drippy-drippy painted dresser.

- Natural bristle brushes: If you want a textured finish to your painted dresser, paintbrushes with natural bristles will give it more texture. In the DIY sphere, we call these “China brushes” or “chip brushes.” Head over to the paintbrush aisle at Home Depot and you’ll see these natural bristle brushes for about $1.00 – $2.00. Buy them on Amazon for a better deal, though. And remember: if you like the look of brush strokes in your furniture paint, let your paint be a little thicker when using your natural bristle brush. To achieve this, simply leave the top off of your furniture paint and it will thicken up over an hour or so. And just add a bit of water to thin it out again. 🙂

(I used this pretty stencil on the dresser below).
STEP 7: Paint the Inside of Your Dresser Drawers!
What point is there to have a pretty dresser, only to open it up and see “ugly” inside? Paint the inside of the drawers, and the sides, too. And while you’re at it, do the back, too. It just makes a piece feel more finished.
Don’t feel like you have to paint the inside of the body–I’m talking the deep bowels of the dresser. No one will see inside that part :).
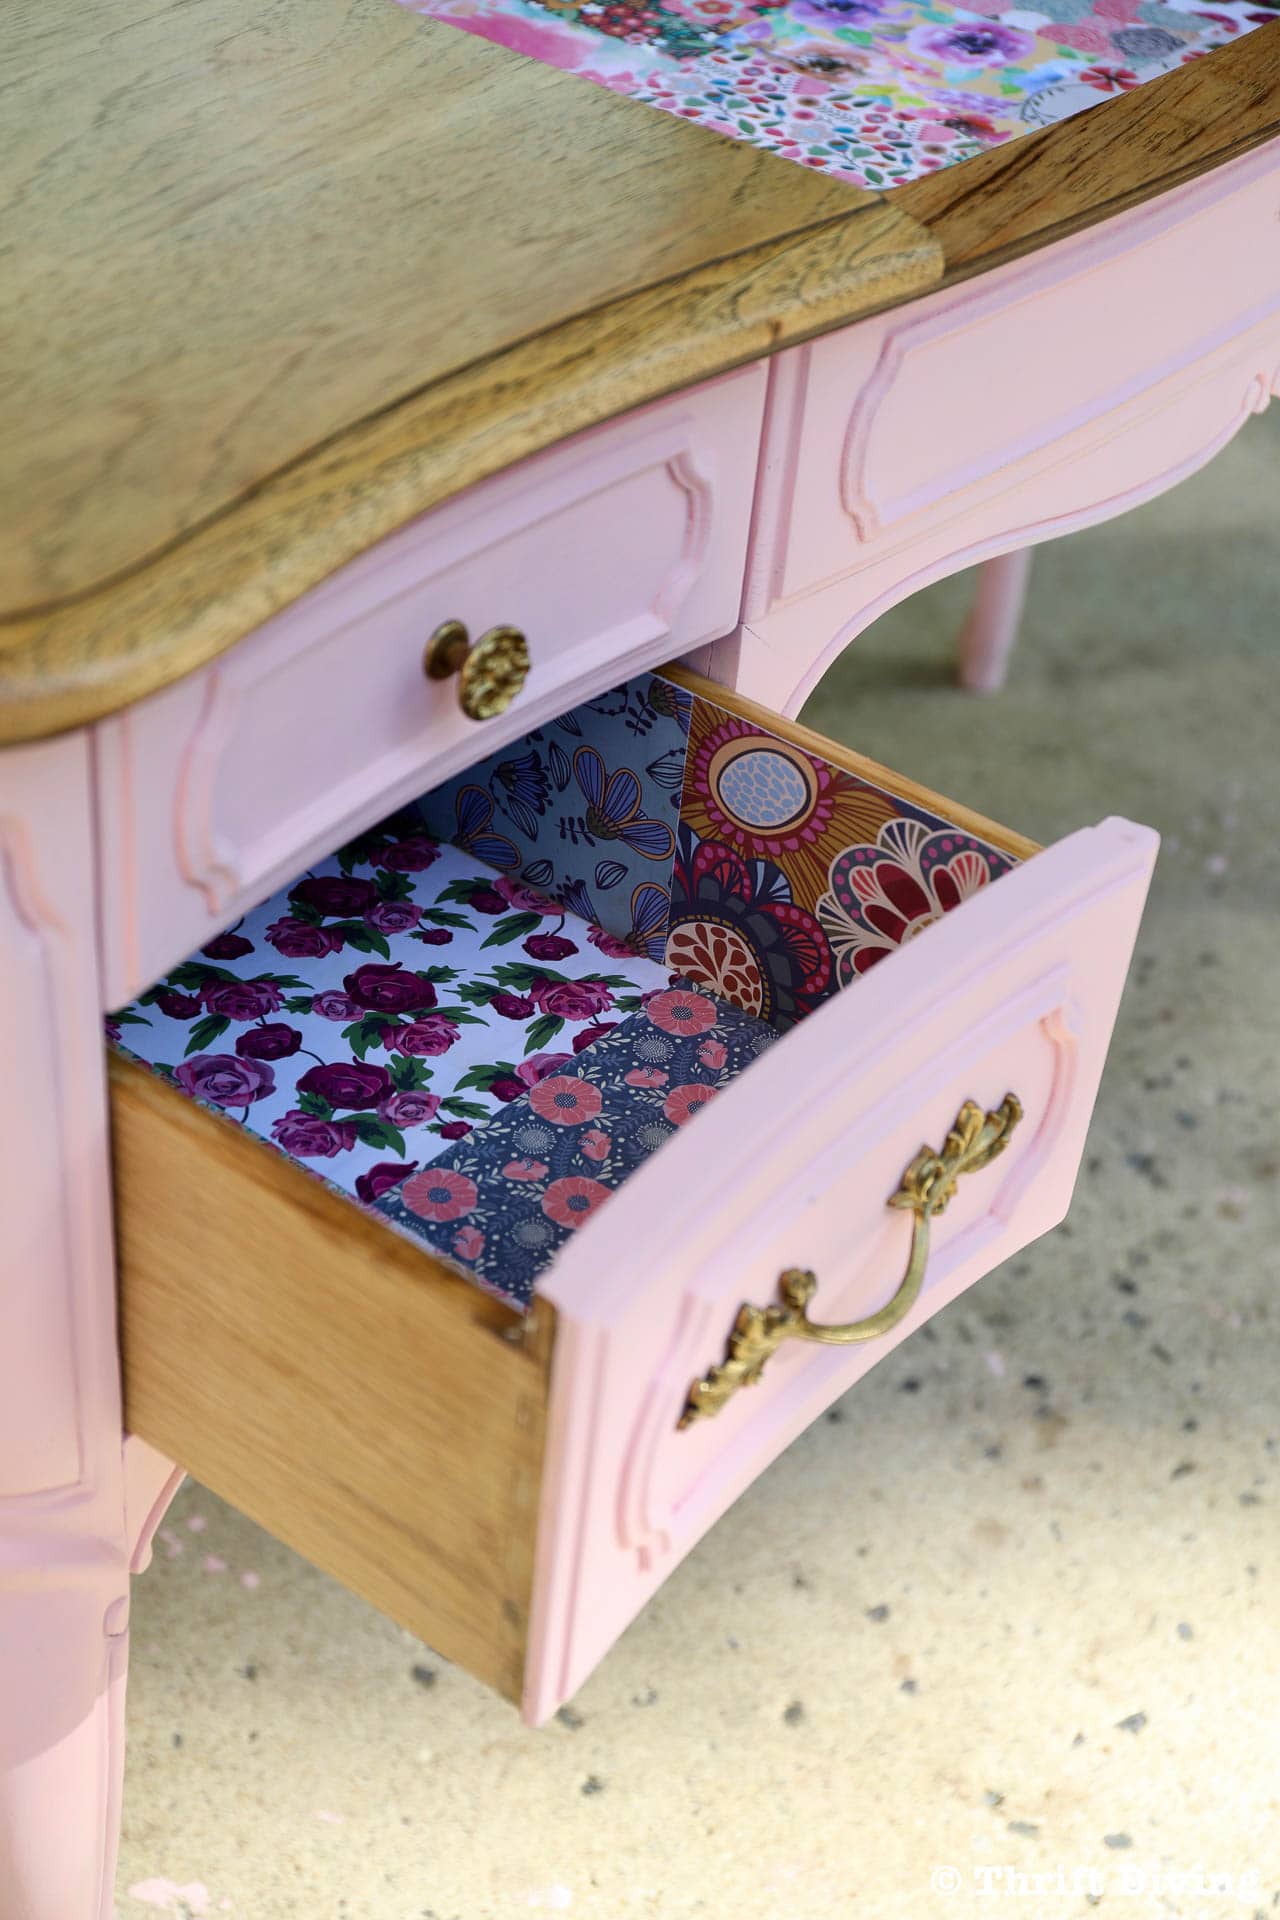
If you want to get super creative, you can also decoupage scrapbook paper to the inside of drawers, like I did this gorgeous vanity makeover. You can watch the full tutorial on my YouTube channel here.
STEP 8: Apply Two Coats of Furniture Paint
Here’s the truth: as good as most furniture paint is, most of the brands will require you to paint two coats. Well…..not require….especially if you’re going for a look that’s more like a white-washed effect. But if you want complete coverage, plan on two coats of paint. Be sure you let the paint dry in between coats. Some paints suggest 2-4 hours of drying time in between. I’ve done second coats in about 1 hour. You might even need to do THREE coats, depending on your dark your dresser is. The darker the wood, the more coats you might need.
If you’re just painting a basic coat, don’t worry about any special technique. If you’re old enough to remember Danielson from The Karate Kid, you simply “paint the fence.” LOL. It’s that simple. Where you need to be careful is that you don’t overload your paintbrush. Overloading your paintbrush will leave your dresser with drips. To prevent paint drips, keep the paint on your brush light. To remove paint drips, smooth them out before they dry. If they’re already dry, lightly sand them smooth after they dry and touch up the paint lightly.
And as I mentioned: if you’re using the chalk paint, the thicker the paint, the more brush strokes you’ll see on your dresser, which may be the look you’re going for. If you mix in a teeny bit of water to thin out the paint, it will go on more smoothly and evenly without as many brush strokes. Depends on the look you want. Play around with it on a sample piece if you’re nervous about “ruining” your good piece.
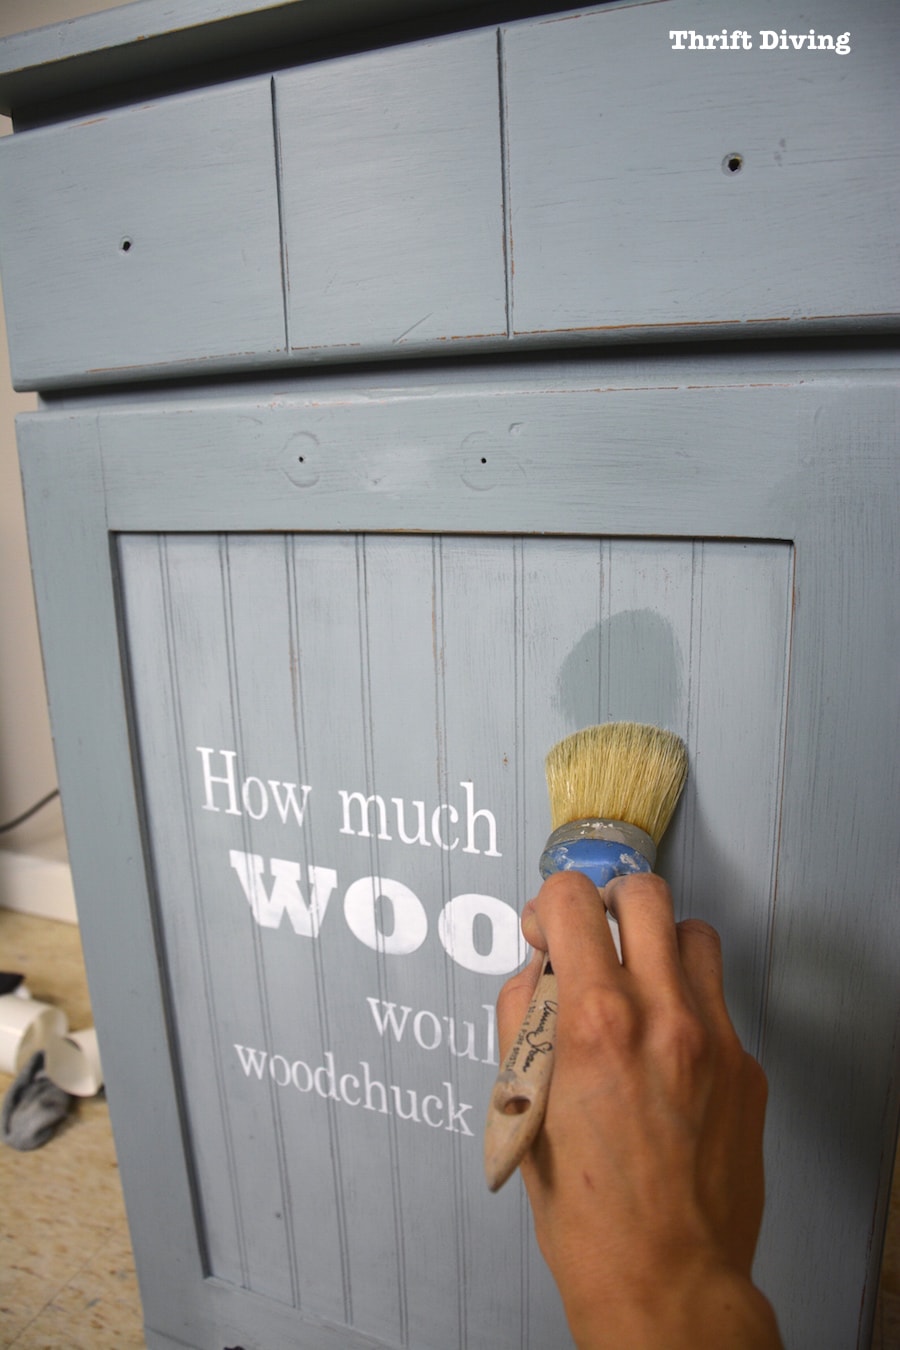
STEP 9: Stencil Your Dresser!
I love stencils. They’re the easiest way to decorate a dresser with just stenciling on the drawers or the whole piece (watch this video tutorial on how to use stencils on furniture). Just make sure that the dresser drawers are dry first.
The stencil you see here is my favorite damask stencil!
But it doesn’t stop with stencils on your dresser. You can also glue fabric to dresser drawers, as I did with this set of fun bedside nightstands! I picked them up for about $7 each from a yard sale, and glued some French fabric to the front! You can watch this video tutorial on how to glue fabric to wood drawers or you can read the blog post: BEFORE & AFTER: Shabby French Night Stand Makeover.

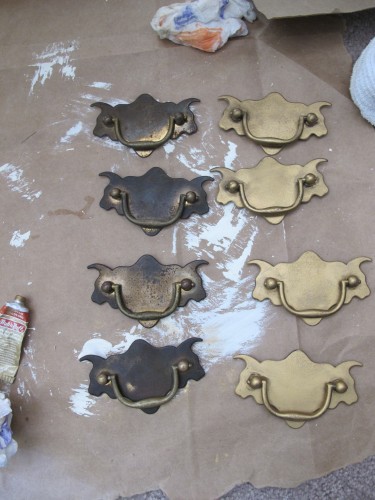
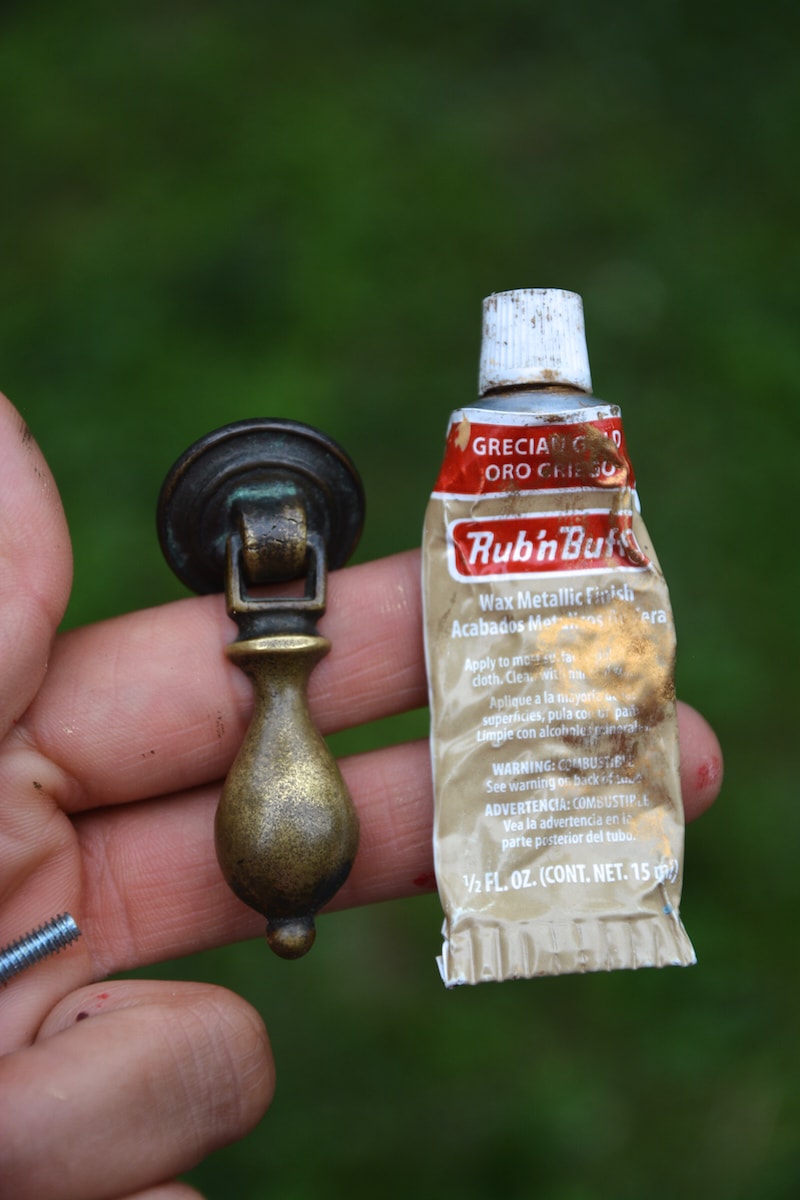
You might want to change the knobs or handles. But if you’ve ever shopped for knobs or handles, they can get pretty expensive. What I like to do is use a little bit of Rub ‘n Buff, which is a metallic wax paint, that can totally transform tarnished hardware. That means you can reuse the same knobs and pulls, especially if they suit the dresser, and save a bit of money! Be sure to check out my post on What is Rub ‘n Buff and 5 Ways to Use It.
STEP 10: Do You Need Wax or a Sealer??
I’ll admit something to you: painted furniture can chip. It can wear down. It can get stained and worn. Especially if it’s a piece that gets a lot of “traffic,” which means that you’ll be putting a lot of things on it…or you’ll be touching it a lot…etc.
Since that’s the case, you definitely need to either wax it or add a sealer (also known as a top coat).
Let’s talk about whether you want to wax or add a top coat for your painted dresser.
If You Want to Wax Your Painted Dresser
Most brands of furniture paint, like Annie Sloan, Country Chic Paint, and more, will offer a wax as part of their line up of products. I love how deep the colors become after adding clear wax. You can see below in this project I did, I used a wax brush to apply some clear wax, and it immediately took on a deeper color. You can use a wax brush, but they’re often pricey (like $30!). Or you can just apply a light coat with a lint-free cloth.
To add clear wax, simply wipe on a thin coat, let it dry for a few minutes, and then buff it out. It will leave a smooth, slight satin appearance. Don’t panic if it looks streaky. Just keep going over it and buffing it out.
There’s something called dark wax that furniture paint companies make with is more so to help “age” a piece of furniture and make it appear more vintage and worn. I personally don’t care for dark wax, but it’s definitely something you should have on hand in case you’re painting a dresser that has some details you want to use the dark wax for.
But here is the most important tip about using dark wax:
ALWAYS APPLY CLEAR WAX FIRST
That’s right. Apply clear wax to your painted dresser first, and then apply any dark wax. The reason why is because the clear wax creates a barrier between the furniture paint and the dark wax. If you were to apply dark wax directly to a chalk painted dresser, you will essentially stain and ruin the paint. There is no getting dark wax off of painted furniture. LOL. You’d be soooo upset. However, with the clear wax coat protecting the paint, once you apply dark wax, if you make a mistake with the dark wax or change your mind, you can simply clean up the dark wax by using the clear wax to help remove the dark wax.
Bottom line: Always use clear wax first, then dark wax.
And just remember this, too: Wax will need to be reapplied every 6 months. Pain in the butt, but it won’t last forever. 🙂
If you Want to Add a Top Coat to Your Painted Dresser
This is my preferred method of painting dressers and other furniture around my house. It’s easier to use, and some furniture paints make their own brand of sealers so that after you paint your dresser and it dries, you simply slather on a couple of coats of top coat and call it a day.
My rule of thumb is: the more heavily used something will be, the more coats you should add. So for a dresser top, I think 2-3 coats would be fine.
The brand of top coat that I love is called General Finishes High-Performance Top Coat. It’s water-based so it cleans up easy, and creates a nice finish for painted surfaces.
My Painted Dresser: BEFORE & AFTER
Whatever choice you decide for your dresser, painting it will create a dramatic difference in your room!
This is what I had been using for my clothes: a cheapie from Ikea that we bought 13 years ago. (EEK!!! Ikea lasts that long???). Hubby had most of the space, and I have my stuff crammed into the bottom drawer (not to mention it’s totally boring!!).
But now, I’ve got a beautiful painted dresser with stencils all to myself!
Dresser……$60 from the thrift store
Mirror……$15 from the thrift store.
Cute son when he was 3-years-old……..priceless 🙂

Loved this post? Be sure to save it on Pinterest!
![]()
So do you have an old dresser you’ve been wanting to paint? Leave your comments and questions below and add to the discussion!

Download the 5 freebies!

Thrift Diving inspires women to decorate, improve, and maintain their home themselves...using paint, power tools, and thrift stores! Use these 5 printables, checklists, and ebooks to get started!
Did you paint over the lacquer of this dresser? I have a piece with similar finish, but I was thinking that I would need to sand the lacquer off?
Hi Kristin! I did paint right over it! It has held up well. If the original finish is in good condition, you won’t need to sand it off. If you wanted to scuff it up a bit with find sandpaper, you can, but it’s not necessary. Hope that helps!
Amazing piece of content, Thanks for putting everything under one roof!
You’re welcome, Sheila! Please let me know if you have any questions! 🙂
You’re welcome, Sheila! 🙂 Thanks for reading!
Im not sure how old this comment is so sorry. They put the link into it already, saying they used this stencil It wont let me send the direct link tho, as it thinks its spam
https://www.royaldesignstudio.com/collections/damask-wall-stencils/products/french-floral-damask-stencil?variant=1270677056
Love the detail on the drawers, it’s beautiful!
Beautiful stencil details on the front. As long as you are the one using the dresser, who cares what others think about making it your own. It looks really good this way. Thanks for sharing with us at #HomeMattersParty
I love the way the chest of drawers turned out, especially the drawer fronts!!! Not sure when you posted this or if you’ll ever see my comment, but I’d love to know what stencil you used. The birds and flowers are beautiful! :o)