BEFORE & AFTER: Sewing Cabinet Makeover with Pink Color Stain!
I love pink painted furniture.
Others detest it with a passion.
But for me, the color pink elicits something a femininity inside that I hadn’t discovered until my “tomboy” inner child grew up.
As an adult, I can’t get enough pinks, purples, turquoises–“Pass the pastels, please!”
Not only have my walls been slathered with shades of pale pinks (my laundry room) and lavender (my bathroom!), but it’s begun to grace the thrifted furniture that I’ve collected since we moved in 12 years ago.
Over the last number of years, though, I have come to appreciate and enjoy the look of wood. In fact, painting wood furniture is something I do with measured hesitation, especially if it’s “good wood” with lots of beautiful grain.
I once built my own bathroom vanity with red oak, and after spending a pretty penny in raw wood to build it, I couldn’t imagine covering up that gorgeous grain and “cheapening” the wood.
BUT……I also appreciate the appeal of prettying up a space with colorful furniture. And you just can’t get that feminine, pastel-y look with all wood furniture tones (in my opinion).
So I was especially ecstatic to learn about Minwax Color Stain, which comes in semi-transparent and solid, and is almost like a paint, but wipes off with an applicator and leaves color behind without covering up the wood texture.
The best of both worlds: color and wood texture!
Especially with oak, which has a beautiful grain that you want to highlight, painting doesn’t do it any service. But a color stain allows that grain to be seen and filled with liming wax for a cerused oak look!
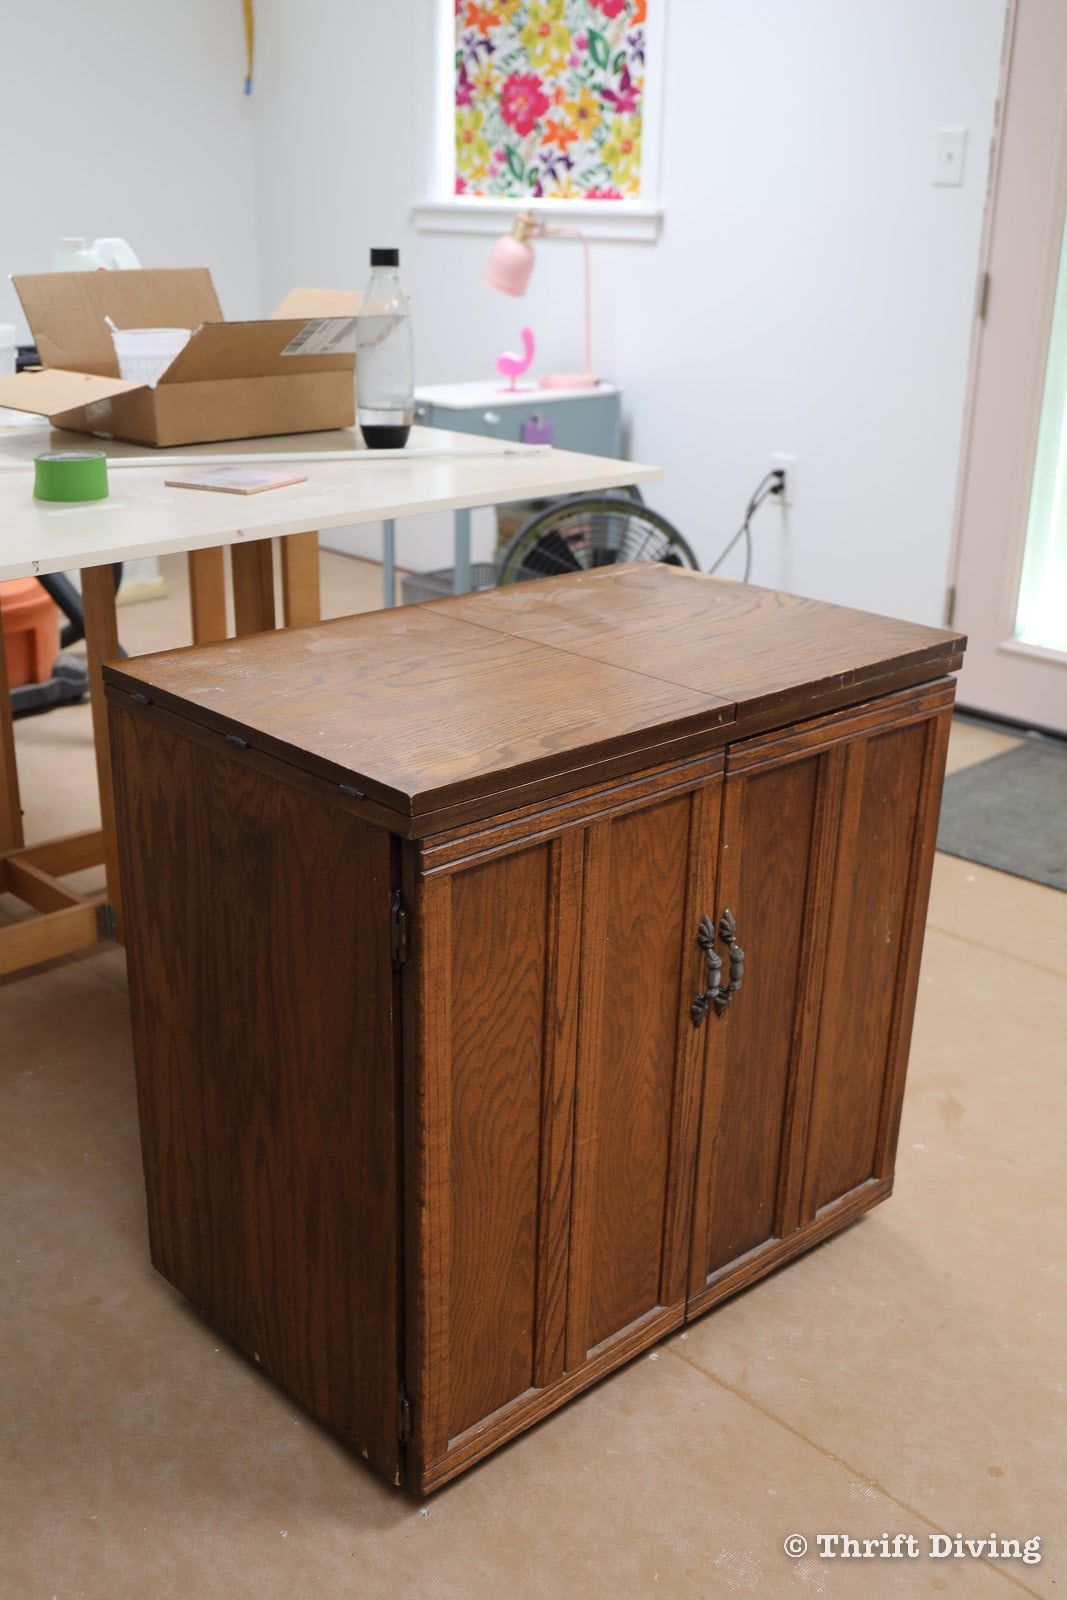
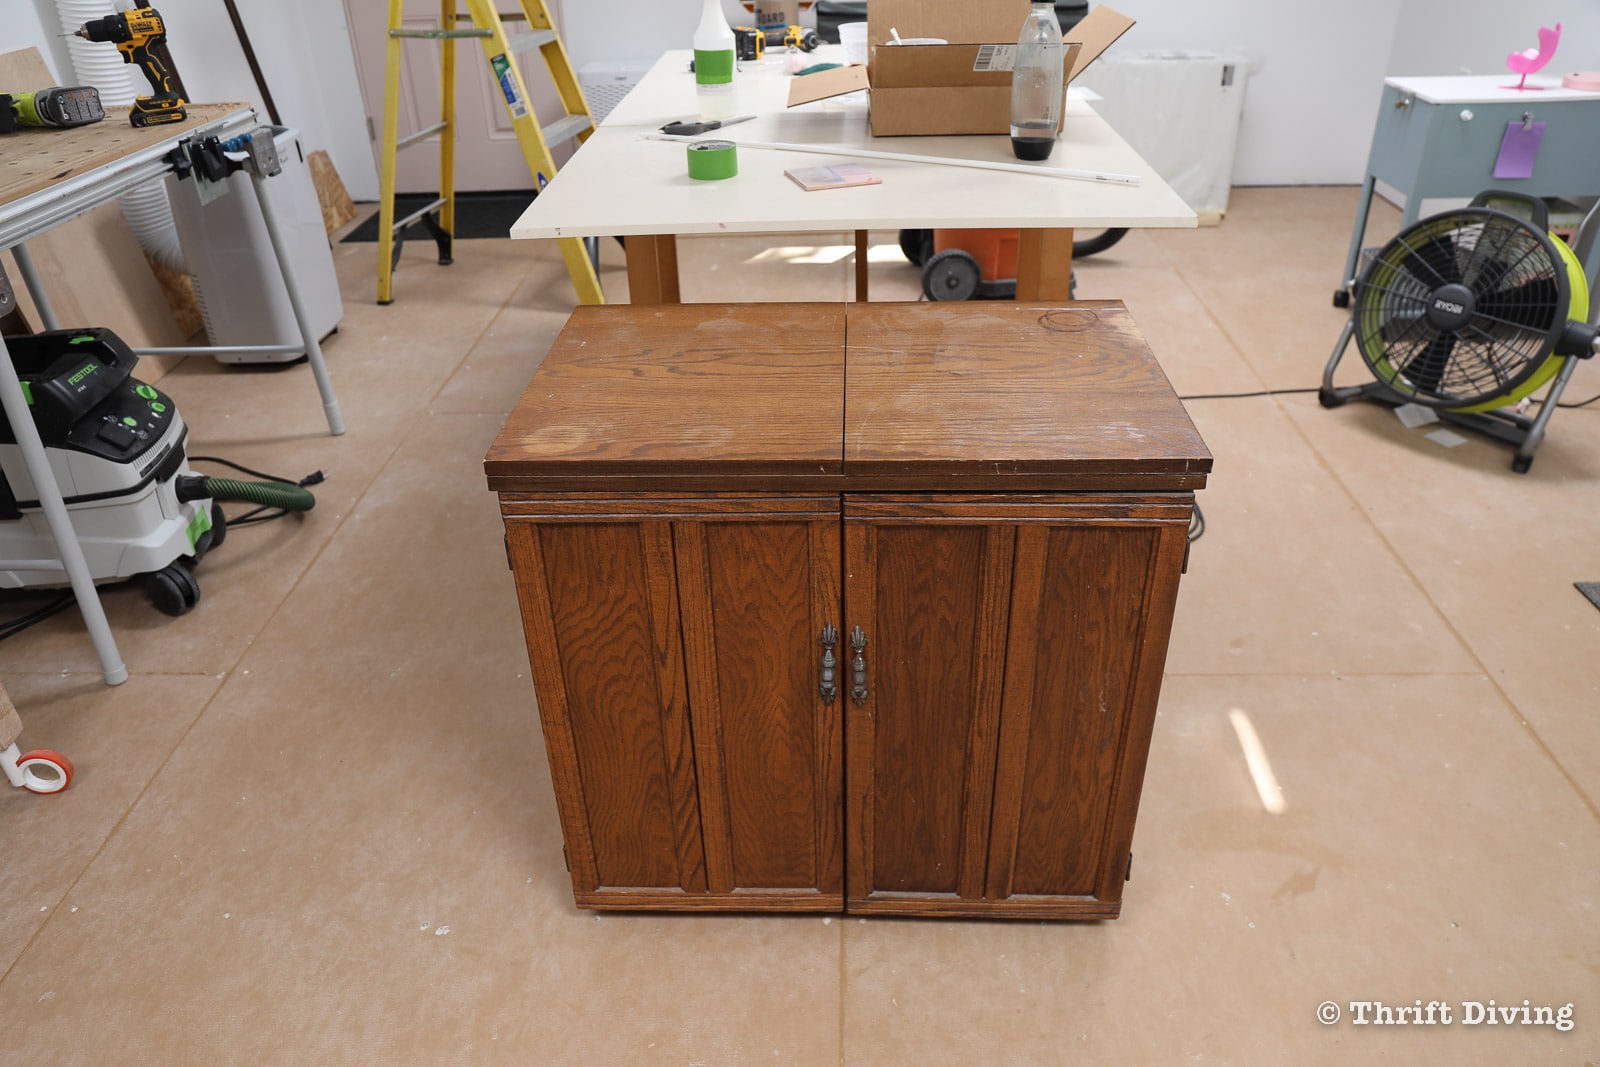
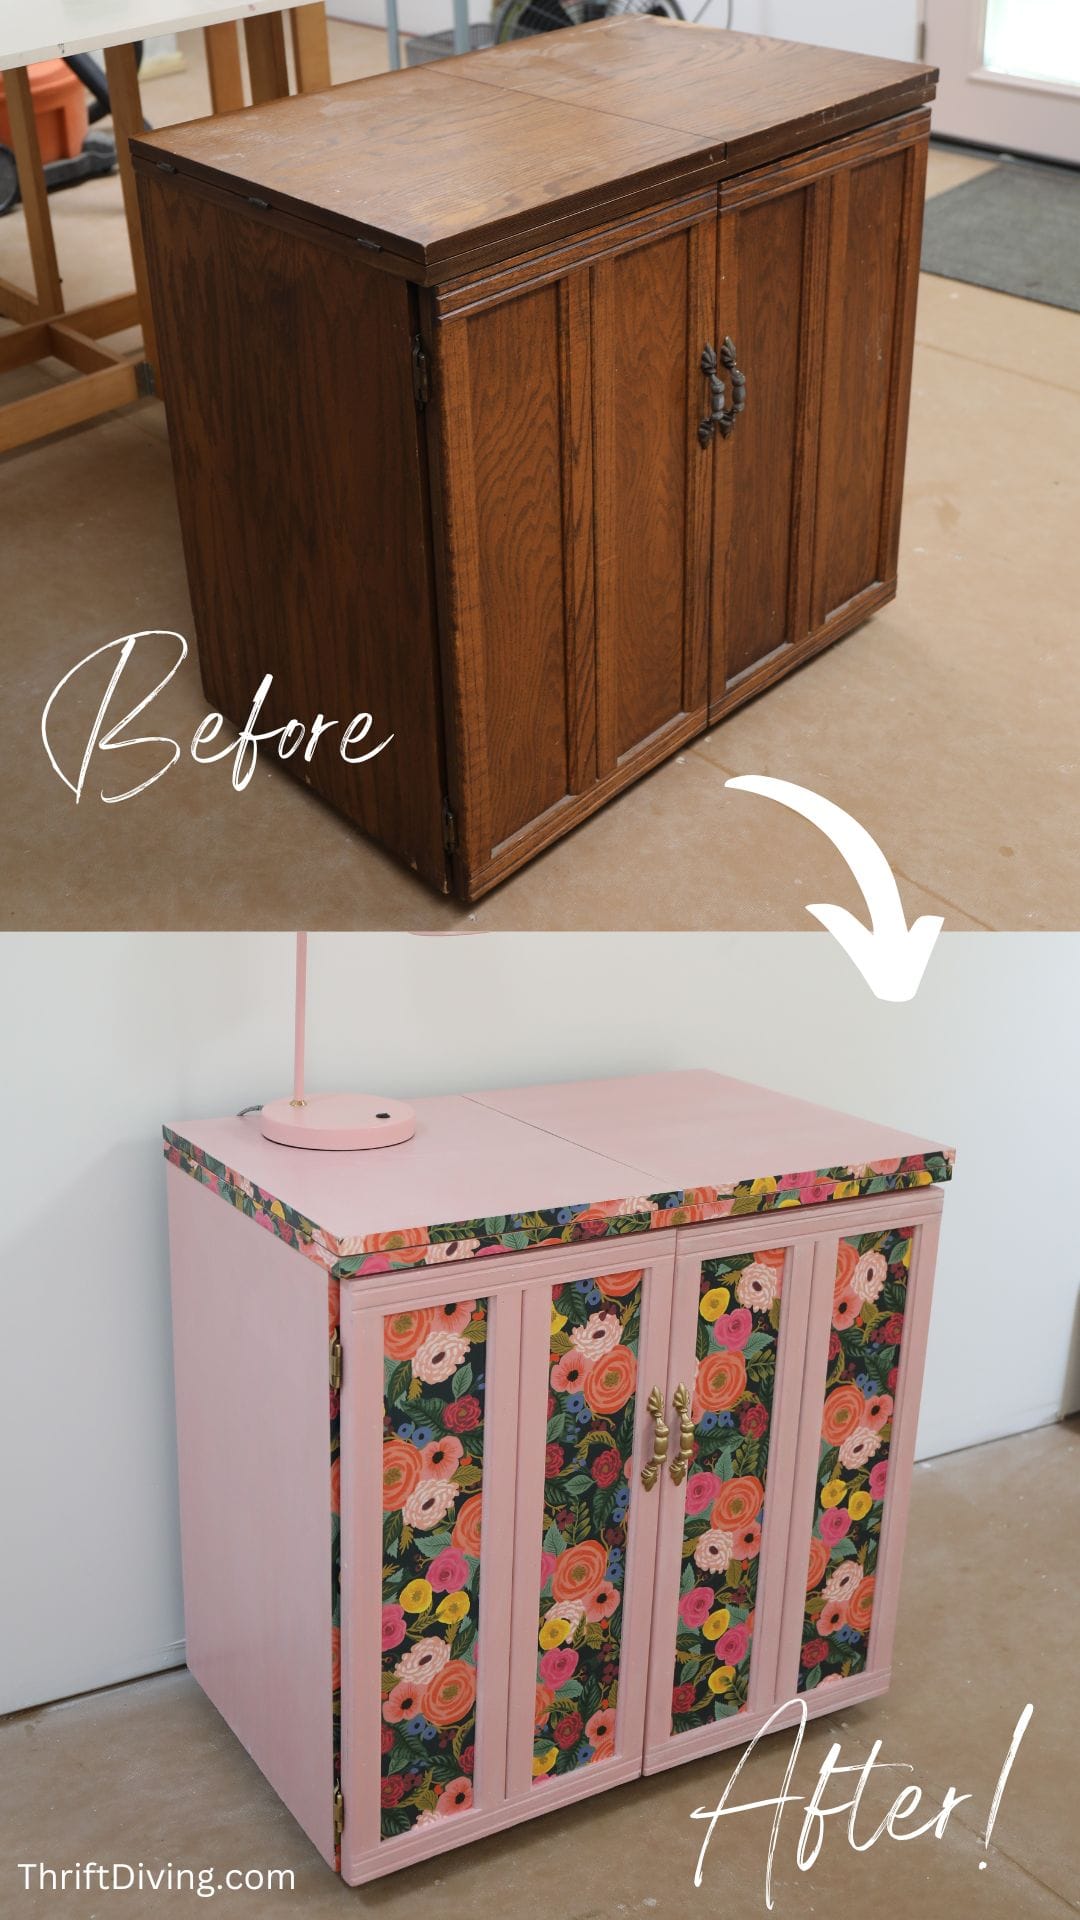
I had found this vintage oak veneer sewing cabinet at the thrift store about 10 years ago for only $40! It was perfect how compact it was, but the dark wood was boring and had some surface imperfections. I could never decide whether paint or stain was the route to go so it just sat for years, with occasional use.
However, with color stain, it’s gorgeous now and is ready to be used in my pretty “she shed” workshop (which is a 16′ x 26′ shed that I had build in 2021; I’ve been finishing off the interior myself when I did the insulation, electrical, and very soon, flooring).
Here’s how it started:
(Click here to save this project on Pinterest).
BEFORE
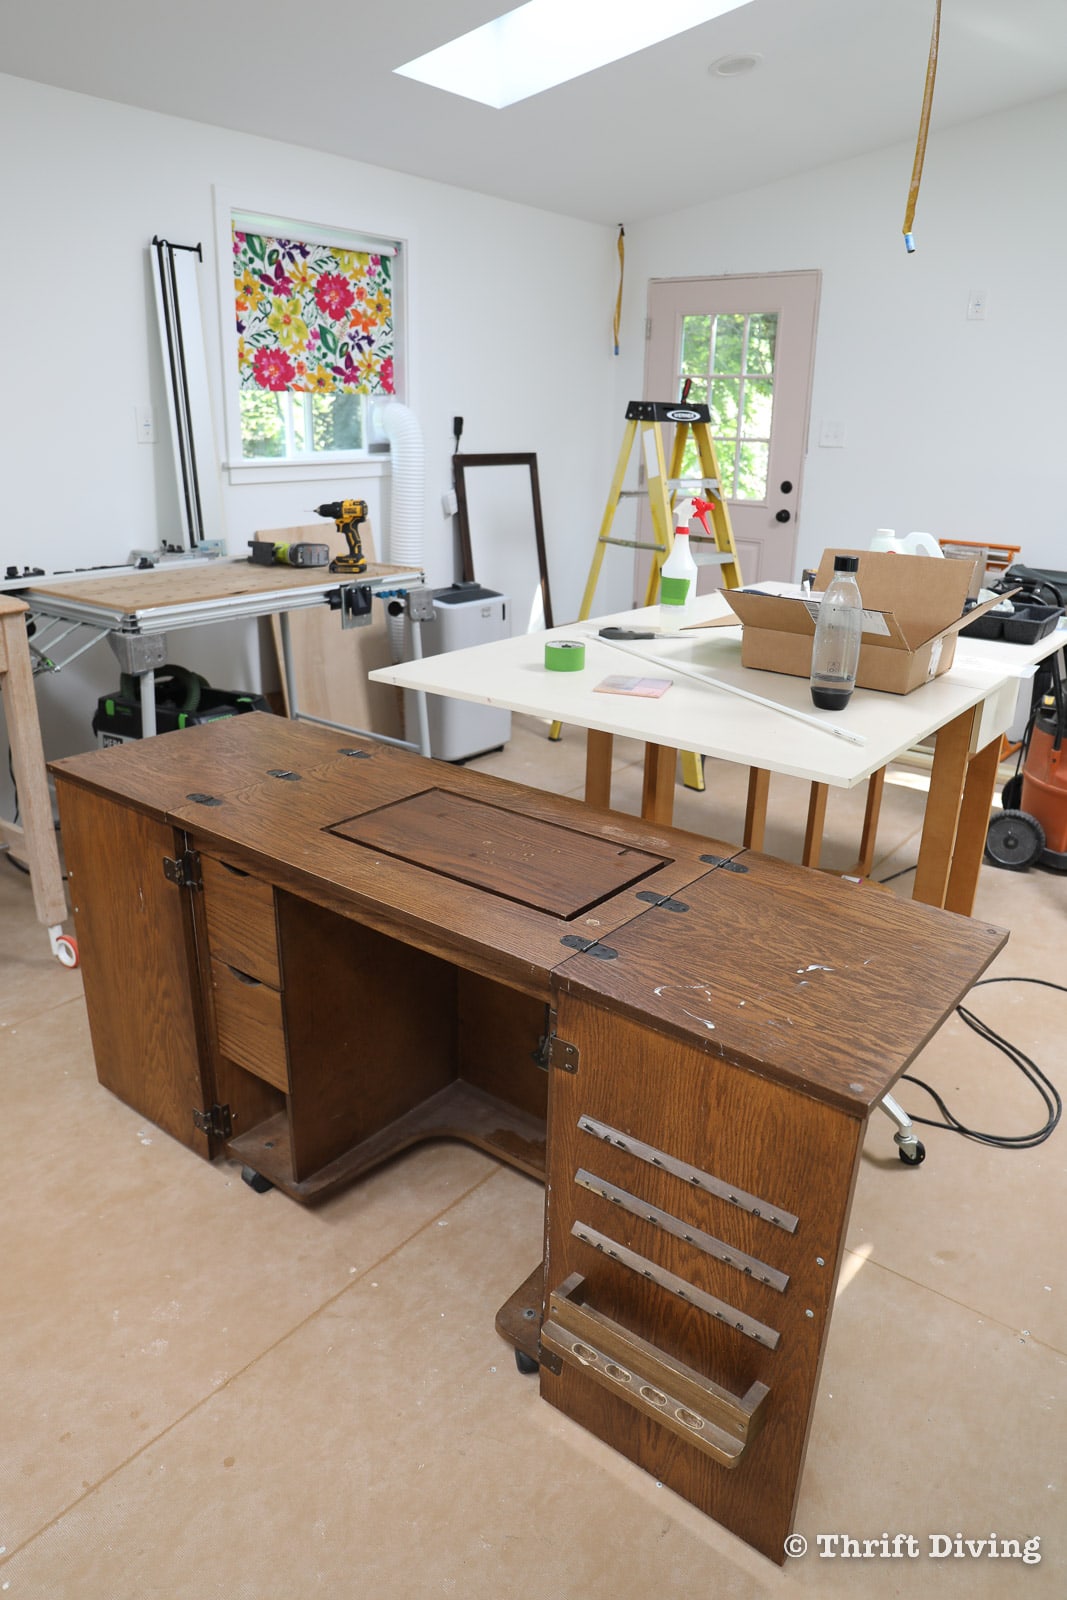
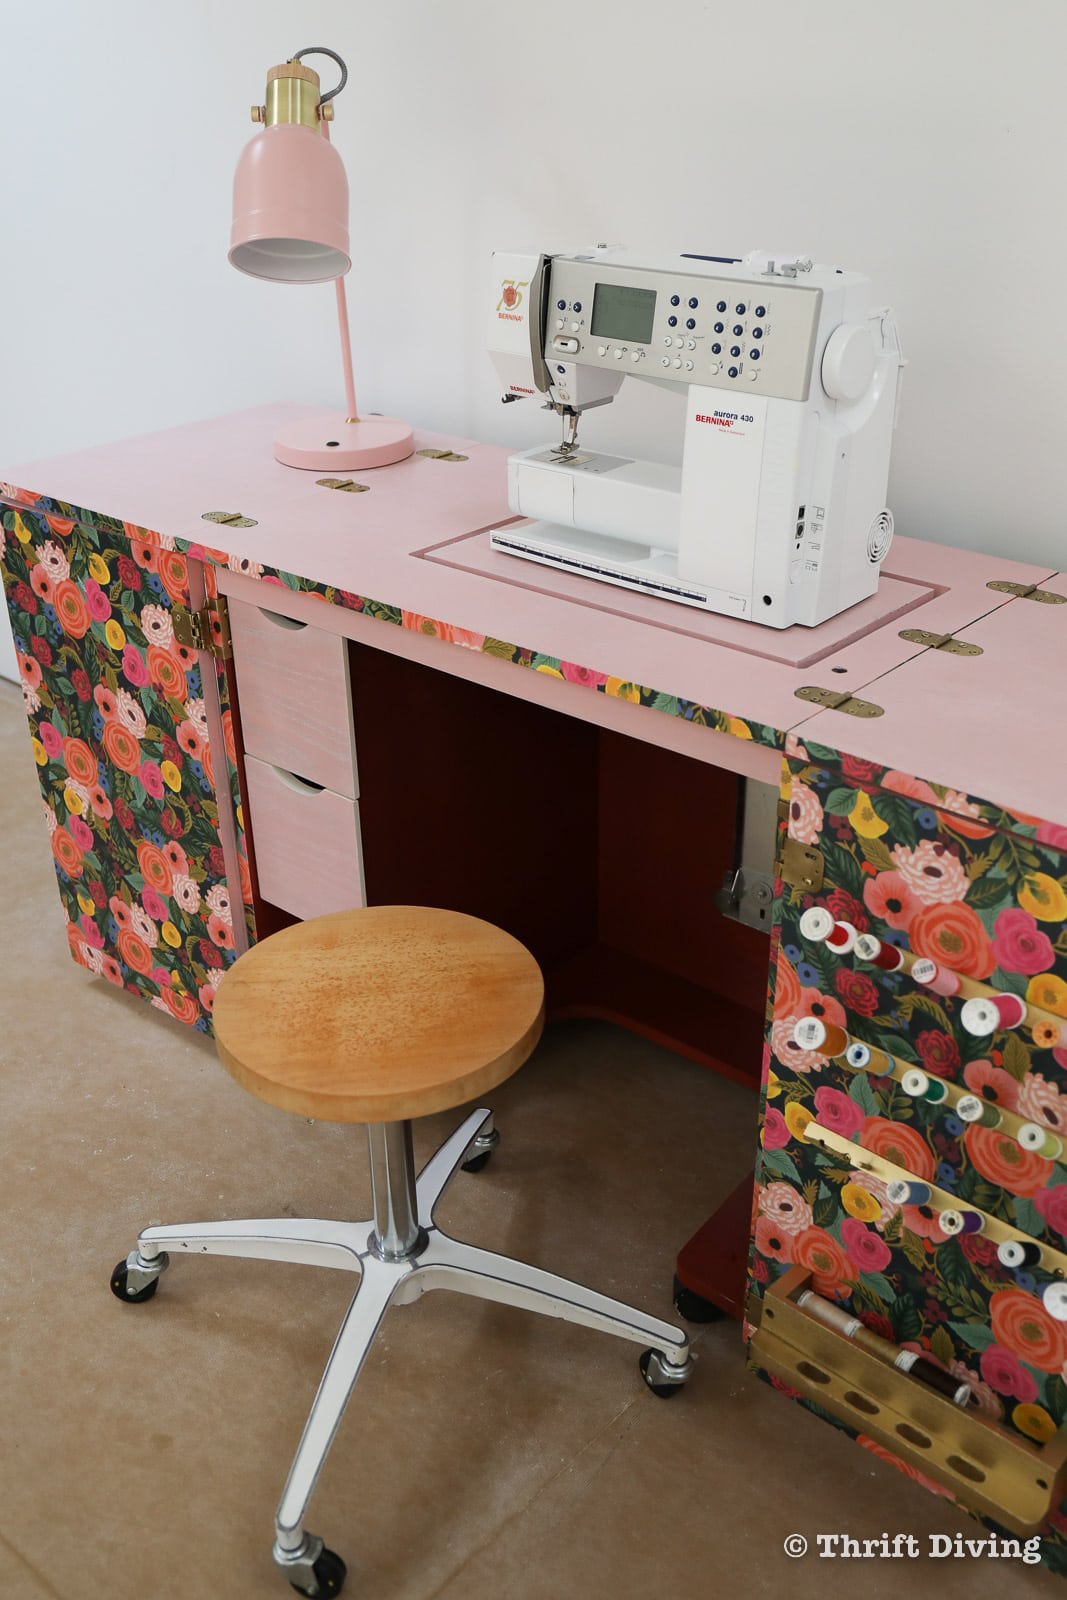
AFTER!
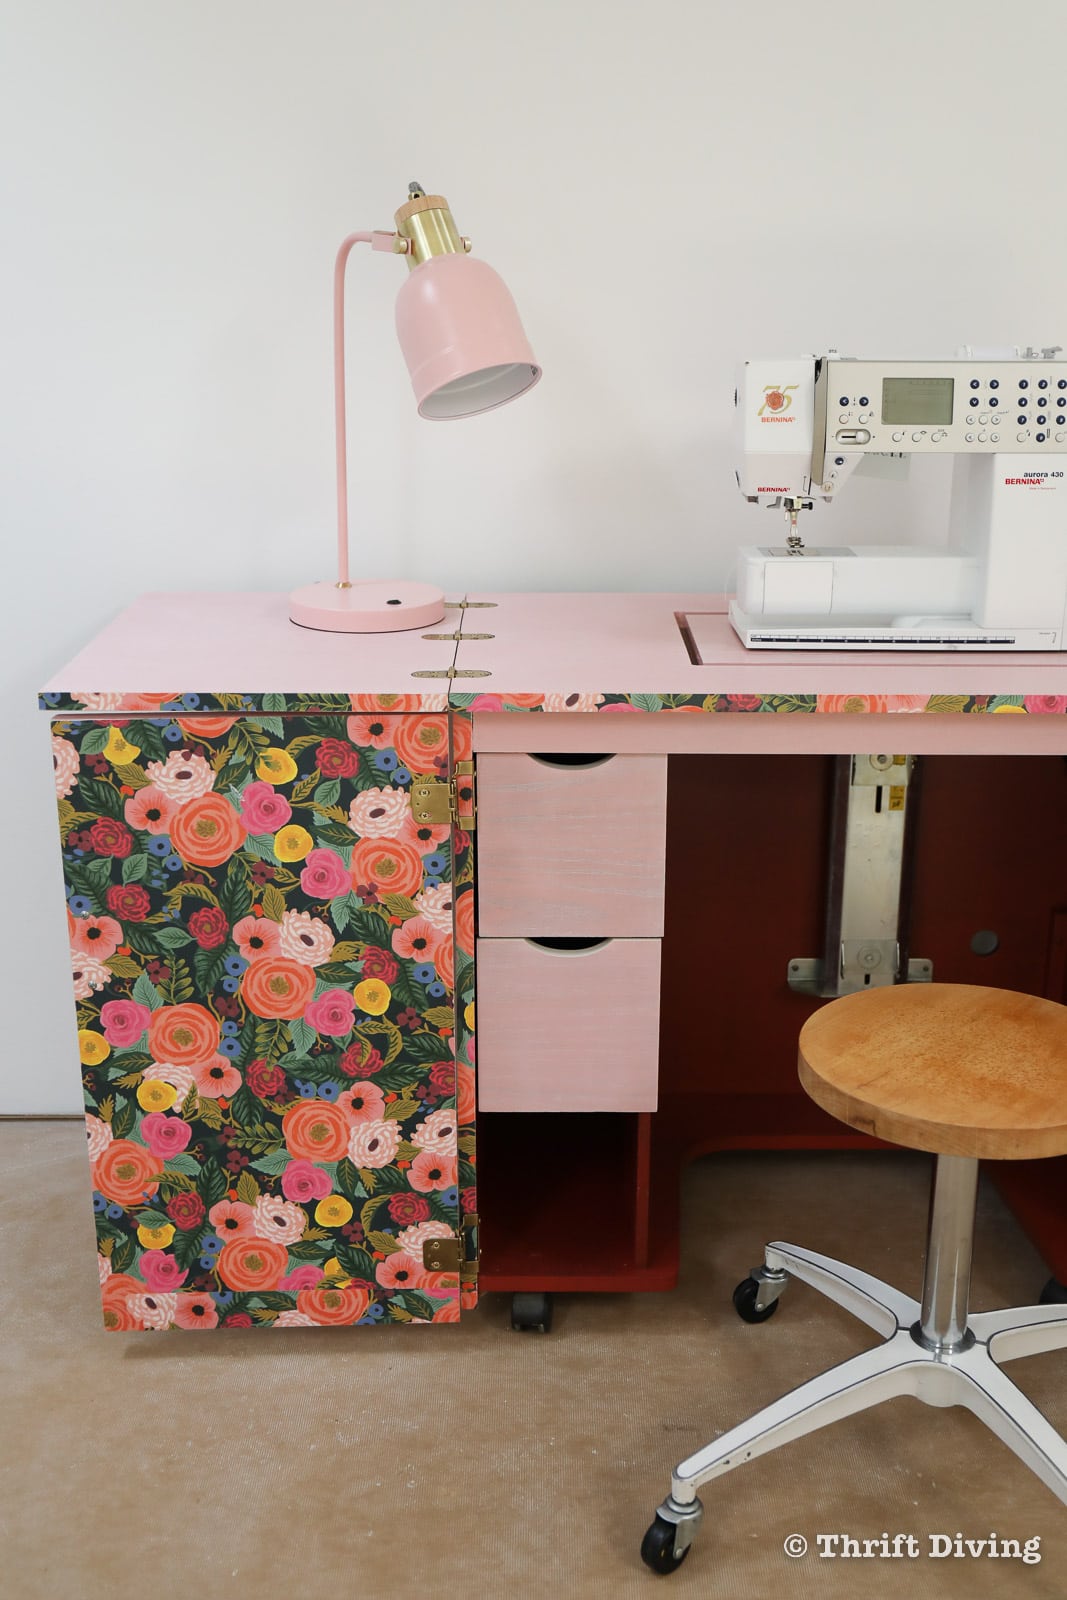
Now it looks amazing and you can see the grain of the oak veneer! The decoupaged paper adds a creative touch and surprise when the sewing cabinet unfolds!

Watch This Project in Action!
You can watch this project here, or go to my YouTube channel to see the transformation, among all my other DIY projects!
Tools & Materials
- Minwax Wood Finishes – pink
- Minwax Wood Finishes – deep red
- Pre-stain wood conditioner
- Liming wax
- Pretty paper
- Paint brush
- Orbital sander (more expensive)
- Orbital sander (less expensive)
- Paint remover (safest paint remover that I use)
- Paint scraper (optional)
- Mineral spirits (for cleaning off residue from paint stripper)
- Synthetic applicator
- Screwdriver or power drill
- Towels
- Mod Podge (for decoupage)
- Minwax Polycrylic top coat
- Sandpaper
STEP 1: Remove Hardware from Sewing Cabinet
The most boring part of a furniture makeover project is having to deconstruct it to make it over! I’m notorious for losing at least one screw from each project. 🙂 I’ve since learned that I should put all the hardware in a plastic baggie to keep it all together. But even so, there’s always that one screw that I can never find…

STEP 2: Apply Stripper to Wood Surfaces
When I’ve done furniture makeovers in the past, it’s usually either/or:
- Paint it
- Strip and stain
If I paint it, I don’t sand or prime (unless the furniture is in bad condition; in that case, check out this post on when you may need to sand or prime).
If I strip and stain it, I will use a chemical stripper (or use an orbital sander to remove the existing finish).
But this vintage sewing cabinet makeover was a bit different. For this project, I wanted to use a color stain, which would add color, but be a stain, and not necessarily a paint.
I’ll explain more below, but because I was going to expose more of that awesome oak grain, the old finish had to come off. I wanted the wood to be as close to “raw” as possible.
LEARN MORE: Click here to read more about how to strip furniture safely!

Once all the old finish is removed and scraped off, use some mineral spirits and steel wool to clean off the residue.
NOTE: FYI…… Be sure to thoroughly allow any rags, towels, or steel wool to thoroughly dry afterwards by laying them flat to dry. Rags and towels soaked with oil-based stains or mineral spirits are combustible and should only be tossed once they’re completely dried).

When I strip furniture, it always tends to leave stained, discolored wood. I like to run my orbital sander over it to further clean up the wood. I would recommend either a 150-grit medium grit sandpaper (or you can do a 220-grit fine sandpaper). However, if you’re planning on staining your wood, stop at the 150-grit sandpaper so the stain has some roughness to grab on to.
If you’re going to leave it natural or use an oil or wax, 220-grit fine sandpaper is ideal.

And just a heads up…. don’t feel that you have to use chemical stripper first to strip furniture to remove old finish! You can totally use the orbital sander to do the entire job!
It can be messy, though, because of the dust. And you might go through a lot of sanding pads that can get gummy and clogged because of all the layers of finish it is removing.
As for sanders, I have upgraded my orbital sander to a Festool sander because it works with their dust extractor (and leaves very little dust in the air!). But they’re expensive.
I still wholeheartedly recommend either a RYOBI orbital sander or a DeWalt orbital sander (which has the ability to adjust the speed, which I like). Just be prepared for a lot of dust and be sure to wear a mask!

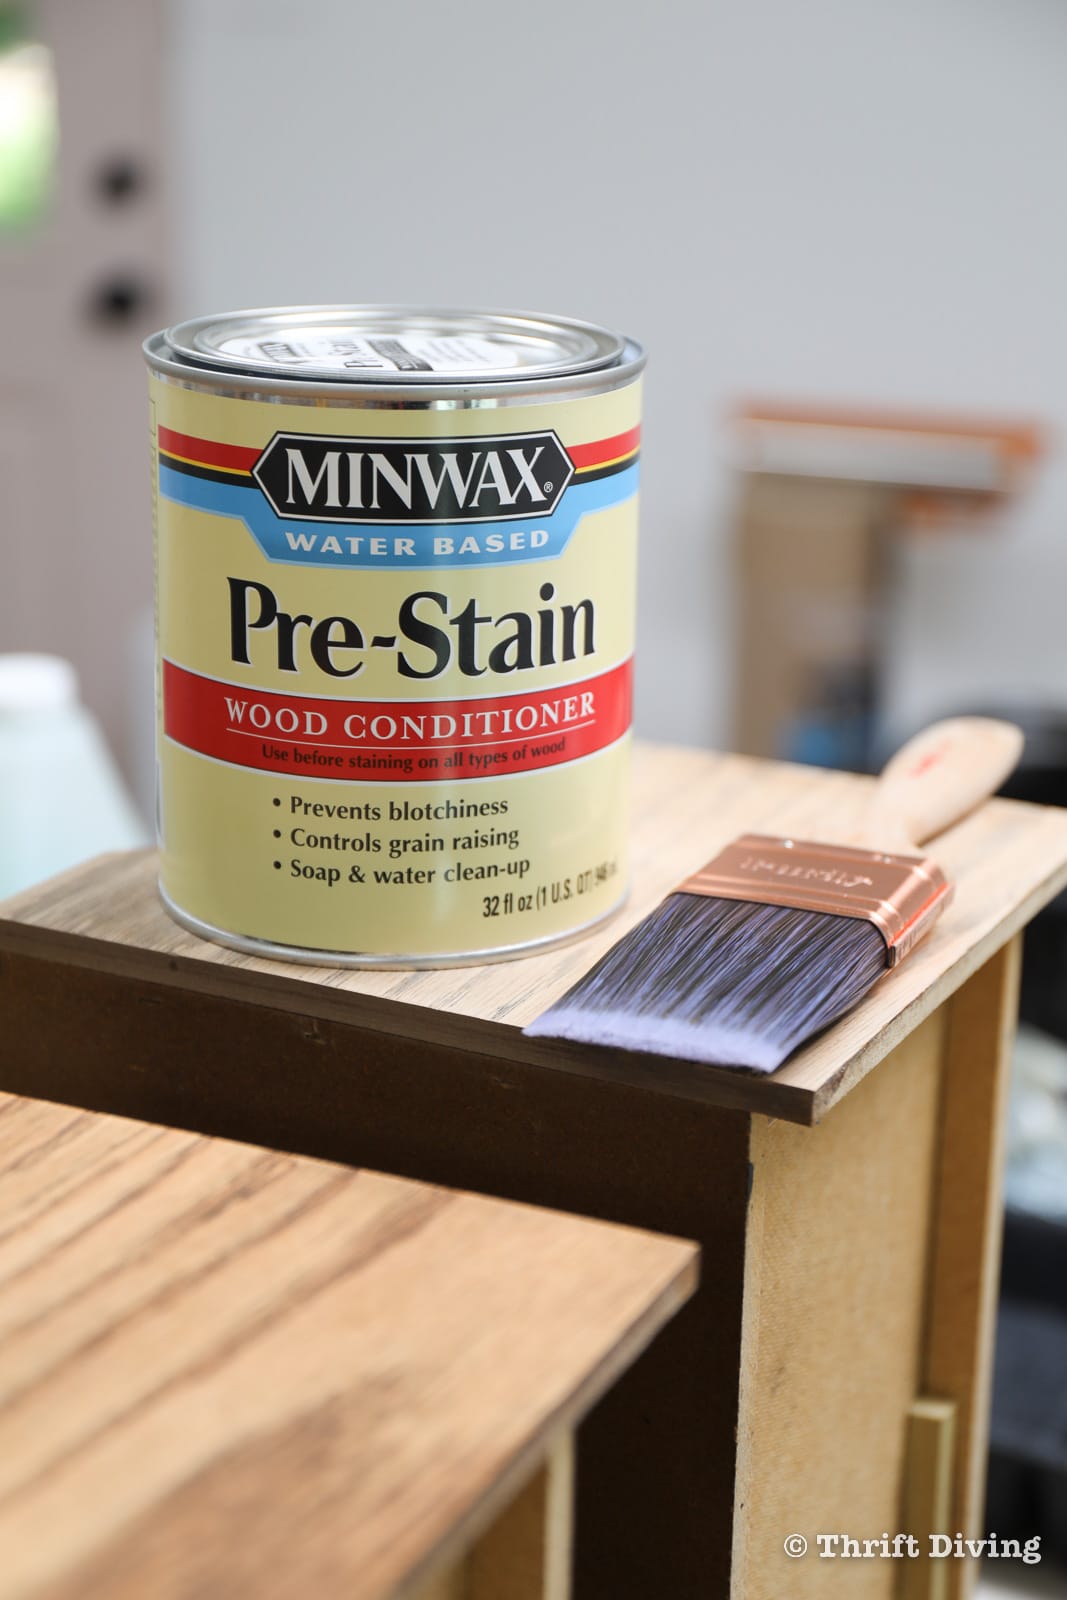
STEP 3: Apply Pre-Stain Wood Conditioner
I remember when I used to skip pre-stain. I didn’t think I needed it because….well….I was inexperienced and just didn’t know the importance of it.
But I describe it like this: If you’re wearing a face full of makeup, you’re likely going to want to start with a foundation, which smoothes everything out so that the blush, bronzer, etc. can be evenly applied and don’t look blotchy on your face.
Pre-stain acts the same way, especially with soft or porous woods, like pine, birch, and maple.
I’ve gotten into the habit of using it for all types of wood, no matter what, so that I don’t risk my wood looking blotchy for any reason.
Here’s how to use pre-stain:
- Brush it onto the wood with a synthetic paint brush.
- Allow it to penetrate for a few minutes.
- Wipe off in the direction of the grain with a clean lint-free towel.
- Allow the wood to dry for 30 minutes.
- Use fine sandpaper to knock down any “burrs” or fuzziness to your wood.
Once you’ve done those steps, you’re ready for stain!
STEP 4: Apply Solid Wood Stain to Give Color to Wood
Now, I’m not using stain, per se….but I am going to use a color stain. The idea is that it’s thicker than traditional stain (about 5x thicker!), almost like a paint, but when wiped off with a synthetic applicator pad, it leaves the wood texture instead of completely covering it up.

STEP 5: Add Liming Wax to Highlight the Grain
I love, love, love refinishing oak furniture! The grain is something truly amazing, especially when you use something like liming wax to highlight the grain!
In the past, I have used wood dye, followed by liming wax, and created some amazing pieces of furniture, like this thrifted wooden chest I refinished!
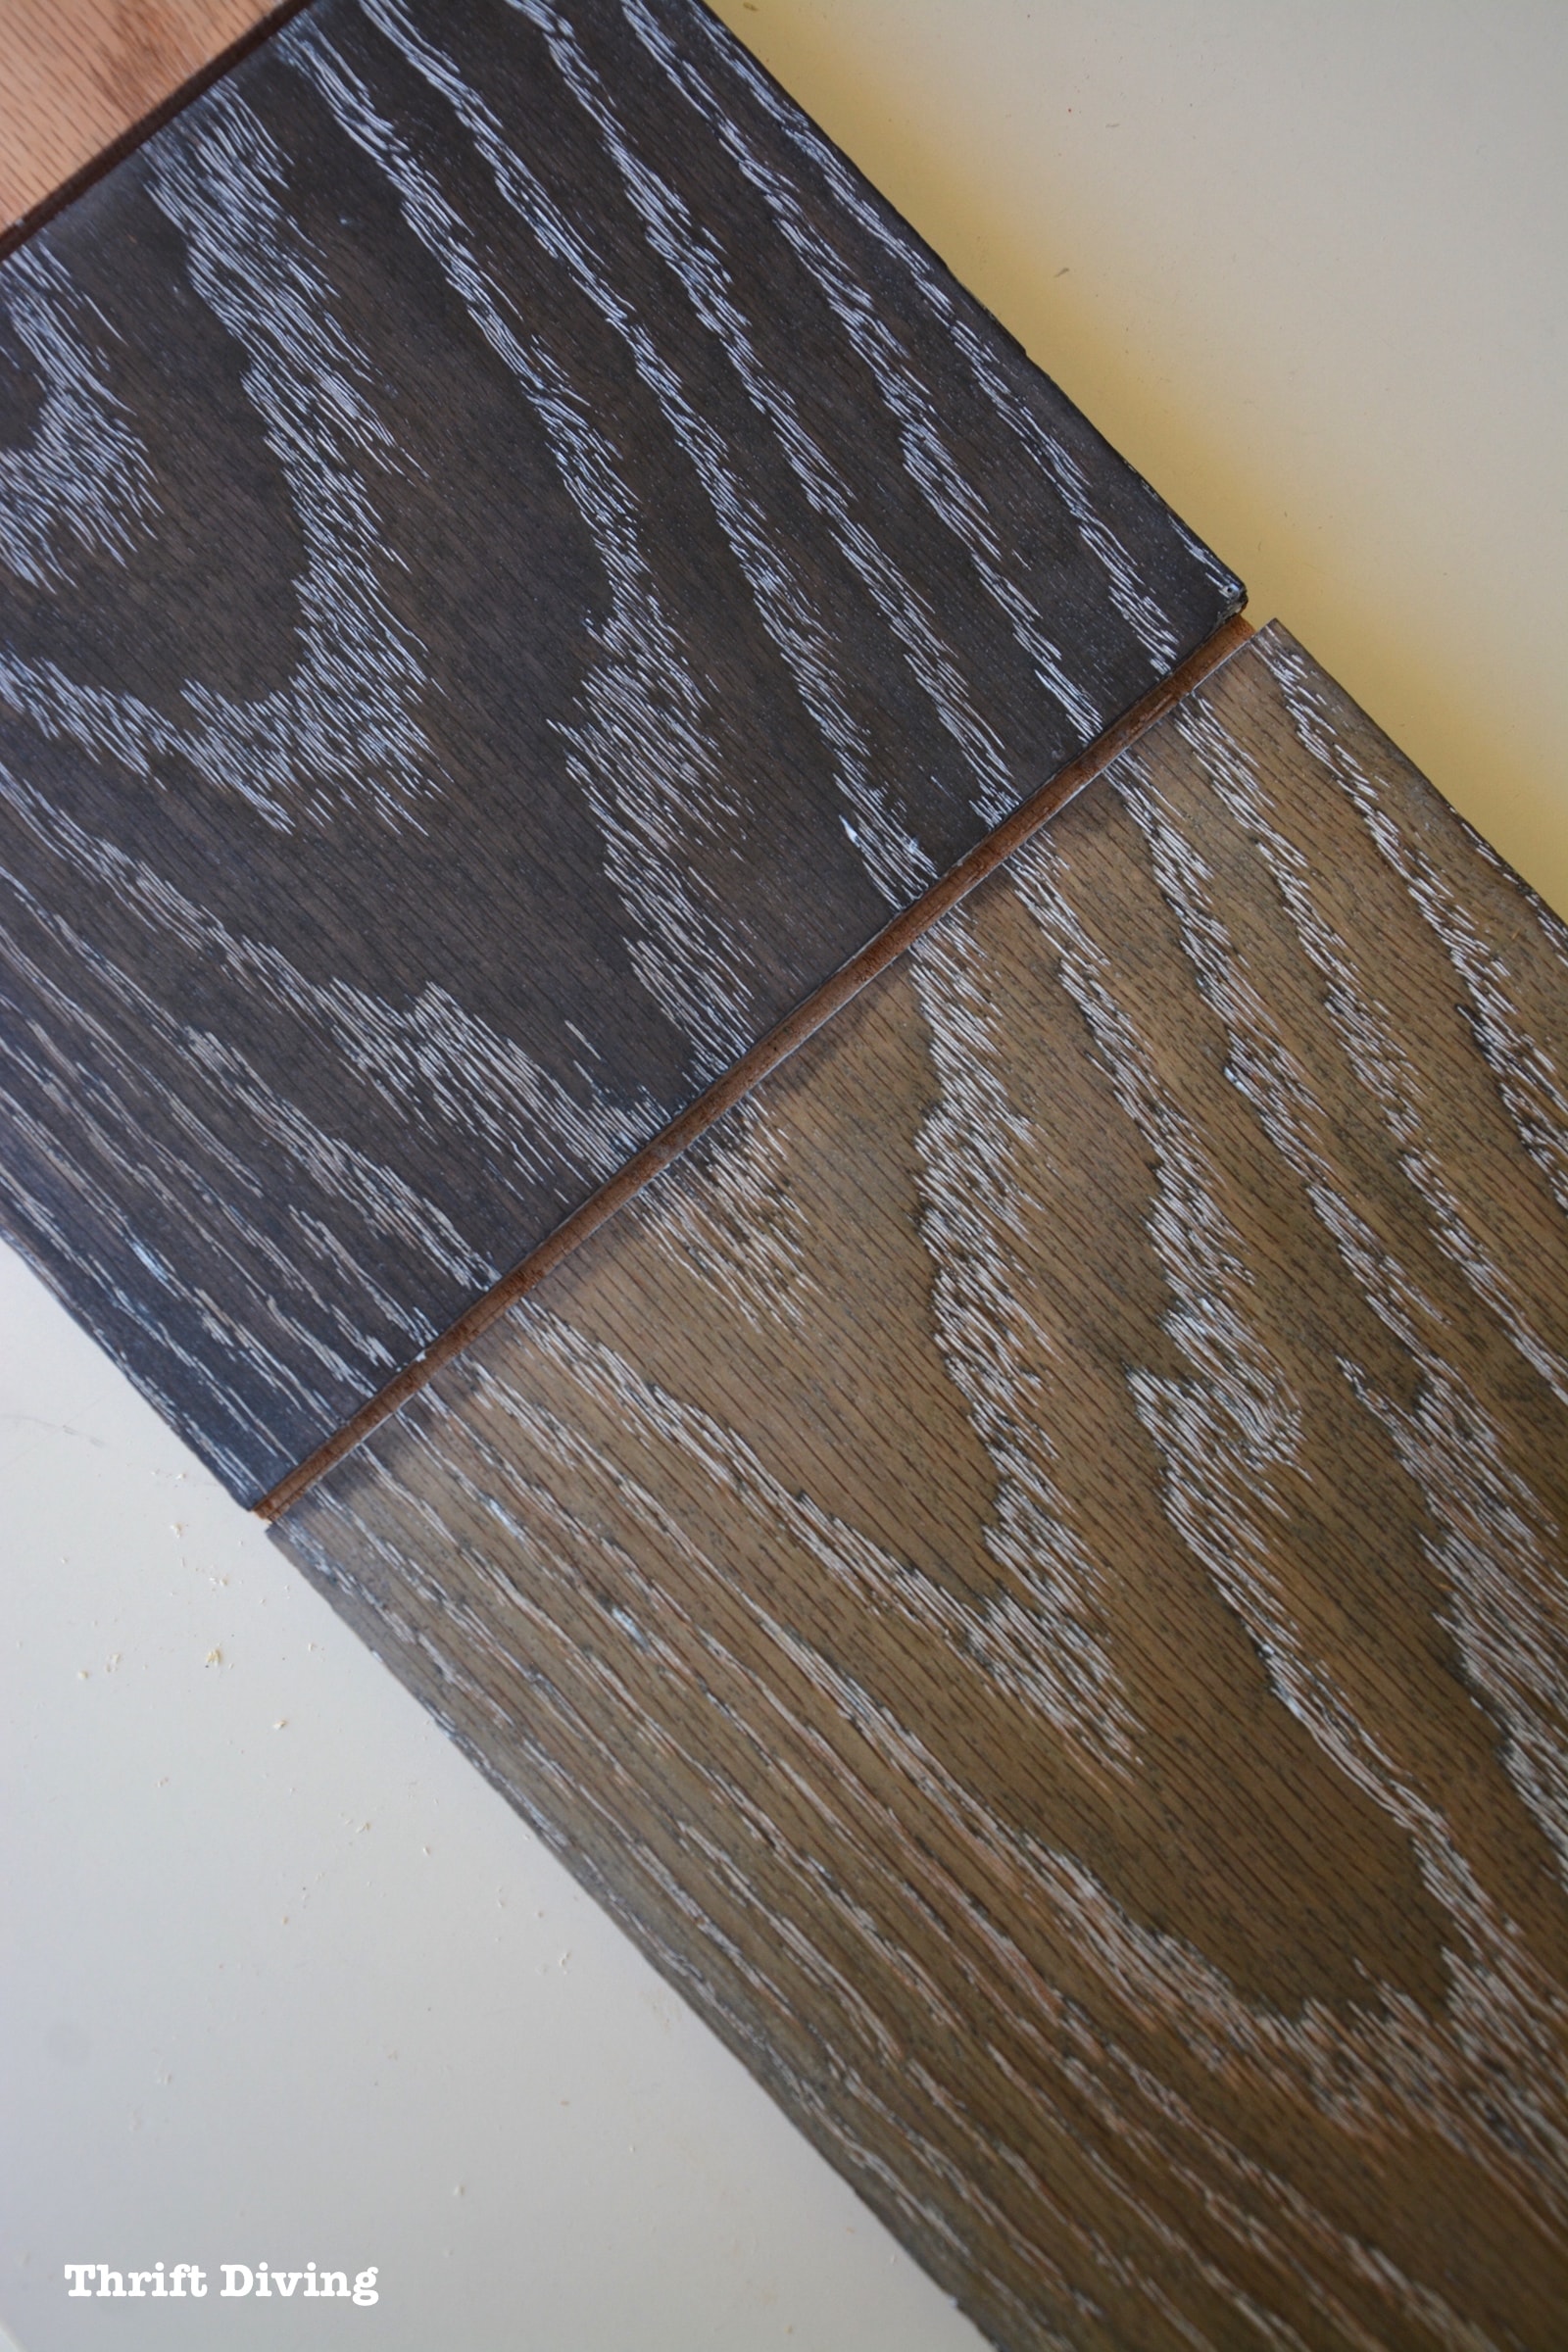
But generally, those pieces of furniture have all been darker woods. That’s not the look I’m going for with this sewing cabinet. I want this to feel yummy and feminine in my “she shed” workshop, which is why I wanted pink. But I also didn’t want to cover up that wood grain; I wanted to highlight it!
Here’s how I used the liming wax to highlight the grain on this sewing cabinet!
- Using a soft cloth, wipe the liming wax perpendicular to the grain.
- Use a thin coat.
- Allow it to dry for 3 minutes.
- Wipe or buff off. (TIP: I find that using a clear wax to remove the liming wax helps to remove the leftover white residue on the surface).
- Add another layer of clear wax. Allow to drive 3 minutes, then buff to a shine.
You’ll be left with the white liming wax in the grain, which gives the wood such pretty dimension!
When this project was done, here is how the pink color stained wood looked with the liming wax! Isn’t it absolutely gorgeous?!?!

STEP 5: Decoupage Pretty Paper to Doors, Trim, and Drawers
I’m sure you saw above that pretty floral paper! Let’s talk about how I did that.
First of all, I will say that when I started this sewing cabinet makeover, I didn’t envision that I would even use that gorgeous floral paper! But that’s how DIY projects are, right? Once you get started, you can’t help but come up with new ideas that you didn’t envision before you started.
I had this floral paper from a couple years ago that I bought at Paper Source. I had planned to use it when I built my closet organizer, but I found that I wasn’t inspired enough to find a use for it.
This vintage sewing cabinet was perfect, though!

I used some of it to line the insert doors of the sewing cabinet with decoupage (I used Mod Podge, which works great).
Here’s how I lined the doors with decoupage:
- Use a lined cutting mat, rotary cutter, and ruler/straight edge to cut pieces to size.
- Apply a thin coat of decoupage to the door insets.
- Apply the paper carefully, starting at one edge, gently lowering it into place, while using a brayer (the roller thingy) to squeeze out any bubbles.
- Use a credit card to press carefully into the corners.
- Add a thin layer of decoupage over the paper to seal and protect it from damage, water, etc. It will dry clear, so don’t worry! And I prefer the Matte finish instead of Glossy.
Watch the tutorial for this vintage sewing cabinet makeover to watch exactly how I decoupaged the paper to the doors (and drawers!).
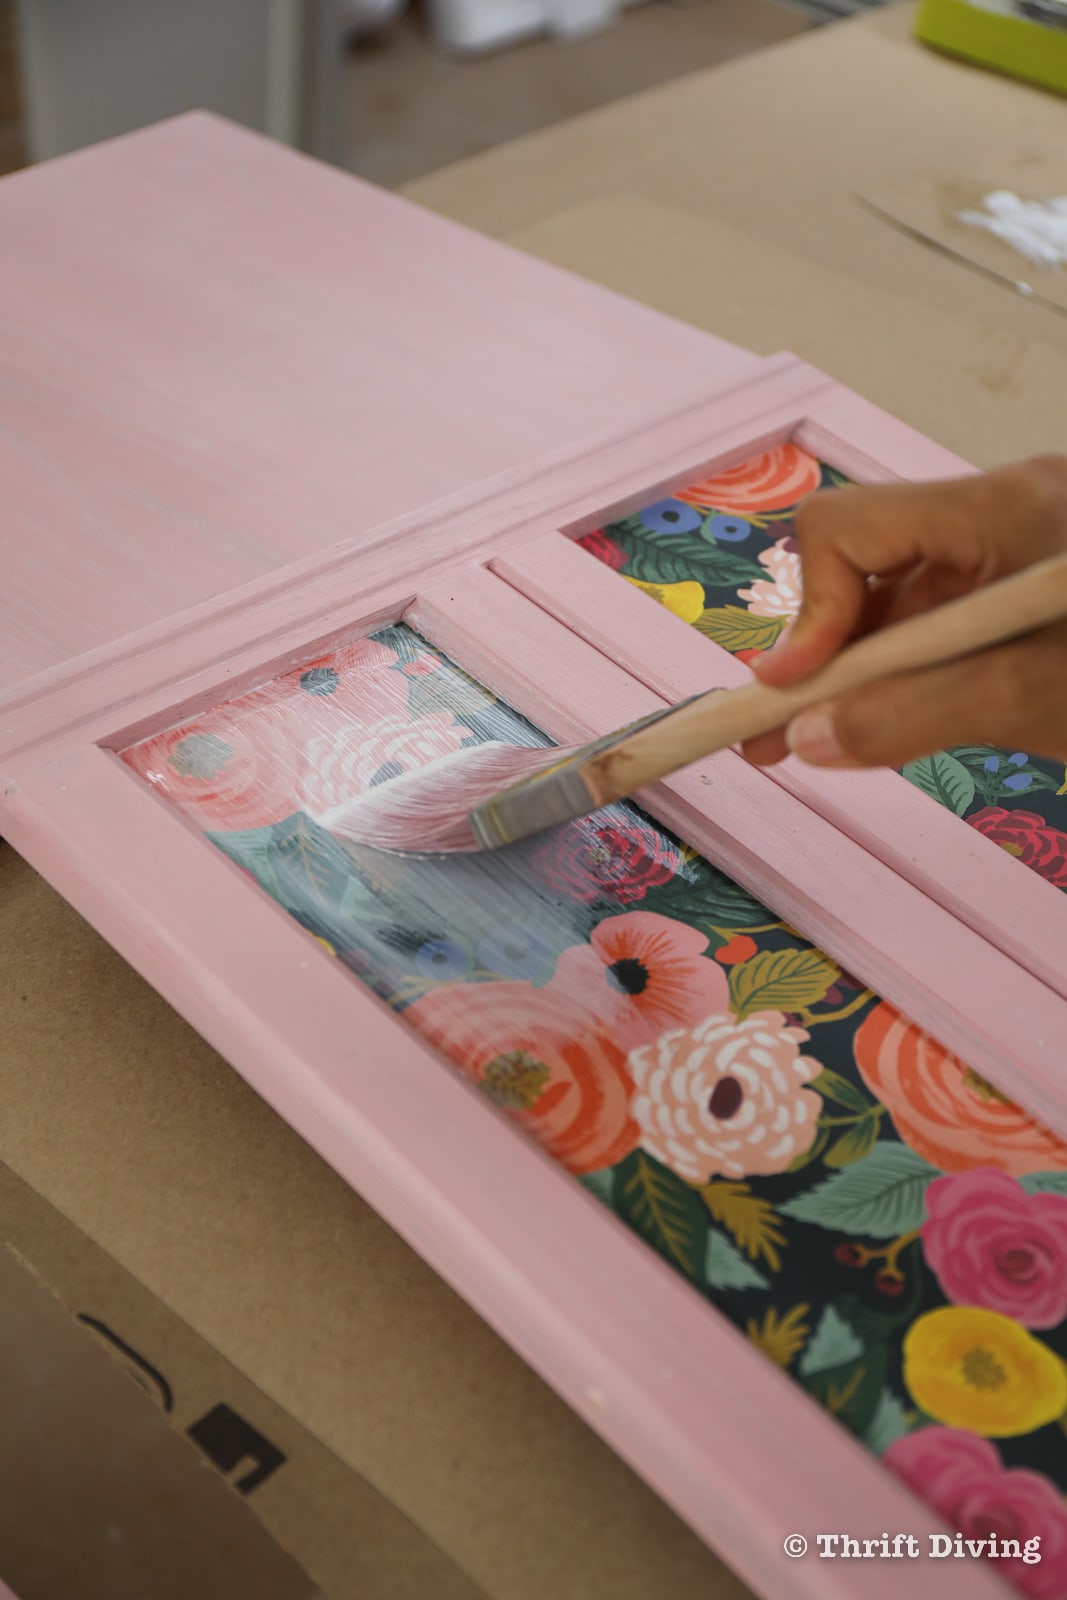

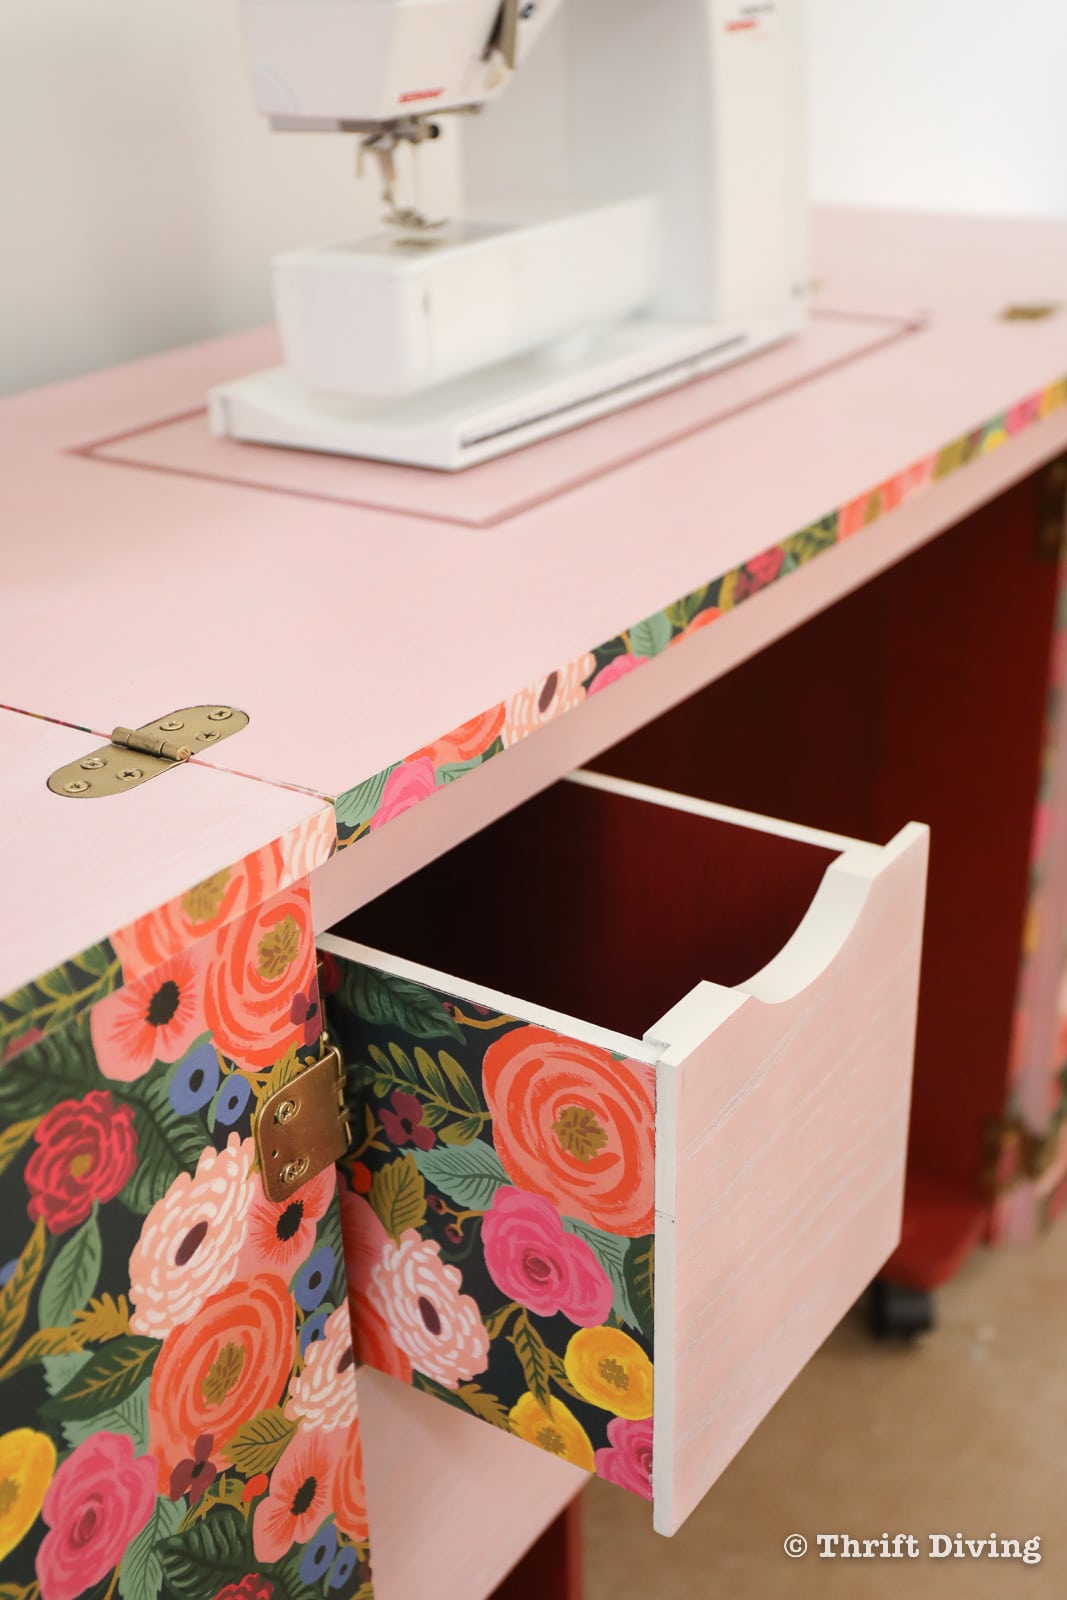
Isn’t this cabinet door a perfect blend of pink paint and pretty paper?! Swoon!

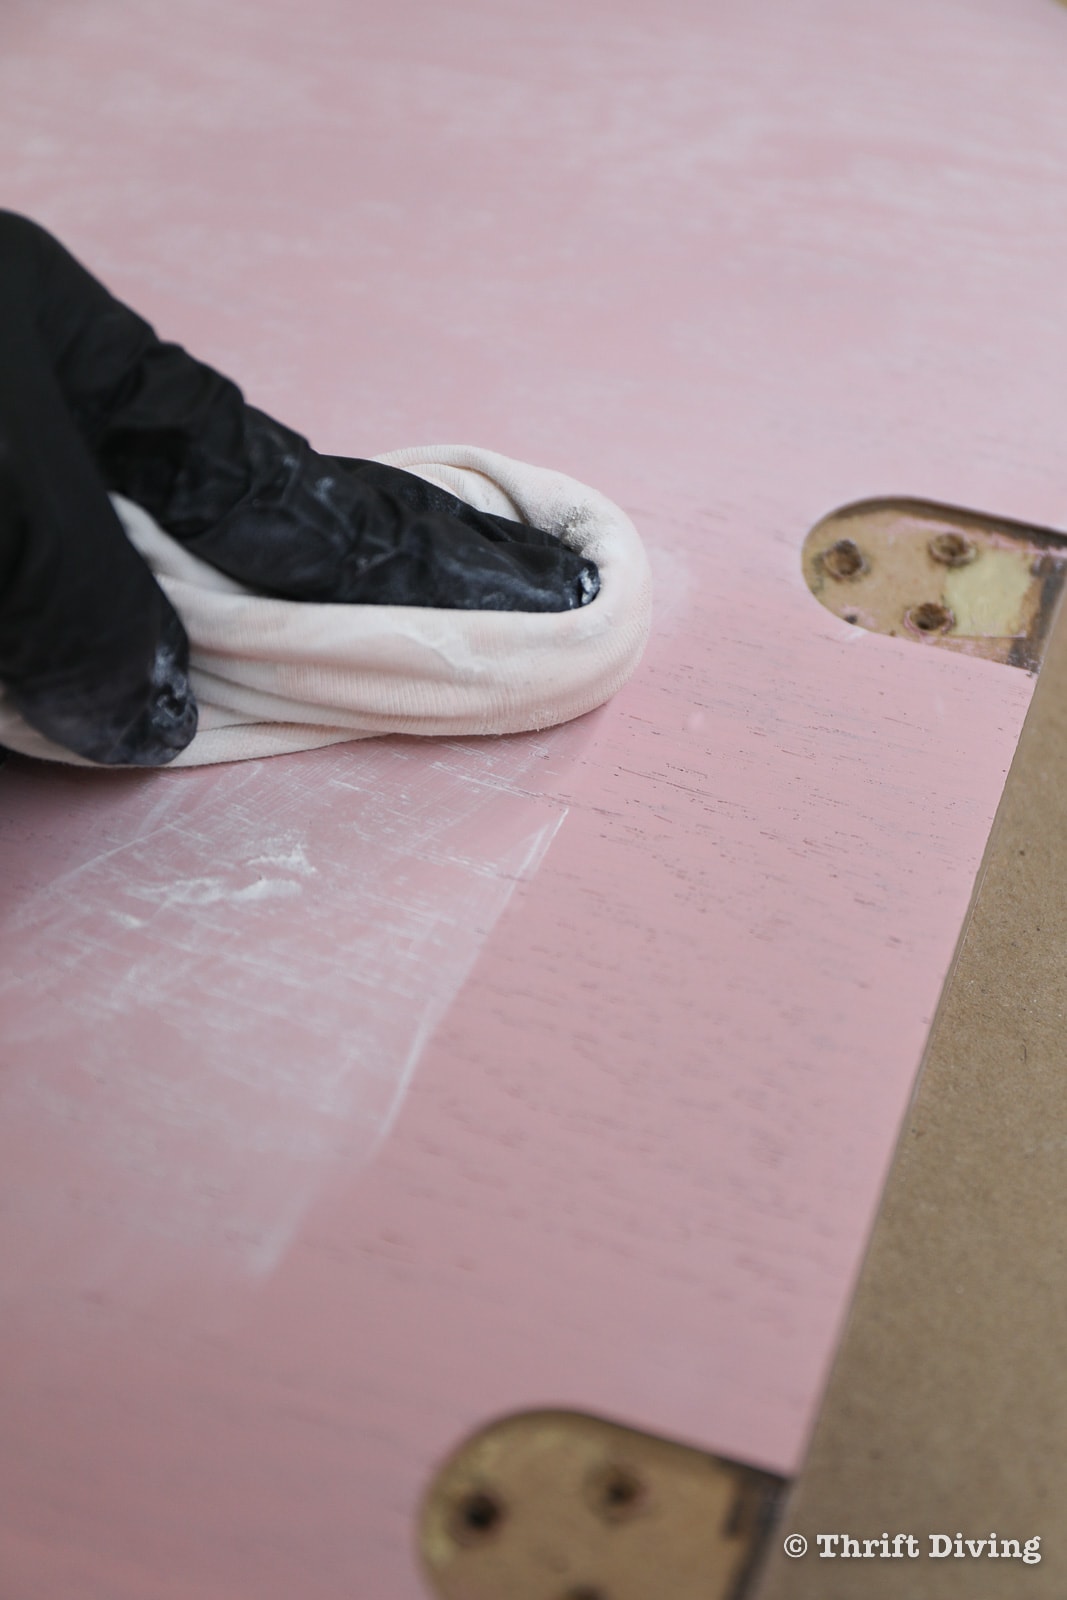
I also lightly sanded the drawers, then added a coat of color stain to the interiors, followed by one coat of topcoat to protect it.

The color matched the floral paper so well, too!
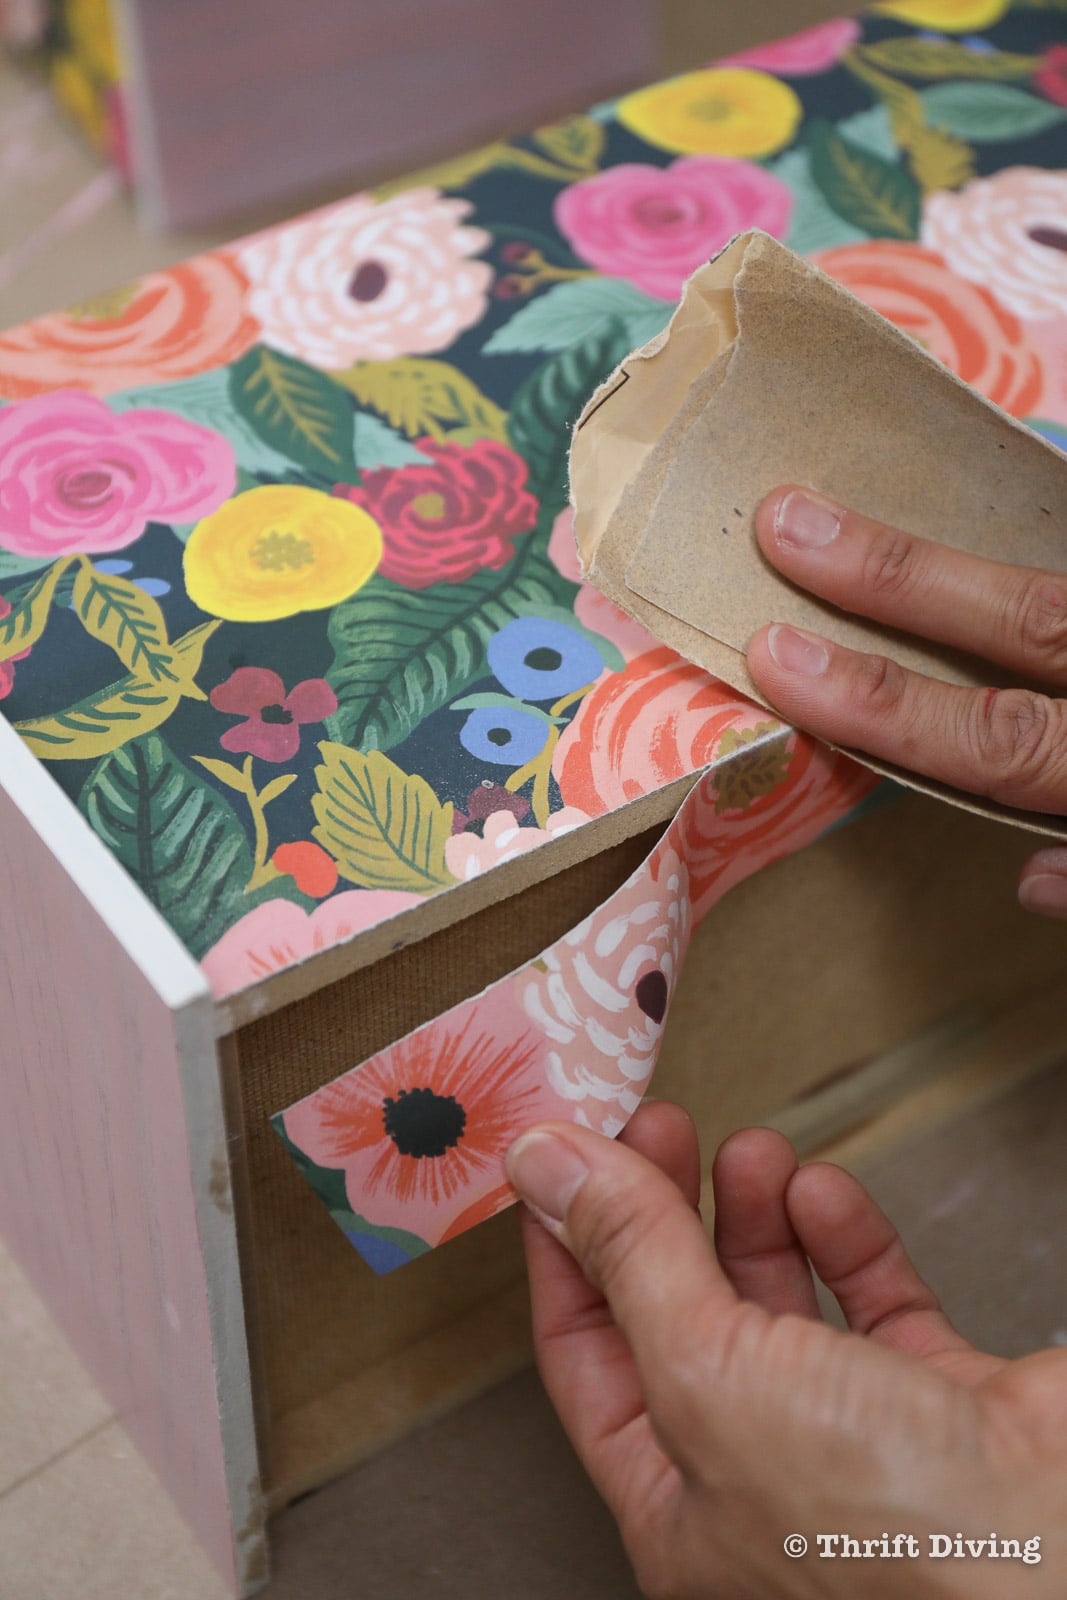
The outside of the drawers got floral paper decoupage, of course! The most amazing thing is that I have this really awesome method for getting a super clean edge when decoupaging paper onto drawers:
- Cut the paper bigger than the drawer surface.
- Add a thin layer of decoupage, then cover with the paper, using a brayer to release the air bubbles.
- Use 150-grit sandpaper and hold at a 45-degree angle. Run it over the edge of the drawer, allowing the grit to cut the paper exactly on the edge. Use this method to trim the paper around the entire perimeter, revealing a perfect edge!
- Use a layer of decoupage over the paper and edges to seal it!
Voila! If you’d like to see a demonstration of this, just watch my video tutorial on how to line drawers with paper and get this beautiful, perfect edge.

The same color I used for the interior of the drawers is the same color I decided to use for the interior of the sewing cabinet.

Once I got on this “decoupage paper” kick, I didn’t stop with the drawers and front of doors! I actually added strips of the paper with decoupage to the edges of the sewing cabinet top, and along the edges of the body! To get clean edges, I used the same sandpaper trick!


STEP 6: Spray Paint Hardware to Reuse It
Yes, you can spray paint screws. You might think that by spray painting them you won’t be able to screw them in again, but that’s not the case. The amount of torque that a power drill has is no match for a thin layer of paint. And besides–a little bit of extra resistance, I imagine, would be good for making a screw nice and tight! 😉
Also, you’re not aiming to spray paint the entire screw. You’re just going to spray the heads of the screws. If they’re flathead screws, the rest of the head and body won’t even be seen. So it’s not a big deal; just be sure the heads are spray painted.
I wanted my screws to be gold!
TIP: Use a cardboard box or a thick piece of cardstock or something to create a square. Poke your screws into the material so you’re able to easily spray paint them all. Styrofoam works well, too!

STEP 7: Re-assemble Your Sewing Cabinet!
When I reassembled the sewing cabinet, I noticed that the extra decoupaged paper did add some “bulk” to the top pieces that swing out and sit on the supportive doors. But it isn’t a big deal.

I also had found this old vintage stool for just under $6.00 at the thrift store and couldn’t pass it up! I would have liked to decorate that, too, but I honestly wasn’t ready to slap paint on that. It looked like it was “vintage valuable.” LOL

BEFORE
AFTER!

BEFORE

AFTER!
I’m not sure where in my “she shed” this vintage sewing cabinet will be placed, but it will definitely be used here! It has been a long time since I’ve had a dedicated sewing spot. I don’t get to do a lot of sewing, but when I do (especially for upholstery projects, like these purple velvet chairs I reupholstered), I definitely need space to stretch out. This sewing cabinet is perfect for that.

I absolutely adore this vintage sewing cabinet makeover! It turned out much better than I had expected!
Next up, I’ll be laying down luxury plank vinyl in my “she shed”! I can’t wait for this to be a pretty spot to hang out and create! 🙂
Love this furniture makeover? Click here to save it on Pinterest!
![]()

Download the 5 freebies!

Thrift Diving inspires women to decorate, improve, and maintain their home themselves...using paint, power tools, and thrift stores! Use these 5 printables, checklists, and ebooks to get started!
I’m not a pink girl, but this is so darn pretty! That floral paper is gorgeous! I also like stained wood, but too much stained wood, especially if you have other wood elements in your home, can be too much, and it’s nice to have a few painted (or in this case, color stained!) pieces as well for interest. It’s your cabinet and your home, and what’s important is that you love it and it makes you smile! I think the most beautiful spaces are the ones with a mix of finishes. I can’t wait to see your finished shed! Thanks for sharing!
Thank you so much, Vicki! 🙂 If you can believe it, I was a total tomboy growing up, so this love of pink came out of left field later in life. HAHAHA. So glad you like it! The liming wax just gives it so much more character, too!
Serena,
You are just an amazingly talented lady! Guess I should add determined too:) The sewing cabinet sure looks nice & I know you are going to use it a lot. I too have an old oak piece I want to do something with but can’t make up my mind what. I’m sure I will get an idea from you along the way! Just seems never enough time for those projects!
Thank you for all the wonderful ideas you share with us!
Thanks, Janice!!! Good luck with your own furniture makeover. You should consider doing something with liming wax. It looks soooo good on oak. Check out this blog post on using dye and liming wax on oak. 🙂 Hope it helps! https://thriftdiving.com/how-to-dye-wood-lime-wax-finish-oak/
Love how this turned out. So fun looking. Your detailed instructions are really helpful. I’m interested in trying the decopauge after seeing this.
Thanks so much, Andrea! You’ll love decoupage!
just fabulous, I appreciate how you explain why you do something. I am one of those people that want to know WHY a certain decision is made and am so glad you give examples and the whys of why you did what you did. Love the pink!
Thanks for letting me know that you like my style of explaining the “whys” of DIY, Shay! 🙂 That means so much!
Nice job
Thank you so much, Cathy!!!
I have to admit this–I am so Jellin’ over here :). I love this sewing cabinet. I only have a tiny little desk for my Sewing Zone in my apartment. I moved out on my own close to 2 years ago. Still Married but living separately due to my health needs. I am currently back in college after a 25-year hiatus. After this lengthy period, they dropped my original degree program so instead of doing Web Development I am now going to earn a degree in Network Security. I will definitely get back to check out what I have missed here on your blog. have a blessed day!
That’s so awesome to hear that you’re in school, Karen! I’m all for education. Sitting in class and learning as an adult is so much more rewarding then when we were kids and felt like it was something we “had” to do. Don’t you think? Glad to hear from you! Good luck with your program and for finding time to DIY, too, in between classes. 🙂
I love to see your growth and hear you say, “I used to do this, but I found this works better…” That’s the voice of experience and of trial and error. This is a great project and I love the outcome. Does the Bernina get lowered down into the cabinet or do you keep it in a separate storage case?
Thanks so much, Kathy! I love growth because those lessons carry you on to the next project. 🙂 And I do leave it down in the cabinet instead of a separate case. 🙂
I think you did a fantastic job on resurfacing the sewing cabinet. I love the paper and the pink. I didn’t know about white liming wax and that is going to help me out. I get what the lady said about covering up wood. But, you brought that useful piece back to life and I think it looked kind of gloomy in dark oak. Don’t forget that the company “stained” that wood to make it into what was popular then. I would prefer that no one stain white oak with walnut stain. I really like what you did. I would feel creative working at that sewing station.
I agree, Ginene, that it looked gloomy! I also agree that I love oak with liming wax while bare. It’s beautiful that way, too! But the dark stain on pretty oak doesn’t do it any justice. I’m glad you like it!!
Oh… you covered up such beautiful wood.😔
Painted furniture goes in/out of style so quickly, but beautiful wood is always “in”.
That’s okay, if I ever get the desire, I could always strip it. But I think beautiful wood can still be beautiful with color stain and liming wax! 🙂
I love the sewing machine makeover,pink not my color but it is beautiful and my granddaughter would flip over this piece,you do lovely work,Thank You for sharing your skills and empowering other women,we need more skilled,fearless women in our world,you make it a better place to live
Awww, thank you, Ruth!