Everything You Wanted to Know About Sawhorses: A Guide
(I participant in the Amazon Services LLC Associates Program and other affiliate advertising programs designed to provide a means for me to earn fees by linking to Amazon.com and affiliated sites).
One of the hardest things about DIY is not just about finding the time to DIY, but finding the space to do it, right?! That’s why I love having easily adjustable sawhorses (I picked these up from The Home Depot). If you’re doing projects around the house, like I do, whether you’re working indoors or outdoors, sawhorses are a DIY’ers best friend.
Let’s jump into sawhorses!
What is a Sawhorse?
Let’s first talk about what a sawhorse is. A sawhorse is a sturdy frame support made of plastic, wood, or metal that helps to support a piece of material that is being cut either with a circular saw, hand saw, jigsaw, or some other tool, or simply helps to create a sturdy work surface for your materials. They’re often used by carpenters when building, but you’ll find my homeowners using them as well for projects around the house. A sawhorse can also become a steady work surface for a large piece of plywood.
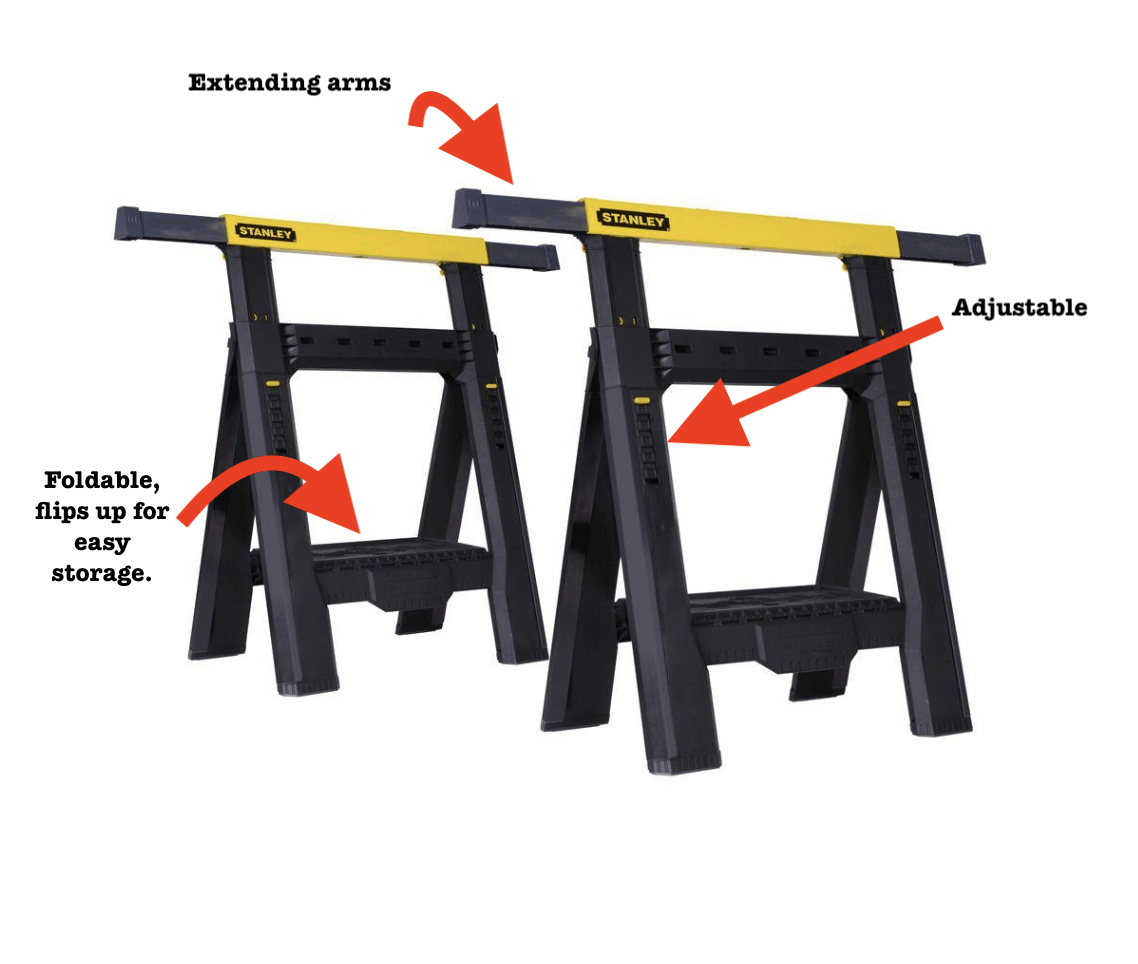
The plastic sawhorses are adjustable so no matter what your height, you’ll have a comfortable work height (unless you’re Shaquille O’Neal….now that’s a different story….).
What I like about the plastic sawhorses is that they fold when the shelf flips up, so they store easy and flat. They’re pretty light-weight, too. (You can make your own wooden sawhorses that fold flat, as well, like these plans at The Family Handyman, towards the bottom of the page).
Why Use a Sawhorse?
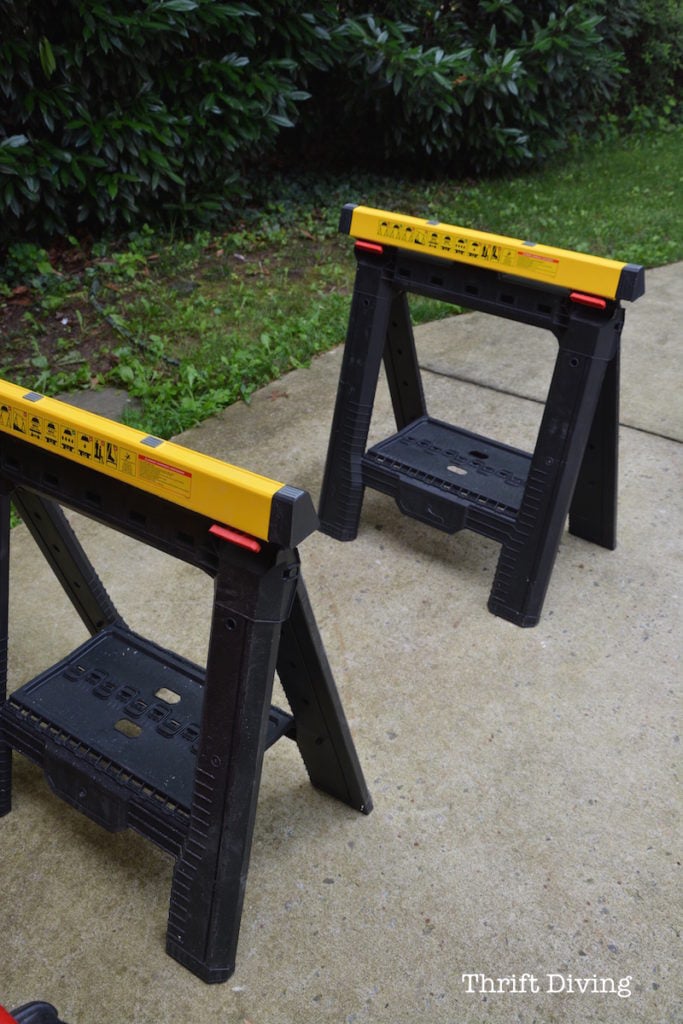
Not everyone is blessed with space for tables and workbenches for cutting and working on projects. As I mentioned before, a sawhorse can easily support a piece of plywood or other rigid structure when working on projects and when you need a secure place to cut. Many of my blog readers complain about not having any space to DIY or work on projects, so I usually recommend getting a couple of foldable, adjustable sawhorses that can be put away when not in use. Not only are they strong (these Stanley sawhorses can support a 1,000 lb capacity), but they’re easy to slide under a bed (if you need workspace inside) or can be tucked along a wall and out of the way (or stored in a closet).
How to Use a Sawhorse
You’ll want to make sure that the sawhorses are parallel and not too far away from each other, but not too close, either. It needs to steady support whatever materials you’ll be sitting on top of them. You’ll also want to make sure they’re on steady grown and not wobbly.
Depending on what you’re supporting, the sawhorses should be supporting the ends, but not too close to the ends where the materials on top could topple off.
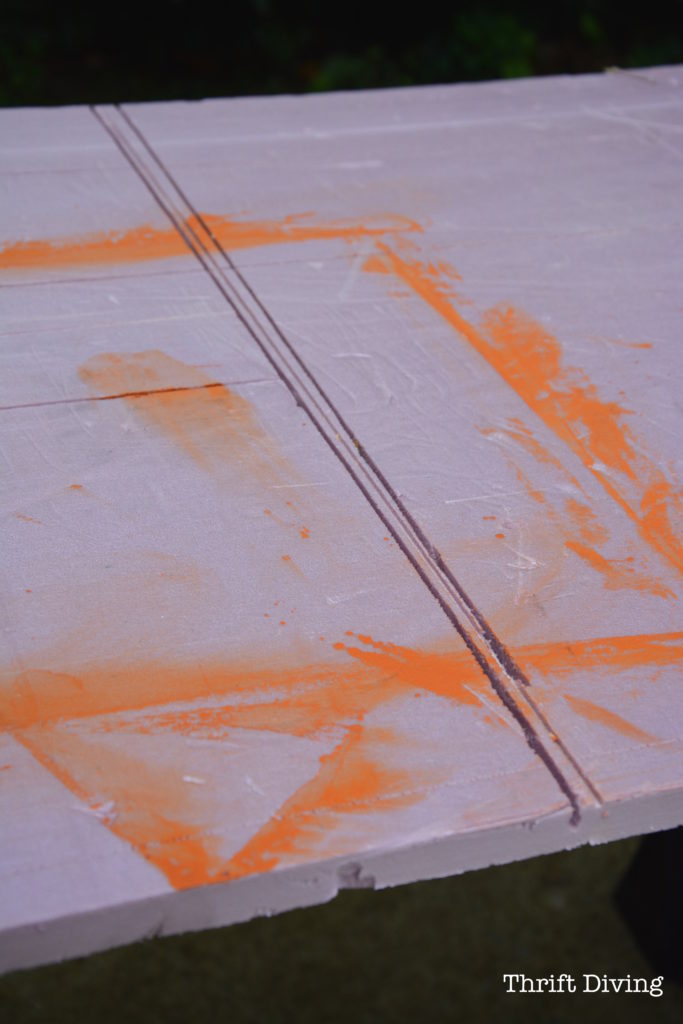
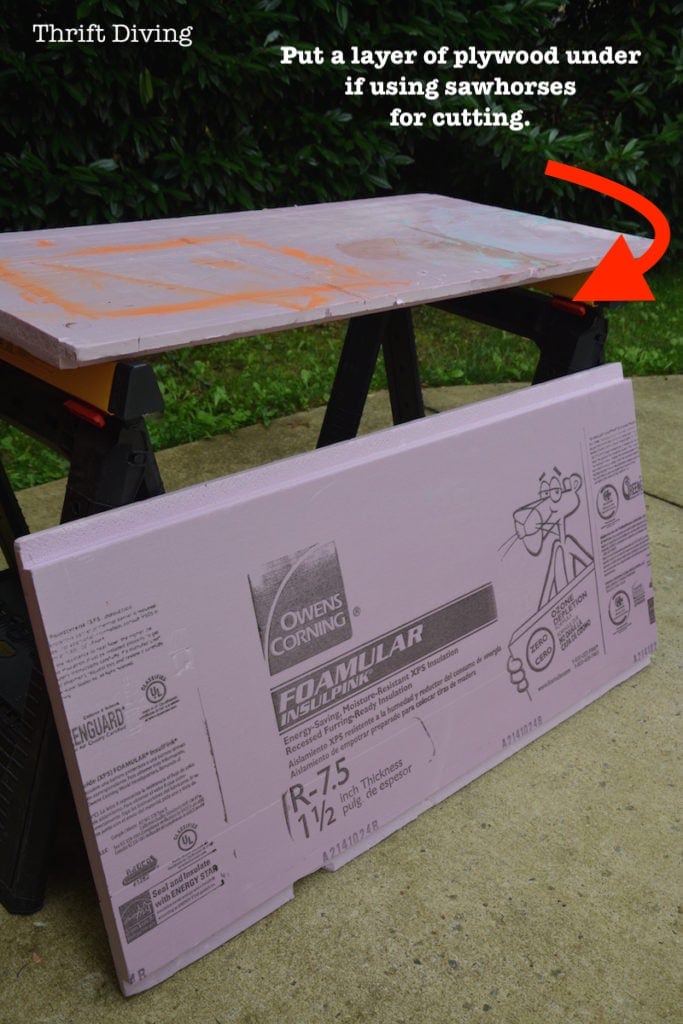
In this picture below, I am using some rigid insulation foam on top, which I have used often times as a cutting surface when making cuts with my circular saw.
In this case, you can also use a third sawhorse to help support the center when using materials that aren’t as solid as plywood.
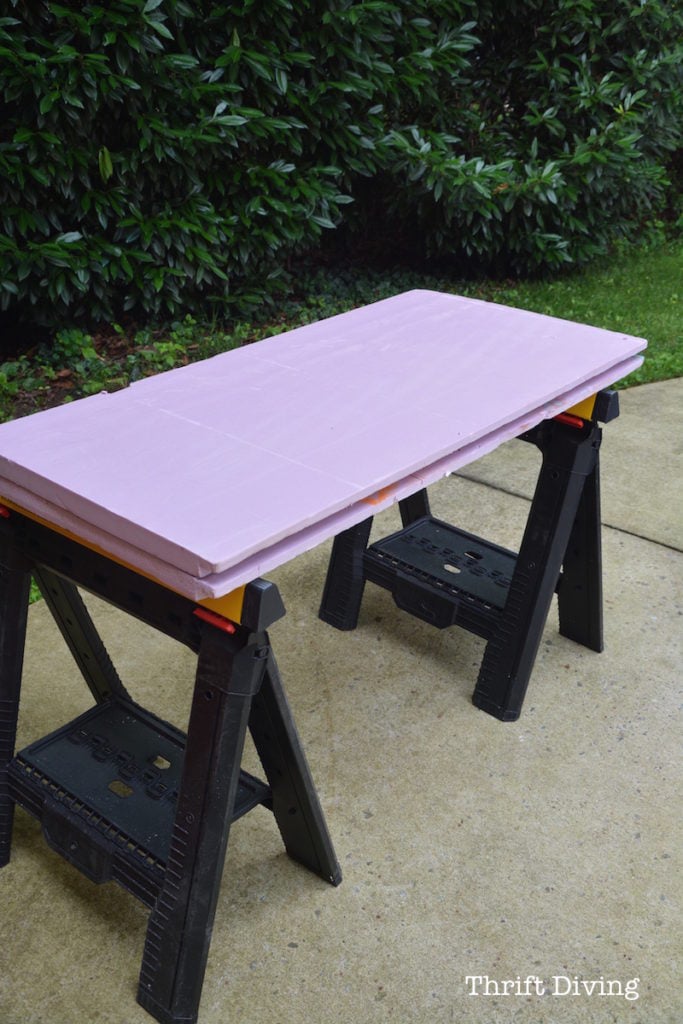
The rigid foam I use (Foamular foam 2″ thick) can be found at most home improvement centers. If you’re going to use this foam on top of your sawhorses, be sure to get the 2″ thick foam. It will cost about $20 for one sheet like this. I bought two because I wasn’t sure how much I needed. But I like the support the extra one provides.

You could get a sheet of plywood if you want, but if you’ve ever moved a sheet of plywood, you’ll know how heavy it is for one person to move. I like how manoeuvrable this is. You could also get a sheet of plywood cut down to a manageable size that you can easily lift on and off the sawhorses in order to have an even steadier workstation. 🙂 But I have found that with just a couple pieces of this thick foam, I am able to do small woodworking and crafts very easily.

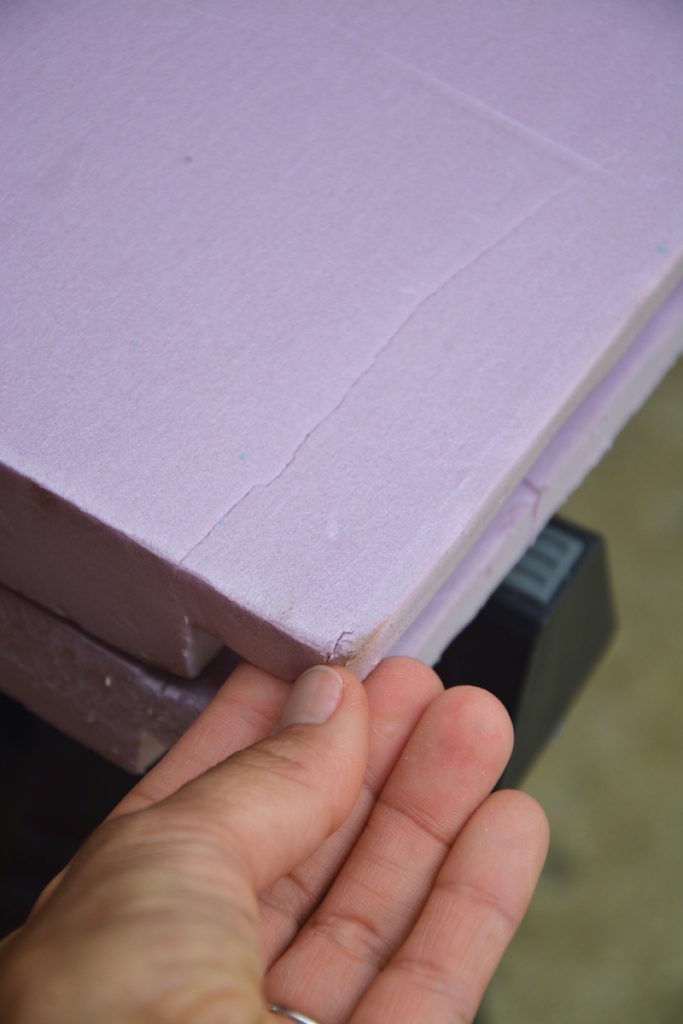
There’s a little sag in the middle, but it’s still pretty solid, so I don’t mind for light crafts or projects. If you use plywood as the base of your sawhorses, you won’t get the sag.
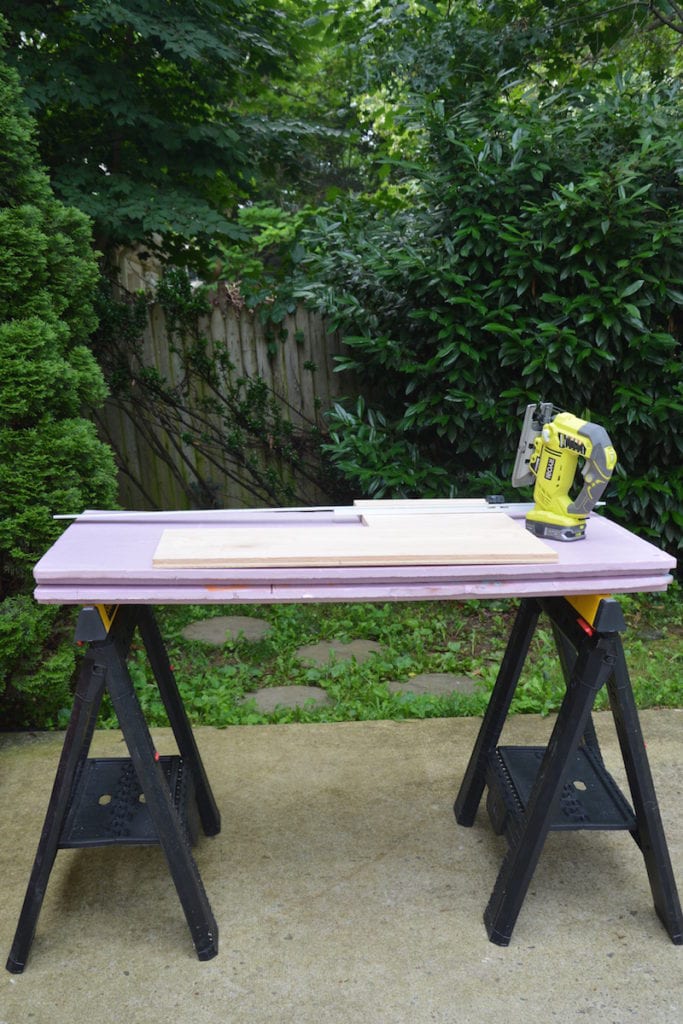
And the great thing about sawhorses is that they’re stackable, both the plastic and wood sawhorses, so if you can’t or don’t want to fold them flat and store them again, you can easily just stack them in a corner on top of each other. Since the foam is lightweight, setting up this structure is simple and takes just minutes.
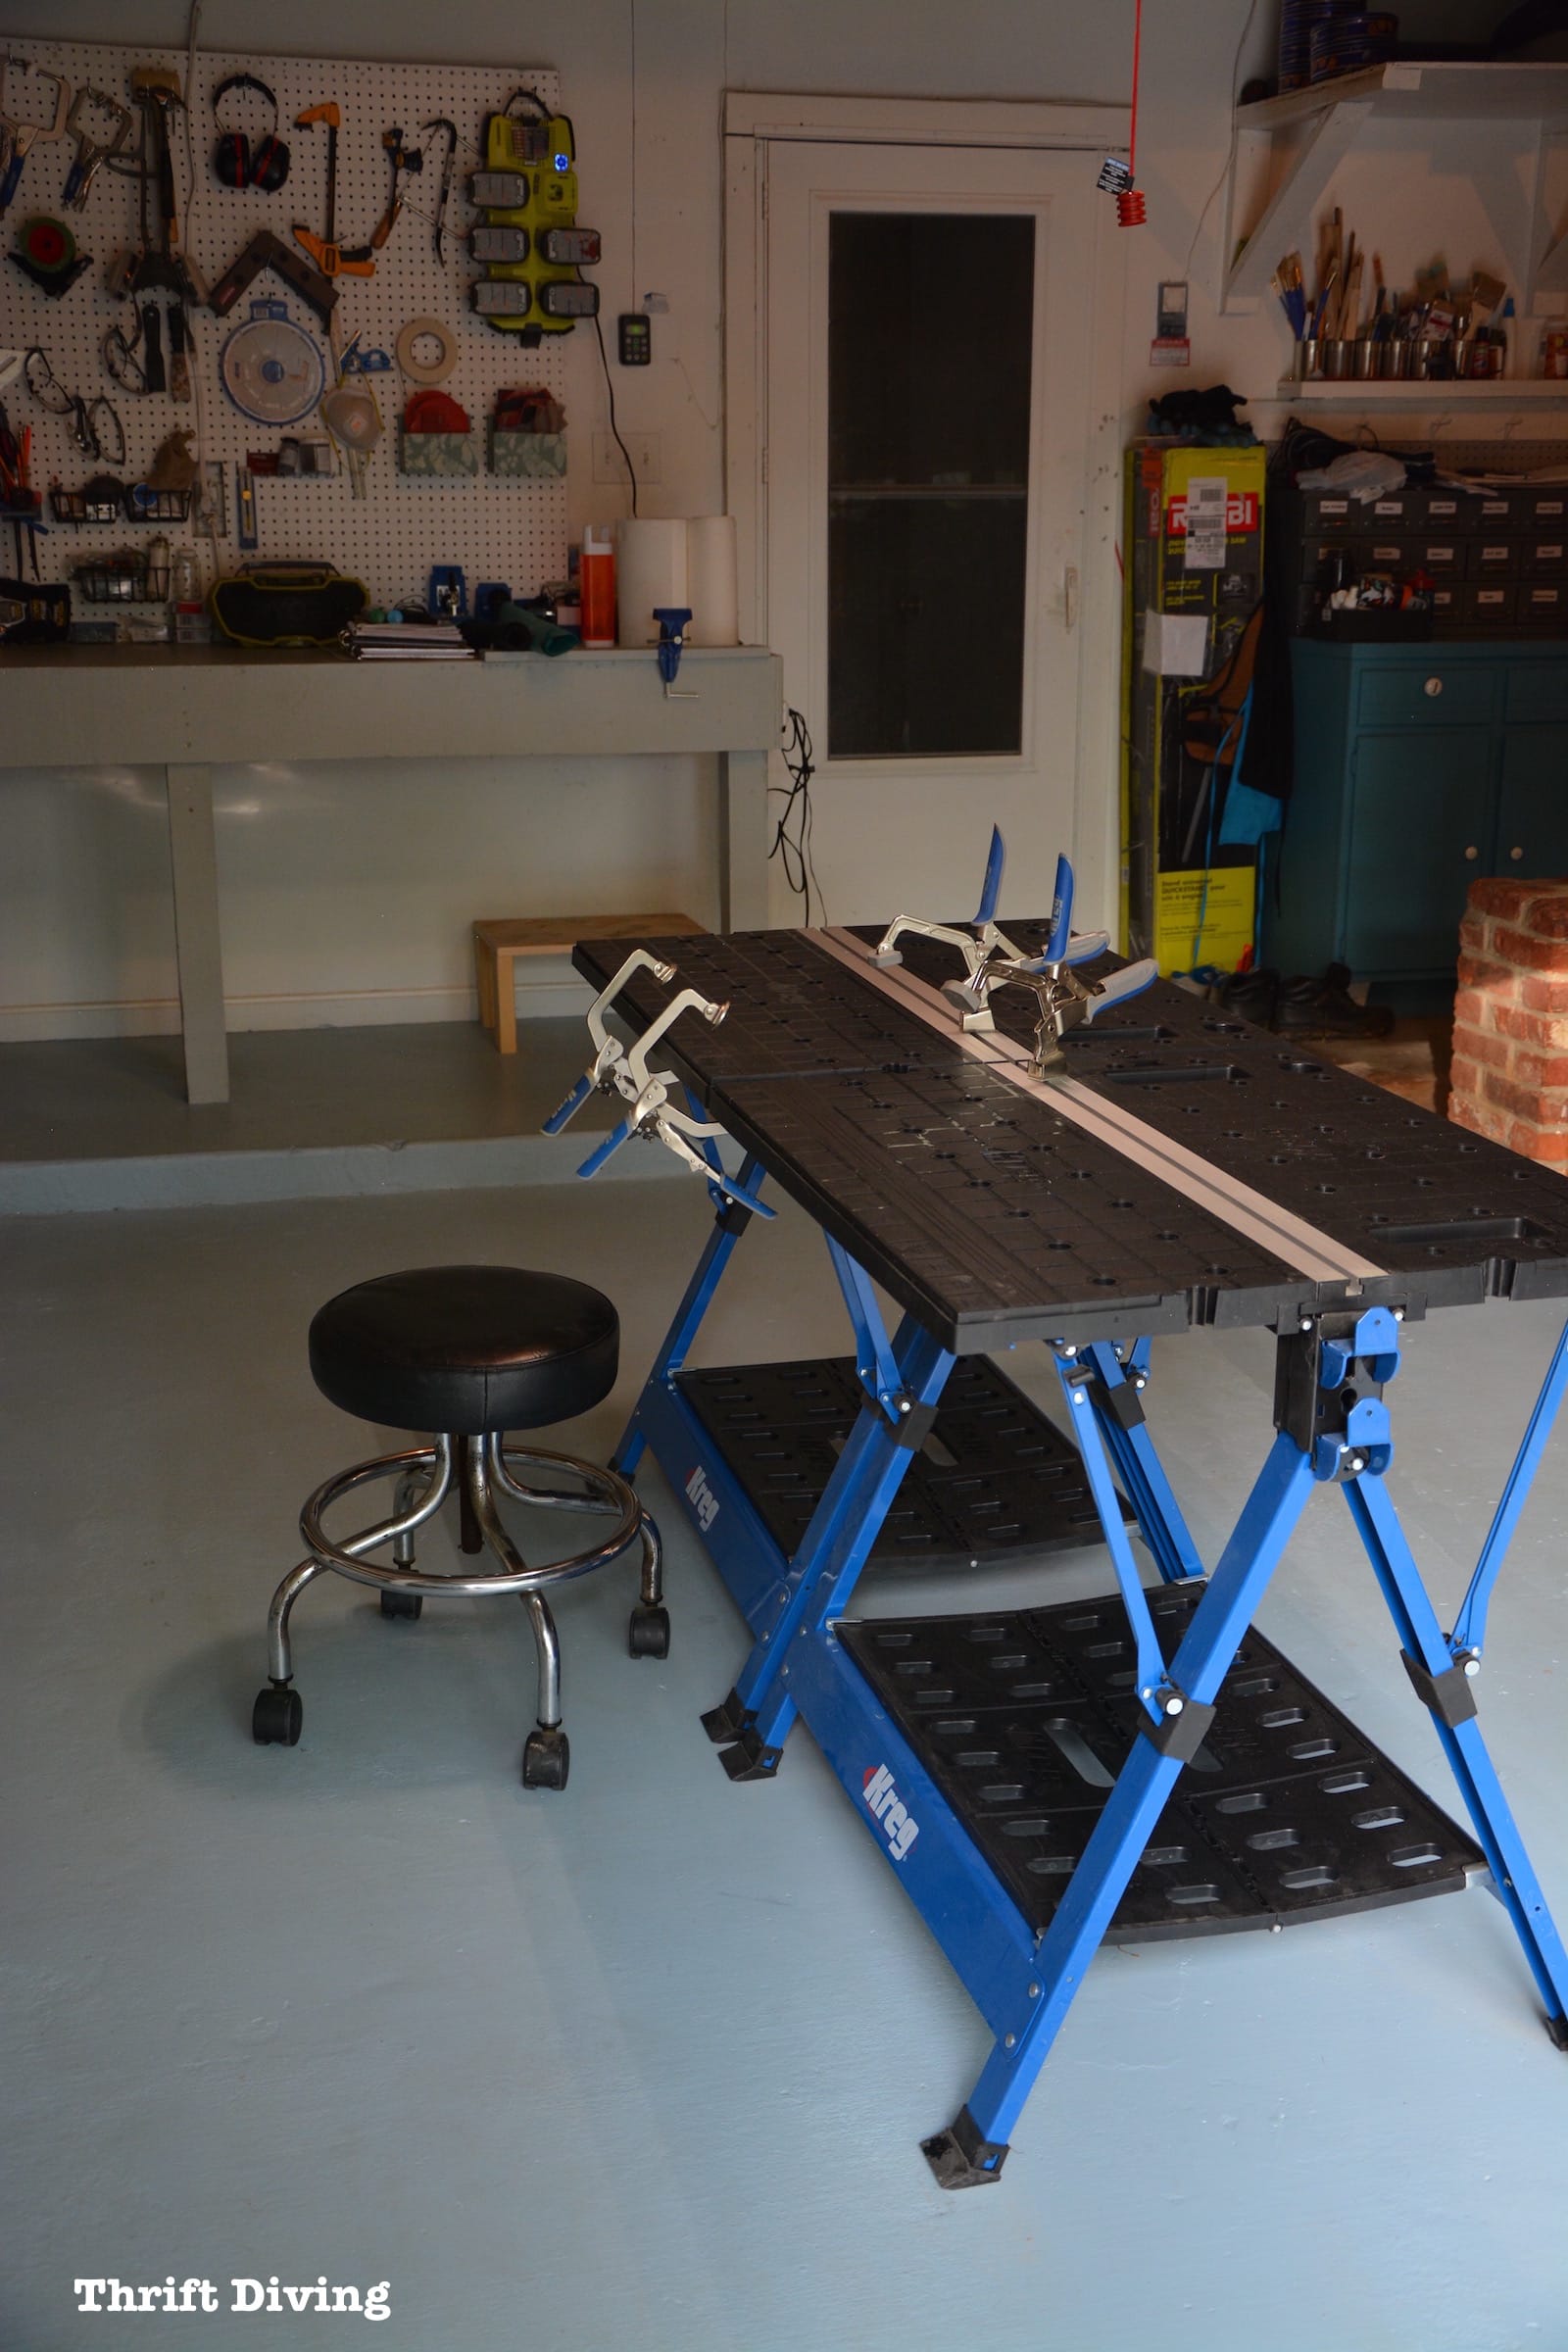
Multi-Function Work Tables and Sawhorses
I don’t know how new a “breed” these multi-function work tables and sawhorses are, but they first gained my attention when the Kreg Mobile Project Center was released.
I snagged me a couple of those babies and set them up in my garage. What drew me to them is how many configurations can be done with them, including turning them into sawhorses and supporting pieces of plywood on top when you wanted to expand your work table area.
You’ll have to do your research to find whether something like this would be a good alternative for traditional sawhorses. From my time using the mobile project center, I treat this area as more stationary and haven’t ever broken then down to be used as sawhorses. For me, the traditional sawhorses are more manueverable and takes only seconds for me to set up. Setting up this mobile project center work top into sawhorses would likely be too much trouble.
But I just wanted to share that buying a multi-function work table like this is an option for getting a table and sawhorse in one.
Where to Buy a Sawhorse
The ones that I own are by Stanley from the Home Depot and they were only about $59 for a set of two. You can buy a 2-set of Stanley sawhorses on Amazon, but they’re at least $12 more.
- Home Depot Stanley Sawhorses
- Kreg Mobile Project Center (has the ability to be a table and a sawhorse with a few minor adjustments)
- WORX Pegasus Multi-Function Work Table and Sawhorse
How to Build Your Own Sawhorse
I have never built my own sawhorses. And considering how much I love the plastic adjustable ones, I probably never will. LOL. But the wood ones look great and seem very solidly built and can even be passed down from generation to generation. How cool would that be to pass down my handmade sawhorses to my sons? 🙂 So you might see them here one day.
One woman I love to follow on YouTube is Leah from See Jane Drill. She has a pretty easy tutorial on how to build your own sawhorses. If I ever decide to make my own, this is the tutorial I would following, using simple instructions and 2×4 planks of wood.
You can also check out this excellent tutorial on how to build a sawhorse from The Family Handyman. I especially like the lower ones so that you can use your knee to support pieces of materials that are being cut.
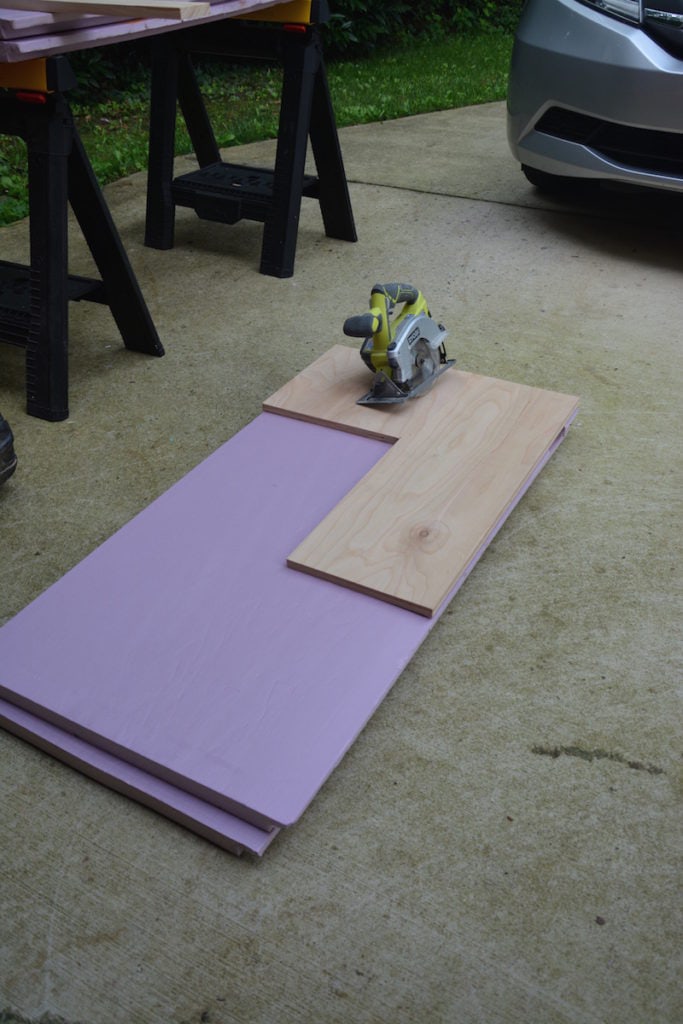
Making Cuts With a Circular Saw
You can easily use sawhorses to make quick cuts on pieces of 2″x4″ wood, but sometimes you need to cut larger pieces of wood.
Often times you’ll find me on the ground ripping or crosscutting larger pieces of wood. The rigid foam on the ground works wonders to help evenly support the boards being cut.
The depth of the blade is adjusted on the circular saw to go just deep enough to cut through the wood and to knick the foam, but it’s not deep enough to go all the way through the foam. The depth of the blade should be no more than 1/8″ to 1/4″ below the bottom of the wood.

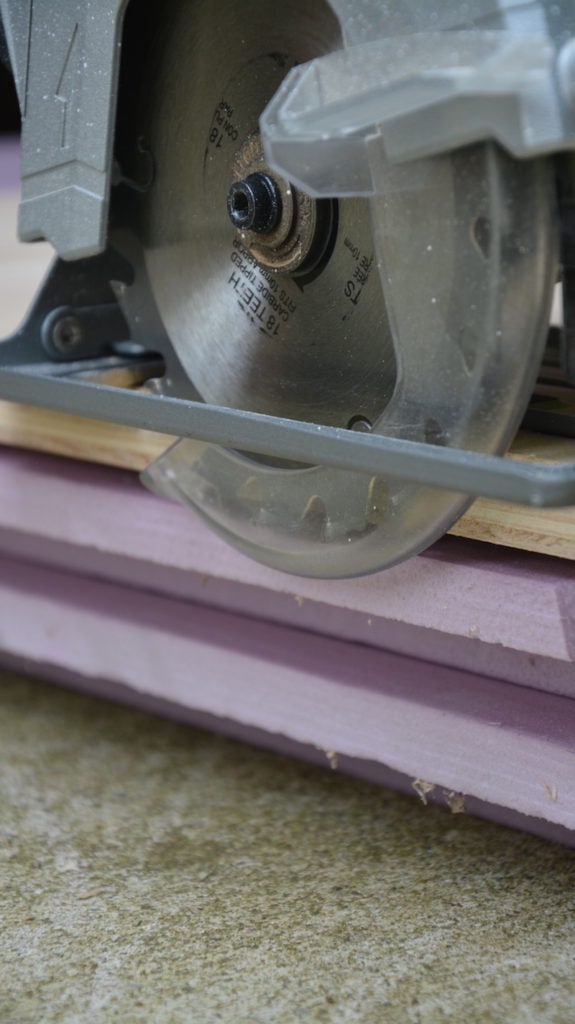
The rigid sacrificial foam will start to look cut up like this, but it’s supposed to get jacked up. Paint…… cuts……The works. It will actually hold up a long time.
If you’re going to use the foam as a sacrificial layer, be sure to put a layer of plywood under first before using your circular saw to cut wood on your sawhorses.
No fancy workshop needed. 🙂
When you’re all done DIY’ing, whether it’s painting crafts, cutting wood, whatever, adjustable sawhorses break down in minutes and can be stored away easily in tight spaces (or even under a bed). Simple, right? Now you have no excuse for not DIY’ing, even without a ton of space or fancy workshop gear!
Are you diggin’ this tip? Go ahead and PIN it!
![]()
So when do you plan to buy sawhorses or make some DIY sawhorses? Leave a comment below and share your own thoughts about sawhorses!

Download the 5 freebies!

Thrift Diving inspires women to decorate, improve, and maintain their home themselves...using paint, power tools, and thrift stores! Use these 5 printables, checklists, and ebooks to get started!


I like the idea of the foam because I am petite and not very strong. How do you use clamps to stabilize the project?
Hi, Laurie! If you’re using foam on the floor or on a table top, you cannot use clamps to stabilize it. Generally, you would just hold it down with your hand, making sure, of course, that your hand is nowhere near where the blade is actually cutting. If you’re cutting a big sheet of plywood or something like that, it has some weight to it and doesn’t shift around as much as you might think. Hope that helps!
Hello Serena,
Thank you for the blog post- here in the UK space is a premium too for DIY projects, so know the use of sawhorses outside well. Particularly like your idea of foam boards for safely cutting large sheets of ply safely.
Have found on some plastic sawhorses they have a little dip so you can put a couple of planks of timber under the foam going lengthways, which nearly completely eliminates the sag. Discovered mine had them by happy accident. https://youtu.be/HOSPgN03kL4
My dilemma. I want to paint my TV stand, but I’m in a condo without an outdoor access. I’m to high up in the building to take anything down the elevator. Bottom line: I’ve got to work in the same room. But how can I keep paint from getting on the walls and other furniture and most particular on the floor(laminate) And how about drying time. Should I forget about spray paint and use a brush only? (since spray could spread) The item looks similar to this: https://goo.gl/d7fXb9
Hi, Sandy! Definitely don’t use spray paint. That stuff is toxic to use indoors and the smell would linger so long. Not healthy. I only use it outdoors or in my garage with a respirator. Get some chalk paint. I typically use Annie Sloan Chalk Paint, but it’s expensive and hard to find easily at times. Home Depot has started carrying a chalk paint by FolkArt and I believe you can buy it in the store, but you can also order it online. Looks like there are 12 colors. I have started using it and let me tell you, it STICKS! I love it, actually. Each bottle is about $8 and doesn’t require any sanding or priming yet, as long as your surface is clean and not bumpy and messed up. You can safely do this inside, and just put plastic or paper bags under to protect your floor.
Here’s the link:
http://www.homedepot.com/p/FolkArt-Home-Decor-8-oz-Cascade-Ultra-Matte-Chalk-Finish-Paint-34159/205359198
Hope that helps!! 🙂
a really great blog, thanks for sharing!
Thanks, Marcelle! I’m really glad you enjoy it! 🙂
I DIY in my room (big space), on my patio definitely, in my living room, kitchen or dining room. Just depends on what I’m (we’re) doing. My husband is now a DIYer because of me. I’M ADDICTED and it’s relaxing sometimes.
????????????happy DIYing
Thanks for the great tip.
I got your post. Just wanted you to know I love the photo of the table with the lush green and tree behind it. That’s my style of gardening. But alas I live in a desert!!! But your yard is so gorgeous!!! No wonder you like to DIY out there!! I do a lot at my dining room table or one of my outdoor tables. Curt, when he could see, used these same “horses” but he got a table too.
Gwen, that’s funny! My yard is FULL of weeds! There’s very little grass–just hardy weeds! But I was thinking about that today, as California faces brown and drought: at least I have green weeds! 🙂 LOL
What a GREAT idea. That foam board makes all the difference because it’s lightweight. I have lots of trouble with heavy things like a sheet of plywood! Going to try that soon. What do you do when the weather is not cooperating though? This summer it’s been windy which makes finishing things outside impossible; not to mention all the rain we get here in Florida. I tried a screened tent but weather and wind immediately ended that idea!
Hey, Mintchip! 🙂 When the weather is not good, I just stop or try to move it into the garage (but usually am scooting past things since there’s not a ton of space in there). We’ve been lucky in that this summer has been AMAZING! It’s not been humid much, very sunny, not a ton of rain. Perfect!! Sorry to hear your weather hasn’t been cooperating!
I’ve been doing this for years……makes a great workspace!! The only difference with mine is, I use a hollow core door that I found at Habitat, for around 10 bucks (for the surface). It’s light weight and stores easily. The saw horses are a definite must have……I have two sets and have bought them for my boys, as well!