How to Use Stencils: A Complete Guide
It looks complicated, but it’s really easy to learn how to use stencils on furniture, walls, and fabric.
Show me a plain piece of furniture and more often than not I’ll think, “Turquoise!” followed by an excited, “With stencils!” You can’t go to some big box furniture store and buy a piece of hand-stenciled furniture. But in the DIYspere, stencils are pretty popular because it’s one of the easiest ways to update old furniture, walls, and fabrics to take a project to the next level.
Don’t believe me?
Just take a look at some of my most popular projects. What’s the one thing they all have in common?
STENCILS!
Today I’m going to share with you everything you need to know about how to stencil on furniture, walls, and fabric so that for your next furniture or room makeover, you’ll feel totally comfortable (not intimidated!) and can begin to love stencils as much as I do!
5 Reasons You Need Some Stencils in Your Life
First, before I cover how to stencil on furniture, fabric, and walls, you have to understand why you should use stencils in the first place. There are probably more than 5 reasons, but these are my favorite reasons:
Reason #1: Because wallpaper sucks.
Oh, suuuure….I’ve seen some fabulous looking wallpaper, my friends. But isn’t that what Moms and Pops said back in the 70’s when they slathered wallpaper on every surface of their Brady Bunch house?
Sure, right now it may look trendy. But just ask those homeowners that buy your house in 30 years as they’re scraping the stuff off with sweat dripping in their eyes. I bet they would say differently. LOL.
Wallpaper sucks because it’s so…..permenant. And I don’t care what they say about wallpaper today being easier to remove. Once it’s up for years and years, I doubt that will be the case.
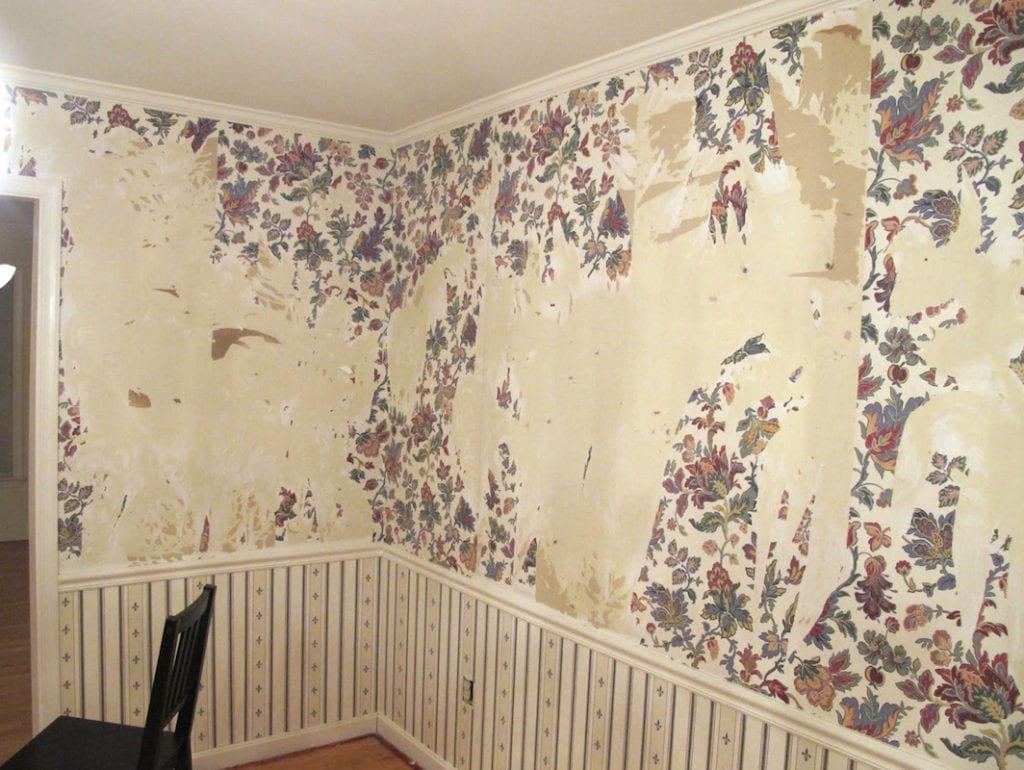
(P.S. This is what my dining room looked like after we moved into our 1973 home and started ripping down the horrific wallpaper).
Reason #2: Because you can be fickle.
Back to the wallpaper thing: once you pick a wallpaper, you’re unlikely to change it the following year when you realize that chevron wallpaper in your powder room is oh-so-outdated. At least with stencils, you can change your taste next year without worries of wasted money because you spent your kids’ college tuition on wallpapering your house.
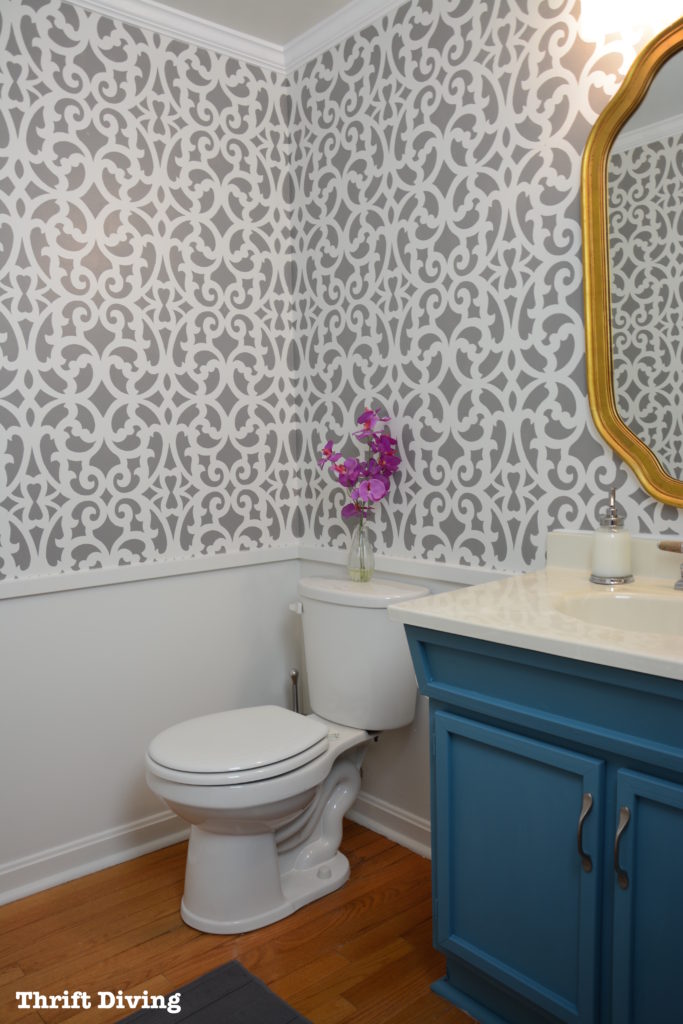
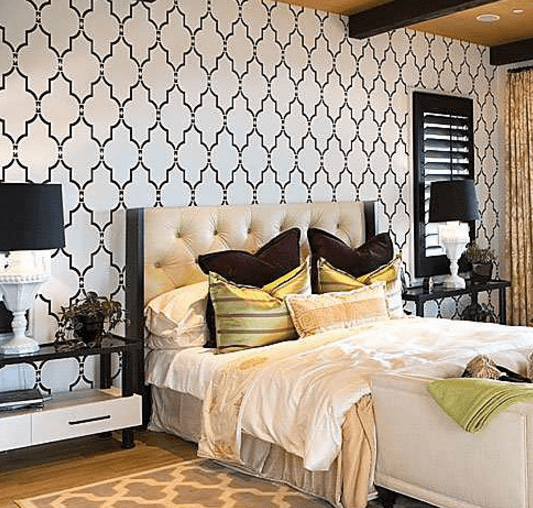
Instead, you can stencil you walls to look like wallpaper, like my half bathroom.
On furniture, you can do the same thing–stencil and then in a couple years, totally redesign the piece of furniture with a whole new look!
Reason #3: Because you can use them 10,000 times.
Okay…10,000 times is probably stretching the truth. But you can use them over and over again!
But first, let’s make one thing clear: stencils can be pricey. For example, my favorite stencil is about $65. YIKES. But, considering that I’ve used it on at least 9 projects (and even more to come), it’s not that expensive per use!
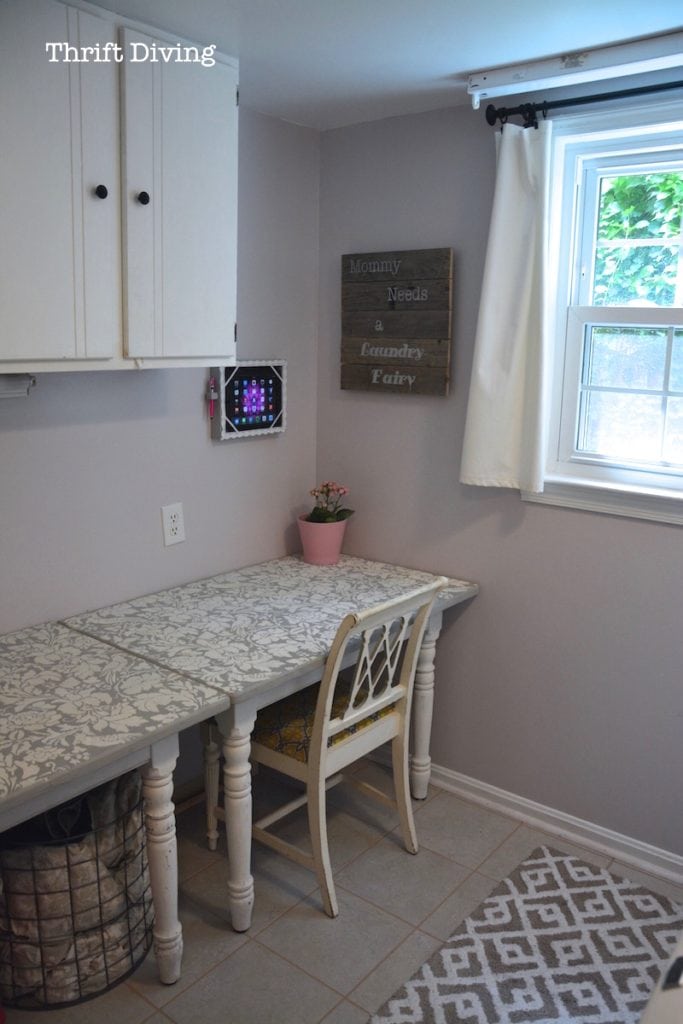
Here’s one of my favorite projects I used it for: I had split a $30 thrifted table in half for my laundry room makeover, creating a long folding table, and then painted it gray and stenciled it with white! Doesn’t it look awesome?? And since I already had the stencil and paint, the cost was only $30 for the table!
Reason #4: Because it’s the easiest way to make plain things fabulous.
I can guarantee that my most popular pieces of furniture makeovers wouldn’t have been so popular if I had just painted them one solid color. How boring is that?
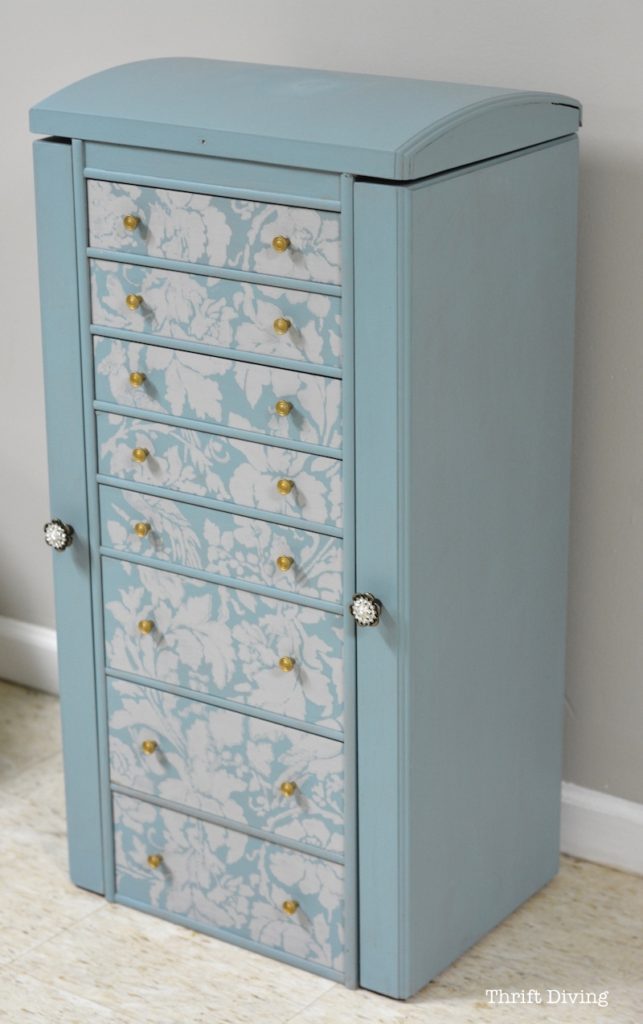
Like this thrifted jewelry box makeover that I turned into a craft supplies organizer. Do you think it would have been so stunning with just turquoise paint?
Uhhhh…Doubtful. LOL
Yet, with gray stenciling with my favorite stencil, it’s stunning! Takes this makeover to a whole ‘nutha level.
Reason #5: Stencils are a great way to accent, contrast, or highlight parts of furniture, walls, fabric, floors, and more.
That’s right, folks. You can stencil not just on pieces of furniture, fabric, and walls, but floors, and even cabinet doors!
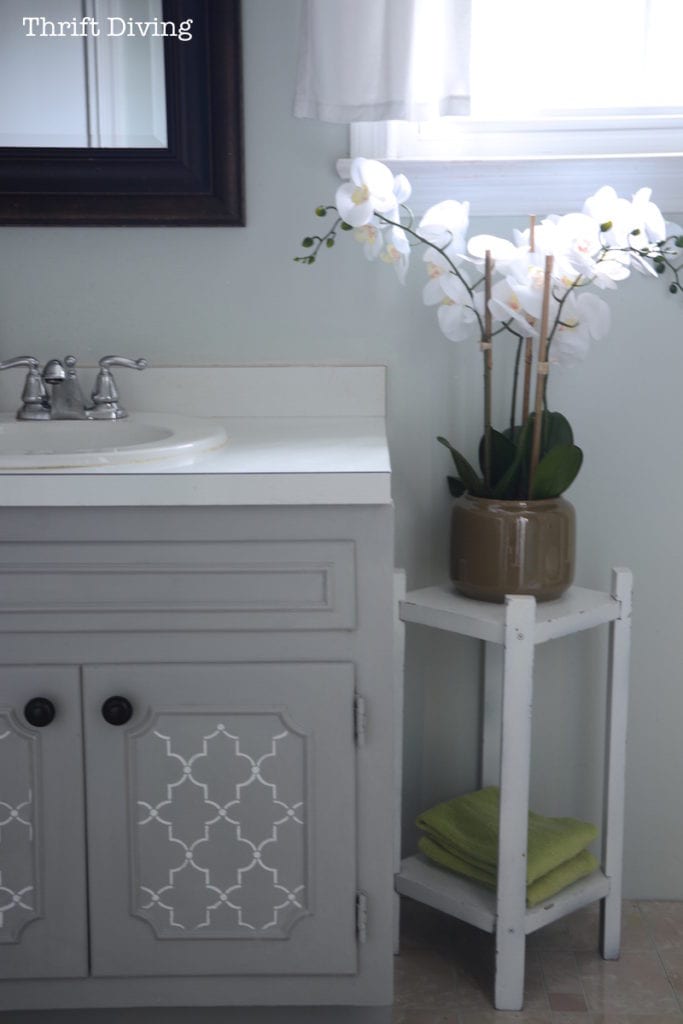
With my bathroom vanity makeover, if I had painted it a solid gray, you wouldn’t even have paid any attention to the molding on the doors. But with a stencil, it accentuates the molding, and instead of it being very 70’s, it feels more updated and fresh with stenciling.
Prepping for Using Stencils
By now you’re probably thinking, “Okay…okay….I get the benefits…..but how do I use stencils??”
Well, we’re getting to that. Let’s first talk about the materials that you need to get started with stenciling furniture, fabric, and walls. Because without the right materials, you can’t even get started.
STEP 1: Find the right stencils.
All stencils aren’t created equal. Some can be store-bought for super cheap. Some can cost what feels like an arm and a leg. And others can be made right at home, DIY-style. Keep reading below for where and how to actually buy/find/make your own stencils.
STEP 2: Find the right thing to stencil.
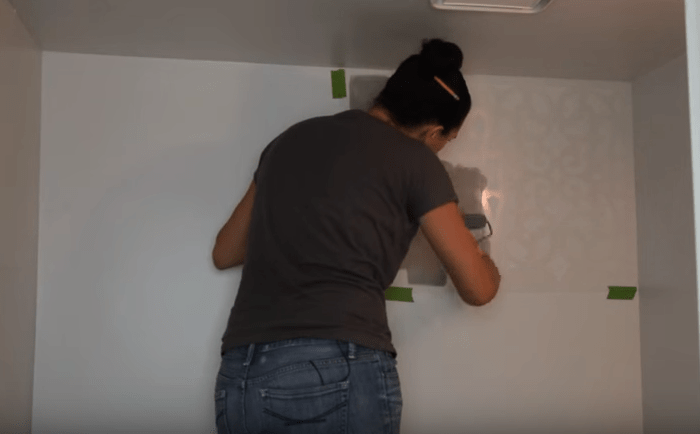
Some projects are easier to stencil than others. Things that are round or prevent the stencil from lying flat are most difficult. Things that are hanging vertical (like large walls!) are also difficult. Stenciling around inside corners may make you want to rip out your hair (don’t believe me?
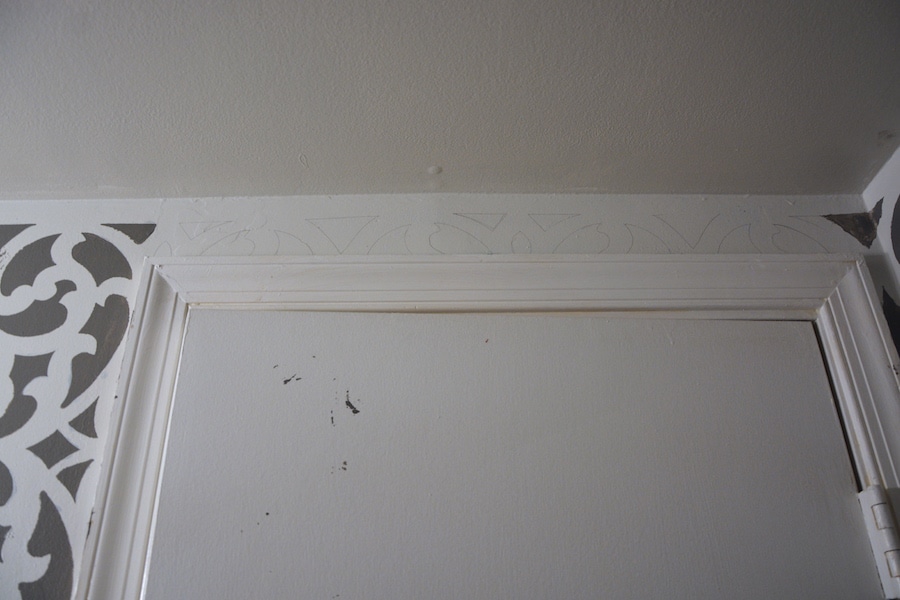
Stenciling around inside corners may make you want to rip out your hair (don’t believe me? Just watch this video of stenciling my half bathroom). All of these surfaces I just mentioned can cause plastic stencils to bunch up and can leave gaps, making it easy for paint to seep underneath and cause yucky, messy lines.
I recommend finding flat surfaces when you’re a newbie stenciler. Things like flat cabinet doors, dressers, small pieces of flat fabric, or small walls (without corners) make great surfaces for learning how to stencil.
STEP 3: Get the right accessories.
So what do you need to get started with stenciling? Here’s a look at the tools you’ll want to start collecting:
- Flat paint. On walls, flat latex paint dries faster, creating less opportunity for paint to bleed under the stencil! On furniture, I like to use chalked furniture paint (check out the 12 best furniture paints here). And to kick it up a notch, Modern Masters has really pretty metallics that look beautiful as stencils!
- Stencils. See below on where I like to buy stencils.
- Spray adhesive. This works really well when stenciling on fabrics, since that tends to be more slippery. On walls and furniture, you can use spray adhesive, but painter’s tape or stencil tape is good, too.
- Painter’s tape or stencil tape.
- Small foam roller.
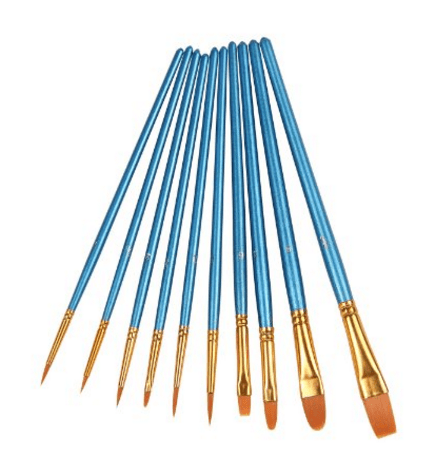
- Stencil brushes.
- Small paint brushes.
What Designs Can You Stencil?
Remember above how I mentioned that stencils can accentuate and highlight? Well, below are some ideas on designs you can actually stencil to achieve this.
Words & Quotes
I love me some stenciled words and quotes!
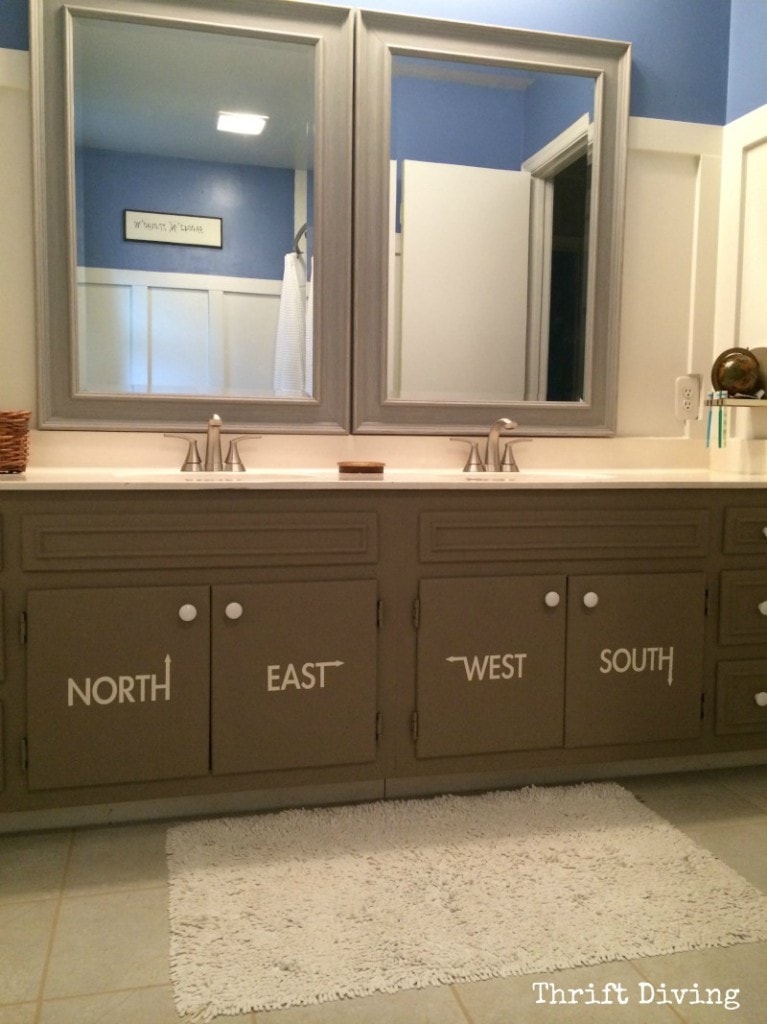
When I made over my kids’ bathroom with a navigational theme, I stenciled the words North, East, West, and South on the existing vanity, and added little directional arrows to the word so that my kids (while using the bathroom) could learn a thing or two. Clever mom tactic…ssshhhhhh. 😉
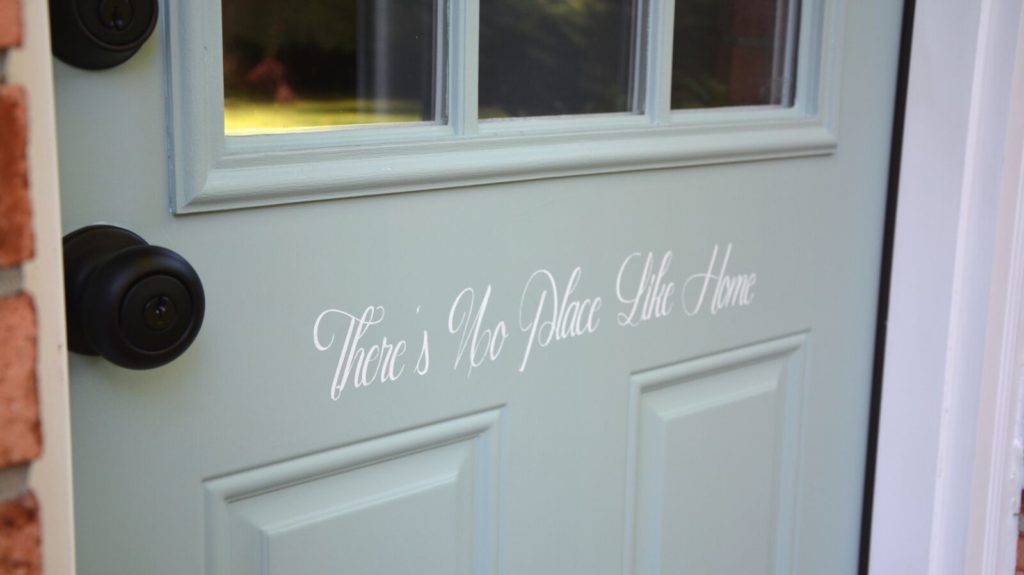
Stenciled exterior doors are fun ways to welcome people into your home (click here to learn how to paint and replace your exterior door).
Fun Images & Shapes!
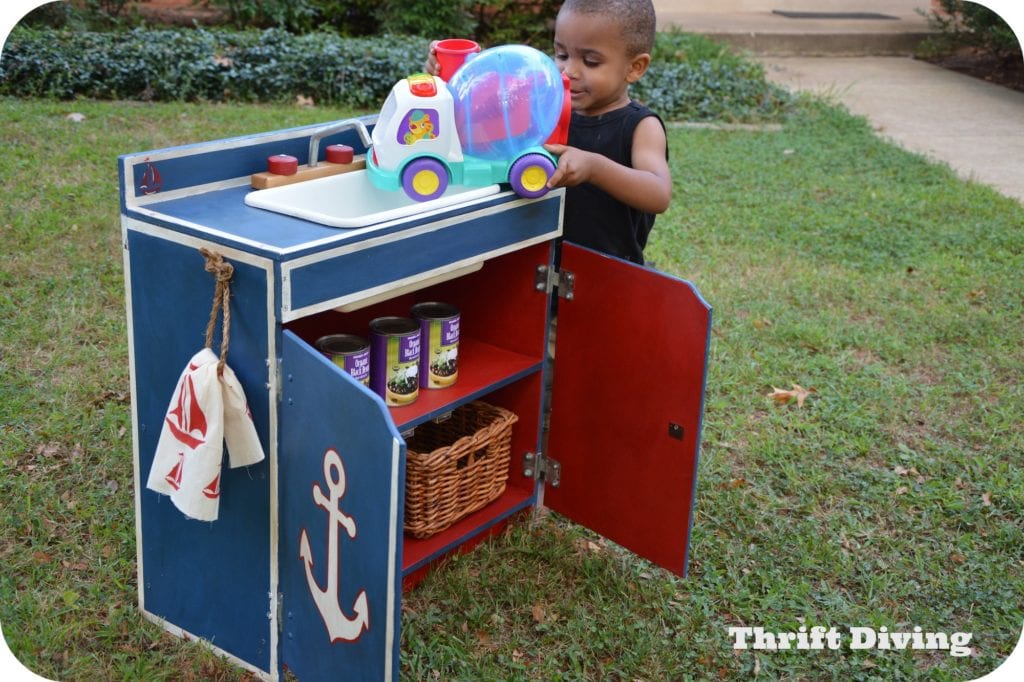
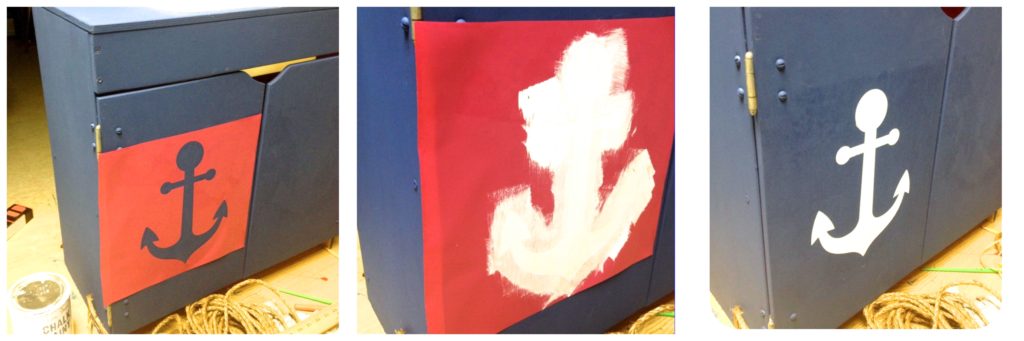
I love how stencils can totally transform a piece of furniture! I had made over this wooden thrifted play sink for my youngest son (which I donated to his daycare for all the kids to play with).
Adding a stenciled anchor totally dressed up the front of the play sink!
Patterns and Designs
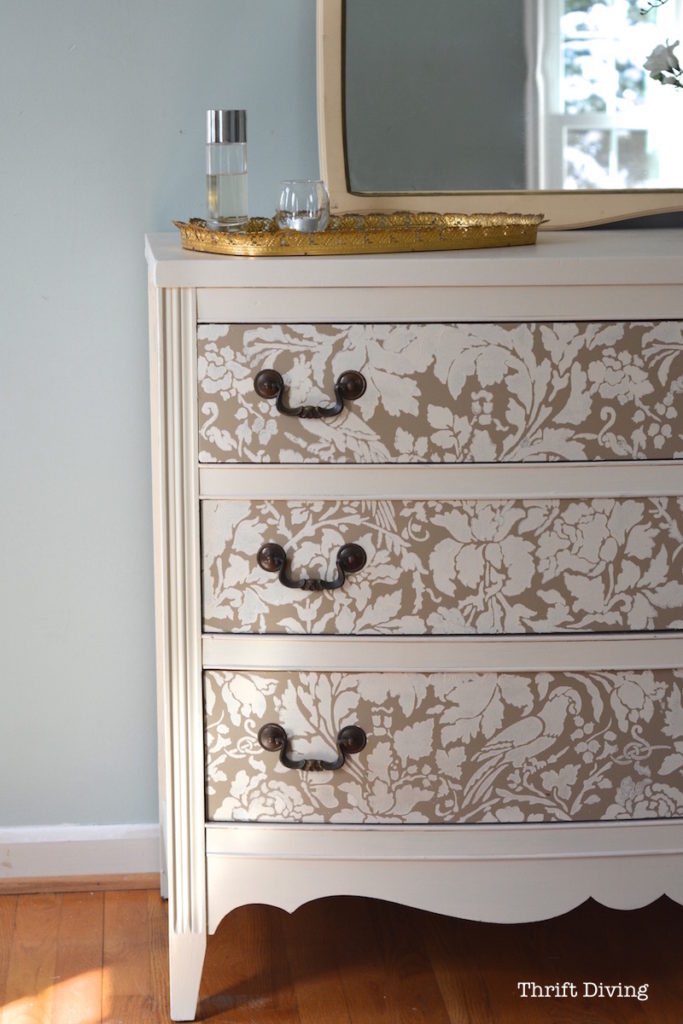
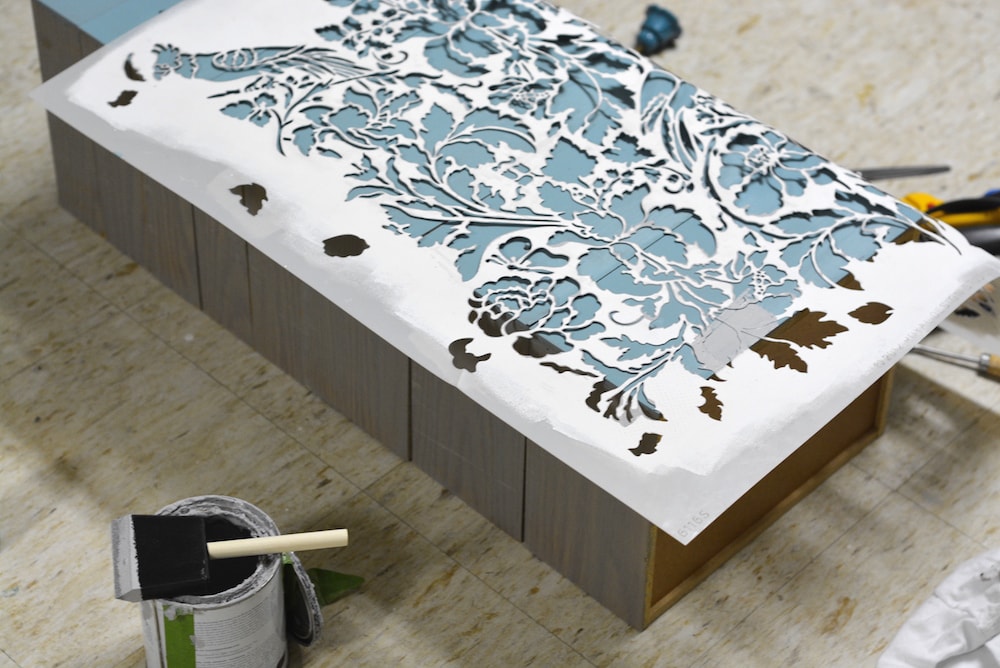
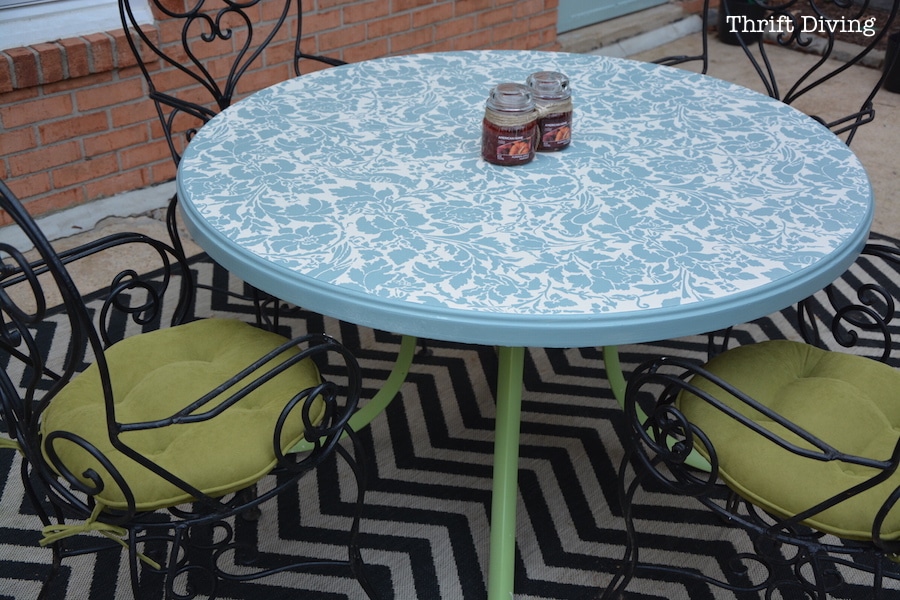
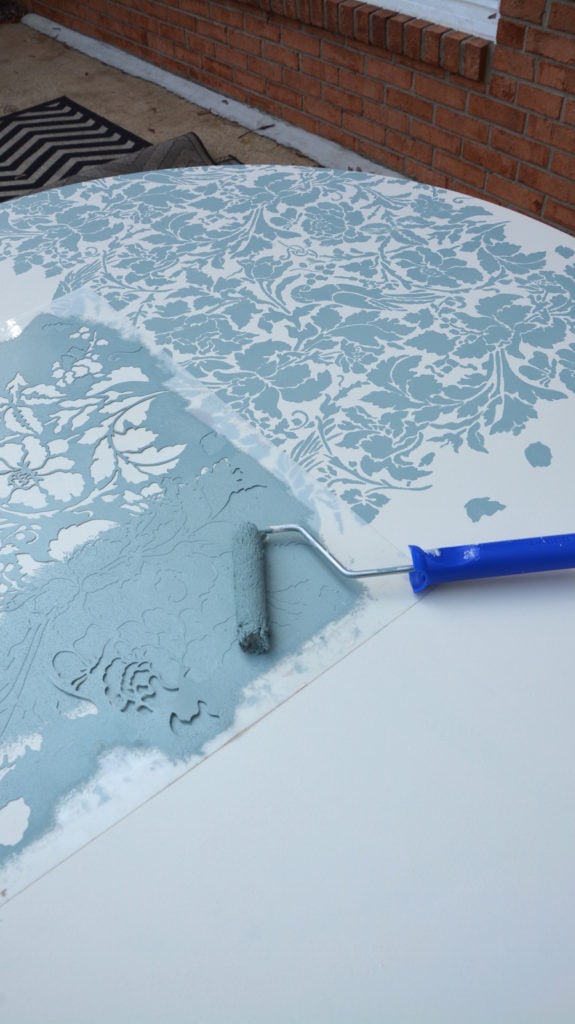
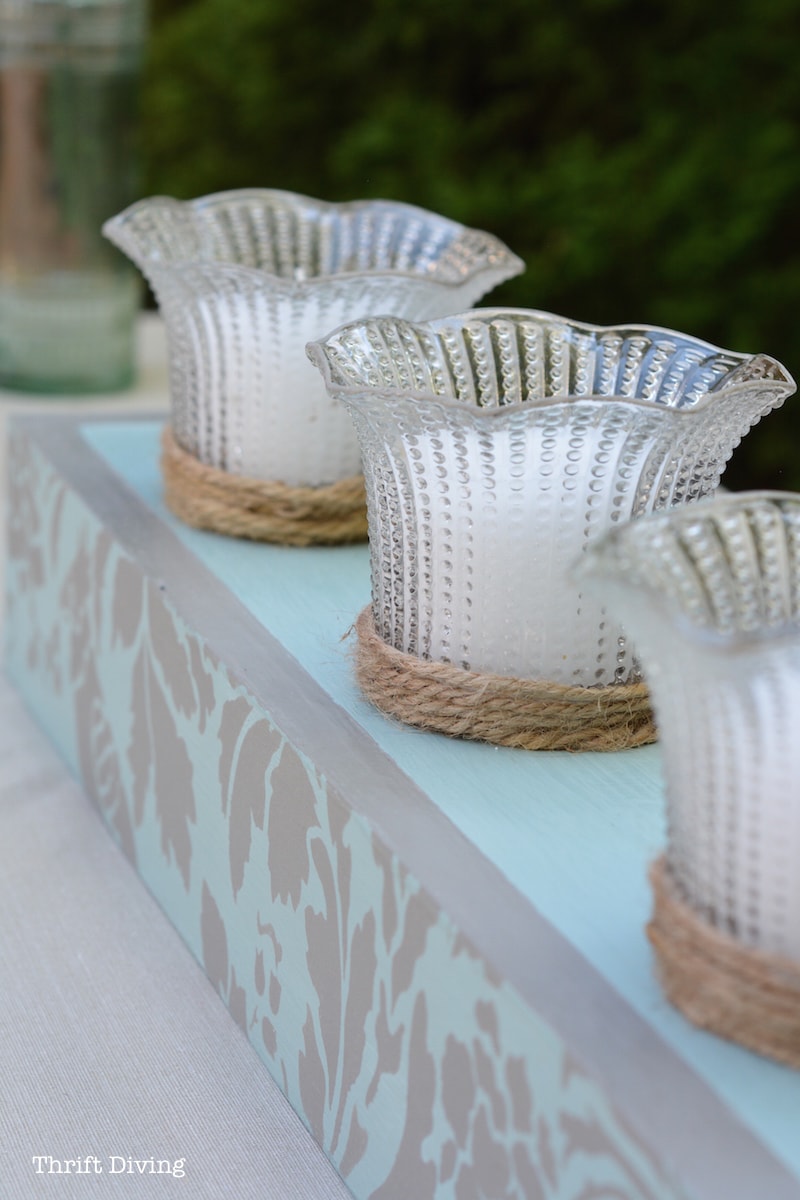
There are popular styles of stencil patterns, such as damask, florals, modern patterns, and more. Choose something you wouldn’t mind using more than once so you get your money’s worth out of the stencil! In the project below, I used my favorite stencil on an outdoor patio table!
How to Use Stencils
Now that you’ve got the right stencil, the right materials, and are excited (or…..overwhelmed?? LOL) about stenciling, now’s the time to actually give it a try!
STEP 1: Plan where to start.
When I stencil walls, I generally start in the corner of the wall or will center my stencil on a piece of furniture. Depending on the pattern, you may want to start elsewhere, especially if there’s a fun design in the stencil you want in a certain place.
STEP 2: Use tape or spray adhesive.
Stencils are going to move unless you’ve got a good hand (or are a magician). LOL. Secure it with a light stencil spray adhesive or use painter’s tape (or stencil tape) on the edges to keep it in place.
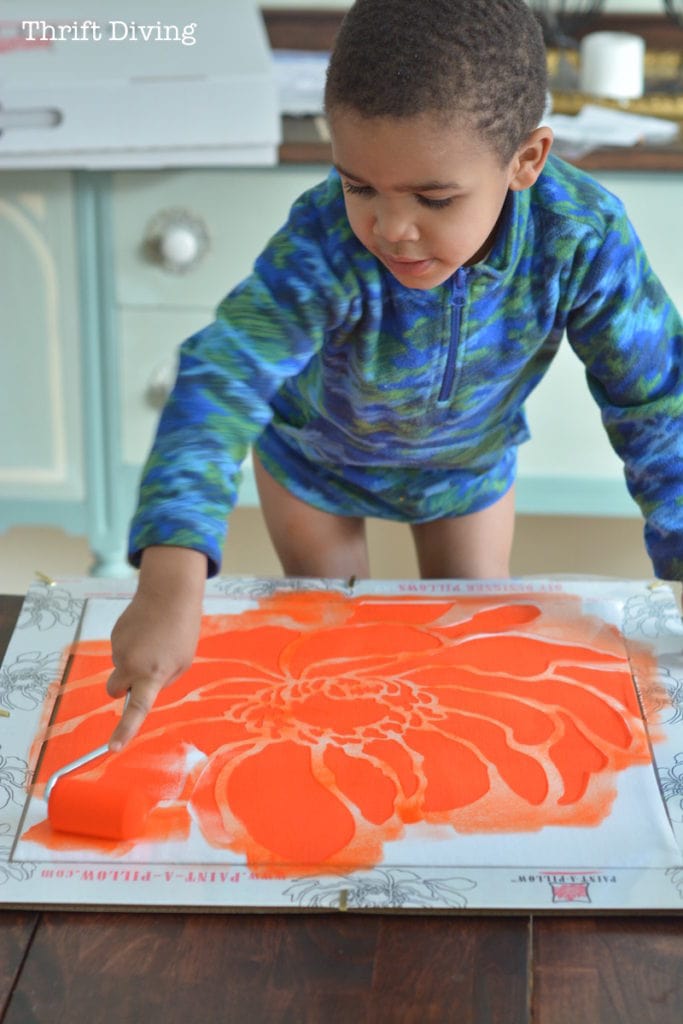
STEP 3: Load your stencil brush or roller very lightly.
Yes, you can use a roller for stencils! Although stencil brushes are great, rollers can get the job done much faster.
The trick is to use foam rollers so that excess paint isn’t sucked up by the roller, creating a runny situation that ruins your stencil job. Foam rollers will hold the right amount of paint as long as you don’t overload them. 🙂 So be sure to off-load much of the paint before stenciling. It’s okay to go over it with two coats if needed.
While you’re stenciling, lift up a little as you go to check if the paint is bleeding through.
When stenciling fabric, be sure to put something in between (like when stenciling pillow cases) or underneath a single layer of fabric to prevent seepage of the paint.
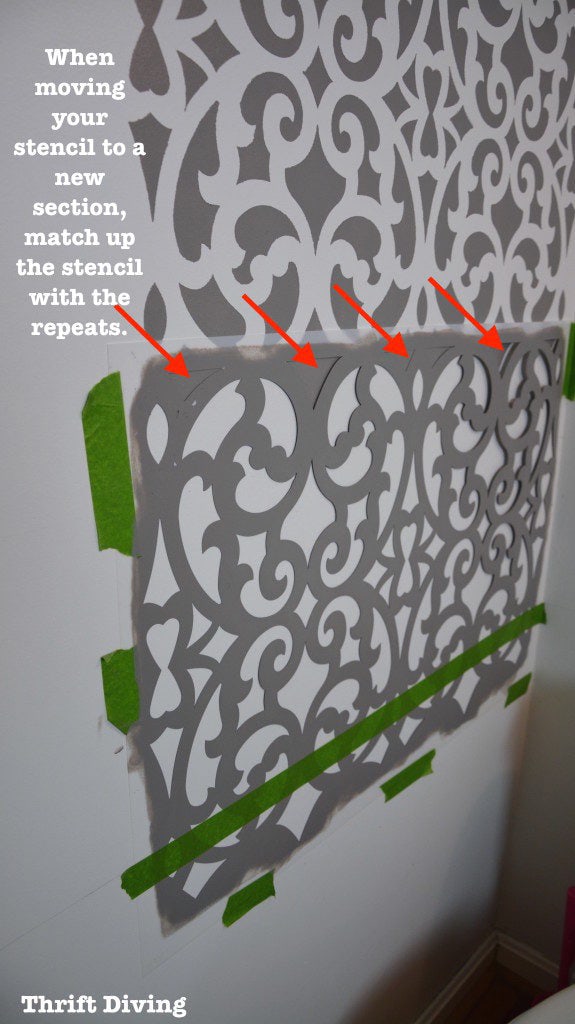
STEP 4: Repeat Your Stencil Pattern
Stencils usually have little indicators that allow you to repeat a pattern. This is important for large walls or for big pieces of furniture. (Smaller pieces of furniture, crafts, or small pieces of fabrics may not need to repeat).
For example, in my bathroom makeover, after completing a section, I gently picked up the stencil and lined up the pattern with the bottom of the painted pattern above it. See the red arrows?
You don’t have to let the paint dry first (otherwise that could take a loooong time!). Just be very careful when repositioning it.
STEP 5: Break out the small brushes!
Around corners, narrow doorways, or edges where the stencil can’t lie flat, go slowly. Use small brushes if needed. I’ve even used a pencil to lightly draw the pattern in odd corners and then just filled in with small brushes.
STEP 6: Stop trying to get it PERFECT.
Trust me–you will have some bleeding! Stencils aren’t 100% flawless and it will drive you batty trying. LOL. Use small brushes with precise tips to touch up around the stencil. (FYI: Stencils with a lot of detail are harder to see your mistakes. Stencils with less pattern are easier to see small screw-ups).
Where to Buy Stencils (Or Make Them Yourself)
There are a couple well-known places to get furniture and wall stencils. The difference between the two is that wall stencils are generally bigger than furniture stencils. But there are some other places to buy them (or to make them yourself!).
OPTION #1: Royal Design Studio
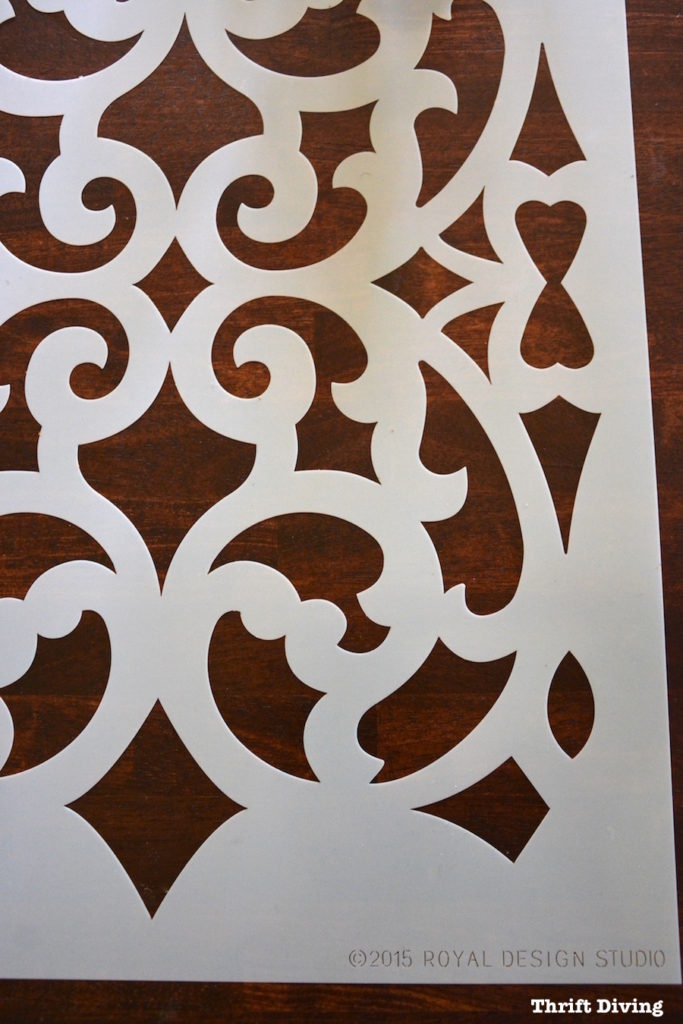
This is where most of my stencils have come from. They’ve got an awesome selection and I’ve had some of them for several years!
My favorite are the Floral Damask stencil and this Mansion House Grille stencil.
OPTION #2: Cutting Edge Stencils
I’ve never used Cutting Edge Stencils before so I can’t say how well they perform compared to Royal Design Studio. However, they get great reviews on Amazon. And that’s also what sets this brand apart compared to Royal Design Studio stencils: you can actually buy them directly from Amazon, whereas you have to go directly to Royal Design Studio’s website to purchase them. I like the idea of one-click buying from Amazon!
OPTION #3: Craft Stores
Craft stores like Hobby Lobby, Michael’s Arts & Crafts, AC Moore, etc. are great places to pick up regular stencils, but let me just warn you that their selection of trendy, hot stencils is dismal. They’ve got a more “classic” selection of stencils that remind me of something your grandmother would buy, or something a mom would buy to stencil little footballs on Johnny’s little wooden birdhouse. LOL.
The high-quality, modern, fashionable ones can usually only be bought online. However, if you’re looking for alphabet stencils, craft stores are usually a good idea.
OPTION #4: Amazon
I mentioned above that you can buy good-quality Cutting Edge Stencils on Amazon, but let’s not forget the other stencils you can buy from Amazon:
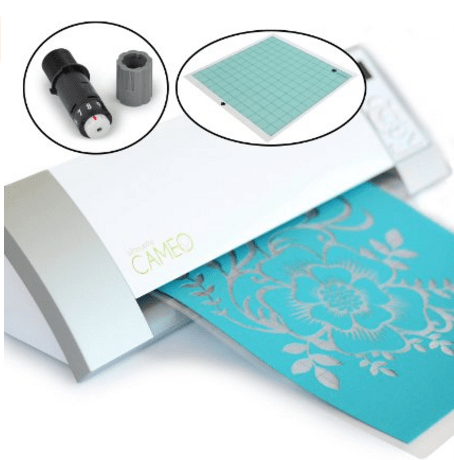
OPTION #5: Cut Your Own Stencils Using a Silhouette Cameo
This is probably my favorite option for creating small stencils for crafts on various projects. The Silhouette Cameo is a cutting machine that can do a bunch of stuff (like designs for heat transfer cutting fabric, stamping, etc.), including cutting stencils and lettering.
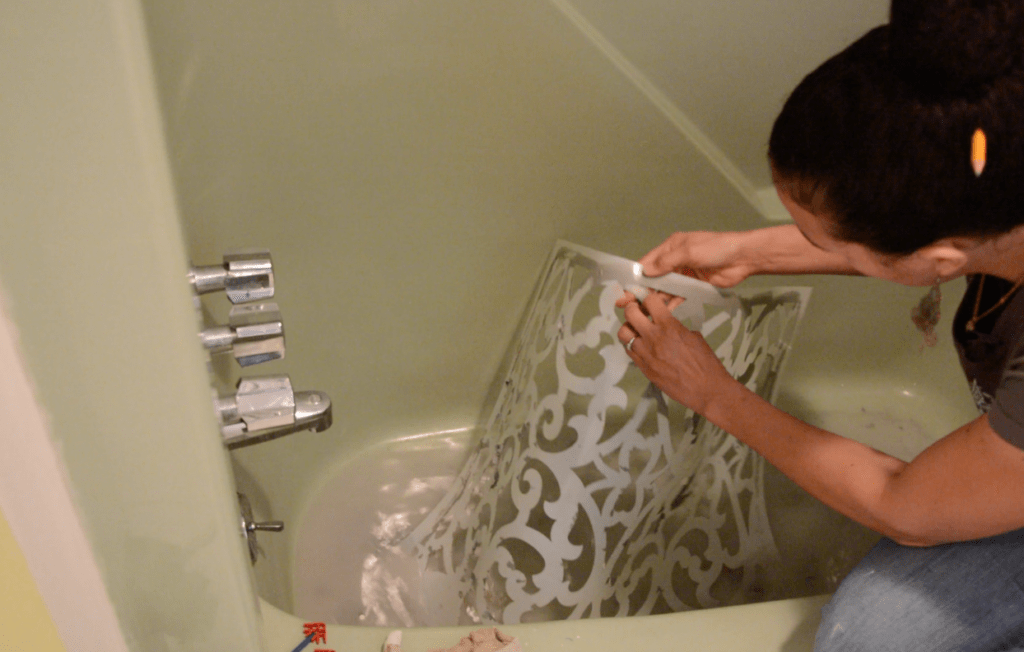
You can watch this video for instructions on how to cut stencils with your Cameo. I also love to use this machine to cut stencils from vinyl because vinyl sticks well and gives me the cleanest edges.
Below is what it looks like to stencil with vinyl that I used to cut with my Silhouette Cameo, which typically leaves very clean lines! I usually prefer to stencil small projects this way, using designs that I found in the Silhouette Cameo store for a couple of bucks.
OPTION #6: Use an Old School Stencil Cutter
And if you don’t want to get all high-tech with the Silhouette Cameo, you can actually cut your own stencils just by using blank stencil sheets and a hand-held stencil cutter. You could lay a design under the stencil sheets, trace it, and then use the stencil cutter to cut it out. Super easy!
OPTION #7: Buy Stencils from Etsy
Don’t forget to check what stencils are available on Etsy! There are a bunch of creative people selling stencils that may be more unique, affordable, etc. You can even get custom stencils. Click here to find stencils on Etsy.
How to Wash Your Stencils
I’ll be honest with you–this is the part I hate the most about using reusable stencils. They get messy really quickly, and if you’re using chalk paint, which is very “hearty” and sticks well to everything, they’re tough to clean if you let the paint dry.
The best tip for washing your stencils is to clean them immediately after use with warm, soapy water.
But if you’re like me and you let the paint dry, let them soak overnight in the bathtub in Simple Green, then use a scrub brush to gently remove the paint. Be careful with intricate stencils so you don’t rip them! Be prepared for a mess in your bathtub, too! 😉
How to Store Your Stencils
After washing them, store your stencils in a place where they can lie flat or gently clip them and hang them up.
Don’t do like me and roll them up in the garage. EEK! 😉
Properly caring for them will make them last longer!
Sooo….Where Should You Start NOW??
I know…this is a LOT of information to take in! I hope I haven’t totally overwhelmed you!
Don’t worry–just pin this guide and come back to it later as a reference.
I would recommend practice stenciling on something you don’t mind messing up. Once you’re feeling like a Stenciling Guru, then try your hand at something easy, like fabric or a small piece of thrifted furniture! Save the walls for the stenciling project to do once you’ve mastered a few smaller projects!
Soon, you will be on your way to transforming your home with stencils and you’ll love them as much as I do! 🙂
If you find this post helpful, considering sharing it with your friends! 🙂
And now that you’ve learned everything you need to learn about stencils, what’s the next thing you’re planning to stencil? Leave a comment below and let’s chat about it!

Download the 5 freebies!

Thrift Diving inspires women to decorate, improve, and maintain their home themselves...using paint, power tools, and thrift stores! Use these 5 printables, checklists, and ebooks to get started!

Great info on how to use stencils. I love to use them. Thanks for sharing at Inspiration Galore Projects!!
Thank you so much!! 🙂
What a great post! I read this and then attempted to stencil a Tide pod container. I have been obsessed with making one of these containers into something decorative- I’m still trying :)!! This was my best try so far, but I should have sprayed the middle of the stencil with something to make it stick better. I sprayed it with a metallic spray and it was pretty good but was a little fuzzy looking in the middle. Then I went to wash off the stencil like you talked about and yeah- there was no washing off the metallic spray, haha!
I have never stenciled on furniture but i have done borders when they were “in”. I loved the idea of the saying on the door. i just may do that! Great info on where to buy furniture stencils.
One question: Doesn’t the spray adhesive leave a tacky feel on fabric or is the adhesive you refer to strictly for fabric?
Hey, Carole! Oh, yes, borders! I remember those! We had some of those here in the house when we moved in. Was happy to rip them down! 😉
As for the spray adhesive, I’d look for the ones that are especially for stencils. I generally don’t use stencil adhesive because I have a steady hand (or tape). The ones for stencils won’t leave a tacky feel, but other adhesives that aren’t necessarily made for stencils probably will!
Great post! Very informative and I just adore your writing style. It’s like mine. You actually type like you talk. 🙂 I’ve never worked with stencils before and you have now inspired me to do so. I have the perfect painted white coffee table that would look great stenciled!!
Hi, Terri! Oh wow, I love that: “you actually type like you talk.” Yes, that’s a great way to describe it! When I’m writing my posts, I’m just talking to friends, explaining what I’ve done and how to do it! I’ll have to stop over your blog and check out your posts now, too! 🙂 Let me know how the stenciling goes!
I didn’t realize this was the same Terri from Snapchat! Hey, girrrrrl! 🙂 I clicked over to your blog and saw your picture and was like, “Hey, I know her!” LOL
LOL!!! Yes! You know me Serena! Heyyyy girlll!!! LOL. It’s funny how that works, huh? Thanks for checking out my blog!!
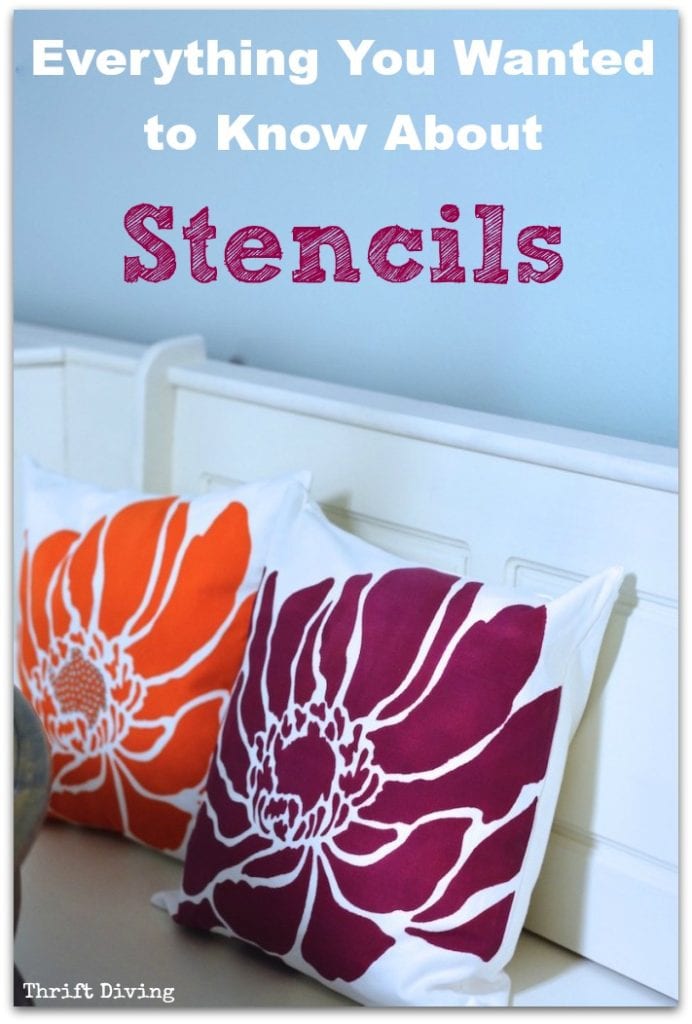
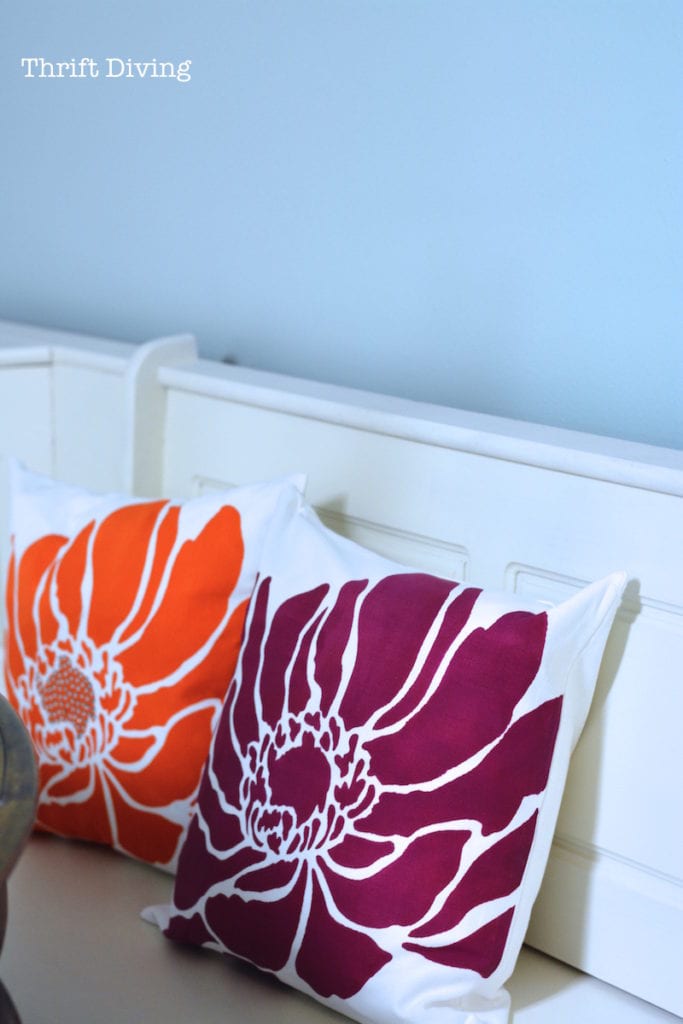
Terrific post, Serena. I love the stenciled look and I’m considering adding one to our deck table. I’ve seen all your larger stenciled projects, but this is the first time I’ve seen your flowered pillows. They’re gorgeous. You are really something.
Great advice, great tips.
Thank you, thank you, for the helpful & informative information. Your projects especially the bathroom look beautiful. I look forward to when I ever decide to stencil this information will come in handy.
I love your stencil work -the bathroom and bedroom walls are beautiful. If you hadn’t told me I would have thought it was wallpaper. And the pillows are fabulous. In fact I have a friend who wants to paint large
flowers on a rug and this stencil looks like she could use it. Thanks I haven’t done stenciling in some
time but it might be time to start again. Great job, keep up the good work.
Hi, Betty! It DOES look a lot like wallpaper, doesn’t it? 🙂 I would say that it was probably harder to do than wallpaper, but waaaay less expensive!
Thank you so much, Serena. I have wanted to stencil a piece of furniture for a long time. I think I will pin your instructions and try this really soon. First I need to find that perfect piece of furniture to try this on. Will let you know what happens…when it happens.
You’re welcome, Vicki! Once you try it, you’ll see how amazing it is! Keep me posted!
Wow! This was such an inspiring post. I am going out tomorrow and finding SOMETHING to stencil. Your tips for using and cleaning the stencils were so thorough and helpful. Thank you! Thank you!
Stenciling is something I have never tried, but I really like the look, especially on your patio table and the jewelry cabinet. It really makes.those projects! Something tol look forward to doing.. Thanks so much for the tutorial! Extremely helpful, as usual!