How to Build, Paint, and Install a Custom DIY Mailbox
Imagine you saw this weather-beaten, decaying dead mailbox post, leaning over while attempting to collect your mail?
If you’re like most people, you’d run to a big box store, buy yourself one of those handy mailbox kits, and self-install the mailbox post it in one afternoon.
That’s what normal people do.
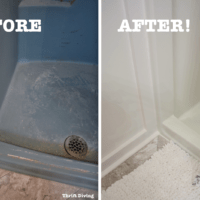
BEFORE

Not me.
I decided to DIY my own mailbox.
AFTER!

I have to preface this post with this caveat– I DID SO MANY WRONG THINGS IN THIS PROJECT! I probably should have titled this post: “What NOT To Do When Building a Custom DIY Mailbox”….. But you have to give me credit for trying. AND, give me credit for the improvement, even with mistakes.
Lucky for you, I’m going to point out all my mistakes so may you don’t make the same ones. (Don’t you love blogger transparency??) 🙂
Materials Needed to Build a DIY Mailbox and Post
(I participant in the Amazon Services LLC Associates Program, an affiliate advertising program designed to provide a means for me to earn fees by linking to Amazon.com and affiliated sites).
- Your old mailbox (if possible)
- 4″ x 4″ pressure treated wooden post (about 6 feet long)
- Circular Saw

- Post digger
- Bag of concrete mix
- Post Level (to make sure your mailbox post isn’t crooked)
- 1″ thick piece of wood (this is what the mailbox will be mounted to)
- Ruler or measuring tape
- Chisel
How to Build, Paint, and Install a DIY Mailbox
I really didn’t have to make this project as hard as I did. But when you’ve never picked up a circular saw and somehow you’re going to have to use that to cut 4″ thick pieces of pressure-treated wood…..well…..”tough” is out the window and “just do it” comes into play.
STEP 1 – Save the Old Mailbox
Your mailbox may be dead, but you’re going to bring it back to life with paint. I call it CPR: crappy post revival. 🙂 Remove these screws that are holding the old mailbox to the wooden platform it sits on.


STEP 2: Paint Your Old Mailbox
Everything is fair game when it comes to getting a coat of paint. Everything. That includes the mailbox. The great thing about furniture paint is that not only does it not require sanding or priming (as long as the surface is in good condition), but you can use furniture paint outside (just don’t use furniture wax on painted mailboxes because the sun will melt the wax).
I used Annie Sloan Country Grey and Napoleonic Blue chalk paint.
One thing I forgot to take a pic of was the pretty little blue flowers I painted on the outside! I got the idea for the flowers because that’s how I painted this patio table I found next to the dumpster, and people loved the free-handed flowers. So why not replicate it?? You can also spray paint your mailbox to refresh it. Be sure to use two coats for even coverage.
Related Read: What’s the Best Paint for Furniture?


STEP 3: Mind the Mailbox Guidelines (and Call 811 First!!)
Mailboxes have to meet certain specifications for the United States Postal Service. How else would these awesome mail delivery people get mail to us if we had 7 feet tall mailboxes, or we installed them 5 feet from the curb? So when building your mailbox, be sure you meet these guidelines.


You’ll notice in the image above that the recommendation from the post office is to dig down 24″ inches to install your mailbox post. However, before you do any digging on your property, you must call 811 to find out where utility lines are buried on your property. Because if you accidentally damage a utility line, you could hurt yourself and you could be fined a huge amount of money. You don’t want that to happen!
I mentioned this very important step in my post 5 Questions You MUST Ask Before You Install a Mailbox.

When you call 811 or contact them on the 811 website to submit a ticket with your state, it will usually take a couple days or so for them to send someone to mark where on your property the utility lines are located. You must wait for them to mark your property before digging. And once they’ve come to mark your grass, you’ve got about 10 days or so to start on your project while the ticket is open.
Please don’t skip this step.
STEP 4: Construct Your Post BEFORE You Install It
Seriously, any idiot probably knows this. BUT…..this idiot (me) made the mistake of not planning properly. I didn’t know how to build a mailbox post, and I followed the wrong instructions on a YouTube video. I mistakenly installed a 4″x4″ pressure treated post like this instead of building out the whole post first. If I was installing one of those mailbox kits, this would have been correct. But I didn’t realize this at the time…. (SO, make sure you construct your post first).

So because I had mistakenly put the post in the ground first, I had to improvise on building the mailbox since this version wasn’t possible since I had already modified the pressure treated wood.
This is what I should have build:

Instead, I built THIS. At least I get an “A” for effort, right????

But let’s take a step back before we get into putting the post in the ground….Remember, construct your whole mailbox post FIRST.
STEP 4 CONTINUED…. Cut Your Notch
In order to join the arm (upon which the mailbox will sit), you have to cut notches, about 4″ total width, which is enough to slide the other post into to create the arm. Run your circular saw back and forth, being careful to make sure your blade isn’t too deep to cut it all the way through.

Once you use your circular saw to add all the cuts, it will look like this:

STEP 5: Tap Out Your Notch
It’s amazing how weak the slices of wood are when you cut them in thin strips like this. Just use a hammer and break them. They fall right now, like fragile teeth! My favorite part. You’re left with something that looks like this:

STEP 6: Clean It Up
This is where you’ll need a chisel to clean up the notch you just cut. I didn’t have a chisel so I just used my Dremel Multimax tool.

Cleaned up, this is what it looks like, although a chisel will get it more smooth.

STEP 7: Connect the Mailbox Arm to the Post
Now here’s where I improvised. I placed the notched piece on top of my post (again, keeping in mind the USPS guidelines for height from the ground to the bottom edge of the mailbox).

If you were building this type of post below, you’d slide the arm on the side of the post, and not on top, so it would look like this below. Plus, you would have made the angled cuts with a miter saw (which I didn’t own at the time).
Anyhow, I used Gorilla Glue and screwed the top arm down with long wood screws, making sure it was level.
One part that is missing from my post is the 45-degree angle support. I didn’t have a miter saw at the time to cut one, so I skipped it. But go ahead and cut that 45-degree angle support. Nail it at the right angle.

STEP 8: Cut a Platform For the Mailbox
Next, cut a piece of wood for the top. This is what the mailbox is anchored to. I used my RYOBI AirStrike brad nailer to secure it to the top. Now sit your mailbox on top of this platform and screw it back into place along the sides.

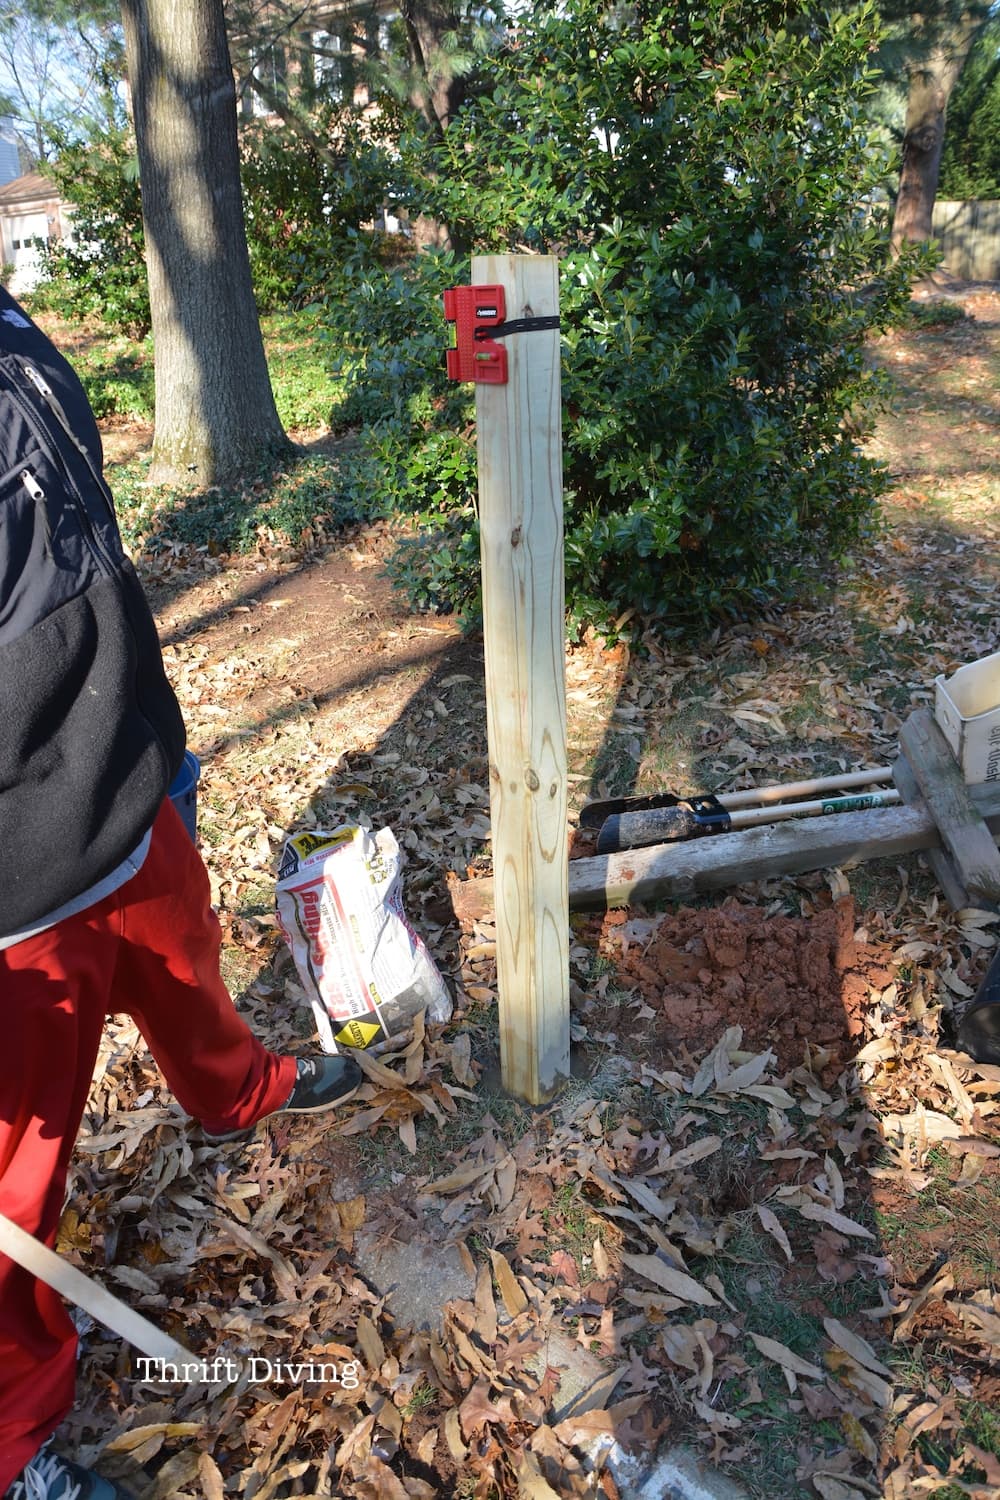
STEP 9: Dig a Hole 24″ For Your Mailbox Post
So now that you’ve checked your location before you dig by calling 811 to make sure you’re digging up buried utilities, it’s time to dig your hole. Remember the USPS guidelines in distance of how far your mailbox will stick out to the street. At this point, if you’ve done it properly, your post is constructed. I guess you can decide to paint it, too, before you install it. Whichever is easiest.
Use a post digger like this, and dig a hole 2 feet deep. You should have at least 4 feet or more remaining of your post above ground.

Be sure to set some stones in the bottom for drainage, or some bricks to keep the post in position, then use one of these post levels to make sure that your post is straight.

Add in the dry concrete mix, and then just add water. No need to pre-mix.

STEP 10: Make It Pretty!
I painted my mailbox post white because I liked the look at a white mailbox post with my painted mailbox. But you can surely keep it natural if you’d like.
Keep the area trimmed and neat. Add some decorative bricks or something to make your mailbox look awesome.
Plant some flowers around it!

More Home Improvement Tutorials
Here are some other home improvement tutorials in which you may be interested:


My Final Thoughts on Building a DIY Mailbox
Although this isn’t the perfect mailbox post, these instructions will have you on your way to building your own DIY mailbox post without spending a lot of money to do it. Have fun with this! And be proud that you totally rocked it out :).

Did you find this post helpful? If so, be sure to SAVE it.

Have you ever wanted to build a custom DIY mailbox post for your home?

Download the 5 freebies!

Thrift Diving inspires women to decorate, improve, and maintain their home themselves...using paint, power tools, and thrift stores! Use these 5 printables, checklists, and ebooks to get started!

Now that I’ve burst that bubble about getting an SBA loan, why all of
the sudden does Chase Bank state they are ‘IT’ if you want one.
The major intent was to regulate interest rates and mortgage terms on the
loans the administration insured. Once you figure that out,
you will have money in your account within 24 short hours.
Heya! I just wanted to ask if you ever have any issues with hackers?
My last blog (wordpress) was hacked and I ended
up losing several weeks of hard work due to no back up.
Do you have any methods to protect against hackers?
Great post (*pun alert*)! thanks for keeping it real. Despite the missteps here and there, it turned out GREAT!!!
Thanks Beth!! I had to make it work somehow!! It would have been a nightmare having to cut out a post from a hole of cement! LOL. The rule of measure twice, cut once–IS TOTALLY TRUE! 😉
Mailbox looks great but what I love more is the picture with your boy with his shoes on the wrong feet 🙂
HA!!!! Oh, you caught that? LOL. The joys of raising a 2 year old……My sweet little Koko Bear. LOL
Awesome job! Sometimes I think we learn better from other’s mistakes than when they do it perfectly. When you show what not to do, it totally helps 🙂 Then when we do it, we don’t think “I bet I could do this to save time…” because we know it wouldn’t work. You save us the trouble of making the same mistakes 🙂
Serena, I think it looks great! My husband’s job includes going out and checking for underground electric lines so I’m really glad that you included the 811 info. You wouldn’t believe how many people (including contractors) don’t do that part and create a huge mess for the power/gas/cable/telephone people. Then of course the person who didn’t call gets assessed damages. So great advice. Plus, I really like your mailbox. I don’t know how you get so much done!
Cindi
Cindi, honestly, it’s lack of sleep and ignoring my children at times! LOL. That is the ONLY way I get things done! I know–not the best methods. But hopefully the stars will align and I’ll be able to make this my day job and get it in during regular hours when people are awake. HA! 🙂 Thanks so much!!
Great post! Sorry, I must admit that I was cracking up at the picture with the mailbox sitting on top a the straight post. Yes, you totally get an ‘A’ for effort. Your mailbox looks lovely now and I like the ideas of planting flowers around the post. When it comes t mailboxes, yours is very nice. I have seen some crazy and scary ones…done on purpose. lol
Thank you, Julie! Looking back, I can’t believe I made it as difficult as I did. Goes to show you that planning and experience count for soooo much. I was just thinking, if I were to construct one today, I could totally knock it out in probably 2 hours vs. 5 months. HA! But hey–it’s all a learning experience! Gotta start somewhere, right? LOL. Thanks for the comment!