How to Reupholster a Wingback Chair: Step-by-Step Video Tutorials!
I did something scary: I decided I was going to learn how to reupholster a wingback chair that I had bought at the thrift store. First of all, I don’t typically buy upholstered furniture from the thrift store. I’m afraid it’s full of critters and creatures. But there was something so beautiful about this chair that I couldn’t turn away.
In case you’re wondering, I had found this vintage wingback chair for $60 at Value Village and Unique Thrift here in Maryland, so if you’re ever in the area, you must go. Best prices in town and a great selection (the ReStore is also a great place to buy furniture).
Contents – How to Reupholster a Wingback Chair
PART 1: Breaking Down a Wingback Chair
PART 2: (Continued) Breaking Down a Wingback Chair
PART 3: Adding Webbing to Wingback Chair
PART 4: Replacing the Seat Springs
PART 5: Finishing Up Springs, Webbing, and Coconut Fiber
PART 6: Creating and Sewing a Pattern for Seat and Arms
PART 7: Reupholstering the Seat and Front
PART 8: Reupholstering Arms and Wings
PART 9: Reupholstering the Back and Outside
PART 10: Reupholstering the Seat Cushion
I literally walked away from it, begrudgingly…..only because I hate the thought of lugging upholstered stuff home from the thrift store that can’t get tossed in the washer and dryer. I am afraid that every fabric from the thrift store is infested with some nastiness that I don’t want to bring into my house.
Finding a great desk or table is one thing……..finding a chair with lots of nooks and crannies for bugs to hide is another thing.
It freaks me out.
My vintage chair makeover that I reupholstered prior to this wingback chair was one of those “Oh, God, please let this thing be bug-free” and it sat in my garage forever waiting until I felt anything in it had died or crawled out. LOL…..whew, it was okay, thankfully. 🙂
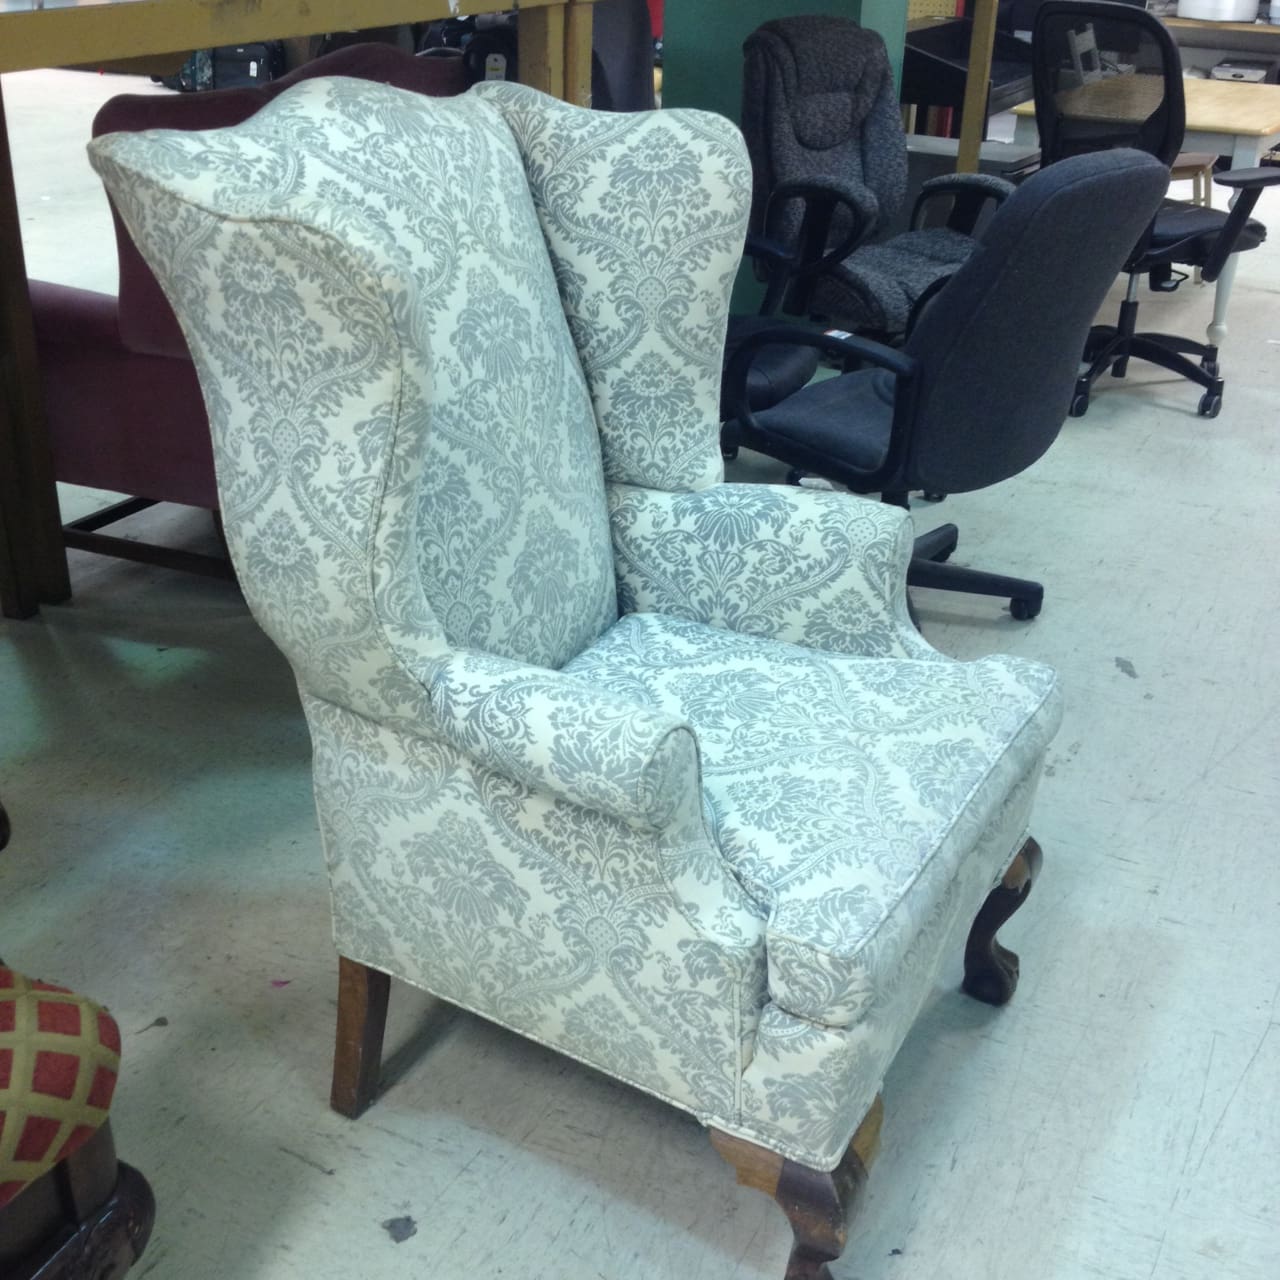
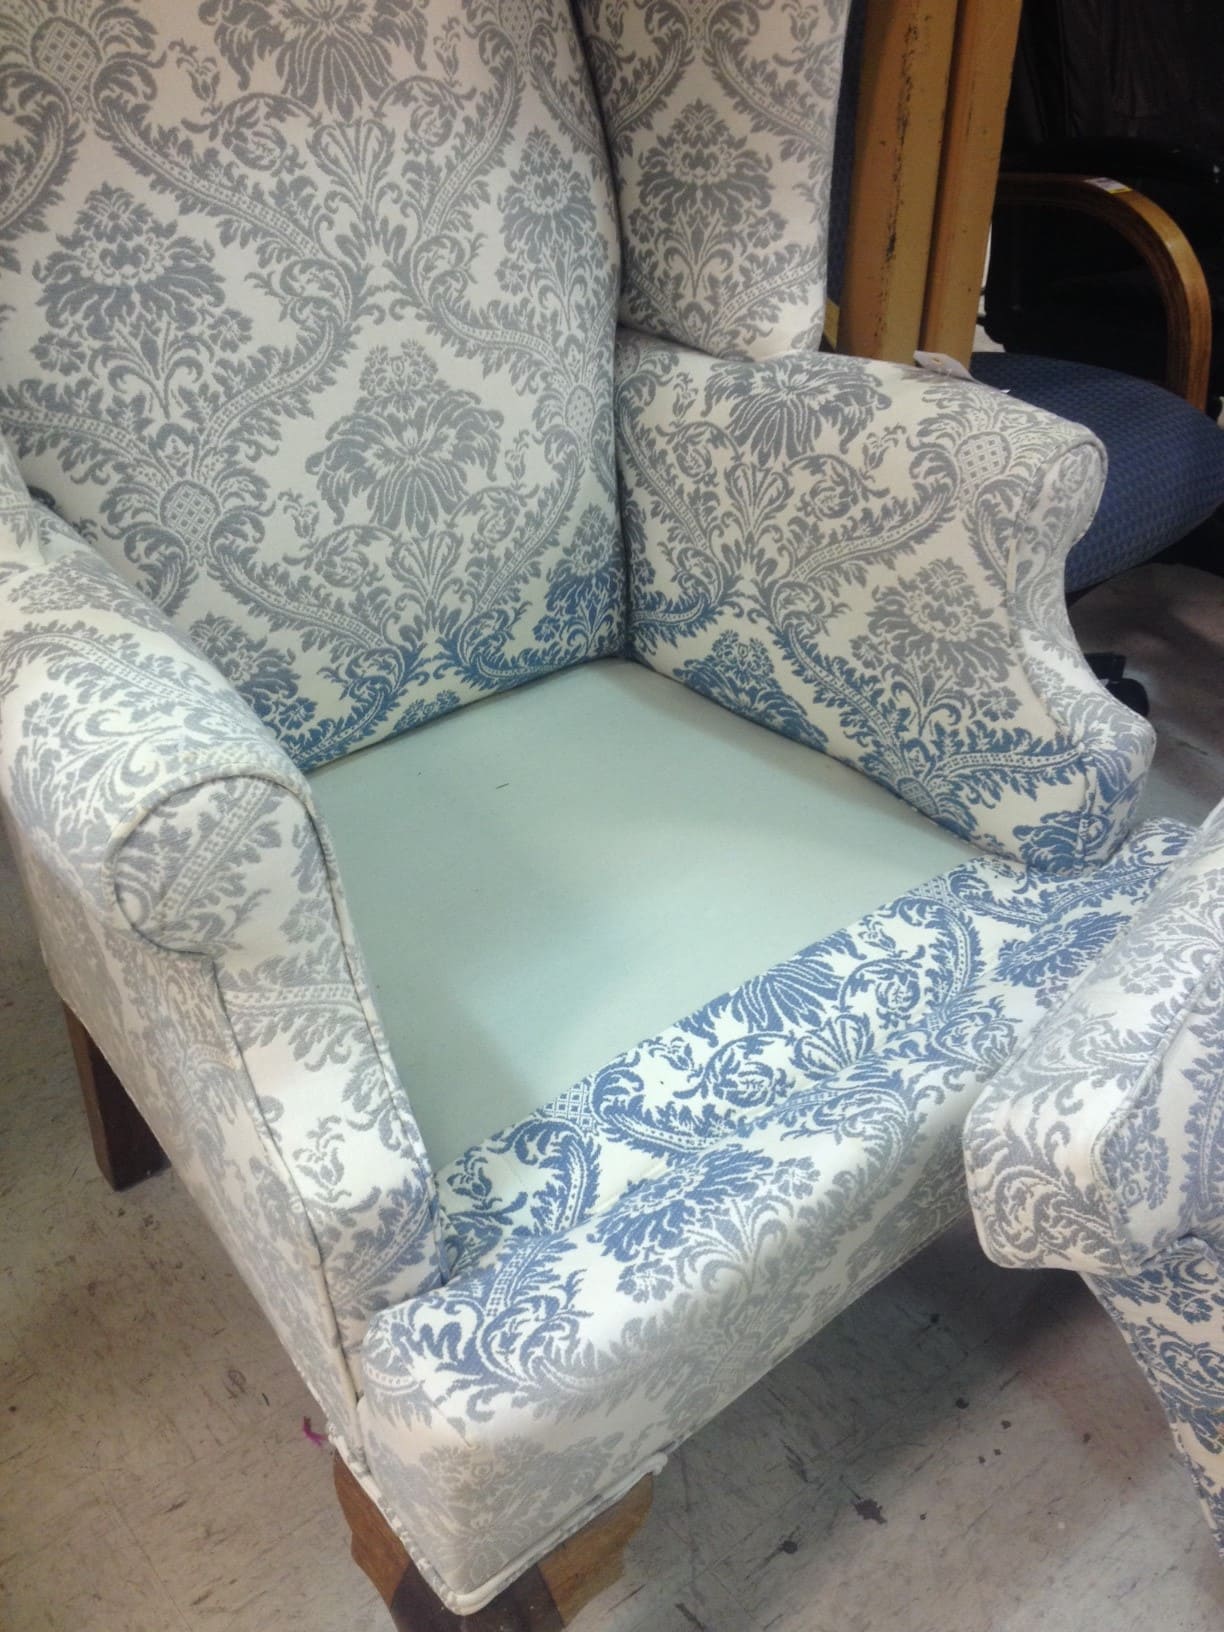
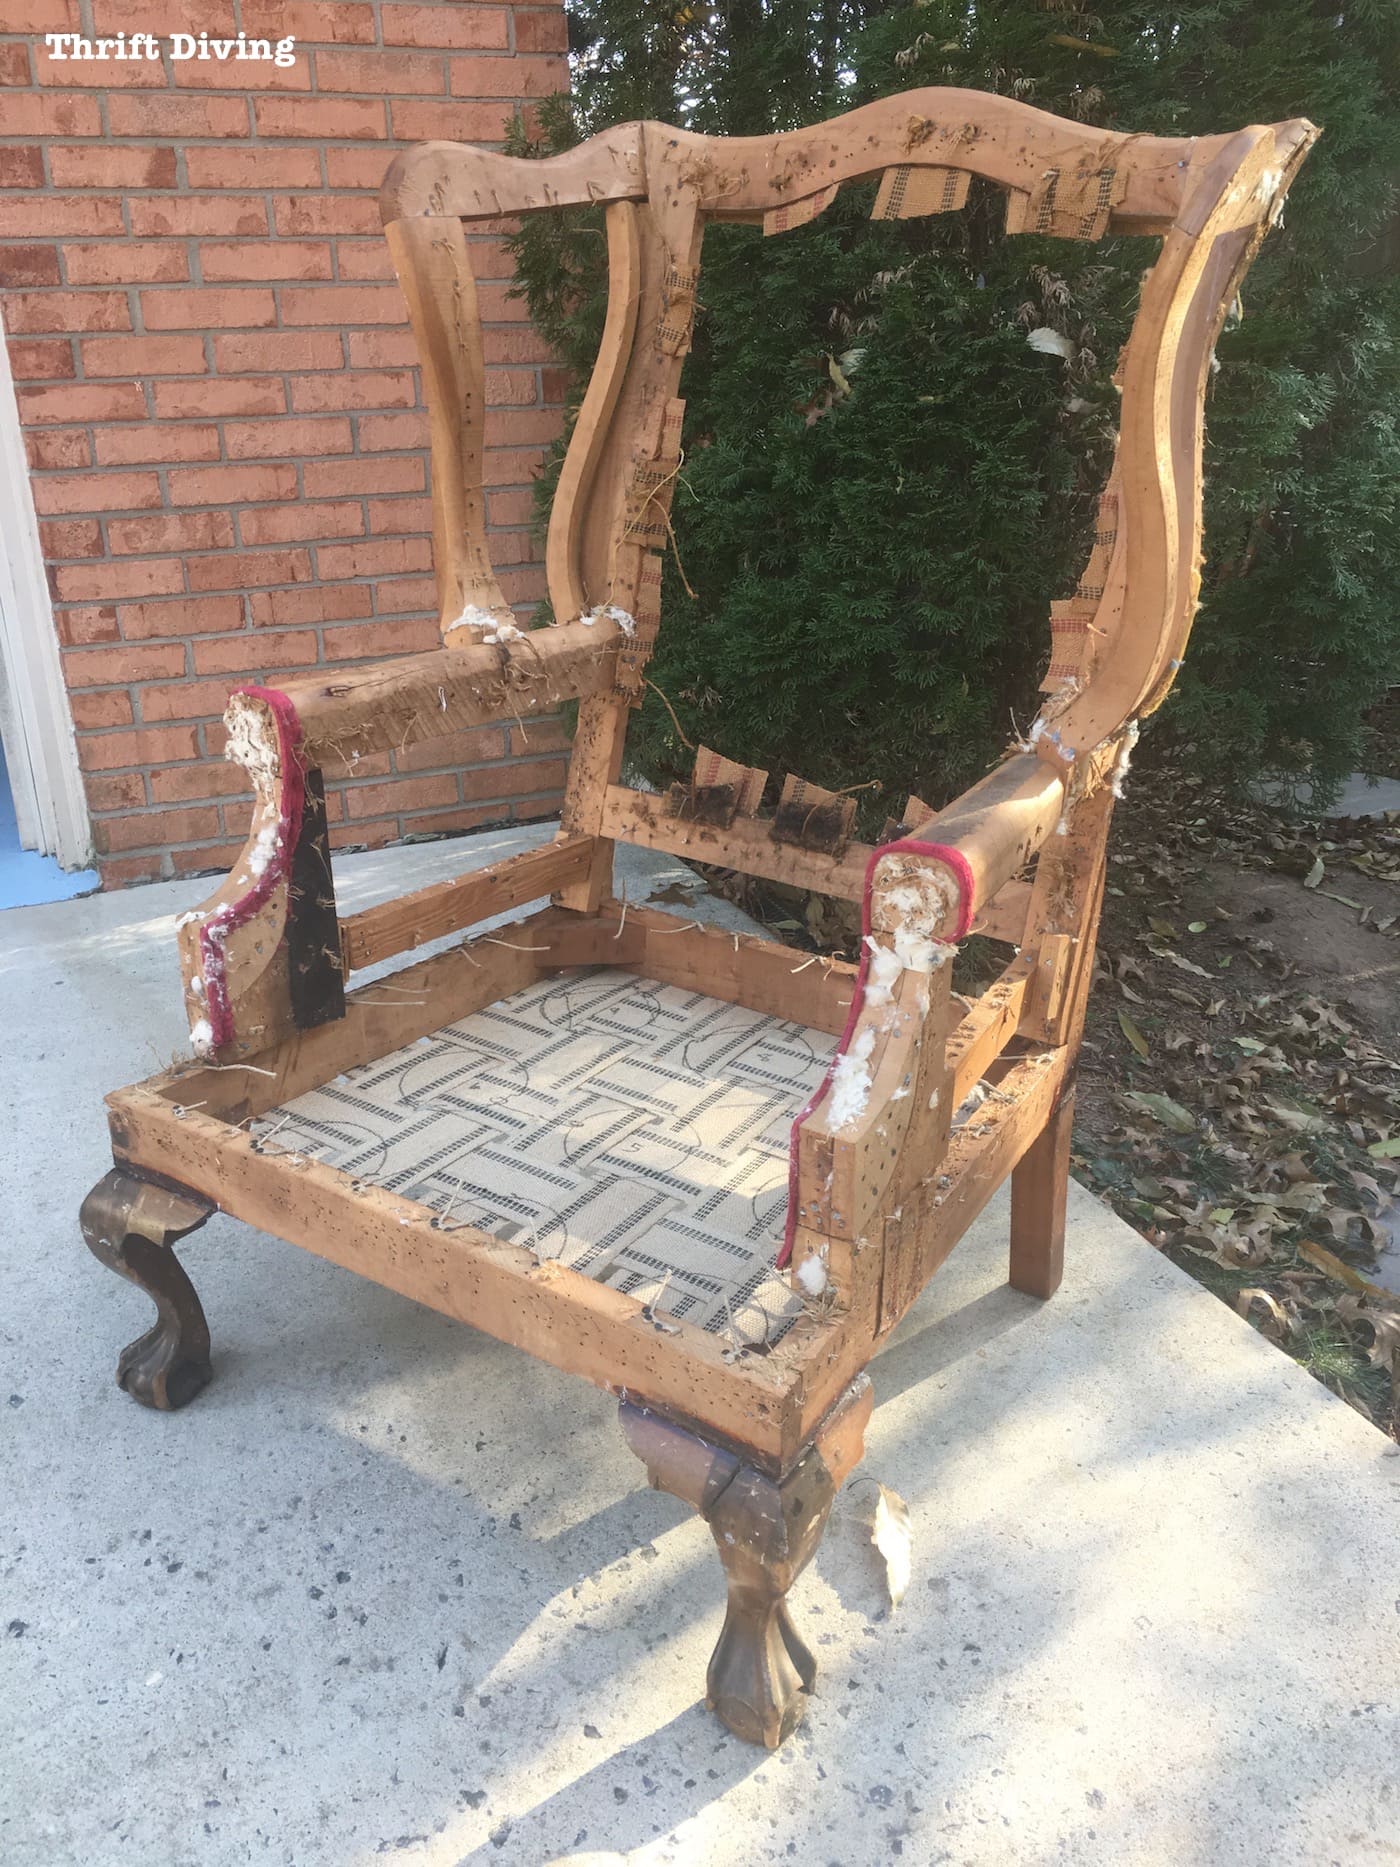
The color of this wingback chair looked pretty, until I removed the cushion. If you were to look up sun-bleached, I do believe you’d see a picture of the wingback chair next to it. That meant one thing: this wingback chair must be reupholstered.
How to Reupholster a Wingback Chair From the Thrift Store
I signed up for a local upholstery class and decided to tackle this behemoth of a chair: a $60 wingback chair that sat in my garage for a whopping 4 years.
The biggest worries were: how in the world do I start this project?? How do I break down this wingback chair to reupholster it? How in the world do I put it back together again??
Clearly, I wasn’t going to complete this project in a weekend…
But as I completed sections of it, I posted the videos to my YouTube channel, including a bunch of reupholstering tips that I’d learned along the way!
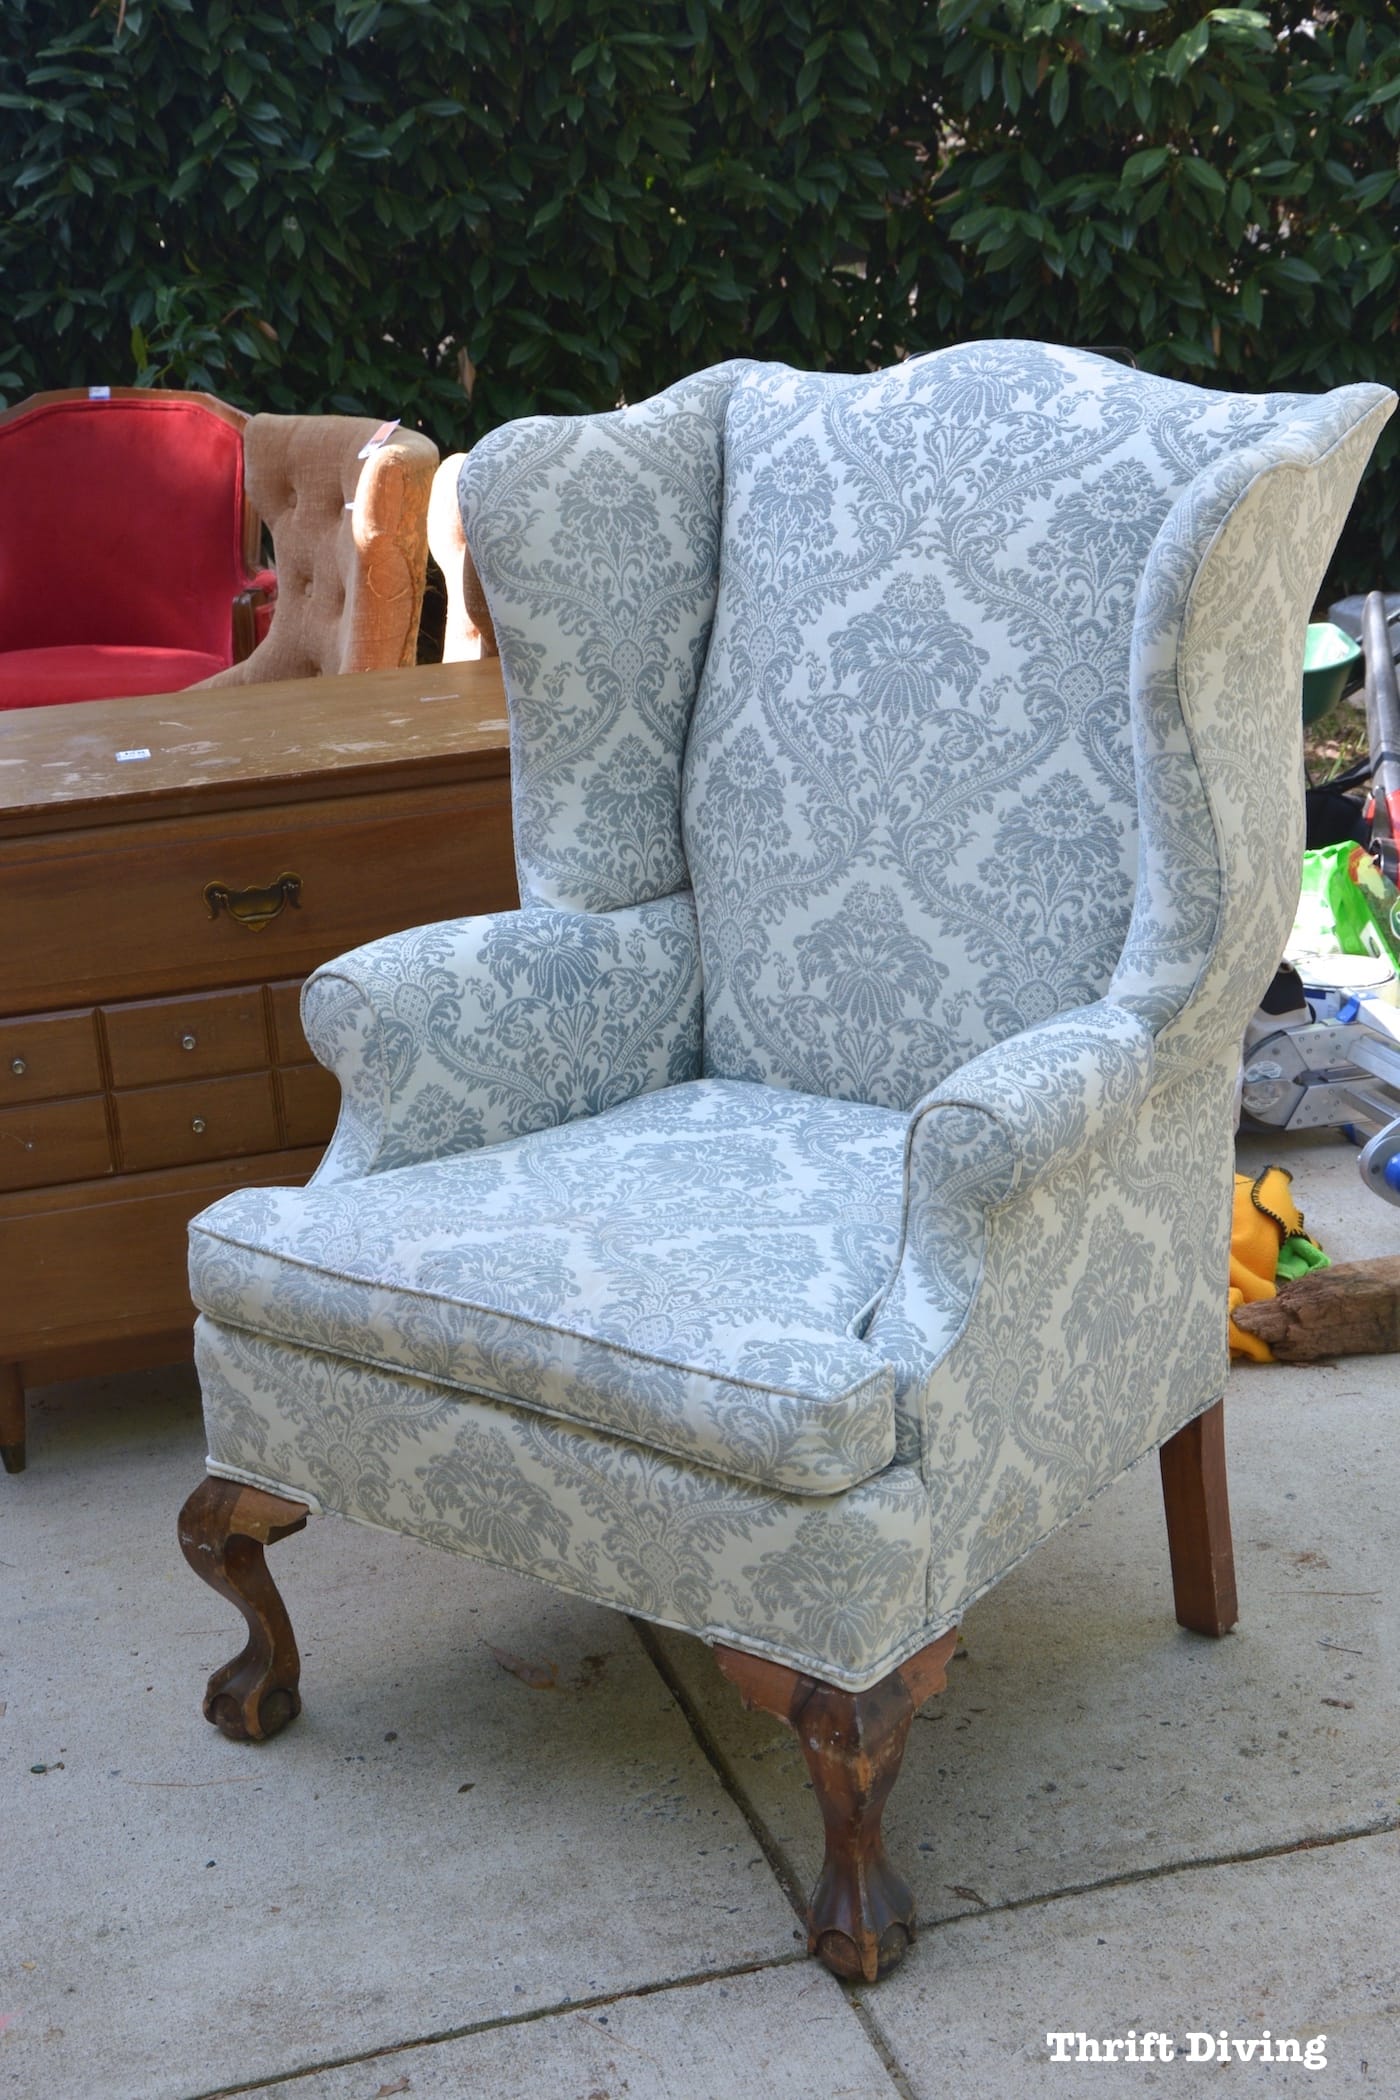
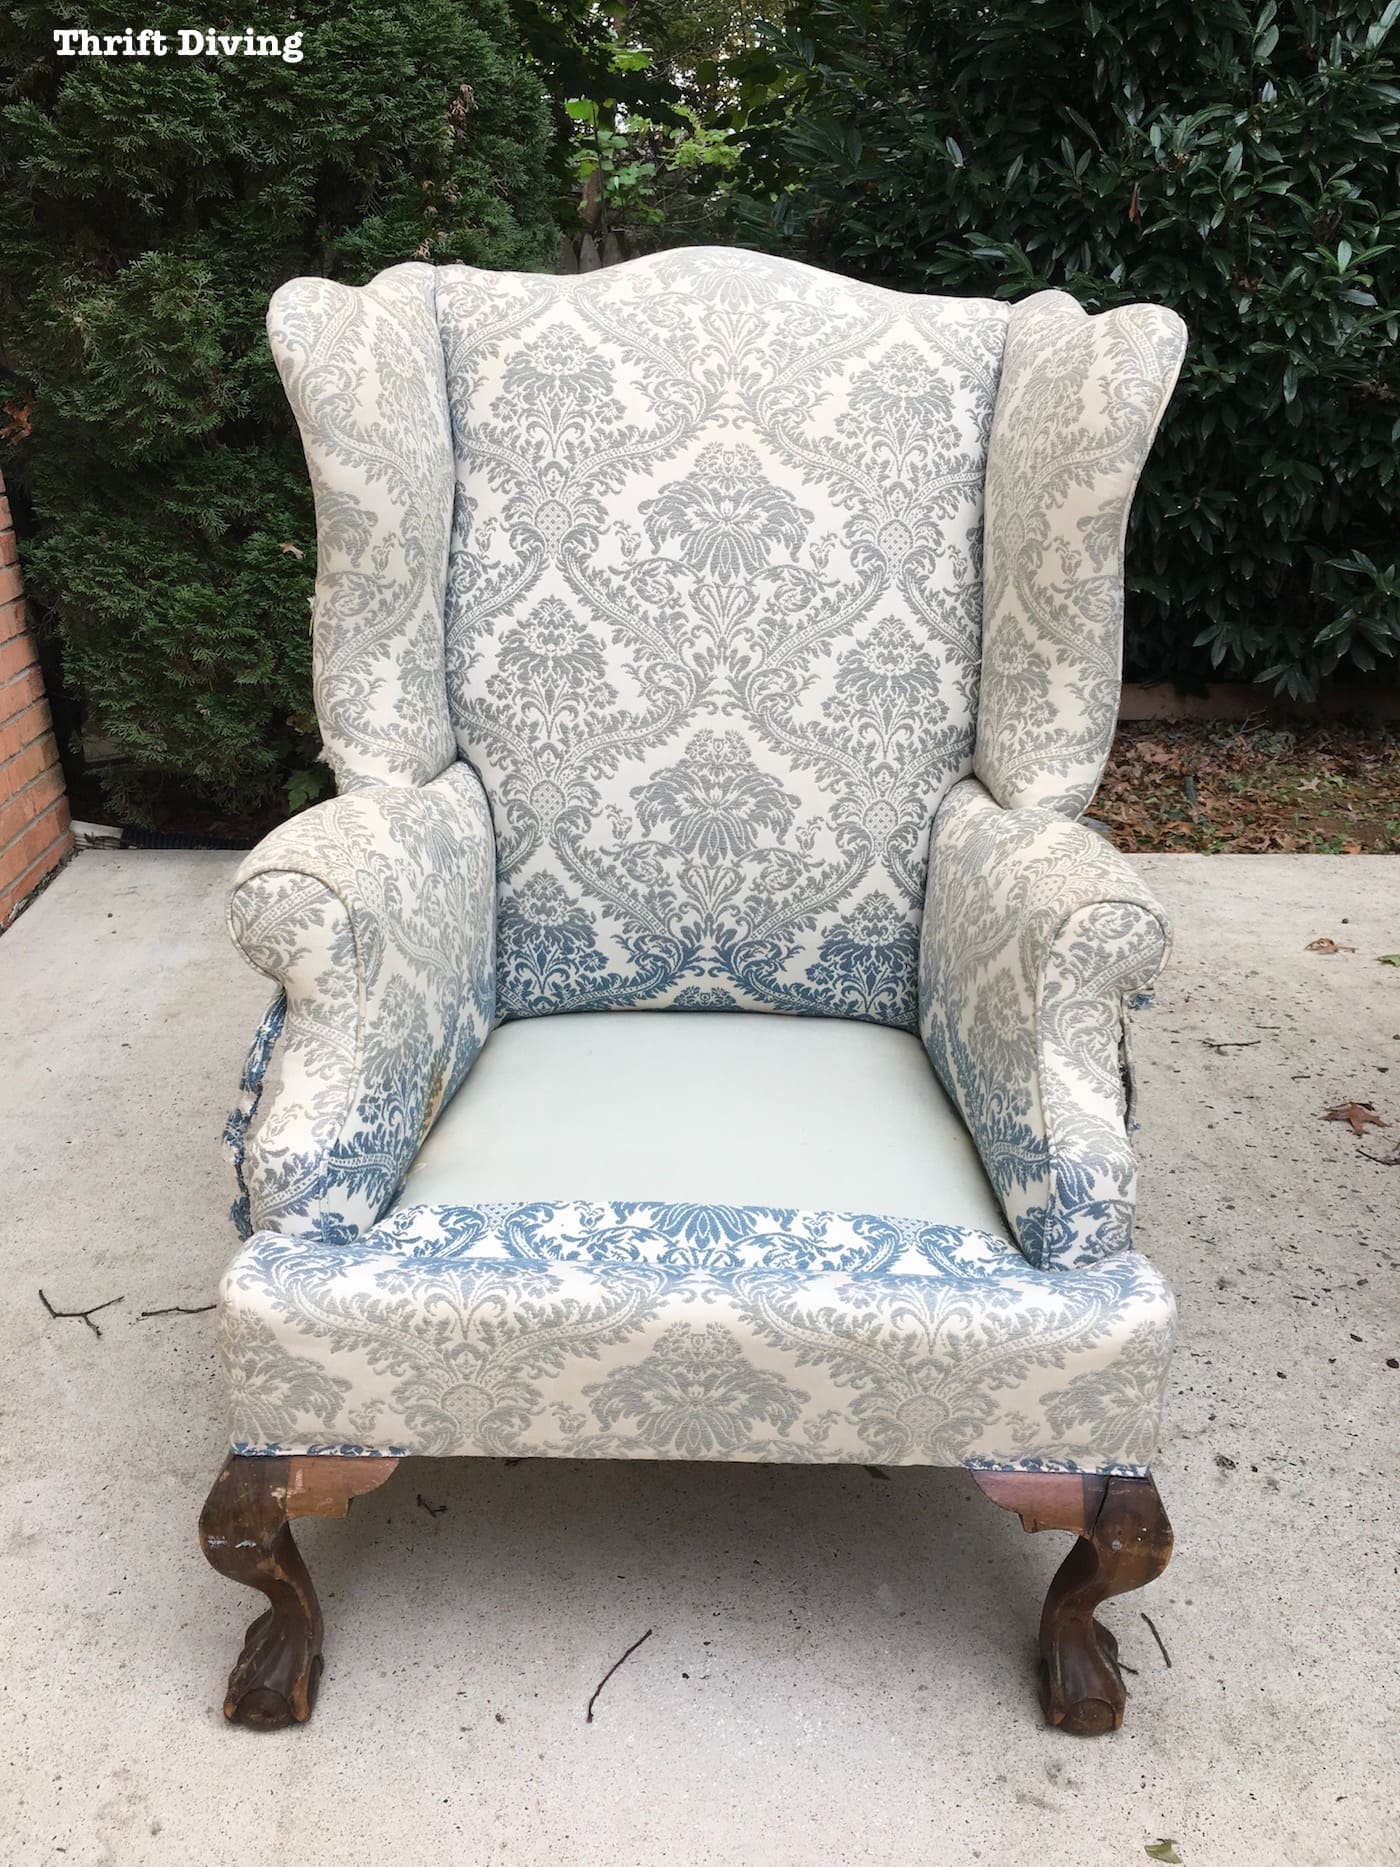
This is what this gorgeous chair looked like before I got started. You may be thinking, “But that fabric is gorgeous!” Yes, I agree. But remember–the sun did a number on that gorgeous fabric!
BEFORE
The chair smelled very old and disgusting, like a neglected piece of “wonderful” that just needed a facelift.
In Progress!
After hours of tentatively tearing down this wingback chair, this reupholstered wingback chair was getting a makeover!
The new webbing wasn’t difficult to put in (see PART 3 below) and the rest of the chair needed to be cleaned up. I’ll admit that I totally underestimated the time it would take to finish this chair. I thought 6 sessions of upholstery classes would be enough, but boy was I wrong! This chair was very complex. Every little step felt like a huge win, as well as an impossible mountain to climb! In the end, I signed up for 3 sessions of the 6-week classes (18 classes, give or take depending on my availability). And I still wasn’t done!
Because this project was so huge, I have been posting updates to this blog post as I complete it.
For now, though, let’s jump right in and see what progress has been made! You can always watch the entire series on my YouTube channel.
Materials Needed to Reupholster a Wingback Chair
Buying all the materials added to the cost of reupholstering this wingback chair, but if upholstery is a hobby that you plan to do often, then the costs will be spread out over all the projects you’ll work on.
(I participant in the Amazon Services LLC Associates Program and other affiliate advertising programs designed to provide a means for me to earn fees by linking to Amazon.com and affiliated sites).
- About 9-10 yards of Jacylin Smith Hollywood Fabric Indigo.
- Upholstery staple gun
- Quiet air compressor for a staple gun
- Air compressor hose
- 1/4″ air compressor connectors
- Pliers
- Staple remover
- Jute webbing
- Webbing Stretcher
- Regulator
- Cotton piping
- Dacron polyester batting
- Cotton batting (by the roll)
- Coir coconut fibre stuffing (I can only find this sold in the UK, or you can call G Street Fabrics, which is my local fabric store)
- Burlap
- Spring twine
- Tufting twine
- Dust cover
- 3/8 staples
- Cardboard tack strip
- Flex-Grip (also called Curve Ease)
- Sewing machine
If you’re freaking out over how many materials are needed to reupholster a wingback chair, you’re right to freak out. It’s a lot. And some of them aren’t cheap materials!
That’s why after going through this reupholstery project, I have a new admiration and respect for upholstery. As a DIYer, it makes sense to invest in these tools and materials if you’re planning to upholster more than one chair. It’s good to build your upholstery toolbox. But if you’re only planning to do one chair, then I would recommend paying a professional. While the cost is expensive, it could be just as expensive and time consuming for you to do it yourself.
If you’re like me and you absolutely love the learning process and plan to use the materials again, then go for it!
For the amount of money I have spent on classes, fabric, and materials I probably could have bought 3 or 4 brand new wingback chairs from Home Goods. HA! However, I do have to say that neither of those chairs would have been as solid and high-quality as my wingback chair!
Anyhow, watch the evolution of this wingback chair makeover below through all the footage I have been filming and posting on my YouTube channel!
Part 1 of 10: How to Break Down a Wingback Chair
In this video, go inside with me to my upholstery class and see how to get started with taking a wingback chair apart. This was the scariest part because I had no idea how to get started! Once I started removing pieces, layer by layer, it wasn’t too difficult! Time-consuming, yes….
Difficult?
Not at all!
Part 2 of 10: (Continued) Breaking Down a Wingback Chair
In this video, I continue to tear down the chair, learning some valuable reupholstery skills along the way.
Part 3 of 10: Adding Webbing to Wingback Chair
In this video, I finally finished 99% of the tearing down of this chair, followed by attaching the new webbing.
I learned how to stretch webbing and how to secure it into place!
Also, don’t miss the reveal of the gorgeous fabric I selected for this chair!
Part 4 of 10: Replacing the Seat Springs
It took a bit of time to tie down the springs and to tie them together. I have to admit that I was nervous about this part because it looked so complicated! But with a little bit of practice, I did it! See how the seat springs turned out!
Part 5 of 10: Finishing Springs, Webbing, Coconut Fiber Filling
In this video, you’ll see how I stitched in the coconut fiber to the seat using a double-pointed needle and twine.
Part 6 of 10: Creating a Pattern for Seat and Arms and Sewing
By this point, all of the burlap pieces should be added to the chair, however, in this case, there is still layer of burlap that is needed to cover the back of the chair, along with stitching down the coconut fiber to the back of the chair.
However, for this part of the wingback chair makeover, we could get started on the front of the seat and the arms. Keep watching to see the progress made!
Part 7 of 10: Finishing the Seat and Front
In PART 7 of this video series, I show you how the instructor and I finished the seat and the front, and started on upholstering the arms.
Part 8 of 10: Reupholstering the Arms and Wings
In this video, I walk you through finishing off the arms of the wingback chair, along with finishing the wings. I didn’t capture as much video for this step because I was trying to pay attention to what the instruction was saying. HA! Filming and paying attention are difficult to do at the same time. 😉
Part 9 of 10 – Reupholstering the Back and Outside
In this video, I was all out of upholstery classes so it was up to me to finish off the back and outside of the chair on my own! Although it wasn’t perfect, I think I did a pretty good job!
Part 10 of 10 – Reupholstering the Wingback Chair Seat Cushion

Download the 5 freebies!

Thrift Diving inspires women to decorate, improve, and maintain their home themselves...using paint, power tools, and thrift stores! Use these 5 printables, checklists, and ebooks to get started!


Hi Serena,
I picked up an upholstered armchair at a thrift shop a few weeks ago, and came across your Youtube videos as I was searching for instructions on reupholstery. Makes me think I got double lucky with the “finds” for this project! Inspired by you, I have taken the chair apart, and now find myself tasked with finding new coconut fibre (the old stuff wasn’t in decent shape). I live in Canada, and haven’t been able to find a source for coconut fibre despite extensive searching. Would you mind sharing the name of the company/brand that you got your coconut fibre from? I’m guessing it’s in the States somewhere?
Thanks so much for your great videos, and I’m already enjoying the email updates I’ve been getting. Feels like I get to do my DIY projects alongside you!
Best,
Maya
Serena -Wow, I am following this closely as I have an old huge wingback that I totally stripped – I did save the springs from the seat and the old material as a guide, but I THREW away all of the batting and coconut fibre – I didn’t know I had to save and re use it. So I am planning to use foam. Do you think this will work? I have a few impt questions: what size in inches are the springs for the back of the chair? Mind did not have springs, just tons of old padding stuff (it was disgusting and disintegrating it was SO old) – Will it be alright to use foam for some padding? I do not understand the use of the coconut fibre to fill in around the springs, do you just stuff it in there pretty tight?
In my chair there was only the bottom front sewn everything else was nailed and stapled, so I have to figure out how to do some of the sewing you did with the instructor. I am praying you will be able to answer this for me, I am afraid to move on until I hear from you. I am ready to do the webbing and seat springs. Also my chair did not have a cushion, so I may have to make one. THANK YOU
Hey there, Dianne! If the batting and coconut fiber was old, I would say, replace them anyhow. It’s more costly, but it definitely will feel like a new chair with new stuffing. Anyhow, as for foam, what I have learned about foam is that it isn’t as good because it can crush over time. At least, that was MY take on it from what the instructor had said. As for spring size, hmmm…..I don’t recall. As for using foam, I think is that is all you can do, you can try it. I don’t know enough about spring sizes to know whether they come in different sizes, but I can tell you that the springs for the SEAT were much stronger than the springs for the BACK cushion part. So my advice would be to make sure (if you buy springs) that you get seat springs and not back cushion springs, which are more dainty.
The coconut fiber around the springs helps to fill in the low areas. We just stuffed it in there, helping to even out the seat. I have coconut fiber that needs to go on the back cushion now, which I’ll be doing tomorrow in class! I will be filming, so watch out for that video soon! 🙂 Hope that helps!!!
I am so thankful for the footage you’ve posted. I can’t wait to see more. I have several projects going right now, and I am a little overwhelmed. I don’t have local classes, and I am trying to get a side business started. There is no one in the area that reupholsters. :/
Hi Serena,
I have watched video #1-4 but can’t find the rest… the part that covers putting on the fabric. Have you not gotten to that part yet or am I not looking in the right place? Help please+
Hey there, Melissa! The instructor and I JUST got to the fabric. I’ve got some footage, but the bad thing is that I won’t be able to attend the final class next week because I’m starting school next week to get a Residential Remodeling and Repair certificate (22 credits). So I will have to figure out how to do the fabric myself. YIKES! Don’t worry, I will figure it out and post as I finish the chair on my own. I have some footage from class this week to show you. I just have to edit it. He taught me how to sew the arms.
Thanks so much for sharing. So informative. I have a chair half torn apart, but haven’t made any more progress on it in quite a while.
I will be following your progress closely. Would you believe they stopped the upholstery classes in my area? So I am teaching myself. It is a lovely chair that you will transform.
Good Evening Serena; I have to smile at your fortitude and ‘get-it-done’ mindset. I learned to reupholster 30 years ago. We moved from a one bedroom apartment to a 6 bedroom house. The previous owners were downsizing and I was able to buy much of their furniture. Since we couldn’t afford new furniture or have someone else reupholster the used furniture, I took a class in reupholstering at our local continuing education program. I learned so much & soon other people wanted me to reupholstery furniture for them. I encourage others to take the plunge and learn new skills, whatever that may be. I will say that after learning to reupholster, one has a greater appreciation of quality furniture and all the facets of a well made piece down to the last tack, button or stitch. Bravo for a great job!
Hey there, Donna! So sorry that I’m just now seeing your message! Wow, 30 years of upholstery experience sounds divine! I often think that if people just learn something new and do it for 20-30 years, they can become quite skilled at it. You’ve proven that. 🙂 The chair is coming along nicely! I can’t wait to show you the finished project!
Hey Serena, is that you on the Duluth Trading ad??
During the early 70’s, I watched my mother reupholster a lovely settee and two barrel chairs. She, too, signed up for a class. This project lasted a while (what with four kids, a house, two dogs, six guinea pigs and her full time job I can’t imagine why!) Once done, they were gorgous! She was so darn proud of herself and we were too. But that’s not the take away my sisters and I remember.
Feminism wasn’t talked about much in our house. Silly us, we thought those “male chauvinist” on TV telling women where their place was were funny. No one ever talked to US that way. A few weeks after my mother finished her project she went down to the IRS and got a new job as an auditor. She retired years ago, but loved her career with the government. She explained that when she signed up for the upholstry class, the male instructor told her to get her husband’s permission first. She was so angry and hurt that she promised herself that she would finish that darn class despite the instructor’s attitude towards a simple housewife as he called her. When she saw that she could do the big project of reupholsering, it helped her gather the courage to apply for a job she had only dreamed possible. I remember the day she came home after getting her new job. She was so happy. She literally beamed!
So, dear Serena, when you post about reupholstering (love the new desk chair, by the way) I find the word conjures up a lot of good memories of my mother. And, no, chair cushions are my limit.
Oh, Elizabeth, this is the best story!! It makes me happy to read about how she persevered even with all that male chauvinism back then! And to think that that class and project inspired her to go for that job—amazing! You had a great role model and I’m sure she inspired you and your family to achieve whatever you put your mind to! I love that! Thank you so much for sharing! I hope that one day my kids will think of my and my projects in the same way! 🙂
i wish you would come and help me aahahaha
I wish I could, Carol! Lol. You can do it, though! The key is it be patient and not get frustrated that you can’t get it done in 2 hours. This is a long-term project that could take a month or 2, depending on how much time you have. But it’s soooo rewarding! After reupholstering a big project like this, you can reupholster nearly anything! 🙂