Make a Wire Bin to Recycle Mulched Leaves for the Garden
This post on recycling leaves is sponsored by Troy-Bilt.
There’s something idyllic about living on a tree-lined street. At least, in the imagination of those who don’t live on a tree-lined street.
For those like myself and my neighbors, it turns into a source of impending suffering at the first sign that fall is near. And that’s usually in August.
Those early tell-tale signs signal to me that the picturesque street upon which “The American Dream” was based, will soon be replaced by the cursing hiss of a promise to my husband, “If I ever buy another house, it will not have a single tree nearby!”
However, something unexpected happened this fall: I learned that the benefit of those leaves in the garden far outweighs the stress of cleaning them up.
As part of Troy-Bilt’s Fall Fence Talks series (you can find the Spring Fence Talk helpful lawn tips and advice here), where homeowners get help from experts on common yard issues, they teamed me up with Erin from The Impatient Gardener, to help me (and you!) understand that leaves aren’t the enemy here.
The real enemy, my friend, is clay soil. 🙂
Let me explain…
In our video below, Erin pointed out how leaves are wonderful for improving the texture of clay soil, which is a huge problem for me here in Maryland.She also shared tips on how best to clean up leaves, how to store leaves, and (just what I needed to hear!) the benefits of adding a leafs to your garden and soil. Her main points included:
- Never send your leaves off with your county recycling; recycle them in your own garden!
- Leaves add organic matter and helps the texture of soil, including retaining moisture.
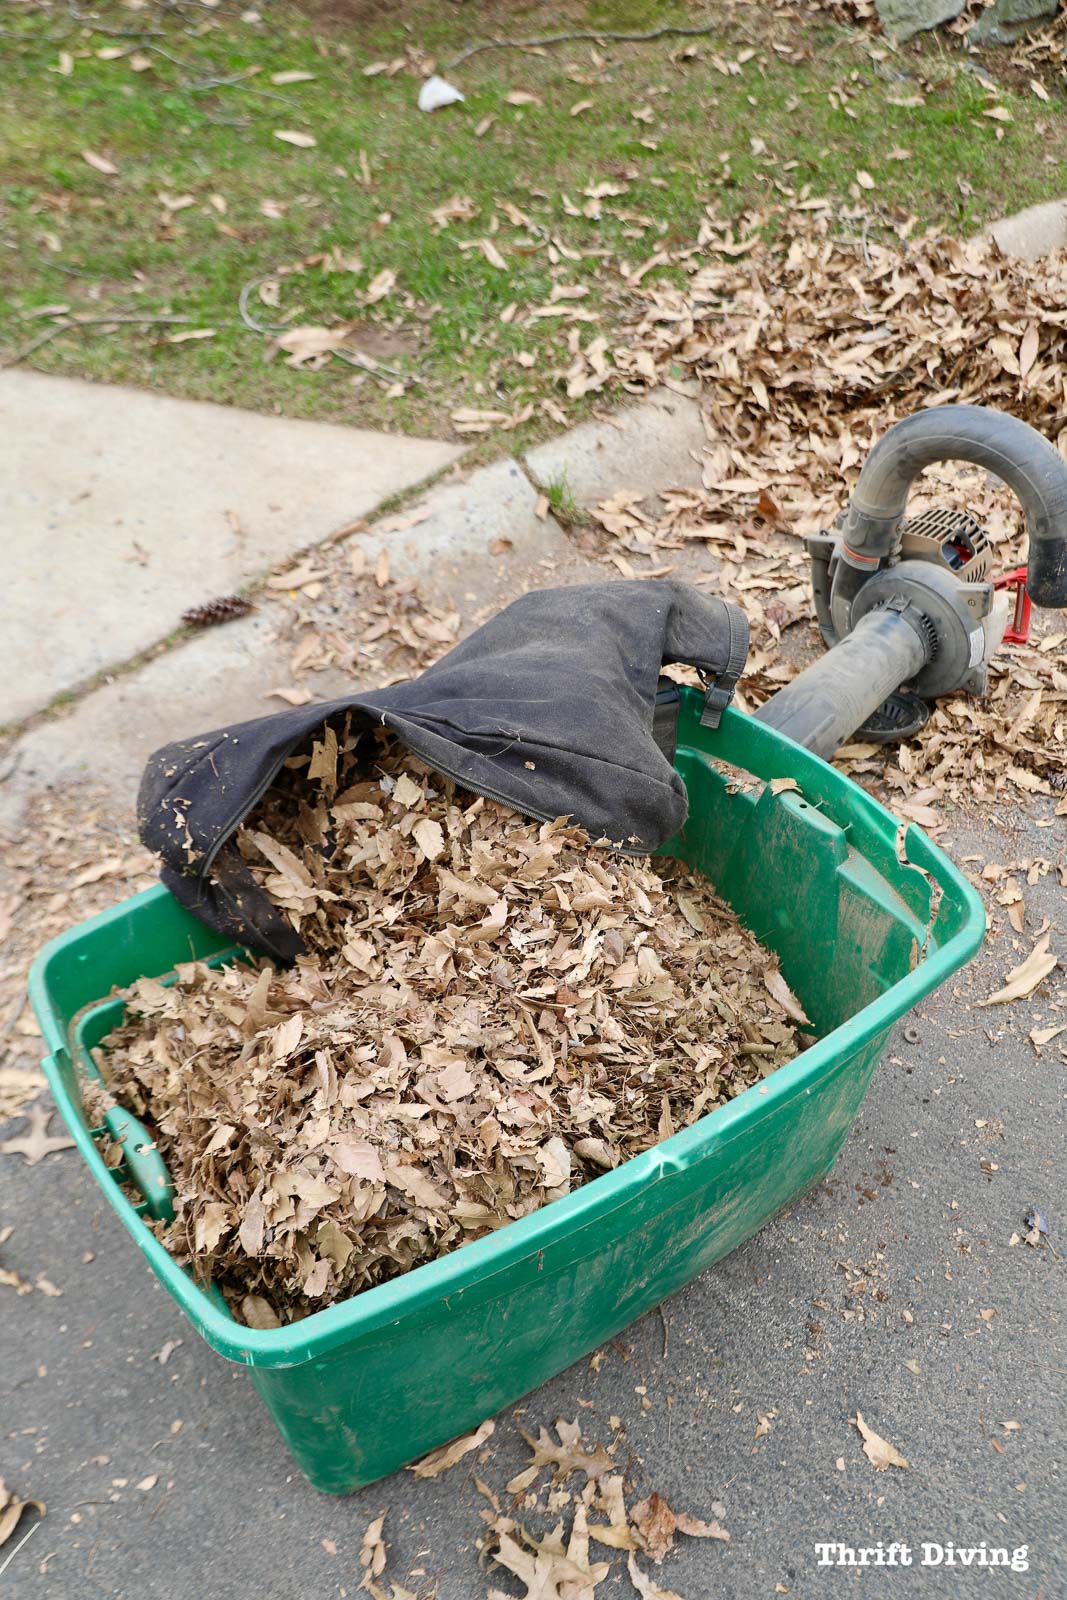
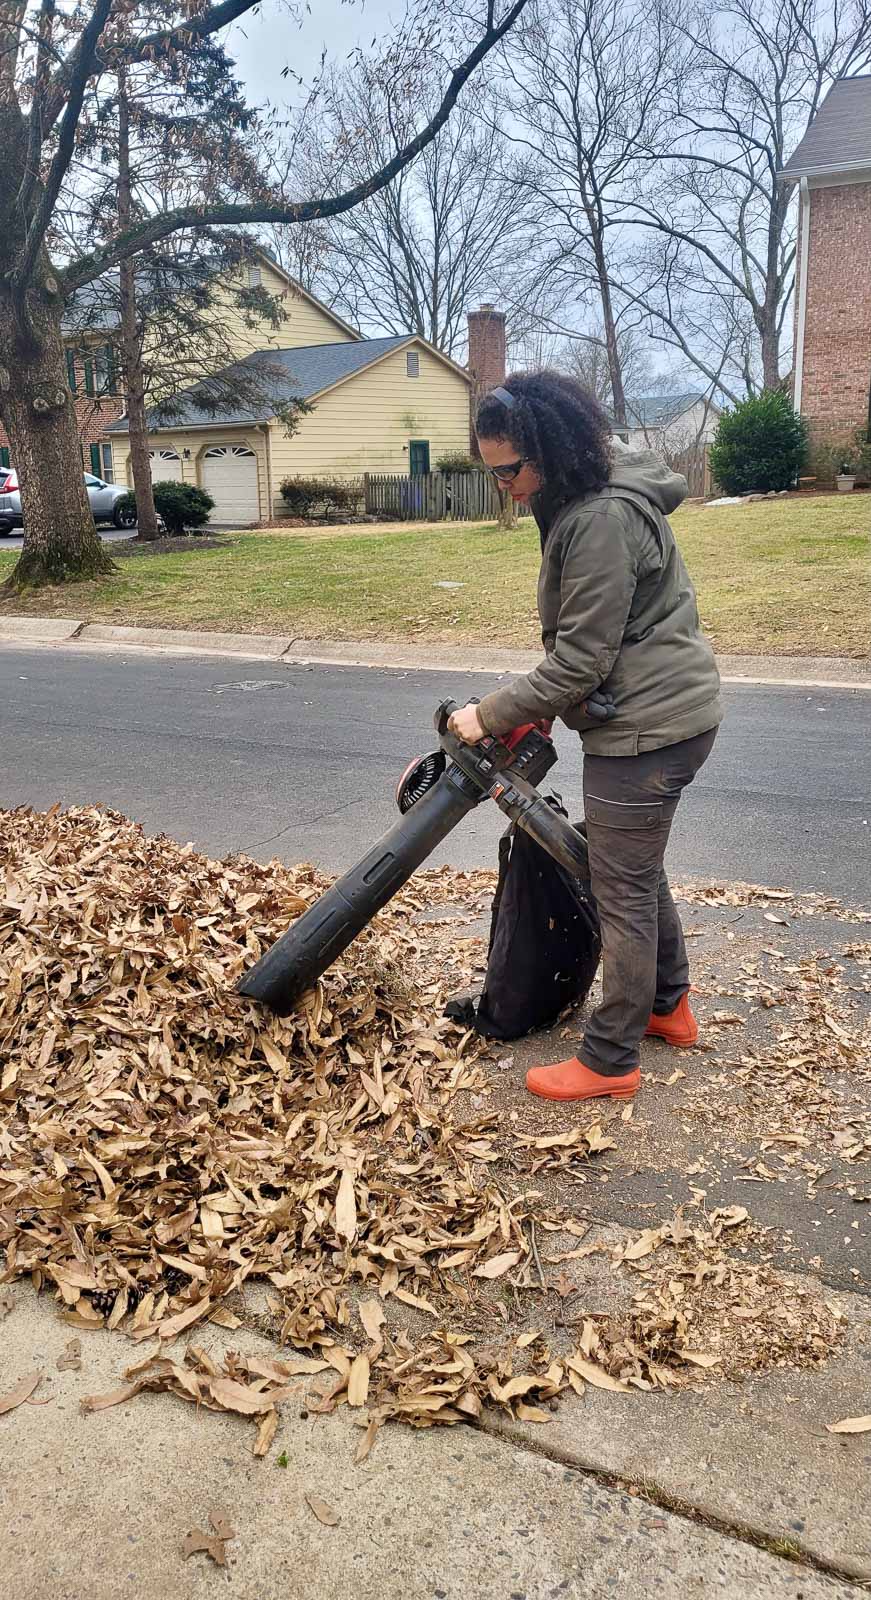
- Use a leaf blower to blow leaves off your hard surfaces. Run your lawn mower over the leaves with a bagger attachment to capture the mulched leaves.
- Try a leave vacuum to mulch the leaves.
- Try a chipper shredder to mulch dry leaves.
- The smaller the leaves, the faster they’ll break down in your garden; whole leaves decompose more slowly.
- Use 3-4″ of leaf mulch on top of your garden. Pull the leaf mulch away from the trunks of trees and plants. This will be your mulch for the year.
- Leaves will amend clay soil over time (hell-OOO! My entire yard is clay!)
- Make a leaf mold by piling up leaves and watering the layers.
- Leaf mold can also be made by stuffing leaves into large plastic garbage bags and poking holes.
- Leaves can be added to your compost bin; be sure to add greens.
Now that I’ve been schooled, however, I took Erin’s advice since we last spoke, and embraced the leaves. I willed more of my neighbor’s leaves to fall from my neighbor’s tree into the vortex of leaves that always end up in our yard.
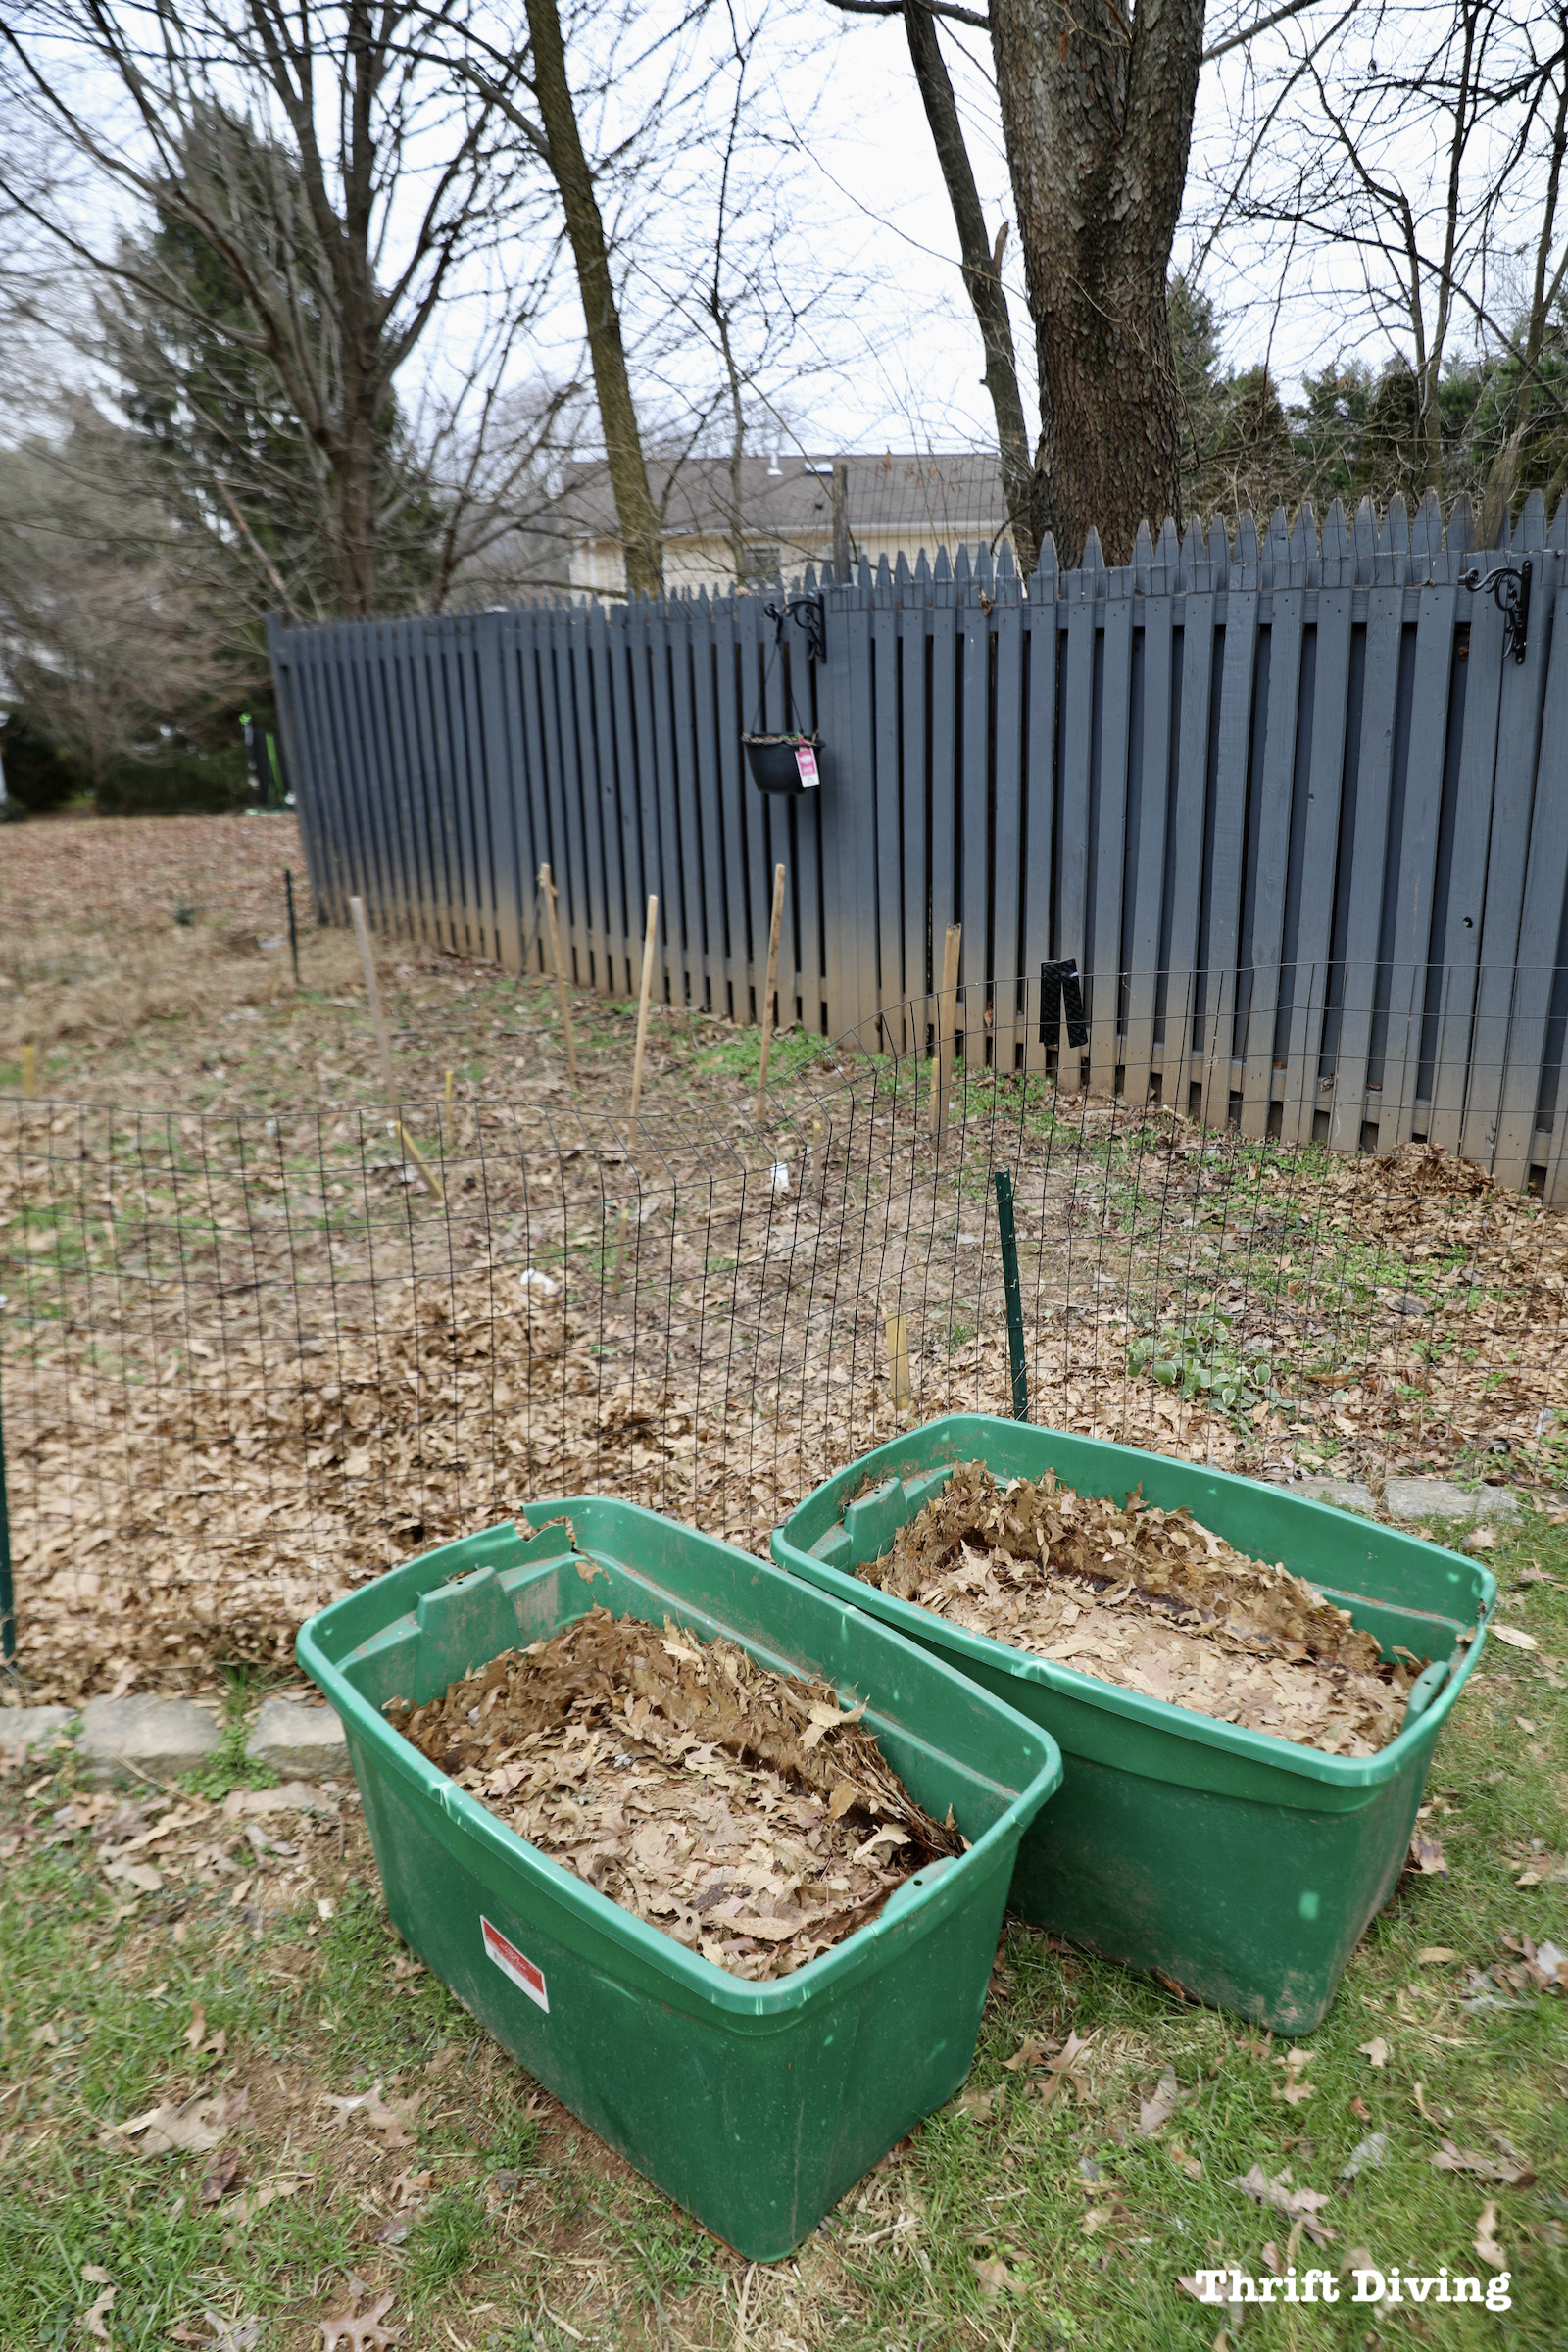
Instead of bagging them and sending them off with weekly recycling, we mulched them and stored them in plastic bins, to be used in the garden that I planted last summer.
I hadn’t mulched the garden and was frustrated by the amount of weeds. You can still see a sprinkling of them in the garden, after I cleared away the dead eggplant and pepper plants.
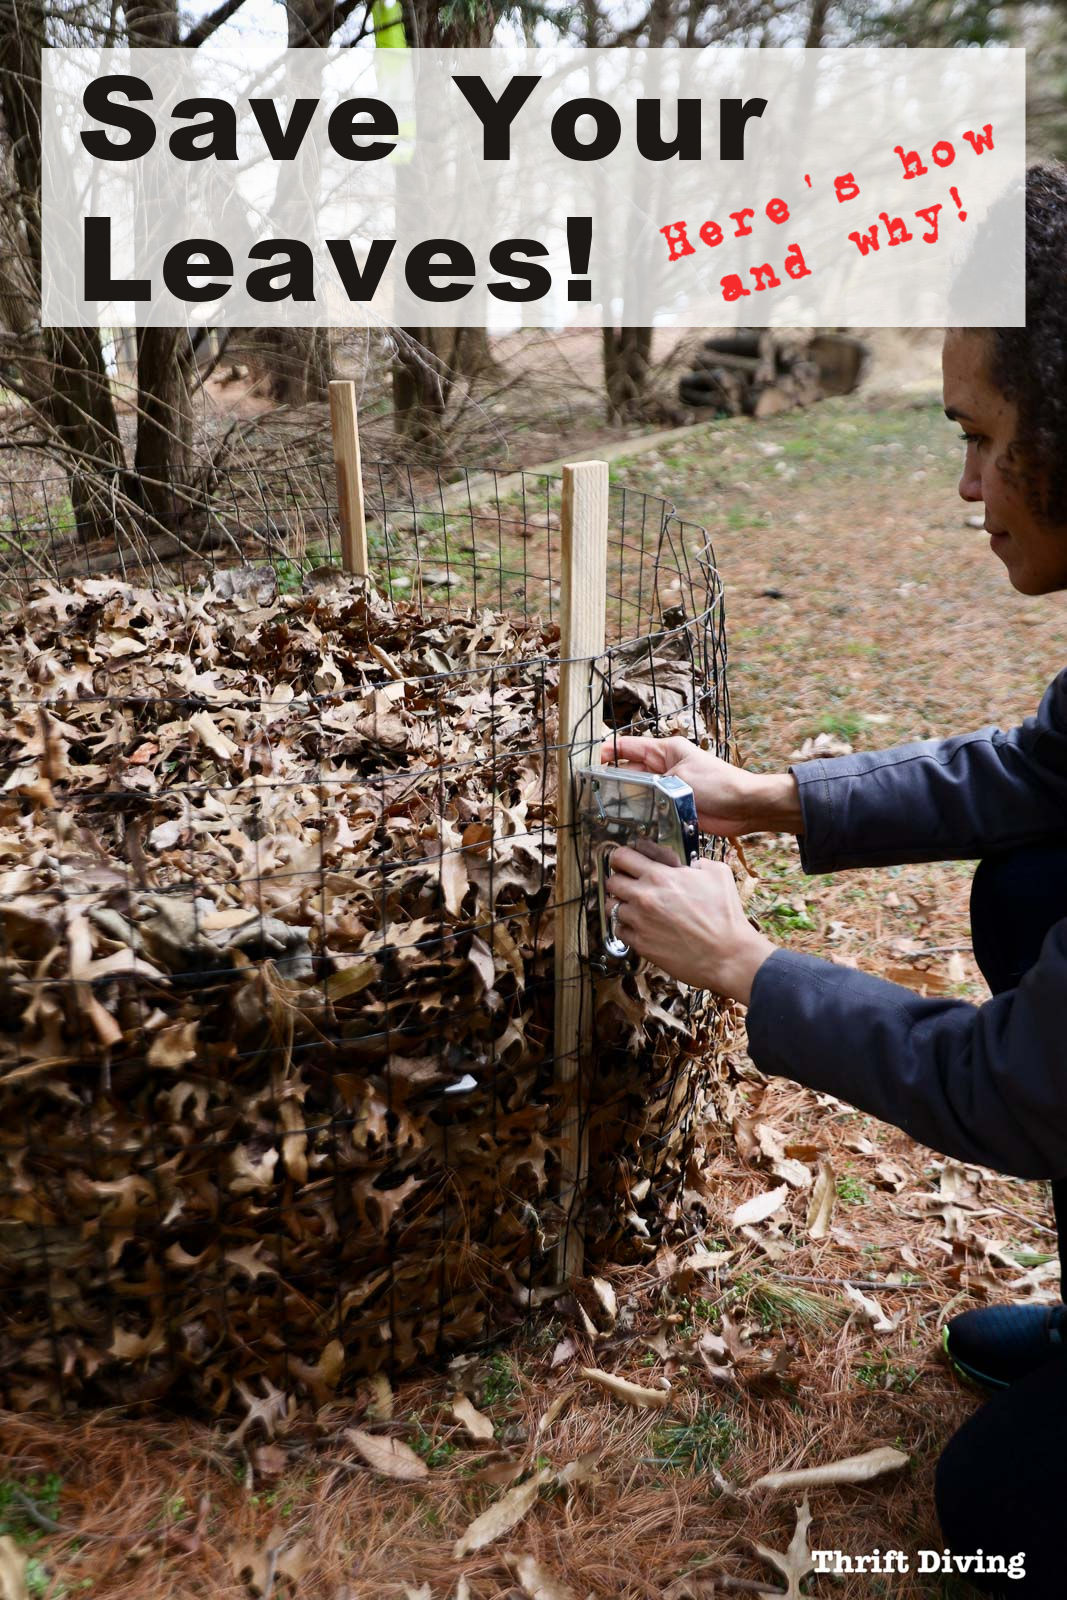
Thanks to Erin’s advice, I made a simple leaf mold, too! Here are some instructions on how to make your own easy wire bin to store and break down those “pesky” leaves.
Materials to Make a Leaf Mold
Making a wire bin to create leaf mold was super easy. As long as you’ve got some fencing, stakes, and some wooden boards, you can make this!
- Whole or mulched leaves (TIP: Mulched leaves break down faster).
- Metal fencing or chicken wire (or plastic deer fencing or this plastic hardware netting)
- Wooden garden stakes (or steel U fence posts)
- Heavy-duty stapler
- Staples
- Wire cutters (optional) or scissors
- Hammer or mallet (optional)
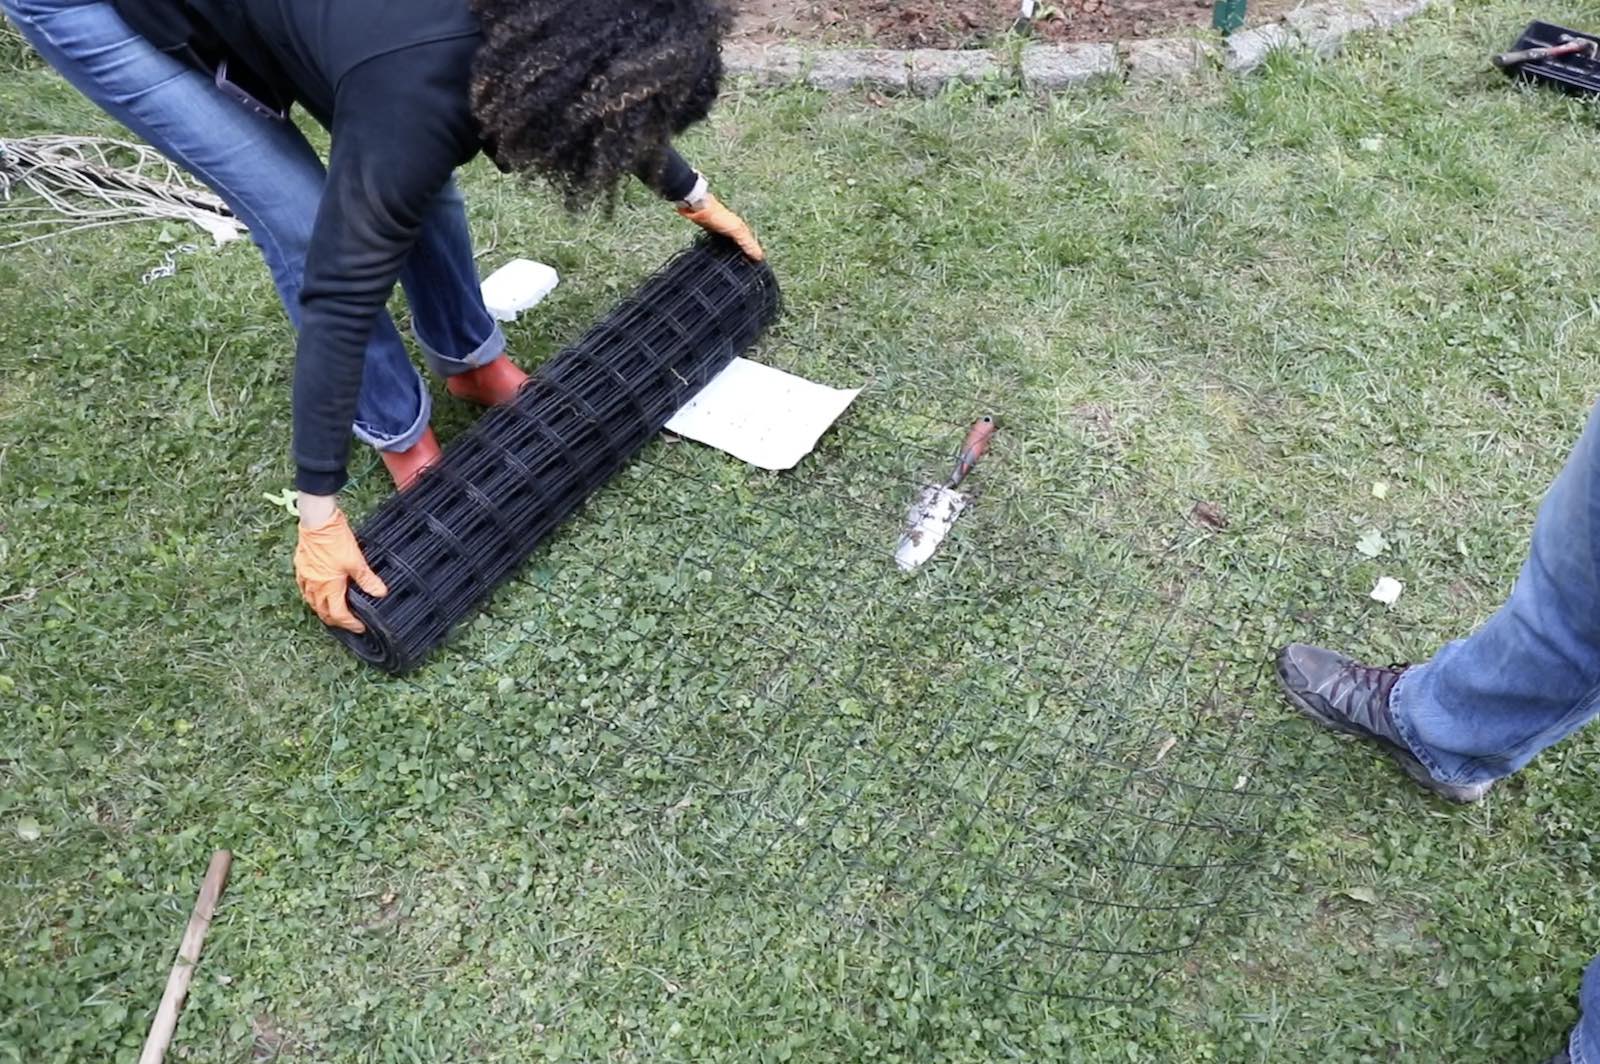
STEP 1: Cut Fencing to Size
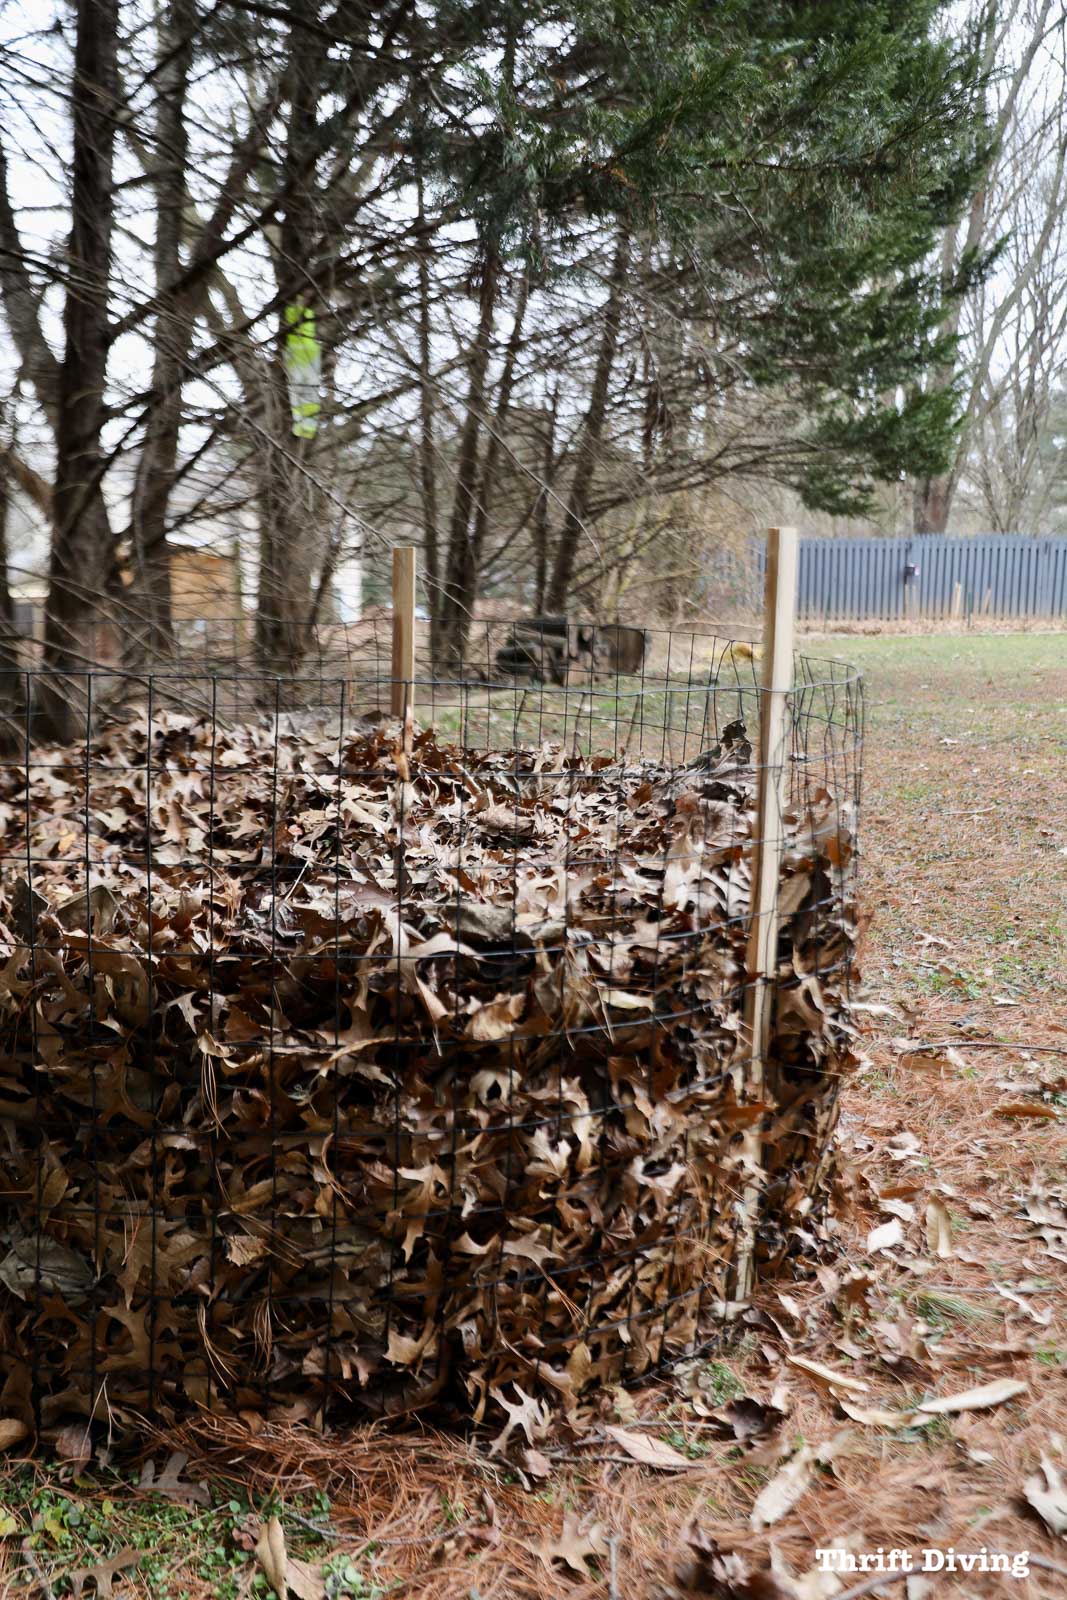
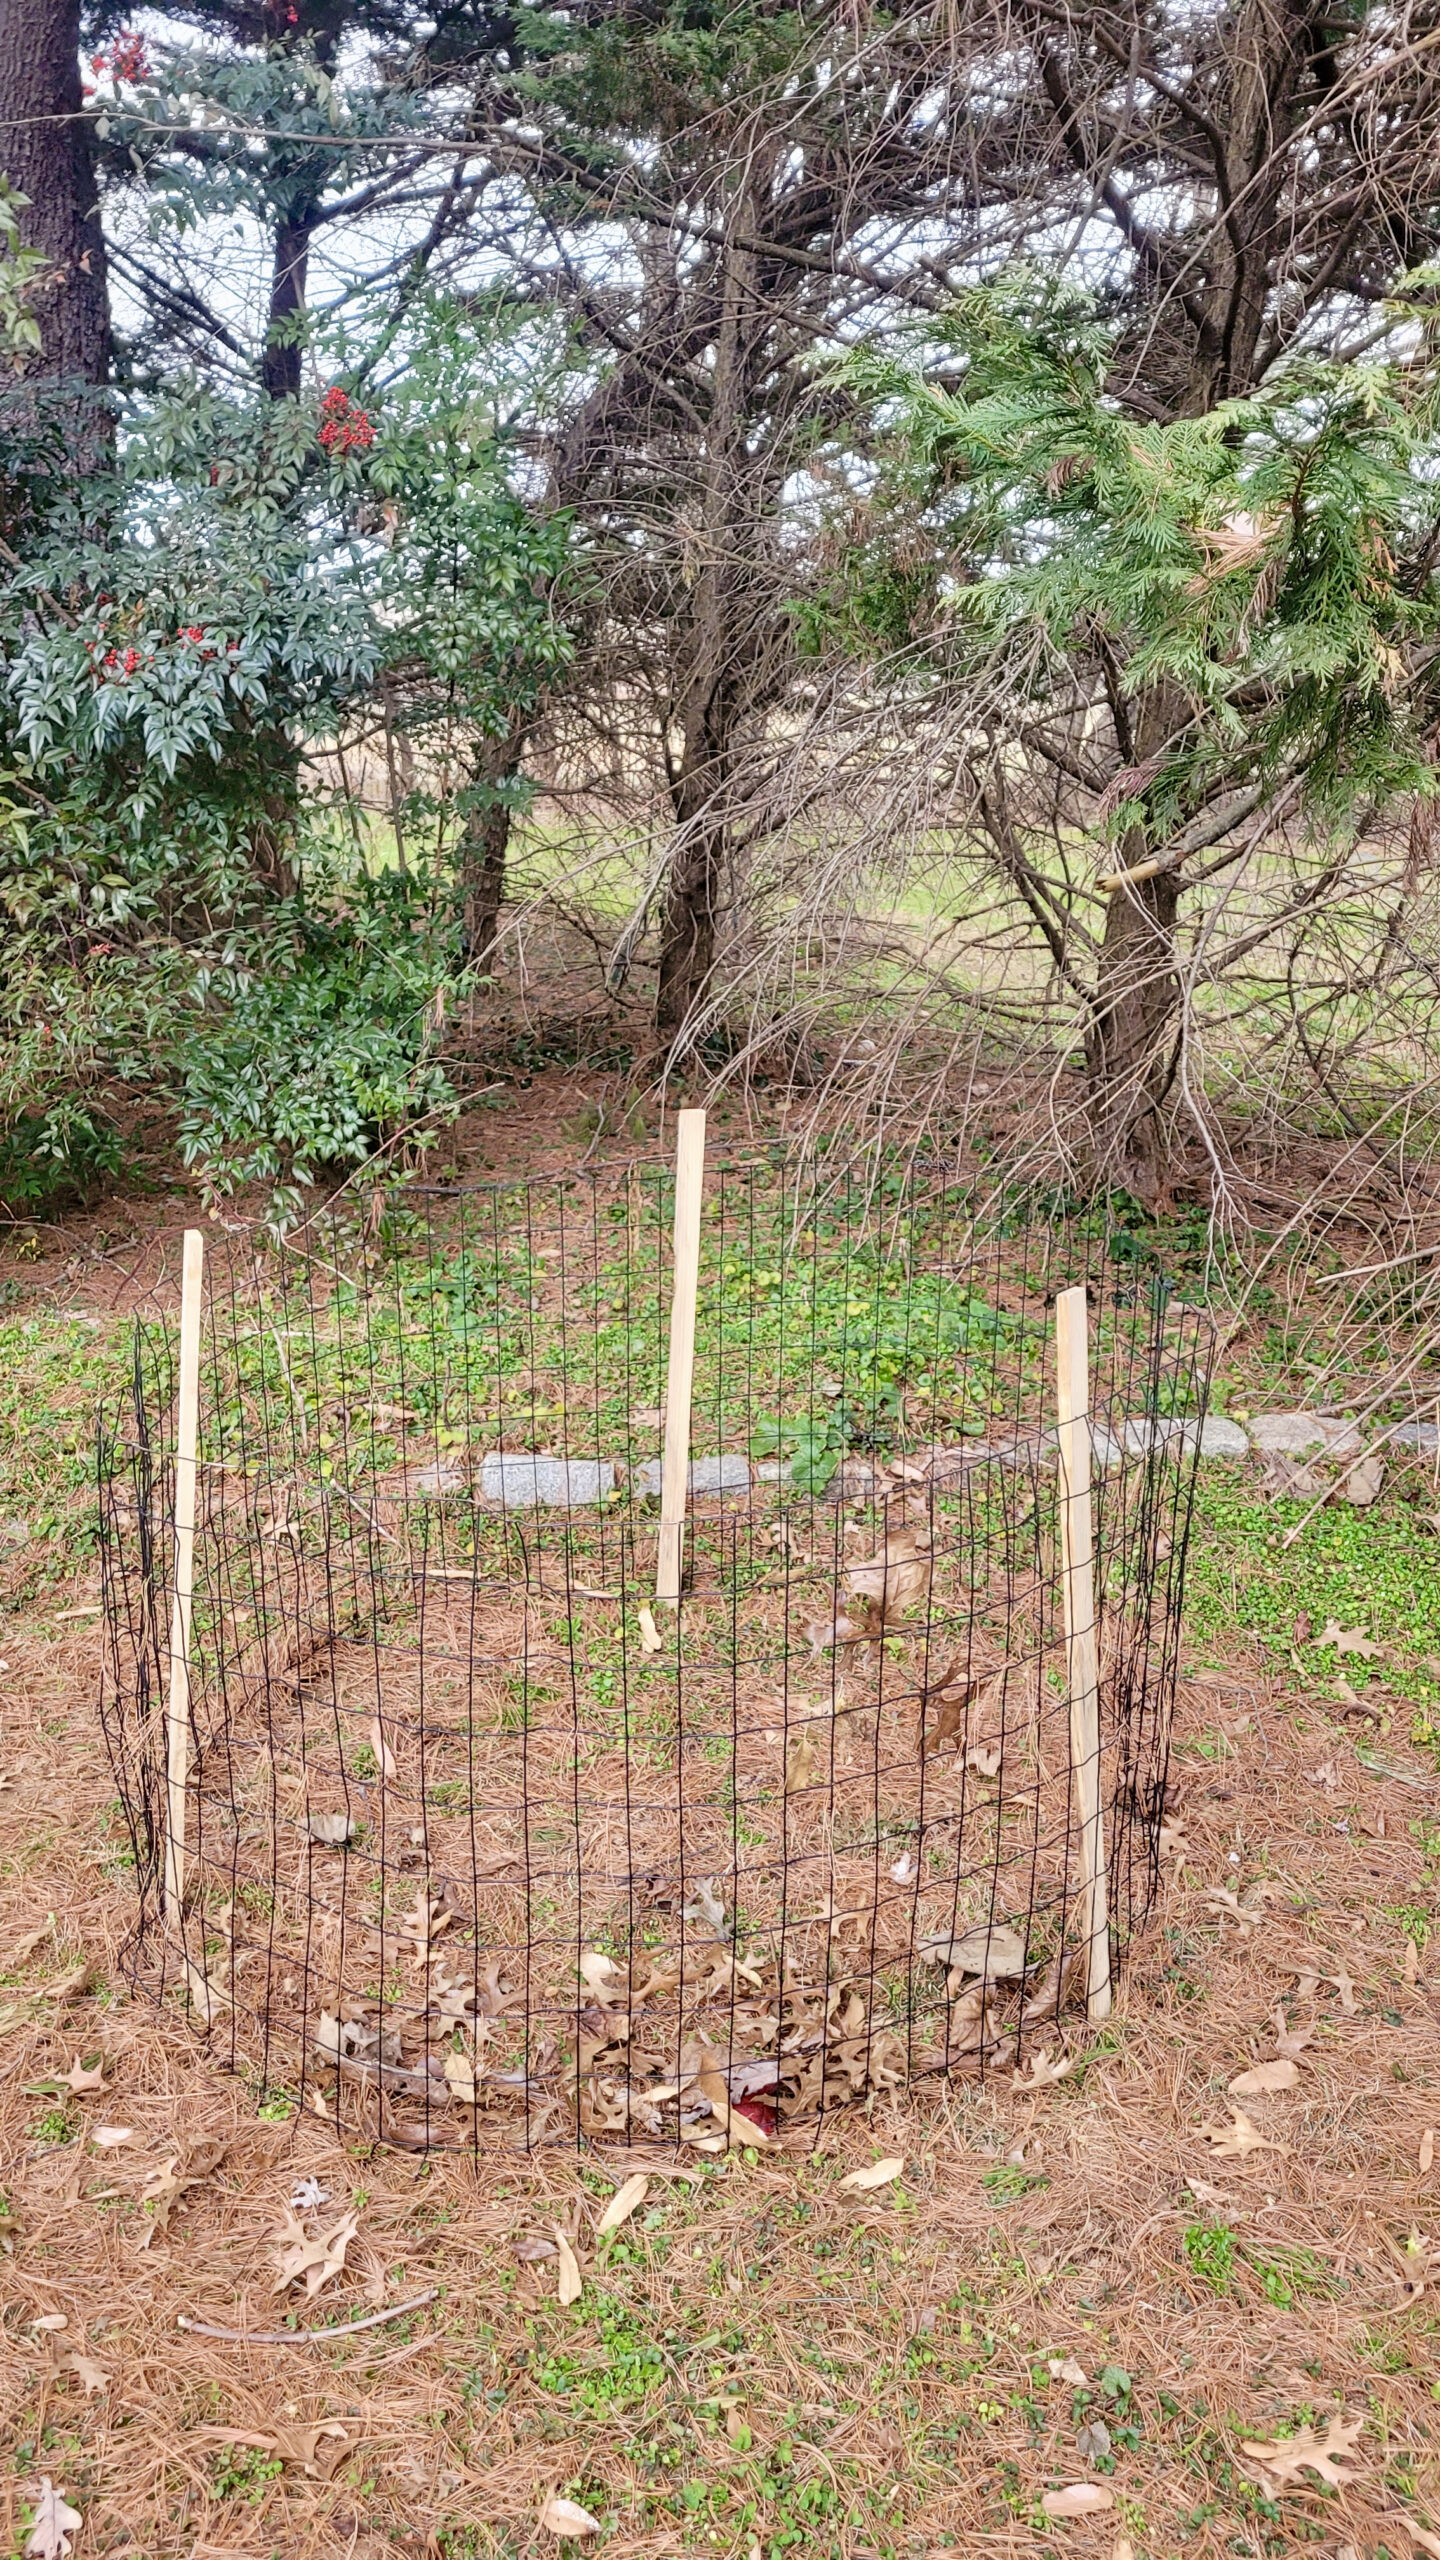
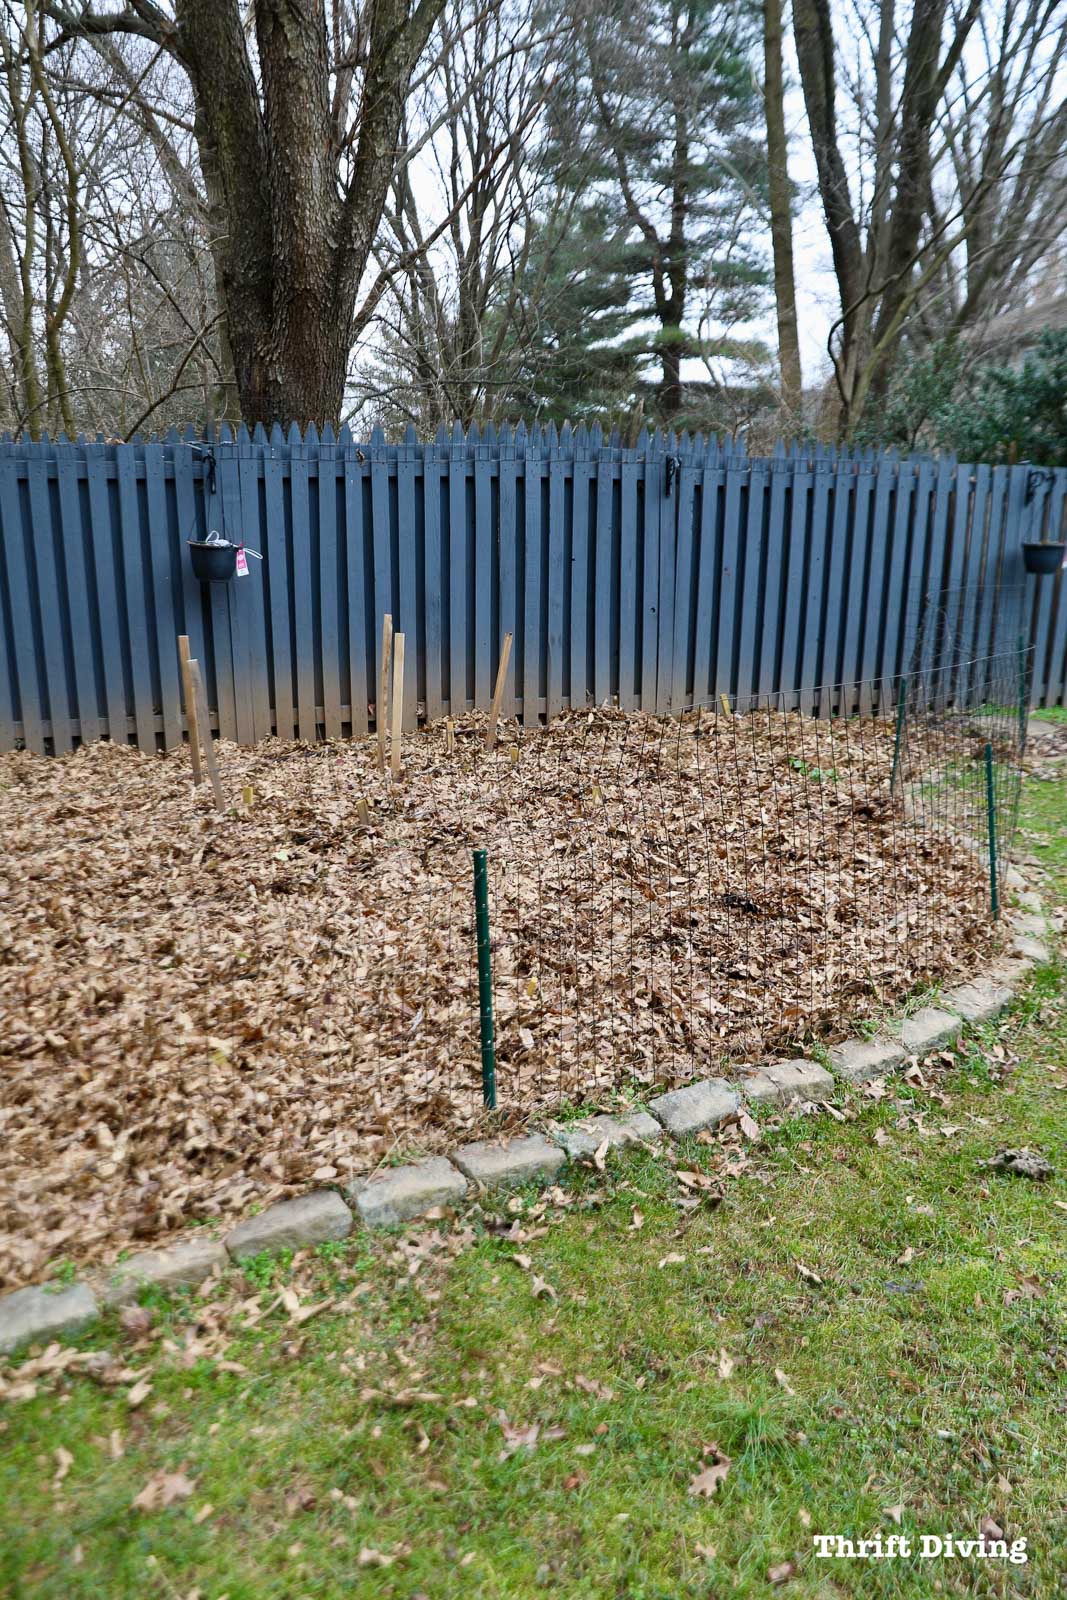
Last year I painted my fence and had secured the area with some metal fencing to keep out the feral cats that love to roam the yard. Thankfully, I had some left over. It wasn’t much, but it was enough for me to create a small circle for a wire bin to recycle leaves into a leaf mold.
Use wire cutters or scissors to cut the fencing to size. You can make it a circle, square, or rectangle. Either is fine. Depending on how many leaves you’ve got, you can make it as tall as you want, but remember–you’ve got to access this leaf mold at some point in the future. 🙂 You don’t want to make it too tall. Wider is better than taller.
With the size of the fencing I had left over, making a circle was the easiest option, and the height was perfect at 3-feet tall.
I had cut the bottom piece off to create sharp “spokes” which I pushed into the frozen ground for extra stability.
STEP 2: Evenly Space the Garden Stakes
Wooden garden stakes are pretty inexpensive at home improvement and garden centers. For a pack of 4-foot stakes (depending on how tall you want your wire bin to be), it’s about $5 – $7.
It’s winter outside right now, so my ground is harder than a rock! I had a difficult time getting the stakes into the ground, so right now, the tips of the garden stakes are the only thing penetrating the hard soil. When spring comes and the soil isn’t as hard, I’ll use a hammer or mallet to pound them a little deeper.
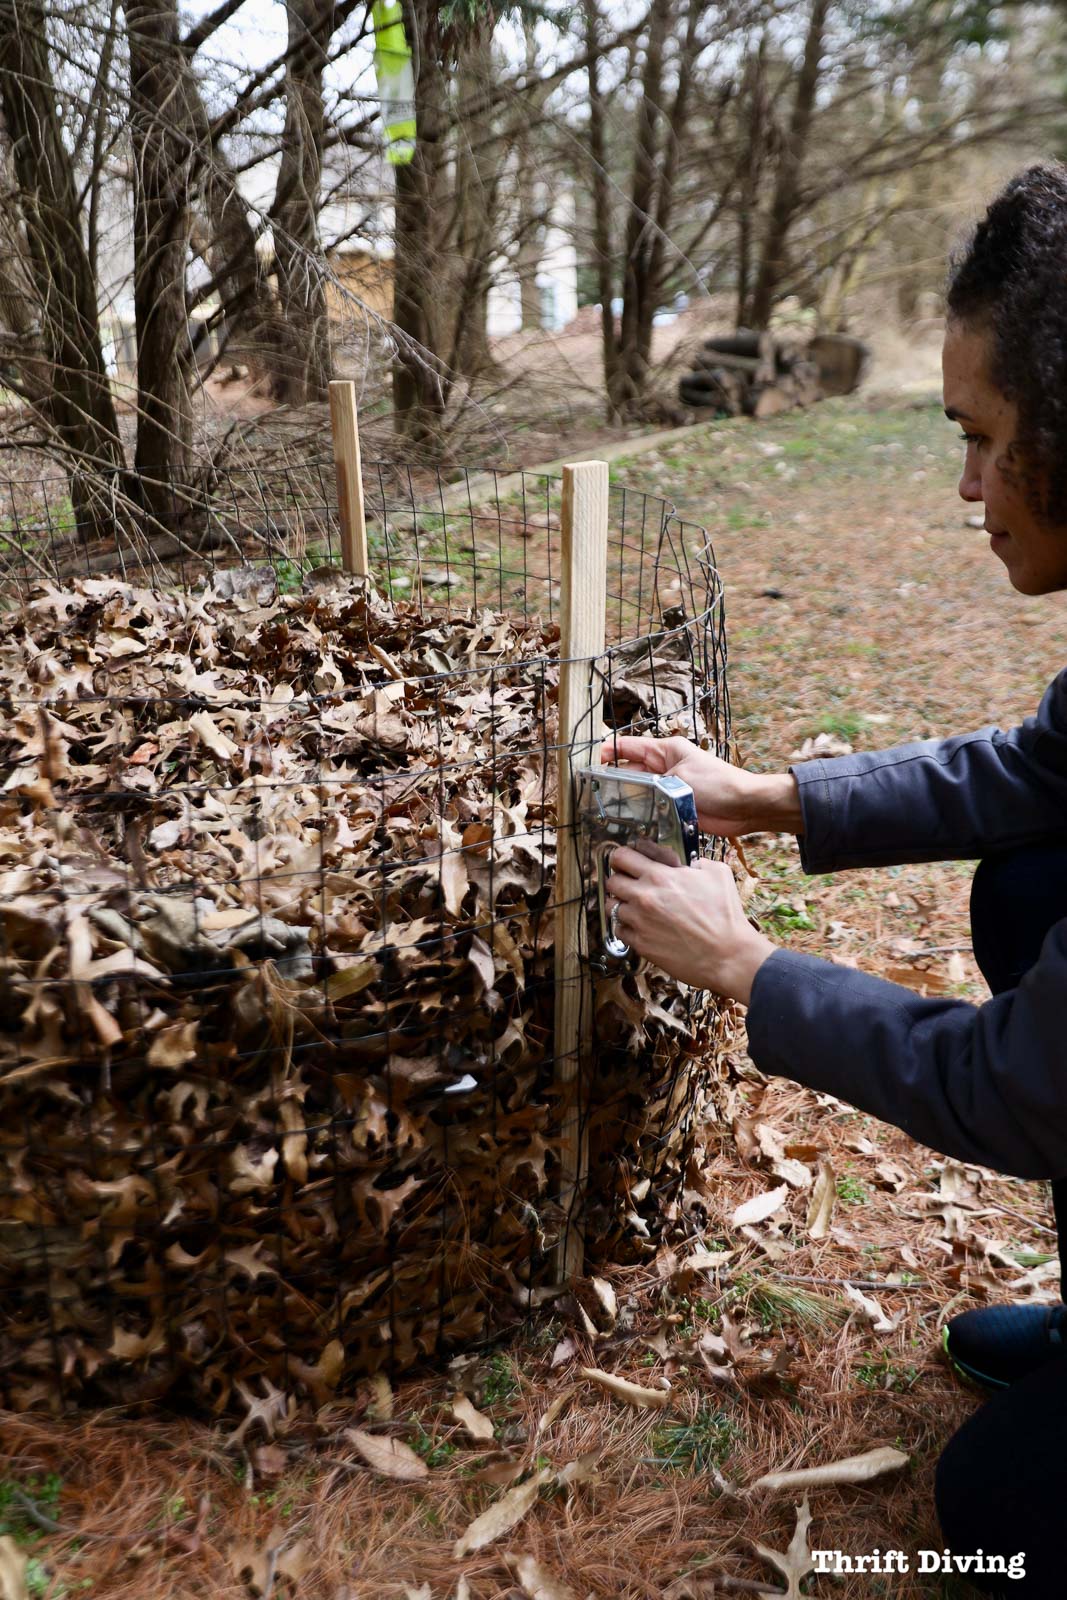
STEP 3: Use a Heavy Duty Stapler to Secure the Fencing to the Stakes
Use a heavy duty stapler to secure the fencing to the wooden stakes. If you’re using other stakes, you may have to use twine or something method to secure them. Whatever you use for stakes, you want to make sure that the fencing isn’t going to fall over or blow away.
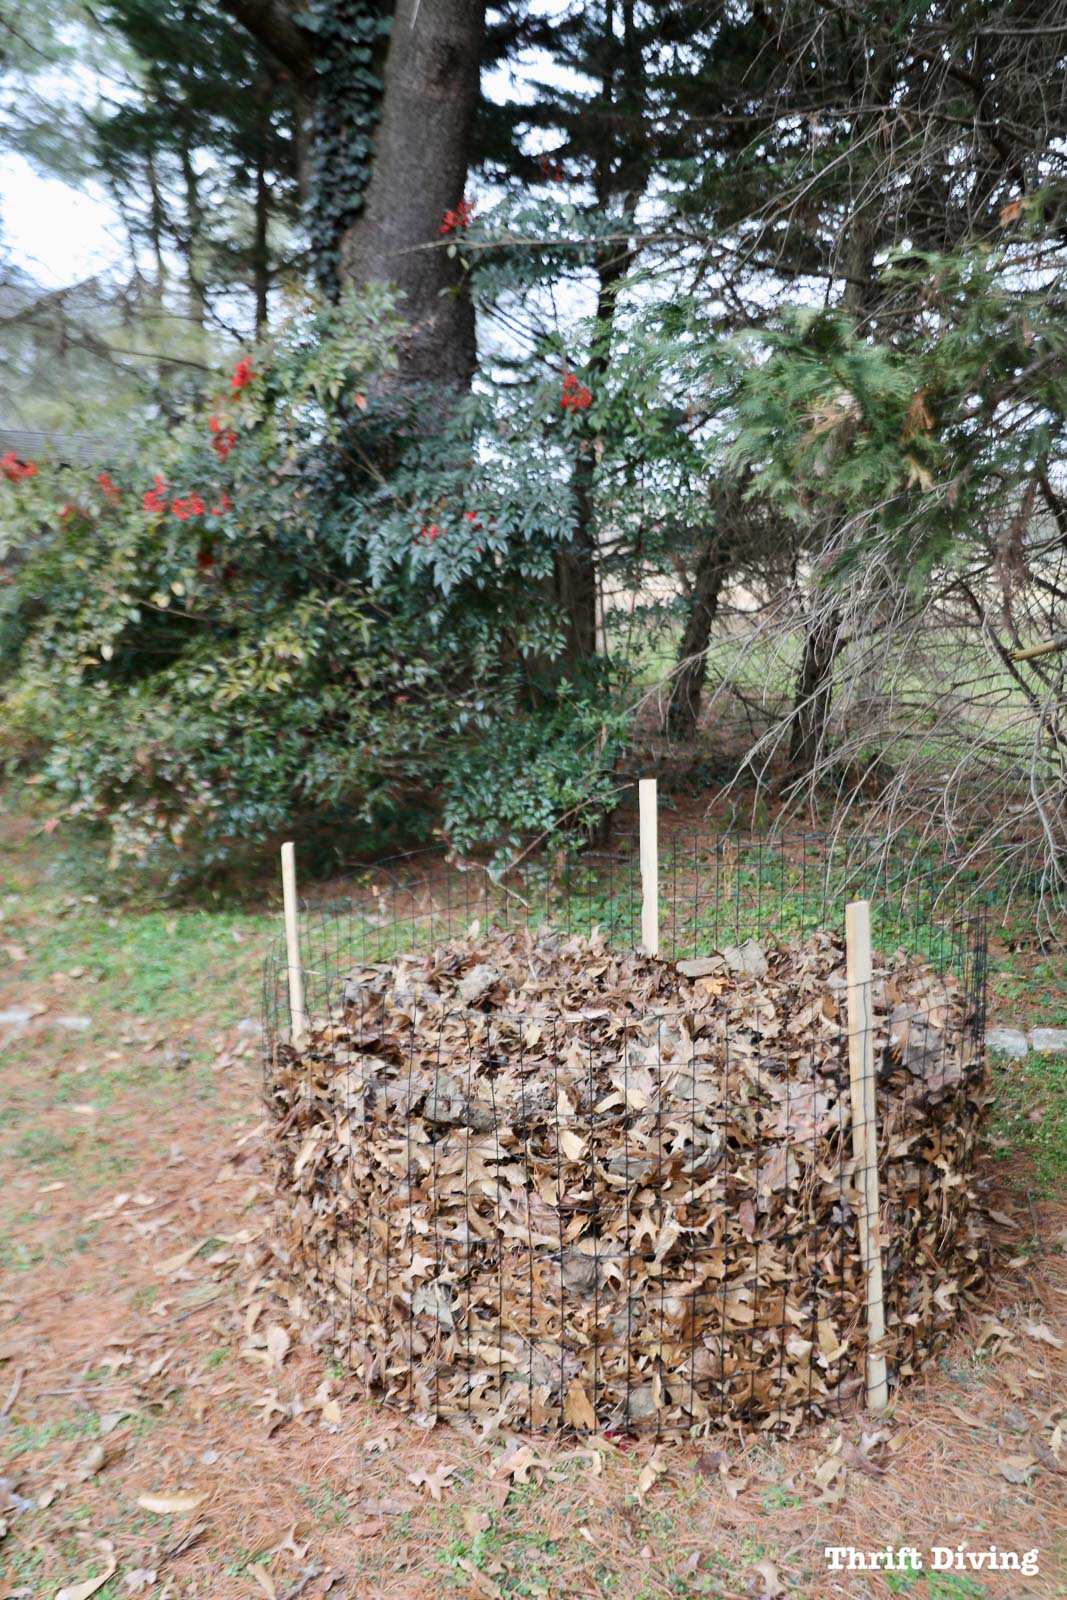
STEP 4: Fill the Wire Bin with Leaves
I had cleaned up all the leaves in the backyard, which tend to collect on the patio and shrubs, and was surprised that I still had space left to create a lot more leaf mold in my wire bin! It held much more than expected. The wire bin will hold even more if the leaves are mulched.
Whole Leafs or Mulched Leaves?
There’s no right or wrong way to recycle the leaves to make leaf mold: either whole leaves or mulched leaves. If you recycle whole leaves, however, plan to wait it out for a good 1-3 years for the leaves to break down to create the leaf mold that you can then use in your garden. For these leaves, I’m in no rush. Mulched leaves will break down faster, within months. So it depends on your patience level. 🙂
Tools I’m Using for Leaf Clean-up
Since I’ve had my share of leaf clean-ups over the years, I’ve learned a thing of two about cleaning them up. Here are some tips I have learned along the way:
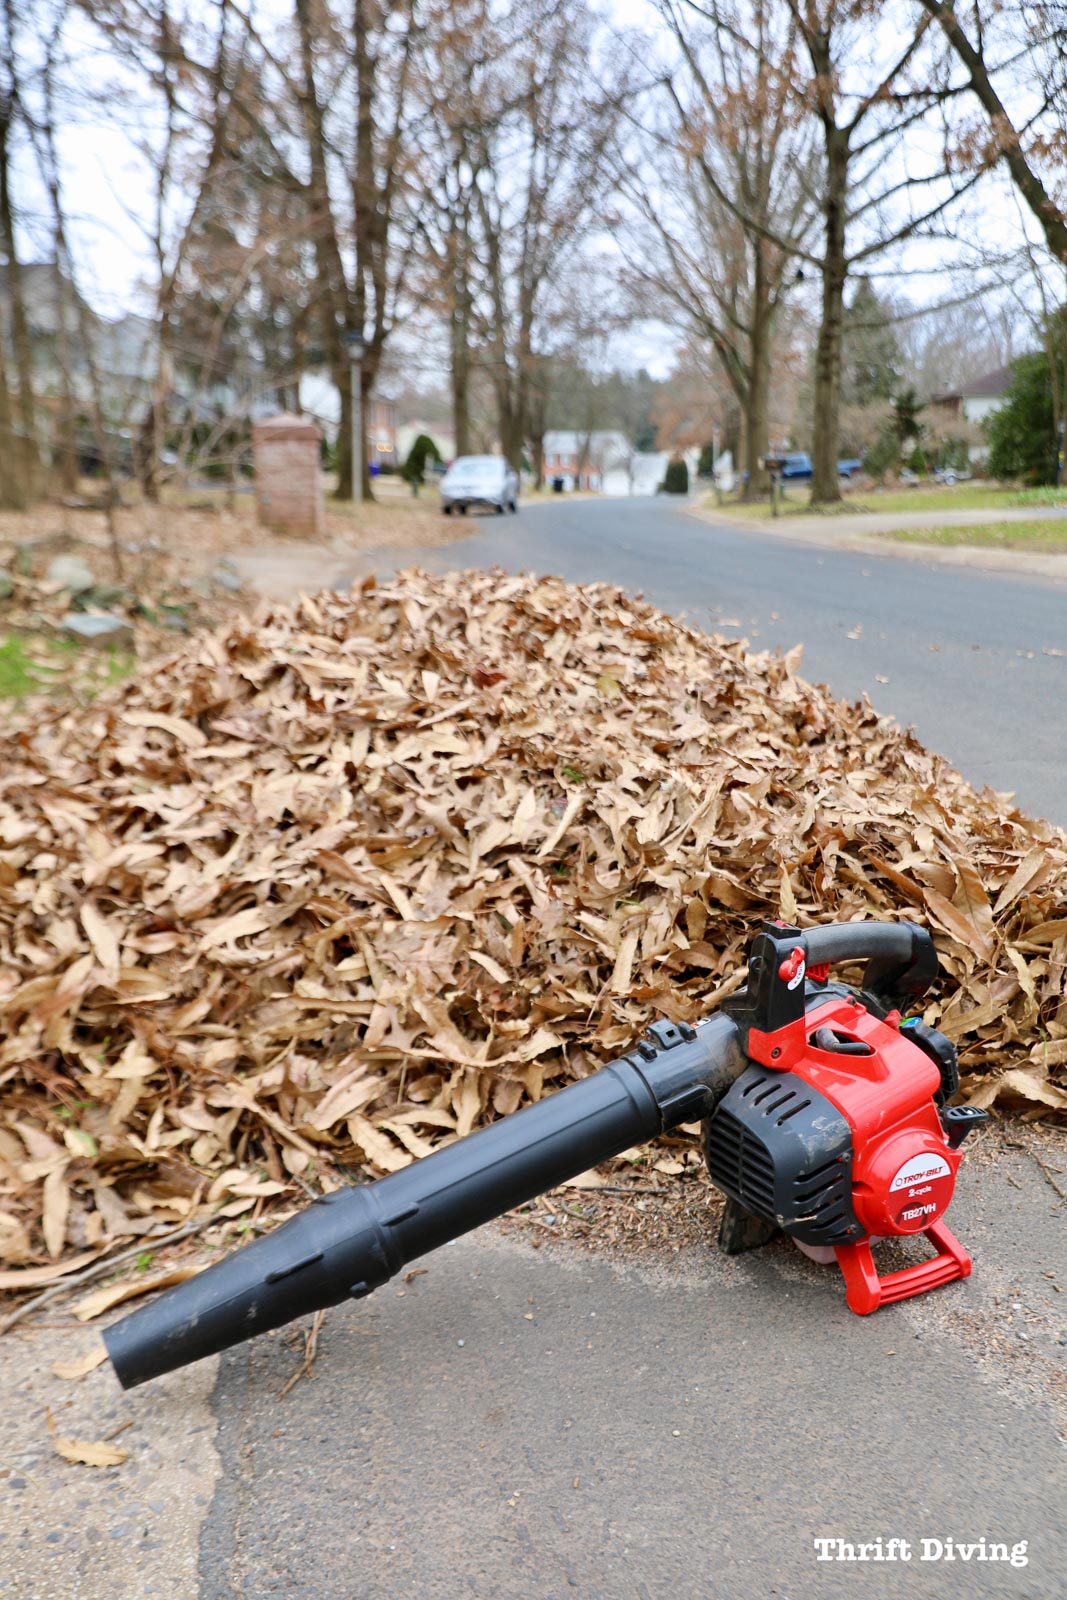
- If you’ve got a big yard or a huge load of leaves, gas-powered is the way to go. I’ve used battery-powered leaf blowers, and while they’re easy to use, they’re not made for big yards or moving heavy leaf piles. Gas-powered leaf blowers have more run-time and tend to be more powerful.
- Try using a leaf blower vacuum that operates as a leaf blower and a vacuum with special attachments, such as the Troy-Bilt TB27VH leaf blower.
- Use large buckets or containers for hauling or storing mulched leaves. Huge piles of leaves being mulched will need to be emptied often.
- Try a tarp. Professional landscapers will often blow leaves into a tarp and haul it away. Try blowing leaves onto a tarp and hauling it to your wire bin to fill with the leaves to make leaf mold.
Adding Mulched Leaves to the Garden
Yes, you can add mulched leaves to your garden! You can even add whole leaves to your garden, but as Erin mentioned, it takes longer to break down. Whole leaves, though, can get compacted together and get too soggy and hold too much moisture, as Erin reports on her blog. For me, mulched leaves are the way to go.
I love the spring and summer, when everything is vibrant and alive and bursting with new growth. But with that, comes the bursting of weeds, too.
When I carved out this little garden in an unused crevice in the back of my yard last summer, I didn’t mulched it, partly due to lack of experience in knowing what to use as mulch. So I just left it and waited for the eggplant and peppers to grow. Of course, the weeds grew, too.
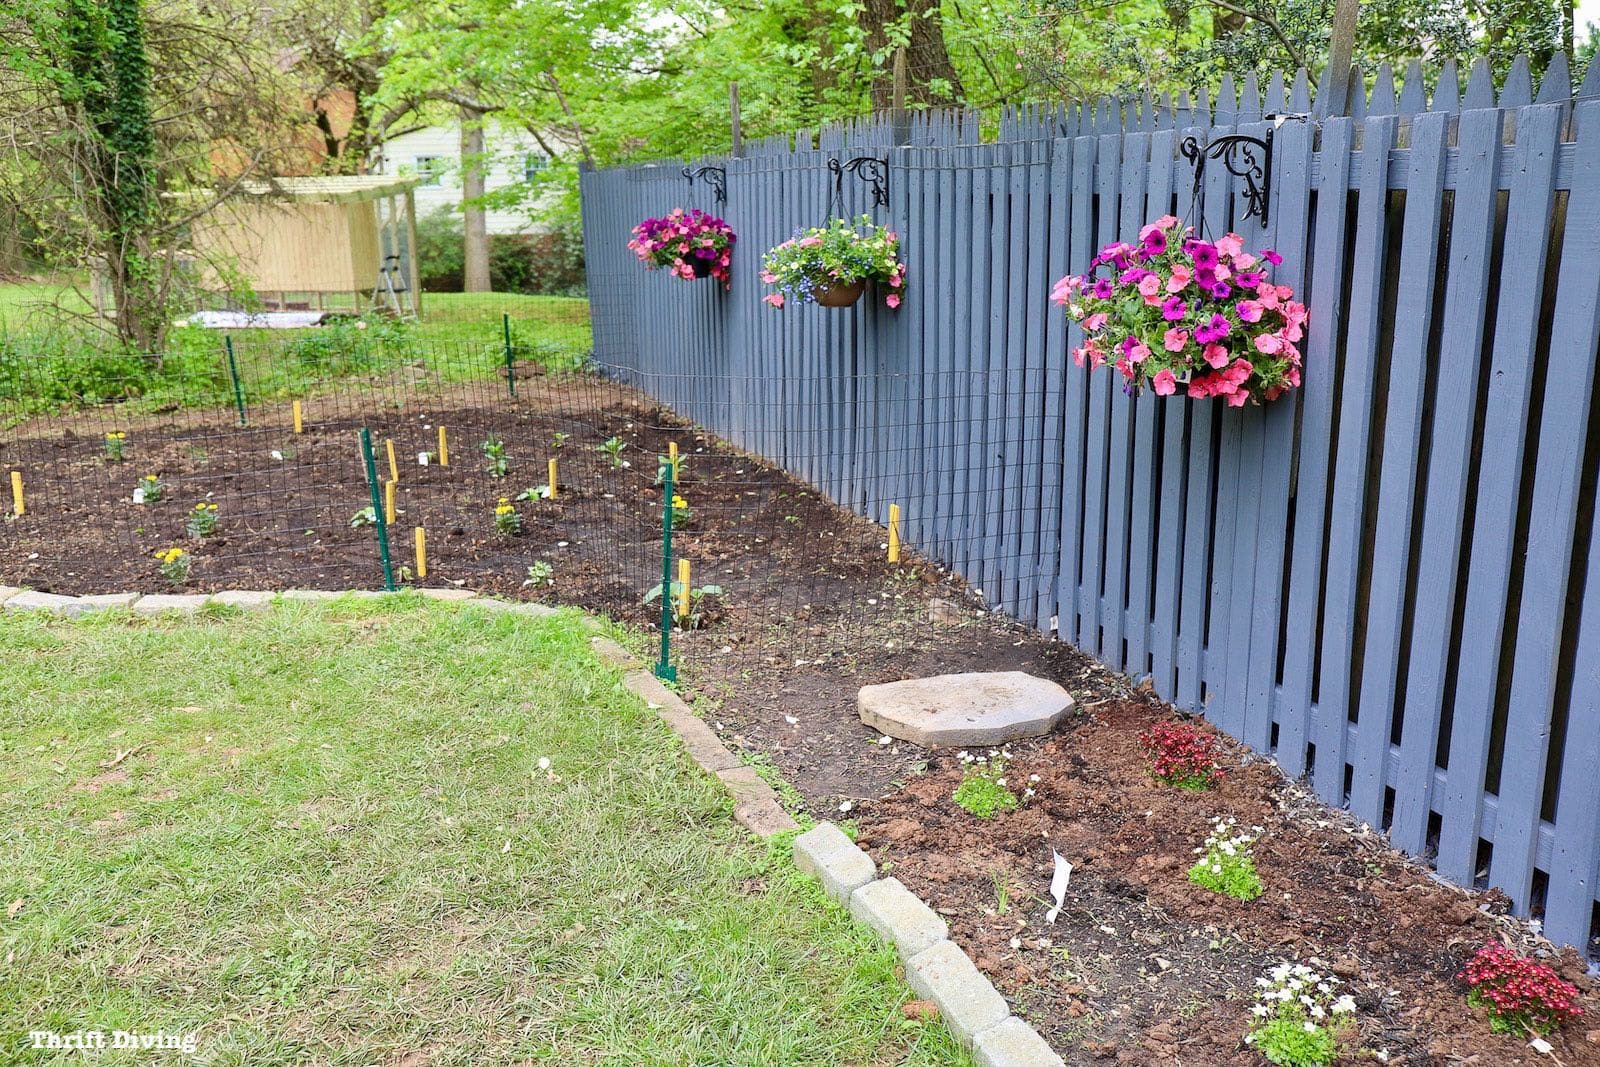
Now, thanks to the massive amounts of fall leaves that fell several months ago, this garden has a pile 3-6″ tall of mulched leaves will provide good cover for the soil to help prevent weeds, as well as breaking down that God-awful compacted clay soil. Can’t wait to see it all come together this spring!

This spring, I may even address the massive amount of weeds in the lawn. In fact, the entire lawn in one giant cesspool of weeds. It’s bad enough that we should likely just start over from scratch. So stay tuned. You may get to see that this spring! 😉
At the beginning of this Troy-Bilt Fence Talks project, if you’d have asked me what I thought about the leaves in my yard, I would have inserted an eye roll, an exasperated suck of the teeth, and cursed this tree-lined street. All I could see were the hours of clean-up, the expense of buying leaf bags (and the frustration of running out of bags–hellOOO!), and the physical exhaustion of the clean-up.
But now, knowing how much my garden benefits from leaves, particularly the breaking down of densely packed clay soil, and how much easier it will be to grow food for my family thanks to those leaves, I have a newfound appreciation for them.
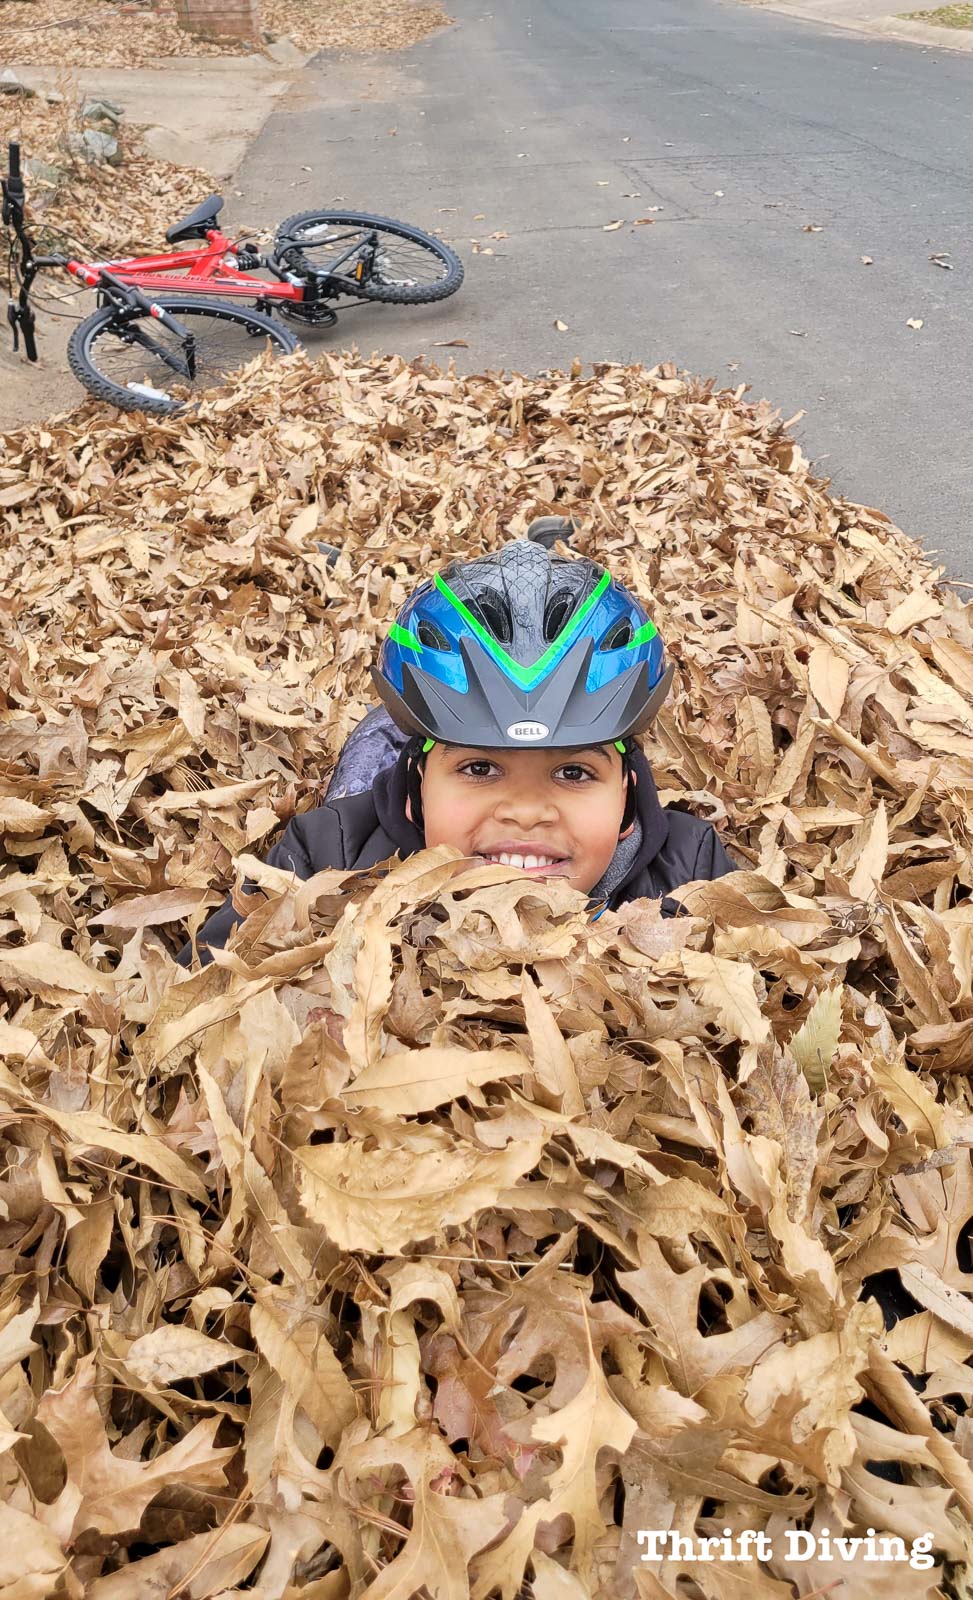
Maybe going forward, the thought of leaves and leaf clean-up can be more pleasant, too. After all, what kid doesn’t enjoy jumping in to them, like my 9-year-old son did this week? I’m convinced it’s a matter of just changing your perspective.
So what about you–do you mulch your leaves for the garden, too? Does the thought of leaf clean-up irritate you, or does the thought of your family jumping into a big pile make you excited? How do you clean-up and recycle your leaves? Leave a comment below and let’s chat about it!
Love this post? Save it on Pinterest!
![]()
Also, a huge thanks to Troy-Bilt for sponsoring Fall Fence Talks!

Download the 5 freebies!

Thrift Diving inspires women to decorate, improve, and maintain their home themselves...using paint, power tools, and thrift stores! Use these 5 printables, checklists, and ebooks to get started!


Great post! I also live on a very wooded lot and the leaves were a yearly nightmare. But last year we finally bought a leaf mulcher and lined all of our flower beds with the leaves for the first time. Saved me a lot of money instead of buying wood mulch. I haven’t started a compost bin yet so thanks for sharing some tips on how to get the most out of adding in the leaves. Good luck with your garden. So glad to see you visiting the party again. #HomeMattersParty
I’m on the path to a pollinator-friendly garden, and in my reading have also run across information that we should leave a lot of leaves undisturbed – at least the bottom inch or two. Leaves protect a lot of beneficial insects and eggs, so blowing or chopping up that lowest level can cause a lot of damage. I live out in the country, so I’m not a golf-course kind of lawn person anyway, so it works here but maybe not so much in town. Anyway, just wanted to share. 🙂 And that last photo of your boy is everything!!! So sweet. https://ggwash.org/view/74379/leave-those-fall-leaves-for-a-nicer-lawn-and-a-healthier-ecosystem#:~:text=To%20mulch%20or%20not%20to%20mulch&text=That's%20actually%20better%20than%20mulching,suppression%20in%20your%20garden%20beds.
Wow, that’s good info!! I would agree that is true. There are all kinds of ecosystems that use those leaves! I am hoping that the insects will use them in my wire bin! Thanks for the link! I’ll check it out!