Mid Century Modern Dresser Makeover Stripped and Refinished
My attempt at stripping and refinishing this mid century modern dresser should have been called:
“The Mid Century Modern Mishap”
It’s my biggest fear whenever I start a project: that I’ll mess it up somehow.
(Yes, we bloggers have those fears, too. You’re not alone).
Especially for me when it comes to stripping and refinishing.
Stripping furniture and refinishing is an art, and you really have to know what you’re doing to get quality, professional results. The more I learn about wood, the more I’m adoring wood tones. I really want to master this thing called “wood refinishing.”
Mid Century Modern Dresser Makeover
Call this dresser my latest DIY experiment in refinishing.
Or rather, instead of an “experiment,” let’s call it a “gentle DIY fail.” HA!
This mid century modern dresser had been sitting in my garage for awhile, but prior to that, I had used it for my basement office makeover to hold my television.
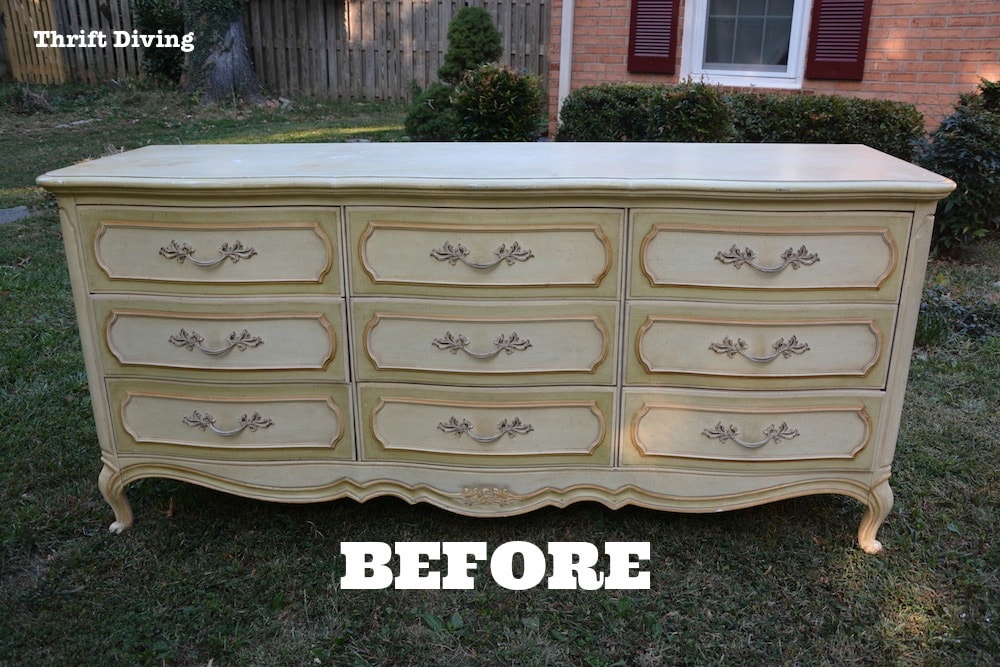
BEFORE

AFTER
The bright side of this mid century modern dresser makeover is that you can finally see the gorgeous veneer grain!
What you don’t see in this picture is the spottiness, along with the unevenness of how to tung oil soaked into the wood.
Keep reading.
I’ll tell you everything that happened. LOL
Or better yet, watch the 13-minute explanation in my YouTube video.

The Amazing Discovery
I first found this dresser for a “whopping” $24.99 at my favorite thrift store.

It had sat in my garage for years, waiting for a makeover.
The taller of the two dressers got a gorgeous makeover with tung oil and white paint, but I really wanted to practice my stripping and refinishing skills on this longer one.
No paint was gonna touch this beauty.

The top was pretty marred, so stripping and sanding seemed to be the best option.

Materials Used
(I participant in the Amazon Services LLC Associates Program, an affiliate advertising program designed to provide a means for me to earn fees by linking to Amazon.com and affiliated sites).
I’ve stripped furniture before on smaller scales, so I knew what materials to pull together:
- Blue Bear Soy Stripping Gel
- Putty knife (dulled at the edges)
- Chemical-resistant gloves
- Bucket
- Old box or carton
- After Wash to remove stripper
- Lots of lint-free rags!
- Tung Oil
- Chip brushes (natural bristle brushes)
- Mineral Spirits
- Orbital Sander
- 150- and 220-grit sandpaper
- Dust mask
- Mahogany Gel Stain
STEP 1: Removed All of the Drawers
The easiest way for me to strip this dresser is to remove all 9 drawers and set them out on a tarp.
Stripping is a suuuuuper messy job!
Trust me–I’ve learned my lesson. Put down a tarp (as a reader suggested) to protect your floors or ground. LOL

STEP 2: Apply the Furniture Stripper
I’ve been using this soy stripping gel lately and I like it a lot. I used it on the drafting table that I stripped and refinished, and I love how it worked. I notice that it doesn’t have the same strong odor that many other strippers have. I’ve used Citristrip before and that is made to smell citris-y, but even Citristrip, if sniffed for too long, starts to make me feel a bit sick to my stomach. The Blue Bear Paint & Urethane Stripper never makes me feel ill and isn’t strong-smelling.

I slathered on a coat, let it do its job, and–BOOM!–removed it with the dulled-down putty knife (so it doesn’t gouge the wood) after about 15 minutes.
Be sure to work in sections because you don’t want it drying on your wood!
You will likely have to do two applications and removals of this stuff, FYI!

After the first pass-through with the putty knife, you can see there was a lot of gunk still left.

Once the second coat is applied and scraped off, use After Wash to clean off the residue from the stripper.
STEP 3: Sand, Baby, Sand!
Oooh, and I tried to be soooo careful this time.
In the past, I’ve been known to move my orbital sander of a piece of wood at lightning speed.
But all that does is leave lots of swirly “pigtails” in your wood: round, annoying, circular scratches that look horrible once you apply any type of stain or finish!
So for this project, I had slowed it down to about 1 inch per second, letting the sander do its job and not forcing it.

The top looked pretty good, but I’ll be honest–I was a little worried about the quality of the sanding I had done.
Did I miss any spots…?
Was it evenly sanded?
How would it look once I put tung oil on it??
The First Problem
The first problem I encountered was after sanding the body was realizing that the front edges of the dresser had no veneer.
Which means, tung oil applied there wouldn’t have the same result as it would when rubbed on the veneer.

Once the rounded drawer pull areas were sanded, I found they were also going to be mismatched from the rest of the dresser, too.

To fix the problem of mismatched wood, I used Mahogany Gel Stain on the edges and on the curved pulls, which worked beautifully!
The reddish tones were a perfect match to the color of the veneer once the veneer had tung oil applied!


I also applied the gel stain to the sanded drawer edges where there was no veneer.

In the meantime….ugh….9 drawers…..
That doesn’t just sound like a lot; it is a lot! LOL
I made sure that I wore hearing protection because having the sander run that long started to grate on my nerves!
Of course, don’t forget to protect your lungs. Even the smallest of particles stay floating around after sanding!

I love sanding inside of drawers and on the sides, too, when they’re a bit messy or yellowed!
Here, you can see that old stain from the previous finishing was cleanly removed with my sander.
These drawers were awesome because the sides were made of oak! That’s great quality right there!

On the inside fronts, I quickly sanded those, too, to make the insides clean.

The effort was worth it because the beautiful veneer shined through!
I couldn’t wait to get tung oil on these drawers!

STEP 4: I Applied the First Coat of Tung Oil
This is where I think things started going wrong.
First of all, I have used tung oil before and have had great results. But it’s been a while. I love the way it naturally deepens the color of the wood without obscuring the grain.
I followed the instructions: mix 50% tung oil with 50% mineral spirits for your first coat, let it sit for 10-15 minutes, then wipe off, the bottle said.
But here was the first problem: this brand of “green” mineral spirits is milky!

I didn’t pay this any mind at first…
(Keep reading to see why this may have mattered…)
The “wet wood” look was emerging and I was ready to wave my “Bad Mamma Jamma” flag for refinishing such an awesome piece….

…that is, until it started to dry, and I realized that the top didn’t look quite so lustrous.
It looked a bit dull, actually.
What happened to that rich-looking wood????

The next day, I also noticed spots that I would have bet money on that I had sanded away, but somehow, they’d mysteriously reappeared after 24 hours.
At this point, my “Bad Mamma Jamma” flag was starting to waver.
How was I going to fix that??

STEP 5: I Got the “Brilliant” Idea to Add a Top Coat
This is where things really started to go wrong.
Typically with tung oil, it’s a light finish that can take many coats. I’m talking maybe 7 coats (spaced our day 24 hours) so that you get maximum shine, which is what I wanted. And pure tung oil can take up to a full week to fully dry! GASP.
But the thought of spending up to 7 days of pulling this bulky piece of furniture out of my garage to apply coat after coat–um, yeah, no thanks. I’d like to keep it movin’.
So I got the “brilliant” idea to add coats of General Finishes ARM-R-SEAL Oil & Urethane over top the tung oil.

While I researched that that can be done, it shouldn’t have been done until well after the tung oil dried, which could have been weeks!
I naively proceeded.
At first, I thought it was going to turn out well.

But once it dried, the following day it was clear that something has gone awry.
The drawers look dried out, with “wet” looking glossier edges.
The result left me disappointed and scratching my head on what to do next.

I tried using some 0000 very fine steel wool to even it out.
SIGH…… lol.
Don’t you hate these kinds of projects where things just go wrong??
STEP 6: I Tried Adding Another Coat of Oil & Urethane
I thought that maybe my application method is what contributed to the spottiness of the finish.
So I got the second brilliant idea to add a second coat the following day, using a foam brush, using the brush to wipe away some of the excess finish.

And instead of waiting to see what result I would have on the drawers, I went ahead and added the urethane to the dresser body.
The gel stain looked amazing, and the oil-based urethane went over it very well.

While it was wet, it looked great!
I just didn’t realize that it would look crappy once it dries! LOL

Stripping and Finishing the Mid Century Modern Dresser Legs
I always dread stripping and finishing round objects.
But these legs were easy enough!
I made a little jig out of scrap wood that allowed the legs to stand up while getting stripped and refinished!

It’s much easier when legs can’t fall over and don’t need to be held!
This is a good tip for when you’re spray painting, too. 🙂

The Stuff You Didn’t See…
Becuase this post is already long enough, I’ll spare you any more pictures of the process I went through trying to rectify the wrongs of this projects.
But it goes a little something like this:
Serena realizes the oil-based urethane was a mistake.
Serena has to re-sand the whole dresser and 9 drawers.
Serena applies 2 more coats of tung oil to try to fix her mistake.
Serena is disappointed that it still doesn’t look perfect, but is glad it’s better.
Serena is done. Done!
Serena doesn’t want to look at another piece of wood furniture for quite some time. HA!
The Grain is Pretty, But……
As much as my brain goes GAGA over the amazing grain of this mid century modern dresser, my brain can’t also accept that the finish isn’t perfect.

The top is very spotty.
At this point, I don’t know what’s worse: the scratched “BEFORE” shot or the spotty “AFTER” shot. LOL
BEFORE
AFTER
Let’s look at the bright side: the side veneer is rather striking, isn’t it??
After removing the old finish, now you can actually see the awesome pattern of the veneer.

I’ve considered just painting the body white to cover up the mishap.
But I feel like that would be a cop-out.
Nope. I must live with this and figure out why it happened so it never happens again.


I couldn’t figure out why the drawers looked so ashy. I did a
I’m guessing it was the bad mix of tung oil and urethane.
I can’t be certain.
But you can see the oily spots. How disappointing!
BEFORE
AFTER
I’m thinking that once the oil has fully tried, I’ll go back with a wax or maybe another topcoat to see if I can add a wet-looking shine that will make it less noticeable.
At this point, I think I may have to take a trip to the woodworking store and get some suggestions on how to fix this.
It’s bothering me. LOL

What Went Wrong
It very well could be that all mineral spirits aren’t equal.
The “green” mineral spirits I used may have contributed to the ashy, cloudy appearance of the wood.
Mixing my tung oil with that brand of “green” mineral spirits could have contributed to part of the problem.
Possible Fixes
The question is, will I attempt to fix this, or will I keep it movin’?
I could:
- Paint the body white. I could just cop-out and paint the outside body white, leaving the drawers wooden. But part of me feels like I need to figure this out before taking the cop-out. Isn’t that what learning is about?? 🙂
- Add another top coat after the tung oil dries. Once fully dried, I might be able to add a wet-looking top coat to give it some shine.
- Keep adding more coats of tung oil. I did some research and it appears that it is ashy because the wood is soaking up the oil. More coats of tung oil may even it out as the tung oil soaks in. Do I have the patience for this, though? What if it doesn’t work?
I’ll figure it out…
In the meantime, I’ve enjoyed the process, even if it made me want to rip out my hair. 🙂
And you have to admit…..ashy or not, that’s some pretty doggone grain!
Wouldn’t you agree??


So there you have it, folks: although my mid century modern dresser makeover didn’t go exactly as planned, it still turned out pretty nice. That grain is absolutely to die for!
The mid century modern dresser makeover is going back down to my pretty basement office. 🙂 I store crafting supplies in it!
So…..have you ever done a mid century modern dresser makeover? And do you prefer furniture stripping or painting furniture?

Download the 5 freebies!

Thrift Diving inspires women to decorate, improve, and maintain their home themselves...using paint, power tools, and thrift stores! Use these 5 printables, checklists, and ebooks to get started!


I just picked up my first project piece to refinish. This is the first blog on the subject I found. Now… I’m scared! Excited! I have decided to enter this with no expectations, ha ha. Thank you for sharing your art. (Yours turned out beautifully)
Hi Serena – wondering if you ever did anything to finish the dresser? Sounds like you got some good advise. My first thought was to paint just the top black. I am firmly in the “paint things white” camp but this piece looks too good to paint the entire thing white – especially after all your hard work.
Serena,
I’m in the midst of a stripping project on an old desk. I hated the dull brown finish, so figured I would strip it off and refinish it. Sigh. Apparently it had been refinished in the past to cover other problems. I first suspected it wasn’t a factory finish when I stripped the drawers and found a reddish stain underneath (looks like a cherry or mahogany). Then I started on the top and found out the refinish had really been glopped on with a super thick application at both ends. Why would they do that? Well, what looks a crayon mark or marker embedded into the wood at one end (I’m hoping I can sand it out, since the stripper hasn’t touched it) and multiple circular water marks at the other end (they should have used a coaster LOL). So I’m with you on frustration. I love the sides and front of your project. The grain is fabulous! Let it sit for awhile (pretty runners cover lots of stuff) and if you don’t find a fix, I would sand that finish off, and redo it with the gel stain you used on the front. Meanwhile, back to scratching my head over that desk! P.S. I appreciate that I’m not the only one who talks about their disasters and problem projects!
Oh, man, sounds like they did a number on that piece! It’s like dried glopped stuff? Can you leave the stripper on for a bit for it to come off?
Thanks for ideas about pretty runners. I will eventually try to sand it out and do like you suggested: use the gel stains. You can’t go wrong with those! (Or can I….Hmmmmmmm….LOL). Good luck on your project! Send me pics when you’re done.
It was dry glop, but much stripper and scrubbing seems to have won that battle. Now tomorrow I will try sanding the top and decide which finish will work.
I love the way the dresser turned out! Woodworkers club in Rockville may be able to help figure out where things went wrong. I need to go to that thrift store on a more regular basis because I’m looking for a dresser just like that one!
Hey, Kalisha! Yes, Wood Craft! I love them. When I go, I spent at least 1-2 hours. LOL. It’s that good.
I will have to show them pictures of the dresser next time I go. And yes, hit the thrift store–there’s always something good there!
My goodness, what a lot of work. I think the sides, legs and drawers look amazing and oh my goodness what a beautiful cut of wood. I love the style too. I hope you’ll try the additional coats of tung oil on the top. It makes sense that the top of a piece of furniture would need more coats. Don’t give up. You’re almost there.
You really need to proofread. EVERYONE needs to proofread.
You poor thing! I totally feel for you! And can completely commiserate…I am on my THIRD time sanding down a small dining table to get the right finish. It’s burl, and so gorgeous…or at least it would be if it was in the right hands of someone more knowledgeable than I! It’s the stupid polyeurothane. I’ve done other projects and gotten a nice finish..I’ve even got some “tricks” that help the finish…but this table ended up so streaked. I am going to stain it again this weekend and hope that it’s not too hot to poly here (South FL). My friend who wants the table has already paid me, so…gotta get it done, Kat! 🙂 Thank you so much for taking the time to share your story and in a positive and informative way. I have a few blogs that I follow on wood finishing, but they make it sound so easy… lol. I’ll keep you posted if I learn anything new. –Kat
Enjoyed your post! And I just love MCM furniture!
When you posted that you found this piece, I think I told you I have an identical dresser, bed and night stand bought new in 1962. I sure would love to have the chest that matches! Now, the dresser and night stand look almost exactly like your before picture. I had no idea the wood underneath would be that pretty! DH got into some refinishing for the first time last winter so I am thinking that when he sees your pictures and tutorial, he might just get interested. The way yours looks NOW would suit us, as amateur refinishers, just fine!
Nice project, i like whst you did
Wow! What an interesting project/post! Yes, in some ways so disappointing to not achieve the results you were hoping for, but in other ways, such a great learning experience. And I agree with all those who say it sure looks better than the before. The grain is amazing; please don’t paint over it.
I think the biggest takeaway I got is “you have to have patience when working with wood (and oil finishes). You have to commit to the time it takes to complete each step and the drying time involved.
Also, you need some sort of “dolly” (like a bigger mechanics dolly? maybe make your own?) to use as a finishing platform so that you can easily roll a larger piece in and out of your garage when you want to work on it.
I’ll be very interested to see what you discover as you research what might have gone wrong and what should have been done and/or might still be done to improve the finish. And that link Zovesta gave you had some very interesting and useful information in it.
This is just a little stumble in your “love affair” with wood and your journey as you continue to learn and grow your skills! Thanks for so candidly sharing your journey!
P.S. Following your room makeover and betting that hubby will love his finished office space once he’s had time to settle into the changes!