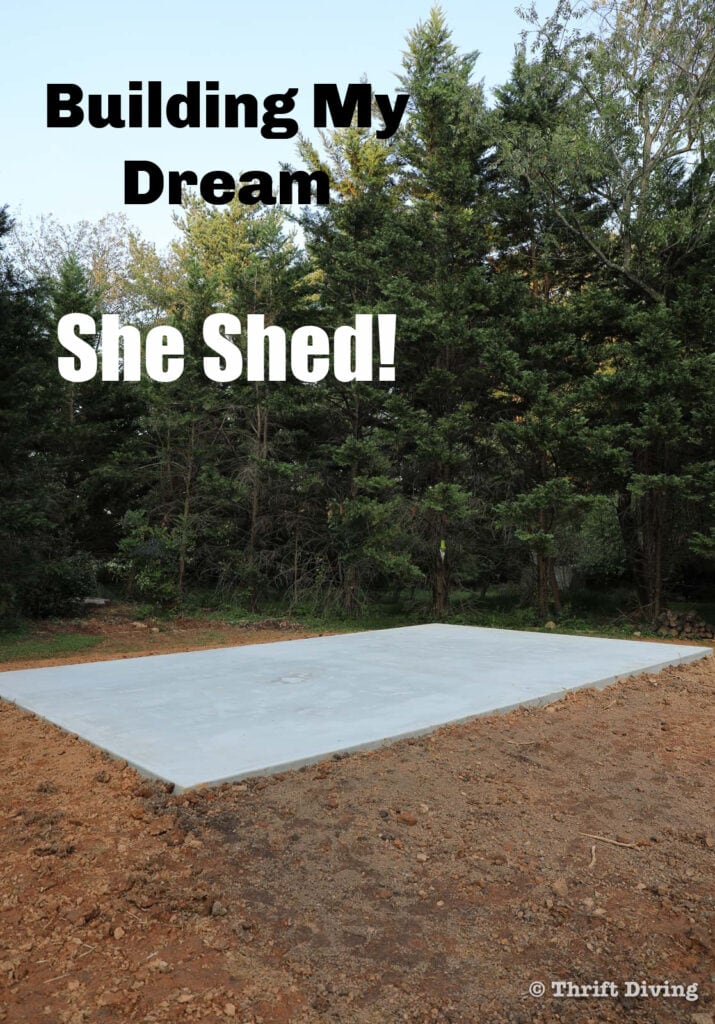
Building My Dream She Shed: Installing the Concrete Foundation
In February 2020, I made the decision that I was going to buy my dream “she shed” for my backyard! This wasn’t a decision I came upon lightly. But once I decided this was what I was going to do, you best believe the idea resonated in my head as an echo, “Do it! Do it! Do it!” Like a chant from the DIY universe.
I remember when we moved into this house in 2010, barely having enough furniture and decor to decorate all 13 rooms/spaces of the house.
But fast forward to present day and suddenly I need a 16′ x 26′ “she shed” in my backyard because I need “space.” As if every nook and cranny of our house is filled to the brim like another episode off of Hoarders and I need to expand my love of hoarding.
That’s not it, though.
You see, I had been wavering for at least a year about buying a “fixer upper.” An investment property that needed to be fixed up checked all those boxes for me:
- It would be good content for this blog and YouTube channel. (After all, that’s what I do here at Thrift Diving: find something ugly and make it pretty).
- It would go up in value.
- I would finally have dedicated space to be a “Thrift Diving Headquarters.” Although what I dreamed about most was having a dedicated garage for a workspace.
But while all of those things sounded wonderful and is still something I want, umm……have you taken a look at the real estate market lately??
People are over-bidding $40K out of pocket just to secure a property. They’re foregoing on inspections. They’re running around like chickens with their heads cut off, looking for a property in a tapped out market that doesn’t want people like me who ain’t payin’ $1 over asking price and definitely ain’t forfeitin’ a home inspection as part of a contract contingency.
No thank you. I’ll sit this one out and wait for things to crash, at which time I’ll be right there with my cash in hand, ready to “clean up.”
Instead of being disappointed, I got the idea: What if I got nearly everything I want, didn’t have to commute, and was right in my own backyard??
That’s what this post is about: building my dream “she shed” and completing STEP 1: getting the concrete pad installed!
Click here to save this post on Pinterest!

Watch the Video!
See the concrete installation process for yourself!
I realized that instead of buying an investment property to meet my needs, I could just buy a brand new “she shed” in my backyard and create the “investment home” that I had been searching for:
- I’d have dedicated work space (no lawn mowers to step over when painting furniture or building something!).
- I can trick it out on options (like skylights and windows–tons of them!)
- It will literally be 20 paces to my back door (no commute!)
- I’ll have to finish off the inside myself (turning plain into AMAZING!)
- I can write the entire thing off as a business expense (the new Thrift Diving headquarters!)
I decided to order the biggest and most decked-out shed I could afford. Well…I didn’t go crazy with it, but I wasn’t holding back, either. If I wanted windows, I added windows.
Skylights?
You betcha–throw 4 of them mamma jamma’s on the roof.
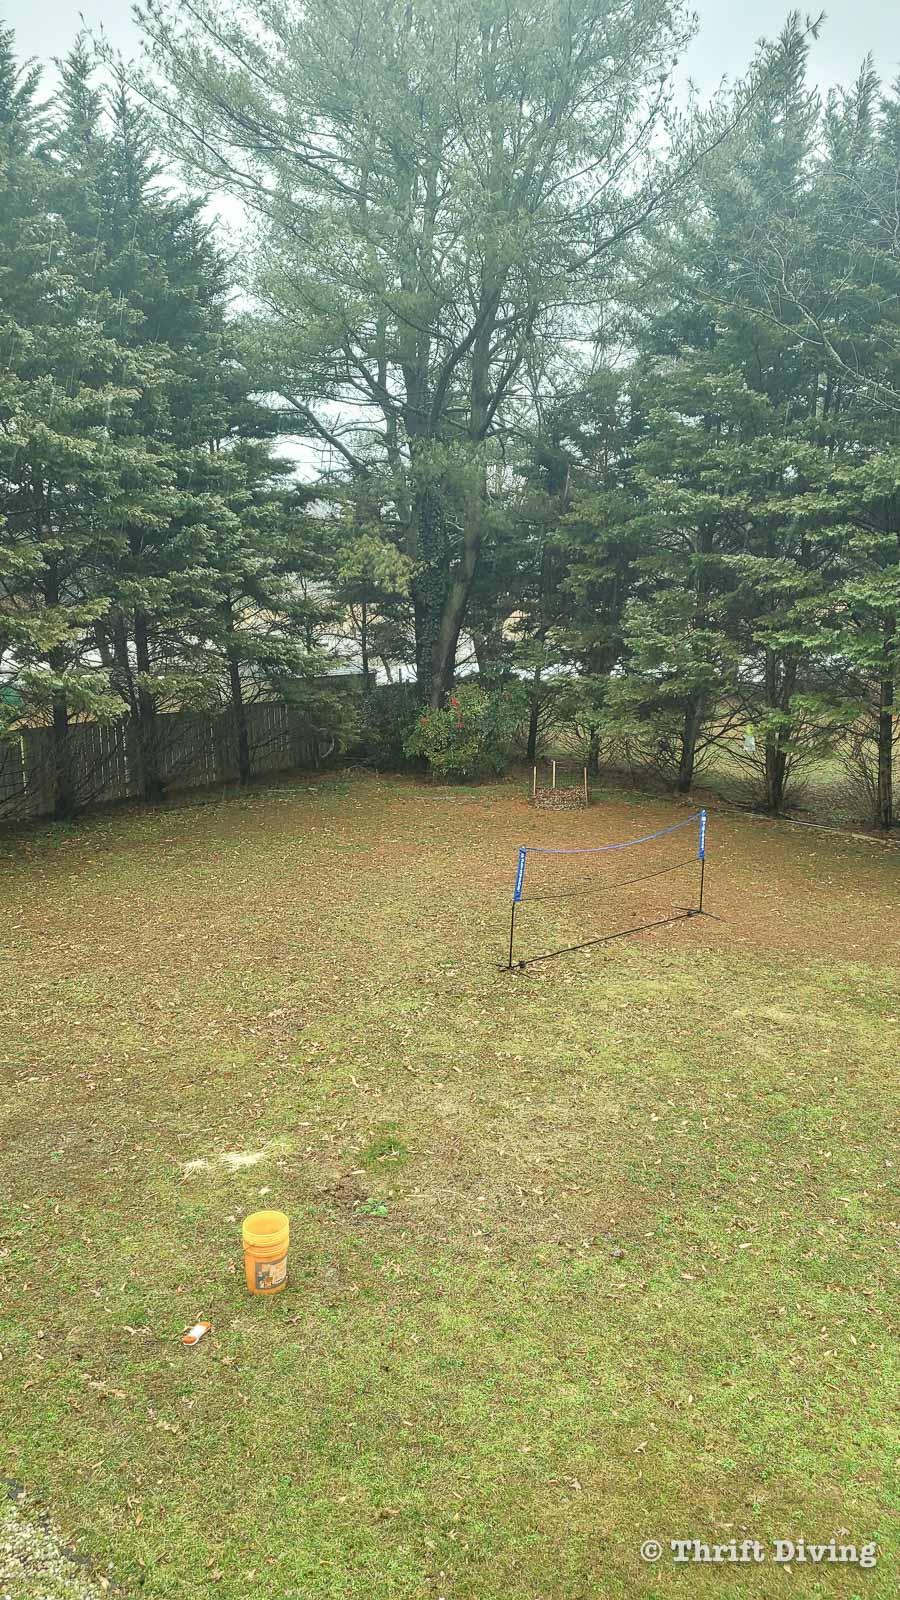
And this corner here in my backyard was the perfect spot!
Choosing the Best Location for My She Shed
Thankfully, I’ve got a pretty big backyard. My entire lot sits on .25 acres, which isn’t huge, but it’s not a postage stamp, either. However, the backyard has always afforded us the opportunity to do what we wish: build a fire pit with seating….. build DIY raised garden beds…. and even have an occasional family fun game of badminton.
But the truth is that we don’t nearly use our yard as much as we should. Wasn’t this part of the allure of buying a home–to have a piece of earth that’s ours (as long as we paid the mortgage…) to do with as we wish?
To have a backyard?
But with the amount of day-biting mosquitoes that flit around even at 11 a.m., hanging out in the yard isn’t on our list of “top activities to do at The Appiah house.” So the yard has mostly been something pretty to look at, but rarely used.
So I wanted to use our yard to build a “she shed” workshop for me. And the back corner of the yard was the perfect location.
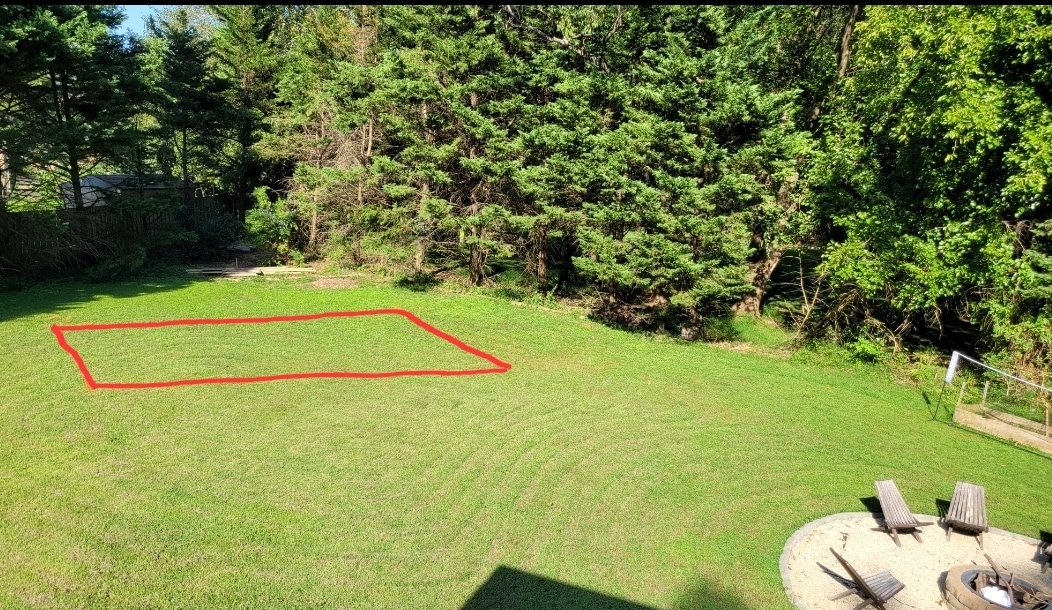
But what would look best for the yard? Does it have to be parallel to the house, or perpendicular? What if I liked it better in a catty-corner location?
Finally, I decided that catty-corner looked best, and could be blended into the yard with landscaping design.
Even up until the day before breaking ground would start, when the concrete guy came to spray off the footprint, I was on-the-fence about whether my location selected would be best. But there was no turning back now!
Besides, the county permit requires the shed to be at least 15 feet from the side yard neighbor and at least 12 feet from the rear. I was worried the shed would be sitting too far into the yard, but thankfully I have enough space for it, and with a nice selection of plants and landscaping, it will blend right into that back corner!
Here’s a look at where the shed would live.
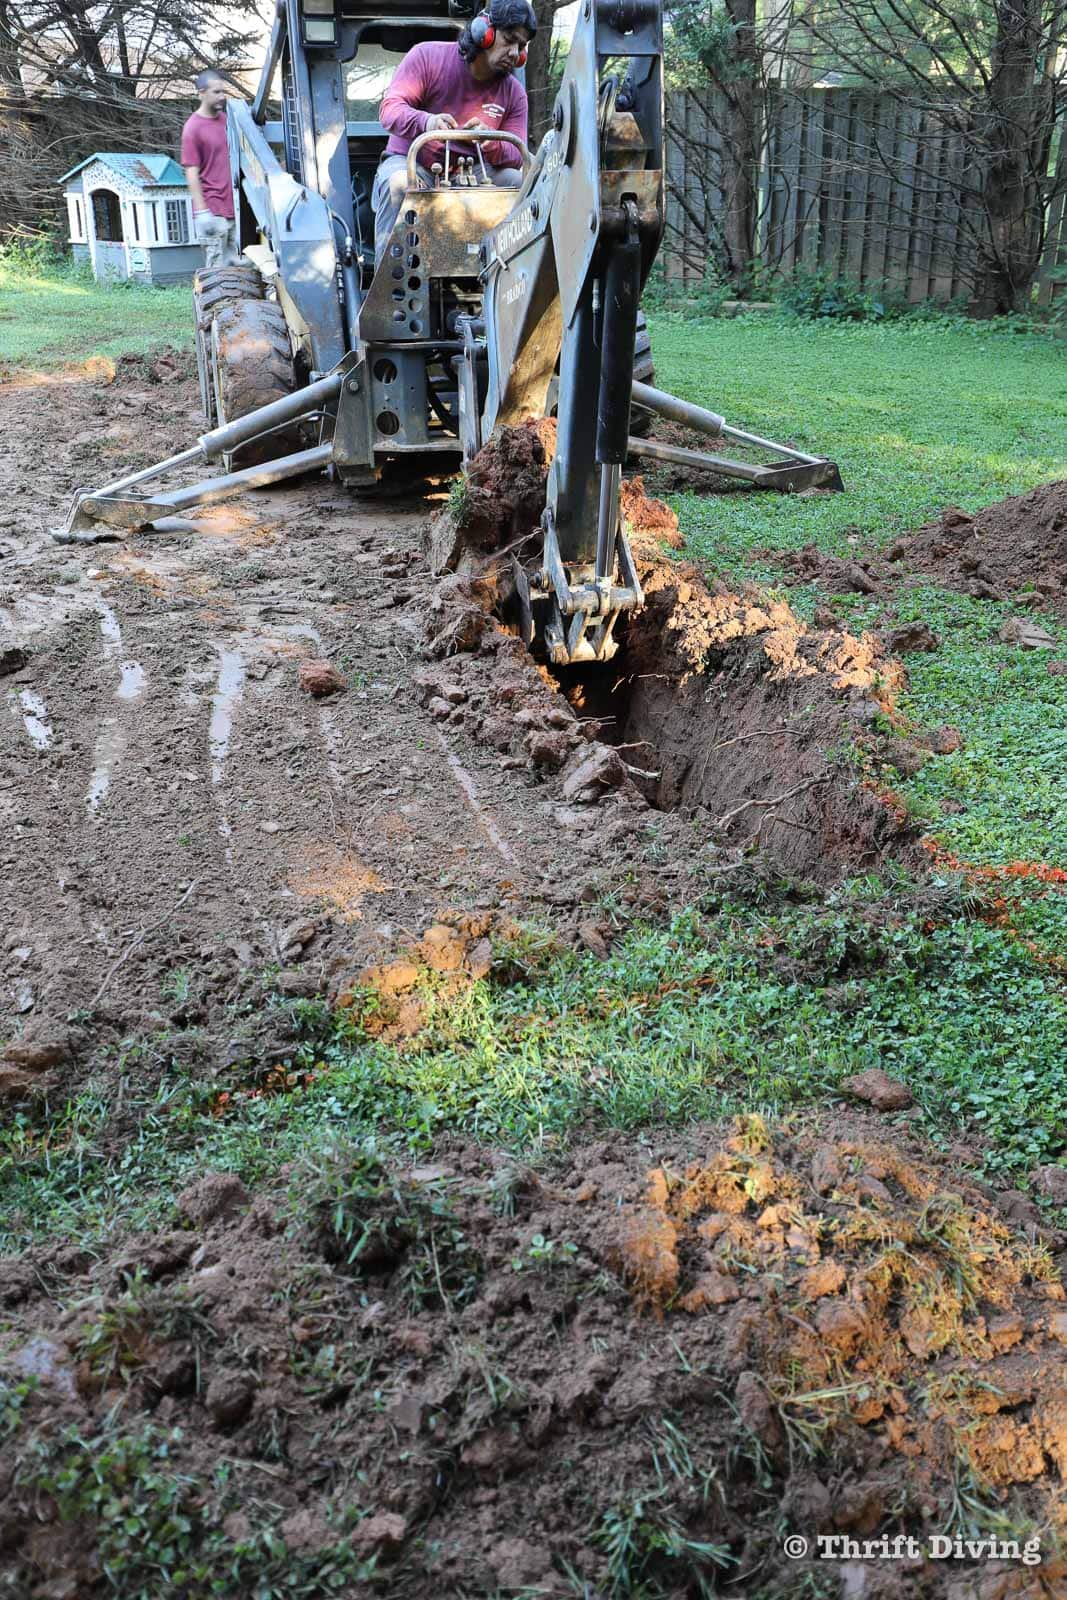
Breaking Ground!
It was unnerving, I’ll admit, the moment they broke ground for my “she shed.” I still had doubts about whether I had selected a she shed that was too large for my space, positioned too catty-corner, or will I regret staring out my kitchen window into the “eyes” of my new “she shed.” We’d be sacrificing “green space” for a shed.
But it was also very exciting, too, to finally see my own space being created–something that took 6 months to come to fruition.

With the top of the grassy 16′ x 26′ footprint skimmed off, my “she shed” was finally becoming real.

Did I Really Need a Concrete Pad? Why Not Just Gravel?
It’s true that many sheds don’t need a concrete pad and can be place on gravel. The biggest thing that’s needed is a level surface upon which the “she shed” will sit.
But it also depends on the type of “she shed” you’re buying, as well as the size. Some sheds have a floor with joists, so all that’s needed is a level gravel pad or blocks. Some sheds are more like garages and don’t have a floor (only walls and a roof) and you need a concrete pad that will be the flooring.
My shed, which I ordered from Tuff Shed, has steel joists to create the flooring. Technically, with these steel beams, I could have gotten away with a less expensive foundation like a wood foundation or 6x6s filled in with gravel.
But honestly?
I wanted the best foundation there could be. I want my “she shed” to last. I had emailed my carpentry teacher about which foundation he would choose if it were him, and he said “concrete.” He also mentioned adding gutters to prevent water from settling around the foundation, which I may consider going forward if it’s possible But I took his suggestion to heart and went with the foundation that I knew would present no problems in the future.
Digging Down Below the Frost Line
Because my shed will sit on a 4″ slab of concrete with footers, the concrete guys had to dig down 30″ which is below the frost line for my county. The frost line is the point at which the ground freezes. Here in Montgomery County, Maryland, I believe it’s about 24″, so to prevent freezing and cracking, contractors will go down a bit further, at 30″, to pour a monolithic pour. “Monolithic” just means it’s done in a single pour, all at once.

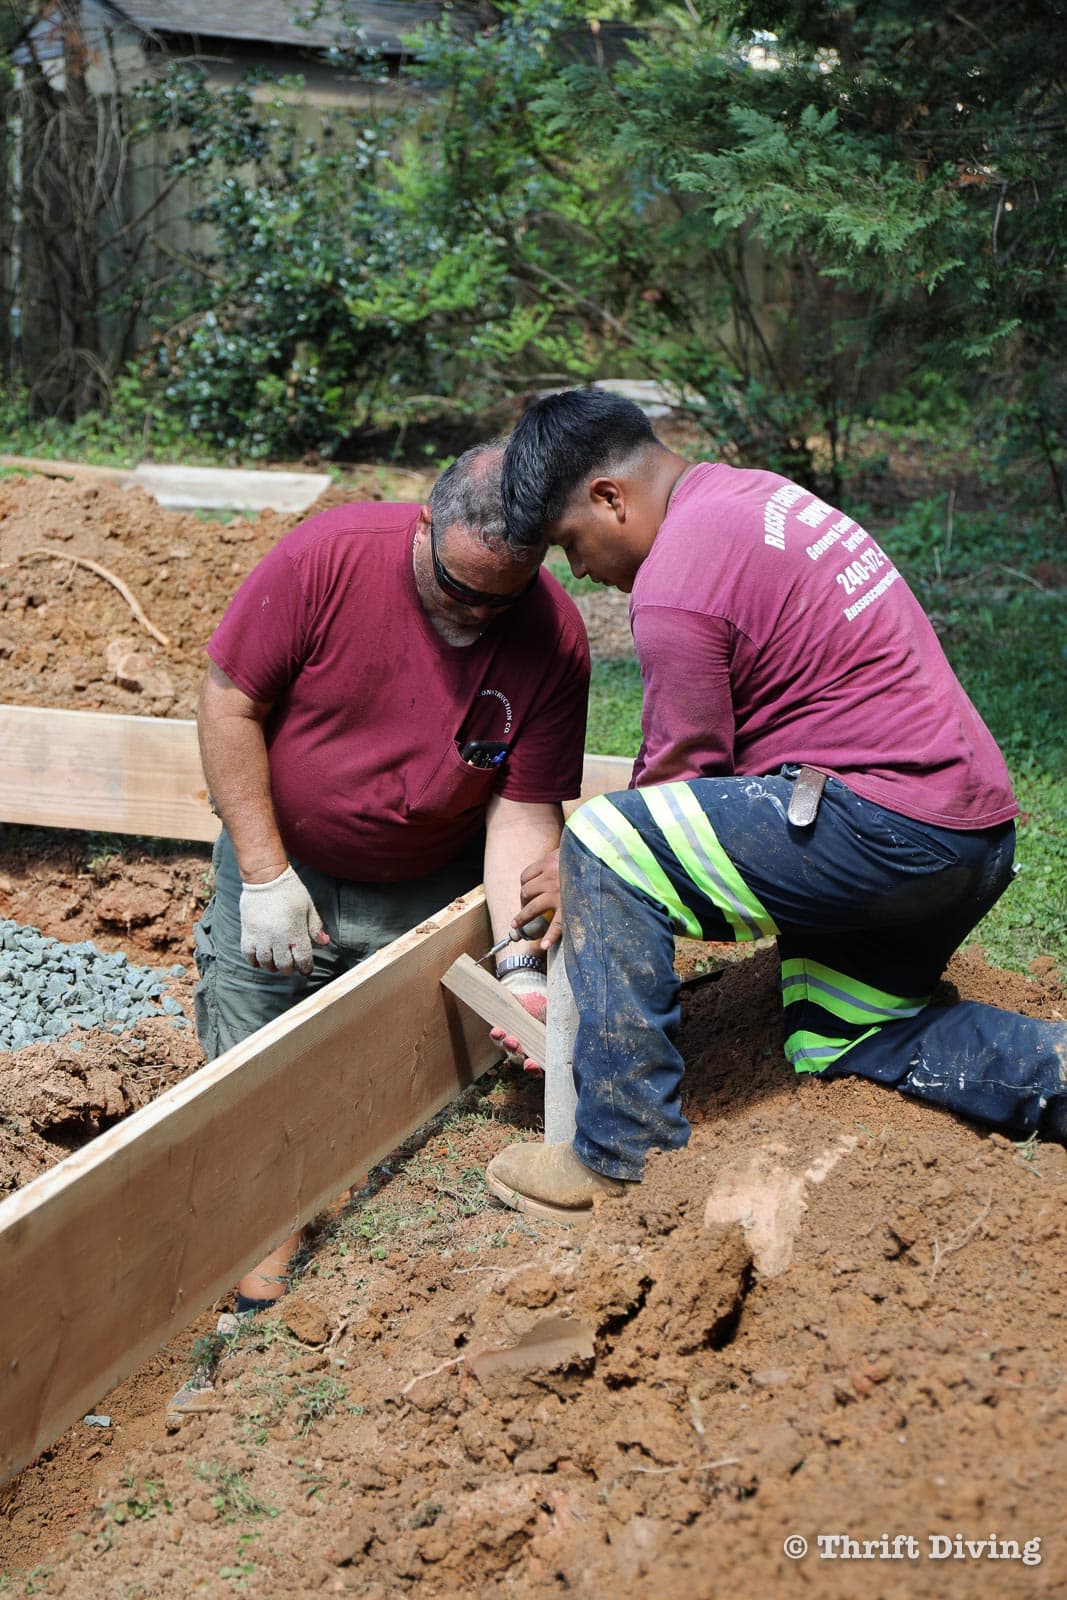
Creating the Concrete Forms
Concrete needs wooden forms to help mold it into a shape. For this concrete pad, the perimeter of the 16′ x 26′ area was framed with 2″ x 12″ pieces of lumber in order to create the sides of what will become my “she shed” foundation. Making sure that it’s straight, level, plumb, square was important.
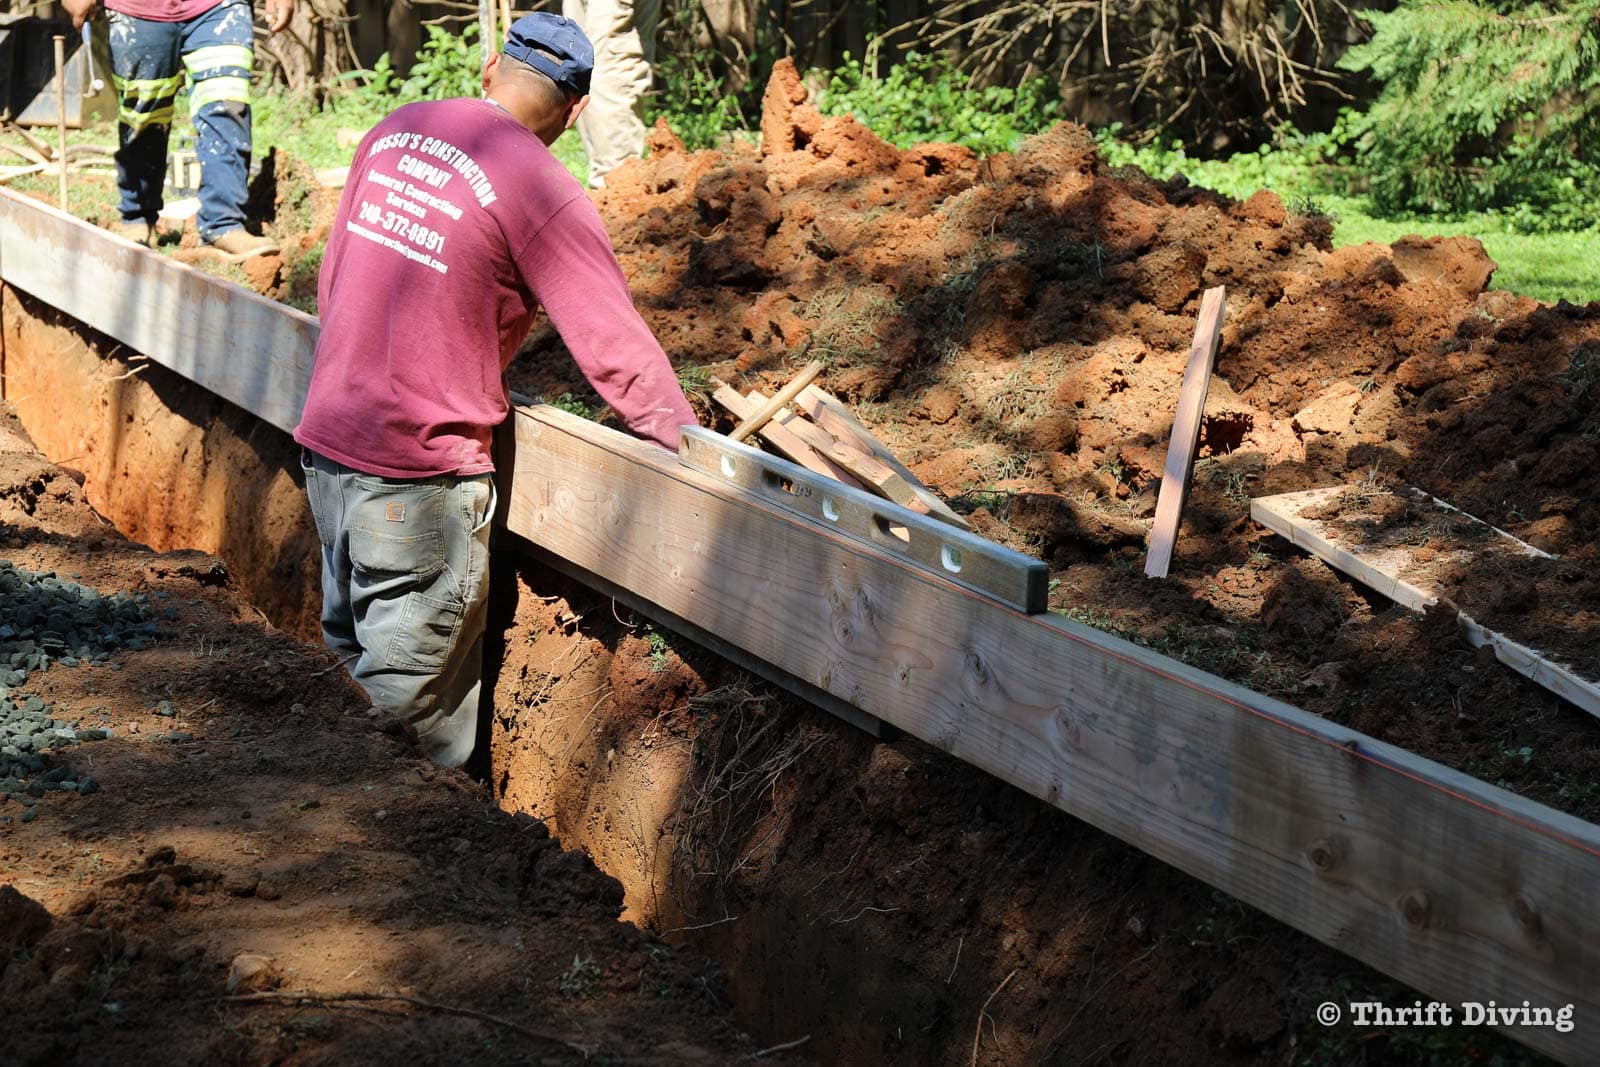
Those drove stakes into the ground and then screwed pieces of wood to hold the concrete form into place.
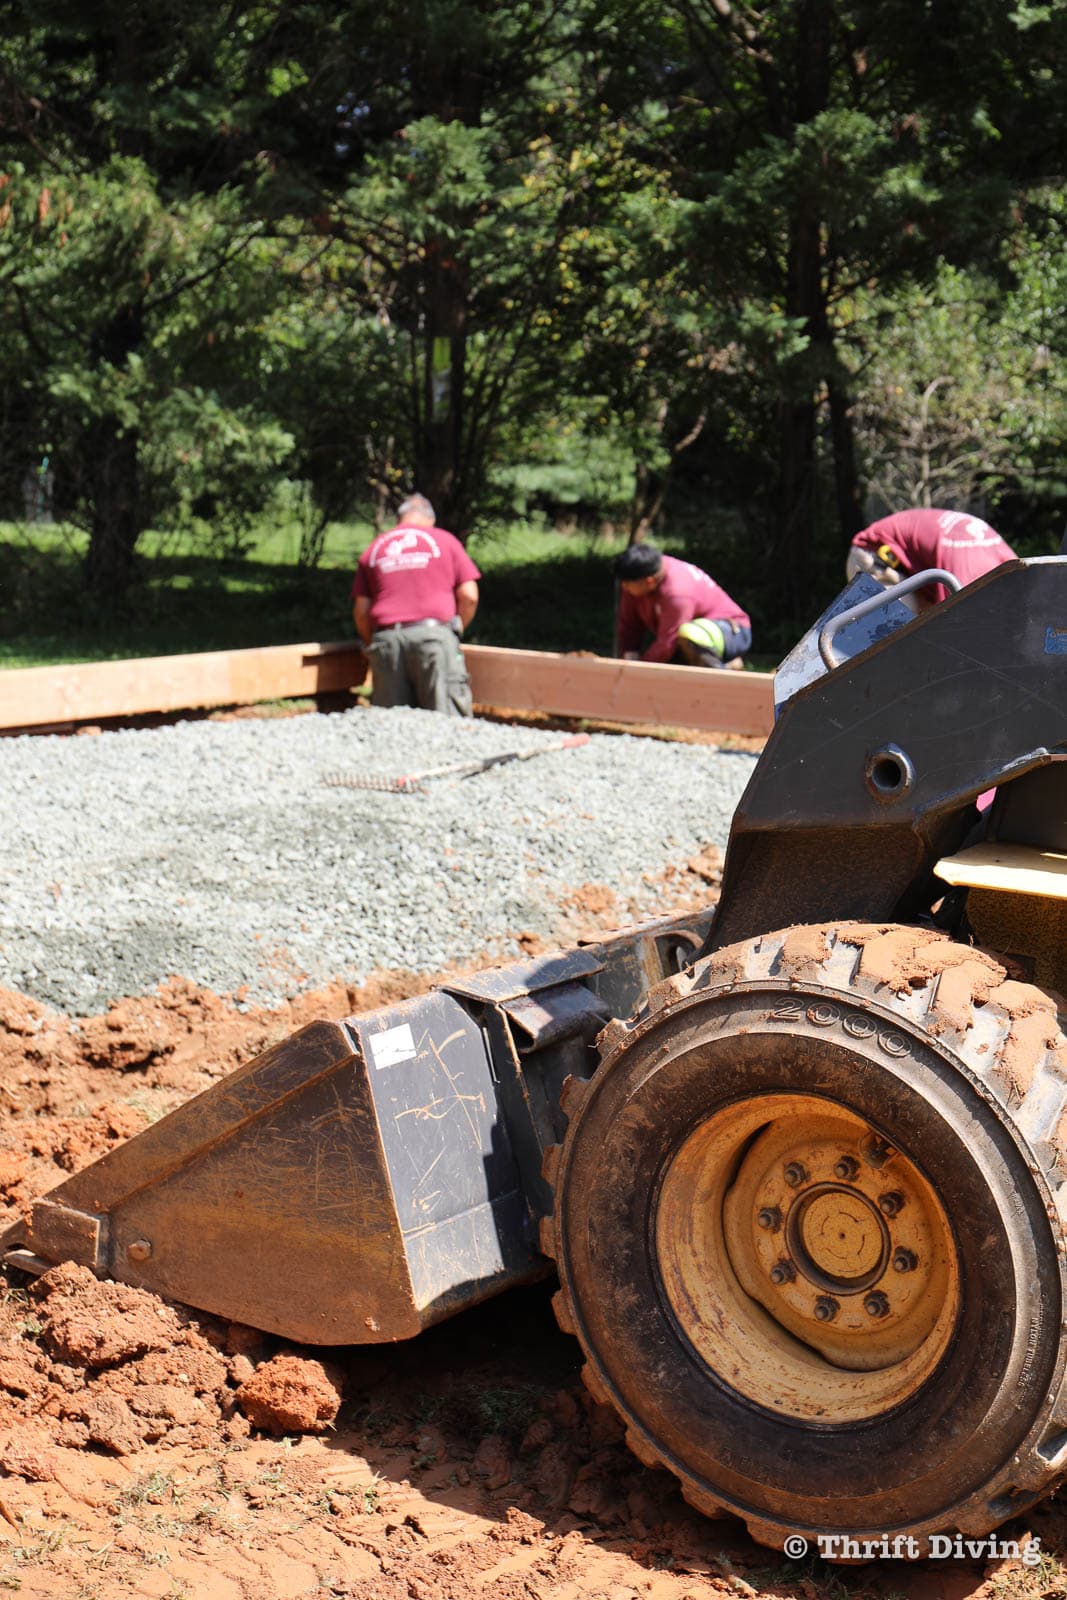
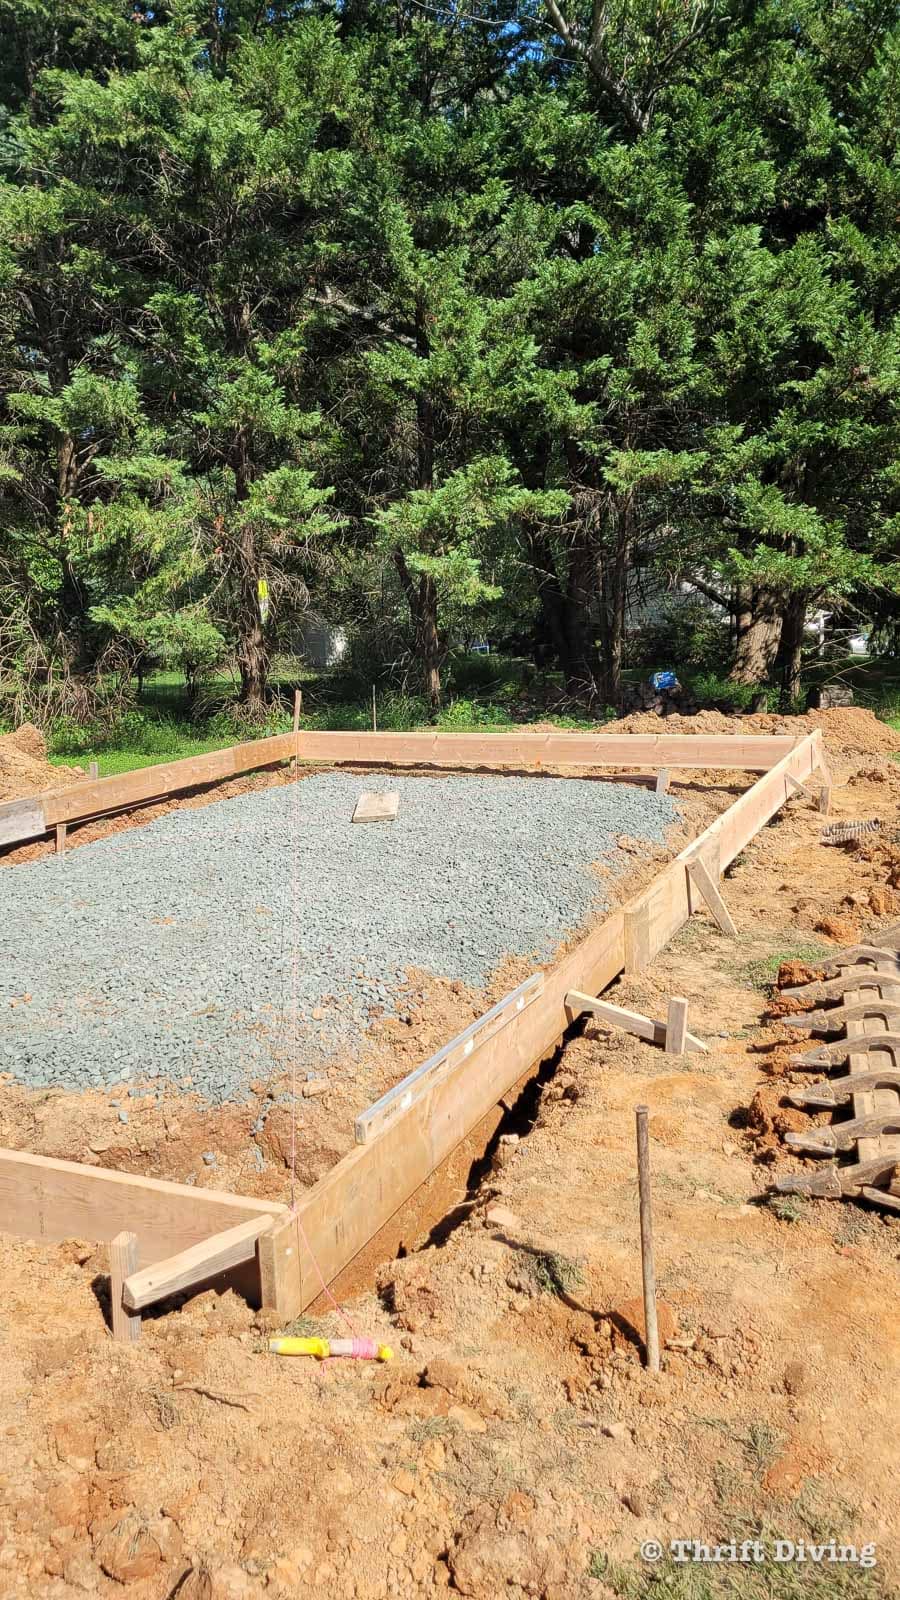
Adding Gravel
After the forms were in place, big truckloads of gravel were brought in to place evenly around the center island of the “she shed” foundation area.
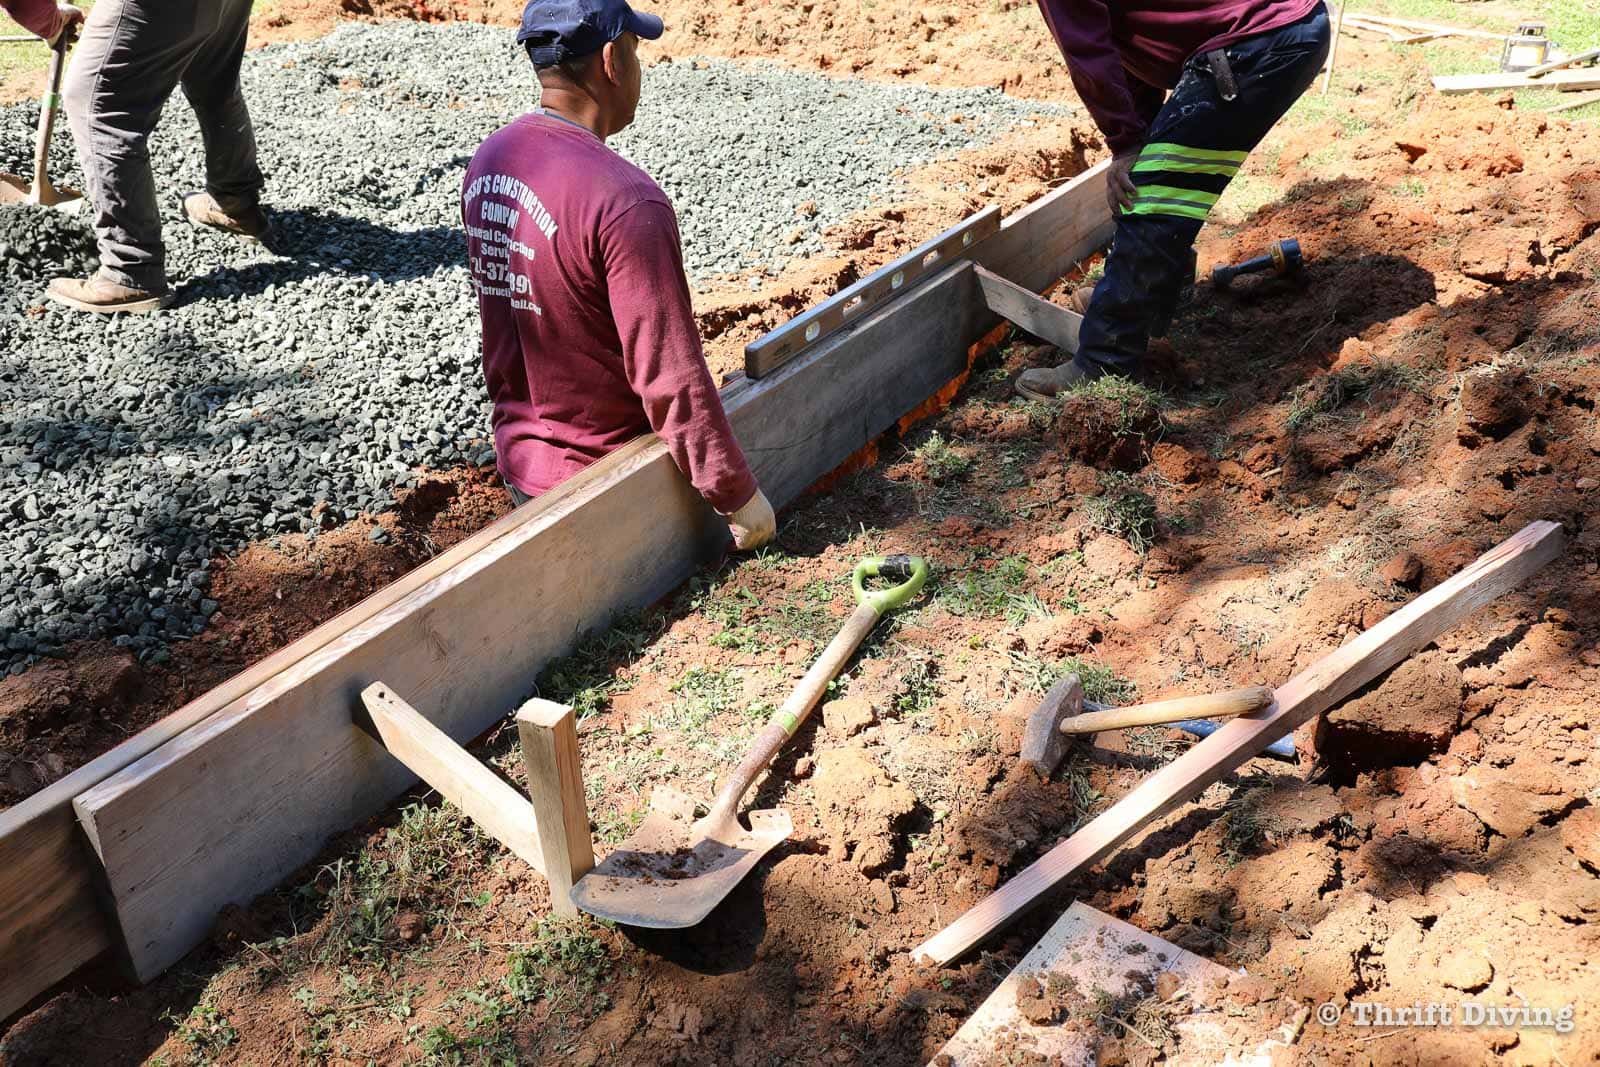
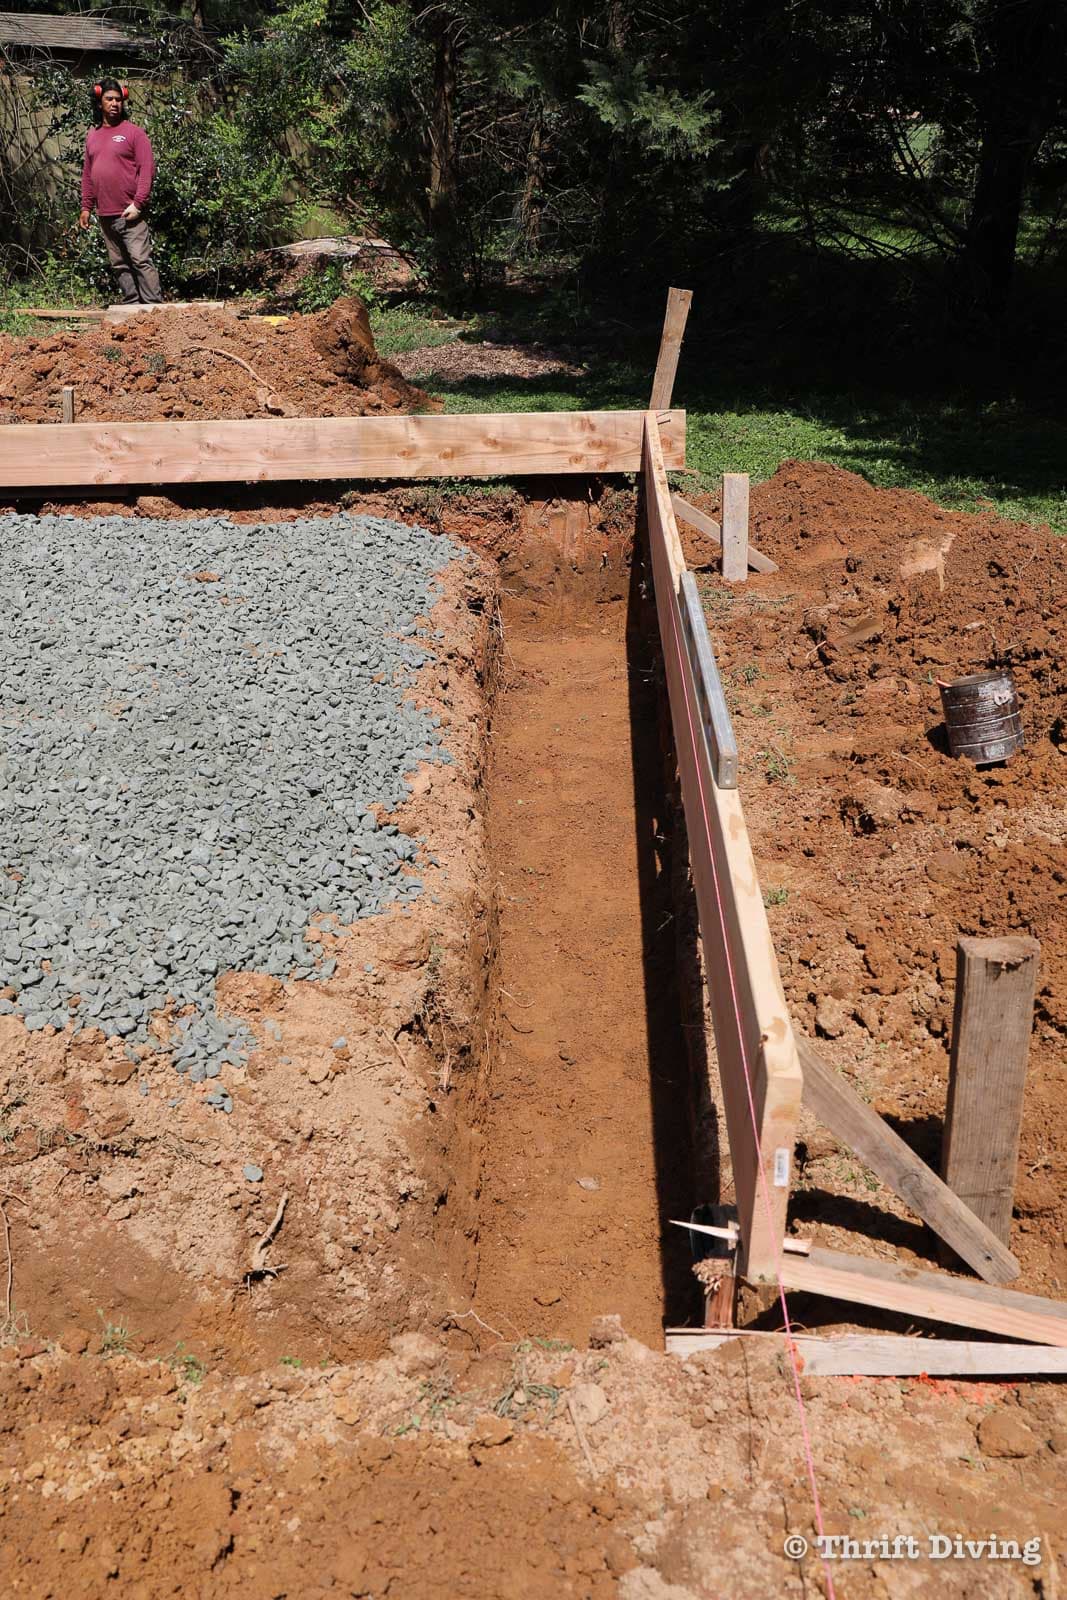
String was tied from corner to corner to ensure that everything was straight, level, and plumb.

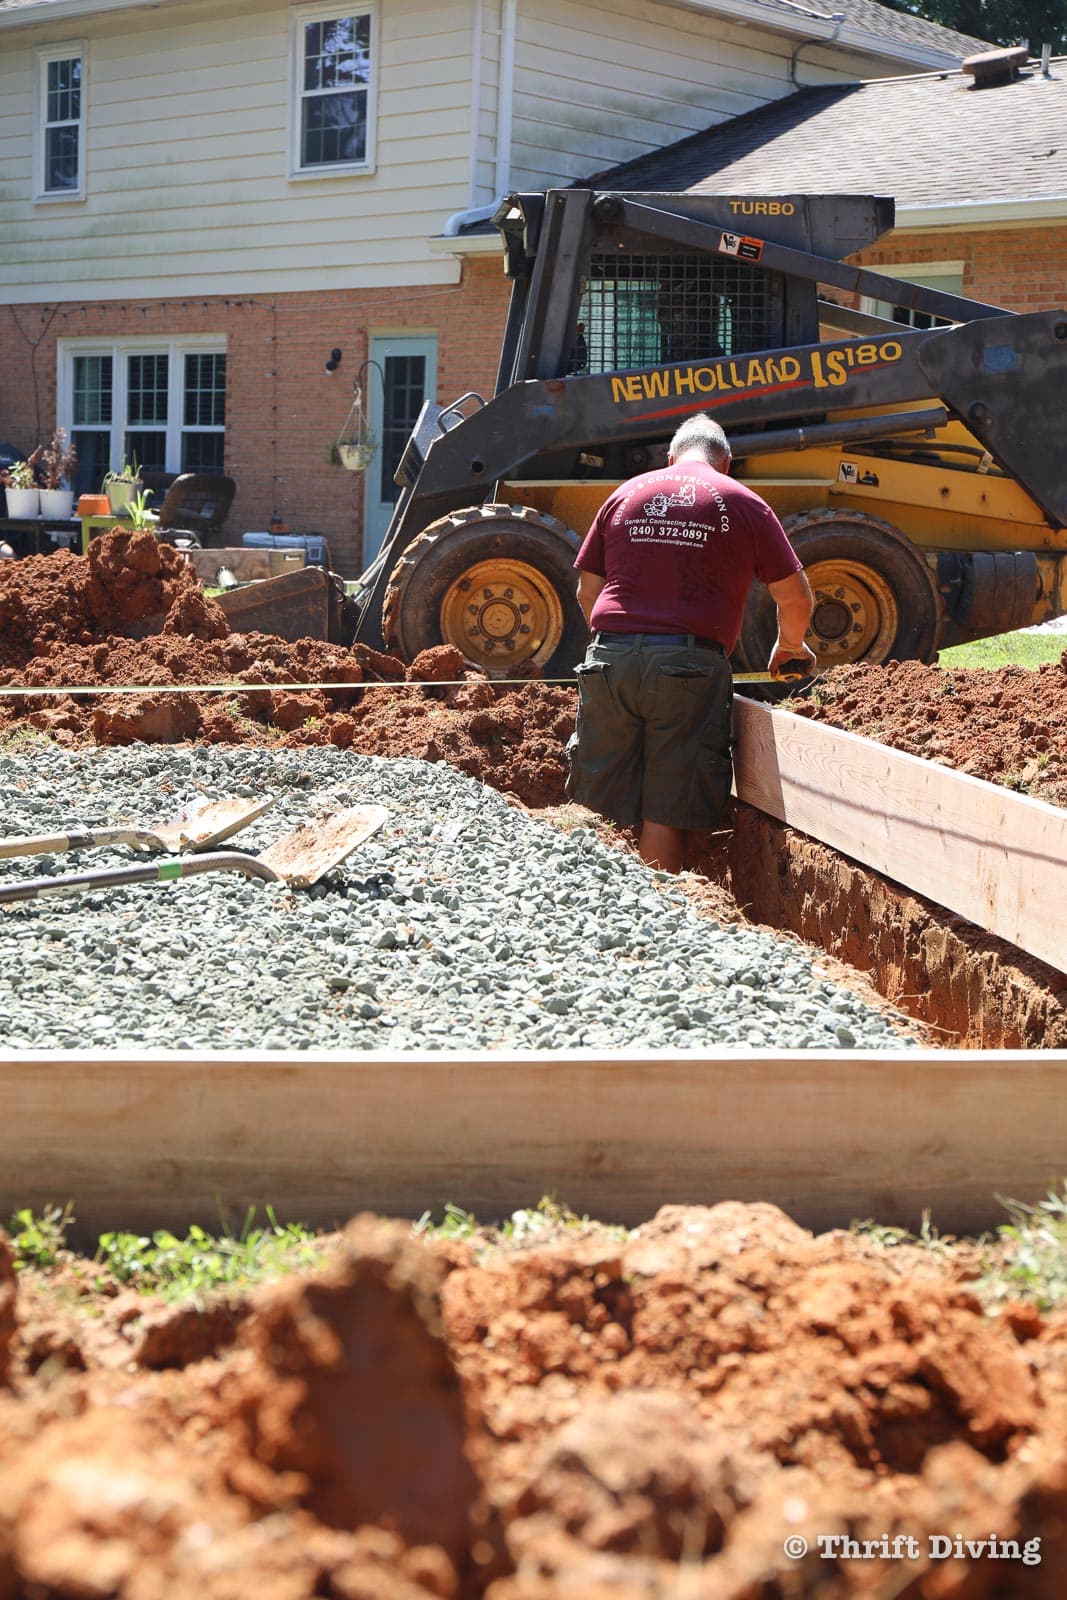
End of Day #1
By the time the guys left on Day #1, everything had been dug out, the forms were created, and I was getting even more excited to see this area taking shape!
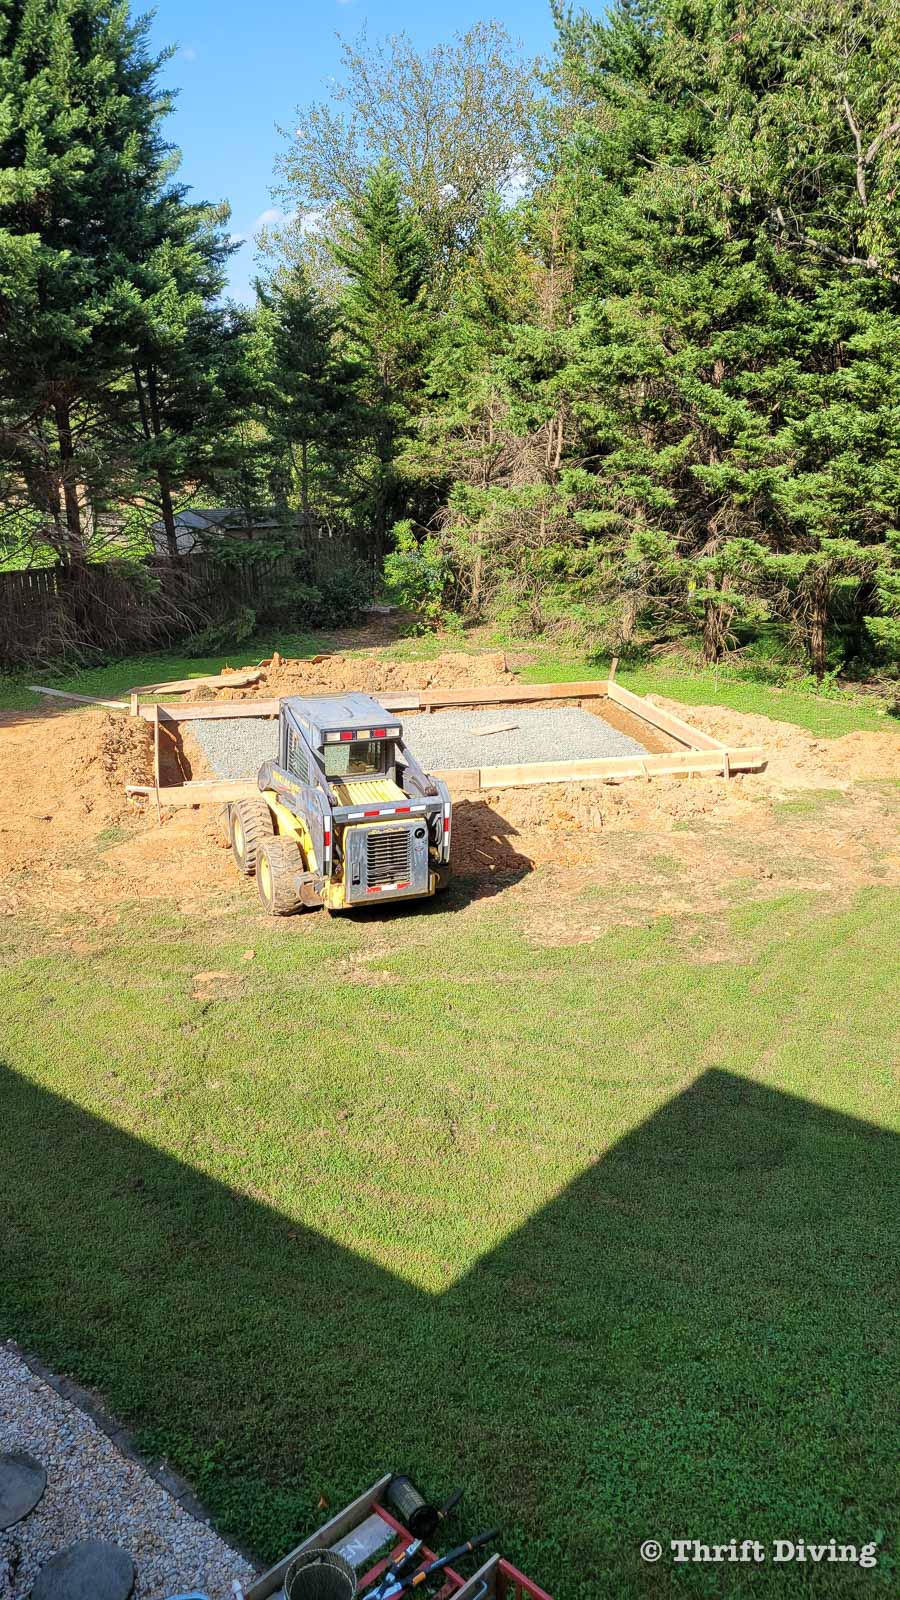
The next morning, the inspector came out to put is stamp of approval on the depth of footers, the structure of the forms, and of course, to make sure the concrete pad was no more than 15′ close to my property line.
After they’d gone home, I snapped this picture from my son’s upper level bedroom. What first came to mind is, “It’s perfect.”
The location was perfect. (Yes, Serena, catty-corner was a great choice!).
The size was perfect. (No, Serena, it’s not going to be too big for the backyard).
I felt even more secure in my decisions, and couldn’t wake up the next day to see the actual concrete pour!

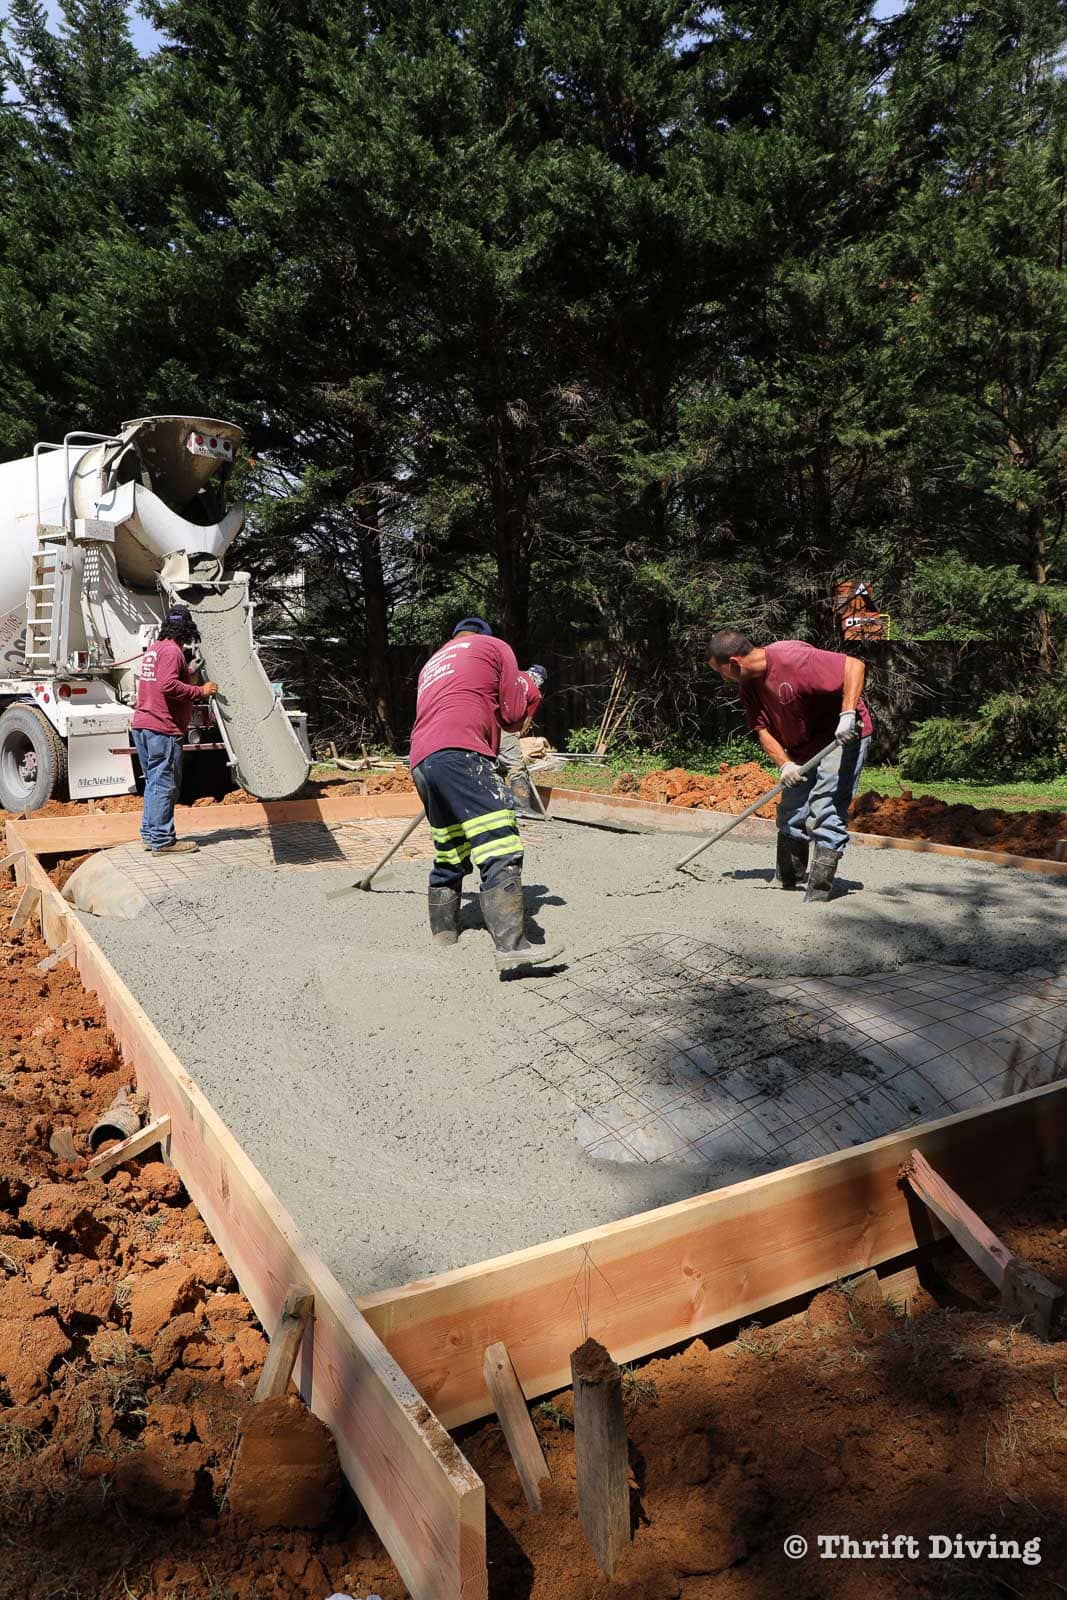
Day #2 – Pouring the Concrete
When the guys came back the following day, they came with a huge sheet of plastic to cover up the gravel. The plastic sheeting is a vapor barrier that prevents moisture from being released from the ground under the concrete. They also added some wire mesh, which gives the concrete strength, and a couple pieces of rebar in order to indicate how high the concrete should be.

Next, the concrete truck came with a load of concrete. It was unnerving to see such a huge vehicle in your backyard, tearing up your lawn, leaving huge imprints of their tires sinking into the earth.
But I was also very excited because we were one step closer to being done!

Once the concrete started to flow, the guys burst into action and started raking it evenly across the wire mesh, pushing it into the earth.
With concrete, time is of the essence. This stuff sets so quickly, so you really need a team of people that can disperse the concrete evenly and timely. They were literally boot-deep in the stuff!
One truck-load wasn’t enough. The truck left to get 9 more yards and they used 8 yards of it. And after each truck load, the concrete driver had to spend 15 minutes hosing everything down (otherwise the concrete would dry on the chute and destroy it!).
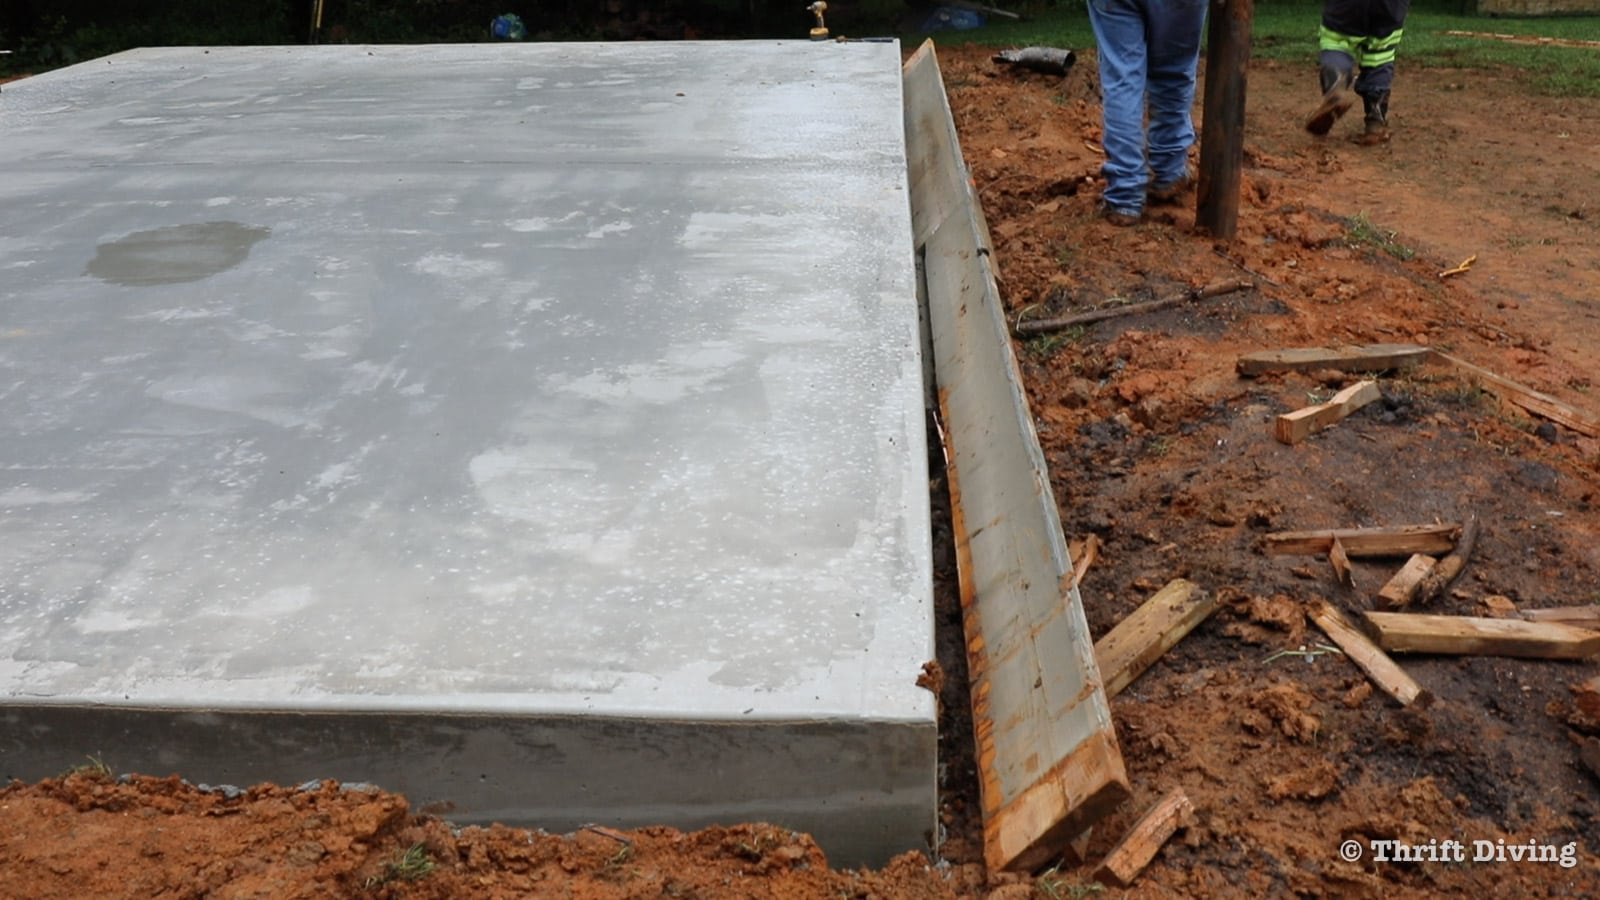
DAY #3 – Removing the Concrete Forms
The following day, once the concrete had cured a lot, the guys came back to remove the wooden forms and stakes. You’ll notice that the concrete is pretty thick. It is higher than ground level to prevent water from collecting next to it.
The yard was an absolute mess due to the rains that night! It left thick mud that cakes your boots when walking through it.
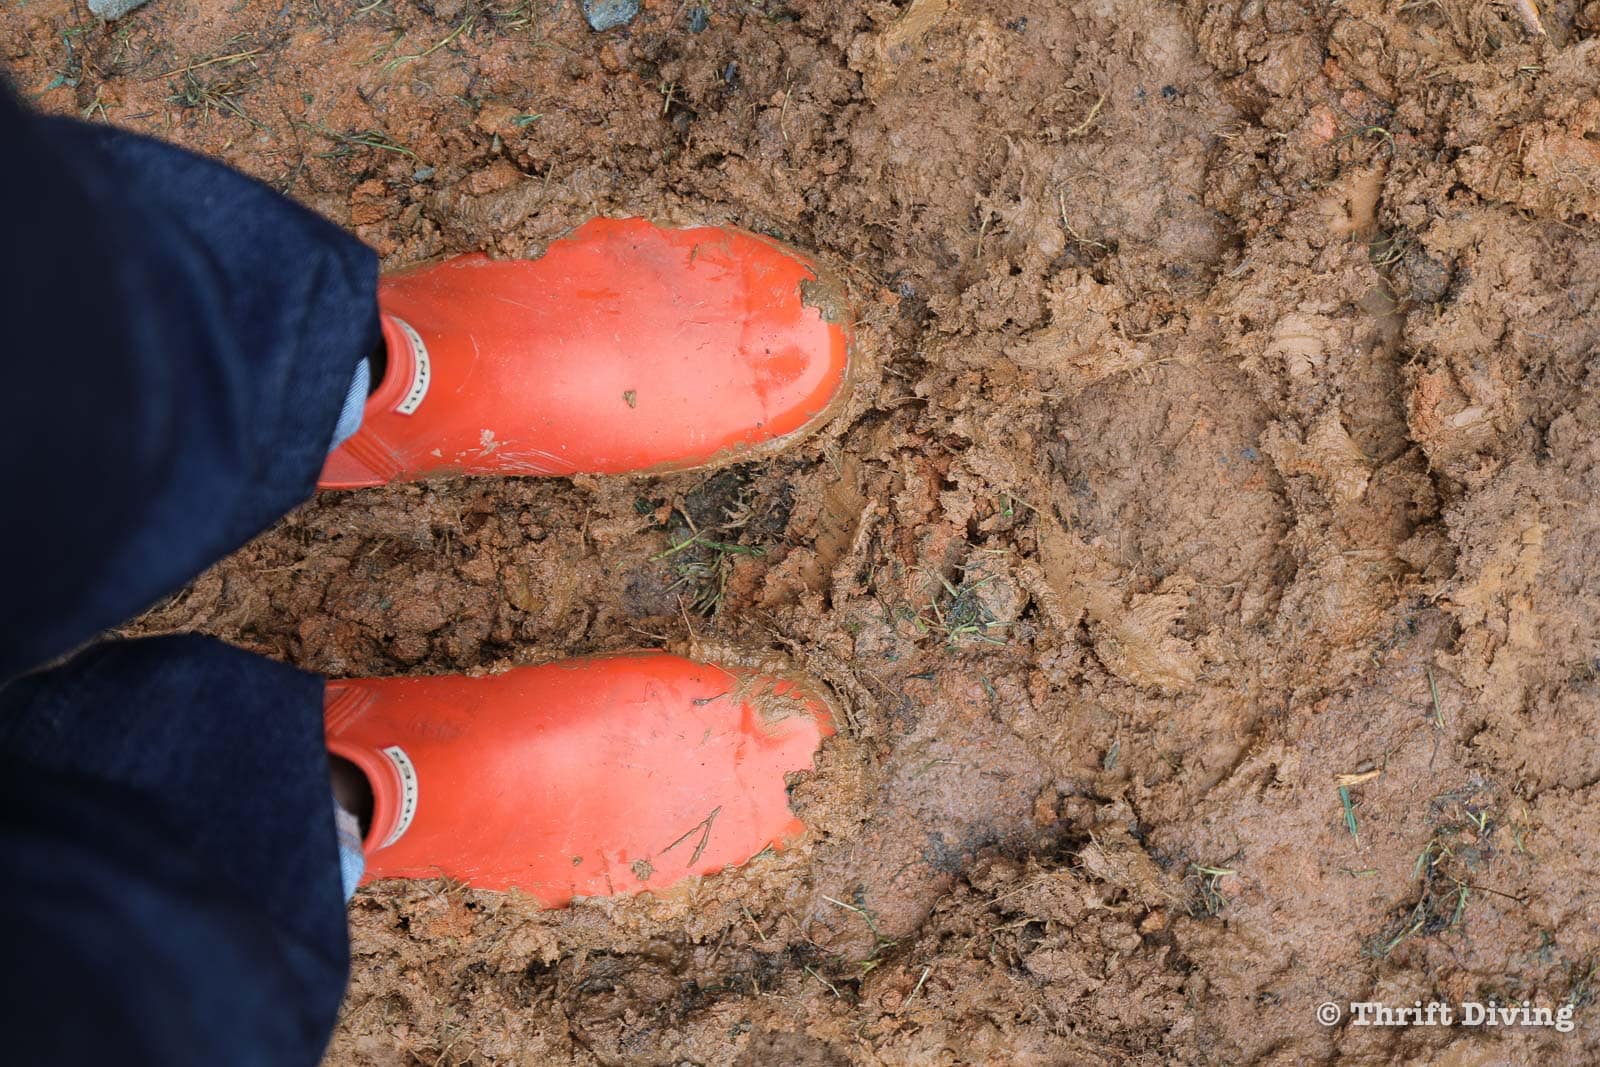
There was no way they could re-seed the lawn in mud. 🙂 They were going to have to come back later.
Day #4 – Re-grading Around the Concrete Pad
On Day #4 they came back after the mud had dried up a bit to regrade around the concrete pad. You’ll notice that the ground slopes down and away from the shed, which is exactly what it should do. Having water pool under your “she shed” is a huge no-no! That’s why gravel works so well, because it drains away, away from the floor joists. But this concrete was actually crowned in the center so that water is supposed to roll away.
Can you see my excitement?? 🙂
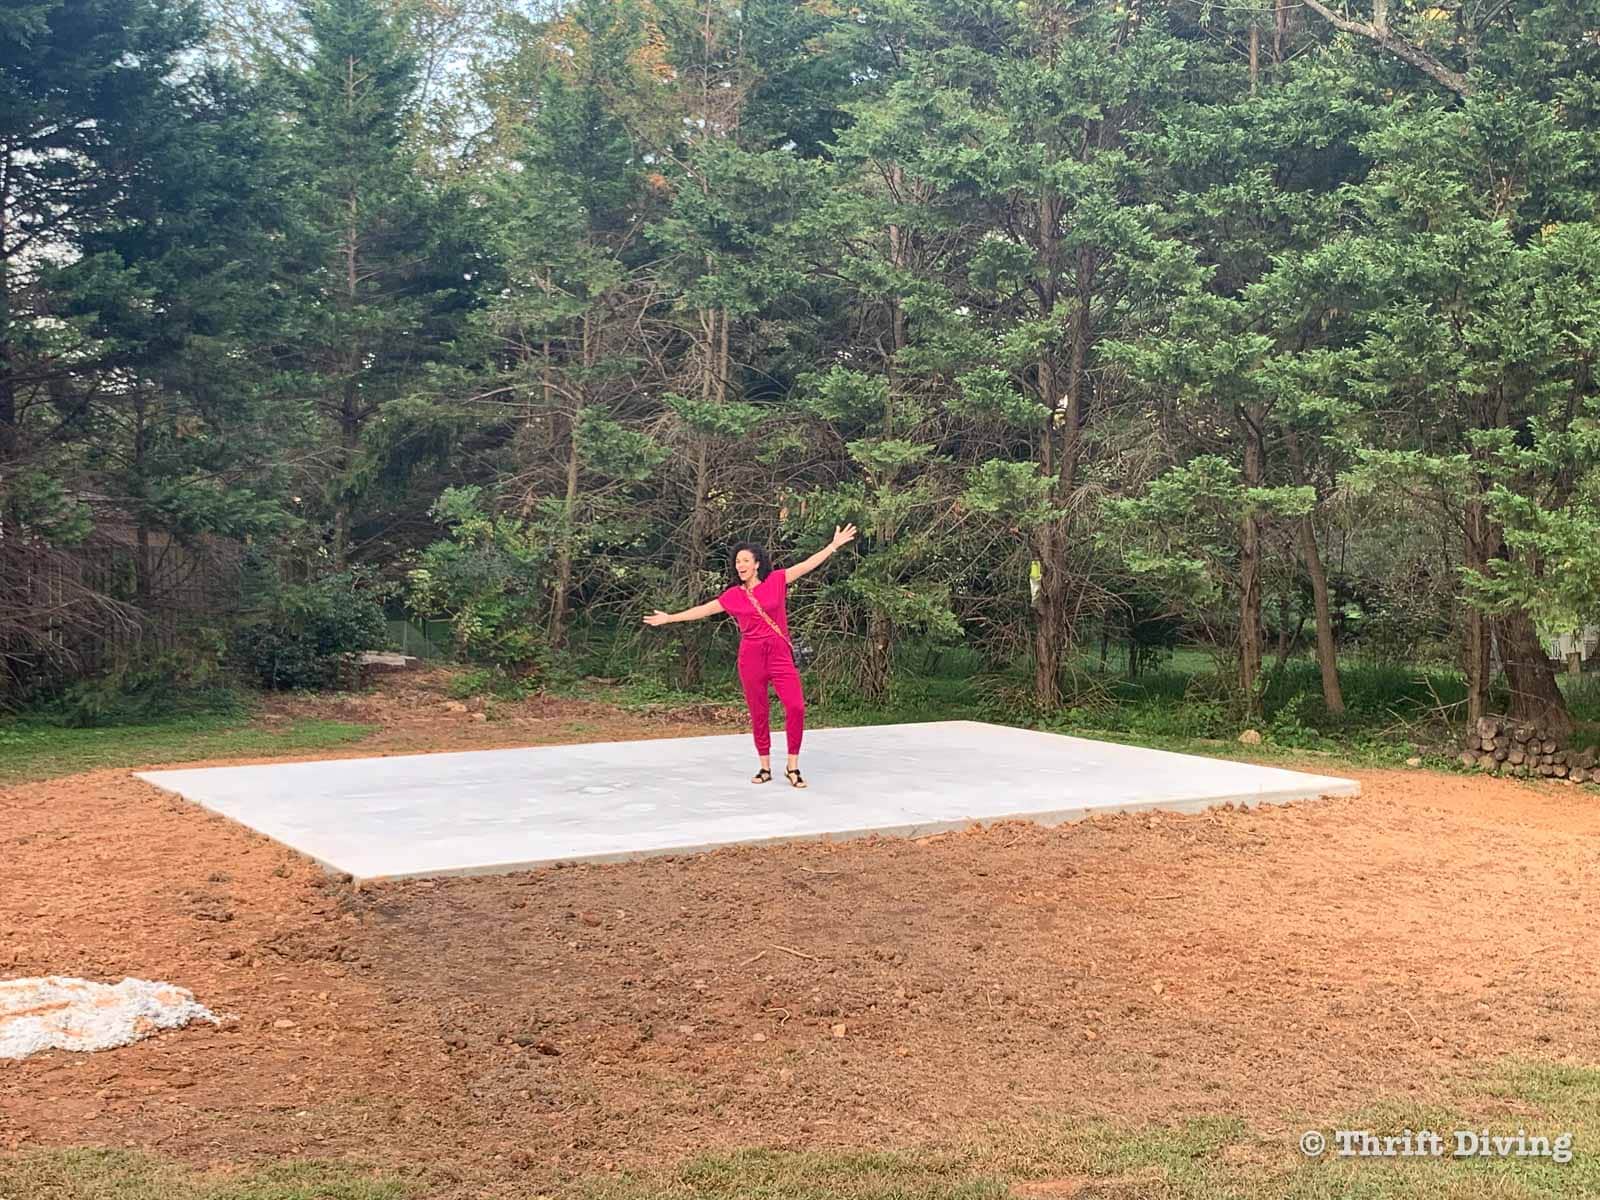
As I walked around the concrete pad, I started imagining what will be place where.
Will there be a huge 4′ x 8′ workbench in the middle?
Where will my track saw be located?
My desk with my computer?
Who will help with installing the many sheets of drywall that will need to be installed?
What kind of flooring do I want?
And doggonit, where will my half-bathroom go? 🙂 Because I’m determined to bring plumbing to this baby!

How Much Did the Concrete Pad Cost?
I’m not going to lie–concrete it expensive. For me to get this concrete pad, the cost was $12,700. While it was costly, the other estimates I had received were about $13,700, and $15,000. So $12,700 was a steal, in the concrete-world of things.
And as I mentioned above, I could have gone the cheaper route, going with gravel and 6x6s. But I do believe that in my county, if your shed is going to be consider “inhabitable space,” then it must have a concrete foundation.
Yeah, I could have fibbed and said it would only be used a shed, but all they’d have to do is open my channel or blog and see that clearly, it’s a workshop! LOL. The last thing I want is to do things on the “DL” (down low) and cause problems later. Just do it right the first time and save yourself a headache later.

FAQ
Here are the most common questions I get about getting a “she shed” in the backyard.
Why do they call it a “she shed”?
Do you remember that State Farm commercial years ago where Cheryl’s “she shed” went up in flames? I think that’s when the term really started to gain popularity! LOL. You can watch that commercial HERE on YouTube. Basically, it’s the same thing as a “man cave” only this is a “shed” specifically for the women!
Do you need a permit to get a shed?
This really depends on your county. My county of Montgomery County, Maryland, is very strict. Every shed needs a permit, no matter the size. However, sheds under 200 square feet have different requirements than sheds over 200 sq ft. Since mine was over 200 sq ft, it needed additional drawings that Tuff Shed had to supply. They didn’t have any of those drawings, so they had to go back to the drawing board with their team and produce them. It held up the process by over a month.
How do you keep it hot in the winter and cool in the summer?
I upgraded my shed with some materials that Tuff Shed offers that would be a radiant barrier, to help reflect the sun’s rays. But if you plan to use a shed year-round, you’ll need to add insulation. A contractor told me he would recommend doing spray foam, because it will work best. But I know that most people use regular batting insulation and then cover up the insulated walls with drywall (or whatever material you’re using for the walls).
I also plan to add electricity to the shed with a mini split. A mini split is a heating and cooling unit that has its own unit sitting behind the shed, and then the indoor unit is mounted high up on the wall. I think they cost about $1,000 – $1,500, depending on the model you get. The electrician can install it for you.
Where can you buy a she shed?
The Home Depot and Lowe’s are were a lot of people order simple sheds from, about 10′ x 12′. But if you want to go larger, you’ll have to go to some place like Tuff Shed (order directly from them), or find another dealer online. Look for local dealers, because they often can be cheaper. I went with Tuff Shed because they’re known for quality and I liked that I could change the specs, like adding skylights, a workbench, and more.
How much does a she shed cost?
That depends on the brand and what sort of extras you choose for the shed! I’ll tell you that my she shed will cost about $20,000 when all is said and done. But that’s a 16′ x 26′ with 4 skylights, 6 windows, updated house wrapping, shutters, flower boxes, etc. And as I mentioned, if you find a company locally that builds them (e.g. Amish sheds), you can often get them cheaper than a bigger company like Tuff Shed. But I ordered mine from Tuff Shed just because I liked what I saw on their site, have seen them at The Home Depot parking lot on display, and they looked like good quality sheds that will last for years to come.
Can you live in a she shed?
Sure, why not?! The only thing you have to make sure of is that with your permitting requirements, if a shed is considering living space, it likely changes the requirements. When I got my shed, I was told by contractors to call it a “shed.” Don’t call it a tiny home. Don’t call it a workshop. Just call it a shed. Once you start putting different labels on it, it changes the permit and becomes more difficult. Of course, you want to be honest. But you also don’t want to create any unnecessary headaches for yourself. And if after you get the shed, you decide you want to live in it, well, then that’s your business. 🙂
What’s Coming Next!
The main general manager of sales or marketing is supposed to contact me about doing a site visit with the contractor who will be assembling the shed. Once they come next week, the shed install date will be scheduled. You can not begin to understand how excited I am about this!
Be sure to follow this series so you don’t miss one step of the process, from installation, to finishing the inside, to blending in the shed to my existing yard with lots of garden beds and shrubs, etc.
Have you ever considered getting a “she shed” for your backyard? Tell me all about it below in the comments section!![]()
Click here to save this on post on Pinterest!

Download the 5 freebies!

Thrift Diving inspires women to decorate, improve, and maintain their home themselves...using paint, power tools, and thrift stores! Use these 5 printables, checklists, and ebooks to get started!


Serena, I am sooo excited for you! Dedicated space for making messes! I’m curious how plumbing is going to work. When I watched the pour for my in-laws house, the plumbing pipes (the initial starts/ends) were already in the soon-to-be poured pad. Half bath still means clean and grey water.
I’ve long considered building a she shed, but my backyard needs more room, and I’m not getting any younger!
I love your enthusiasm and joie de vivre; can’t wait to see what you create in the future!
You are right, Marie! The plumbing is best initiated in the concrete, as the electrical wiring could have been, too. But when I did the permitting, I hadn’t specified any of those things and to go back and get more approvals would have added more delays. So I decided to just do what I can after-the-fact. LOL So glad to hear from you!
Greetings Serena, I’ve been enjoying all your posts and this one with all the details is especially informative and inspiring!! Thank you for sharing! I’m also in Mont Co and have ideas to share with you about the 4×8 workbench you mentioned. Please email me!
Congratulations Serena! Cant wait to see videos from the she-shed! It will take your already great videos to another level!
You are so right, Brett! I actually am planning for one side of the shed to be JUST devoted to recording space! I am putting together a power tools course and it will serve as the location where I’ll be able to record everything. It will be so nice to have a dedicated space for it! 🙂 Thank you for following along!
Oh what a great post! We need to replace our old shed. Everything you put in your post is relevant. Base, ( concrete vs gravel,) permitting ( what to call it,) getting quotes. Size, how much concrete for size, cost, source, add ons, uses, business aspects.
I am sure your journey will be avidly followed by many of us.
Thanks again,
Your fan,
Caren
Thank you, Caren! I tried to put as much info as possible into this post so that people know what to expect! 🙂 Good luck on replacing your old shed. Hopefully you have the space to increase in size. 😉 I have learned you can never regret going bigger. LOL. Can’t wait to finish this and show you each step of the process! Thanks for following along. 🙂
Serena, I am so excited to see the shed started. I know you are gonna love it. I look forward to following you through this journey ❣️
Serena,
I’m so excited!!!! I so understand how you feel about your She Shed. It was the same way I felt about my sunroom. I can’t wait till it’s finished. When it’s all done, do you think we can do a Zoom video and a champagne toast? You within your She Shed and us from ours.
Oooh, what a great idea, Karen!! I have mentioned to my husband that I wanted to do a “shed warming” party! You just gave me a great idea to do one virtually via Zoom and we can all toast! Definitely! Okay, I’m totally serious. Let’s make it happen! Once the shed is here, I will try to be speedy about finishing off the inside, although I suspect it will take time. But the Zoom doesn’t have to wait for that. 🙂 Regarding your sunroom–YES!! Sunrooms are absolutely dreams, bright, sunny, and full of happiness. I have always wanted a sunroom. But since I couldn’t get that, the sunny shed was the next best thing. So I know how happy you must have been, too! Thanks, Karen!!!
I just want a small shed because I’m an avid gardner and want to get all my tools out of my garage so one day I might be able to park in there. So you have to be really excited with what you are doing!!
You should totally make it happen, Carla! You can get small ones for not very much money!
Serena, I am so excited for you and so enjoyed watching the video and reading about this awesome project. If I were younger and had the space and need for the shed, I imagine it would be such fun putting together a private, functional space all your own. Can’t wait to see the rest of it and how you will tweak it with your own special touches.
There seems to be nothing too challenging for you to conquer. You clearly dream big and your enthusiasm and excitement jumps off the page.
Awww, Patricia, thank you so much! What amazing feedback. 🙂 I love that you call it “dreaming big.” My husband calls it “you making life complicated.” HAHAHA. Sometimes we can’t help what ideas come into our mind. We have to go with the ones that most excite us. After all, isn’t this what life is about–being happy, excited, and having something to look forward to? Yes indeed! 🙂 Thank you, my friend! Can’t wait to keep you posted on how things come together!