How to Build a Walk-in Closet Organizer From Scratch!
This closet organizer build was sponsored in part by Arrow Fastener.
You might be wondering if it’s possible to build your own closet organizer from scratch. I’m here to tell you that it’s possible, and it’s not that hard. It’s intimidating, though, because it’s such a large item that you’ll use daily. So not only does it have to hold up and not crush under the weight of your clothes, but it’s got to look good, too. That’s what I’m going to walk you through in this blog post. Feel free to use the links below to jump around from section to section and to watch this project in action!
CONTENTS
Materials
Tools
STEP 1: Take Measurements
STEP 2: Paint the Walls
STEP 3: Find and Mark Studs
STEP 4: Design Your Closet Organizer
STEP 5: Make a Cut List
STEP 6: Choose Wood Finishing
STEP 7: Plan Your Layout
STEP 8: Start Cutting!
STEP 9: Pre-Finish Your Plywood
STEP 10: Glue up Boards
STEP 11: Add Edge Banding
STEP 12: Assemble the Closet Organizer
STEP 13: Attach Rest of Edge Banding
STEP 14: Install the Clothes Rod
Save on Pinterest

Yes, You Can Make a Closet Organizer, Too!
It’s hard to believe I finally built my own closet organizer from scratch! When I started this project, it was just an inkling in this lofty brain of mine. Most of the walls in our 1973 home had been scrubbed free of wallpaper, but our walk-in closet was the last remaining place where the 1970’s pattern stared us back in our faces each day when getting dressed.
I wanted to do something about it for so long, but I didn’t know I could make my own closet organizer. I worried that it would:
- Collapse under the weight of the clothes,
- Be outrageously expensive (how much wood would I need, anyhow?!)
- Fit poorly together and I’d feel like the ultimate DIY loser.
But one thing to know about me is that I don’t easily let “DIY project fear” scare me away from a project. Despite the nerves, I started this project exactly 1 year ago, removing the old hardware and tearing down the wallpaper, intent on building my own closet organizer. You can watch the wallpaper removal tutorial on my YouTube channel and below:
BEFORE
This is how our walk-in closet looked for years, with very little organization, wasted space between the shelving, and also one of the clothes rods was pulling away from the wall due to the weight of hubby’s clothes. Something needed to be done.

With everything moved out, it took me about 3-4 days to remove all of the wallpaper, repair and prep the walls with primer, and painting them a pretty shade of blue that I couldn’t tell if I’d like that color or not. Then I left for Brazil, not realizing that “life” would get in the way, preventing me from revisiting this project until the following year (raise your hand if you know all about “unfinished DIY projects”!).

AFTER!
I let nearly a year go by before I started working on this DIY closet organizer again. But in just about a month, off and on, look what I was able to create so far! This is only one side of the closet. The other side is yet to come, with build-in drawers, adjustable shelves, and more cubbies for shoes and folded clothes! I absolutely love how it turned out and feel like this will offer more organized space!!!

This was the original plan for how I wanted this small walk-in closet to look (it’s only about 5′ x 7.5′ in size). I’ve since made some adjustments, which you’ll get to see in the next post (so you should definitely SUBSCRIBE so you don’t miss the next post!).
So I hope that my example is motivation to let you know that yes, you can make a closet organizer, too! You just need to go through the process and that’s what we’re going to cover in this closet organizer tutorial!
Materials
There are a lot of tools and materials you’ll need for this project. I’ve tried to list many of them down below, including affiliate links. Before getting started, it’s a good idea to jot them all down and buy what you think you’ll need. Keep receipts and return items that you later find that you didn’t need. Be sure to buy an extra 10% of wood, too. You can always return what you don’t need.
- 3/4″ maple plywood (About 7 sheets).
- Cabinet screws for securing organizers to the brackets and studs.
- Kreg 1-1/4″ course thread pocket screws for plywood
- Maple pocket hole plugs
- 3/4″ maple edge banding (how many feet needed will depend on your organizer’s size).
- 2″ maple edge banding (for double partitions)
- Wood glue
- Pre-conditioner
- Wood stain or paint.
- Water-based top coat
- Chrome closet rod
- Closet rod hardware
- Safety gear: gloves, eye protection, hearing protection.
- Rags
- Brushes
- Decorative trim
- Wooden shims (optional)
![]()
Tools
- Arrow Fastener PT18G Brad Nailer with 1″ brad nails
- Circular saw, table saw, or track saw
- Edge guide for straight cuts
- Kreg Pocket Screw system (K4 or K5)
- Power drill
- Drill that can fit small spaces
- Clothing iron (for applying edge banding)
- Clamps
- Tape measure
- Laser distance measurer
- Impact driver
- Level
Lugging the Wood Home and Storing
Just a quick note about lugging home the plywood for your DIY closet organizer. Ask the home improvement store to cut the 4′ x 8′ sheets in half for you. This makes it easier to slide in the back of a minivan or truck. Plus, closet organizers usually aren’t very deep. So the 24″ width of the cut sheets will be wide enough for your closet organizer (mine closet organizer is only 21″ deep, by the way).
Store the plywood flat in a dry place, away from rain or moisture. I kept mine in the garage with a dehumidifier.
STEP 1: Take Measurements
Any project where you’re building a structure inside of another structure (such as this DIY closet organizer from scratch in a walk-in closet), you’ve got to know the dimensions of that space. Common sense, right?
When taking measurements, be sure to take measurements from exactly the location where the closet organizer will be installed. If you’ve got baseboards but plan to remove them, take the measurement from the wall, not the baseboard.
Measure your ceiling, too. Most ceilings are either 8′ or 9′ but you might very well have 10′ ceilings. Measure all corner heights of your closet and note the heights. It’s not uncommon to have the ceiling heights be off by as much as 1/2″ from corner to corner. This means you may have to use wooden shims to level out your closet organizer.
Remove the Baseboards and Old Organizers
You can also remove any baseboards before you take the measurement. Or, add the thickness of the baseboard to your measurement for a final accurate measurement. This will ensure that when you’re planning your closet organizer, you’ll make sure it fits properly without annoying gaps.
If also helps to point out that you’ll want to remove all the previous closet organizer shelving and brackets at this point, too, so that the closet is empty. Use a hammer with a pry bar, being careful not to damage the drywall.

STEP 2: Paint the Walls
I often wonder if it’s worth re-painting the walls of a closet, especially since the clothes and closet organizer will cover much of it up. But in my case, I had a bunch of nasty wallpaper that I wanted to remove first. Once that was removed, the walls needed new paint. But you’re free to leave your old paint or wallpaper and just re-decorate the exposed wall areas to save on paint or replacement wallpaper. If you’re not sure what colors look good together, check out this post on picking awesome paint color combos.
STEP 3: Find and Mark Your Studs
A project such as this requires studs. Other piddly-little projects around the home, you might be able to get away with no stud support. But heavy closet organizers such as this, you must secure them to studs.
Use a pencil to mark their locations using a stud finder. Go slowly over the entire area, to find the end locations of the studs (which are typically 16″ apart, on center). Place an “X” in the center of the location of the stud.
Use a tape measure to measure the distance of those studs from the adjacent wall/corner. If the wardrobe covers up your stud “X” marks, you’ll have no way of knowing where they’re located. When you install your closet wardrobe, use those measurements to locate where the stud anchors will go, but be sure to subtract any thickness of plywood from that measurement, if necessary. More on this in a moment. 🙂
Lastly, be sure to check the level of your floor. You may need to use wood shims under your closet organizer to help level it out when it’s build and in place, prior to installing it to the studs.
STEP 4: Design Your Closet Organizer
Start thinking about how you want to design this organizer. Some questions to ask yourself as you jot down ideas:

- Will you keep the same layout or change it up?
- Will you use plywood which is more expensive, or a melamine which is less expensive?
- What are the problems you have with your closet?
- Where do you need more space in your closet?
- What can you build that will offer more organization?
- Do you want to include cubbies or drawers? How many?
- What are the new features you want that you don’t currently have?
It’s also important to take note of what you have in your wardrobe. For example, if you have a lot of long dresses, you’ll want to design a section of your closet organizer that allows enough space for the dresses to hang. You might also store your travel suitcase in the closet. Where will be stored once everything is built? Do you have a lot of tall boots that need a high shelf? Go through your items and get an idea of what items will need space so that you know what your closet organizer needs will be.
How to Create a “Mock Up” of Your Closet Organizer
There are several options for creating a mock-up of your closet. Before we jump into that, let’s cover a few rules I have found when designing a closet organizer.
Standard Measurements for a Closet Organizer
- The average reach-in closet is 24″ deep. (Mine as a built-in is about 21″ deep because of how the walk-in closet is designed and seems to work fine).
- For a single closet rod organizer, install the rod 66″ above the floor.
- For a double closet rod organizer (like mine), install the top rod around 81″ and the bottom rod around 40″.
- Install the closet rod at least 12″ from the rear wall.
- Shelves should only span an average of 36″ (less if you’re using MDF). Sagging shelving is a real problem if your shelf is too long without support. Check out this sagging shelving resource for more information and use this calculator (The Sagulator) to tell if the amount of sag in your closet organizer shelf is acceptable while designing your space.
- Adjustable shelves should be no more than 30″ – 32″ to prevent sagging. That more weight it will hold, the shorter it should be.
- Shoes will need about 7″ of height space and 8″ width space for women and 9″ of width space. Extra height is needed for tall boots.
- Drawers can be up to 30″ wide and 14″ deep (although I think you may be able to go a little wider).
- Closet shelving is an average of 14″ deep and either 18″ or 24″ wide.
- Folder clothes shelves should be 10″ – 12″.
- Shelves for flat shoes should be 12″ deep.
- Shelves for folded clothes can be 24″ – 26″ wide for 2 stacks of clothing.
Paper & Pencil
While it’s not high-tech, it is a great way to get the juices flowing about what you envision your closet organizer to look like! For this step, though, it doesn’t need to be to scale. Just start getting your ideals out. Later, though, if you stick with paper and pencil, you’ll definitely want to use graph paper so that you can draw your closet to scale, so you’ll get a true idea of where things will be.
When I got started drafting plans, I used my Samsung Notes app to create this rough sketch on my phone!

Draw on a Real Picture
Another great option in the early planning period is to draw onto a picture of your space, to draft ideas. I decided that behind the closet door there would be shelving to accommodate my suitcase, shoes, along with a structure in front of the window. It wasn’t perfect, by any means. But it started me moving in the right direction!

Homestylr
This is a site I have used for helping me to design a space visually, for free. It uses your actual rooms dimensions and allows you to choose from furniture from name brands in order visualize what your space would look like with those items in it. Use your closet’s dimensions and then choose materials that might be what you want. You can watch this tutorial I put together on using Homestylr.
SketchUp
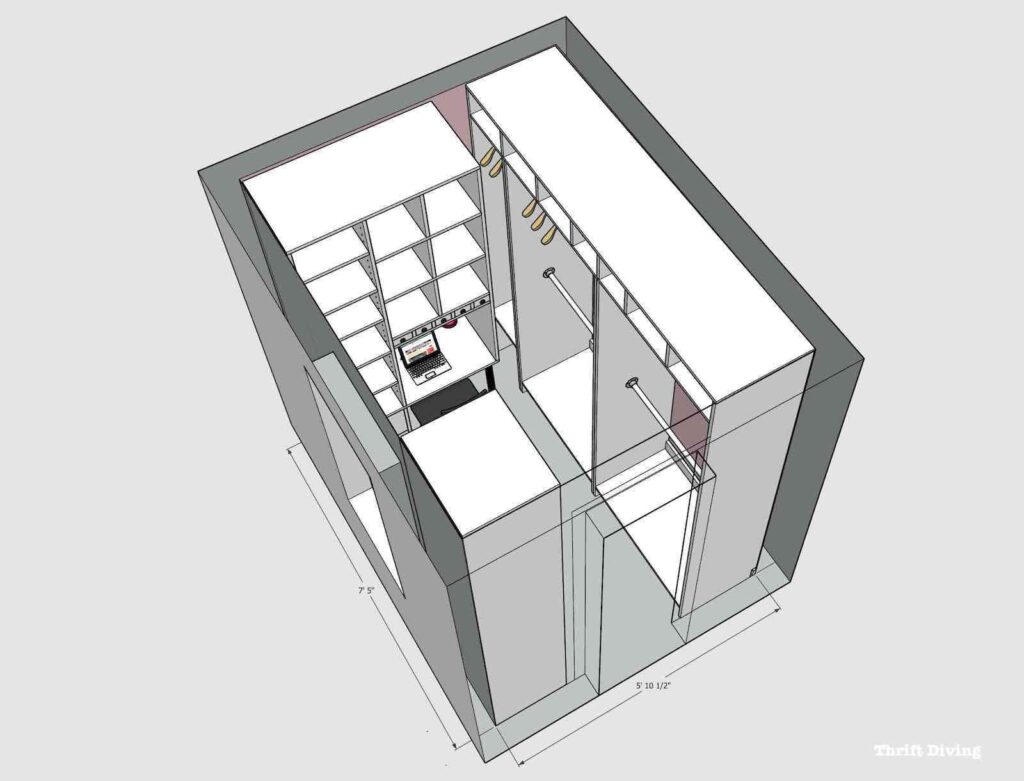
SketchUp is a free (and a Pro) 3-D modeling program to design furniture, architecture, and more. I have to admit that SketchUp is difficult to use if you have never taken a training on it. But if you set aside a little time to learn, the things you can create are amazing. I did a SketchUp training program on LinkedIn Learning. After I finished the training, I was able to easily create this in SketchUp.
The best part is that if you design it correctly in SketchUp, you’ll have all the dimensions and pieces needed to begin your DIY closet organizer from scratch! And when you need to make adjustments, you can easily do so right in the program. I highly, highly recommend learning how to use SketchUp.

Design Tips to Keep in Mind When Designing a Closet Organizer
Here are some critical questions I had to keep in mind when designing walk-in closet ideas:
- How will your corners meet? If your closet organizer is close to the other wall, make sure you’ve got at least 9″ of space between the edge of one organizer to another. This top view of my closet organizer design has enough space to pull out the long dresses that will be stored towards the wall. Be sure to plan how your build-in closet will meet at the corners and that you’ll have enough space to remove hangers.

- Do you have a place to install a full-length mirror? Some closet organizers have these really cool pull-out mirrors that are very cool! Where can you install a full-length mirror on or around your closet organizer?
- How will it be secured to the studs? I mentioned in a previous step to mark the studs. But you’ll have to think about how the organizer will be secured to the studs so that it doesn’t sag or collapse over time. We’ll talk about how to do this when you see me build mine! Keep this in mind, though.
- Will you have to build it in sections? My closet organizer was built within the small walk-in closet because there was no space to build it elsewhere or to even fit it through the doorway. If you’re tight on space, think about how you’ll maneuver the pieces into place or how you’ll build it piece-by-piece within the small closet.
- What color will you stain or paint it? Before you get started, make a small sample board with your sample stains or paints. Knowing what colors you’ll use may play a role in how you design your closet organizer.
STEP 5: Make a Cut List
Making a cut list helps you to estimate how much wood you’ll need and the best layout for getting the most cuts in a sheet of plywood. Some people find it helpful to just draft it on paper. But if it’s not to scale, it doesn’t tell you exactly how those pieces will fit. It does, however, give you a general idea. Here’s an example of one I created early on in the project:

SketchUp has a cool add-on feature called Cut List that allows you to figure this out, but I’ll be honest with you: it takes more training to learn how to do this properly. Instead, within SketchUp, I created a 4’x8′ rectangle for my plywood and then moved my pieces onto the “plywood” to see how much I would need and how many pieces I would be able to cut from it. Here’s an example of the two side pieces of the closet organizer, along with its dimensions, pocket hole locations, and dados (dados are joints in the wood where another piece of wood slides into it, creating a strong joint. It’s created with a router).

Going through this process of planning for the pieces needed allows you to buy the right amount of plywood, plus 10% extra for waste and mistakes. In my case, I needed about 7 pieces of maple plywood to create this closet organizer.
STEP 6: Choose Your Wood Finishing
Imagine finishing your closet organizer build and then staining or painting it. Imagine having to dig your hand deep into those cubbies. I bet you’d miss a spot or two. It would be torture! 🙂
Knowing what finish you want on the wood allows you to pre-plan what pieces to stain or paint before you assemble them.
Also, in woodworking, you typically leave the joints paint- and stain-free so that when you wood glue the joints, the glue can effectively do its job. Paint and stain prevent the wood glue from holding. In my case, I pre-finished my boards and forgot that I should have left a few spots free of top-coat. As a result, I used a glue called Roo Glue, which works well on melamine boards, in hopes that it will stick well to the pre-finished areas that needed glued.

Environmentally-Friendly Wood Stains Options
I’ve used many brands of wood stains over the years, but the older (and more wise) I get, I realize that we should be using as many environmentally-friendly products as possible. Regular stains release VOCs (volatile organize compounds) into the air loooonggg after we’re done with them. That means we’re contributing to our indoor air pollution when we use traditional stains.
When building your closet organizer, think about environmentally-friendly stains, pre-conditioners, and water-based top-coats.
Choosing to Paint Your Closet Organizer?
Paint is a great option, too. Just make sure that you add 1-2 coats of primer and 1-2 coats of latex paint. It’s up to you whether you want a flat, satin, semi-gloss, or gloss paint. But make sure you choose something that is a good quality paint that won’t chip or peel through the years of wear and tear.
STEP 7: Walk Through the Layout
There is truth in the old saying: Measure twice, cut once. The same is true for this DIY closet organizer from scratch. My first step after drafting a sketch was to run through the steps in my head, imagining how the joints come together and how it will be secured. It might make sense to build it in sections, what which section to build first? Start from the left or right side? If you build one section first, will you easily be able to join the back?
All of these questions are answered when you run through the layout in your mind first, then jotting the steps down on paper. Once you’ve got a good grasp on those steps, you can start with cutting!

STEP 8: Start Cutting!
This is the exciting part! I have to admit that it’s also the scary part, too. I was so afraid I was going to make a mistake. 🙂 Let’s walk through each of the steps to cutting.
STEP A: Trim the Side Pieces and Partitions
Here were my dimensions for the side and interior support partitions:
- Left and right panels height = (7 ft. 11-1/2″) x 21″
- Interior support panels – (6 ft. 9-3/8″) x 21″
- Total width of closet organizer = 7 ft 4-1/2″ x 21″
I used a homemade circular saw guide to help me get straight cuts. A bit of double-sided tape on the bottom helped it to stay in place while I cut. (This method didn’t work as well as I had hoped, so I later invested in a Festool track saw and a dust extractor, which was pretty pricey, but they’re top notch in breaking down sheets of plywood in furniture building while minimizing the dust!).
NOTE: Wear a dust mask (it gets messy!) and clean-up after every cut so you’re not slipping in the saw dust.

STEP B: Create the Dados
Once the long side pieces and center partitions have been cut, use an edge guide with a router to create 1/4″ deep dados along the cross grain at the appropriate locations. Although plywood is just shy of 3/4″ thick, generally a 3/4″ router bit is perfect* for creating dados.
This is also a great opportunity to do some practice dados on scrap boards before creating dados on your project pieces. Do practice pieces so you’ll know precisely were to place the edge guide in relation to your router bit.
Once you’ve figured out its perfect placement in relation to the edge build, cut a dados in the locations where there will be perpendicular boards that need support, like shelving pieces.
*NOTE: Plywood is actually 23/32 thick, which is a little shy of 3/4″. Using a 3/4″ router bit for the dados will allow a little bit of wiggle room, but with wood glue in the dado, it will still create a strong joint.

For this closet organizer, the upper long panels will have plenty of dados where the cubby dividers will slides into place. The panels will look similar to this (there will be 2 of them–UPPER top and BOTTOM of the cubbies). If you’re creating a closet organizer similar to this, be sure to know exactly where to place these dados so that they’ll properly line up when it’s time to assemble! This is why designing in SketchUp is so awesome because you’ll be able to visualize before you cut.

STEP D: Drill the Pocket Holes
Knowing how the closet wardrobe will be assembled is important so that the pocket holes can be drilled properly in the right location. Believe me–when the closet organizer is already constructed, you will not be able to create pocket holes after-the-fact! 🙂 At the top of the side panels, on the inside face, the upper board will be attached via pocket hole screws, so I used my Kreg pocket hole jig and drill to create the pocket holes.

Evenly spaced apart, there were 4 pocket holes. Both the left side panel and the right side panel have pocket holes at the top. Also, you can use pocket holes in the places where I created the dados for the bottom shelf. Dados are great joints for strength, but pocket holes can be used, too, FYI.

STEP E: Cut Some of the Plywood
I’ve made the mistake before where you think you’d planned things out perfectly, you made all your cuts, and then—-DOH!–something didn’t add up. Now you’ve ruined your materials and have to buy more. Cha-ching! Plywood isn’t cheap at about $55 per sheet. So carefully measure and cut through each step. Although you have your SketchUp cut list, if you’re like me, you may make mistakes along the way and some of the measurements might not add up perfectly. It’s best to cut some pieces as you go, taking measurements and making cuts as you need them.
STEP 9: Pre-Finish Your Plywood
Maple plywood is one of those woods that if you don’t use pre-conditioner on them, they’ll get blotchy and unevenly accept stains (watch this video on what happens if you don’t use pre-conditioner). Pre-conditioner helps to create a uniform surface upon which the stain and top-coat will evenly lay, giving you an even finish.
Although I wasn’t staining and just using top-coat for a natural finish, I still took the time to add a coat of pre-conditioner to all pieces. It dries in only 30 minutes, then maple plywood pieces should be lightly sanded with fine sandpaper.

When the pre-conditioner is dry, the boards will be dry to the touch. At that time, then you can stain. In my case, I was doing three layers of satin water-based top coat with a synthetic bristled brush, allowing the top coat to thoroughly dry in between*. I sanded in between top coats with super fine sandpaper (about 300 grit). The surface will feel so smooth to the touch with just a little bit of sheen, while still seeing the maple grain!
*NOTE: Don’t apply stain or top coat to any areas that will need to be wood glued; wood glue doesn’t stick well to stained or finished surfaces.

STEP 10: Glue Up Boards
Once these pre-finished pieces are dry, glue together the center panels to create the double-thick center support partitions. I spread the wood glue over the unfinished side of the board, working quickly (or you can use a longer setting wood glue that won’t dry quickly).

I set one of the pieces on top (unfinished side to unfinished side), and then secured them together with clamps. It’s best to add as many clamps as possible and keep the panels on a flat surface, if possible, to prevent the boards from warping. Clean up any excess glue before it dries.

STEP 11: Add Edge Banding to Exposed Sides
It’s best to apply edge banding to the exposed raw edges before building the closet wardrobe. It helps to know what pieces are coming together so that you can add the edge banding on only the exposed sides. Use a hot iron to apply, and then trim off the excess with an edge bander cutter or a utility knife. Sand it smooth with 220-grit sandpaper along the edges of the edge banding.

STEP 12: Assemble the Closet Organizer
Once the pieces are all prepped and ready, it’s finally time to start assembling! Here are the steps I used to put the closet organizer together.
STEP A: Attach Bottom Shelf to Side
This closet organizer has 2 large bottom shelves (the length of yours will depend on the size of the closet organizer you’re building, but a general rule is that you’ll not want them to be any larger than . Using one of the large shelves, with wood glue in the dado joint, slide the shelf into place, wiping up any wood glue that seeps out.

Most of this closet was build in closet quarters of this small walk-in closet. However, since this was the first joint of the assembling process, I was able to secure this dado joint with three 1-1/4″ cabinet screws. All the other joints I was not able to screw together because I didn’t have access to them. Any extra added strength was helpful! 🙂

STEP B: Add the Brackets
The top and bottom of this closet wardrobe have 6″ wide brackets that will be secured to the studs. I used two 1-1/4″ pocket holes to attach them (with glue), and using a scrap piece of wood, line up the bracket with the bottom edge of the dado. Usually, brackets such as these have pocket screws on the back of the bracket so they’re hidden, I added them to the front. If you can, add the pocket screws to the back of the bracket if you have access to the back of the closet organizer.

I used Kangaroo Glue to attach the brackets because wood glue won’t hold wood that has already been pre-finished. So I used the Kangaroo Glue for these brackets. You’ll also notice that I had attached one of the partitions to the left side of the bottom shelf.


STEP C: Cut and Attach the 1/4″ Plywood Back
I wasn’t planning to attach a 1/4″ maple plywood back on this closet wardrobe. But it looks so much more finished with one. Also, a plywood back can help to square up a cabinet, too. I used a circular saw with my homemade circular saw straight edge to cut a piece to fit on the back of the first section.

I revised the design to include rabbet edges in the back of the closet wardrobe, but to go back and have to make these modifications would have been extra work. So instead of attaching the 1/4″ back on the rabbet edge, I just brad nailed the back without the rabbet edge.

The seam of the plywood lined up to the seam of the double-thick partitions. I attached it using my Arrow Fastener pneumatic brad nailer, the PT18G.

This brad nailer is perfect for most small trim and interior molding. It’s easy to handle and durable for consistent use.
![]()
You’ll need a compressor. I like my compressor from California Air Tools because it’s quieter than other compressors. With the brad nailer and the compressor, it was easy to attach the back to the closet wardrobe using 1-1/4″ brad nails. Just be sure that you don’t shoot brad nails through your project and out the other side where it’s visible. Those rouge brad nails are a pain to remove!

STEP D: Attach Closet Organizer to the Studs
The studs should have been marked on the wall before starting. When the closet organizer is moved into place, you have to take into account the studs location/distance from the corner of the room, then subtract the thickness of the wood against the wall. For example, if the stud is 8″ from the corner, and I’m using 3/4″ plywood, the drilling location into the stud when measured from the corner where the wood is located, would actually be 7-1/4″.
Use a countersink bit to allow the 2-1/2″ cabinet screws to sit below the surface for a professional appearance. You can also fill them with wood filler to hide them (although, on natural plywood, you will see the wood filler, FYI).

You’ll want to use 2-1/2″ cabinet screws so that you’d be able to properly secure the closet wardrobe to the studs.

Once the right side was secure at the top, bottom, and middle, I secured the braces at the top and bottom. Again, I made sure that I properly located the stud and took into account the thickness of the wood against the wall.


STEP E: Create the Other Section of the Closet Wardrobe
Let’s take another look at the closet wardrobe. The right-hand side panel and center partition were completed. Now it’s time to start on the second section.

I slid the bottom shelf into the dados with wood glue, connecting the bottom shelf and the double-panel center partition, along with securing the brackets.

For the back, I cut another piece of 1/4″ plywood to attach to the back and secured it with the Arrow Fastener PT18G brad nailer and wood glue.

The braces were also attached using pocket holes and this section was attached to the studs, as well.

STEP F: Attach the Left Panel
The left panel now is attached. You’ll notice that a top panel was set on top of the closet wardrobe so that the edge could slide into the dado and secured with wood glue. I didn’t secure the top panel to the double-panel center partitions until the left panel was in place.

STEP G: Attach the Top Panels
The top panels have lots of dados in order to house several shoe cubbies at the top of the closet wardrobe.
With the two pieces dadoed, with dividers, the top can hold shoes, organizer boxes, and more.

The top panel is attached to the partitions using 1-1/4″ pocket holes.

STEP H: Plug and Sand Pocket Holes
This next step was not fun. While convenient, pocket hole plugs (I used maple plugs to match the maple plywood) are tough to trim and sand after they’re glued in. Since I had already pre-finished the boards, trimming with a flush mount saw (as they recommend) scratched the finished surface of the closet wardrobe. So I tried using a multipurpose tool with blades and while that was easier, it didn’t eliminate the need to sand them smooth. Doing so messed up those areas of my pre-finished boards.
Going forward, I will be using a Festool Domino joiner to join my pieces of wood for a seamless finish, but you can also use a biscuit joiner for seamless joined boards.

STEP I: Attach Decorative Trim
Using my Arrow Fastener PT18G brad nailer (and 1-1/4″” brad nails) I attached some decorative trim around the top and sides of the closet wardrobe to hide the remaining gaps. It gives the closet a nice finished look! I am leaving it all natural and the brad nails are thin enough that I didn’t feel like I needed to use wood filler to hide them. But you can surely add a bit of wood filler to hide the small nail holes.

STEP 13: Attach Edge Banding
Once everything has been assembled, any remaining parts that haven’t been edge banded should be attached. Use a hot iron to attach it, and use an edge band cutter to or utility knife to remove the excess edge banding.

If you’ve got any double thickness pieces of partitions like I do, there is an edge banding that is thicker at 1.5″ and 2″ to make the glued double-panels look like one solid thick panel.

STEP 14: Install the Clothes Rod
Here’s a couple of tips about installing the closet rod:
- Get a helper. It’s nearly impossible to be able to line this up evenly without someone holding it at the other end.
- Remember these rules of thumbs. As I mentioned above, mount clothes rods accordingly to ensure you’ve got enough space. In general, 40″ from the floor and 80″ from the floor are great for double-rod clothes organizers. Single-rod closet organizers can be mounted about 66″. Make a special section for extra long dresses or coats.
- You may not need anchors. If you’re installing the clothes rod into wood or studs, you won’t need anchors. But if your closet hardware will be attached directly to drywall, use anchors with the screws for added strength.
My hardware was being installed into the 3/4″ plywood so there were no anchors needed (at least, I hope that’s the case once we start loading it with clothing! 🙂 Although, it does seem pretty strong.

Soooo….after that lengthy tutorial, let’s have another look at the “BEFORE” and “AFTER”!
BEFORE
This is what the closet looked like with everything chaotic! There was very little organization, wasted space for clothing, and ugly 1970’s wallpaper.
AFTER!
Now it feel modern, fresh, and (whether you’d agree or not), feels like more space! I took what used to be the right and back side and condensed all of our clothing into one side. Now there is space for adjustable shelving, build-in drawers, shoe shelves, and even a little desk for me to use my laptop and record podcast episodes and voice overs! (Yep–clothing is a great sound diffuser!).
Of course, this is not all of our clothes! 🙂 I still have much to add to my new DIY closet wardrobe! But I want to completely finish off the entire walk-in closet before I start bringing everything back. For now, this is a good start!

Let’s Talk About Cost
I’ve priced really nice closet organizers from The Container Store and was dismayed to see they cost thousands. My closet organizer was nowhere near that cost. Here’s a look at what I bought, minus a few things I am sure I am forgetting items, like the cabinet screws I can’t find a receipt for.
Total cost: About $1,008
| Material | Amount | Cost | Total Cost |
|---|---|---|---|
| 3/4″ maple plywood (4’x8′) | 7 | $56.15 | $393.04 |
| 1/4″ maple plywood (4’x8′) | 2 | $26.14 | $52.28 |
| Kreg 1-1/4″ pocket hole screws | 1 | $43.45 | $43.45 |
| Kreg maple pocket hole plugs | 1 | $11.65 | $11.65 |
| General Finished Satin High Performance Water-based Top Coat (5 quarts) | 1 | $114.26 | $114.26 |
| RooClear Melamine Glue | 1 | $17.28 | $17.28 |
| Edge banding | 1 | $31.79 | $31.79 |
| Edge banding trimmer | 1 | $52.99 | $52.99 |
| Countersink bit | 1 | $9.51 | $9.51 |
| Clamping guide | 1 | $55.11 | $55.11 |
| Dremel blade for cutting pocket hole plugs | 1 | $10.57 | $10.57 |
| Pre-conditioner (5 quarts) | 1 | $94.26 | $94.26 |
| Router bit (3/4″) | 1 | $31.82 | $31.82 |
| Closet Pole | 1 | $30.18 | $60.36 |
| Closet hardware (pole sockets) | 4 | $7.40 | $29.60 |
| GRAND TOTAL | $~1,008 |
When I review the items I bought, I realize that some of what I bought were tools needed to complete the job, or a large pack of things for which I won’t use all of (like a pack of 50 pocket hole plugs). Some things were expenses for tools that I used to complete the closet organizer but will be used again, like the router bit. The actual cost for materials for the closet organizer were about $847.97. That is still much less expensive for a built-in closet organizer that someone else would have charged me thousands to build and install!
Yes, You Can Build Your Own Closet Organizer!
So….back to your original question: Can you build your own closet organizer? The answer is: absolutely! While it is costly to get everything you would need if you have no tools at all, if you have a toolbox with many of these items I mentioned above, including the Arrow Fastener PT18G brad nailer, you can build your own closet organizer with the right planning and help when some panels are too heavy or awkward to do on your own. And the pride you feel from building it with your own two hands will be worth the time and effort!
Love this project?? Click HERE to save it on Pinterest!
![]()

Download the 5 freebies!

Thrift Diving inspires women to decorate, improve, and maintain their home themselves...using paint, power tools, and thrift stores! Use these 5 printables, checklists, and ebooks to get started!

excellent tutorial, very detailed. you are such a great craftswoman, I’d say a “superwoman”. congratulations. from São Paulo, Brazil.
Aww, thank you so much!! 🙂 Obrigado!
Nice Presentation. Way better than what you usually see from others. Good detail. Good pictures.
Hi Serena, What software did you use to plan your closet? I am working on a couple of projects and have not yet decided on which platform to do the planning on.
Hi Angela! I used SketchUp to design it! It’s not an easy, intuitive software to use…UNTIL you learn to use it. LOL. I did a 5-hour training using a site called LinkedIn Learning (which used to be Lynda .com). It was just enough instruction for me to learn how to use it so that I could design the closet. I’m about to start using it to try to design my backyard shed! 🙂
In our last house, we had someone do an upgrade on our master/downstairs guest bathroom and that included the closet. I drew everything in the closet out for them. They messed it up twice. I finally told them I would just do it. (They didn’t like that idea!) But the one thing I made sure of was that each corner had shelves so we didn’t waste any space! The guys were impressed with my plans even though they were embarrassed I might need to show off my skills.
HAHA!! I could imagine them like, “Wait, why didn’t we think of that??” Good call on the corners and not wasting space! I’d love to see a picture of your closet!
I am in AWE of your skils, Serena. You’ve grown your blog and your carpentry skills and we all benefit. What a lot of work you put in to this project. It looks stylish and practical and of course up-to-date. It’s so polished. Seriously, how do you do it: three boys, a blog, a YouTube channel and more and more complex projects.
I voted a few weeks ago. I’m not sure I can watch on election night. Here we go.
xo
Thank you SO much, Alys! You have always been one of my biggest supporters, and that keeps me going, seriously! It’s funny how this blog is a journal of how I’ve grown, and what I have learned. And now I want to find an even better way to package up all that I’ve learned and help someone else who’s trying to transform their home, too. It’s intimidating when you’re first starting out, but what I have learned is that it is STILL intimidating through each project that is new. The key is to keep going and try it–you might just succeed. As for the election, you don’t have to wait any longer! 😉
Can’t wait to see the entire closet finished. You have done an amazing job.
Thank you so much, Letty! I am currently designing the other parts and am going to get started on it this week! 🙂 Thanks for the support!!!