10 Lessons You MUST Learn Before Your Next Room Makeover!
When we moved into this old 1973 home back in 2010, it was overwhelming. I knew absolutely nothing about doing a room makeover other than tearing down the nasty wallpaper, slapping on a coat of paint, and filling the room with whatever affordable furniture I could scoop up from the thrift store.
This method of “room makeover” was more like “home decorating survival mode” on a budget. There was very little thought other than, “I’ve got to do this room together on as little bit of a budget as possible.” The goal was simply to make the room affordable and livable and unfortunately, I didn’t spend much time thinking about how to infuse personality into the room.
After 11 years and multiple rooms makeovers, the goal of my room makeovers is still to save money, but as I have been revisiting rooms that I previously “made over,” I’m now infusing a bit more style and character, and using more of my woodworking skills to pull rooms together, doing projects that, years ago, would have unnerved me.
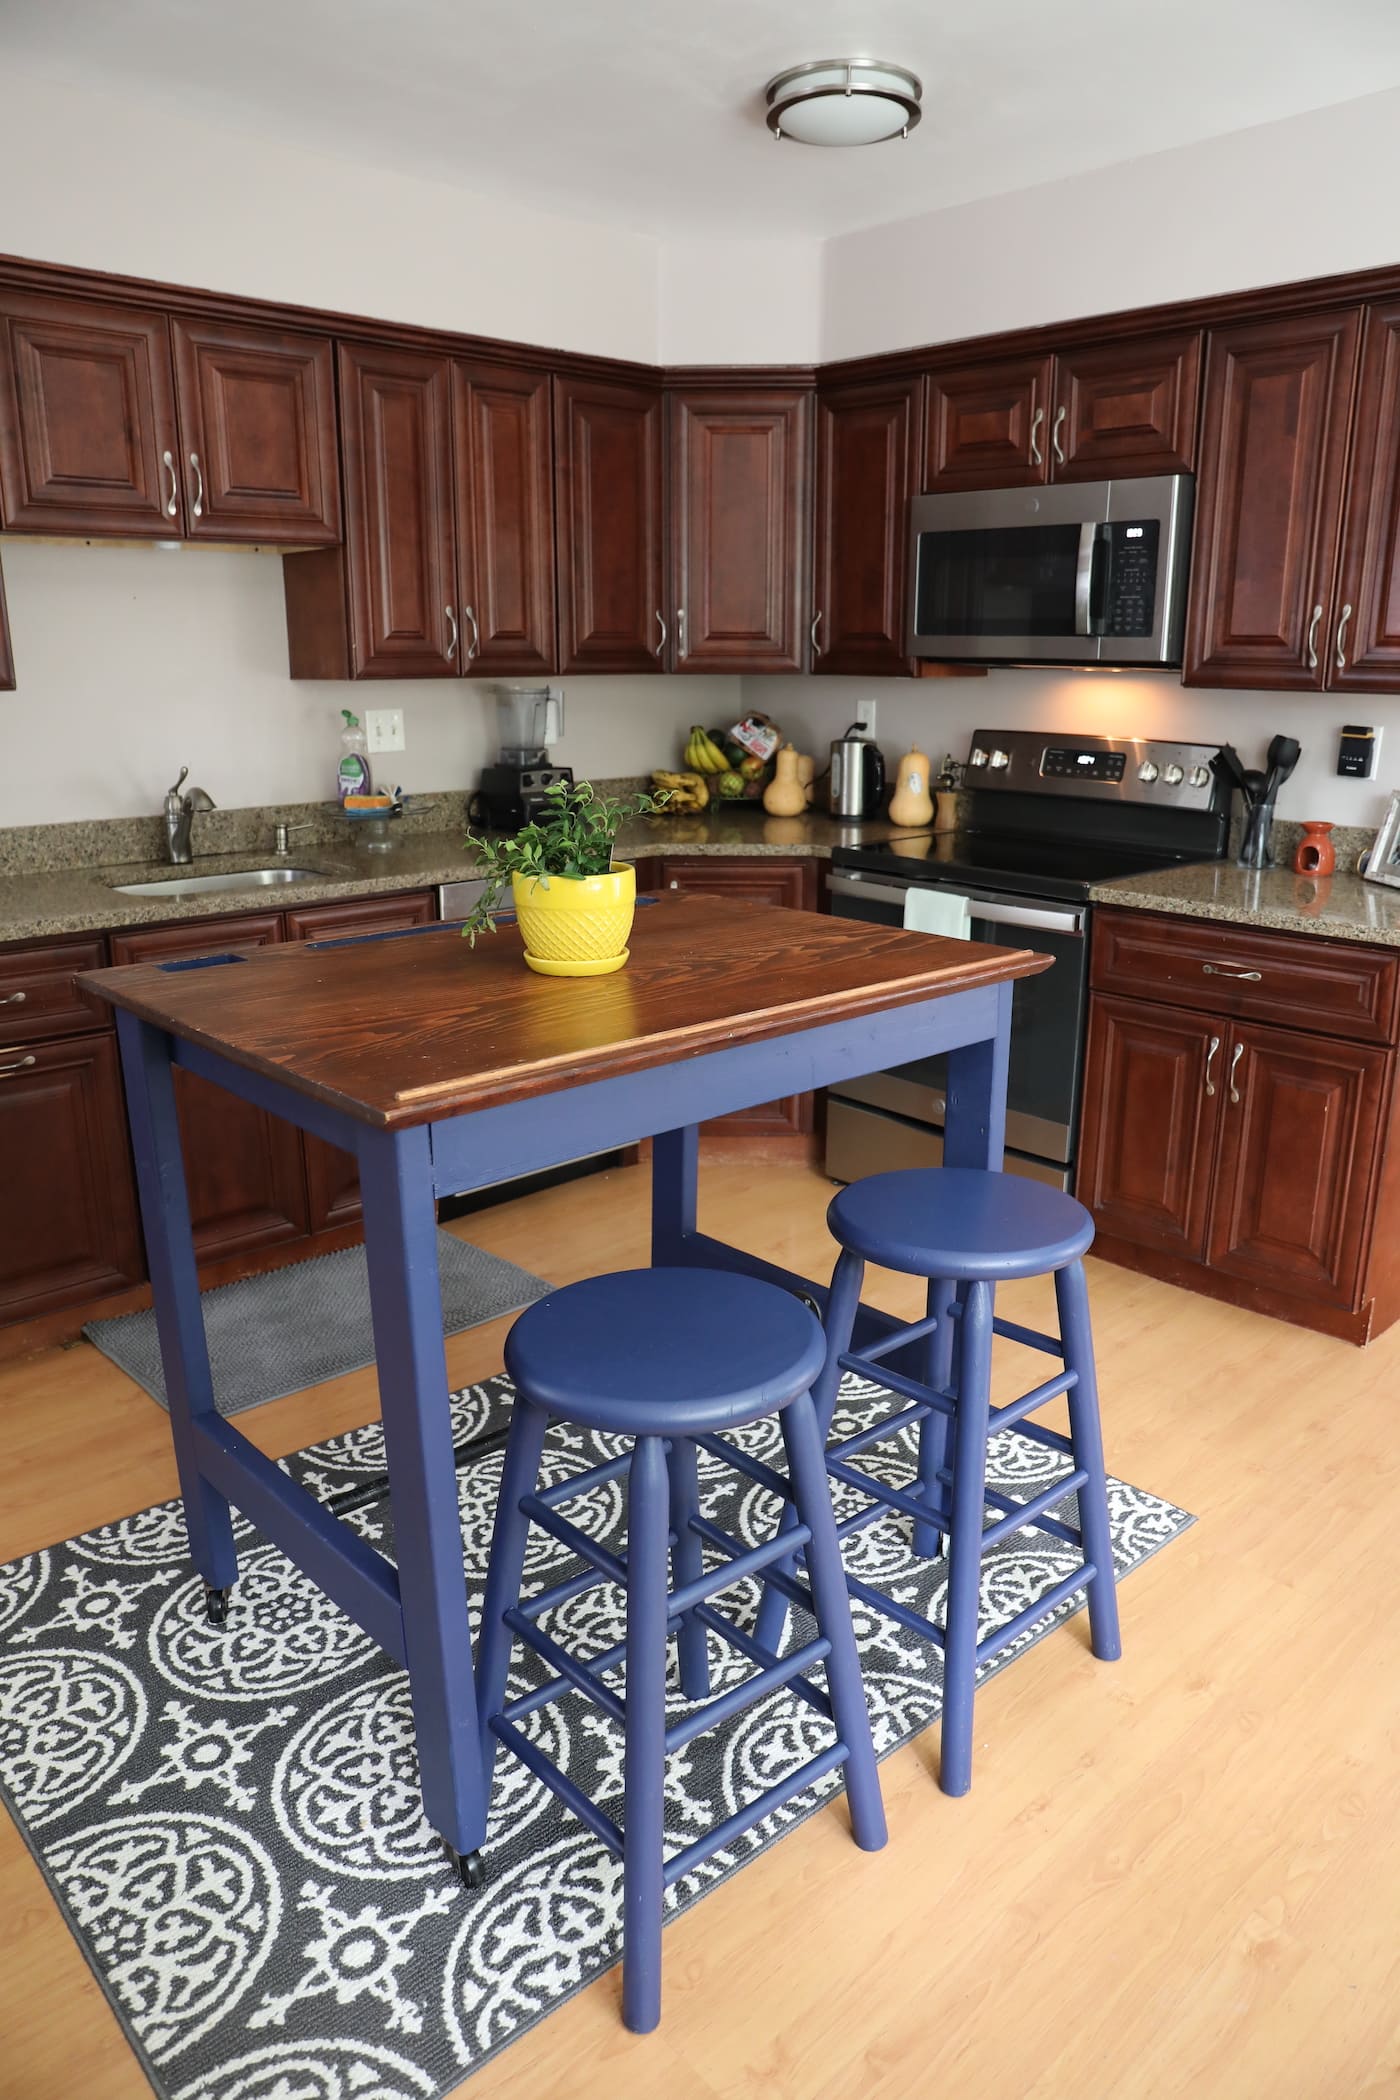
One room that I’ve revisited recently is my kids’ bedroom. I’ve got 3 boys, ages 15, 11, and 9. My 11- and 9-year-old share a bedroom.
For this total room makeover, I teamed up with Capital One Shopping in order to save a bit of money while shopping online for items I needed to purchase for the room, like stylish “masculine” bedding that would be perfect for tween boys to grow into, and photos for the kids’ walls.
Let’s take a look at how this room looked like through the years, and what it looks like now, and most importantly, the lessons learned along the way as I have transformed this old 1973 home!
Click here to save this awesome post on Pinterest! 🙂

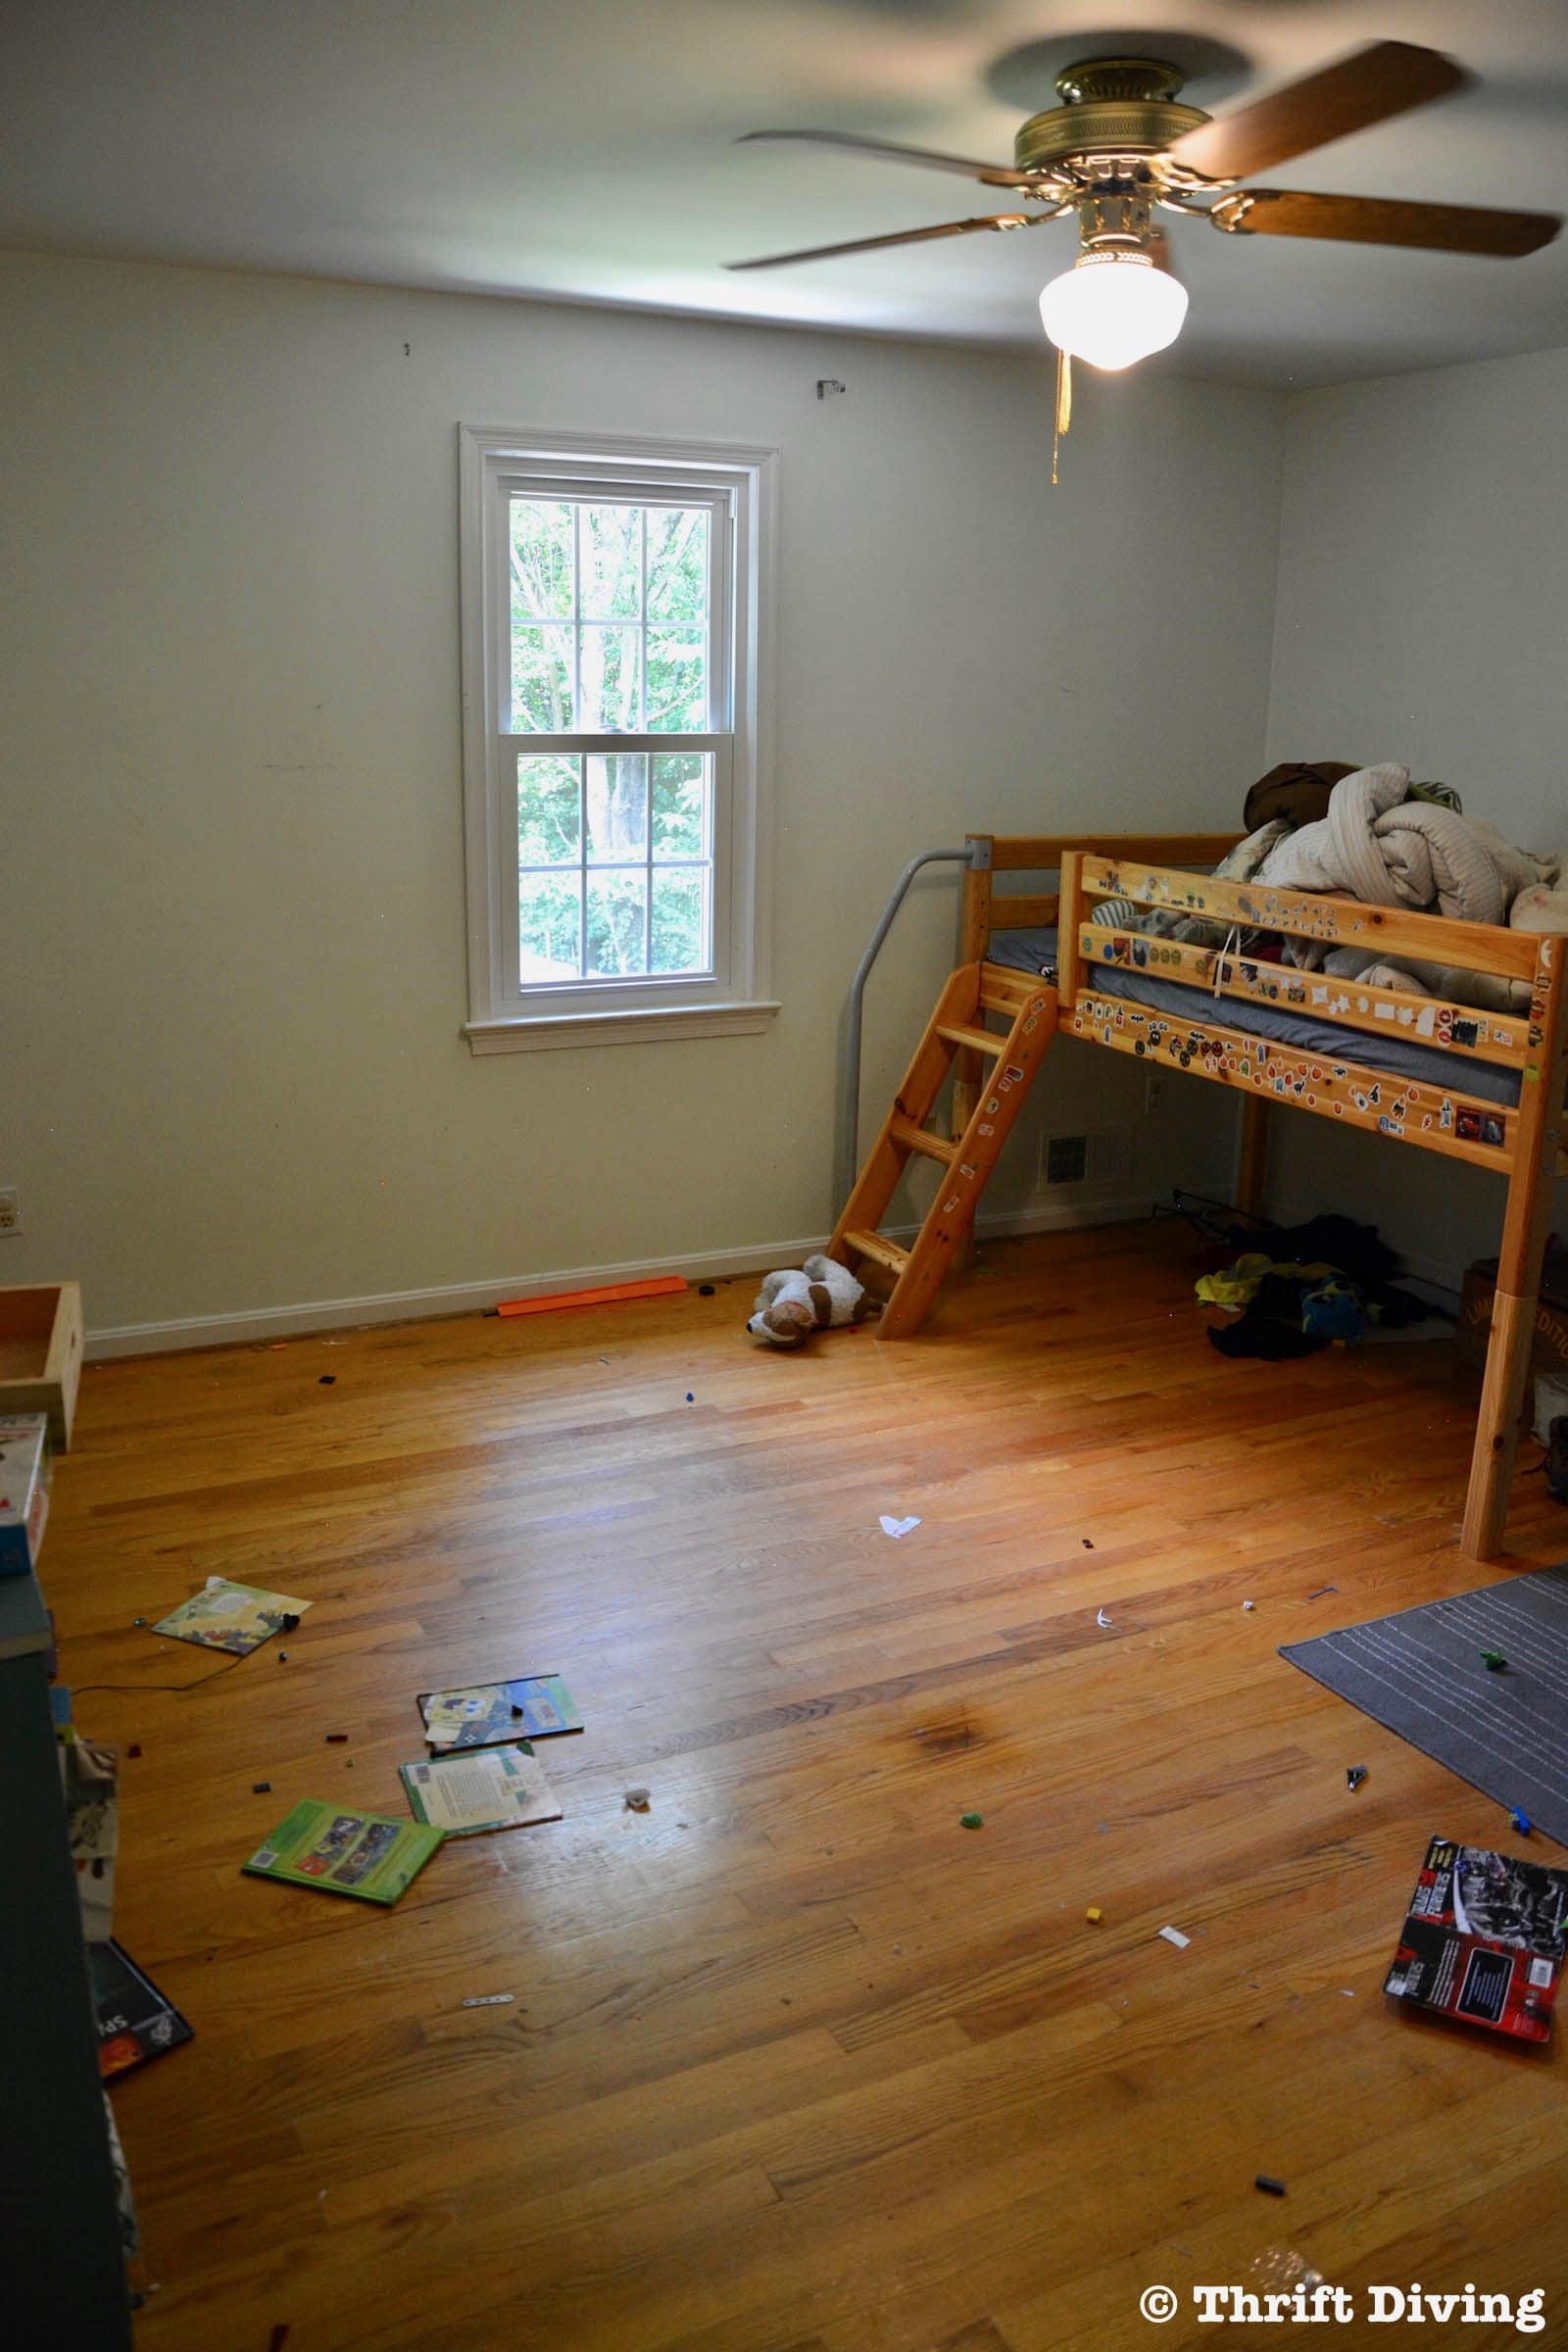
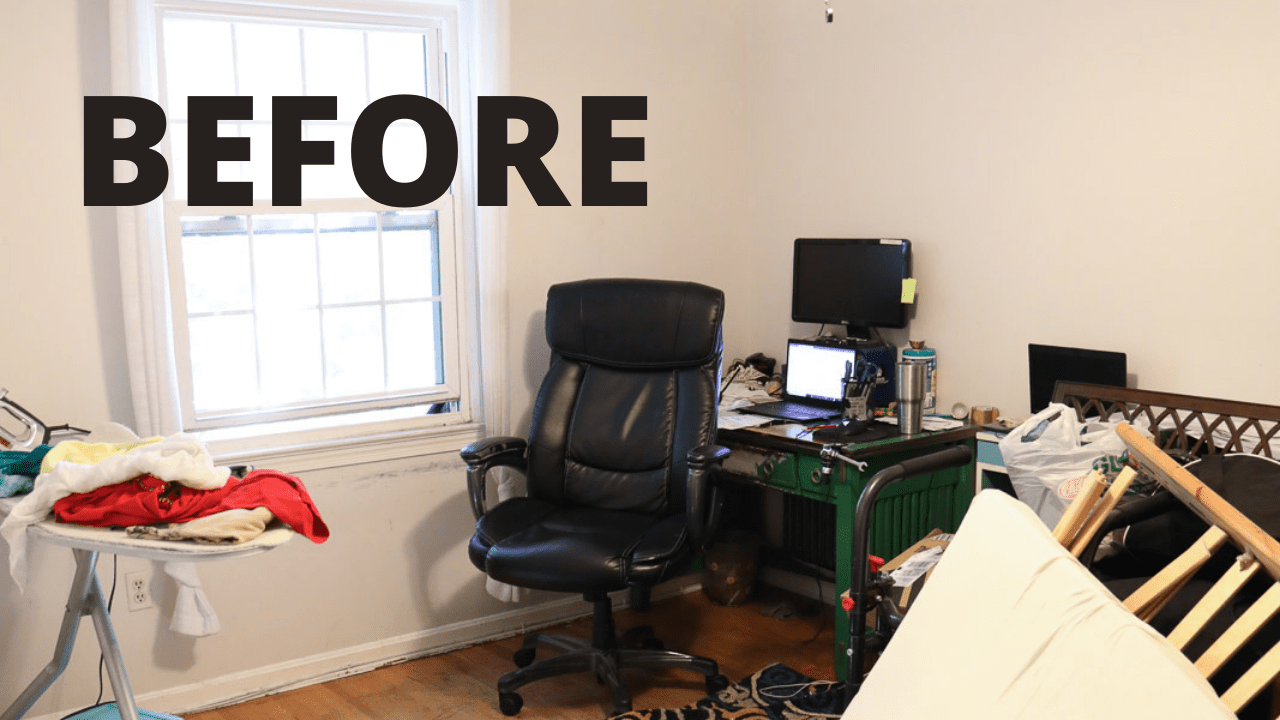
BEFORE
The kids’ bedroom was one of the only rooms in the house that didn’t have wallpaper. That stuff (especially the 1970’s kind) is evil. The rest of the house was covered with it, even my walk-in closet! (Which I had removed the wallpaper and built my own walk-in closet organizer).
This room was pretty bare, just waiting for some personality and warmth.
Several years ago, starting with blank white walls, I coated them in a luxurious deep green. While the update was a huge improvement, I never got used to the dark, enclosed feel of the space. Their room doesn’t get a lot of sunlight, so the dark green made it feel like a cave.
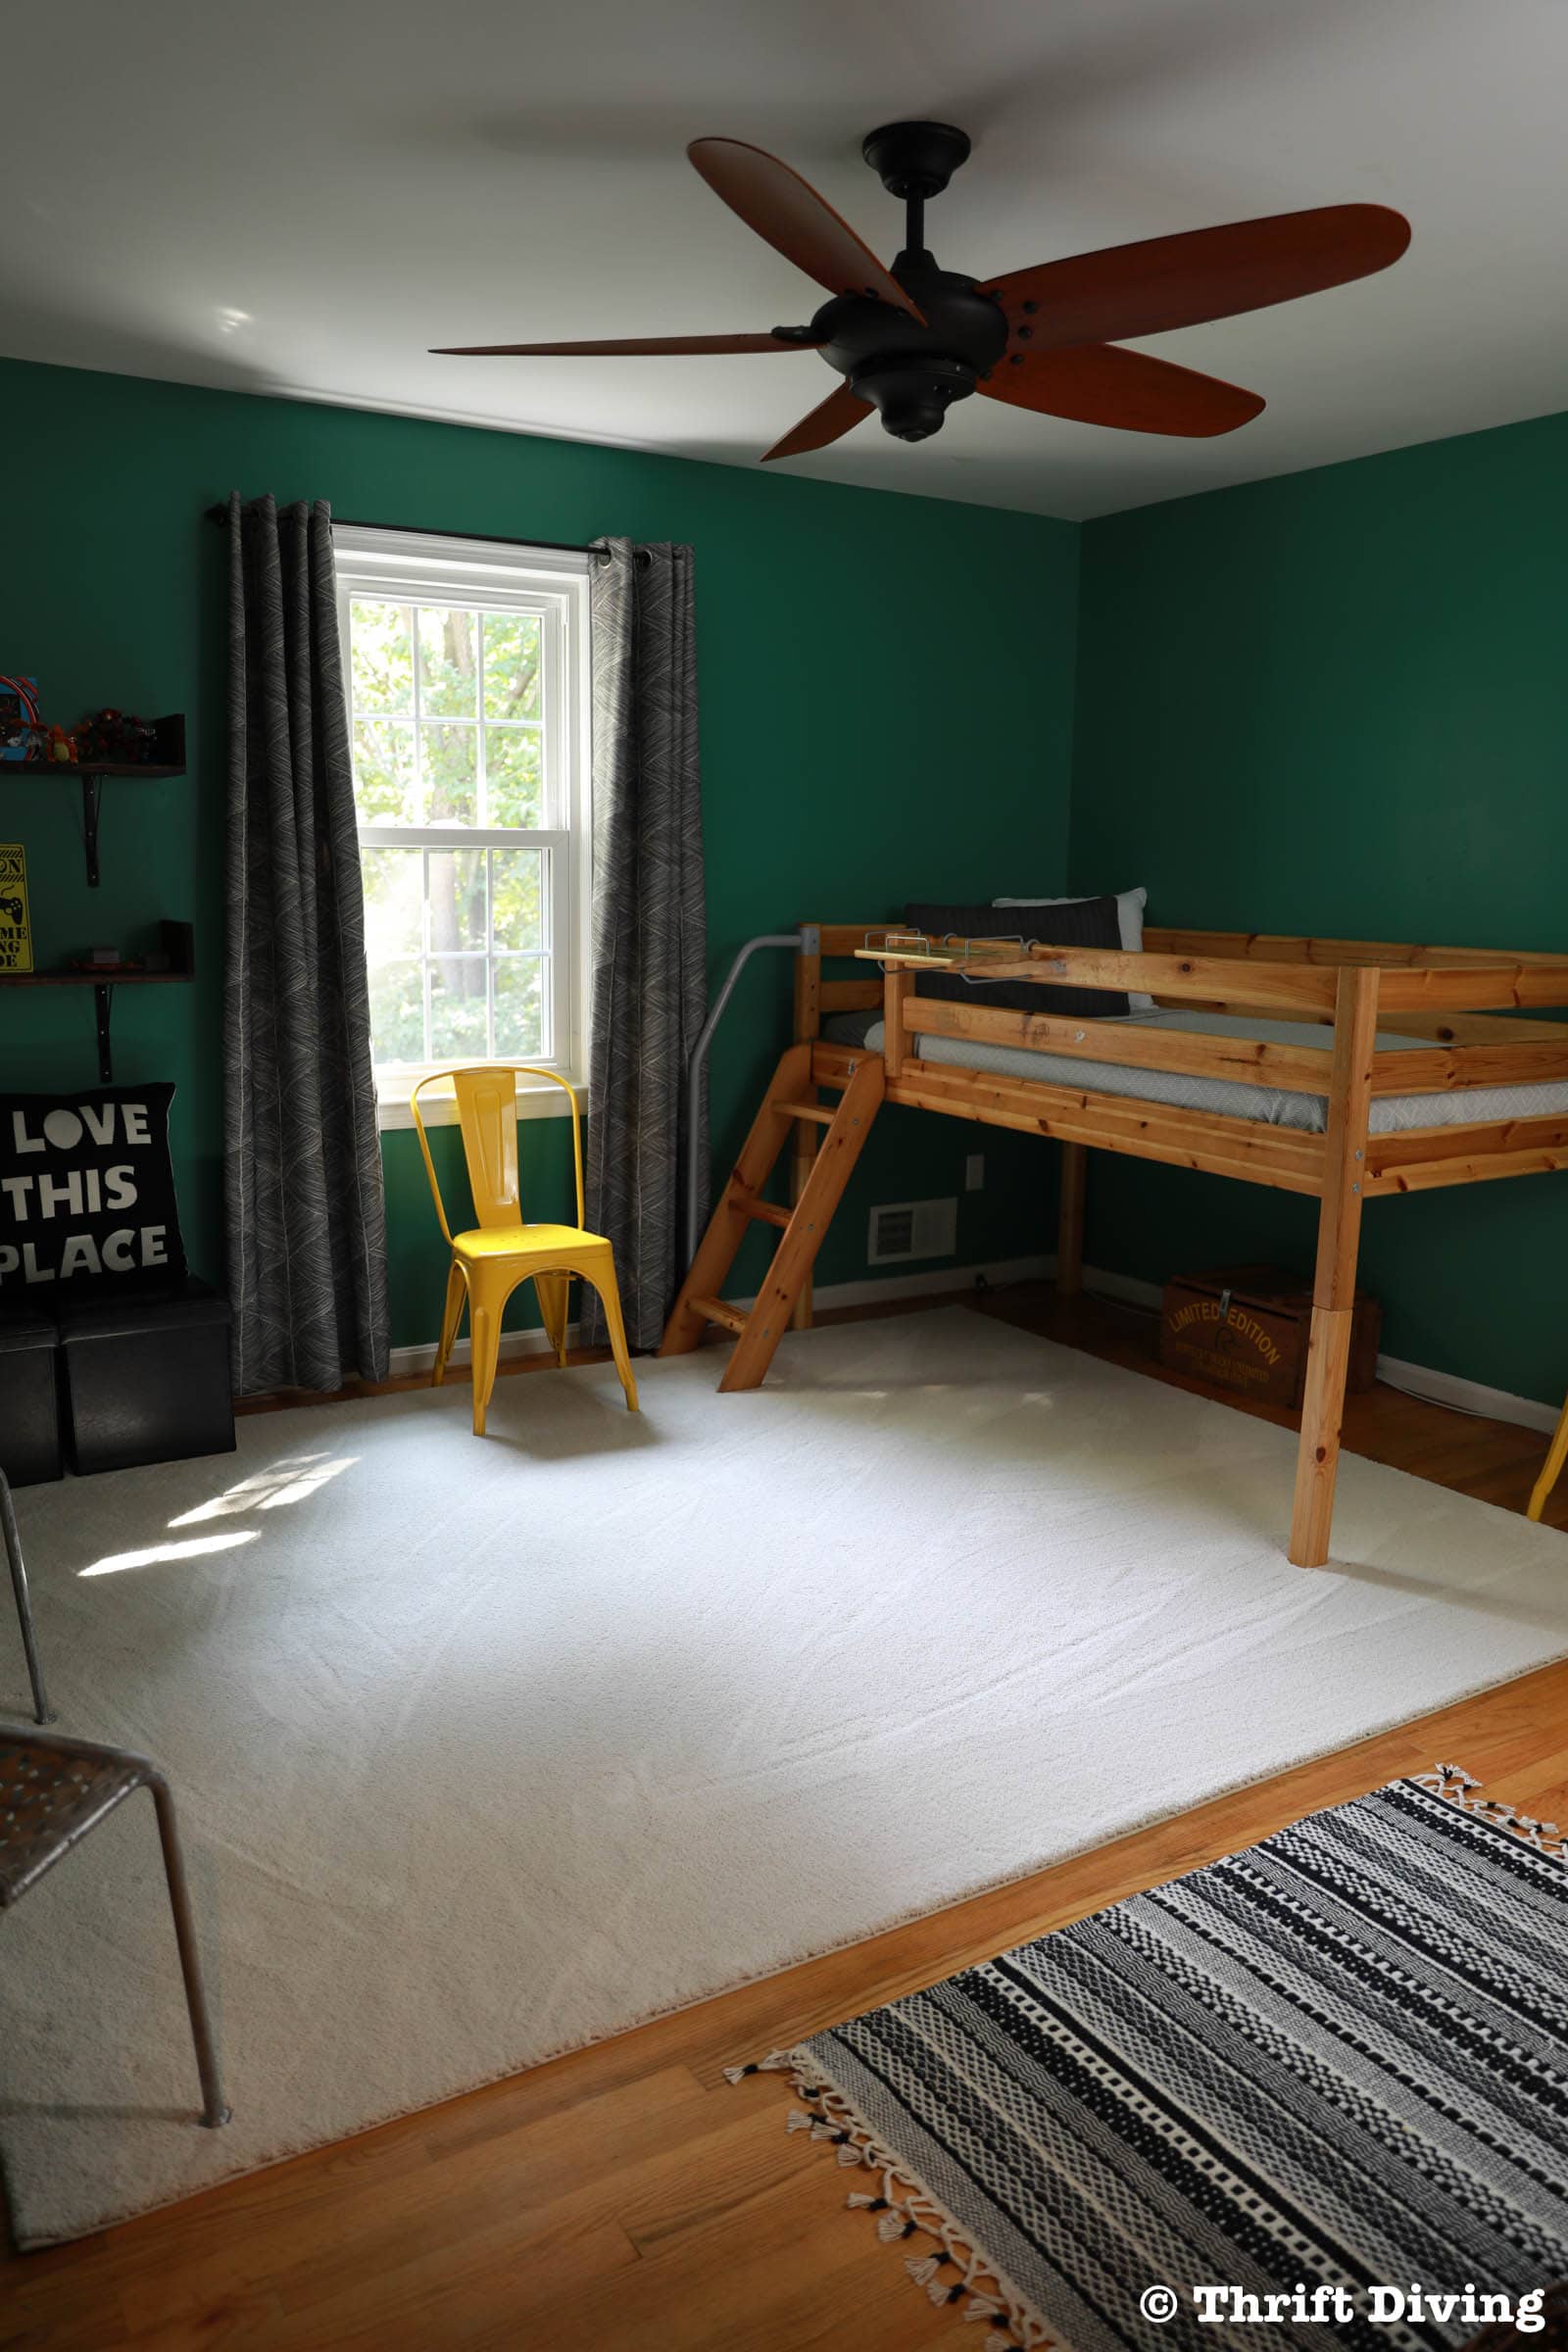
Fast forward to recently, the kids had been sleeping together on an old king-sized mattress shoved under their loft bed. The room had very little personality. And the green was begging to be lightened up.
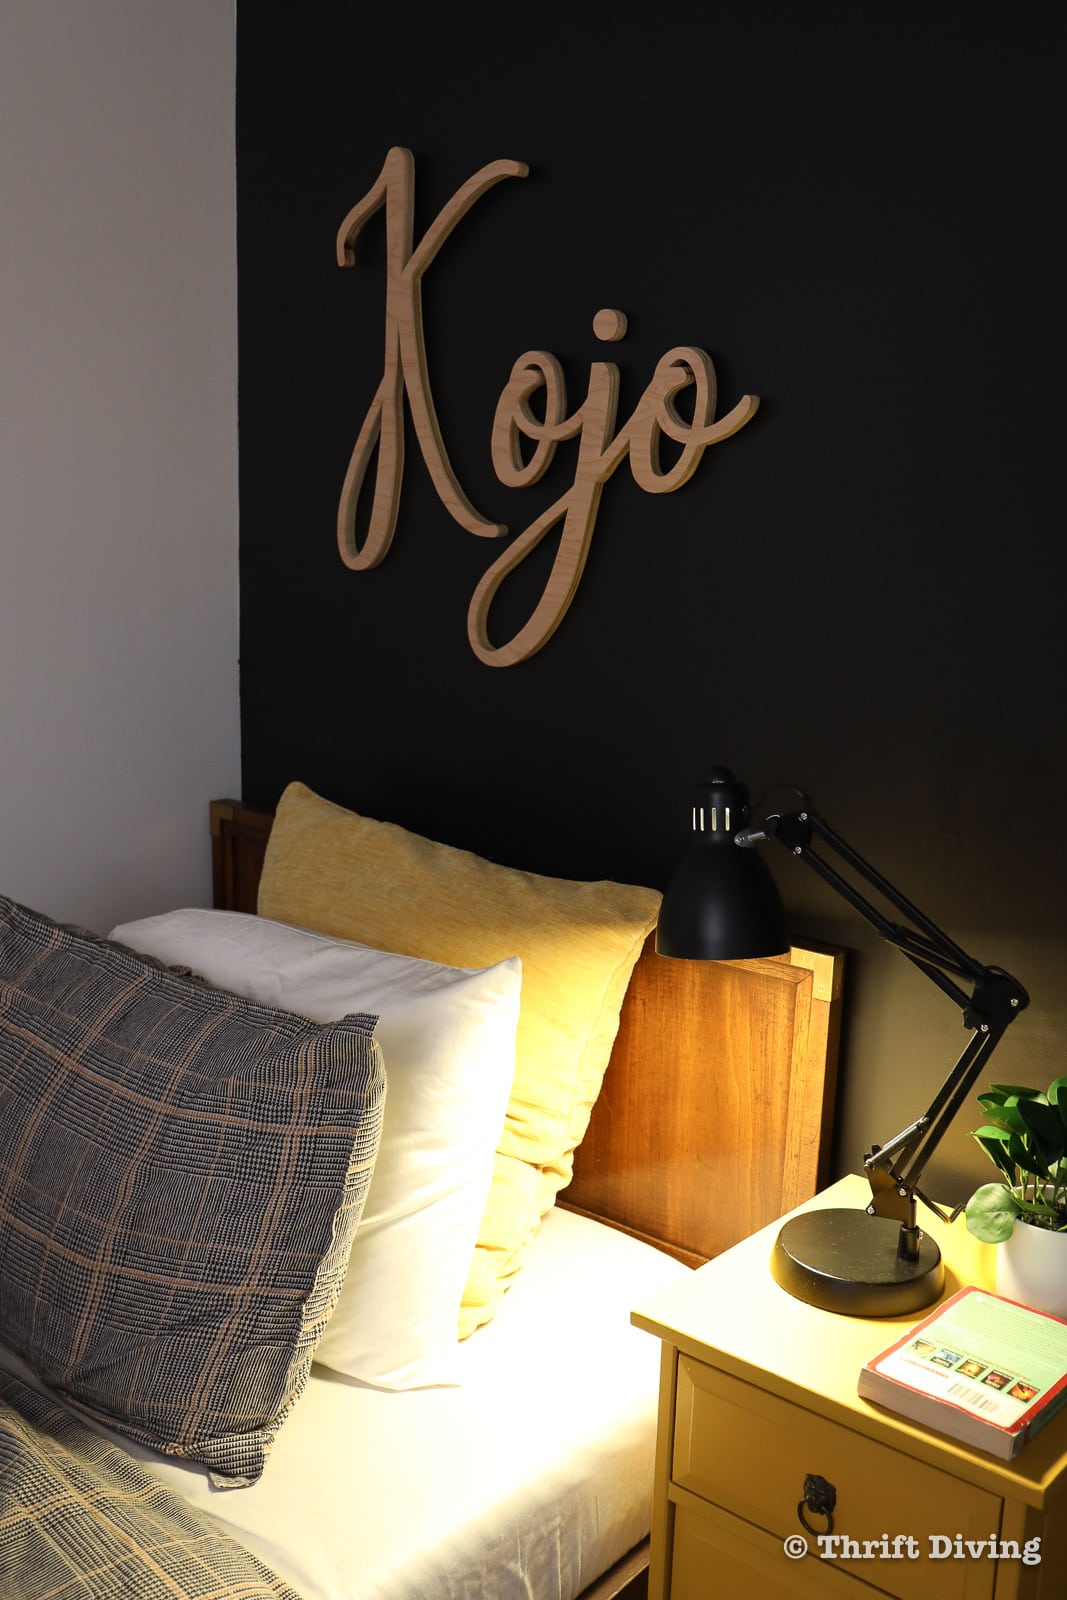
The kids wanted me to paint the room black, but if I couldn’t stand dark green, there was no way I’d allow an all-black bedroom! Huh-uh….ain’t gonna happen. 😉

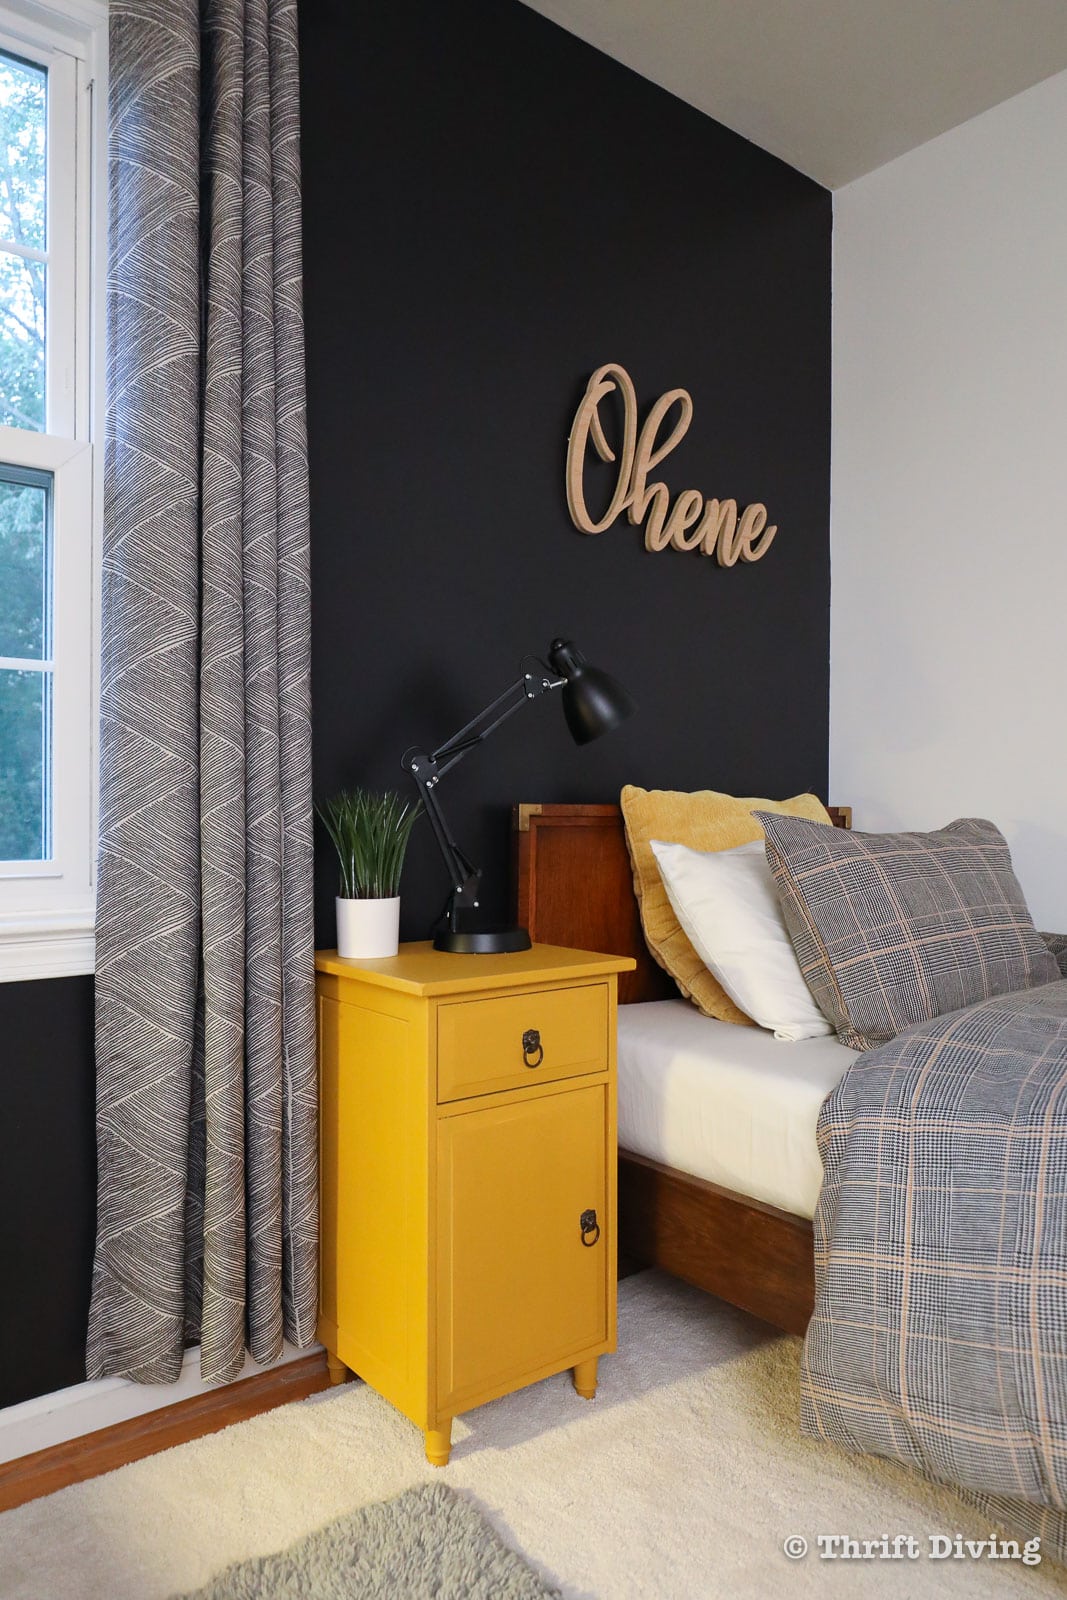
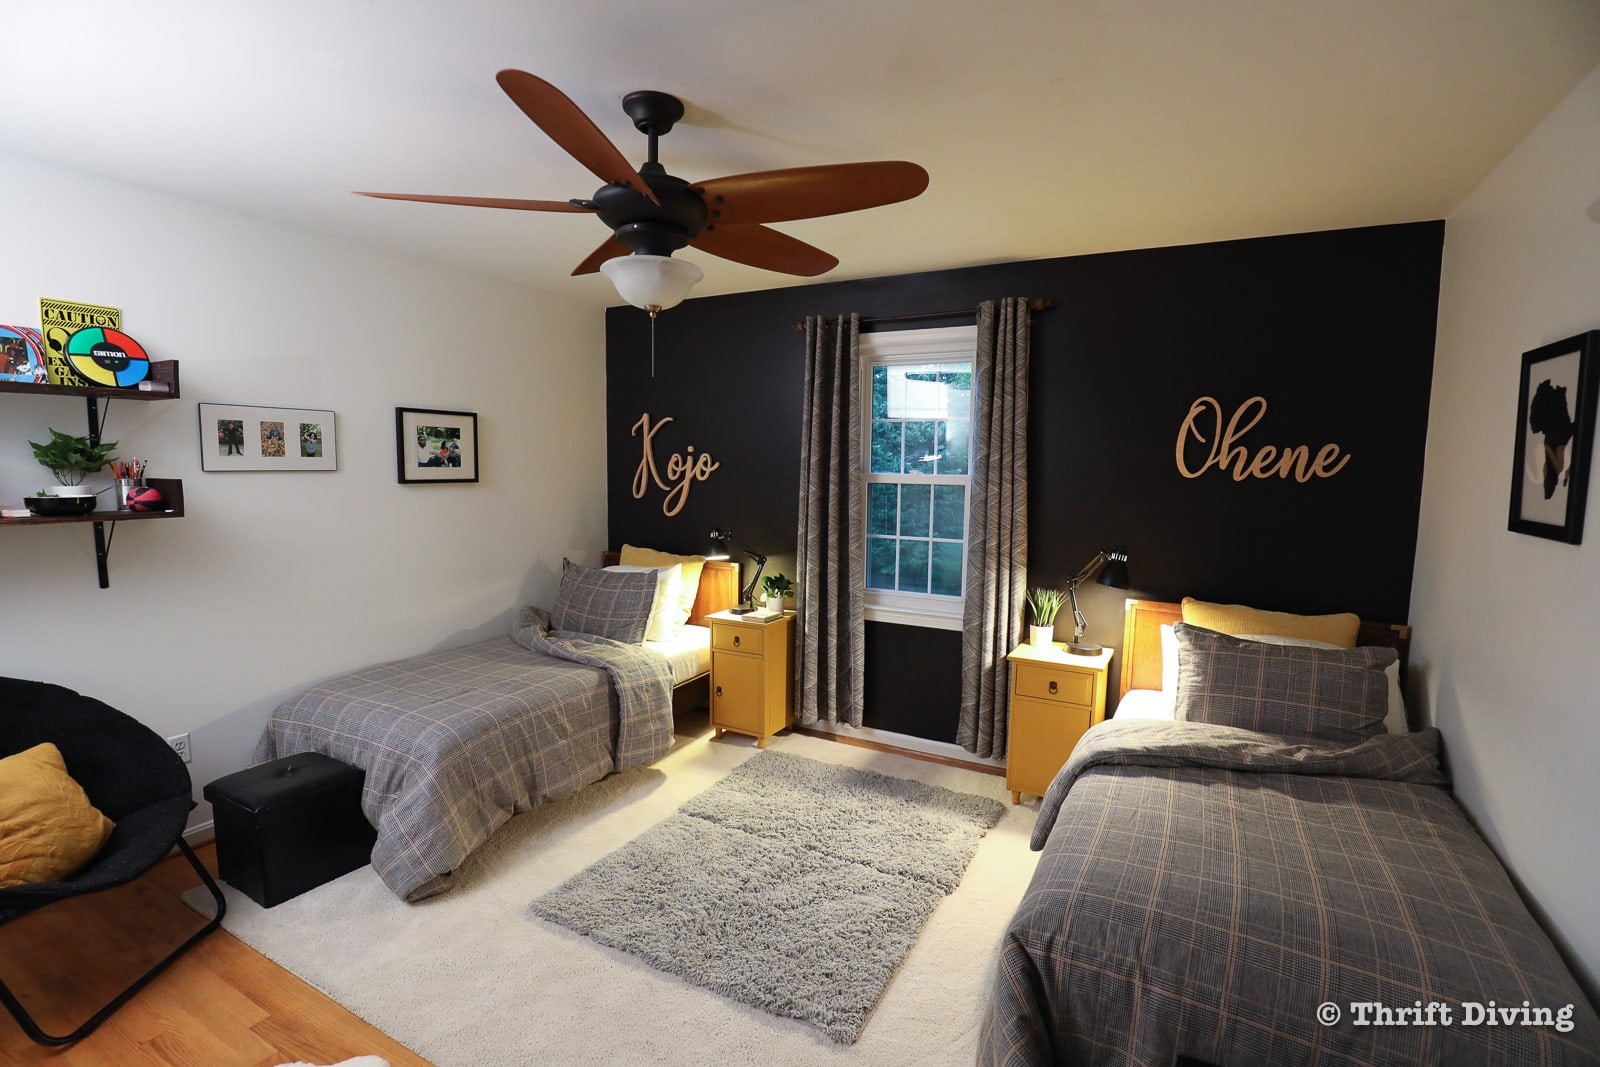
I did, however, compromise and give them a black accent wall. And the result was stunning and turned out even better than expected!
While finishing up with room, I started thinking about what I’ve learned along the way as I have transformed this house. Let’s talk about what some of those lessons are.
Lesson #1: Start with Your Fabrics First
I’ll be honest with you: I start every room makeover with a lot of excitement and a little bit of dread. Why the dread? The dread stems from picking a starting point, and sometimes that starting point isn’t clear to me.
Should I start with a paint color in mind? Should I pick out the bedding first? Or maybe a special rug I’ve always wanted to use?
With the kids room makeover, the starting point was obvious: the black accent wall, since the kids requested it. But from there, I anxiously had to decide:
- What accent colors should I choose?
- Should I paint the dresser with a pop of color, or blend it into the room?
- What kind of “masculine” bedding will go with a black accent wall and where can I find that bedding?
Here’s a tip someone shared with me recently regarding picking a starting point. Her advice was relevant to starting an upholstery makeover on a chair:
Start with picking the fabric first and then choose the paint color for the chair. It’s much easier to pick a paint to match a fabric than it is to pick fabric to match a paint.
Applying this rule of thumb to a room makeover, start with the fabrics first: the cozy bedding you found online… the curtains you love… the pillows you adore…. the rug you can’t live without…If you start there, it’s easier to find paint colors to match those things than to find the fabrics and patterns to match your paint.
The bedding for the boys even had some yellow, which was a great inspiration for picking the accent colors!
Lesson #2: Reuse or Repurpose Items from the Room
Room makeovers can be expensive. One thing I don’t like to do is to spend a lot of money on home decor. When it comes to electronics, I love to drop a pretty penny. But home decor?? No way. That can always be done inexpensively and look great.
Using what you’ve already got in your room or repurposing it saves money. As mentioned in Lesson #1, you can even start with picking the item you’ll reuse (for example, the curtains) and selecting a new color scheme where that item still fits and looks great.
In my kids’ room, I reused their neutral area rug, as well as their gray curtains and bookshelves I had built for them years ago.

Lesson #3: Save Money While Shopping Online
As much as I love thrift stores for finding affordable home decor, not everything can be bought at the thrift store, such as bedding.
I shop online a lot. And when I say a lot, I’m talkin’–there’s a delivery person pulling up at least 3-4 days a week to drop off something. 🙂
I’m the kind of online shopper that will always do a search for coupon codes before ordering (but that takes time to find the right code that’s active), not to mention comparison shopping to make sure I’m paying the lowest price.
This is where Capital One Shopping helps out.
How it works is you install the extension to Chrome, and as you shop online, Capital One Shopping will automatically search for coupon codes. There are also a ton of stores where you can earn Capital One Shopping Rewards just by shopping with the extension installed.
For example, after I installed Capital One Shopping to Chrome as an extension, I went to Macys.com and found the perfect Kenneth Cole New York flannel menswear bedding for the boys’ room! Capital One Shopping actually provided 10% back in the form of rewards, which meant extra savings without having to do anything.
It will automatically search for coupon codes at checkout, too, which means you won’t miss out on savings if there is savings to be found. There were times when the savings alert popped up on my screen and I was surprised and happy to save a few unexpected bucks!

For the kids room, I also used coupon codes that Capital One Shopping found for both SnapFish and Walgreens when I printed some photos for the kids’ room. But they also have rewards and coupon codes for other popular stores, like Papa Johns (which I order online a lot), Michael’s, Lowes, Walmart, Costco, and hundreds more.
To sign up for Capital One Shopping, follow the prompts on their website to download and easily install the extension on your Chrome browser. Enjoy those extra bucks that can add up!

Lesson #4: Buy What You Can from the Thrift Store
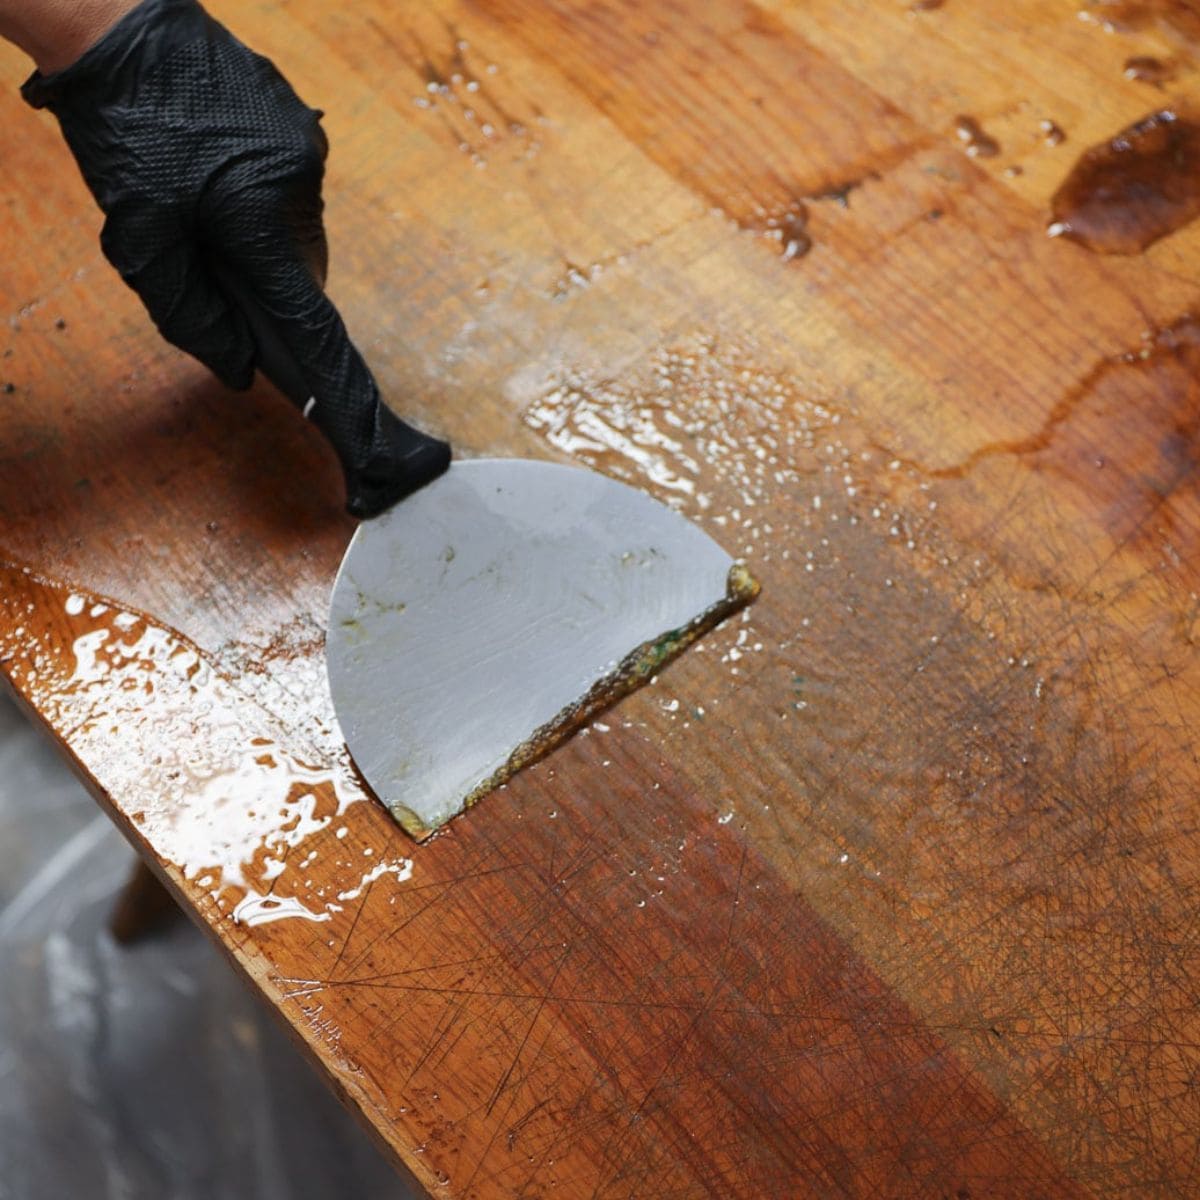
I love, love, love thrift stores! That’s where you find the really unique items that you may not necessarily find online. For the kids’ room, I found these two Henredon vintage headboards and transformed them into beds for my boys. You can find the step-by-step tutorial on how I did also here on the blog.
Thrift stores aren’t going to always have exactly what you’re looking for, but if you find something that works, buy it! Check out my post on how to get started painting or reupholstering your first piece of furniture, or read more about how to strip furniture and re-stain it.
And if you’re lucky, you will find furniture that won’t need hardly anything done to it, like these vintage headboards, which were in great shape!


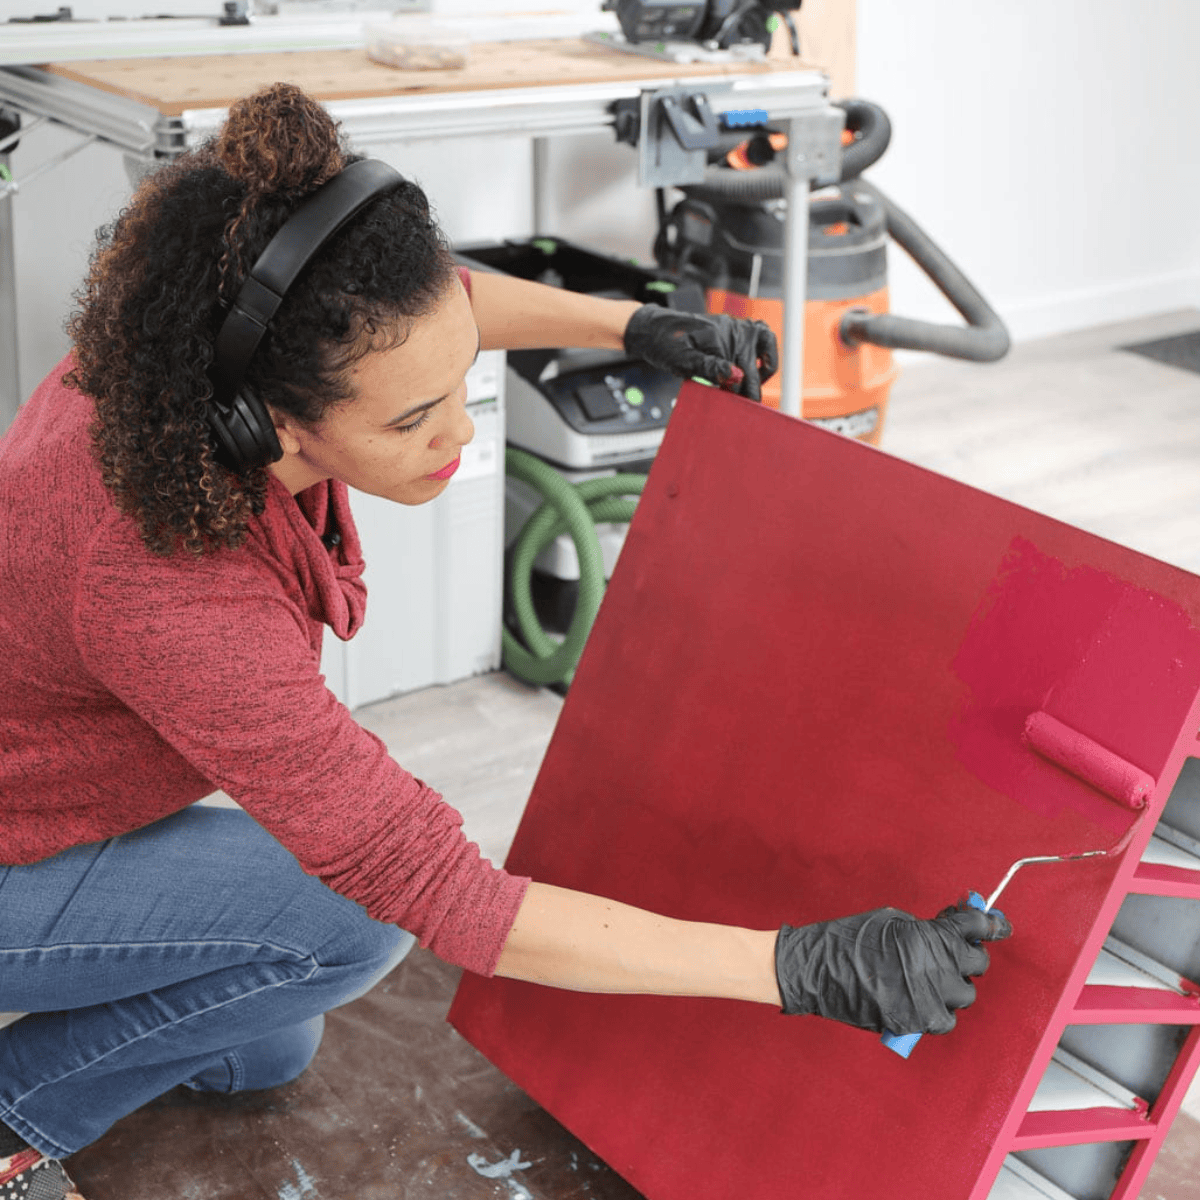
Lesson #5: Make Your Own Chalk Paint for Furniture
These nightstands were originally in our bedroom, but we gave them to the kids, knowing their room makeover was coming up. All they needed was some paint.
But have you priced the cost of chalked paint lately?? It’s very pricey at about $20 for a small quart or less.
And while I typically advise newbies to get started with ready-made chalked paint, the second-best alternative it to make your own, especially if you’re on a budget (or if you don’t need very much. Why buy a whole quart when all you need is a little bit?).
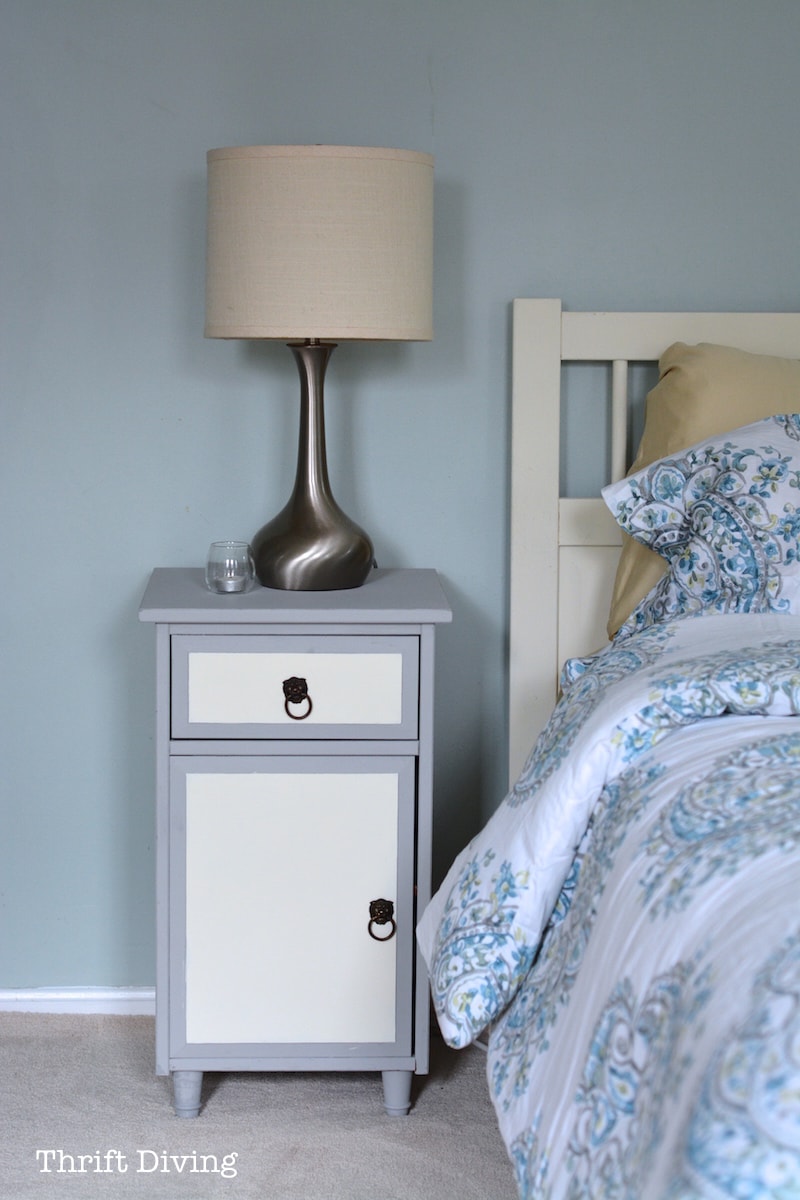

If you’re doing a small project like a nightstand or painting something for a pop of color, buy the little sample pots from the hardware store. Sherwin Williams’ sample pots are at least twice the size of the sample pots from the Home Depot and are priced similarly.

Next, buy yourself a container of BB Frosch, which is a paint additive that will turn your paint (flat or satin finish) into a chalked paint that sticks very well to furniture. Follow the mixing instructions on the jar. One container can create gallons of chalked paint and save you money in the long run, especially for smaller painted pieces. And you only mix what you need.

These fun, mustard-yellow nightstands were created with one inexpensive sample pot for about $4.00, mixed with the paint additive, and it was literally just enough to paint the two nightstands! Not bad for a few dollars!

Lesson #6: Use Complementary Color Cards

I don’t consider myself to be a designer. I know what I like (pinks and purples and blues) and I tend to buy lots of those colors, and pair them up with fresh whites. I don’t get much more radical than that, folks. 🙂
Because I tend to stick to a few basic colors, when I am putting a room together for someone else that doesn’t appreciate my taste in the–ahem–pastels, I turn to color collections that paint manufacturers put out for homeowners that want to take the guesswork out of picking coordinating colors. These collections are designed to give you 20 colors in different styles that all look good together. So no matter what colors you pick, you can’t go wrong in the same collection.

Lesson #7: Make Your Own Artwork
Artwork on the walls should be personal. I’ve never understood people buying one of many pieces of generic wall art from a pile with 10,000 copies of the same work.
I much prefer to use family photos (order them from SnapFish or Walgreens and use the Capital One Shopping extension to save money).
But I also love to do personalization like names, ethnic celebration art, states, continents…anything that shows who you are, where you come from, and what you’re proud of.
I had some left over plywood from when I built my closet organizer and used it to cut out personalized names for the boys (you can see a similar tutorial for how to cut out a word sign).
I also reused a picture frame that I had lying around the house. Using my Cricut cutting machine, I cut out a vinyl shape of Africa (my husband is from Ghana, West Africa), and adhered it to a piece of wood painted white which was cut to the size of the frame. 🙂 It didn’t cost me anything to make since I had all the materials already on hand!

I should also mention that you can shop at Cricut.com via Capital One Shopping and earn Capital One Shopping Rewards and find all the Cricut sales all in one place. Love that!

I also love the idea of using a large picture frame and framing your favorite fabrics!

Lesson #8: Don’t Be Afraid to Go Bold
As I mentioned above, I love pastel rooms.
I know…I know…they can be boring.
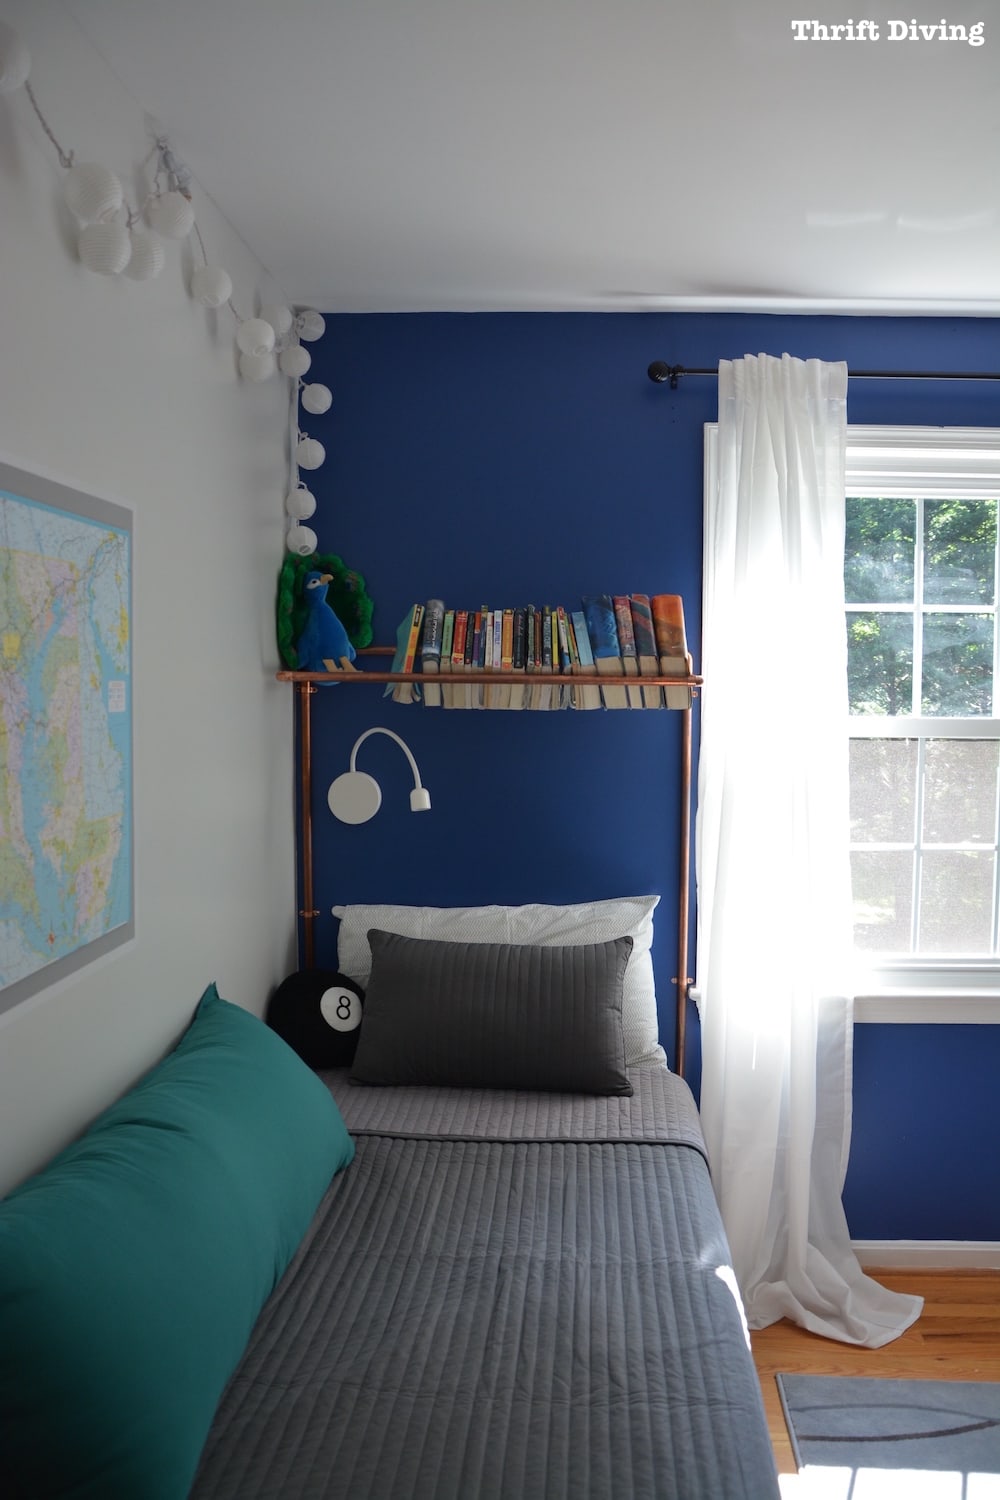
Every now and then, though, especially for the men in my life, I like to go a little bold. The black accent wall was bold, as was the deep blue accent wall in my oldest son’s room. I think what’s fun about going bold with an accent wall is that it allows you to dip your toe into a color or a design you’re not quite sure of, but if you don’t love it, it’s not a huge commitment and it’s less overwhelming.
Try some unexpected deep colors and pick the main wall that you want the focus to be (like the wall with a window) and go bold! If you don’t like it, it will only require a couple coats of primer to cover it up, and you can start over!

Lesson #9: Choose a Style that Will Be Relevant for at Least a Few Years
As I mentioned, I’ve done a lot of room makeovers in this house. And some of them have been done at least twice now. That is a lot of time committed to re-doing a room. Pick colors and styles that will be relevant for the next 3 years. If you’re doing a room for a tween, make sure they’ll be comfortable with that color and design through their next phase of development.
Pick trends that, even if it goes “out of style” you will love it for the next 3 years.
My oldest son’s room still looks great, but it’s been about 5 years now and he’s ready for another room makeover. I wonder what color he’ll request? 🙂
Lesson #10: Layer Your Rugs
My absolute favorite style of rug are shag rugs! They’re so cozy under your feet and can be snuggled up on them together with the kids. I had a hard time finding the rugs I wanted in a short turn-around. So I found these two gray shag rugs at Target and laid them downside by side to create a larger footprint in the room.
I also added a faux bear skin rug that I bought months ago from Costco which covers the hard surface in front of their closet.
Rooms with lots of soft rugs layered add to the cozy factor!
I tend to stick with solid rugs so that when I want to change the decor, the rugs won’t clash.

BONUS TIP: Take Lots of “Before” Pictures!
The one thing I have appreciated about my home in the 11 years I have lived here is that I have documented everything I’ve done to this house, starting with the horrific outdated kitchen…and the basement…to the kids’ room…even the outdoor space.
And when I stumble upon those old pictures, I squeal in disbelief and run to ask my family, “Hey, do you remember the house looking like this?!?”
You forget how much your home has changed over time and how it has become more of a reflection of who you are and what you value for your family.
No matter what you’re doing in your house or yard, always take “before,” “during,” and “after” pictures. Turn the pictures into an album that you can flip through and reminisce about your projects, and even show your guests when they come over to visit. It’s a great conversation starter and a walk down memory lane!
And you never know…you might just inspire someone else to tackle their own DIY projects!
BEFORE

LATER
NOW
I’d love to hear from you: what are the makeover tips and tricks (and lessons) that you have learned from tackling room makeovers in your home?
Remember to download the Capital One Shopping browser extension for Chrome so that you can save money and earn rewards when shopping online!
Love this post? Click here to save it on Pinterest!
![]()


Download the 5 freebies!

Thrift Diving inspires women to decorate, improve, and maintain their home themselves...using paint, power tools, and thrift stores! Use these 5 printables, checklists, and ebooks to get started!


I want to know you keep that white rug so clean? Everything looks amazing.
LOL, the kids are NOT allowed to eat in their room! That’s the only way!
I love this makeover! Awesome job with colors and patterns. I am trying to makeover my master bedroom but keep getting side-tracked. I’ll be taking lots of pictures of the journey. Thanks, as always, for the inspiration!
A standing “O”! Fantastic job, Serena! My sons wanted to paint their rooms black when they were in their ‘tweens, also. What’s up with that??? I would add, don’t be afraid to change out light fixtures and ceiling fans. It’s easier than you think.
HAHA, it must be the “cool” tween thing, I guess! 🙂 As for the light fixtures and ceiling fans, yes, those are easy to change. I took two wiring classes for my carpentry degree so I now am pretty confident with some wiring jobs!! 🙂 Thanks so much for commenting, Ramona!
Your sons’ room looks great! Those headboards were such an awesome find. You did a great job of mixing colors…the touches of gold and teal with the black, white and gray are really nice. Thanks for sharing your tips! I’ve heard of ways to make your own chalk paint, but not this particular product. I have a lot of sample pots of paint from when we built our house, so I need to look into that!
Yesss…you’ll love this chalk paint additive. It’s non-toxic and works very well. 🙂 Much cheaper than buying ready mixed paint (although I still like to do that, too). But especially when you need a certain color, or you just want to do a quick paint-job of a small piece, mixing your own small sample pot is easier! Thanks, Vicki!
Very thoughtful and insightful tips. Really like the boys rooms. Love the deep teal(?)in the older boys room ,but the new black accent walk and the bright accent colors really are grand. I am a pastel to mid tone person myself GREAT JOB!!!!
Aww, thanks, Charleen! Glad you like it! I’m glad they suggested black because it took me outside of my comfort zone to choose colors that I wasn’t used to. 🙂 Thanks so much!