How to Paint Shutters and Garage Doors: Outdoor Refresh Makeover
This post on painting shutters and garage doors is sponsored by Wagner.
Don’t ever underestimate the power of painting your shutters or your garage door for curb appeal, especially if it’s been years.
I don’t know if it’s just me or not, but after so many years, I stopped noticing the faded shutters, the tired paint color on the garage, the rotting wood around the garage door frame. Oh–and the janky exterior wall sconces. One was cracked, exposing a lightbulb, and the other one looked like he was tipping his hat, “Good day, sir!”
Wagner, one of my long-time sponsors, asked me to come up with some home improvement project ideas on which to collaborate using their Wagner Flexio 4000 HVLP Paint Sprayer. One of my first thoughts was “Painting the shutters and the garage doors!”
As simple as it was, it took two days during the hottest days of the year, but it was well worth the effort! My middle son is my harshest critique who typically doesn’t comment on my projects. But even he was stunned that a few simple updates turned our dull 1973 home into something a bit more fresh!
Click here to save this project on Pinterest!
BEFORE
Funny enough, Google Maps got a pretty good picture of our house. 🙂
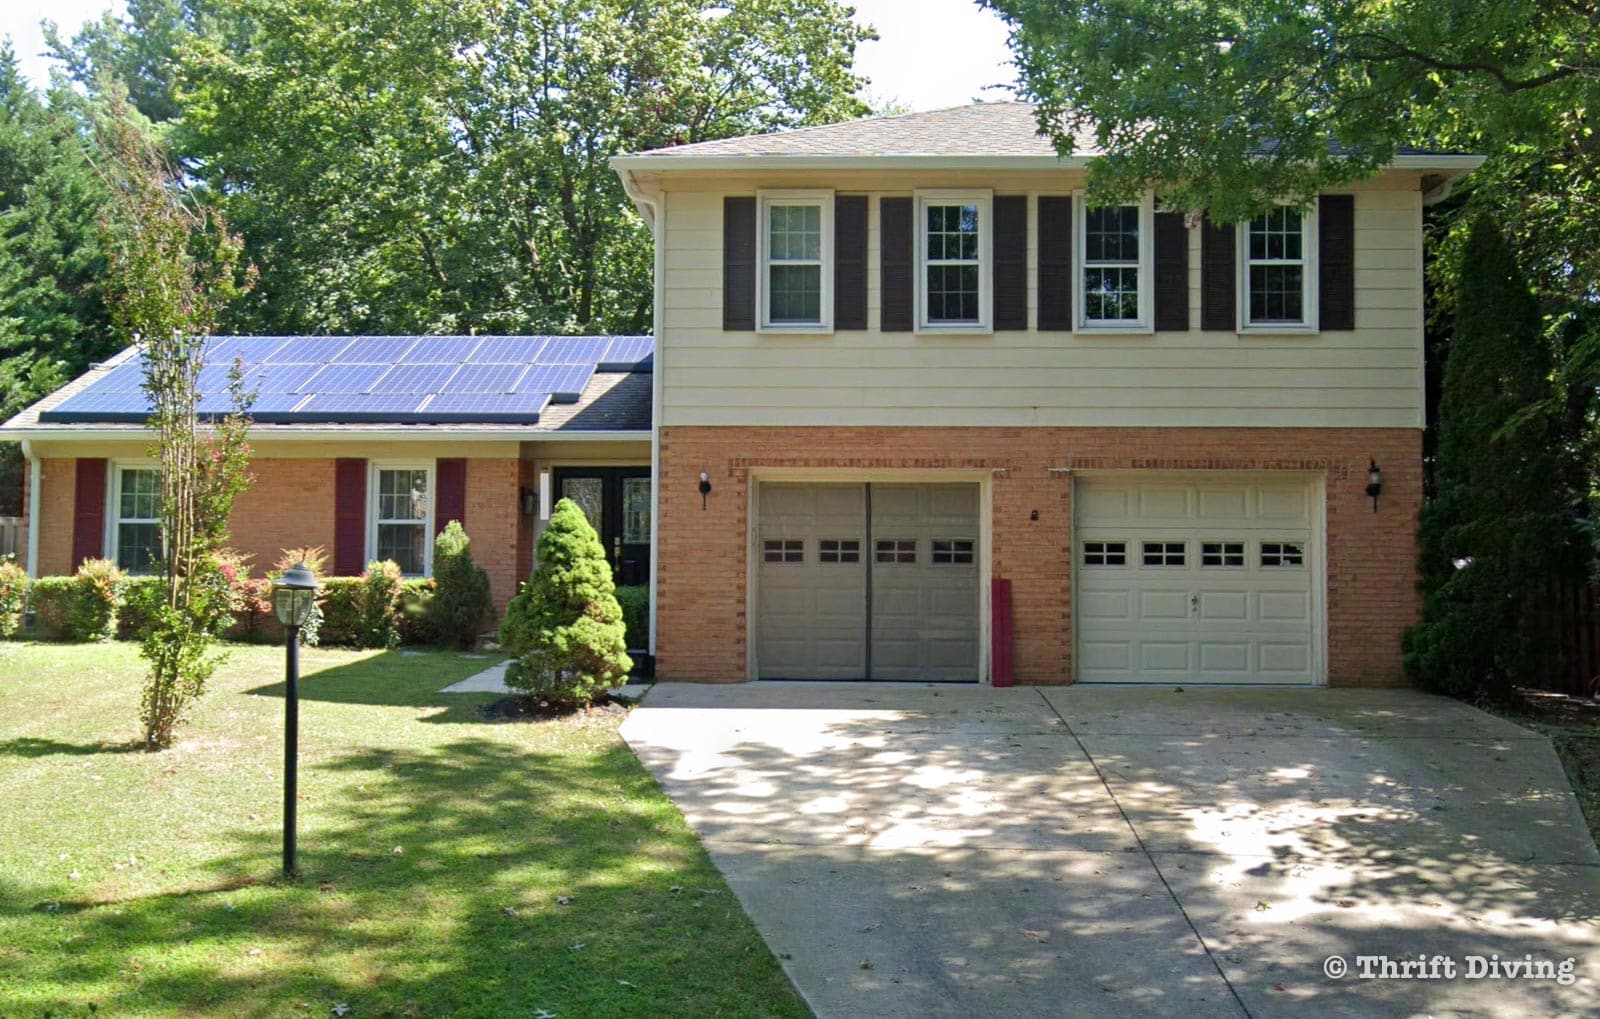
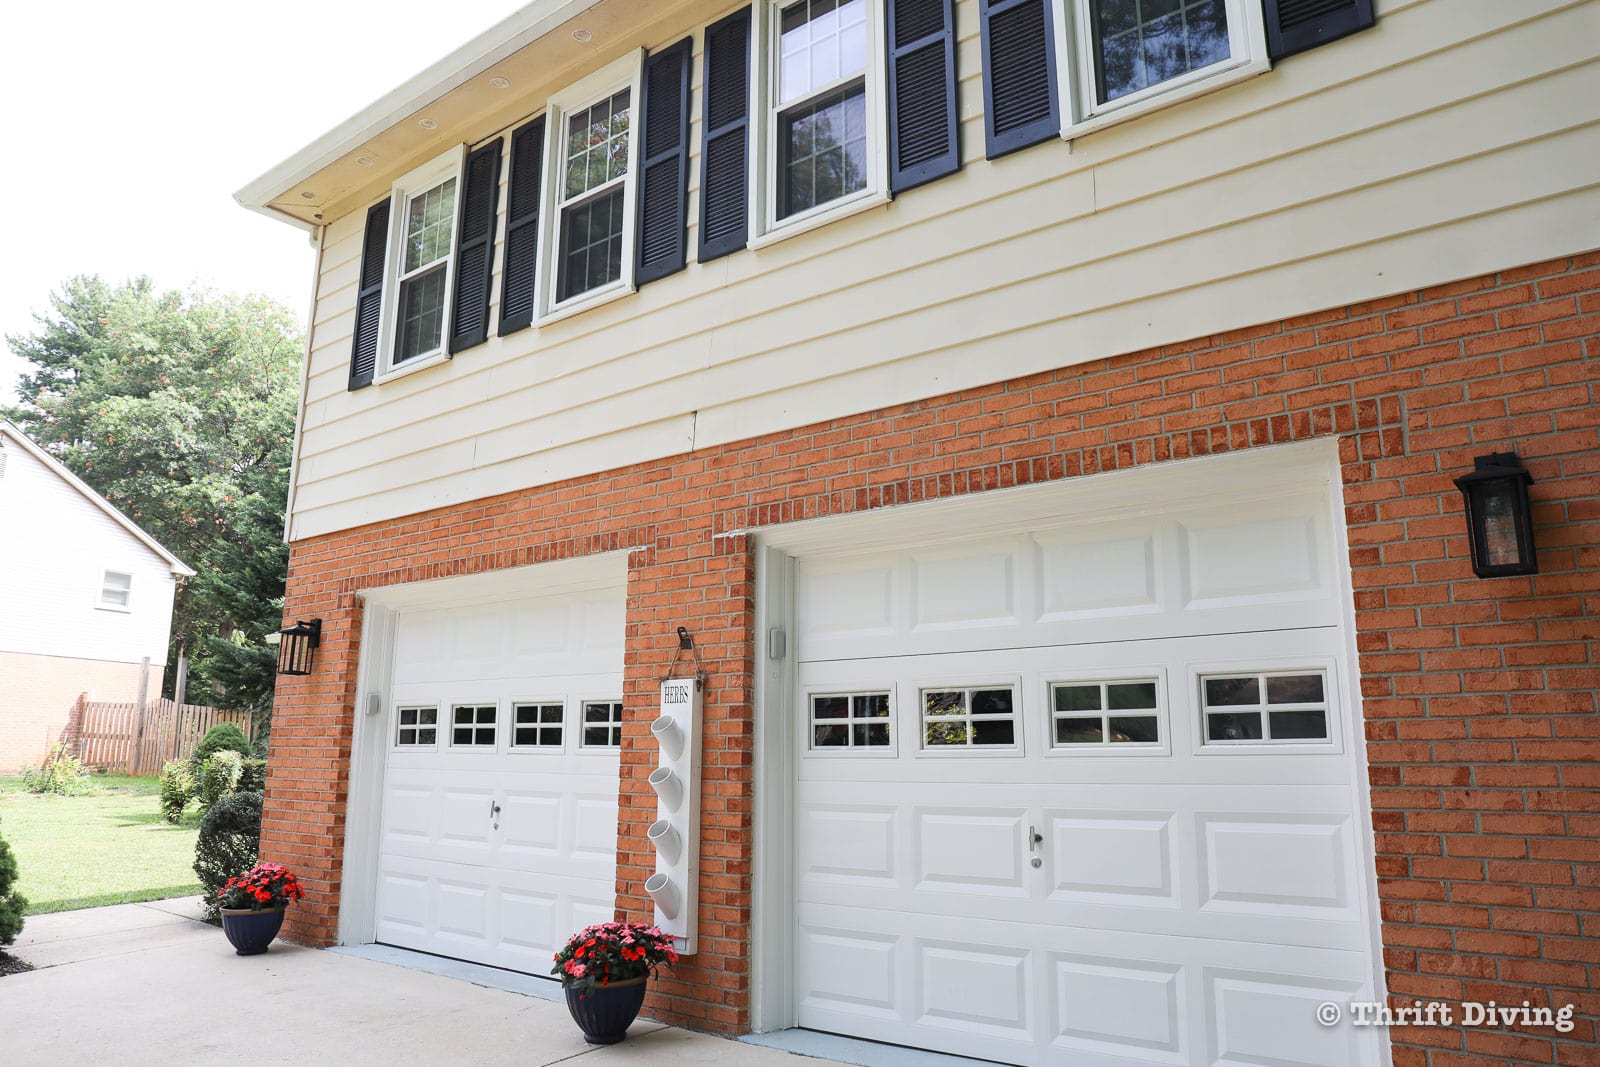
With pretty painted shutters and fresh white garage doors (and new lighting, flowers, and gardening!), the house looks amazing!

BEFORE
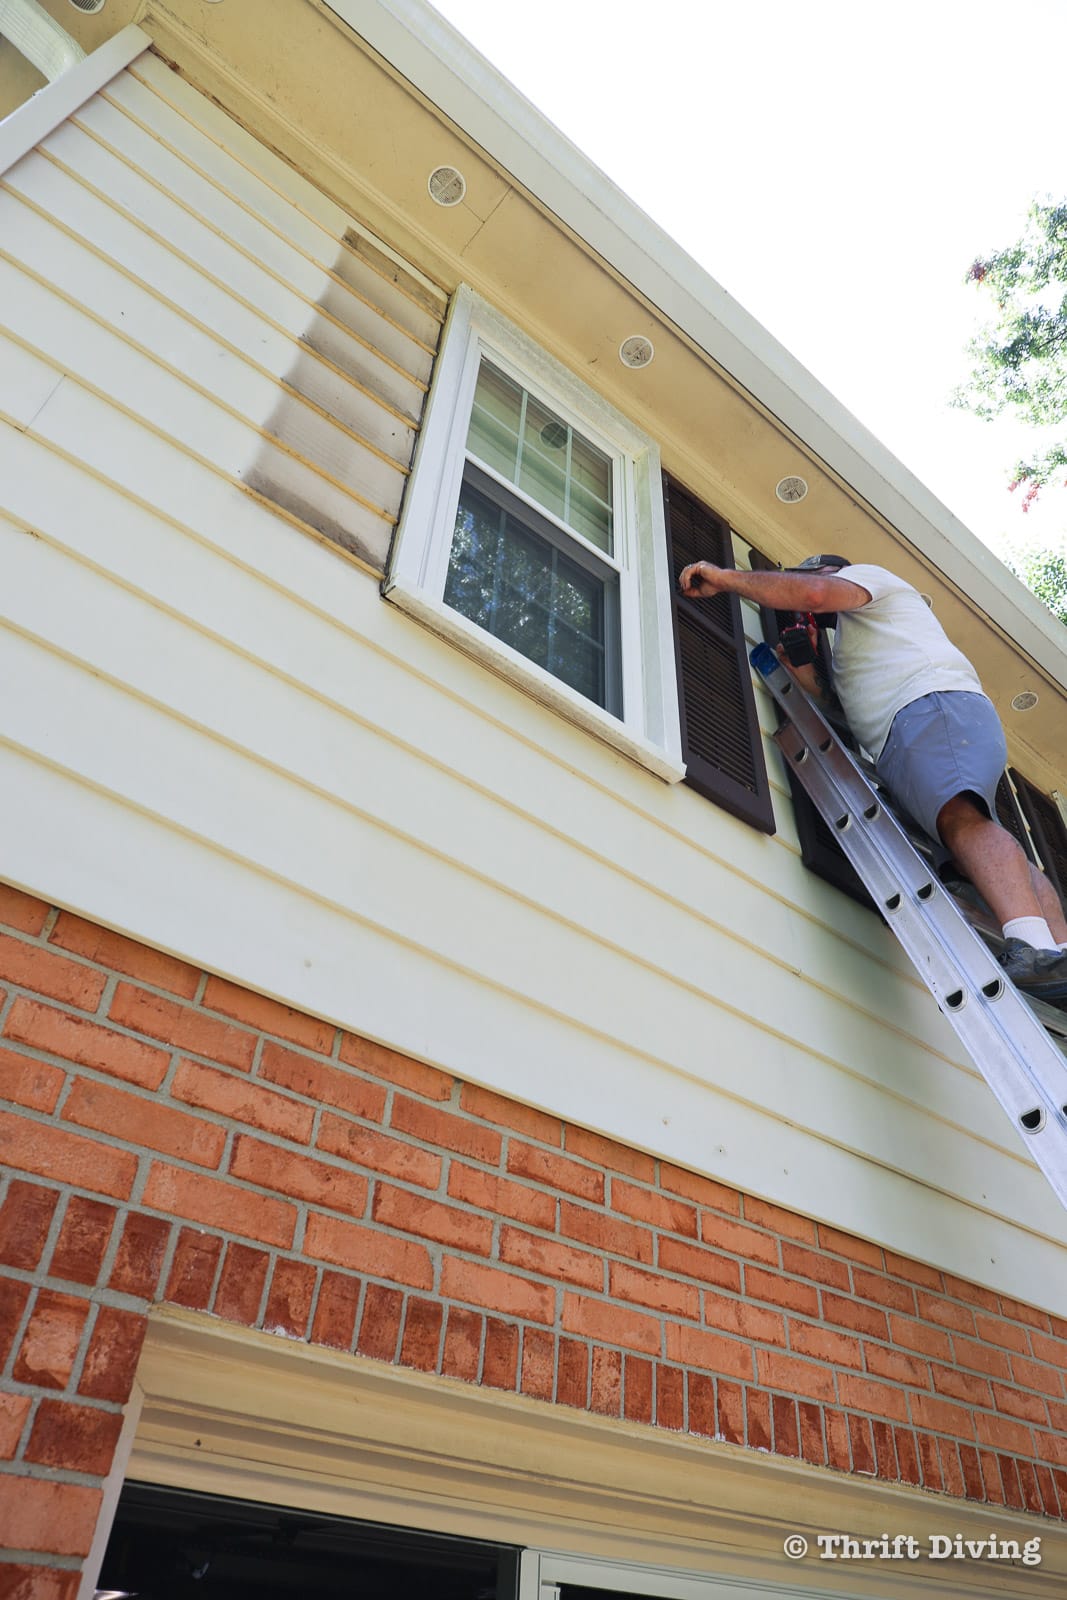
The reason I left the upper shutters unpainted when I attempted a refresh years ago is because I didn’t have a tall ladder. Not to mention that I’m wary of ladders. From what I’ve heard, they’re more dangerous than most power tools. I know of people who have fallen off of ladders and have permanent brain damage. So pulling off the old shutters wasn’t something I was willing to do. Until now, with some hired help. Take a good look at these forlorn shutters.
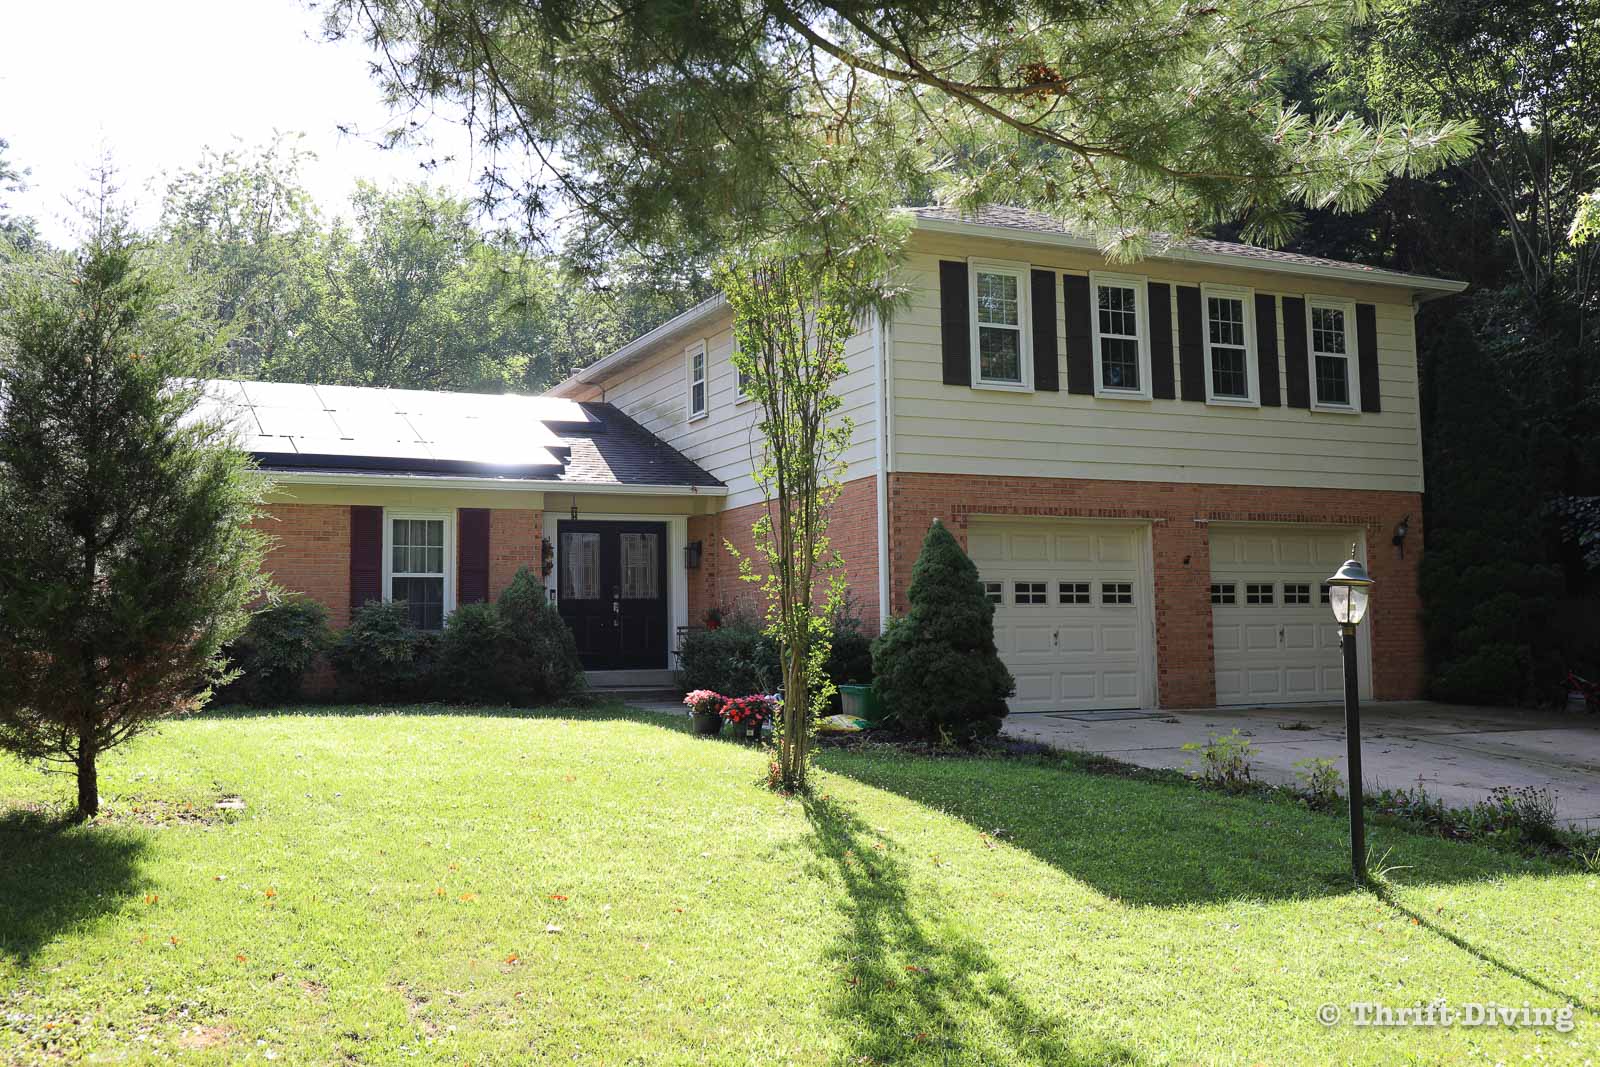
With new paint on the shutters, brighter garage doors, and some much-needed de-weeding and cleaning up, my house looks amazing! (Don’t get me wrong–we still need to replace the original aluminum siding, and I honestly despise the color of this brick and am trying to convince my family that paint does wonders for ugly brick). Overall, it definitely looks more fresh!
AFTER!

The house is cleaner, looks more sleek with the black shutters, and the pop of white from the doors looks fresh! So let’s talk about how I pulled off this project!
Materials
Here’s what I used to refresh my exterior:
- Wagner Flexio 4000 HVLP Paint Sprayer
- Benjamin Moore black paint
- Benjamin Moore white paint
- Ladder (optional)
- Power drill with drivers and drill bits
- Hose
- Cleaner and Degreaser
- Painter’s tape
- Painter’s plastic or masking paper
- Small paint brush
- Dust mask
- Gloves
- Cleaning towels

STEP 1: Remove the Old Shutters
I don’t know about your house, but my house is at least 25 feet tall, if not more. The thought of climbing up on a tall ladder to remove my shutters is what prevented me from painting them years ago, as I mentioned earlier. This time, though, there was no skipping these shutters out of lack of a ladder and a lack of bravery. But I knew the best decision would be to hire someone to help.
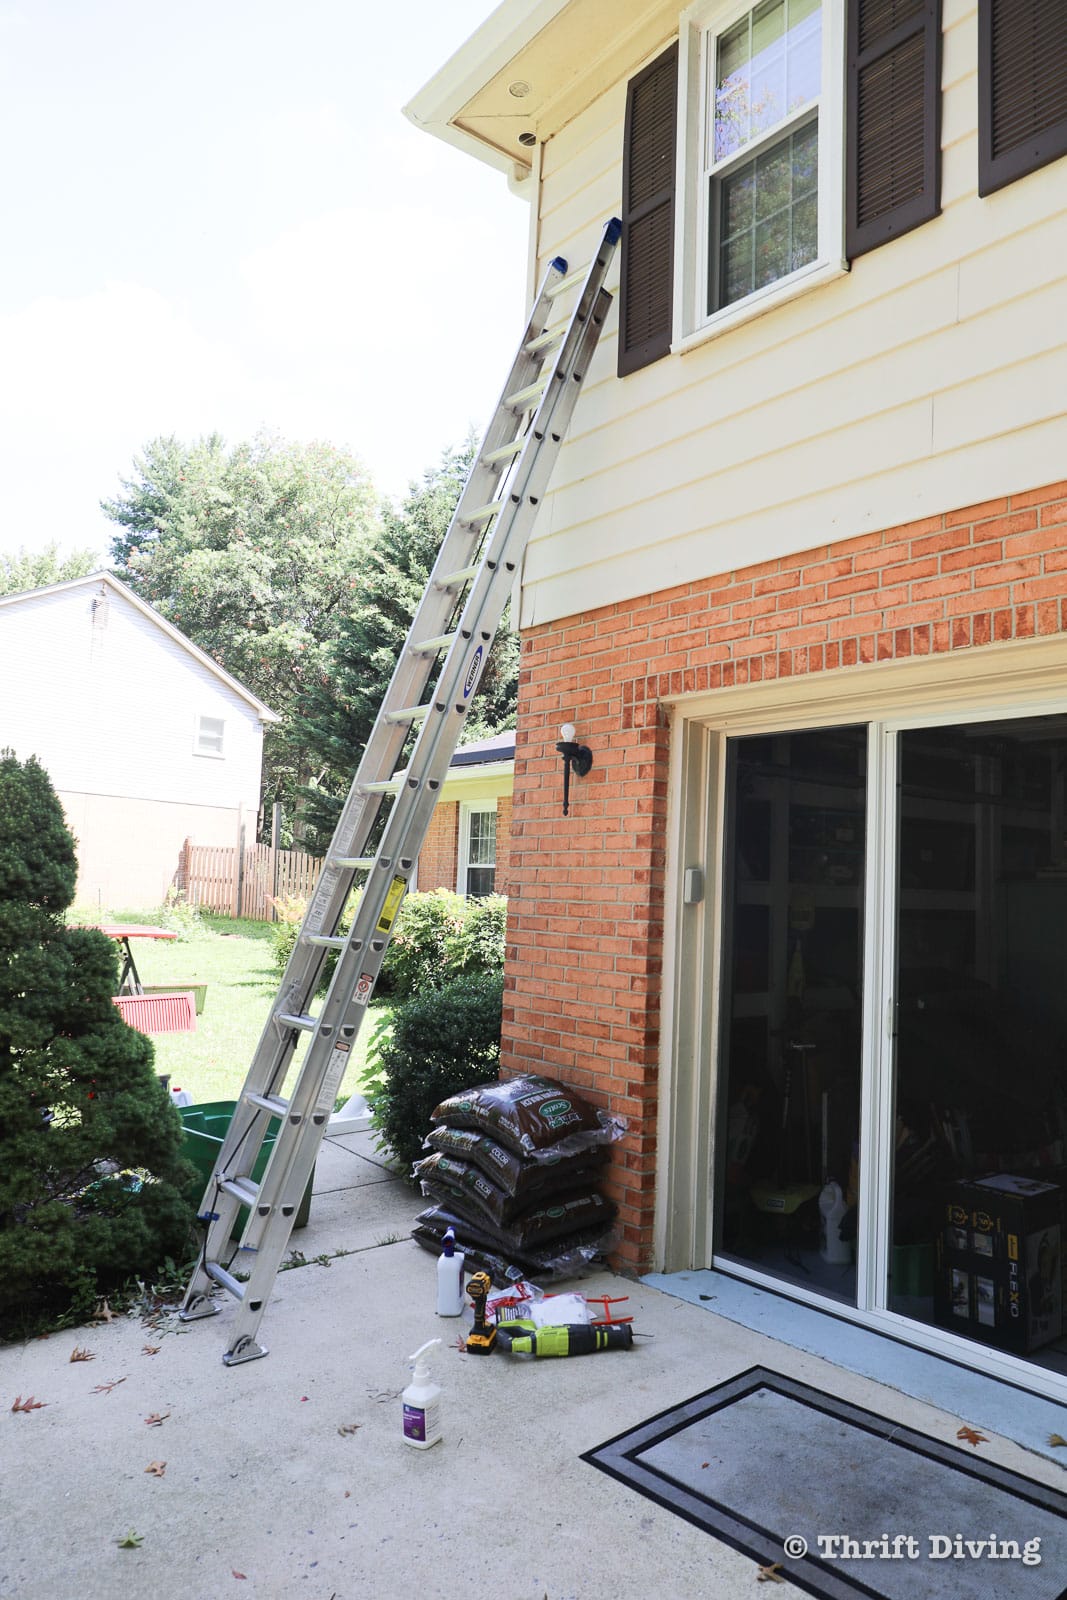
I hired Troy, a carpenter that I have hired a few times to do work on my rental property locate in my hometown. I called him up, asked him to bring his tall ladder and his experience in climbing ladders, to remove my shutters for me.
If you don’t have a “Troy” or a tall ladder, check out with friends and family (or on NextDoor) to ask your neighbors if they’ve got a recommended handyman to come and help with this part of painting your shutters and garage doors.
Also, be very careful when climbing on ladders if you’re planning to remove your own shutters up high. Please watch this video first on how to not fall off a ladder!
STEP 2: Clean Off the Shutters
Once my upper shutters came off, I realized how much in bad condition they were! When they’re up high, you don’t see the blotchiness, but once removed, it was clear they were way overdue for painting (and cleaning behind them!).

There’s likely to be lots of dead insects, cobwebs, and dirt behind your shutters. Now is the best time to thoroughly clean off the front and the back with a hose. But there’s years of dirt on these shutters, so after hosing off the debris, spray and wipe them with a cleaner and degreaser (or even a mixture of vinegar and water). This thoroughly cleans the surface of the shutters and prepares them for painting.

STEP 3: Paint Your Shutters
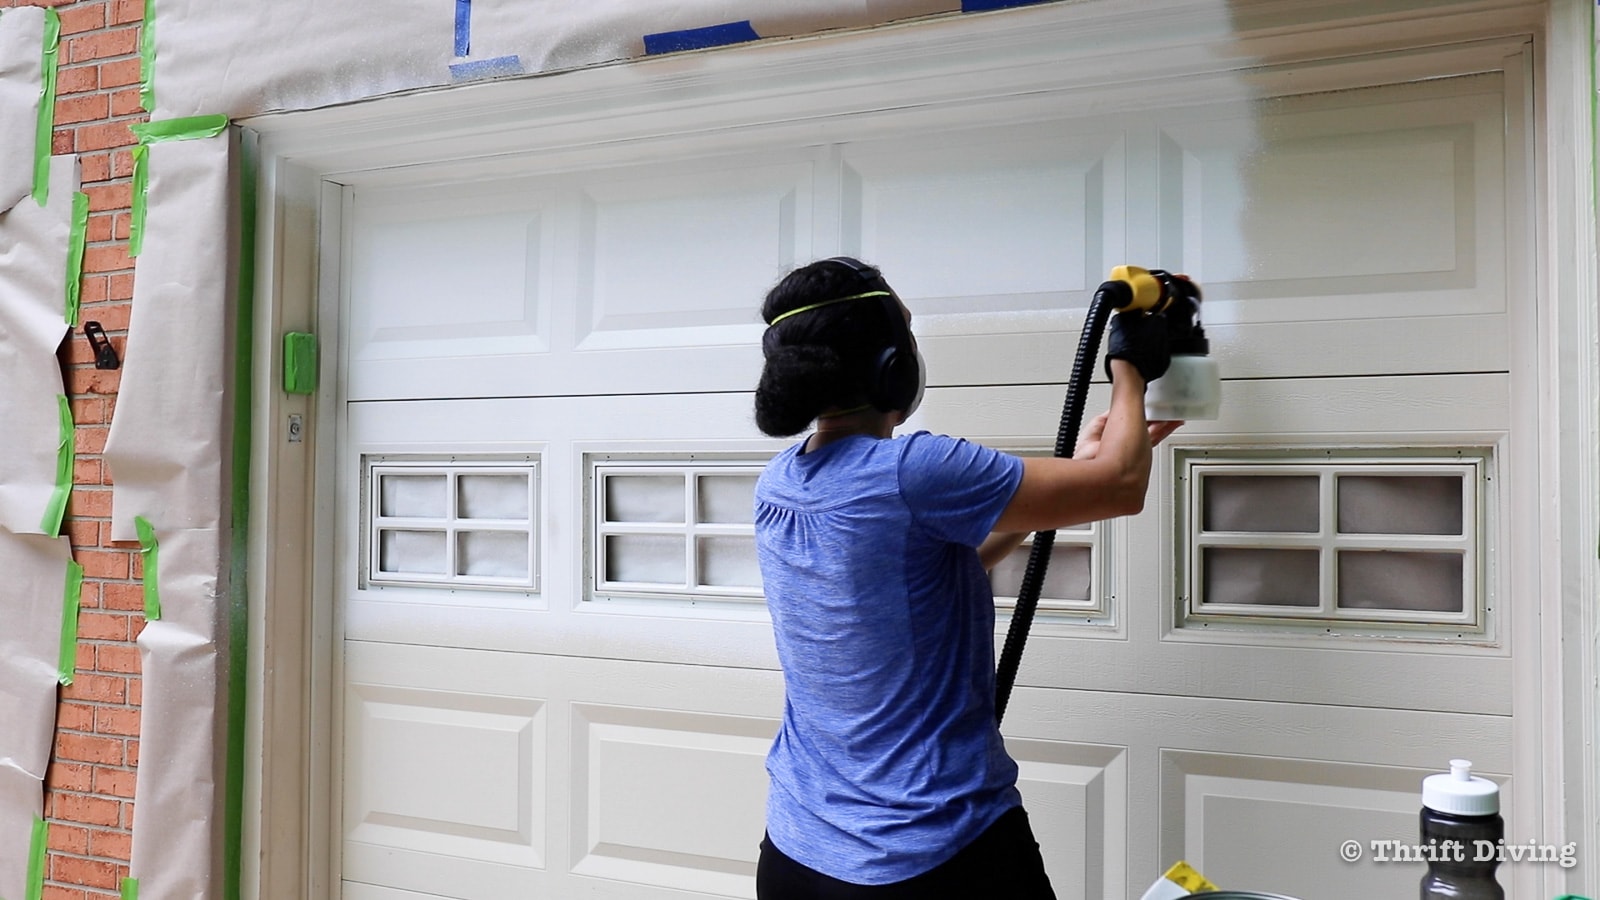
Let the shutters completely dry before painting. For this part of the project, the easiest way to paint your shutters is with a paint sprayer. I’m using the Wagner Flexio 4000 HVLP Paint Sprayer, provided by Wagner for this project.
Painting shutters with louvered openings would be tortuous to do with a paint brush. When using a paint sprayer like the Wagner Flexio, you simply pour your quality exterior paint into the cup (you shouldn’t have to thin the paint), twist the handle into place, plug in the blower, pick your spray pattern (they even provide a large paper practice spray pattern sheet before you start spraying on your “real” project), then start painting!
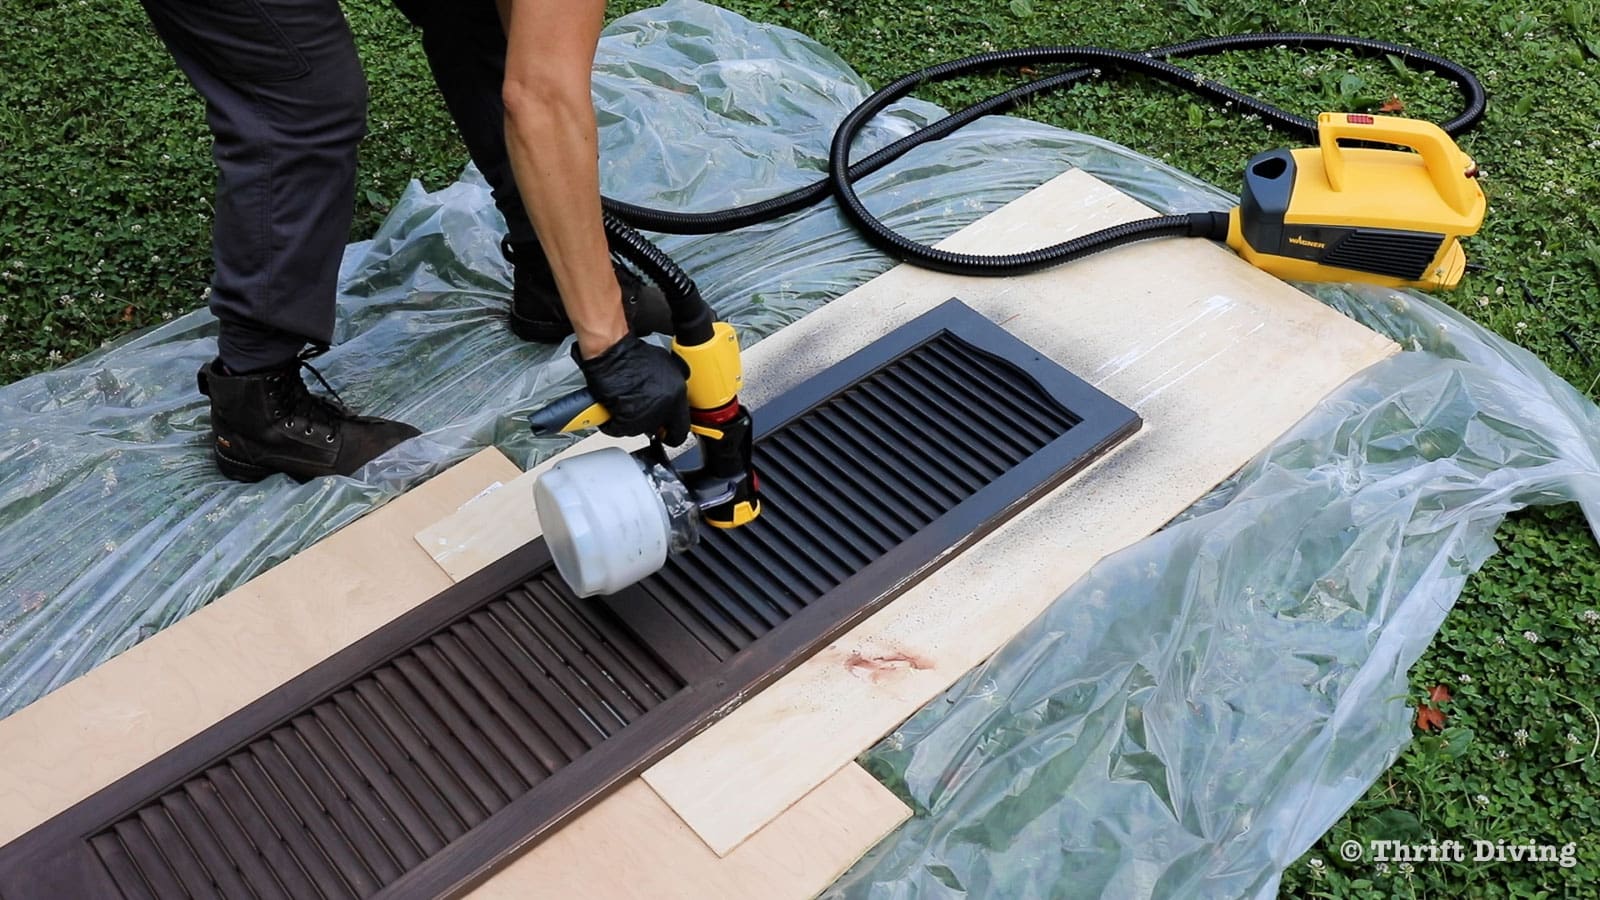
As you’re working, if you need to adjust the paint sprayer, there are a couple dials on the handle, such as the adjustable pattern width and the material flow control. On the blower, you’ll find the variable airflow control.


Add 1-2 coats of paint on your shutters. I found that with this paint sprayer, I could do a couple of thin coats back-to-back, and get great coverage.

STEP 4: Reattach Your Shutters
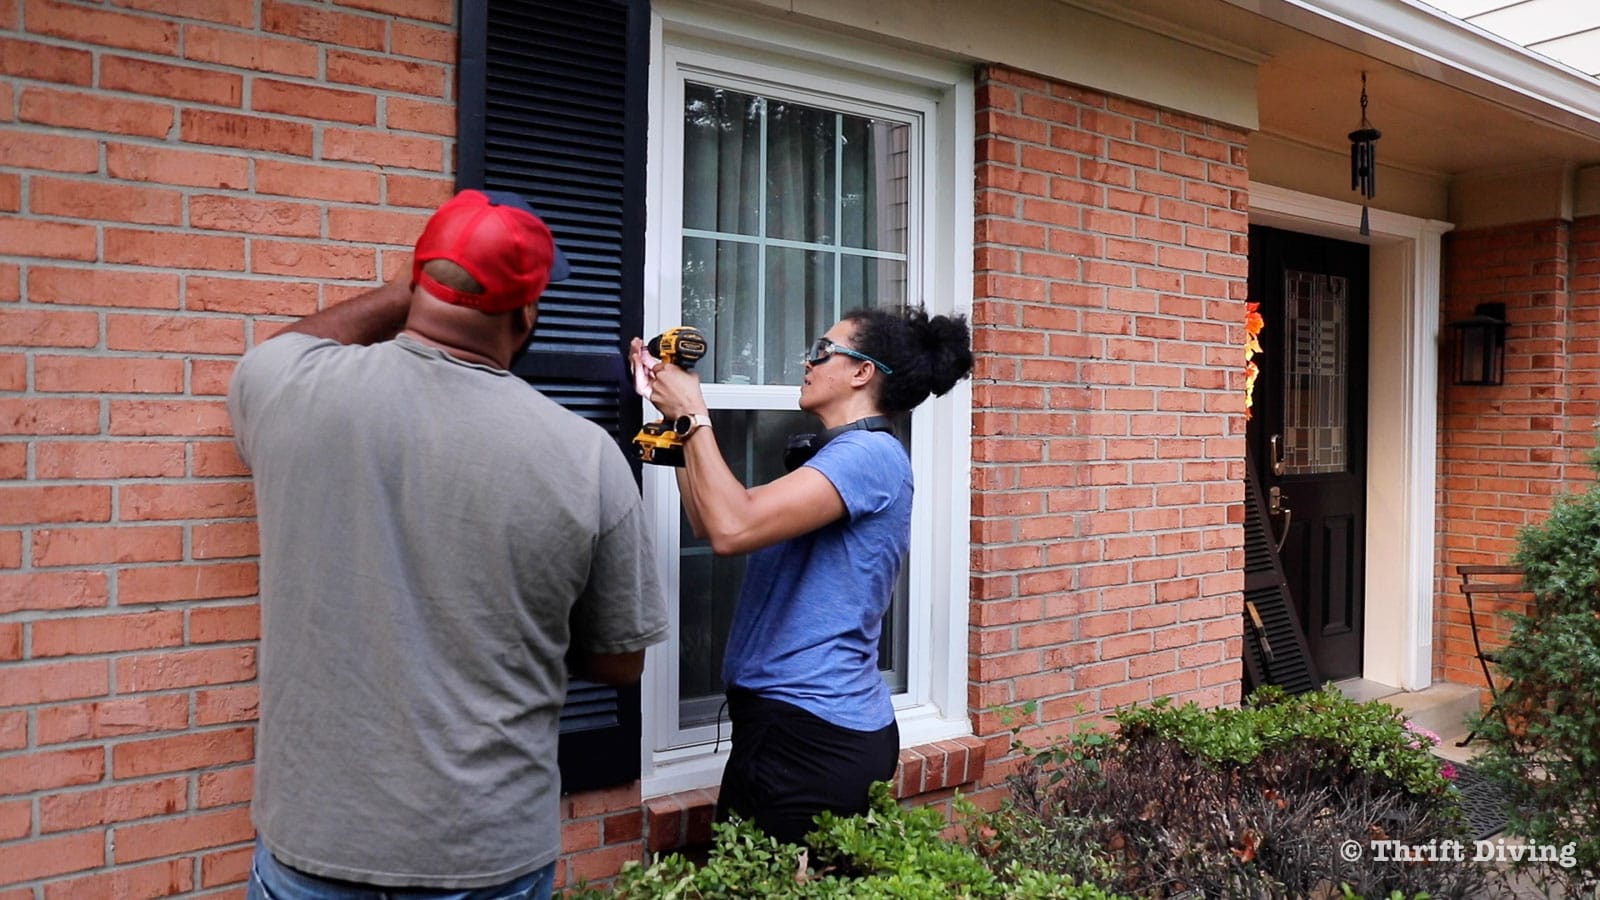
Let the shutters completely dry before reattaching them to the house. In my case, the shutters attached to the siding were easy to reattach with exterior screws. To attach shutters to the brick of my home, I had to use a hammer drill and concrete screws. Look for the Tapcon brand of concrete screws and use a hammer drill with a masonry bit that is indicated on the Tapcon screws for recommended size drill bit.
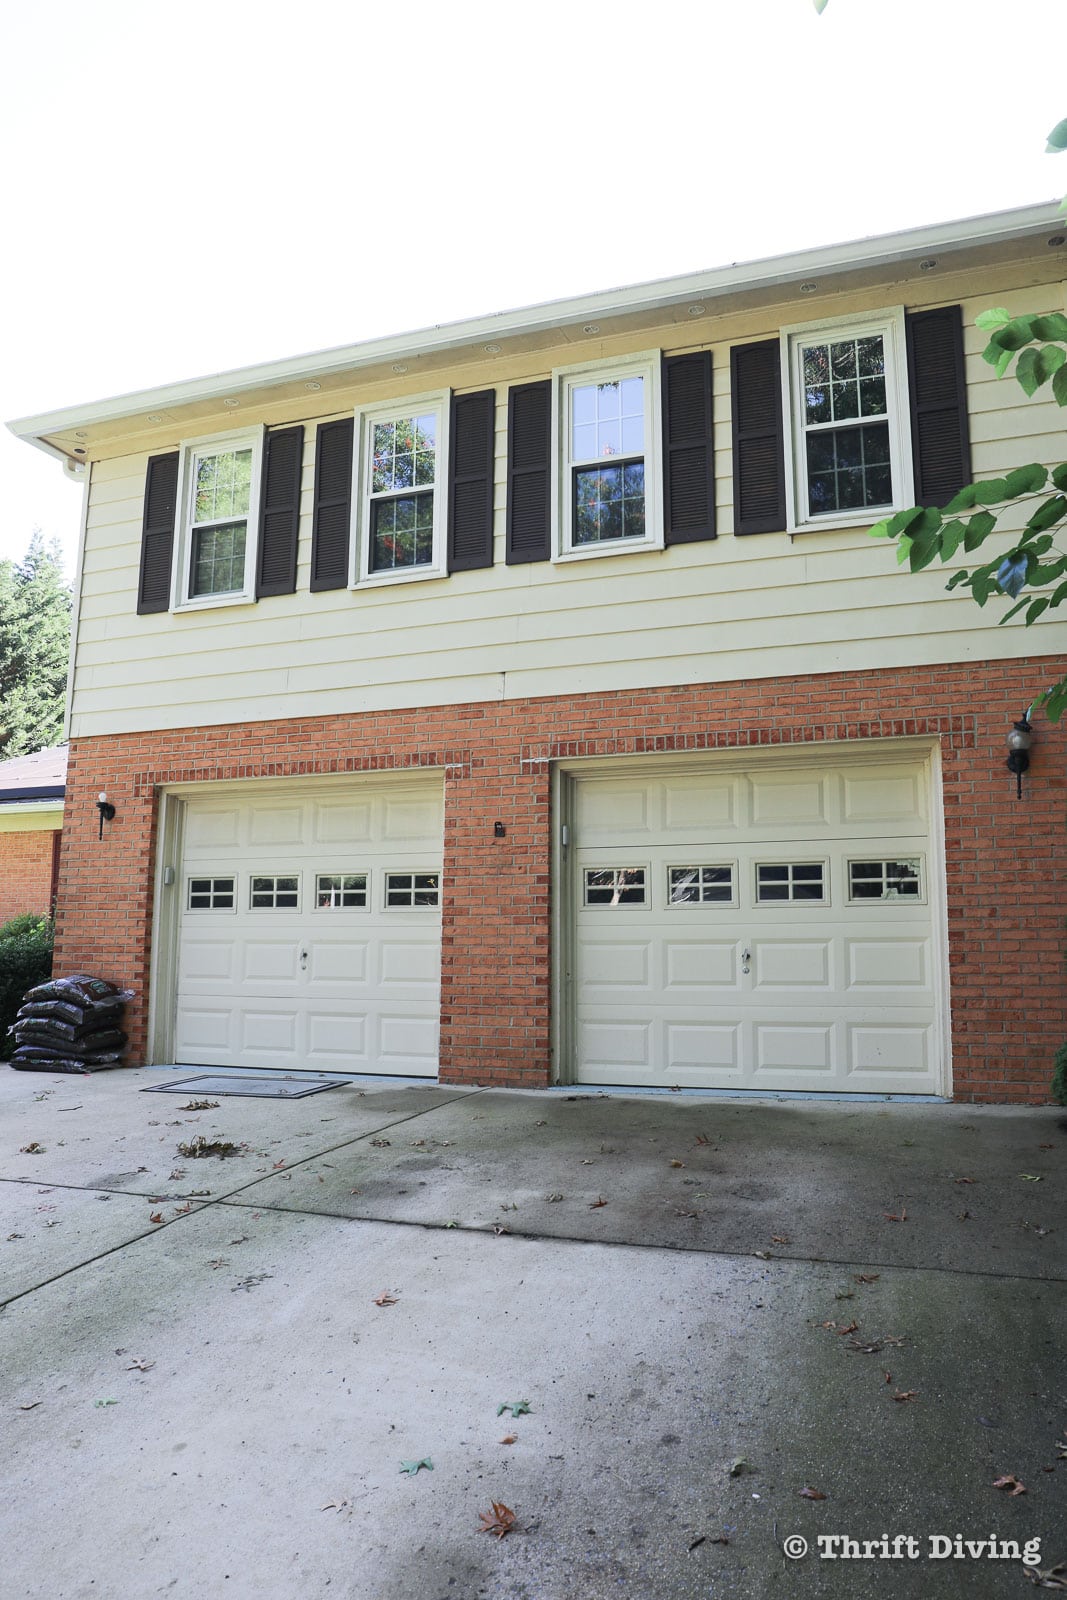
Painting Your Garage Doors
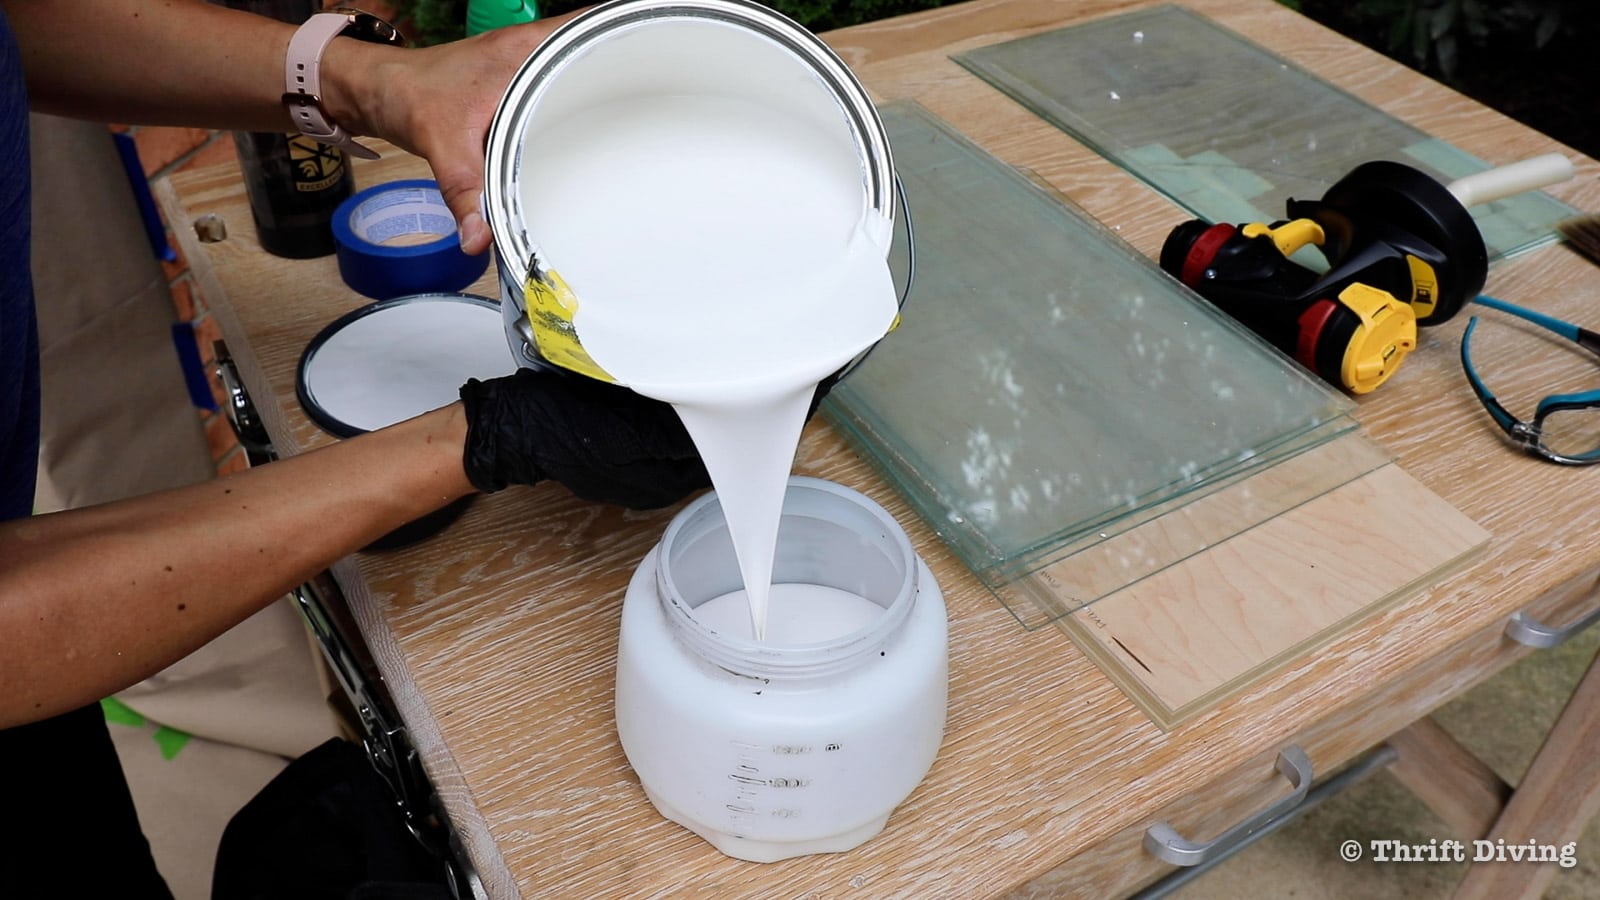
Our garage doors were the color that I despise the most: almond, to match the ugly color of our old aluminum siding. A bright white was perfect for helping to brighten up the whole exterior.
I cleaned up the Wagner Flexio, let it dry out overnight, and the next day, loaded a full cup of exterior white paint (not thinned).
STEP 1: Thoroughly Clean the Garage Doors
Just like cleaning your shutters (or a piece of furniture), you definitely need to clean your garage doors before painting them. You can use the cleaner and degreaser, but you can also use a mixture of vinegar and water.
To clean my garage doors, however, I used 30-Second Outdoor Cleaner. I had some mold and mildew on my siding that needed to be removed. Using a pressure washer on your siding is too intense and shouldn’t be used on siding. However, there are several brands of ready-to-spray cleaner that simply attaches to a garden hose and once sprayed on, can be easily hosed off.
I cleaned off behind the shutters, cleaned the garage doors, as well as the mold and mildew that was growing on the other side of the house, as well.
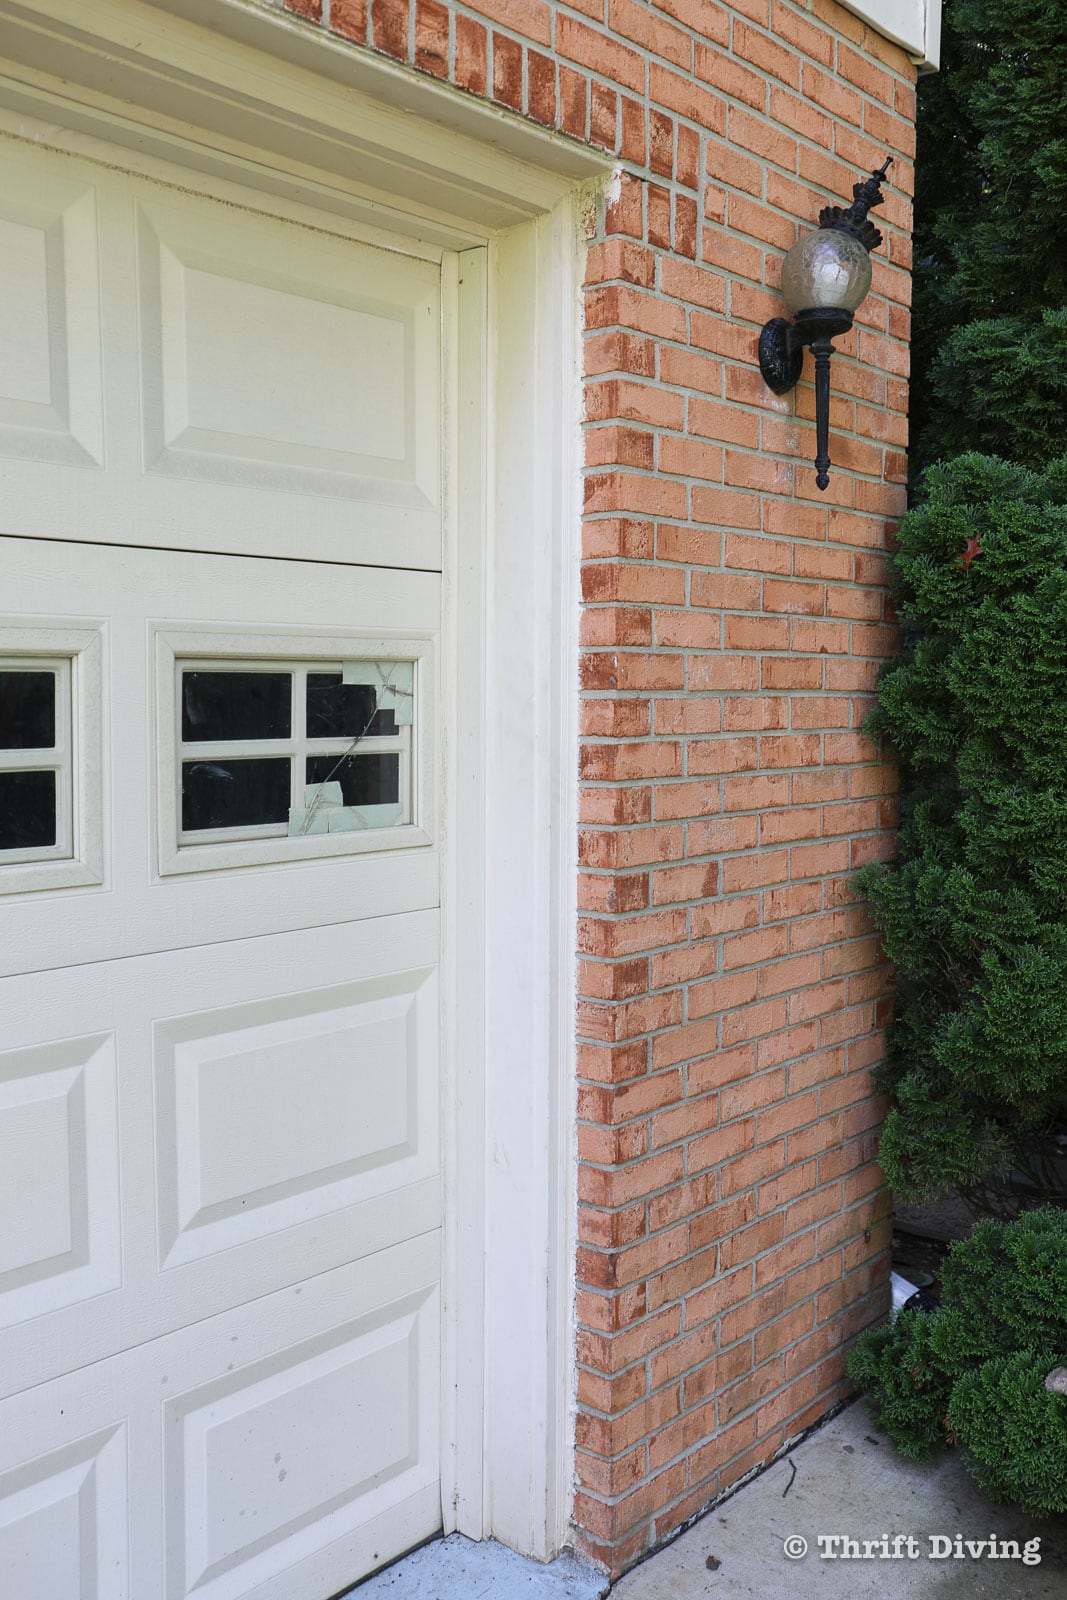
STEP 2: Fix the Rotted Wood
Trim around doors and windows often gets rotted. I had a couple of rotted spots that I needed to fix before I could paint my garage doors. I used a rotted wood restorer first, followed by the wood filler to patch the rotted wood.
I’m terrible at using this stuff and can never get a great, smooth patch. But anything is better than leaving it rotted, so I’ll accept its imperfections. 🙂 Take your time when using this wood restorer and wood filler because it gets really messy quickly and dries just 3-5 minutes after mixing a small batch.
After it was dry for 2 hours, I tried to sand it smooth. (TIP: Put painter’s tape down underneath of the area you’re patching; otherwise, you’ll drip it all over your concrete).

STEP 3: Tape Off to Prevent Overspray
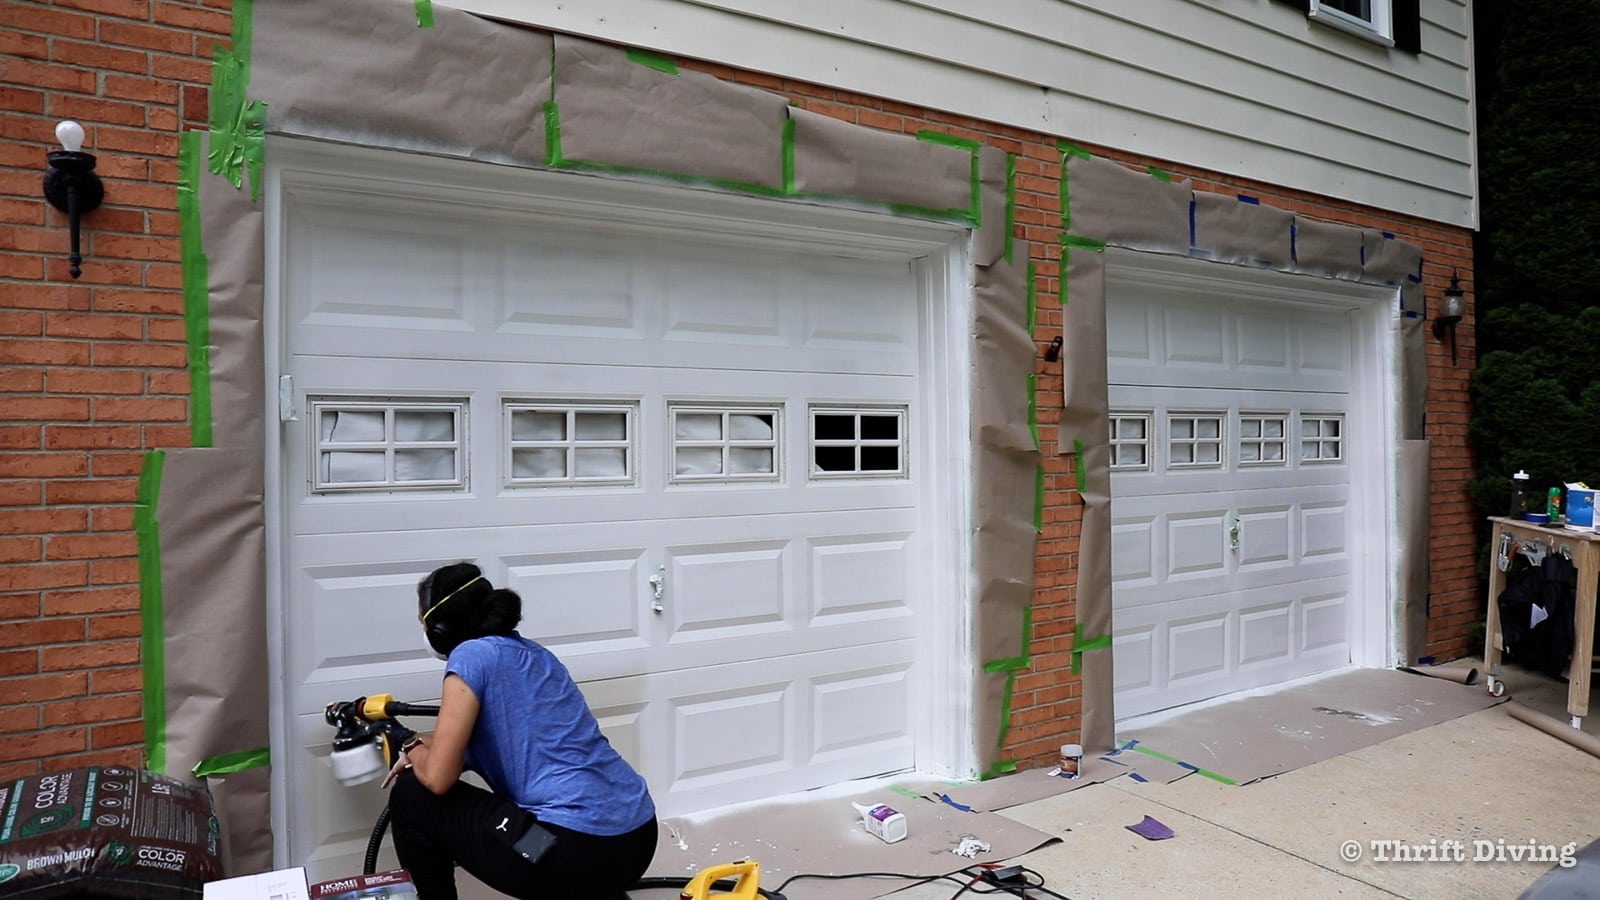
Using painters plastic or masking paper with painter’s tape to tape off around the garage to prevent overspray.
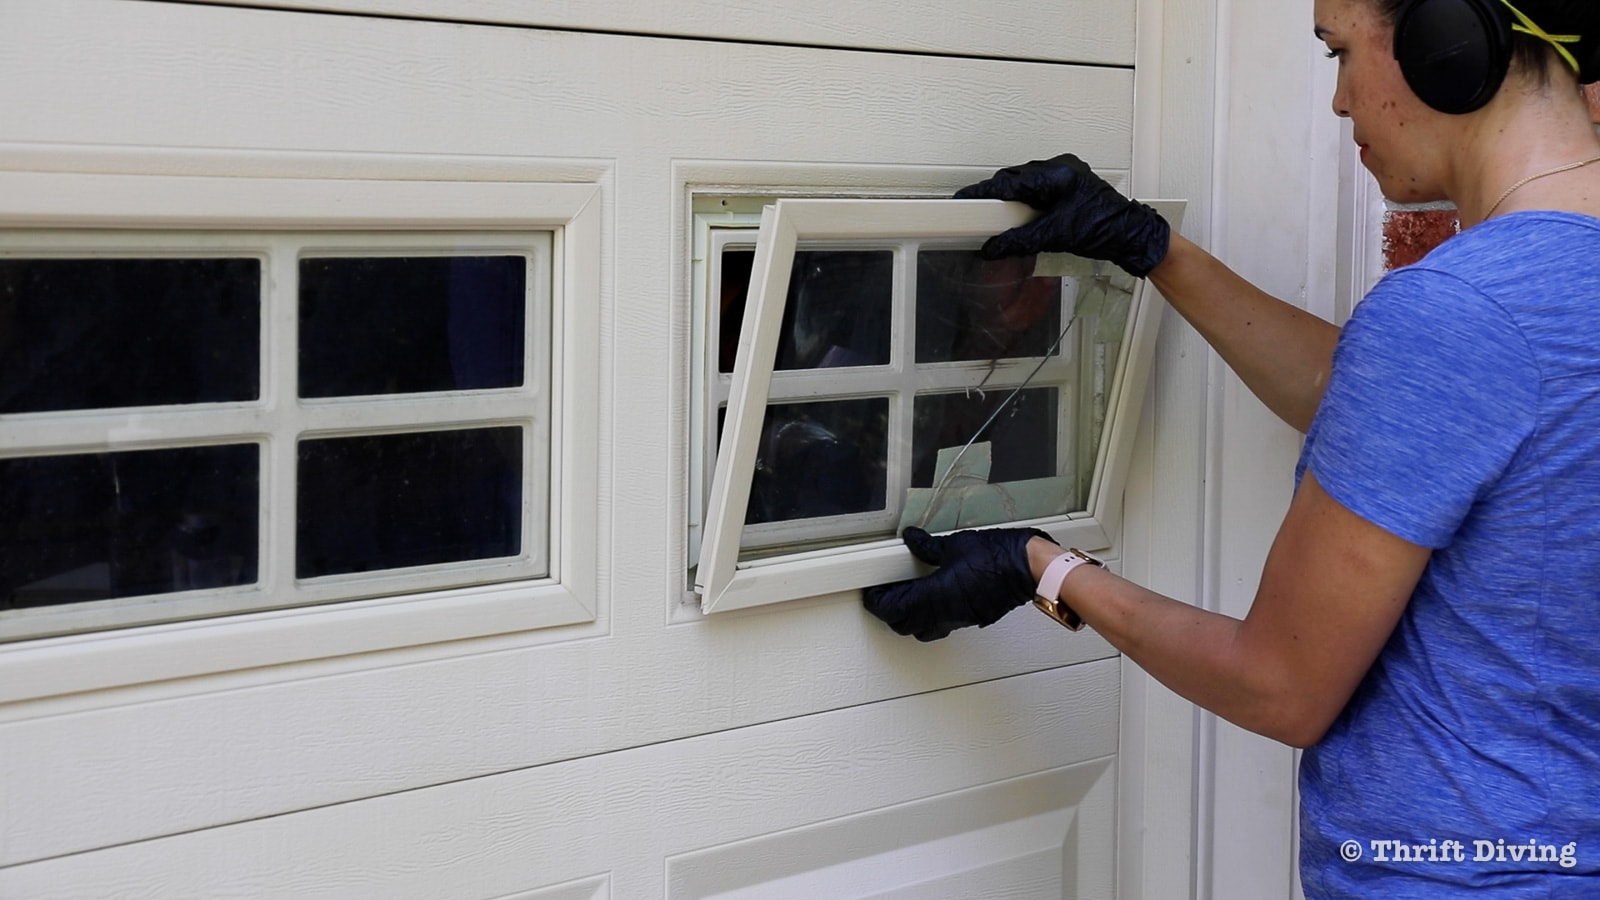
You’ll also need to remove any glass inserts in your garage doors. This step needs two people: one to hold the insert with glass, and the other to unscrew the insert from the inside. A big thanks to my husband for helping out! These inserts will need to be painted, as well.
STEP 4: Paint Your Garage Doors
The key to getting good results when using your Flexio is to sprayabout 6″ to 10″ from the surface. Keep the paint sprayer moving, while overlapping sections. I was quite pleased that there weren’t drips and spills in the paint and that the surface was uniform. Be sure to put paper behind your garage door windows before painting to prevent overspray from going inside the garage.
STEP 5: Change Exterior Lighting
It’s not that I mind the vintage lighting on the front of my home. But the other globe was broken and it was tired looking. I can probably reuse this one lamp elsewhere so I will be saving it. But I wanted something more modern, to match the exterior lights we had updated last year next to the door.
I chose the Mauvo Canyon Collection Black Outdoor Seeded Glass sconces. I love these! Last year, The Home Depot hired me to film a video for the product page for these lamps, which you can find on HomeDepot.com. 🙂 Since I love them so much, I bought 2 for next to the garage to replace the old vintage ones. These sconces cut on at dust automatically and use LED lights so there’s no need to replace any bulbs.
What a huge improvement!

BEFORE
Let’s take another look at how my house looked before this refresh, as it has looked for the past several years:
- Mismatched shutters
- Broken sconces
- Dirty siding
- “Dingy” garage doors
AFTER
I can’t believe how nice it looks now! I put in garden in some time ago with edgers, that will grow a ton of weeds. Some deweeding helped to improve that area, too. I still have a few things to do, like paint the yard lamp post. I also need to do the back of the house. Once my “she shed” comes, I will be consumed by that project, so getting my yard together in the rear will be top priority over the next week or so.
BEFORE
AFTER!
Want More Exterior Curb Appeal Projects?
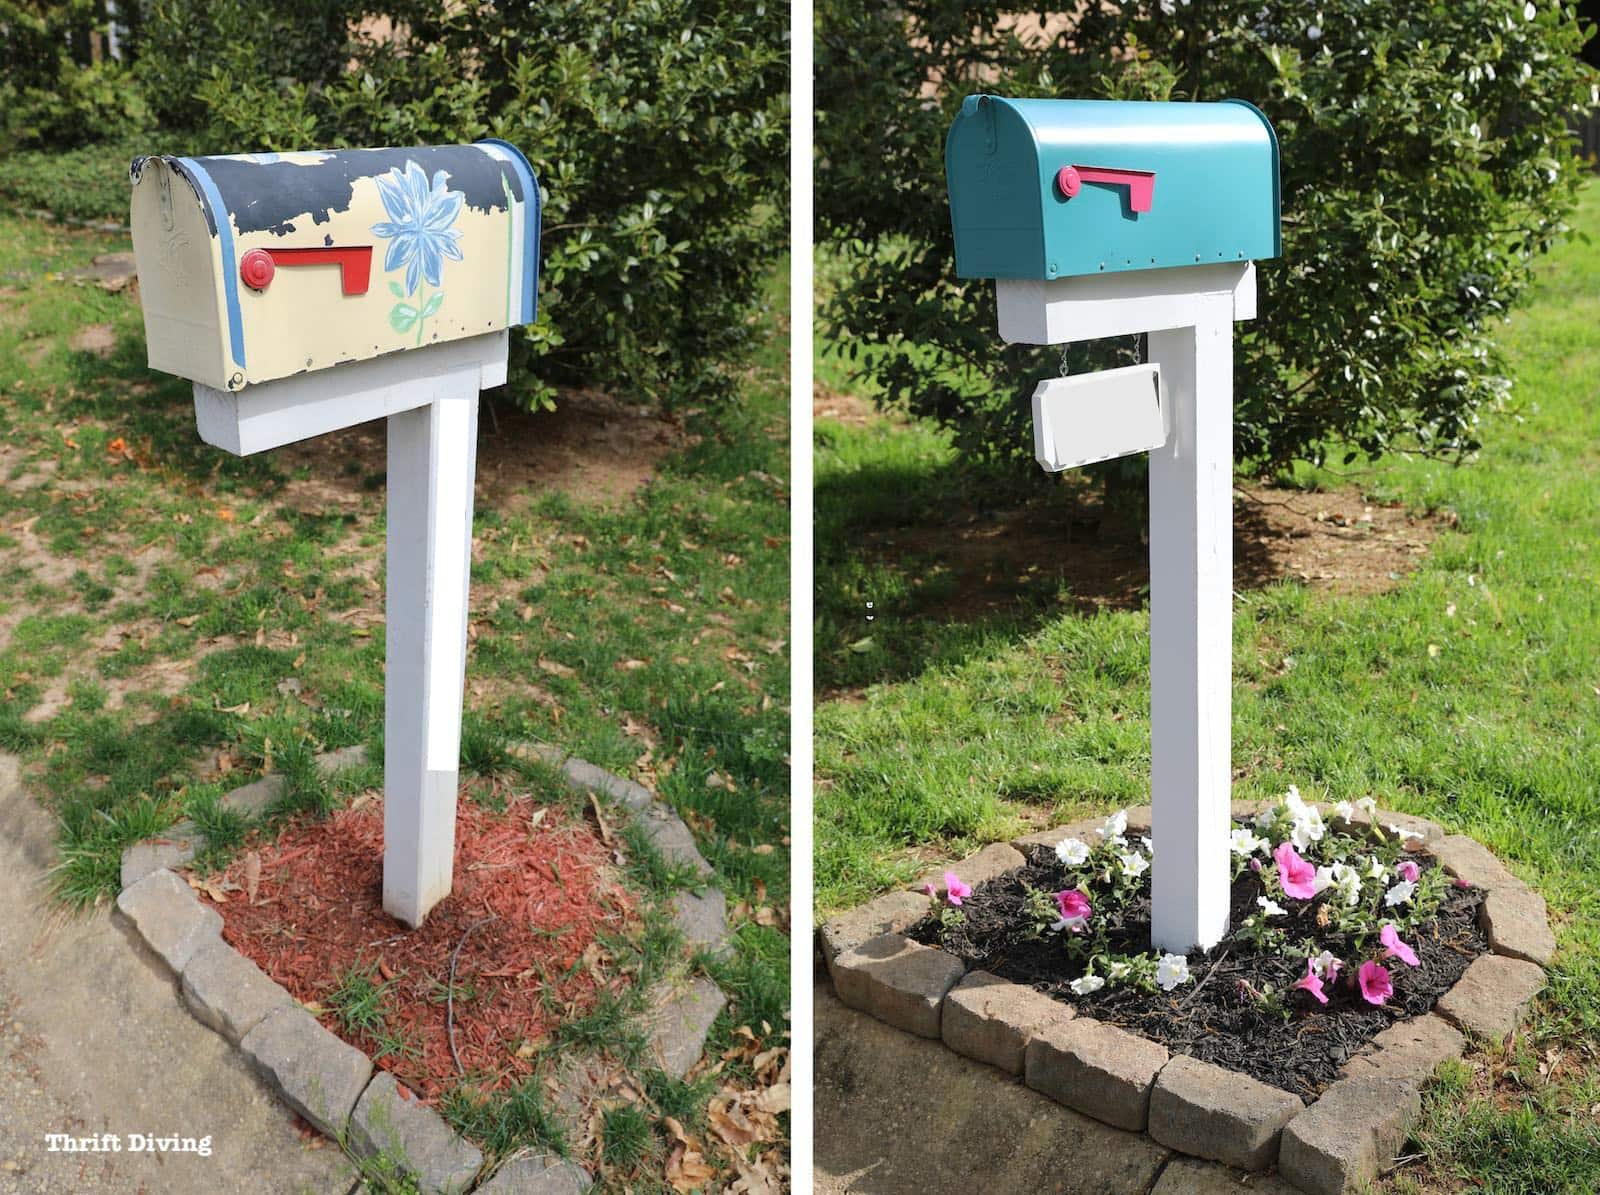
Boost your curb appeal with a mailbox makeover!
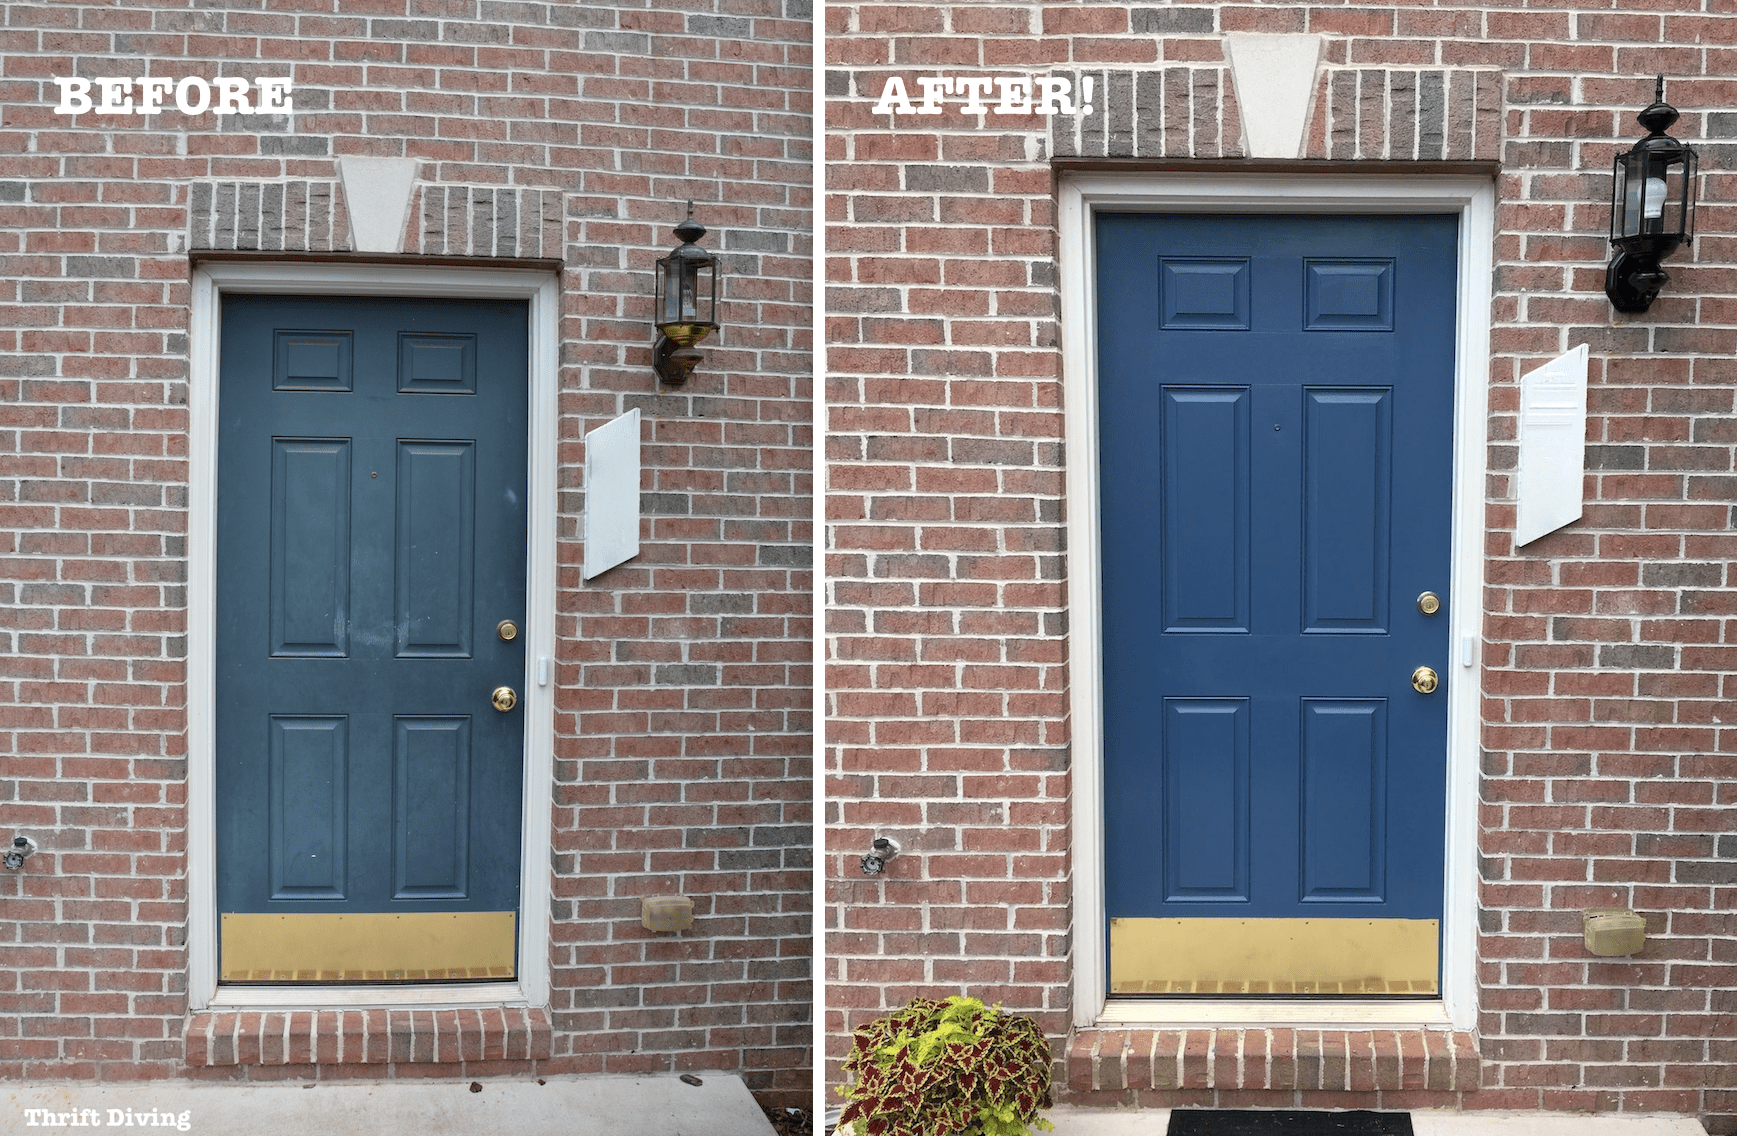
Paint Your Front Door
How about a fresh coat of paint on your front door?
Have you totally ignored your exterior, too, and now you want to paint your shutters and garage? Leave a comment below and let me know if you also have neglected your home, too! Also, be sure to check out more painting tools at Wagner!

Love this project?? Click here to SAVE this on Pinterest!
![]()

Download the 5 freebies!

Thrift Diving inspires women to decorate, improve, and maintain their home themselves...using paint, power tools, and thrift stores! Use these 5 printables, checklists, and ebooks to get started!


Wow! No more tired looking house now! It looks absolutely fantastic! Now google needs to come get an updated photo.
HAHA, I know, right! Too bad they don’t have an email where I can tell them to come back. HA! Thank you so much, Pam! I appreciate it. 🙂
Oh pooh! I forgot to say your skinny sad looking tree out front is in need of a serious pruning. Is it a Crepe Myrtle? I am guessing that it is, by the shape. Now is not the time to prune it but come spring, or even late winter would be good. It looks sad. Crepes can be pruned to shape them. You do not have to do the Crepe Murder thing, but it definitely could use some help.
I volunteer to come help. We have 12 in our yard. In truth, too many. But I foolishly chose them on merit of their color. Word to the wise, check the color and the projected height before you buy yours. Look up details. I believe the ones with Indian Names I read are more disease ( mold and mildew) resistant.
Come by next time you are in the area.
Pat
Hi! again….
Once the weather cools down, like December through March, they can be pruned without any adverse effects.
Crepe Myrtles are super easy to maintain. In fact they look really nice when they are neat and tidy. Okay…. It is really easy particularly since yours looks sort of sad. If you come through Virginia Beach, come by. See ours. See what you can do with yours too! Plus, pruning is a very therapeutic task!
Pat
I’d love to see a picture of yours, Pat! I’ll keep this in mind in early spring. I’ll do some research on how to prune it. We’ll see how well it starts to flourish then. 🙂 Thank you for pointing it out! I have NEVER paid any attention to that tree prior to you bringing it up! LOL
Hello Serena!
Yes, I enjoyed your update. And thank you for the scoop on the shutters. Ours have faded and could use a touch up.
I think your house looks quite nice. I personally would (probably) never paint bricks. They really look crummy when they get a few months on them. Then you are practically required to mess with them on a regular basis. Make your life easier! Leave them natural!
The rest of the house looks very nice. Very welcoming.Good job!
Hi Pat! You are right about the up-keep. That garden that I put in next to the driveway, that also requires up-keep and it’s exhausting at times, pulling out the weeds. So you’re right–do I really want to keep painting the brick every few years? Likely NOT. As for the tree, I guess it’s a Crepe Myrtle…? Honestly, I had never paid attention. The tree was there when we moved in, we never did anything to it, no trimming, nothing. But I did notice that other people’s trees similar to it were full and pretty. I’m okay with leaving it as-is. As pretty as it could be, I don’t want anything that is going to block the sun from coming in. This house was covered with trees nearby, and it was like living in a dungeon. LOL. The maples in the back were removed for that very reason. So I will likely leave this little sad tree! HAHA Thank you for naming it, though, because I had no idea what type of tree it was! They are very pretty when in full bloom, from what I can see from neighbors’ yards nearby.
I think it looks absolutely FAN-TAB-U-LOUS!!!!!!
That little swathe of flowers totally finished the look, I think.
As far as the brick, I 100% agree and think you ought to paint it anyway, to prove to them how right you are!! The only drawback is once you start painting, you have to KEEP painting them, but I think it looks great even though you didn’t paint them white. I REALLY REALLY do!!!
Aww, thank you so much, Suzzanne! That’s the thing that causes me to pause: once you start painting, you must keep painting. I’m finding that to be true for many things around a house: the minute you put in a garden bed, you must keep mulching and weed-pulling. LOL. I have to weight the esthetic value vs. the maintenance factor! 🙂 Thank you so much. Glad you like it!
Everything turned out great!
Thank you so much, Ginger!! 🙂
The house looks great. I also like the brick color. The problem with painting brick is that it doesn’t last forever and it’s a lot more work to repaint. I love the pop of color the flower pots provide. Only, you either need one more or to move the middle to the other end of the garage. Sorry, I have this thing about symmetry. I look forward to your posts and videos.
Hi Wanda! Exactly–once you paint it, you have to keep painting it! And you’re right about the flowers being moved to the side. I thought about it as I put it out: “Serena, it’s not symmetrical.” LOL. But I was like, Oh well, if it’s too far off to the right, I’ll never see it over there, because it would be too far away. LOL Glad you’re part of this community!
I didn’t spell check, you did a great job😀
You dud a great job! It looks renewed. My next DIY will be painting my daughter’s accent wall in her bedroom.
Good luck painting your daughter’s accent wall! I will be doing the same this month. And no worries about the spell check. I know what you mean! 🙂
Serena,
I think you did a Great job. Everything looks so fresh and renewed. But then again you always do great work.
I appreciate that so much, Jackey!! 🙂
This is such a great post, and completely achievable for many people. I love your information about repairing rooted wood. I had no idea I could do this – previously, I thought I had to rip out that trim and replace. BTW, I love your brick color!
Thank you, Paula! Most people think you have to rip out the wood, but you can definitely fill it with the Bondo! I am horrible using it, because I can never get a totally smooth fill. LOL. But it looks better than ripping it out and replacing it! 🙂 And oh wow, I can’t believe you like my brick color! That makes me so happy to hear. Maybe it’s not as bad as I thought! LOL