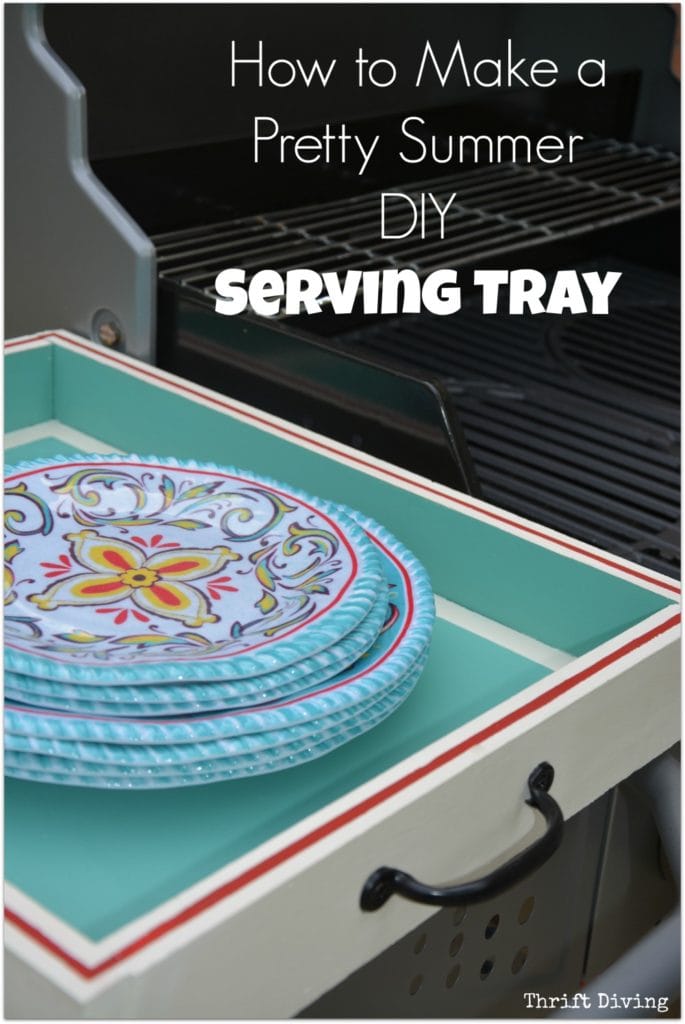
How to Make a Pretty DIY Serving Tray
Me and my patio–we have a love-hate relationship.
Since moving into our house over 5 years ago, it’s gone through a cycle of patio makeovers.
For the longest time, we weren’t able to actually use the patio because it was a hot mess. I’m talking green slime growing everywhere…no grill….and a patio table that went through three makeovers because the paint kept getting destroyed each season due to the elements.
Last summer was the first (and only!) time that my family has been able to use our patio in 5 years. Five years!!
Now that spring is here and summer is rolling around, I’m pumped to get my family and friends together again! I mean, isn’t this the whole point of having a patio??
There are still some things I’ll need to do for the patio, like more comfortable seating (those wrought iron chairs I got from the thrift store years ago, unfortunately, feel like I’m sitting on a pile of bricks!)
I’ll be doing another patio overhaul in the months to come, but for now, I was on the hunt for nice dishes for a fun summer DIY serving tray I was making!
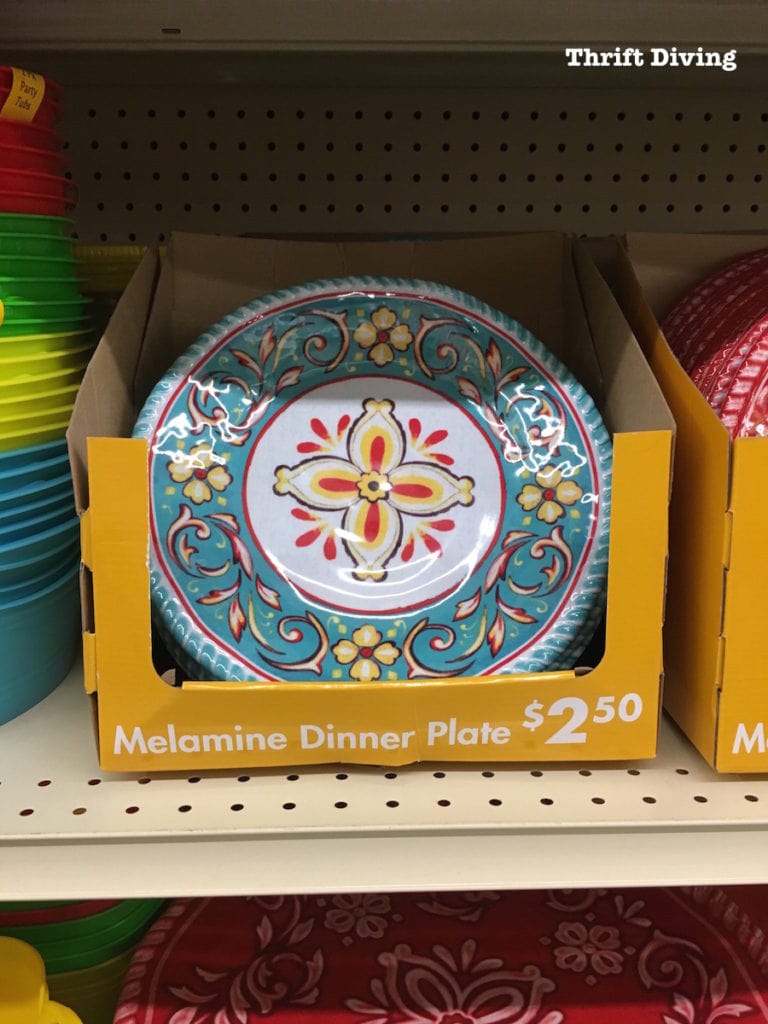
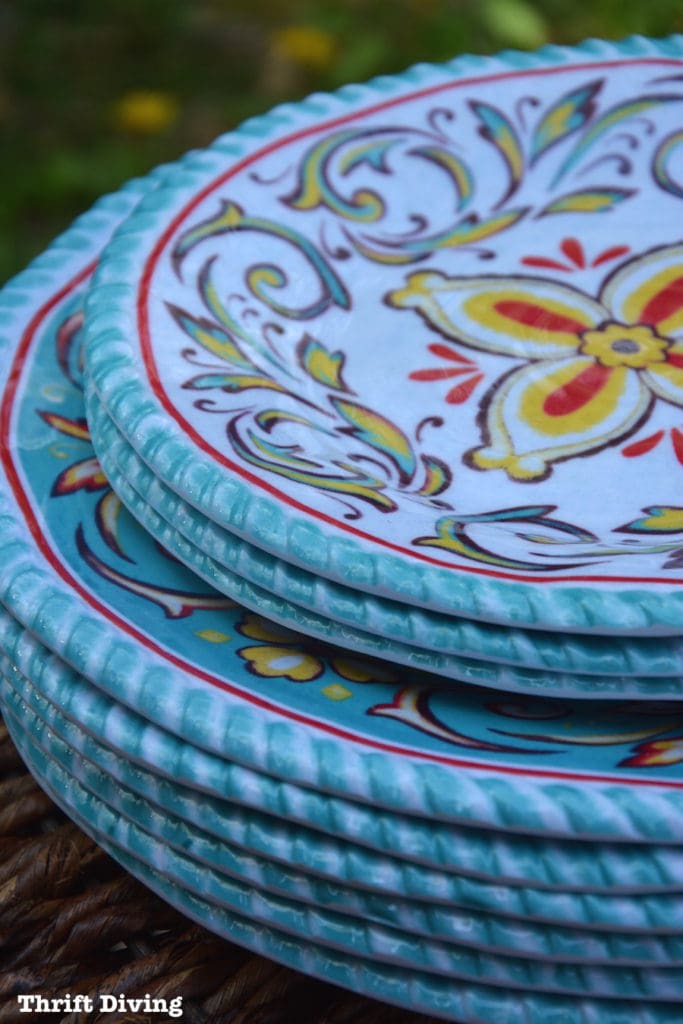
I headed over to Big Lots to check out the selection of melamine plates, cups, and bowls.
….’Cause you know glass and kids don’t mix, right??
They had some awesome stuff!
If you’ve been reading this blog for any length of time, you know I love me some turquoise, right??
I spotted these pretty turquoise, yellow, and red ones and knew that I had to have them (styles and assortment vary by store).
And I was just excited to have something matching! You don’t even want to look in my cabinets….I think if there was an award for Most Mismatched Dishes, I’d be reigning queen. 🙂
Anyhow, let’s jump into how I actually made this cute little summer DIY serving tray!
How to Make a Pretty Summer DIY Serving Tray
First, you’ve got to go grab these things:
- 1/2″ thick MDF board from the home improvement store for the base (the MDF was cheaper than real wood)
- A long piece of 1″ x 4″ common board from the home improvement store
- Chalked paint & brush
- Tape measure
- Straight edge (or speed square)
- Painter’s tape
- Handles for the sides
- Wood glue
- Wood filler
- Jigsaw
- Nailer (or hammer and nails)
- Power drill
- Sandpaper
- Clear wax to seal the paint
STEP 1: How Big Do You Want It?
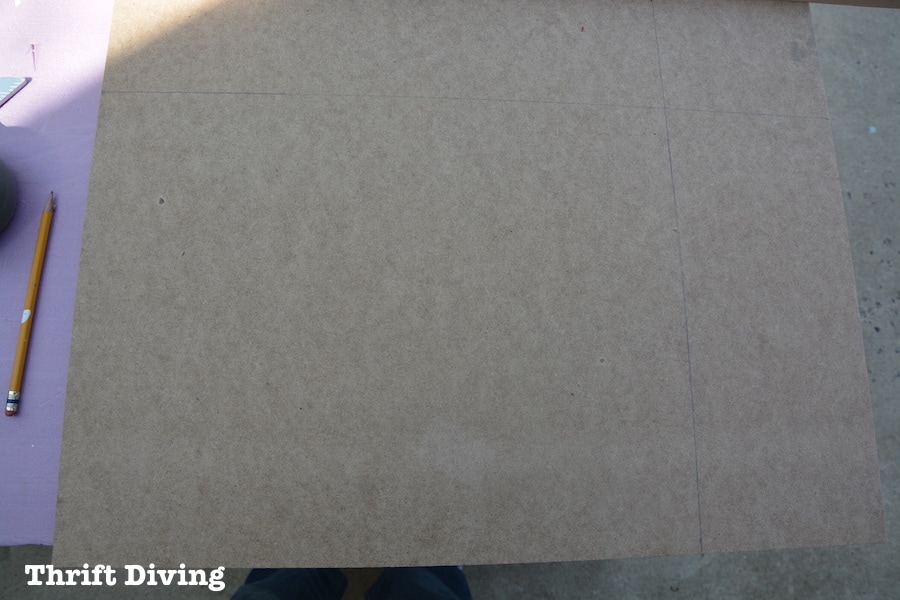
I figured the base would look good at 18″ long and 14″ wide, but it’s all up to you. You can make yours any size you’d like. Use your tape measure to mark the length and width.
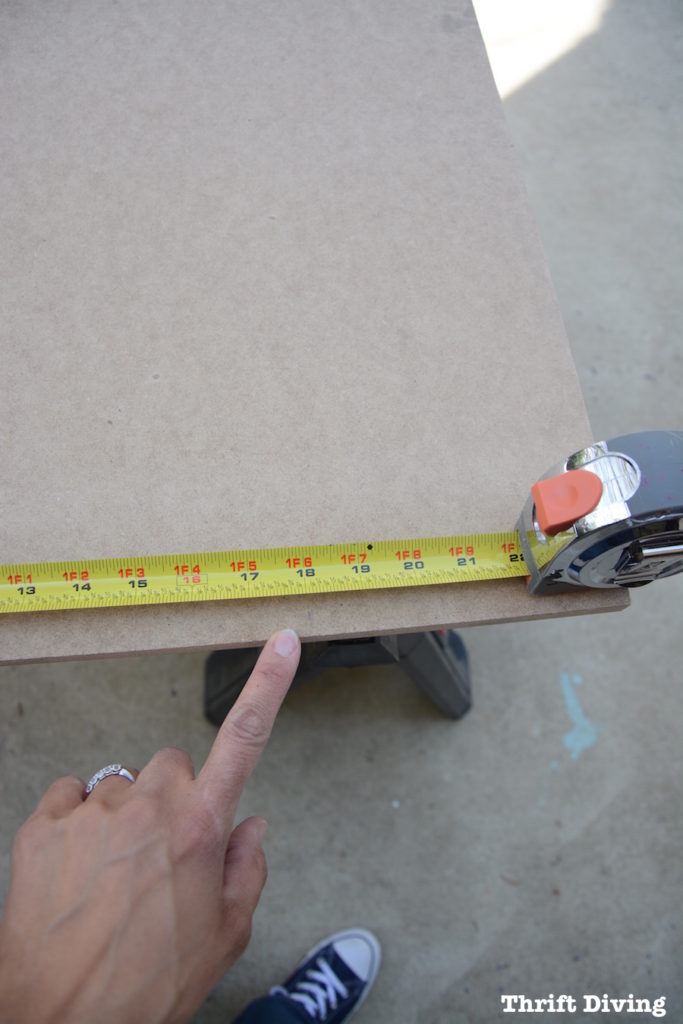
Here’s a little helpful tip: make sure you use a speed square when making drawing straight lines. It allows you to get your right angles perfect every time! Just lay the edge on the board and draw your lines after marking the length and width!
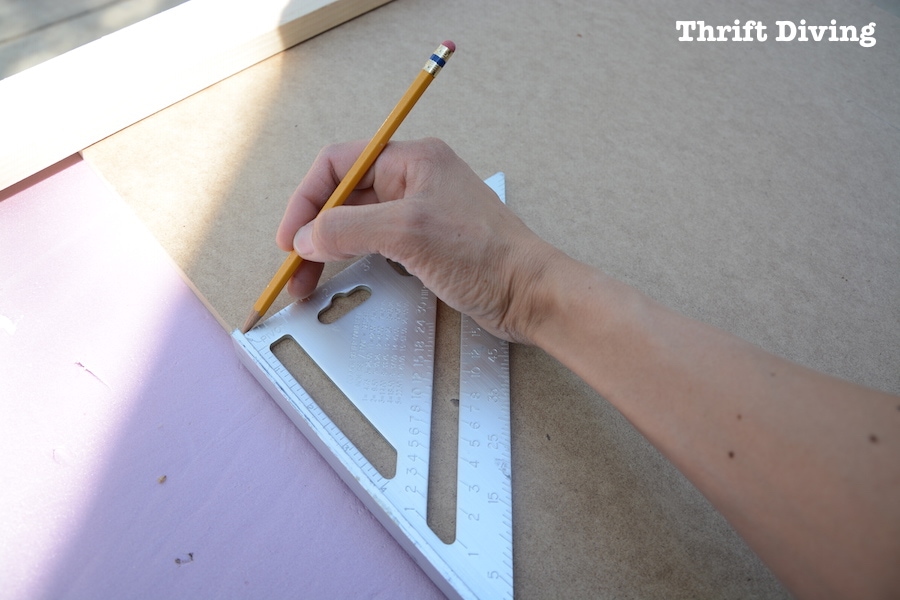
With lines drawn, it will look like this:
STEP 2: Get Jiggy With Your Jigsaw
The jigsaw is one of my favorite tools because you can make a bunch of quick and easy cuts. The edges aren’t as crisp and straight as a miter saw would be, but it’s easy for the most beginner DIYer. And they only cost about $60 to buy one. If you don’t have one for this project, ask a friend to borrow theirs, if necessary!
I sorta of messed up a little when figuring out the size I wanted mine to be, and ended up drawing a bunch of lines.
Pretend you don’t see those lines. 😉
Just draw your two lines and cut out your 18″ x 14″ or whatever size you chose.

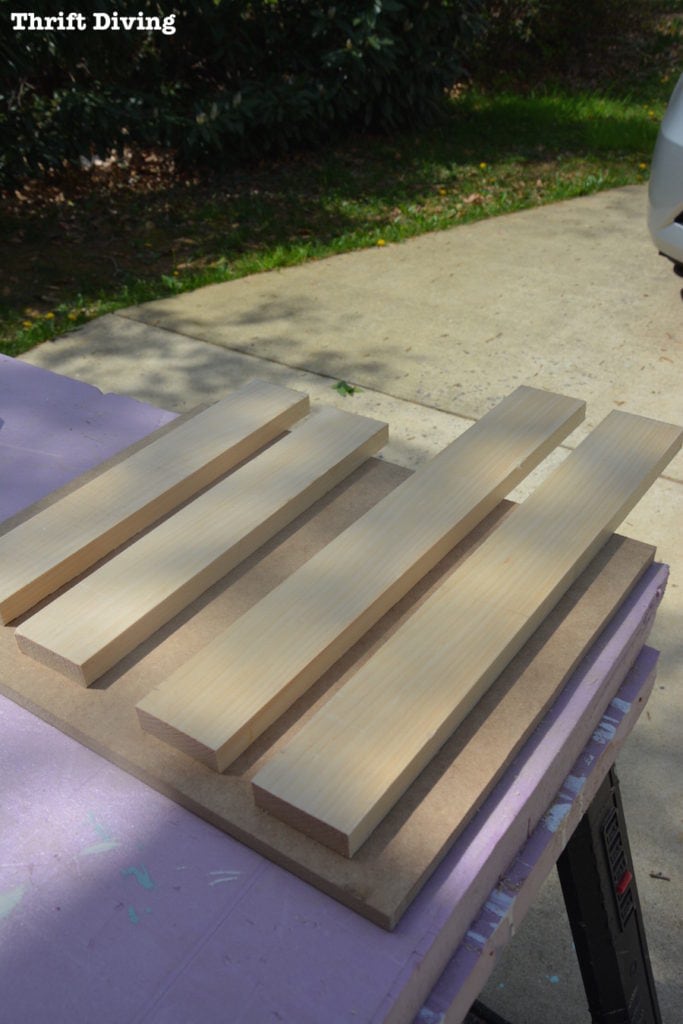
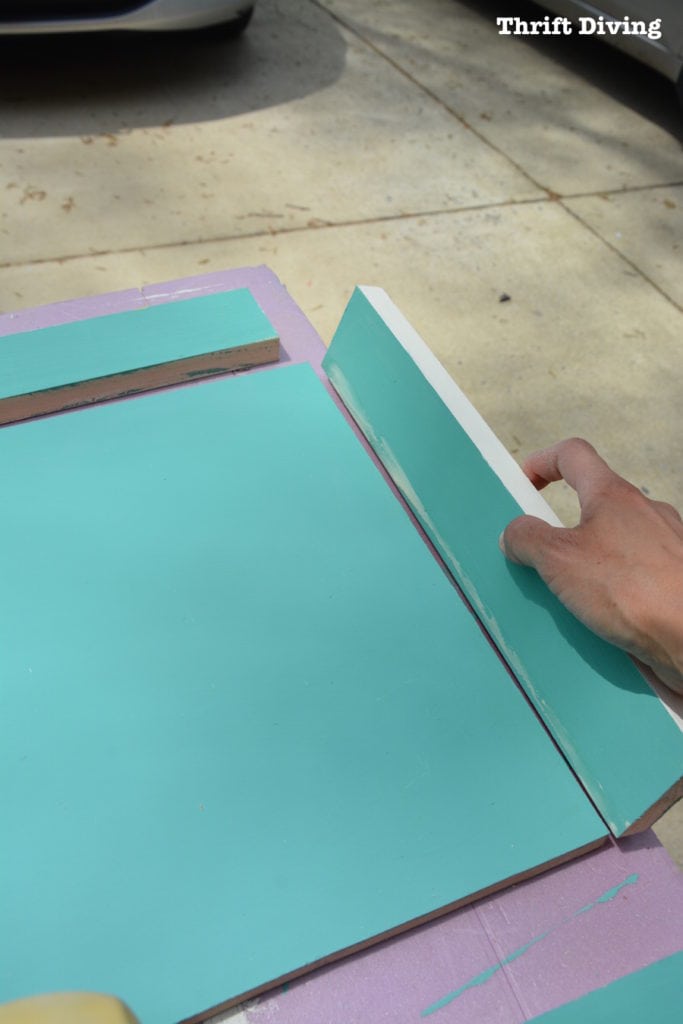
STEP 3: You’ll Need Sides and Ends
Go ahead and cut your sides and ends.
The thing to remember is that your side boards will be longer than the 18″ length. Each other those will be 19.5″ long.
Your end boards will be the exact measurement of your width, at 14″ each.
You’ll end up with 5 pieces that look like this.
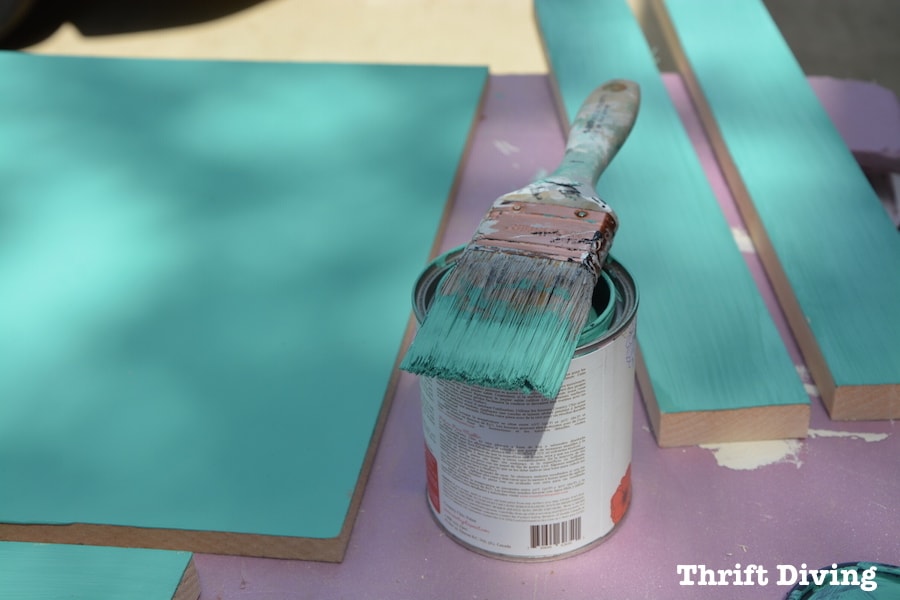
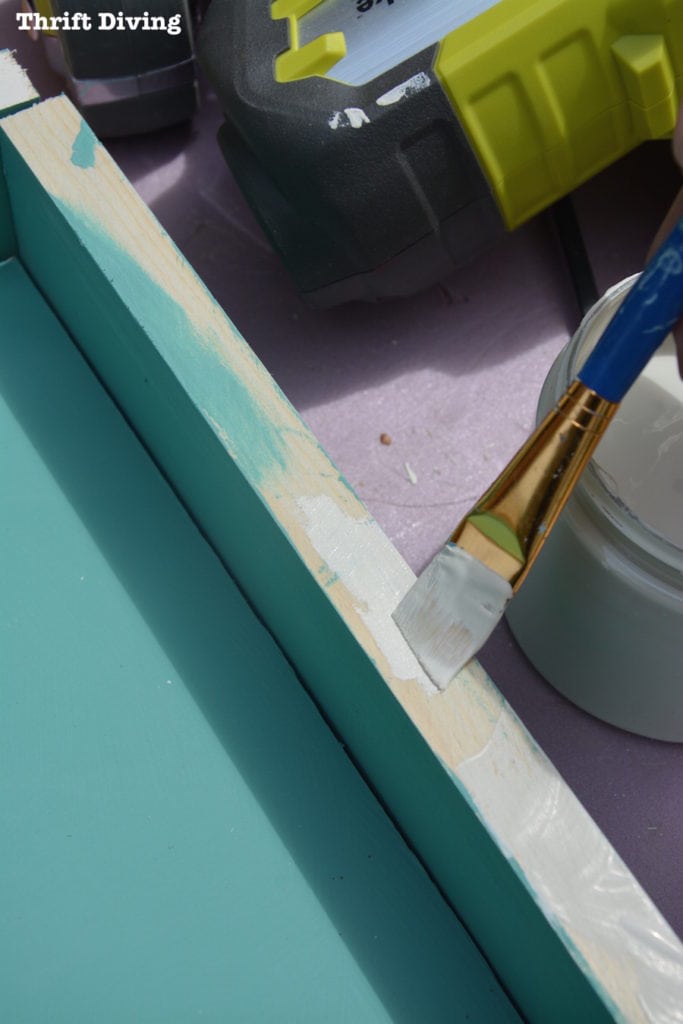
STEP 4: Paint It Pretty!
You don’t have to paint right now, but you can, especially if you’re doing a fun design on the base of the DIY serving tray, like stencils or something where you need your board flat for easy access.
I wasn’t sure what I wanted to do decoratively, so I just went ahead and painted the boards.
I used a chalked paint, which allowed me to skip priming and allowed me to jump right in to painting!
TIP: Don’t paint the outside of the sides and ends yet. You’ll be nailing them together and the nail holes will have to be filled before painting.
STEP 5: Sticky Business
Always use wood glue when making something with wood. Always. It just helps to reinforce those joints.
I used my finger and applied a little to the edges of the ends and sides where I would be joining them.
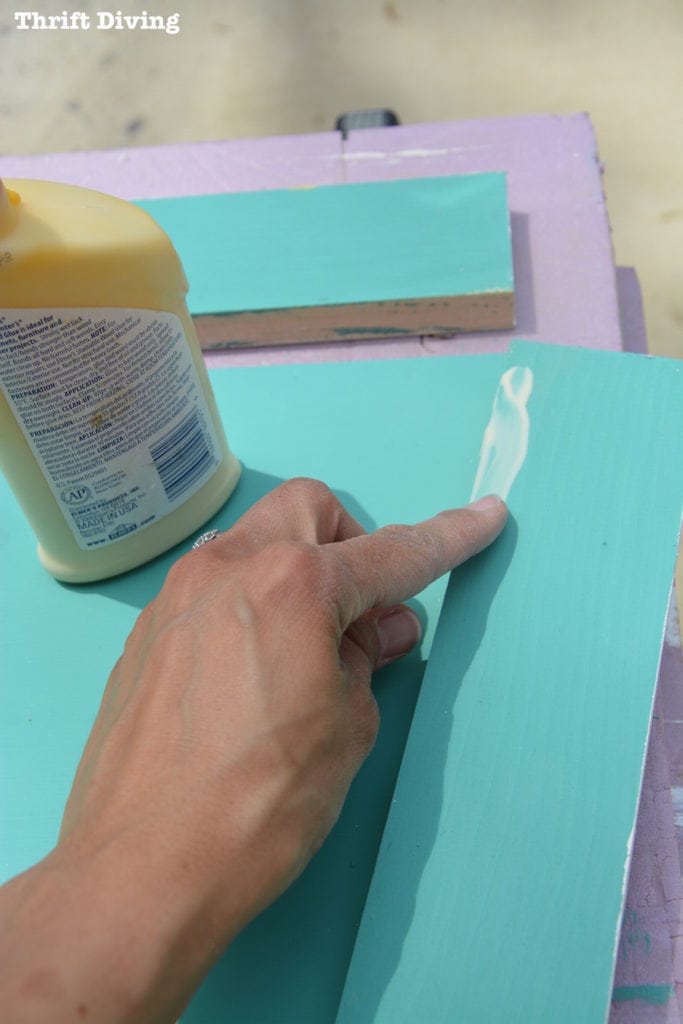
Once there is glue, attach it.
You’ll need to let it set for a second or so.
Then use your nailer (or a hammer and nails) to join the sides together.
Silly me was on the phone while completing this step and wouldn’t you know my forgetful self forgot to snap a picture of using the nailer?? Yikes! Sorry, guys!
But you get the idea…right?
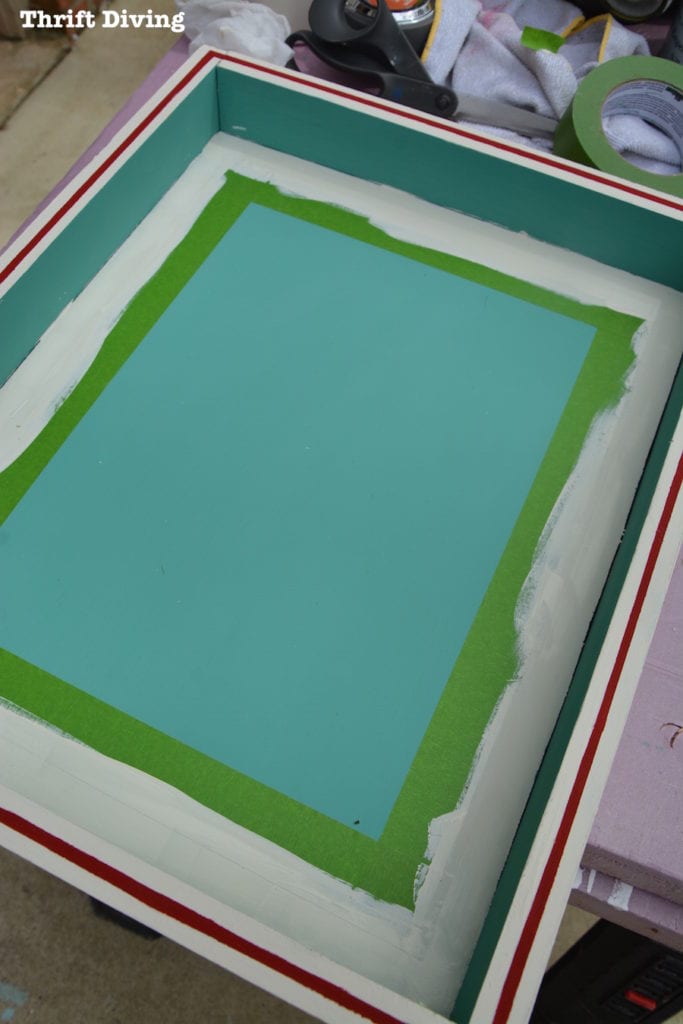
STEP 6: Embellish Until Your Heart is Content
One of the things I love about being crafty is the fun way you can think of ideas as you move along in a project.
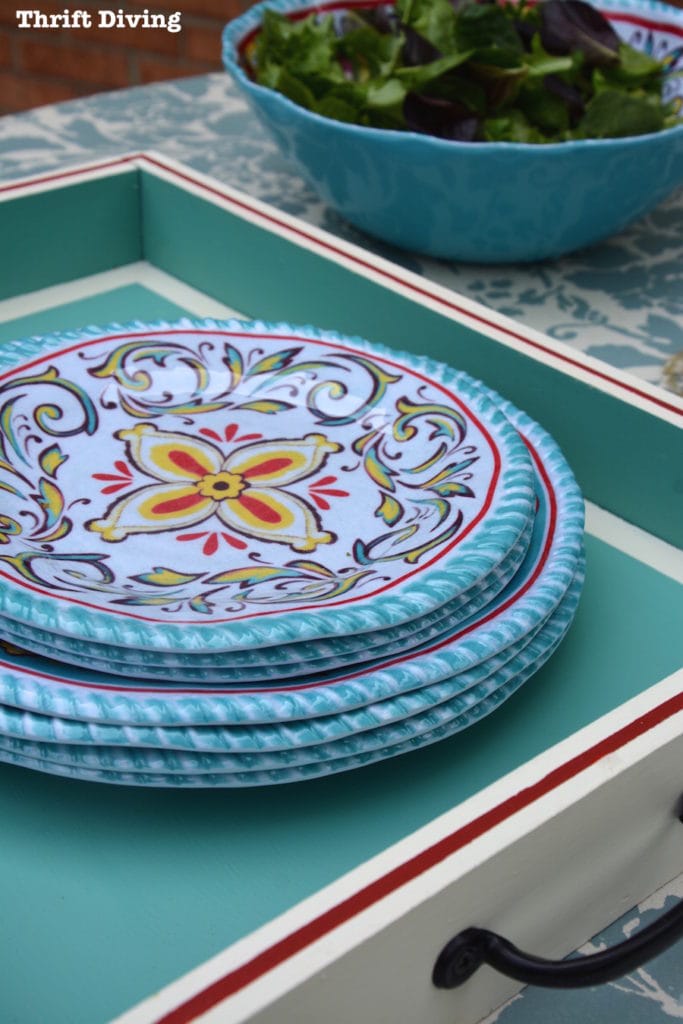
I was a little bored with just white trim, so I decided to pull in some red from those pretty Big Lots plates.
Then I decided to bring in more white into the inside of the DIY serving tray.
I used painter’s tape to create a white boarder around the inside.
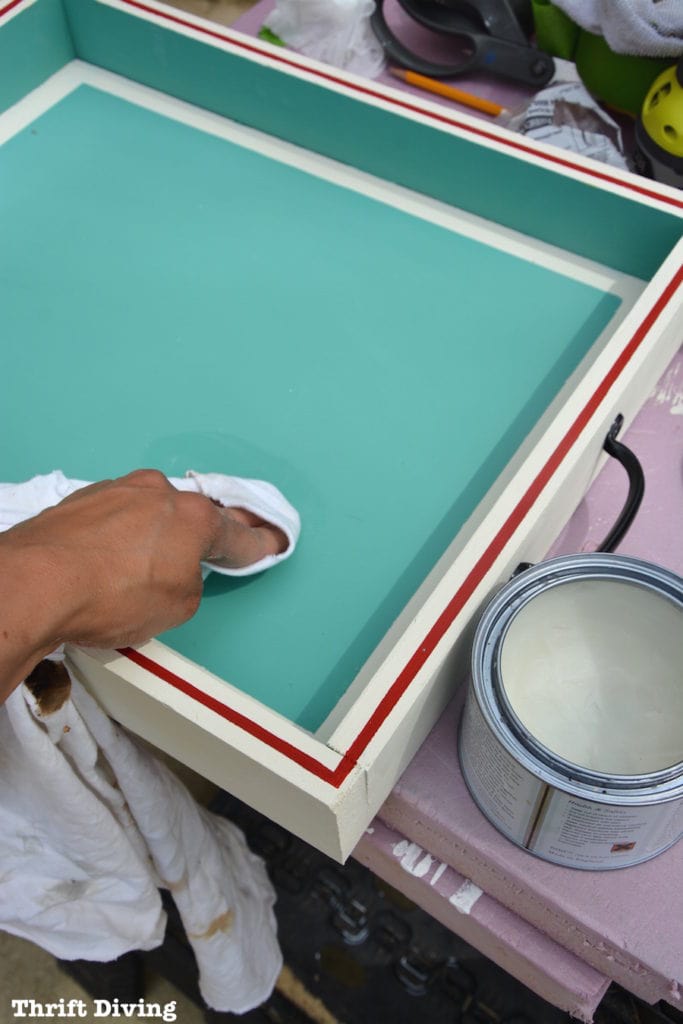
STEP 7: Wax On….Wax Off, Danielson
Okay, this isn’t Karate Kid, but you know what I mean.
You’ve got to protect that chalky paint!
I used a clear wax (just 1 coat), but later I may want to add another coat because if there is food and drink spilled here, I don’t want to ruin the paint!
STEP 8: Don’t Forget the Handles!
How are you going to carry your new DIY serving tray? Don’t forget the handles!
Most home improvement stores have affordable little handles like this. Just use your power drill to screw them on once they’re centered.
(P.S. I did NOT paint the bottom of my DIY serving tray. Hopefully at a party no one will turn it over to look. HA!)

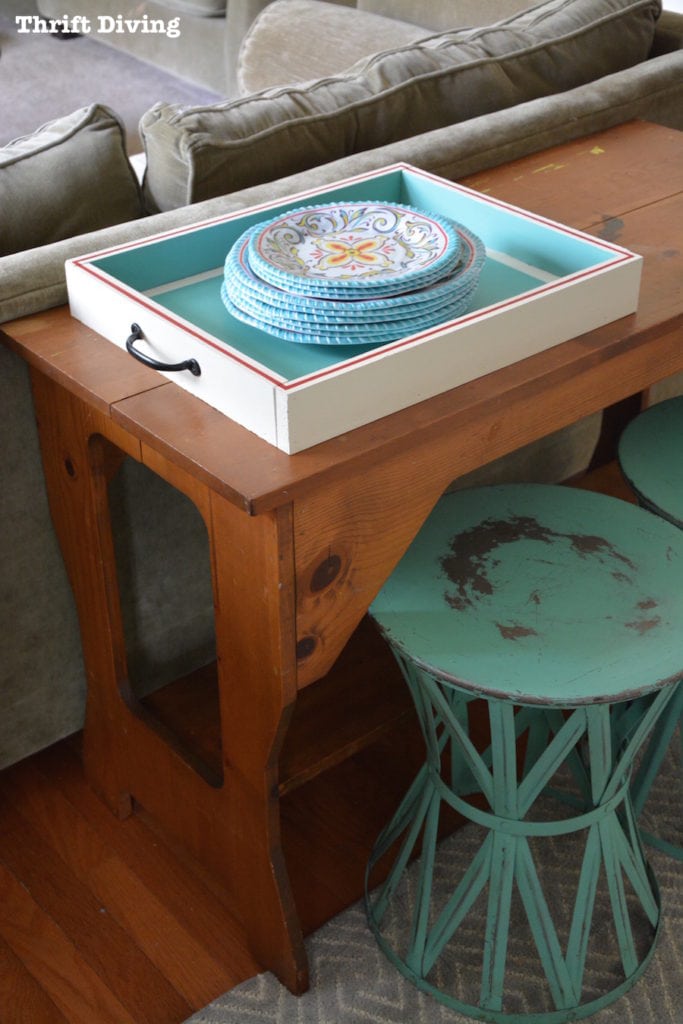
Ta-Da! My New DIY Serving Tray!
I’m so excited how it turned out!
I wanted to add more red inside, but there is such as thing as too much detail so I stopped where I was and let well enough alone. 🙂
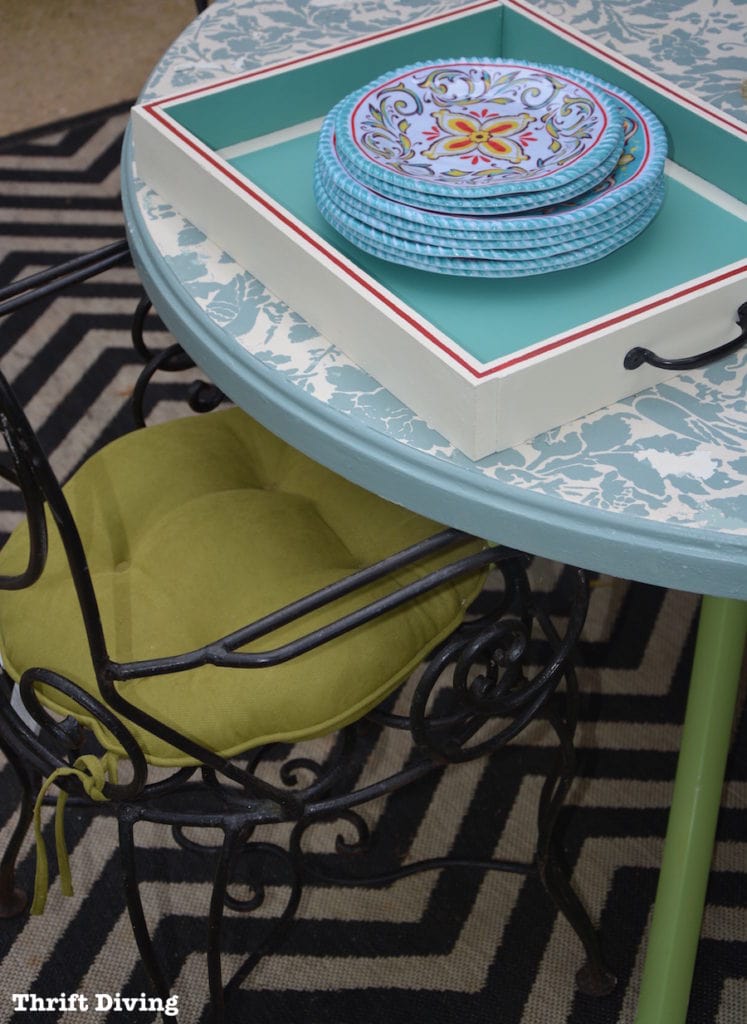
I absolutely love these plates and bowls from Big Lots!
Now the next order of business is picking a date of when I’m going to invite people over!
And whether we’re inside or outside, I’ve got this cute little DIY serving tray to impress people with, along with the cute dish set! 🙂
Did you guys know that Big Lots has all your spring and summer entertaining “must-haves”??
And now tell me…..how do you guys get ready for entertaining?
Leave a comment below and let’s chat about it!

Linking up:
Download the 5 freebies!

Thrift Diving inspires women to decorate, improve, and maintain their home themselves...using paint, power tools, and thrift stores! Use these 5 printables, checklists, and ebooks to get started!


This is one of the first things I saw on your site. Thought it was easy and beautiful. The white and red were a perfect accent! Not sure when you did your yard, but that was when I began ready your posts. You make it easy and simple to understand. I think what also drew me to you was you are a common person. Messy areas. Kids. Not afraid to show your home before and after. It’s not fancy, but comfy…like you’re family. I read some of the other DYI sites, and although I enjoy what they do, I feel ‘outclassed’. That’s not bad, just not what I’m like. I am older and s l o w l y I’m getting the confidence to do something. I did make a spring door wreath and was surprised how nice it looks.
Hey there, Diane! Awwww….yes, we are like family here at Thrift Diving! I never consider myself above anyone else when doing DIY and how I make my home look! It’s all about making home comfortable and a place where you’re happy to have people over and not embarrassed. Thank you for appreciating what I do here and letting me know it’s a comfortable place to come and feel at home! I appreciate it!!! And congrats on your spring door wreath! It feels good to make something that turns out! So exciting. Thanks, Diane!
What a charming, summery serving tray! The colors you used simply sing, “SUMMER”! I love using melamine in the summer, inside or out; it’s light, colorful and does quite well in the dishwasher! Last summer, I got a couple of large enameled rectangle serving trays, from Ace Hardware of all places. One is bright lime and the other, bright turquoise. I used them to hold side dishes, napkins, condiments, cups, etc. This darling try of yours would be a perfect piece to use along side one or both of those trays. Thanks for sharing.
Thank you, Judy! Yeah, I love melamine, too! And they’re usually so summery! Makes me think of summer BBQs. 🙂 So glad you like this project! 🙂
That looks great! Love the colors you chose and I’ve seen those pretty dishes at BL! Love ’em! Is the little red line on the edges painted or is it some kind of adhesive tape? I find it really hard to get my tape down tight enough that the paint doesn’t leak under there.
I may have to head out to Lowe’s and get some mdf!
I really LOVE the colors you chose and the china is beautiful. I’m going to Big Lots tomorrow … You did a FAB job as always. I guess you love your jigsaw as much as I do mine, even though I haven’t use it in a while.
Thank you, Betty! Definitely look to see what kind of plates and stuff they have. These were the prettiest! People will definitely be impressed if you pulled these out to serve some summer treats! 🙂
Your tray turned our wonderfully! Love the colors and those dishes. I’m moving to lighter dishes now, too, not because I have kids, but because I’m edging into my senior years and hefting stoneware just got to be too much. Corelle works for now, but I’d certainly look at melamine again for both inside and out. Most of my entertaining is very casual, so it would work fine. I will put the tray on my I Want To Try list. It would make a great gift for my sister or my nieces, as well as being useful for me! As always, another super idea!
P.S. What did you think about my Room Makeover progress report? Isn’t life just the craziest ever! Still sorting and tossing like mad, but everything is up in the air for the time being until I have some idea if I get the duplex or not. Oh, well, never a dull moment!
Hey, Teckla! Oh no, I did write you back about your room makeover/possible move situation! Did you not get it? I’ll see if I can find it and forward it to you. I’m excited about the possibility of you moving!
And that’s a great point about getting older and lifting heavy plates and stuff. I never thought about that. But you’re right. We have ceramic ones in our cabinet and they do get really heavy once they’re piled with food! The melamine ones are perfect for you!
I love the plates! We have lots of melamine around here because things tend to get broken too – what a great job you did on the serving tray – I wish I had the talent to do that – maybe I can get the hubs to do it for me!
Kelli, you need to go buy a jigsaw RIGHT NOW! 🙂 You seem pretty creative to me, so I don’t believe you don’t have the talent to do it! Do you own any power tools? And did you enter to win that prize pack I’m giving away for RYOBI? Next month I’ll be doing a tools giveaway worth $300 and you can pick the tools you want to get! Girl….we gonna have to get you up to speed! 🙂
Serena,
The tray is beautiful – you did a super job of building and painting it. It would fit right into my kitchen/dining/living room entertaining! I have Fiesta dinnerware already in peacock blue and red, but I saw these same dishes at Big Lots and almost went ahead and bought at least salad plates which I could put on top of my Fiestaware. I love that tiny red line on the top of the tray. How did you do that? Did you tape it off and paint the red line, or is it some kind of adhesive trim?
Hey, Barb! Oh wow, you saw these at Big Lots? You should get some. They’re super cute! The red line, I’m sorry I didn’t take pics. I was on a conference call with someone while working on the project and got so distracted that I missed pictures! HAHA. Okay, so to create the red line, all I did was take painter’s tape and created a line with the painter’s tape, if that makes sense. Meaning, I taped the top, but left the center part open. And then I painted it red. Once it dried after 2 coats, I just pulled the tape off and it left the red line. I hope that makes sense! Let me know if it doesn’t and I’ll try to explain in a little video for you! 🙂
Hey Serena, I’m a turquoise nut too! Love the tray, I wondered about the nailing….lol I always look at the photos, then read what you wrote….lol I thought how is glue gonna keep that together?! haha Love the colors of the dishes, as for using melamine because of the kids, I’d use them for outdoors anyway, dropping glass anything on concrete is gonna end badly. I’ll be expecting my invitation in the mail… Love ya’
Oh how I wish I could invite you over! You’d be fun to have around!! 🙂 I know….I’m sorry for not taking a pic of the nailer! I was saying in another comment that I also didn’t get a pic fo the red line I did on top. I was on a conference call at the time of working on the project, and you know what they say about multi-tasking. EEK! It’s unlike me to skip pictures, so the lesson learned here is to NEVER talk while working again, so that I can stay on task! :). Thanks, Patricia!!
Yeah, what M said; a very nice job, and now when you’re bringing out lots of glasses and plates and those little things and napkins and salt and pepper shakers and ketchup and mustard and rolls and stuff, you can make one trip with your lovely homemade tray! Lovely, as usual!
It will definitely be a conversation piece, Linda! 🙂 Thank you! I’m glad you like it!
Good job! But try and remember that no matter how messy things get at a party it can be cleaned up. So go have friends over, laugh enjoy and make new memories!
My friend has been bugging me to throw something, and I think this may be the best time to do it! We get those nasty little day-biting mosquitoes and thankfully, they haven’t come yet. Her birthday is in the next few weeks, so that may be the best time! 🙂
Thank you!