How to Install Baseboard Yourself: A Step-by-Step Guide
This post on how to install baseboard is sponsored by The Home Depot.
Last year I did a basement makeover, laying vinyl plank flooring over linoleum tiles. But it took me some time to finish off the project to install baseboard because of a nasty basement leak that prevented me from finishing the job. Once the leak was correct, I was able to install the baseboard so that my basement makeover could be completed!
I realized that many homeowners may not know how to install baseboard, so I thought this would be the perfect time to put together this extensive guide on installing baseboard–everything you want and need to know to install your own DIY baseboard: choosing baseboards, planning, cutting, installing baseboards, and more. So let’s jump into this post right now! Use the navigation below to skip around this guide.
Table of Contents
- 1
- 2 Choosing Baseboards
- 3 Planning for Baseboards
- 4 How to Install Baseboards
- 4.1 STEP 1: Remove Old Baseboards (If necessary).
- 4.2 STEP 2: Paint the Baseboards Using Semi-Gloss Paint.
- 4.3 STEP 3: Measure and Cut the Baseboard, Starting in One Corner
- 4.4
- 4.5
- 4.6 STEP 4: Add Insect Powder Behind Baseboards (Optional)
- 4.7 STEP 5: Attach Baseboard Using a Brad Nailer
- 4.8
- 4.9
- 4.10 STEP 6: Fill the Nail Holes With Wood Filler
- 4.11
- 4.12 STEP 7: Sand the Wood Filler
- 4.13
- 4.14 STEP 8: Attached the Quarter Round (Also Known as Shoe Molding).
- 4.15 STEP 9: Caulk the Baseboard Gaps
- 4.16
- 4.17 STEP 10: Touch Up the Nail Holes and Caulk With Paint
- 5 How to Clean Your Baseboards
- 6 Save This Guide on Pinterest
Choosing Baseboards
Let’s kick off this post on all the things you need to consider when installing baseboards!
What are Baseboards and When Are They Installed?
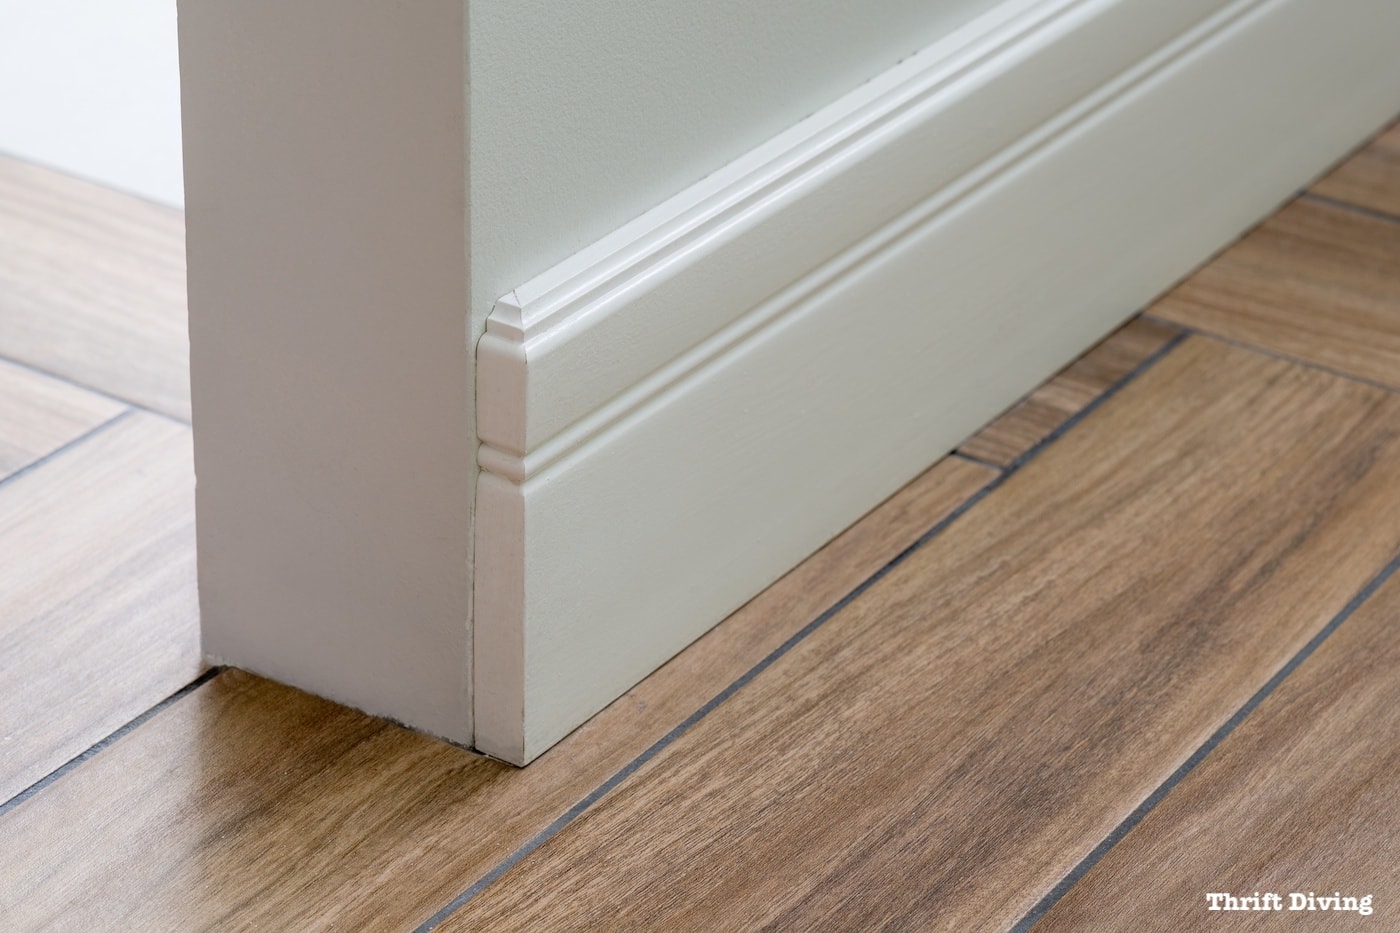
Before I dig into how to install baseboards, let’s talk about what are baseboards! (The British use the term skirting board, by the way). I’m not going to assume everyone already knows. Well, Merriam-Webster dictionary defines a baseboard as a molding covering the joint of a wall and the adjoining floor.
In other words, it’s a strip of material that covers up the imperfections from where the drywall and floor meet. But it’s more than just about imperfections. It’s about the necessary spaces that contractors leave along the edge of flooring to allow for a floor to expand and contract. That 1/4″ expansion gap is necessary, but it doesn’t mean we have to look at it. We just have to make sure it’s there. Baseboards cover it up.
With drywall, you also have to leave 1/2″ off the ground when installing it. The reason it to prevent water damaging the drywall in the event of a leak. All these little cracks and gaps we have to leave when hanging drywall and installing flooring are hidden behind the baseboards, pulling the room together to look more “finished.”
Also, think of your favorite picture. The mat used to frame the picture, along with the picture frame, creates a cohesive look to your framed art. The same is true for baseboards. Baseboards are like the picture frames of walls that finish off a room.
Are Baseboards Required?
Good question. There aren’t any building codes requirement for baseboards that make them required or mandatory, but it would look sloppy and unprofessional to not install baseboards to cover up the raw edges of drywall and flooring. Baseboards hide the ugliest of joints, finishing a room off to look complete. And depending on how they’re painted (or even if you use stained or solid hardwood baseboards), they can compliment a wall by providing a “framed” look to your wall.
What Size Baseboards and How High Should I Install?
How tall your baseboards are depends on the height of your ceiling, actually. If you’re blessed to have 9-foot ceilings or higher, you could go with a wider baseboard (for example, 5 and 1/4″ or even taller). In my basement with 8 feet ceilings, which is the standard ceiling height, a 3 and 1/4″ wide baseboard trim would work well.
Anything higher on an 8 foot ceiling wouldn’t look proportional to the height of the wall/ceiling. Just remember: the higher your ceilings, the higher the baseboards you can install. You can even add a layer of trim inches above your baseboard to create the illusion of taller baseboards.
What Style of Baseboard Should I Install?
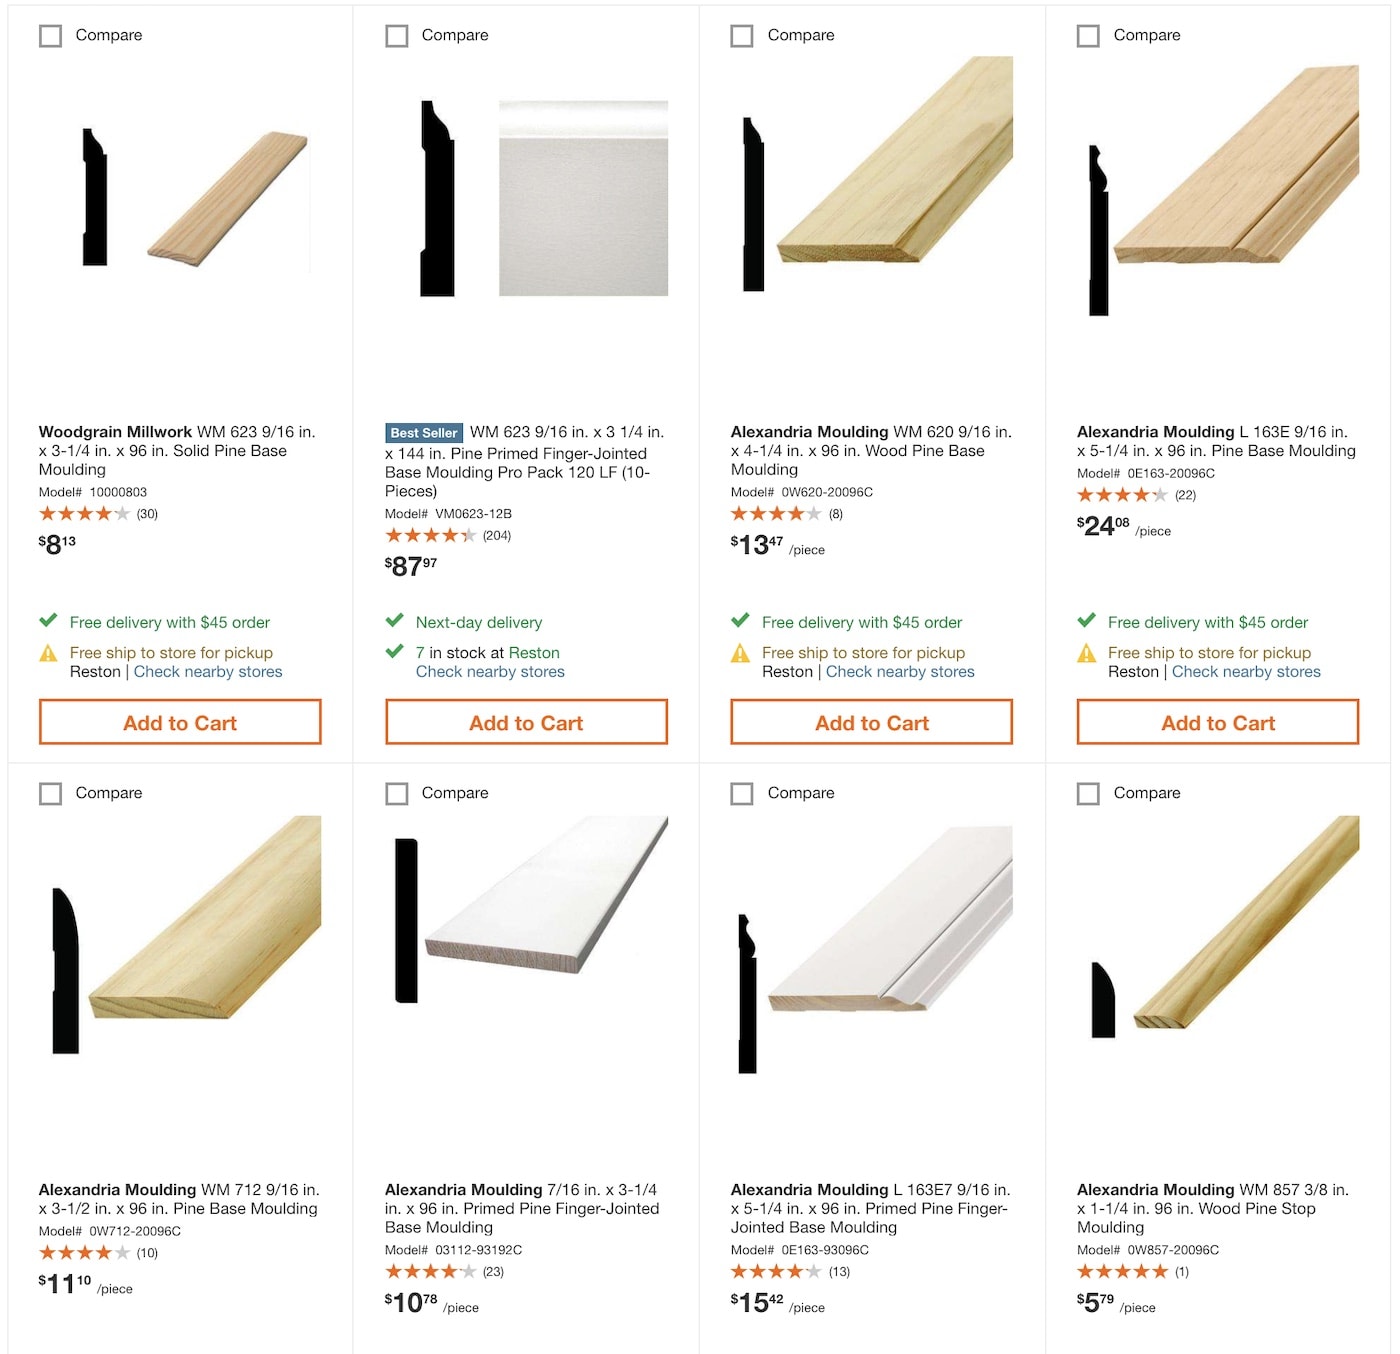
There’s no right or wrong answer here. It really just depends on your unique style. If you’re traditional, more traditional baseboards are the way to go. If you like modern clean lines, then baseboards that are more flat and simple look best. You can buy baseboards from the lumber department at The Home Depot.
The other day I stopped in to The Home Depot and snapped a shot of their In-Stock Molding (they spell it moulding; I spell it molding. I say potato, you saw poTAHto…). There are tons of options of moldings, including ceiling crown molding, door and windows, floor, general purpose, and wall and trim.
If you look specifically at their floor molding (also knowns as baseboards), you’ll see that there are several options. But don’t let those options limit you. You can install baseboards and add additional wall and trim to make it fancy or unique.
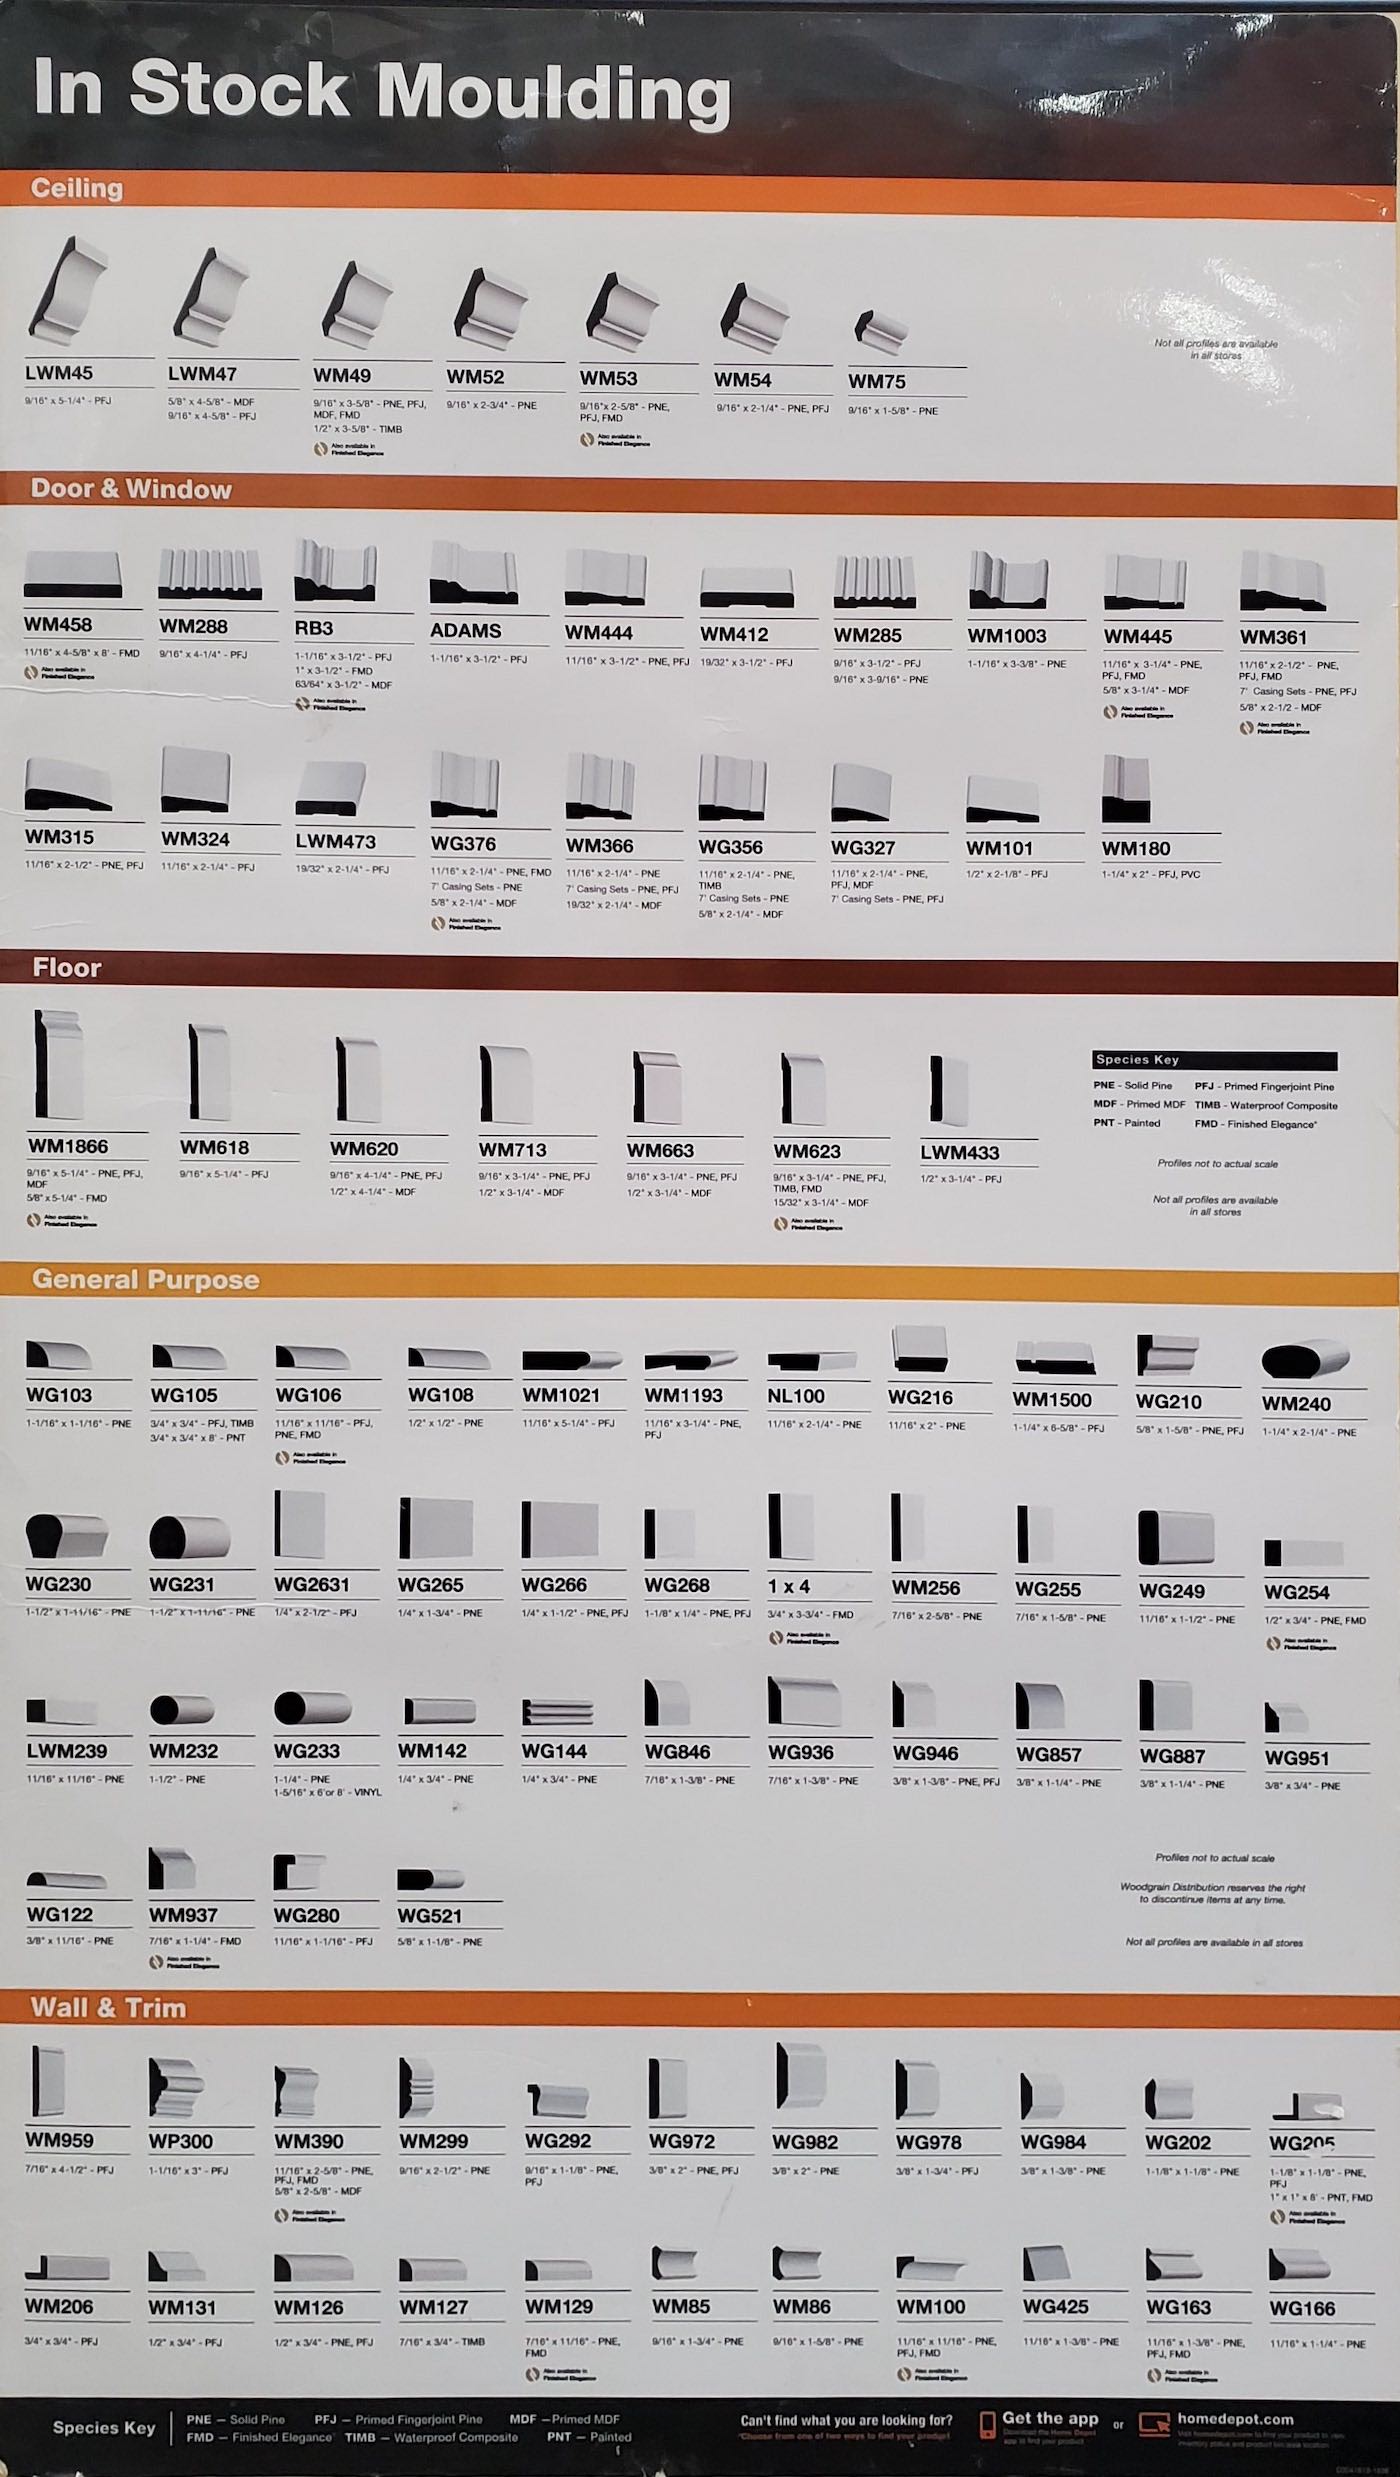
What Type of Baseboard: Wood, MDF, or PVC?
Now that you know what style of baseboard you want, the next thing to plan for is the type of baseboard to buy. There are several types, as you can see from the Species Key at the bottom of the moldings chart above. But it boils down to:
- Wood
- Medium Density Fibreboard (MDF)
- Polyvinyl Chloride (PVC)
Wood Baseboards
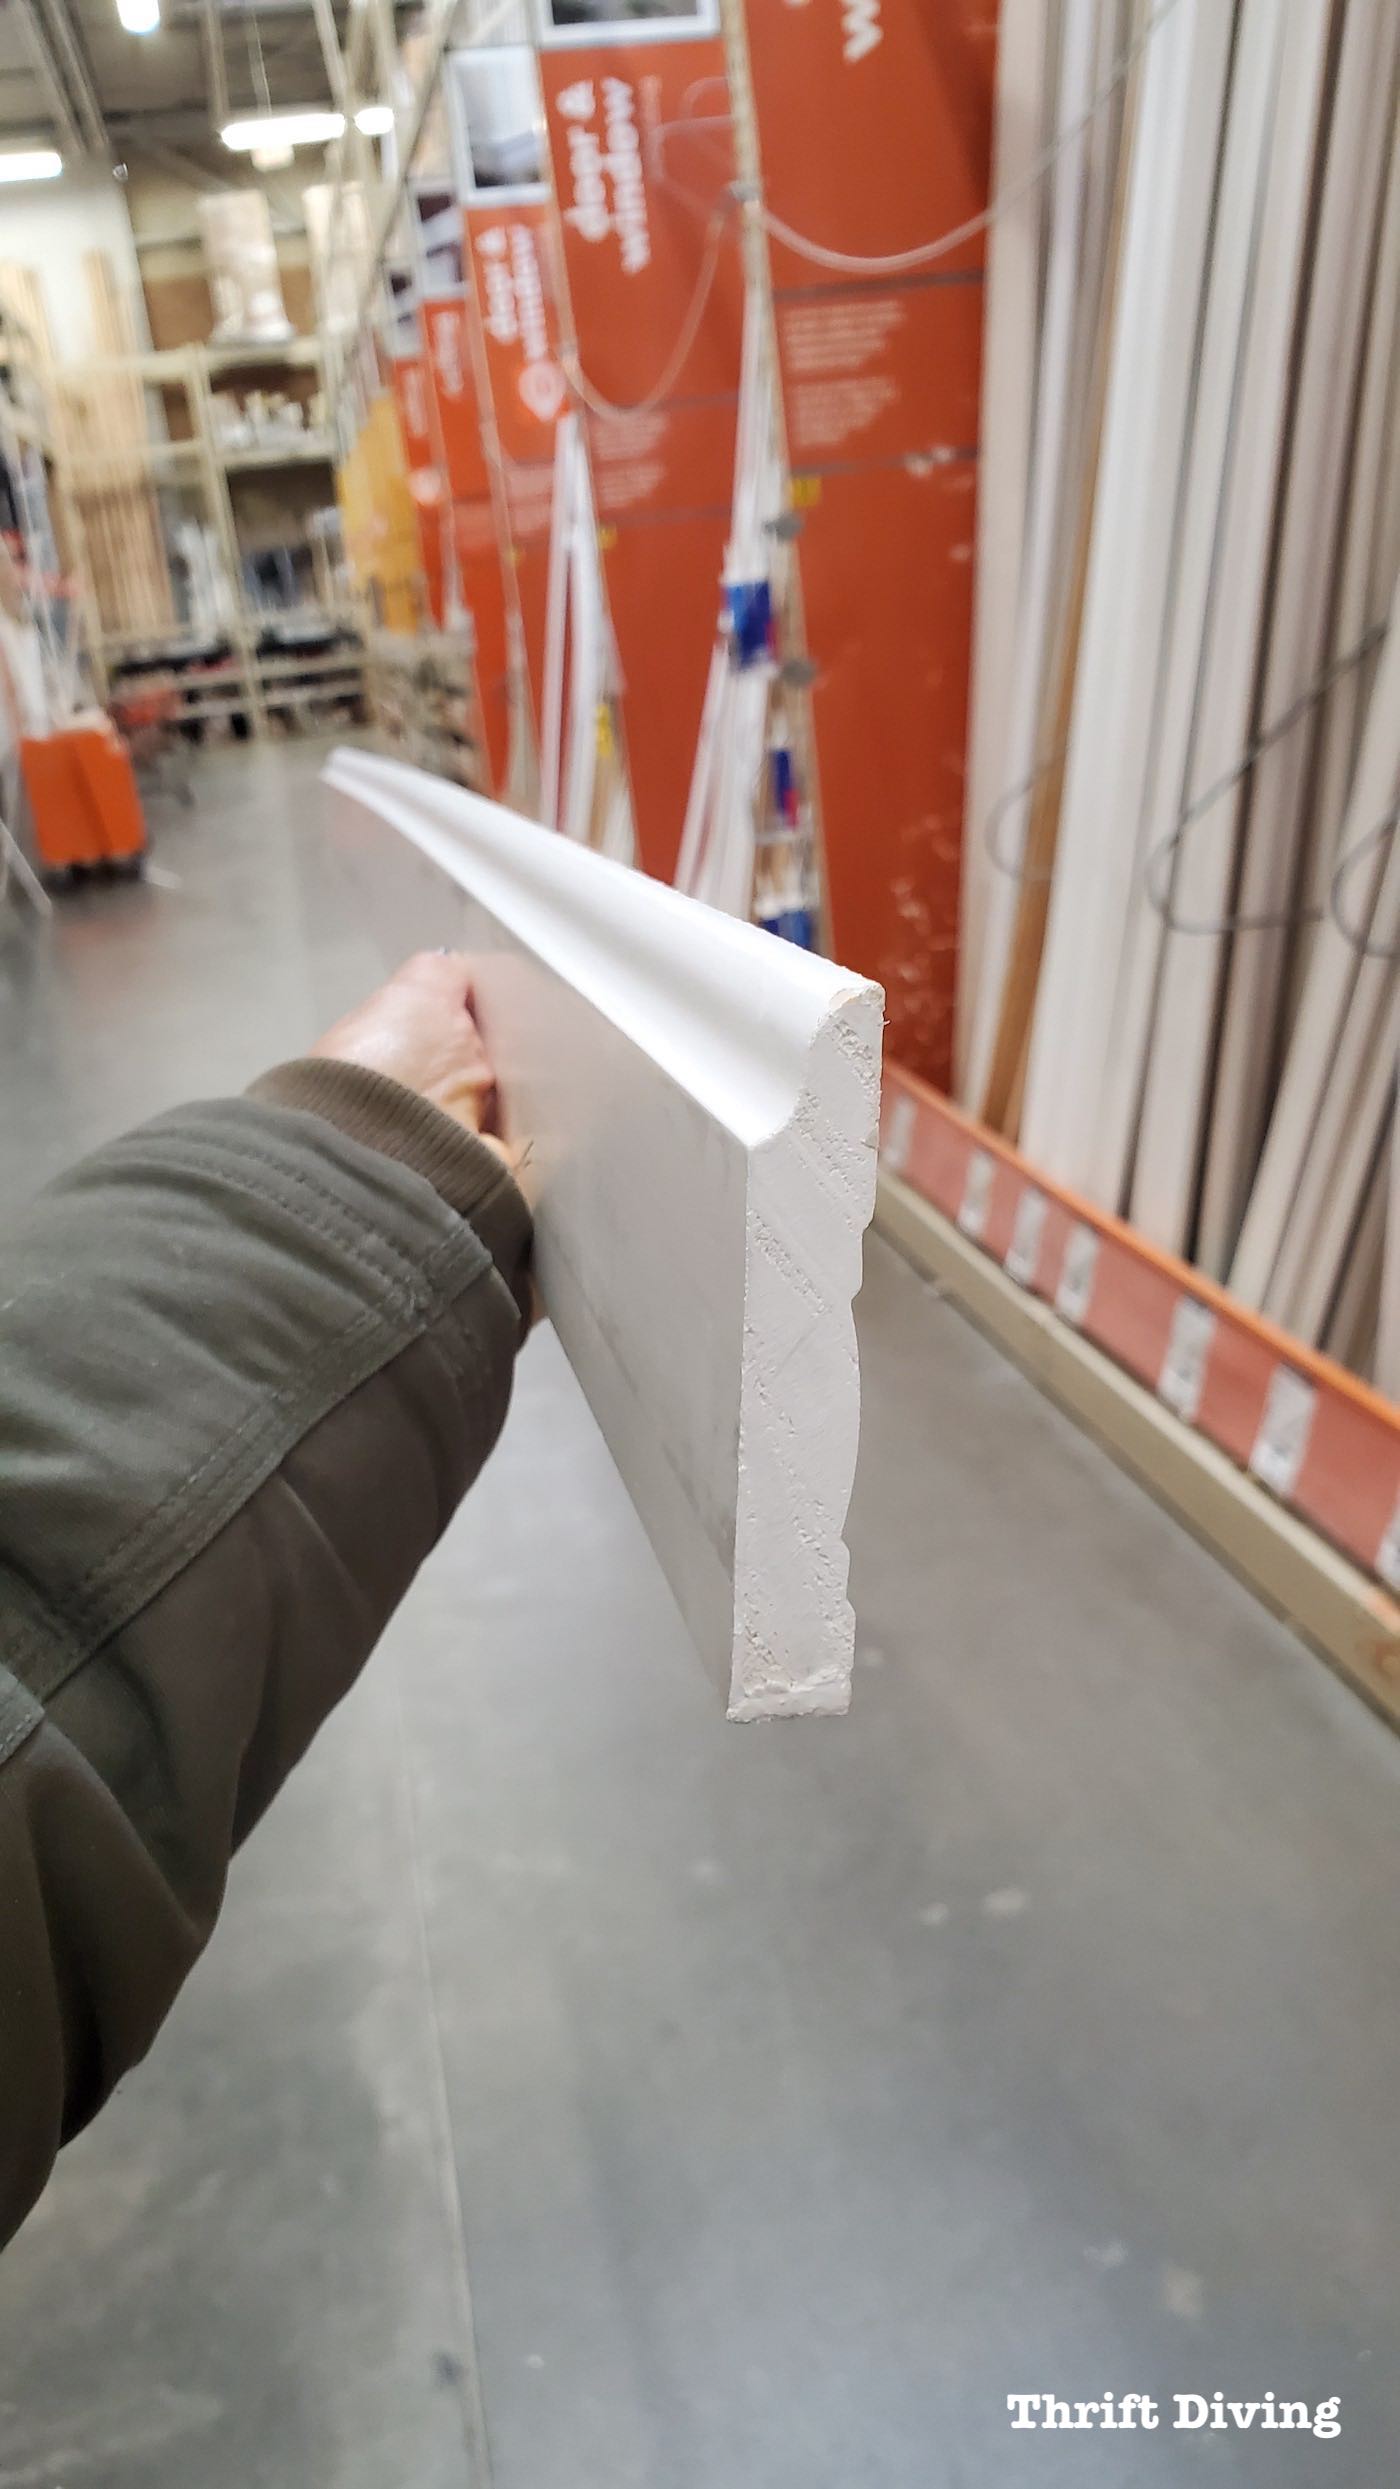
Wood baseboards are typically made from solid pine and can either be primed or unprimed. Buying primed is a little more expensive, but it saves you the hassle of priming the raw pine wood. Here is a example of a typical piece of primed pine baseboard.
MDF Baseboards
Can baseboards get wet? Well, not if they’re made with MDF (medium density fibreboard). Baseboards made with MDF, while more affordable, can’t withstand water. If you repeatedly expose it to water, it will swell and you’ll have to replace it. (Ask me how I know……It’s true that experience is the best teacher!).
Before I knew much of anything about trim and baseboards, I had used MDF in the kids’ bathroom. After years of repeated peeing on the board (I have dirty boys–what can I say??), the board started to warp. I will have to replace it with a waterproof baseboard. But if you’re installing MDF baseboards in areas where they will not be water, then yes, it’s a viable option for affordable baseboard, for sure.
PVC Baseboards
This is my favorite type of baseboard for basements and bathrooms where baseboards can get wet. Not that you want your floors or walls to get wet, but for areas where water can be splashed or in basements where leaks can spring up overnight, PVC baseboards are the waterproof alternative to wood or MDF baseboards. Wood baseboards can grow mold behind them if they’re installed in moist areas, and as I mentioned, MDF baseboards can warp. I also like that PVC baseboards are termite-resistant.
Planning for Baseboards
When you’re planning to install baseboards, the first step which we already covered is deciding what style and type of baseboard you need, based on your preferences and where you’re planning to install it (e.g. bathroom, basement, kitchen, family room, etc.) But the next step is to actually plan for buying it.
How Many Baseboards Do You Need?
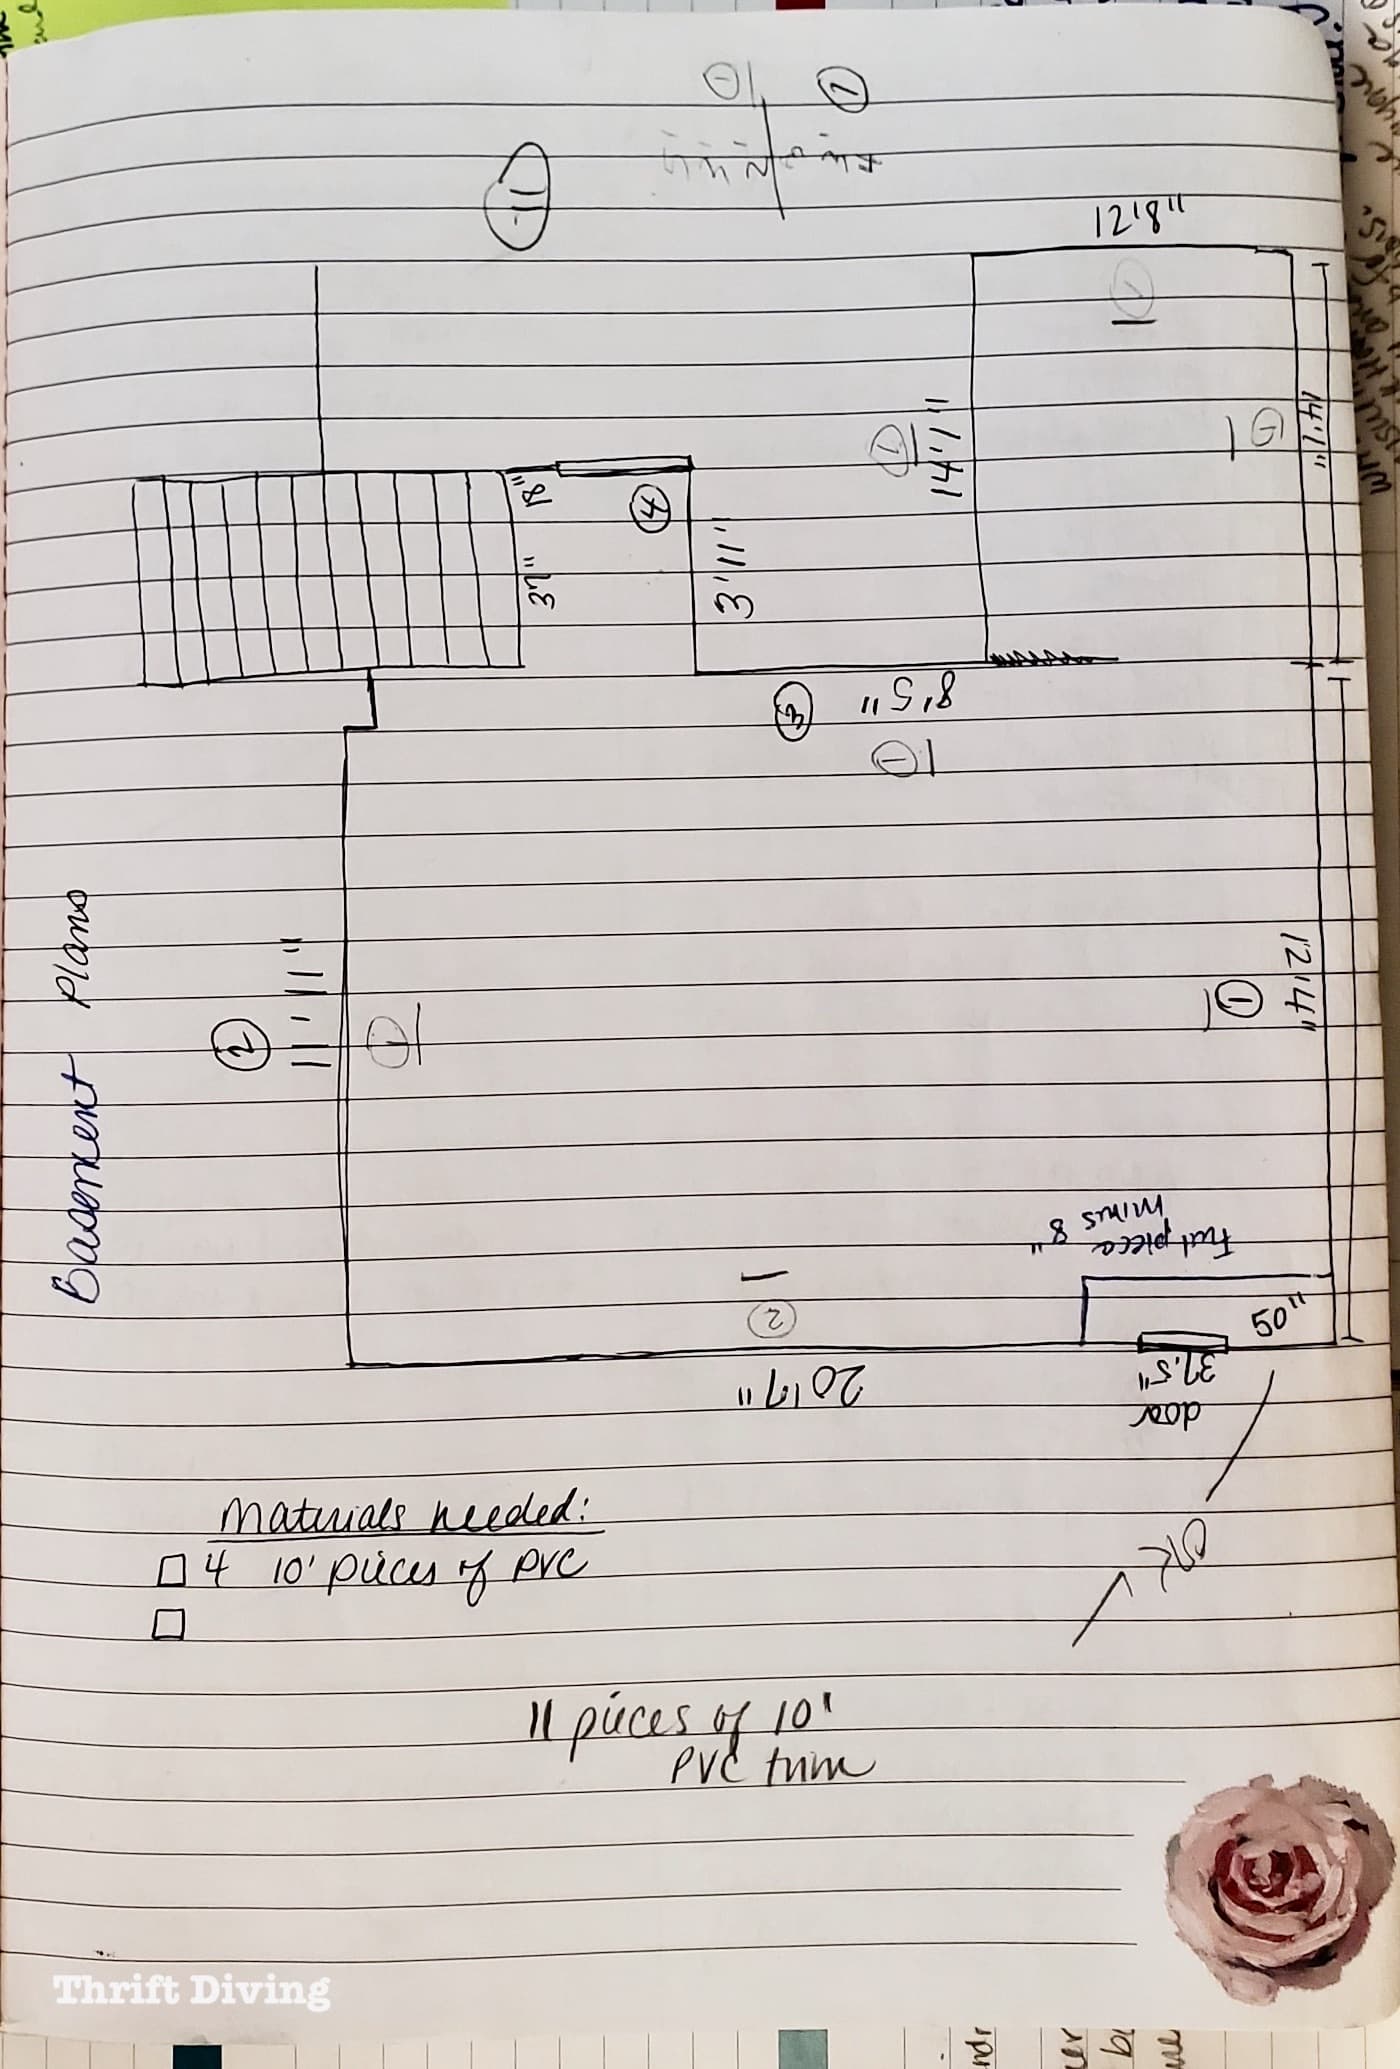
Instead of asking how many baseboards you need, the better question is how much baseboard do you need? Baseboard is measured in inches and feet. And to come up with that number, you need to measure your space. Don’t worry–all you need is a tape measure, a pencil, and some paper.
Start by drafting out a sketch of the space where you’re installing the baseboard:
- Draw a sketch of your floor plan. Don’t worry–it doesn’t really need to be to scale. It just needs to be accurate in terms doors and stairs locations, etc.
- Measure. Along each wall where baseboard will be installed, note the length in feet and inches. Round up if necessary.
- Add up the measurements. You don’t have to be a math genius. It’s always better to have more than not enough!
- Note how many pieces of baseboard you need. At Home Depot, baseboard typically comes in 8-foot pieces (and sometimes you can find 10-foot or 12-foot pieces). Figure out how many pieces you’ll need by adding up the total feet needed and dividing by the length of the piece of the baseboard.For example: 104 feet needed, divided by an 8-foot piece of baseboard, you would need 13 pieces of 8-foot baseboard. Of course, you always want to add 10% extra materials for mistakes and waste. So get an extra two more 8-foot pieces, for a total of 15 pieces of 8-foot baseboards.
How Much Do Baseboards Cost?
Now that we’ve done a little math has an example of how much baseboard you need, let’s do an example of how much it costs. Of course, this will depend on the type (wood, MDF, PVC) and the style (traditional, modern, etc.).
Let’s say we’re going to buy the primed pine Alexandria Moulding from Home Depot, at about $16 per 8-foot piece (96 inches). $16 per board for 13 boards means we’d be spending roughly $208 on baseboards. If you’re installing it yourself, you’ll save on installation costs. But if you’re doing it yourself, you may need some additional materials, and those will have costs associated with them.
What Tools Are Needed to Install Baseboard?
In addition to the baseboard, which we just figured out in the example above, we’d need about 15 pieces (at a cost of about $208, based on my example). But what other tools and materials are needed and how much will they cost? Let’s find out:
- Miter saw. You’ll need to cut some 45-degree angles at corners and across long spans of walls. If you don’t own one, consider renting one from The Home Depot.
- Miter box. If you don’t have a miter saw, a miter box is a good alternative (albeit slow alternative) for cutting baseboards at 45-degree angles.
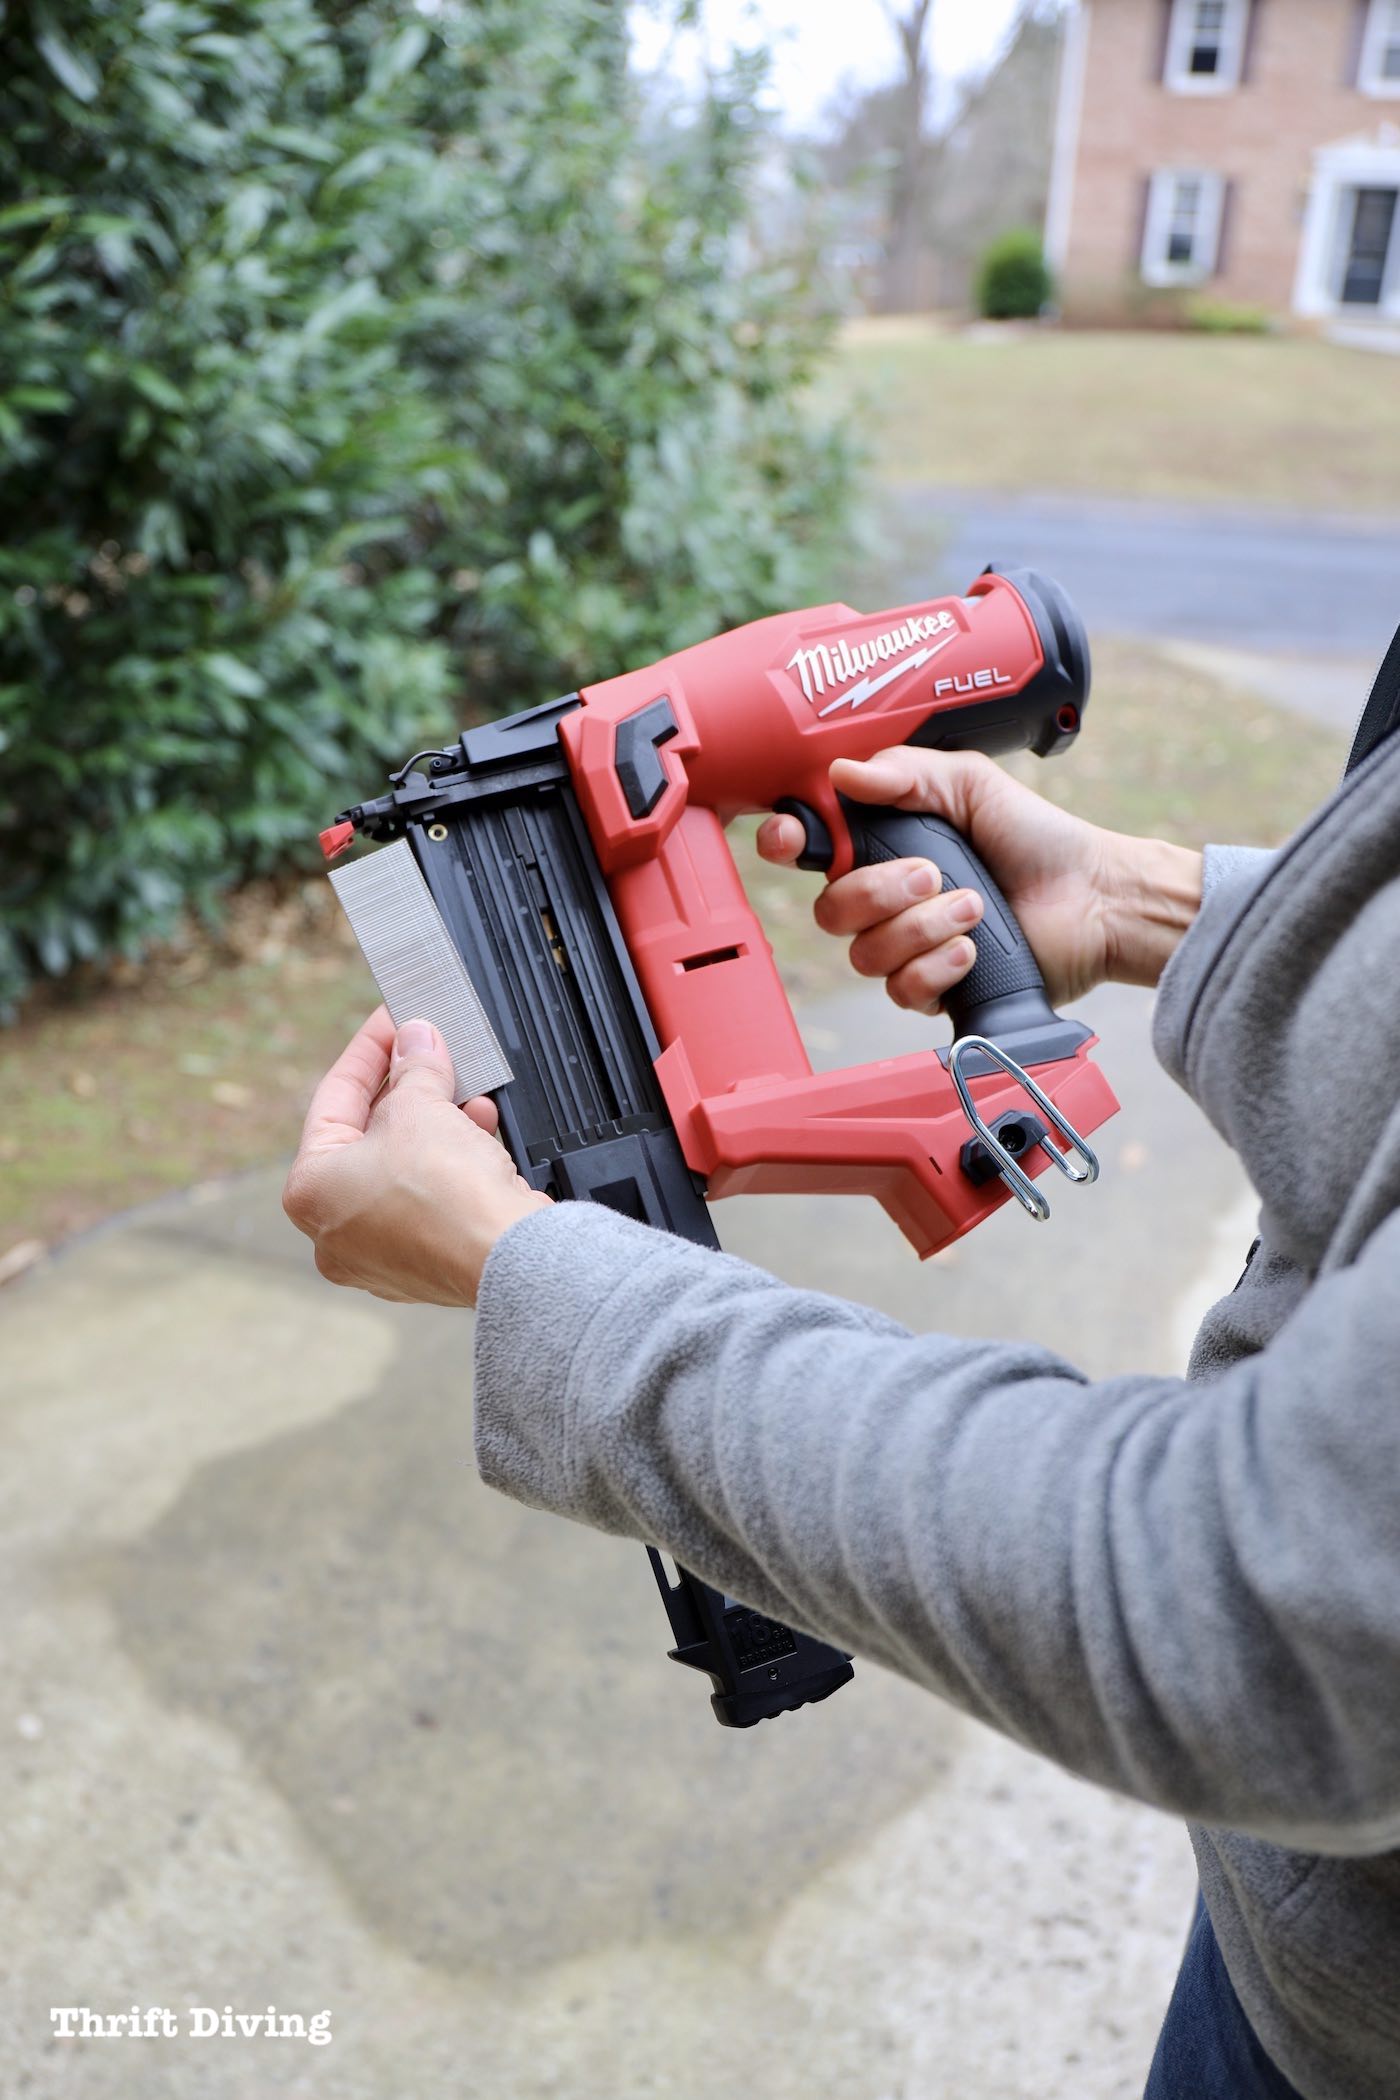
- Brad nailer. A brad nailer will attach the baseboards to the wall. A finish nailer can be used if you already have one. However, a brad nailer has thinner nails and leaves a finer hole on the baseboard.
- 18 gauge brad nails. Buy brad nails that are 1-1/2″ to 2″ long. Don’t go any longer than 2″.
- Stud finder. Perfect for nailing your baseboard to the studs for added holding power.
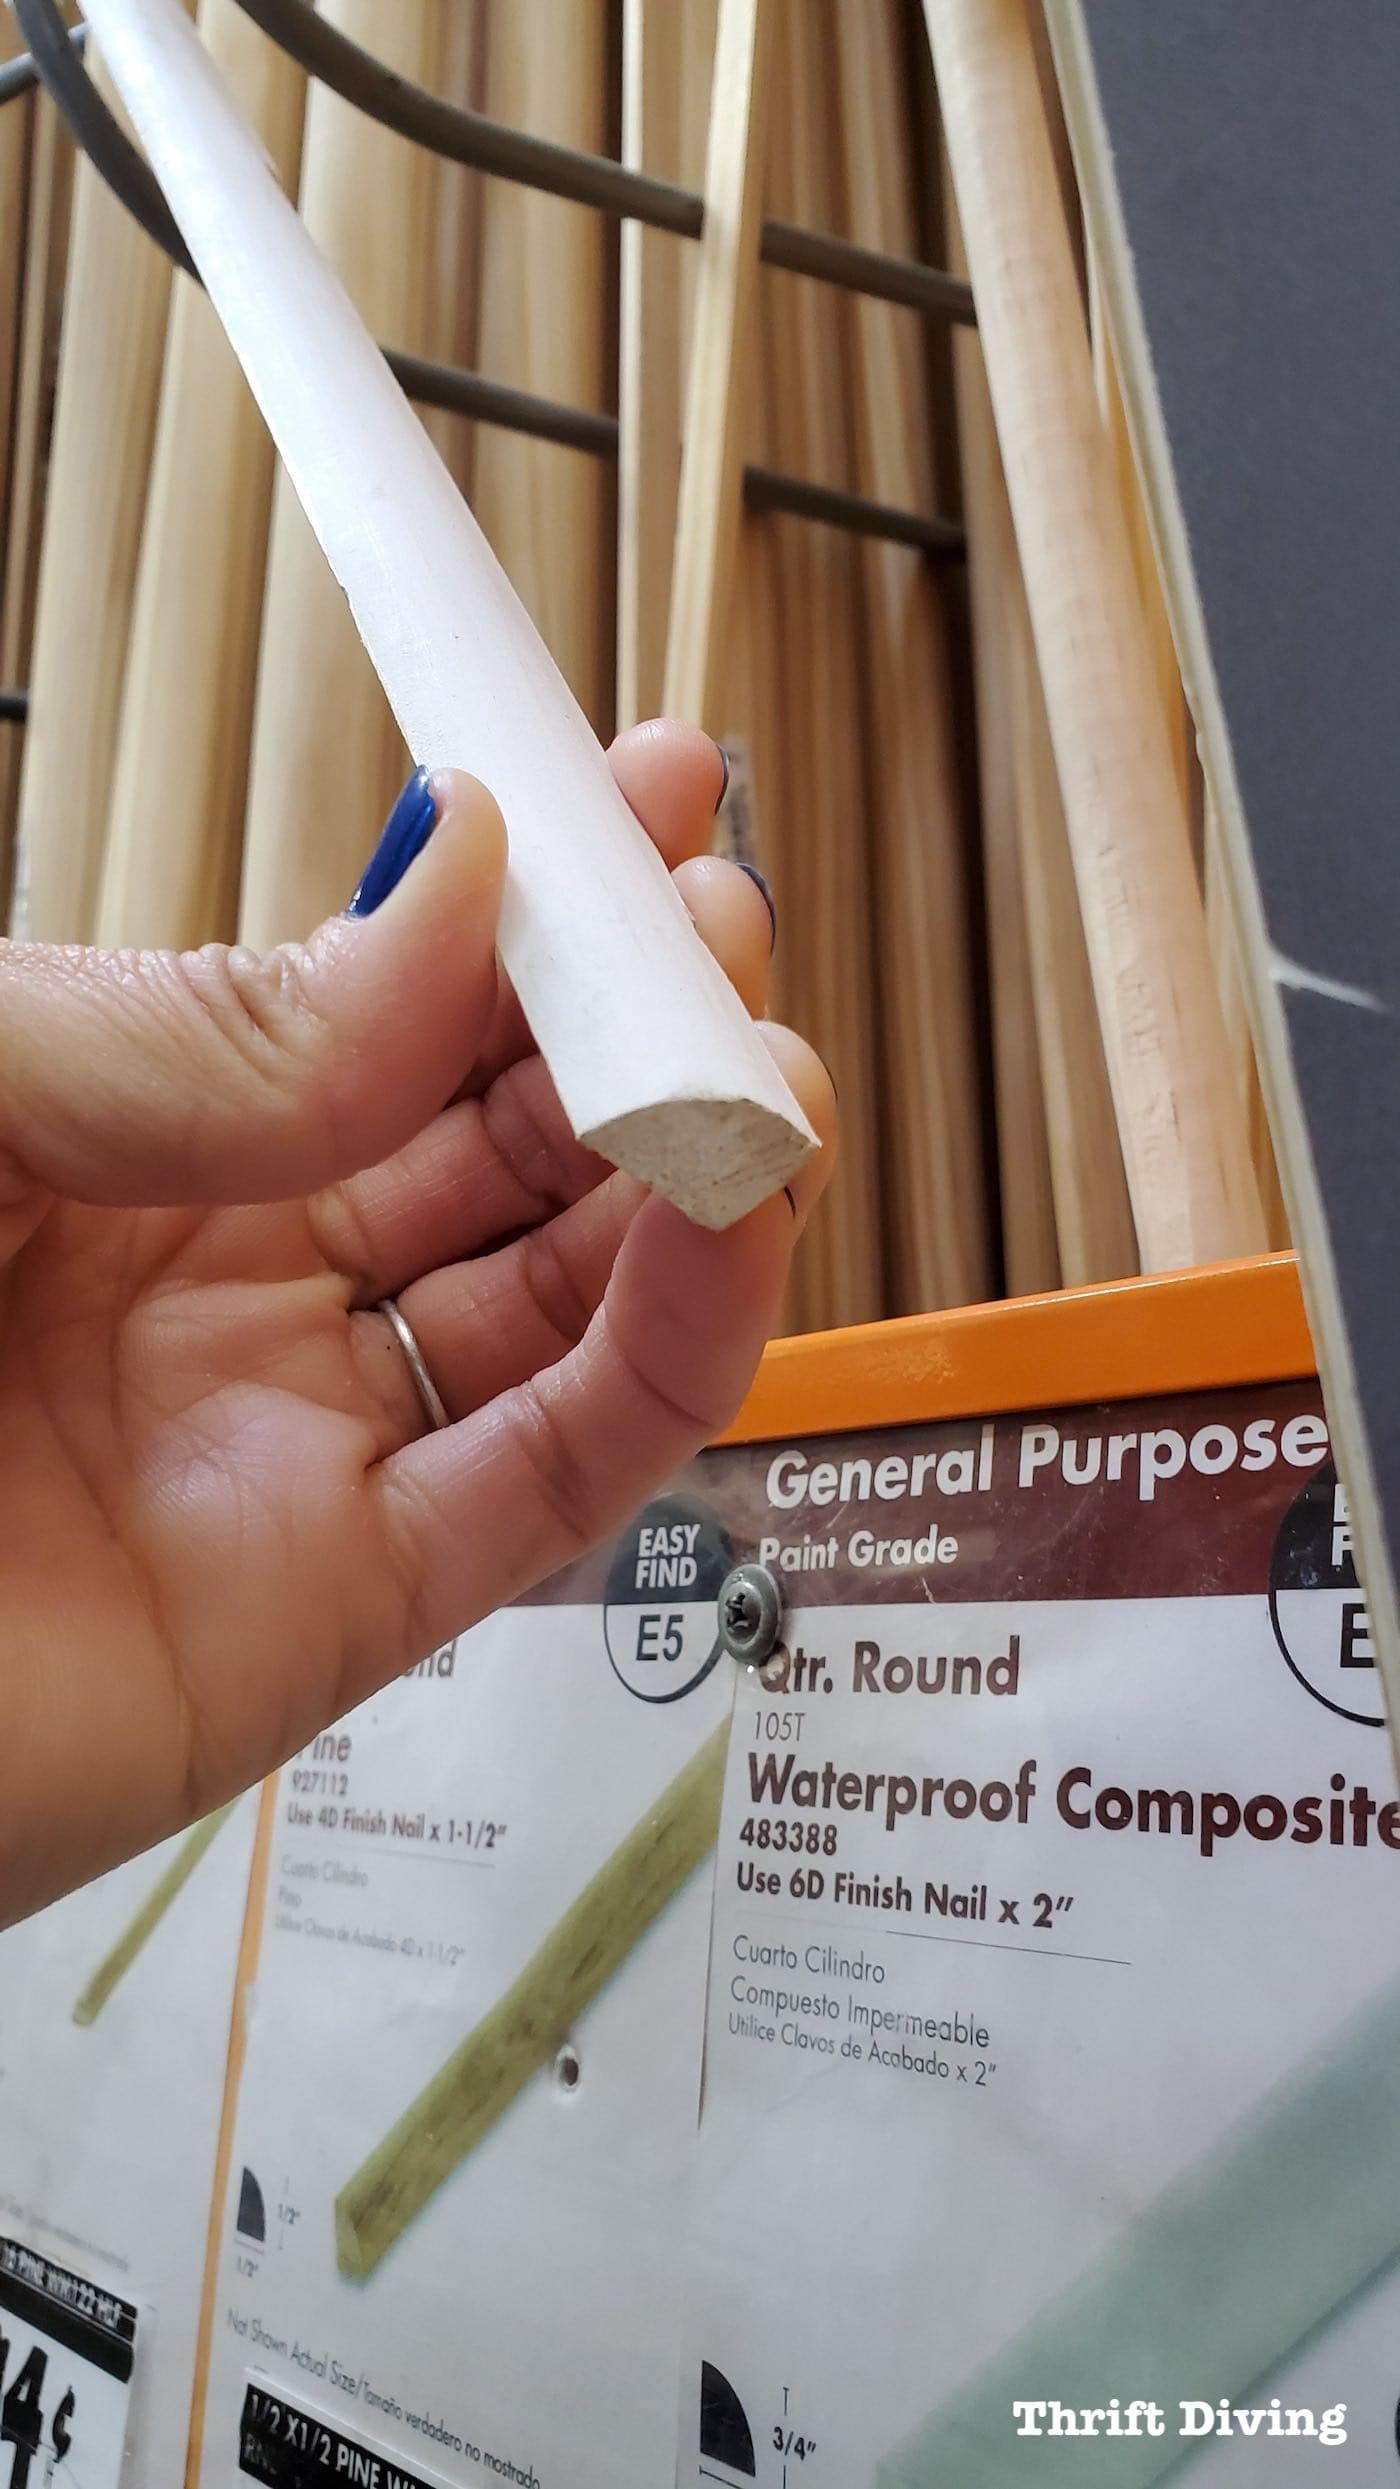
- Quarter round. – Also known as shoe molding. This is helpful to use if you’ve got an uneven floor and need to hide some gaps.
- Caulk. – Caulking isn’t required, per se, but it helps to hide imperfections or gaps along the wall and baseboard. Be sure to use the caulking that is made specifically for molding and trim.
- Caulk gun. – Required in order to use the caulk.
- Pry bar – Necessary if you need to remove a baseboard without damaging the wall.
- Wood filler. Fills in the brad nail holes so they can be painted (or stained) over.
- Sandpaper.
- Dust mask.
- Milwaukee Performance Safety Glasses. These safety glasses are great because they’re anti-fog so they won’t steam up when you overhead while working.
- Semi-gloss (or satin paint). (or satin paint) – Baseboards should be painted with a semi-gloss or satin paint . Semi-gloss is preferred because it can easily be wiped down and prevent scratches. It doesn’t have to be white but the standard color of baseboards is white and compliments all paint colors.
- Painter’s tape. Optional
- Paint brush.
- Gloves.
- Utility knife.
- Diatomaceous Earth – Diatomaceous earth is an all natural organic compound (made up of fossilized tiny aquatic organisms). It’s very effective at killing all kinds of bugs, such as ants, fleas, bed bugs, carpet beetles, roaches. It cuts their exoskeleton and they dehydrate and die. It’s not toxic to humans or pets, but when applying it, wear a mask, so you don’t breathe it in. I like to sprinkle some behind my baseboards when installing them to help curb pest problems. It will last forever as long as it doesn’t get wet.
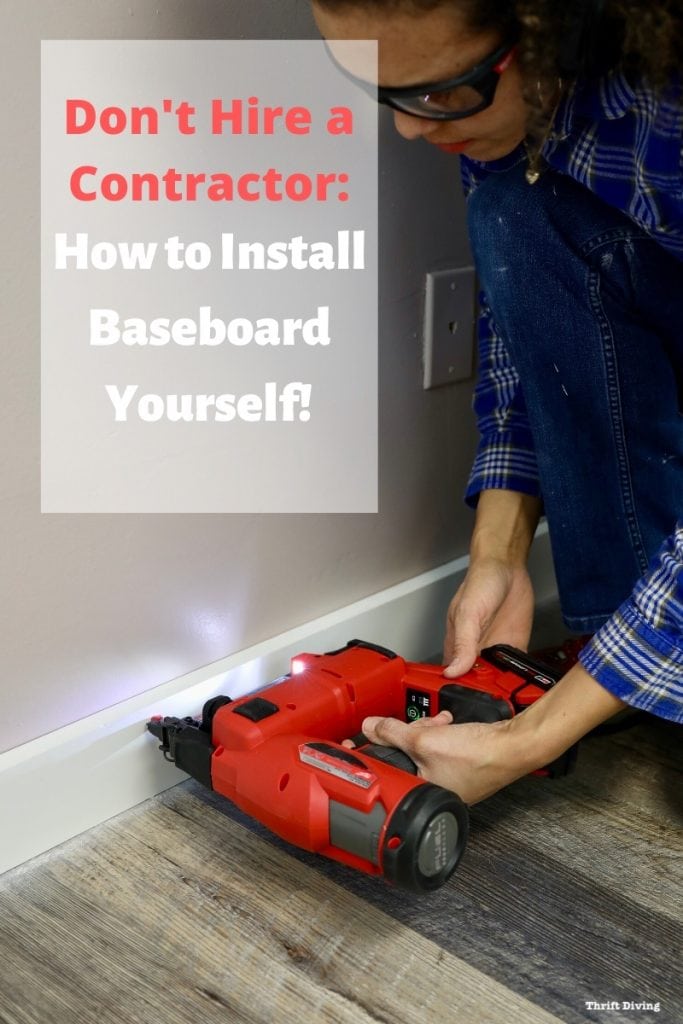
The Home Depot provided this Milwaukee M18 FUEL 18-Volt Lithium-Ion Brushless Cordless Gen II 18-Gauge Brad Nailer to use for my own basement baseboards project. It’s pretty light weight with zero ramp-up time. And because it runs on battery, no gas cartridge is required. When installing baseboard and trim, this compact brad nailer produces clean nail holes in both hard and soft woods.
How to Install Baseboards
Baseboards definitely are easy to install. Now that you’ve gotten all the materials needed for installing baseboard, here’s how you install them, step-by-step.
STEP 1: Remove Old Baseboards (If necessary).
If you’re installing new hardwood flooring, vinyl, tile, or even carpet, you will need to remove the old baseboards. Flooring goes under baseboards, so don’t take the lazy route and attempt to leave them on when installing a new floor. Use a pry bar to remove the old baseboards. A scrap piece of wood behind the pry bar is helpful for leverage and to prevent damaging the walls (otherwise, using the pry bar could puncture the drywall). If you’re planning to reuse the old baseboards, set them aside and be sure to use a hammer or wire cutters to remove the old brad nails sticking out. Be careful not to damage the old baseboards. If you’re not using the old baseboards, use a hammer to flatten the brad nails so you don’t step on them.
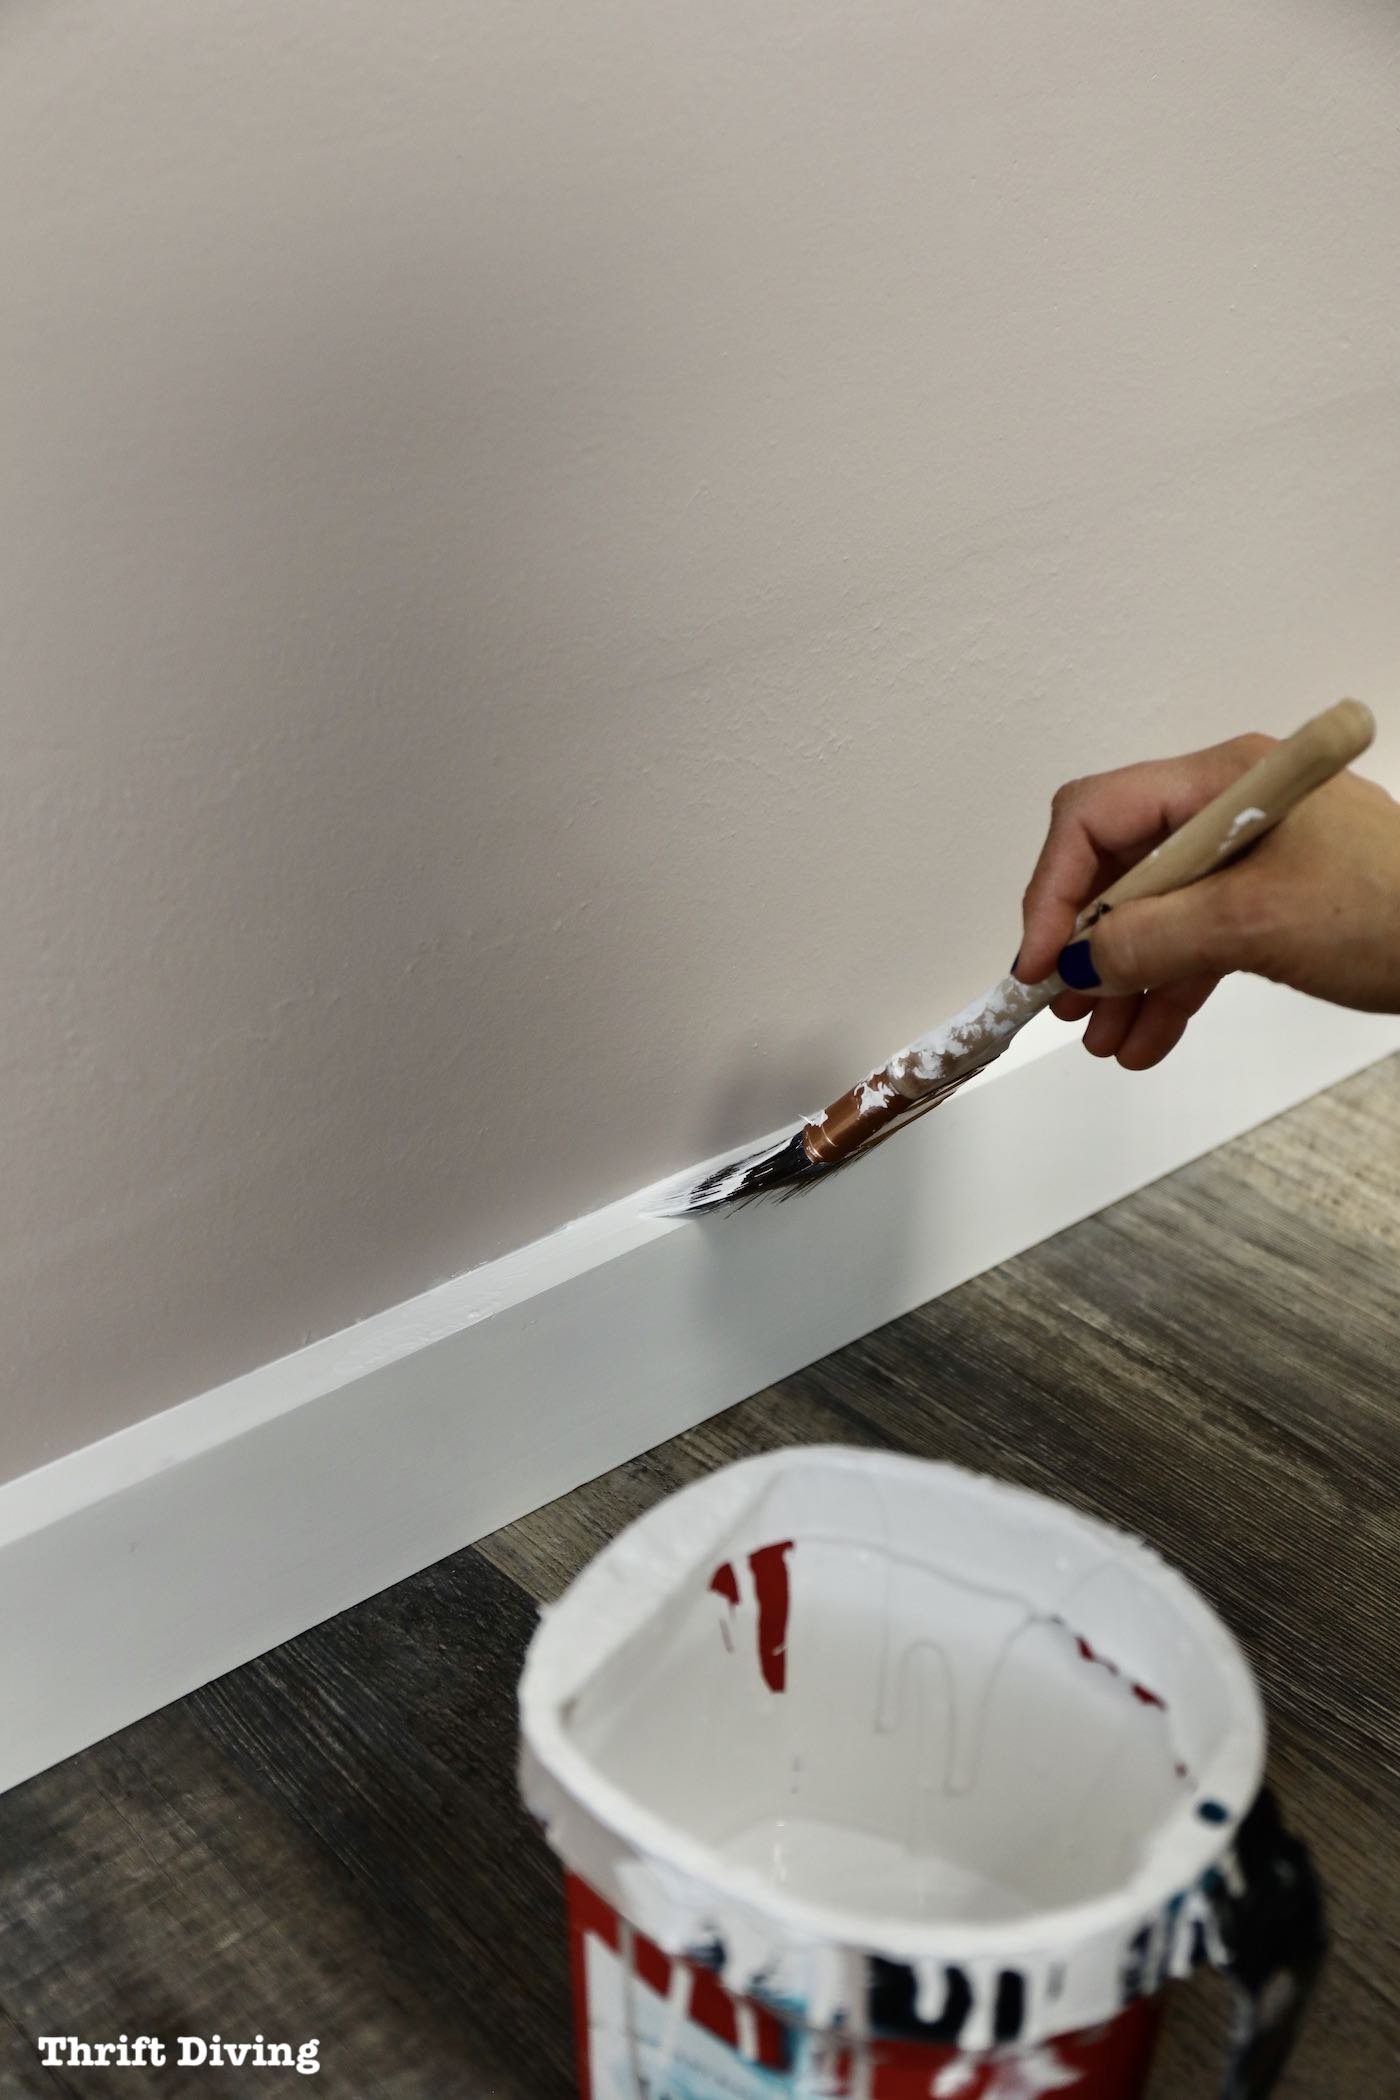
STEP 2: Paint the Baseboards Using Semi-Gloss Paint.
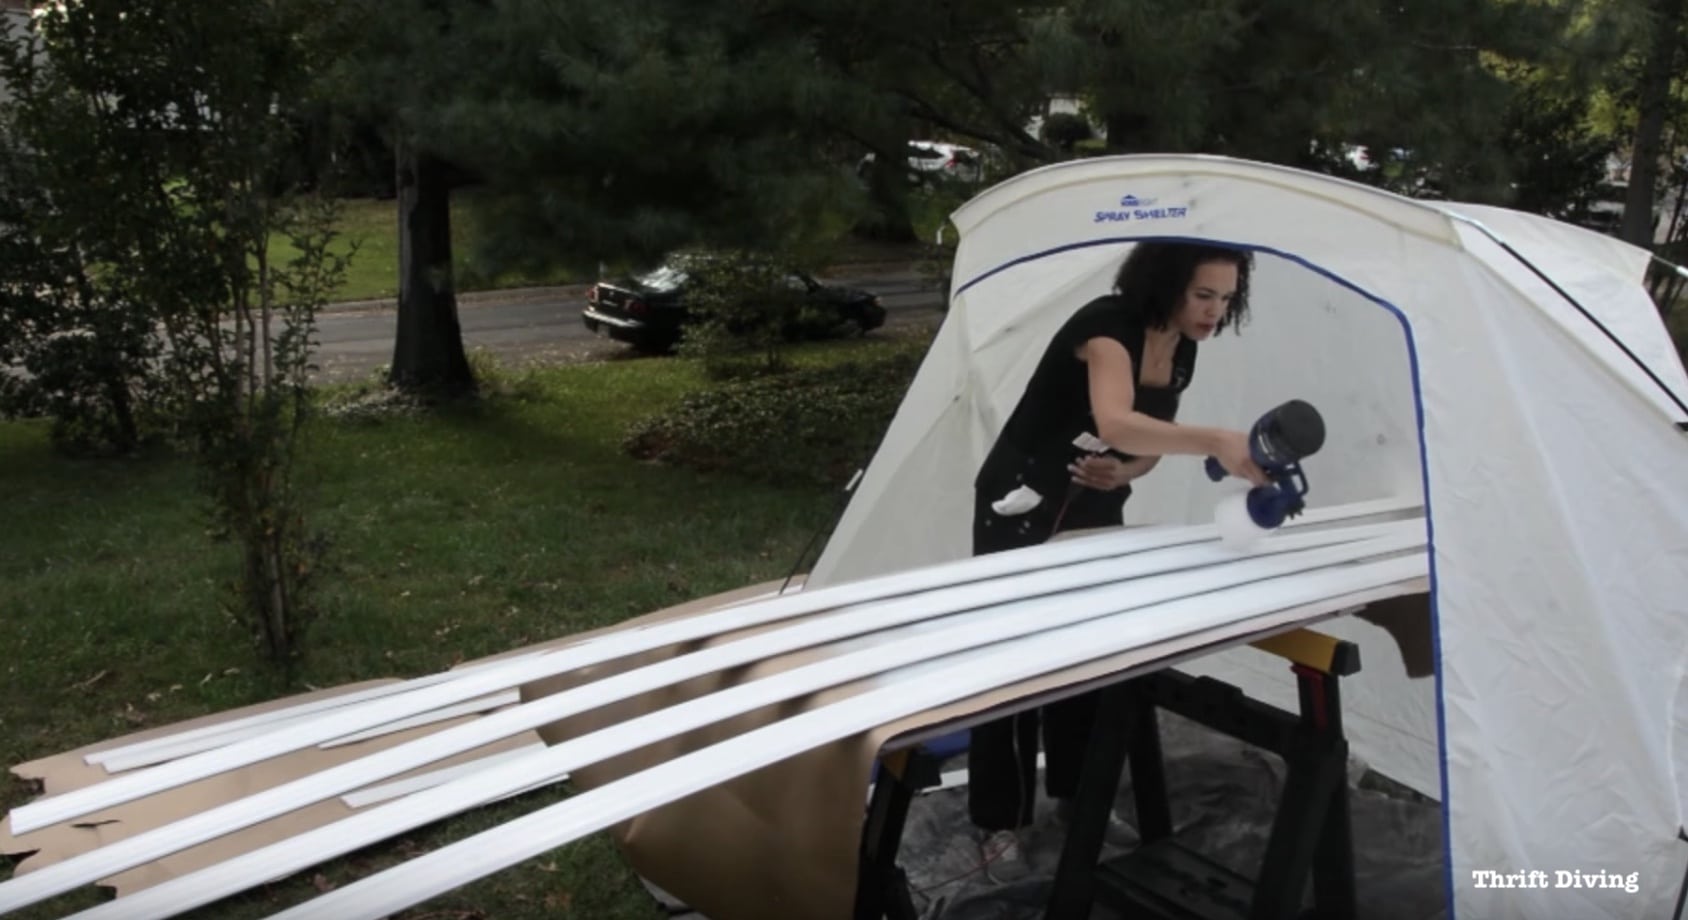
It’s best to paint the new baseboards before installing them. If you bought primed baseboards, you’ll likely only need one coat of semi-gloss (or stain) paint. If it’s unfinished pine, add a coat of primer and then 1-2 coats of paint. If you’ve got a lot of baseboards, pull out a paint sprayer to get through the job a little faster. (If you’re planning to add quarter round, plan to paint that, as well.). If you’re using a paint brush, use a synthetic paint brush and glide it over the baseboards in long, smooth strokes. Yes, I do recommend painting the back of baseboards, too, which helps to seal them. Start with painting the back first. Once it dries, turn it over and paint the front. One coat is fine.
Can Baseboards Be the Same Color at the Wall?
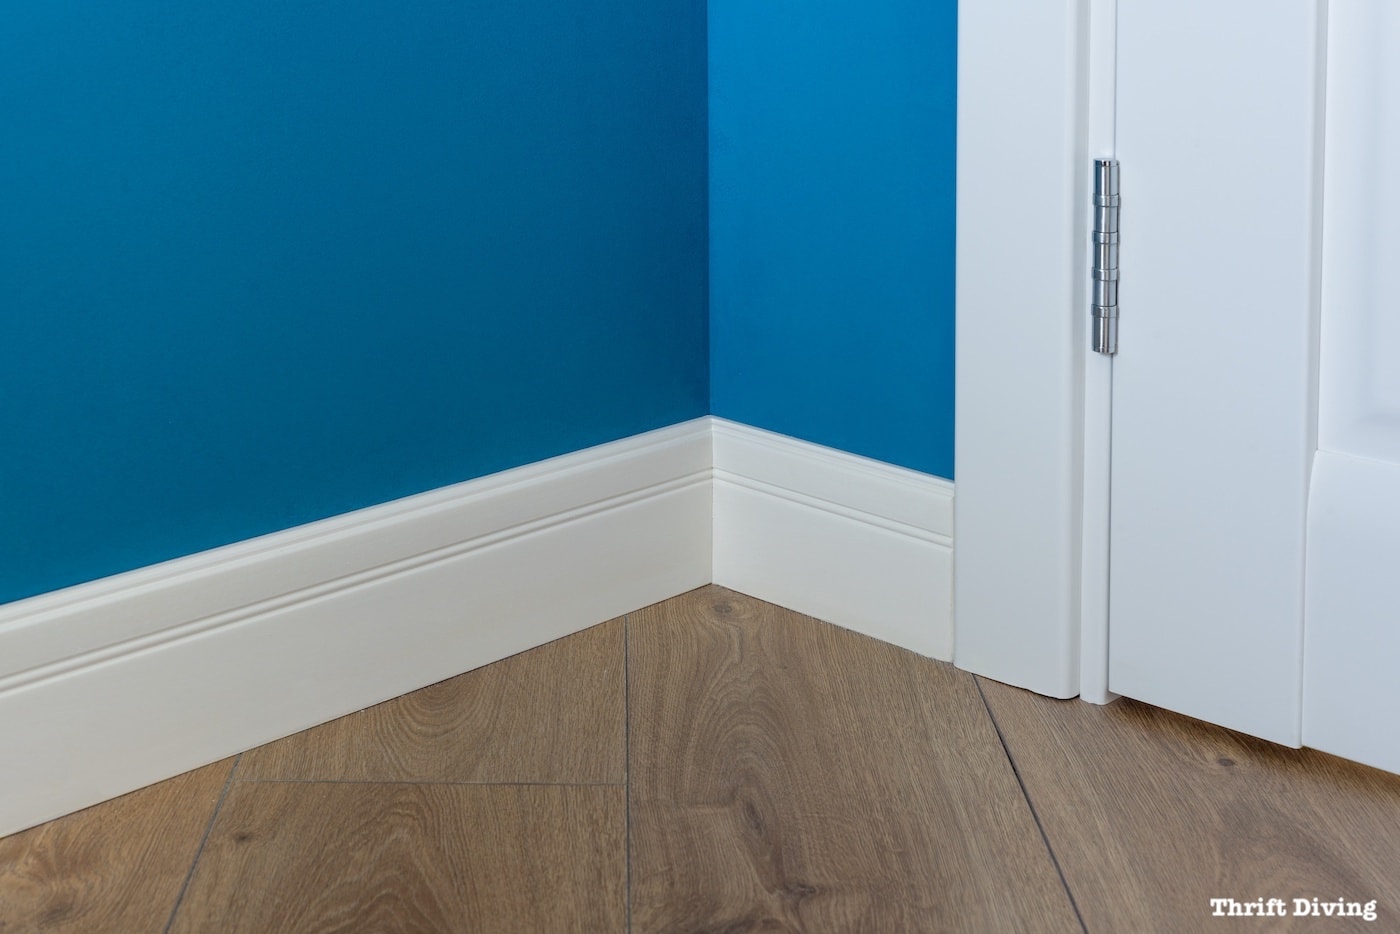
Yep, you can totally paint the baseboards the same color as the wall. There are no rules here. You could even paint them a contrasting color. Although white is typical, feel free to paint them whatever color you want.
STEP 3: Measure and Cut the Baseboard, Starting in One Corner
When cutting baseboard, there are a few rules to keep in mind:
- Always measure and cut each baseboard one at a time as you go. DON’T cut all baseboard pieces at the same time. Fitting and cutting pieces as you go allows for more precise measurements.
- Always measure from longest edge to longest edge, especially when measuring pieces with 45-degree angled cuts.
- Inside corners and outside corners are cut at 45-degrees to form and inside and outside 90-degrees.
- Join pieces of baseboard along a long wall using 45-degree angles.
- Butt baseboard pieces up against door casings using a 90-degree cut.
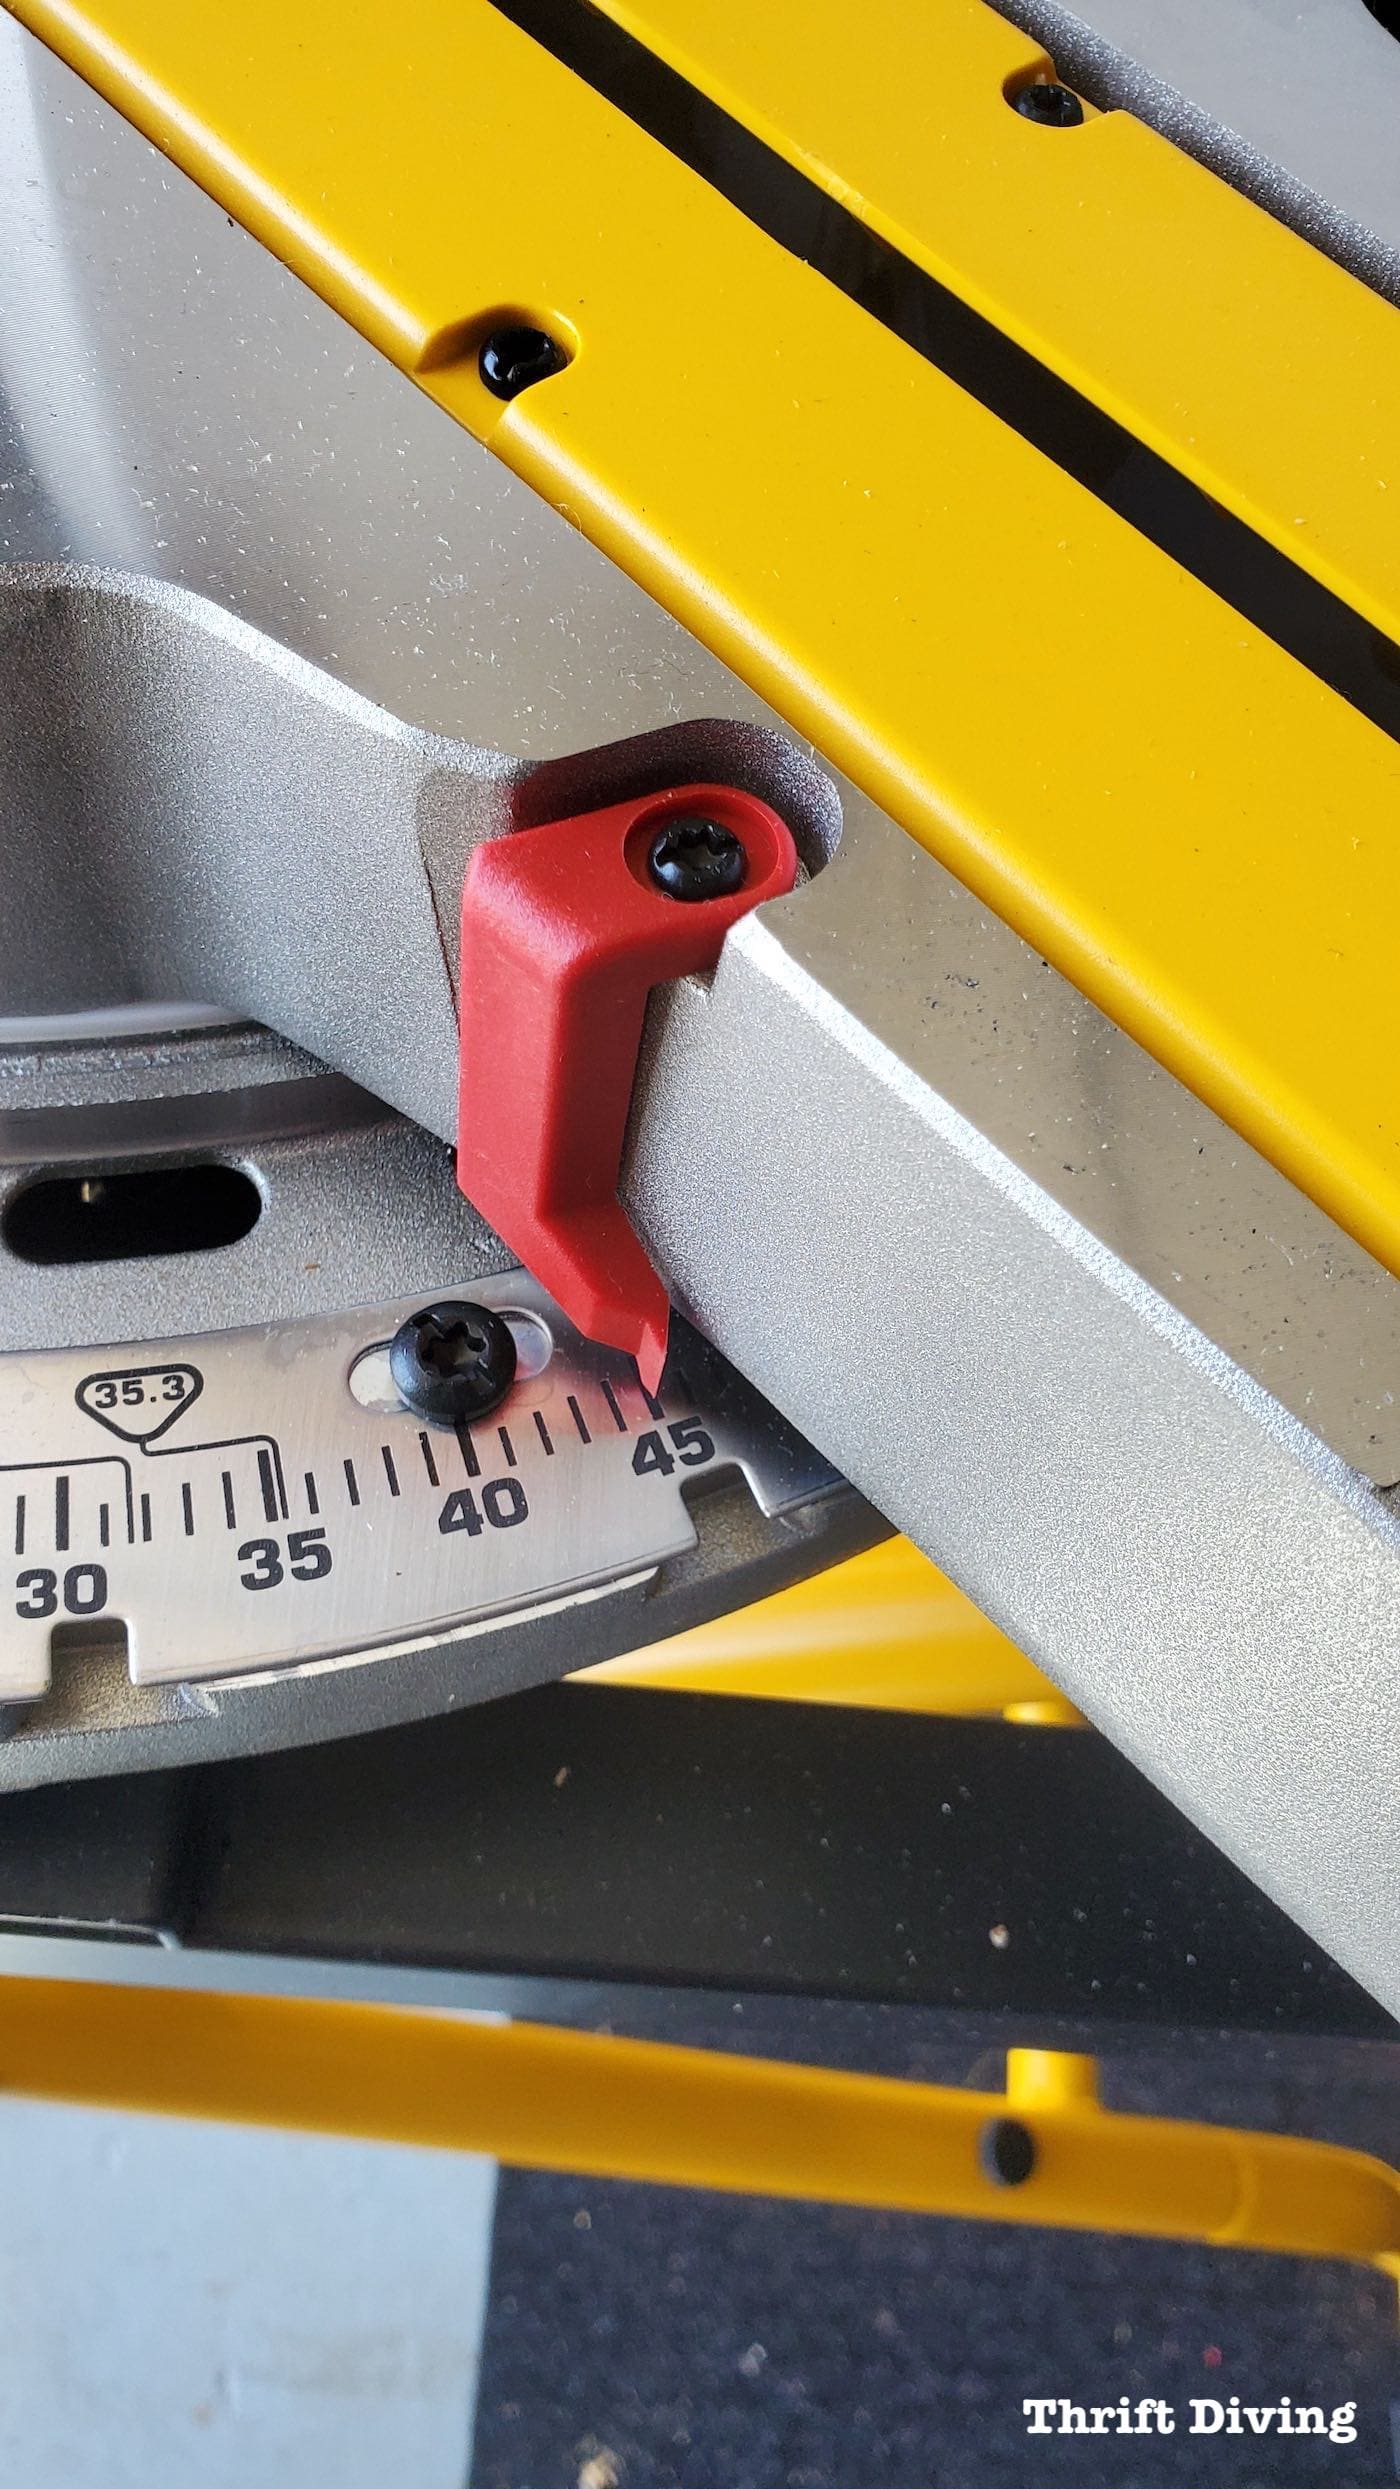
A 45-degree cut is the basic cut you’ll be making when cutting baseboard, both at inside and outside corners, and to join baseboards along long walls. Set your miter saw to 45-degrees. As I mentioned before, it’s easier to use a miter saw, but if you don’t own one or don’t want to rent one from The Home Depot, you can use a miter box. But this is the general cut you’ll be making. And remember, too, the Home Depot’s lumber department can make baseboard cuts for you, too.
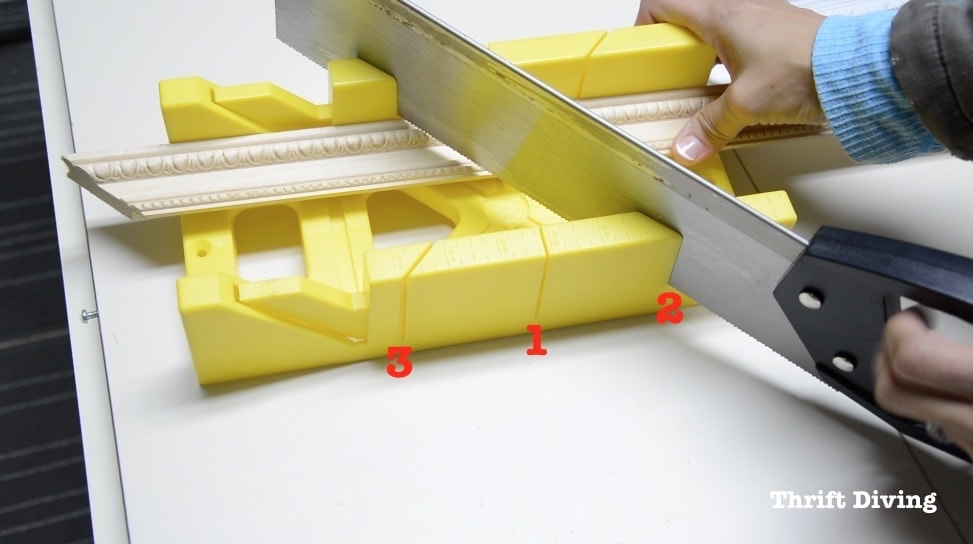
How to Use a Miter Box to Cut Baseboard
A miter box is a pretty cheap alternative to a miter saw when cutting molding and trim (like how I use it to make my own DIY picture frames.).
- 1 – Position your saw this way to cut a 90-degree cut.
- 2 – Position your saw to cut a 45-degree angle to the LEFT.
- 3 – Position your saw to cut a 45-degree angle to the RIGHT.
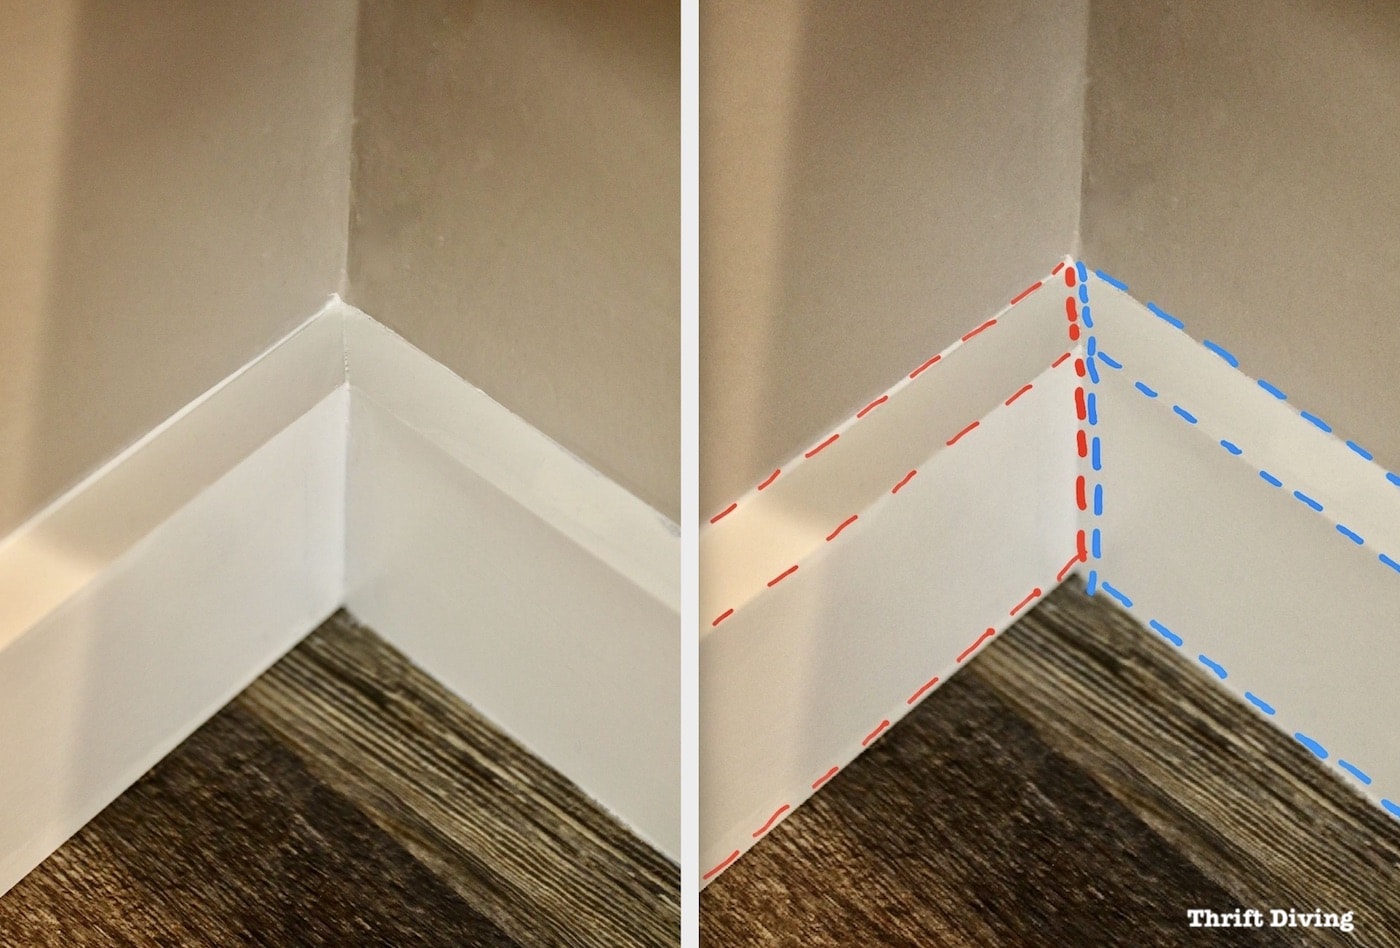
Cutting Inside Corners for Baseboards
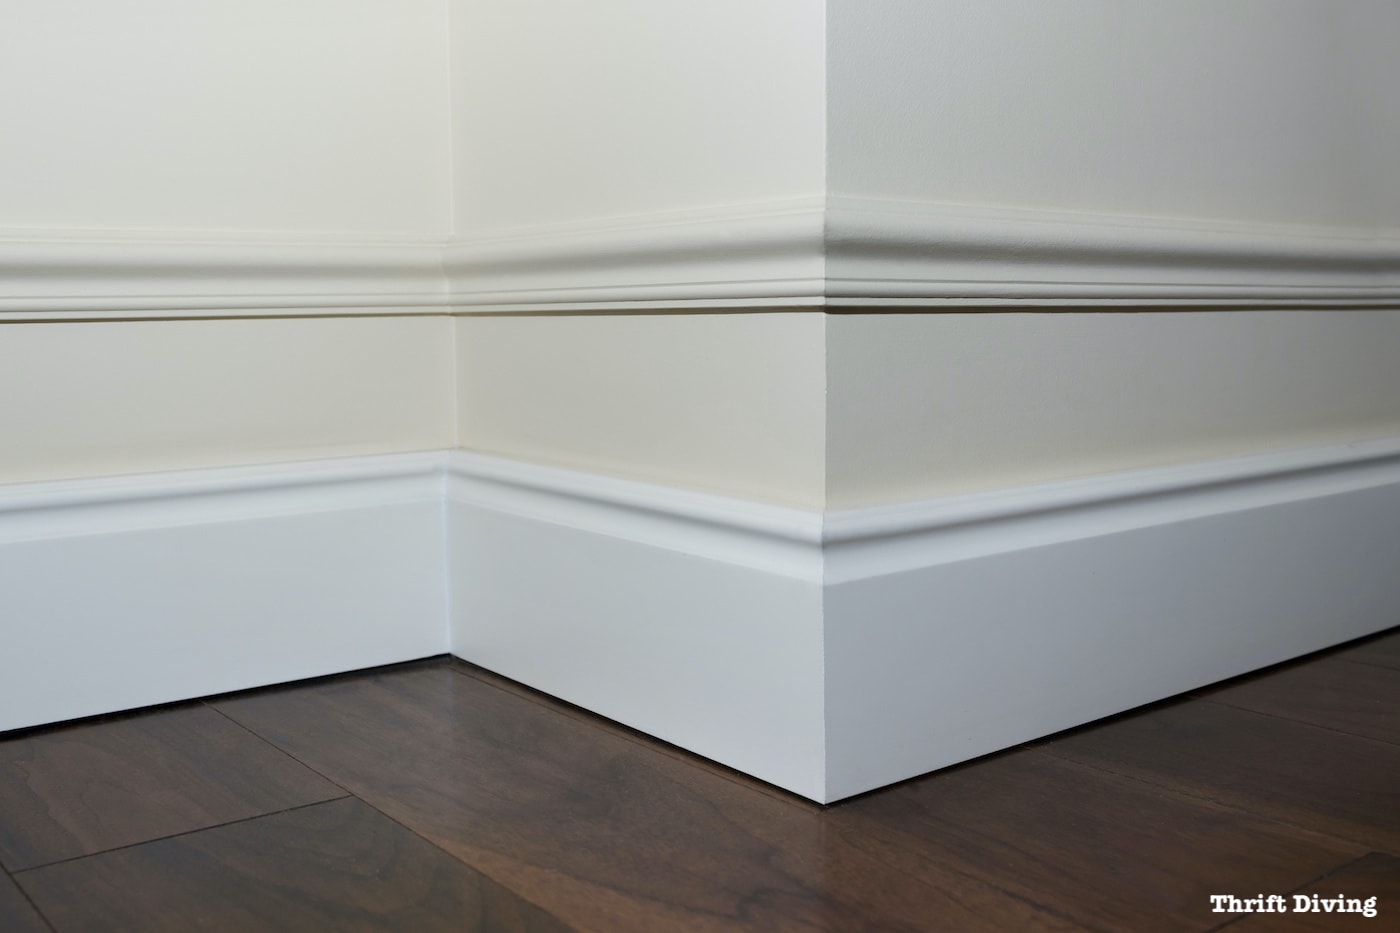
When planning your baseboards for inside corners, they’ll be positioned with 45-degree angled cuts. When joined together on an inside corner, those 45-degree angles come together to create a 90-degree angle. Don’t worry if it’s not a perfect joint. That’s what caulk is for. 😉
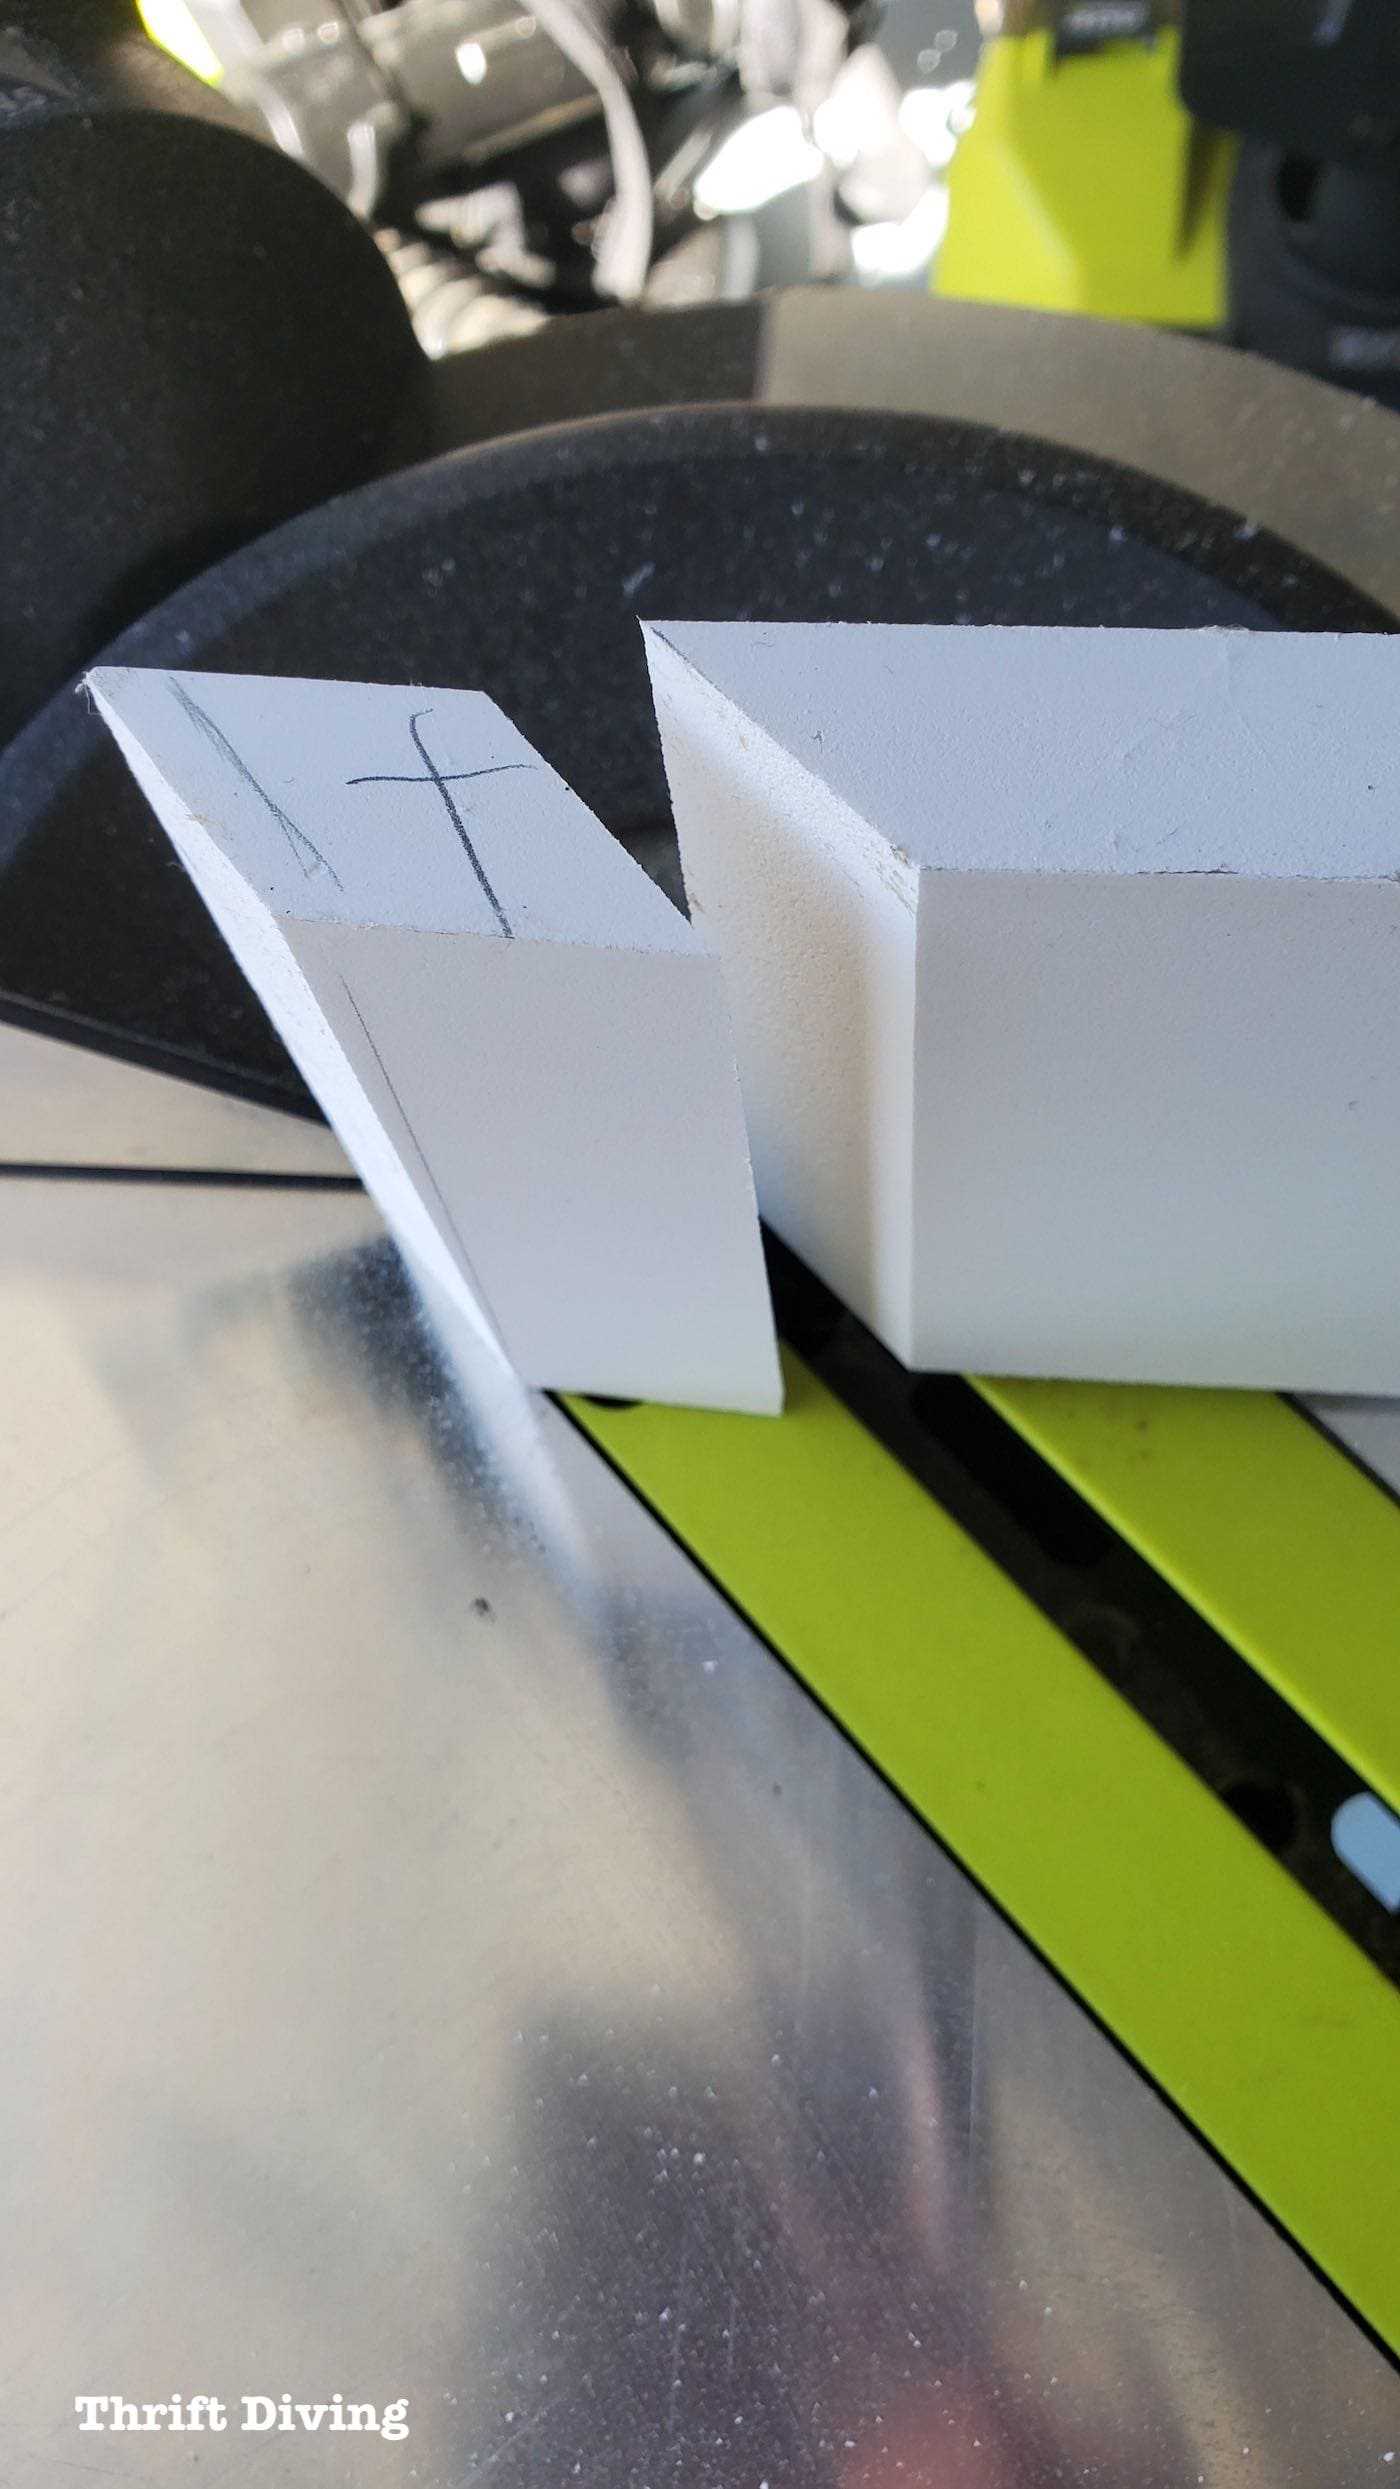
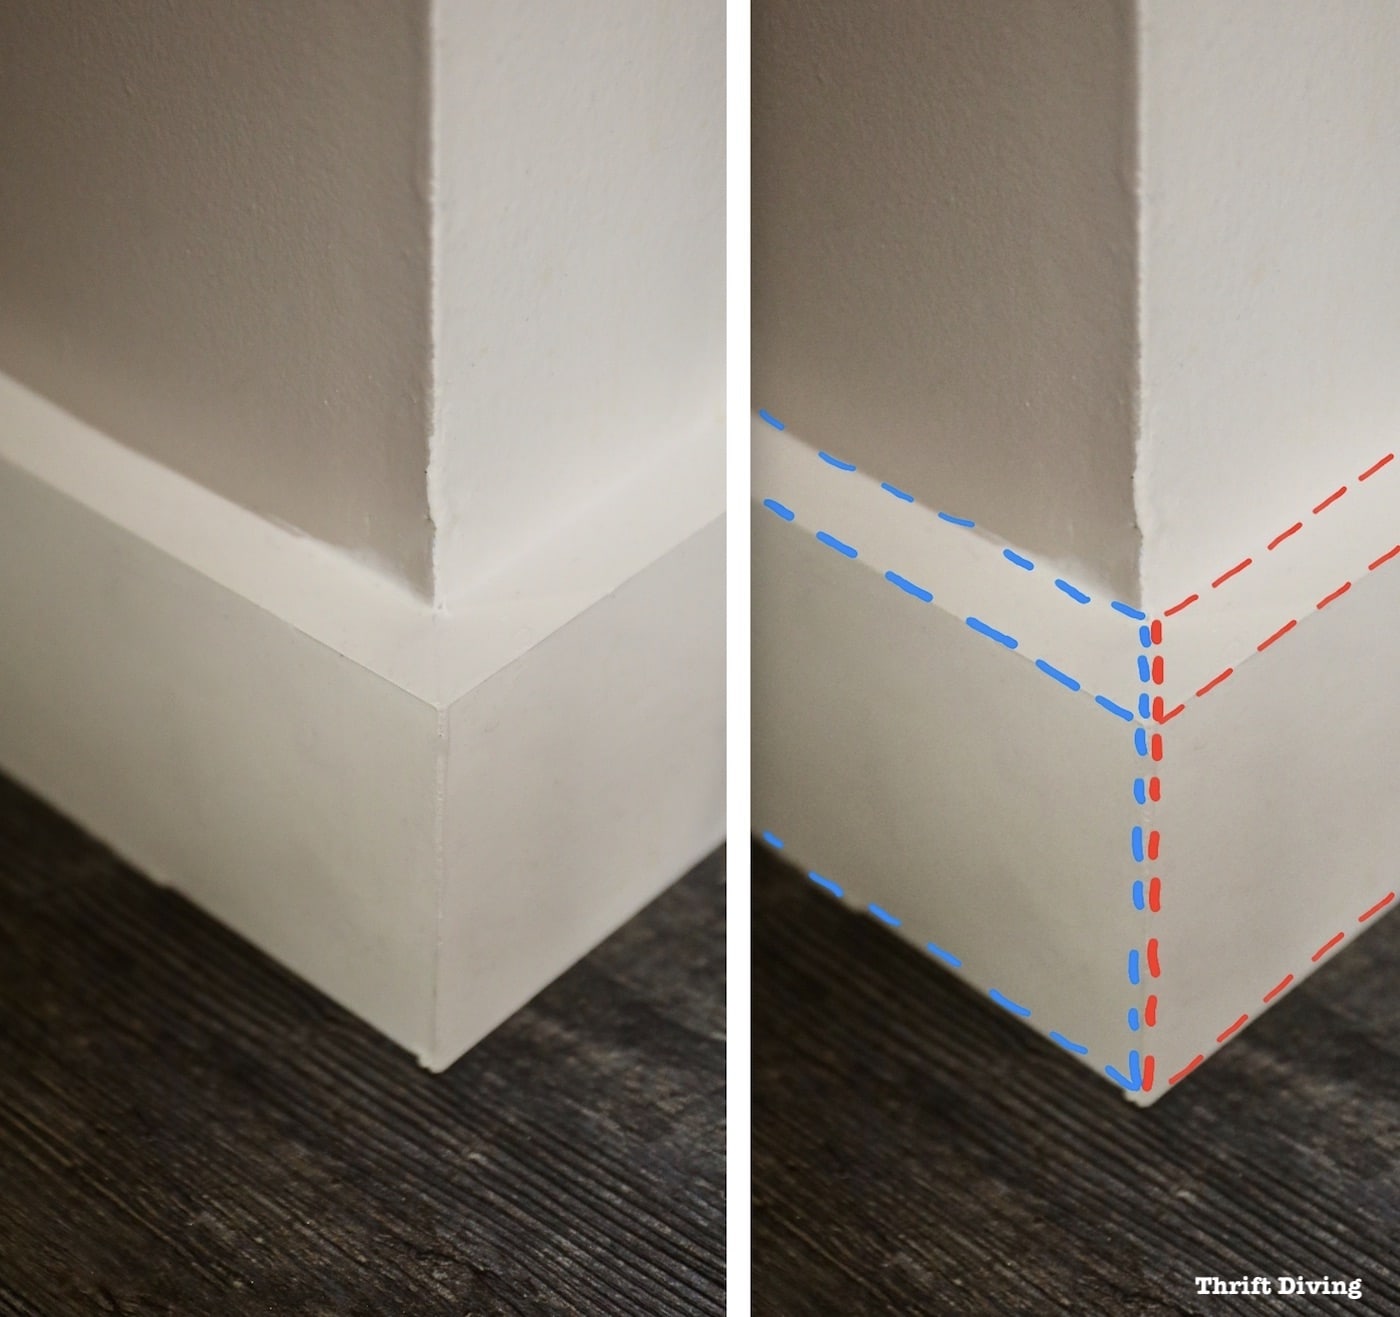
Cutting Outside Corners for Baseboards
When cutting outside corners, cut your baseboard moldings with 45-degree angles to meet at the outside corner. The dotted diagram shows how the two pieces will be cut to join together at the outside corner.
Installing Baseboard Next to Door Casings
When installing baseboard and you come to a door casing, you’ll always cut the baseboard at a 90-degree straight cut. Set your miter saw (or miter box) to 90-degrees. It will look something like this: with one end butted up against the door casing.
Installing Baseboard Only to an Edge
Sometime when installing baseboard you may very well get to the edge of wall and not want to continue wrapping it around the wall. This is a rare situation, but in the event that it happens, you would make a 45-degree cut at the end, and then cut another small piece at 45-degrees, as if you were making an “outside corner” cut. Then the piece join, it will be capped off nicely at the end of the wall. If it’s a small piece, use wood glue to secure it (to avoid breaking the piece with brad nails).
STEP 4: Add Insect Powder Behind Baseboards (Optional)
Before actually installing the baseboard to the wall, I like to sprinkle a natural insecticide behind the baseboards called diatomaceous earth. It’s basically ground up sea fossils that cut the exoskeleton of insects when they crawl through it, including ants, bed bugs, carpet beetles, roaches, etc. Not that you have to have all of those insects to use it! But it’s great to put in place behind the baseboards because it will last forever (as long as it doesn’t get wet). My basement tends to get a lot of ants so for me it’s extra insurance. Buy the food grade variety. It’s safe for humans and pets and is non-toxic and natural. Just be sure that when applying the diatomaceous earth, be sure to wear a dust mask and apply it with a duster.
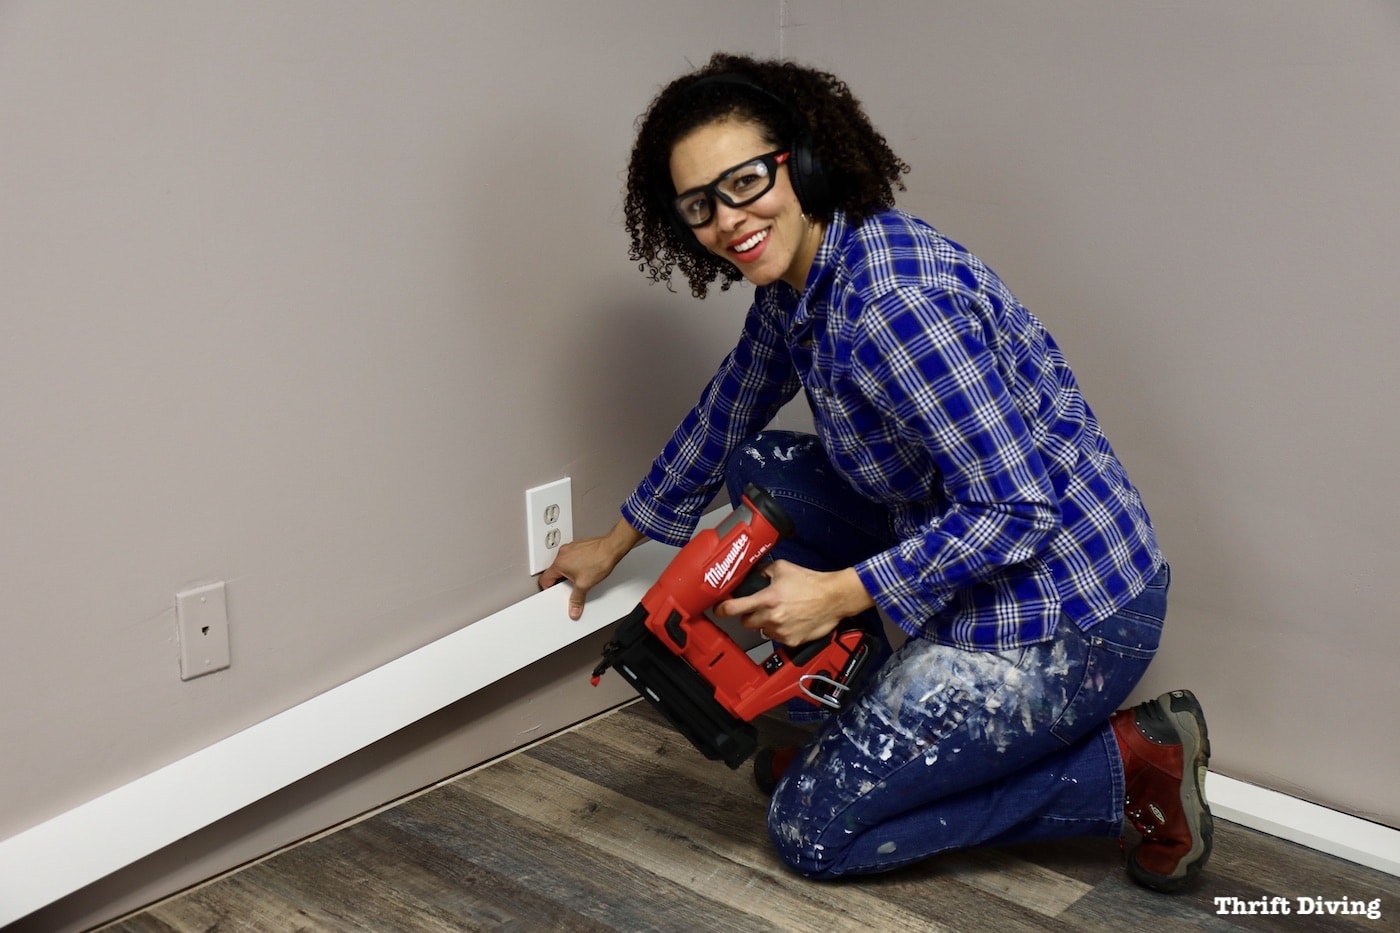
STEP 5: Attach Baseboard Using a Brad Nailer
When attaching baseboard, use a brad nailer with 18 gauge nails (either 1-1/2″ or 2″ brad nails). No, you don’t have to glue baseboards to drywall. In fact, if you glued the baseboards, you could damage the drywall when removing them if you ever need to remove them again to install new flooring.
Before attaching them, locate studs in the wall using a stud finder. The studs will typically be 16″ apart, so once you find one stud, the next will be 16″ away. But use a stud finder to confirm this (some homes may have studs located 24″ apart).
Use the brad nailer to attach the baseboard to the drywall, going into the studs to secure it. Along the bottom of the baseboard, add a brad nail, as well. The brad nails closer to the bottom will attach to the wall framing behind the drywall.
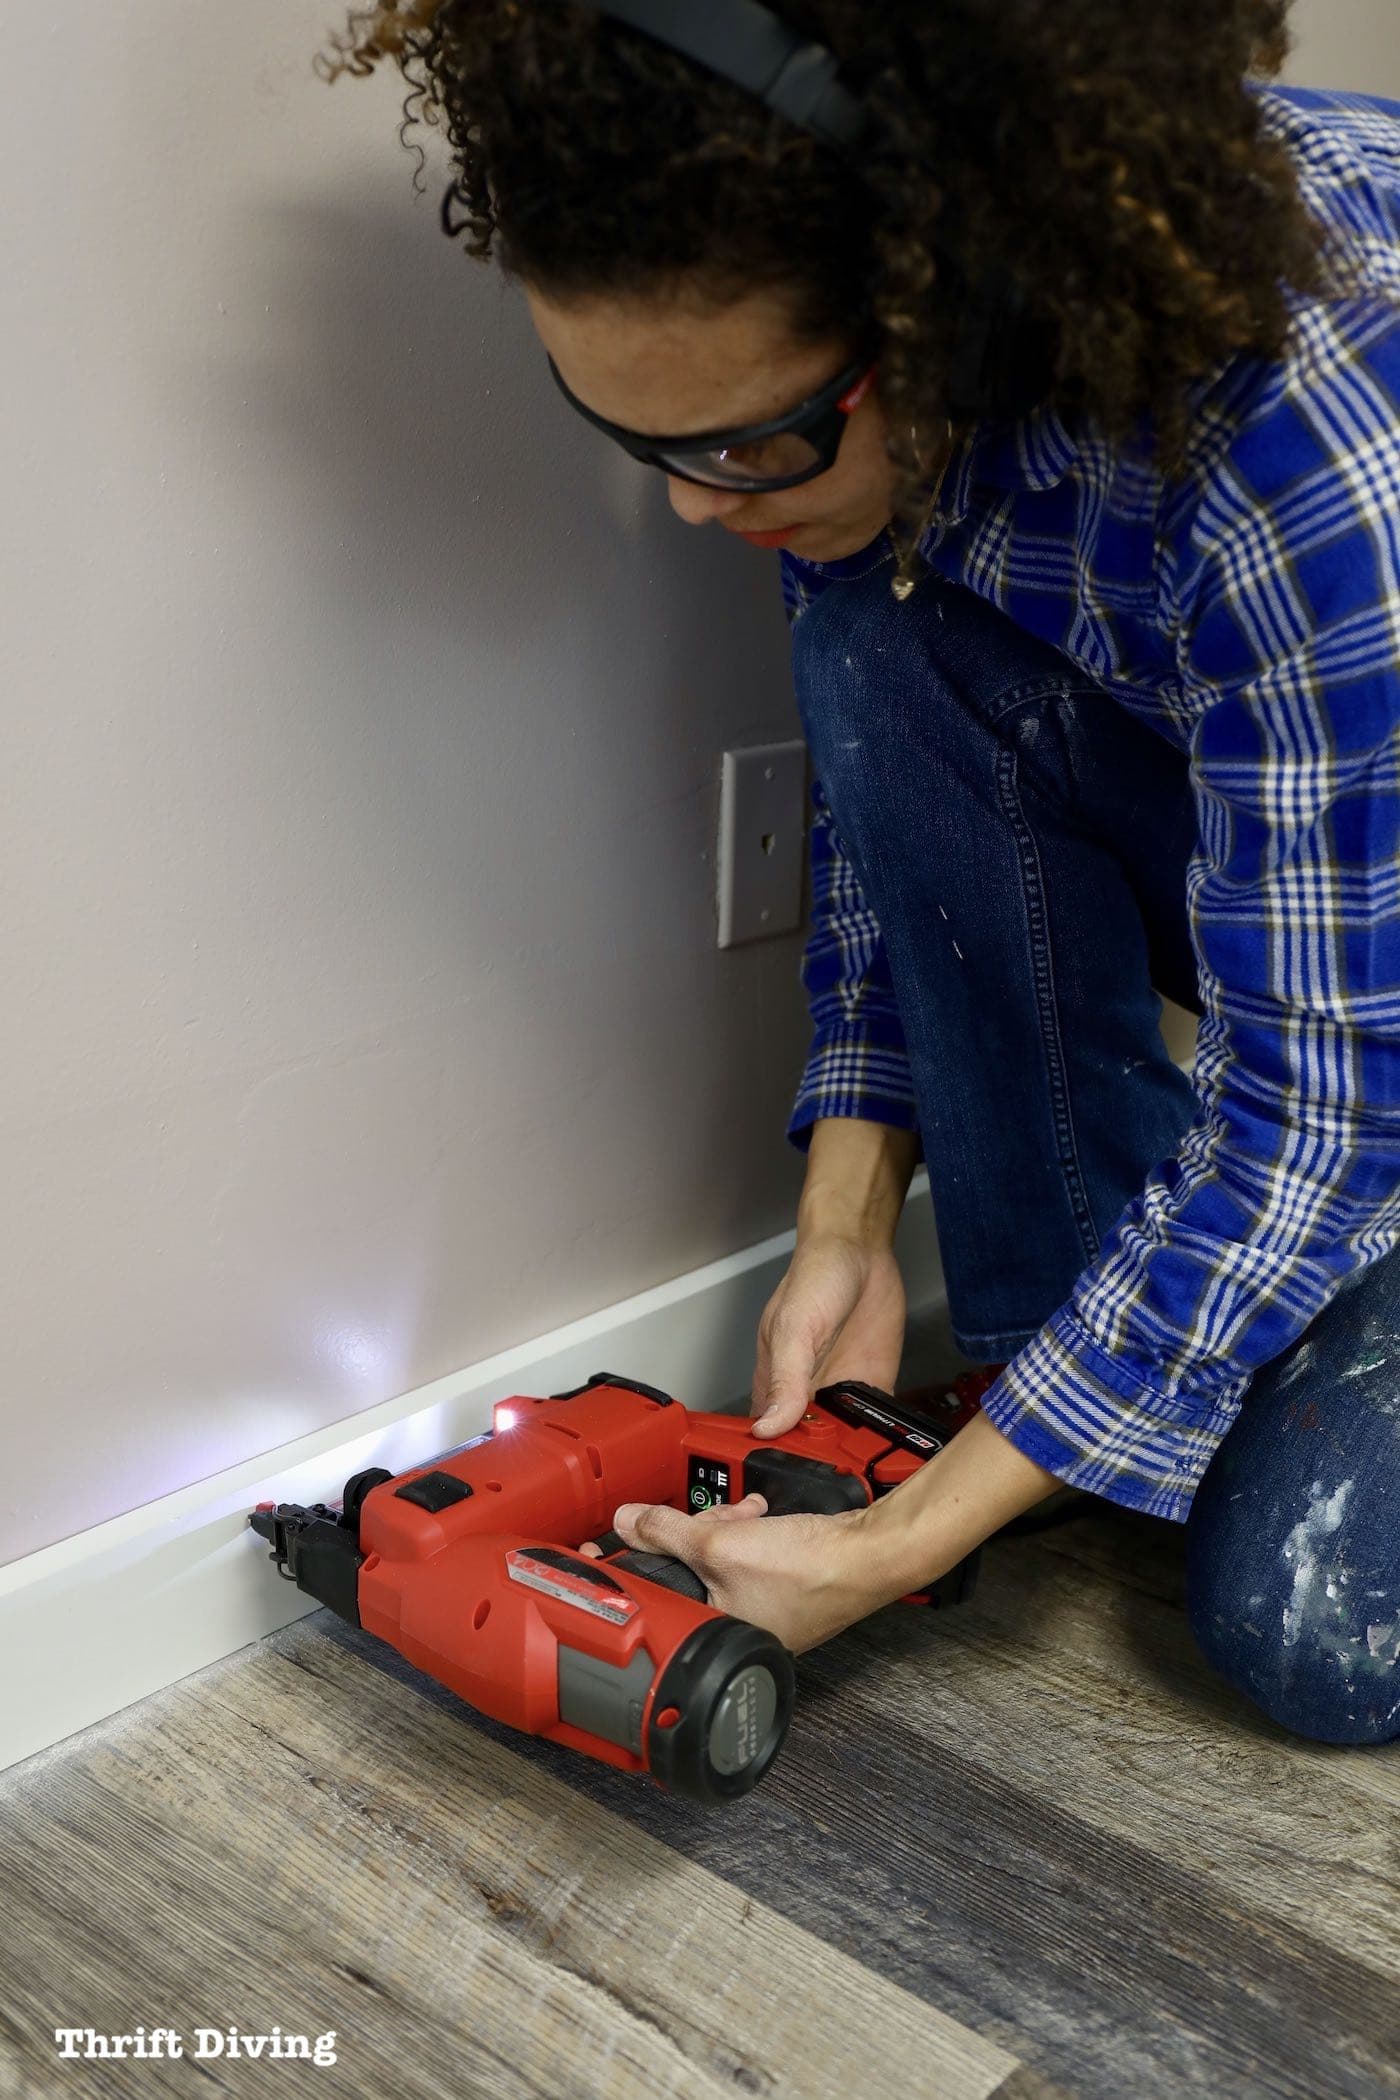
Be sure to wear your safety glasses. These Milwaukee Performance Safety Glasses are my favorites. Home Depot provided them to me to use for this project of installing baseboards in my basement. They won’t fog up in hot or humid temperatures, offer military grade impact protection, and have durable anti-scratch lenses.

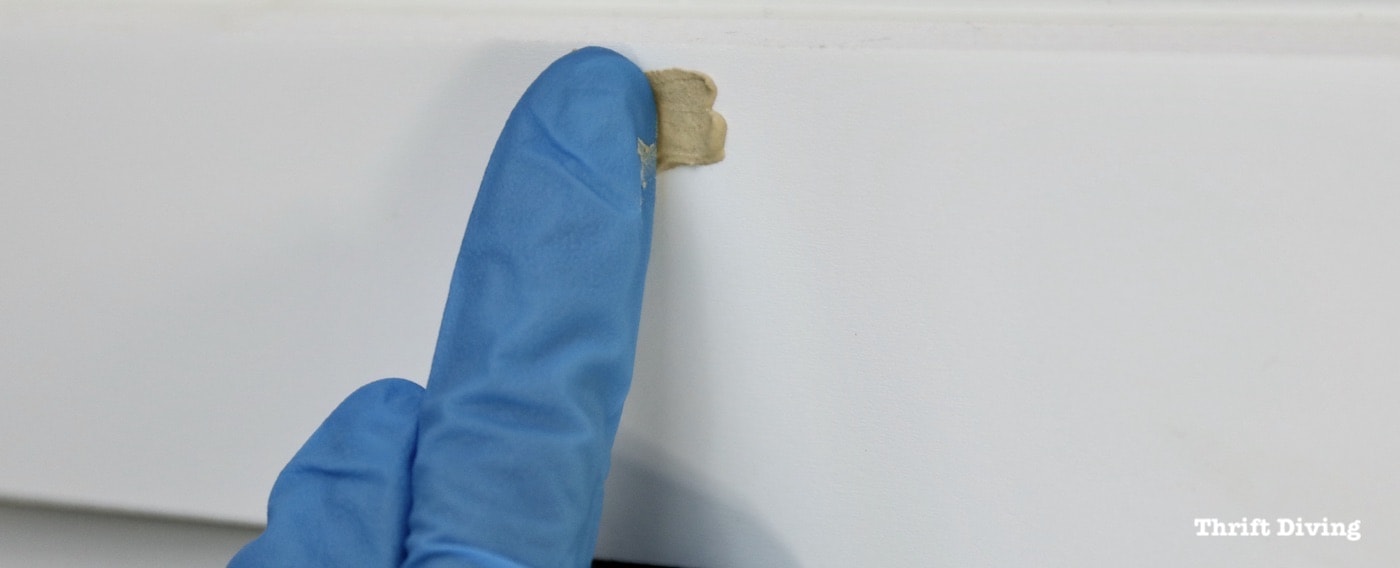
STEP 6: Fill the Nail Holes With Wood Filler
Brad nails leave a small hole in the baseboard. I won’t lie that I have sometimes left the holes unfilled. But it improves the overall appearance of the baseboard if you fill them with wood filler.

Apply a pea-sized amount to the brad nail hole and let it thoroughly dry before you sand it. You’ll want to apply more than you need, making a small mound. When you sand it down, it will sand smooth and flat over the brad nail hole.
STEP 7: Sand the Wood Filler
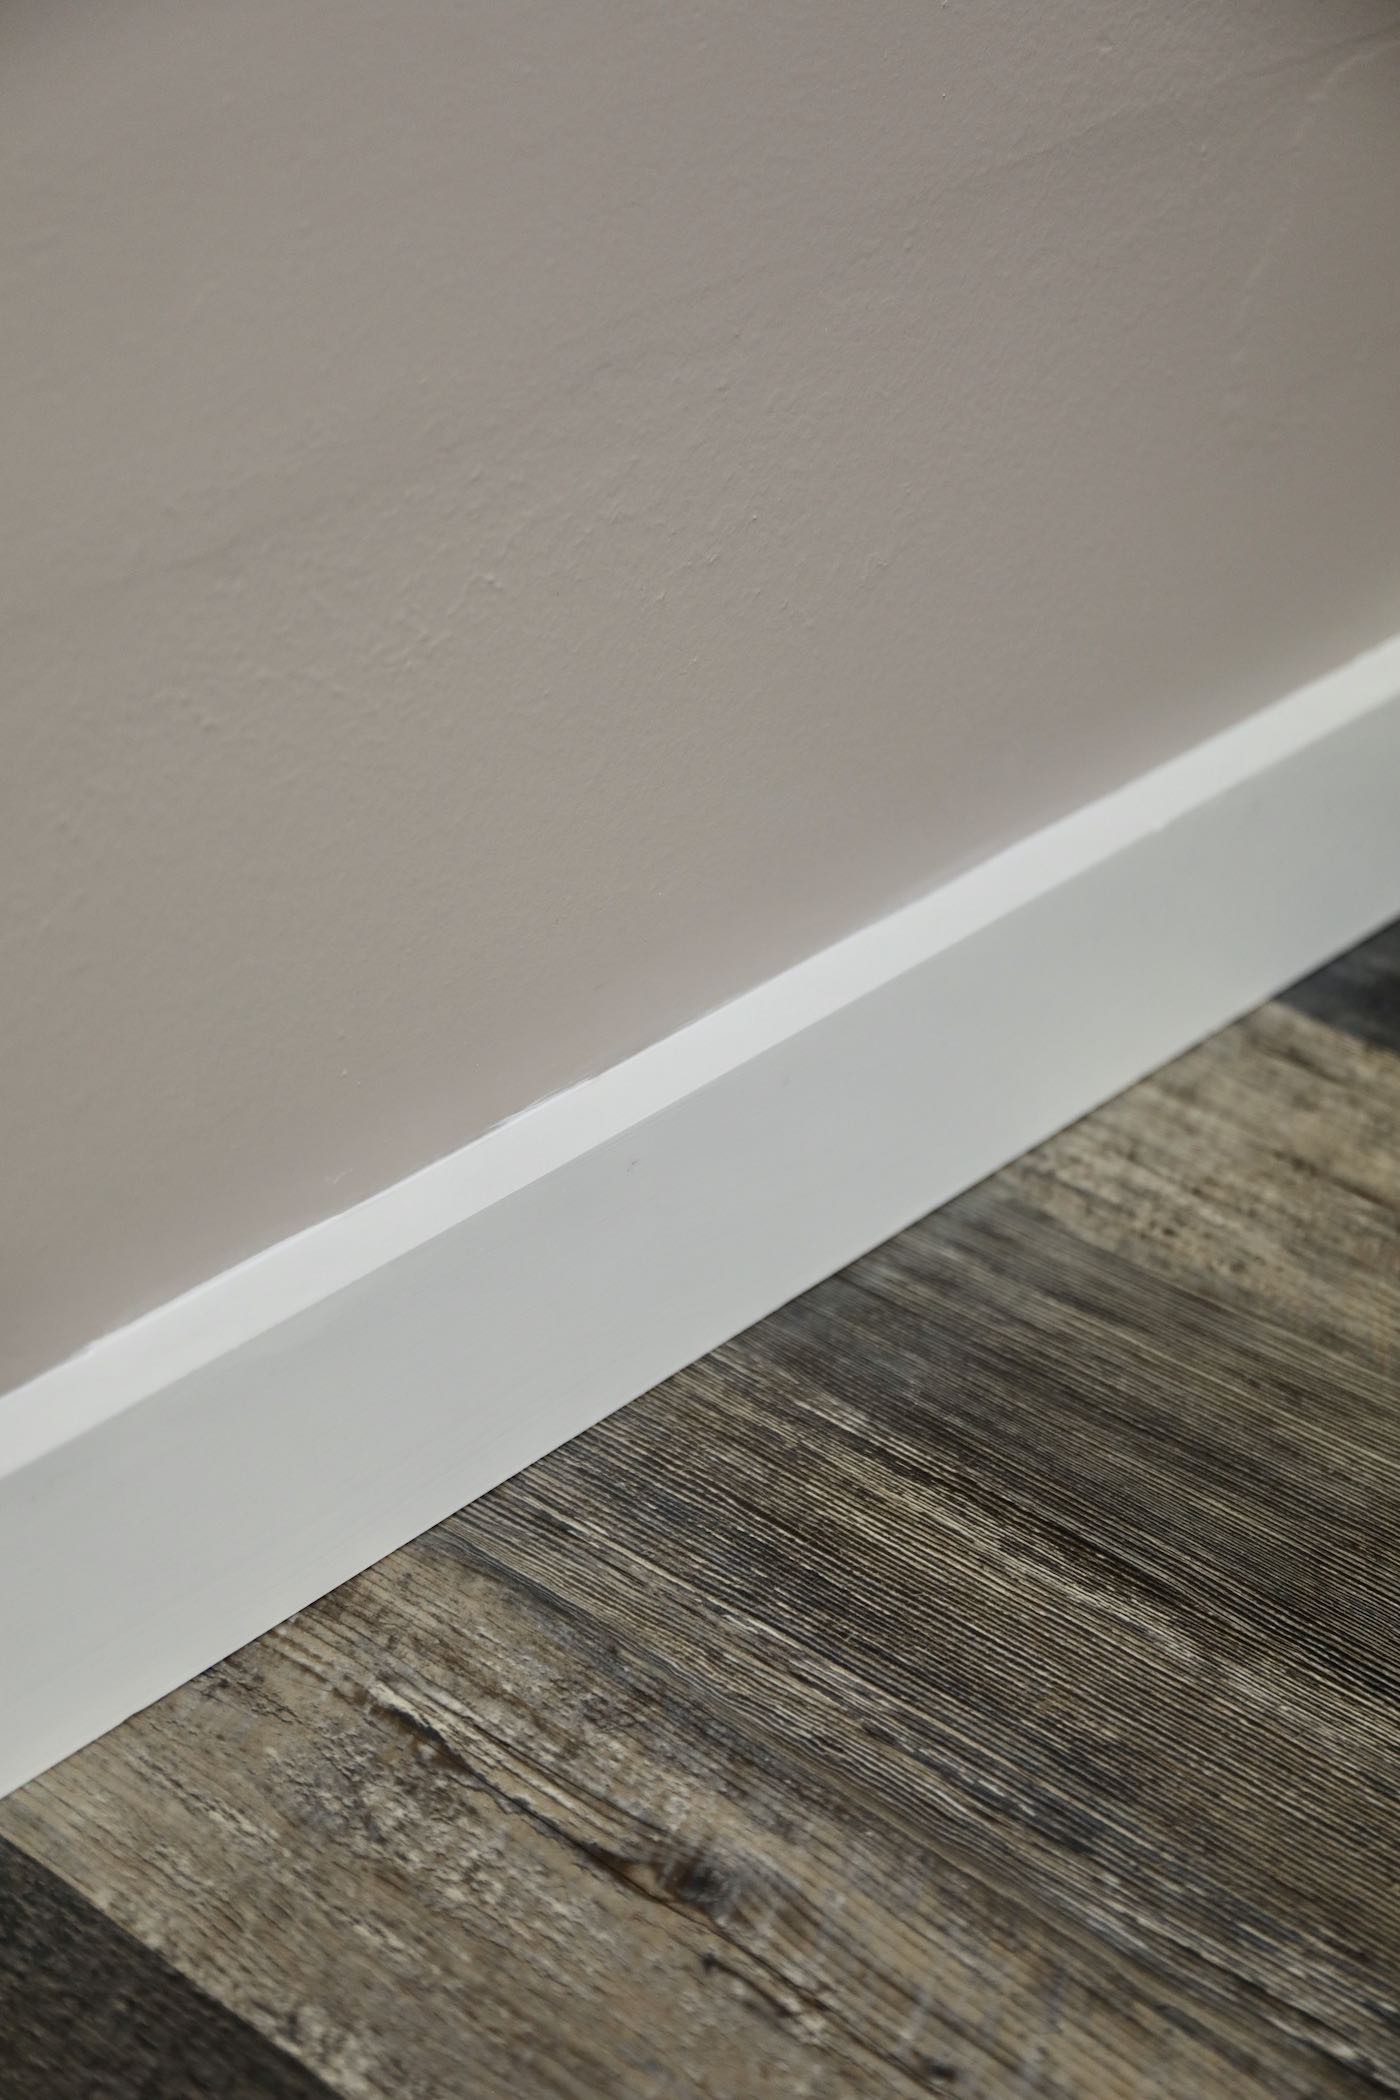
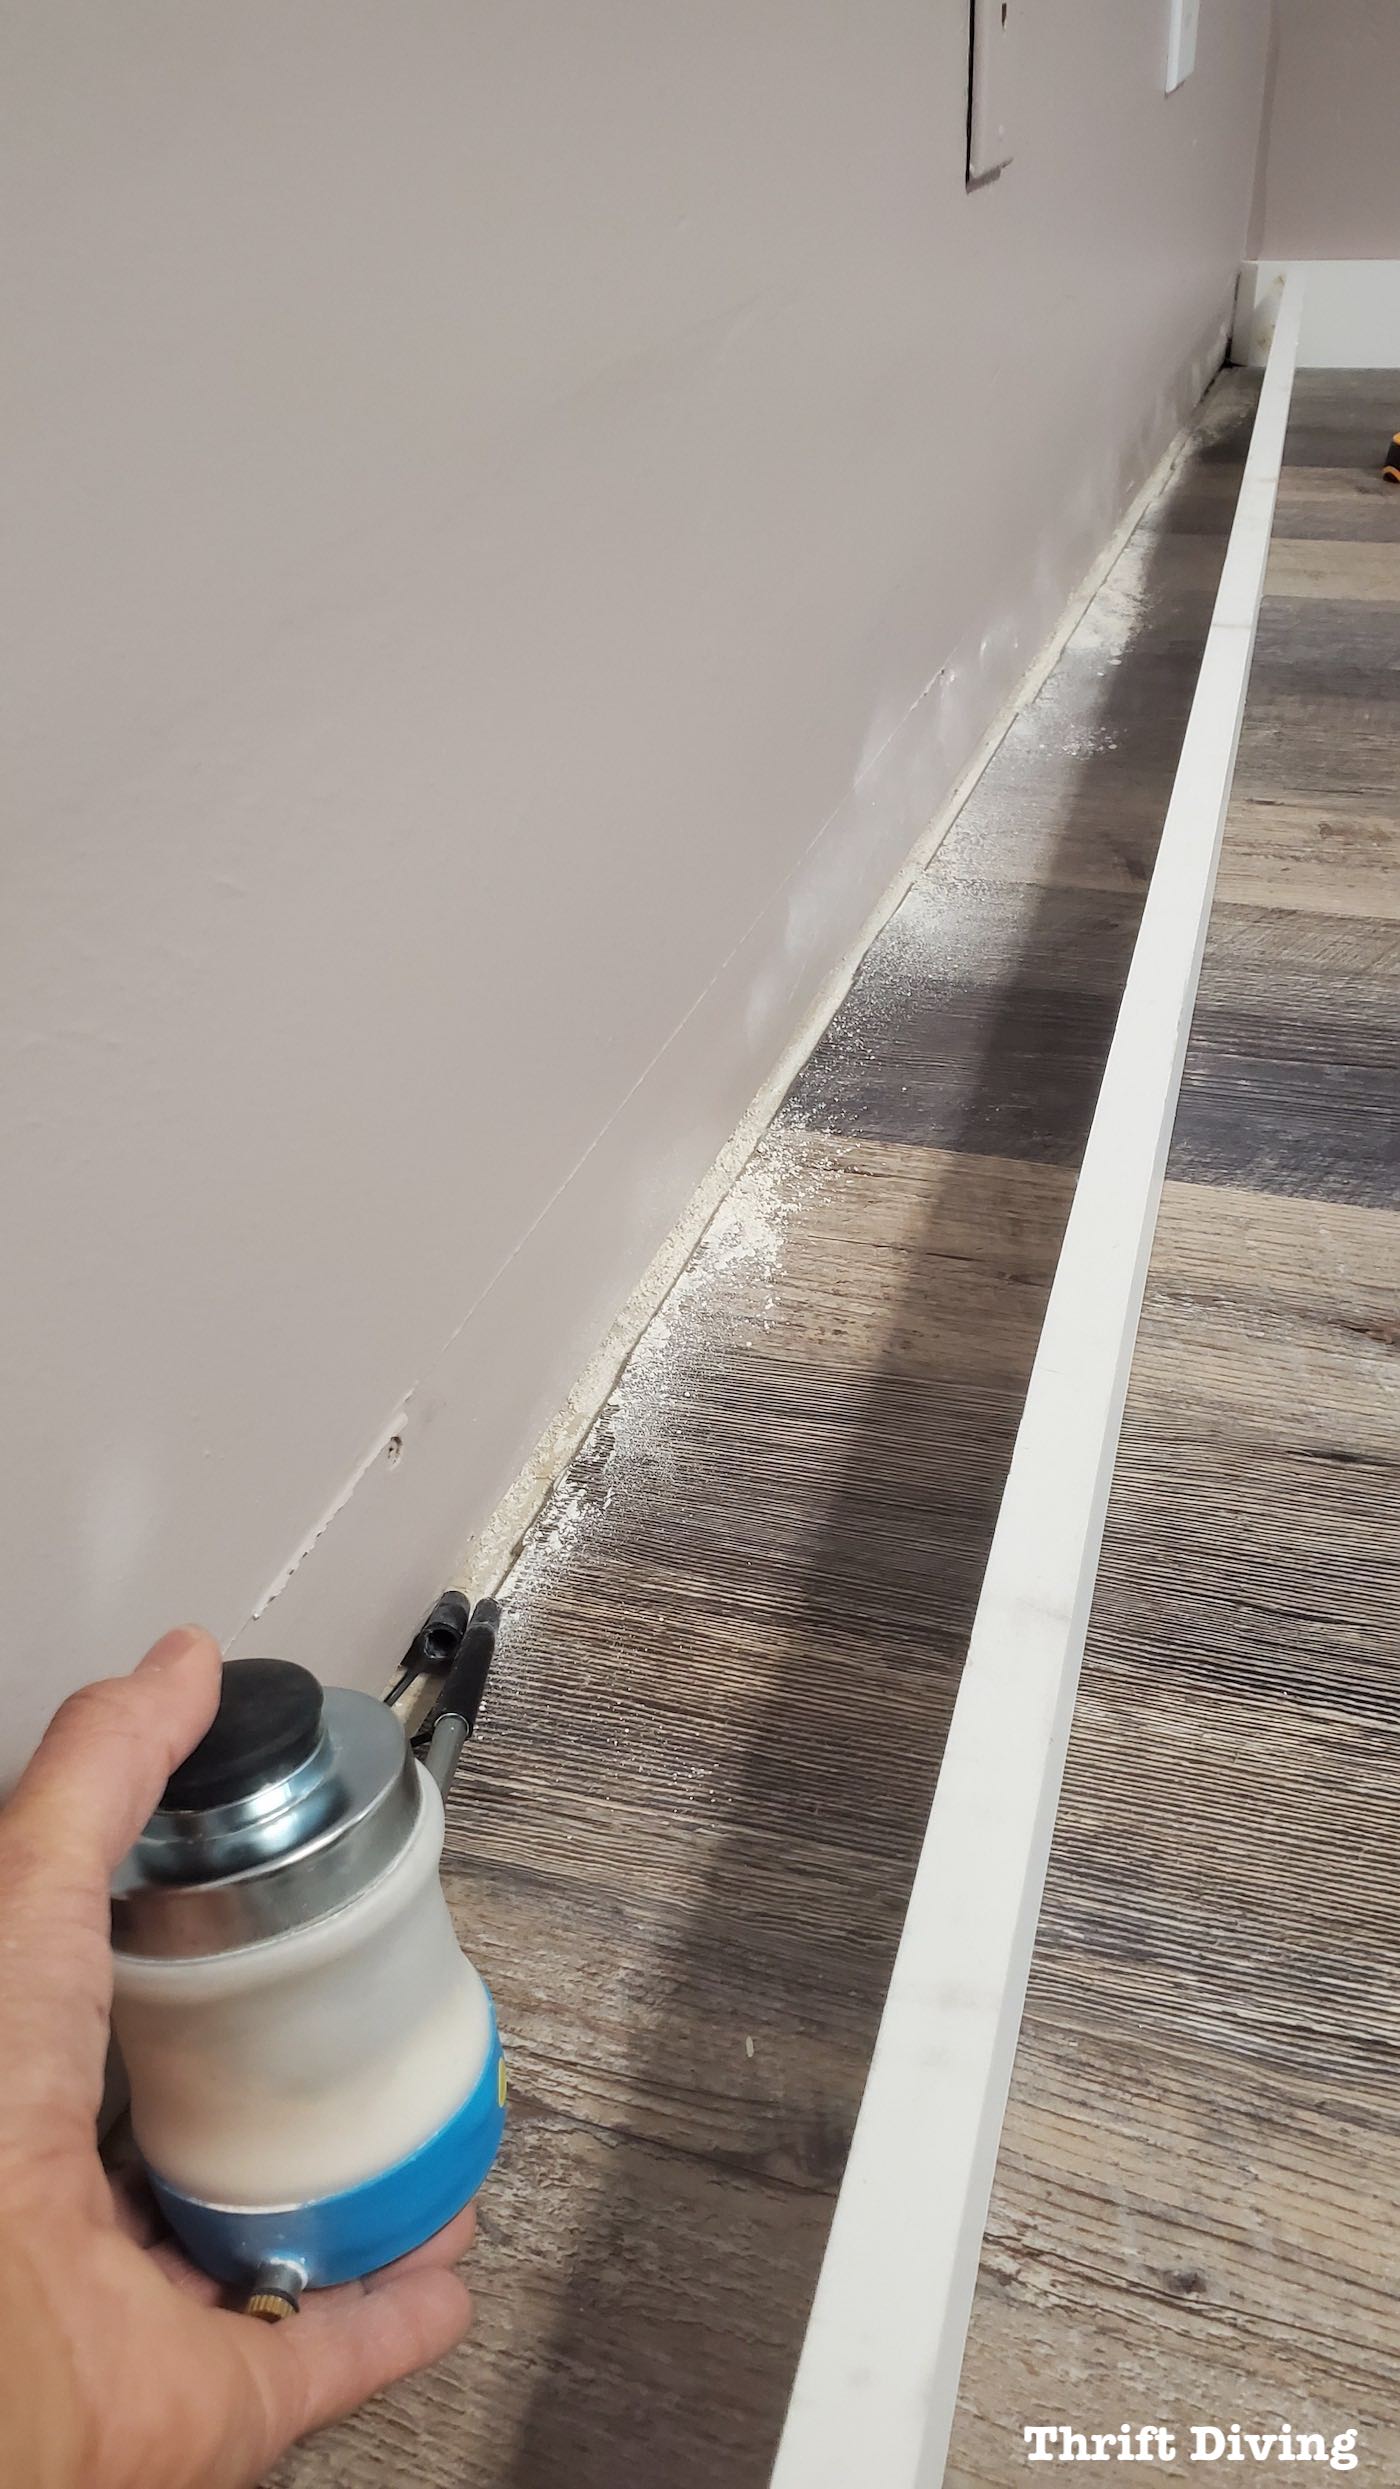
Once the wood filler is dry, sand it smooth with 150 or 180 grit sandpaper. Be sure to wear gloves and a dust mask. Use a rag or vacuum to clean up the dust. (Pssst! Also, notice the small gap between the baseboard and the wall? That’s the small gap that we will be filling in Step 9).
STEP 8: Attached the Quarter Round (Also Known as Shoe Molding).
Baseboard with uneven floors or with gaps benefit from installing something called quarter round. It hides any gaps along where the baseboard meets the floor. It’s not required, but if you’re plagued with unsightly gaps or unevenness, then consider adding quarter round. Using a brad nailer, attach it to the baseboard, not the flooring. Remember: your flooring expands and shrinks due to temperatures and humidity. You don’t want to prevent this natural shifting or have the quarter round shifting because it’s nailed to the floor.
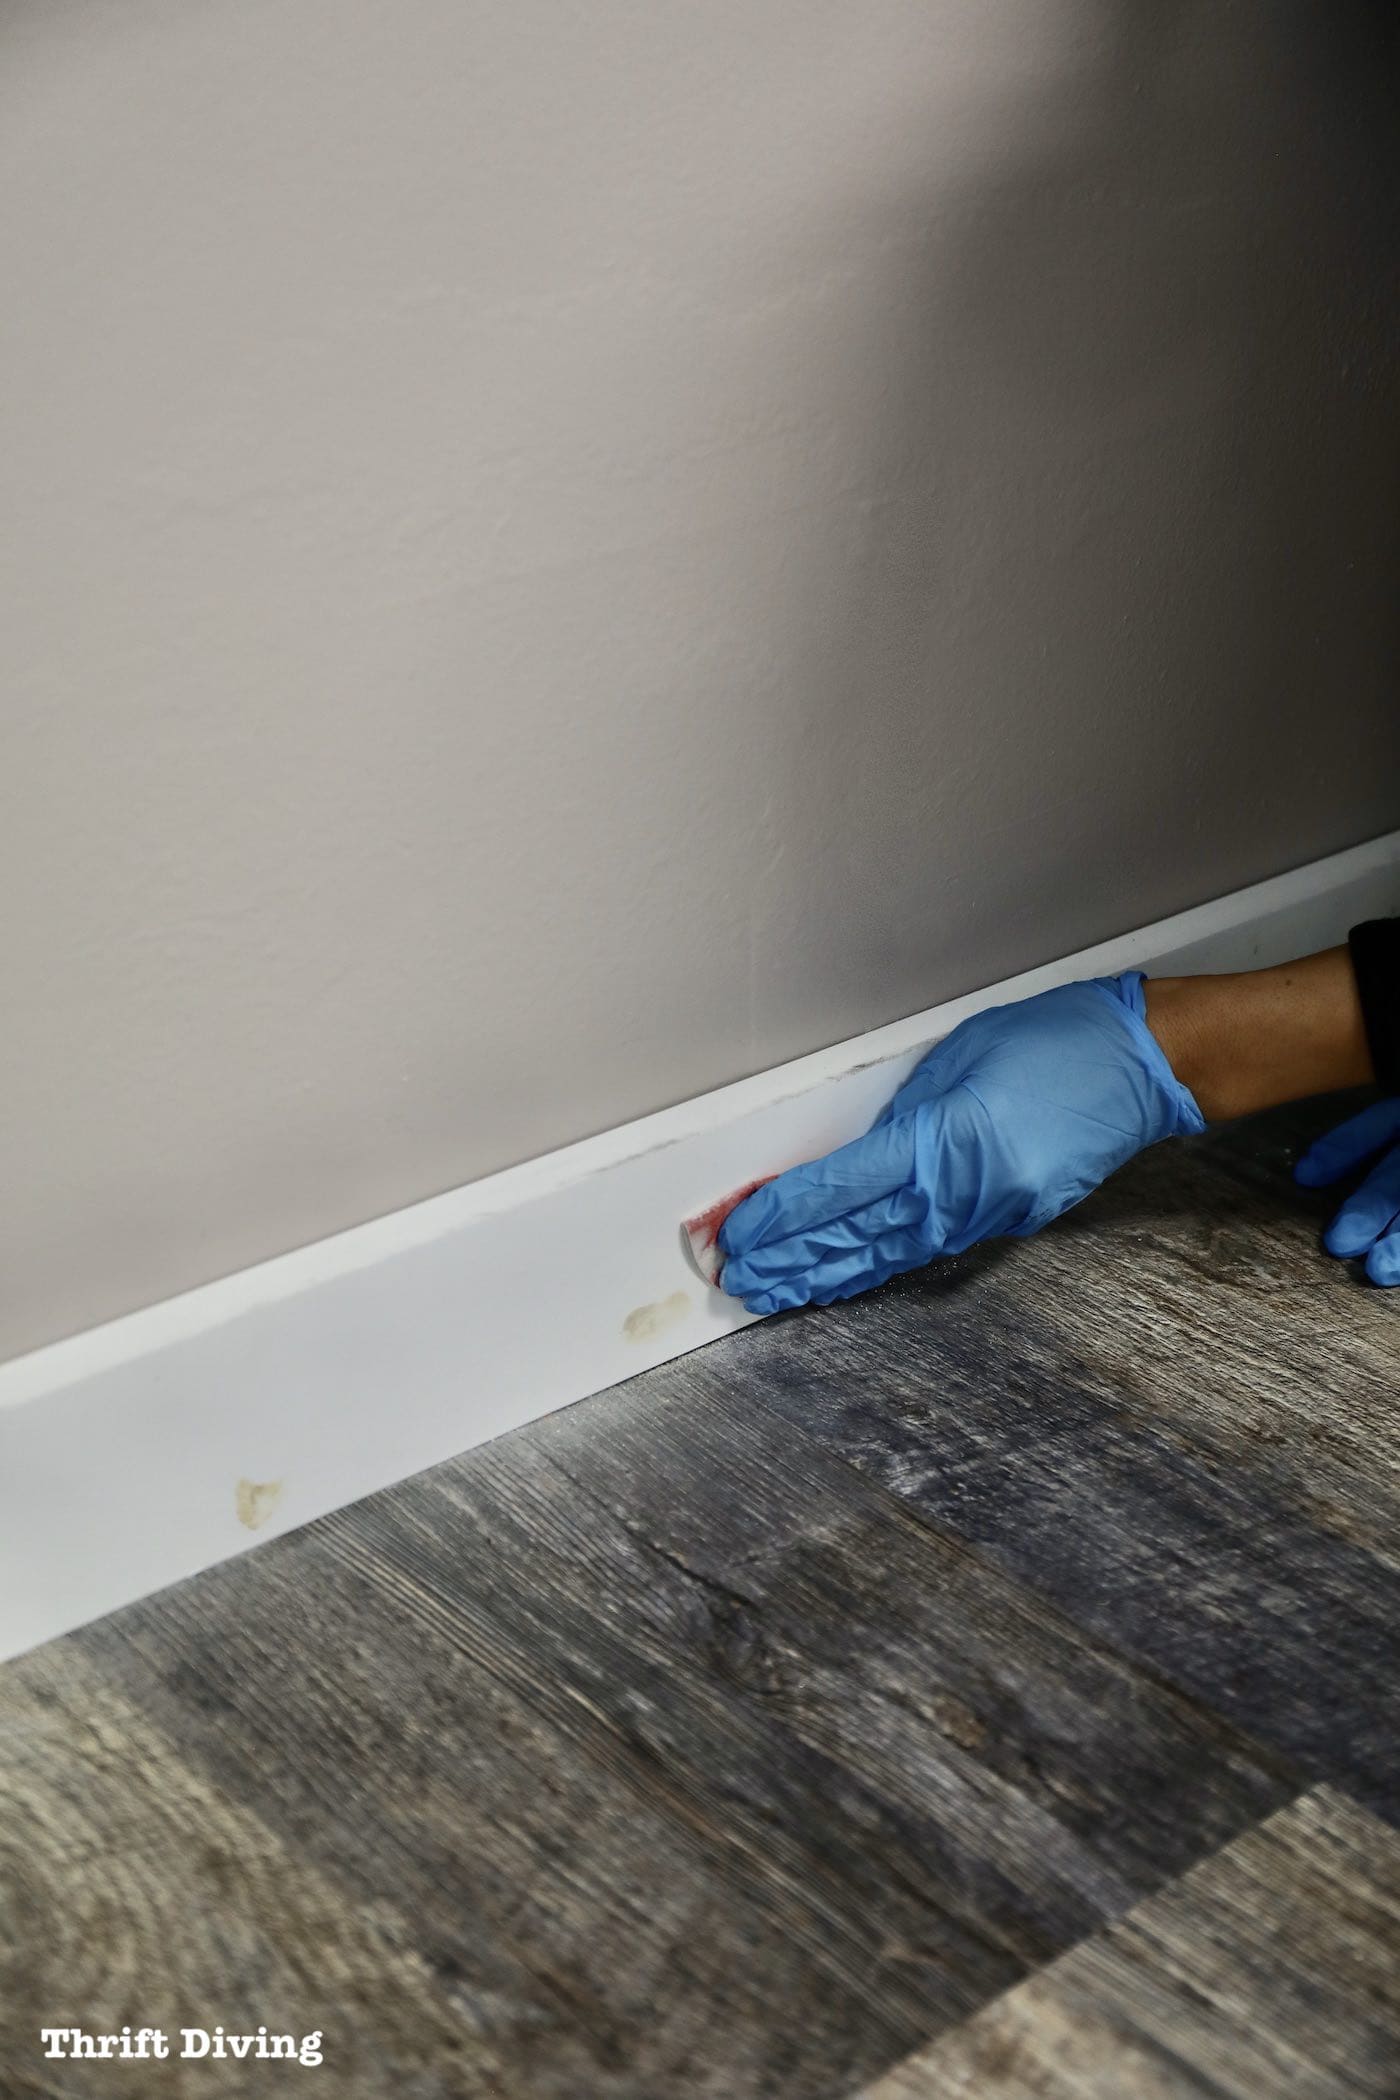
STEP 9: Caulk the Baseboard Gaps
Baseboards should be caulked when you need to fill any gaps where the baseboard meets the wall or when there are seams you can see where the baseboards meet (such as inside and outside corners and joints). Don’t use just any caulk, though. Be sure to use molding and trim caulk. Be sure that the caulk says that it’s flexible, crack-proof, and paintable. Cut the tip at a slight angle, insert the tube into a caulk gun, and wear gloves. The caulk gun has a blade to cut the tip, but I prefer using a utility knife.
Apply just a small bead of caulk and then use your finger or a wet sponge or cloth to spread the caulk over the gaps. Some people even use painter’s tape just above the baseboards so that when they spread it and remove the tape, it creates a clean line. Personally, I think that’s overkill and just makes the task that much longer. Just be careful not to apply much. Wear gloves. And wipe up any that smears on the wall or baseboards.

STEP 10: Touch Up the Nail Holes and Caulk With Paint
Now that the nail holes have been sanded and smoothed, and the gaps have been filled with caulk, adding a coat of semi-gloss paint to the baseboards helps to finish it off. If you painted the baseboard first, there won’t be much touching up to do. If you wanted to paint the baseboard, you may need to add some painters tape to the floor (and wall) to prevent making a mess while painting the baseboards (unless you have a steady hand!).
How to Clean Your Baseboards
Installing your own DIY baseboards is easy and a great idea to save money when doing room makeovers, but don’t forget that you need to remember to clean your baseboards, too. They’re dustier than dusty, and they’re easy to miss. The easiest way to clean baseboards would be to include then when doing your routine vacuuming, but once a month or more, use a microfiber towel to dust them clean. If you’ve got PVC baseboards, a damp microfiber towel works well and won’t damage the baseboards. If you’ve got MDF, use a dry cloth. If they’re wood, use lemon oil or some other wood conditioner.
Save This Guide on Pinterest
It may seen overwhelming because this is a lot of information to digest, but installing your own DIY baseboards is actually pretty simple. Hopefully I have answered all of your questions in this step-by-step guide so that you can feel confident and excited to tackle this project on your own. Be sure to SAVE this guide on Pinterest if you found it helpful!
Click here to SAVE this guide on Pinterest!
![]()

Download the 5 freebies!

Thrift Diving inspires women to decorate, improve, and maintain their home themselves...using paint, power tools, and thrift stores! Use these 5 printables, checklists, and ebooks to get started!


Girl, this is an uhMAZING tutorial! Thanks for your hard work and attention to detail in showing us how it’s done. 🙂
Question for you! Do you think it’s best to caulk the area between the floor and baseboard as well? Is that something that’s commonly done or recommended?
Otherwise, really loved your post, essentially the tips for use of different types of baseboards and especially the use of DE. We get pests problems in our condo and this I think is a brilliant idea. Will consider when we renovate our condo.
Hi Gurji! Great question. I have actually caulked not just the top of the baseboard (to cover cracks), but I have caulked where the quarter round (also known as shoe molding) meets the floor. I would definitely recommend using painter’s tape when caulking so that when you remove the tape after caulking, you’ll get a nice, clean caulk line. I’ve been considering doing this around my own house (some rooms I have added caulk already). And I will definitely caulk all cracks and gaps in my “she shed” once the vinyl flooring is done. It does help to keep out critters! Good luck on your own condo! 🙂
I returned to your tutorial recently to take a look at your angle cuts and was reminded of pest control behind the baseboards! Thank you for reminding me.
I thought I’d offer you another tool for your tool box, so to speak.
We’re in the same area-ish. I’m out Central Ave between the beltway and Davidsonville, in the country. Country = field mice. Winter = warm place to stay. ehhhhh
I hadn’t put down shoe molding yet in an area where I could NOT keep the mice out. I had found this metal fabric that doesn’t rust or become brittle called Xcluder. They make door sweeps, etc., but this fabric has copper in it, rather than steel like steel wools. It will cut the crap out of your fingers, and mice can’t chew through it.
I cut strips and put it in the gaps under the baseboard, and secured it in place by nailing up my shoe molding. It is just under the molding along the floor, so mice really can’t chew through it.
This is the first year I haven’t had mice in that area. Sure, I now know were else I have to focus, but there are no mouse trails where they’ve chewed their way into that room.
I love the fact you plan ahead on things. Potential pests, future usage of a room, expansion, etc. Thanks for taking the time to create your posts!
Hi Christine! Wow…..this is a great resource! I just looked up this Xcluder and it reminds me of the steal wool I have used to shove into holes and stuff, to keep mice out. But this comes in a roll so that you can do larger areas. Awesome! I appreciate this!
If you’ve sealed the wood with paint, lemon oil, etc., will just sit on top and eventually yellow. Treat your painted wood the same as pvc! If you’ve used a quality paint, a damp microfiber cloth works wonders. I admit: I still use Windex for everything. Ammonia works wonders.
I wanted to compliment you on such a great tutorial. Very thorough!
I particularly like the idea of Diatomaceous Earth. I’ve put boric acid behind my woodwork (nontoxic in those amounts to humans and pets, but death to ants and – God forbid – cockroaches!) but I have Diatomaceous Earth for my garden and think I’ll add it to my arsenal when I finish my own trim.
Thanks again for taking the time.
Thanks, Christine! I did hear about the boric acid. I will use that going forward. I don’t know which works better, but anything has got to be better than using nothing! 🙂
Great guide/tutorial! Thank you for sharing at Party In Your PJ’s.
Thank you, Ann!
One more thought… Have you ever noticed how carpeting will darken next to the baseboard? Sure, it can be from not cleaning or vacuuming but more often it is from air penetration coming under the wall over a period of time. If you caulk the seam between the wall and floor, you will solve this problem. I happen to be getting ready to install baseboard in our new home which is on slab (with radiant heat.:-) ). One windy day we had the garage door open and I actually saw sawdust blowing underneath the base plate of the stud wall! I just “fogged” my spaces prior to caulking the wall/floor seam and I will add your great idea of dusting diatomaceous earth, too! Thanks for a well written DIY!!!
Thank you for this DIY. I need to replace my baseboards. In our new condo they put plain MDF baseboards. I really like the ones you chose. They look really nice. As soon as our JC opens up again I’m signing up for the carpentry class.
Wow – this is comprehensive! Love how you go into the different materials – and the pic from Home Depot! Great idea on the Table of Contents to help return readers navigate quickly through the sections. And detailed pics. Thanks! (seen through Petals Pies and Otherwise)
Thanks for posting at Funtastic Friday
A brilliant and comprehensive guide on doing this bit of DIY yourself. Your finished boards look great. I once had the unenviable task of trying to find a match for one of the skirting boards in my Edwardian house, and it was a pain trying to find a reasonable matching piece!