9 Tips for Using a Table Saw for Beginners
The tool review is sponsored by The Home Depot. All opinions belong to Thrift Diving.
I started using tools in 2013 after attending a blogging conference where The Home Depot and some exclusive brands were in attendance. Over the years, my tool collection has started to grow. I’ve not used all common power tools that you’ll find in most homeowners’ garages, but many of them are now lining the shelves of my walls and table tops!
There’s one tool, though, that I have just added to my collection of power tools. I didn’t know much about it or how to properly use it. Power tools generally have common safely rules, such as “Never put your hands near the blade” and “Unplug or remove the battery before changing the blade.” But each tool also has its own specific rules of how to use the tool safely, and this particular tool has always been the most intimidating.
That tool, my friend, is the holy grail of power tools: the table saw.
I had used a table saw in carpentry class when the teacher glazed over it quickly during a course lecture one day. Each of us students got to run a piece of OSB wood through it once or twice. But that’s the extent of my experience with a table saw.
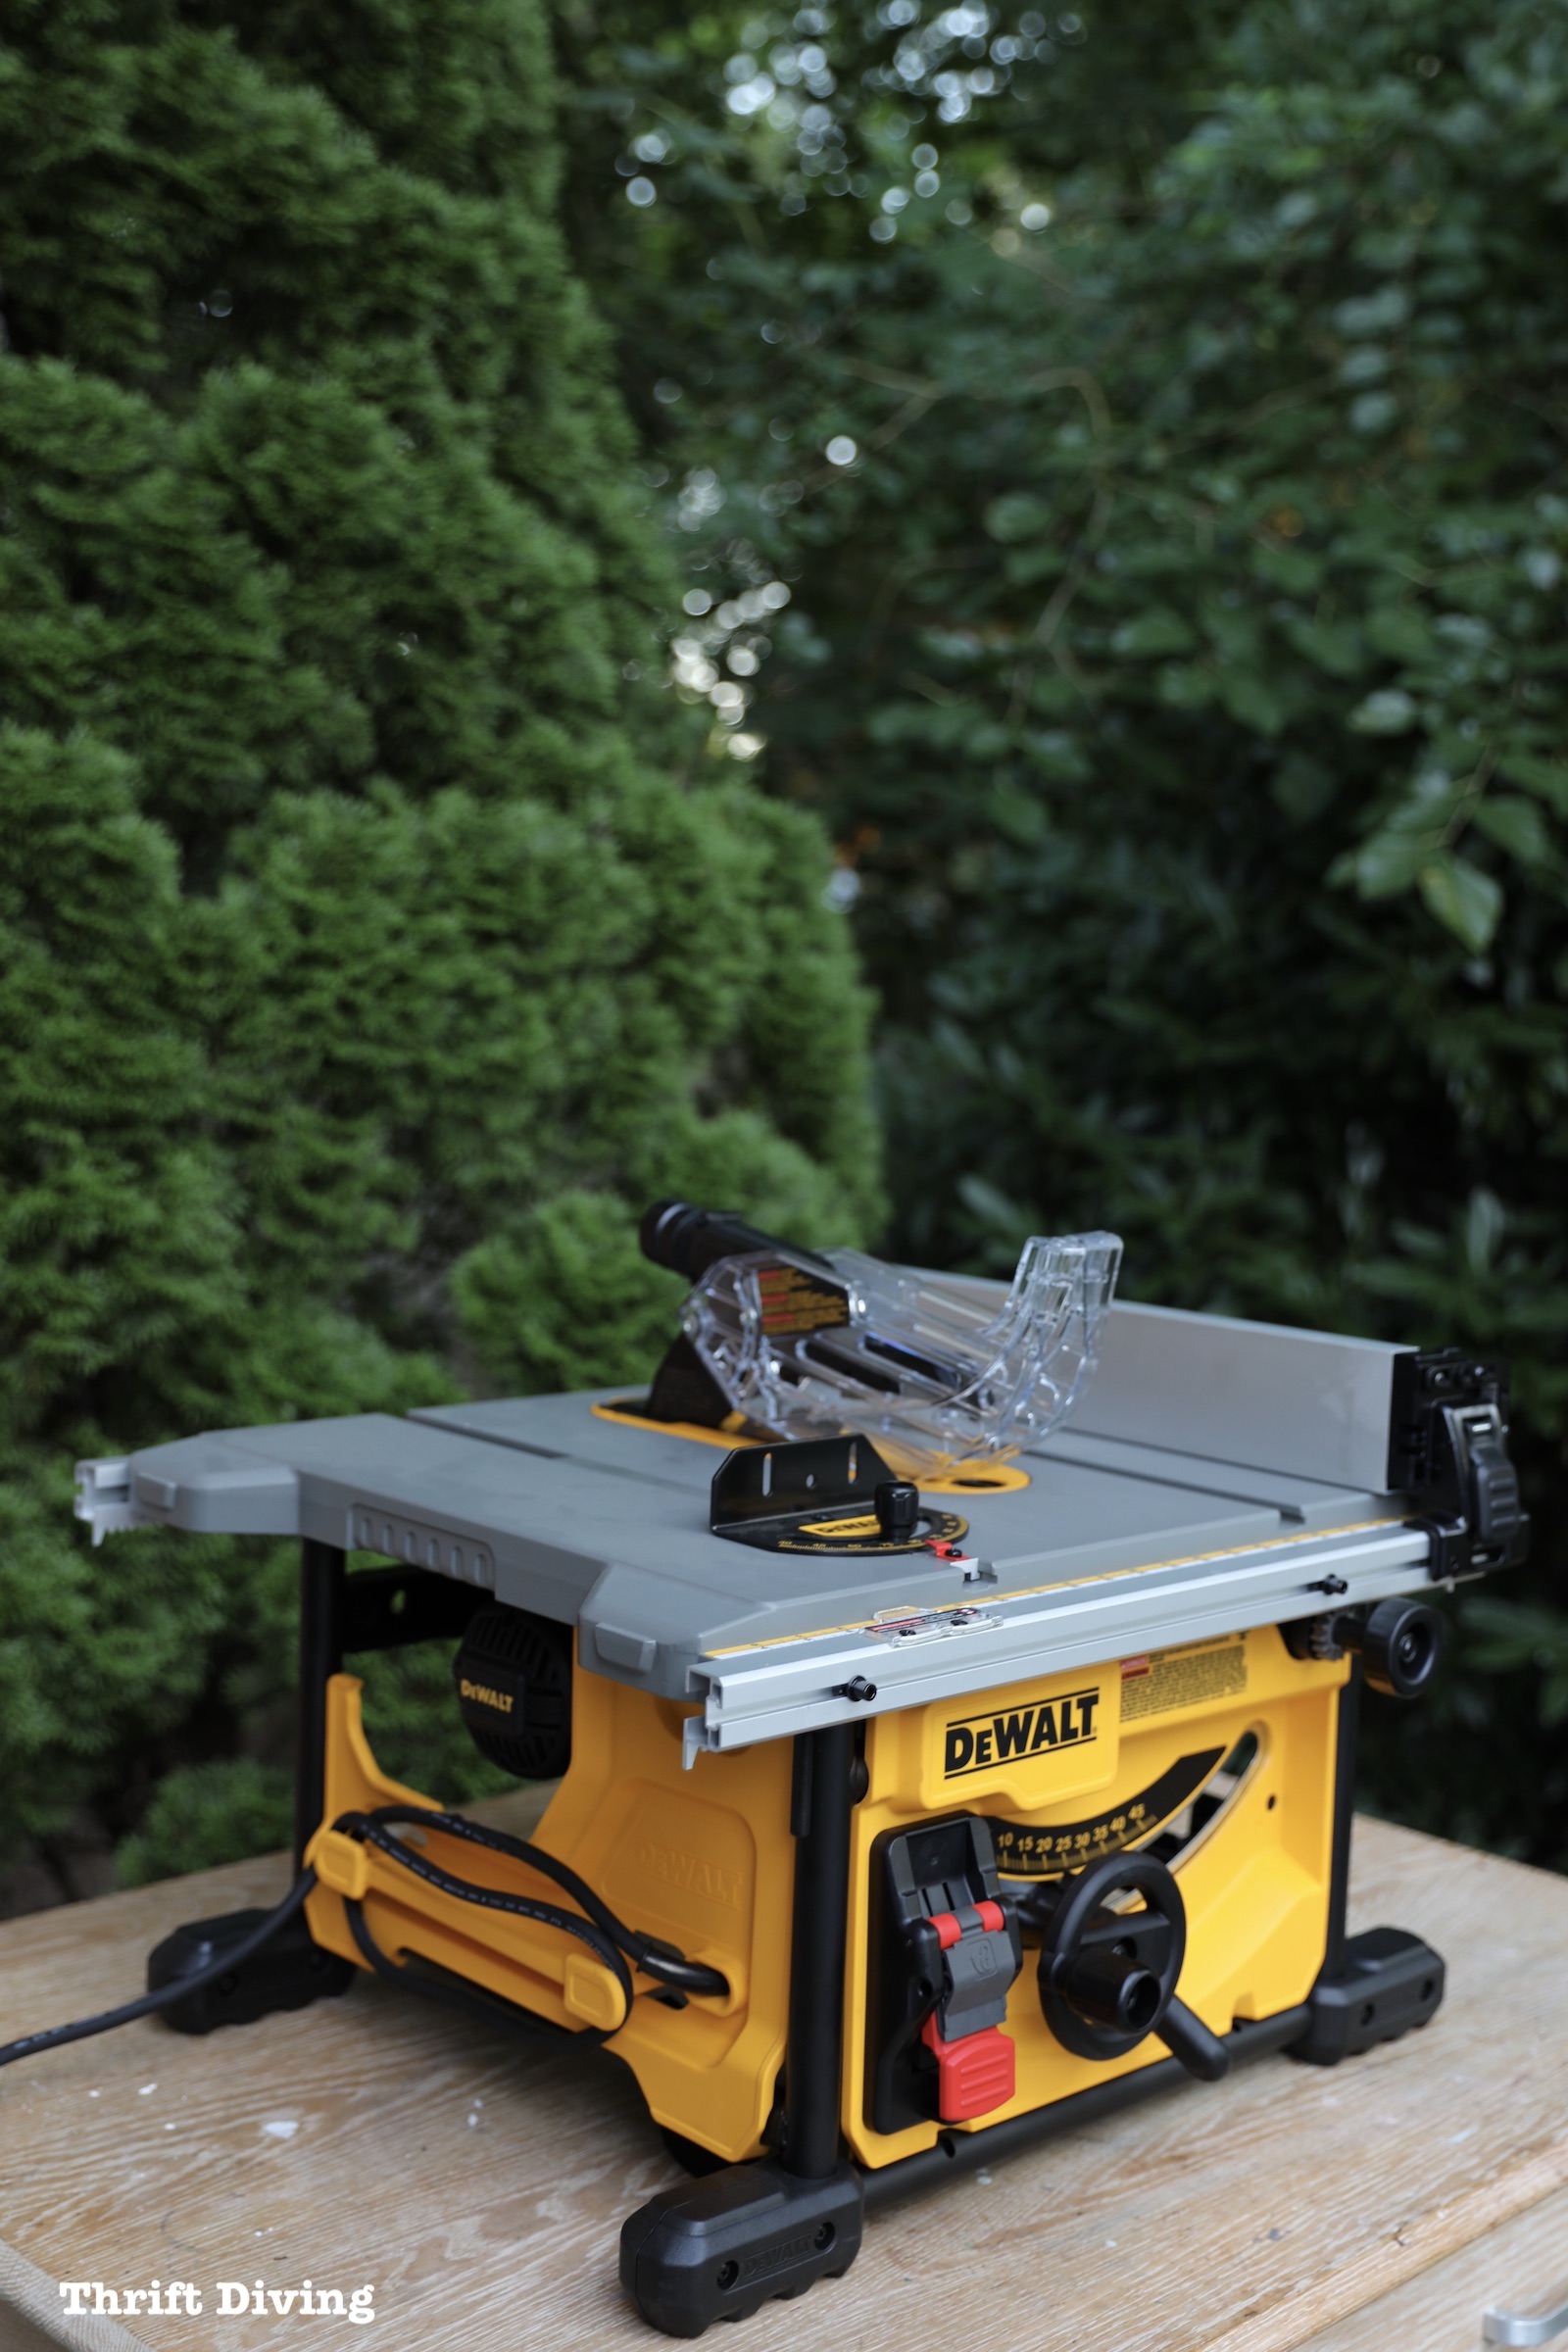
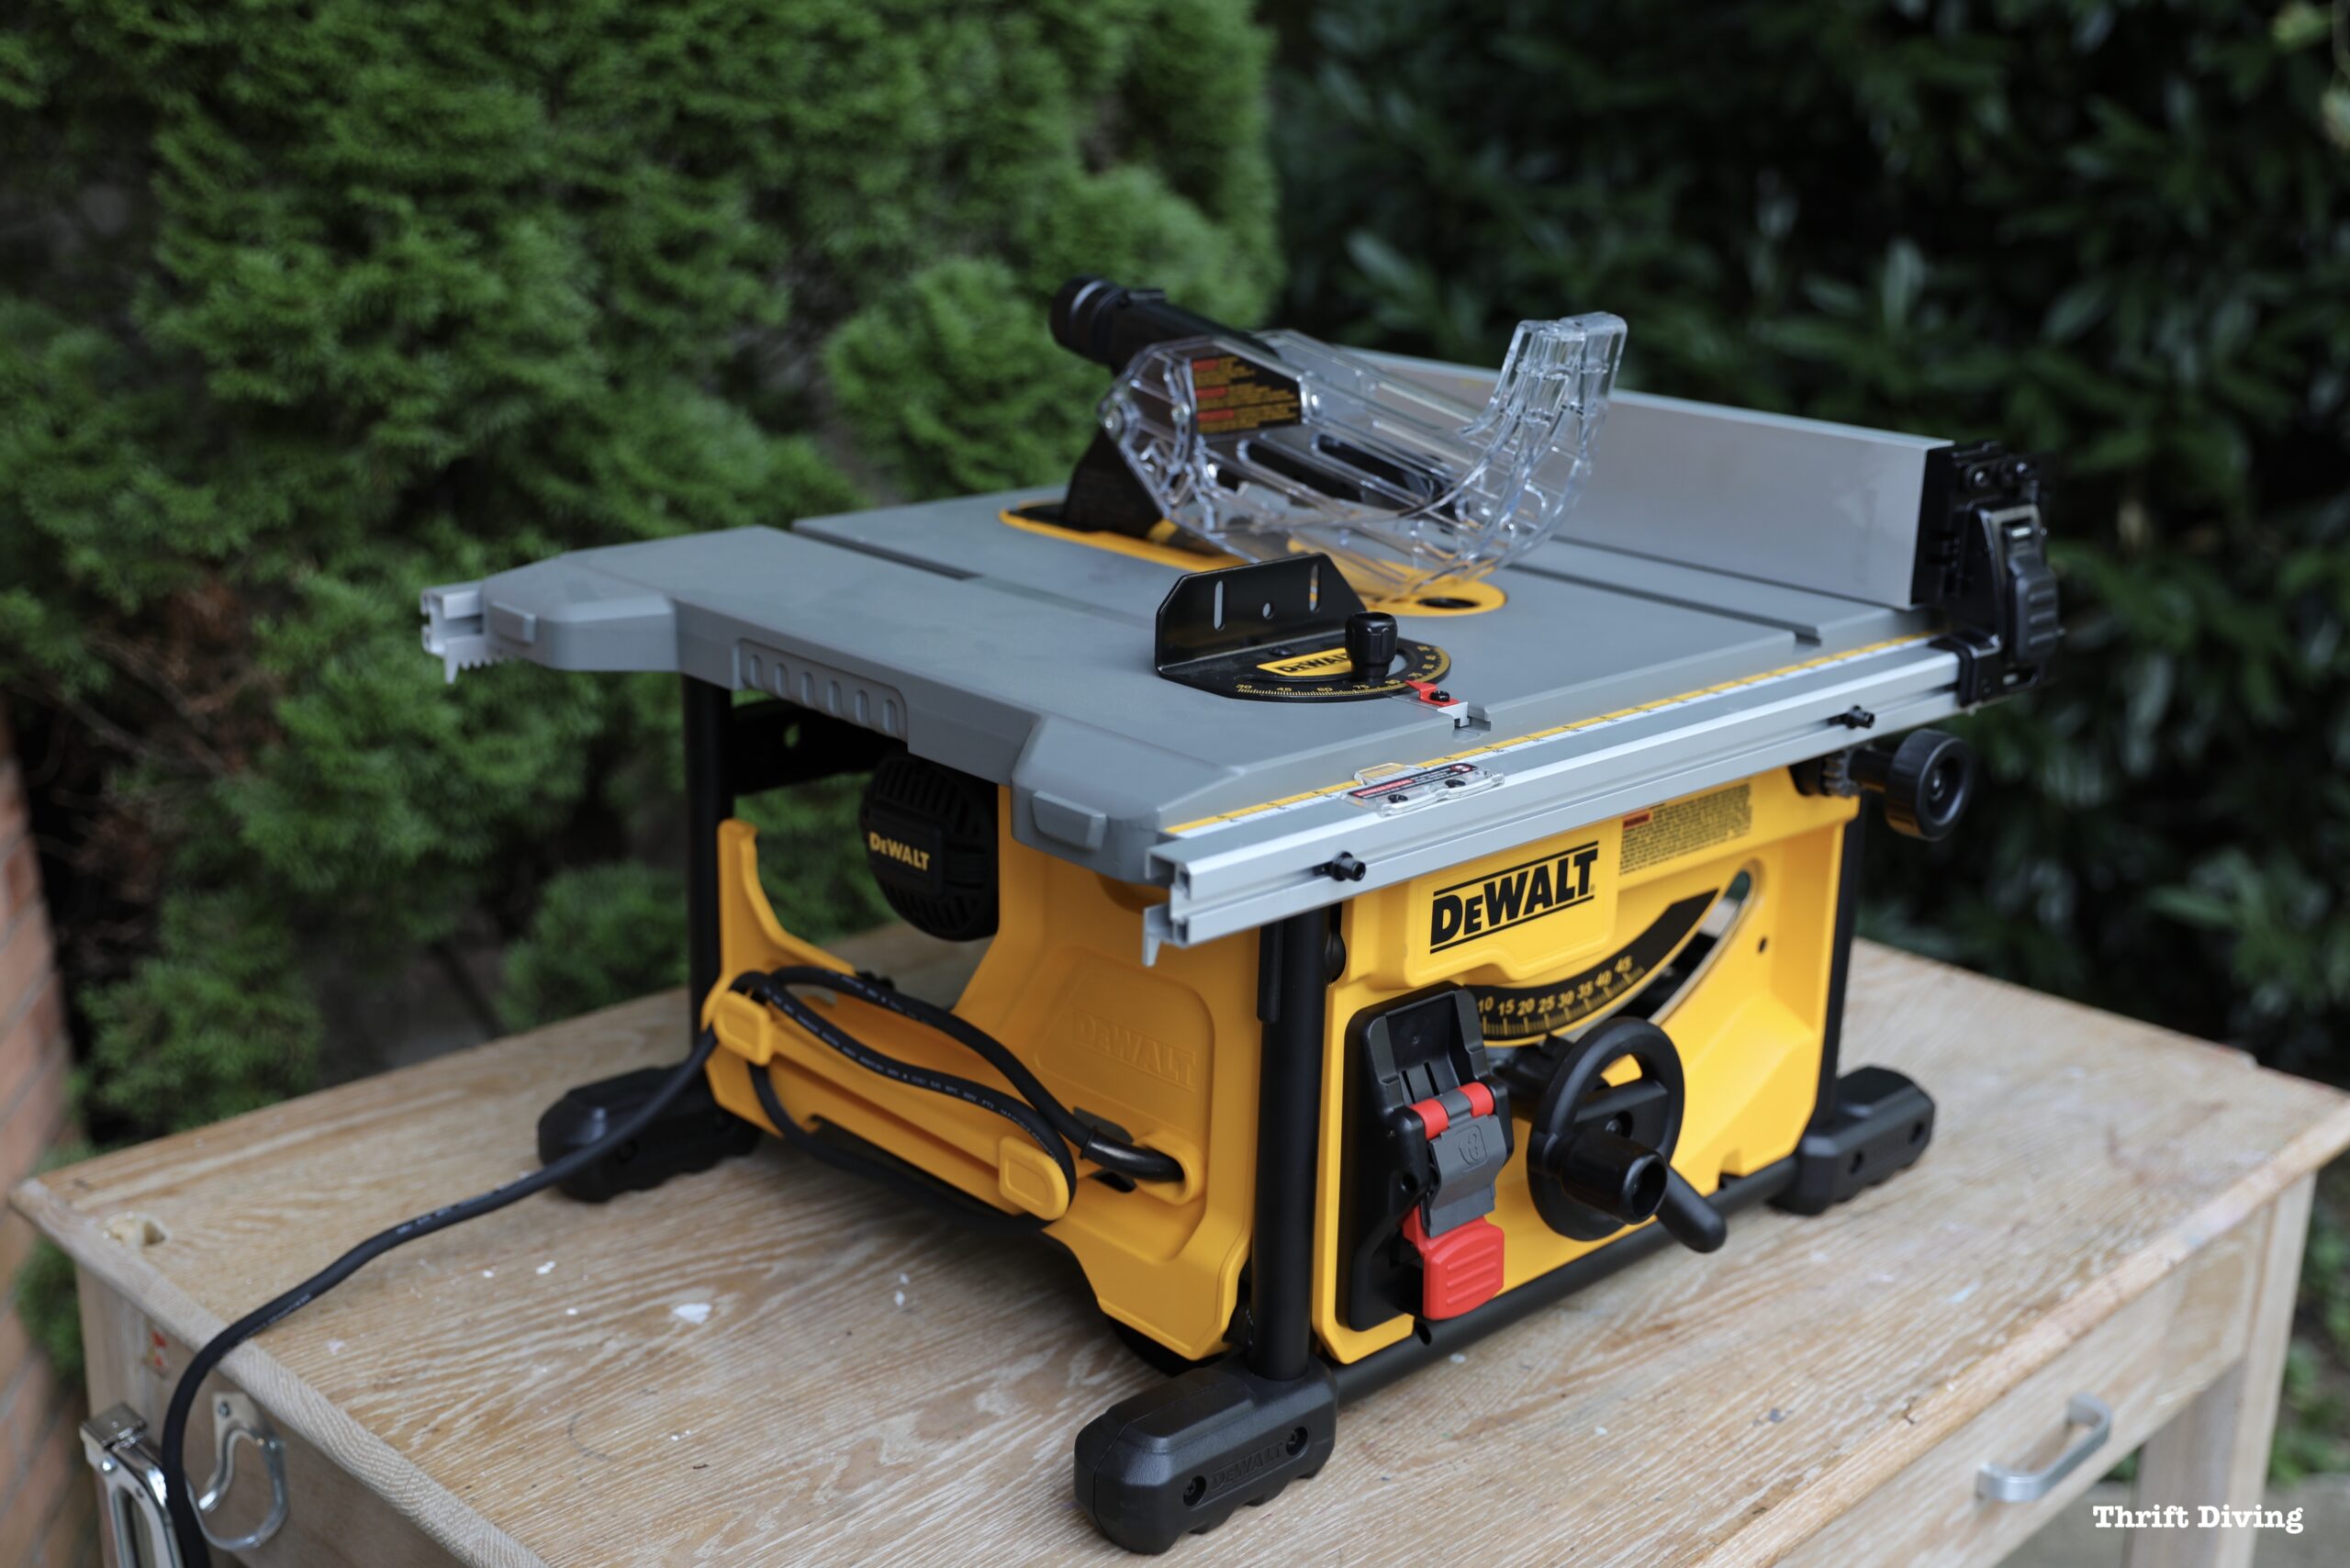
I am part of The Home Depot ProSpective program where The Home Depot and its exclusive retailers send bloggers and YouTubers products to review and use with their projects. When I received this DeWalt Compact Jobsite Table Saw, I’ll admit that I was nervous.
It meant that I would have to confront my intimidation with learning how to use a table saw. But if you know me, you know how we do at Thrift Diving. We might be intimidated, but it doesn’t stop us from tackling something new!
In this post, I’m going to attempt to get to know the table saw: its rules, its nuances, and what makes it a powerful power tool to add to your arsenal of tools.
I’ll also share with you how these tips related to some of the features of the DeWalt Compact Jobsite Table Saw.
Let’s jump into it right now!
TIP #1: Always Support Your Work, No Matter What
When using power tools, one of the most important safely checks is to make sure you’ve got enough support for the material you’re cutting. Power tools love stable work surfaces because it allows the tool to do what it’s designed to do: cut safely and straightly.
Table saws can extend the rip fence to accommodate and support wider pieces of materials to be cut. But you have to know how wide that rip fence will extend so you’ll know the maximum size cuts you can make while still having enough support against the rip fence when ripping materials (e.g. cutting with the grain of a piece of wood, for example).
Turning the knob will extend the rip fence. This DeWalt table saw has a rack and pinion telescoping fence rail that feels solid and secure.
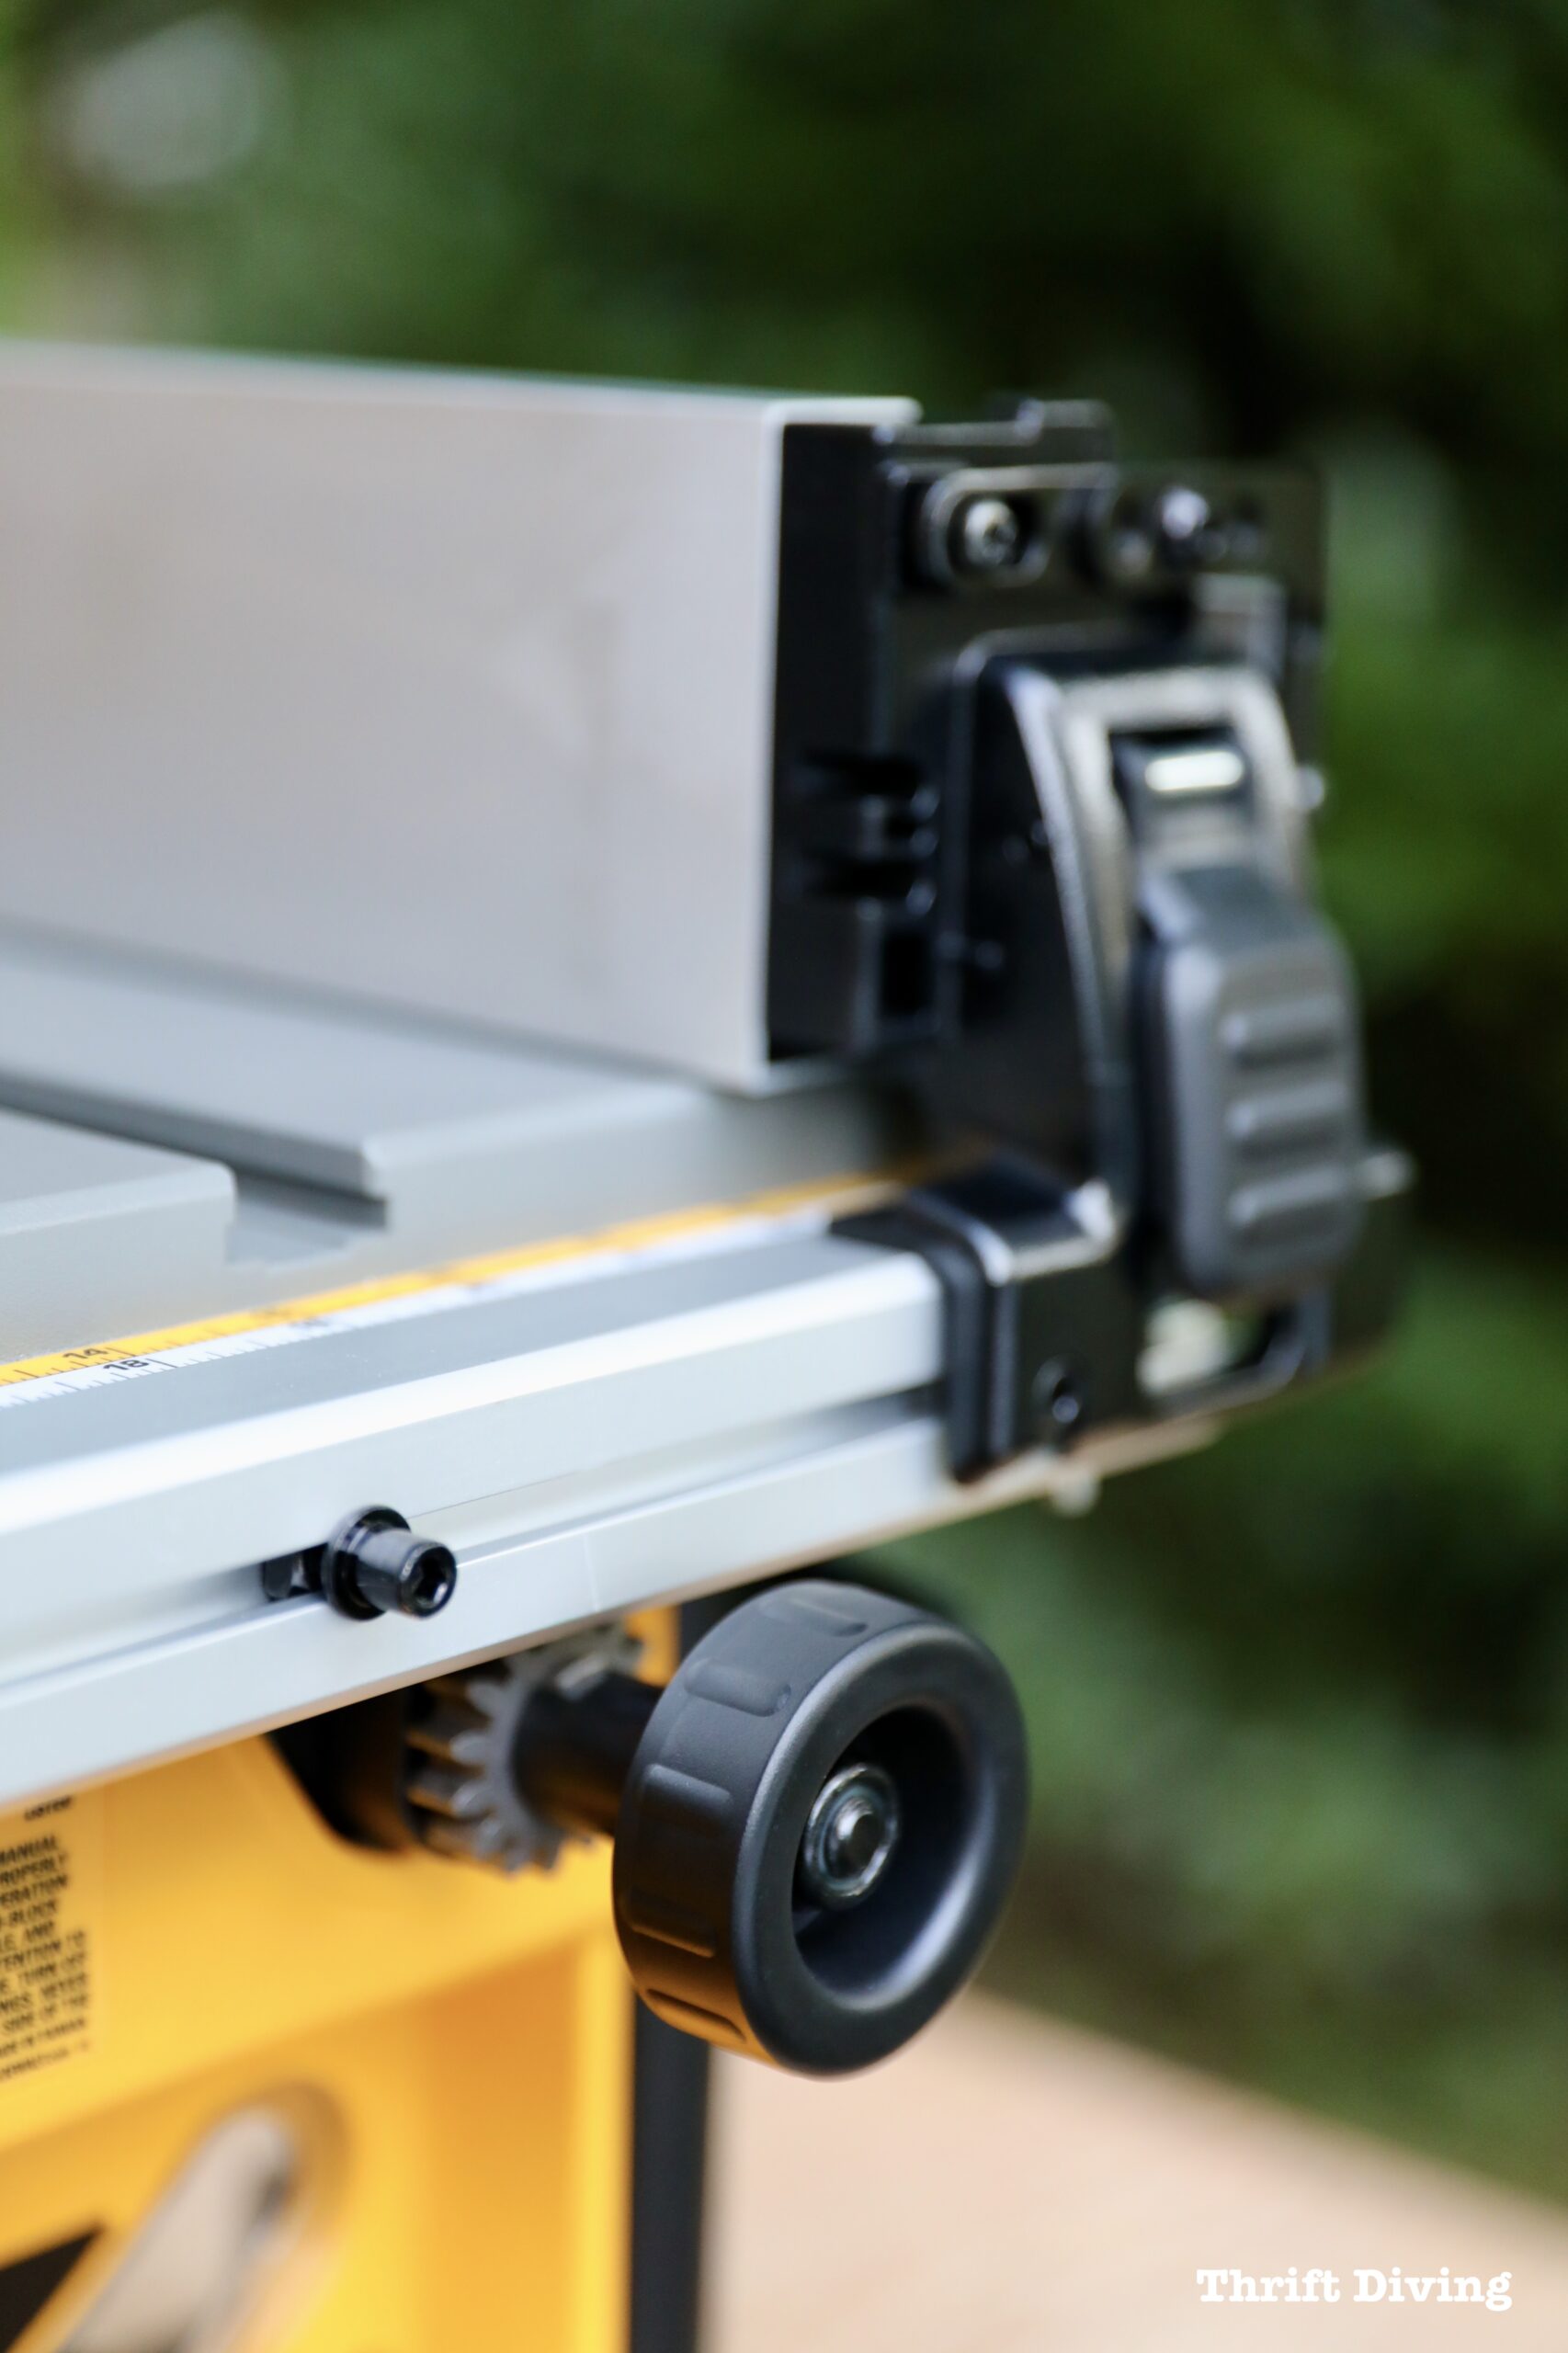
The capacity on this model is 24.5″ pieces of wood which means it can cut in half 4′ x 8′ plywood and OSB (oriented strand board, which is typically used for exterior sheathing in construction).
Keep in mind when cutting pieces of plywood and OSB that size, you’ll want to make sure you’ve got enough support all around to support large pieces of materials. It helps to either have an extra set of hands, a table saw roller stand for the out-feed, or even building a table saw workbench that offers additional support for large pieces.
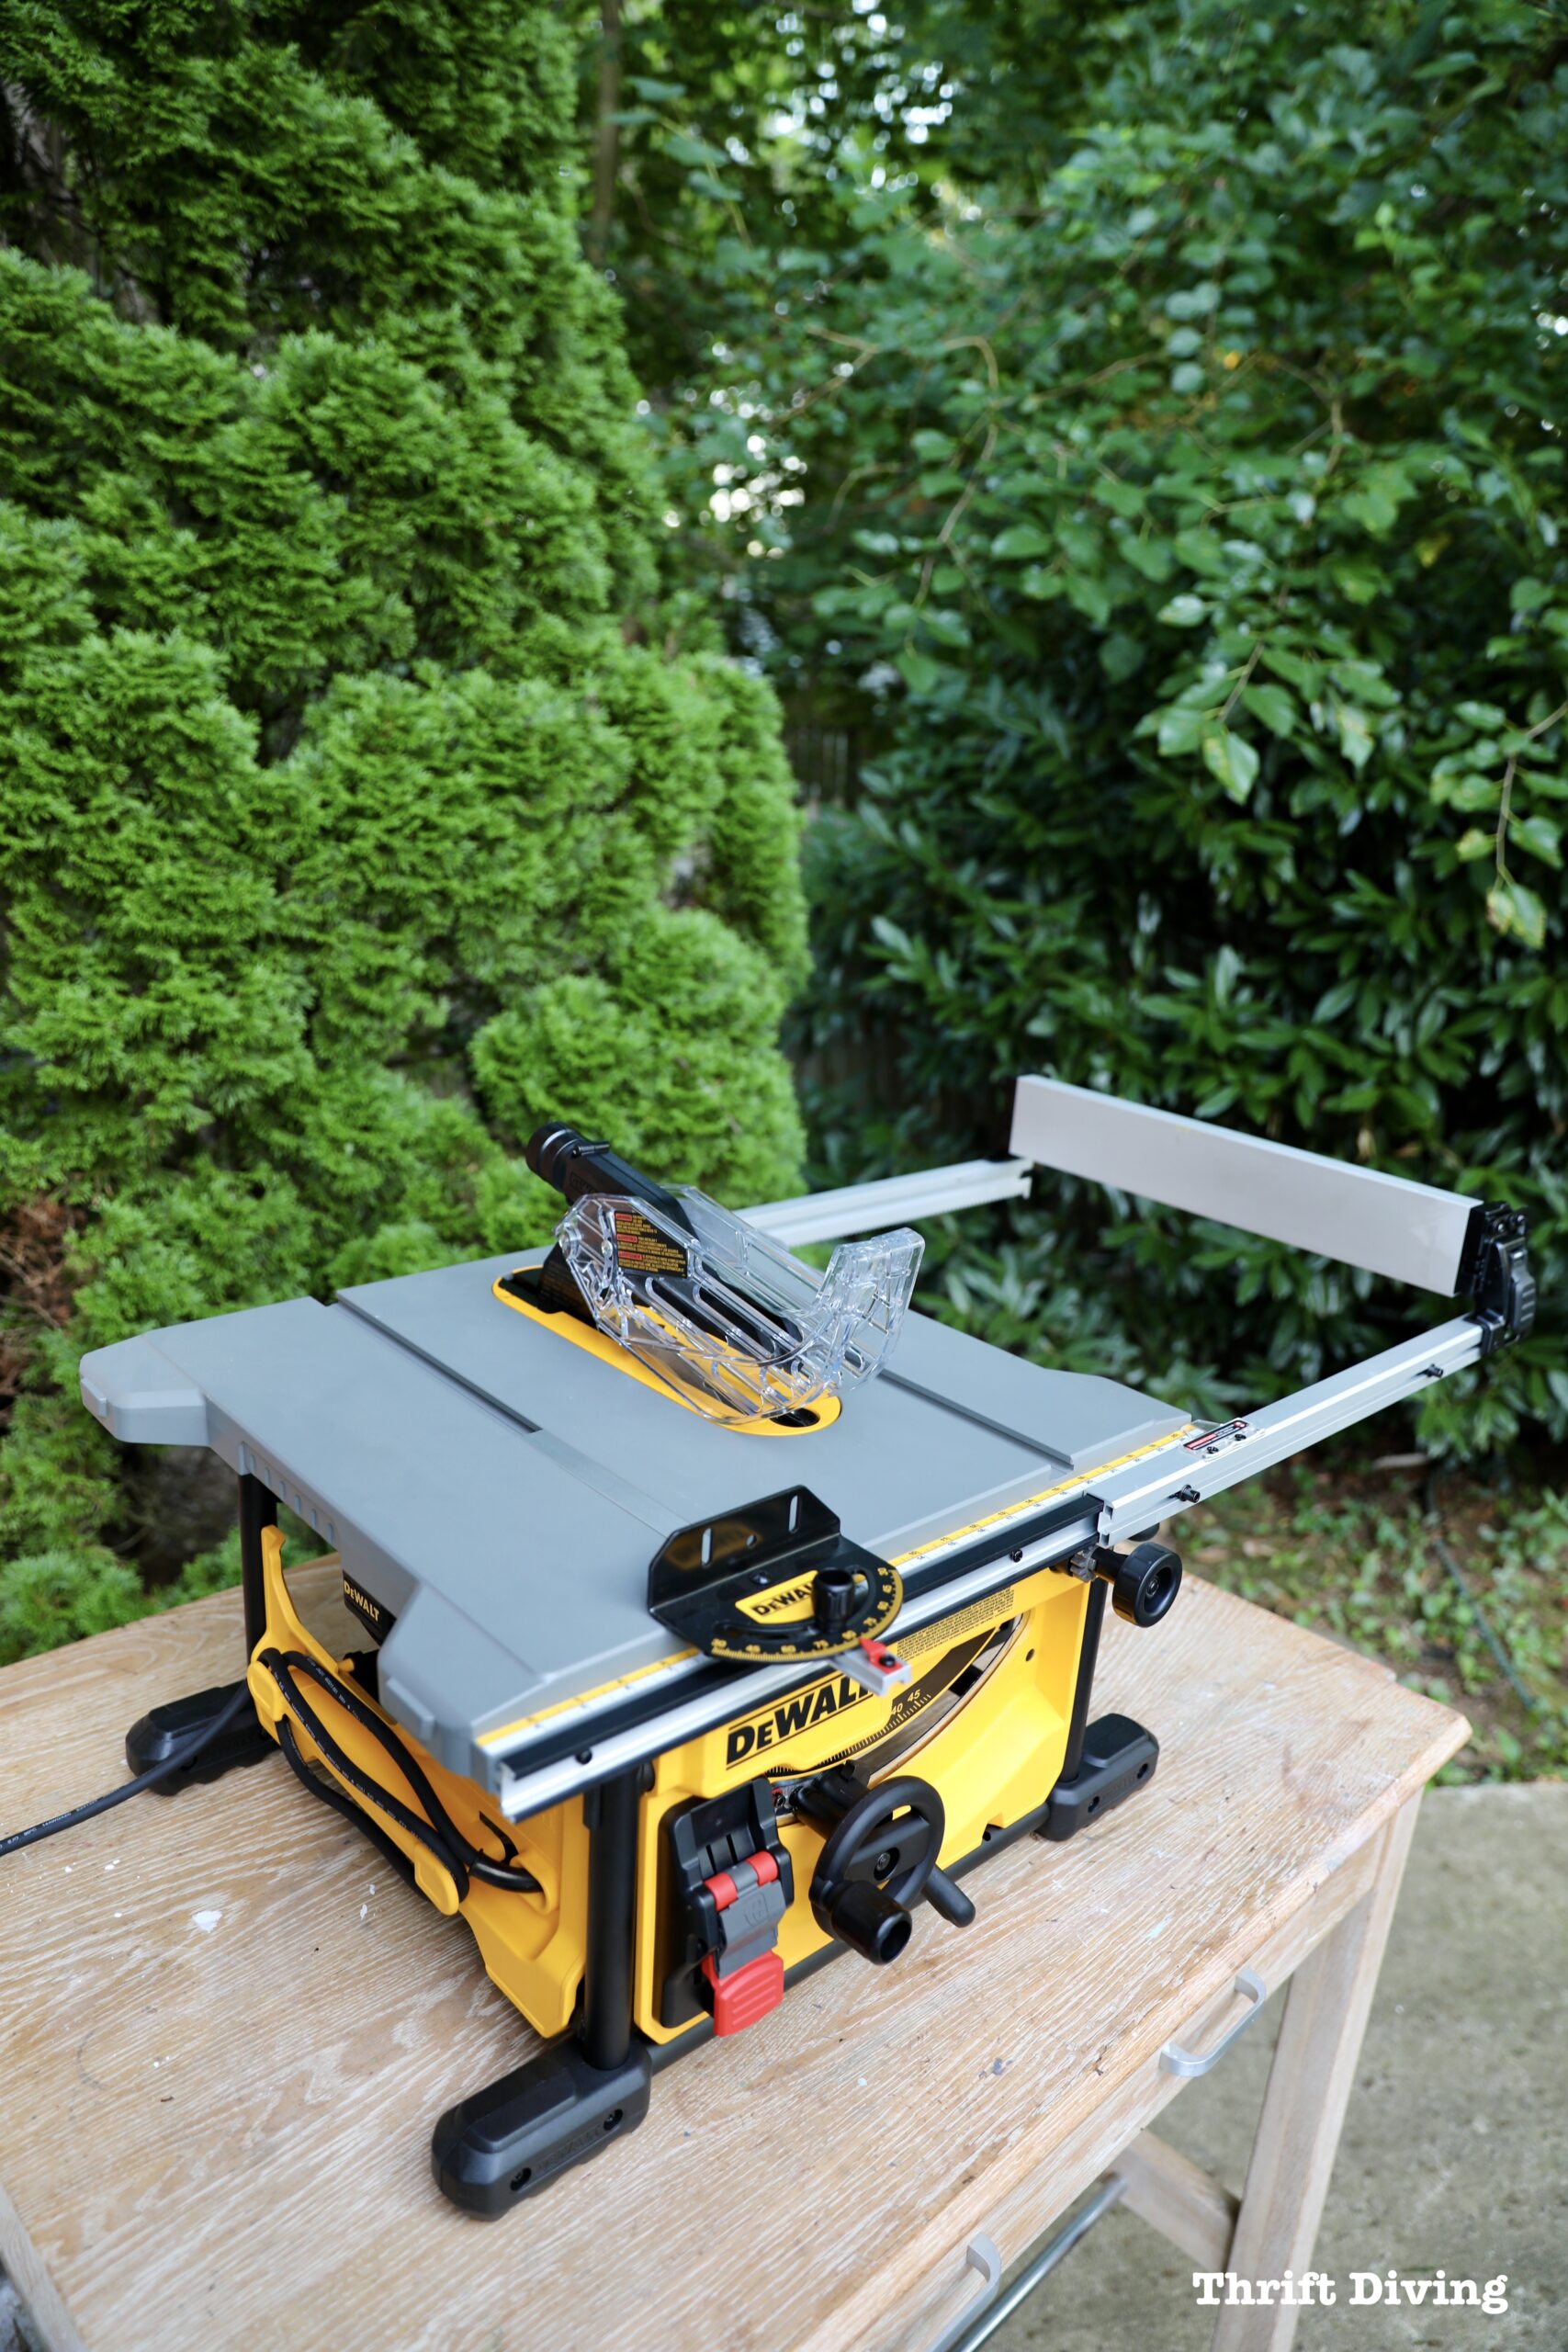
This table saw is a compact size that makes for ease of transportation and storage, which is great for anyone with lack of space or has projects that require easily taking tools to a jobsite (or even to the driveway, like I do!).
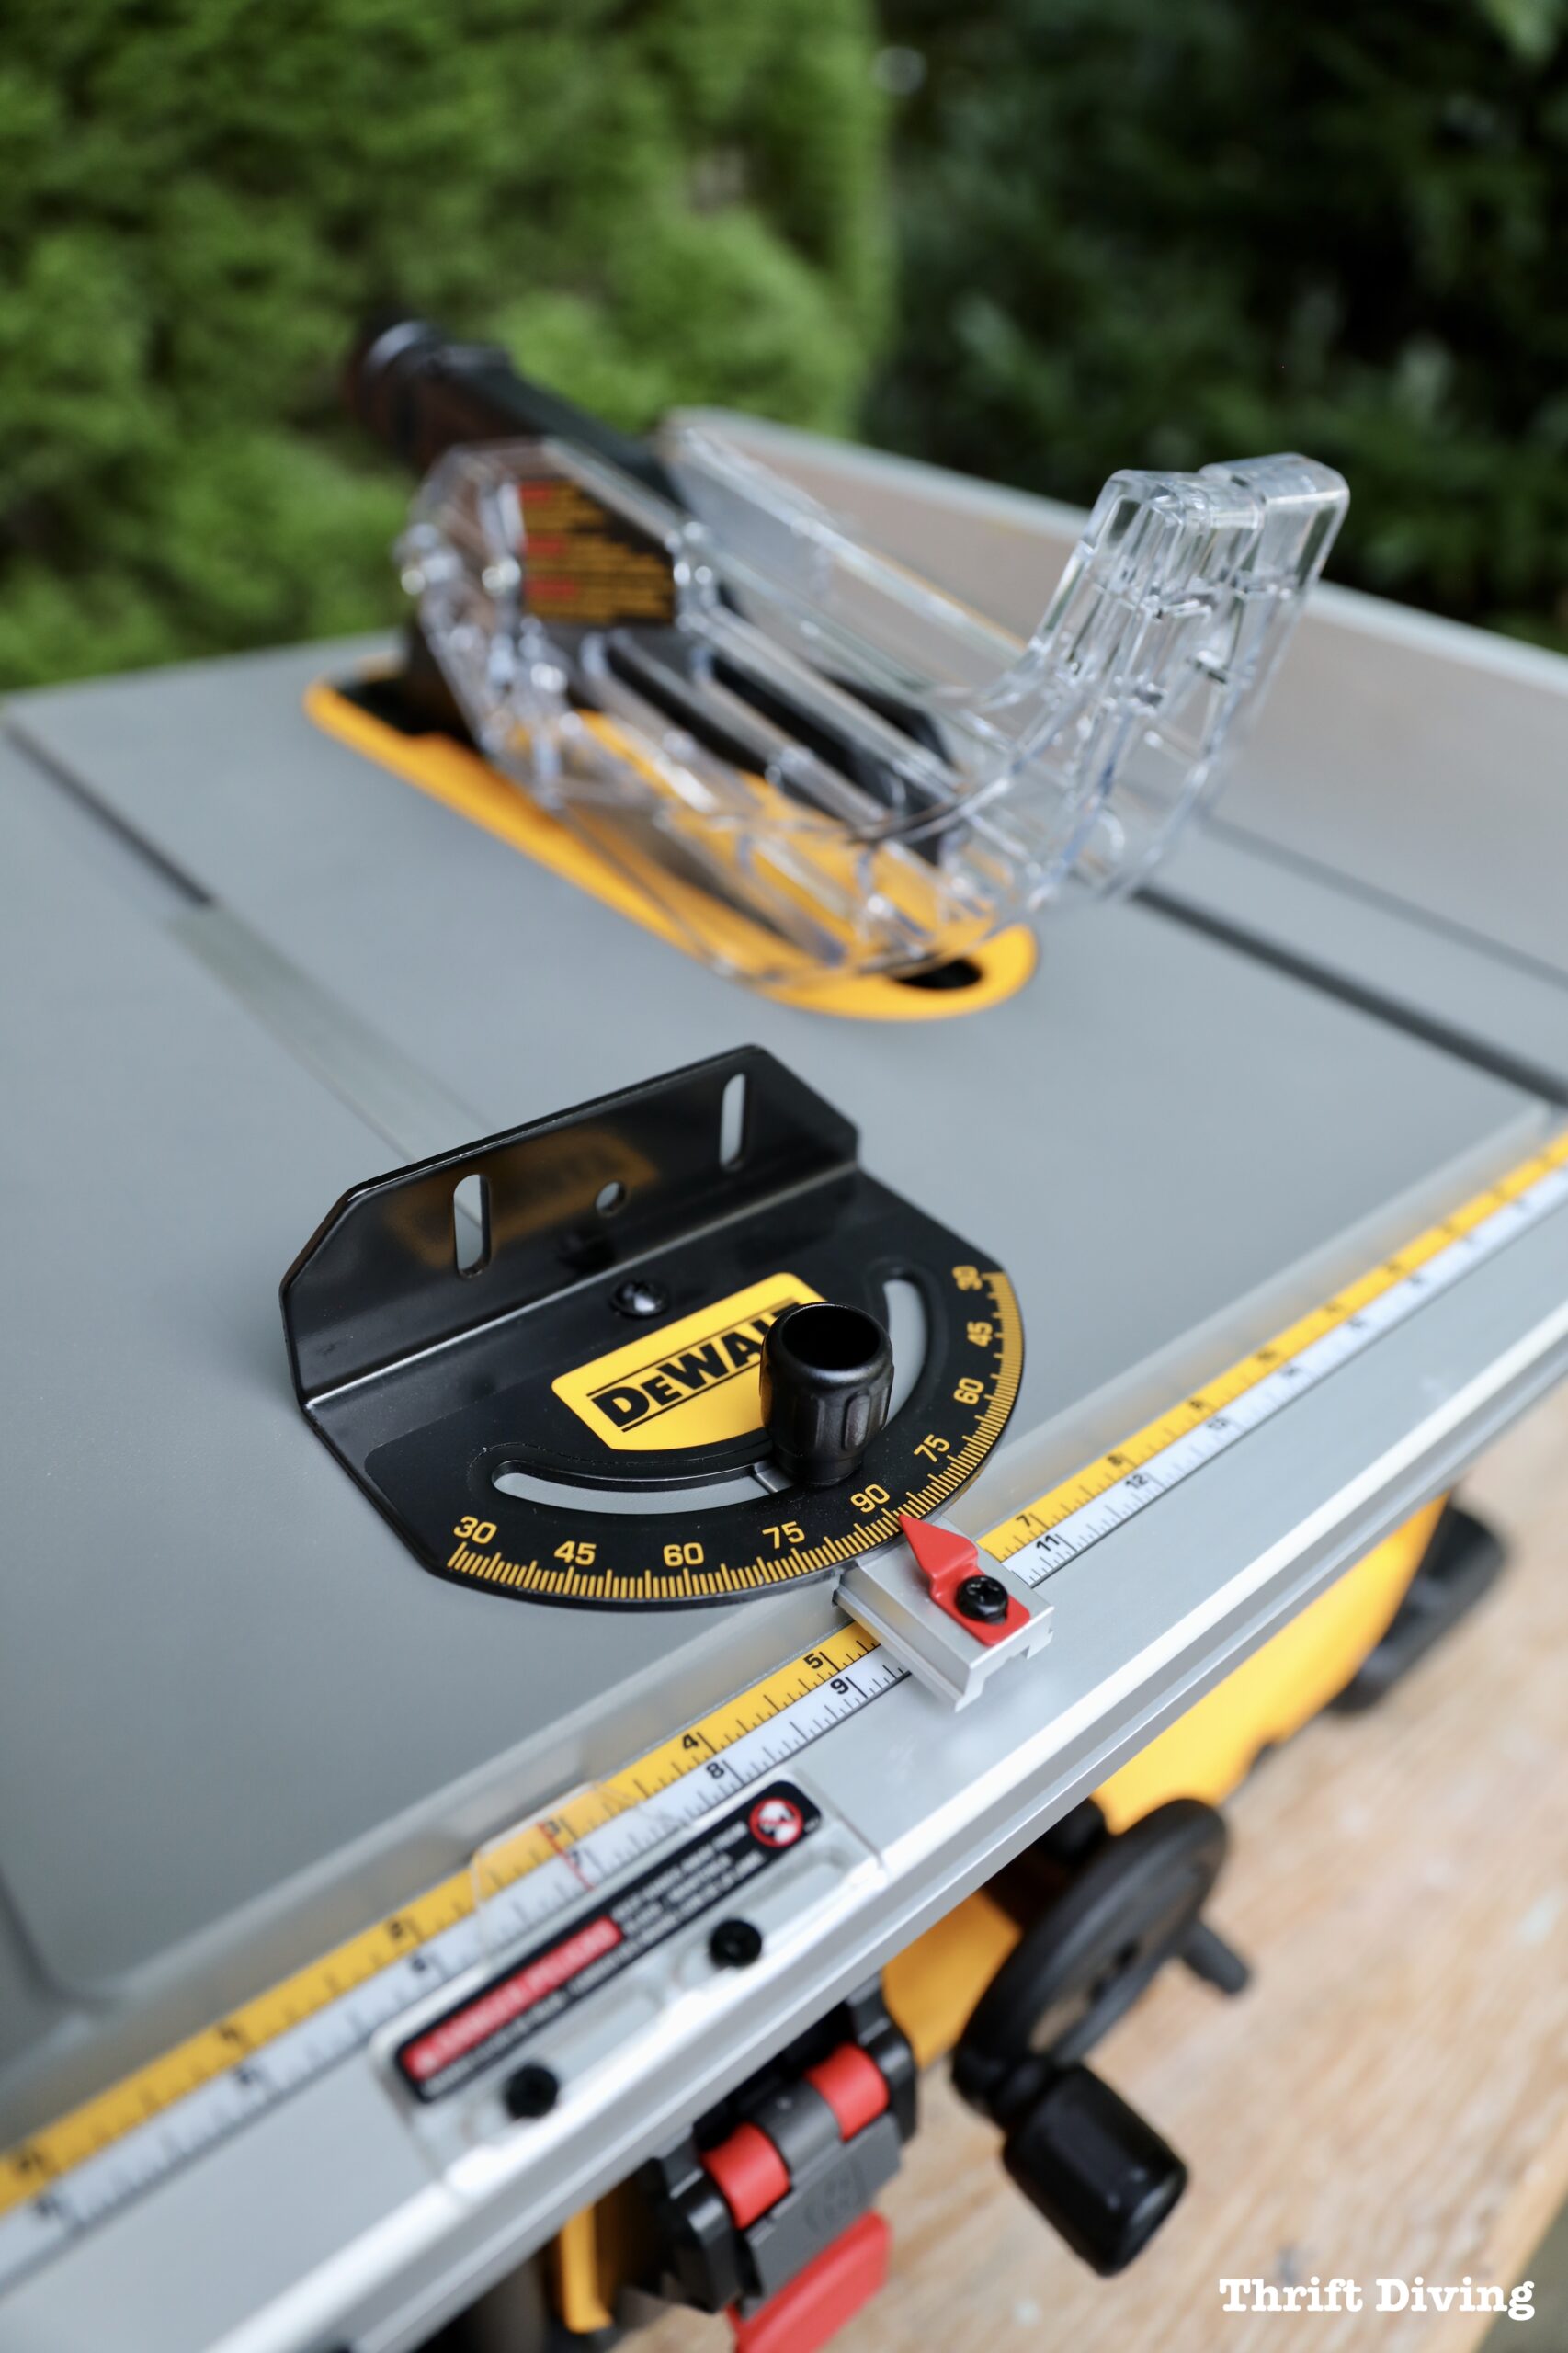
When doing cross cuts (e.g. cutting across the grain of a piece of wood), the miter gauge that slides in and out of the groove will support your work piece while cutting off the waste. Some people also build a table saw sled for extra support of both the work piece and the waste piece.
Keep in mind that when doing rip cuts with long pieces of boards, you’ll need to have support behind the table saw so that your work piece and the waste piece both have a place to rest that’s even with the surface of the saw.
And most important….
- Never cut a piece of material free-handed. It should always be supported by either the rip fence when doing rip cuts OR by the miter gauge. Never support a piece of material with both the rip fence and the miter gauge at the same time, which will pinch the wood and cause kickback, which is when a piece of material is thrown at high force back in your direction.
TIP #2: Wax the Top of the Saw
Materials need to slide easily across the table of your tools, and a bit of paste wax is a great way to achieve this. I took a scroll saw class at my local woodworking store earlier this year and the instructor advised that we wax our scroll saw iron top to help the wood slide easily over it.
The same is true for a table saw, too. Just be sure not to add too much, and to thoroughly buff it off so that wax residue doesn’t ruin any future finishing you’ll do on your wood projects.
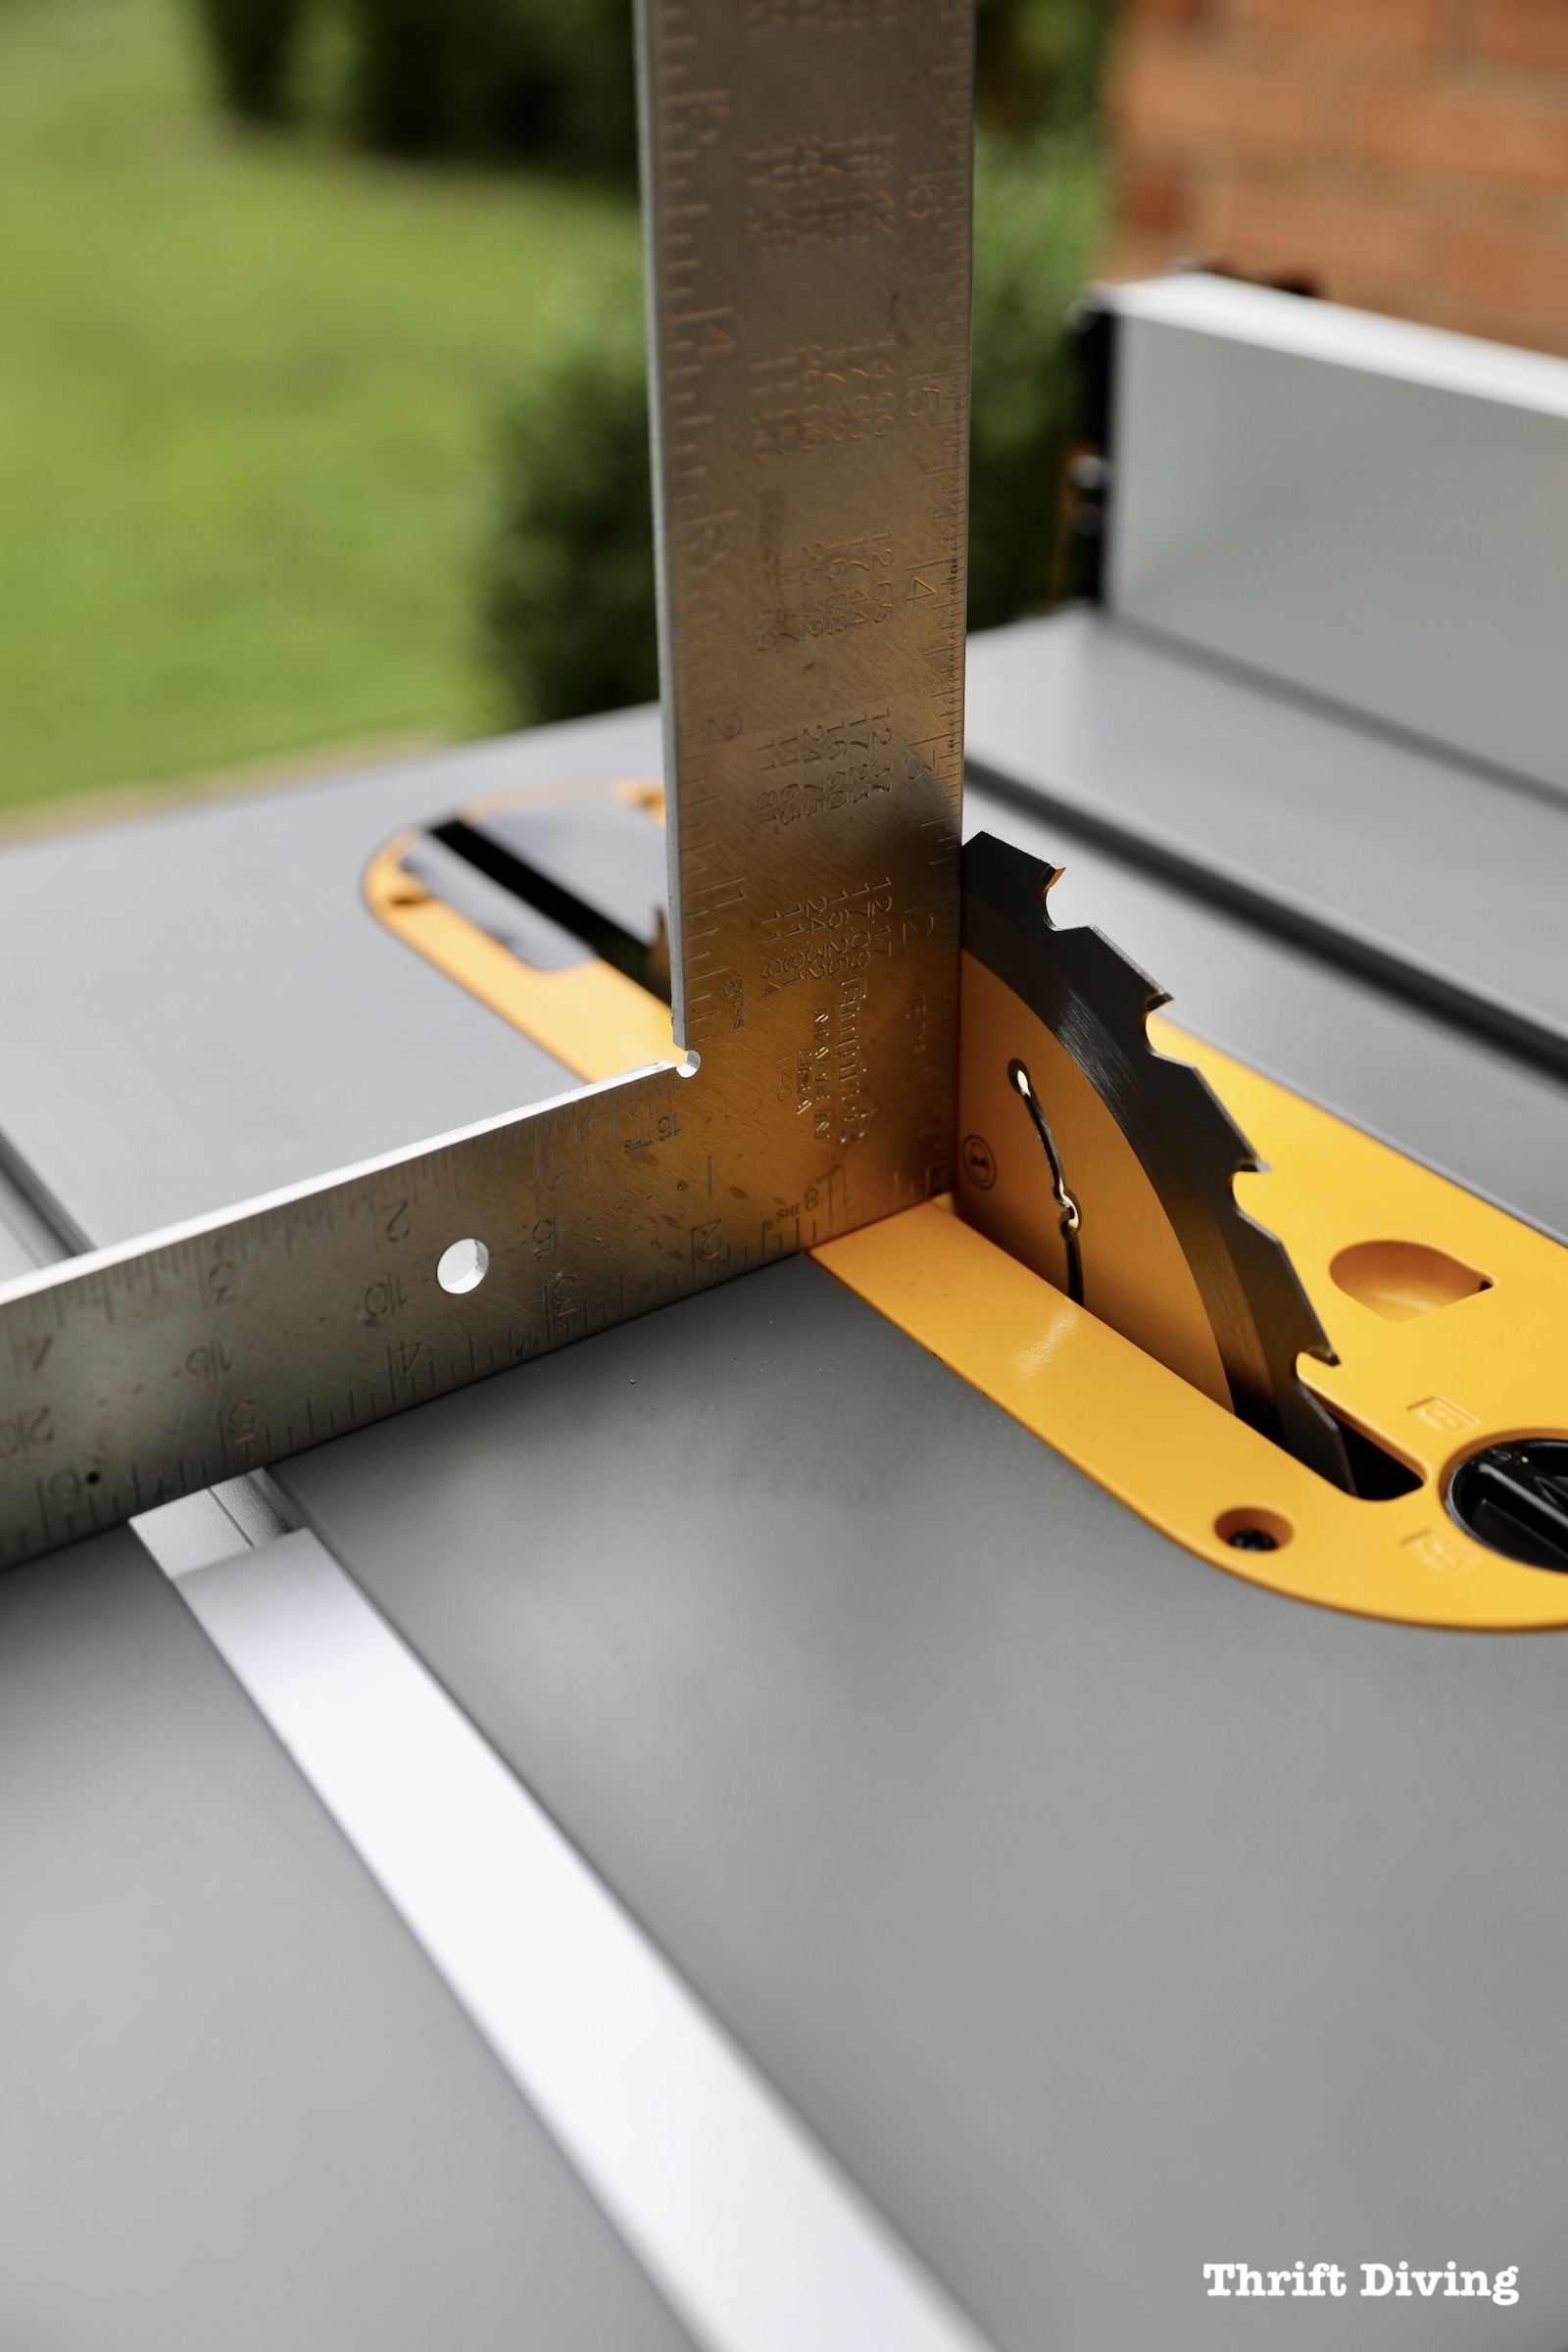
TIP #3: Make Sure Your Blade is Really 90-Degrees
By releasing the lever near the wheel, this blade will bevel up to 45 degrees, which is really useful when making something like french cleats (which I used when I made and hung my DIY hanging fence garden, but at that time, I used a jigsaw).
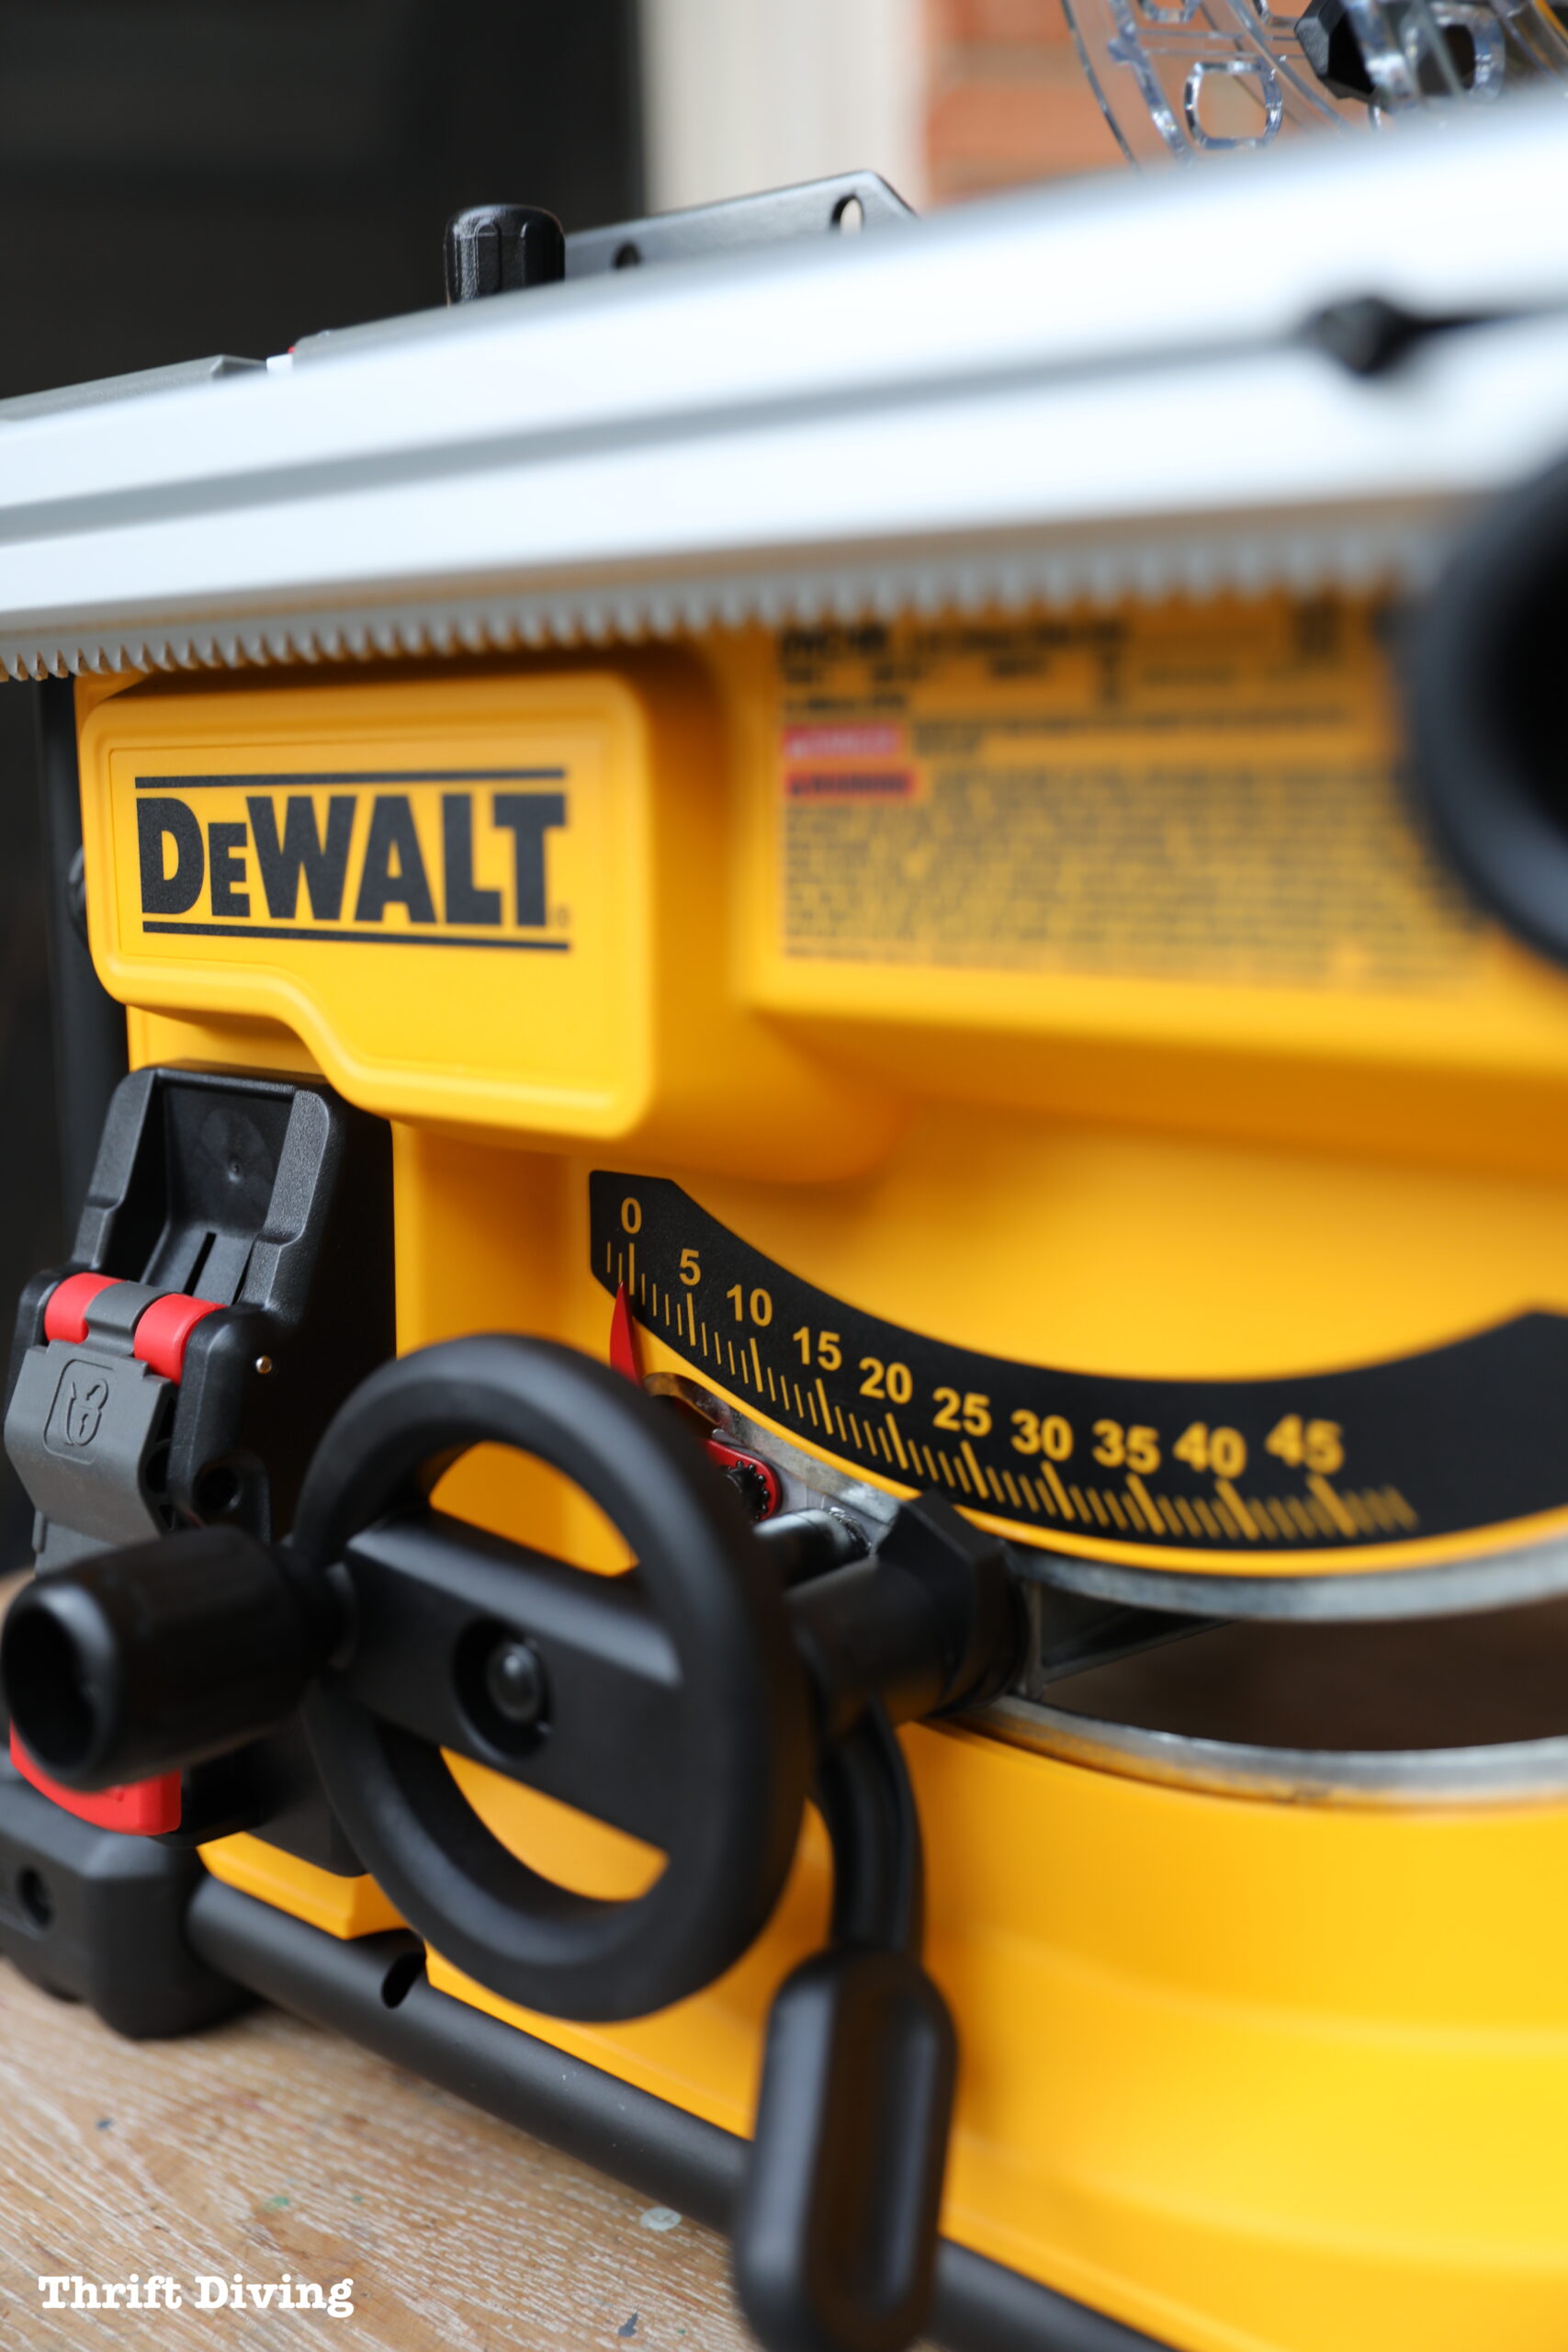
At “0” it is in the 90-degree right angle position to make straight cuts. Using a speed square or rafter square, check to ensure that it’s really at 90-degrees, and then make adjustments if needed.
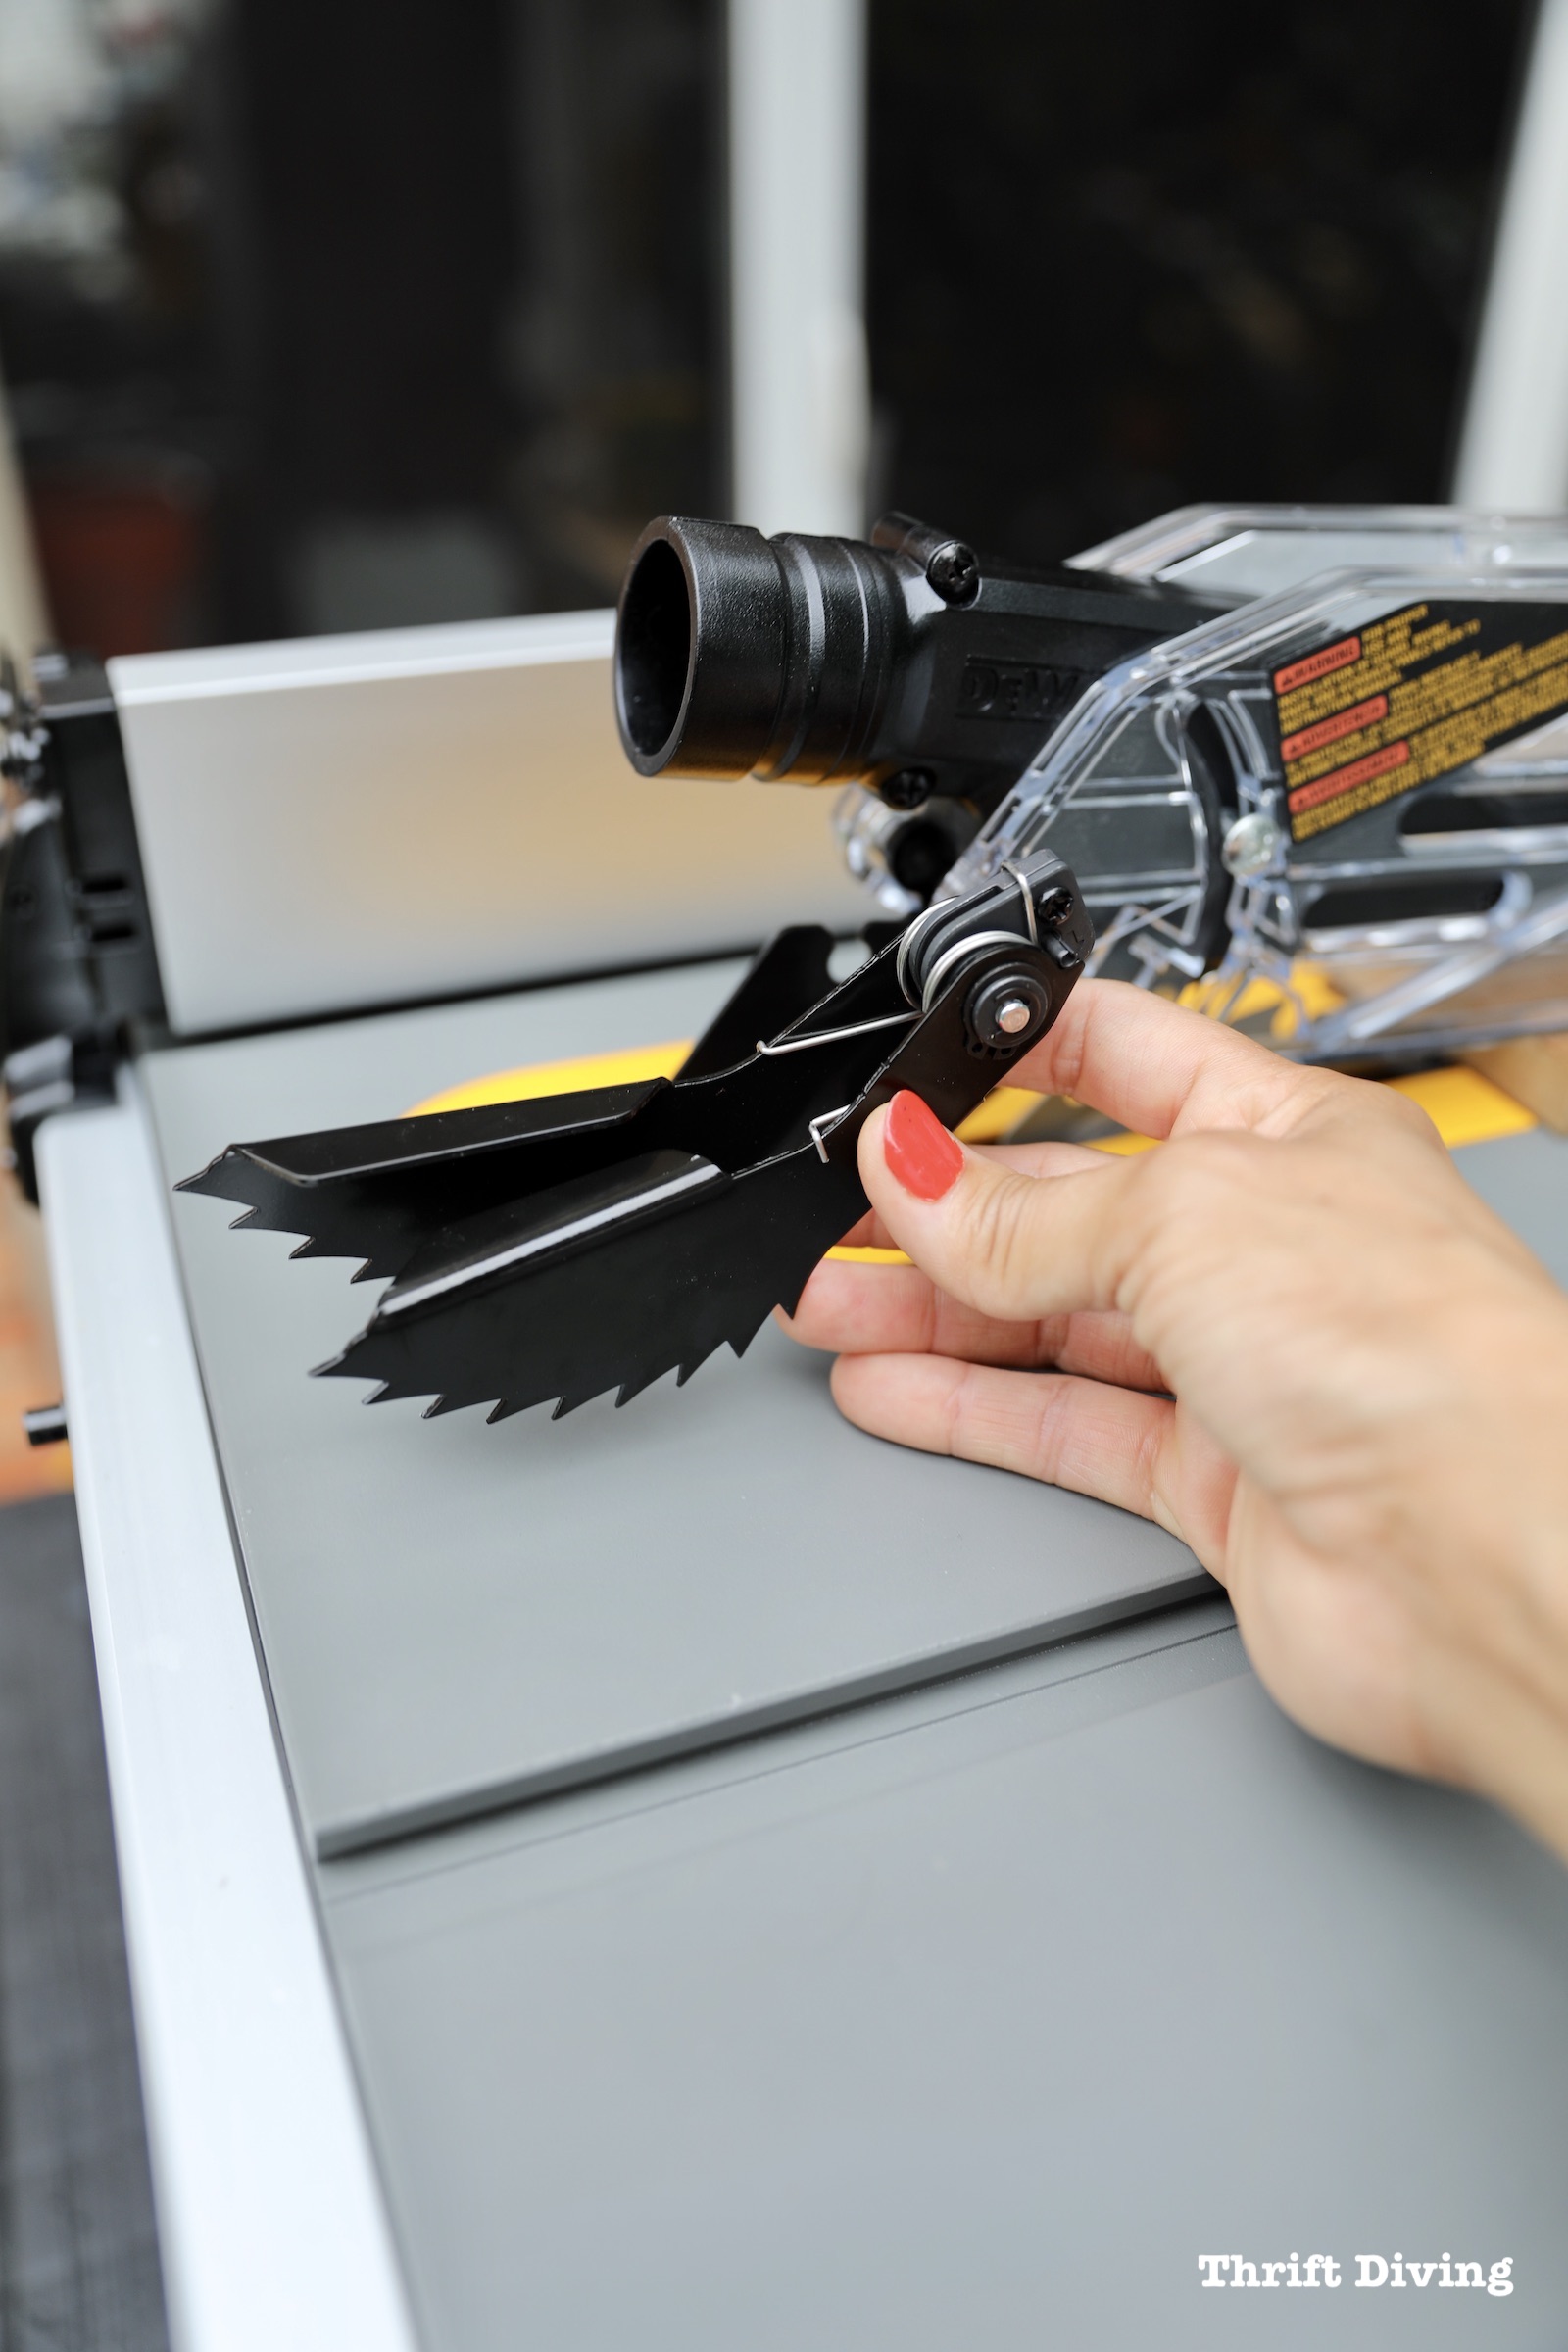
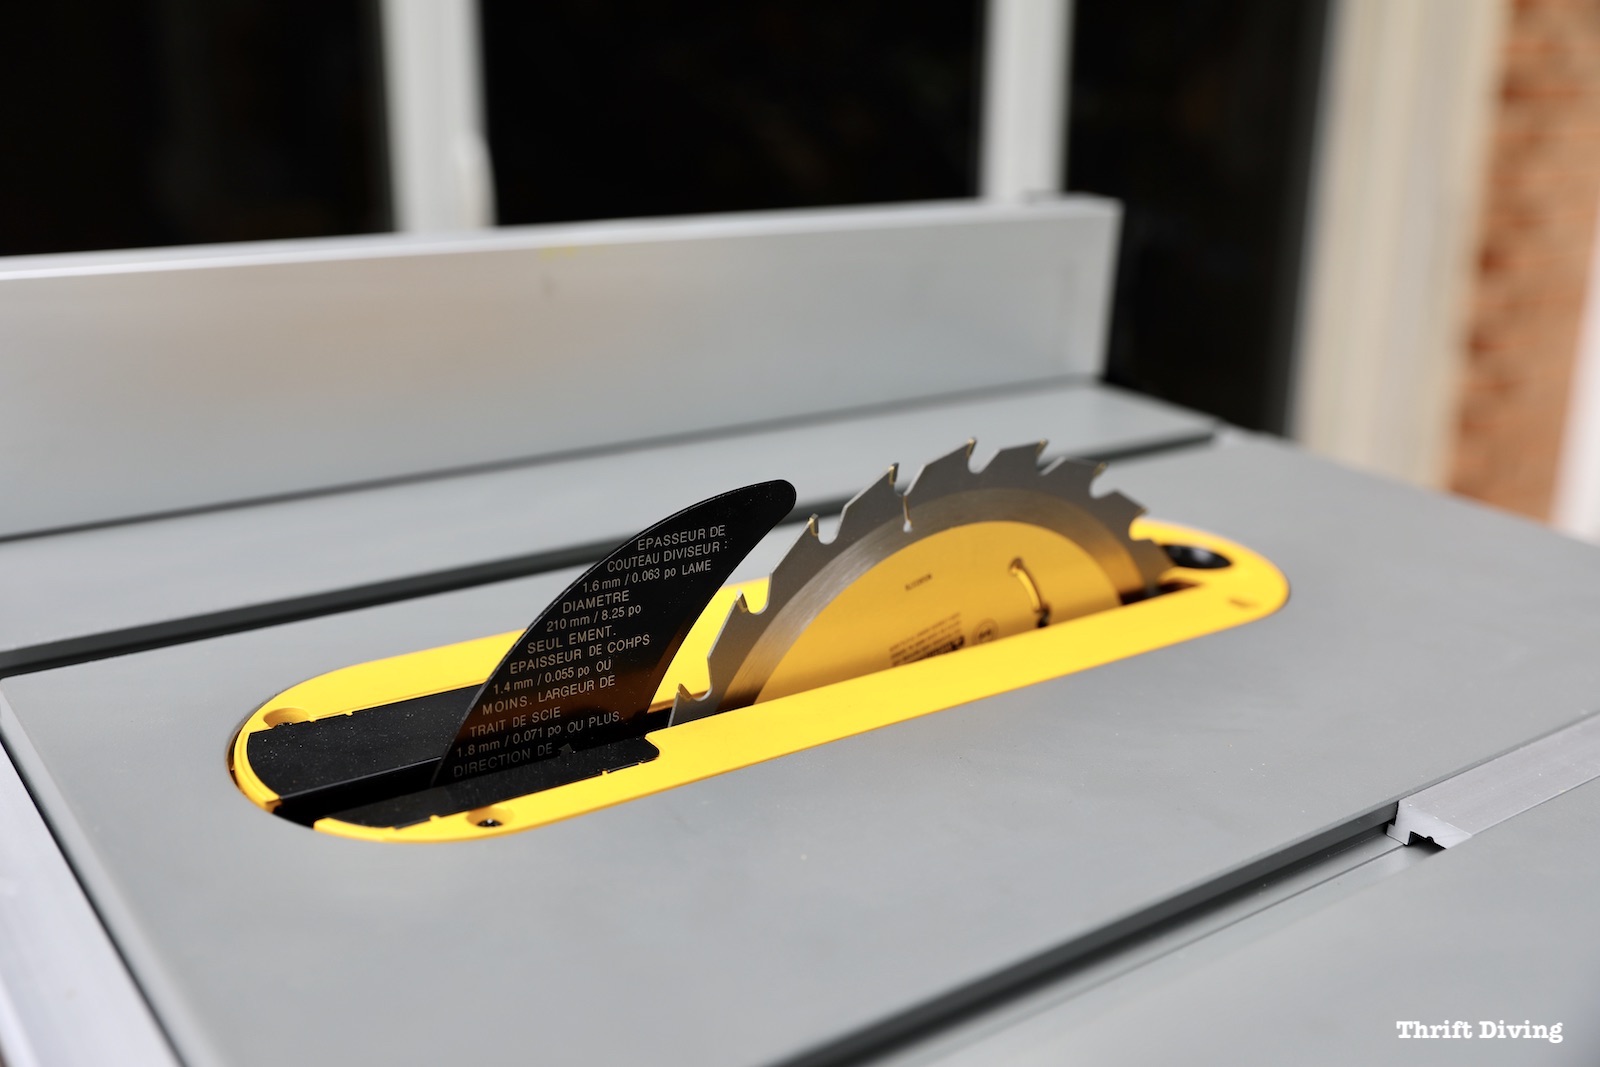
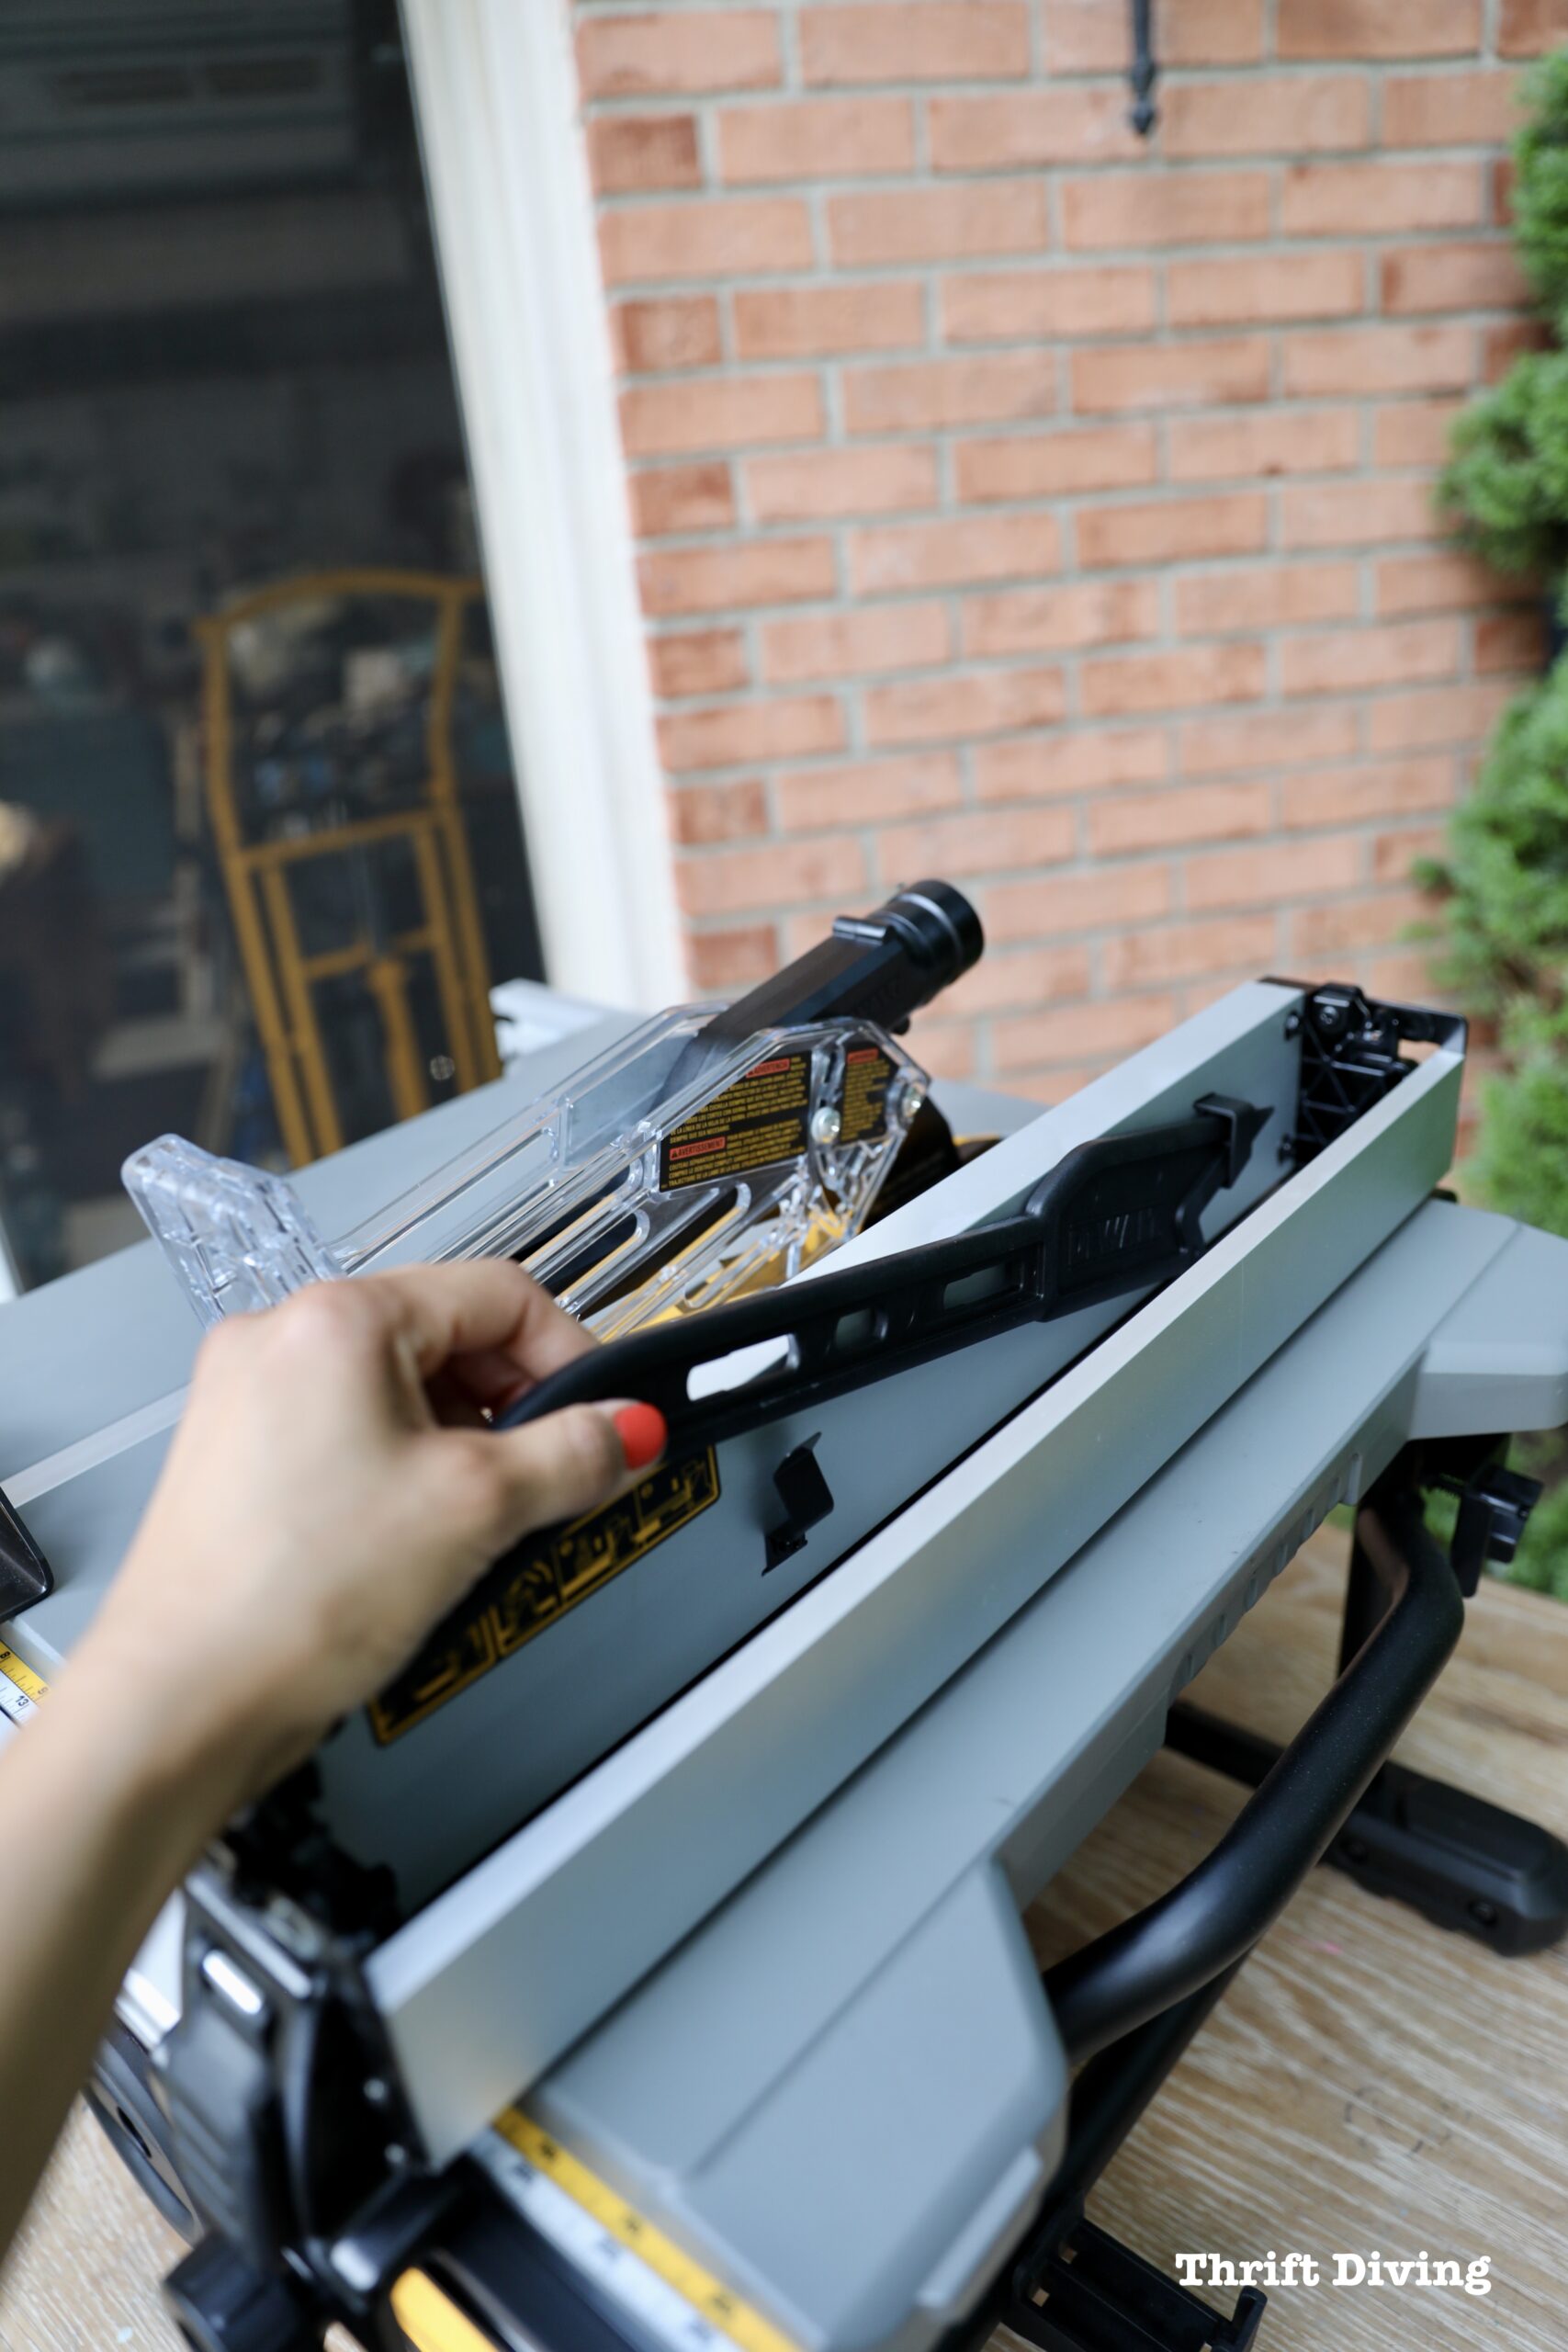
TIP #4: Use the Blade Guard or Riving Knife
The blade guard is there to protect your hands from getting anywhere near the blade because it serves as a visual reminder. It also helps prevent wood from kicking back if wood is accidentally dropped on a spinning blade.
Some people remove it and install the included riving knife, or remove it when they’re using a table saw sled, as previously mentioned (the riving knife stays installed when using a table saw sled).
This table saw has something called anti-kickback pawls, too. I always think of it like one of those garage tire spikes: you can ride over it, but the minute you attempt to back up over it or drive over it in the opposite direction, it punctures your tires by sinking its spikes into your tires.
The anti-kickback pawls does sort of the same thing: allows the wood to safely pass through the blade, but if a piece of wood becomes wedged or crooked and is about to get caught up in the blade (which would cause it to shoot back in your direction), the anti-kickback pawls grabs it with its teeth and prevents the kickback.
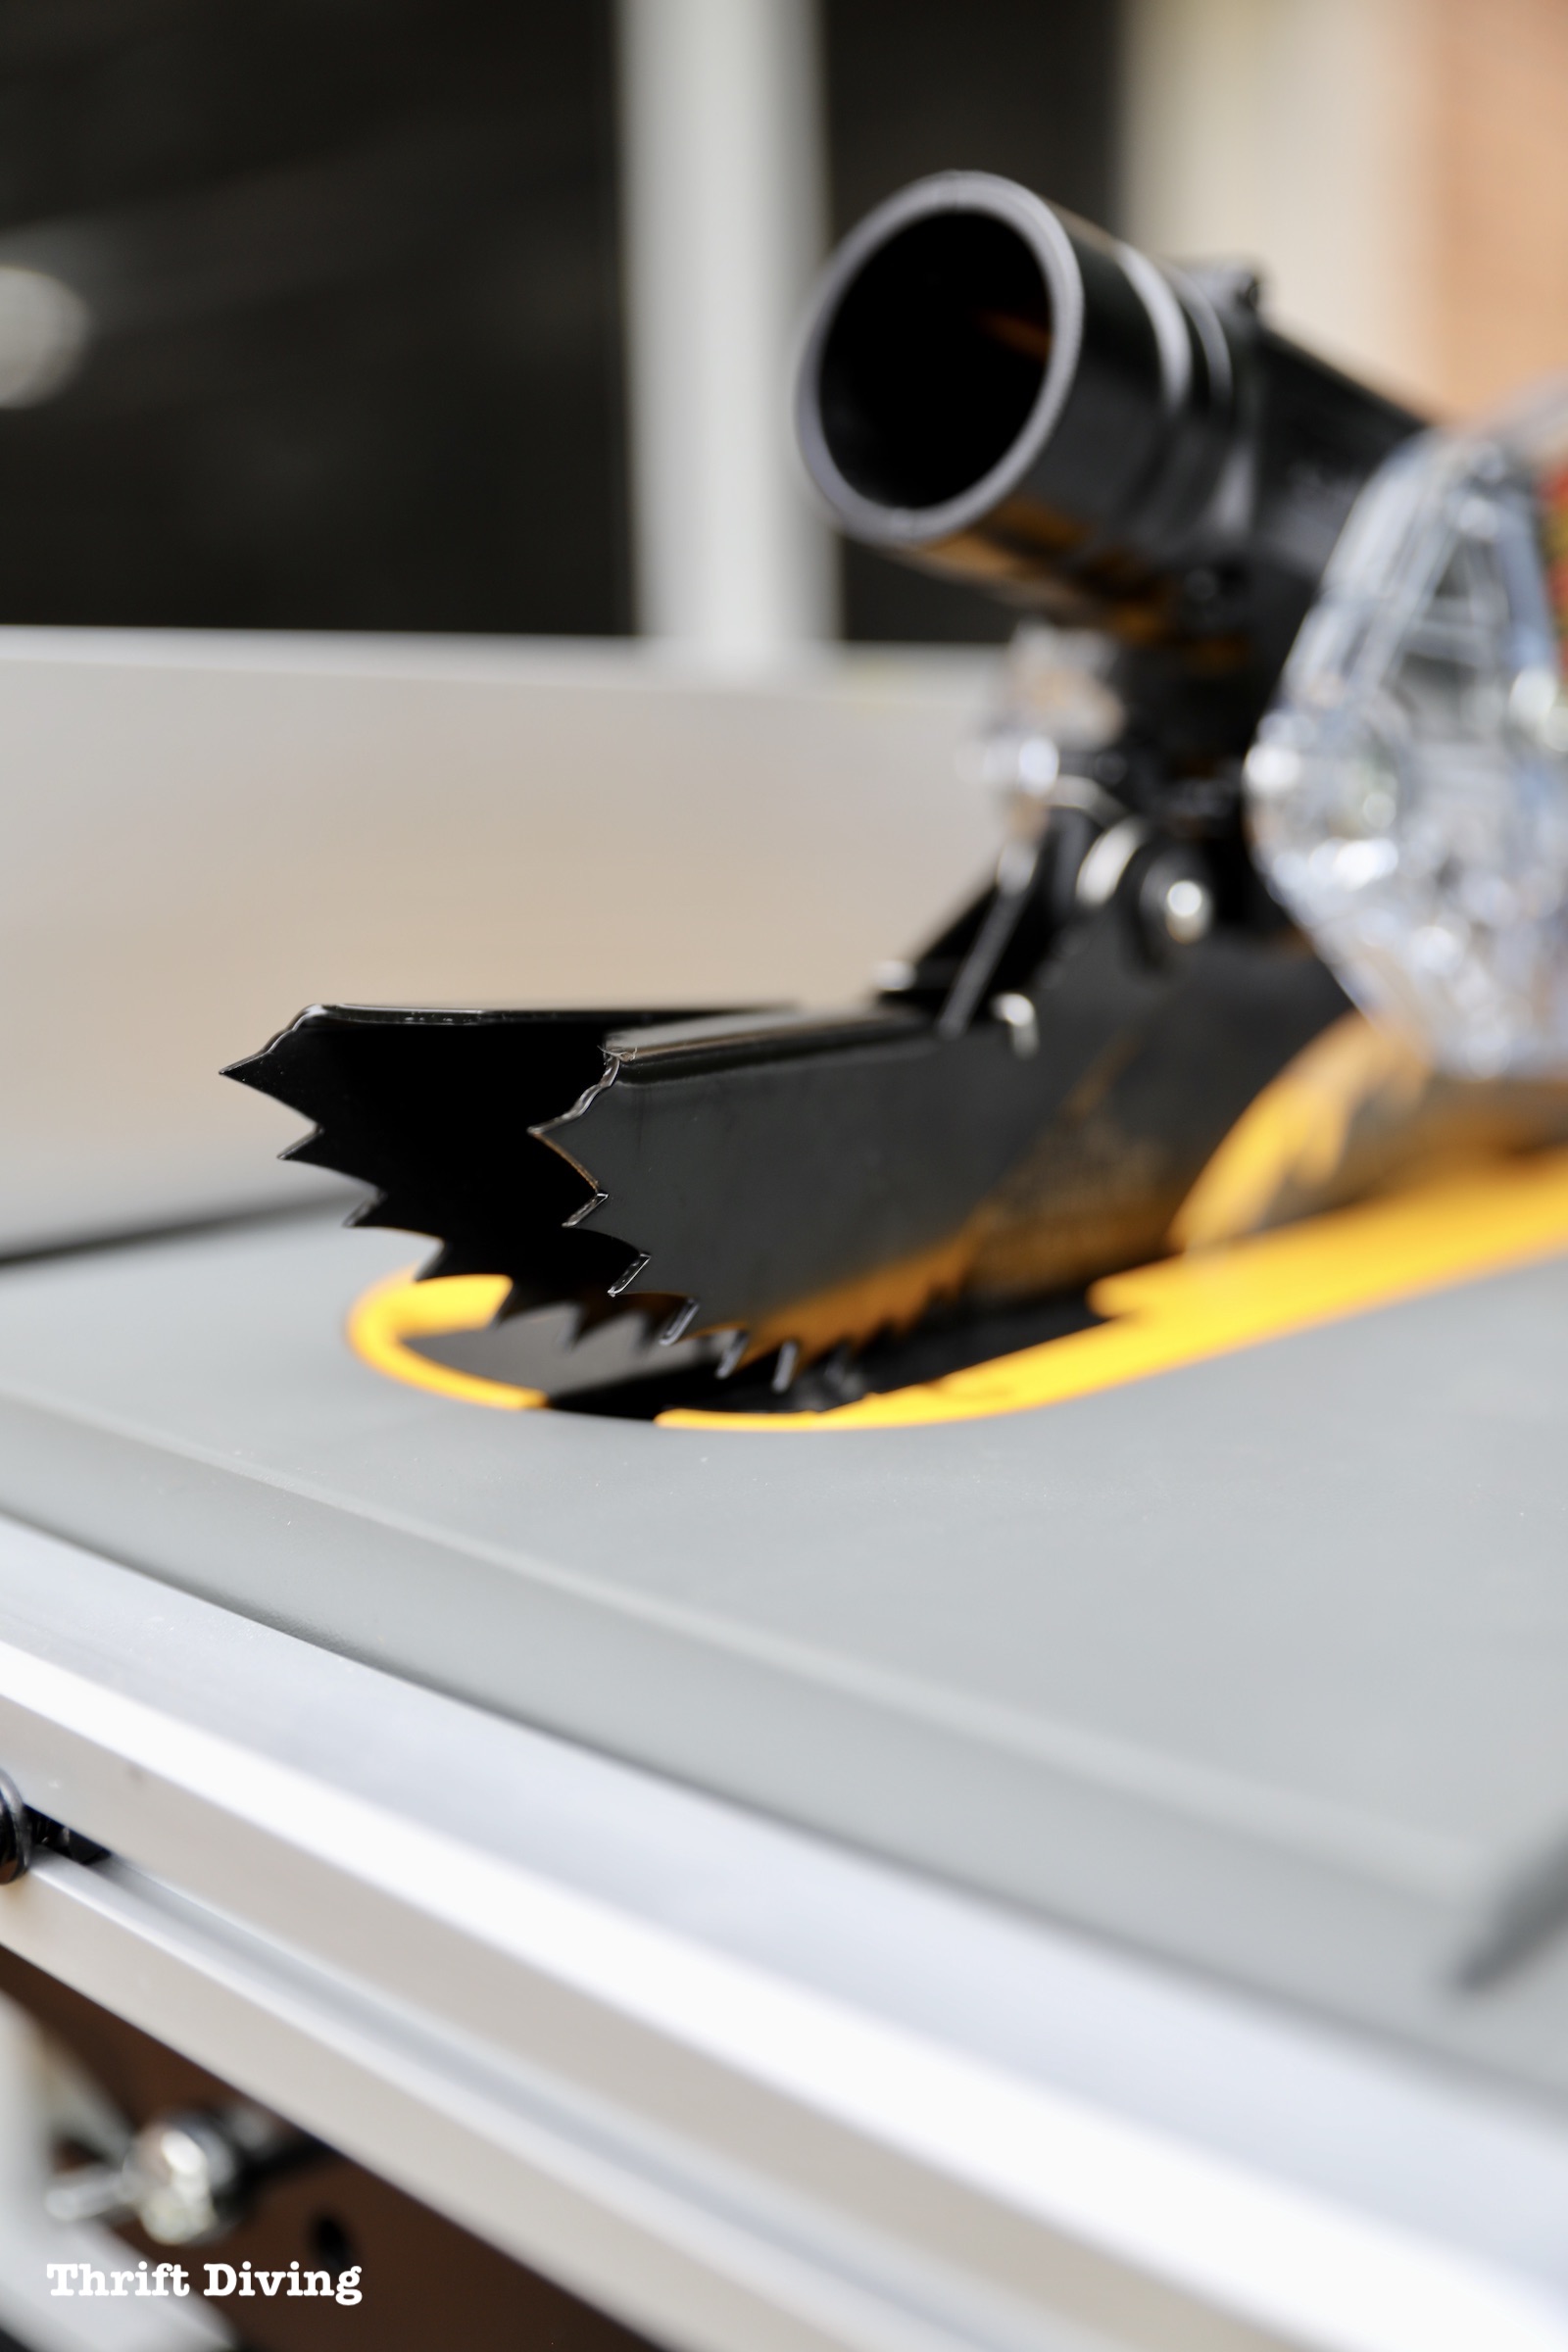
The blade guard with anti-kickback pawls and riving knife are never used at the same time, though. It is either/or: either use the blade guard or install the riving knife.
TIP #5: Always Apply 3 Pressures: Forward, Down, and Inward
On the side of the rip fence, there is a push stick that is included and stored onboard with this DeWalt Compact Jobsite Table Saw. Some people like to use a push stick such as this that comes with their table saw, but you can also buy one, or even make one out of wood (here is a great tutorial I found online).
The main thing is to always have pressure on your wood at three points: forward, downward, and inward on the edge of the wood to keep it against the rip fence when ripping a board. I’ve found recommendations online to always use two push sticks which allows you to have all three points of pressure covered: one centered in the middle of the wood, pushing your wood through, and the other on the side, pushing inward.
The side pressure should be on the wood before it reaches the blade. Therefore, keep the pressure on the wood, not the blade.
GOOD TO KNOW: You should never use a push stick while the end of a board is hanging off of the table, because that downward pressure at the back could cause your wood to tilt upwards onto the blade, causing kickback. Instead, as you’re feeding the wood through, use the push stick once the edge of the wood is resting on the table.
TIP #6: Hook Up a Shop Vac
I don’t have anything fancy for air filtration or vacuum options in my garage workshop. The back of this table, though, has a dust port where a standard shop vac can be attached. Be sure to use it to prevent excess dust from floating around in your work space.
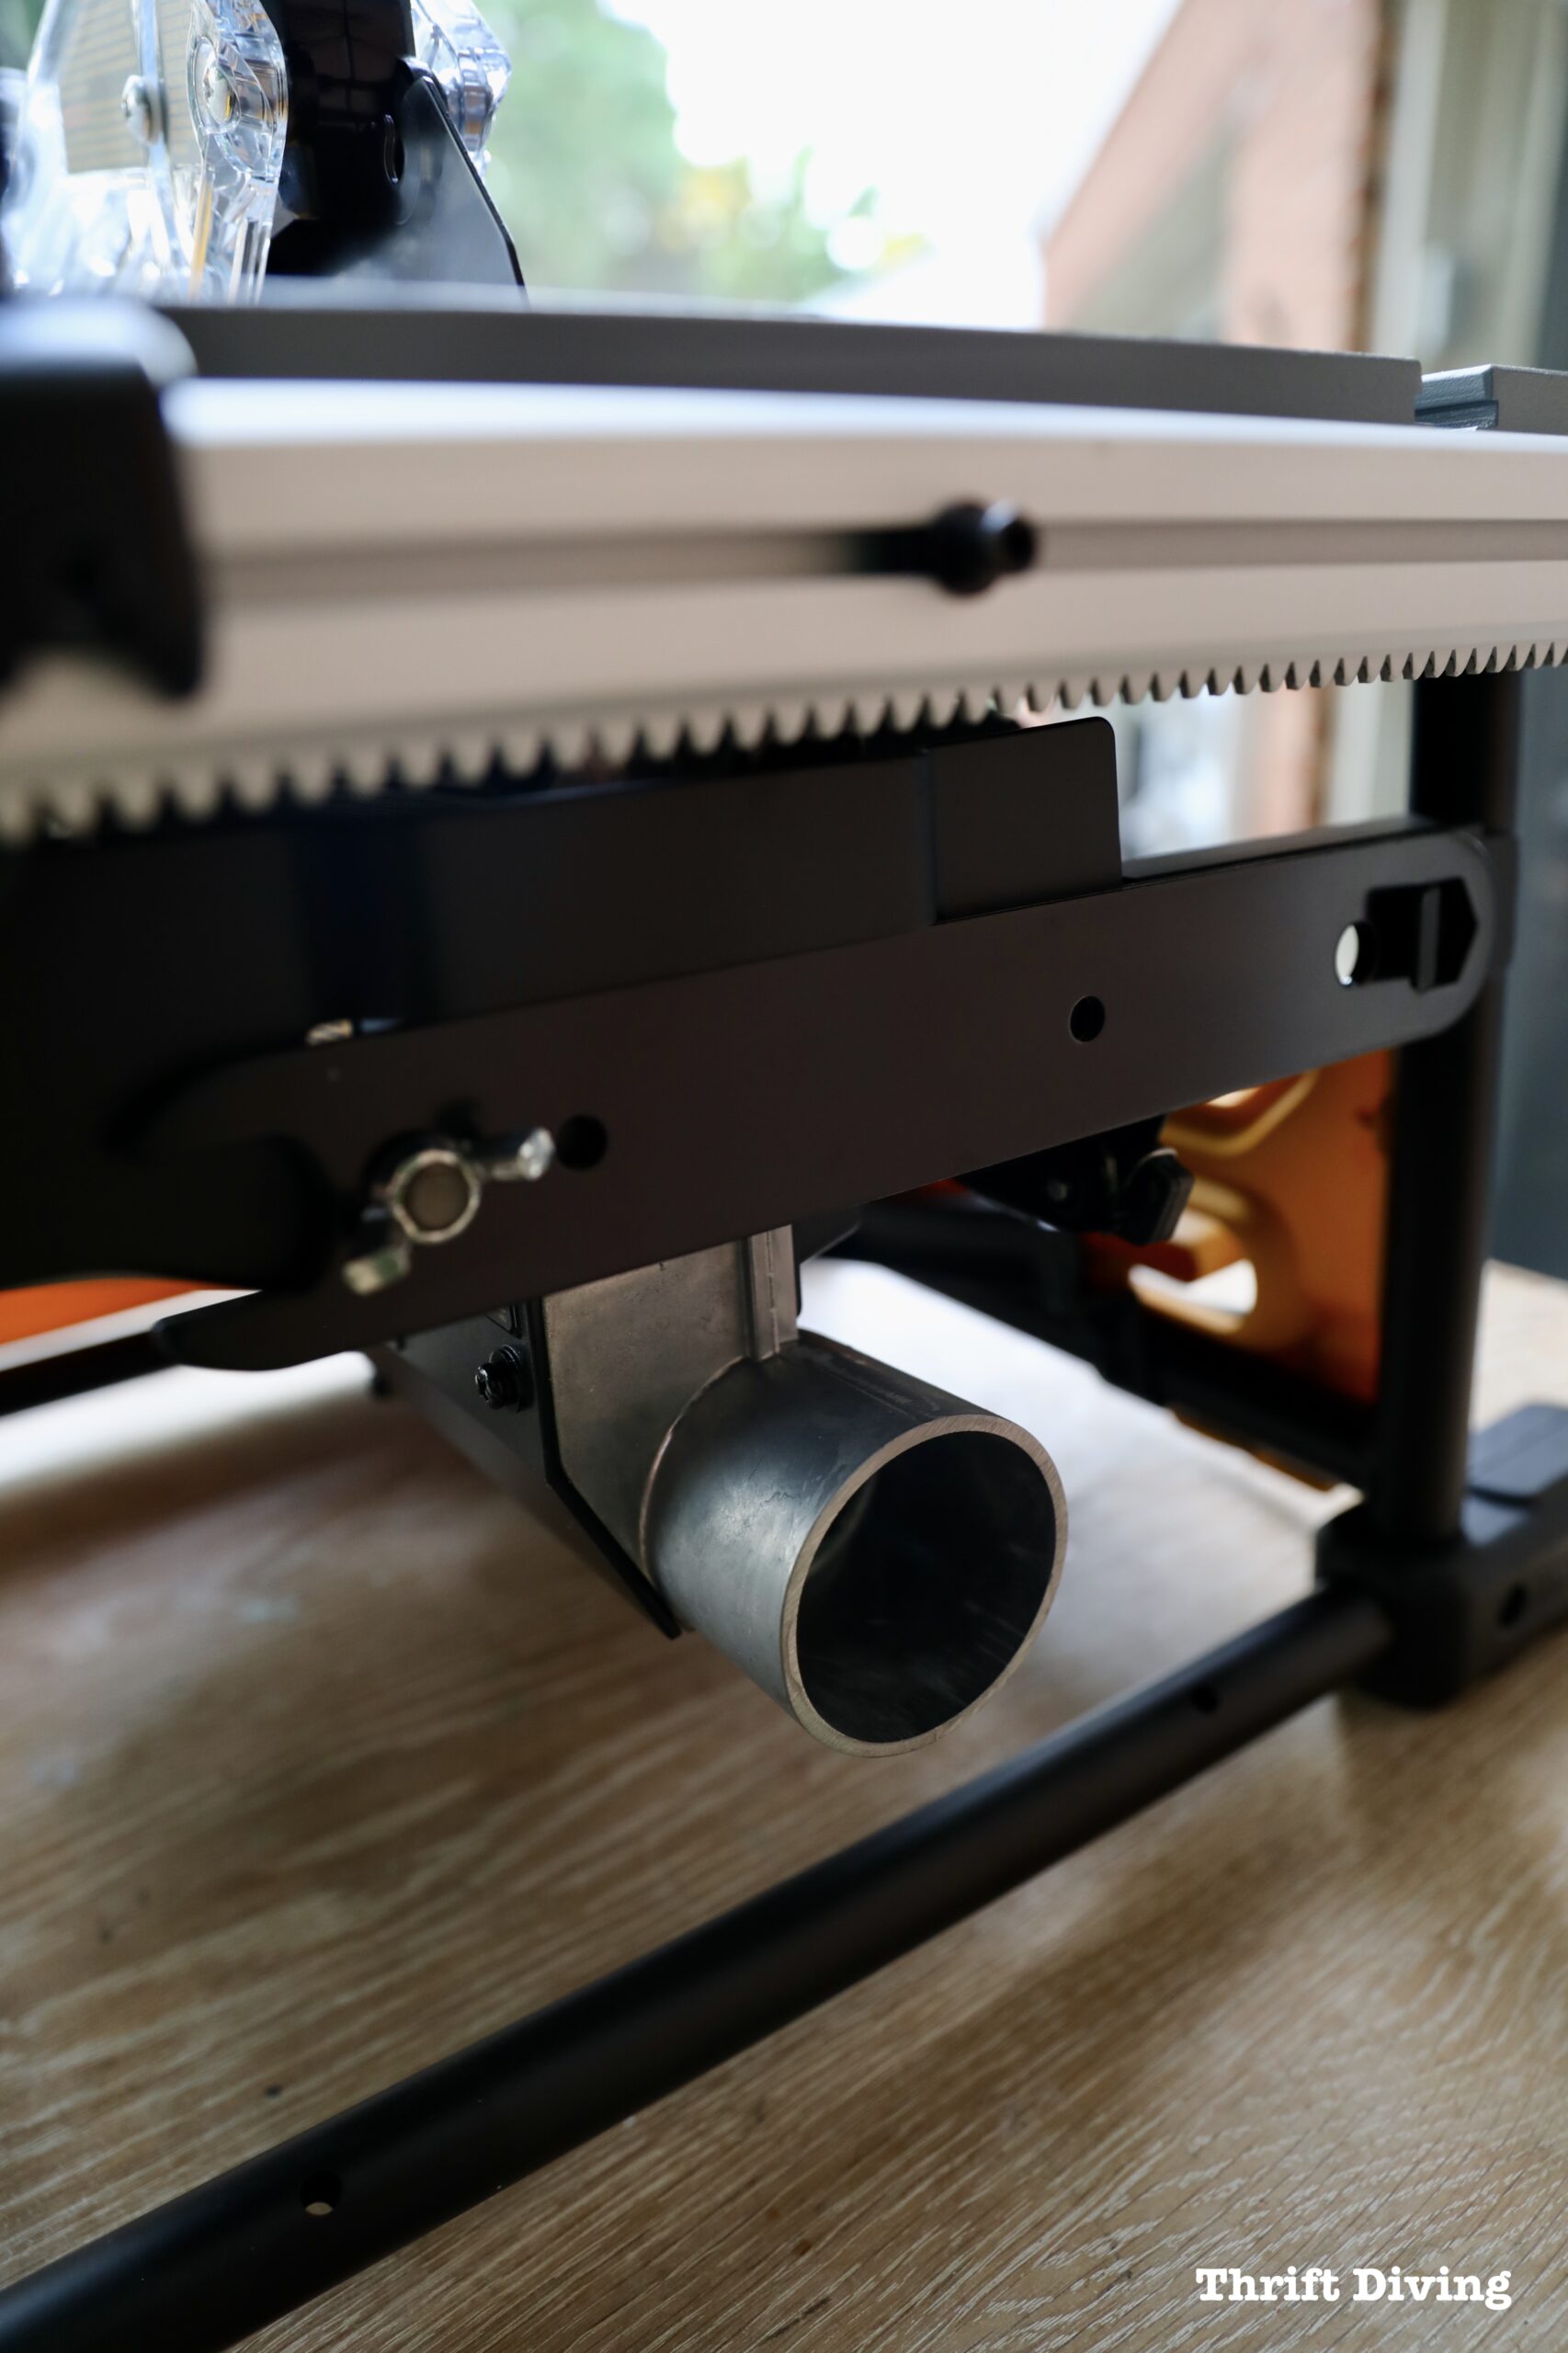
GOOD TO KNOW: The guard, fence, wrenches, and miter gauge can all be stored on-board this table saw. You can see the wrenches are stored right above the dust port in the back.
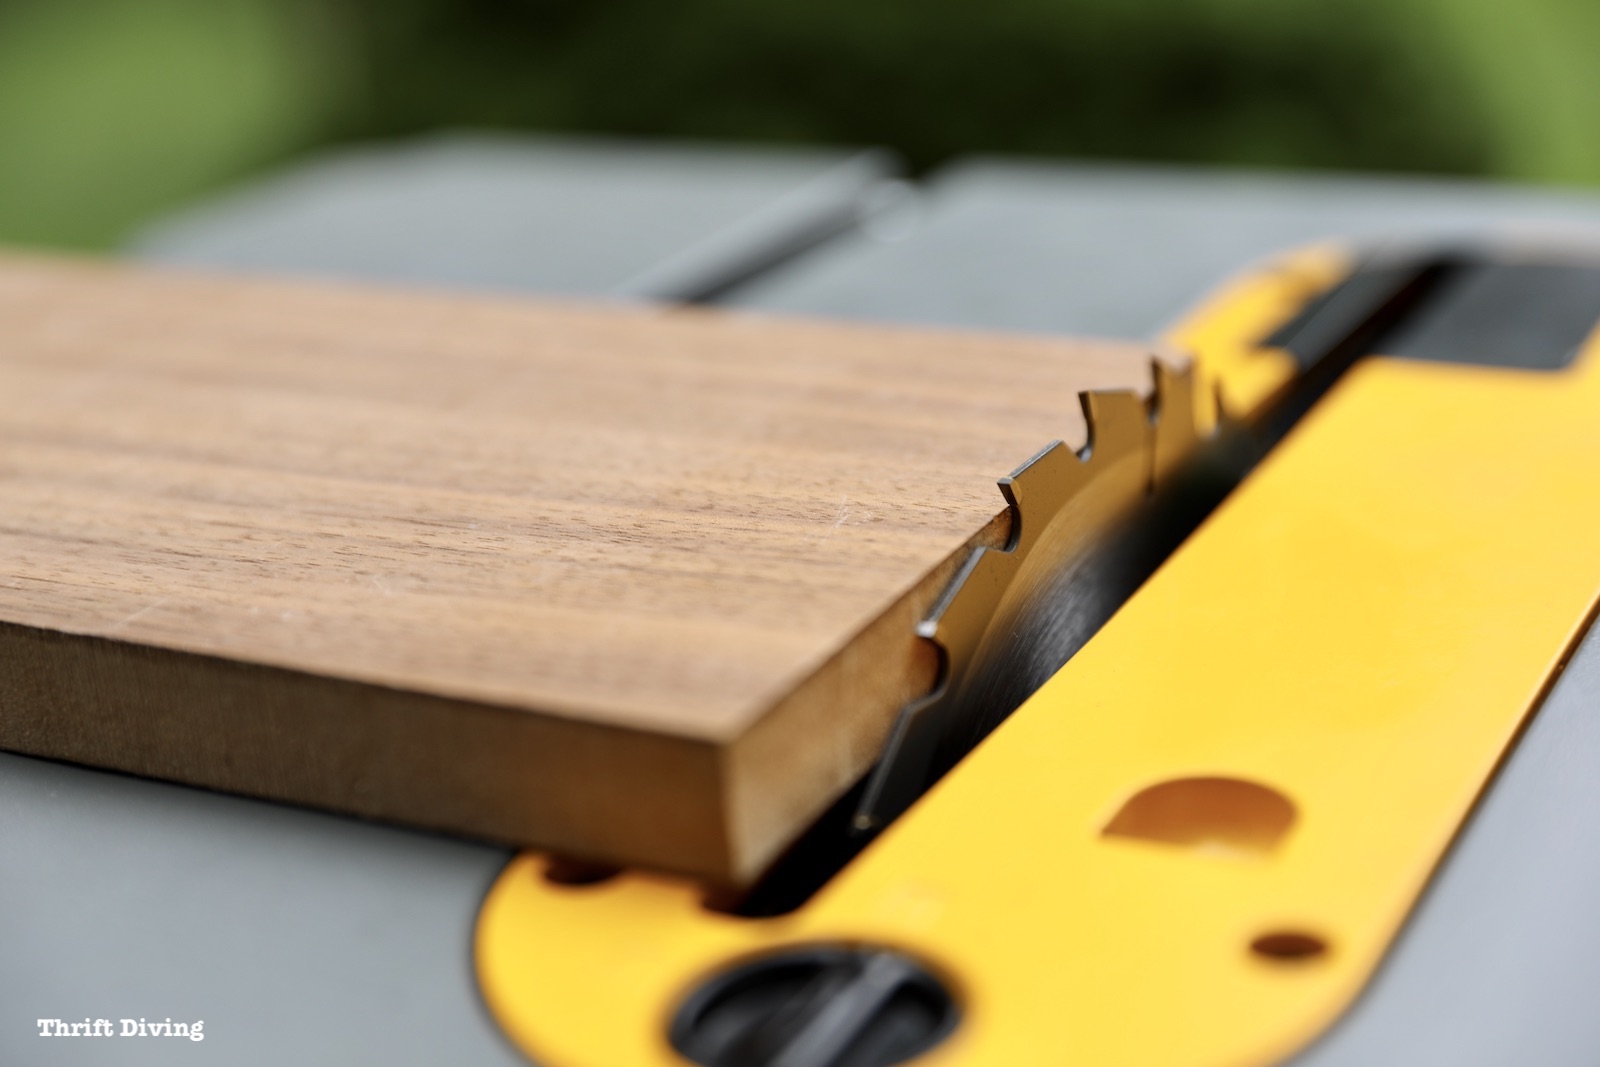
TIP #7: The Blade Should Be About 1/4″ Over the Top of Your Wood
To set the depth of the blade, most saws will have a wheel to raise and lower the blade.
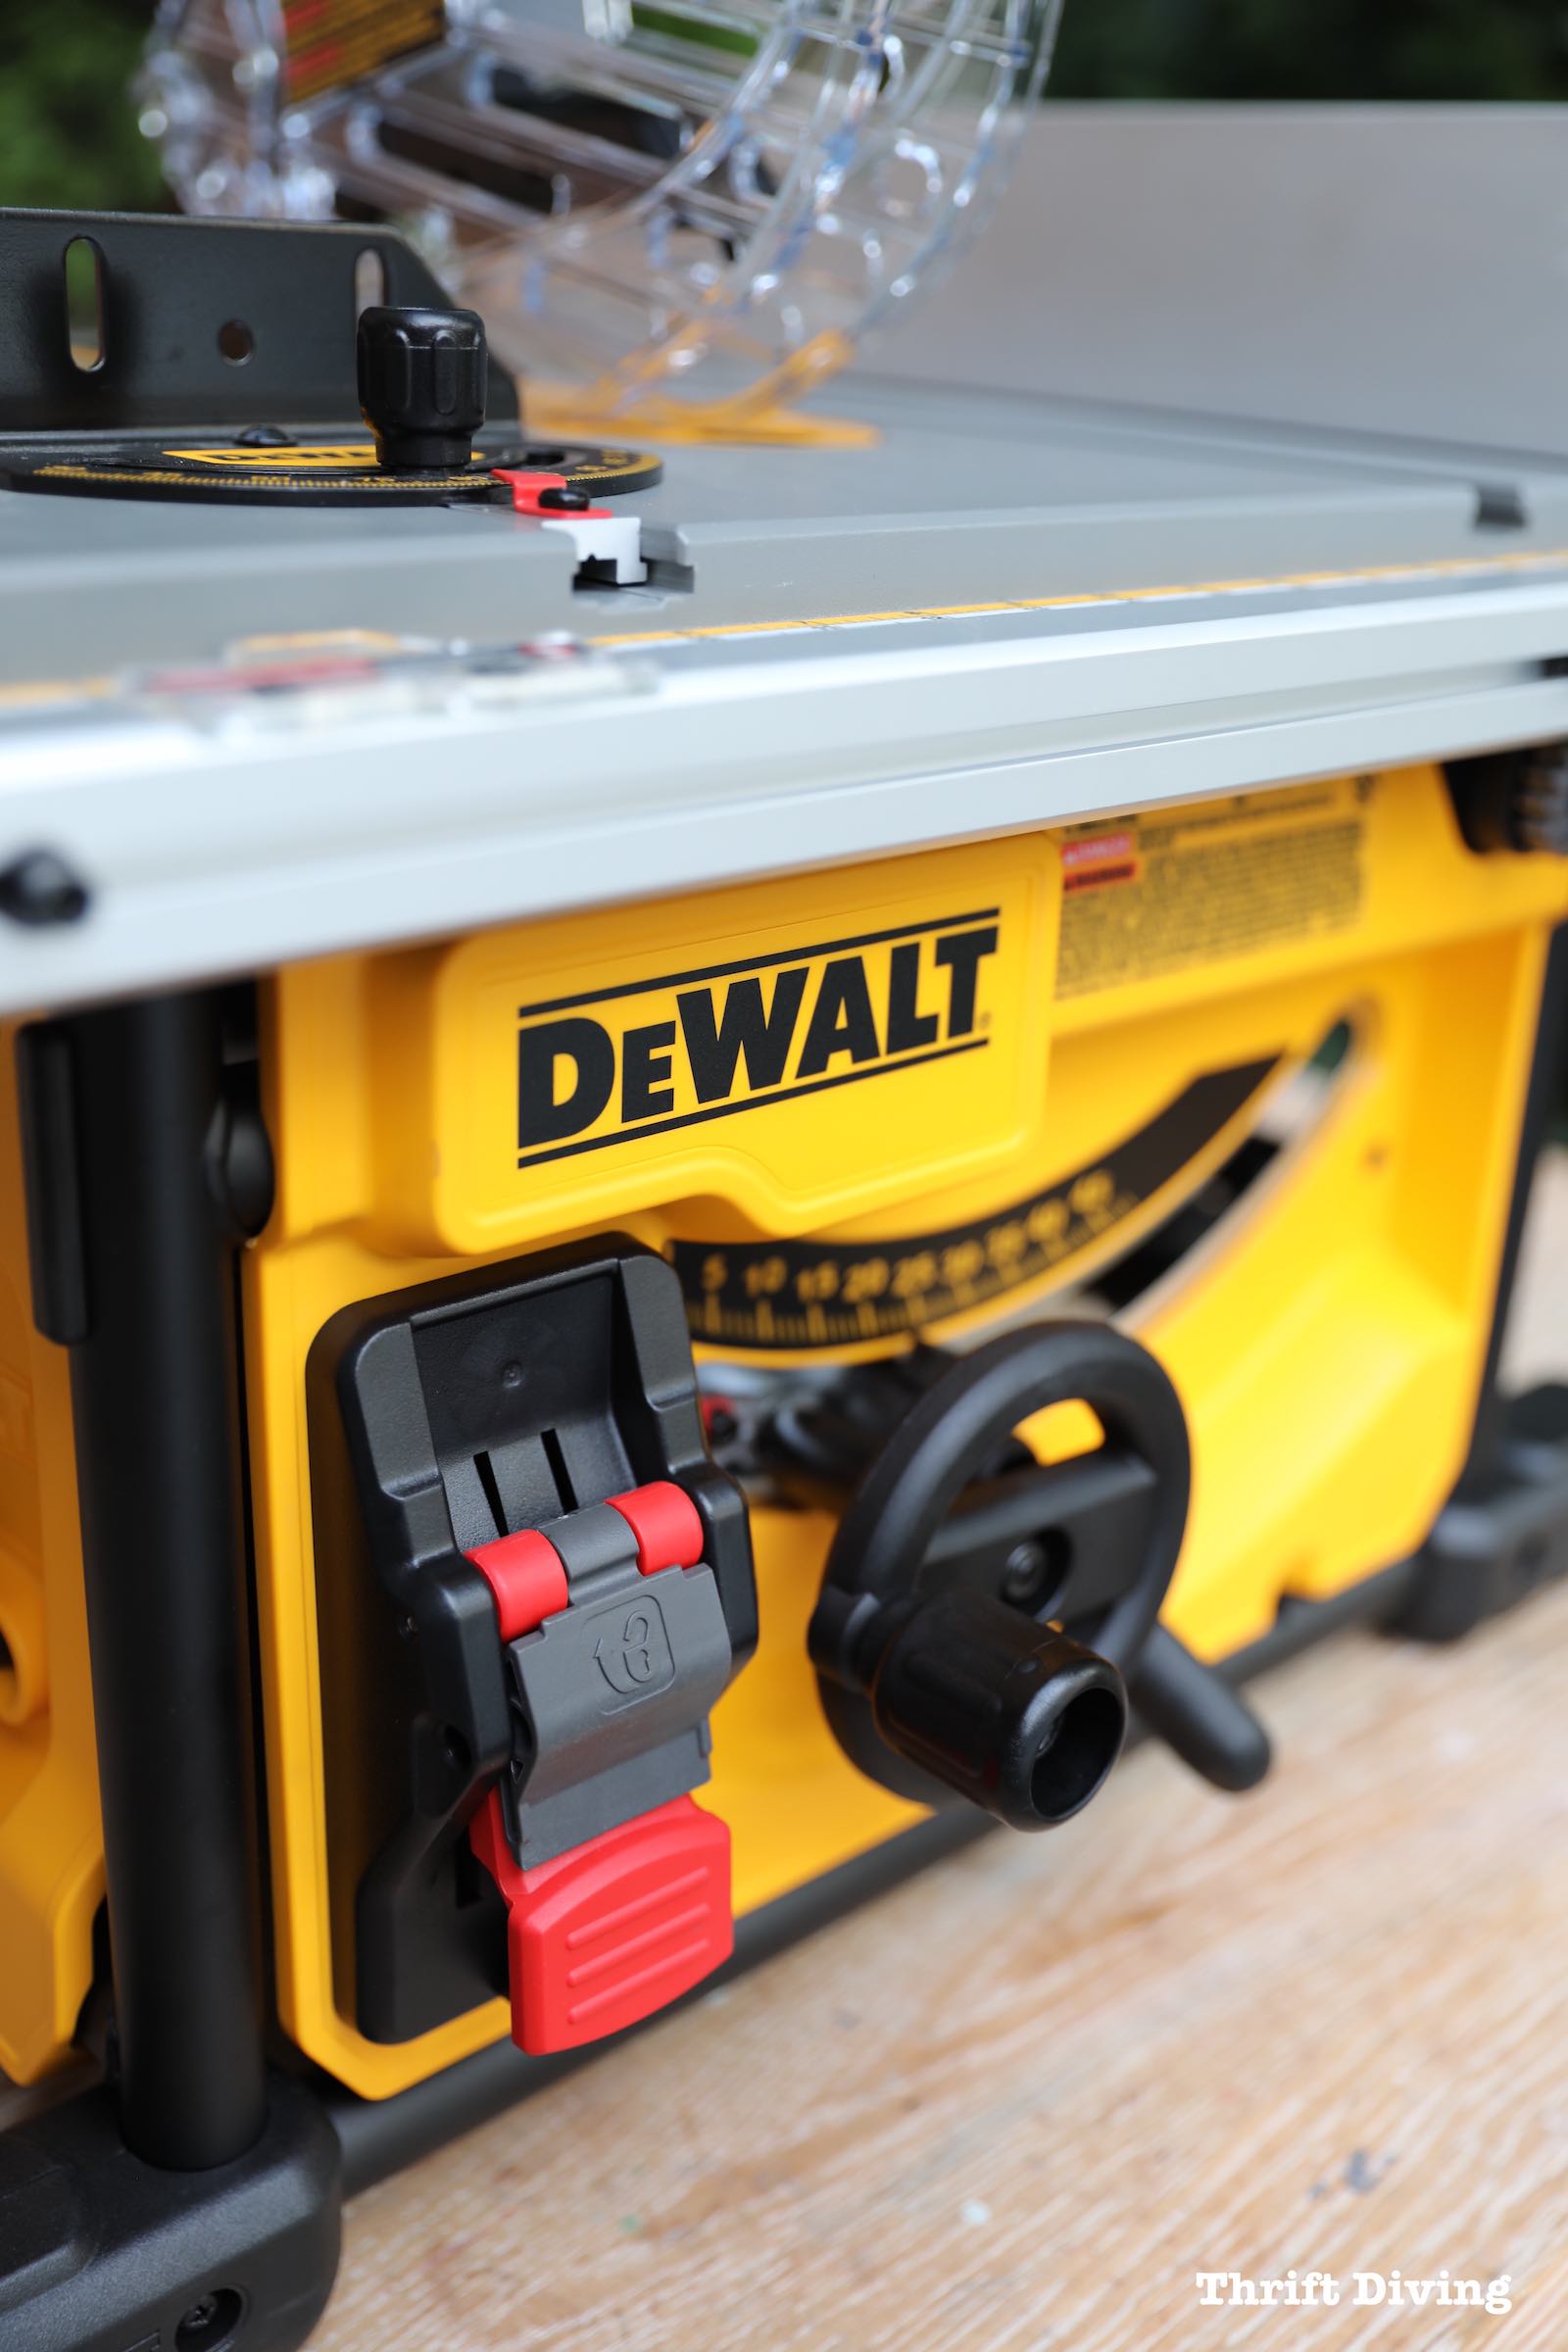
As with using a circular saw, the depth of the blade should be set so that the blade can cut through with just 1/4″ more blade extending over your wood.
TIP #8: Keep Your Eyes on the Position of the Board, Not on the Cut
When using tools, it’s natural to want to watch the cut, to make sure that it’s straight. But when using a table saw, one of the most important tips I learned is to keep your eyes on the position of the board against the rip fence when ripping a board. You don’t want to see any gaps or space, which means you’re not keeping the board straight or the fence is crooked.
The rip fence needs to be parallel with the blade. Tom Silva from This Old House gives some good tips on how to actually check that your rip fence is parallel to the blade (by using a tape measure) so you can ensure that your rip fence is parallel.
This is also a good time to mention that a table saw is never meant to cut rough sawn wood. It needs to be flat against the table and have a flat, straight edge against the fence (such as a factory edge). It shouldn’t have a bow or a cup. You might have to use a planer first to remove any rough edges. This will ensure that it will always ride smoothly and straight on the rip fence.
TIP #9: Use the Rip Fence for Any Board that’s Longer Than It Is Wide
The rip fence is for the long edges of boards to rest upon when cutting the grain of wood. Never use the rip fence for the short, narrow edge of a board, while leaving the longer part to dangle in front of the blade. There’s too much wiggle (read: not enough support), which could cause kickback.
5 Extra Quick Tips
Here are a few quick tips that are just as helpful, straight and to the point:
- Never remove wood until the blade stops spinning. Always let the blade thoroughly stop before removing wood or waste pieces.
- Always stand out of the way. Never stand in the direct path of the blade. Stand to the the left of the blade when making cuts, to lower your risk of being struct if there were kickback.
- Keep your hands away from the blade. Common sense, yes, but always plan to keep your fingers at least 6″ away from the blade.
- Don’t be distracted, tired, or rushed. Mistakes are more likely to happen when your head is not in the game.
- Trust your gut! If something feels off or dangerous, listen to your gut. That voice is there for a reason.
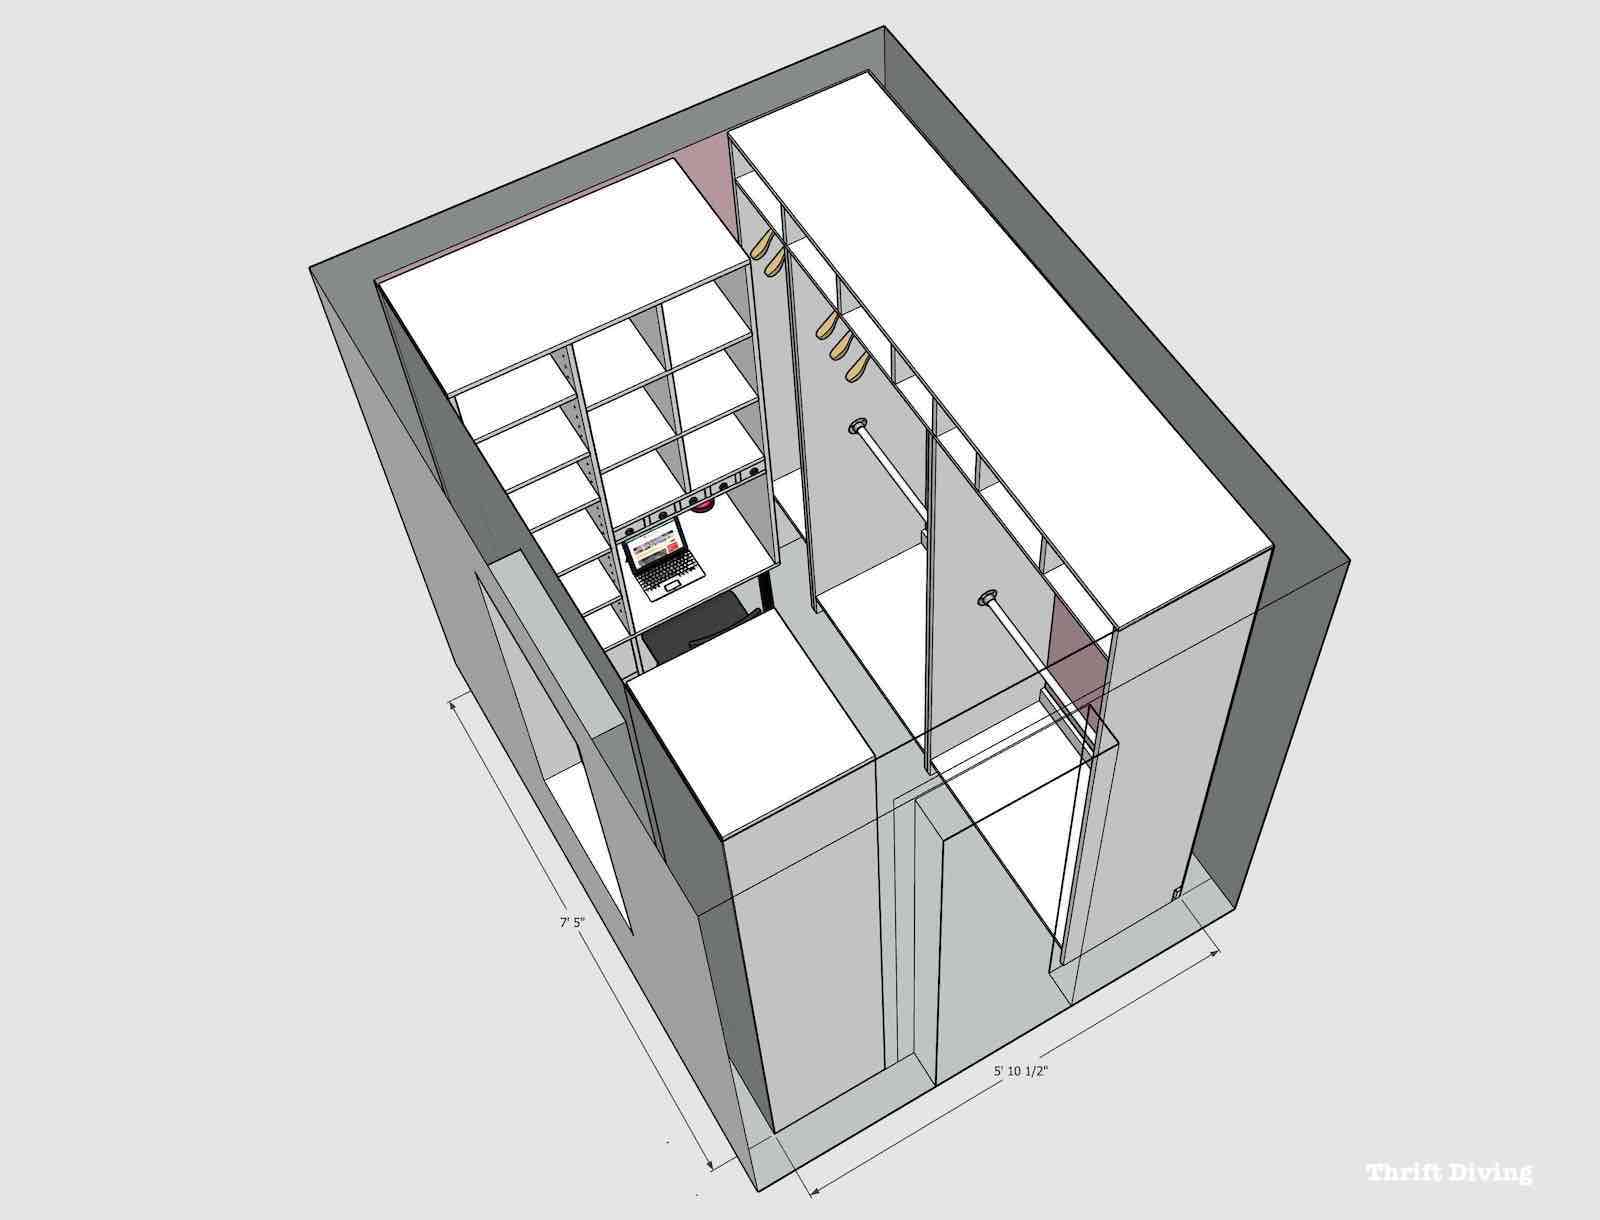
I’m sure there are a ton of other tips to include here, but these were the most important ones I could round up. I’ll be honest when I saw that I’m eager about getting started with this compact sized table saw, but also very nervous about making stupid errors. I’ll be taking the next week to get acquainted with the saw so that this month I can build the awesome walk-in closet organizer I drafted up in Sketchup!
Having a table saw to be able to accurately build the components is going to make this closet build a breeze!
If you’re interested in finding out more about this DeWalt Compact Jobsite Table Saw, you can find it at The Home Depot or online at HomeDepot.com.
If you enjoyed these tips, click here to SAVE it on Pinterest!
![]()

Download the 5 freebies!

Thrift Diving inspires women to decorate, improve, and maintain their home themselves...using paint, power tools, and thrift stores! Use these 5 printables, checklists, and ebooks to get started!