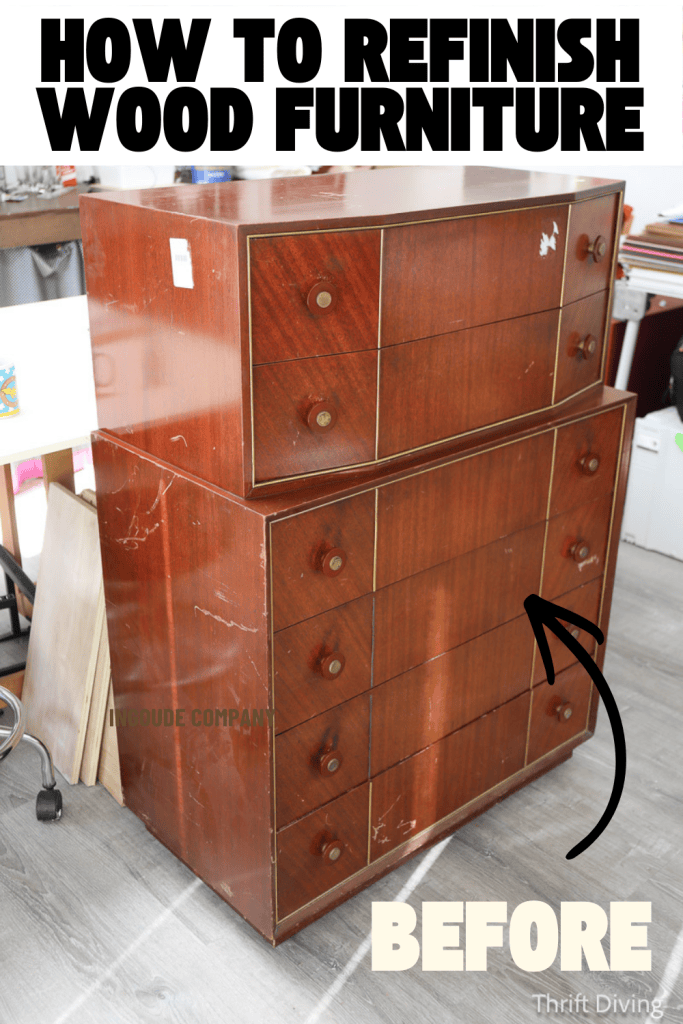
How to Refinish Wood Furniture: BEFORE & AFTER!
I’ve been refinishing wood furniture for about 1/3 of my life. (Actually, I started by painting everything first–ugh….I regret being so heavy-handed about furniture paint, but I digress).
But if I count refinish projects I did before this here “Thrift Diving” was even a thing, you could include the middle third of my life, too.
This mid-century modern dresser refinishing is the latest in a gallery of projects that, I’m sure when I’m 75 years old, I’ll look back on and think, I can’t believe I restored that!
But I almost walked away from this dresser when I saw it!
Click here to SAVE this post on Pinterest!
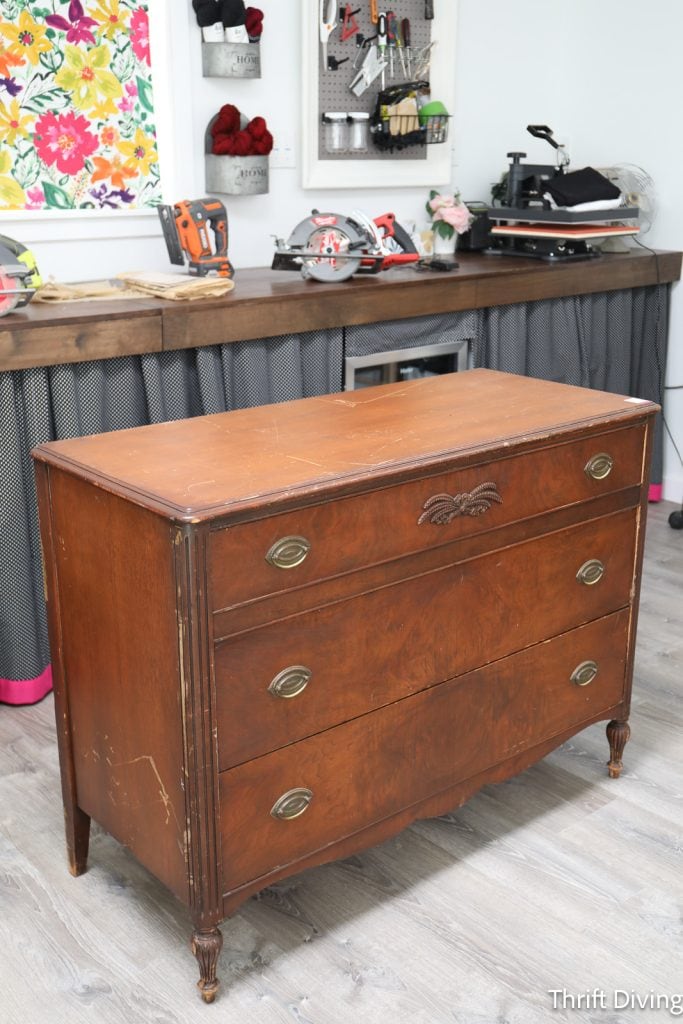
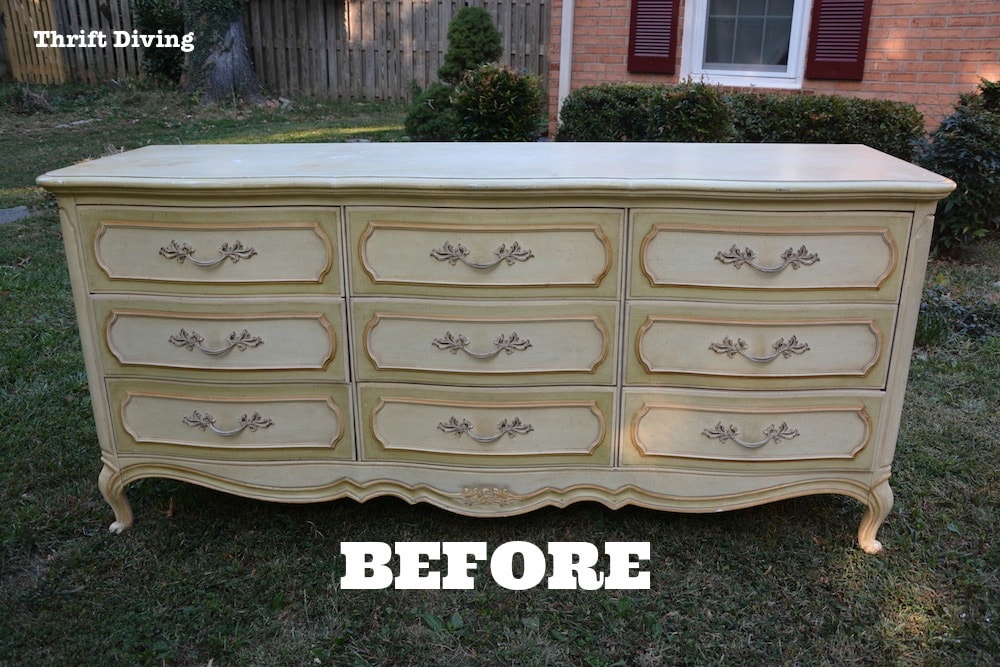
BEFORE
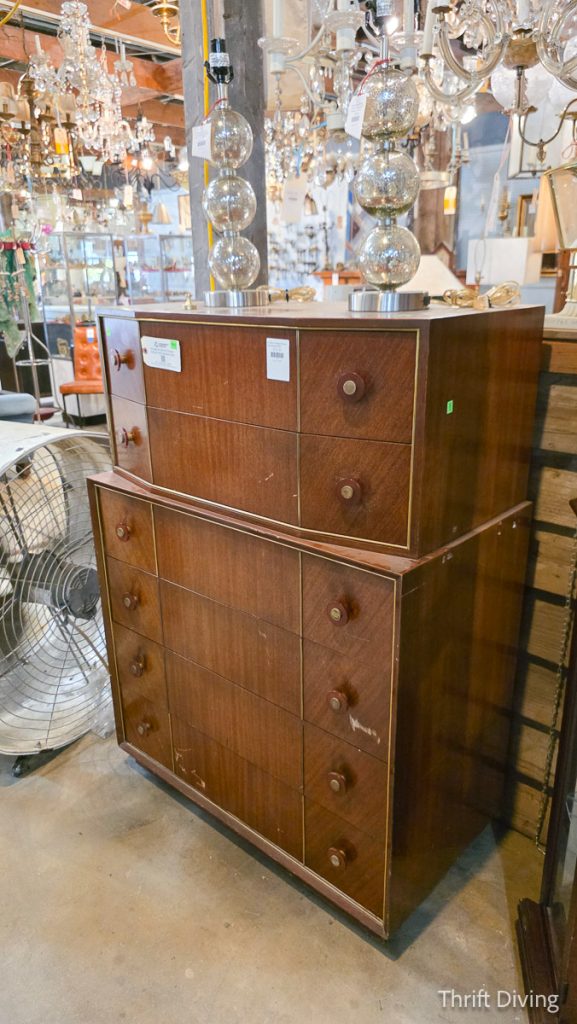
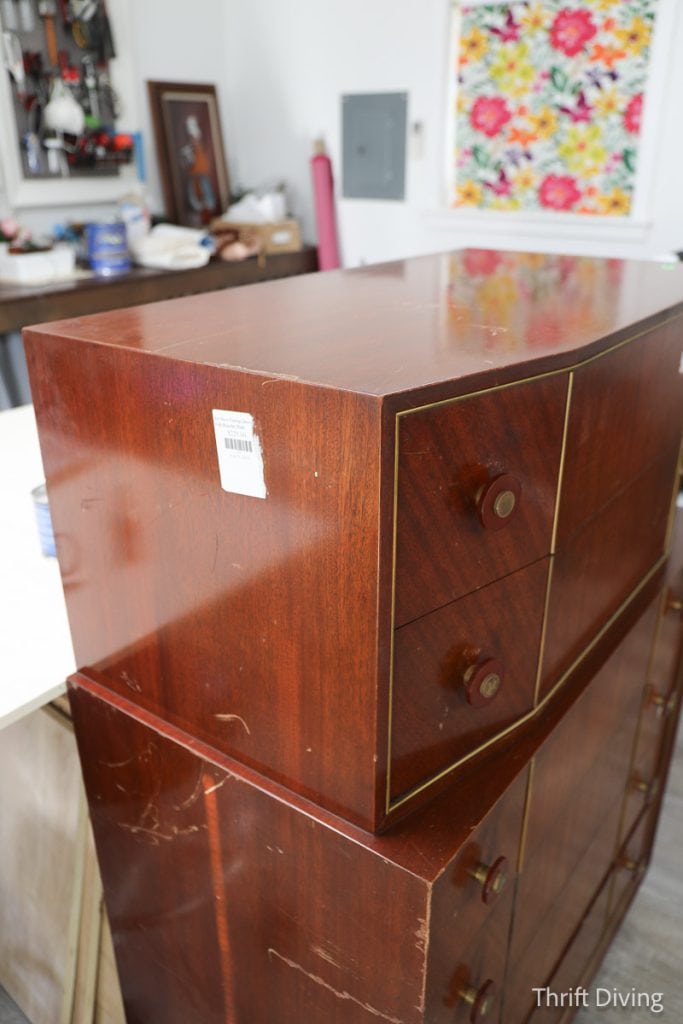
In fact, I saw this stunning mid-century modern dresser on their website about a week before I stumbled upon it at Community Forklift, the salvage shop that’s quite popular here in Maryland. Its angles and streamlined brass edging drew me in, but the price (at $275) repelled me from seriously considering it. I shuffled away, lingering nearby, trying to figure out how I could buy it.
If you know me and this blog, I don’t buy furniture for $275. That doesn’t feel like a deal, considering that I bought my thrifted dining room table for $12…my dresser for $60 (which felt steep at the time)…and the list goes on of amazing pieces I have scored and refinished or painted for my home.
That day, I had actually forgotten about the dresser as I made my way through the aisles of overpriced furniture, getting dopamine hits as I envisioned how I could transform each piece–if I had the time, space, muscle to lug them home (or deep pockets to afford my favorites).
And just like that–I stumbled into this beauty sitting there, just like this, with a price tag of $275.
I wanted her. I really did. She wasn’t in terrible condition, but she needed a good strip and stain. For $275, I couldn’t justify it, though. I shuffled away, lingering nearby, wondering how I could afford her.
As I was admiring these cute teacups, the manager sidled up to me, clearing his throat, coyly trying to get my attention, asking me if I liked the teacups. “Why, yes….I do….but let me show you the dresser that I like even more….and can I buy it for $175 instead?” Thankfully, he said yes!

Lesson learned: always ask for a discount! You never know if they’re just being nice…if they need to get rid of it quickly for new inventory…or whatever the reason! But I was thankful that day, as you can see in the YouTube video I captured!
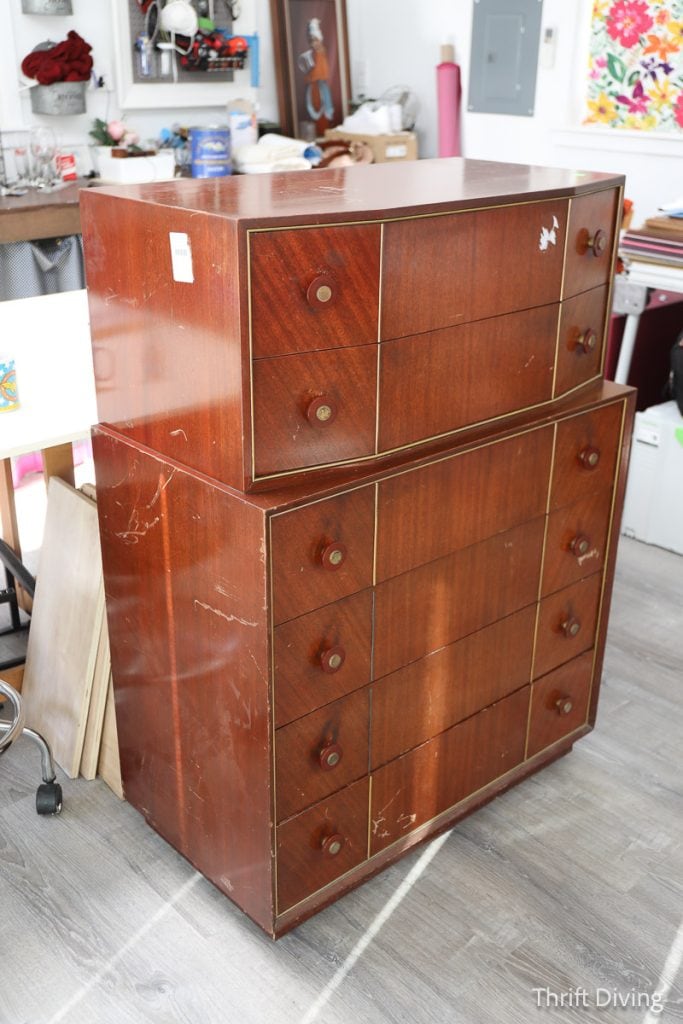
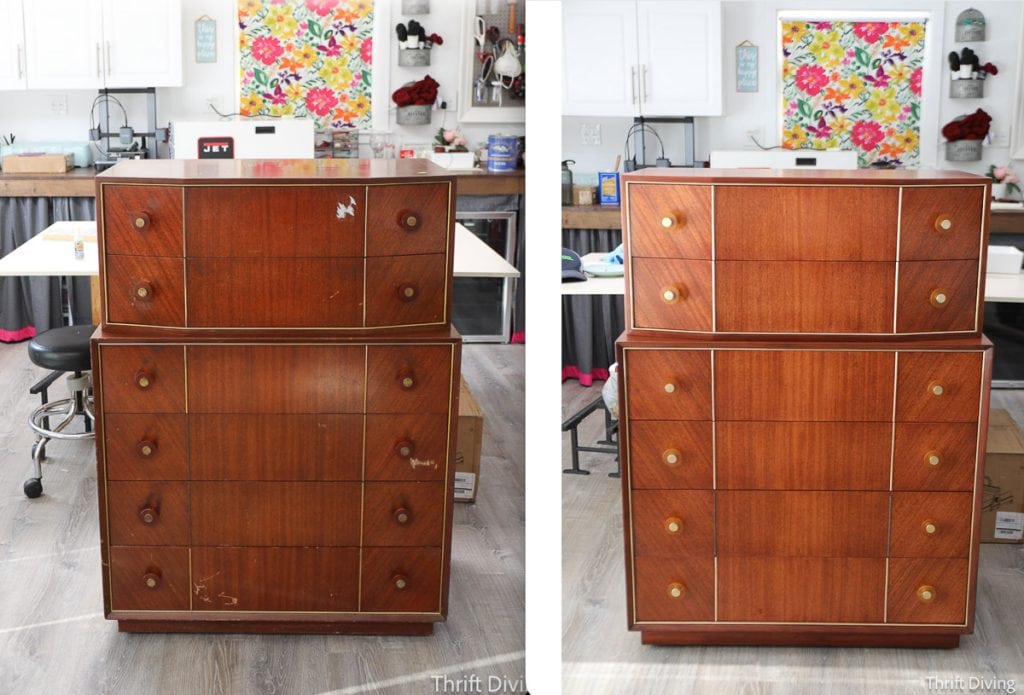
That was 4 months ago, and I’m happy to say that it didn’t take 2-3 years of crowding my garage before I got my hands on it. I lugged it into my “she shed” and vowed to get it done so that my oldest son could finally have a place to store his clothes (he’d outgrown his smaller dresser). Here’s what the dresser looked like BEFORE and AFTER!
BEFORE!
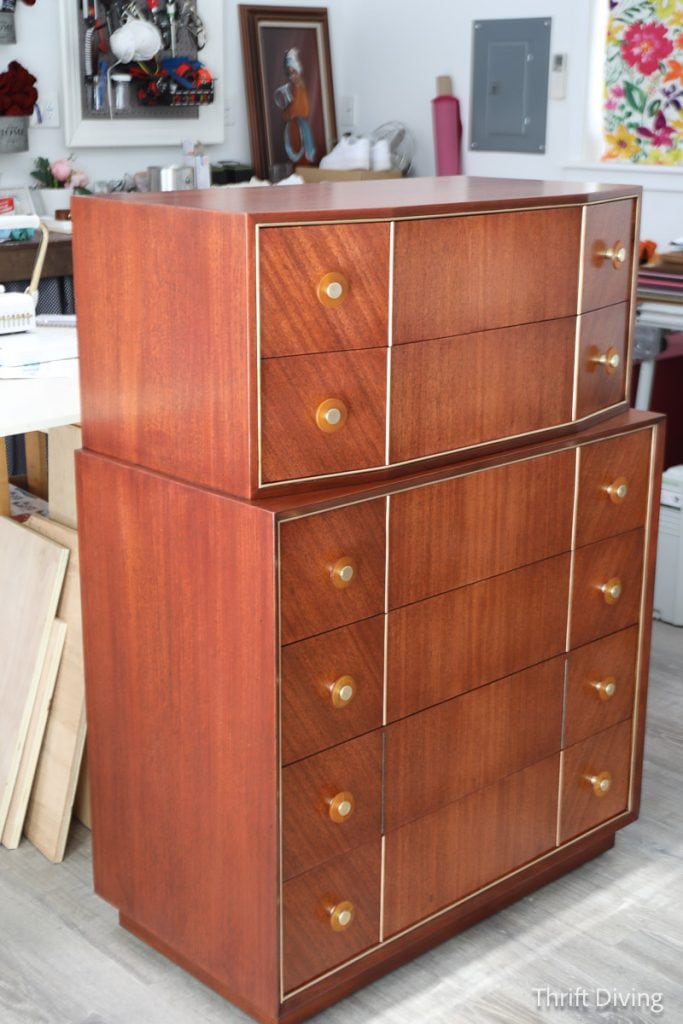
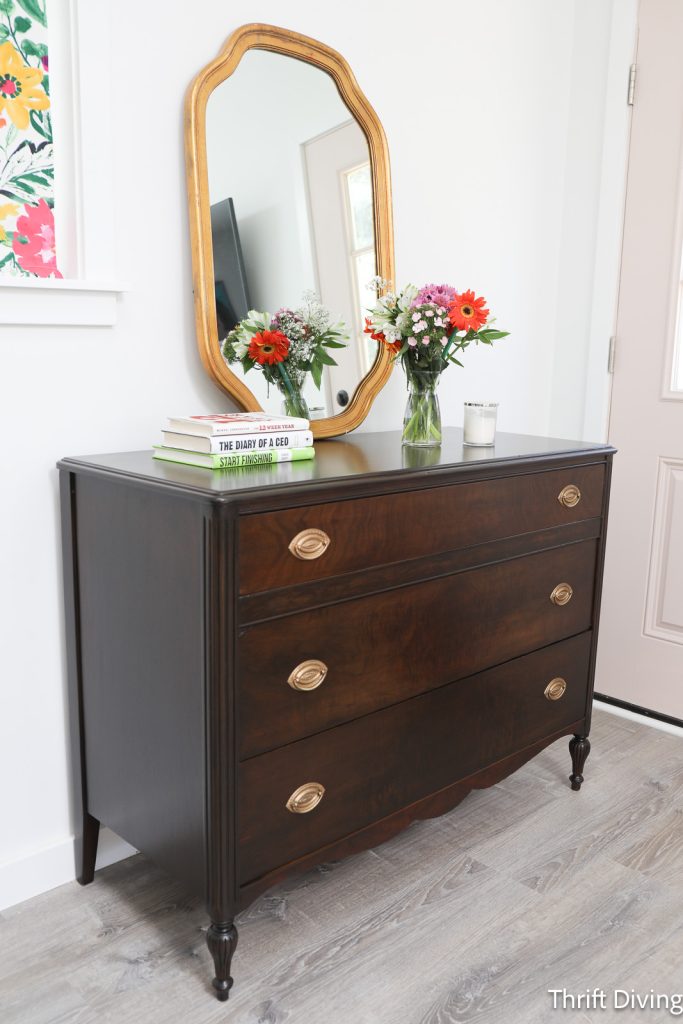
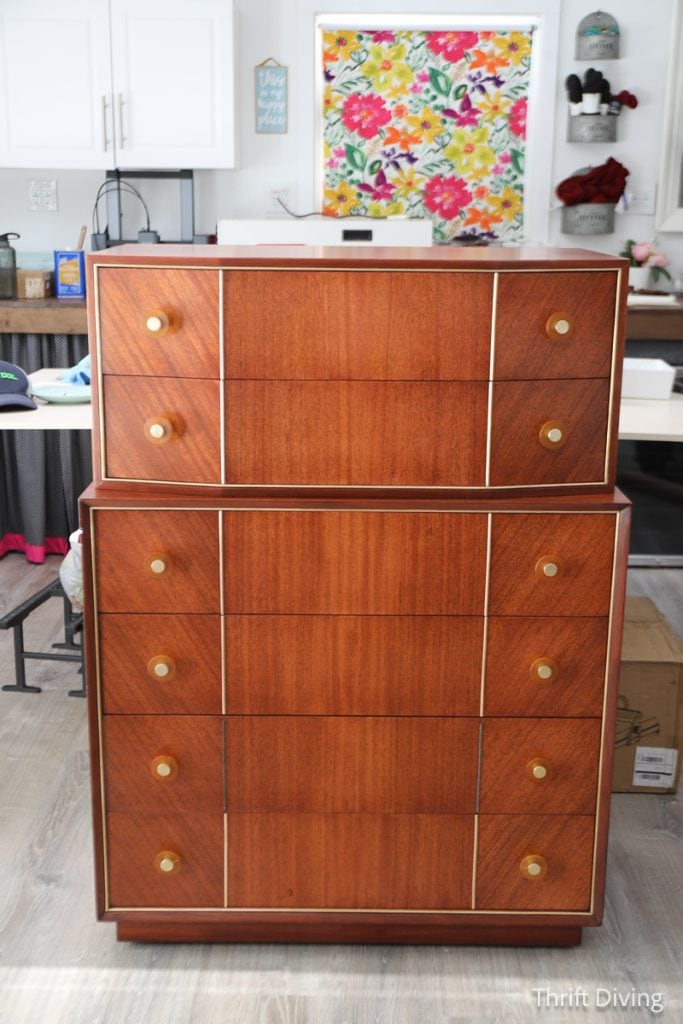
AFTER!
I get that stripping and staining dressers and other wood furniture isn’t as “exciting” as painting it. When you see the dresser in the pictures above, there doesn’t seem to be that much difference between the two pictures, does there? It just looks like a “cleaned up” version of the same dresser.
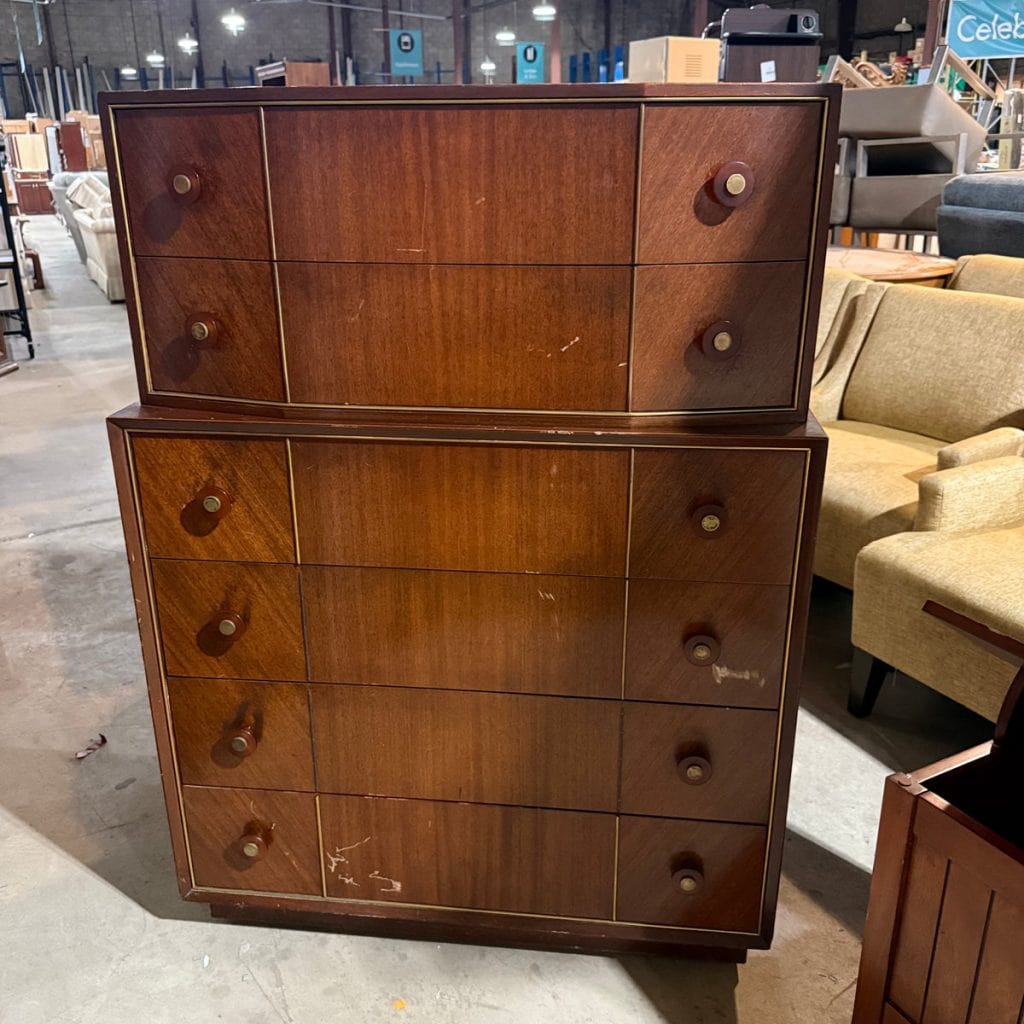
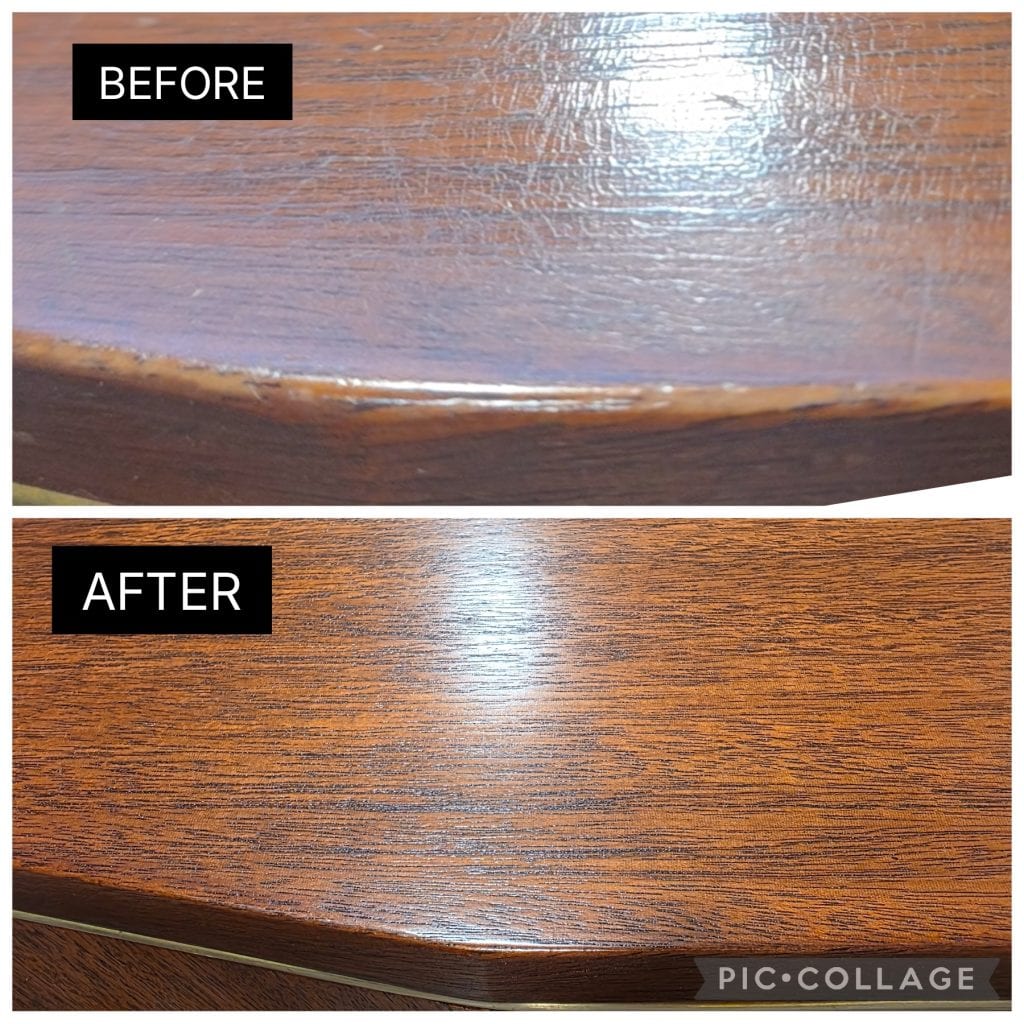
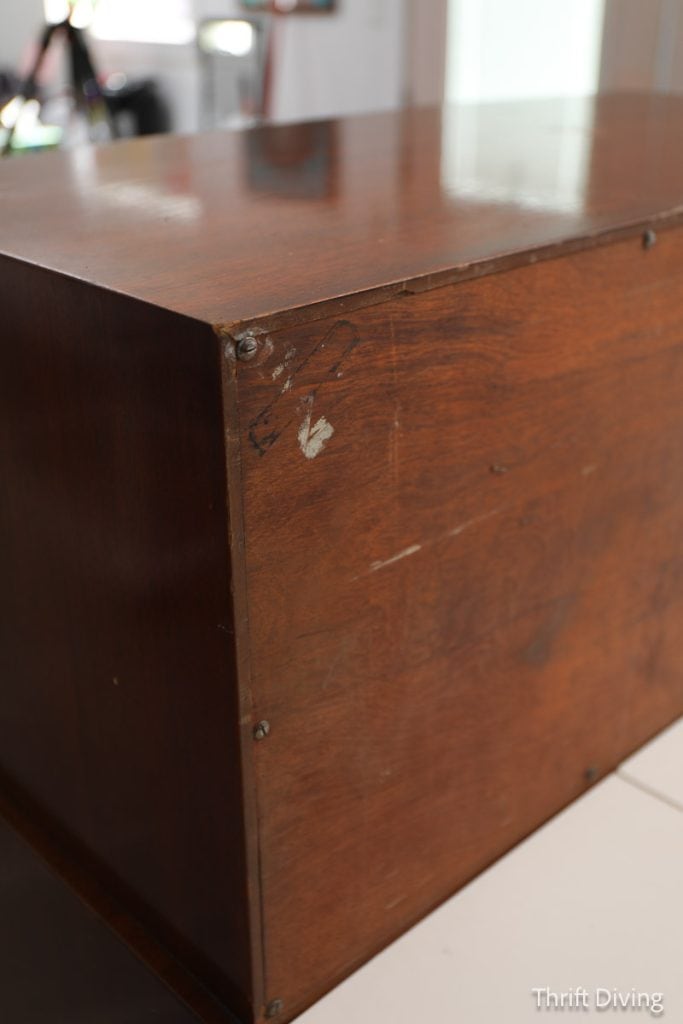
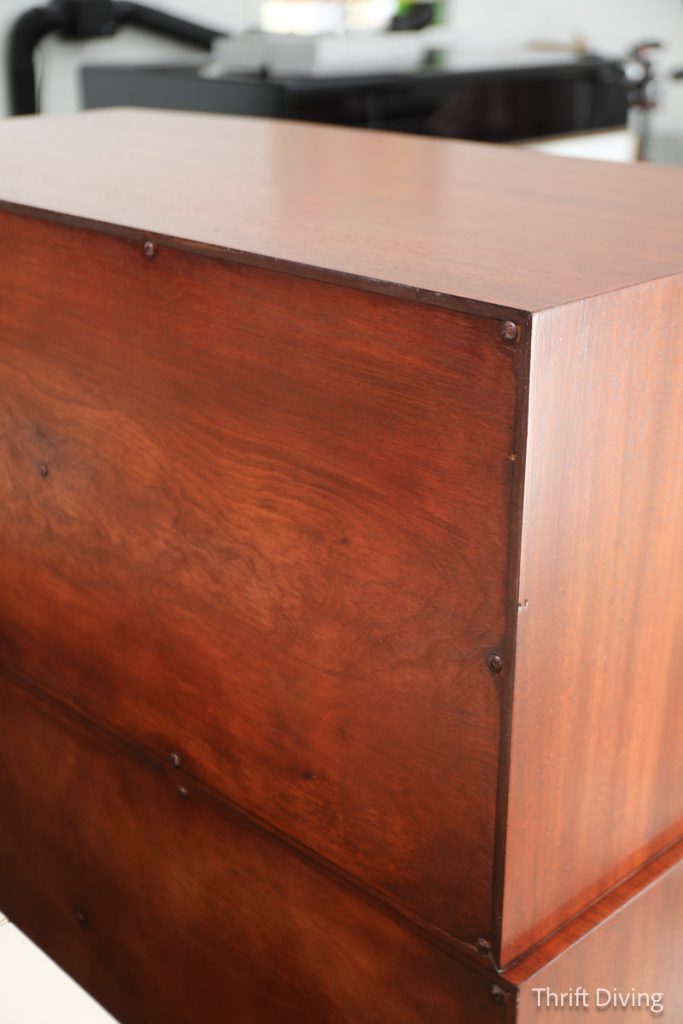
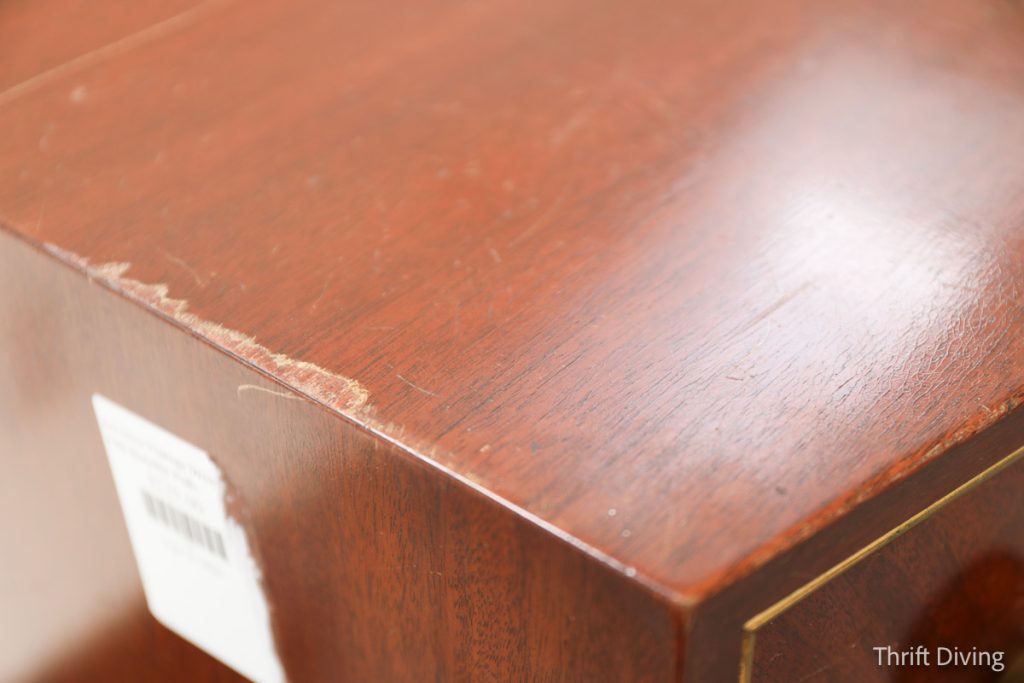
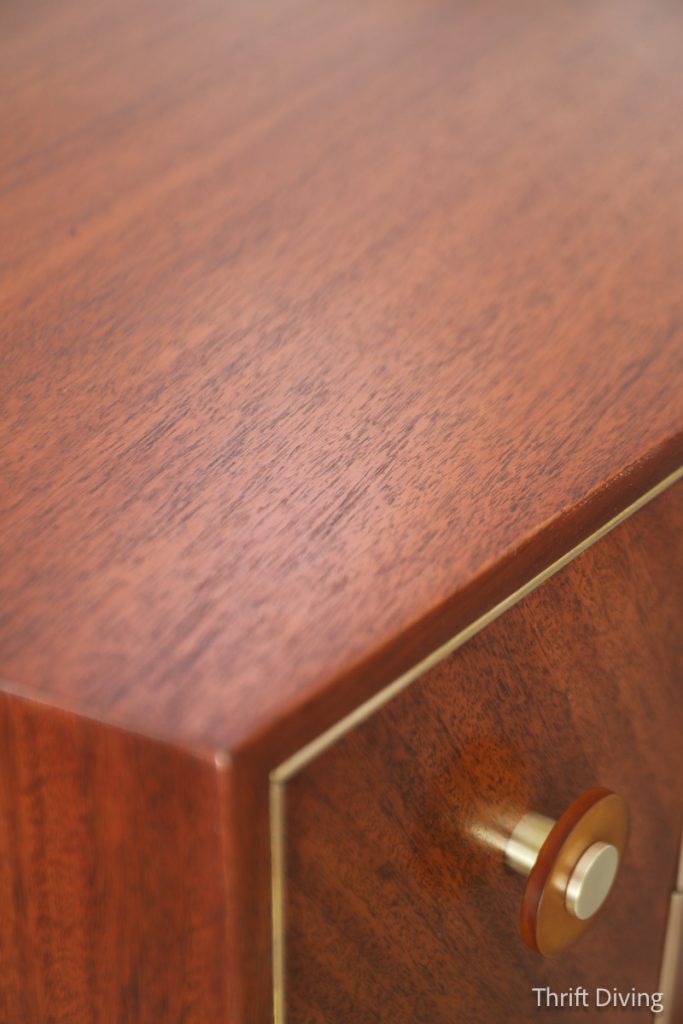
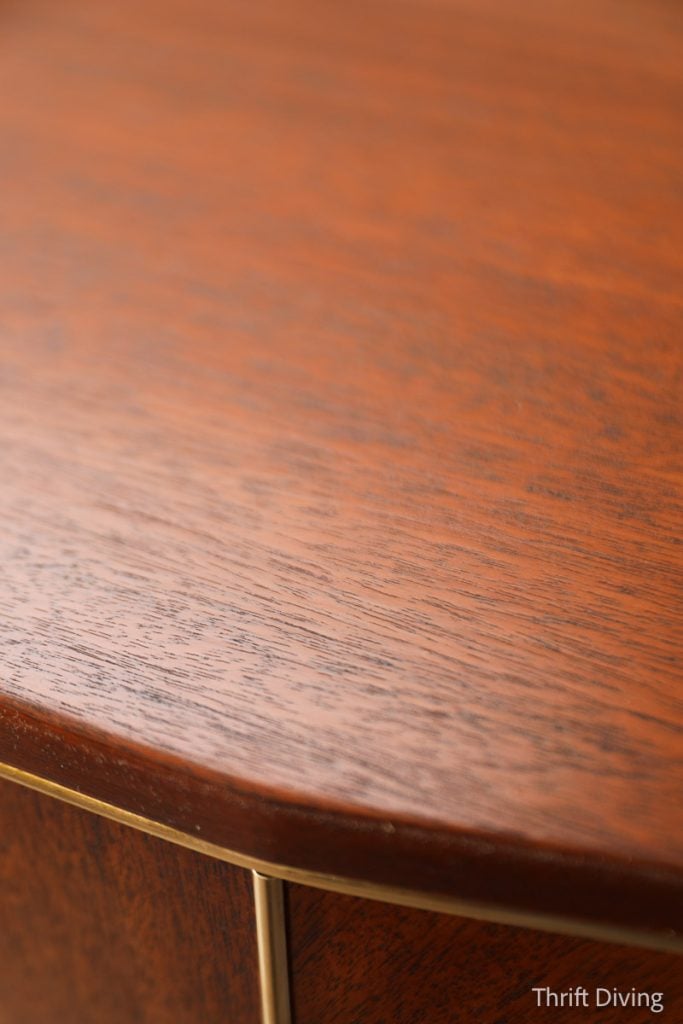
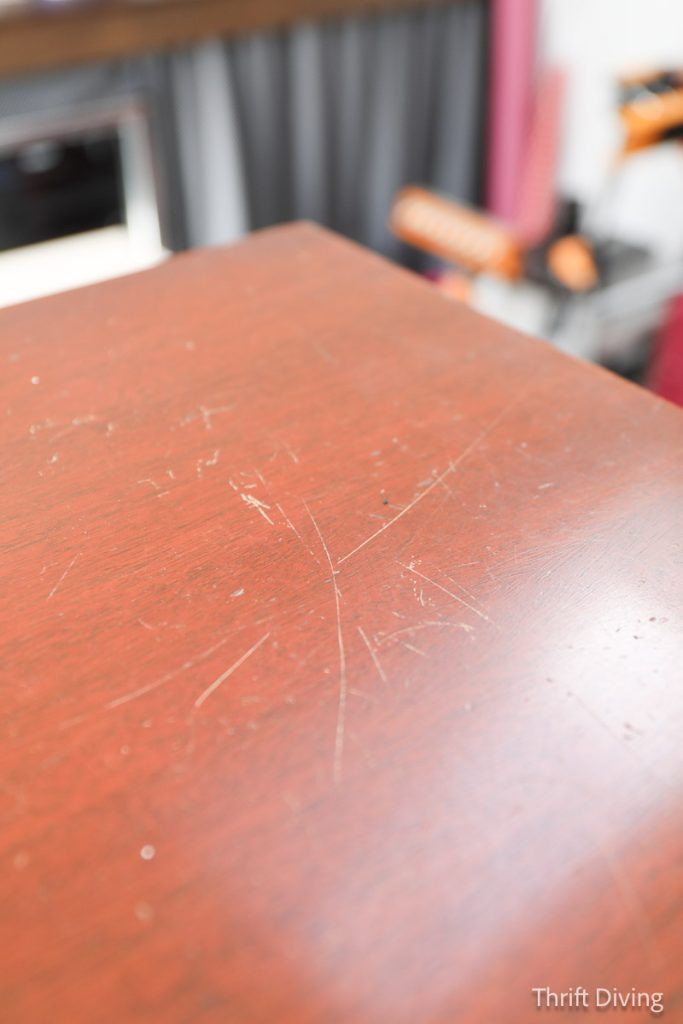
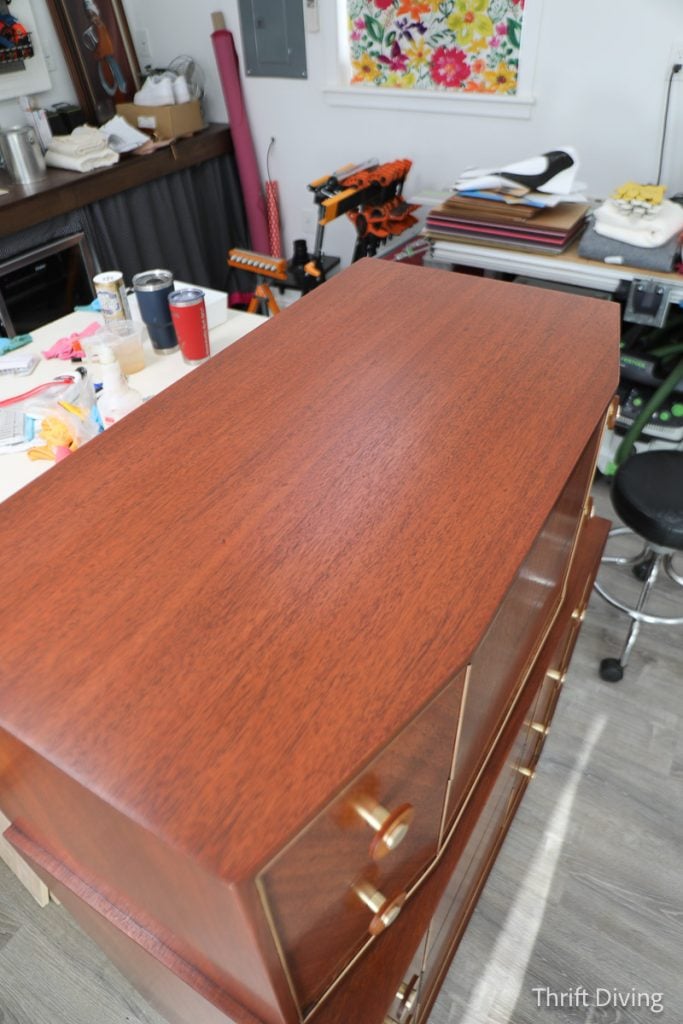
But this picture of my mid-century modern dresser, below, tells a detailed story of what a successful strip and re-stain looks like, close-up. In the “BEFORE,” the old finish was cracked and weathered, with scratches all over her. But in the “AFTER,” the finish looks smooth, brand new, and gorgeous! Doesn’t it look fabulous?!
BEFORE
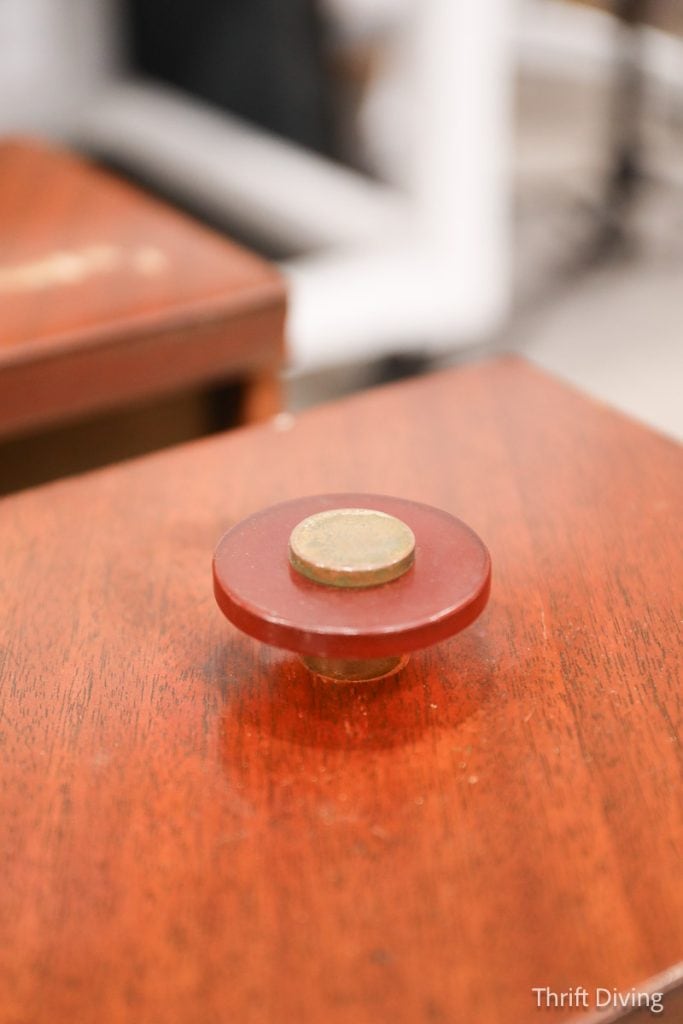
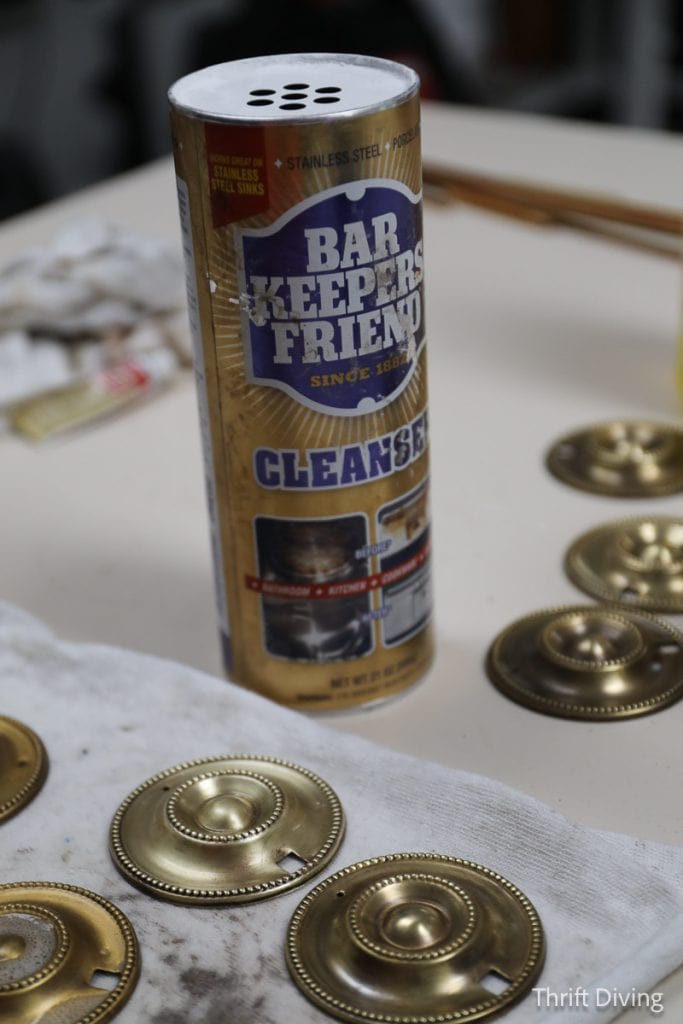
Despite the scratches and the cracked finish, the dresser wasn’t in terrible condition at all. One thing that wasn’t very clear, literally and figuratively, were the drawer knobs. They were a dark orange amber color, but what I didn’t know until I began cleaning them, is that they were just aged, dirty, and worn.
AFTER!
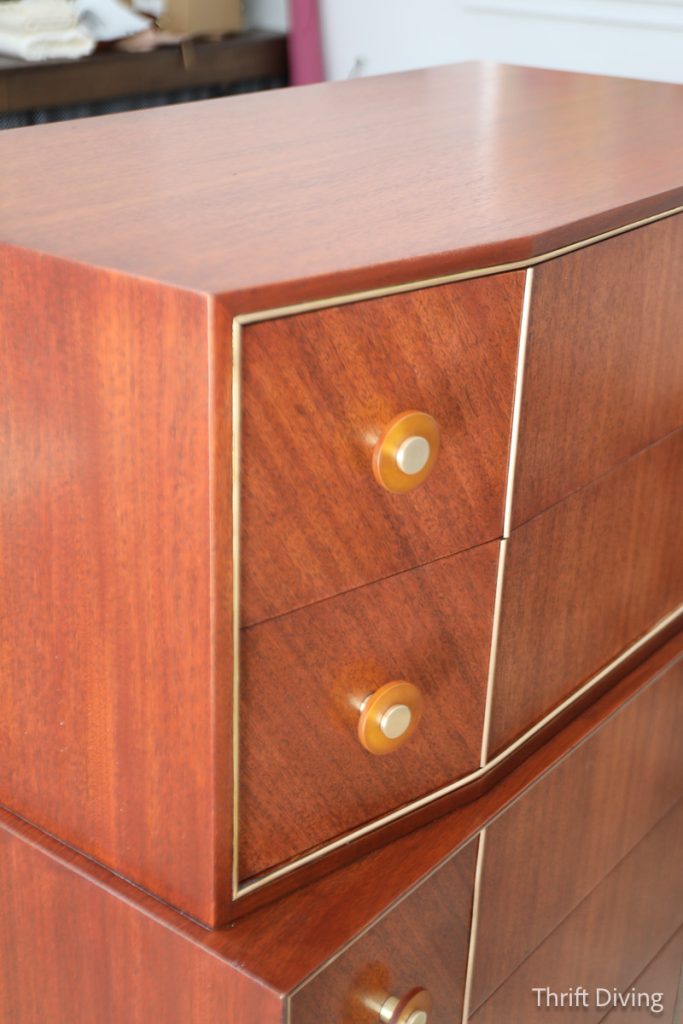
Once cleaned up, the knobs were a brighter orange, and the brass centers of the knobs were gorgeous! I also cleaned up the brass edging that lined the body and drawers.
So let’s go through the exact steps I did to restore this mid-century modern dresser, so if you find a dresser that you love, you know exactly how to breathe new life back into it!
Tools & Materials: How to Refinish Wood Furniture
You know, I’ve stripped and re-stained a bunch of dressers in all these years of doing furniture makeovers, but I finally feel like I’ve come to a good list and steps of how to do this right. This is the second dresser I have stripped and refinished in the past month (see my other son’s Federal dresser makeover here). Doing these two dressers back-to-back as allowed me to evaluate my tools, materials, and processes, so let’s first list what I used that worked best for these two dressers:
The following products are what I use to refinish wood furniture, including used when refinishing this mid-century modern dresser. I’ve included affiliate links, as well:
- QCS Finish Remover – Quick Clean Safe finish remover is my favorite, and allows me to strip safely in my “she shed.” It’s expensive, but when it comes to your health and being able to use it indoors, this is the way to go.
- Orbital sander – I use a Festool orbital sander, which is also expensive because it has a dust extraction
- Water-based or oil-based stain – I’ll share some tips with you below on which I prefer and why.
- General Finished High-Performance Top Coat – My ultimate favorite!
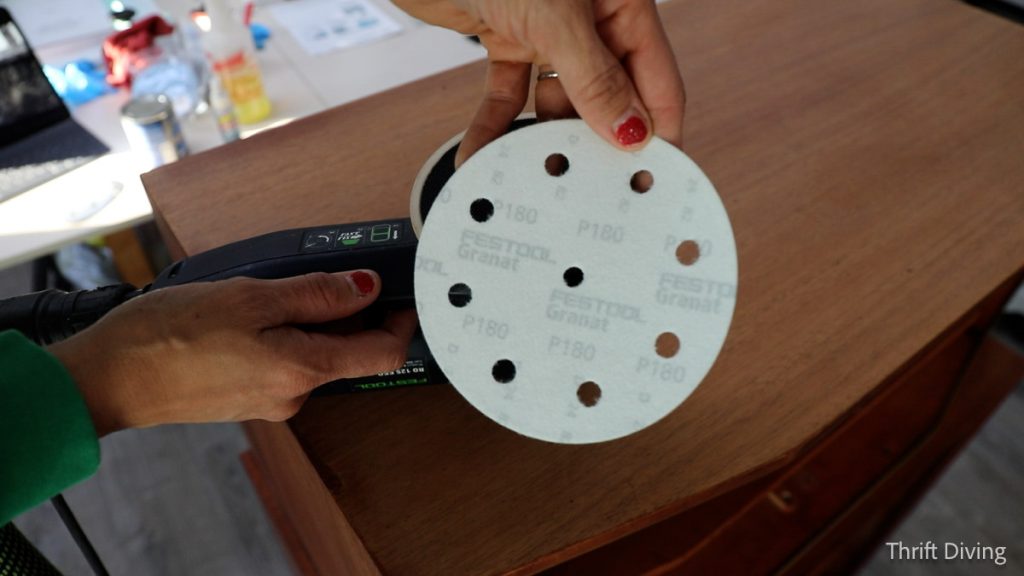
- Sanding discs – You’ll need the following grits: 180 (semi-rough) and 220 (fine)
- Sanding sheets – 320 grit (super fine)
- Flexible contour sanding grips – These are critical when sanding round edges of furniture!
- Small detail sanding block – These are perfect for corners and narrow flat edges along dressers
- 6″ putty knife – These are important for scraping the old finish off.
- Bucket or container
- Disposable gloves – You will go through many! 🙂
- Plastic sheeting or table cloth – Check Dollar Tree for cheap plastic table cloths to put under your dresser or furniture.
- Paint brush
- Dust mask
- Staining pads or lint-free clothes
- Sanding sealer and or a pre-conditioner
- Screw driver – For removing trim
- Hammer (optional, depending on your project)
- Ziploc plastic bag – For storing all your knobs, screws, etc. It’s easy to lose these!
- Stainless steel brushes – To get into the nooks and crannies when stripping.
- Steel wool 0000 – Very fine steel wool for cleaning up metal or brass hardware
- LA Awesome cleaner – I love, love, love this cleaner for applying to hardware and just let it soak off dirt and grime. It’s great for cleaning paint, brushes, oil-based stains, and everything in between!
- Barkeeper’s Friend – The very best for polishing metal hardware or brass, with the help of the steel wool.
- Microfiber towels – Absolutely love these for clean-up and general project stuff!
- Tack cloth – For removing all the dust before staining.
STEP 1: Strip….strip again…keep stripping until it’s clean!
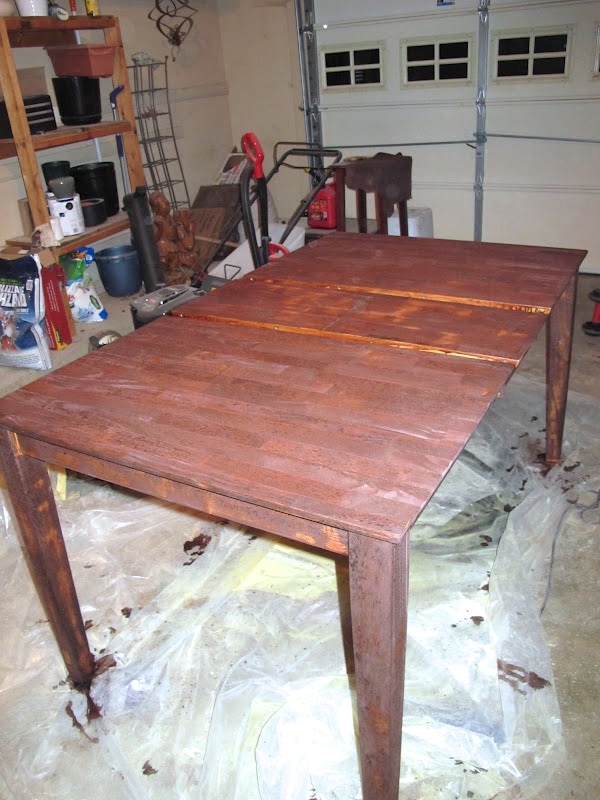
Years ago, I refinished my $12 dining room table in my garage. Mind you, this was the first thing I had ever stripped and tried to re-stain. Well, look closely–it turned out horrible! LOL. It was blotchy because I hadn’t done a good enough job of stripping or sanding. So when I applied stain, it only “took” in some areas, and other spots, you could tell I hadn’t fully removed the old finish. Well, this is what happens when you do that: a disaster. (Don’t worry, it ended up all coming out nicely in the end for my first attempt!)
With this mid-century modern dresser, it had all flat surfaces, so there weren’t any nooks and crannies that would have been challenging to strip and sand.
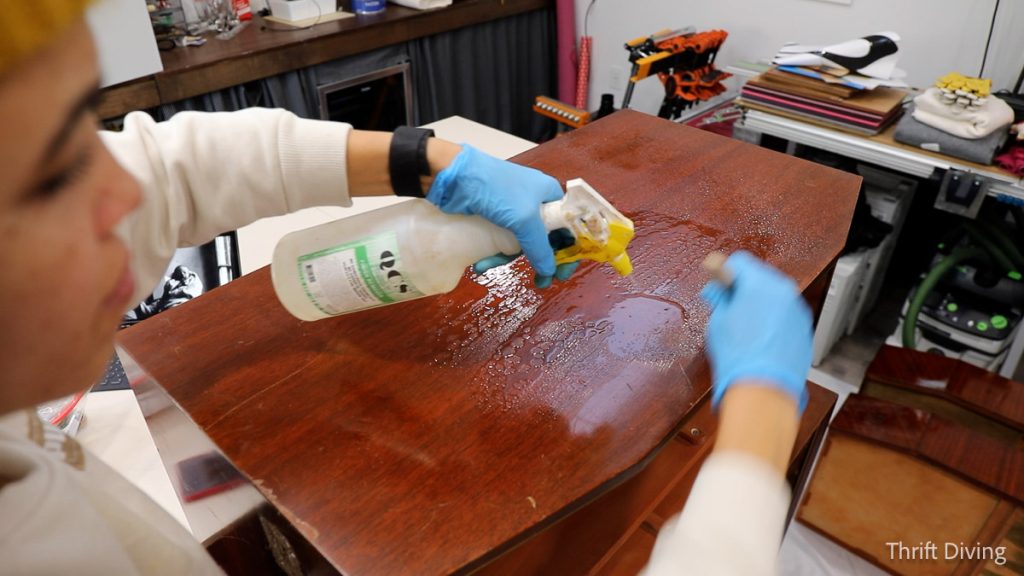
Here’s the key: You have to add finish remover multiple times. Don’t expect to get the old finish off with just one pass of finish remover. Here’s my process:
- Remove all the hardware (put it in a Ziploc plastic baggie so you don’t lose any pieces).
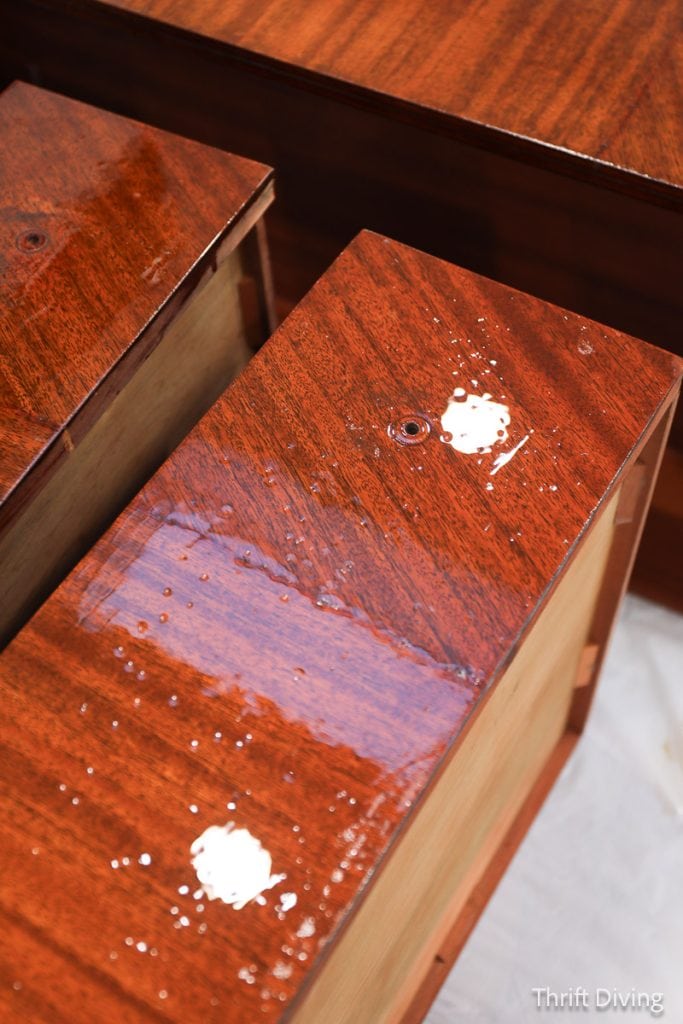
- Apply finish remover to strip off the old finish.
- Let it sit for 15 minutes or more. You should see it breaking up the old finish.
- Use the 6″ putty knife to gently scrape and remove the old finish. Be careful not to gouge the wood. Scrape the old finish into an old bucket with a trash bag inside of it to make clean-up easier. Old cardboard boxes work, but those can leak.
- Apply another coat of finish remover to the wood for a second round. Let it sit, then scrape off.
- Repeat this process until the finish remover is mostly watery and doesn’t have as much “gunk” coming off. This is when you know the furniture is “clean” and ready to move on the next step.
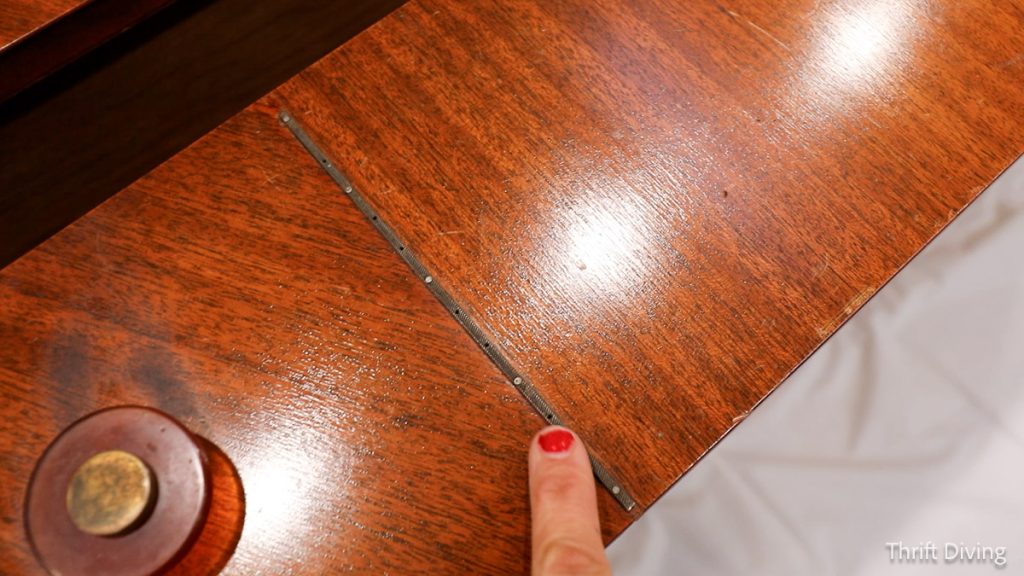
TIP: Make sure you remove all knobs and trim that is easy to come off. This mid-century modern dresser has brass decorative trim, with a metal track that was nailed in (see below). I was going to take the lazy route and just strip and sand around it, so I didn’t have to remove it.
But that would have been silly, because I wouldn’t have been able to strip or sand that close to such a detail. So I used a staple remover to gently lift it up. The nails were so tiny! Put all the hardware into a big ziplock baggie! Believe me, you don’t want to lose any of this stuff! LOL
A Couple of Things About Hardware When Refinishing Furniture
I have to say a few things about hardware, first, before we move on, because this was the point in this mid-century modern dresser restoration where I realized that a couple of these brass edgings were actually missing from the dresser. And I hadn’t even known it!

I was so excited about the dresser that I hadn’t realized that some of the hardware was actually missing when I found the dresser. I thought I had lost the hardware when I was transporting the dresser, which wasn’t the case.
I searched high and low on Etsy and other places to see if I could find the brass metal trim, and I could find square brass “channel,” but not “U brass channel.” Which means, when I refinished this dresser, a couple of drawers couldn’t properly be completed.
So my tips before you buy a dresser or a piece of furniture, especially if you’re planning to refinish and sell it:
- Make sure you have all the parts of the dresser.
- Check the hardware. Is it all there, or is one of the knobs or pulls missing or damaged?
- Will you need any pieces or parts to fix this dresser or furniture, and if so, can you easily locate a similar replacement part?
Thankfully, my son doesn’t mind having a couple pieces of brass “U” channel missing on the drawers. But if I had been planning to refinish this dresser and sell it, I would have had to sell it with pieces missing! Not a good look. LOL

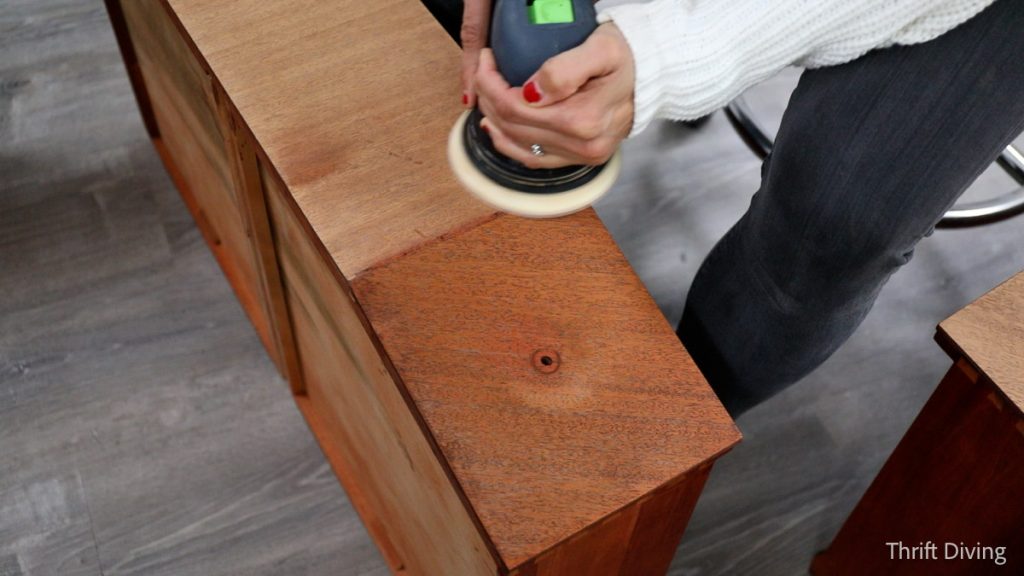
STEP 2: Sand With an Orbital Sander
I adore my orbital sander. It’s from Festool, which is an expensive German brand. But I didn’t start out with a Festool orbital sander. I had me a basic RYOBI sander that got the job done quite nicely. What it was missing, though, was a vacuum to suck up the dust, which meant that all my sanding had to be done outdoors. I also loved my DeWalt corded orbital sander because it has variable speed. But again, I didn’t have a vacuum, so I had to sand outdoors, with a mask. And you should, too, so you don’t pollute your lungs or your indoor air quality.

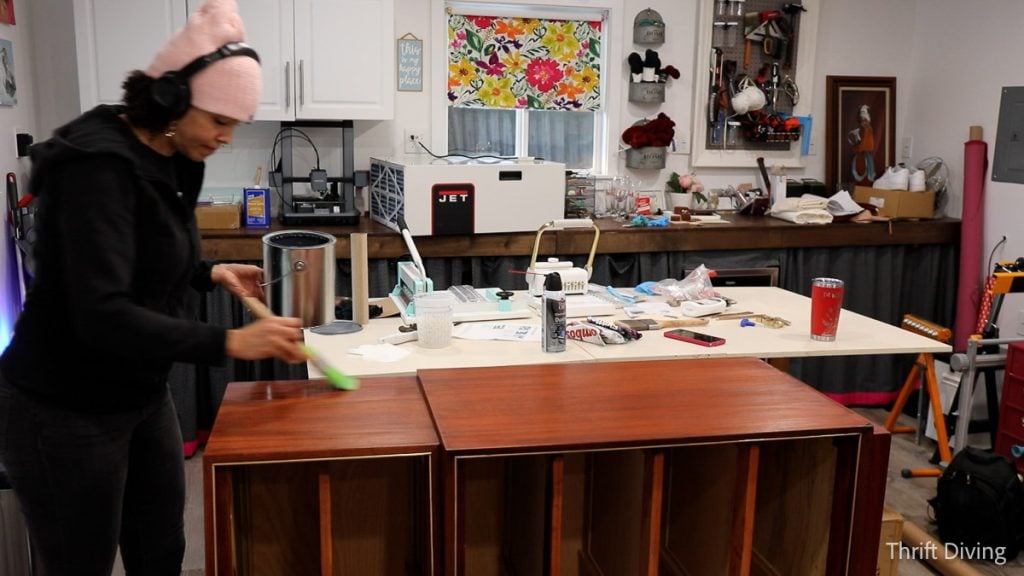
Now I use my Festool 150 Rotex orbital sander because it connects to my Festool dust extractor which virtually sucks up everything without putting fine particles of dust in the air. I feel I should tell you that, because when you see me sanding indoors, that’s the reason why I can–because of the Festool. I also turn on my JET air filtration so if there are tiny particles floating around, they’re removed.
Otherwise, you should be sanding outdoors! The dust you’re sanding off is very toxic. I’ve got a little air quality monitor that sits on my desk here in my “she shed” and I see the difference when I cut or sand with certain tools, and when I don’t turn my filtration machine on.

How to Sand Wooden Furniture With an Orbital Sander
So now that I show you what I use, let’s talk about how I sanded down this mid-century modern dresser, because it’s a process! Just like getting all the old finish off, this is a process you can’t really rush, or you’ll get crappy results like that $12 dining room table I stripped and sanded. LOL

- DO get as much of the existing finish off with the finish remover (see STEP 1).
- DO start with 150-grit or 180-grit sandpaper. This medium-grit sandpaper will remove the left over stain from the wood.
- DO only move the orbital sander about a pace of 1 inch per second. Don’t move it too quickly or you’ll get noticeable “pig tail” swirly marks.
- DO finish the final sanding with 220-grit sandpaper BY HAND. Sanding by hand will remove any swirly marks. Otherwise, swirly marks will show up later when you apply stain (ask me how I know…LOL)
- DO use detail sanding blocks to get all the smaller, more narrow spaces where the orbital sander won’t fit. I like these flexible contour sanding grips and the small detail sanding blocks.
- Do use a tack cloth and vacuum to remove all the dust from the wood.
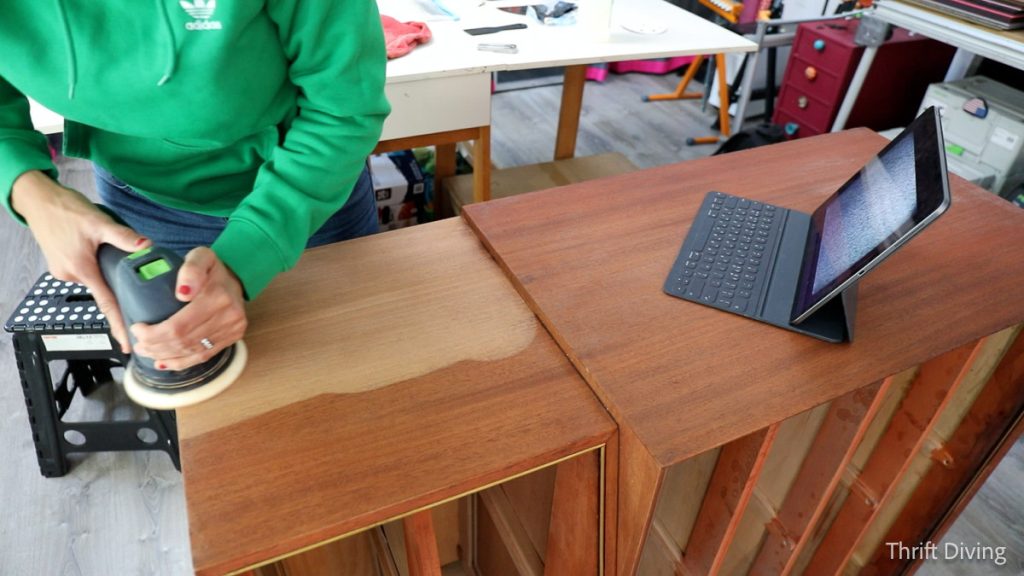
- DON’T push down on the sander thinking that the harder you push, the faster you’ll remove the finish. Let the weight of the orbital sander do the work.
- DON’T lean your orbital sander over the edge, or tilt it in any way on the surface, or else it will scrape off the veneer and leave your wood with “bald” spots where you chewed through the veneer. Those spots won’t accept stain. (Again…ask me how I know…LOL)
Of course, there always feels like more I could share about how to properly sand. If you want to know more, go check out my post on How to Strip Furniture and Stain Wood: A Complete Guide. Let’s move on to the next step: preparing the wood surface for staining.
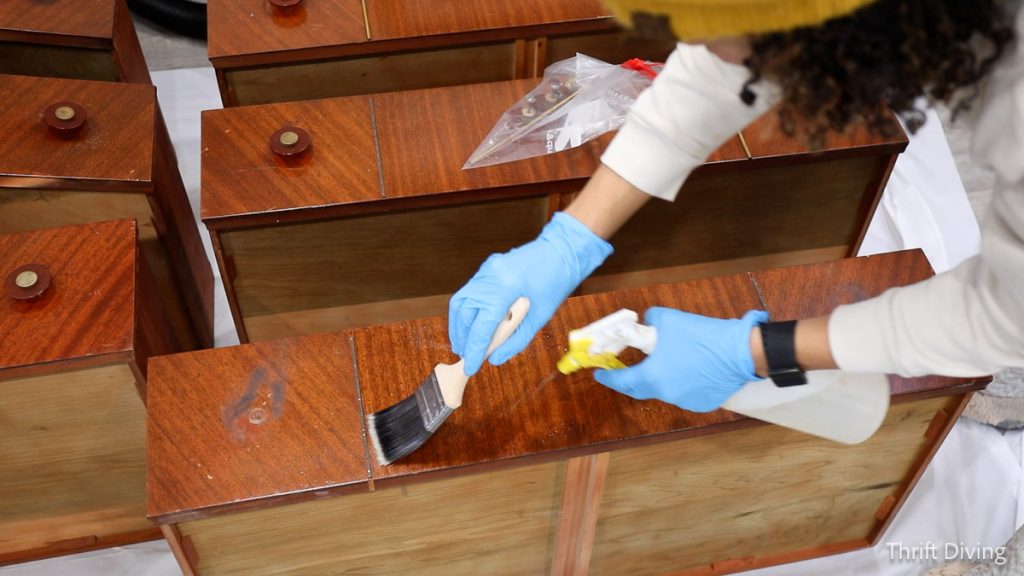
STEP 3: Do you need a sanding sealer or a pre-conditioner?
I feel like there are both opinions on whether a de-waxed shellac sanding sealer is needed for mahogany, which is what this mid-century modern dresser was. And if it was needed, does it go on before or after the stain?
Well, I decided to use it before the stain, because it felt like the right decision. The mahogany veneer was deep, and I wanted the sanding sealer to create a uniform surface for me before applying stain. Some sources (like this Reddit thread) say that the sanding sealer will prevent the stain from going on too dark; others have said to apply the stain and then add the sanding sealer to build up the grainy surface of the mahogany with the sanding sealer, so the surface isn’t bumpy.
Who knows. But I decided to add a coat of sanding sealer, let it dry overnight, and then lightly sanded it smooth with 220 grit sandpaper, making sure I didn’t sand through to the bare wood.
Pre-conditioner is similar and used before the stain and helps to get an even finish. I always use pre-conditioner on soft woods, especially pine, which already stains very blotchy. It seems I used the sanding sealer “wrong,” but it worked out well for me!
STEP 4: Which stain to use–water-based or oil-based?
I’ve used both water-based and oil-based stain, and each of them have their pluses and minuses.
Water-based stains are:
- Non-toxic
- Doesn’t smell
- Is easy to clean up with water
- Dries way too fast, so you must use an extender mixed in so you have more working time to apply it, especially with larger projects.
- Can look blotchy without the extender, and shows more lap marks.
- Brand I love: General Finished water-based stain
I refinished this awesome vintage dresser using water-based stain (watch the transformation here on my YouTube channel), but believe me when I saw that it was hard with water-based stain! I hadn’t used an extender at that time (didn’t know about extender).
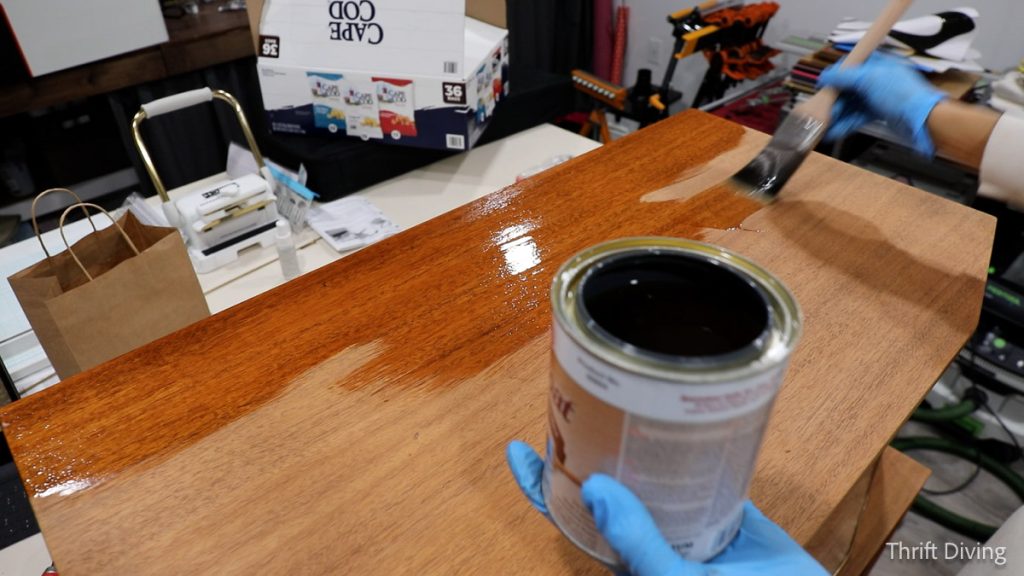
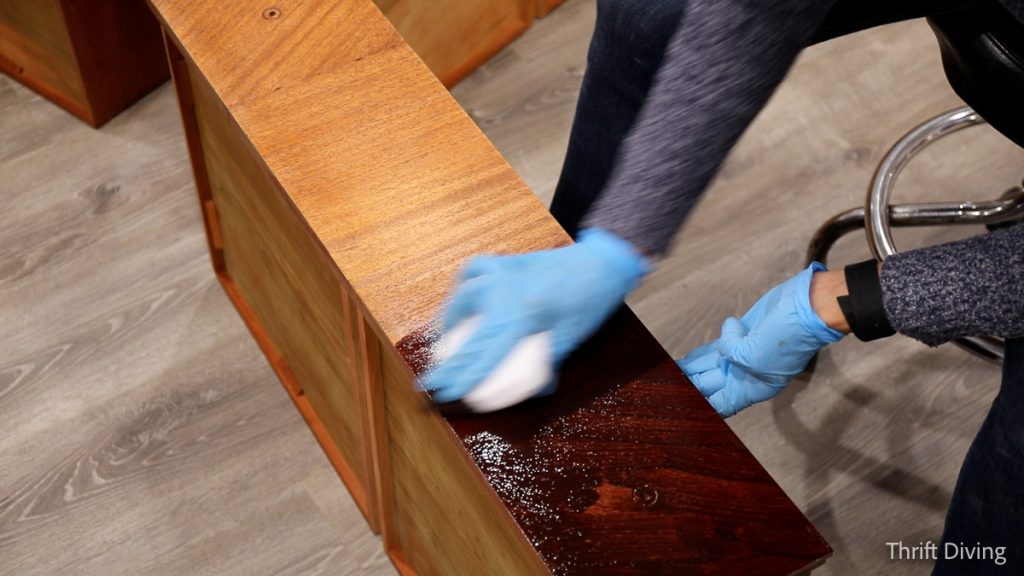
Oil-based stain, on the other hand:
- Doesn’t dry immediately, so it gives you more time to work with it when applying it
- Doesn’t give you lap marks on your wood.
- Looks rich and luxurious.
- Stinks! Open windows if doing this indoors, seriously.
- Is hard to clean up. You’ll need paint thinner or mineral spirits.
- Rags and supplies must thoroughly dry laid flat out before tossing in the trash, or else they can spontaneously combust.
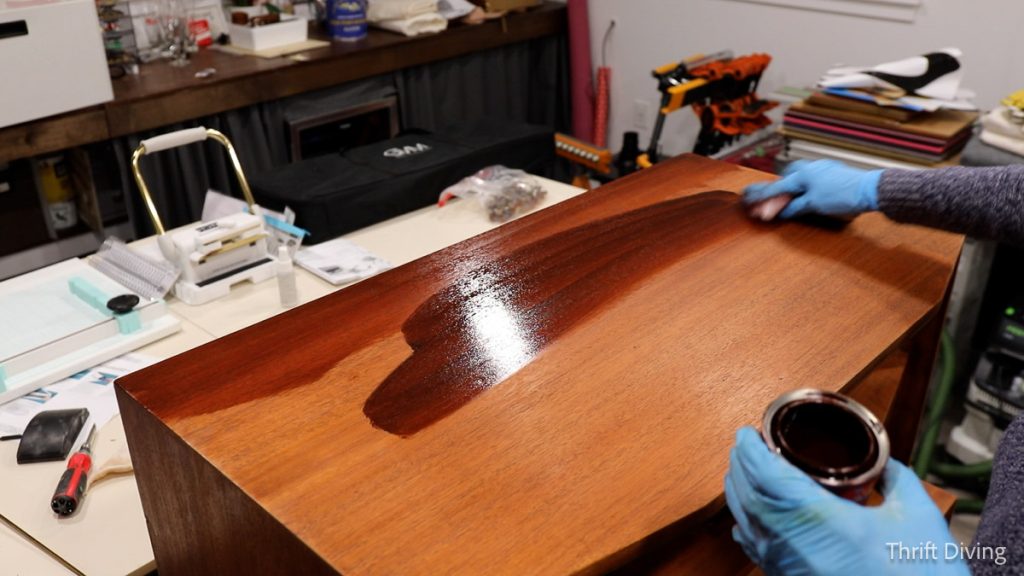
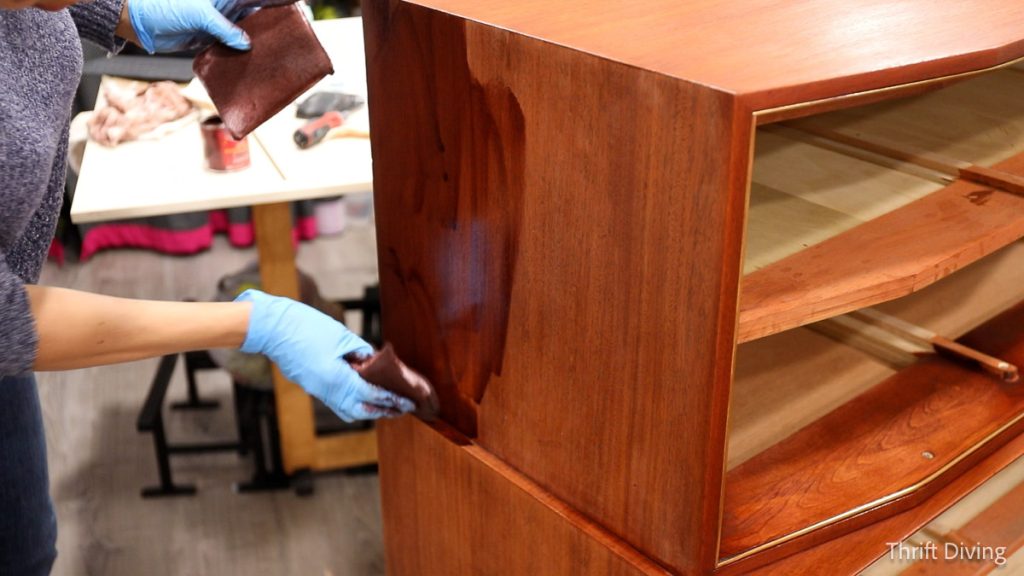
I loved using stain application pads to stain this dresser. I probably needed a bunch more, because the 3 I had just weren’t enough. I liked having one to apply it, and one to wipe the excess away.
CAUTION: Keep in mind that oil-based stained rags and sponges all need to thoroughly dry individually, spread out, and not in a heap, where they can spontaneously combust. Lay them out to dry before throwing them away in the trash!

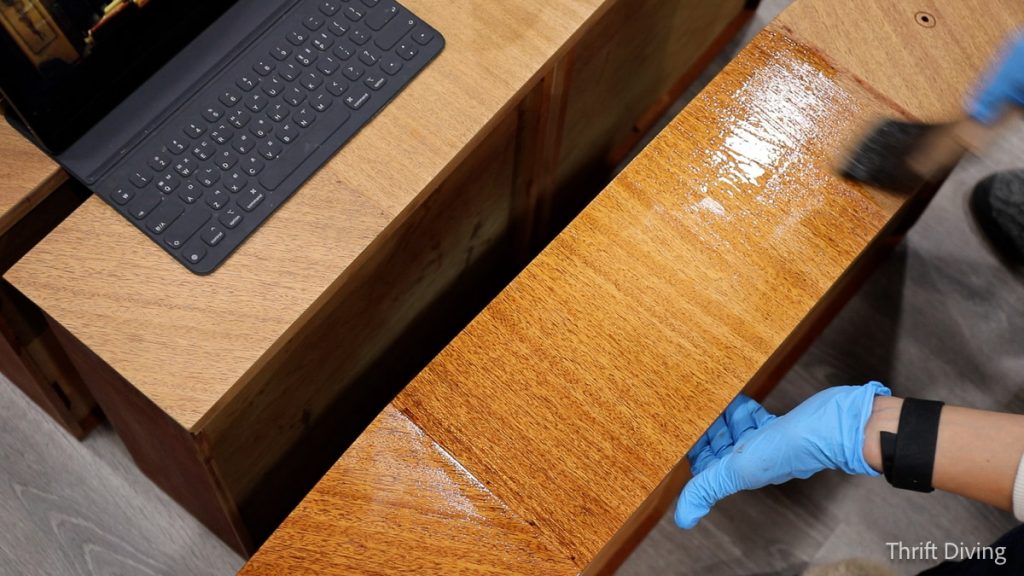
STEP 5: Top Coats Will Protect and Shine!
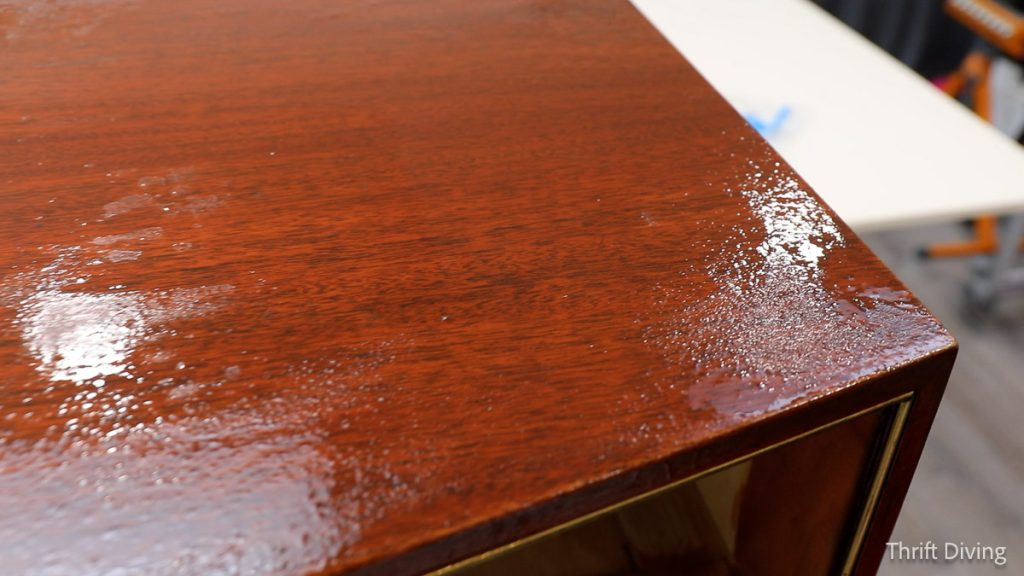
I absolutely love General Finishes High Performance Top Coat in Satin. It’s my favorite! I always get good results with it. But here’s the thing: since I used an oil-based stain, I needed to let the stain thoroughly dry before adding the top coat. (With water-based stains, you don’t need quite as much drying time before applying a water-based top coat).
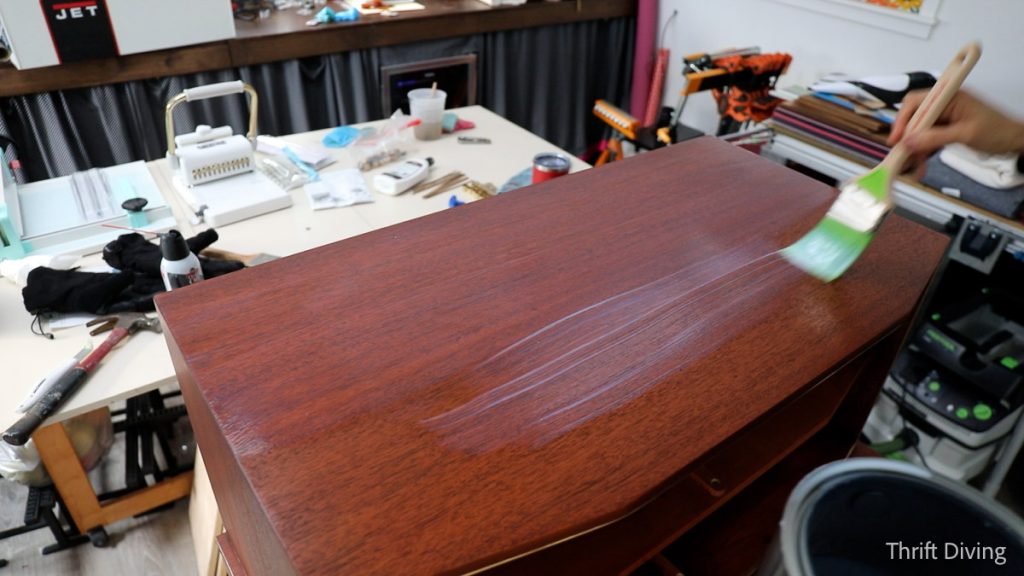
It goes on milky-white, but it dries clear and beautiful. I apply it with a synthetic paint brush, and I try not to “overwork” the top coat. Meaning, I won’t keep going over the same spot, or else it will start to create texture and smears. Just slather it on, work quickly, minimize overlapping by smoothing it, and allow it to dry without “fixing” anything you don’t like.
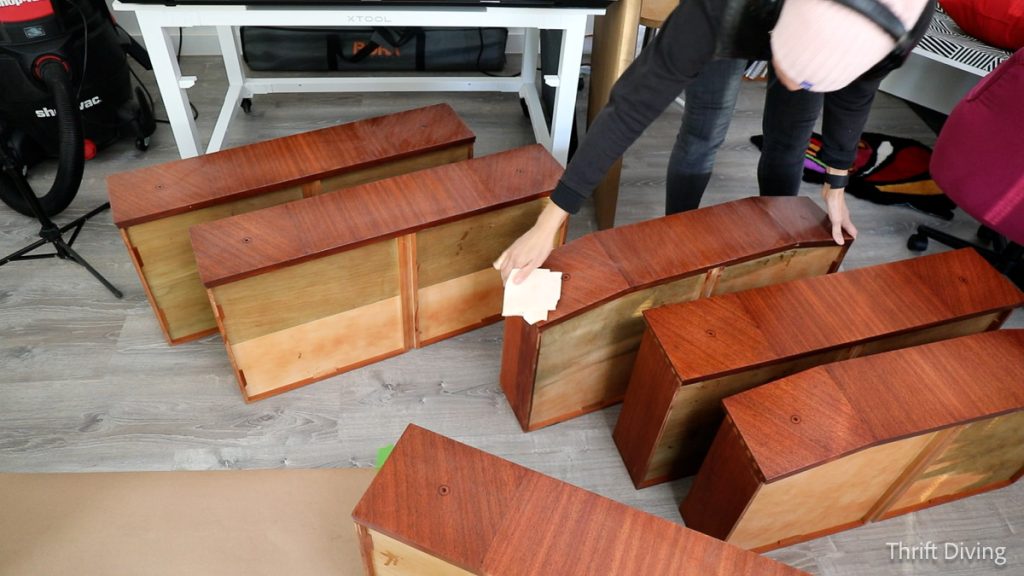
I always sand with 320-grit sandpaper in between coats, like you see below. Just lightly enough to knock down the top coat, then wipe the dust, and add a new layer. I do 3 coats in the satin.
I would be curious to use the Gloss, just to see how that looks. But Satin is my “go-to.”
Yes, I like to refinish the back of my dressers. 🙂
I sometimes skip refinishing the back. I mean…if no one is going to see it, or if it’s not in terrible condition, what’s the point? But sometimes it feels like a shame to leave an ugly back. If you’re already sanding and it’s not adding too much work, but sand it out and add a coat. No need to get fancy with it. But if you’re selling it, it helps to make the entire piece look presentable, don’t you think? 🙂
BEFORE
AFTER
Not perfect. Not topcoated. Just a little more cleaned-up.
BEFORE
AFTER!
This mid-century modern dresser restoration was a lot of fun. I liked that there weren’t any nooks and crannies that were hard to sand. I got pretty good results. And when I showed my 19-year-old son, he said he looked really good! Now I’m on the hunt for a cool dresser for my youngest son. 🙂
You may not know all the ins and outs on how to refinish wood furniture, but I think this vintage dresser refinishing is a great template for you to use! Try refinishing wood furniture that isn’t that important to you, to practice on. Once you feel more confident, you can work your way up to the projects that are more valuable–the vintage dressers or family priceless pieces of furniture passed down through your family.
Leave a comment below and let me know which wood furniture piece you’re excited to refinish next!
Love this project? Click here to save it on Pinterest!

I’ve been refinishing wood furniture for about 1/3 of my life.
But if I count the refinishing projects I did before “Thrift Diving” was even a thing, I could include the middle third of my life, too (that includes painting furniture!).
Wood is absolutely stunning and painting it shouldn’t be the first option (read this post When Should You NOT Paint Wood Furniture?).
This mid-century modern dresser refinishing is the latest in a gallery of projects that, I’m sure when I’m 75 years old, I’ll look back on and think, I can’t believe I restored that!
But I almost walked away from this dresser when I saw it!
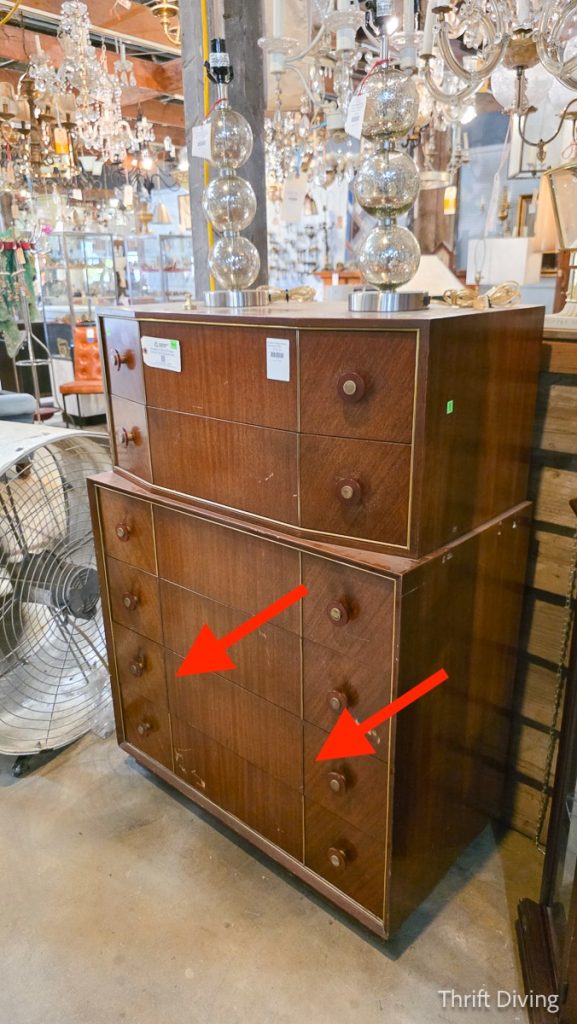
BEFORE
In fact, I saw this stunning mid-century modern dresser on their website about a week before I stumbled upon it at Community Forklift, the salvage shop that’s quite popular here in Maryland. Its angles and streamlined brass edging drew me in, but the price (at $275) repelled me from seriously considering it. I shuffled away, lingering nearby, trying to figure out how I could buy it.
If you know me and this blog, I don’t buy furniture for $275. That doesn’t feel like a deal, considering that I bought my thrifted dining room table for $12…my dresser for $60 (which felt steep at the time)…and the list goes on of amazing pieces I have scored and refinished or painted for my home.
That day, I had actually forgotten about the dresser as I made my way through the aisles of overpriced furniture, getting dopamine hits as I envisioned how I could transform each piece–if I had the time, space, muscle to lug them home (or deep pockets to afford my favorites).
And just like that–I stumbled into this beauty sitting there, just like this, with a price tag of $275.
I wanted her. I really did. She wasn’t in terrible condition, but she needed a good strip and stain. For $275, I couldn’t justify it, though. I shuffled away, lingering nearby, wondering how I could afford her.
As I was admiring these cute teacups, the manager sidled up to me, clearing his throat, coyly trying to get my attention, asking me if I liked the teacups. “Why, yes….I do….but let me show you the dresser that I like even more….and can I buy it for $175 instead?” Thankfully, he said yes!
Lesson learned: always ask for a discount! You never know if they’re just being nice…if they need to get rid of it quickly for new inventory…or whatever the reason! But I was thankful that day, as you can see in the YouTube video I captured!
That was 4 months ago, and I’m happy to say that it didn’t take 2-3 years of crowding my garage before I got my hands on it. I lugged it into my “she shed” and vowed to get it done so that my oldest son could finally have a place to store his clothes (he’d outgrown his smaller dresser). Here’s what the dresser looked like BEFORE and AFTER!
BEFORE!
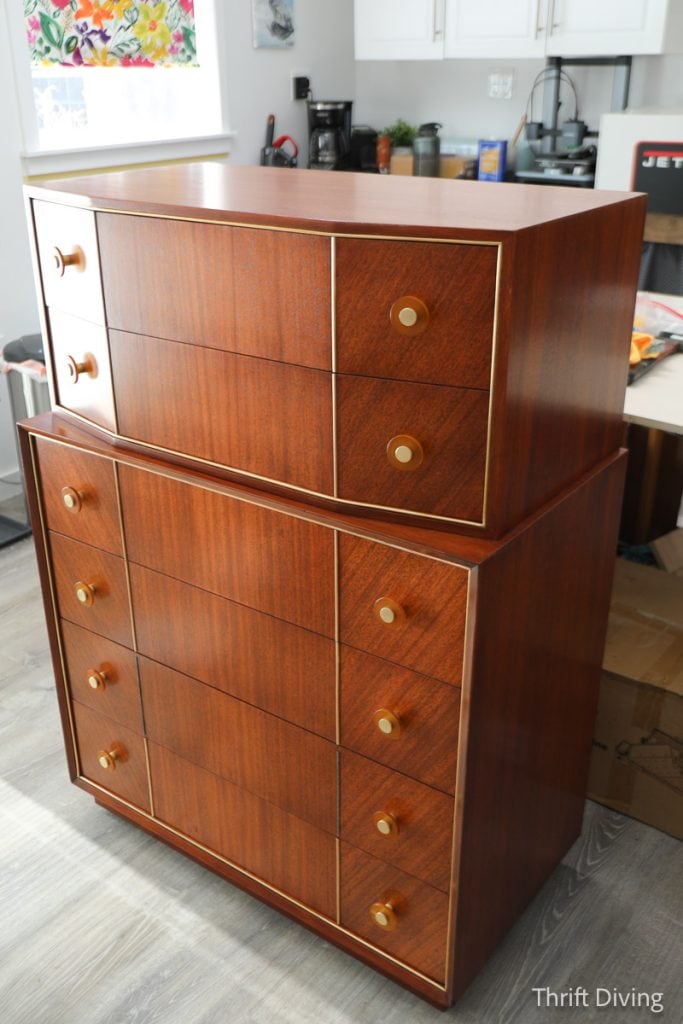
AFTER!
I get that stripping and staining dressers and other wood furniture isn’t as “exciting” as painting it. When you see the dresser in the pictures above, there doesn’t seem to be that much difference between the two pictures, does there? It just looks like a “cleaned up” version of the same dresser.
But this picture of my mid-century modern dresser, below, tells a detailed story of what a successful strip and re-stain looks like, close-up. In the “BEFORE,” the old finish was cracked and weathered, with scratches all over her. But in the “AFTER,” the finish looks smooth, brand new, and gorgeous! Doesn’t it look fabulous?!
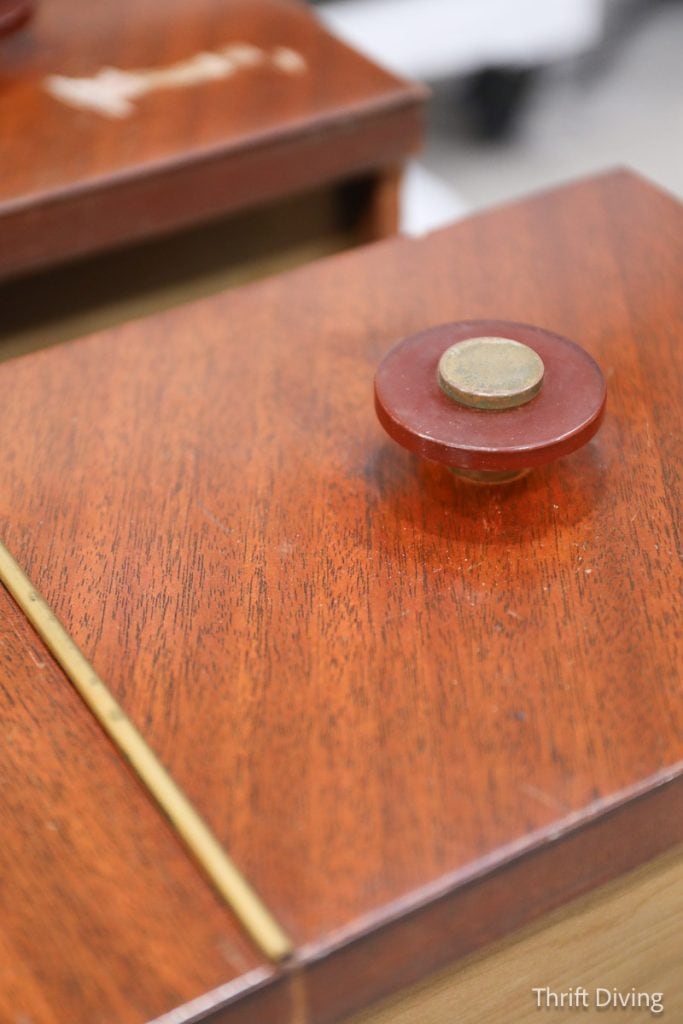
BEFORE
Despite the scratches and the cracked finish, the dresser wasn’t in terrible condition at all. One thing that wasn’t very clear, literally and figuratively, were the drawer knobs. They were a dark orange amber color, but what I didn’t know until I began cleaning them, is that they were just aged, dirty, and worn.
AFTER!
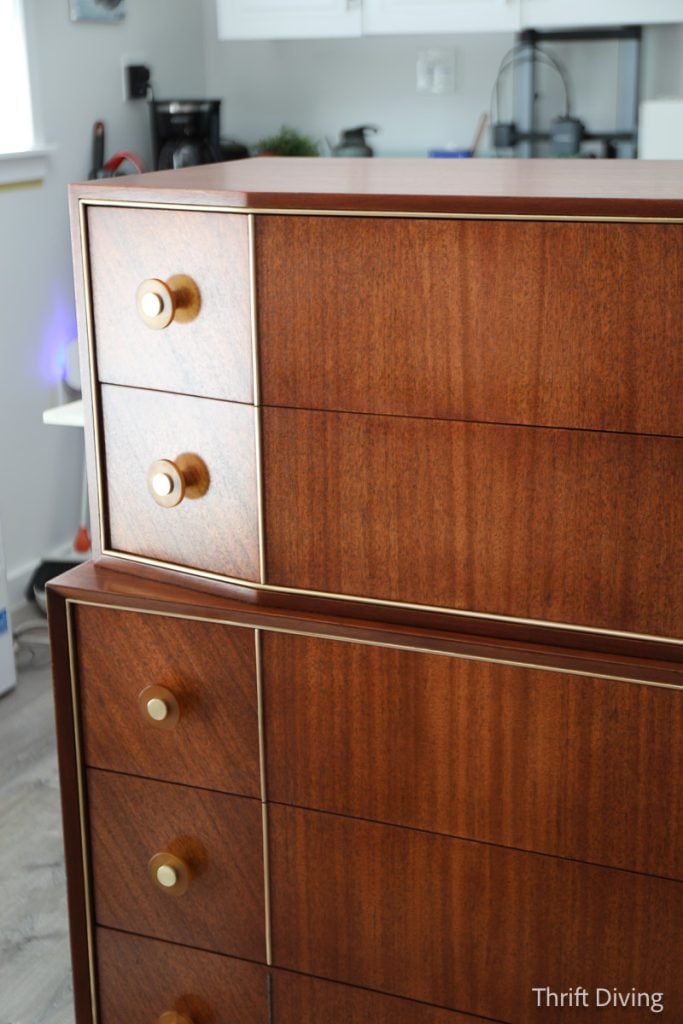
Once cleaned up, the knobs were a brighter orange, and the brass centers of the knobs were gorgeous! I also cleaned up the brass edging that lined the body and drawers.
If you’d like to check out this project on YouTube, you can watch here.
So let’s go through the exact steps I did to restore this mid-century modern dresser, so if you find a dresser that you love, you know exactly how to breathe new life back into it!
Tools & Materials: How to Refinish Wood Furniture
You know, I’ve stripped and re-stained a bunch of dressers in all these years of doing furniture makeovers, but I finally feel like I’ve come to a good list and steps of how to do this right. This is the second dresser I have stripped and refinished in the past month (see my other son’s Federal dresser makeover here). Doing these two dressers back-to-back as allowed me to evaluate my tools, materials, and processes, so let’s first list what I used that worked best for these two dressers:
The following products are what I use to refinish wood furniture, including used when refinishing this mid-century modern dresser. I’ve included affiliate links, as well:
-
- QCS Finish Remover – Quick Clean Safe finish remover is my favorite, and allows me to strip safely in my “she shed.” It’s expensive, but when it comes to your health and being able to use it indoors, this is the way to go.
-
- Orbital sander – I use a Festool orbital sander, which is also expensive because it has a dust extraction
-
- Water-based or oil-based stain – I’ll share some tips with you below on which I prefer and why.
-
- General Finishes High-Performance Top Coat (Satin) – My ultimate favorite!
-
- Sanding discs – You’ll need the following grits: 180 (semi-rough) and 220 (fine)
-
- Sanding sheets – 320 grit (super fine)
-
- Flexible contour sanding grips – These are critical when sanding round edges of furniture!
-
- Small detail sanding block – These are perfect for corners and narrow flat edges along dressers
-
- 6″ putty knife – These are important for scraping the old finish off.
-
- Bucket or container
-
- Disposable gloves – You will go through many! 🙂
-
- Plastic sheeting or table cloth – Check Dollar Tree for cheap plastic table cloths to put under your dresser or furniture.
-
- Paint brush
-
- Dust mask
-
- Staining pads or lint-free clothes
-
- Sanding sealer and or a pre-conditioner
-
- Screw driver – For removing trim
-
- Hammer (optional, depending on your project)
-
- Ziploc plastic bag – For storing all your knobs, screws, etc. It’s easy to lose these!
-
- Stainless steel brushes – To get into the nooks and crannies when stripping.
-
- Steel wool 0000 – Very fine steel wool for cleaning up metal or brass hardware
-
- LA Awesome cleaner – I love, love, love this cleaner for applying to hardware and just let it soak off dirt and grime. It’s great for cleaning paint, brushes, oil-based stains, and everything in between!
-
- Barkeeper’s Friend – The very best for polishing metal hardware or brass, with the help of the steel wool.
-
- Microfiber towels – Absolutely love these for clean-up and general project stuff!
-
- Tack cloth – For removing all the dust before staining.
STEP 1: Strip….strip again…keep stripping until it’s clean!
Years ago, I refinished my $12 dining room table in my garage. Mind you, this was the first thing I had ever stripped and tried to re-stain. Well, look closely–it turned out horrible! LOL. It was blotchy because I hadn’t done a good enough job of stripping or sanding. So when I applied stain, it only “took” in some areas, and other spots, you could tell I hadn’t fully removed the old finish. Well, this is what happens when you do that: a disaster. (Don’t worry, it ended up all coming out nicely in the end for my first attempt!)
With this mid-century modern dresser, it had all flat surfaces, so there weren’t any nooks and crannies that would have been challenging to strip and sand.
Here’s the key: You have to add finish remover multiple times. Don’t expect to get the old finish off with just one pass of finish remover. Here’s my process:
-
- Remove all the hardware (put it in a Ziploc plastic baggie so you don’t lose any pieces).
-
- Apply finish remover to strip off the old finish.
-
- Let it sit for 15 minutes or more. You should see it breaking up the old finish.
-
- Use the 6″ putty knife to gently scrape and remove the old finish. Be careful not to gouge the wood. Scrape the old finish into an old bucket with a trash bag inside of it to make clean-up easier. Old cardboard boxes work, but those can leak.
-
- Apply another coat of finish remover to the wood for a second round. Let it sit, then scrape off.
-
- Repeat this process until the finish remover is mostly watery and doesn’t have as much “gunk” coming off. This is when you know the furniture is “clean” and ready to move on the next step.
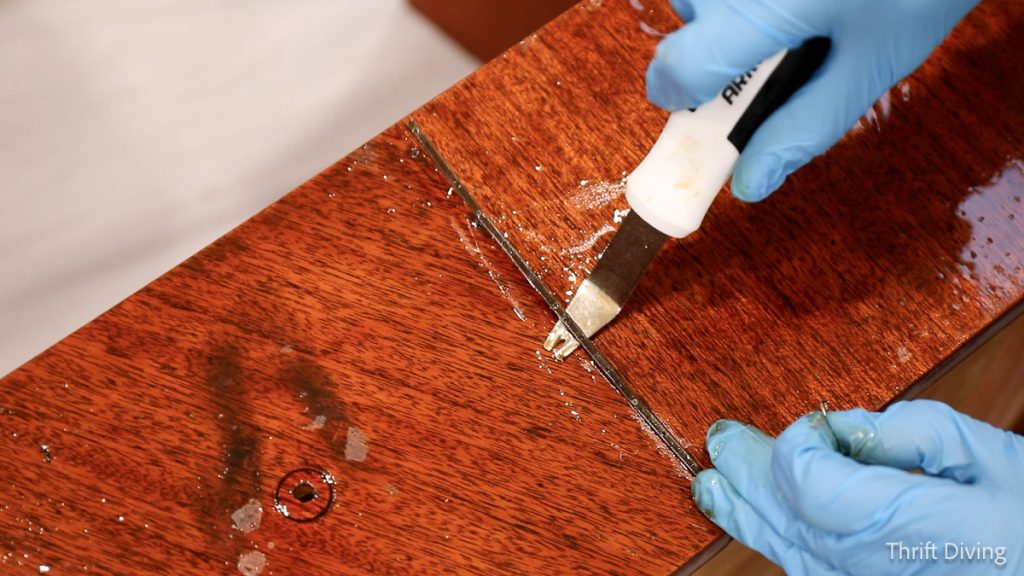
TIP: Make sure you remove all knobs and trim that is easy to come off. This mid-century modern dresser has brass decorative trim, with a metal track that was nailed in (see below). I was going to take the lazy route and just strip and sand around it, so I didn’t have to remove it.
But that would have been silly, because I wouldn’t have been able to strip or sand that close to such a detail. So I used a staple remover to gently lift it up. The nails were so tiny! Put all the hardware into a big ziplock baggie! Believe me, you don’t want to lose any of this stuff! LOL
A Couple of Things About Hardware When Refinishing Furniture
I have to say a few things about hardware, first, before we move on, because this was the point in this mid-century modern dresser restoration where I realized that a couple of these brass edgings were actually missing from the dresser. And I hadn’t even known it!
I was so excited about the dresser that I hadn’t realized that some of the hardware was actually missing when I found the dresser. I thought I had lost the hardware when I was transporting the dresser, which wasn’t the case.
I searched high and low on Etsy and other places to see if I could find the brass metal trim, and I could find square brass “channel,” but not “U brass channel.” Which means, when I refinished this dresser, a couple of drawers couldn’t properly be completed.
So my tips before you buy a dresser or a piece of furniture, especially if you’re planning to refinish and sell it:
-
- Make sure you have all the parts of the dresser.
-
- Check the hardware. Is it all there, or is one of the knobs or pulls missing or damaged?
-
- Will you need any pieces or parts to fix this dresser or furniture, and if so, can you easily locate a similar replacement part?
Thankfully, my son doesn’t mind having a couple pieces of brass “U” channel missing on the drawers. But if I had been planning to refinish this dresser and sell it, I would have had to sell it with pieces missing! Not a good look. LOL
STEP 2: Sand With an Orbital Sander
I adore my orbital sander. It’s from Festool, which is an expensive German brand. But I didn’t start out with a Festool orbital sander. I had me a basic RYOBI sander that got the job done quite nicely. What it was missing, though, was a vacuum to suck up the dust, which meant that all my sanding had to be done outdoors. I also loved my DeWalt corded orbital sander because it has variable speed. But again, I didn’t have a vacuum, so I had to sand outdoors, with a mask. And you should, too, so you don’t pollute your lungs or your indoor air quality.
Now I use my Festool 150 Rotex orbital sander because it connects to my Festool dust extractor which virtually sucks up everything without putting fine particles of dust in the air. I feel I should tell you that, because when you see me sanding indoors, that’s the reason why I can–because of the Festool. I also turn on my JET air filtration so if there are tiny particles floating around, they’re removed.
Otherwise, you should be sanding outdoors! The dust you’re sanding off is very toxic. I’ve got a little air quality monitor that sits on my desk here in my “she shed” and I see the difference when I cut or sand with certain tools, and when I don’t turn my filtration machine on.
How to Sand Wooden Furniture With an Orbital Sander
So now that I show you what I use, let’s talk about how I sanded down this mid-century modern dresser, because it’s a process! Just like getting all the old finish off, this is a process you can’t really rush, or you’ll get crappy results like that $12 dining room table I stripped and sanded. LOL
-
- DO get as much of the existing finish off with the finish remover (see STEP 1).
-
- DO start with 150-grit or 180-grit sandpaper. This medium-grit sandpaper will remove the left over stain from the wood.
-
- DO only move the orbital sander about a pace of 1 inch per second. Don’t move it too quickly or you’ll get noticeable “pig tail” swirly marks.
-
- DO finish the final sanding with 220-grit sandpaper BY HAND. Sanding by hand will remove any swirly marks. Otherwise, swirly marks will show up later when you apply stain (ask me how I know…LOL)
-
- DO use detail sanding blocks to get all the smaller, more narrow spaces where the orbital sander won’t fit. I like these flexible contour sanding grips and the small detail sanding blocks.
-
- DO use a tack cloth and vacuum to remove all the dust from the wood.
-
- DON’T push down on the sander thinking that the harder you push, the faster you’ll remove the finish. Let the weight of the orbital sander do the work.
-
- DON’T lean your orbital sander over the edge, or tilt it in any way on the surface, or else it will scrape off the veneer and leave your wood with “bald” spots where you chewed through the veneer. Those spots won’t accept stain. (Again…ask me how I know…LOL)
Of course, there always feels like more I could share about how to properly sand. If you want to know more, go check out my post on How to Strip Furniture and Stain Wood: A Complete Guide. Let’s move on to the next step: preparing the wood surface for staining.
STEP 3: Do you need a sanding sealer or a pre-conditioner?
I feel like there are both opinions on whether a de-waxed shellac sanding sealer is needed for mahogany, which is what this mid-century modern dresser was. And if it was needed, does it go on before or after the stain?
Well, I decided to use it before the stain, because it felt like the right decision. The mahogany veneer was deep, and I wanted the sanding sealer to create a uniform surface for me before applying stain. Some sources (like this Reddit thread) say that the sanding sealer will prevent the stain from going on too dark; others have said to apply the stain and then add the sanding sealer to build up the grainy surface of the mahogany with the sanding sealer, so the surface isn’t bumpy.
Who knows. But I decided to add a coat of sanding sealer, let it dry overnight, and then lightly sanded it smooth with 220 grit sandpaper, making sure I didn’t sand through to the bare wood.
Pre-conditioner is similar and used before the stain and helps to get an even finish. I always use pre-conditioner on soft woods, especially pine, which already stains very blotchy. It seems I used the sanding sealer “wrong,” but it worked out well for me!
STEP 4: Which stain to use–water-based or oil-based?
I’ve used both water-based and oil-based stain, and each of them have their pluses and minuses.
Water-based stains are:
-
- Non-toxic
-
- Doesn’t smell
-
- Is easy to clean up with water
-
- Dries way too fast, so you must use an extender mixed in so you have more working time to apply it, especially with larger projects.
-
- Can look blotchy without the extender, and shows more lap marks.
-
- Brand I love: General Finished water-based stain
I refinished this awesome vintage dresser using water-based stain (see the transformation here), but believe me when I saw that it was hard with water-based stain! I hadn’t used an extender at that time (didn’t know about extender).
Oil-based stain, on the other hand:
-
- Doesn’t dry immediately, so it gives you more time to work with it when applying it
-
- Doesn’t give you lap marks on your wood.
-
- Looks rich and luxurious.
-
- Stinks! Open windows if doing this indoors, seriously.
-
- Is hard to clean up. You’ll need paint thinner or mineral spirits.
-
- Rags and supplies must thoroughly dry laid flat out before tossing in the trash, or else they can spontaneously combust.
I loved using stain application pads to stain this dresser. I probably needed a bunch more, because the 3 I had just weren’t enough. I liked having one to apply it, and one to wipe the excess away.
CAUTION: Keep in mind that oil-based stained rags and sponges all need to thoroughly dry individually, spread out, and not in a heap, where they can spontaneously combust. Lay them out to dry before throwing them away in the trash!
STEP 5: Top Coats Will Protect and Shine!
I absolutely love General Finishes High Performance Top Coat in Satin. It’s my favorite! I always get good results with it. But here’s the thing: since I used an oil-based stain, I needed to let the stain thoroughly dry before adding the top coat. (With water-based stains, you don’t need quite as much drying time before applying a water-based top coat).
It goes on milky-white, but it dries clear and beautiful. I apply it with a synthetic paint brush, and I try not to “overwork” the top coat. Meaning, I won’t keep going over the same spot, or else it will start to create texture and smears. Just slather it on, work quickly, minimize overlapping by smoothing it, and allow it to dry without “fixing” anything you don’t like.
I always sand with 320-grit sandpaper in between coats, like you see below. Just lightly enough to knock down the top coat, then wipe the dust, and add a new layer. I do 3 coats in the satin.
I would be curious to use the Gloss, just to see how that looks. But Satin is my “go-to.”
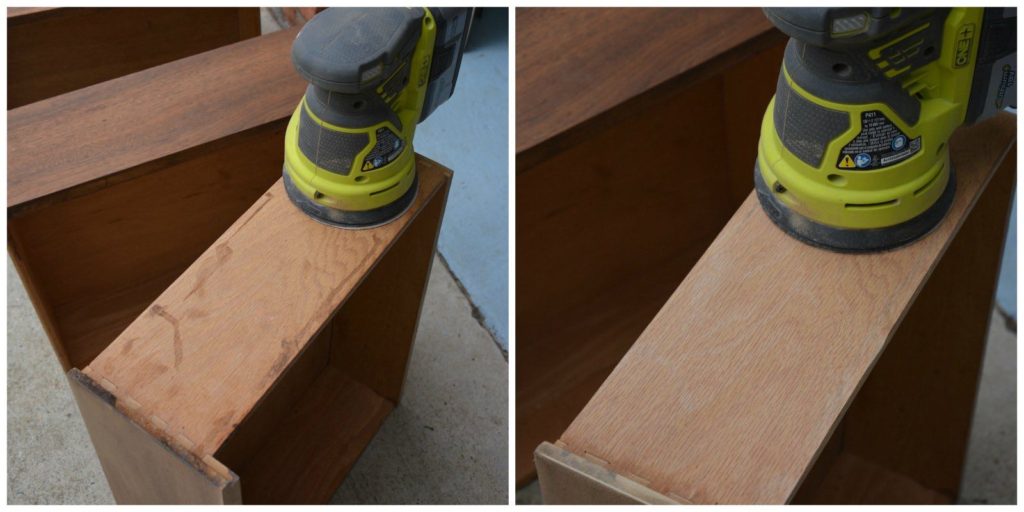
Yes, I like to refinish the back of my dressers. 🙂
I sometimes skip refinishing the back. I mean…if no one is going to see it, or if it’s not in terrible condition, what’s the point? But sometimes it feels like a shame to leave an ugly back. If you’re already sanding and it’s not adding too much work, but sand it out and add a coat. No need to get fancy with it. But if you’re selling it, it helps to make the entire piece look presentable, don’t you think? 🙂
BEFORE
AFTER
Not perfect. Not topcoated. Just a little more cleaned-up.
BEFORE
AFTER!
This mid-century modern dresser restoration was a lot of fun. I liked that there weren’t any nooks and crannies that were hard to sand. I got pretty good results. And when I showed my 19-year-old son, he said he looked really good! Now I’m on the hunt for a cool dresser for my youngest son. 🙂
You may not know all the ins and outs on how to refinish wood furniture, but I think this vintage dresser refinishing is a great template for you to use! Try refinishing wood furniture that isn’t that important to you, to practice on. Once you feel more confident, you can work your way up to the projects that are more valuable–the vintage dressers or family priceless pieces of furniture passed down through your family.
Leave a comment below and let me know which wood furniture piece you’re excited to refinish next!
Love this project? Click here to save it on Pinterest!
Download the 5 freebies!

Thrift Diving inspires women to decorate, improve, and maintain their home themselves...using paint, power tools, and thrift stores! Use these 5 printables, checklists, and ebooks to get started!


I’m thrilled to see this beauty refinished and not painted!! I love what you did. The dresser is back to its original glory!
Loved reading about this project. As usual, you make everything beautiful and I’m sure your sons are thrilled to have a Mom so talented. But something is gnawing at me. Why didn’t you paint or spray paint the metal placeholders for the missing trim a brass/gold color so it at least matched the existing trim? I found that so curious as the raw metal really stands out and painting it would seem to be an easy work-a-round.