DIY Scrap Wood Trash Bin Makeover
If you were to ask me what was the nastiest furniture makeover I’ve ever done, this wooden trash can bin from the thrift store would take the prize.
Hands down.

AFTER!


Wooden Trash Can Bin Makeover
(I participant in the Amazon Services LLC Associates Program, an affiliate advertising program designed to provide a means for me to earn fees by linking to Amazon.com and affiliated sites).
Sure….the outside of the trash bin looked pretty innocuous.
But it’s a wooden trash can, after all….
One shouldn’t be surprised that it looked like this inside when you opened the door.

I had bought it nearly two years ago (when I was hoping to convert it into a laundry cabinet for my boys’ bathroom makeover.
But like all the other furniture, it sat.
And sat.
Until finally I decluttered my garage recently.
Something about that massive donation to the thrift store sparked a flame to start tackling some of those projects.
Maybe because now the sense of overwhelm was gone and there were fewer options of projects from which to pick.
But it was time to make this baby over!
Prepping the Wooden Trash Can
Most furniture won’t need to be primed (as long as it’s already smooth and not bleeding through. If it does bleed through, cover it with a coat of Kilz Oil-Based Primer).
But it definitely should be wiped down before you start painting.
I tend to stick with Simple Green to clean and de-grease.

The Face of Disgust
Oh, oh, but can I show you how disgusted I was with this project???
I don’t care how much degreasing you try to do, ain’t nuthin’ totally removing the nastiness inside this wooden trash bin! That’s probably some family’s 15-years-worth of food particles in there!
How. Disgusting.
That’s when I realized there was no way in heck this thing was going into my house.
Not even for my recyclables or dirty laundry.
This thing was going out into my garage for storing scrap wood –right where it belongs!
So I decided to try to SAND OUT the gunk, so I could at least paint the inside BLACK to help hid the gunk, which left me making the ugliest face.
I just couldn’t stop making this face.

But can’t you see why, though??
I feel sick just looking at it.


Feel free to keep swipin’ and scrollin’ along!
I don’t blame you.
It’s super gross!
What’s the Best Paint For a Wooden Trash Can?
I wrote a post on the 12 best paints to use for furniture, and one brand I left off that list was Country Chic Paint.
I had never used it–had never really even heard of it.
But they emailed me asking if I wanted “free paint.”
Well, nothing is free, but since I’m supposed to be “in-the-know” about all these different products and how well they do or don’t work, I agreed to try it out to see how it stacks up again other furniture paint. At least I wouldn’t have to pay for it out of pocket (#brightside!!).
And this wooden trash can was the perfect small project to test it out!


Creating Texture With a Chip Brush
I normally use Purdy paint brushes because they’re synthetic and so smooth and I tend to love modern finishes without a lot of brush strokes.
But this time, I used some chip brushes with natural bristles lying around in my supplies and decided to use it.
The bristles left some texture behind in the brush strokes, which later ended up being a good thing!

A little spotty, but not unusual with 1 coat of paint. Most paints require 2 coats.

The Cheap Technique For Aging Furniture With Steel Wool
It’s no secret that steel wool can be used to distress furniture. Heck, you can distress furniture with sandpaper and vinegar, too.
I have a bunch of steel wool lying around, although I’d never really used it. But it worked so well on my mid-century modern chair makeover (the one I almost ruined, LOL), I decided to see how it worked on this wooden trash bin makeover.

So this is what happened:
As I rubbed the steel wool over the blue paint, it started to turn gray.
At first, I was a little horrified, thinking I was going to have to re-paint the whole thing.
But I was curious what would happen if I kept going.

But then the most awesome thing happened: when I took 220 grit sandpaper to the grayed areas, it removed the top layer of gray while leaving some of the gray settled into the paintbrush strokes!
I.LOVED.IT!!

I’m generally not a distressed-furniture kind of chick, but knowing that this was going into my garage, a modern finish was too….perfect.
It needed to be a little “dirty” and distressed.
After all, scrap wood was going inside. It was begging to not be “pretty.” LOL

I admit that it was super messy, so I had to wear a dust mask because those little particles were floating everywhere–I even had them in my hair! But I had texture!
I realized that it was a great way to distress furniture without having to spend money on antiquing wax!!
The Whimsical Stencil
I love, love, love stencils!
I use ready-made stencils, but some of my favorites I cut with my Silhouette Cameo.
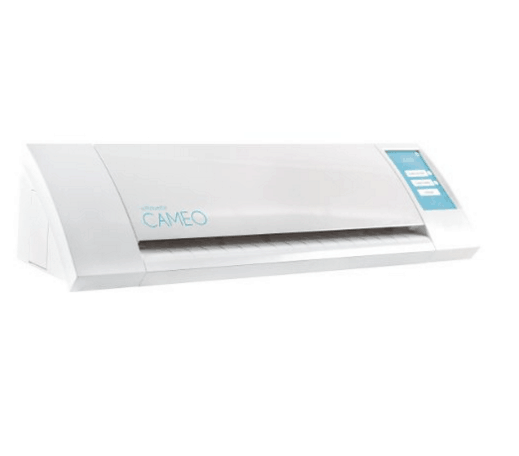 I used vinyl to cut out a stencil that says, “How much WOOD would a woodchuck chuck…” and used transfer paper to apply it.


One of my favorite brands of paint is FolkArt Home Decor chalk paint. That stuff sticks so well, and you can buy it in smaller amounts from Amazon for cheaper than some of the more well-known brands of paint.
I dabbed a foam brush in and added two thin coats over the stencil.
When it dried, I ran the sandpaper over it to smooth it out and make it look not-so-perfect.


A Coat of Clear Wax
Oh, man, I loved the Country Chic natural wax! It had absolutely no smell (versus the other stinky wax I used recently).
One of my favorite parts of waxing is seeing the color deepening. Don’t you love that, too??

And after all that sanding, with a light coat of wax (buffed with a lint-free cloth)–my goodness…..
…it looked great and felt soooo smooth!
And the inside??
It got a nice, thick coat of black to disguise the GUNK.
BEFORE
AFTER!

When you look closely, you can see the aging of the steel wool in the paint!


It’s perfect for holding pieces of scrap wood in my awesome garage workshop.


Let’s have one more look at the ugly “BEFORE.”

AFTER!

I’m really pleased with how it turned out!
Now I just need to focus on the next big project: Operation Garage Workshop!
And this piece will be perfect for it.
So how do you like this wooden trash can makeover? Leave a comment and let’s chat about it!

Download the 5 freebies!

Thrift Diving inspires women to decorate, improve, and maintain their home themselves...using paint, power tools, and thrift stores! Use these 5 printables, checklists, and ebooks to get started!
Voted and posted on Facebook. What a great thing for you!
A note – Purdy makes both synthetic and natural bristle brushes. And I love them.
Rosie, I agree! I love me some Purdy brushes!!
I love this! I love that you used sandpaper instead of yet another product to distress this. I adore the clever saying on the front. I’m in love with the color. And I’m dying to hit up a local yard sale if it ever stops snowing. But suddenly, I’m a girlie girl and when I saw your bare hands, I gasped. No gloves? Yep. Not that I get a full manicure ever since hitting the age of **mumble*** but it would drive me nuts to be covered in all that paint for days. Anywho, well done. Now I want a grody looking trash bin!
Noelle, LOL! Yes, girl, no gloves!! And I’ve got MAN HANDS, so I’m the FIRST person that needs a set of gloves! My hands get so rough, I could probably sand furniture WITH NO SANDPAPER. hahaha! I’m glad you like the problem! Sorry for the delay in commenting. Things have been insanely busy and I’m just now able to comment! You make me laugh!
You got my vote! This trash can turned out great. I love how you think outside the box. Good job!
Thanks, Belinda! I find that it’s the little details that make a piece unique! 🙂
Serena, Awesome job as always. I just did the voting for the Home and Garden Event then decided to watch all three videos and you definitley are the winner in my book. You are truly inspiring and deserve to win. Good luck although you don’t need it.
Wendy J. Leon
Thank you, Wendy!!
I like what you did with that! Looks great. I voted! Good Luck.
It’s so cute now! Difference between night and day on the inside too. I have some yuck projects coming up so I can relate about the face. I make it just thinking about it, but you have once again motivated me to do it anyway.
Hop to it, Kimberly! Just keep those gloves on for the “icky” part, and grin and bear it! LOL 🙂 Thank you!
Good Luck with the Home & Garden contest! Not only did I vote for you (and will daily) but I have asked my extensive followers (Pinterest, Facebook, Blog, etc.) to vote for you as well!
Best Wishes!!!
Thank you so much for that, Tamera! I wish the voting wasn’t so LONG….like until March 16th! Every day I’ll have to bug and remind people. LOL. I am supposed to be focusing on getting my garage together, along with putting my presentation together for the final show-down on stage at the Denver Home + Garden show. But now–it’s all about voting! LOL
Here’s where you can vote tomorrow! THANK YOU!! https://thriftdiving.com/vote
Love it! I used to have something similar, and they DO get yucky inside.
Yep, even my pull-out trash bin is yucky, although not THAT yucky as this one! BLEH!
Serena, the ‘woodchuck bin’ looks great! What a nice new use for something that most people probably would have sent off to the trash heap! I love how you give new life and purpose to lonely, forsaken, homeless furniture. By the way, congrats for being a finalist in the H&G Trendsetter Award!! I’m SO happy and proud of you. You are in the lead and will win it!!
Your family must be so proud of you as well! : )
(Perhaps eventually you’ll have your own tv show on DIY or HGTV? Hey, I can dream!)
p.s. – yes I voted too! 😉
Hey, Jeanie! I loooove dirty old furniture! Although this dirty one was a run for the money! LOL It was so gross inside!
Thanks for voting! I’m super excited about it, and I feel like I will win! You guys are awesome to vote for me and support me like this. Please try to vote daily. I’ll send a little reminder daily! 🙂 If you don’t mind. I really can’t do this without you all! Here’s the link to vote tomorrow: https://thriftdiving.com/vote
Thank you!!!
Well that turned out quite nicely!! Too nice to keep in the garage!! Question though how did you do that stencil?? I am pretty crafty but I haven’t been able to turn out a stencil that looks that good! Good luck with the contest, I voted!!
Hey, Debbie! I know, it does look a little out of place there with all that DIRT everywhere! As for the stencil, do you own a Silhouette? They’re pretty awesome at cutting out vinyl stencils. And the key is to DAB the paint on with a foam brush, with very light paint on the brush, otherwise, it will bleed.
Thank you so much for voting!! Please remember to vote daily!! You can go here to vote: https://thriftdiving.com/vote
Thank you!!