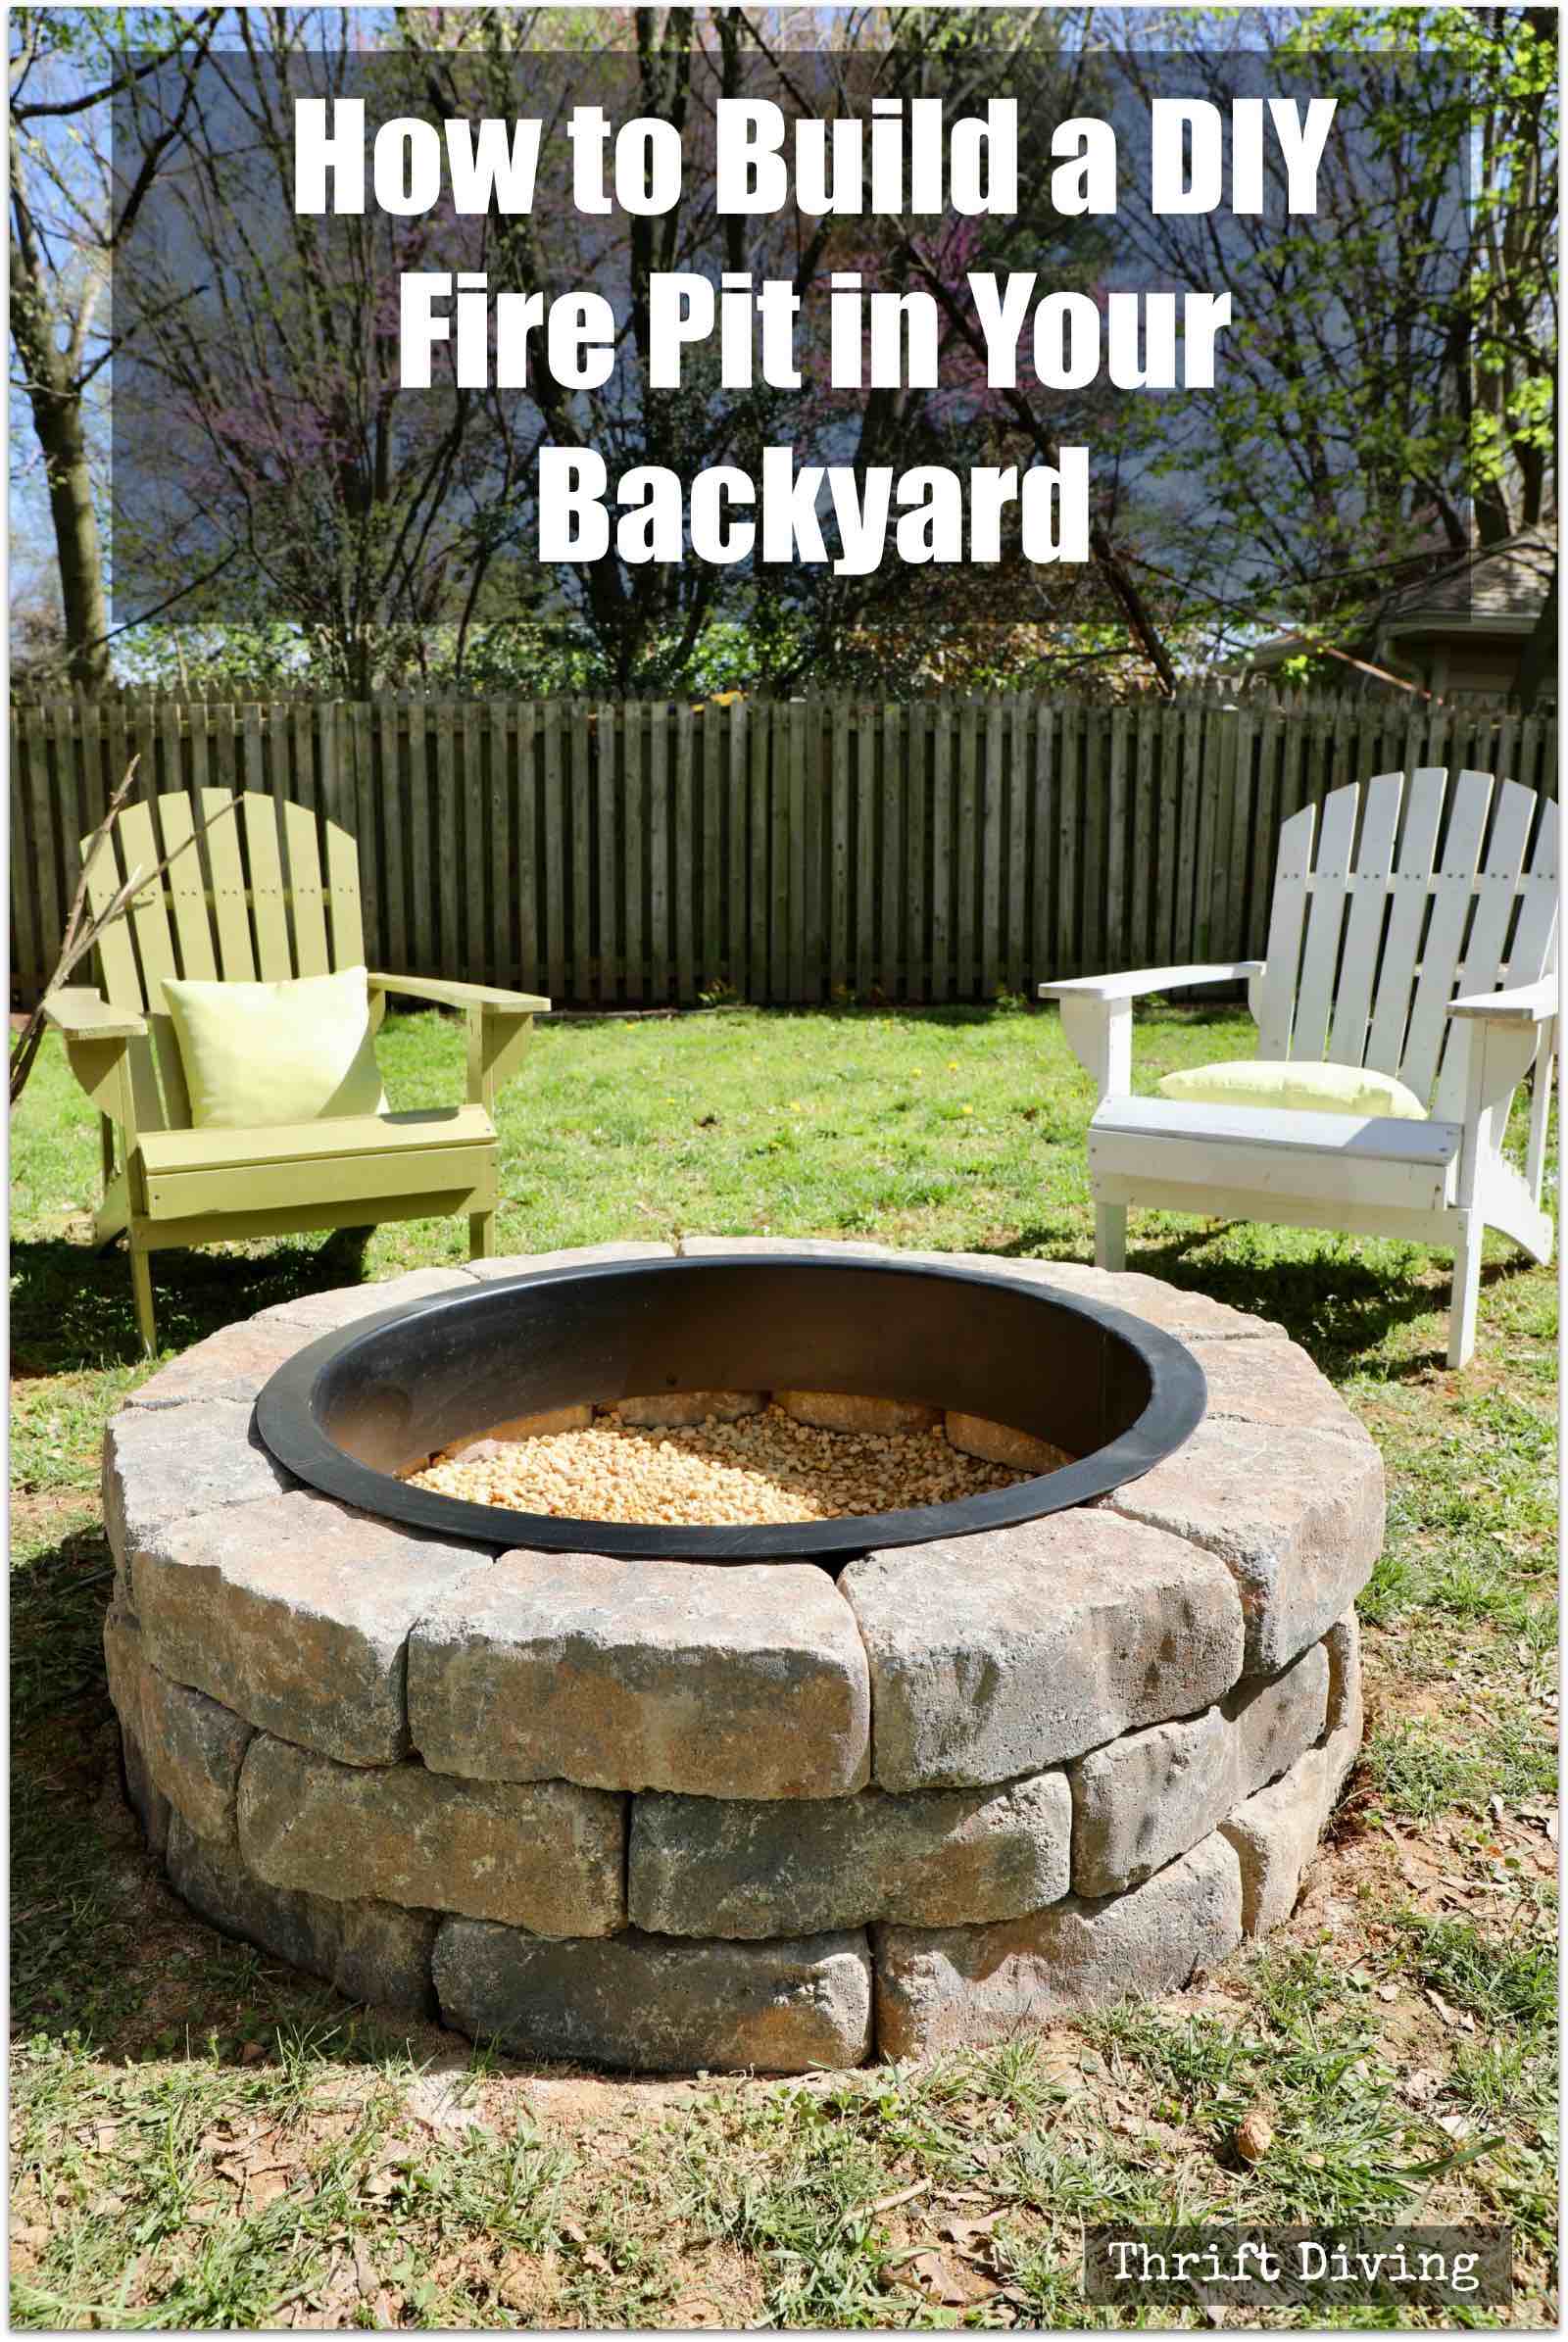
How to Build a DIY Fire Pit With Gravel, Stones, and Walkway
I can’t tell you how long I’d been wanting to build a DIY fire pit in my backyard, with a stone walkway. Projects always happen in stages, don’t they? You do one thing…realize an improvement you can make…then come back to it later to make it even better. That’s what happened with this DIY fire pit.
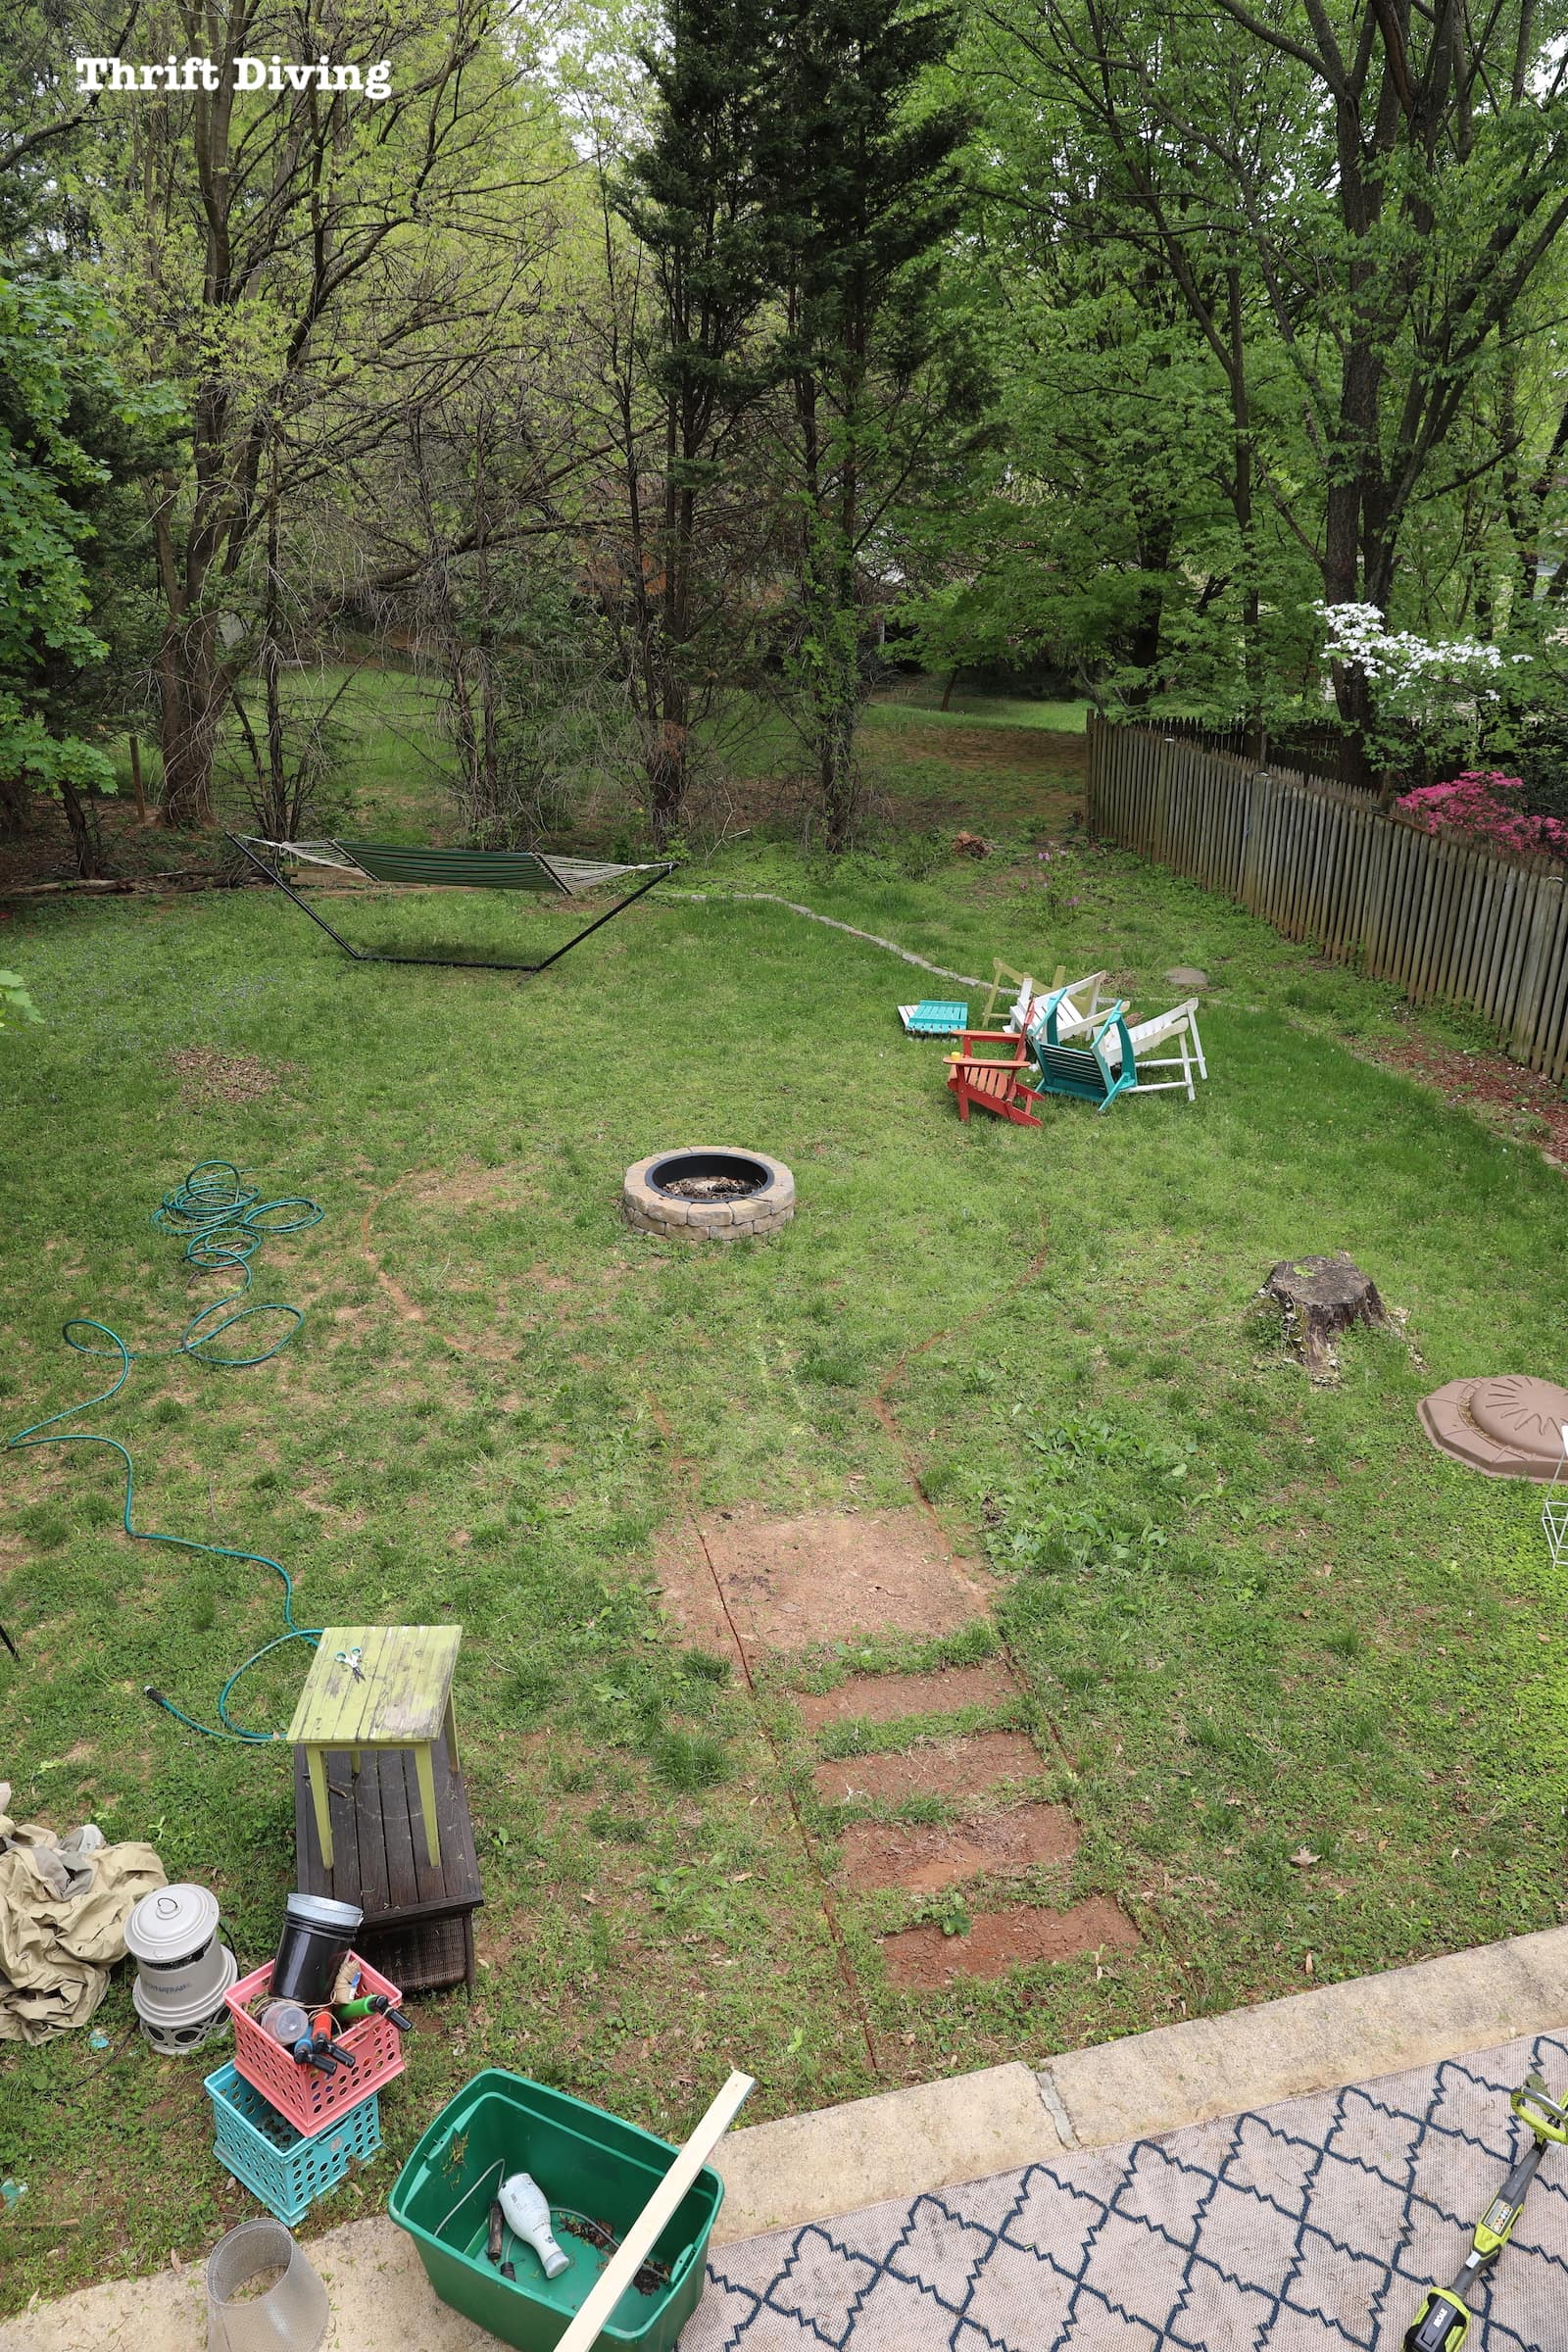
One summer, I built this outdoor DIY fire pit in my backyard, which was a labor of love for my middle son and me (since he’s not one to love DIY projects). It looked great and served its purpose for roasted marshmallows for my family. But it was sitting in the middle of the yard and needed a little something more.
(See how I make these DIY gazebo screens for my backyard gazebo, which makes me backyard feel even more like an oasis!).

Buuut….like any great outdoor project, what started out looking fabulous, within a year, it was quite broken-down and neglected. It’s inevitable: the sun fades things…the trees shed their gunk…and the weeds take root. My yard was a mess.
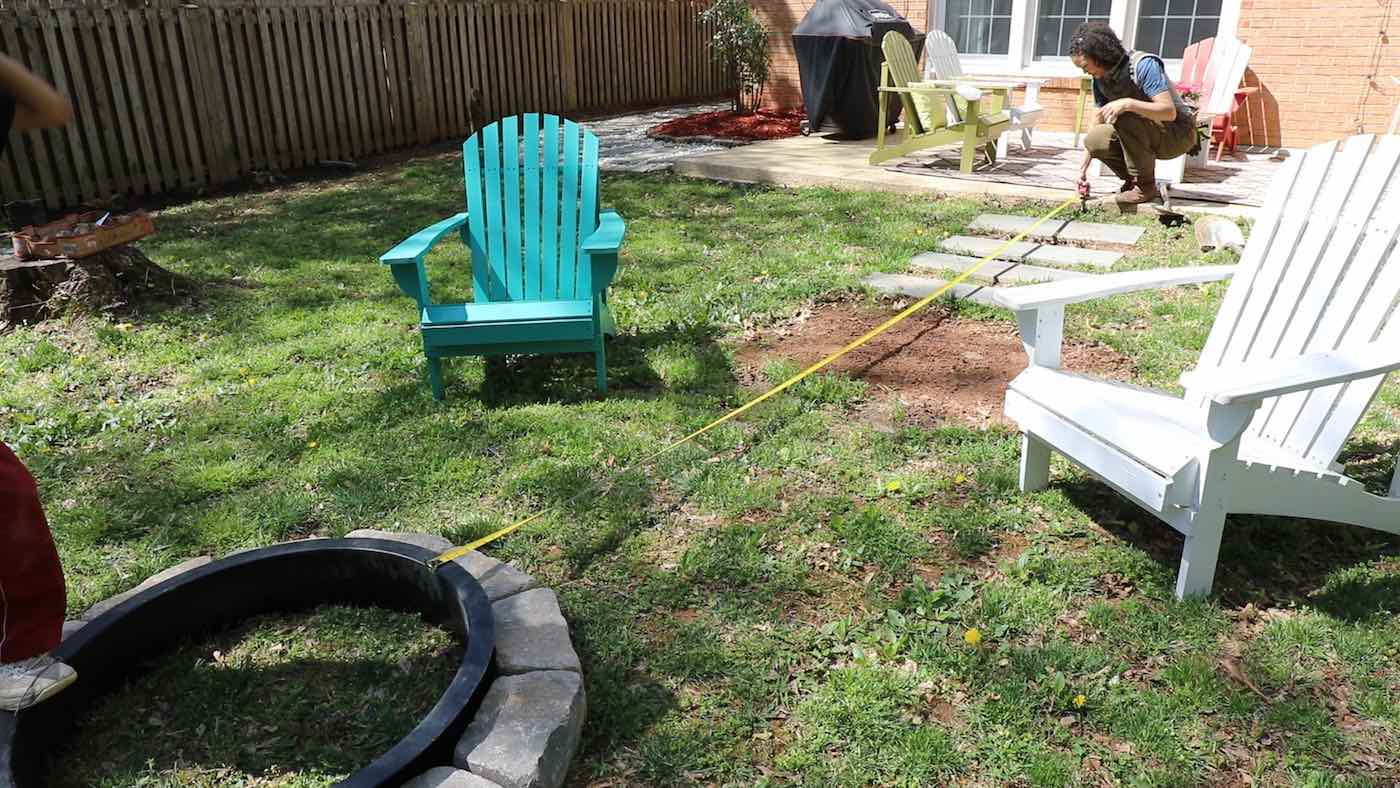
And what’s worse is that the amazing fire pit simply looked like a floating tire in my yard when viewed from my son’s bedroom window. There was nothing anchoring it to the yard. It needed a home, for sure (like a stone walkway!).
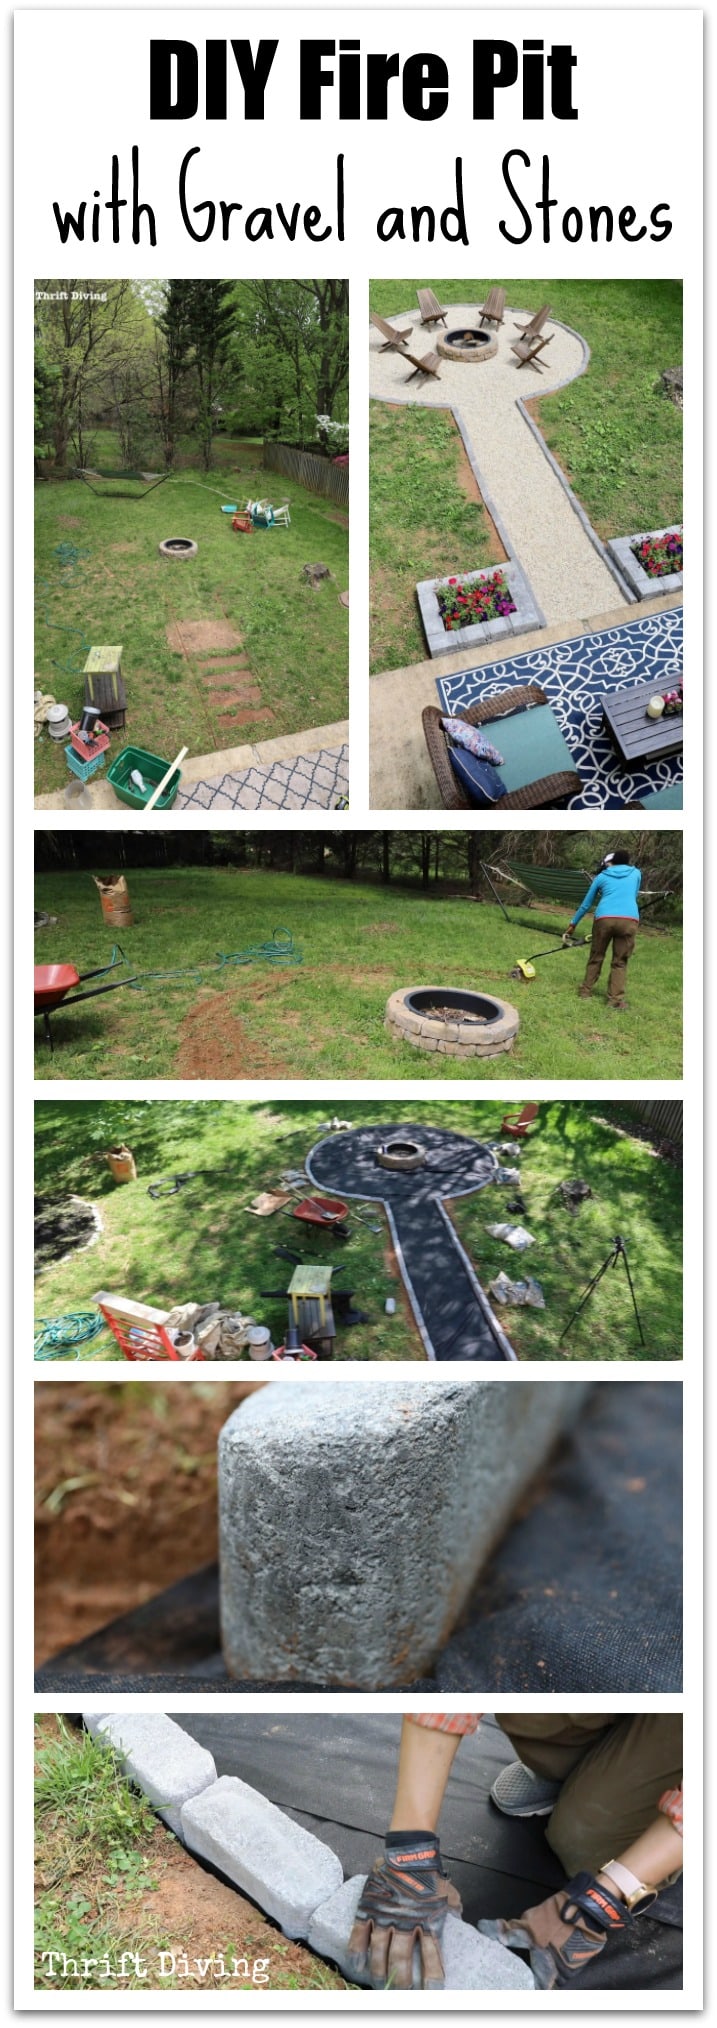
BEFORE
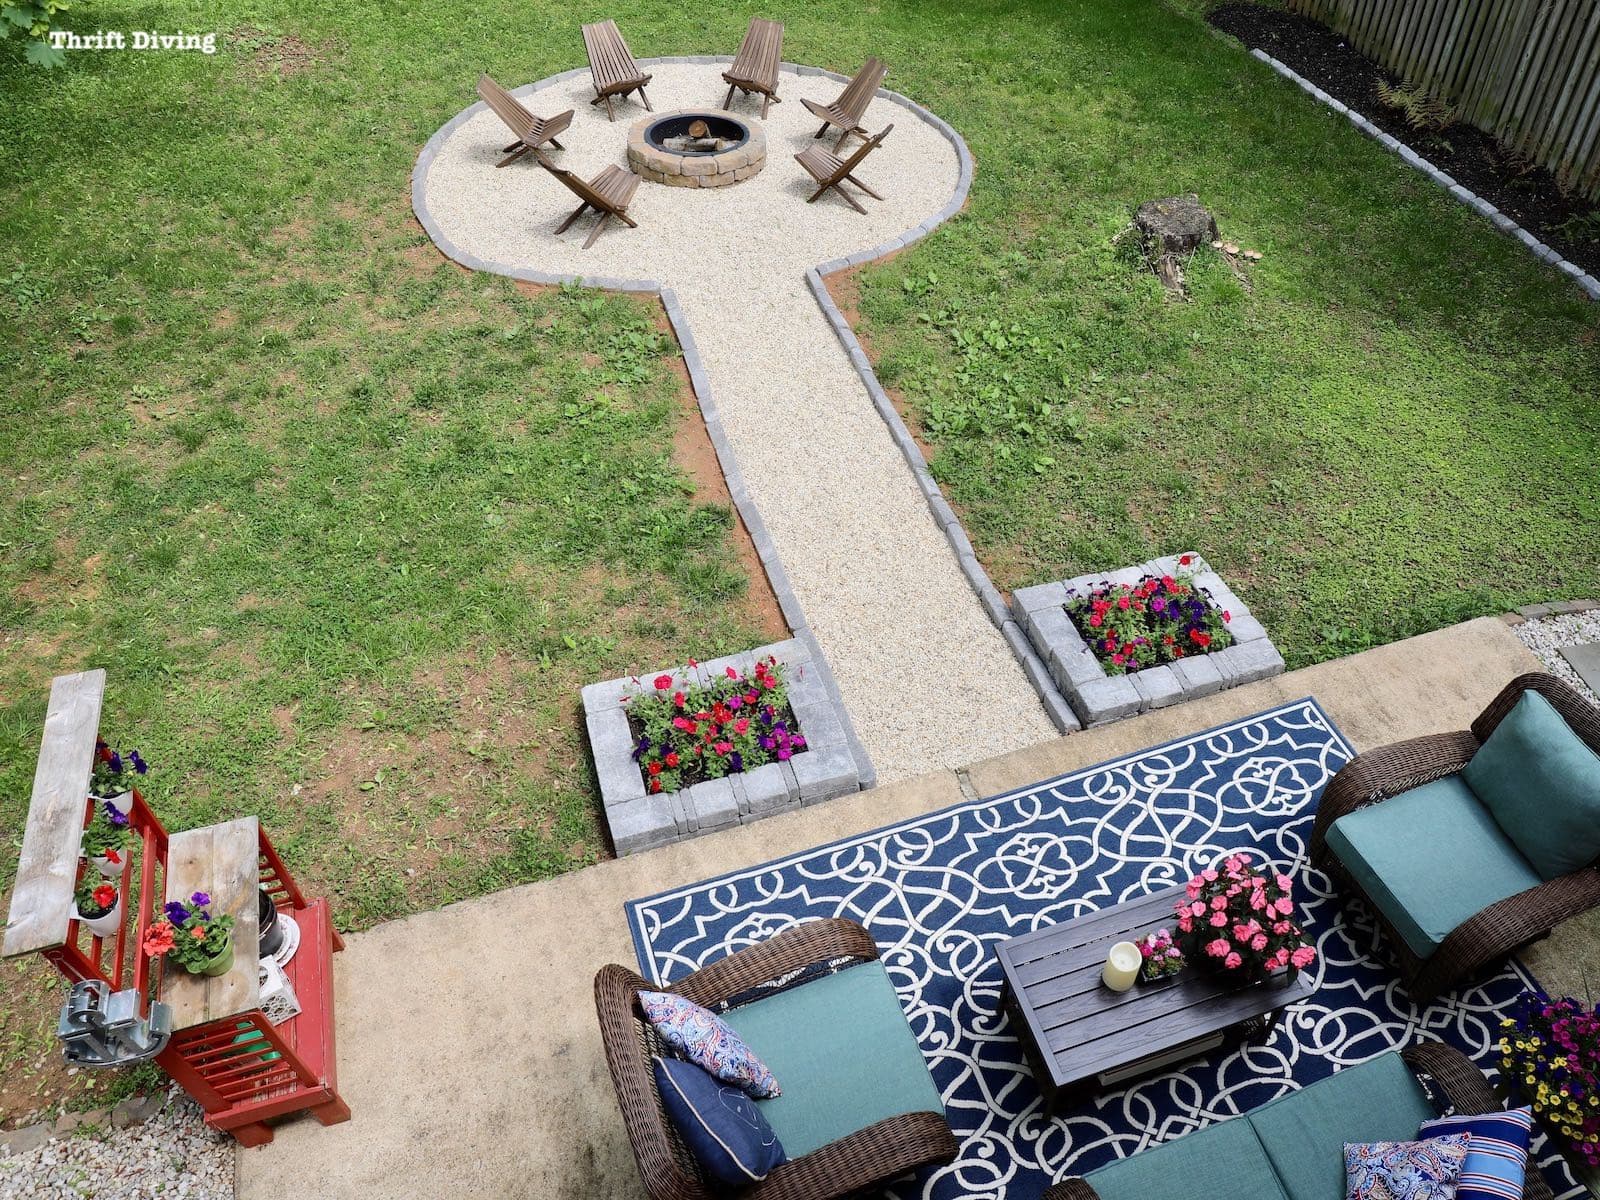
Sometimes projects are just like that, aren’t they? You start PART 1 of a project, thinking it’s all the rage and so wonderful….only later to realize that you’ve got to tackle PART 2. That’s exactly how this project was–split into parts. In fact, I am thinking that there are some perennials that I would love to plant along the DIY fire pit gravel and stone walkway. So there could very well be a PART 3 of this project. 😉 For now, this is how PART 2 turned out! Big improvement, eh??
AFTER
Video Tutorials: How to Build a DIY Fire Pit With Gravel and a Stone Walkway
Since this project was split over two springs, I’ll go ahead and split this post into two parts as well.
DIY Fire Pit Tutorial – PART 1
First, this tutorial will review the steps needed to create a DIY fire pit.
How to Build a Fire Pit Seating Area Using Gravel and Stones – PART 2
This tutorial will review the steps needed to create a DIY fire pit seating area using pea gravel and Pavestone Rumblestone edgers.
How to Build a DIY Fire Pit With Gravel and a Stone Walkway
Okay, now that we cleared up why this project was split into two separate projects, let’s walk through step-by-step how to create a DIY fire pit with gravel and a stone walkway! For the sake of clarity, I’ll combine all the necessary steps into one post so that you can tackle this project from start to finish with the assumption that you’ll be building the fire pit seating area at the same time you build the fire pit.
Let’s cover the materials you’ll need to build a fire pit with a seating area made out of gravel and stones.
Materials to Build a DIY Fire Pit with Stone Walkway
(The following contain Home Depot affiliate links).
- Fire Pit kit (you can also use concrete blocks)
- Pavestone Rumblestone Edgers
- Pea gravel
- Transfer Shovel
- Garden spade (for clean, straight edges)
- Tape measure
- Paver Sand
- Tamper
- Level
- Tape Measure
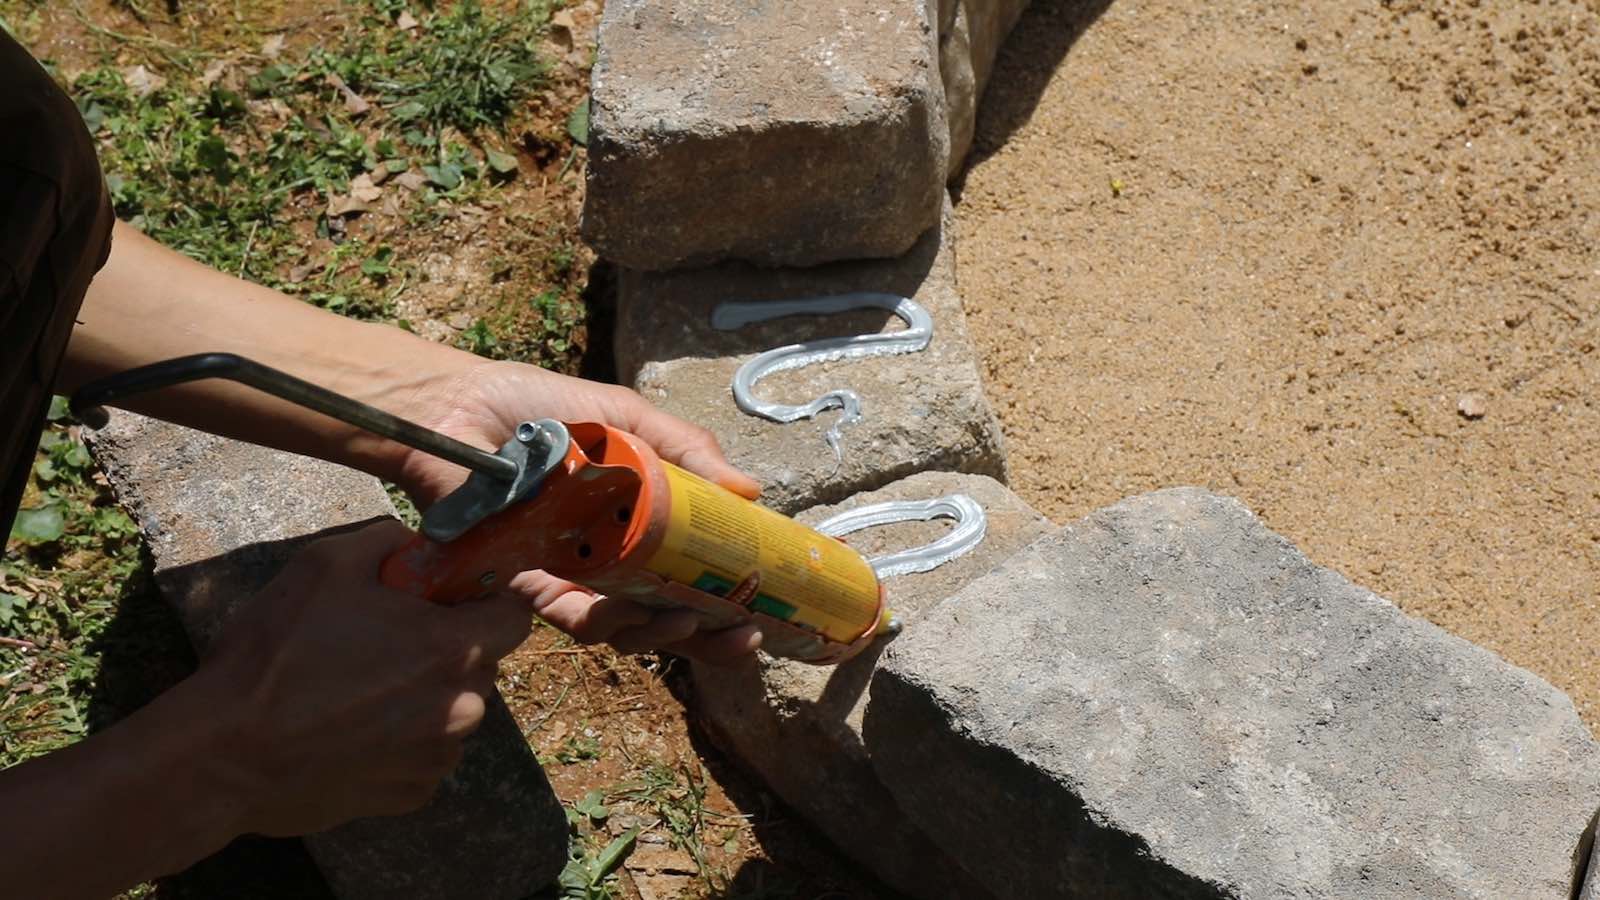
- Landscape construction adhesive
- Caulk gun
- Fire pit chairs: These are the ones I used
- Mallet
- Wheelbarrow
- Weed Block fabric
STEP 1: Call 811 Before You Dig
Did you know that before you dig anywhere on your property, you should call 811 in order to have someone come and mark on your property where your buried utility lines are??
Yep!
It doesn’t matter if you’re installing a mailbox…planting trees or shrubs…or installing a fire pit. You should definitely call to be safe. They’ll come to your property and mark the location of your utilities. If you don’t mark your utilities and you cut your utility lines, guess who gets stuck with a fine? Oh yes, you are, my friend!
They usually come pretty quickly. And since you’re building the fire pit in the backyard, it’s unlikely (but not impossible) for the utility lines to run through your backyard. But don’t assume. You know what they say about people who make assumptions. 😉
Here’s a little tip: Snap a picture of where the utilities have been marked and save it. You’ll be able to reference it later.
STEP 2: Determine How Far Your DIY Fire Pit Will Be From the House
This is another thing you have to do before you build a fire pit: check your county code!
How far will does fire pit need to be from your house?
Here in Montgomery County, Maryland, the code says that fire pits must be at least 20 feet “from any structure.”
Ummm….does that mean, 20 feet from the edge of my patio…? Or 20 feet from the brick of my house?
I had no idea what they meant by “any structure.” I even tried to call for clarification, but they just kept repeating: any structure. Sounded like they really didn’t know, either.
So to be safe, I decided to move my DIY fire pit back another 5 feet so that it was 20 feet from the edge of my patio.
I also made sure that it was 20 feet from the side fence.
I don’t know about your neighbors, but if you’ve got some questionable neighbors as I do, believe me–they’ll report you the smallest thing–even having a DIY fire pit. But if you follow building codes for your jurisdiction, you are totally covered. If an inspector shows up at your door, you’ve covered your bases.
Making sure that my fire pit is up to code means one less thing I have to worry about. Plus, if we ever sell our house, I won’t have to worry about moving it when a home inspector comes through looking for any infraction!
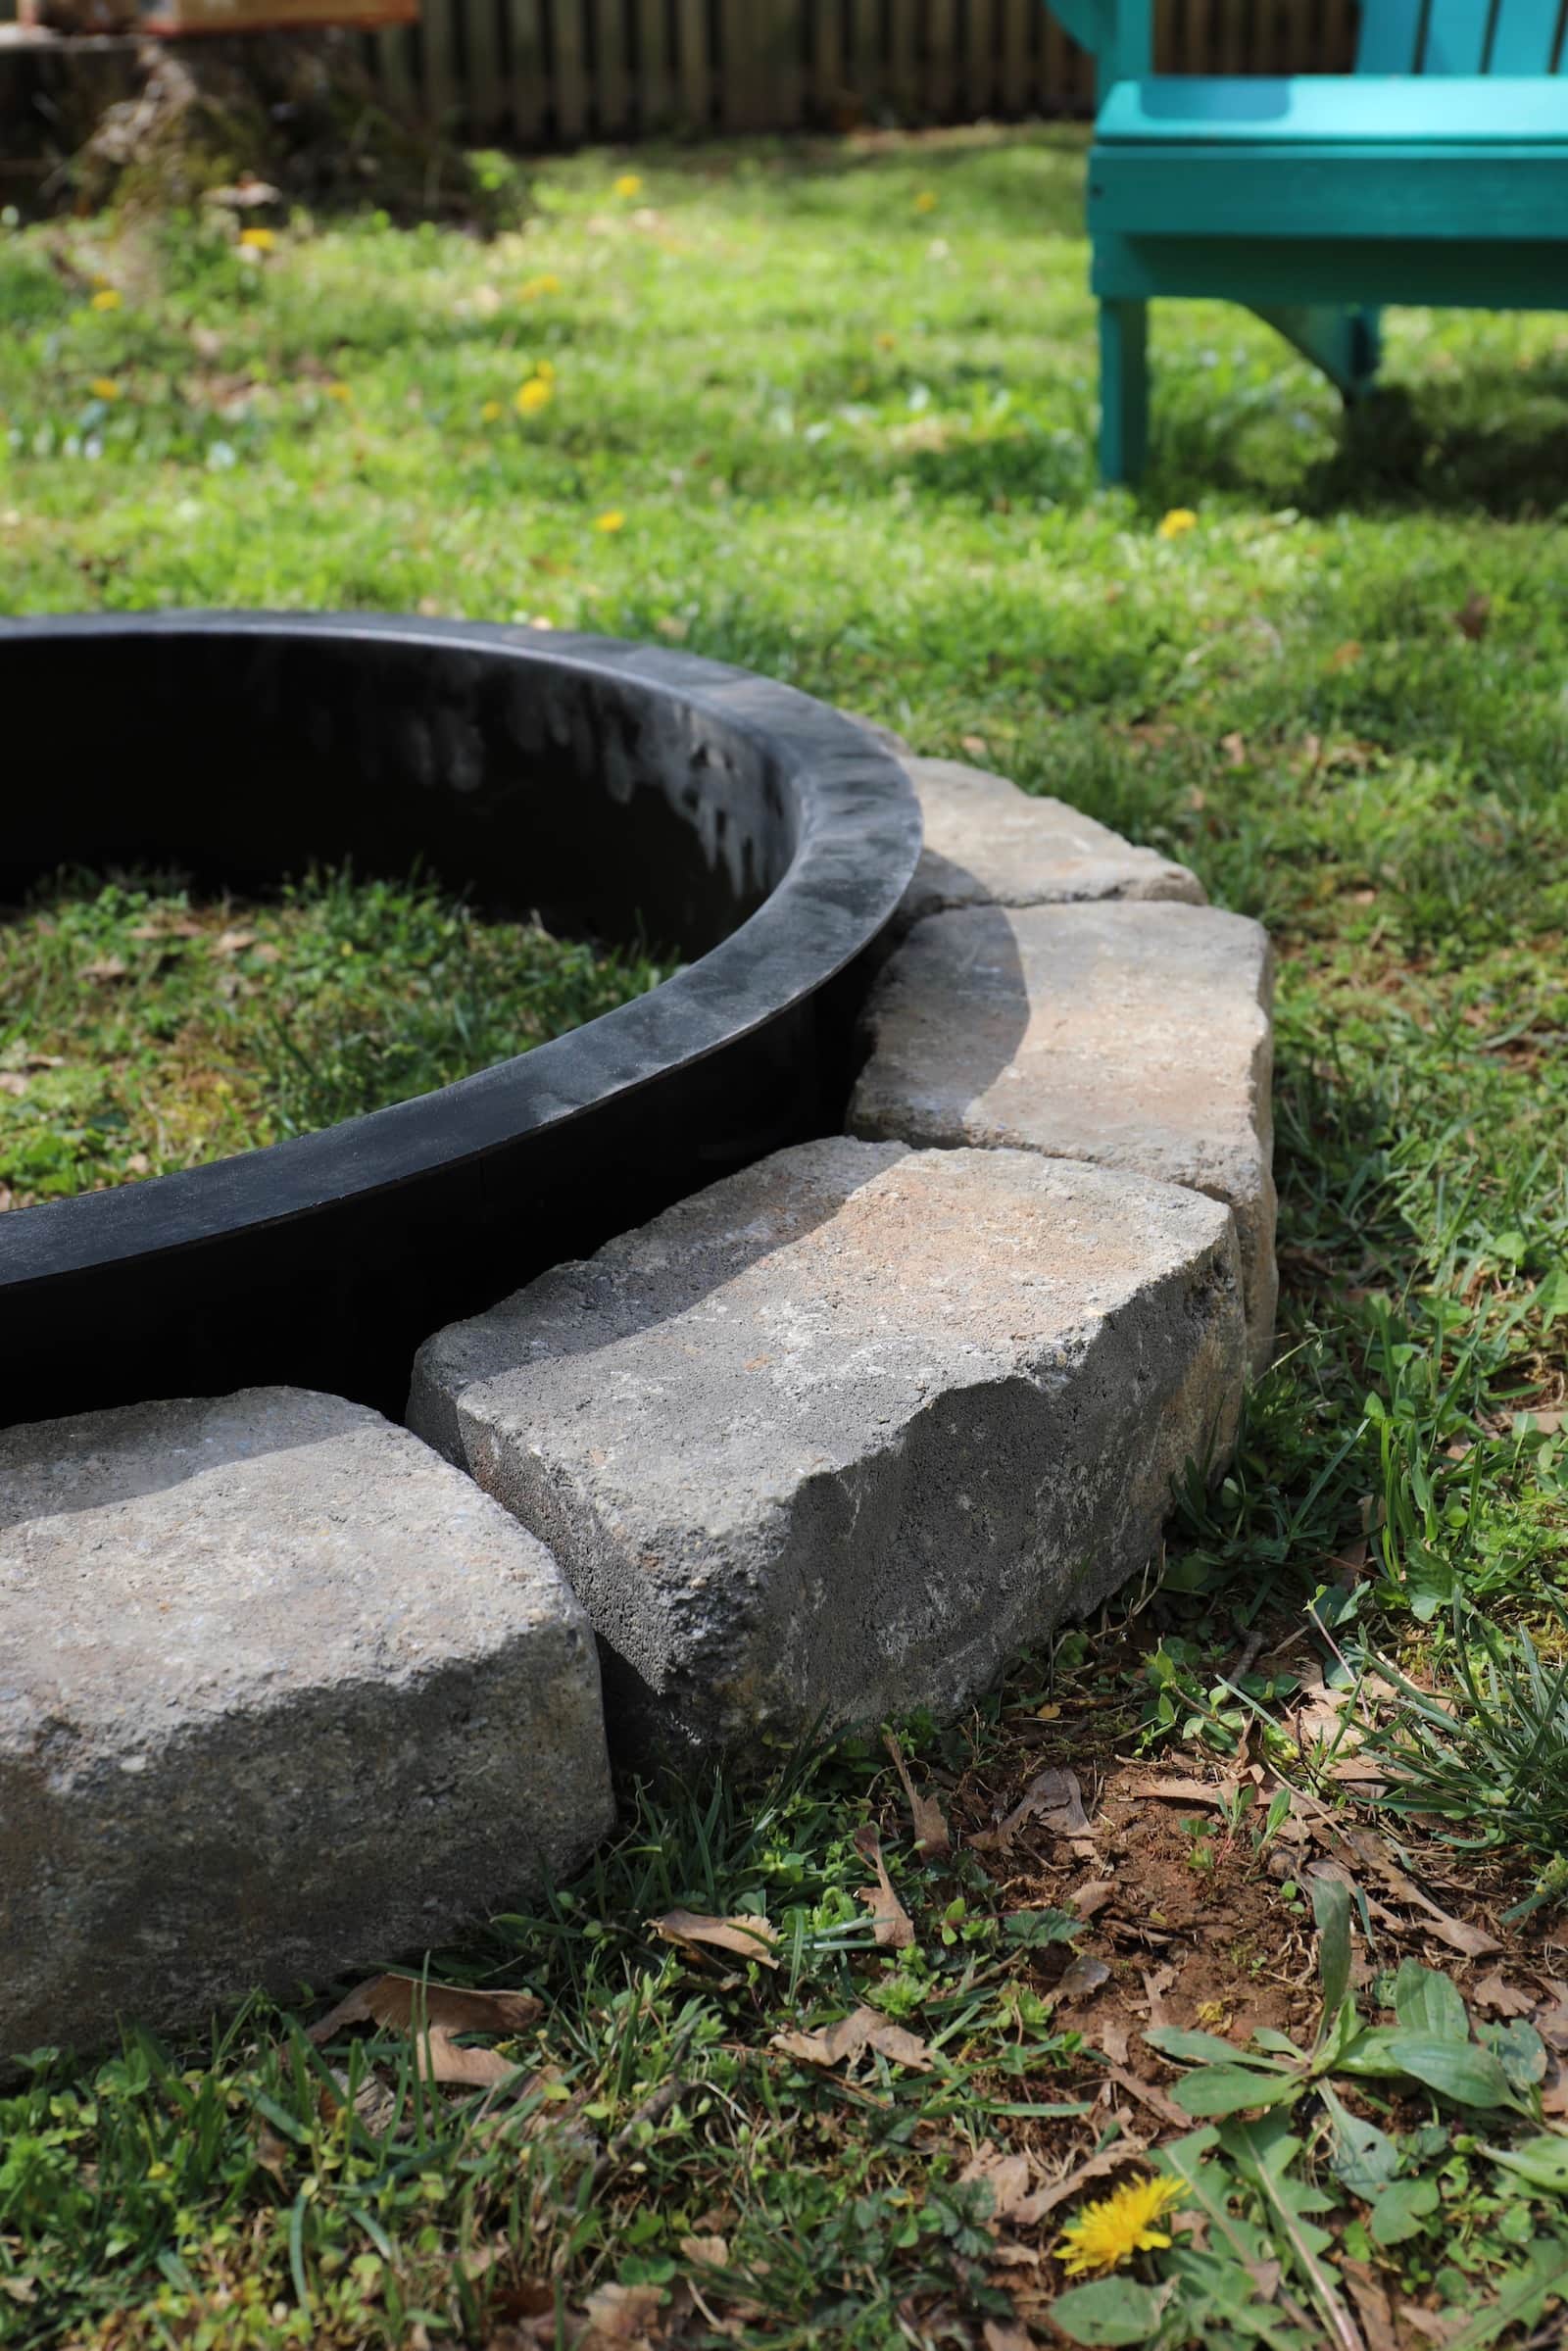
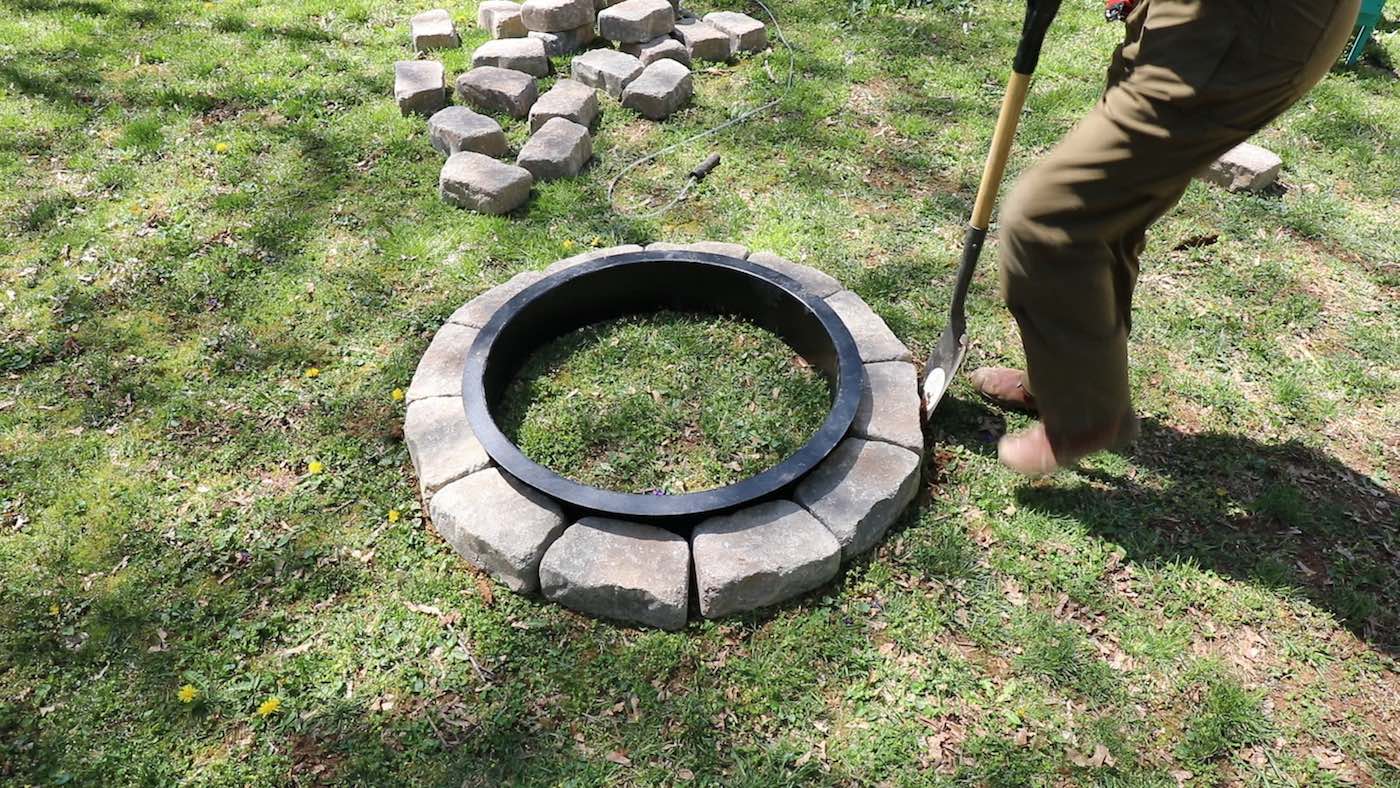
STEP 3: Plan Your First Layer of Fire Pit Bricks
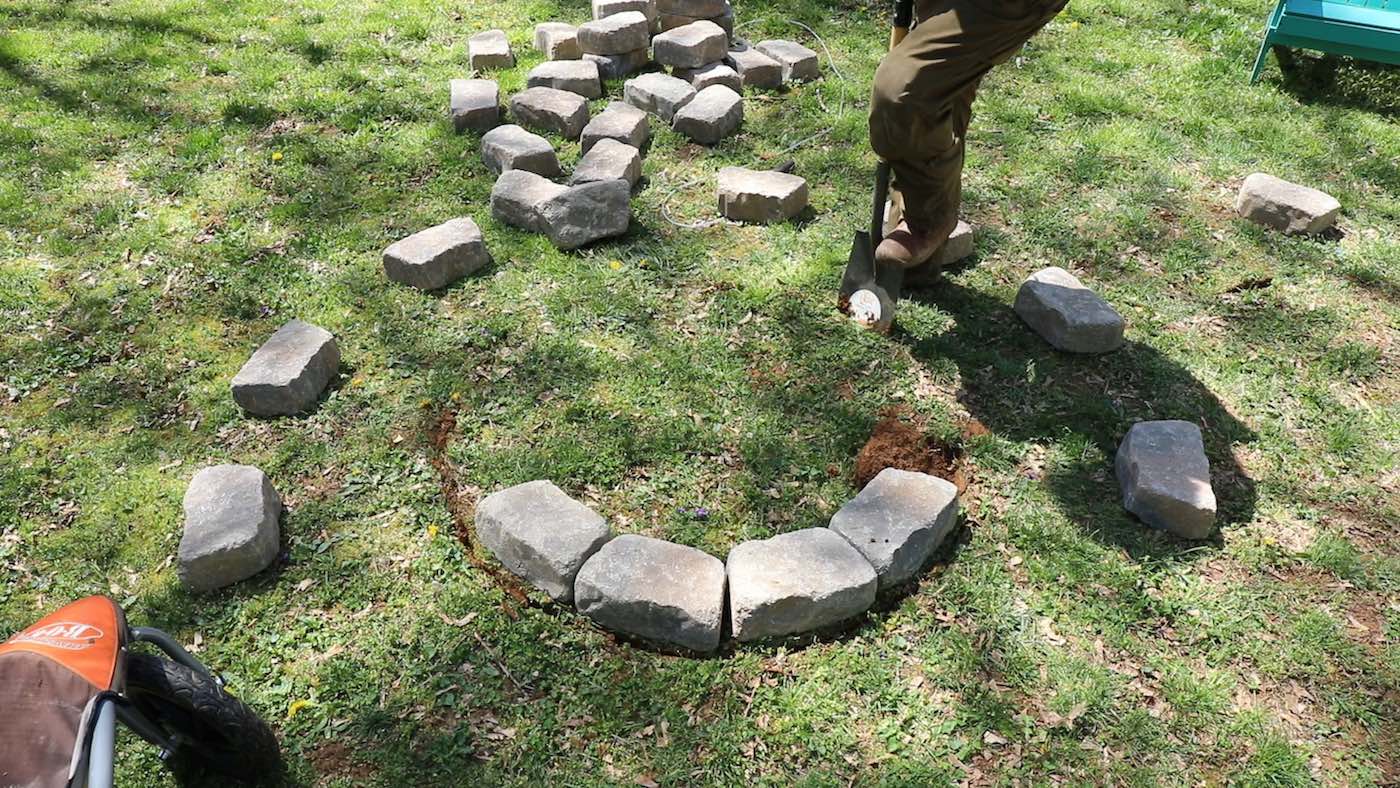
I laid out the first layer of the bricks at the 20-feet mark, adding the ring so that I knew exactly where I would be placing it in the yard.
You can make a DIY fire pit out of random bricks or stones, but you can also buy fire pit kits from home improvement stores like The Home Depot. They usually range in price from $200 – $600, spending on the bricks. But you could also use concrete blocks to build one for super cheap. But the kits have everything you need to build a chic fire pit.
STEP 4: Mark Your Fire Pit Seating Area and Path
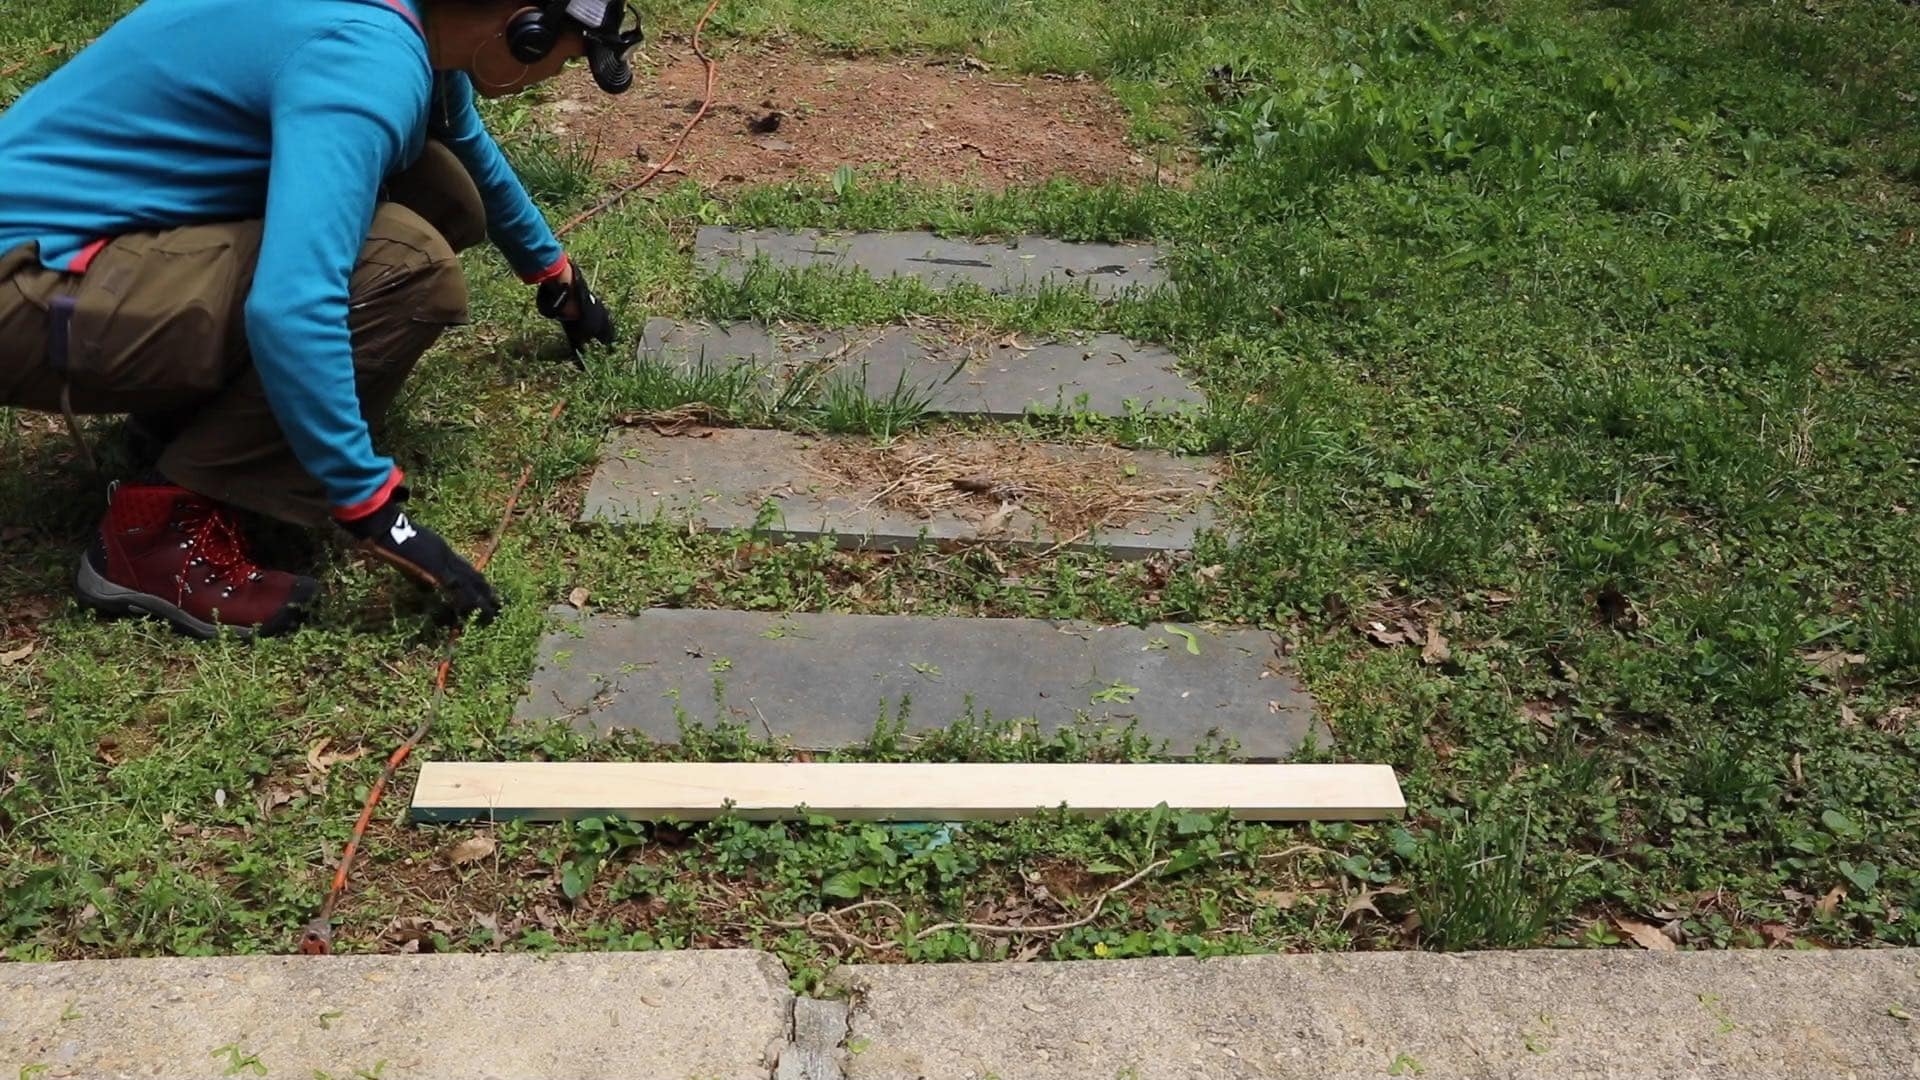
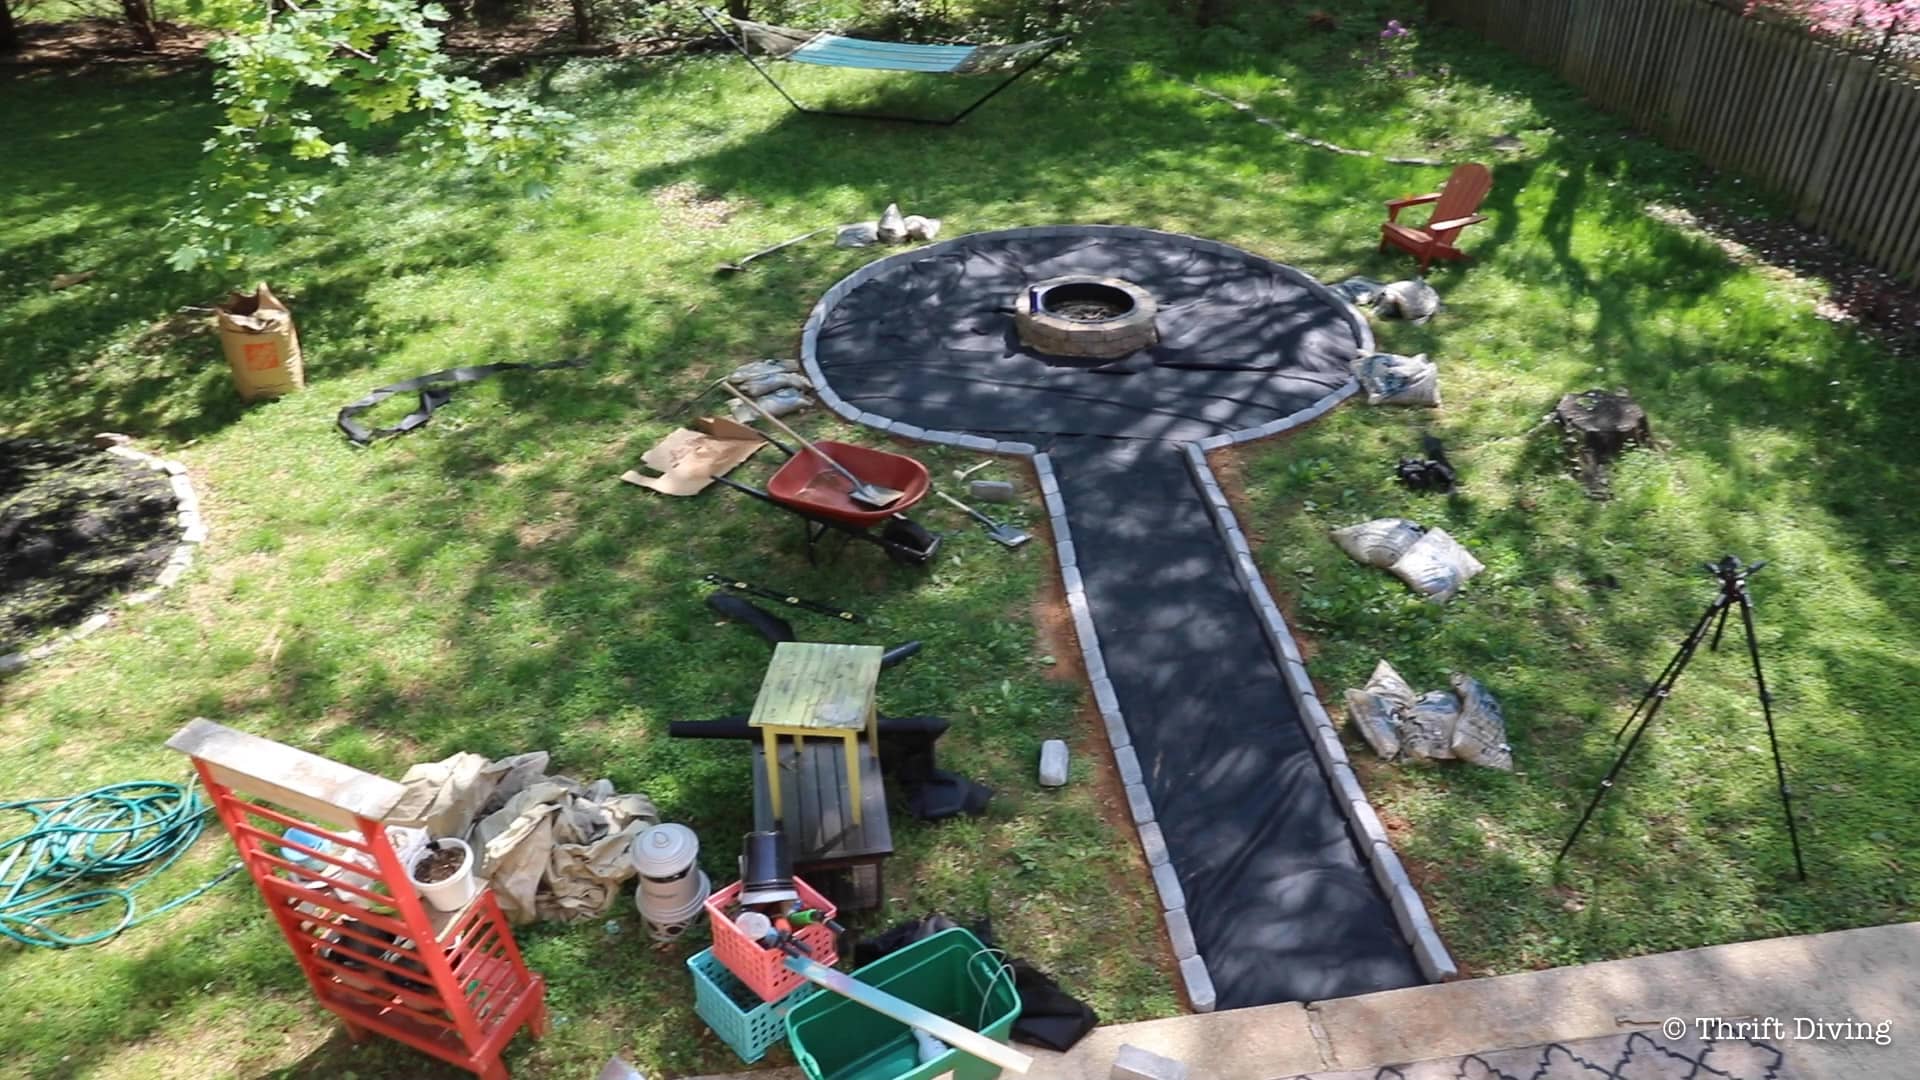
Usually, fire pit seating areas have a path that leads “to” and “from.” Not always, unless you’re just creating a circle fire pit seating around the fire pit. But if you’ve got a patio or deck, you may want to create a walkway leading to the fire pit seating area.
The biggest challenge will be: KEEPING IT STRAIGHT! You don’t want any “wonky walkway” that looks like a novice DIYers got their hands on it.
I love walkways that have some curve to them when the fire pit seating area is off-set. In my case, the fire pit was directly in front of the patio, so there was no need to get all fancy. I just needed a straight walkway leading to the fire pit seating area. To keep it straight, I simply used a board measuring about 36″ long as a gauge of how wide my fire pit walkway would be.
Last year when I put in the fire pit by itself with no defined walkway or seating area, I simply set the stones in place and dug around the stones to mark where the fire pit was going to be placed. I used a shovel along the edges to mark the grass where the stones would be sitting.
Then I moved them out of the way and started digging a little deeper to define that DIY fire pit circle location where the fire pit will site. Note: If you’re only putting in a DIY fire pit, then you can simply start digging and follow the other directions for a DIY fire pit. But if you’re putting in a seating area as well, then you’ll just need to mark the location of your fire pit bricks because you have a bit of marking left to do.
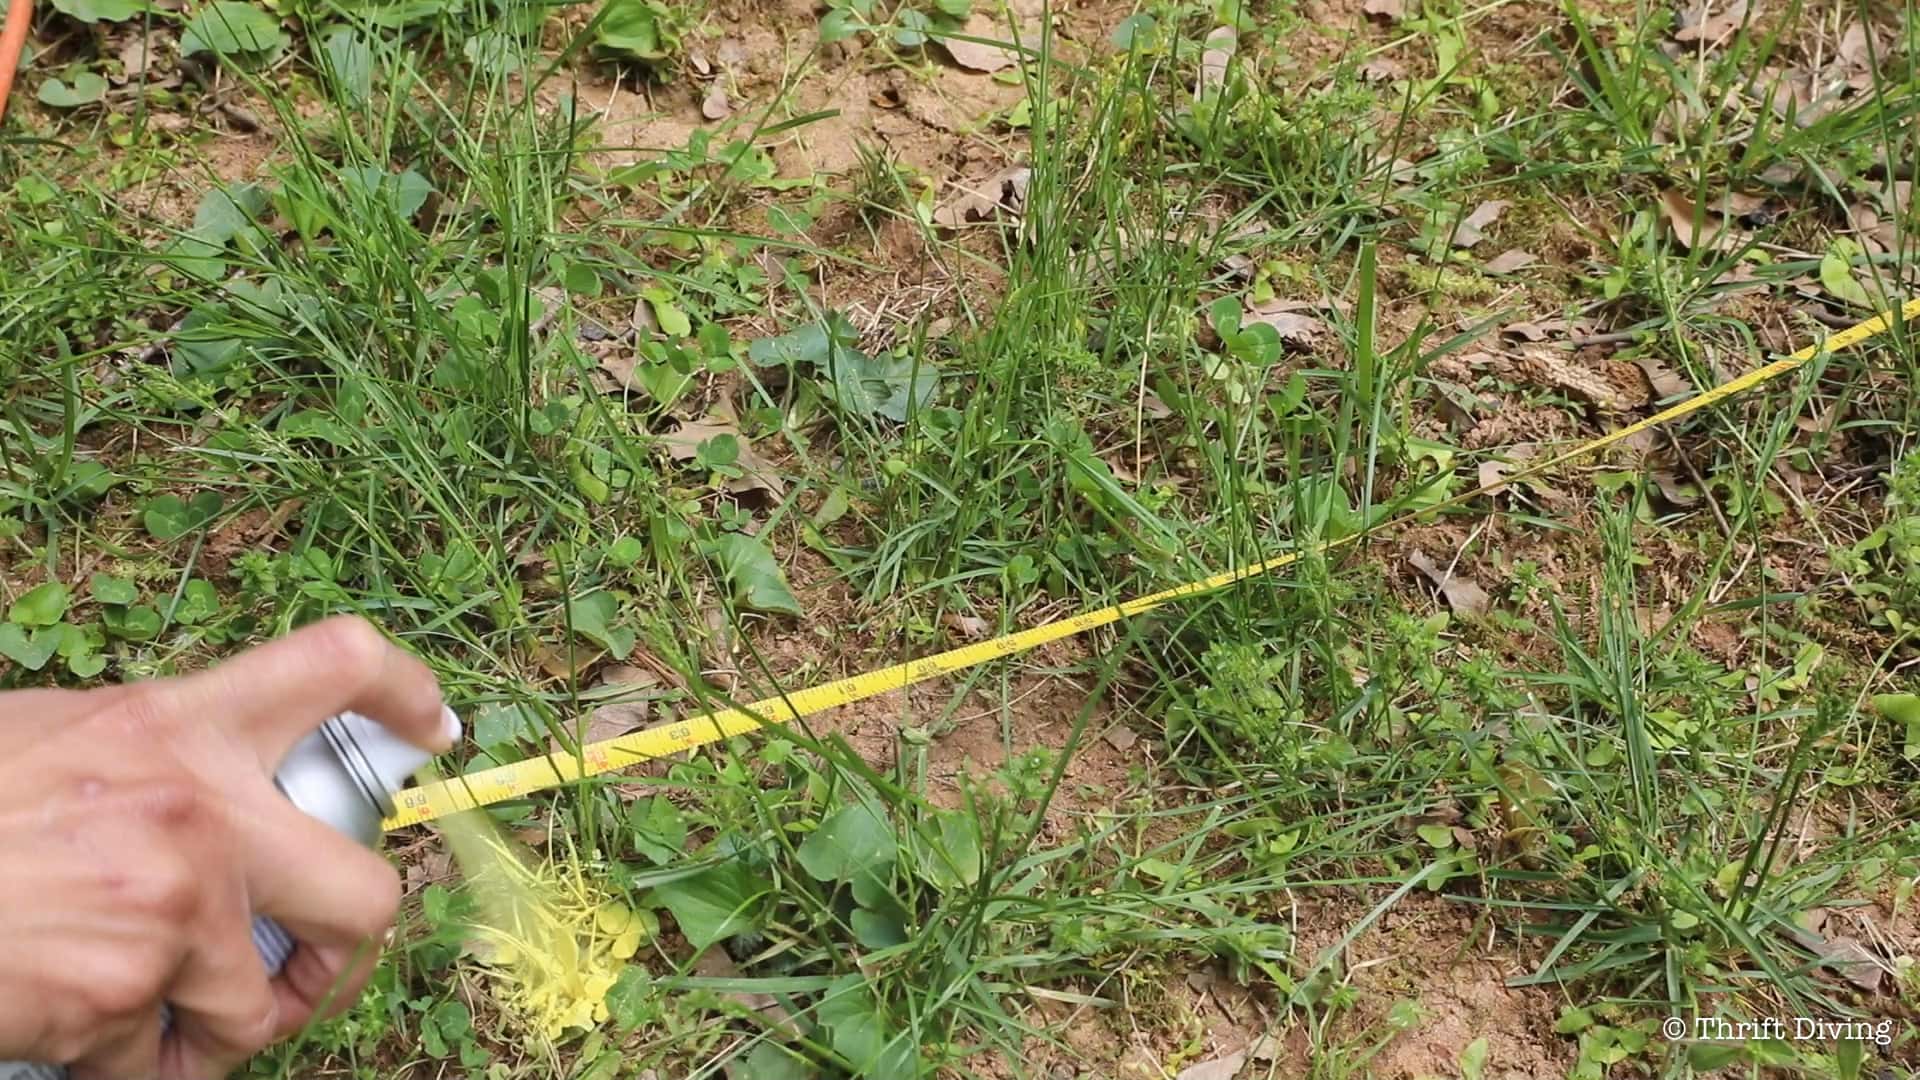
How to Measure a Perfect Circle Fire Pit Seating Area
The easiest way to create a perfect circle around your fire pit is to put a stake in the center of the fire pit and attach a string to it, going around the circumference so that all your measurements from the center of the fire pit would be perfect.
In my case, I didn’t have a stake or a string, so I simply measured 5’5″ from the edge of the fire pit bricks and marked the length with spray paint.
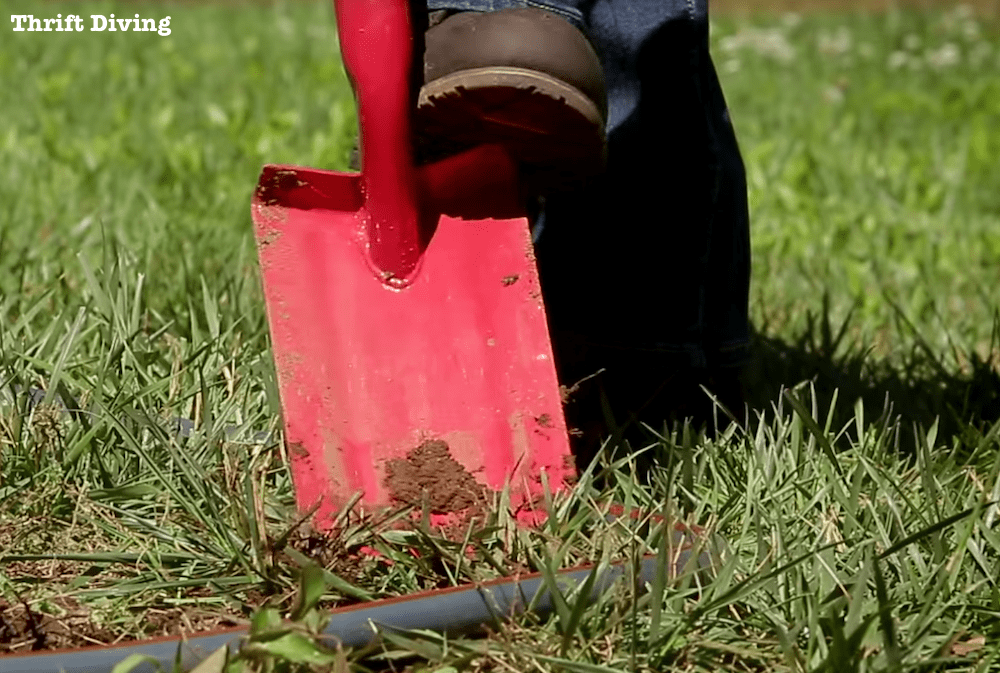
STEP 5: Dig Down 2 – 3 Inches
If you’re only putting in a DIY fire pit with no seating area, you’ll only need to dig out the area where your fire pit will be seated. Dig down 2-3 inches.
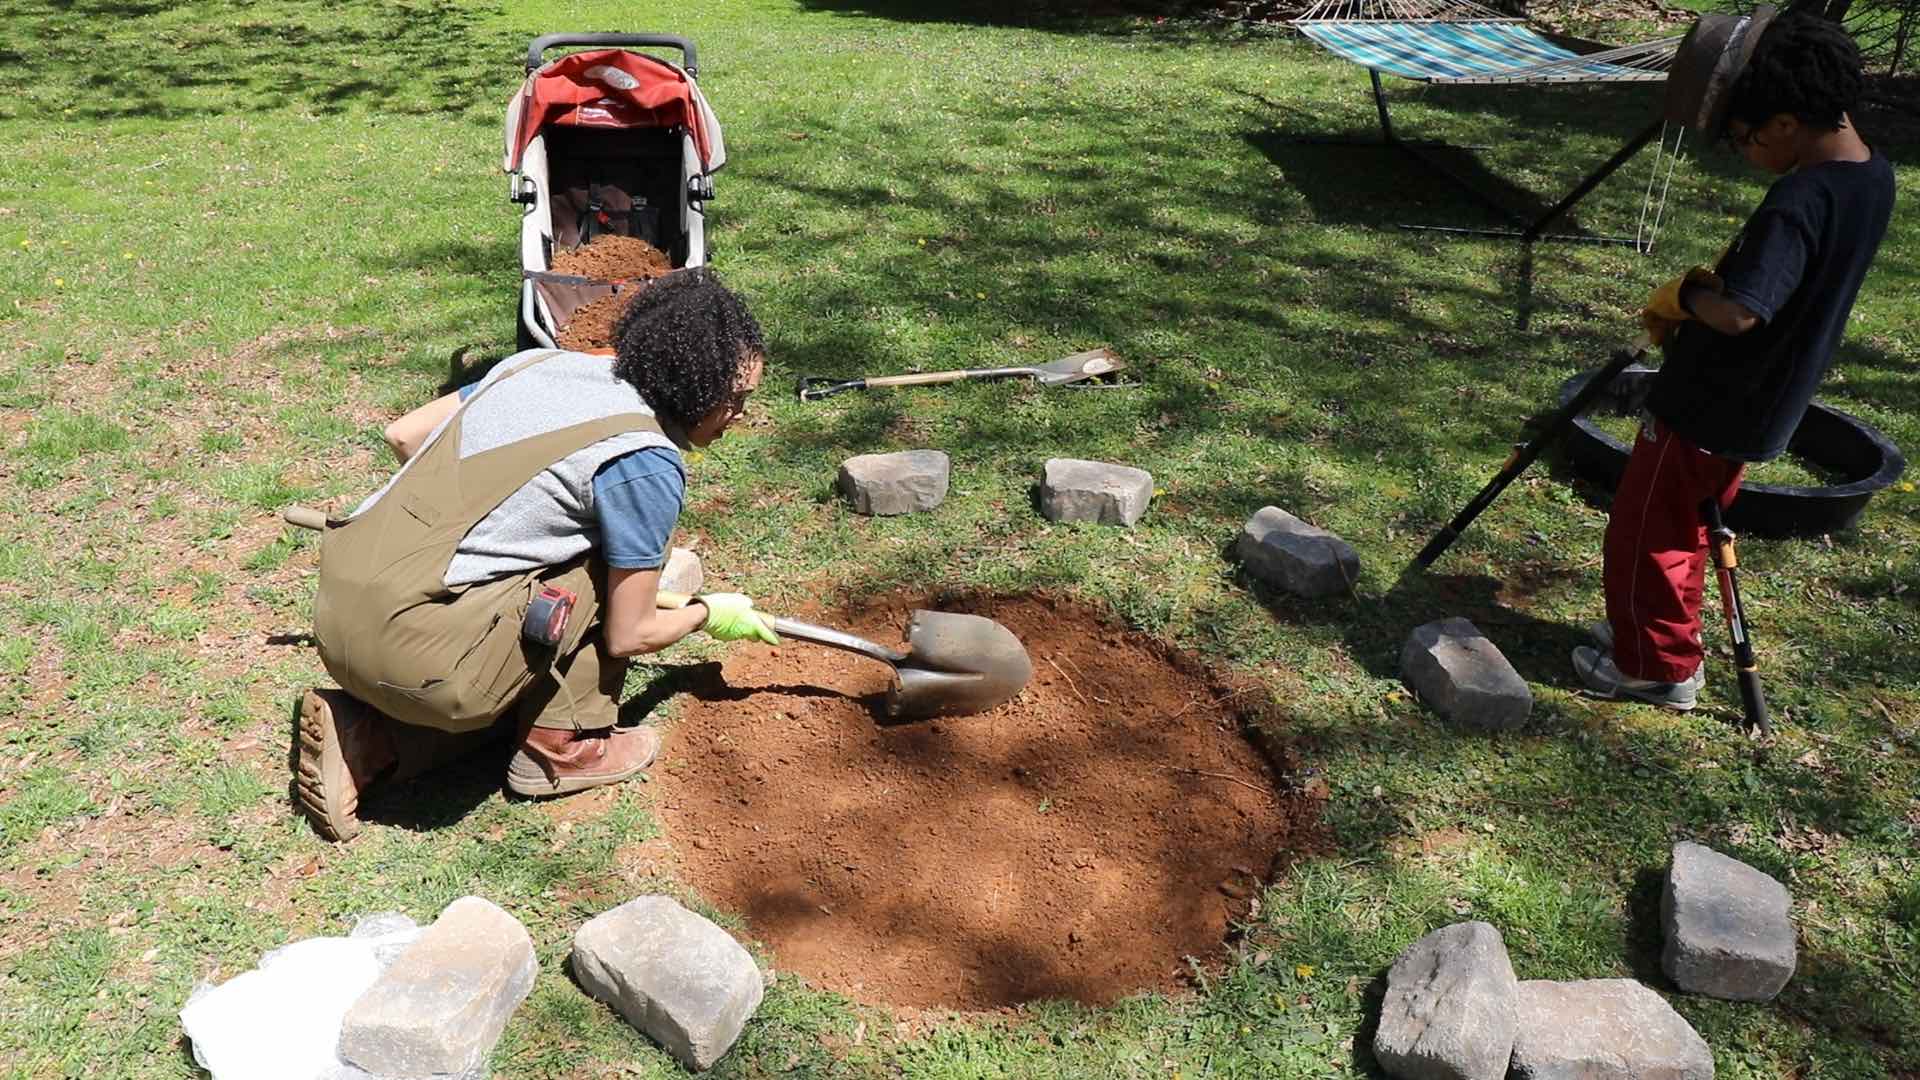
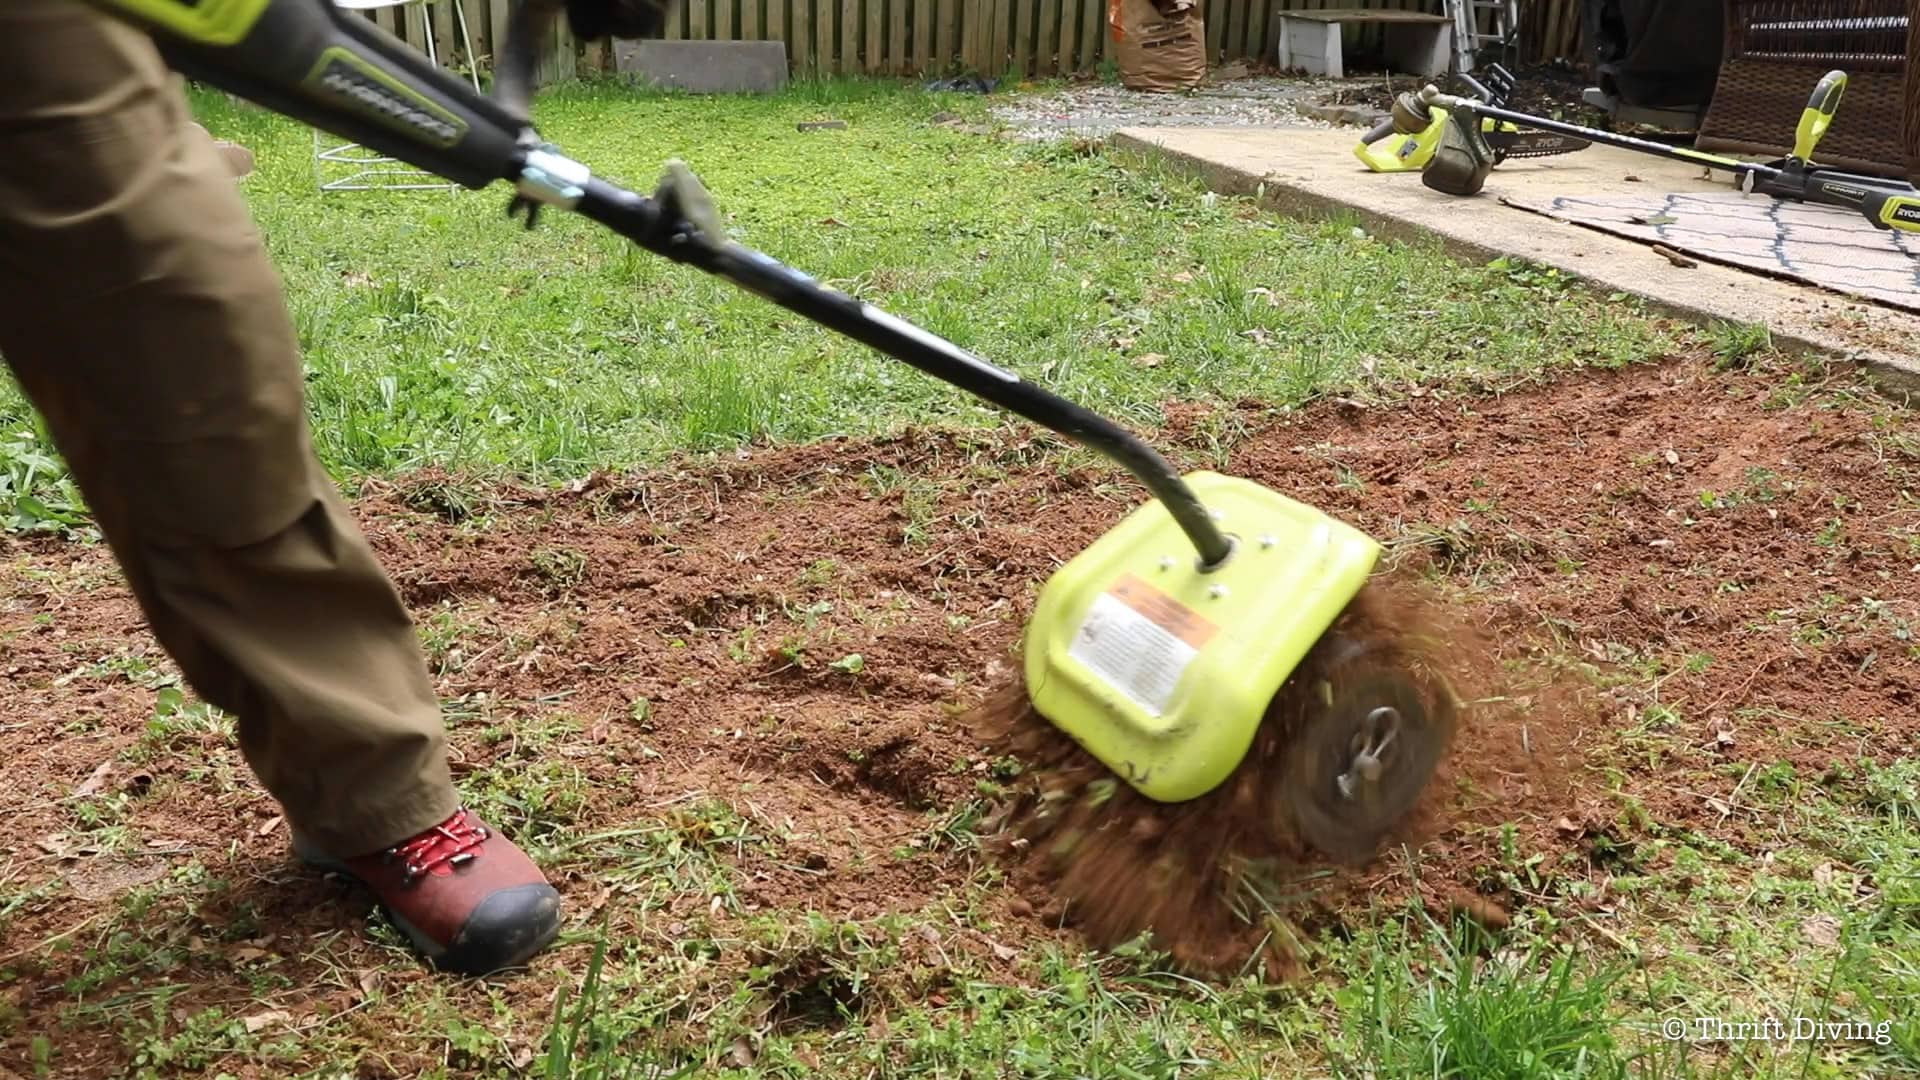
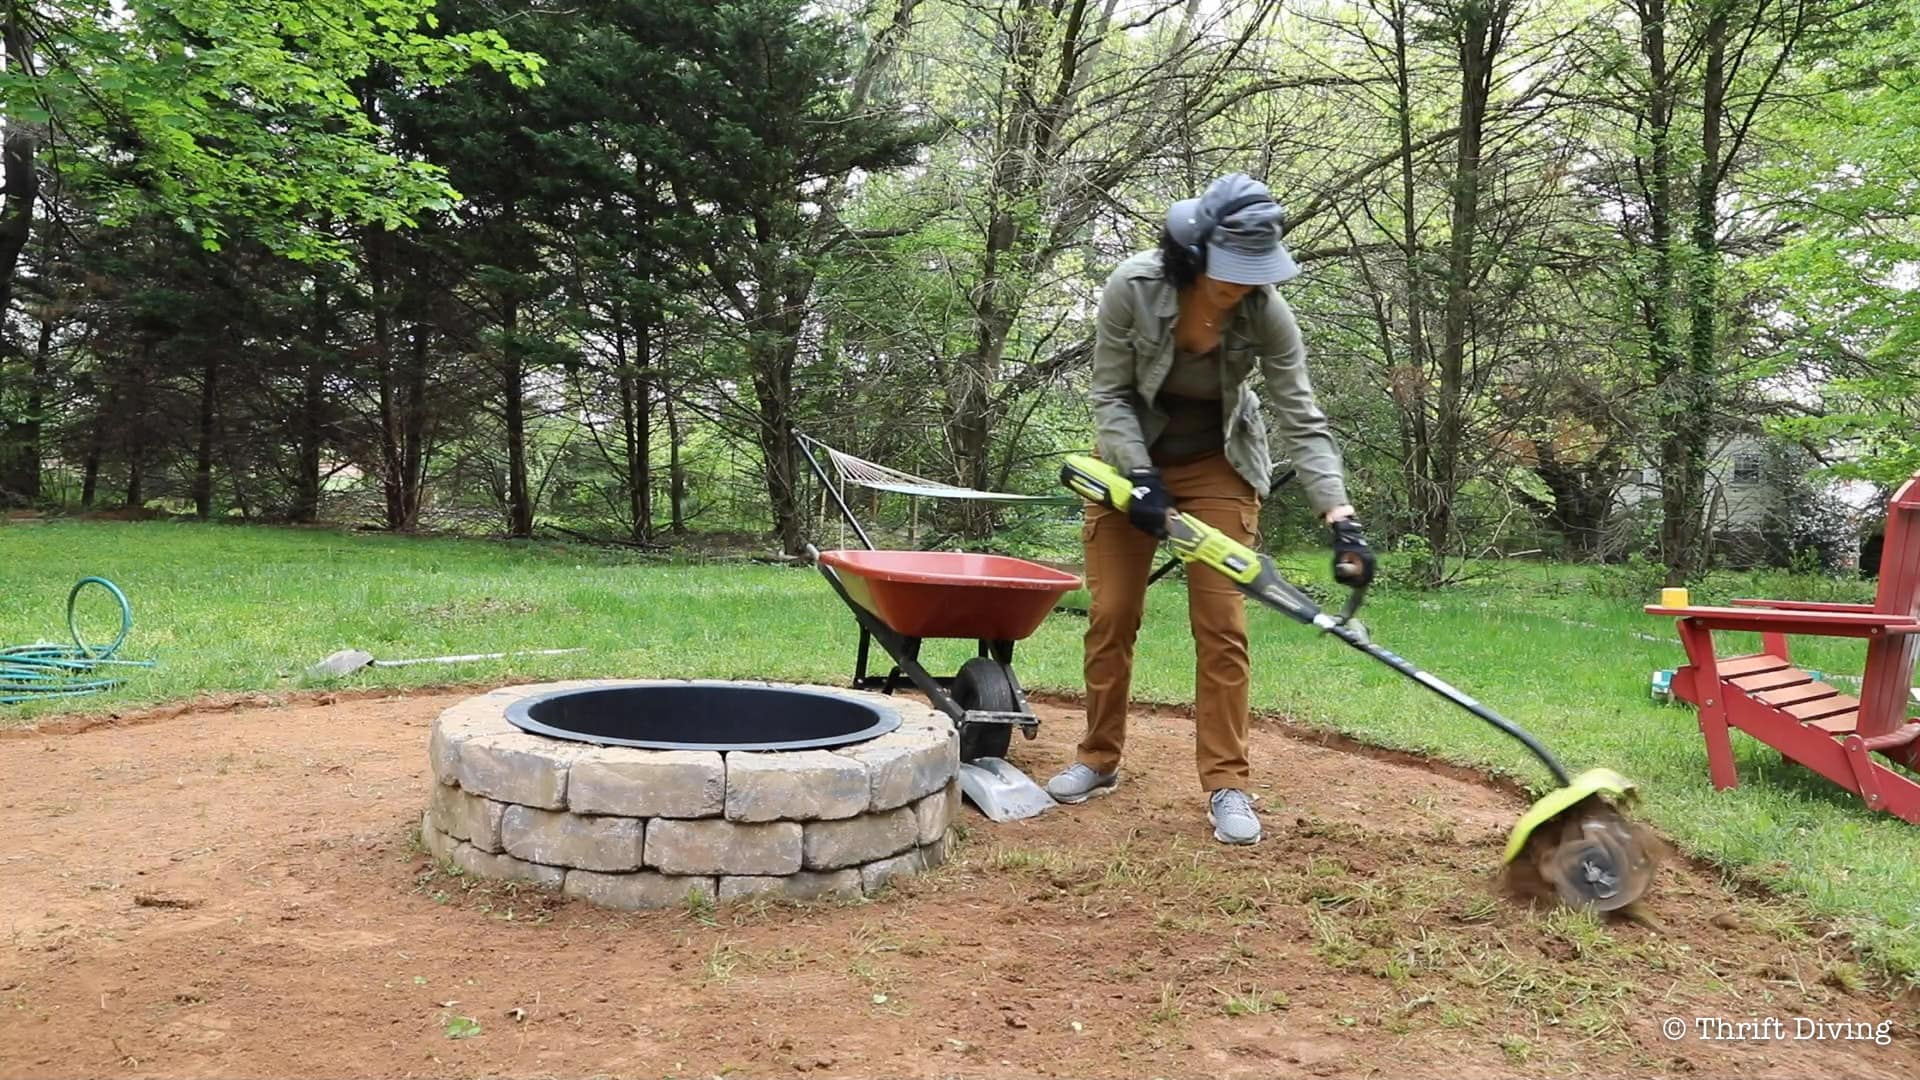
If you’re putting in a seating area and a walkway leading to the fire pit, you’ve got a whooooole lotta digging to do. For this part of the project, I used a cultivator, but if you have the means to do it, rent yourself a bigger tool from The Home Depot for sod removal. It will make the job go much quicker. The cultivator worked, but it added to the workload.
There will be a lot of soil you’ll have to remove while you dig down 2-3 inches, so be prepared with a wheelbarrow and some shovels to even out the area.
Related: See how I planted a blueberry garden in my yard.
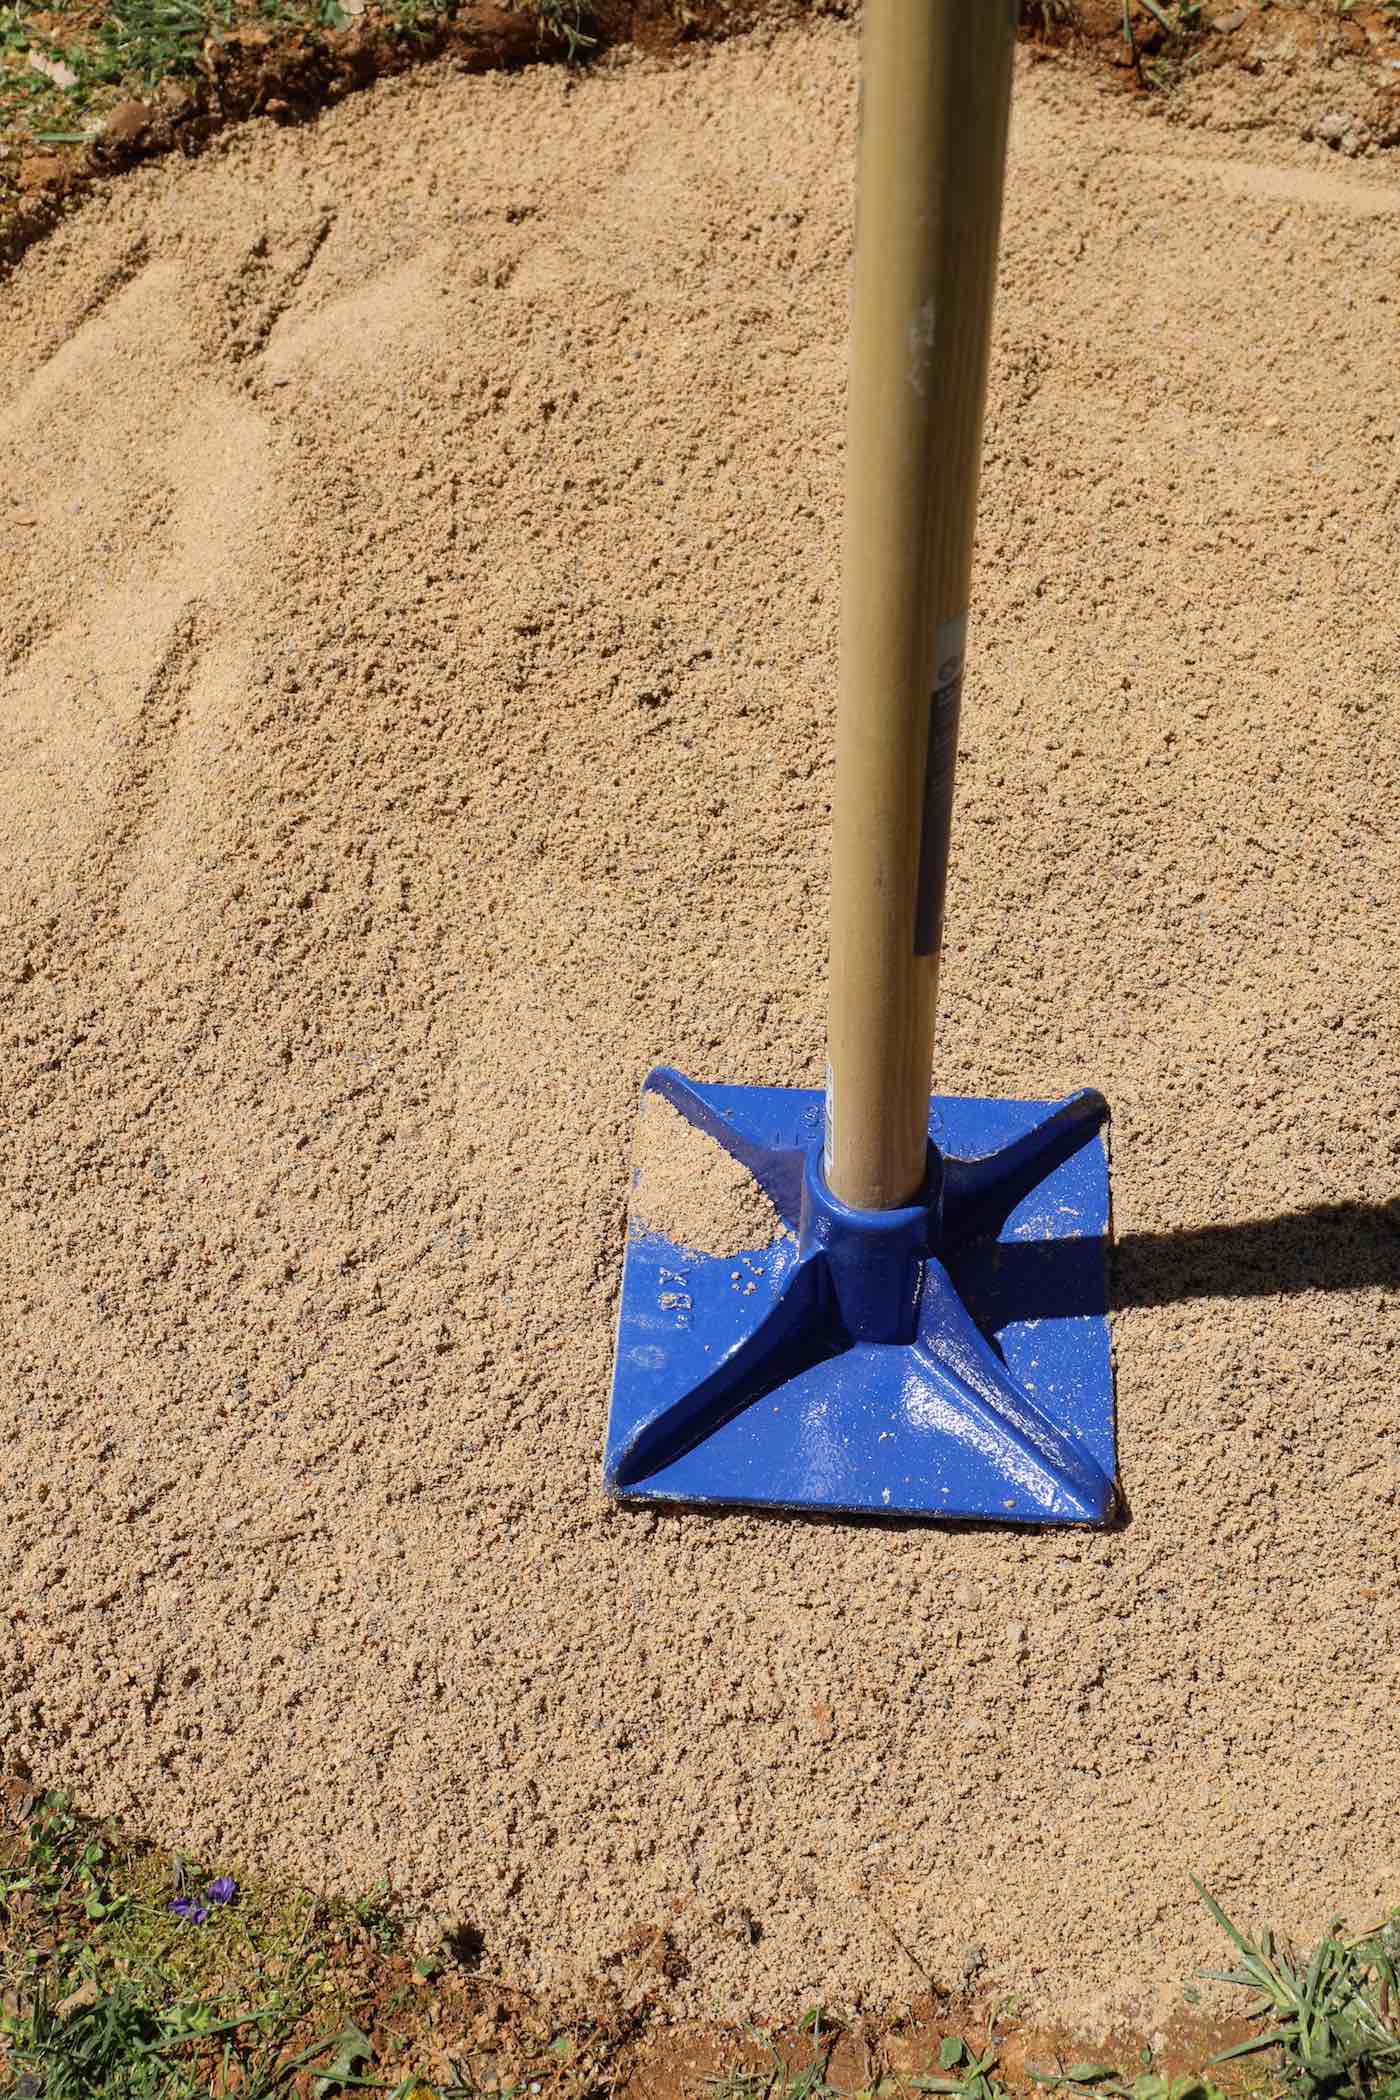
STEP 6: Add Paver Sand, Tamper, and Check for Level
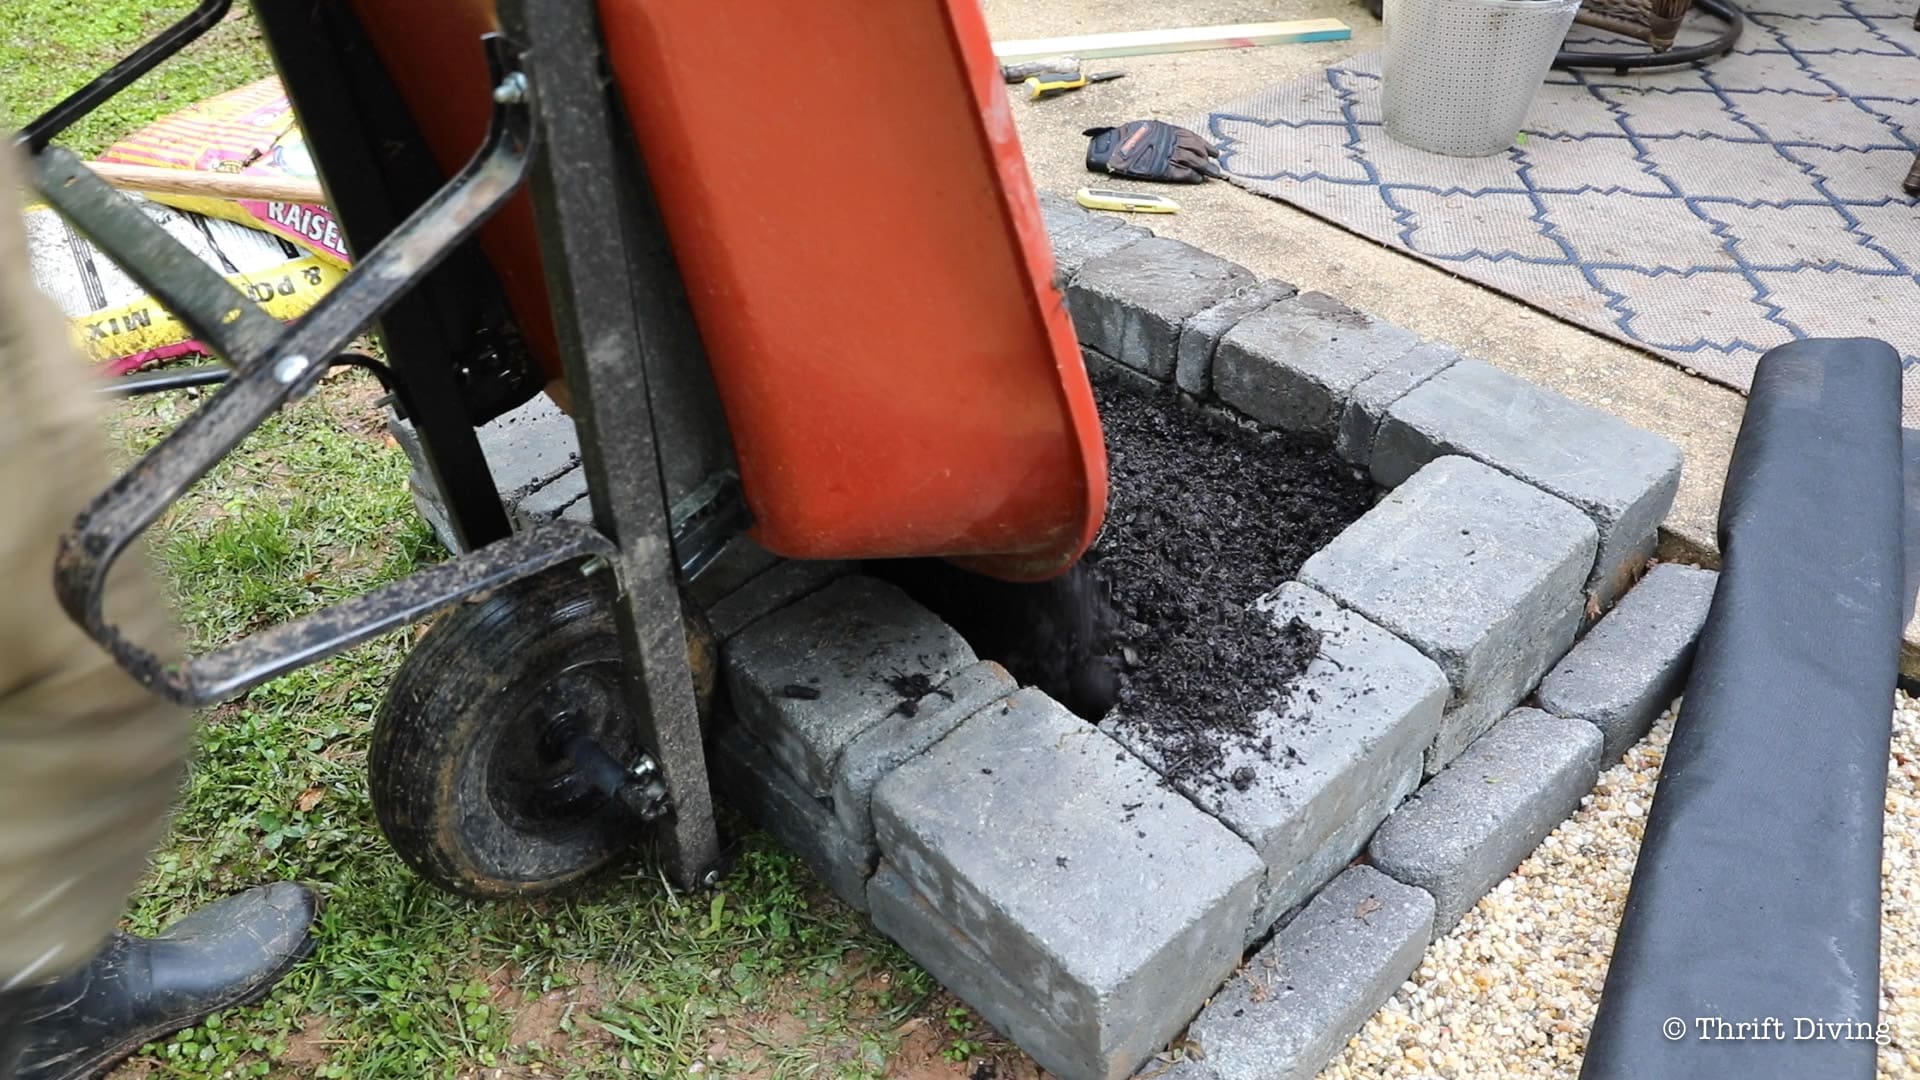
Using paver sand under a fire pit helps to level the ground and provide some stability for the bricks. I did use paver sand under the fire pit when I built it last summer. I added about 1.5″ to 2″ of paver sand…..tossed some water on it to help make it compact…..and then tampered it.
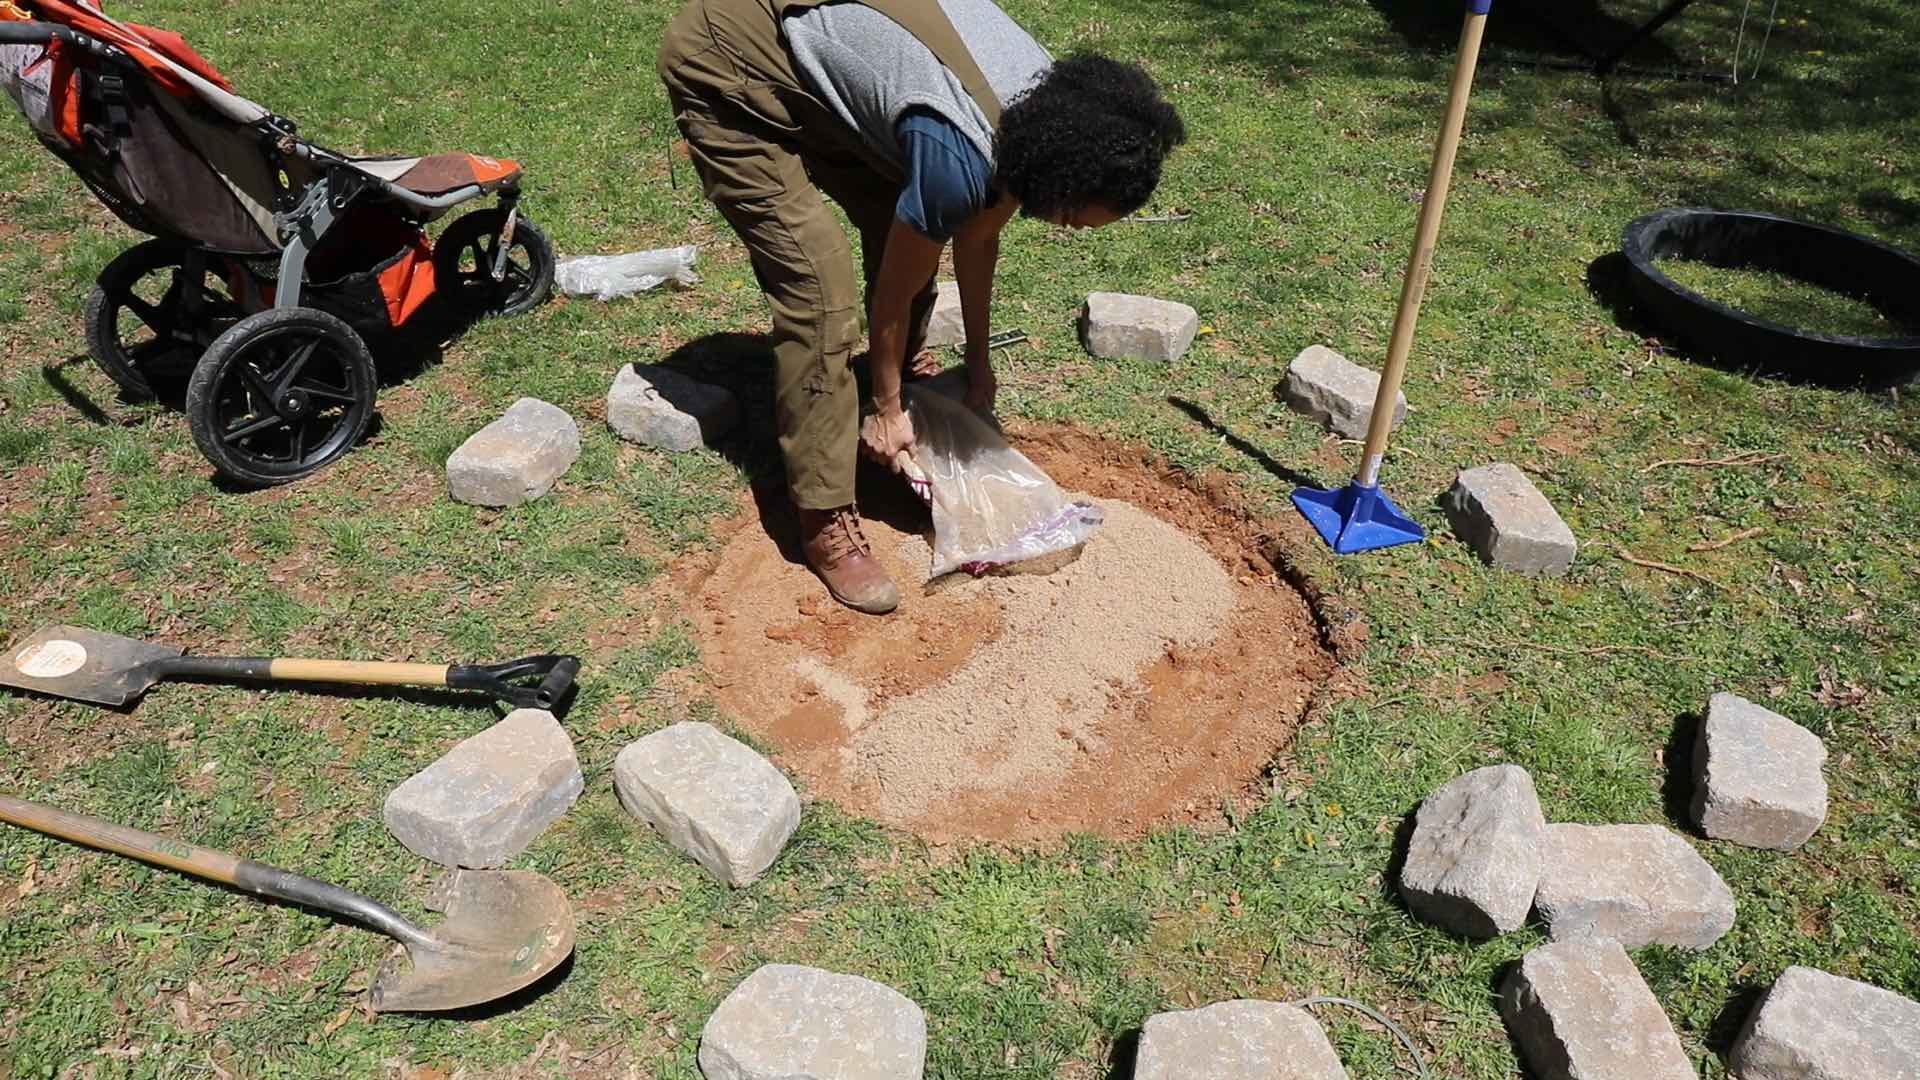
You can’t tamper more than about 2″ at a time, so after that was tampered down, I added the second bag of paver sand with some water on top, and tampered again.
My yard is a bit sloped. I didn’t realize it until after I was 2 layers into it and realized–oh, crap–my fire pit is about 1″ sloped on one side!
So unless you want a crooked fire pit like mine, make sure you check the level of the paver sand before adding your fire pit bricks!
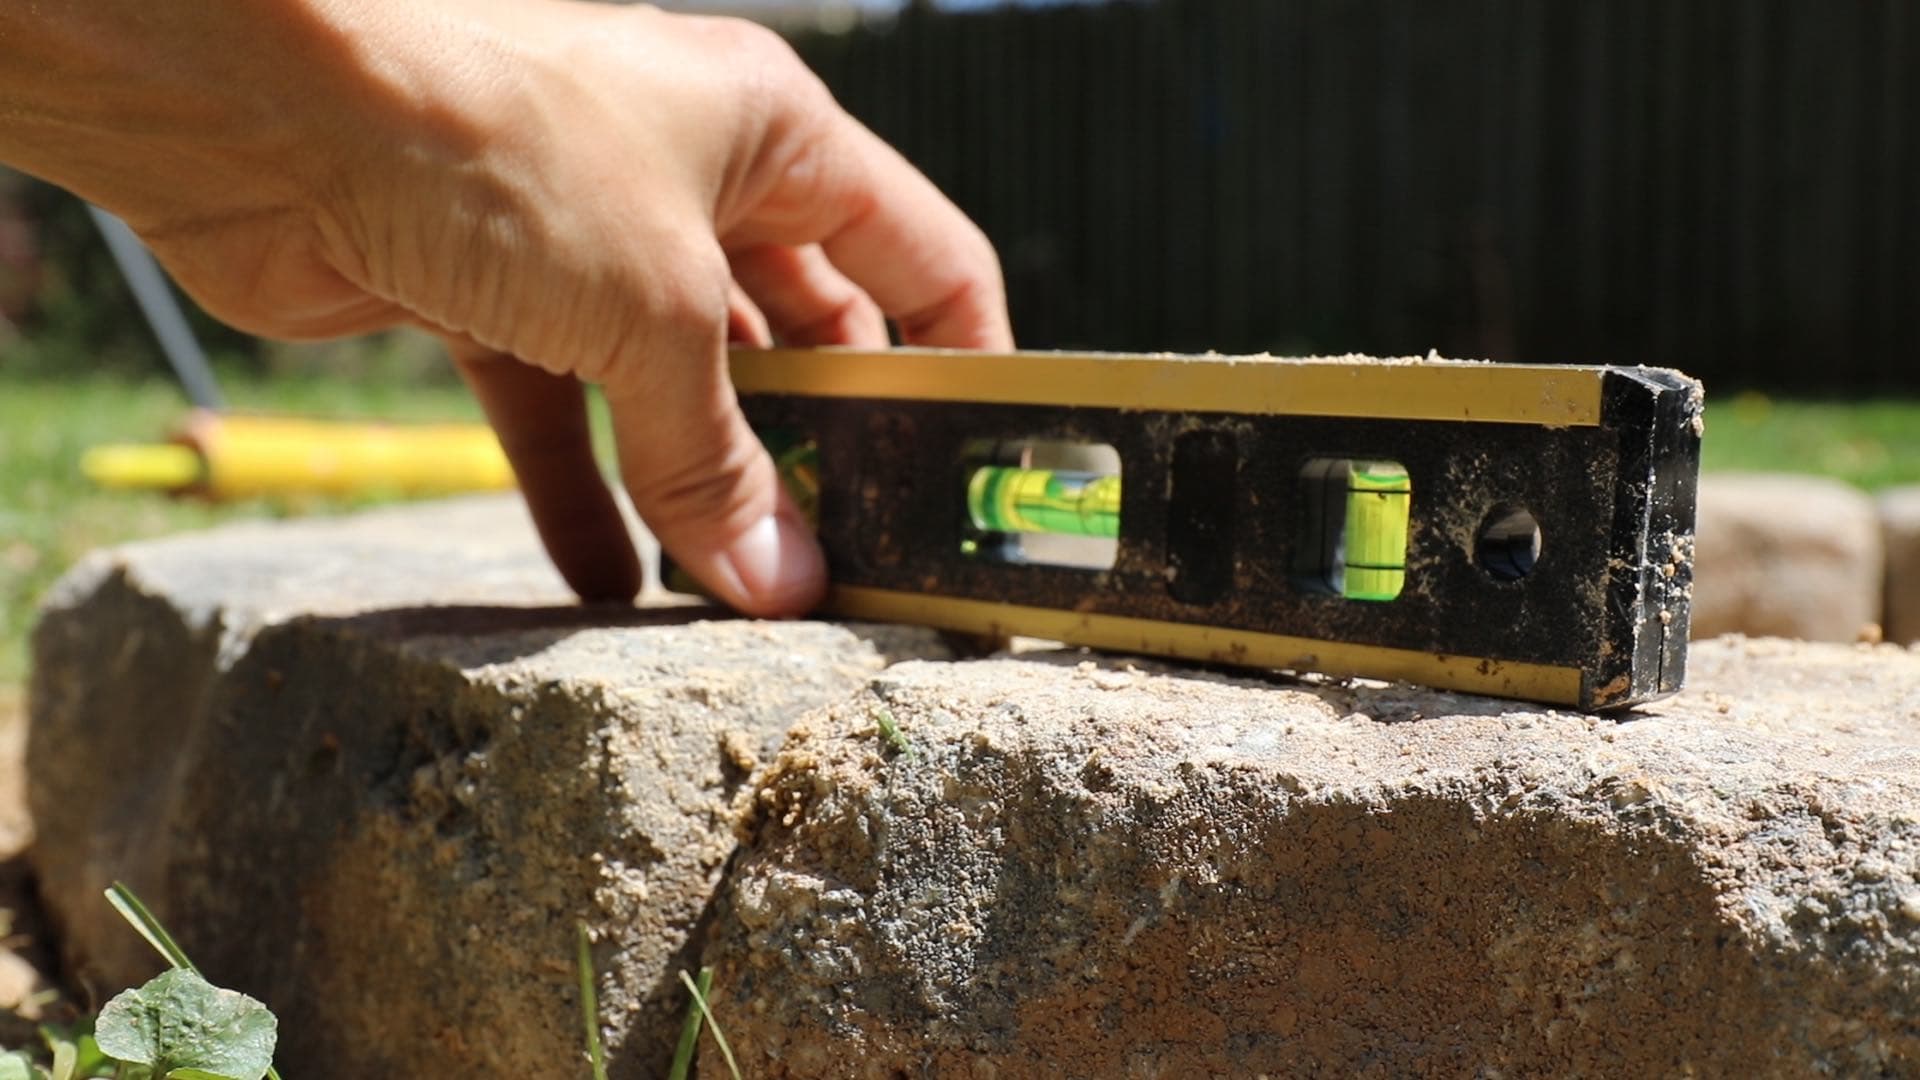
Now, one thing I did do was check that every two bricks lined up together was level. Otherwise, when the next layer was stacked on top, it would rock back and forth.
I don’t mind a fire pit that slopes a bit, but rocking bricks?? Huh uh. That ain’t gonna work. This thing needed to at least be steady! So I made some small adjustments and that seemed to help, including using a rubber mallet to help adjust them.
When I build the DIY fire pit last summer, after adding the paver sand, I checked the bricks for level.

For the walkway and fire pit seating area this season, I skipped the paver sand for underneath the edgers. I’ve gotten a few comments on the YouTube video tutorial on my channel, pointing out that the edgers will shift and settle over time, but I am doubtful that will happen much. I have done other edgers around my yard and they’ve held their position well, so I felt confident that I could lay down the weed block and skip putting paver sand under the edgers.
However, if I were lining this entire walkway with pavers, I would definitely use paver sand to keep them solidly in place.
STEP 7: Use Construction Adhesive to Glue the DIY Fire Pit Bricks
I found it a little difficult to glue the fire pit bricks with the construction adhesive.
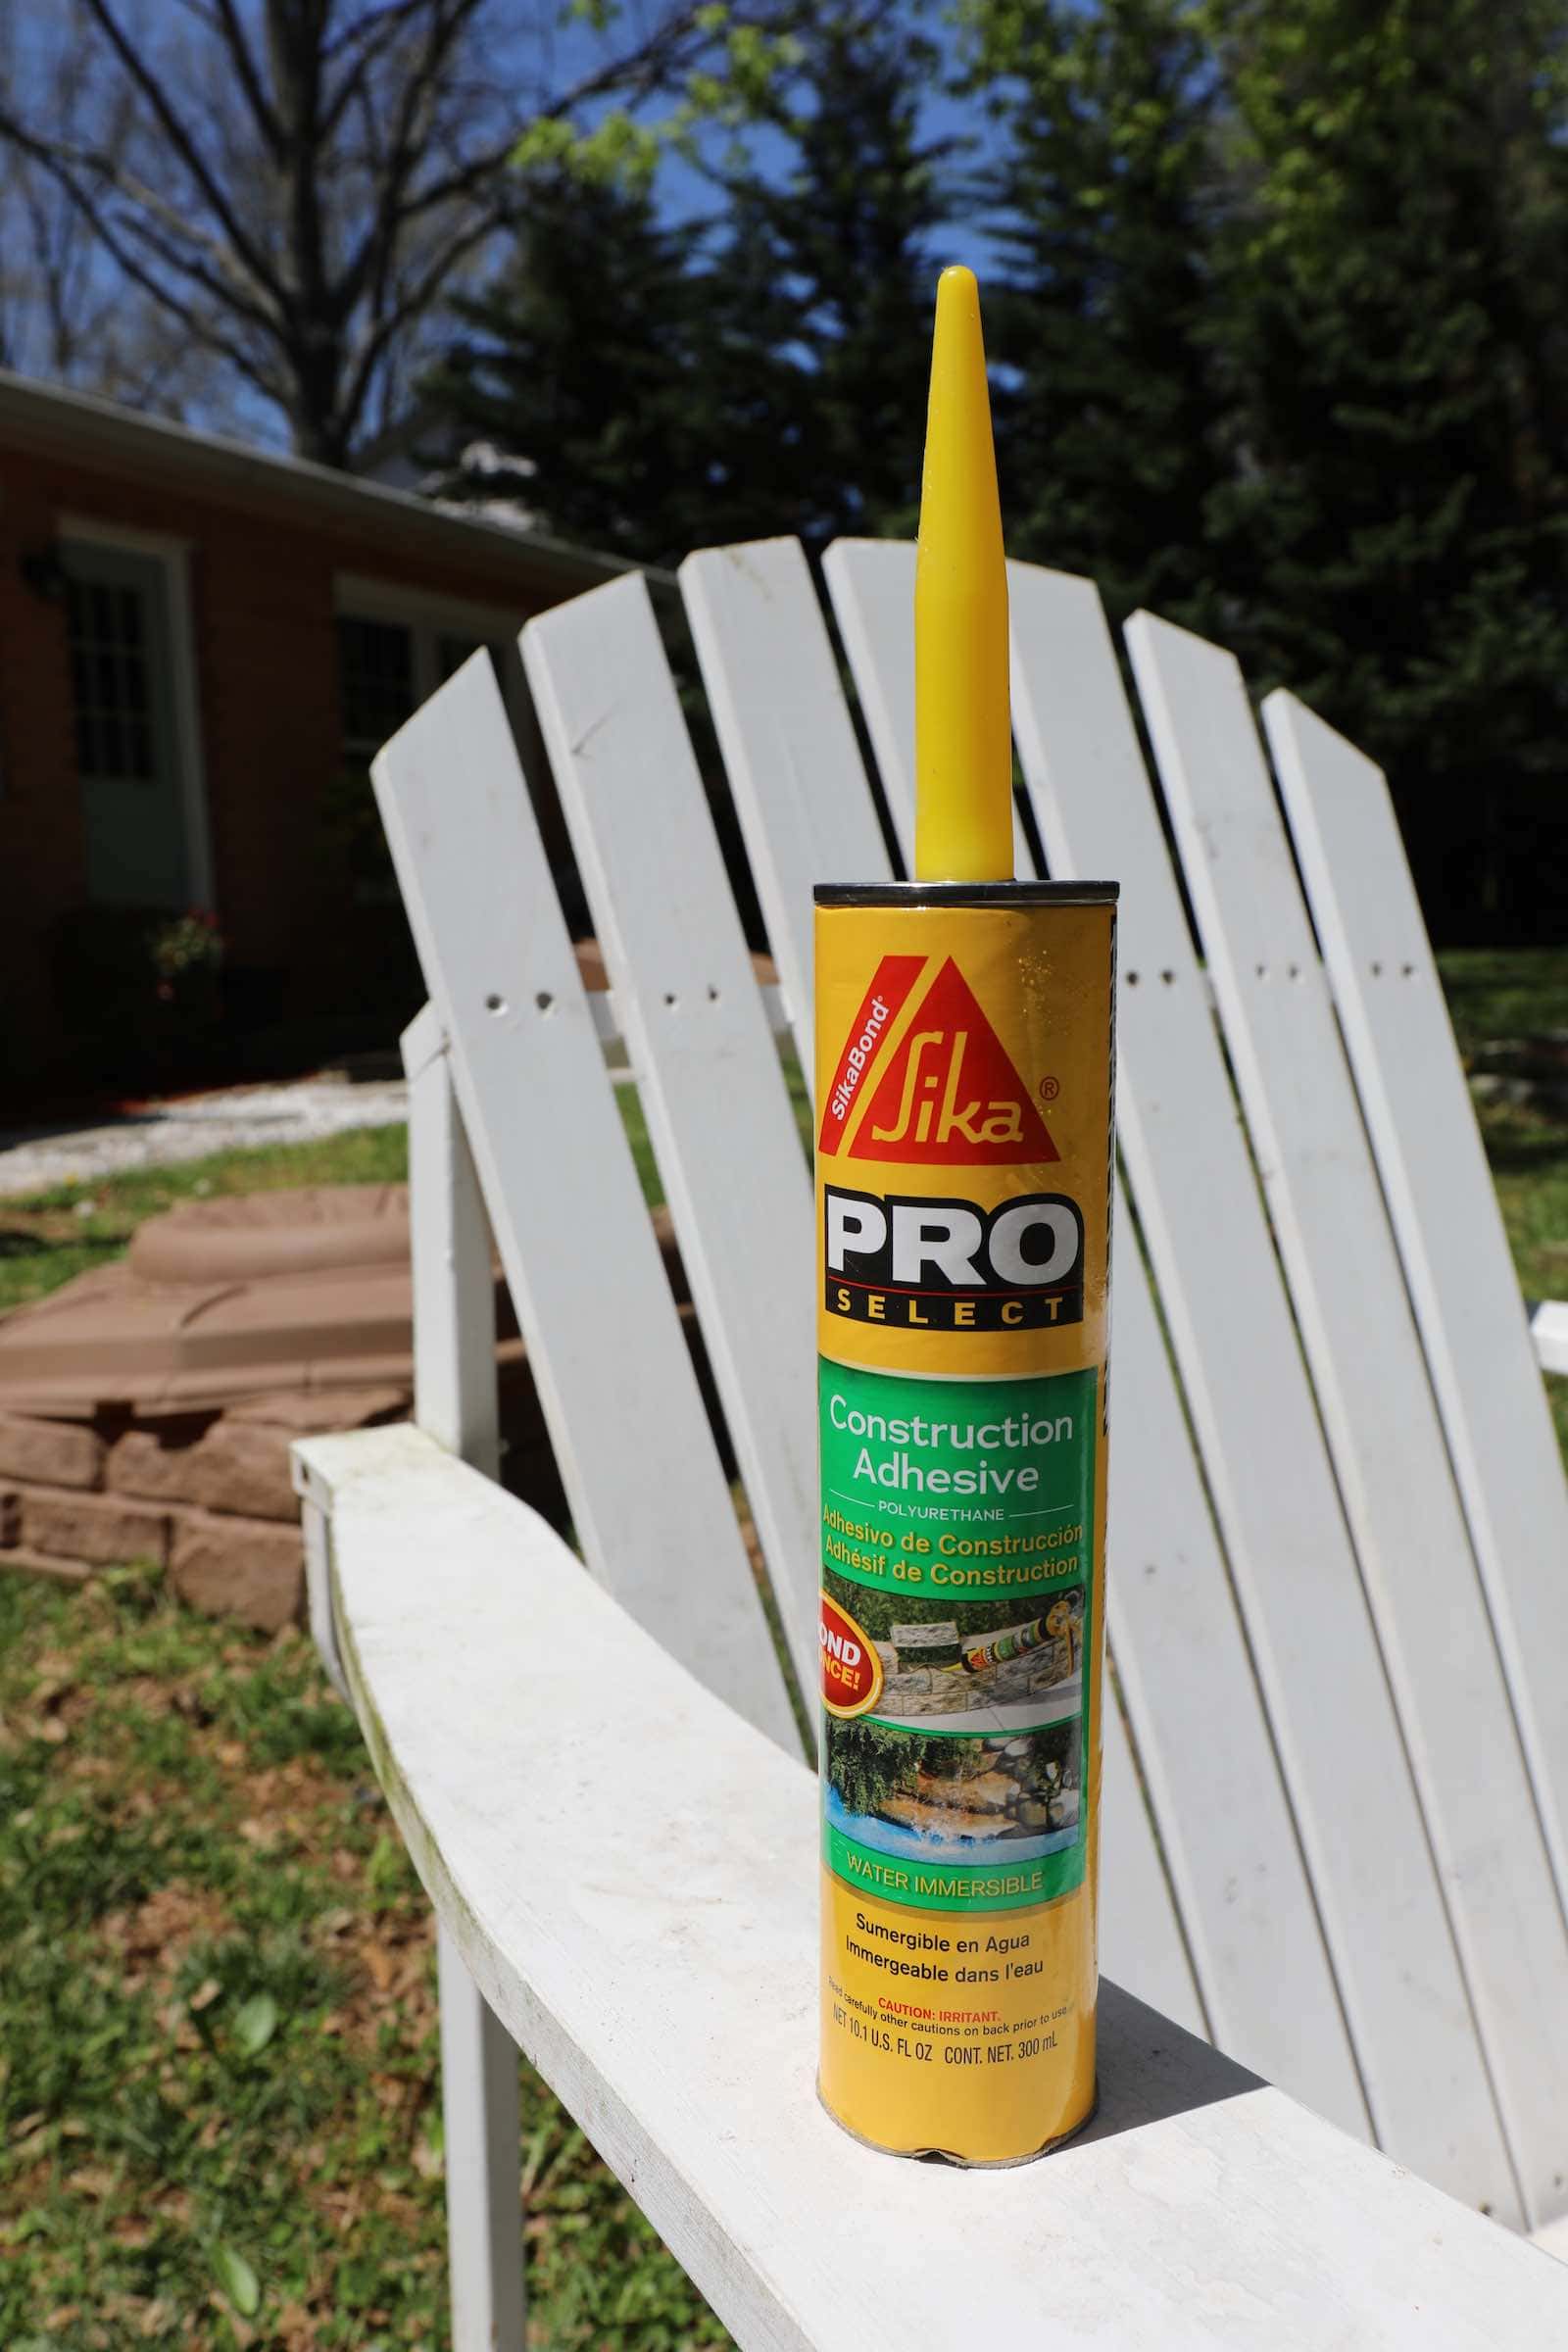
You’ll want to make sure there isn’t a lot of “rocking” between the bricks when glued together. And when stacking the bricks, I made sure to stagger the seams, as you see here. All three layers of the DIY fire pit were glued together.
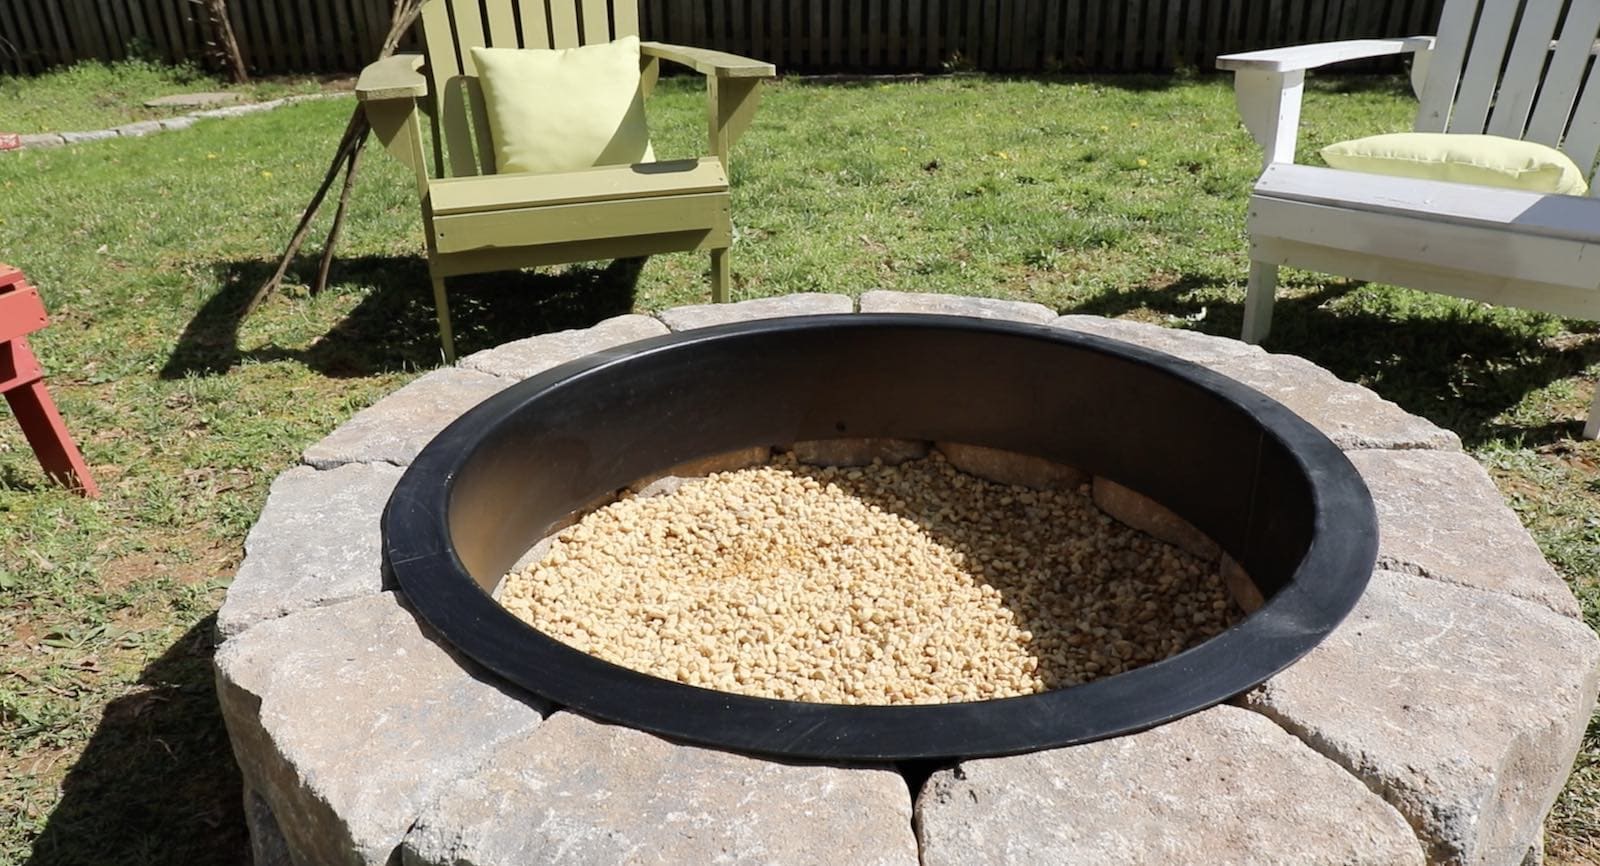
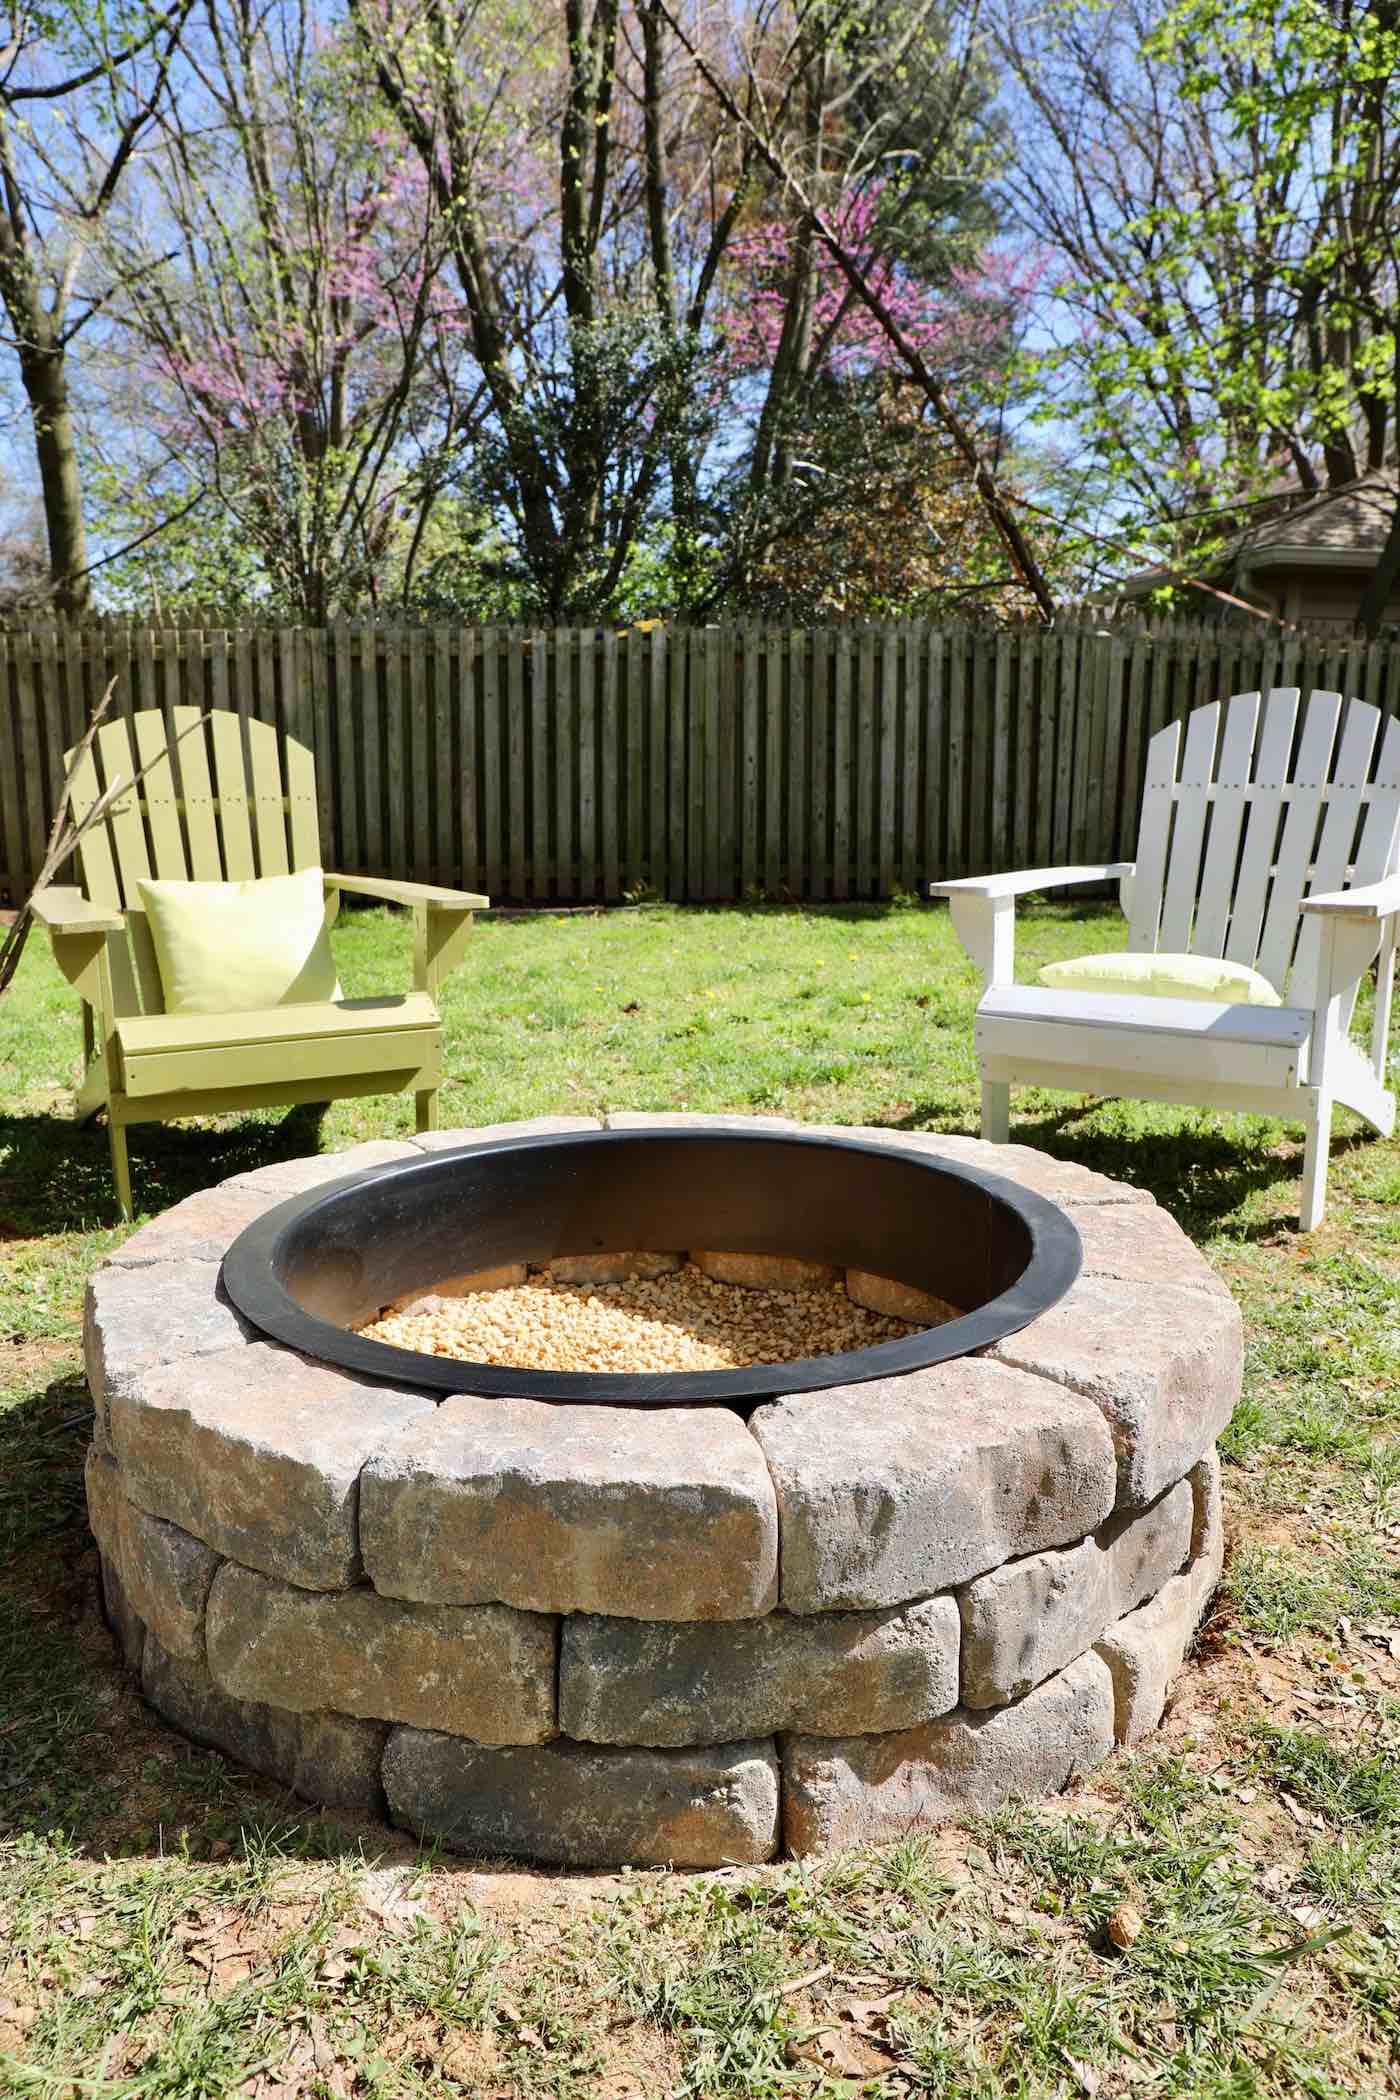
Most DIY fire pit kits will come with a fire ring. Once it’s all glued together, you can insert the fire pit ring and all the crushed gravel. Some people say they don’t think crushed gravel is good to use inside of the fire pit because it makes it hard to clean, but I haven’t found it problematic to clean out.
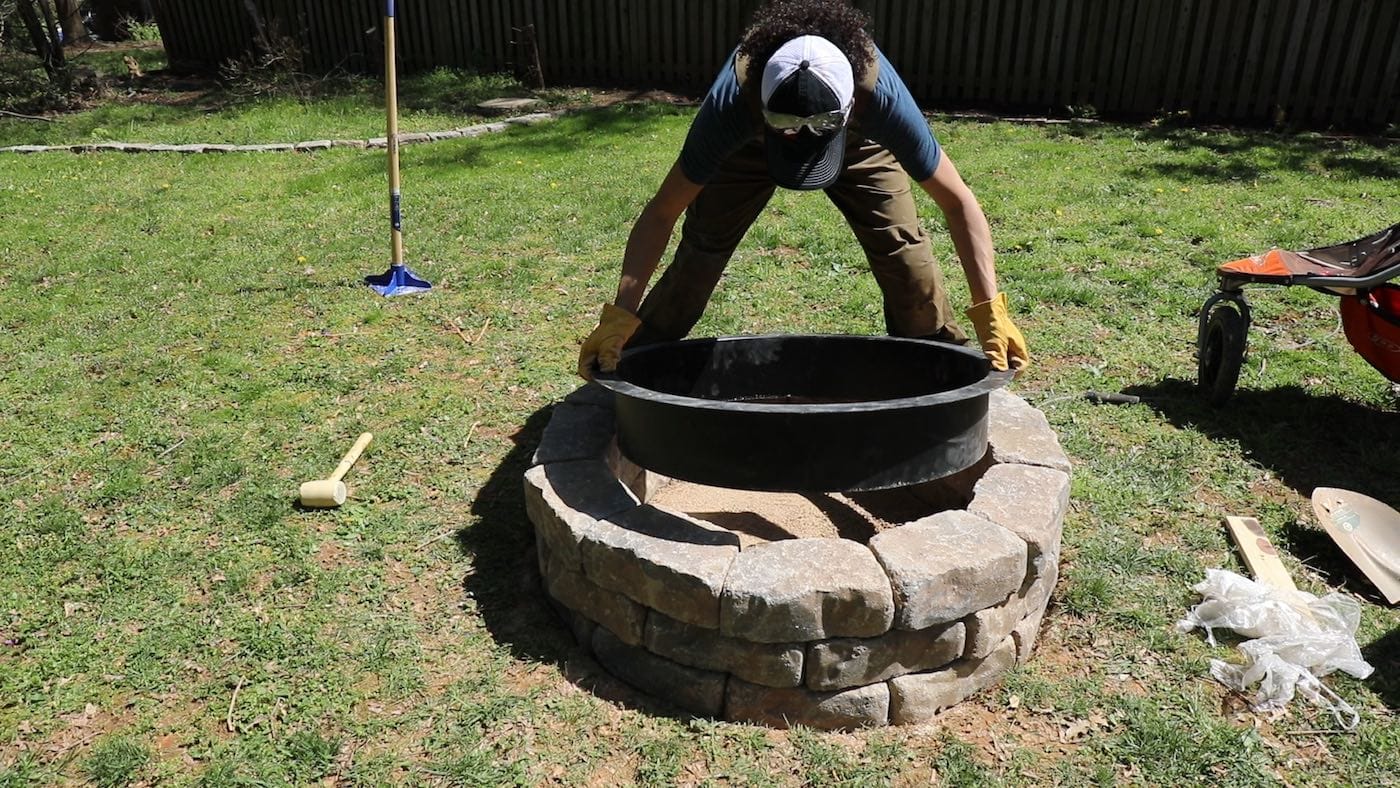
Last year, this is how the fire pit looked when I was done!
But you can see the entire area around the fire pit that I had to carve out this spring, using my cultivator. Here are some tips for making this project easier:
- Identify a dumping ground for the grassy leftovers, using a high-quality wheelbarrow.
- Use a garden spade to edge out the area around the fire pit seating area so that it’s crisp.
- Rent a sod cutter from The Home Depot if your area is big. It will be much faster but could be considered “over-kill” and expensive if your fire pit seating area is small.

This step was a lot of work! It took about a solid day to clear out the fire pit seating area.
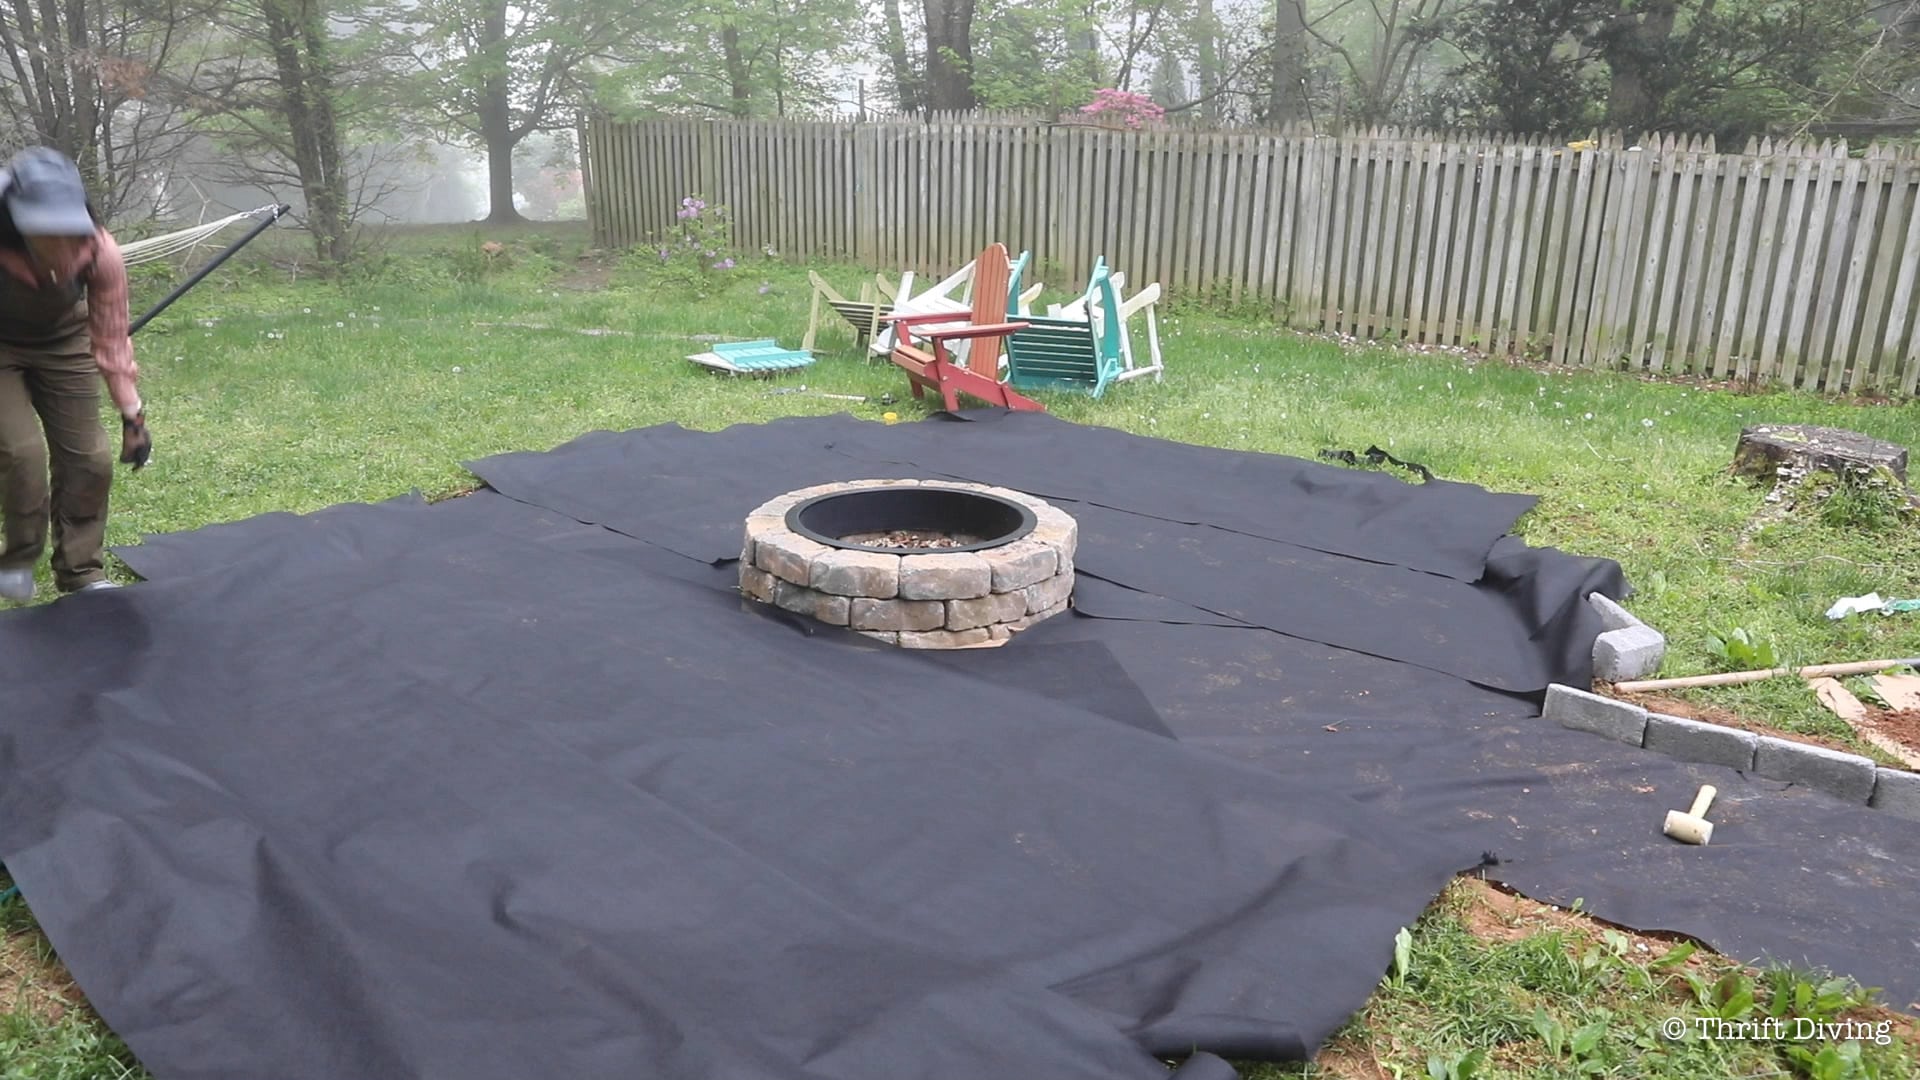
STEP 9: Add Weed Block Fabric to the Fire Pit Seating Area
If you’re putting in a walkway and seating area around your DIY fire pit, then you’ll want to use a weed block fabric to deter weeds. But just so you know, this won’t entirely stop weeds! You’ll still get some weeds that will grow in your fire pit seating area, so there will definitely be some maintenance and weed-killing each season!
Depending on the size of your fire pit seating area, be sure to get a roll that will cover the entire area.
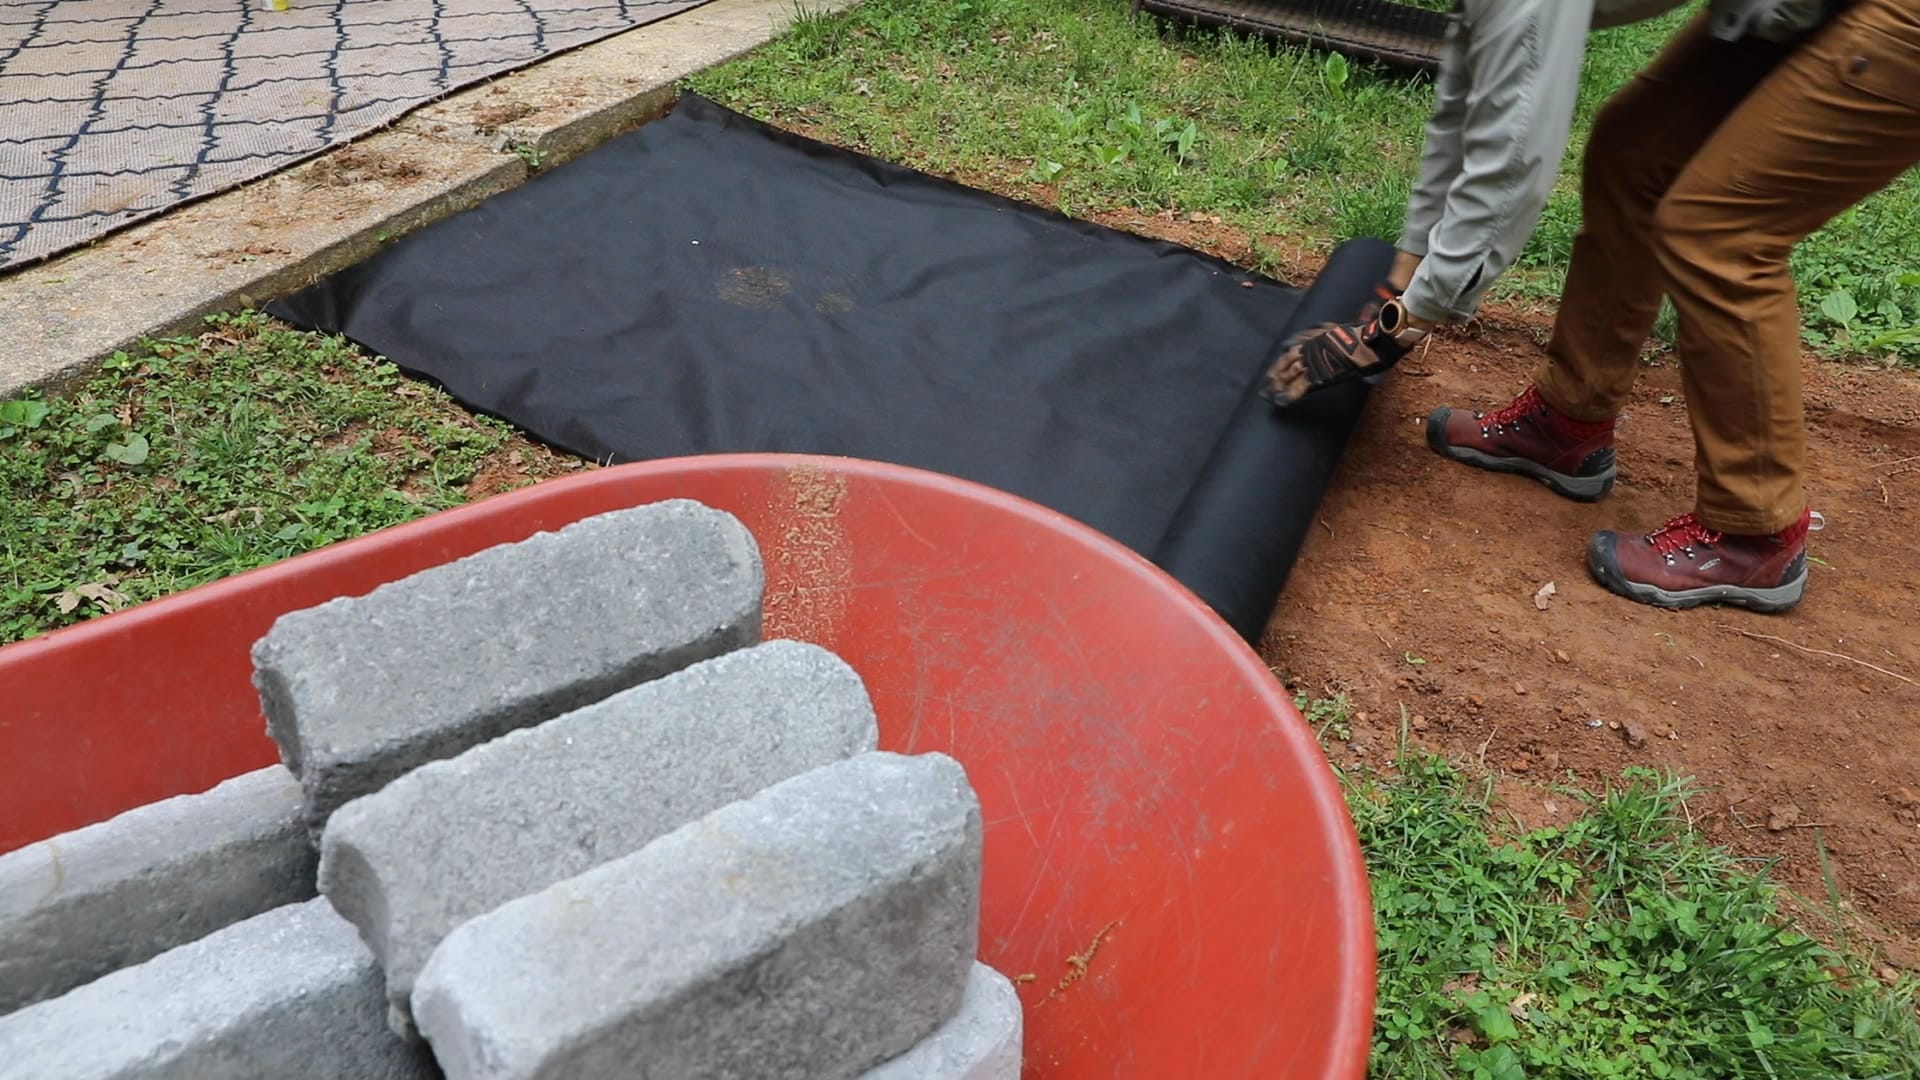
I stretched several pieces out over the entire area. Since my fire pit was already built last summer, I worked around it. If you’re putting in a fire pit at the same time as the seating area, you can still just work around the area where your fire pit bricks will be. You won’t need to put weed block fabric under the fire pit directly. NOTE: Keep in mind that weed block fabric really only prevents weeds from growing up. It does nothing for preventing weed seeds from settling on the gravel and growing on top of the gravel. Essentially, you’ll still need to do some de-weeding during the spring and summer, into the fall.
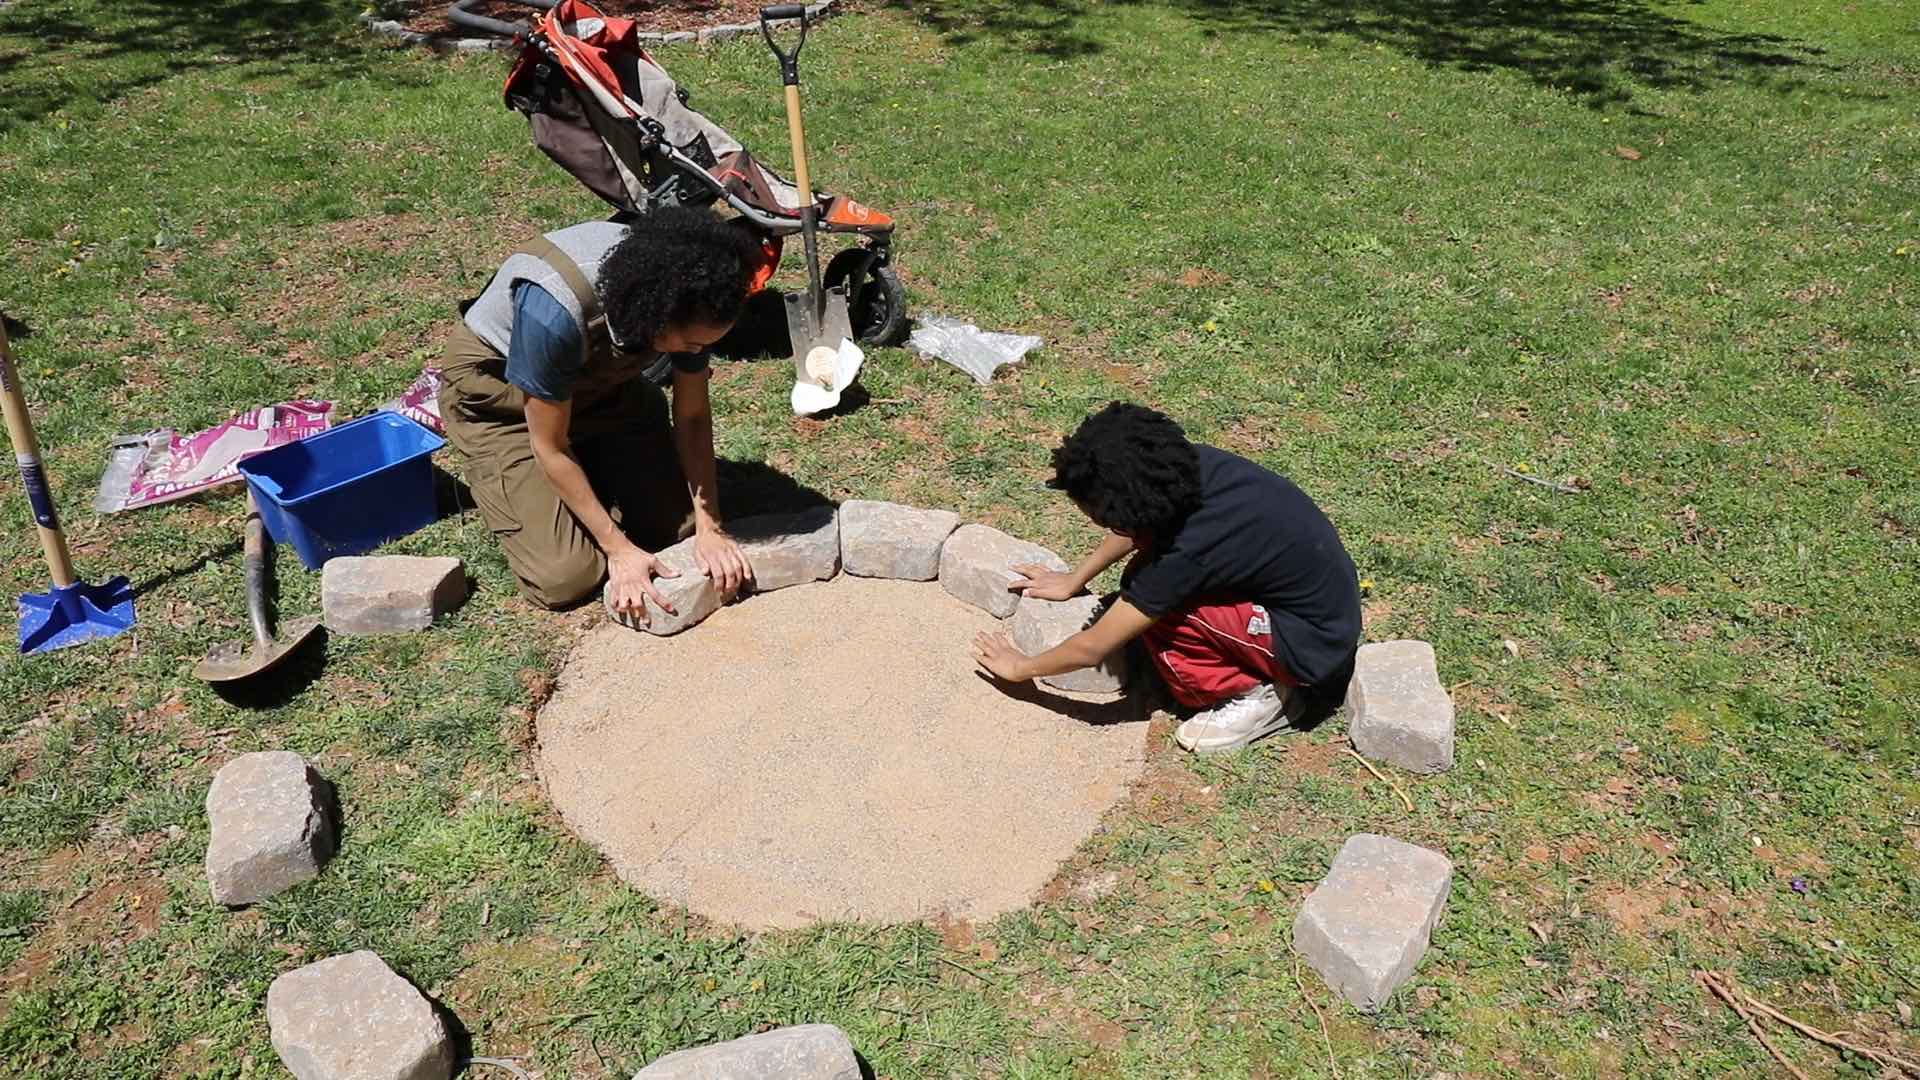
STEP 10: Neatly Line Your Edgers Around the DIY Fire Pit Seating Area
When putting in the edgers for the walkway and DIY fire pit seating area, I didn’t use a level, but instead, gauged by eyesight and my hands to see if one was significantly higher or lower than the one before it.

These Pavestone edgers actually “locked” together nicely because the edges were rounded out with a crescent shape.
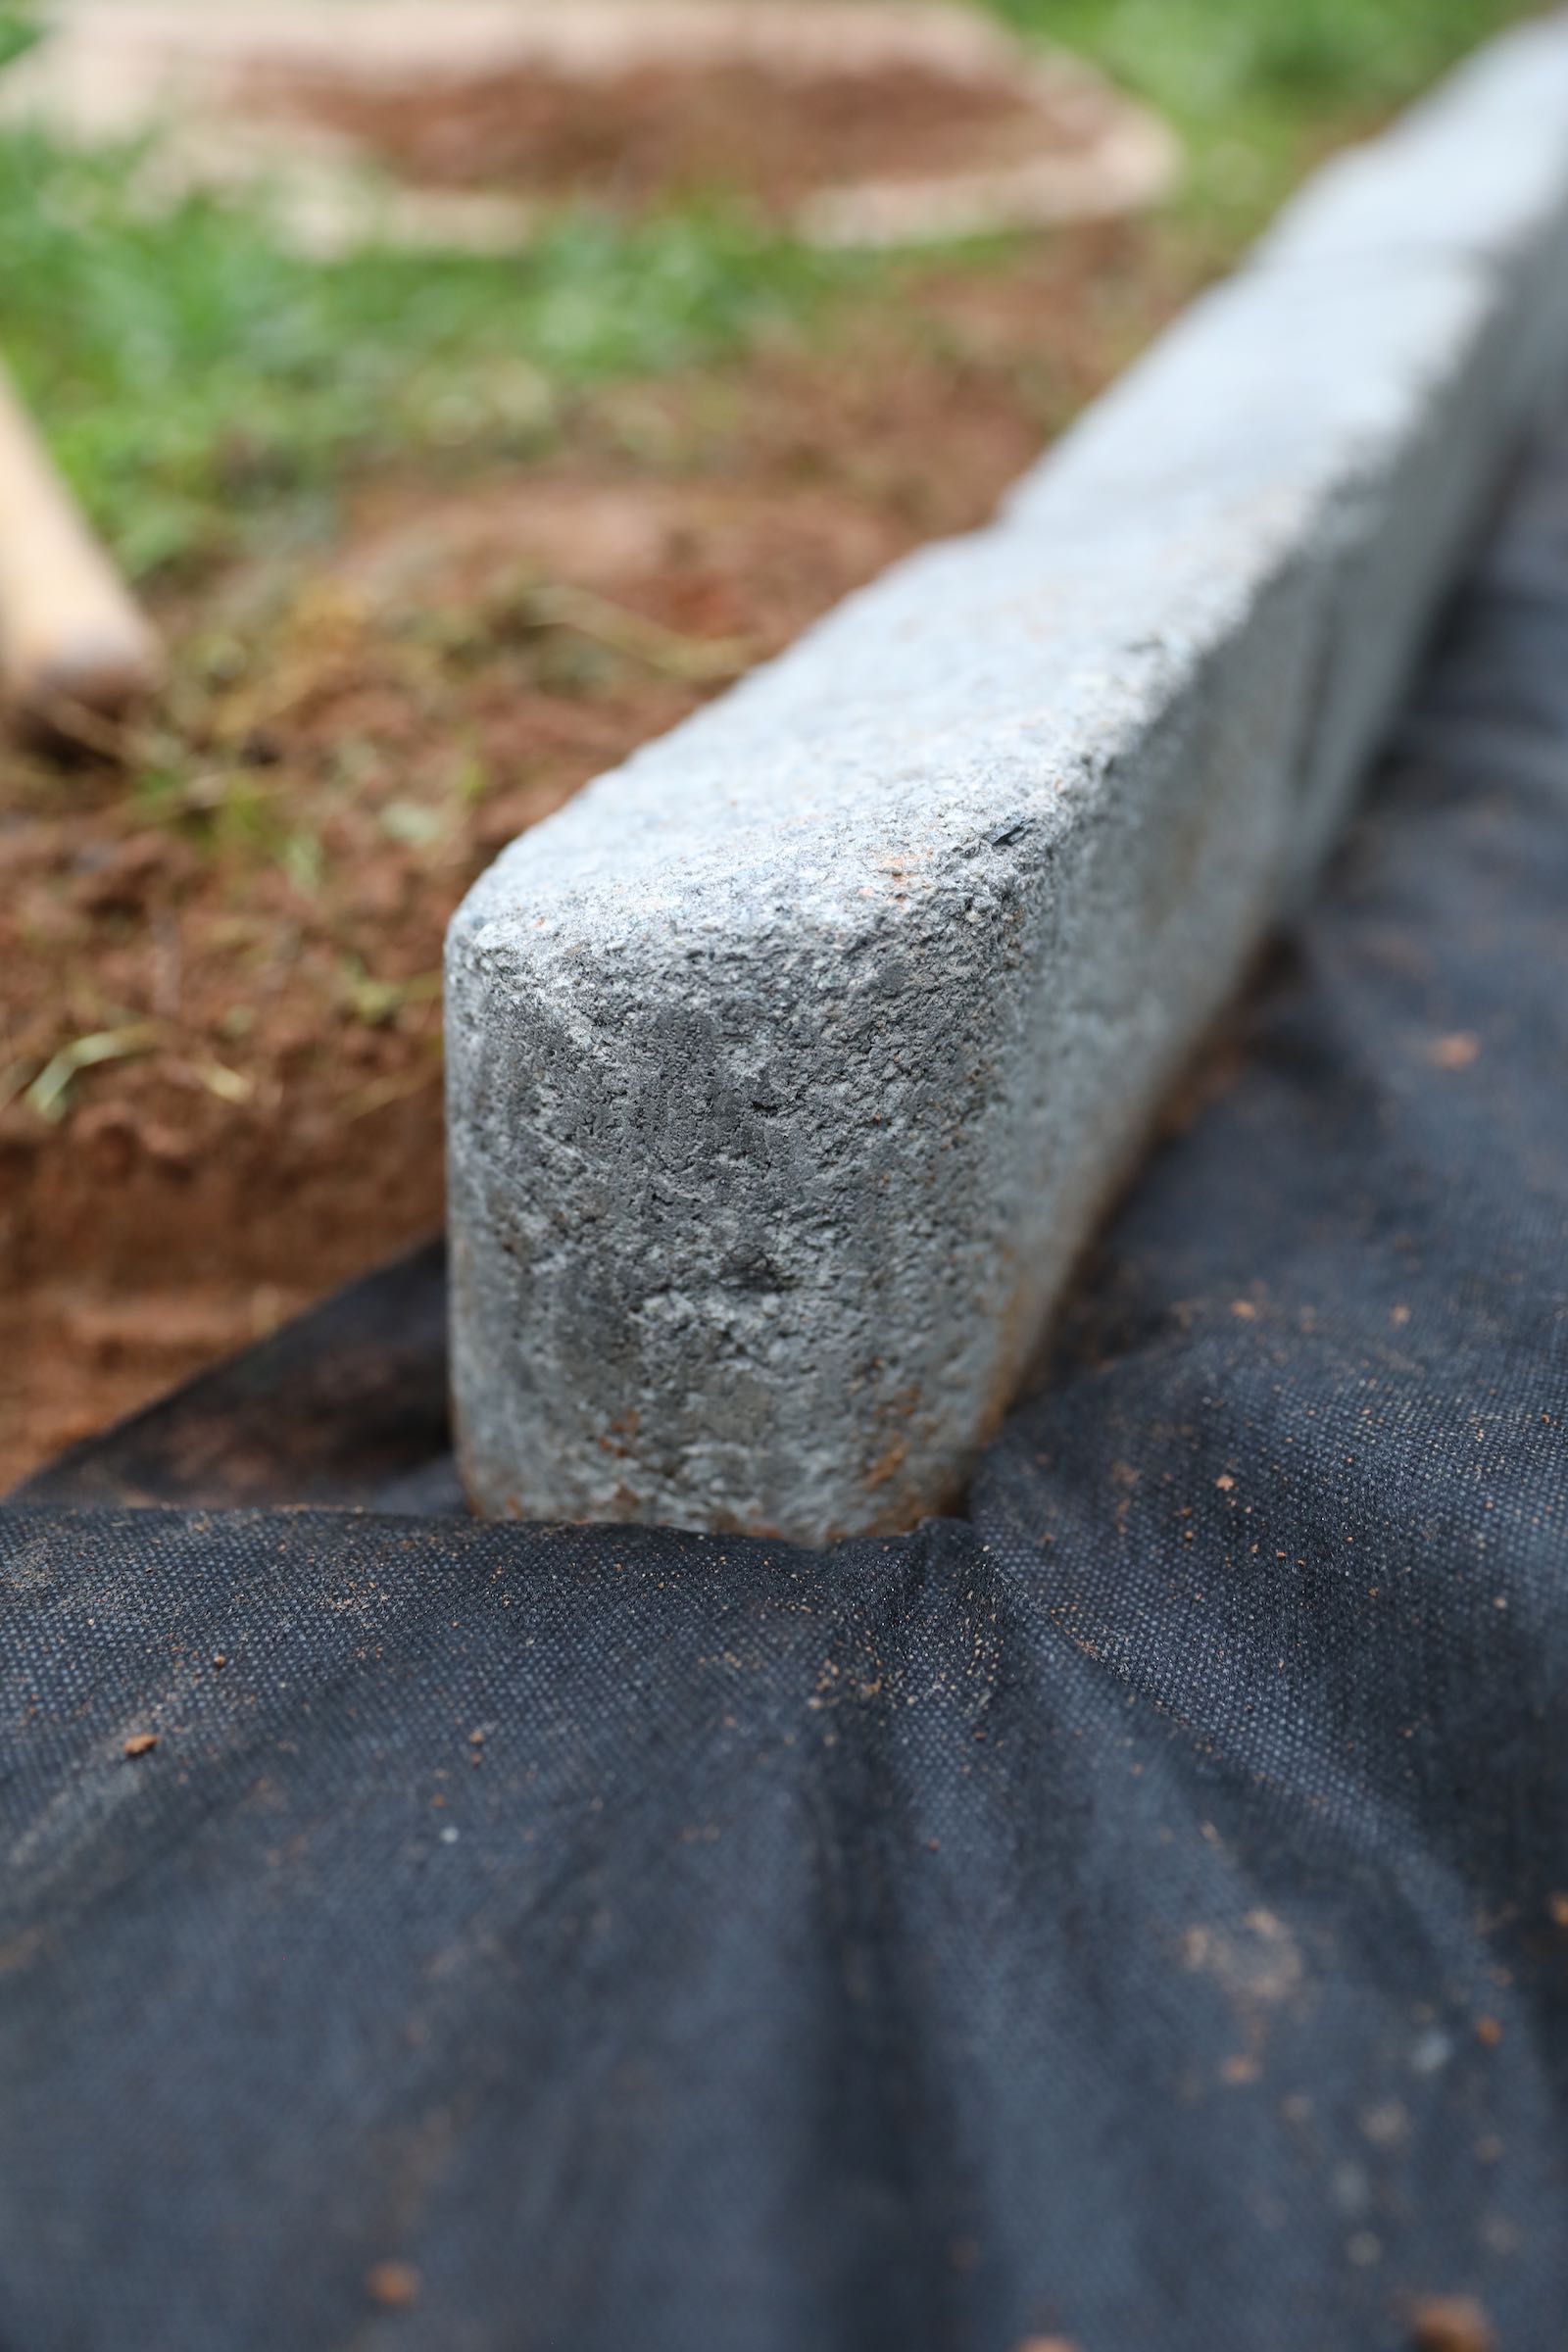
They sit on top of the weed block fabric, holding it in place. You can also use weed block pins/metal stakes to hold everything in place. As I mentioned before, some folks said I should have used paver sand under these, but I honestly didn’t feel I needed it. My soil is very clayish and compact and in the past, I have had success with edgers staying in place without paver sand, so I felt I didn’t need it.

Here’s an important tip: Make sure that you measure the size of the edgers you’re using when planning your DIY fire pit seating area because you want to make sure you have an exact number of edgers for the space you’re completing. It is possible to cut bricks to trim them to fit, but honestly, who wants to do that? If you know the length of the bricks, you can determine how many bricks you’ll need so that each junction fits perfectly.
Here is what the fire pit seating area looked like when the edgers were all laid out!
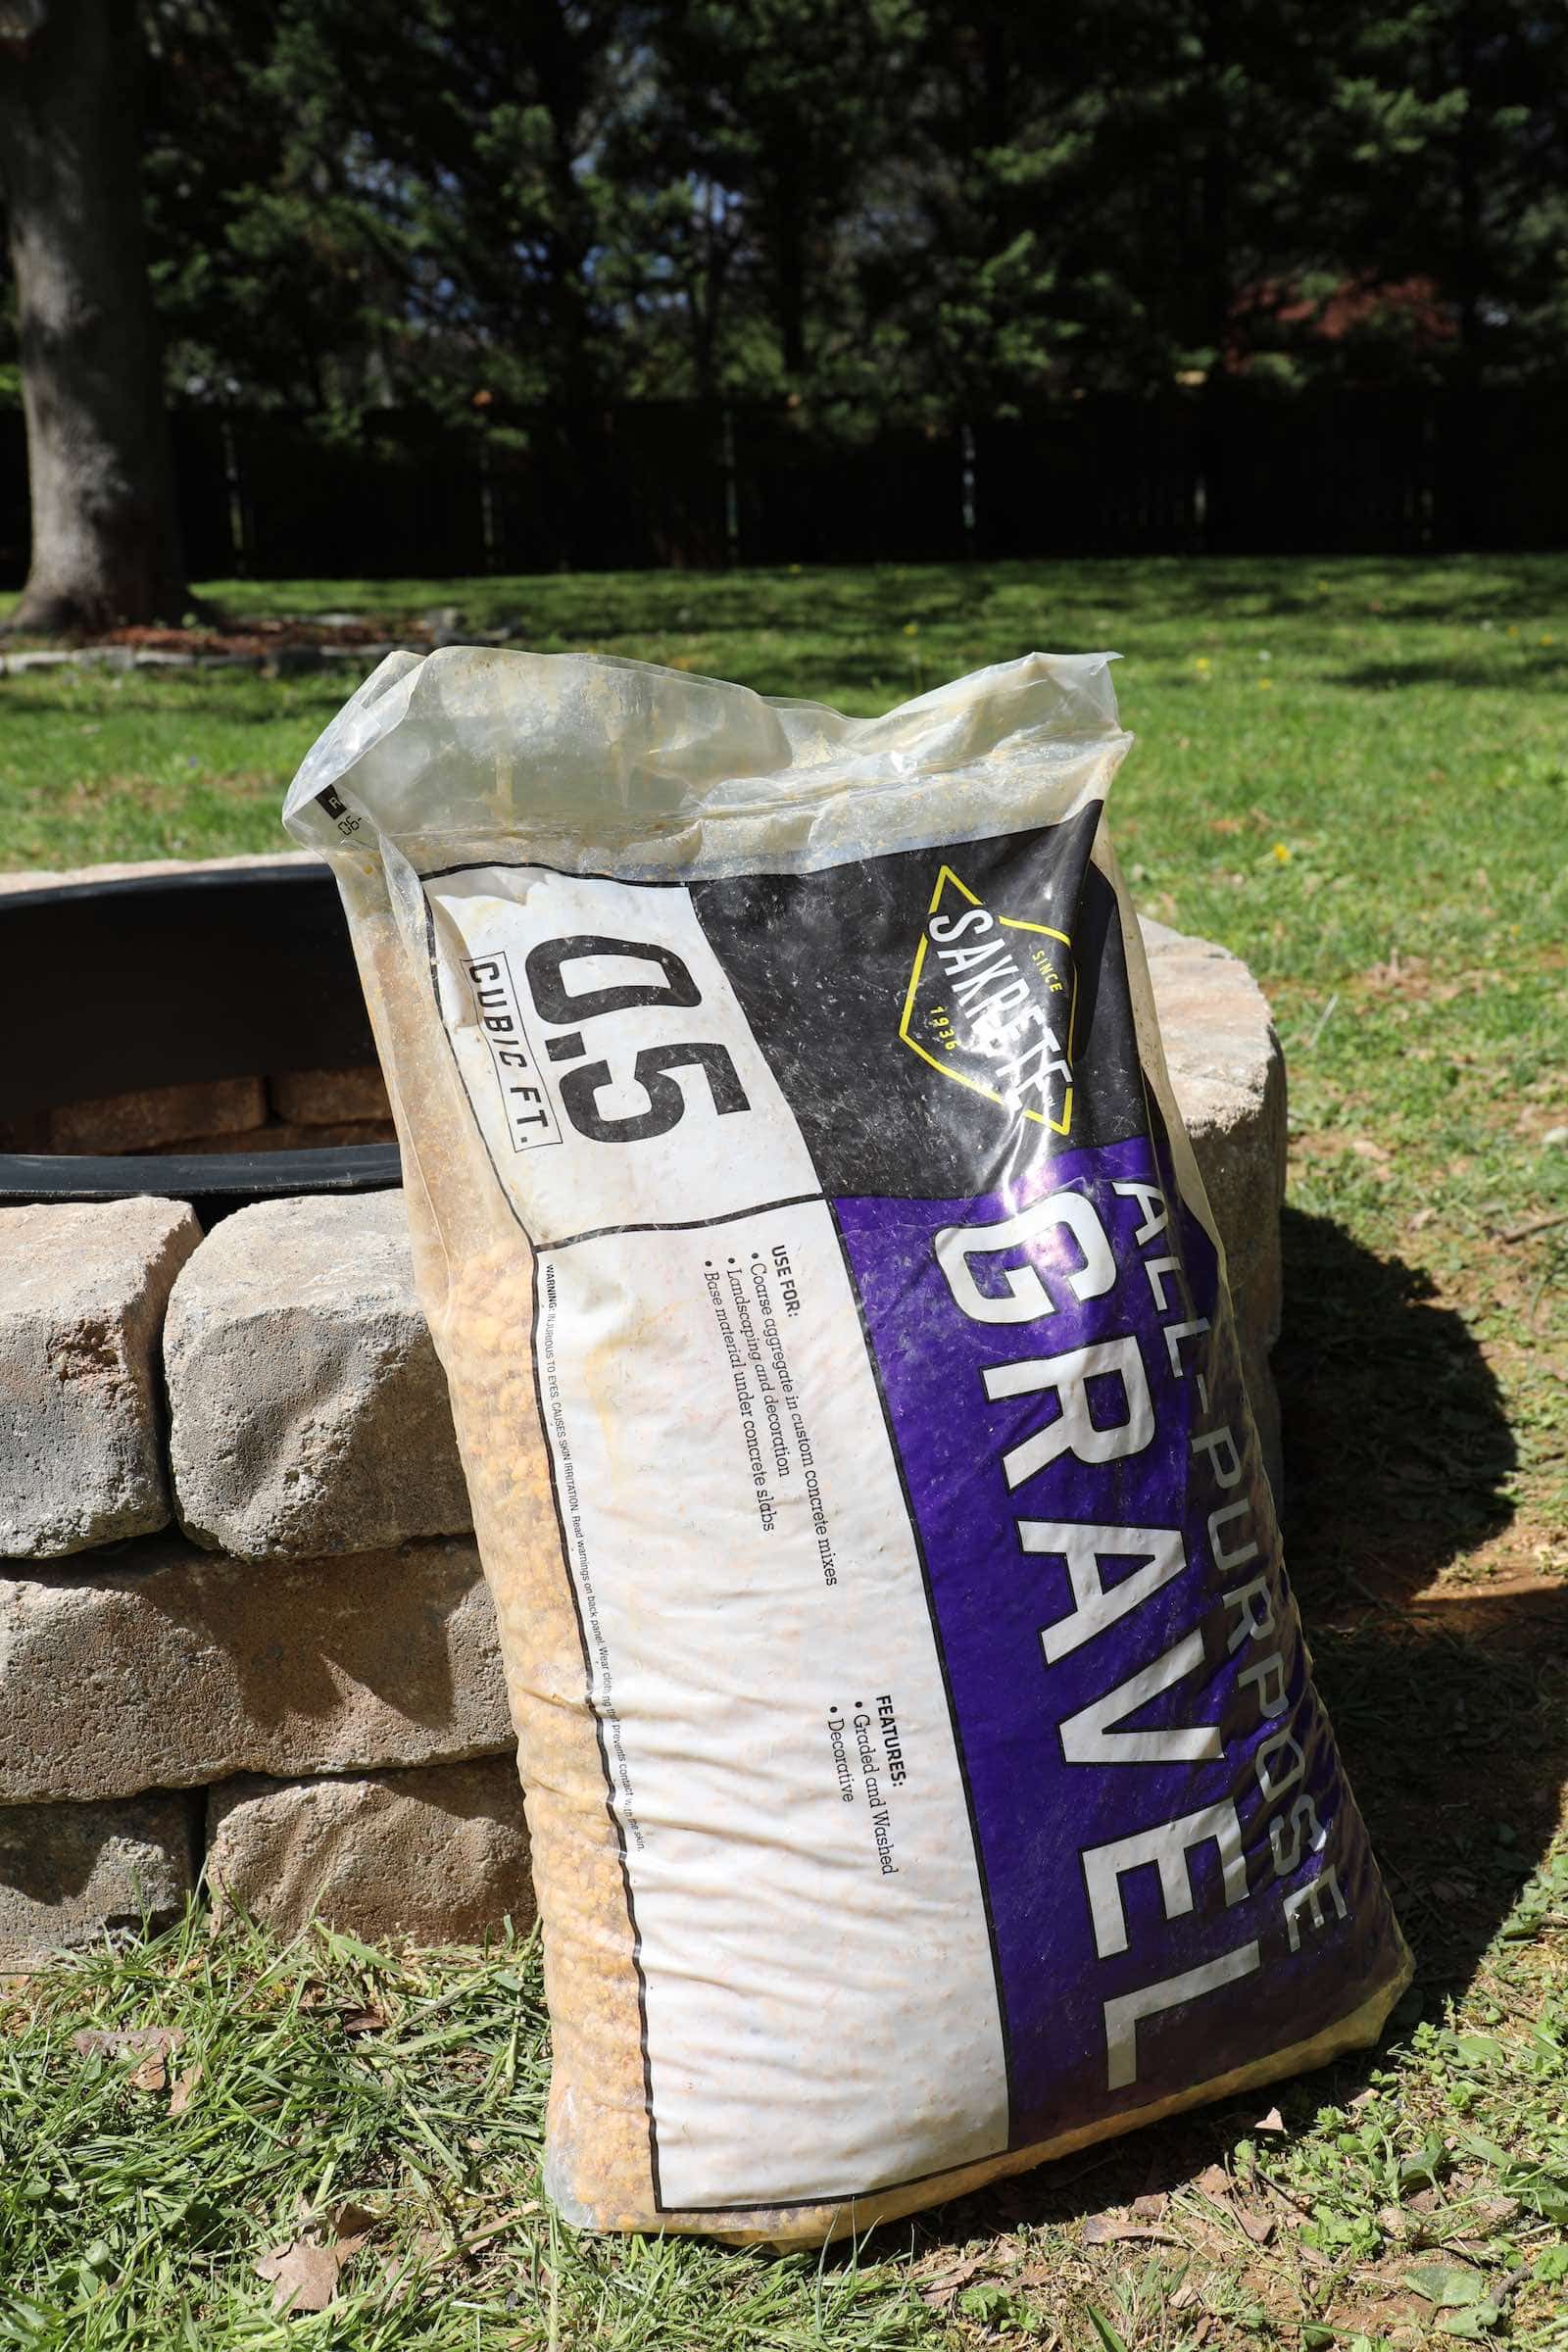
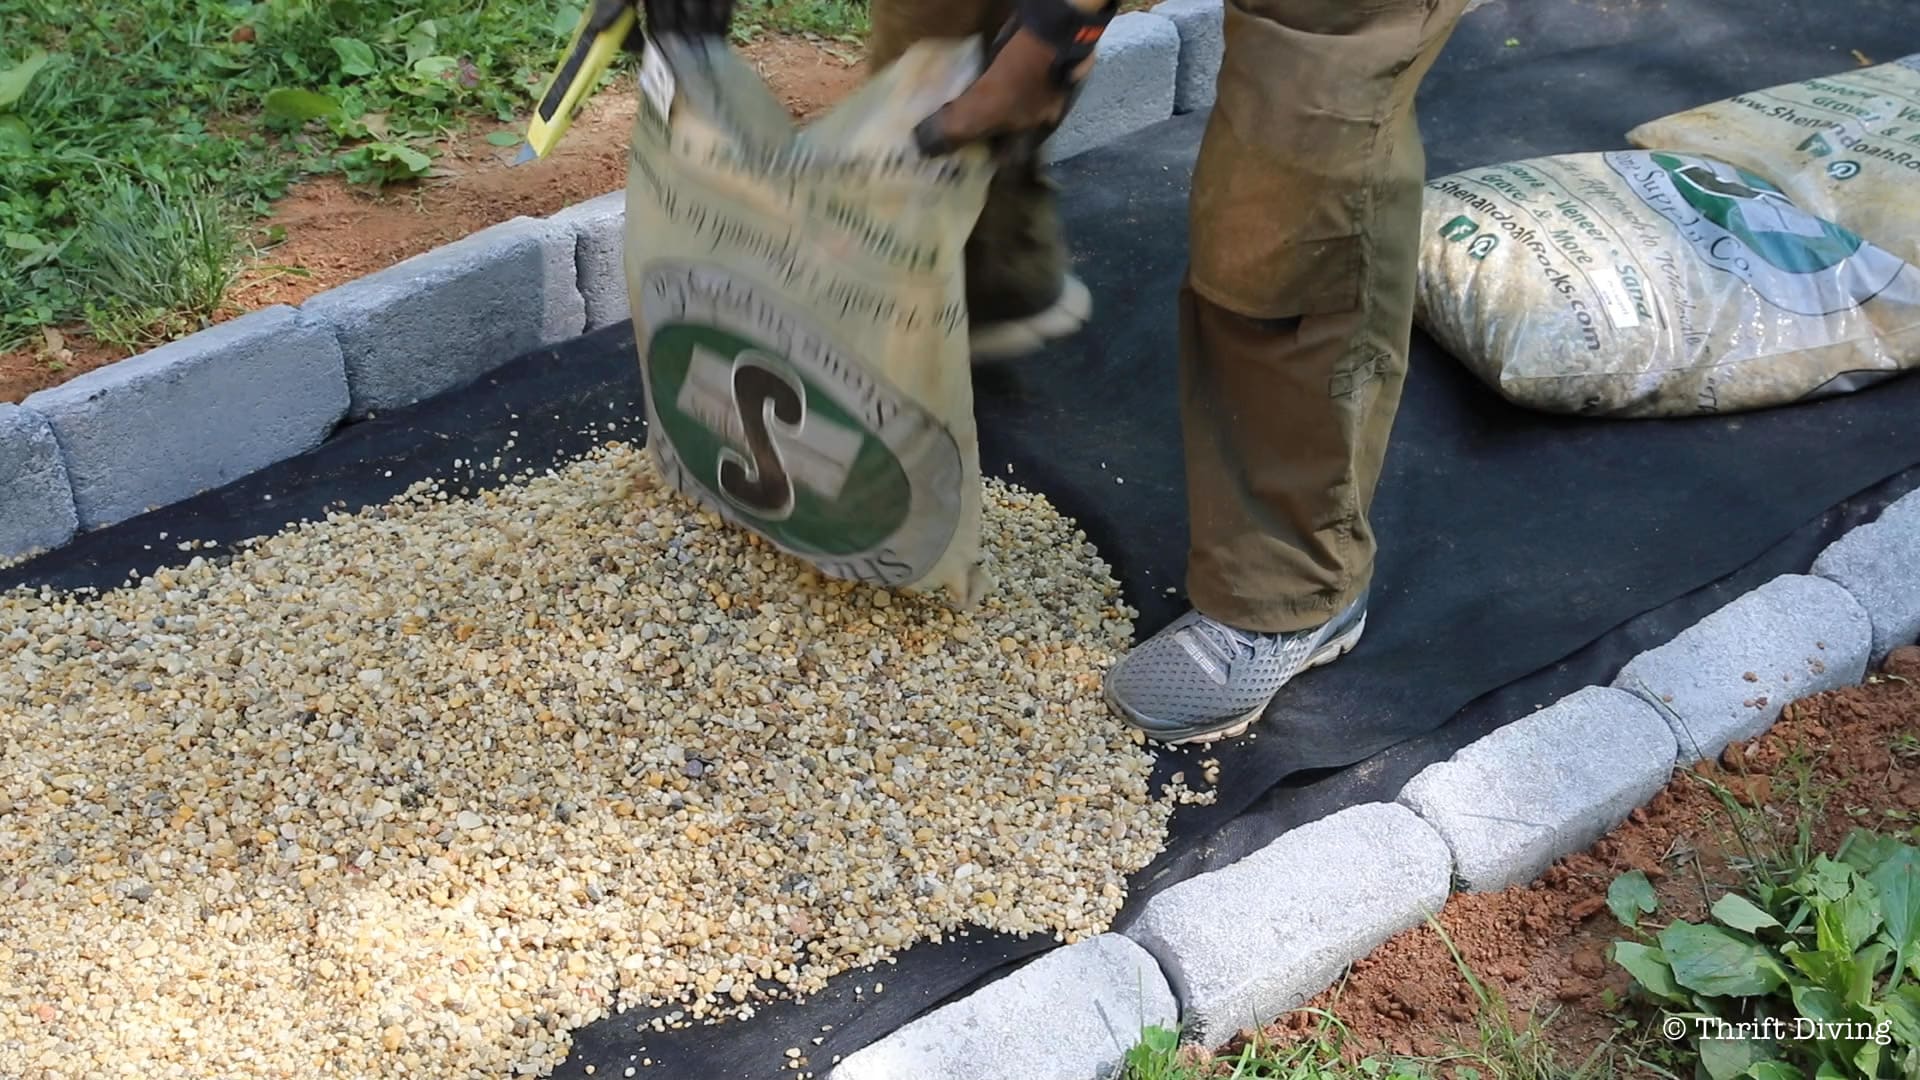
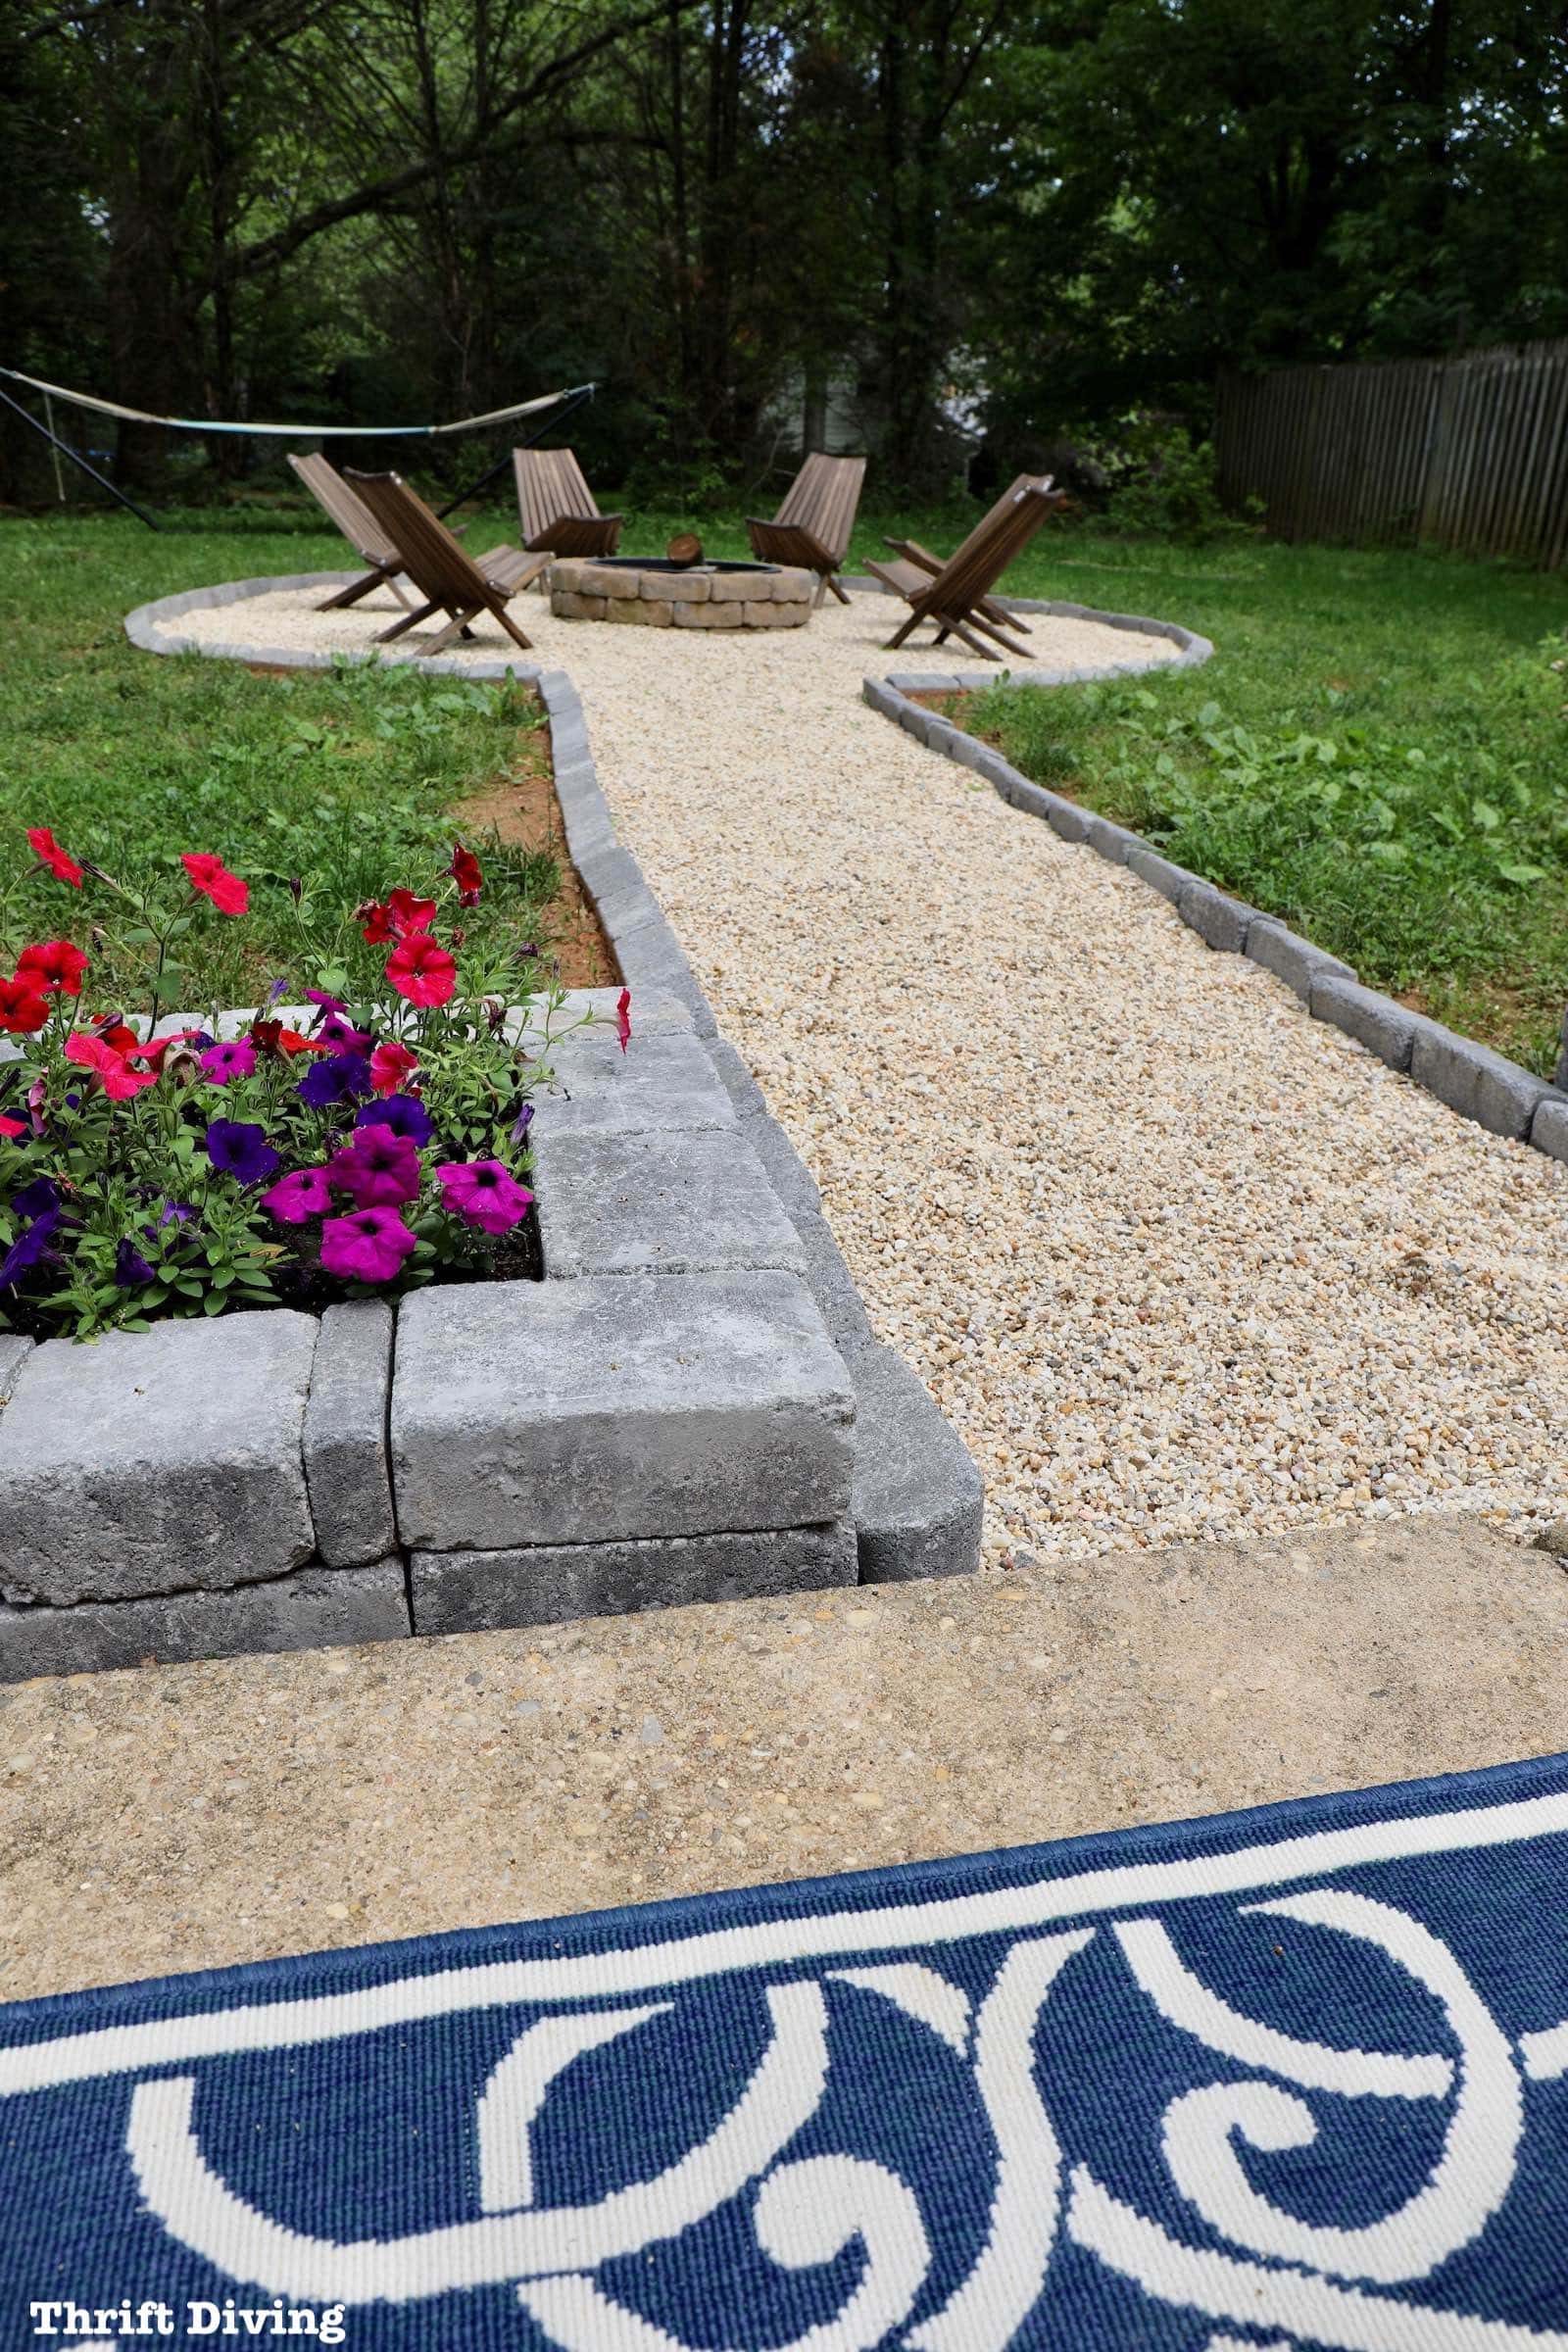
STEP 11: Add the Pea Gravel
Pea gravel is great to add to a fire pit area because you don’t have to be so precise with it. It’s comfortable to walk on and doesn’t cost much per bag. I had about 28 bags of pea gravel and ended up needing more. I still need more, actually! But that will come with time. Just make sure you have enough to cover the weed block fabric.
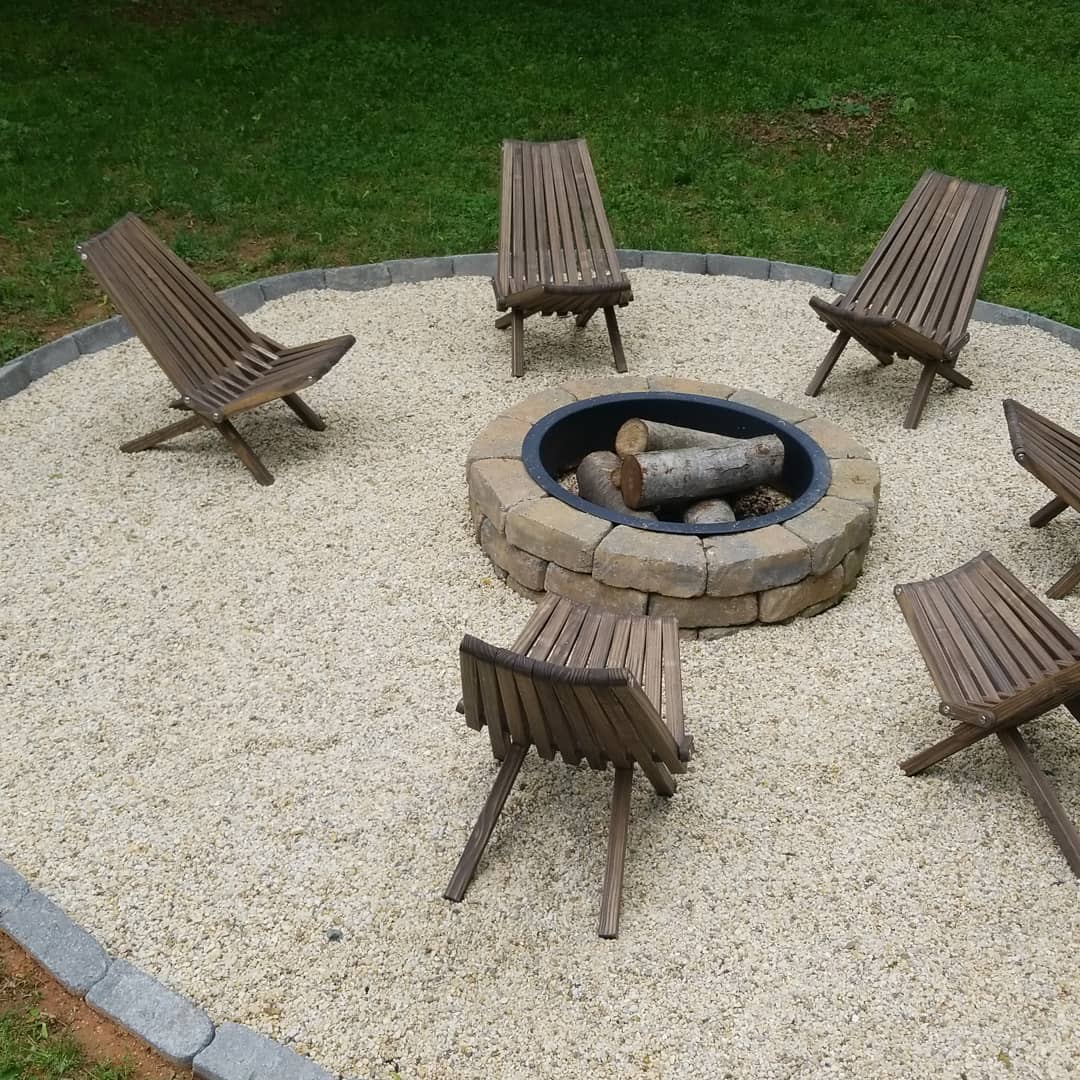
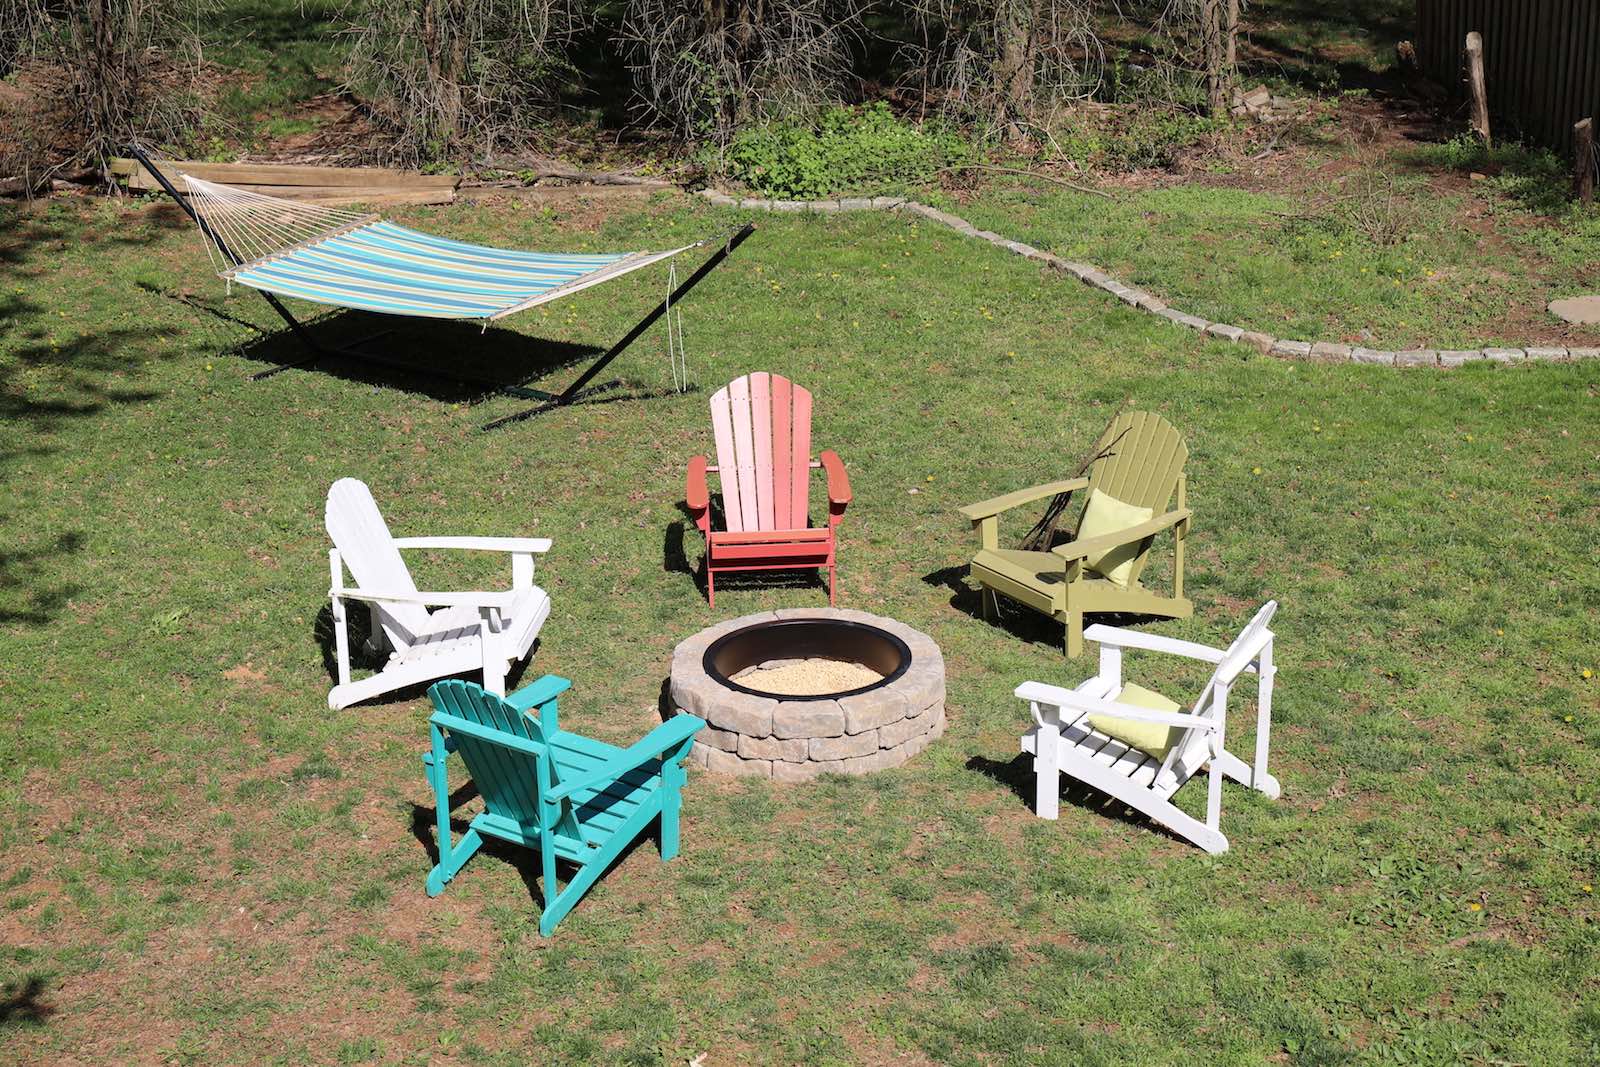
STEP 12: Add New Fire Pit Seating!
The last critical step is to add new seating around your fire pit! These awesome chairs were sent to me by a friend I met several years ago at the Florida Home Show. He’s the CEO of a company called GloDea. I knew these fire pit chairs would be the perfect addition to my DIY fire pit (thanks, Dan!).
STEP 13: Add Stone Planters
The Pavestone Rumblestone bricks that I used actually come in a bunch of kits, including fire pits, planters, and even benches. I had ordered two bench kits but changed my mind on using them as bench kits. Instead, I decided to use them as low planters!
I could have stacked them a little higher but knowing my children, they would have stood on them if they were any taller (that’s just how boys are). Keeping them low to the ground makes them less attractive to my sons.
I still them with soil and pretty flowers. Typically these bricks would be glued together just as I used construction adhesive for the DIY fire pit. However, since they were low to the ground, I didn’t find them to be a falling hazard. Plus, if I ever want to reconfigure them into another arrangement, I wanted to be able to easily move and reposition them.

All Done! My New DIY Fire Pit!
DIY fire pit kits are super easy to assemble. Carving out a fire pit seating area is always a bit more challenging because it’s back-breaking work! But you can do it yourself in as little as a weekend. If you have help–even better!
Here’s a reminder of what my yard looked like when I just had the DIY fire pit.
Before – Without a Fire Pit Seating Area and Walk-way
But after a season of elements, it needed a pick-me-up for the spring.
AFTER! – With Fire Pit Seating and Walk-way!
With a new fire pit seating area to anchor the fire pit, along with pretty planters, a new patio rug, and fresh flowers, I couldn’t be happier with my patio and fire pit!
I still have some things I am planning, like mulch around the path with flowers…and a sunshade over the patio with a zippered screen (to keep out mosquitoes). I’m also planning to put in an in-ground garden to go with my DIY raised garden beds that I built last spring!
The best thing about building the DIY fire pit last year was being able to spend the day with my middle son…

…and the part about Part 2 of the fire pit this year is that I’ll be able to spend time with my family sitting around that fire pit, enjoying the summer with vegan marshmallows! (Yep, I said “vegan”).
Love this project? Click here to save it on Pinterest!
![]()
Have you been wondering how to build a DIY fire pit with a stone walkway and a seating area in your backyard? Well, you can do it yourself over a weekend, and it will bring many years of memories with your family and friends!

Download the 5 freebies!

Thrift Diving inspires women to decorate, improve, and maintain their home themselves...using paint, power tools, and thrift stores! Use these 5 printables, checklists, and ebooks to get started!

Firepits can be a great focal point for a garden or green space and a good place for people to gather round as the night comes in. Great project – love the photos!