How to Reupholster Dining Room Chairs with Velvet Fabric
This post on how to reupholster dining room chairs with velvet fabric is sponsored by Arrow Fastener.
When you have kids (or pets), there are things that you allow yourself to buy for the house. And then there are things that make you suck your teeth in frustration and file away in the “Things I Can Never Enjoy Because My Kids Will Literally Destroy It” category of home decor.
If you have kids, you know I’m not making this up.
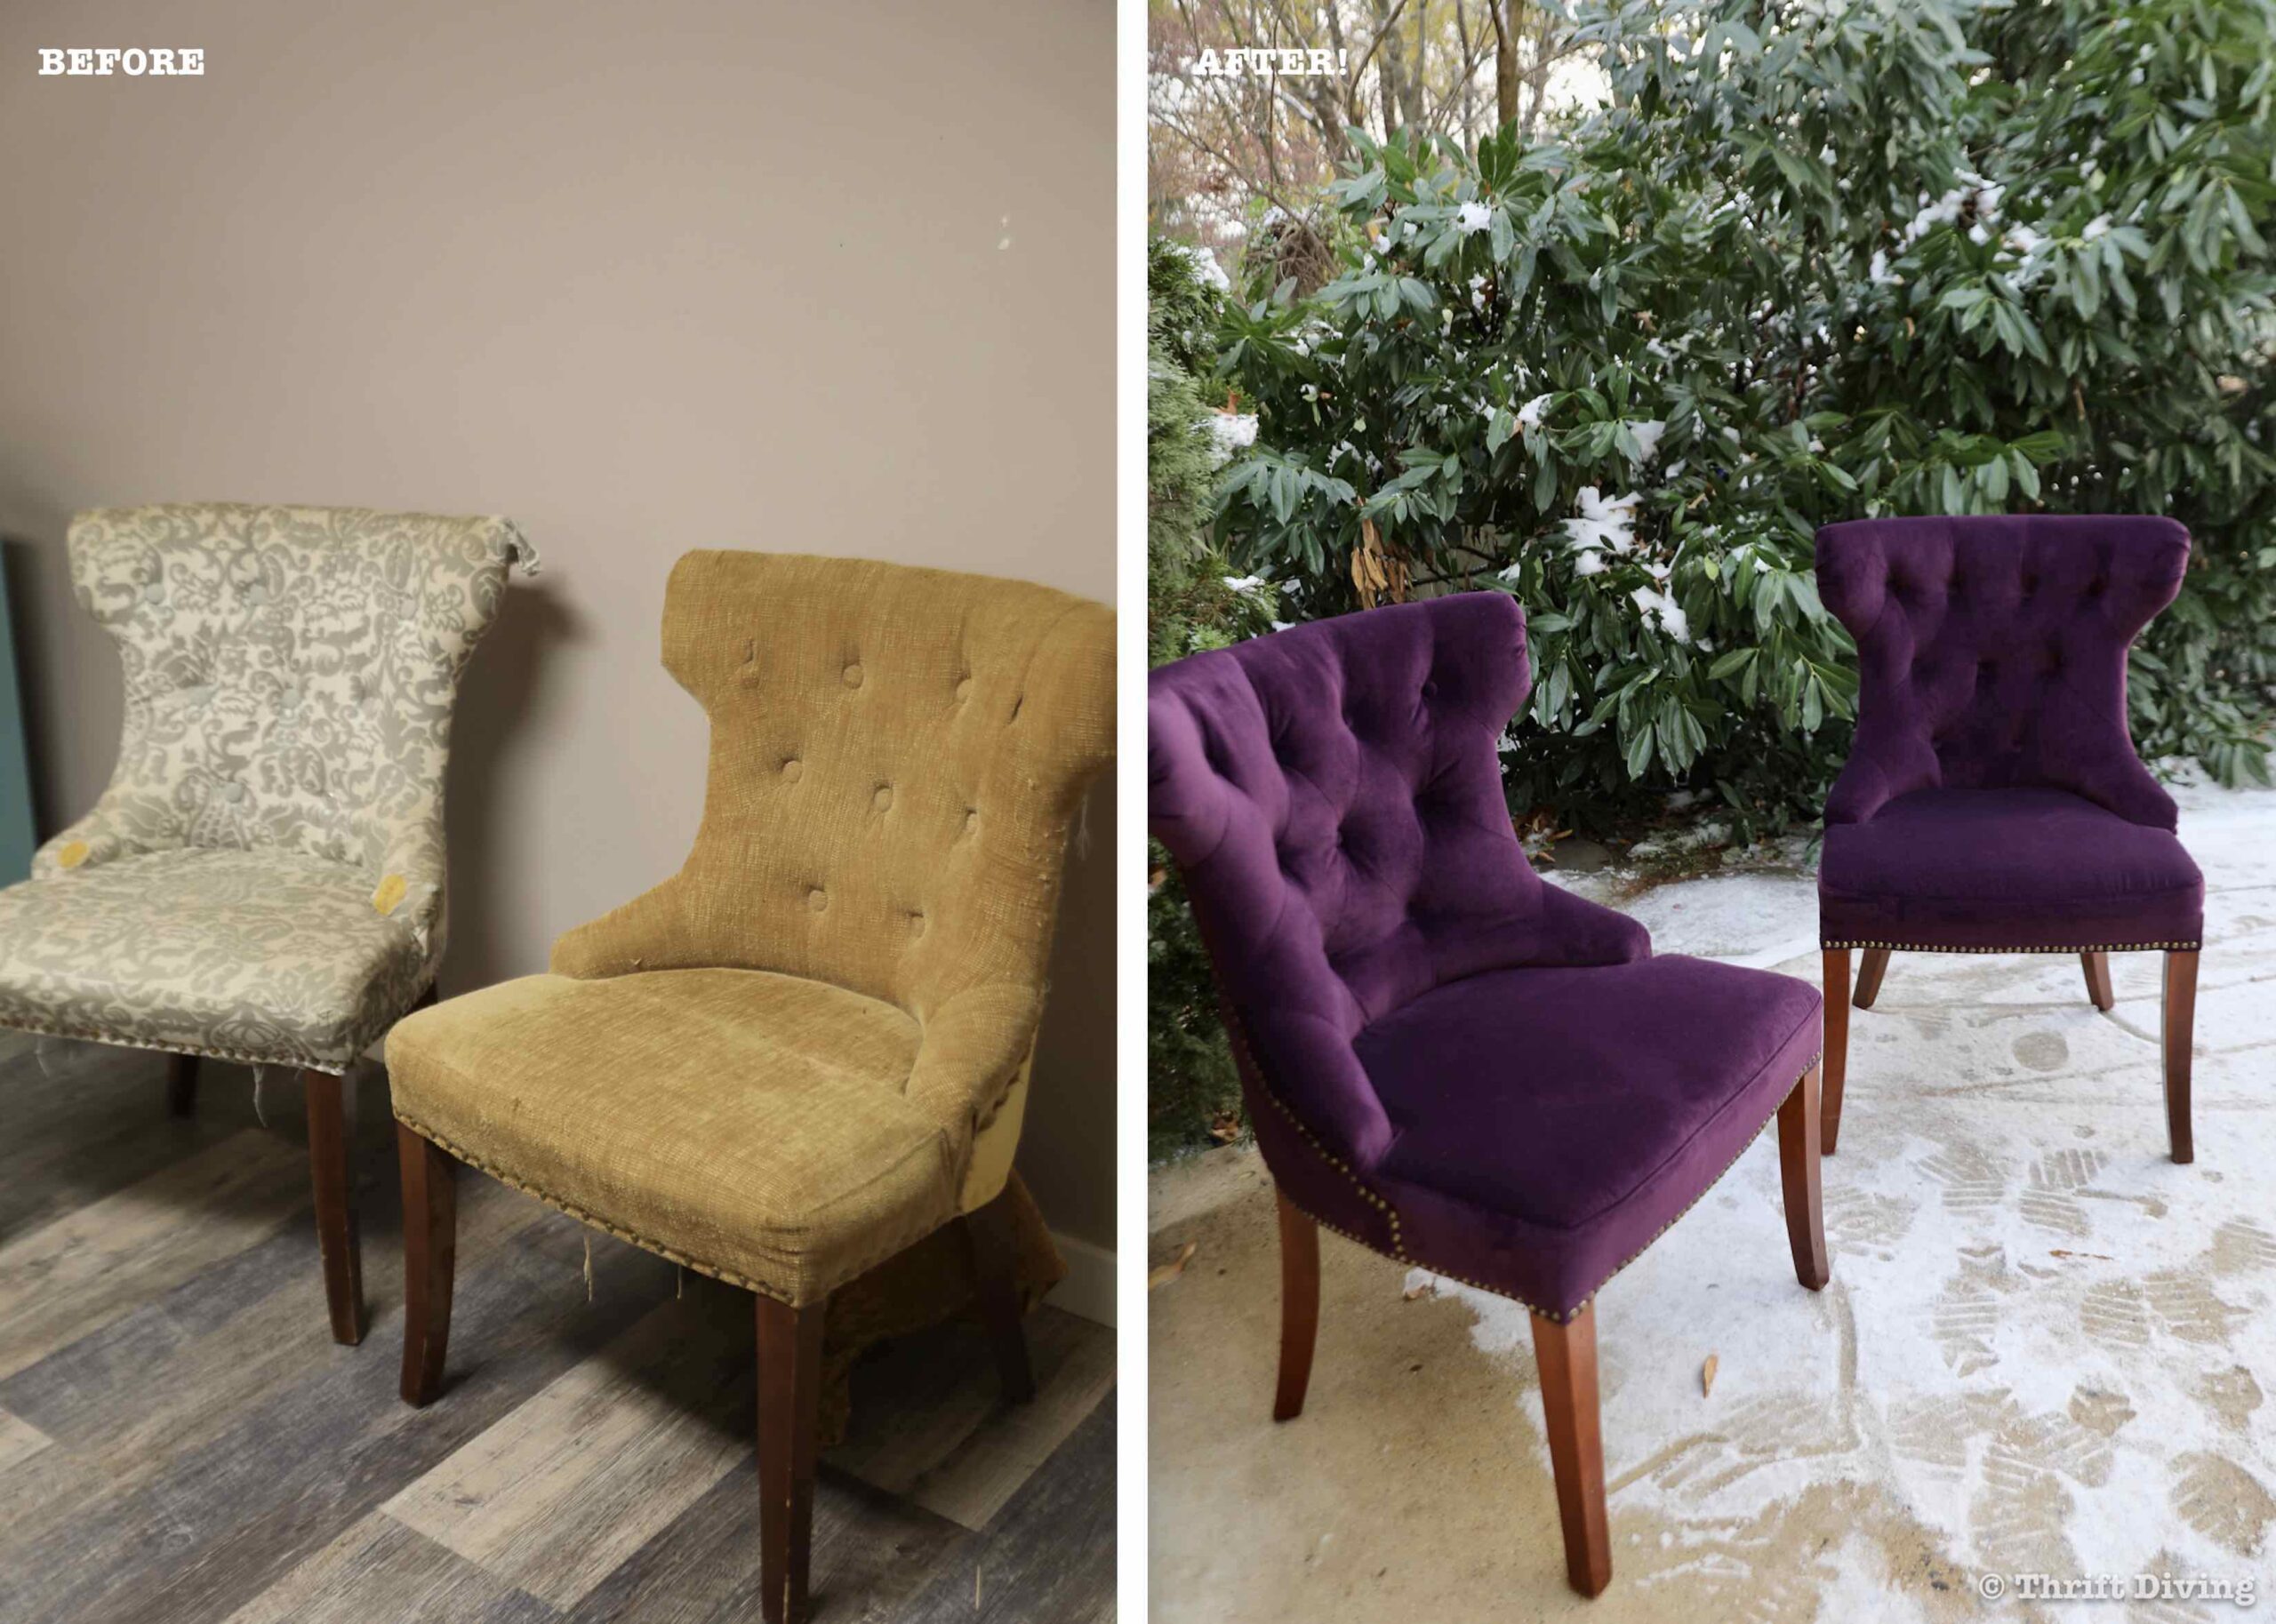
These two dining room upholstered chairs I had found at the thrift stores are a perfect example. I bought them for $20 each, which was a steal because they were originally priced at $199 from Pier 1. There were quite lovely when I bought them, but I wasn’t feeling the fabric.
Click here to save this project on Pinterest.
BEFORE
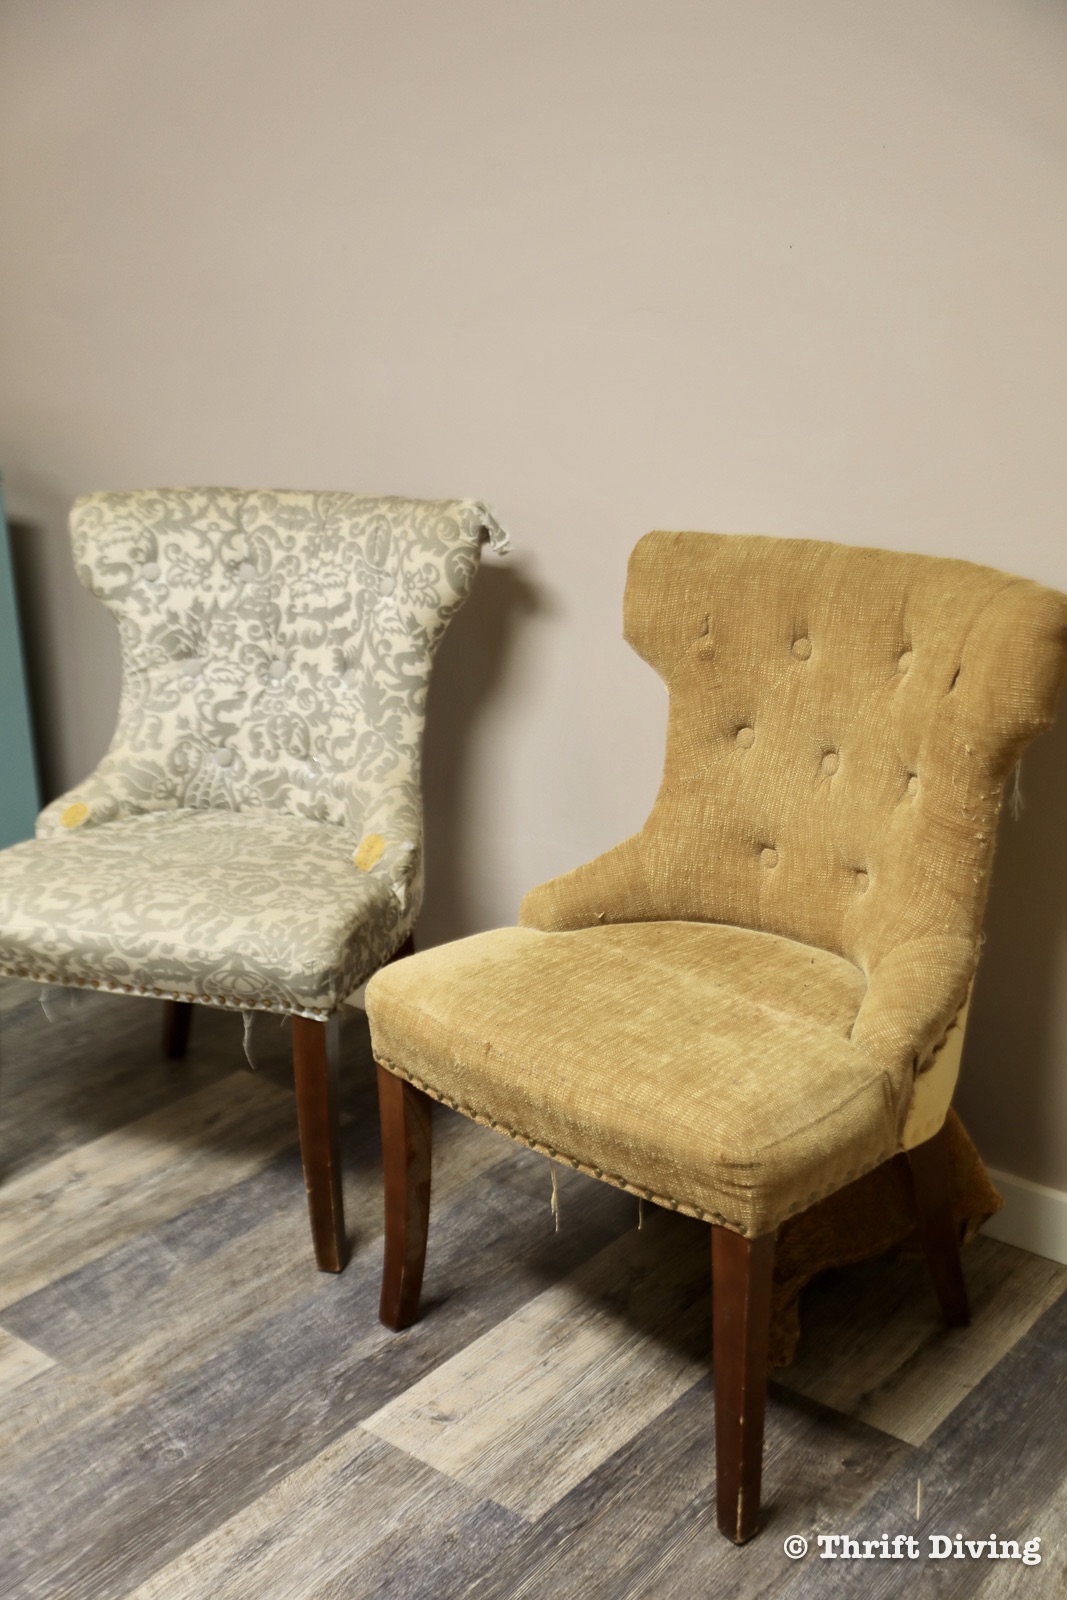
I had reupholstered one of them to use as a desk chair for my office makeover (the gray and white one). But my middle son started using it soon after, pulled the tacks out of it, started picking the foam from the arms after he’d worn down the fabric (who knows how he did that…).
The poor chair sat discarded in a corner of the room, dirty, and simply unusable.
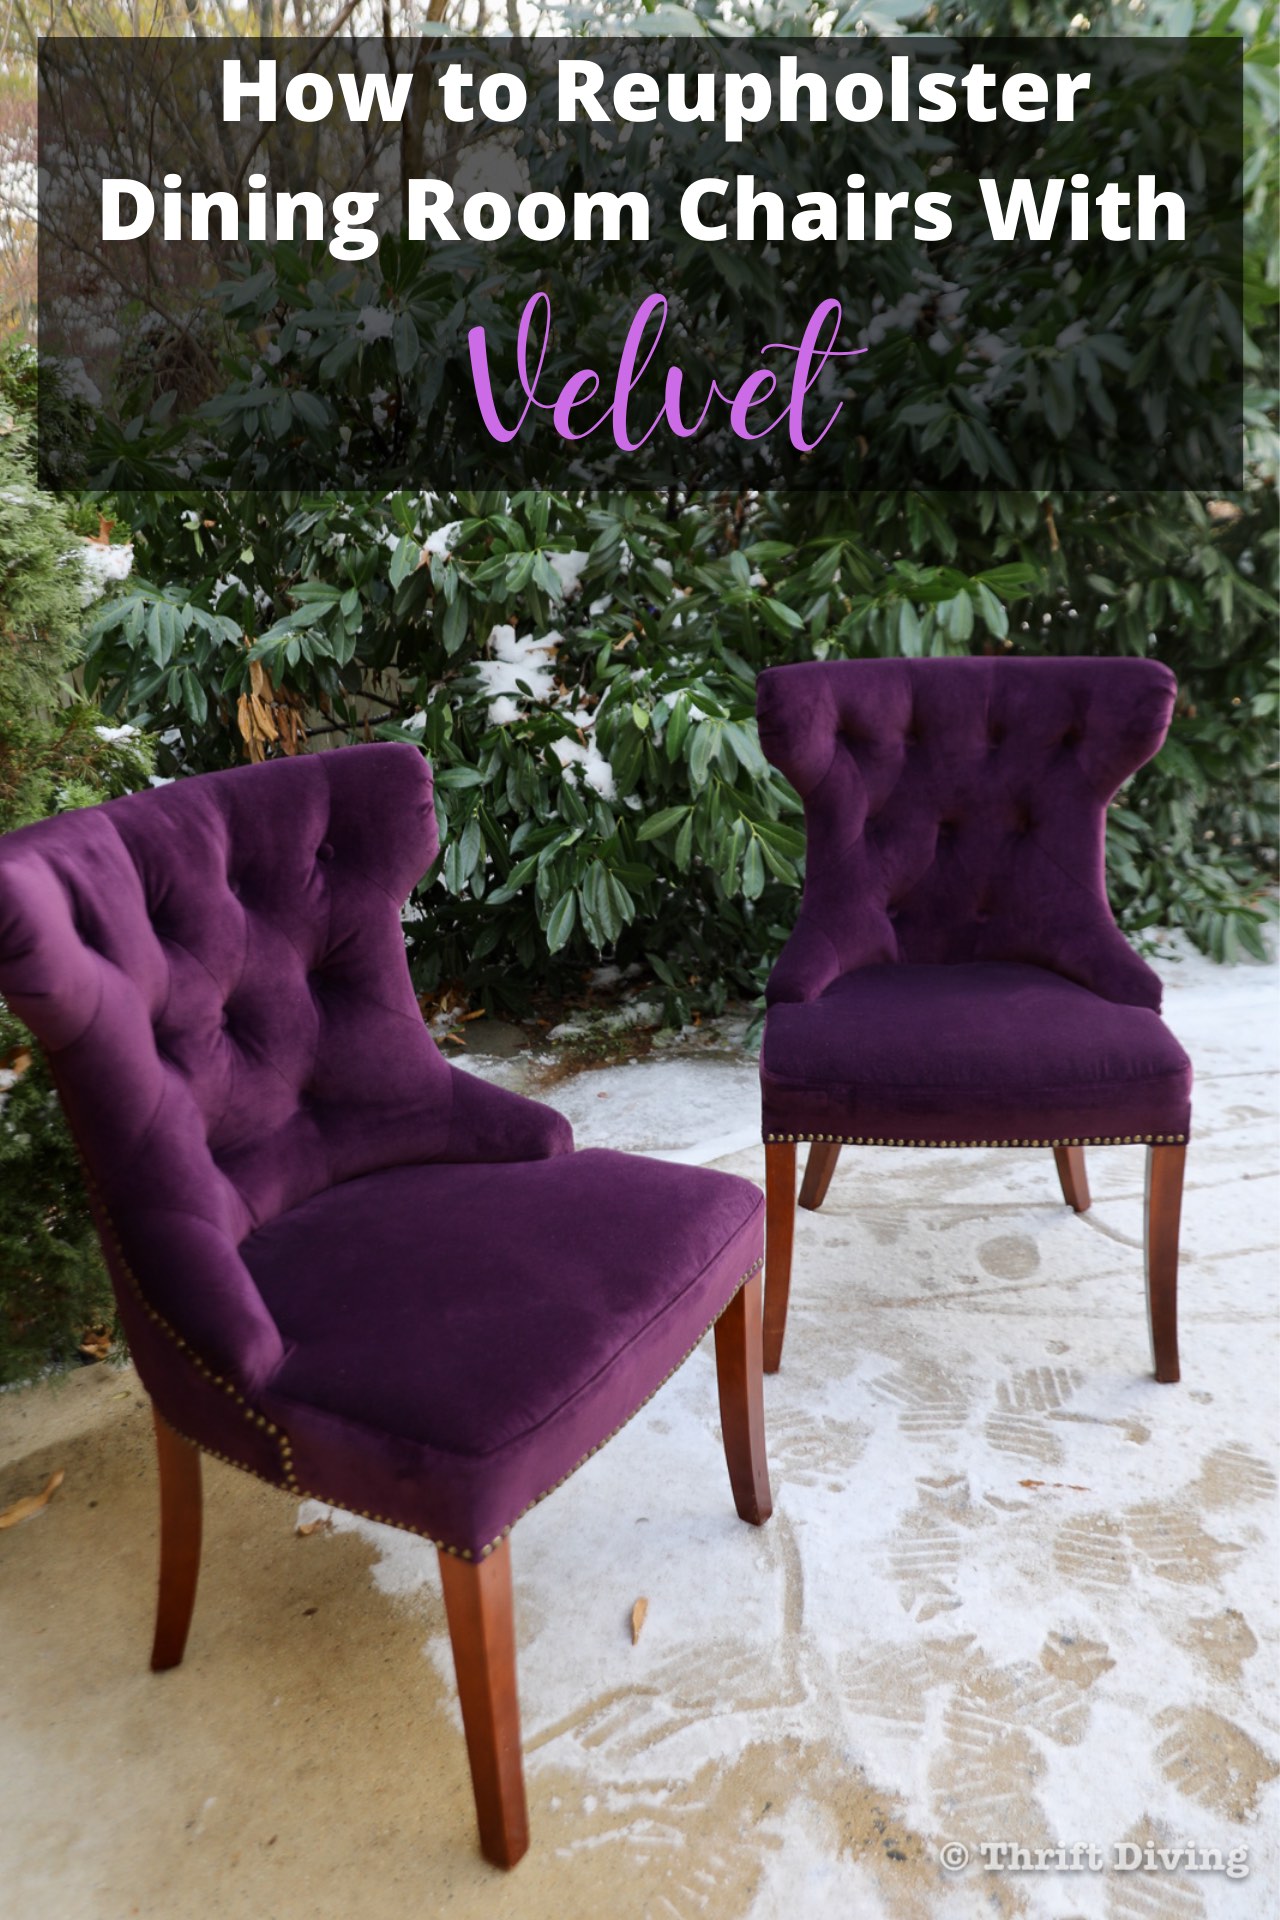
I came across the most beautiful purple velvet at the fabric store and decided these chairs deserved a proper makeover. Velvet is one of luxuries filed away in the “Things I Can Never Enjoy Because My Kids Will Literally Destroy It” category, but now that they’re older (ahem–when they should “know better“), I am finding that I’m less willing to budge on buying better-quality materials and home decor.
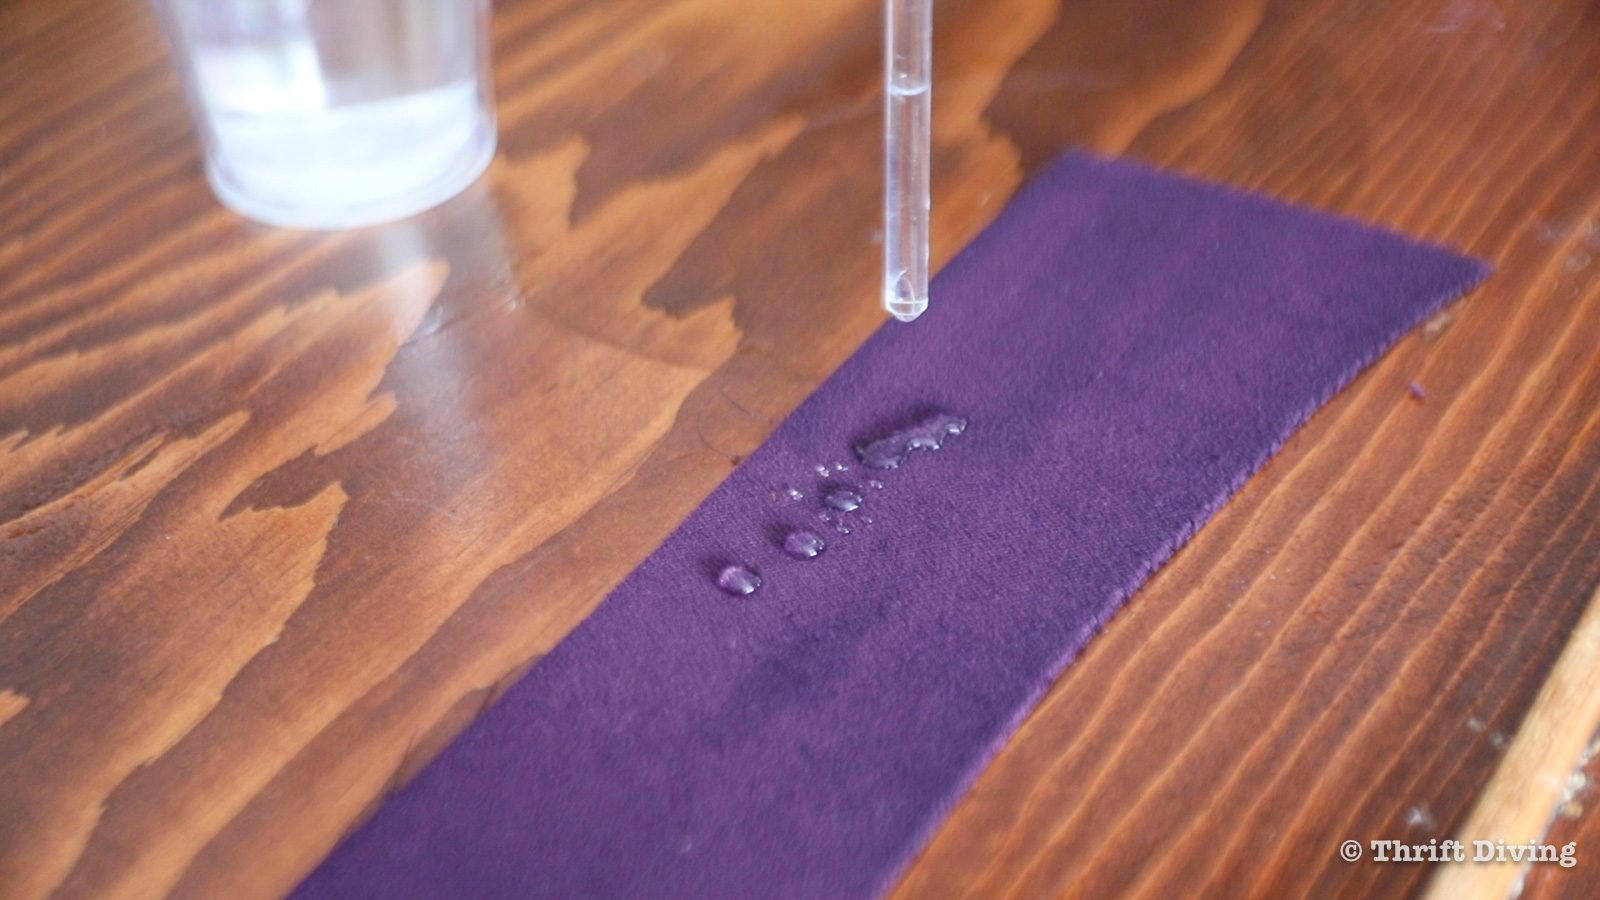
Plus, I found the perfect velvet that is washable, water- and liquid-resistant, and is odor resistant!
So in this post, we’re going to talk about how to reupholster dining room chairs with velvet. Because your home is worth it, kids or not kids. Pets or no pets. 🙂
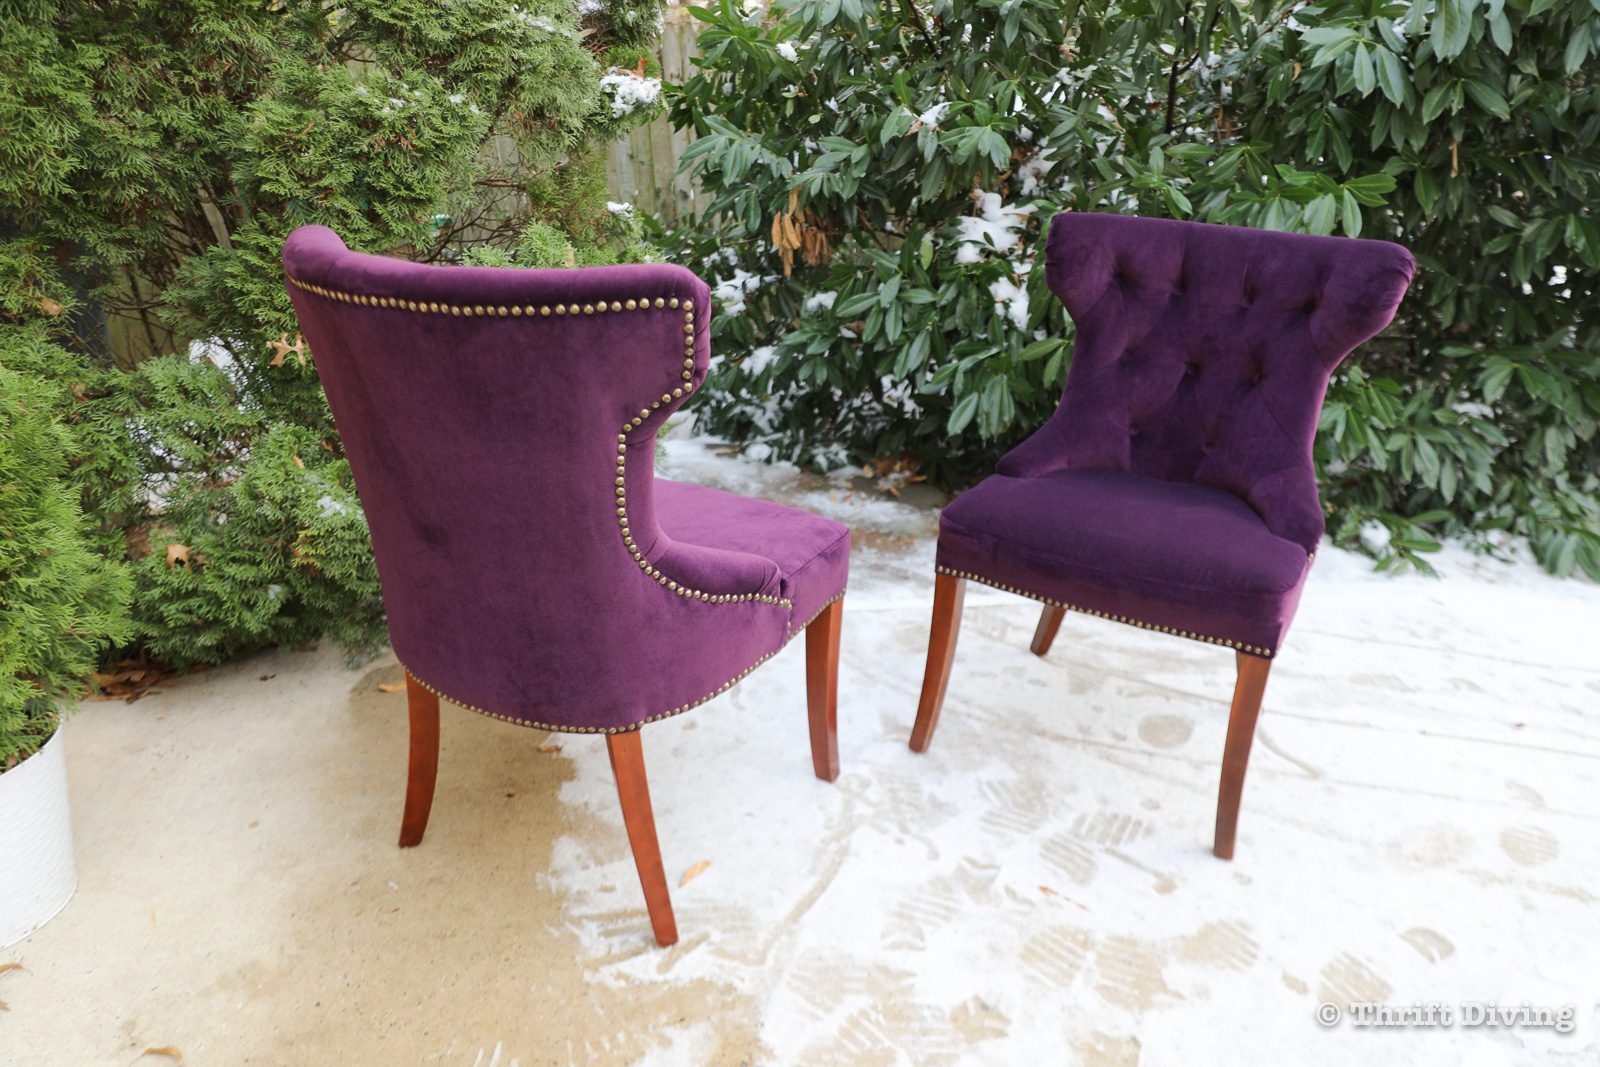
AFTER!
Click here to save this project on Pinterest.
![]()
Watch My Reupholster These Dining Room Chairs!
Feel free to watch this project from start to finish on my YouTube channel, or just click below to enjoy!
Materials
The materials you use for your own dining room chairs may be different. Here are all the materials I used, however. I participate in the Amazon Services LLC Associates Program and other affiliate advertising programs designed to provide a means for me to earn fees by linking to Amazon.com and affiliated sites.
- Crypton velvet fabric
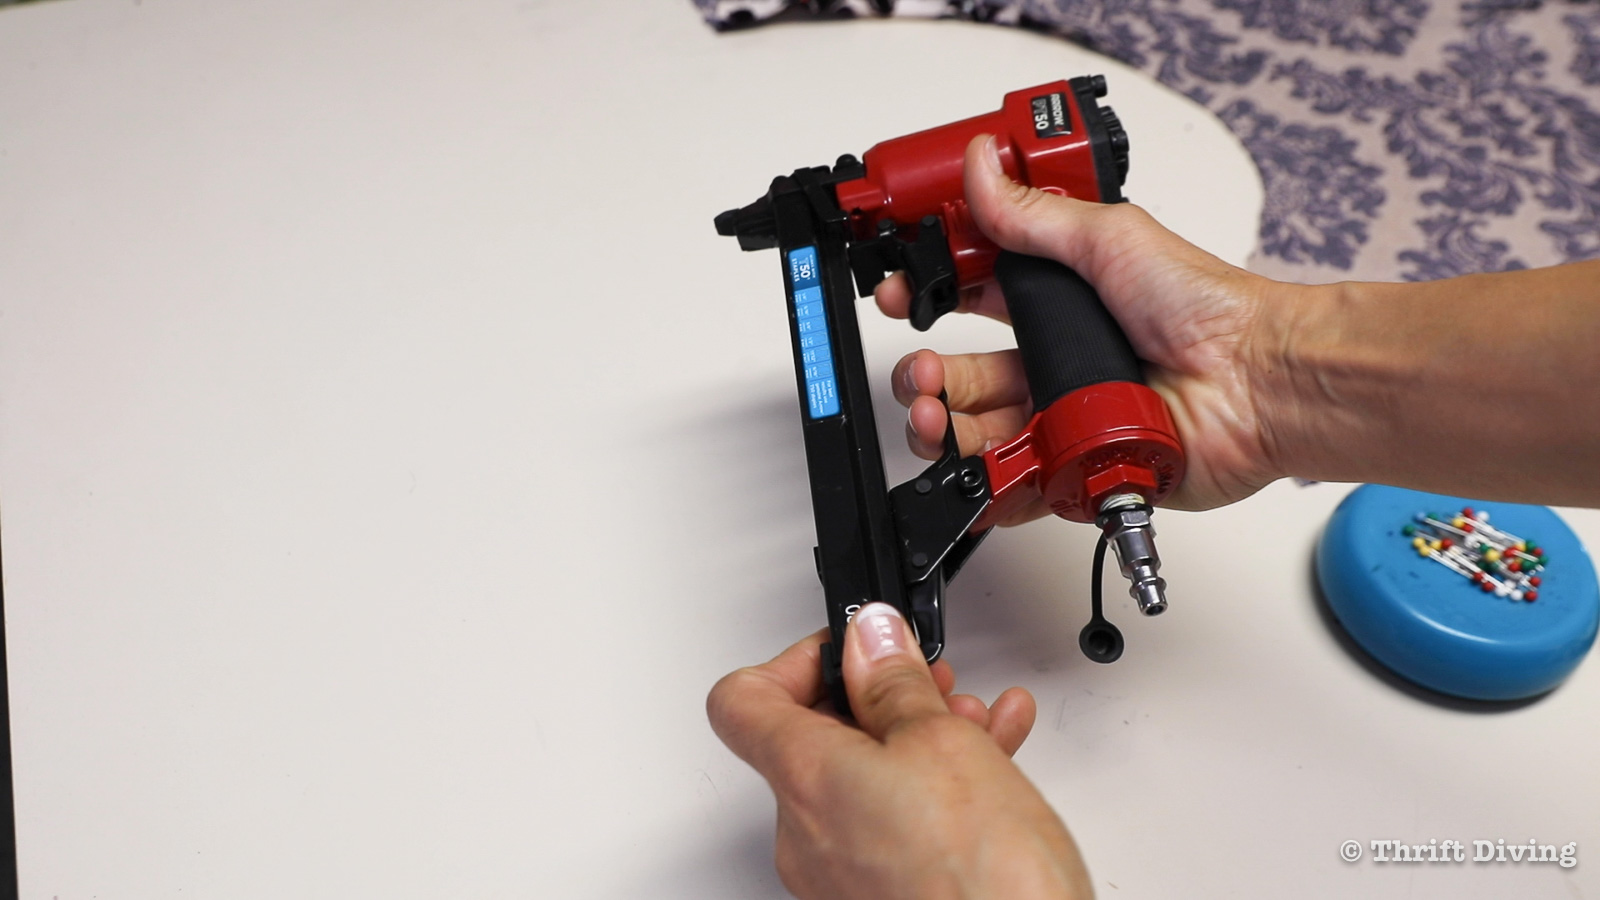
- Arrow Fastener PT50 stapler
- 3/8″ Arrow Fastener staples
- Quiet air compressor (you can buy this hose with these couplings)
- Upholstered buttons
- Large upholstery needle
- Twine
- Decorative tacks
- Cardboard to make a “jig” for the tacks (optional)
- Fancy tack spacer (optional)
- Tack hammer
- Dacron upholstery batting and/or coconut fiber stuffing
- Staple remover
- Seam ripper
- Sewing machine
- Thread
- Scissors
- Pins
- Black Sharpie
How to Reupholster a Dining Room Chair with Velvet
Velvet is such an amazing fabric! It’s luxurious and often doesn’t mesh well with people that have kids or pets. But don’t let that scare you. If you’ve got an upholstery staple gun (like the PT50 pneumatic stapler from Arrow Fastener) and this fabric, which is liquid-resistant and stain-resistant, you can reupholster nearly any piece of furniture in your house! Let’s walk through how reupholstered these chairs.
STEP 1: Take Pictures and Videos of Your Chair First
I’ve reupholstered a few pieces, but I wouldn’t consider myself a professional upholsterer. I’ve taken a series of upholster classes. I’ve also done a few changing of pendent lamps around here. And one thing i have always learned it to always, always, always take pictures and videos of the “BEFORE” before starting any project. Especially when reupholstering. It’s great to have a reference when you’re adding the new material.
For this chair, I saw that the back fabric overlapped the other fabric. So it would be the first to be removed…..and also the last to be replace.
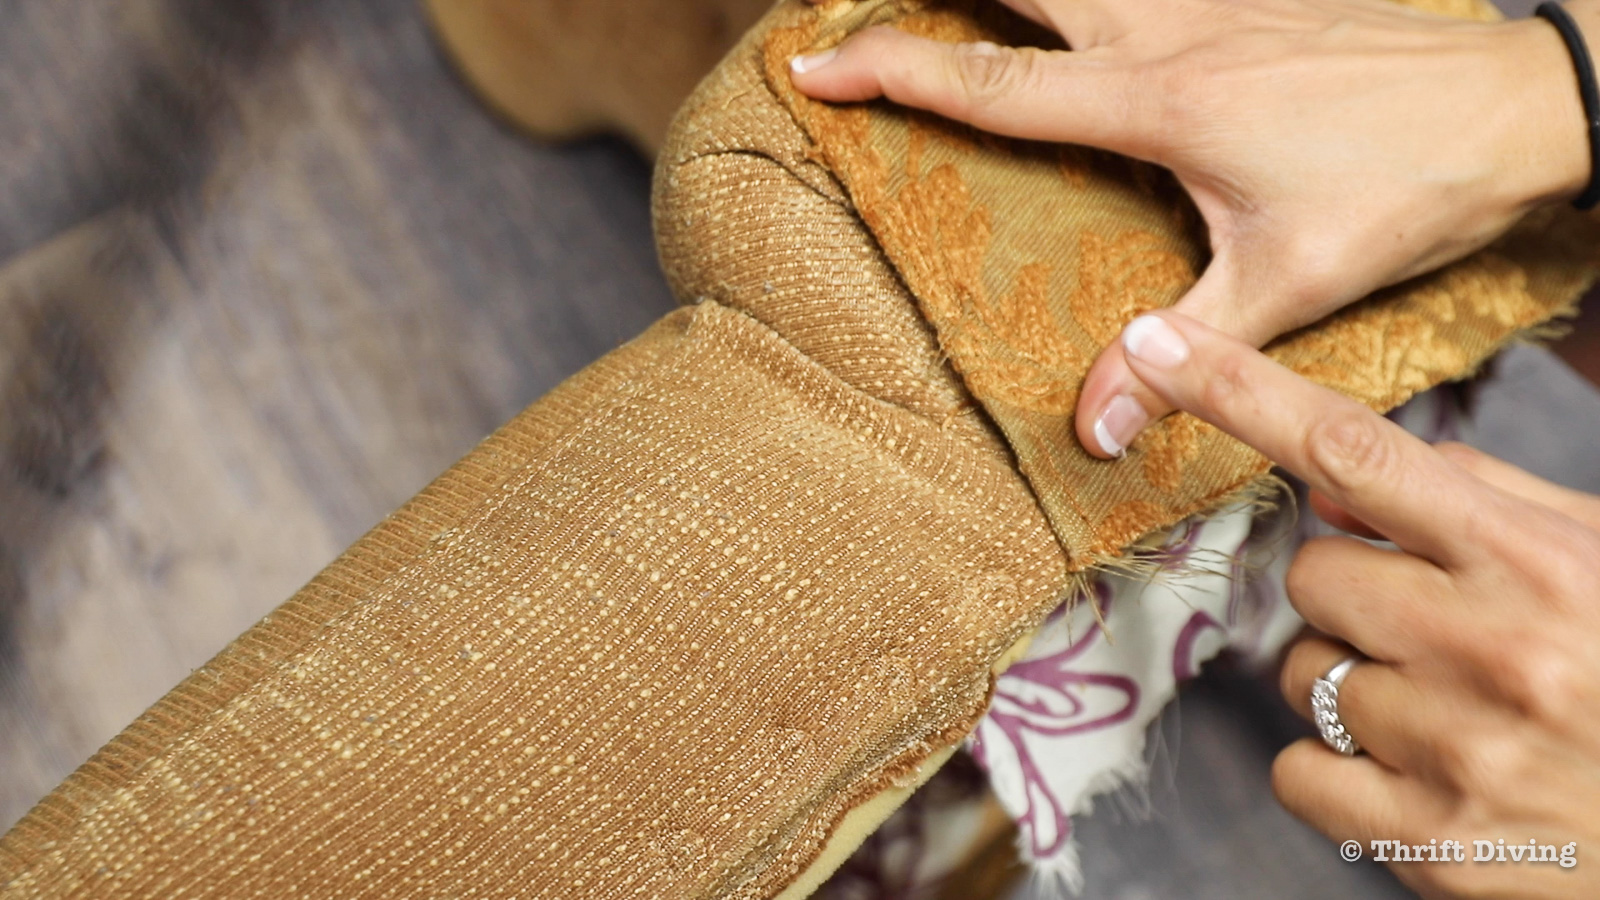
STEP 2: Remove the Old Fabric Carefully
The old fabric can always be used as a pattern for the new fabric. Carefully remove it using a staple remover. This step can take a lot of time because staples are usually buried deep in the wooden frame of the chair. Don’t get frustrated and start ripping the old fabric away. This old fabric is golden!
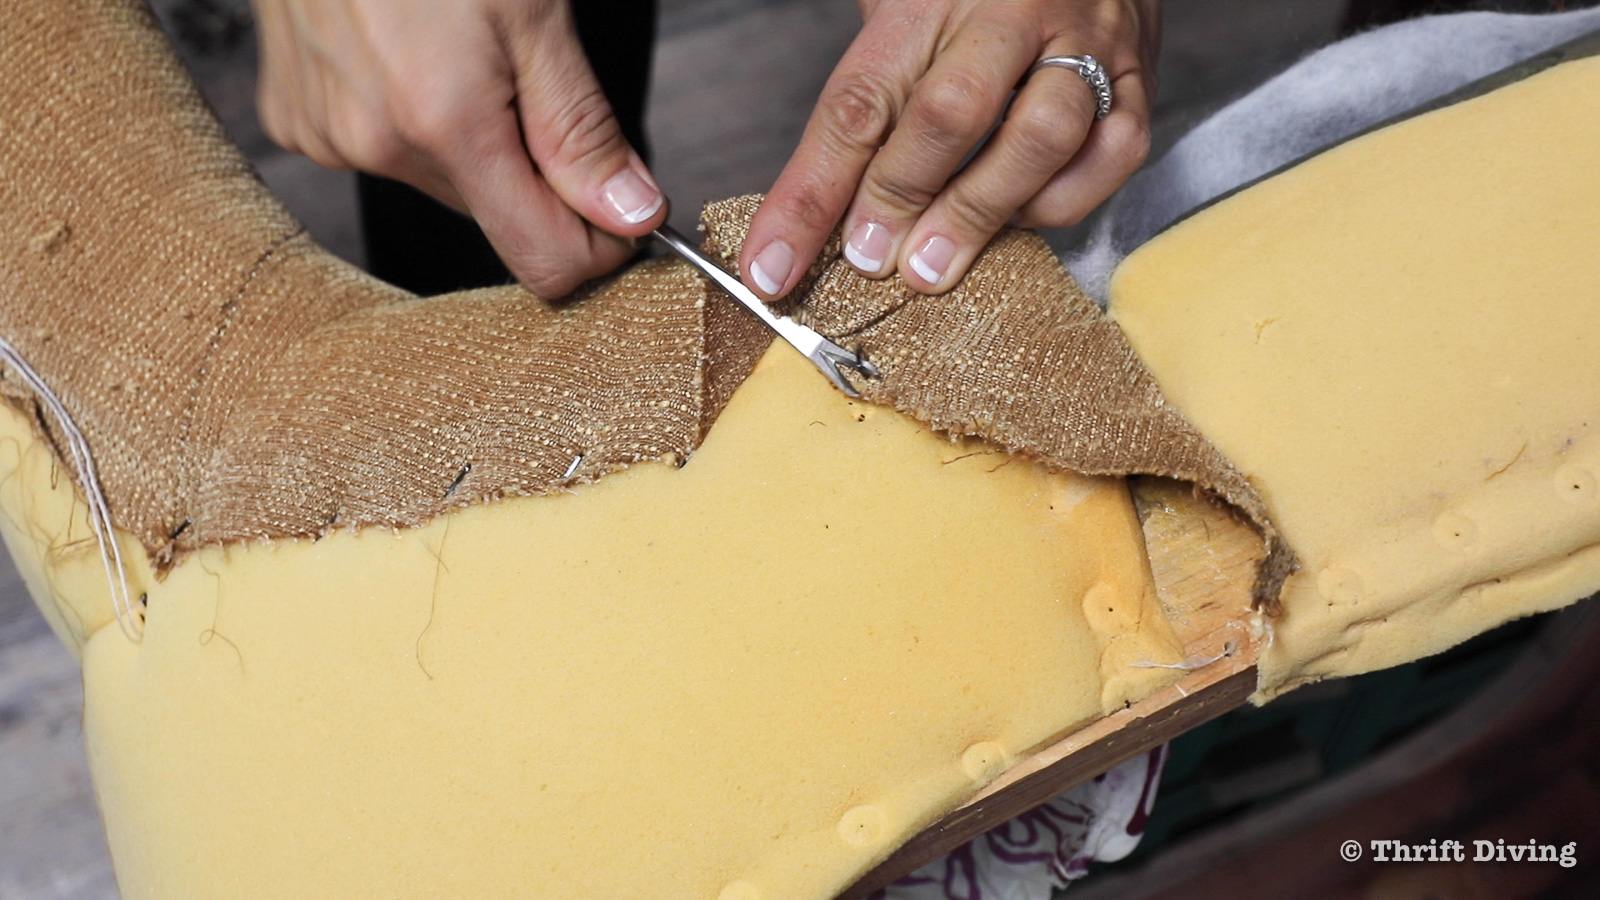
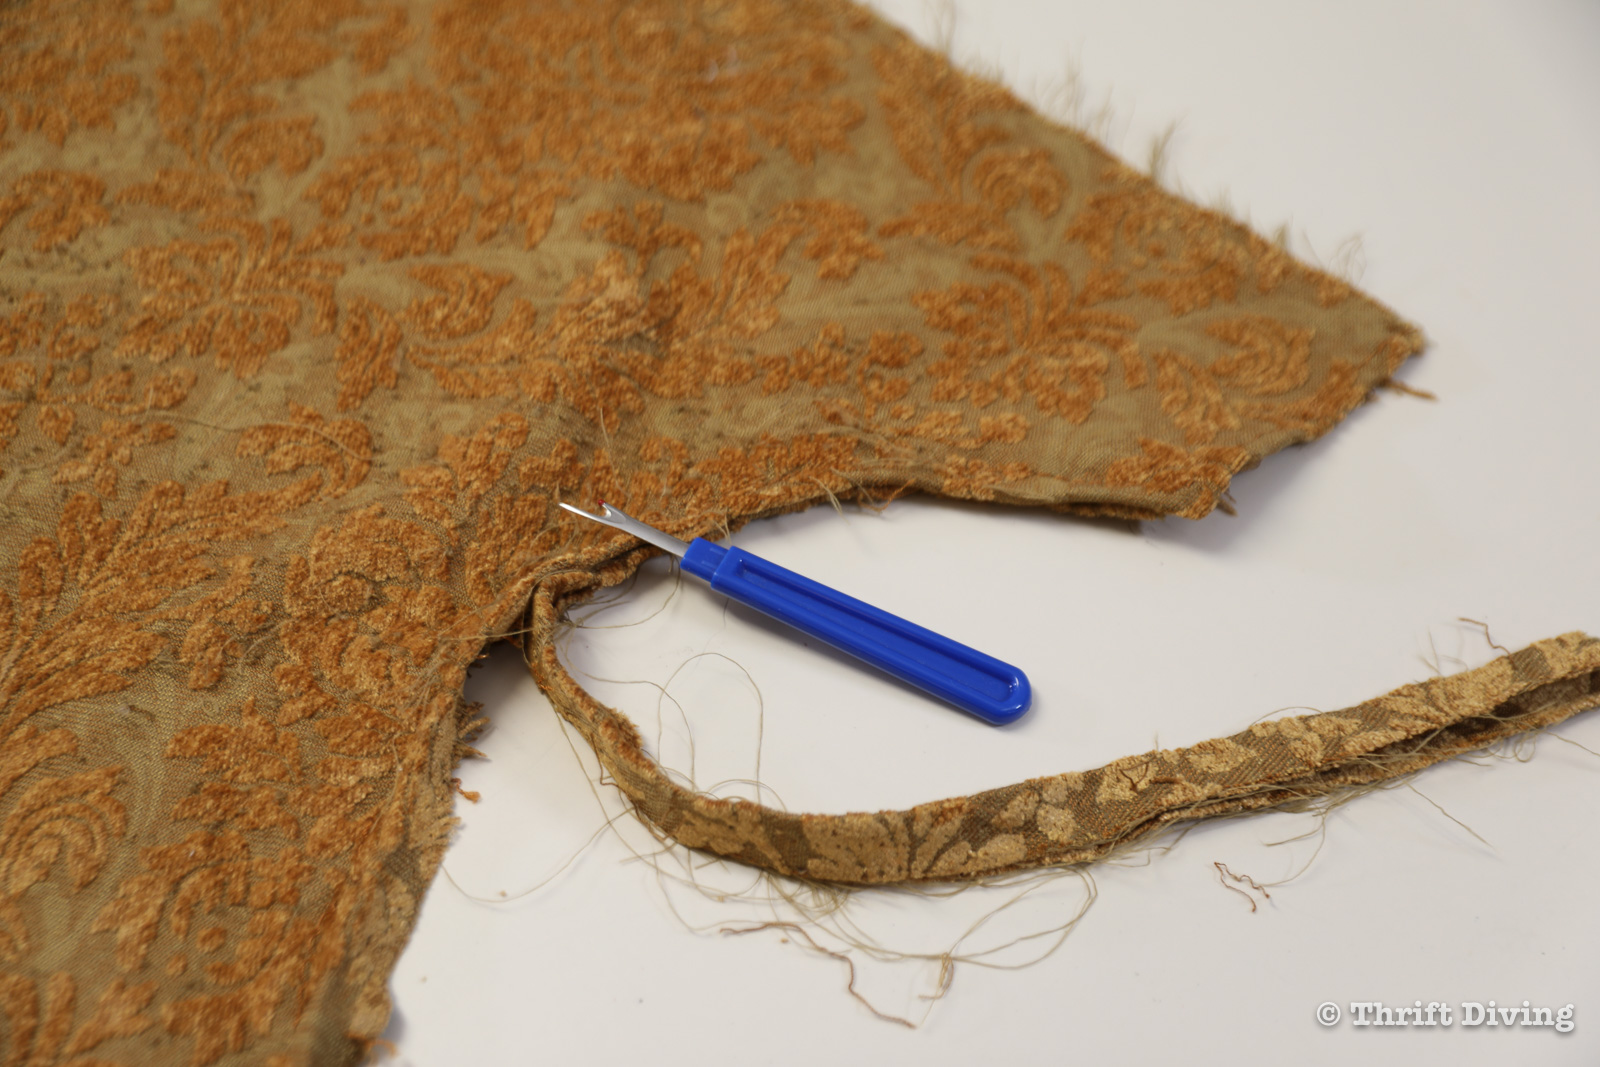
STEP 3: Use a Seam Ripper to Separate the Pieces
Not all chairs will have pieces sewn together, so you may not need a seam ripper. But my chair had a few major that were sewn together and needed to be carefully removed from each other. A seam ripper is your best friend in this case!
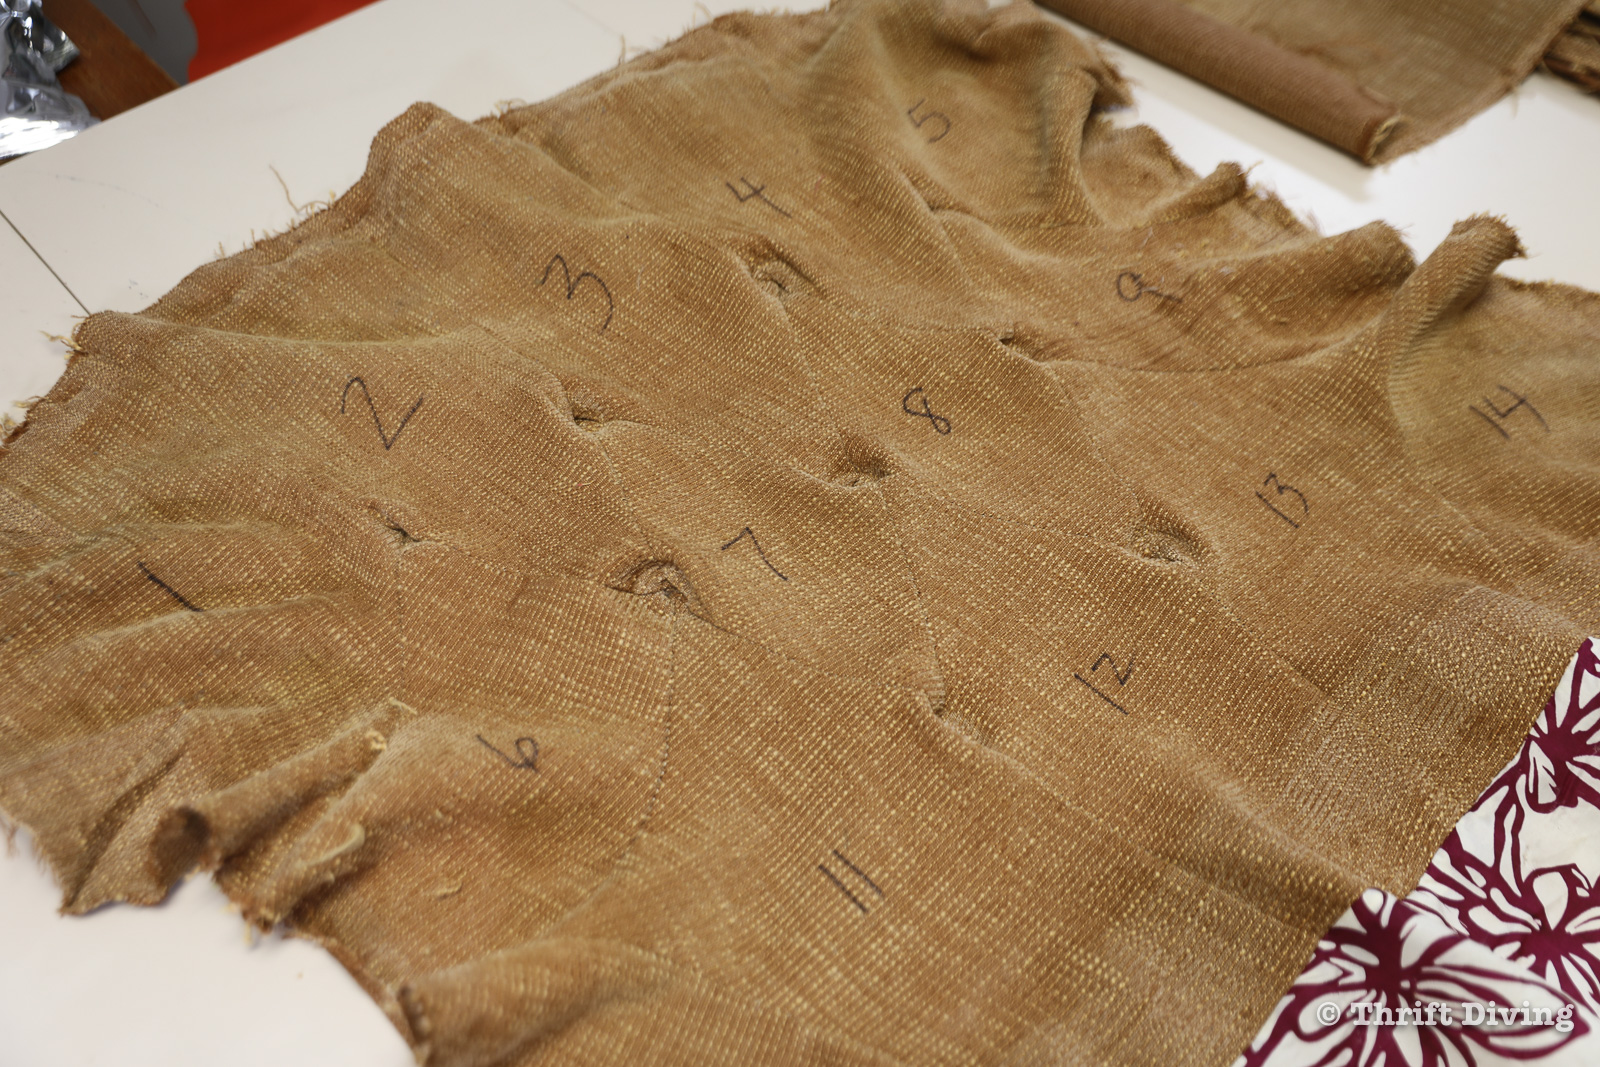
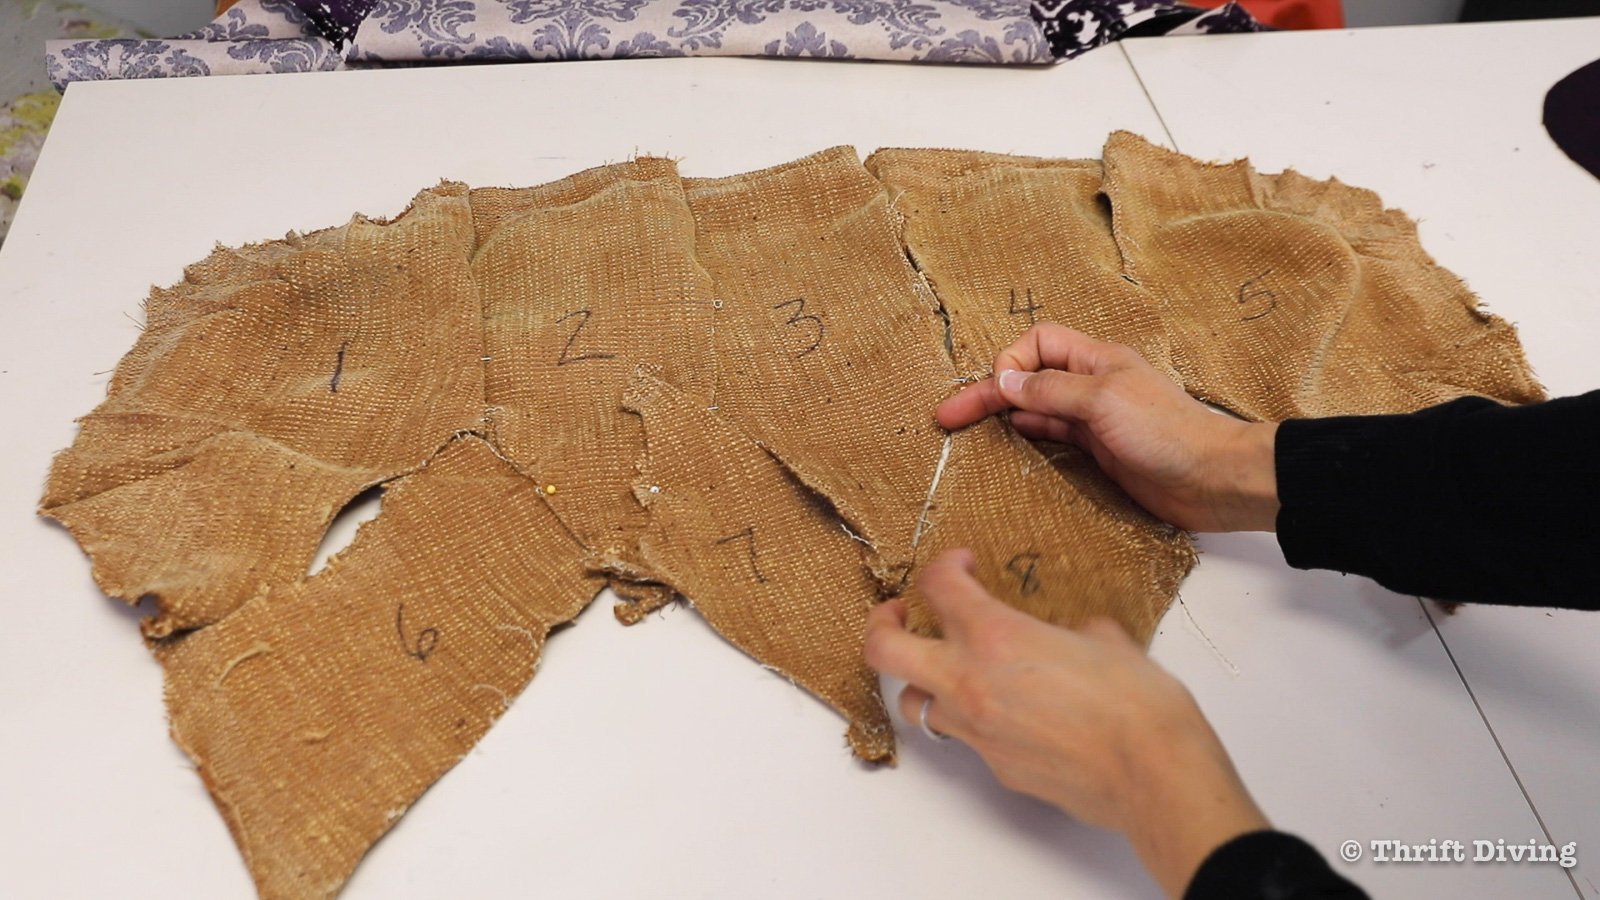
STEP 4: Label Each Piece with a Sharpie
Before removing the seams, though, I labeled each individual piece of fabric of this tufted dining room chair back with a number, 1 through 14. The key for me was to keep straight which piece would be sewn to which piece.
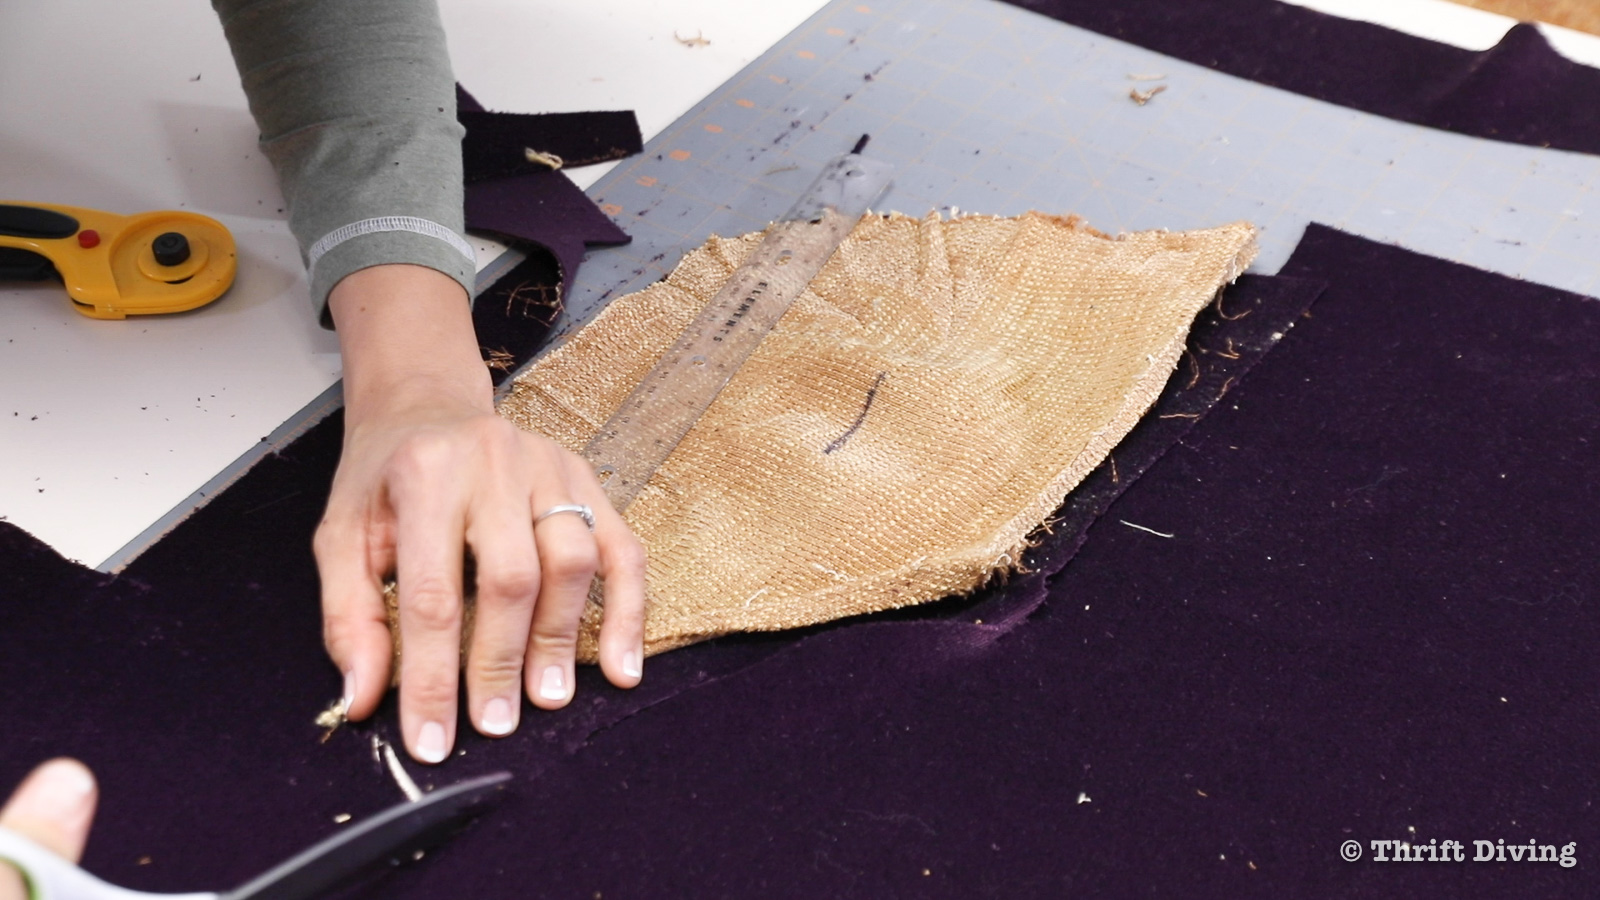
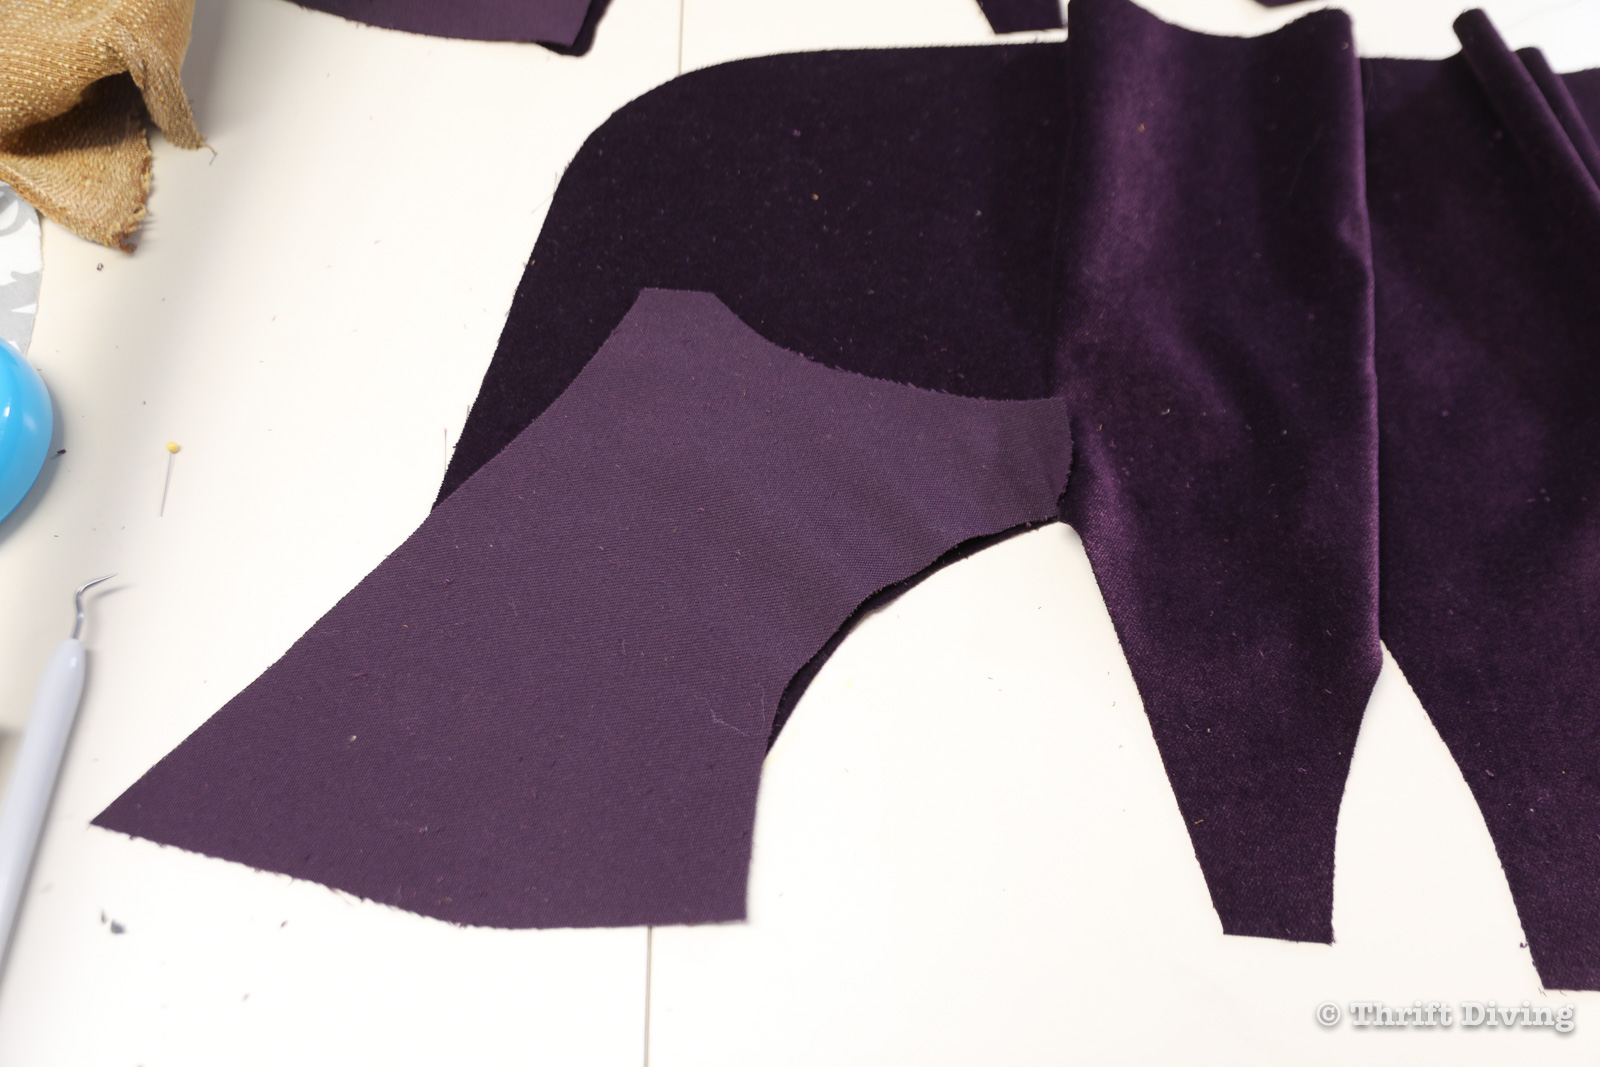
STEP 5: Cut Out New Pattern Pieces Using the Old Fabric
For this project, I was reupholstering two dining room chairs at the same time. This is easier than completing one chair and then afterwards, needing to reupholster the the other. I don’t know about you, but once I am done a project, I am done. 🙂
In knitting, there is a real phenomenon called “second sock syndrome.” It’s when you finish one sock and you dread going through aaaalllllllll the steps again to do another sock. Reupholstering chairs is the same way.
If you’re reupholstering more than one chair, do each step simultaneously for each of the chairs. Cut all the pieces at the same time. Sew the pieces together all at the same time. Trust me on this–it will save you a bunch of headache.
Be Mindful of the “Nap” or Pattern of the Fabric
Here’s a little tip, though, when cutting out your fabric: some fabrics have a “nap” such as velvet, which requires you to cut the pieces out in a particular way. For example, when you run your fingers over velvet, one direction is smooth, and one direction is rough.
You want the upper back of the chair to run “smooth” when you run your hand over it, so be sure to cut the pieces of fabric with the nap, not against the nap.
Same is true for cutting fabric with patterns, whether it’s formals, damask, pinstripes, etc. Be mindful of where your seams will fall and which is “up” and which is “down” on the fabric.
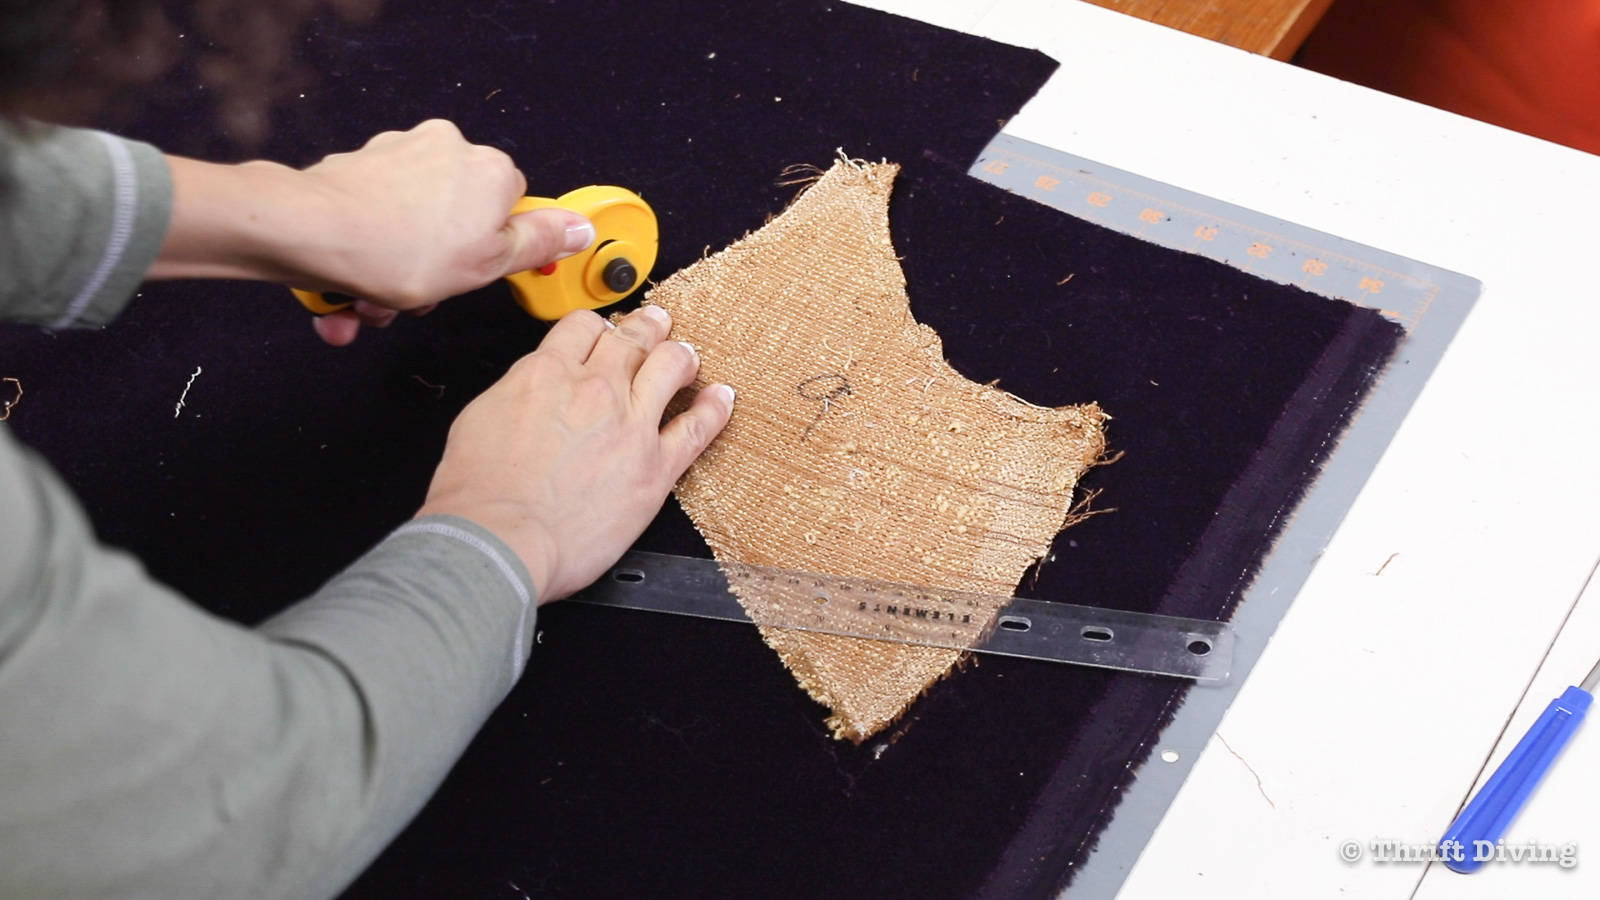
TIP: Be sure to include at least a 1/2″ seam allowance on all the cut pieces. It’s easier to remove fabric if you cut pieces too big; it’s always hard to add fabric for pieces cut too small.
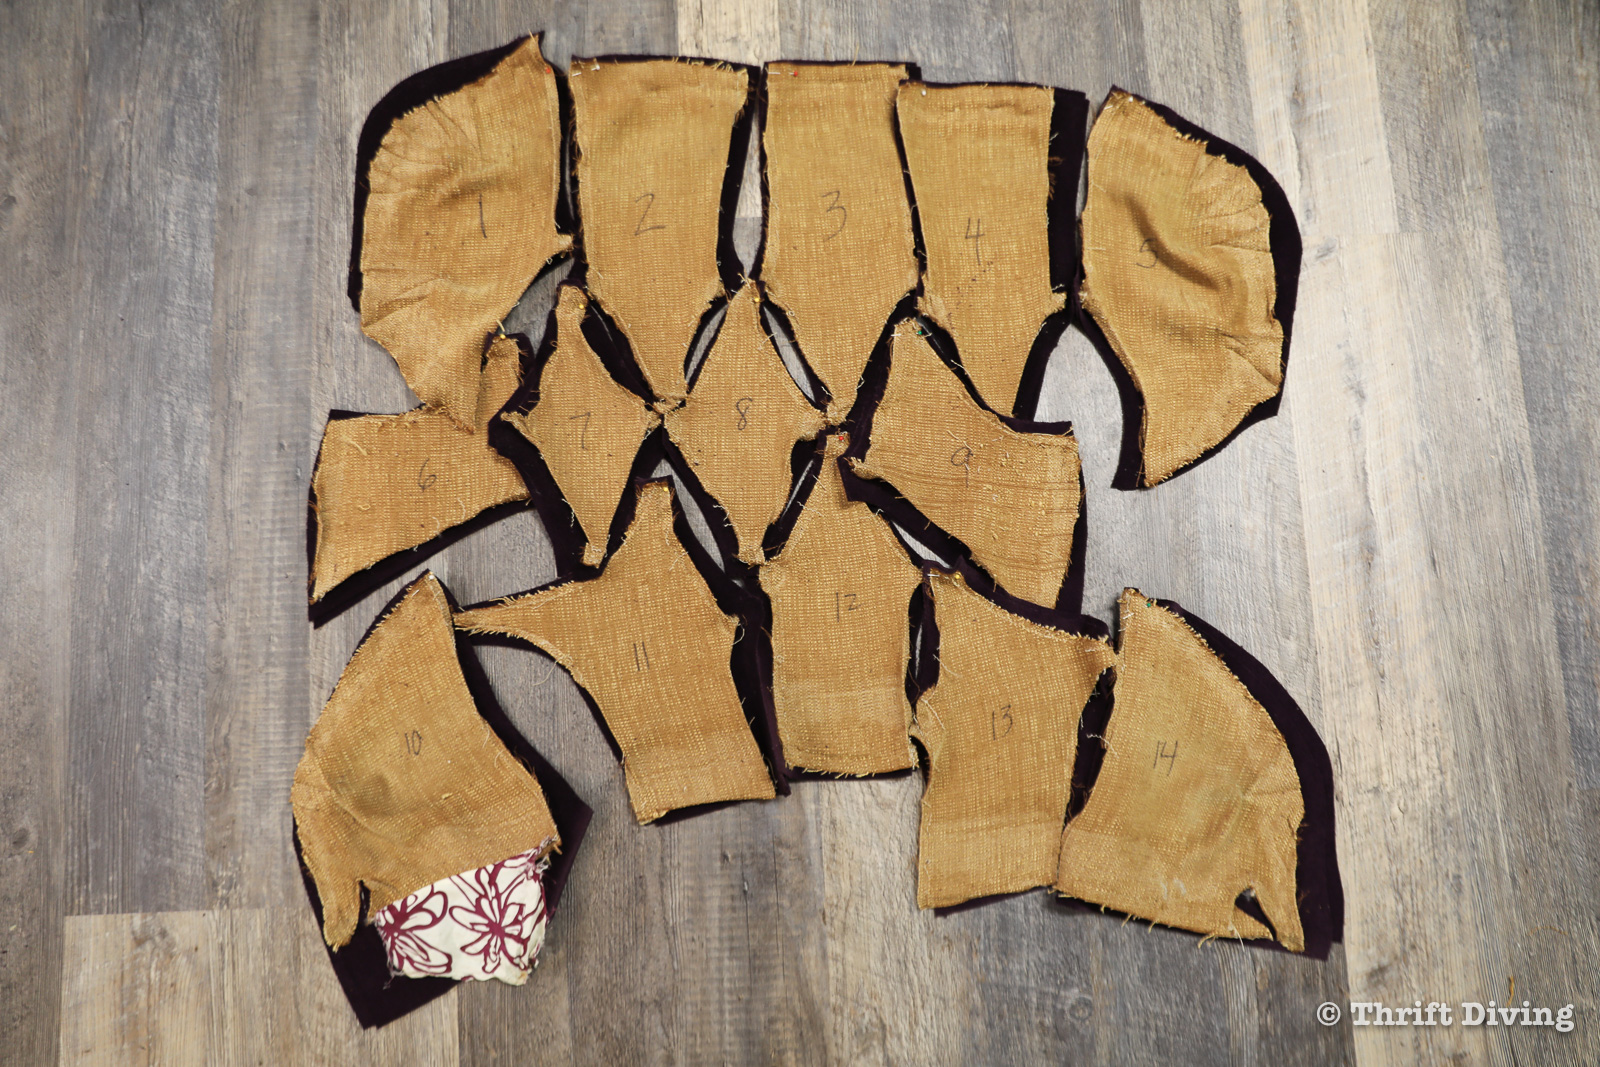
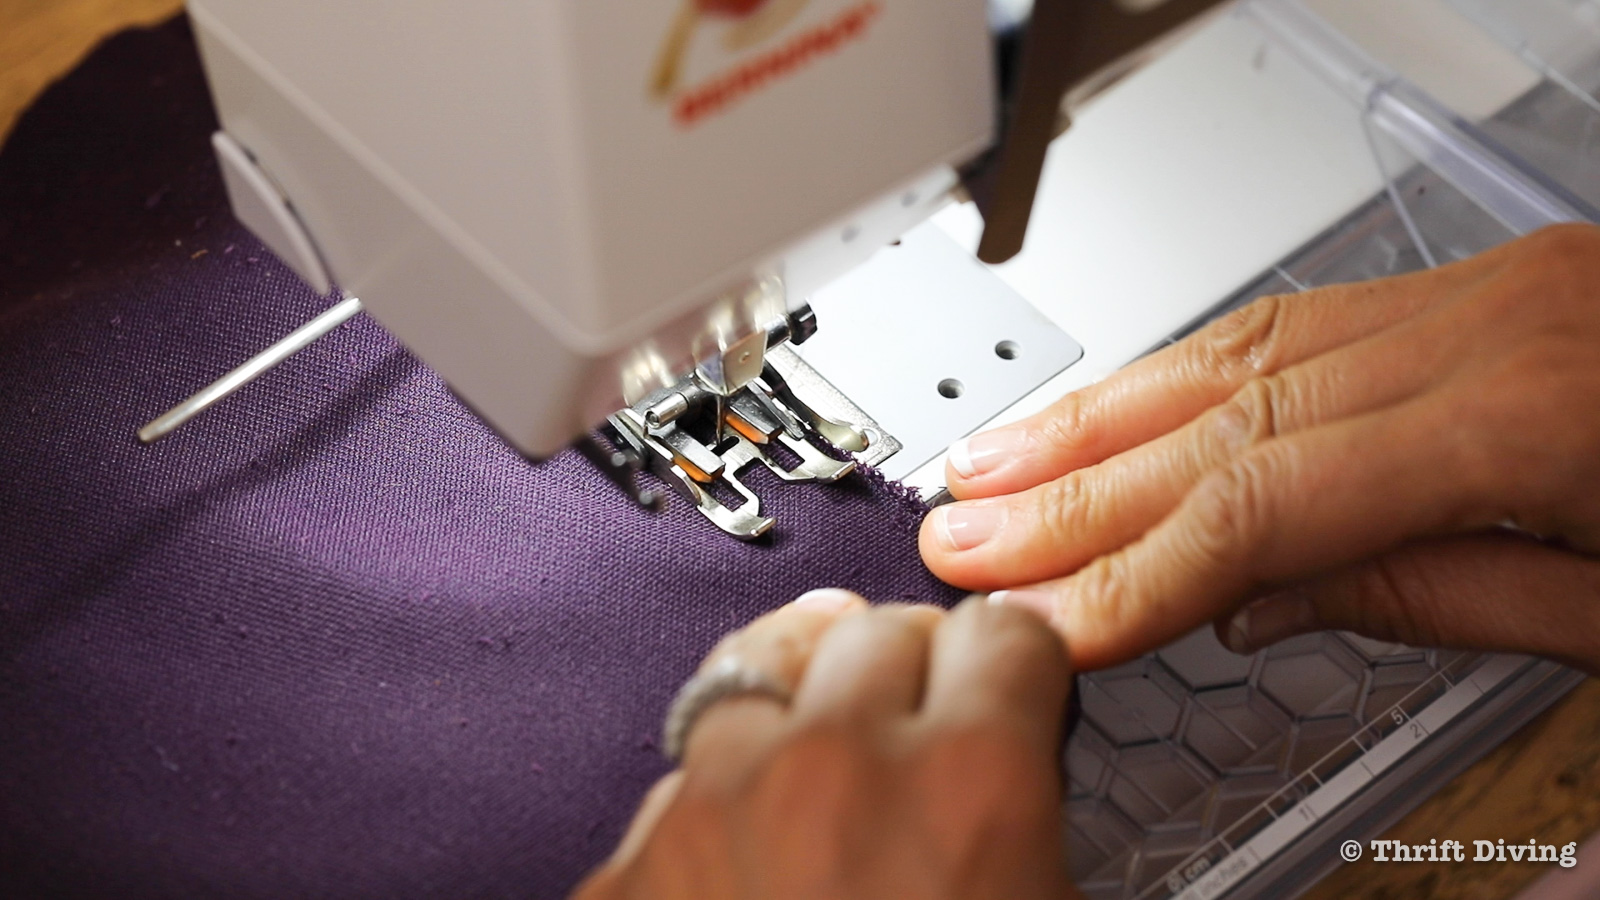
STEP 6: Sew Each Piece Together
To keep track of the pieces for the back, I used a black Sharpie to mark each piece, 1 through 14. I pinned each original material to the new pieces of velvet, then assembled them in order so that I knew which piece needed to be sewn to which piece.
Work piece by piece, pinning and sewing the velvet together, using at least a 1/2″ seam allowance.
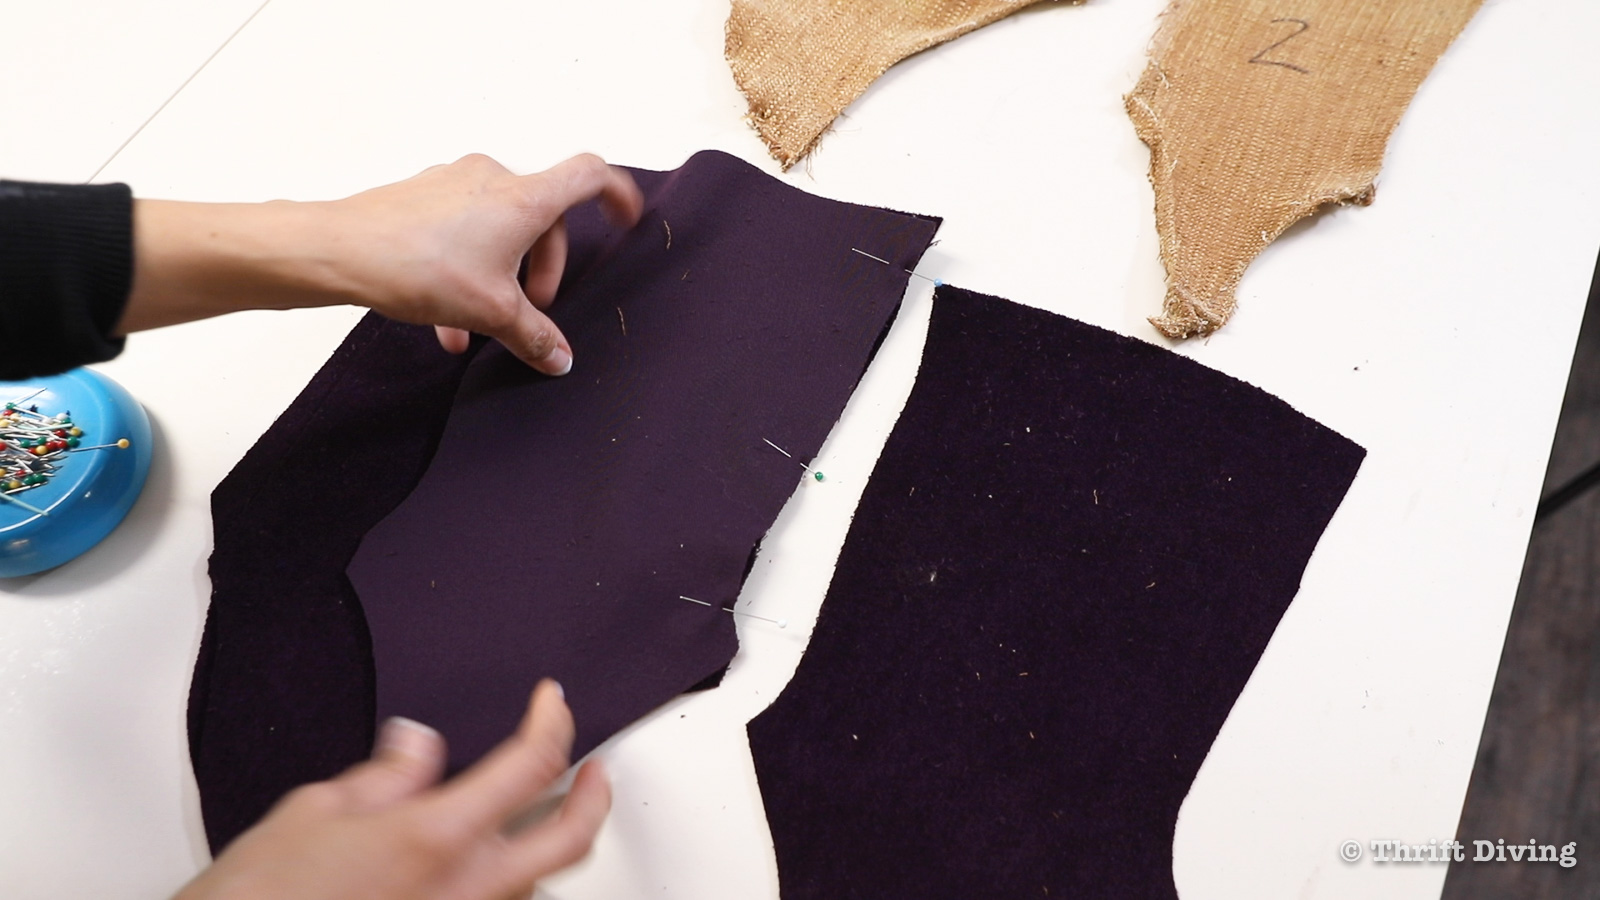
When I was done with each section of the upper chair back, I pinned it so the originals to keep track of which pieces have been cut and their location as it relates to the other pieces.
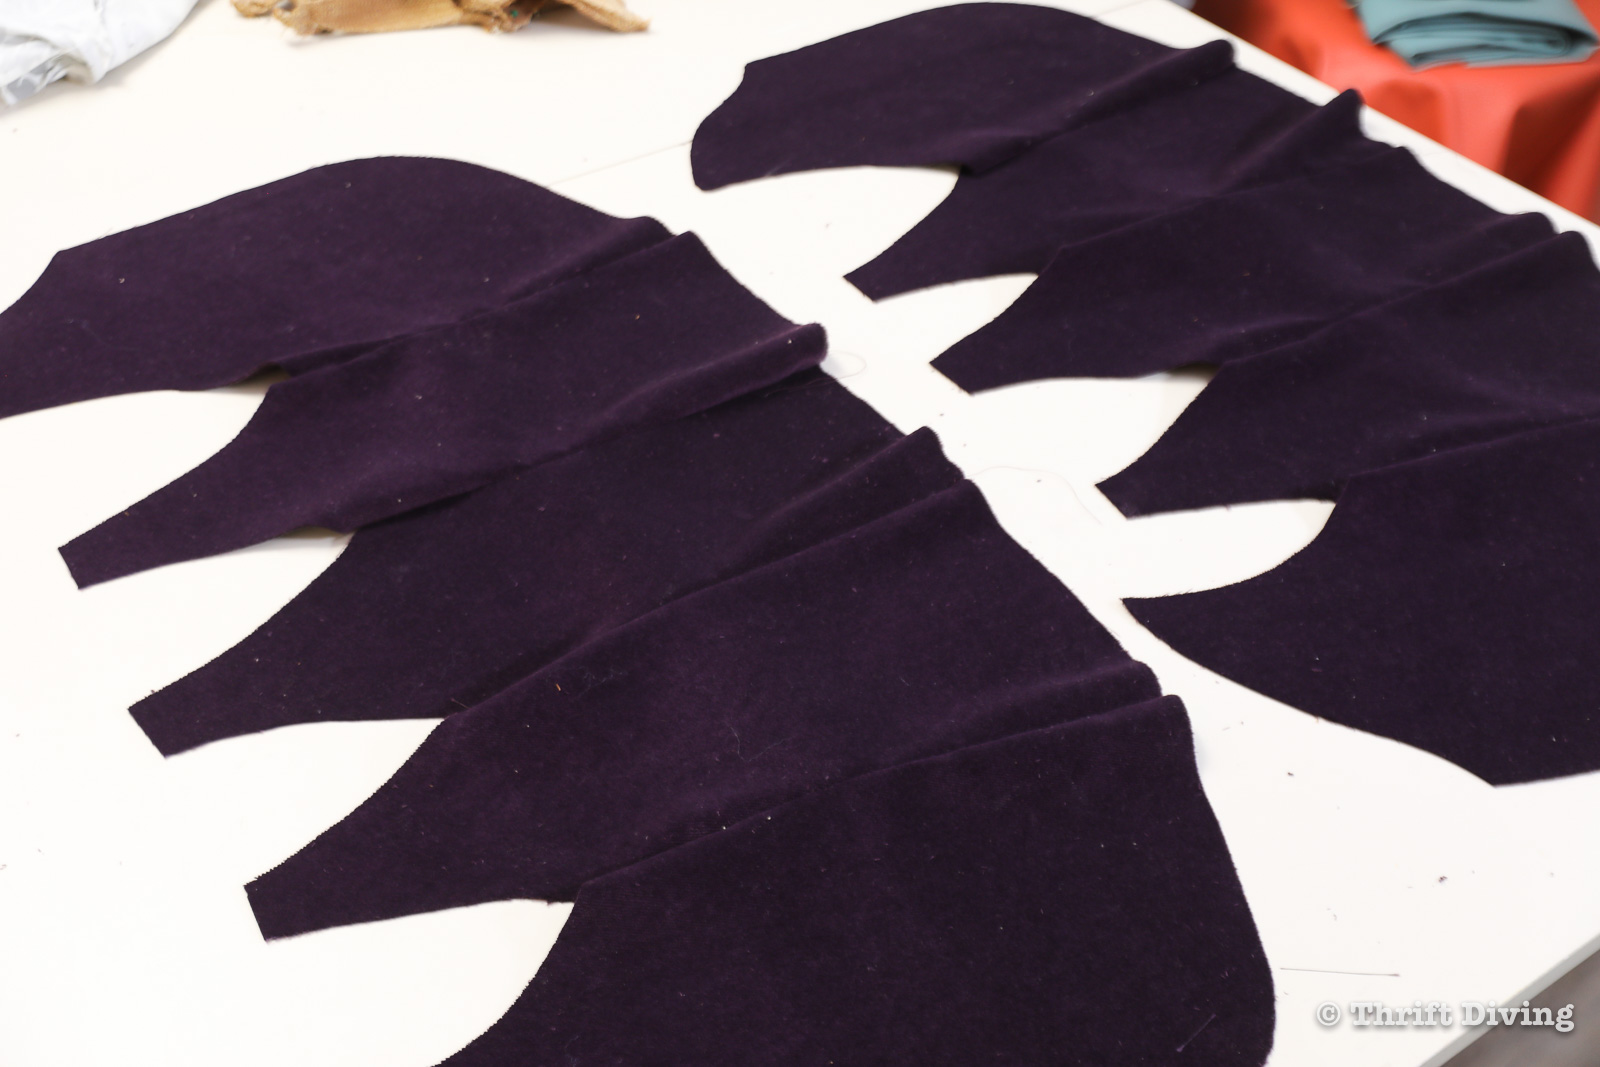
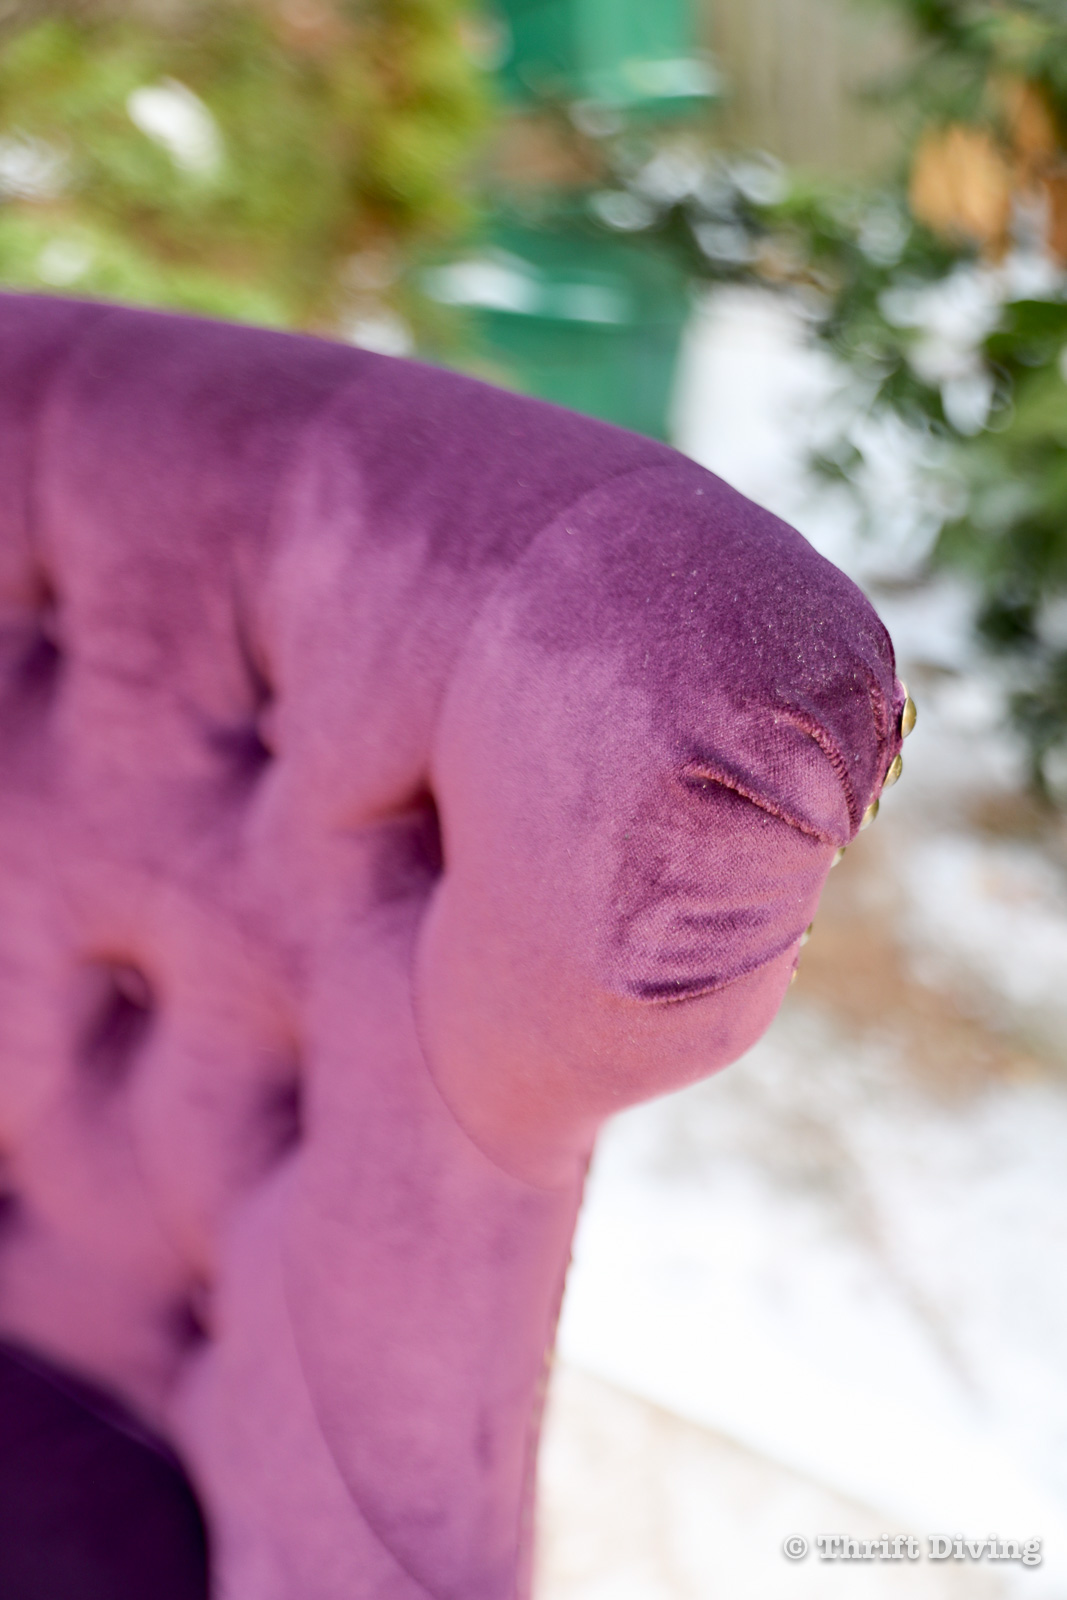
As the pieces came together for the two dining room chairs, it started to resemble some sort of mammal….perhaps a purple elephant?? LOL 🙂
Working one piece at a time, I lined up the edges of each piece and carefully fit them together, securing them with thread. This part was anxiety-provoking because I didn’t know if it would all come together in the end! Would the new fabric be too loose? Too tight? Would it look sloppy? Only time would tell. But I had to keep going!
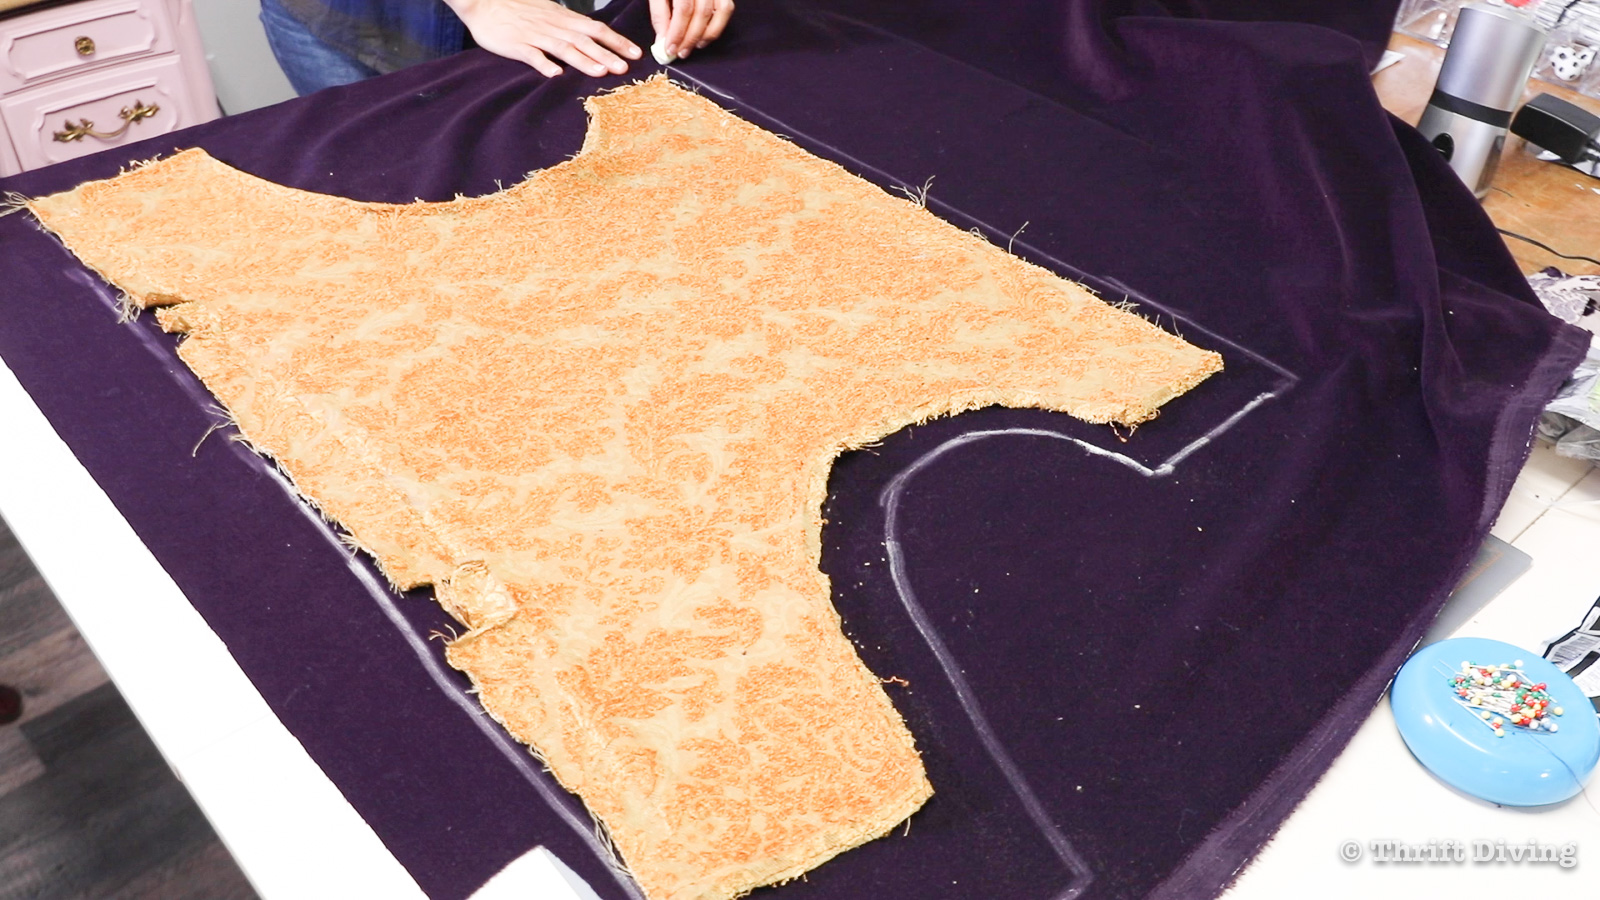
I used one of the old, dirty fabric pieces as a template to refer to. So when you’re doing your projects, if you can salvage one of the intact covers, use it to refer to, in addition to your pictures and video clips.

When all of the pieces were sewn together, I removed some of the extra bulk by trimming the seam allowances, being careful not to cut through the seam.
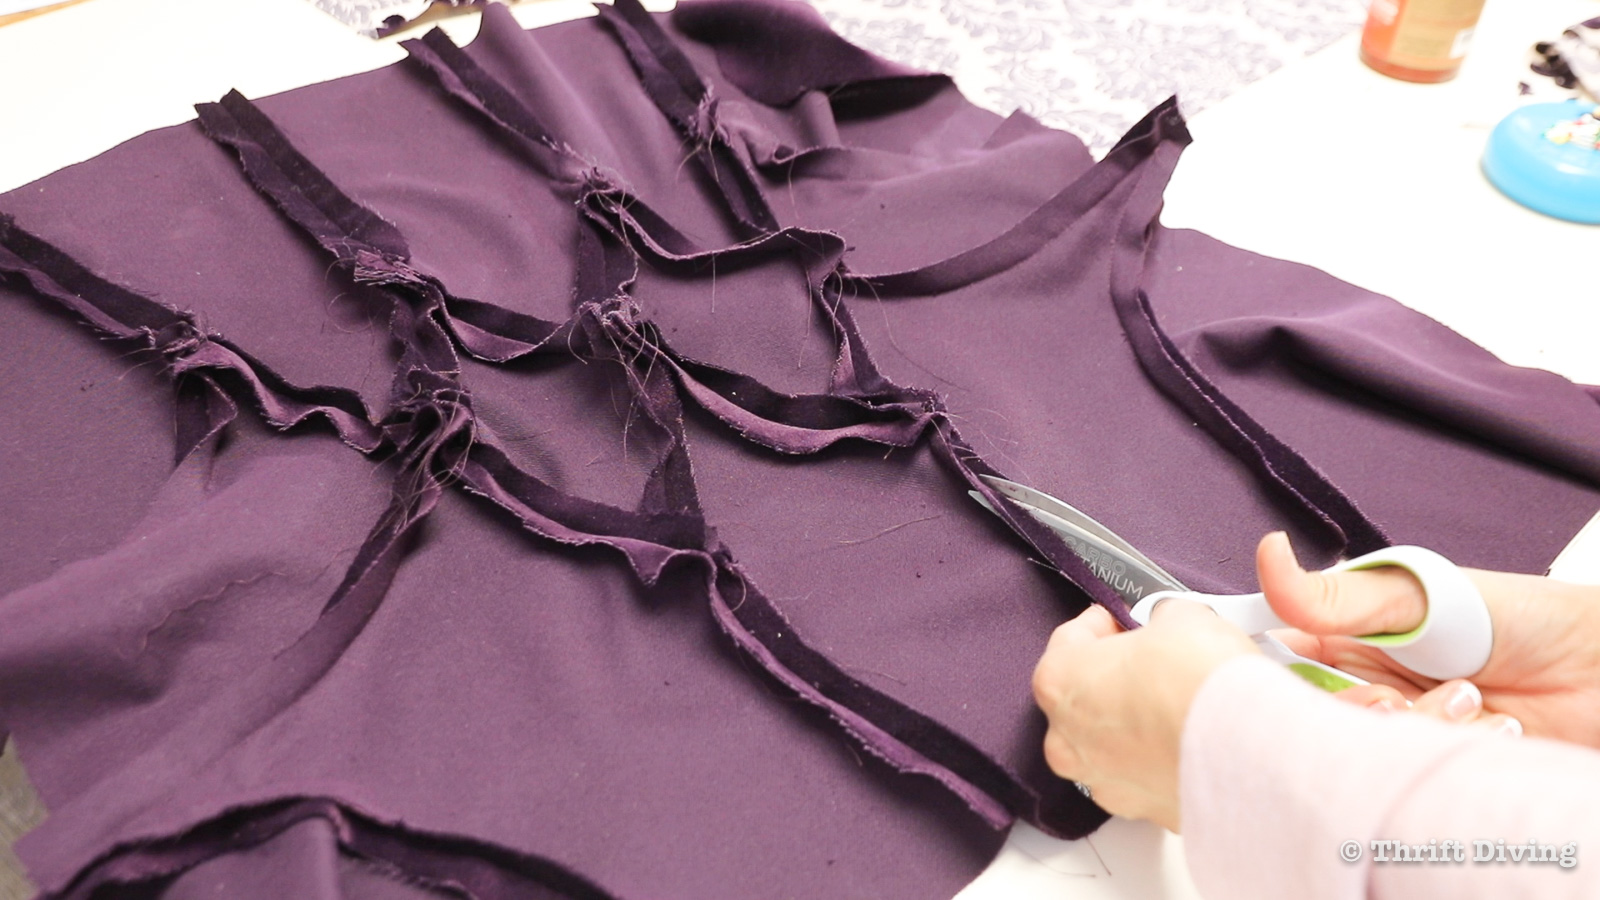
I also cut and sewed the pieces for the seat of the chair, as well as the outer back.
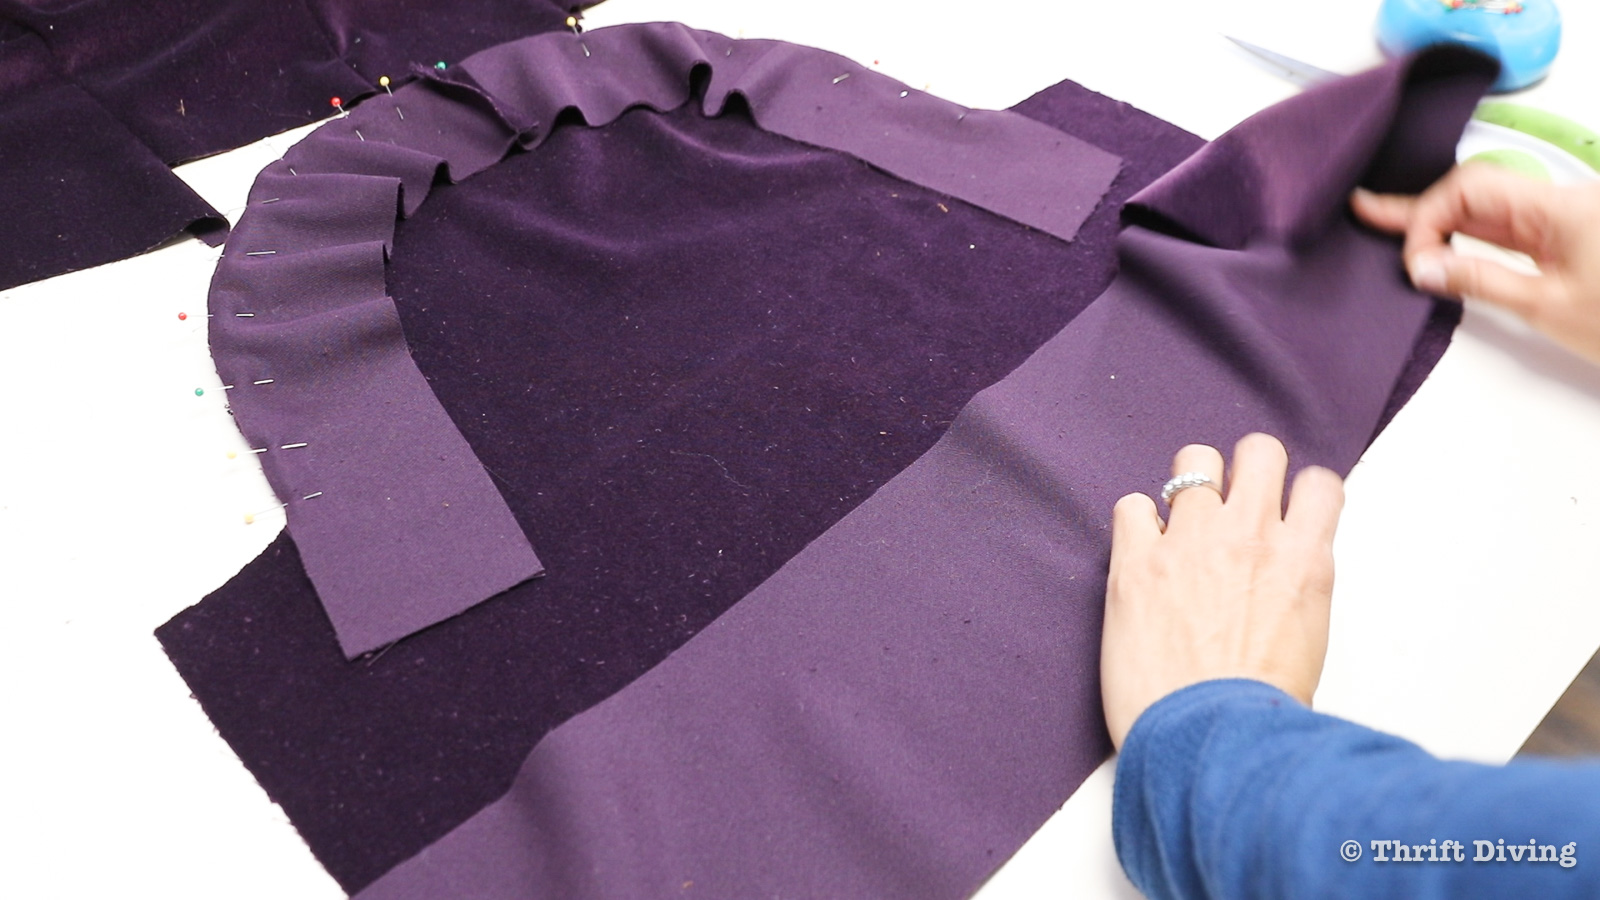
You’ll notice here that I used chalk to draw a pattern before cutting it. I also cut it bigger, so that I had more wiggle room for fitting the fabric to the back. It’s always best to have too much fabric versus not enough! (Ask me how I know….). Thank goodness I have enough fabric to do this!
STEP 7: Add More Stuffing, If Necessary
These chairs didn’t have much stuffing other than the foam that was already existing. I wanted my chairs to have a bit more luxuriousness to them, so I used some of the left over dacron batting that I had from an old wingback chair makeover I did a couple years ago.
I placed the dacron over the chair and did a rough cut-out of its shape. I also added “relief cuts” to the curved parts so that the dacron could easily wrap around the edges.
Because this chair had button indentations, I used a Sharpie to mark where those buttons were. You definitely want to make sure your buttons are evenly spaced.
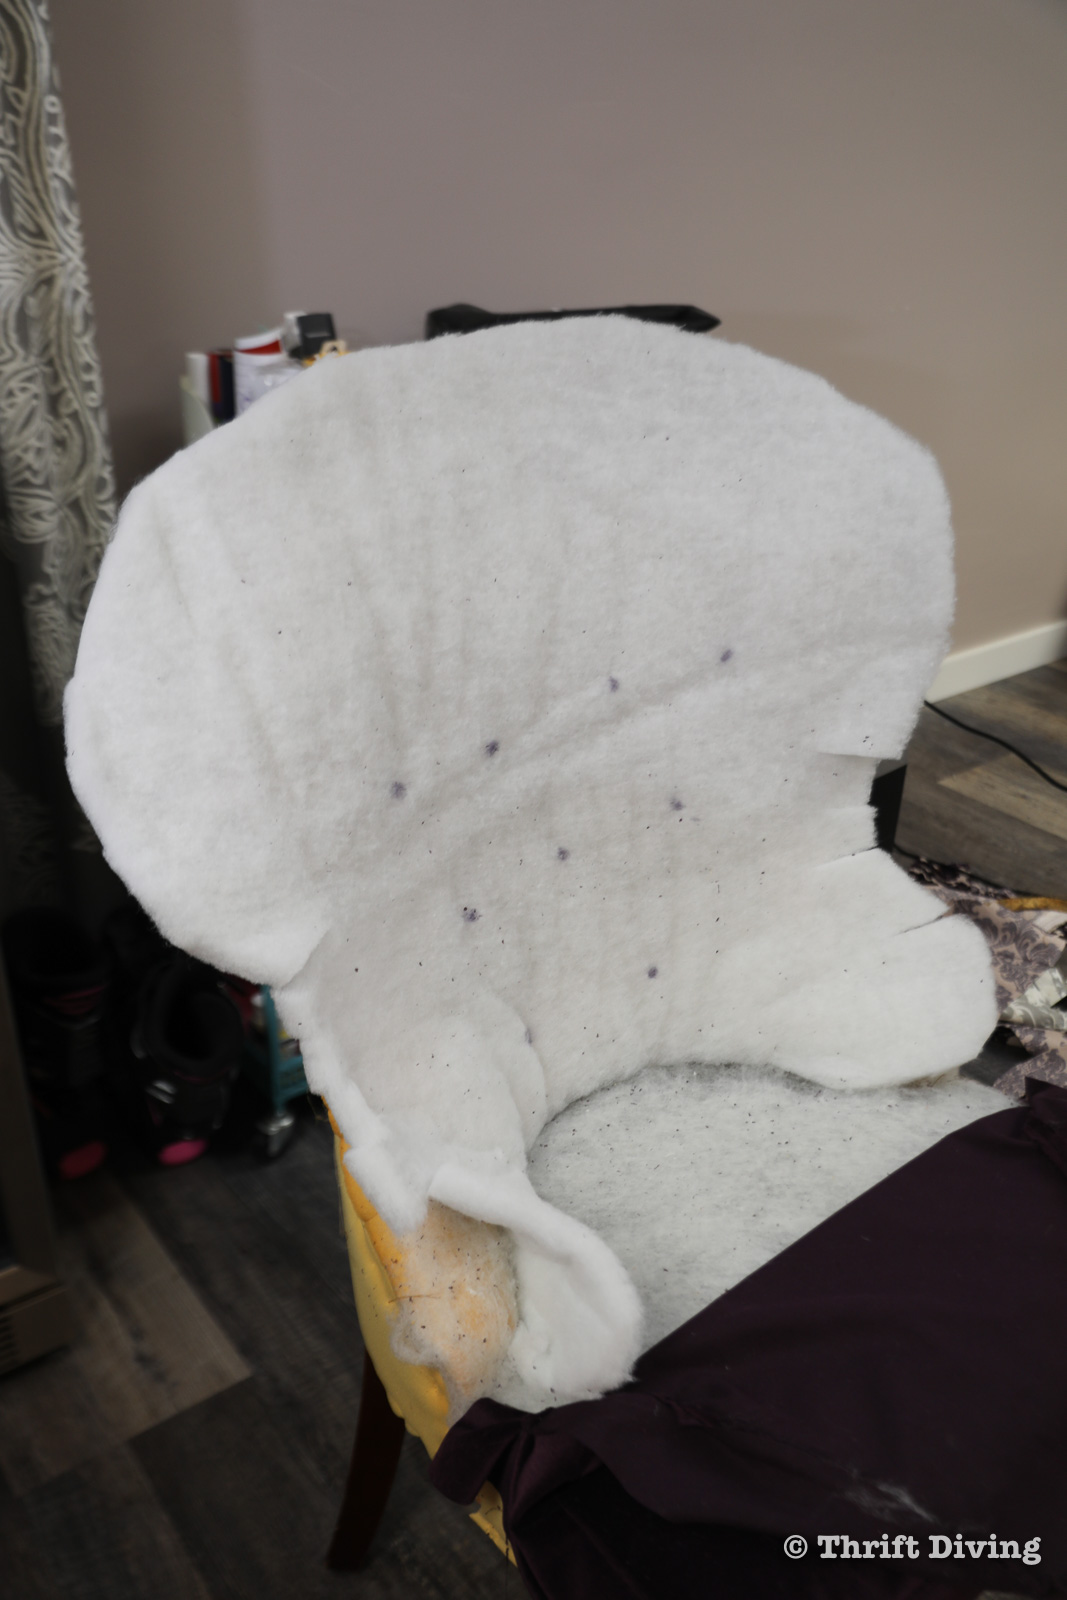
I didn’t have to do anything to keep the dacron batting in place. I just molded it with my hands and figured that the upholstered buttons will how it in place.
STEP 8: Fit the New Fabric to the Chair’s Upper Back
-Find the center of each fabric, find the center on the chair, working from center outwards.
-Pull tight towards the corners to remove wrinkles.
-Be sure to know which part goes on first, second, third, etc.
-Use relief cuts to fit the fabric around curves.
-Attractively gather fabric in folds when there is excess fabric.
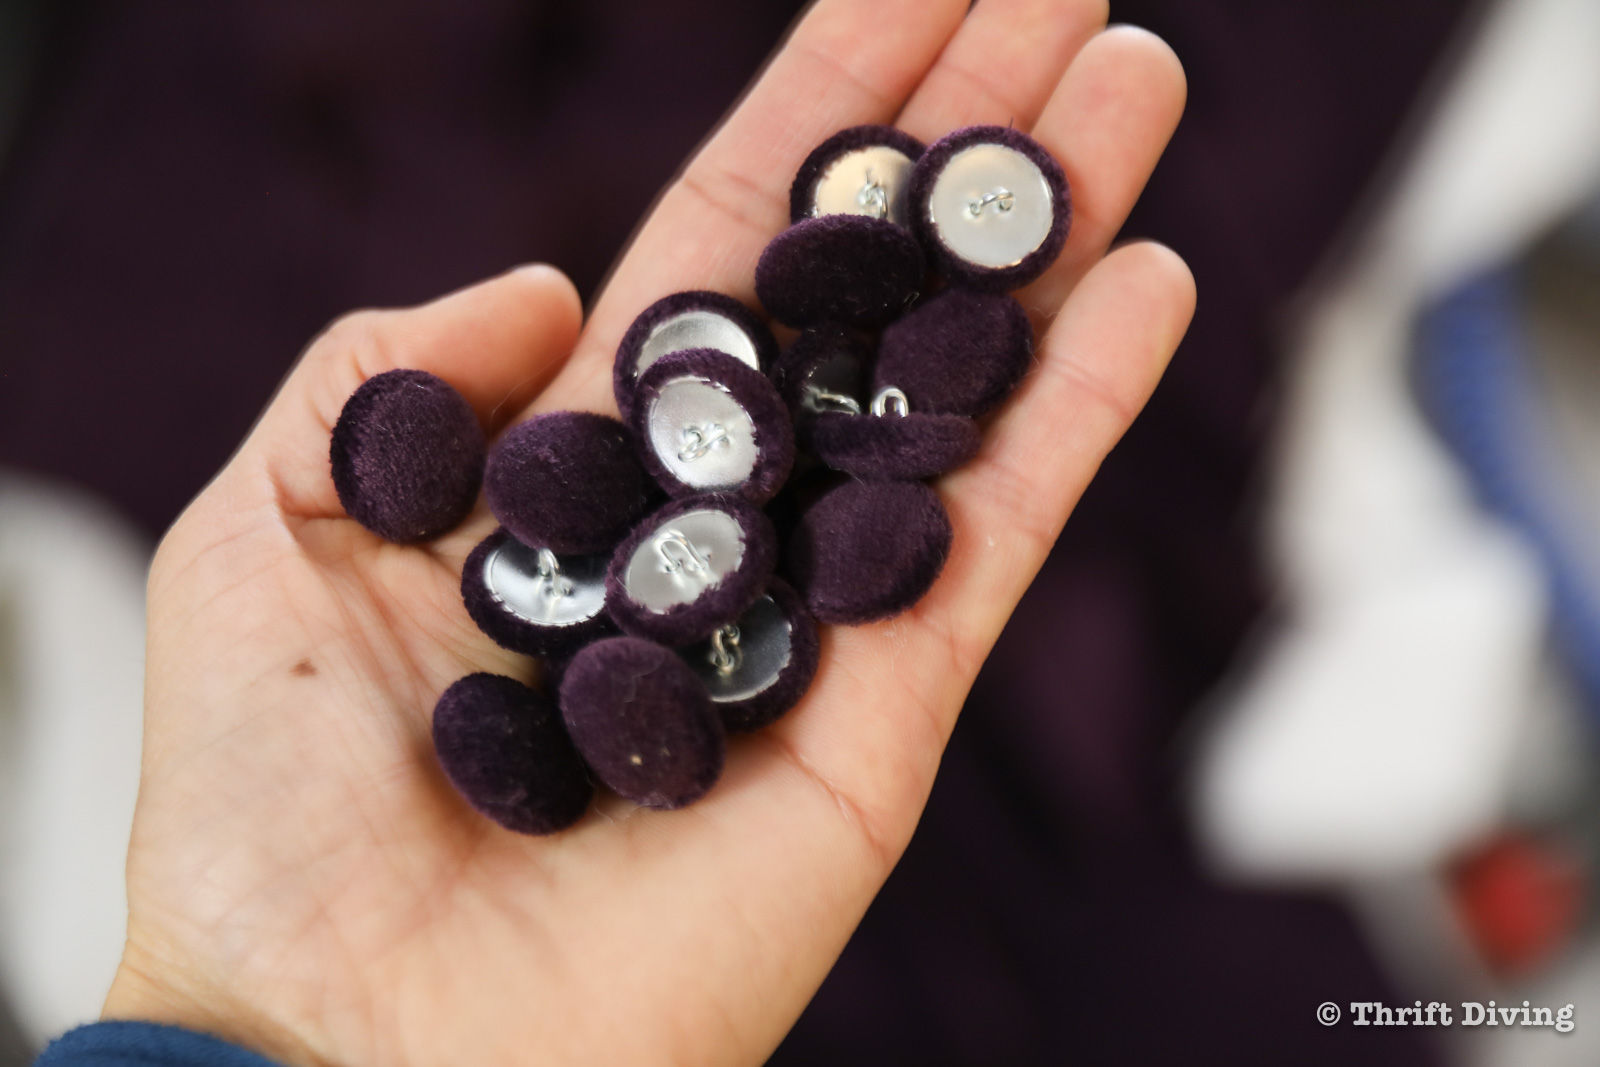
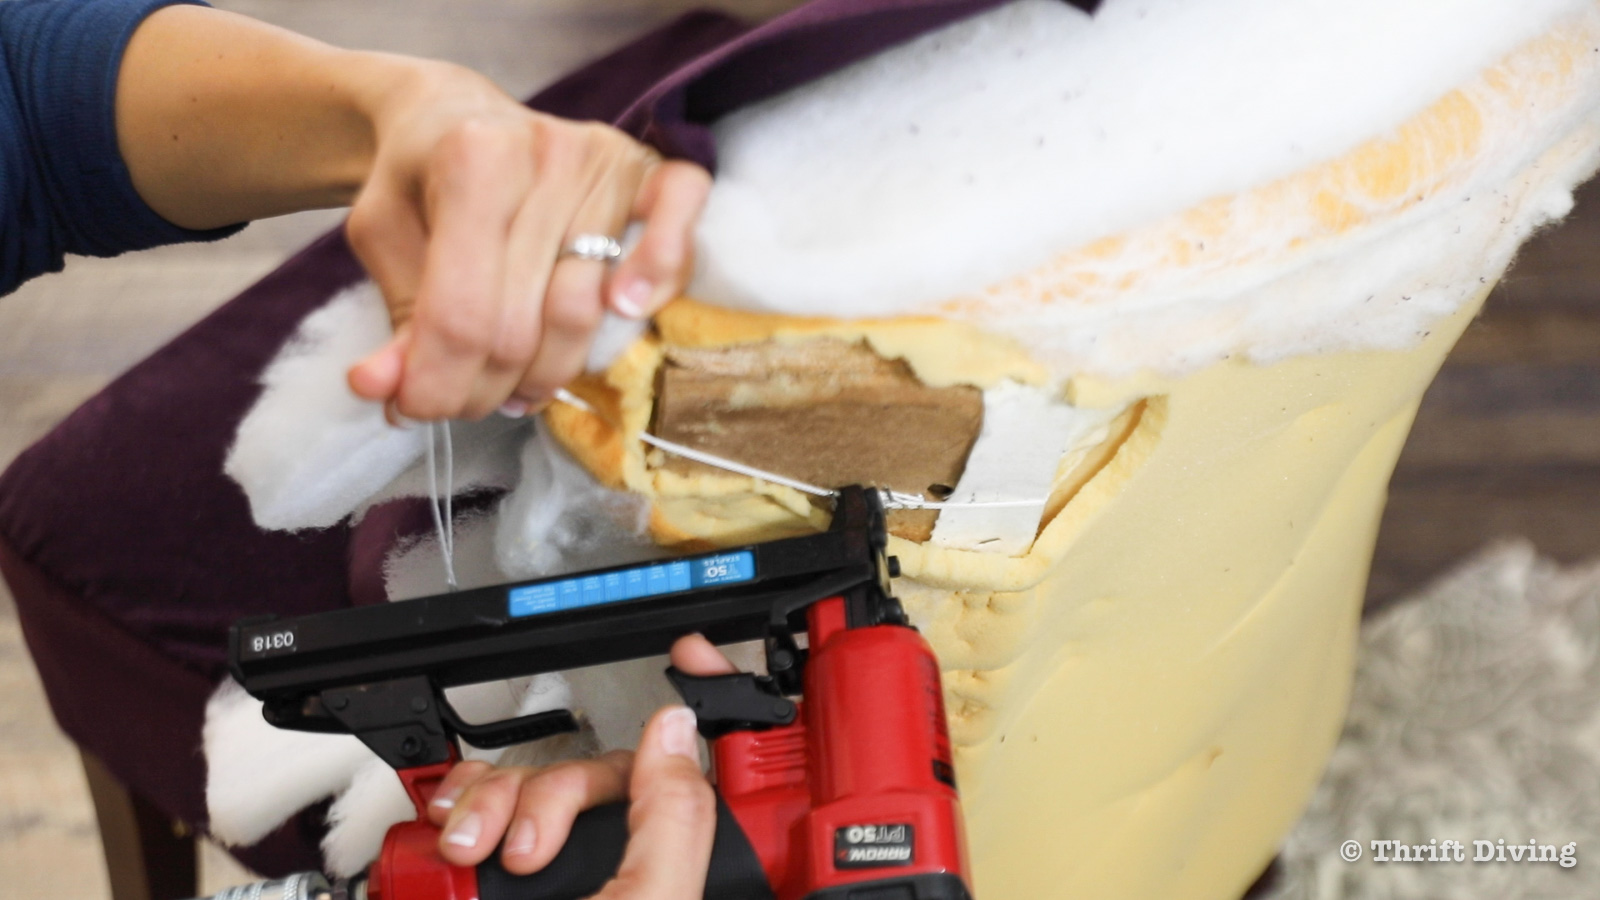
Thankfully, this chair already had button indentations where the old buttons had been in place. So all I needed to do was use a long upholstery needle threaded with twine and reupholstered buttons (which I asked a professional upholstery place to make for me), and push the needle through the 3 layers of fabric, dacron, and foam, and out the back.
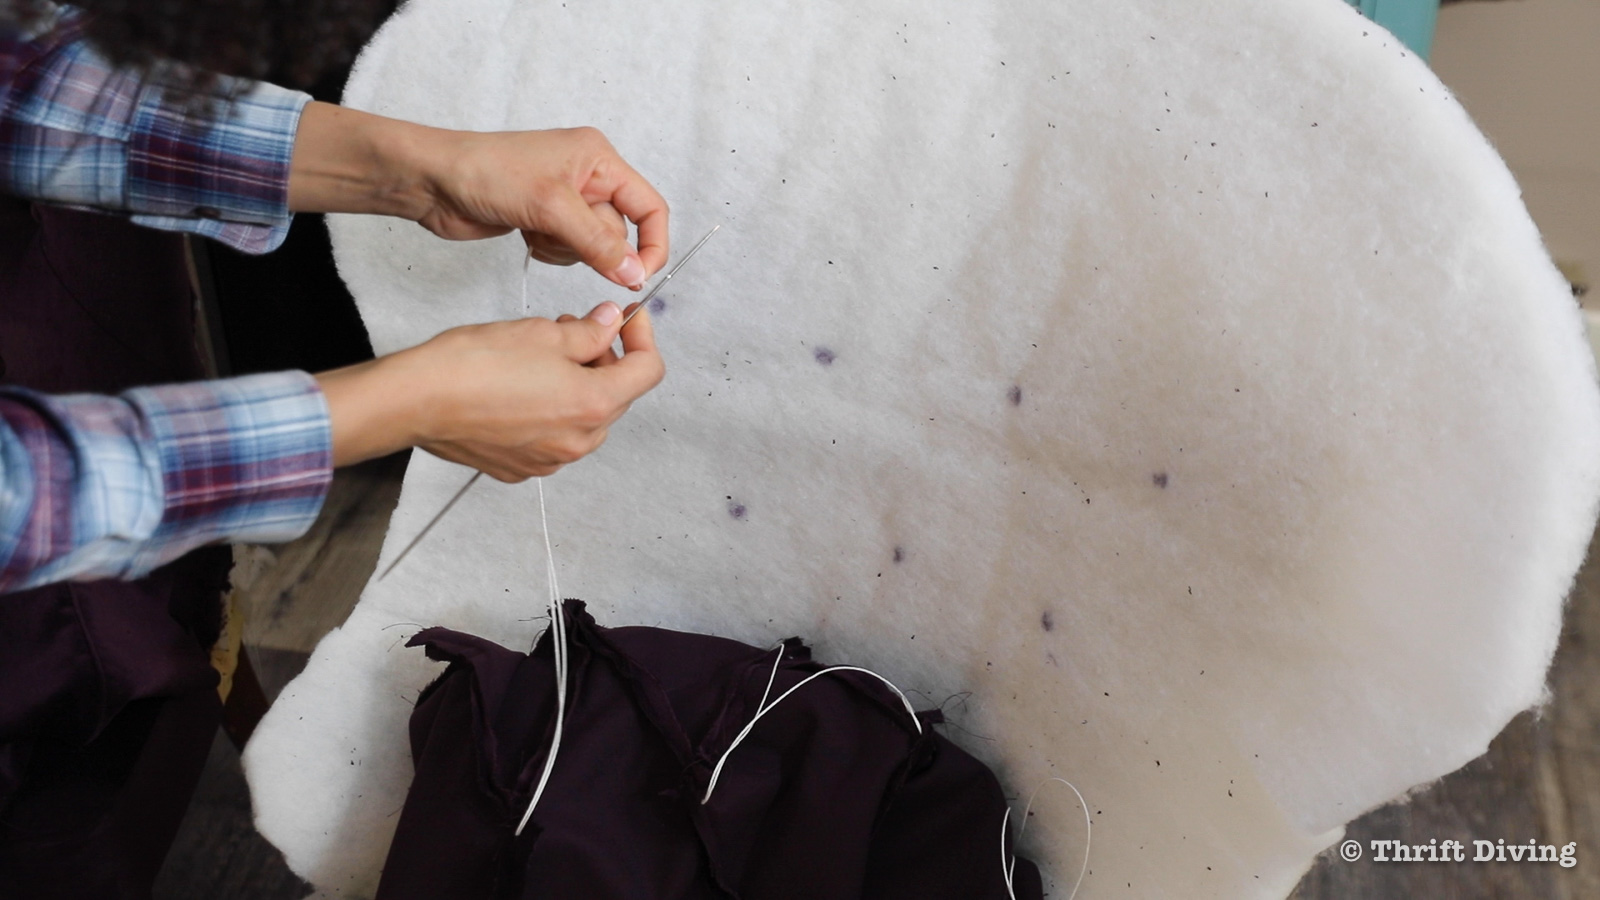
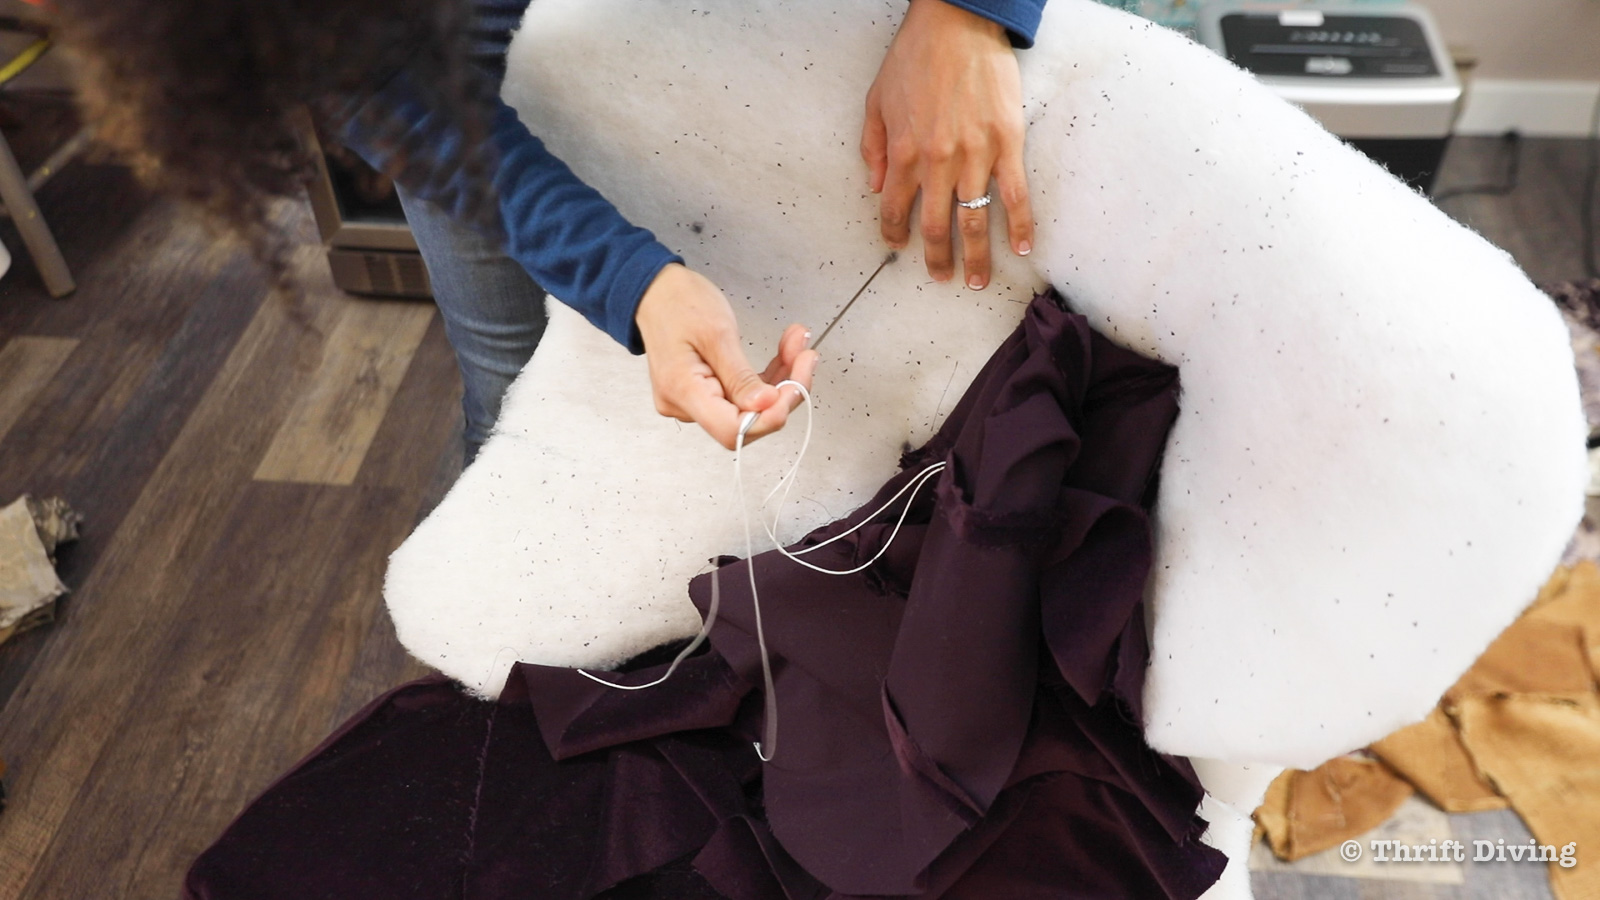
The most important part with the step, in addition to the buttons being evenly spaced, is to make sure that the buttons have even tension on them. Pull the twine out of back, and secure it to the wooden frame of the chair was 4-5 staples. Flip the twine onto itself and secure with a couple more staples.
The scary part of this step is that the fabric will look bunched up. Pulling the fabric taut will remove some of that bulk. But you may also want to use more stuffing (I used coconut fiber, but any type of stuffing will do). The stuffing helps to fill out any places that are too loose. Just be sure to break up your stuffing so it doesn’t get lumpy.

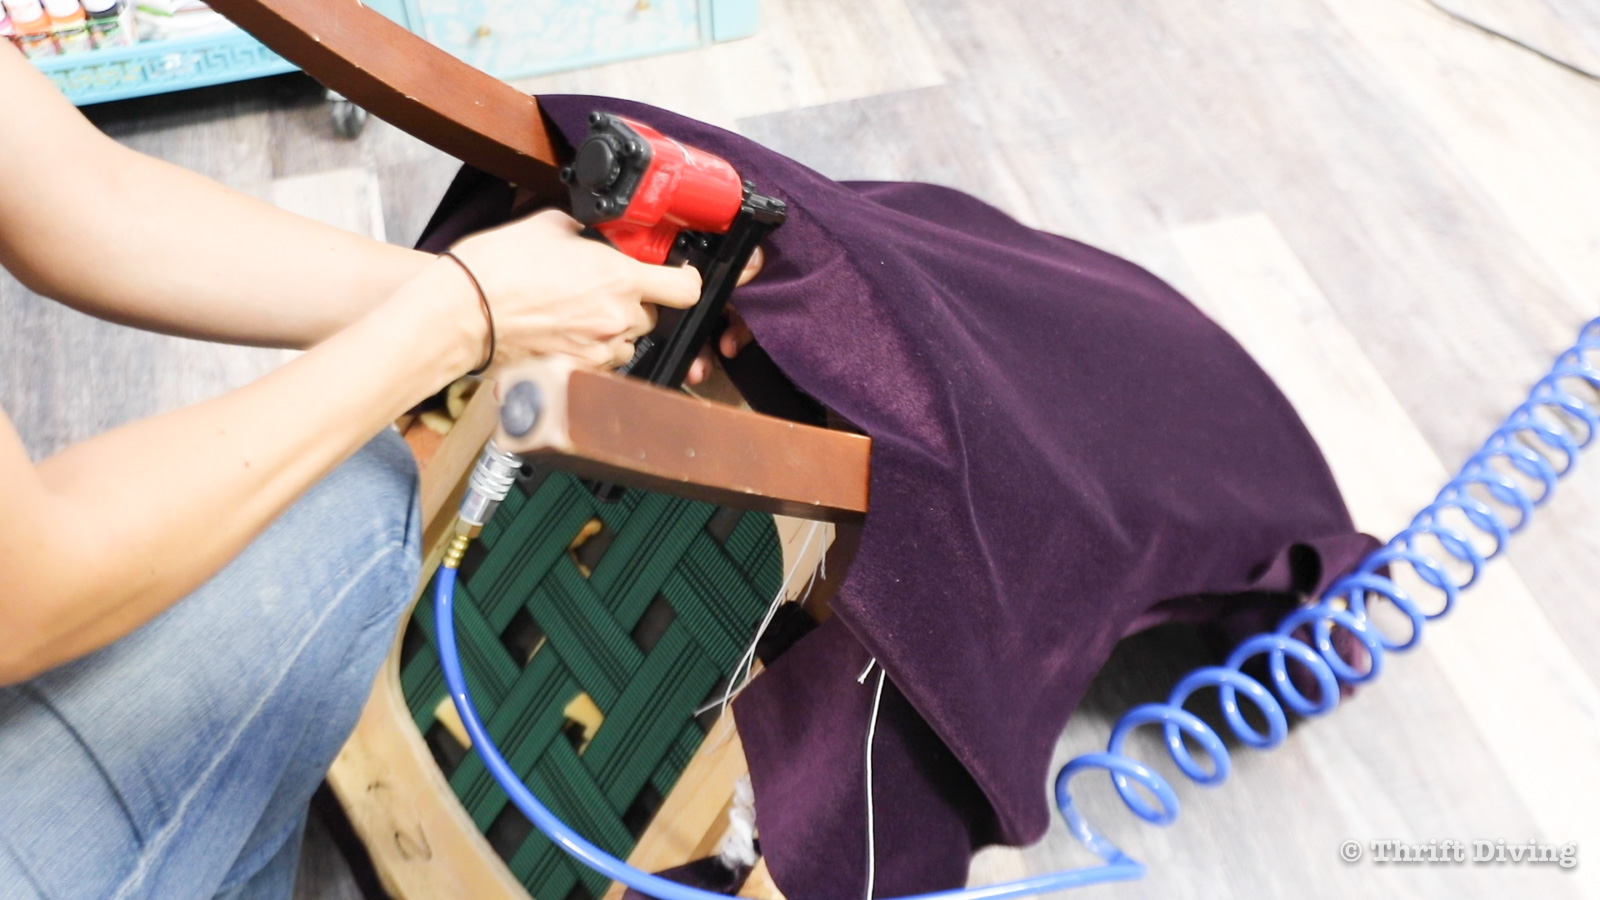
To fit the fabric on the back of the dining room chair, I started working from the arms, pulling it tight, stapling, and working out the wrinkles as I worked my way up to the corners.

I also pushed the fabric through the seat, pulling and stapling the fabric to the underside of the chair. It’s helpful to have enough fabric to grasp. This is where I could have done better because I struggled with finding enough fabric to grasp. Typically upholsters will use a cheaper fabric to sew on the bottom of these pieces so that they’ll have something to grab on to and to staple to the bottom of the chair.
You could simply cut your pieces a little longer, but if you’re using expensive fabric, that’s not ideal.
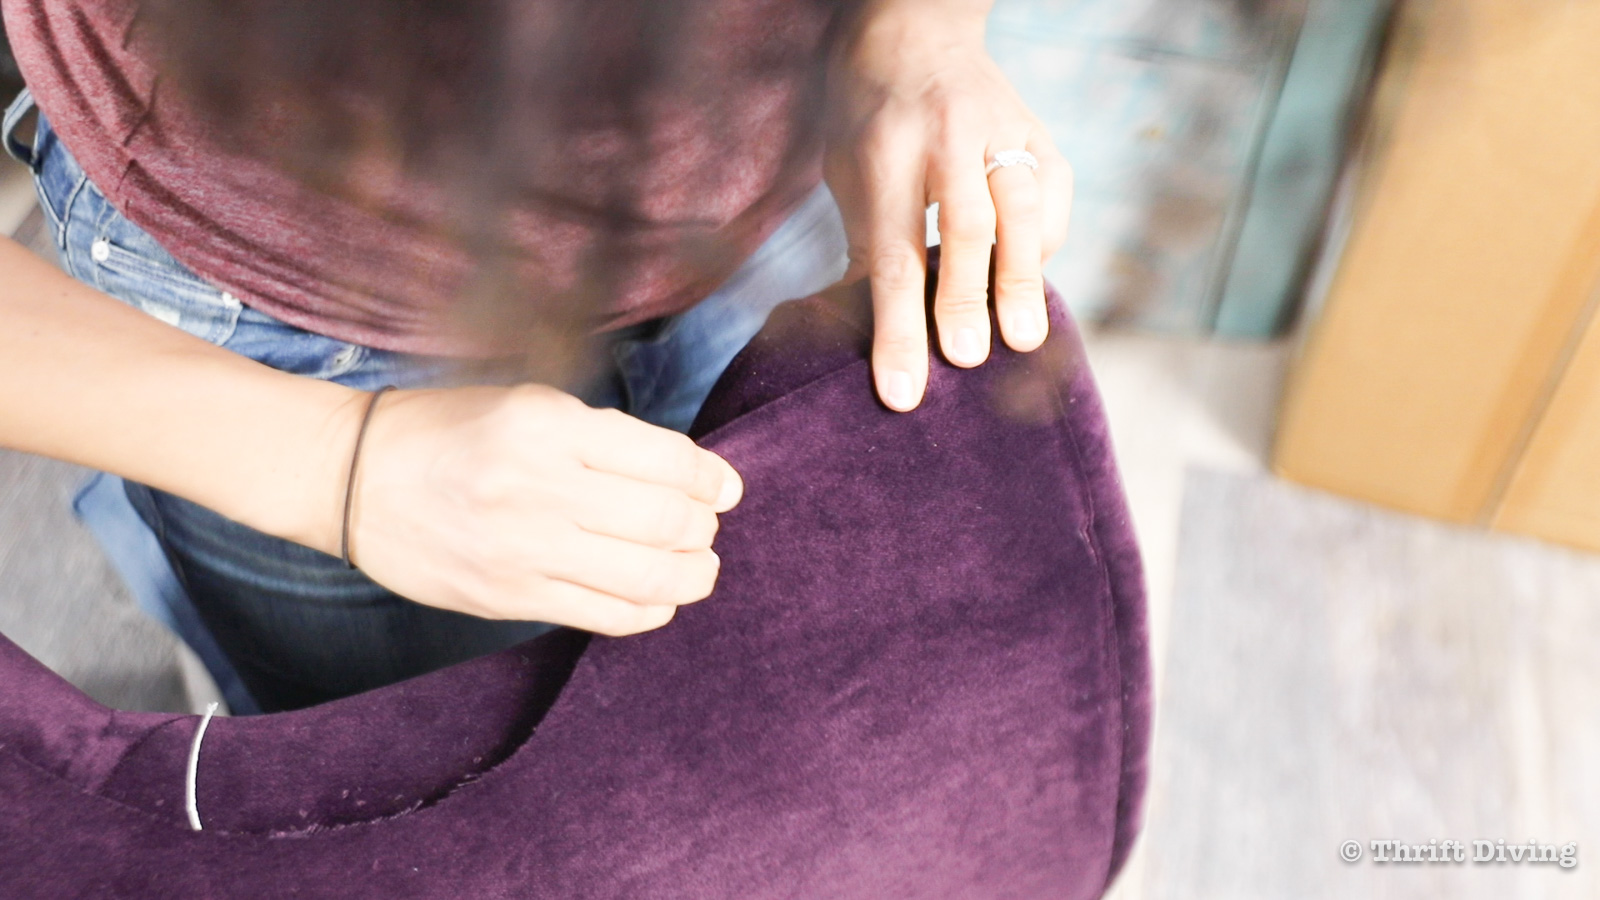
At the top of the dining room chair, I put a single staple in the center of the chair and then pulled towards the corners to get out the wrinkles as much as I could.
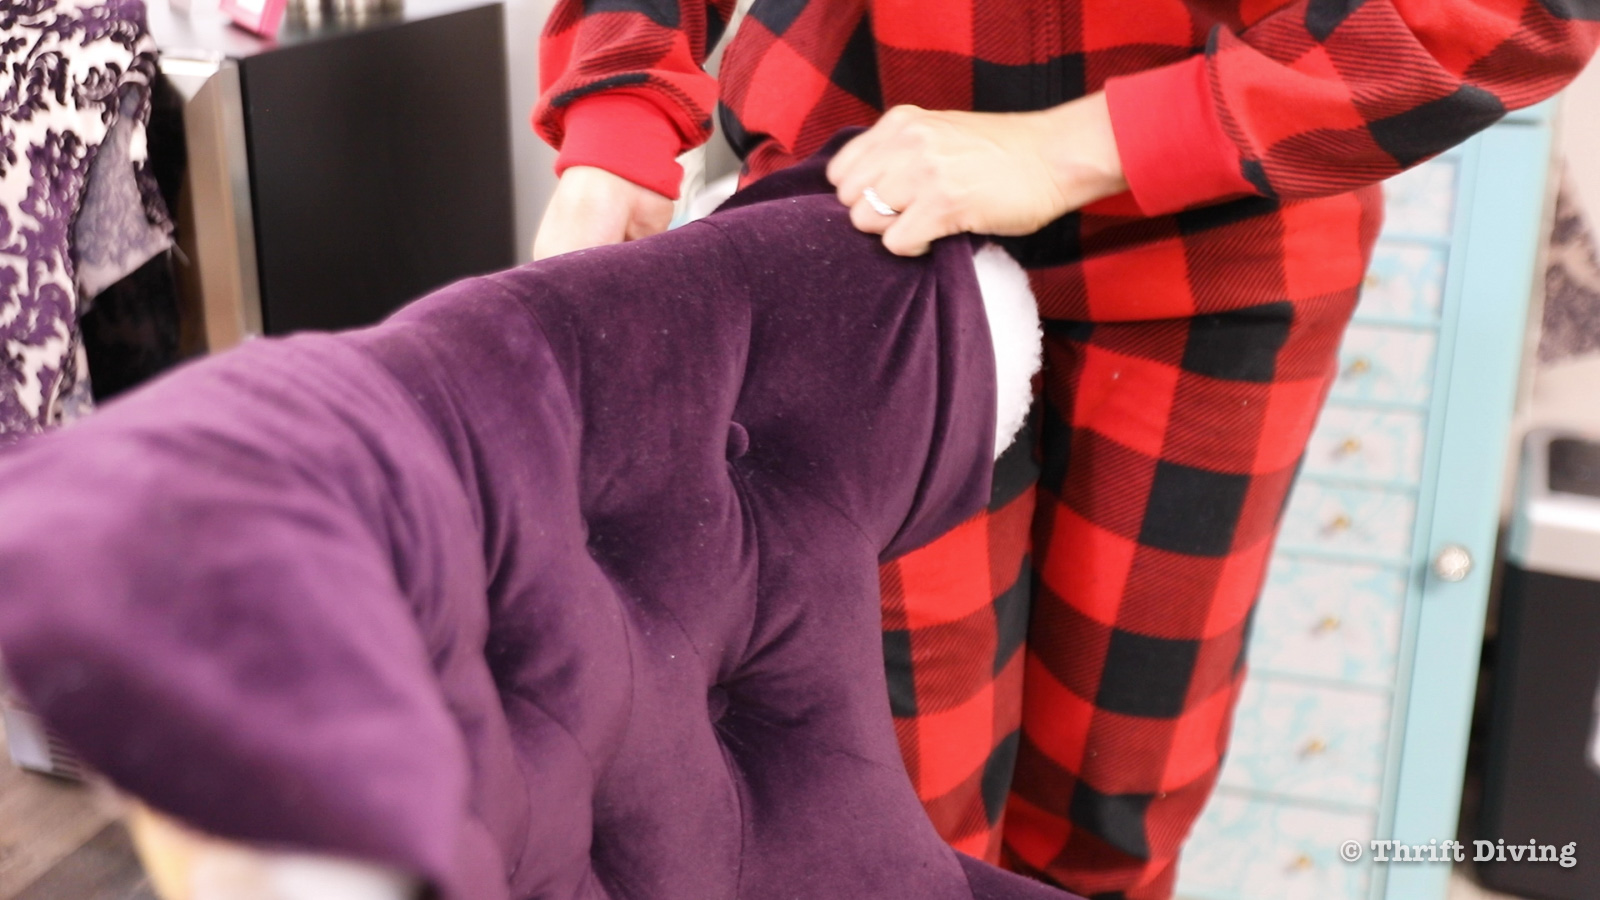
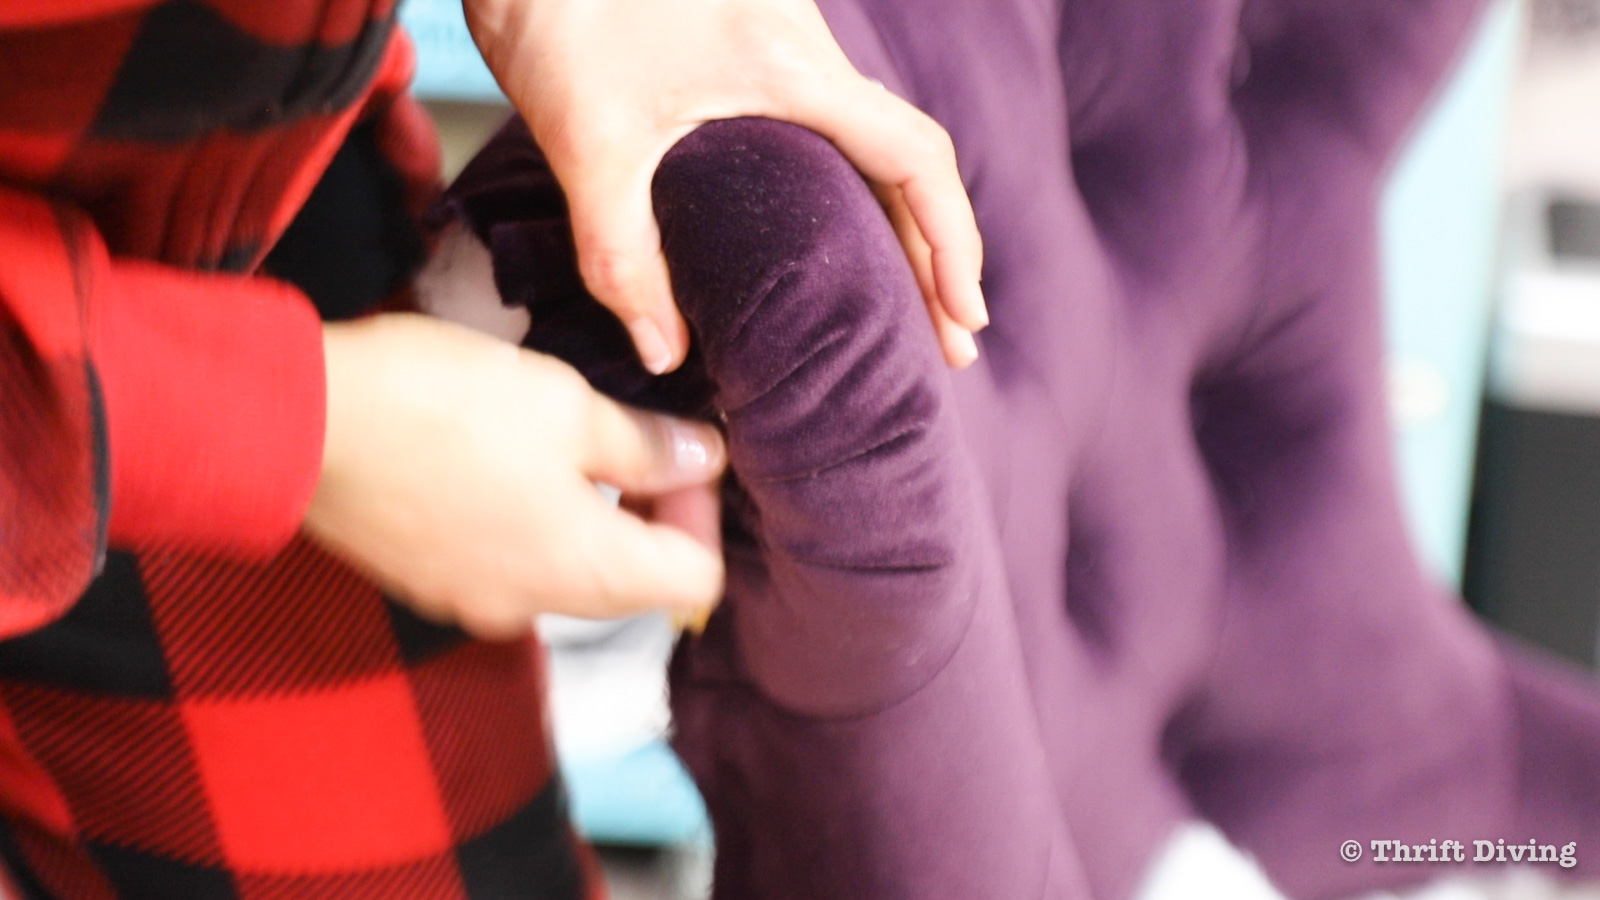
At the corners, I tried to attractively fold the excess fabric and then secured it with staples.
STEP 9: Fit the New Fabric to the Chair’s Seat
Once the back fabric was secure on the dining room chairs, it was time to add the seat fabric. That had been sewn together, as well, using the original fabric as a template. You can see the white fabric I added to the back to be used as a grip once I shoved the fabric down into the seat. This fabric allowed me to grip and pull the chair fabric, removing the wrinkles.
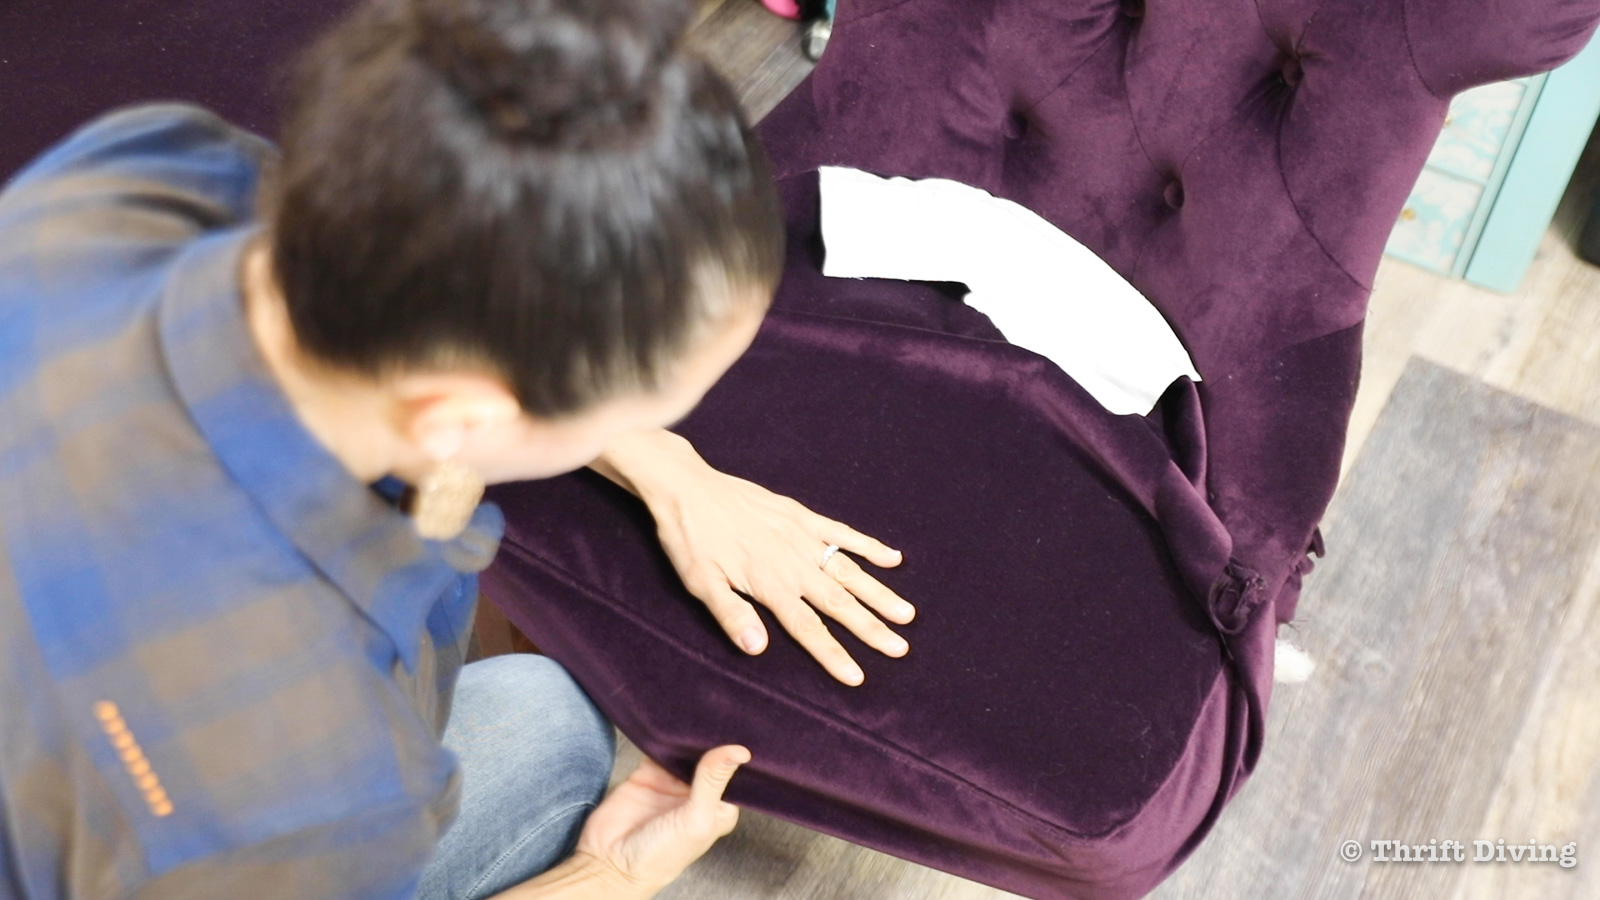
I secured this fabric at the front with a single staple, and then pulled towards the corners. Use scissors to snip 1/2″ of the fabric alongside the edge of the chair leg.
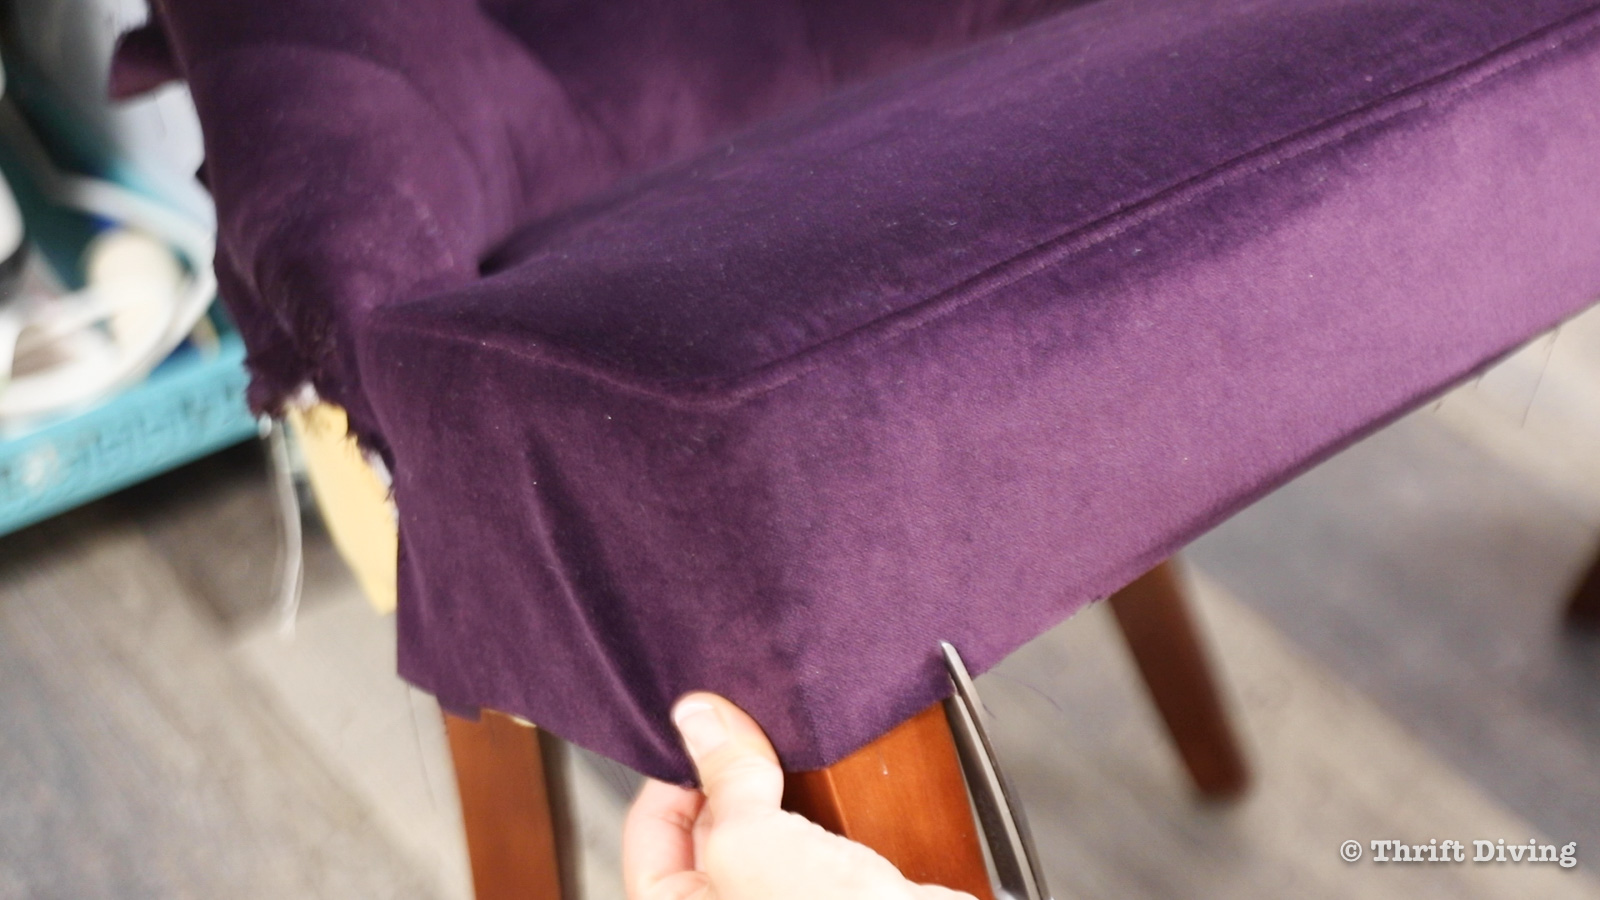
Next, secure the fabric to the chair, keeping your grip on the fabric. Pull the fabric taut on the other side of the leg, snipping 1/2″ again, leaving a “tail” of fabric around the leg.
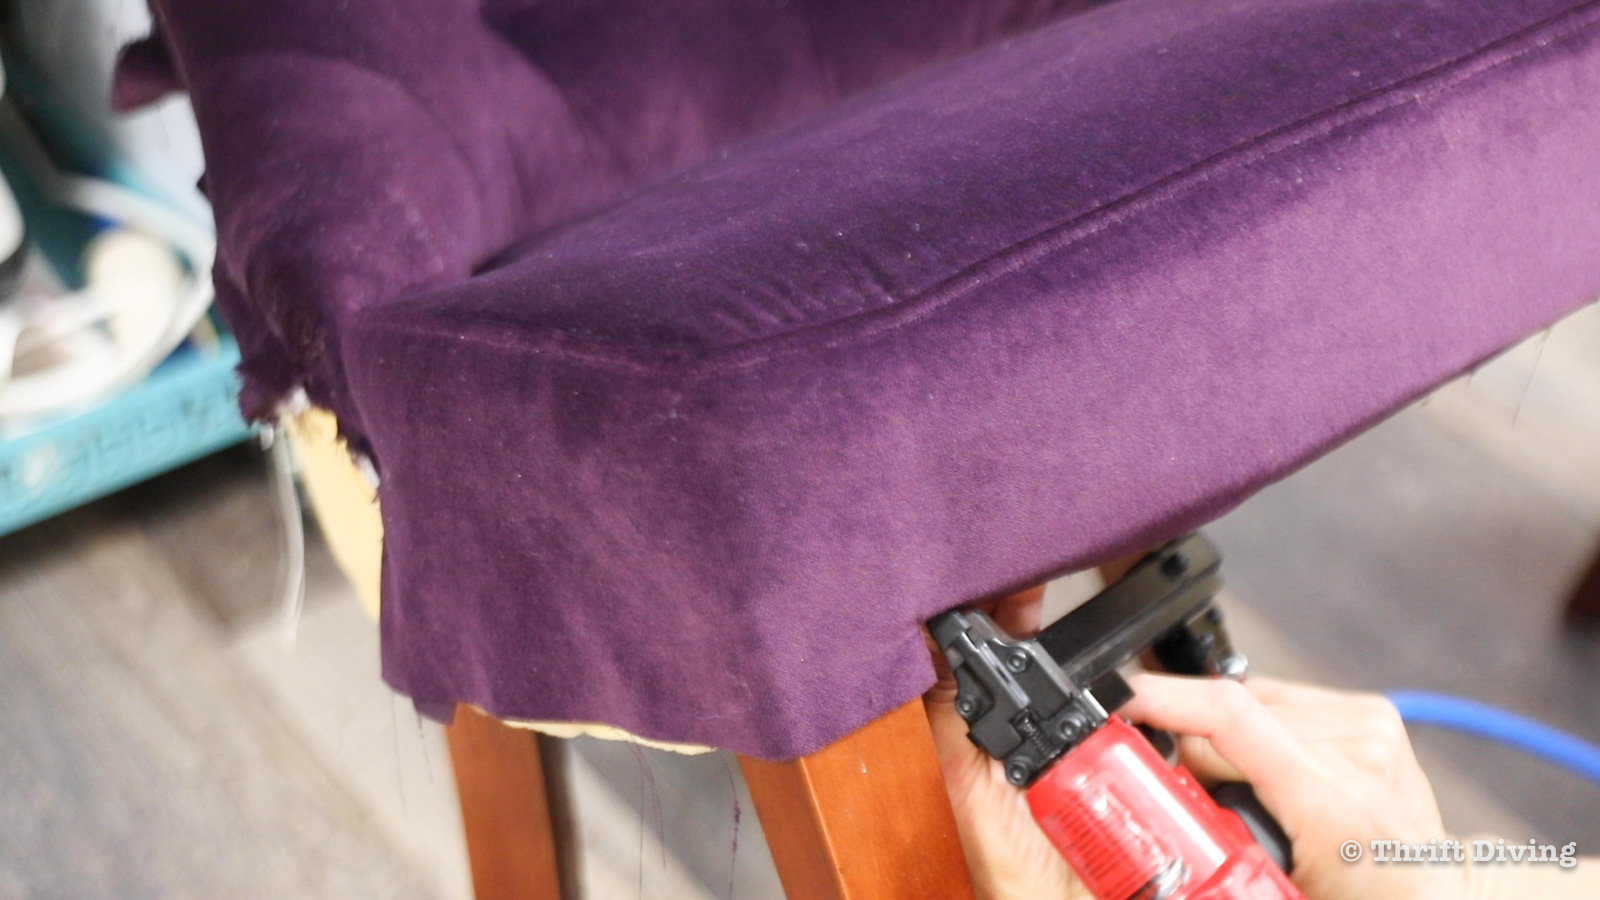
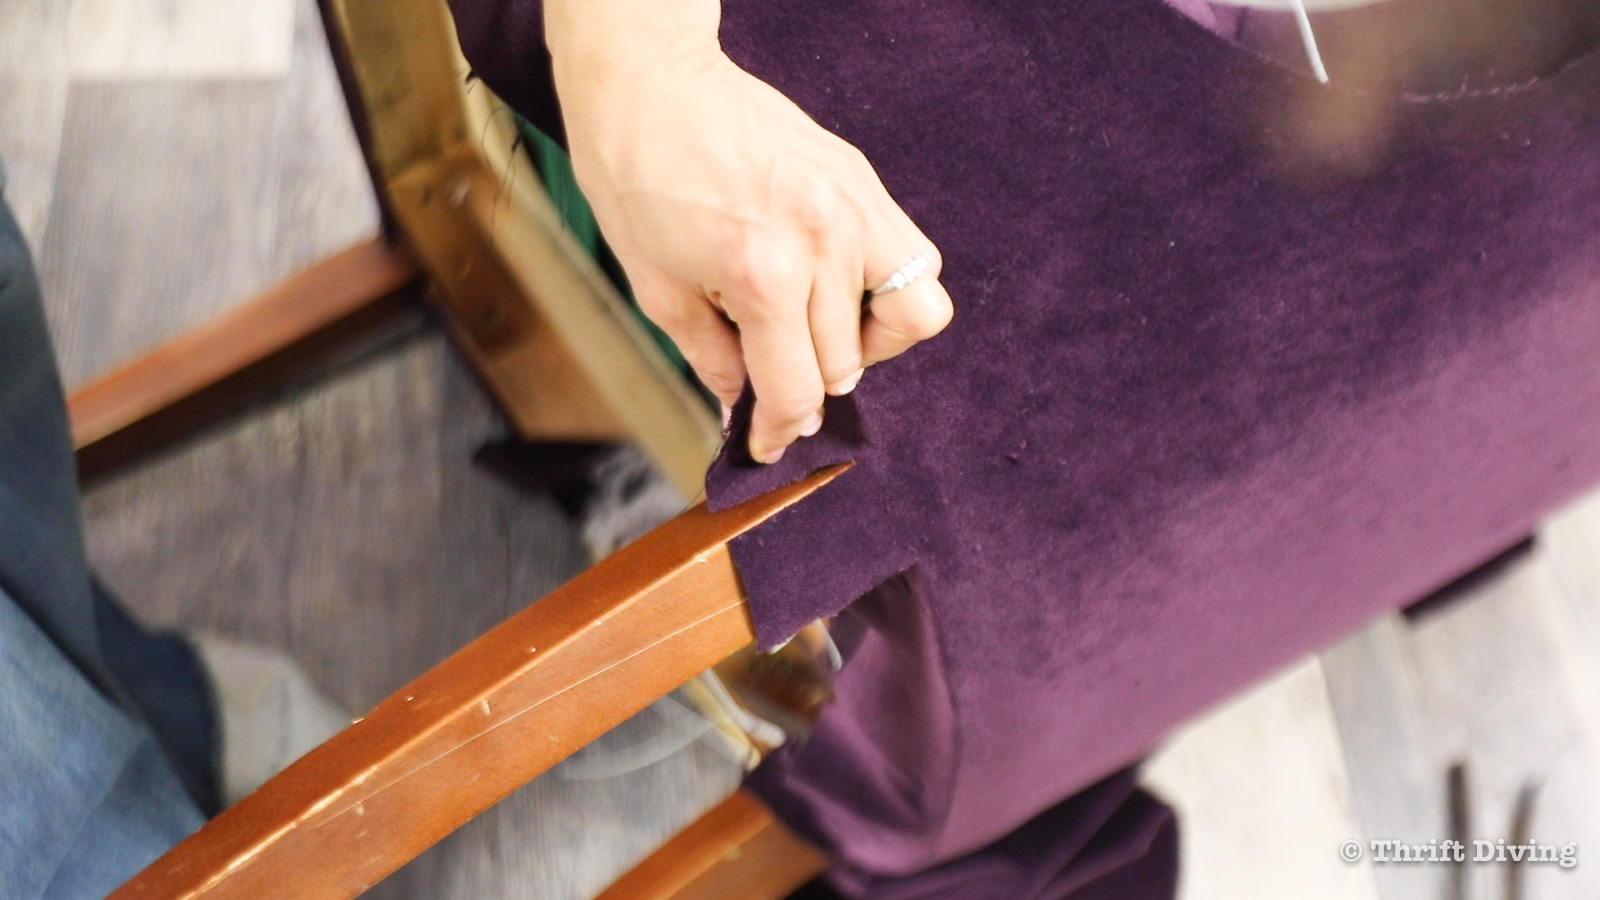
Flip that fabric up, creating a nice profile of the fabric along the leg.
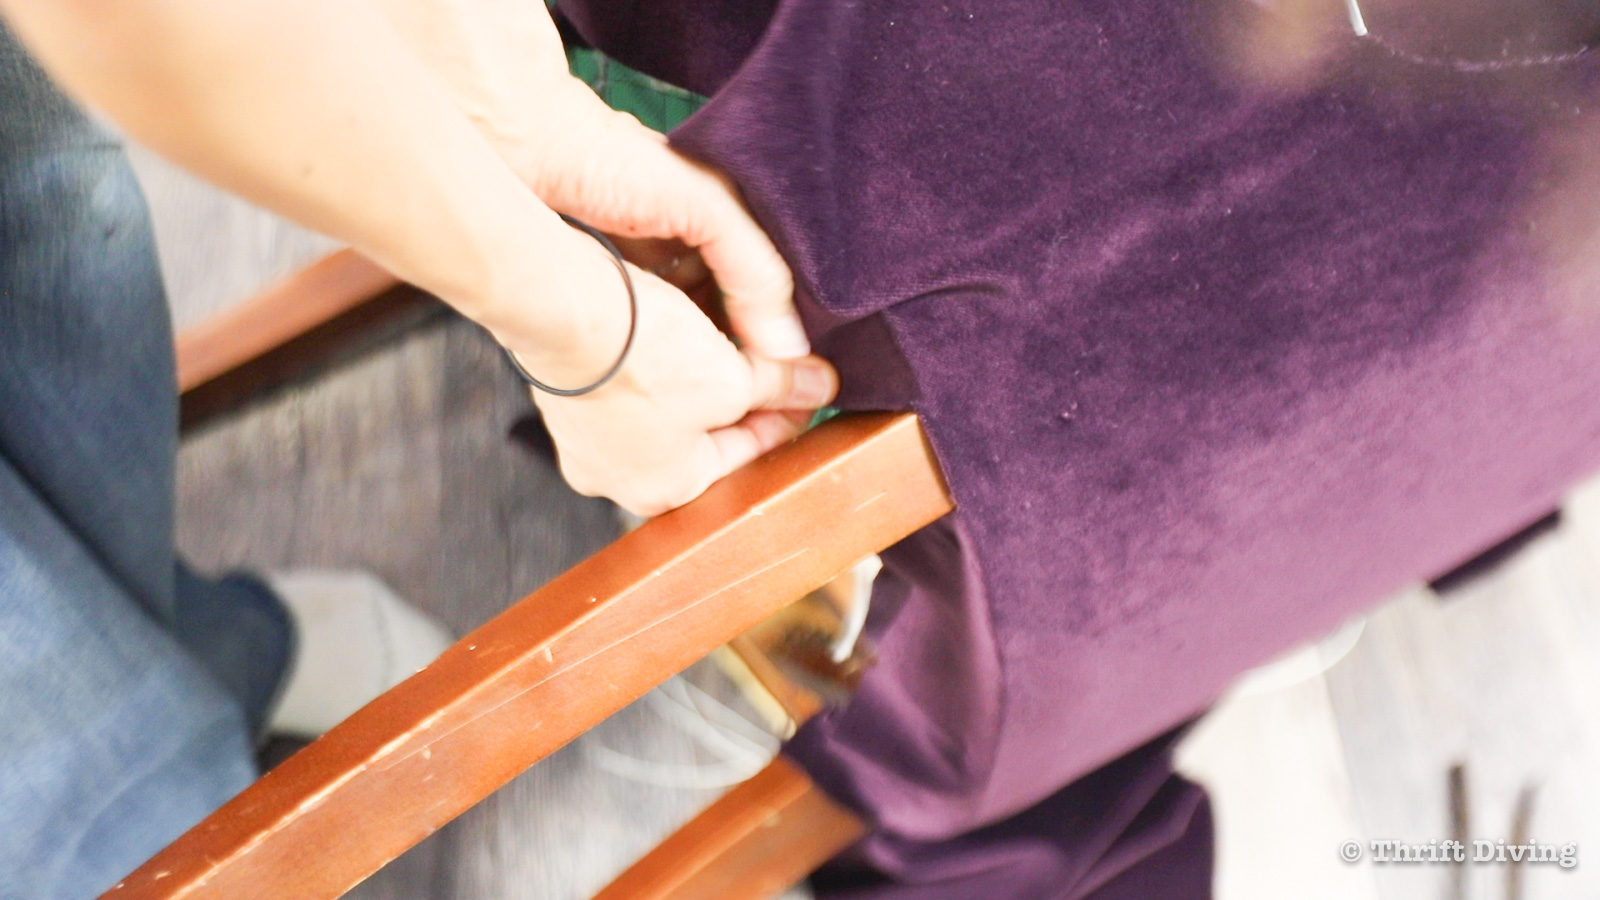
Keep pulling the fabric tight, securing with staples.
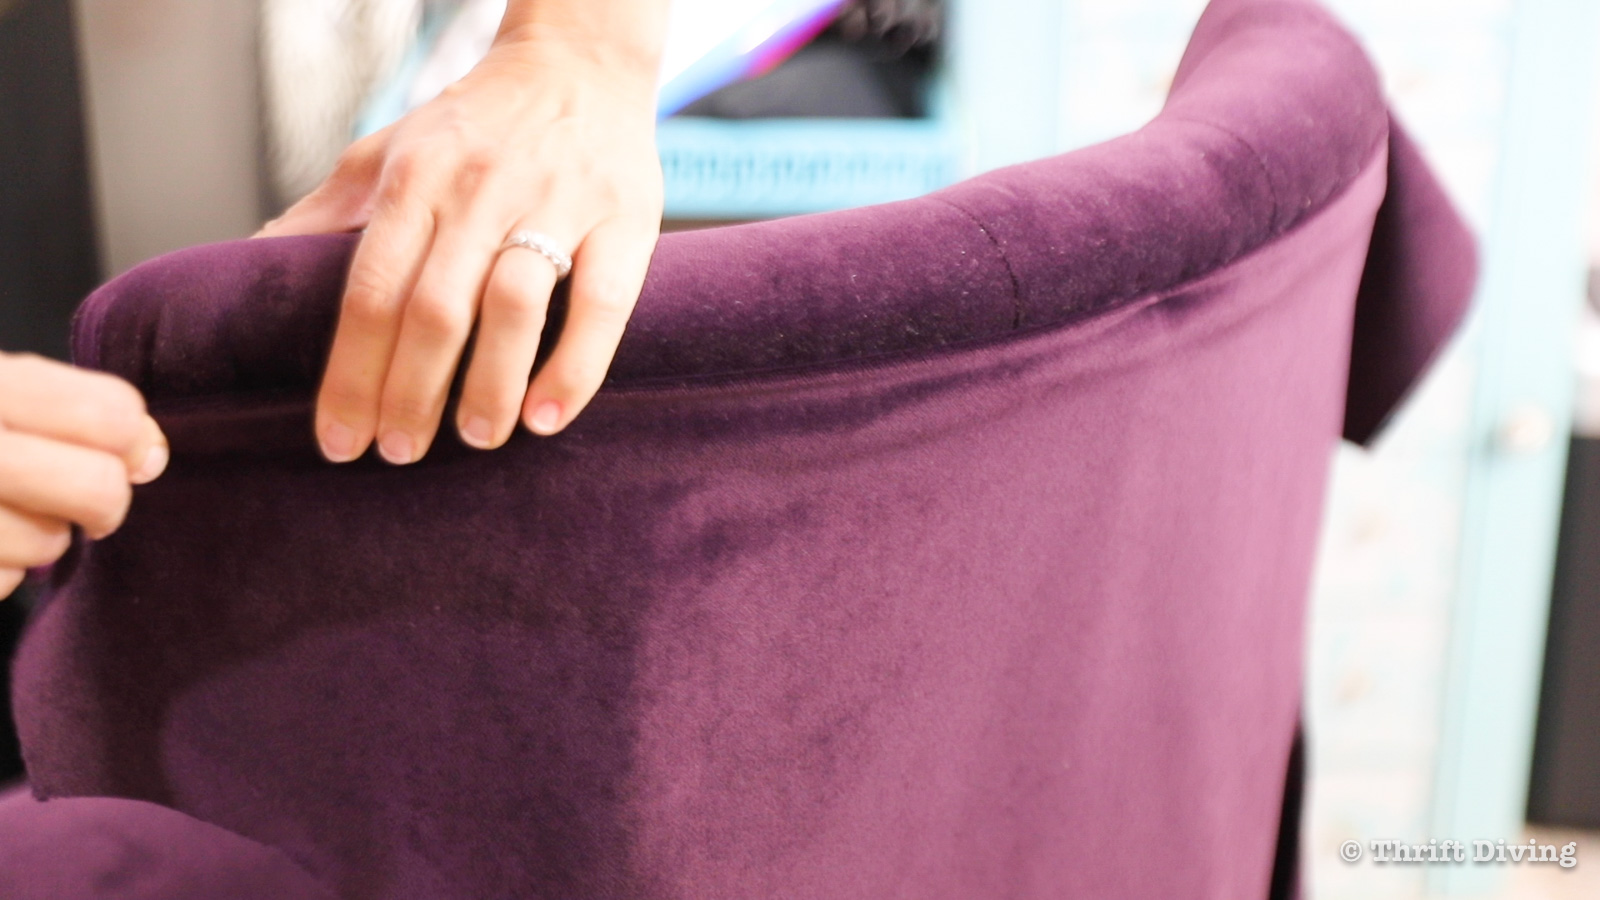
STEP 9: Fit the New Fabric to the Back of the Chair
I cut the fabric a little bigger for the back of the chair because the first fabric I cut seemed too small to fit properly. Thankfully, I have gotten 5 yards of fabric, so I have enough left over to cut two pieces.

In upholstery, I learned that you always want to find the center of your fabric and your chair when joining the two together. By adding as a single staple, you then start pulling and working the wrinkles out of the fabric towards the corners, which is what I did here. I pulled it as taut as I could horizonally, then secured it with a single staple on each side.
Once the top was secure with those few staples, then I turned the chair over and pulled the fabric vertically as tight as I could, and placed another single staple. Afterwards, I pulled the fabric tight towards the sides, adding a few staples, and fitting the fabric around the legs.
Next, I pulled the fabric tight throughout the bottom, to the sides, and added a few staples to hold it in place.
Going around curves doesn’t work well with fabric, so I added some relief cuts that breaks the tension of the fabric and allows you to fit the fabric better. Since my fabric was a little bigger than the original pattern piece, I had to trim off some of the fabric. But, as I have said before–more fabric is definitely better than too little fabric! 🙂

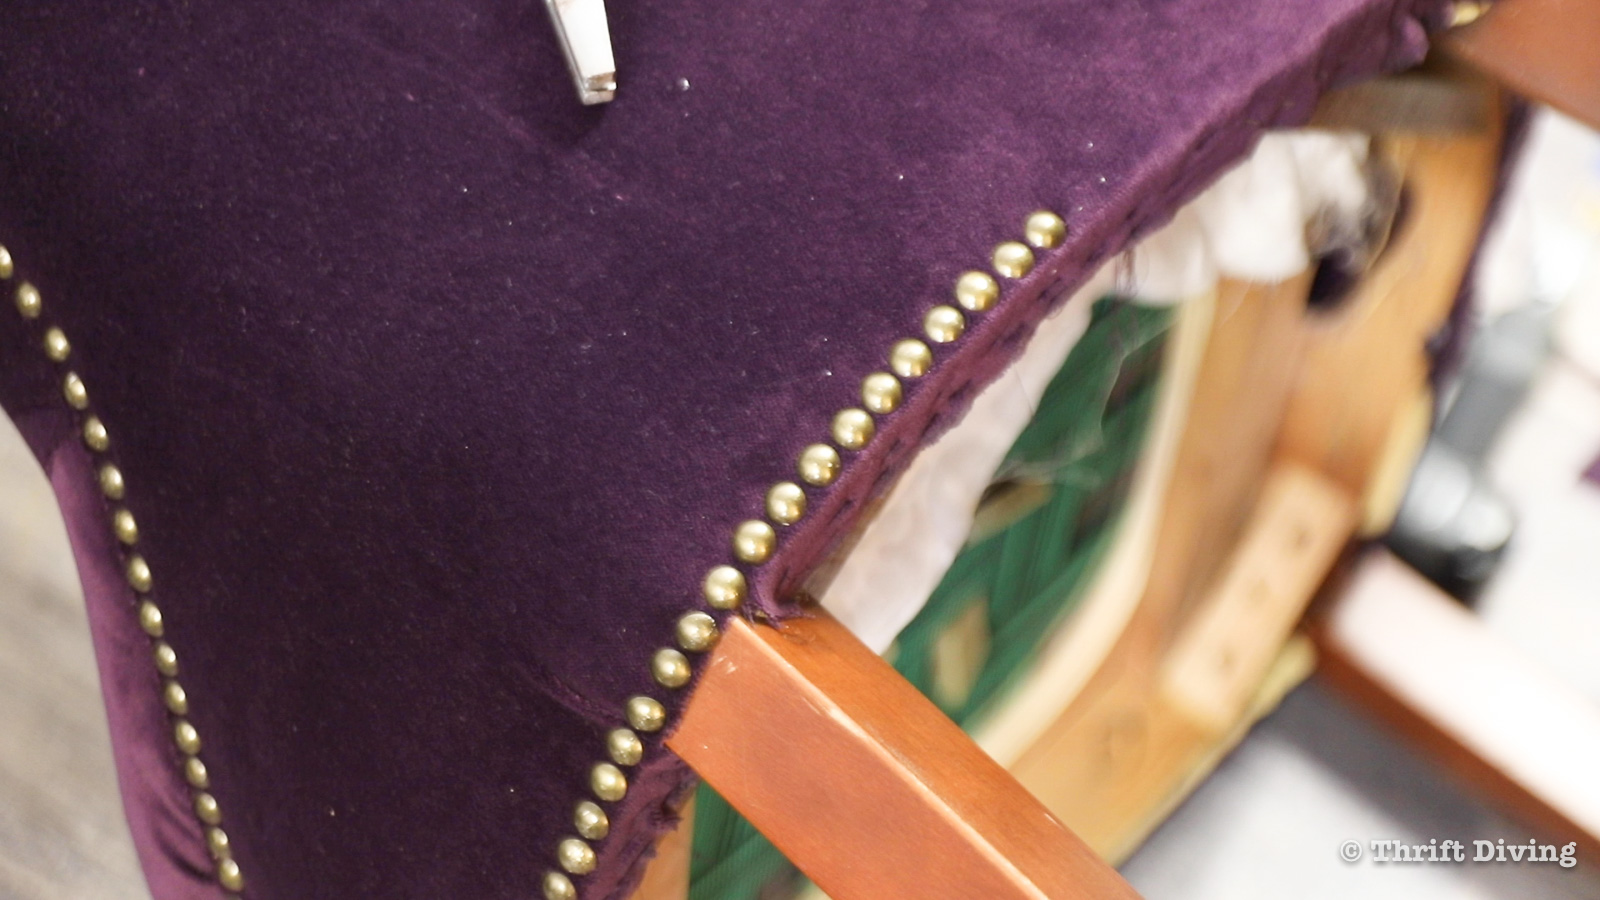
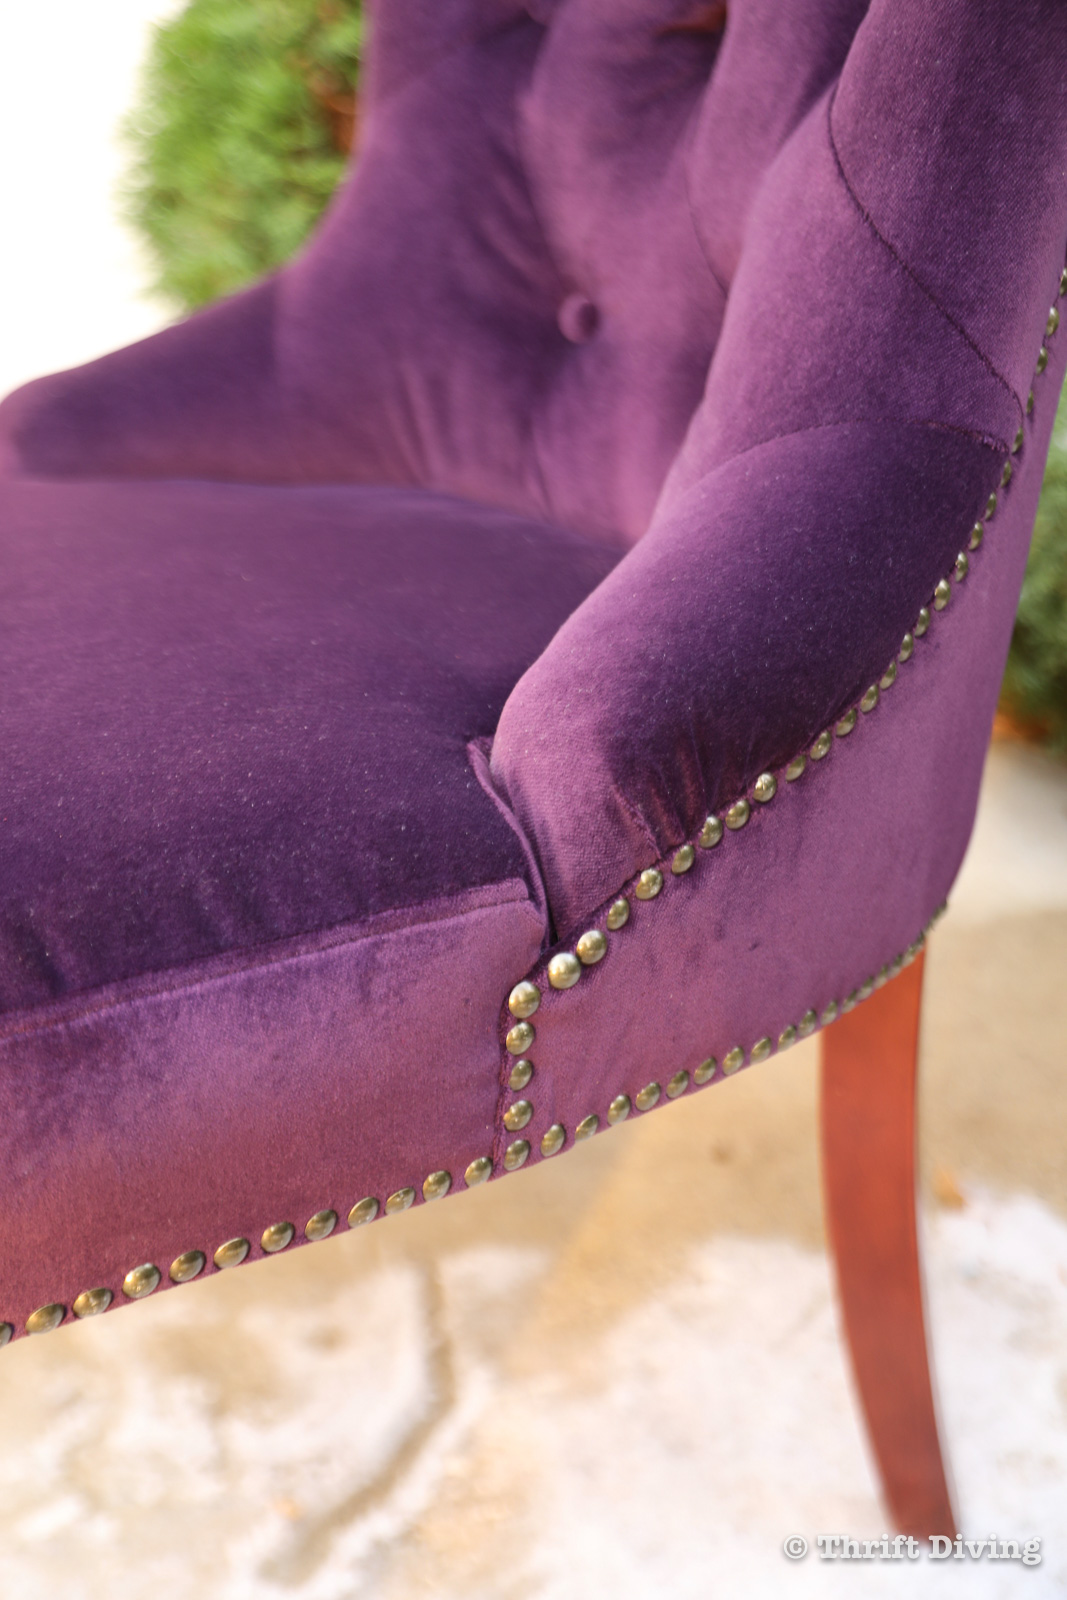
STEP 10: How to Apply Decorative Tacks
-Use a cardboard jig with 1/2″ spacing and 1/4″ up from the bottom edge.
-Use a tack hammer.
-Remove any tacks that get very bent and cannot be tapped into a straight line. There will be some waste.
Furniture tacks can make you pull out your hair! I have done then a couple of times–once when I refinished this chair several years ago, and on this lovely vintage chair I bought for $60 at the thrift store.
Getting them straight is the hardest part if you’re attaching them one by one, which I was. (Or, you can use a decorative tack strip, which some people swear is much easier. I’ve never used them, though). I did watch this YouTube video on how to get tacks to be even, which was very helpful.
The woman recommended using a piece of cardboard with 1/2″ spacing and 1/4″ slots from the edge. I thought I would be able to add more than one tack at the time, but that proved to be…..eh, let’s just say, messy. 🙂
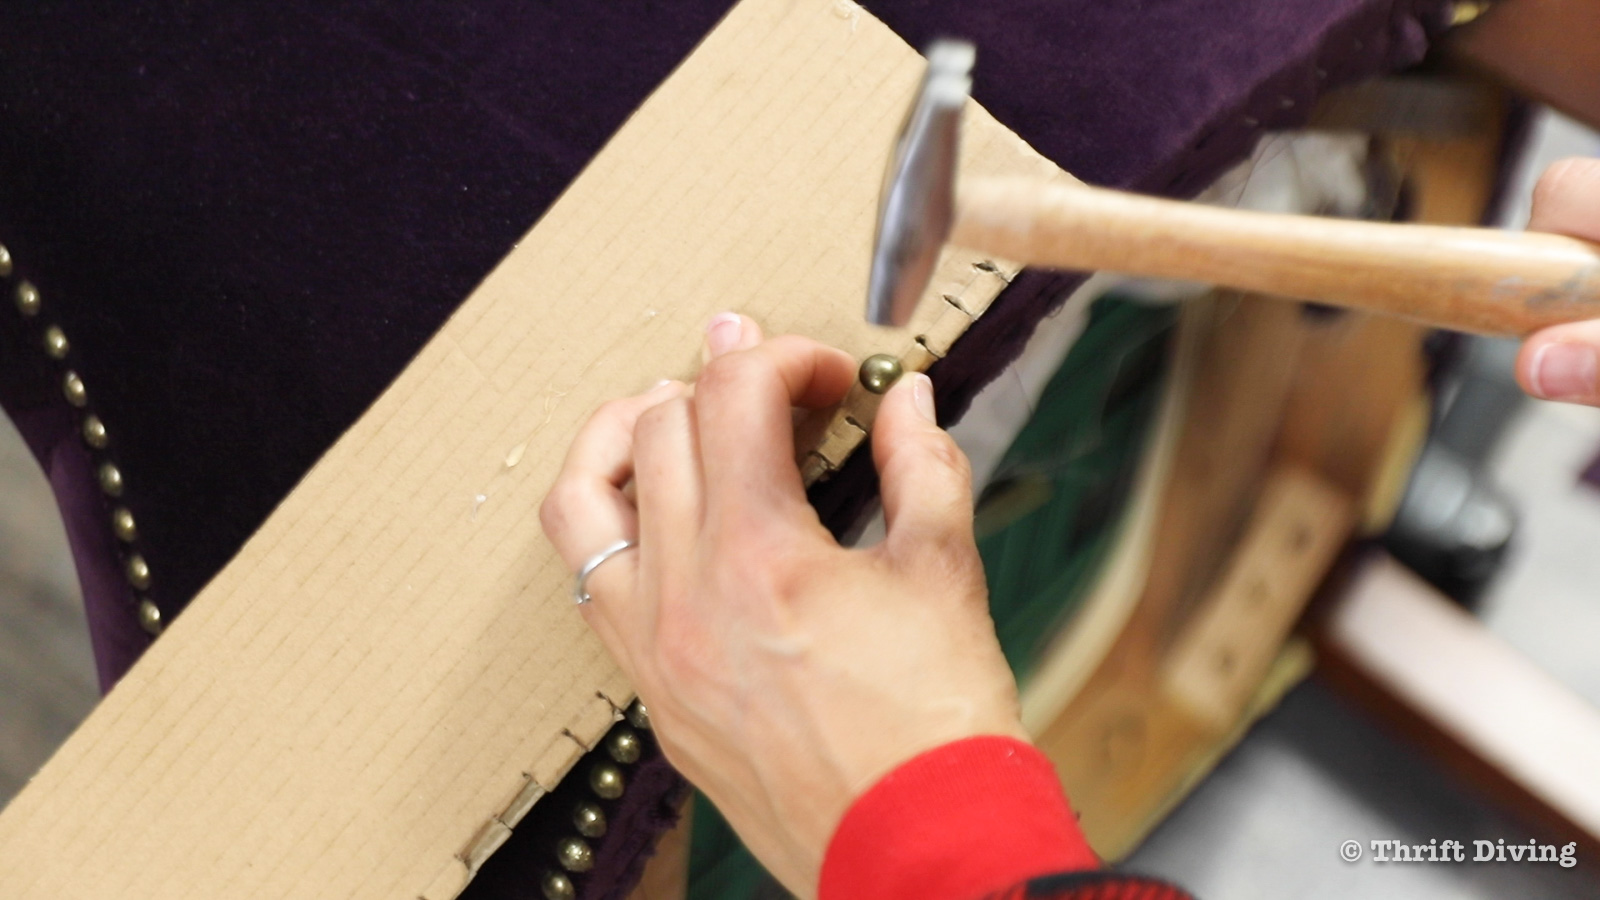
Adding them individually, while still using the cardboard, we most helpful. I was pleasantly surprised that I was able to “get a groove” going and didn’t have many problems getting them to line up. There were some duds, of course, but overall, they were fun to add!
STEP 11: Remove the Scratches from the Wooden Chair Legs
I debated with myself on whether I should have sanded and refinished the chair legs. After all, such gorgeous fabric shouldn’t have busted-up legs. But I’ll admit–by the time I was done with the fabric and furniture tacks, I was spent. I took the short-cut and used one of my Wood Repair Markers to cover up any scratches or worn out areas of the legs.
If you recall, I tested these markers on removing wood scratches on this upholstered rocking chair and I was super impressed by them. They didn’t fail me this time, either! I added a bit of glossy shine to them, as well. I was happy with the results.

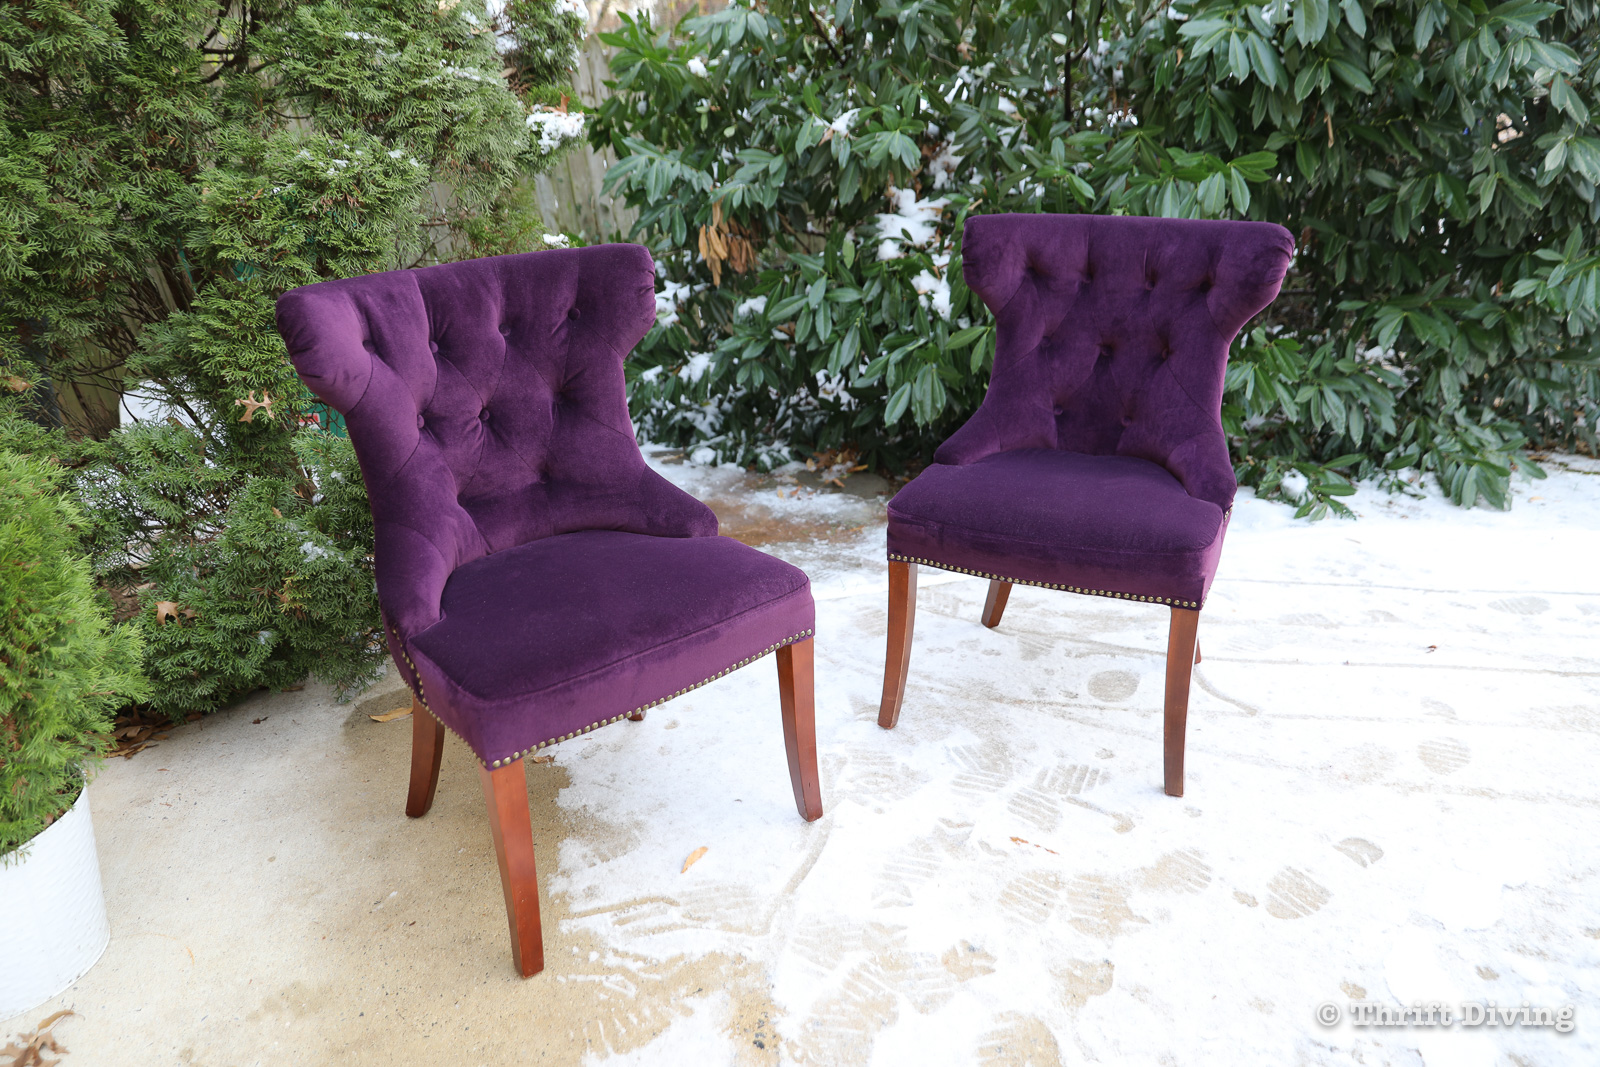
Let’s have a quick look at how these gorgeous chairs turned out!
BEFORE
AFTER!
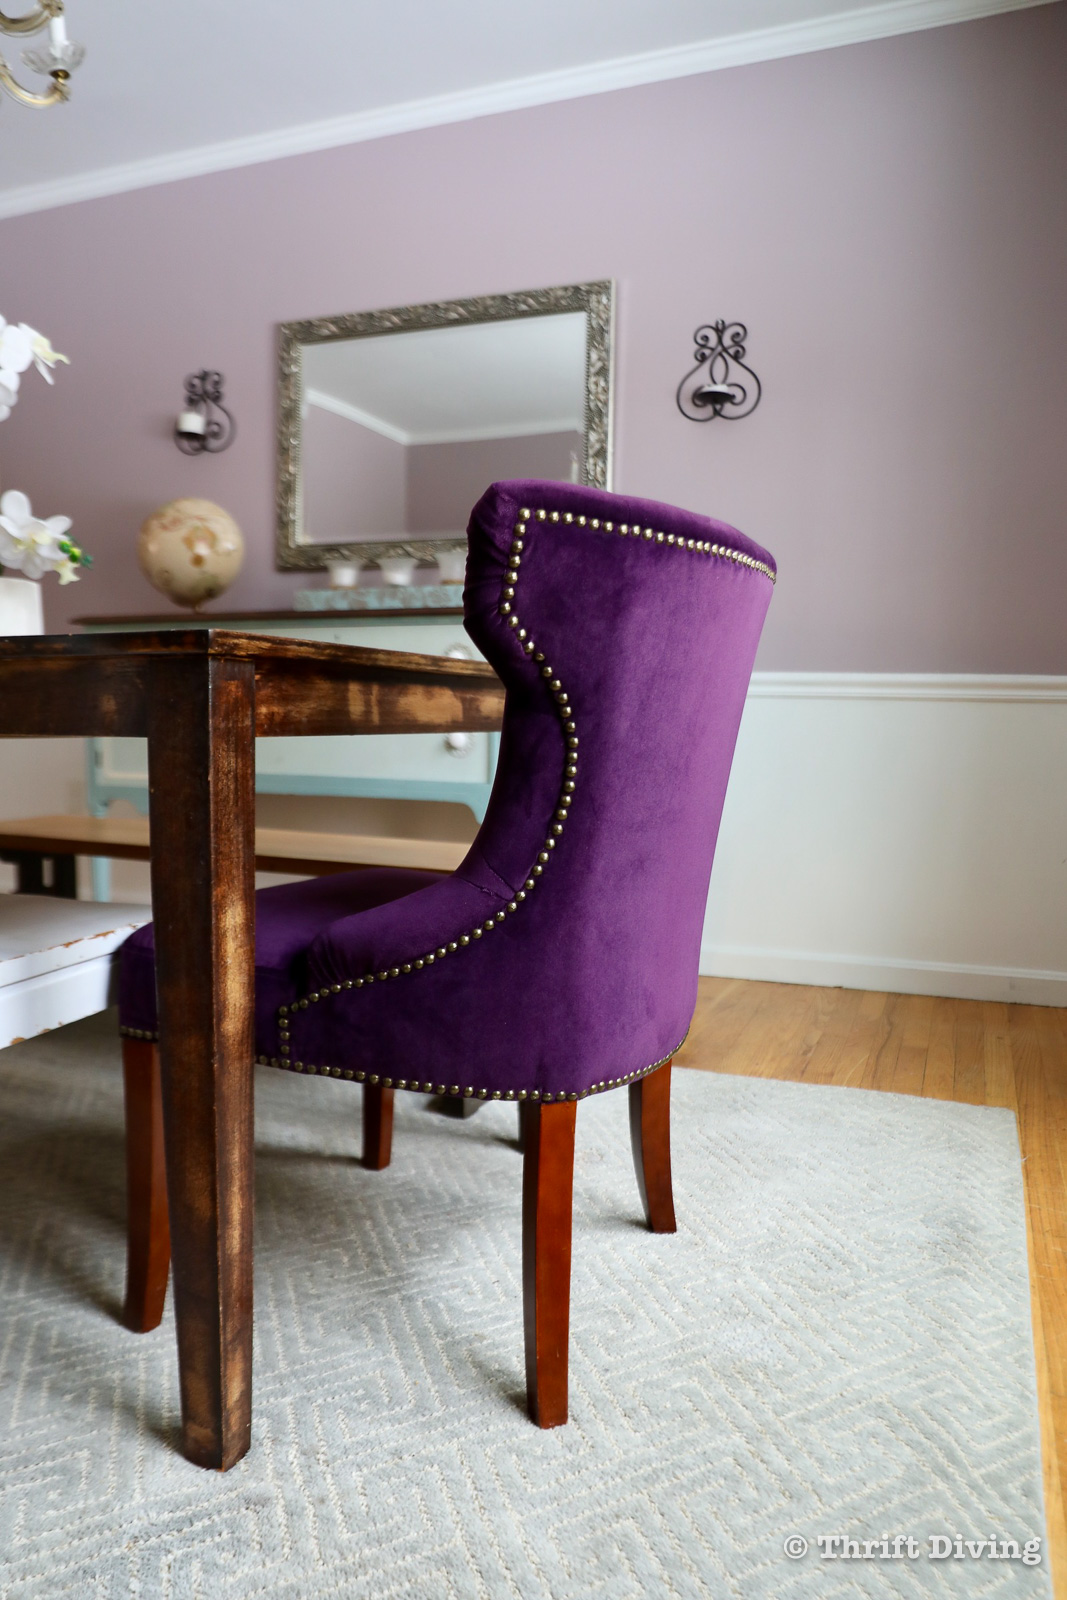
These chairs are absolutely stunning!!! I couldn’t have picked a better fabric, honestly. My plan was to use them in the dining room and only allow hubby and myself to use them (read: kids not allowed!). But when I sent the picture to my mom, she was like, “Why in the world are you covering them up at the dining room table!”
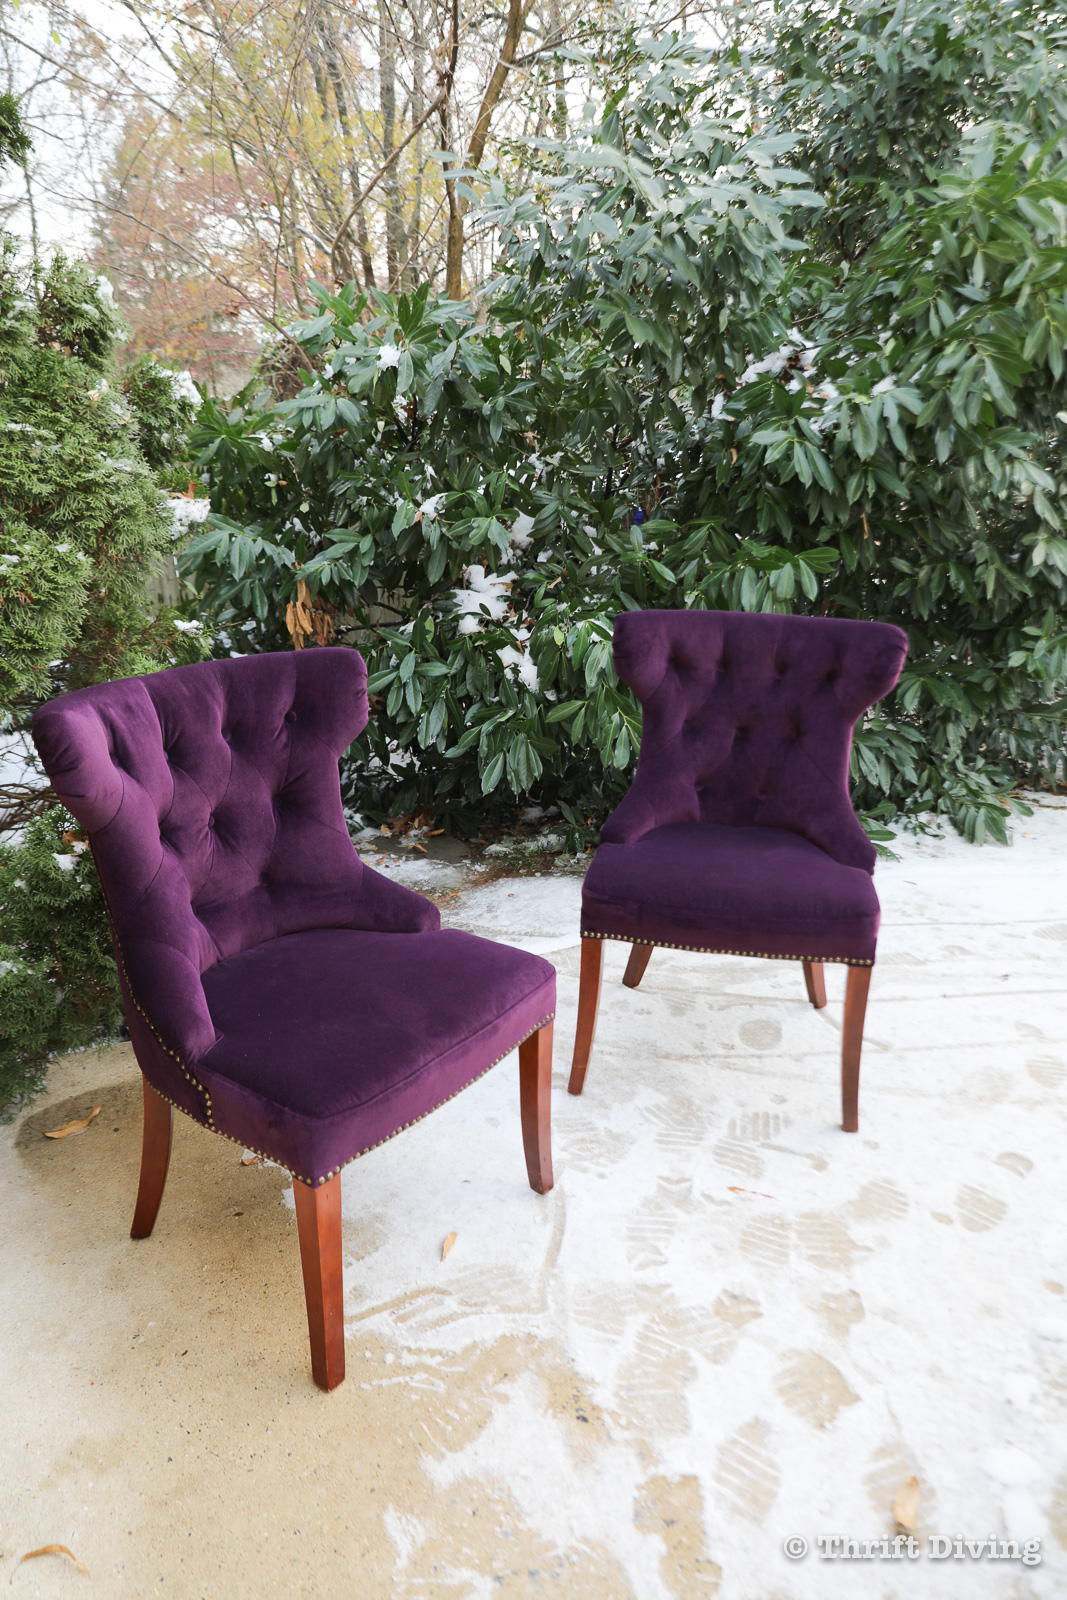
While they go very well with my dining room mauve paint color, I agree that they deserve the spotlight. I’m thinking of putting them in my family room, another a smaller sitting area for adults-only. 🙂 Either way, I love these chairs and I think they’ll be the highlight of any room I use them in!
OMG, I Love This Fabric!!!
The only things I needed to purchase for these chair was the fabric and decorative tacks; I had all the other materials. I found this Crypton velvet fabric at a local fabric store (you can also find it at Joann Fabric), but didn’t realize that it was more than twice the amount that I could have bought it from other retailers. You can get it for about $30 per yard (I used just under 5 yards total).
I hate overpaying for materials, but at least I have discovered it! It’s stain resistant and–GASP!–liquids simply bead up on the fabric and roll off! Let’s just say that I plan to put this fabric on everything “upholstered” in my house! LOL
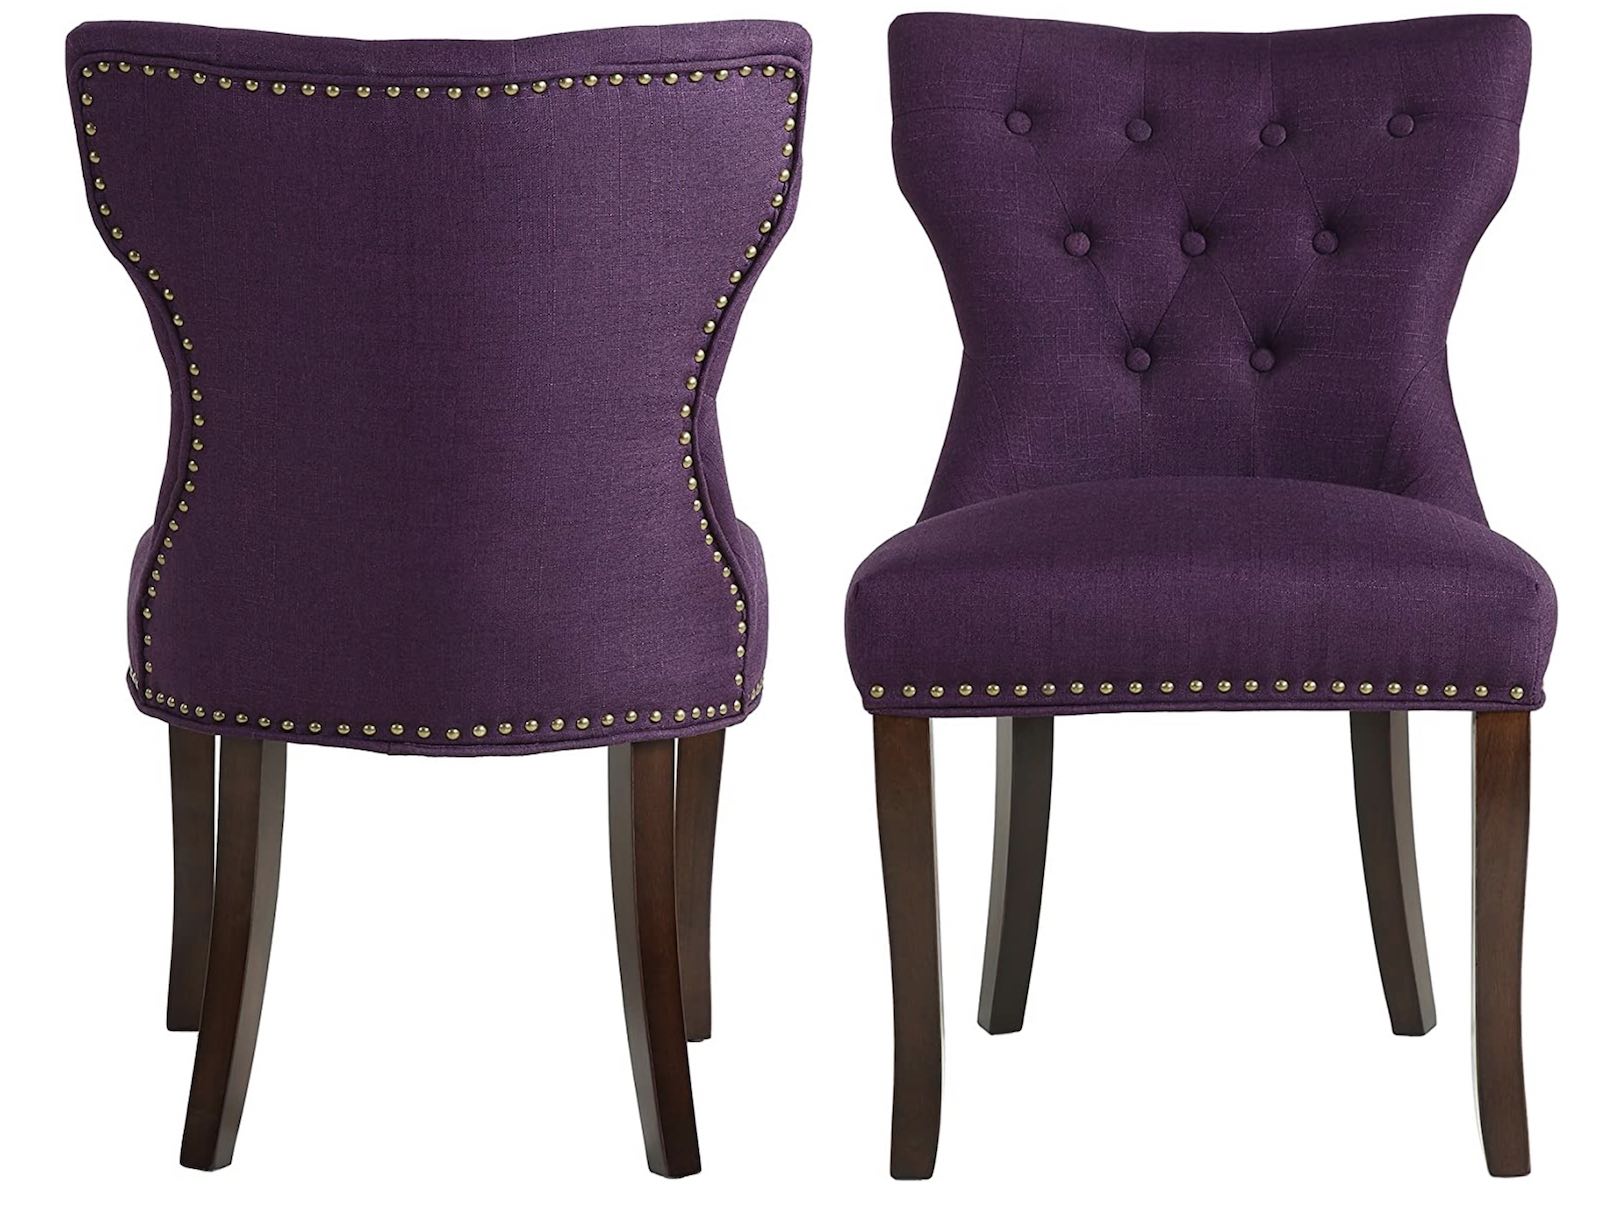
Where to Buy Similar Purple Velvet Dining Room Chairs
I realize that not everyone has the resources or the time to pull off a project like this (and it did take a lot of time!). So I found some sources for where you can buy similar dining room chairs!
These look sooooo nice, and at only about $200 for 2 of them on Amazon, that’s a steal.
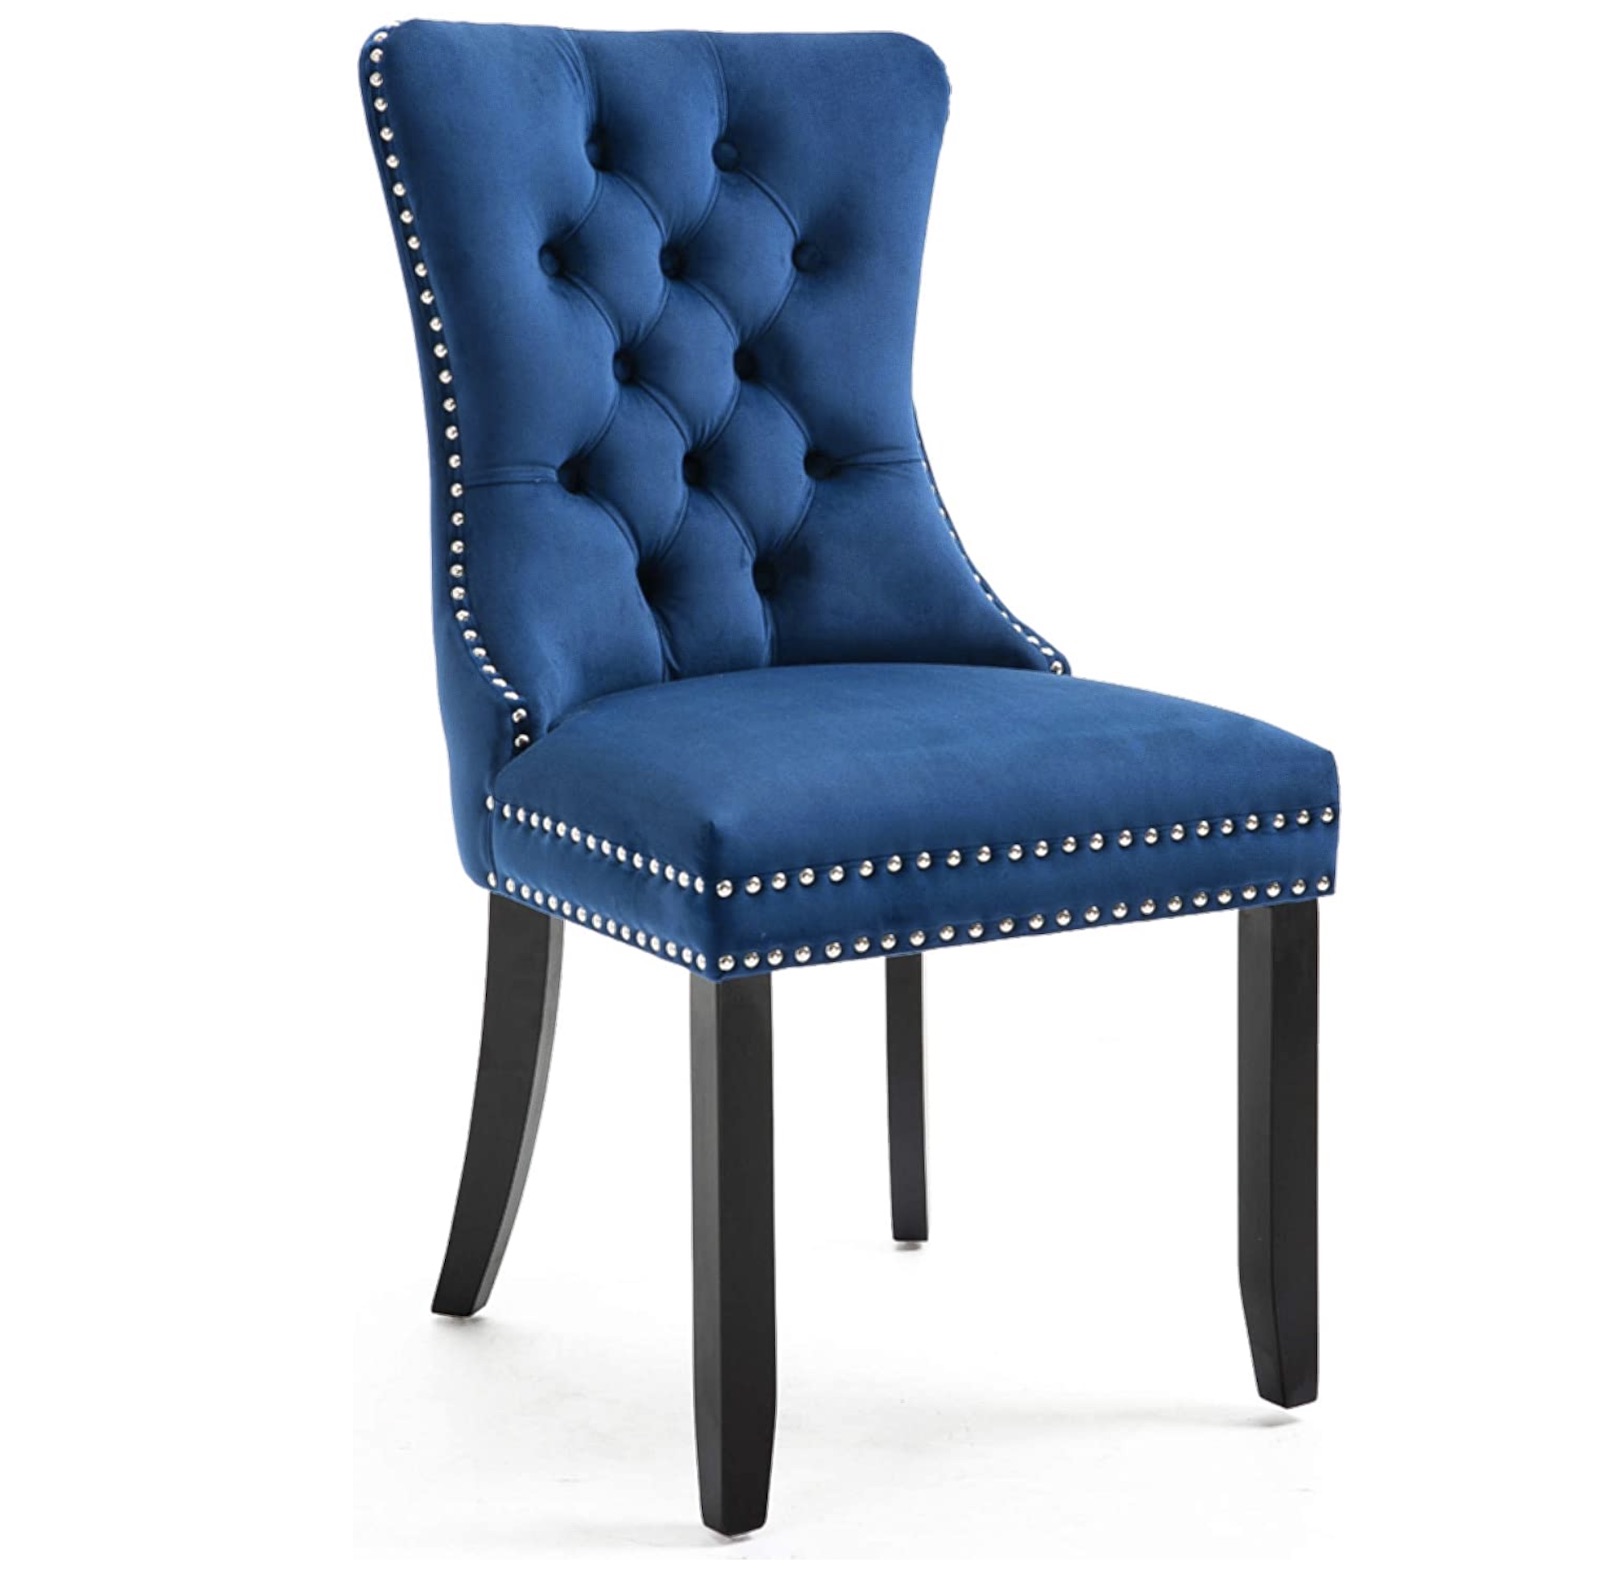
Blue is also a great color choice! When I saw the few wrinkles in this chair, it made me feel better about the few remaining wrinkles in my velvet dining room chairs. 🙂 $200 for 2 of them on Amazon
And lastly, these gray ones are super cute, minus the decorative tacks. They only have 1 set left, though, at $179 for a set of 2 on Amazon.
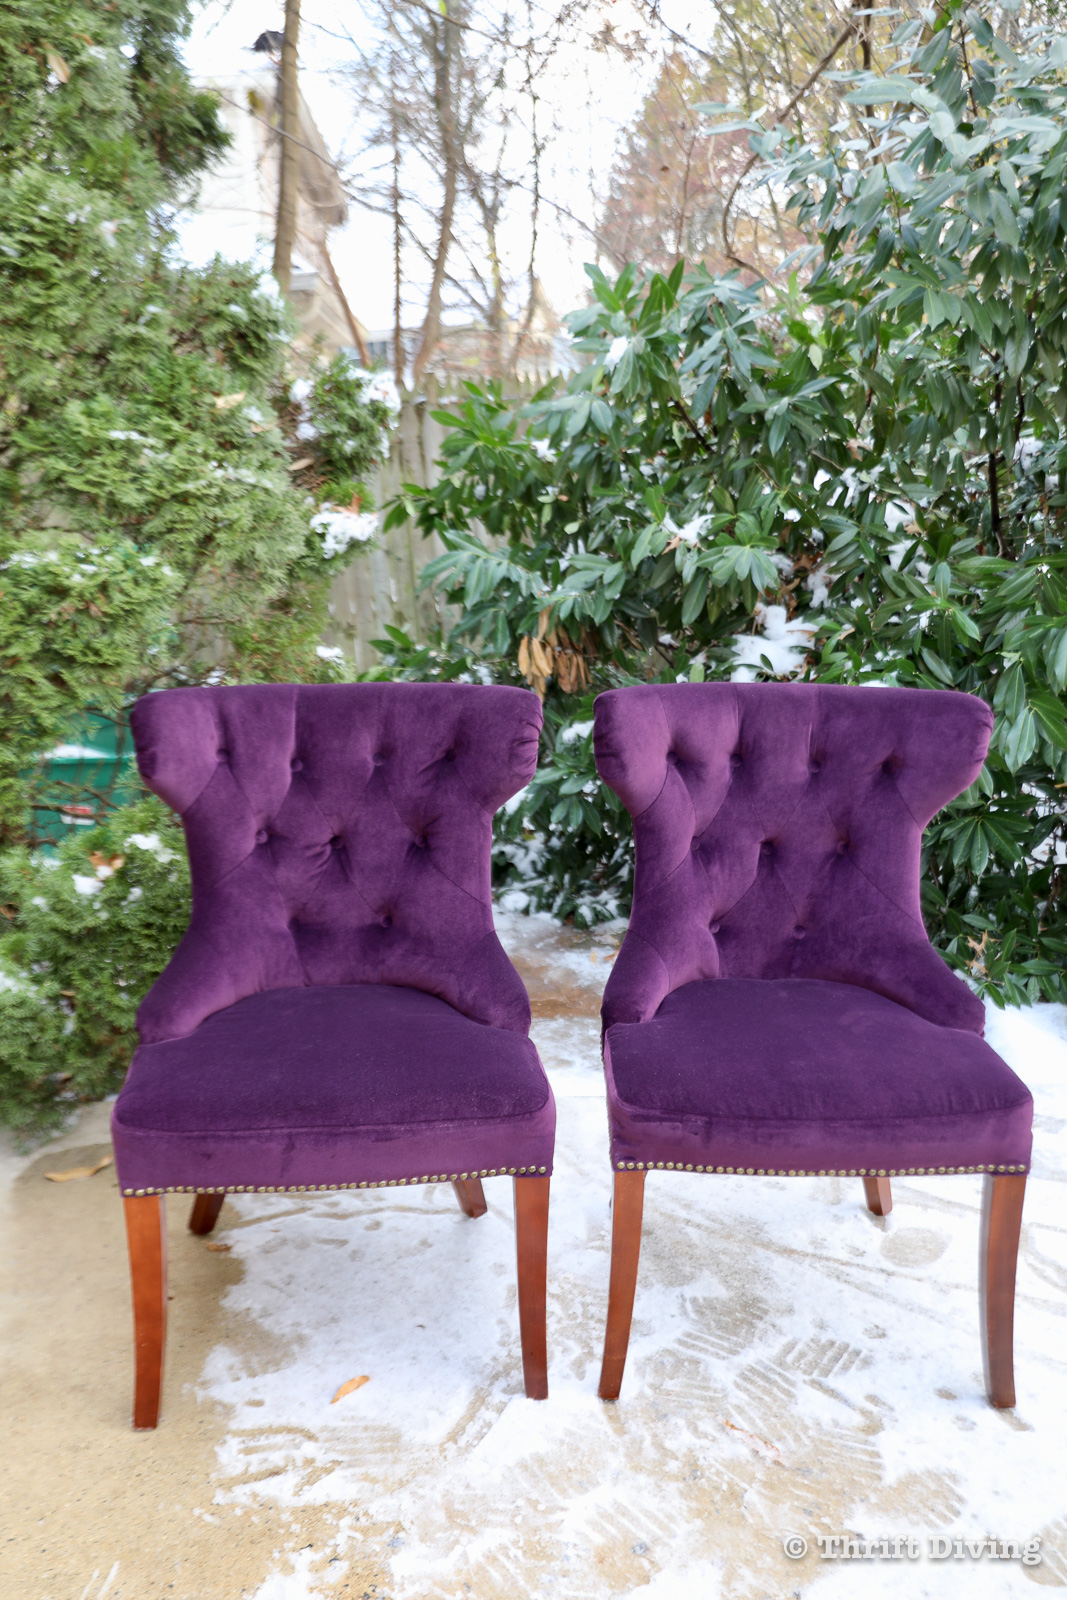
BEFORE
It’s funny how these chairs were tucked away in the corner and in the basement for years. I mean, I knew they could be gorgeous. But I had no idea they would look as good as they do!

AFTER!
Not back for $20 thrift store chairs! The fabric was expensive, but if you buy it online or at Joann Fabric, at $30 a yard, for $150 (plus a few bucks for tacks), you can reupholster these solid chairs yourself with luxurious fabric that is super soft, stain resistant, and liquids just bead up on it and rolls off. And if you have the tools, like Arrow Fastener’s PT50 stapler, you can do any project that your heart desires. 🙂
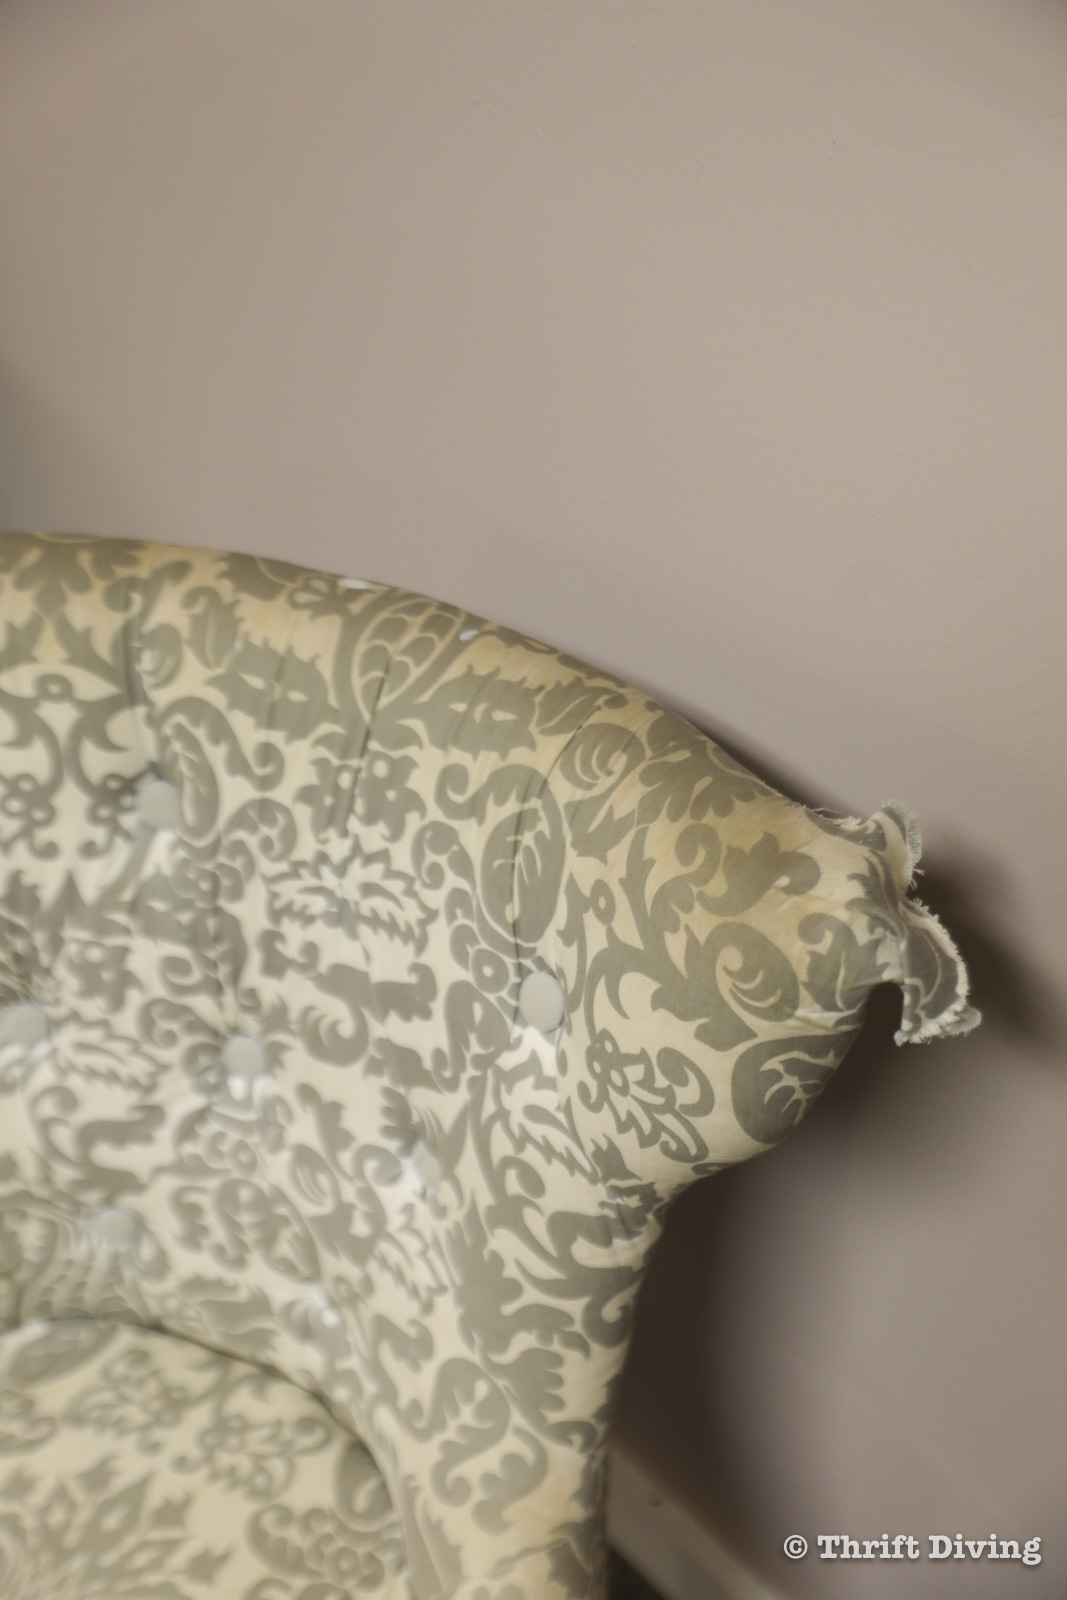
For me, the key to a great reupholster project is how smooth can you make the fabric? And for places with extra fabric, do the folds look neat and attractive? In the “BEFORE” picture you can see how much slack was left over in the fabric. It was poorly done.
BEFORE
AFTER!
While a professional upholsterer may tell me otherwise, I’m pretty happy with how these edges look now! I’m likely going to sign up for more upholstery classes to learn how to work the corners even better. 🙂
I am soooo happy with these reupholstered dining room chairs! I mean, there are always things I could have done better, and things I would do differently next time, but overall, I’m pleased with how these turned out! So what do you think?? Do you love these reupholstered dining room chairs as much as I do?! 🙂 Leave a comment below and let’s chat about them!
Love this project?? Click here to SAVE it on Pinterest!
![]()

Download the 5 freebies!

Thrift Diving inspires women to decorate, improve, and maintain their home themselves...using paint, power tools, and thrift stores! Use these 5 printables, checklists, and ebooks to get started!


Those chairs are beautiful!
Thank you, Angela!!!