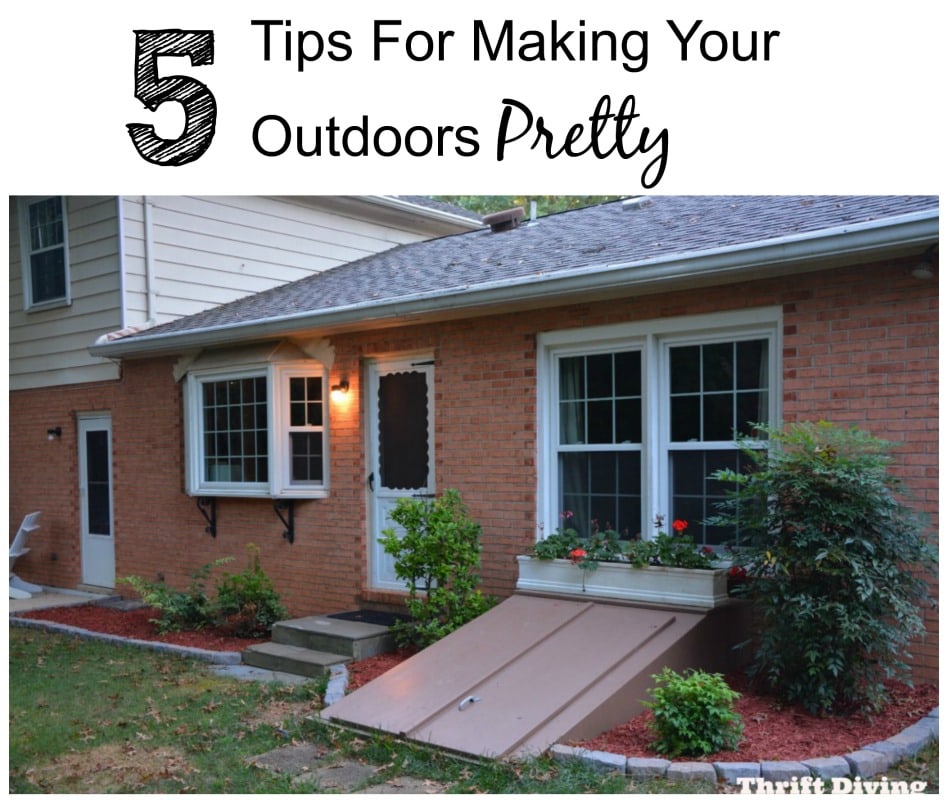
5 Tips for Making Your Outdoors Pretty
I’m embarrassed to admit that up to nearly 3 years we’ve lived in this house, I have never laid a hand on a bag of mulch, much less DIY’ed anything on the outside of our house. Isn’t that pathetic?? After moving from a 2-BR condo with no yard…..to a 4-bedroom house on 1/3rd acre….well…..you never imagine how much money and hard labor it costs to care for and “prettify” an outdoors space!
It was easier to just ignore the outside of my house and hope that one day we’d had enough money to pay someone to make it look pretty.
Yeah. Right.
We’re still waiting for that day. 🙂
I realized that no Magic Landscaping Fairy or Outdoor Design Fairy is going to appear from a bubble like Glinda the Good Witch of the North to come grant my wishes. 🙂
So here are 5 tips that I’m doing to make it happen myself!
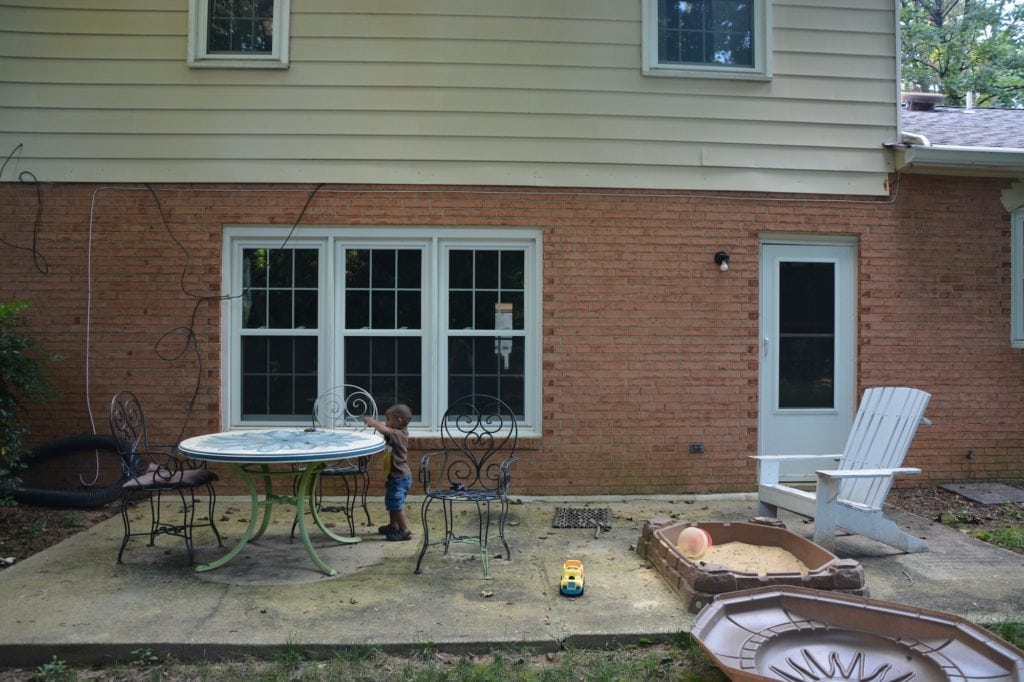
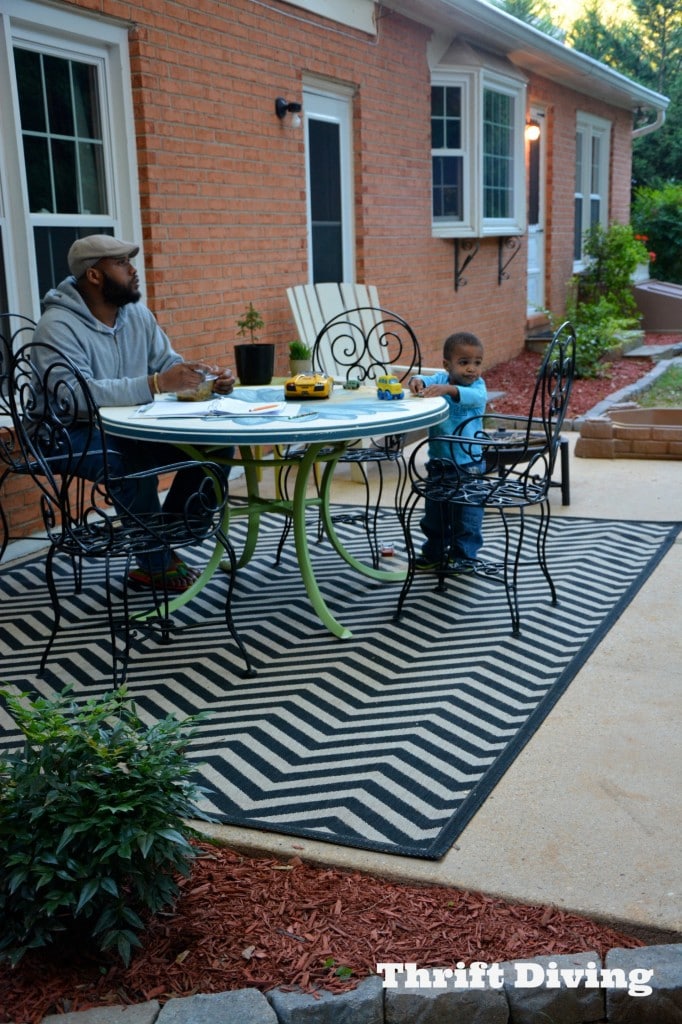
I’ve been collecting this hodge podge of patio furniture for quite a while now. It had been just sitting on my outdoor patio, collecting dirt and debris. Okay, you ready to see this? I’m warning you– it’s not pretty……..
<<<<insert gasp here>>>>
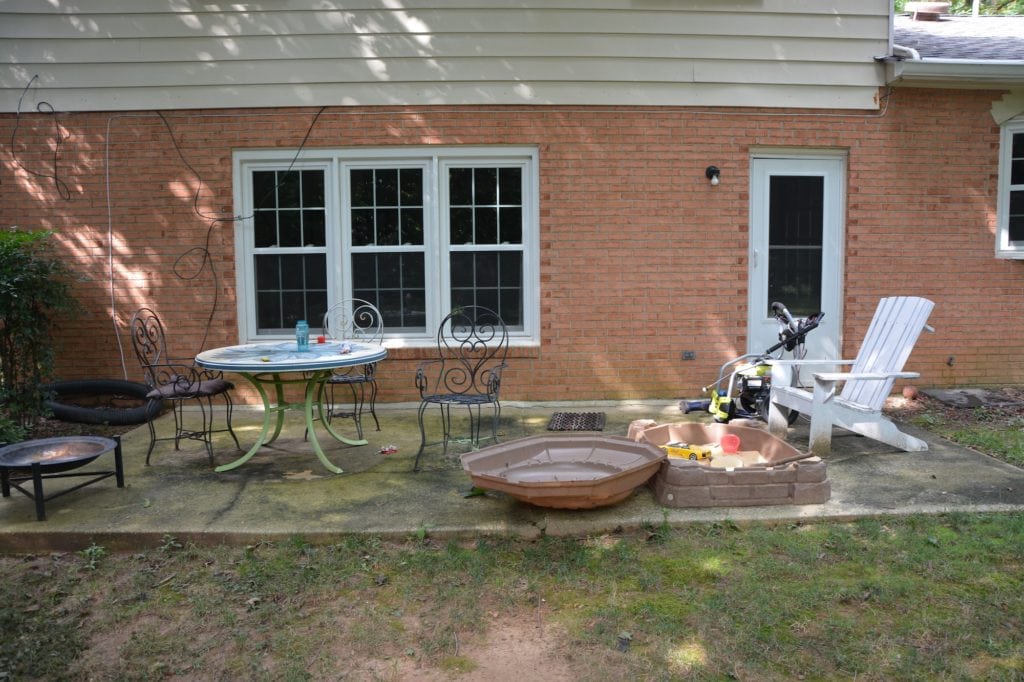
BEFORE
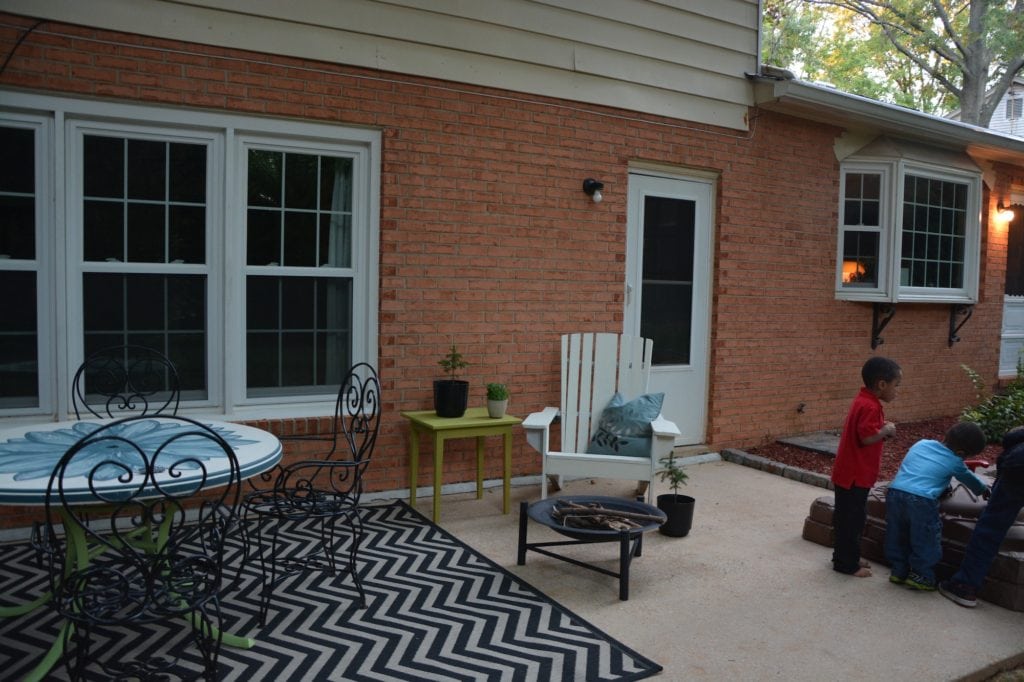
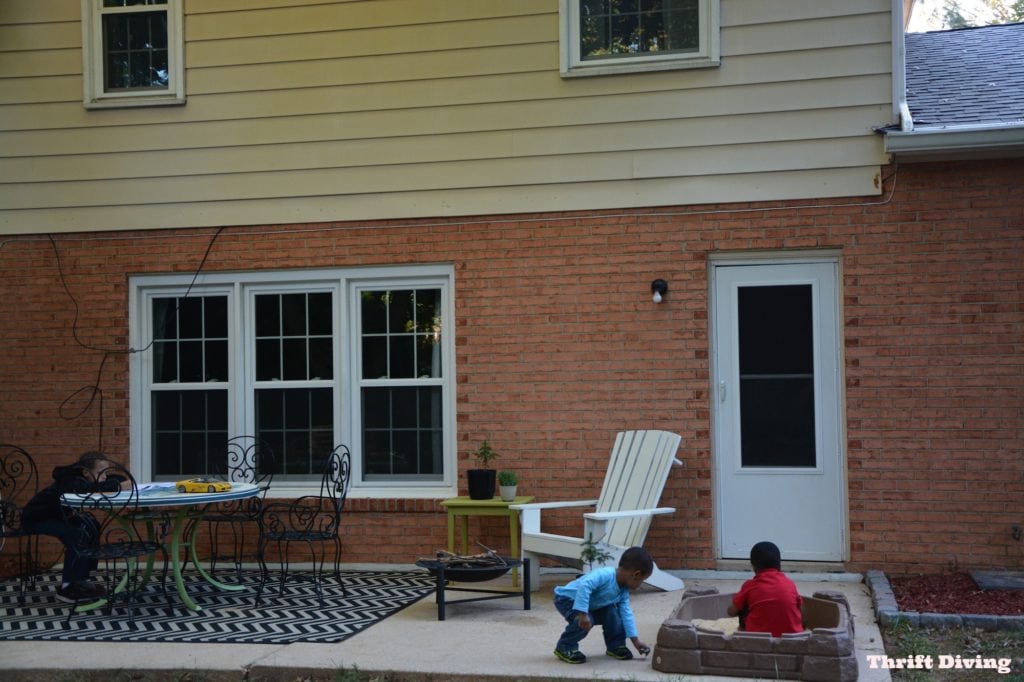
AFTER

I know.
You’re shocked.
I am, too. I still can’t believe I put all my ugly business out there.
Don’t judge me 🙂 And please know that this patio is still in progress. I have many more “TO DOs” to pretty it up. But this is a good start, right?
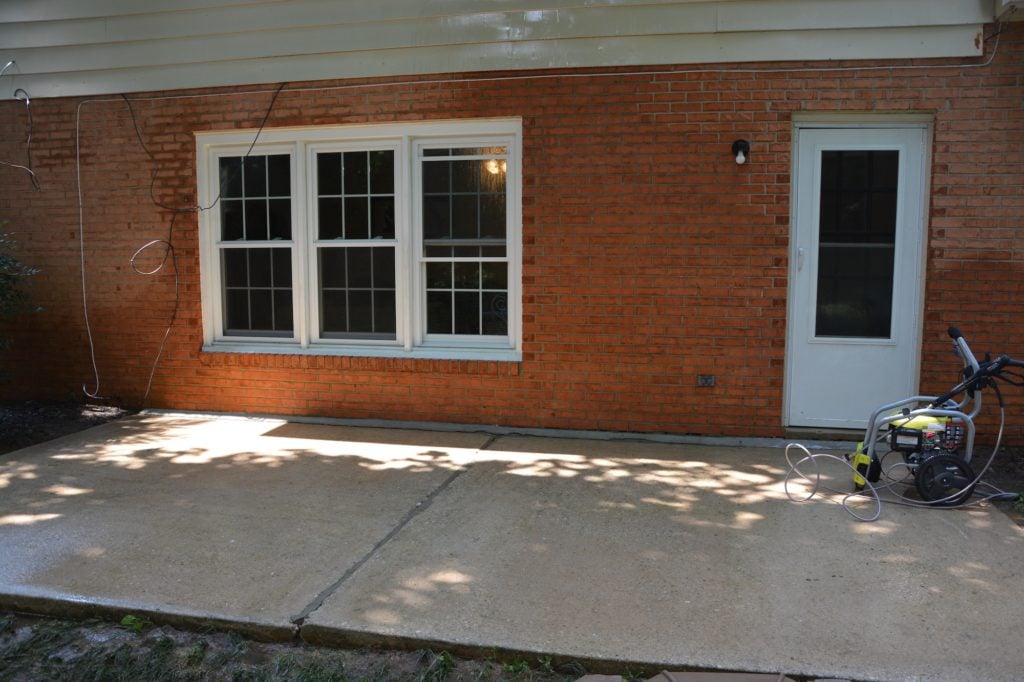
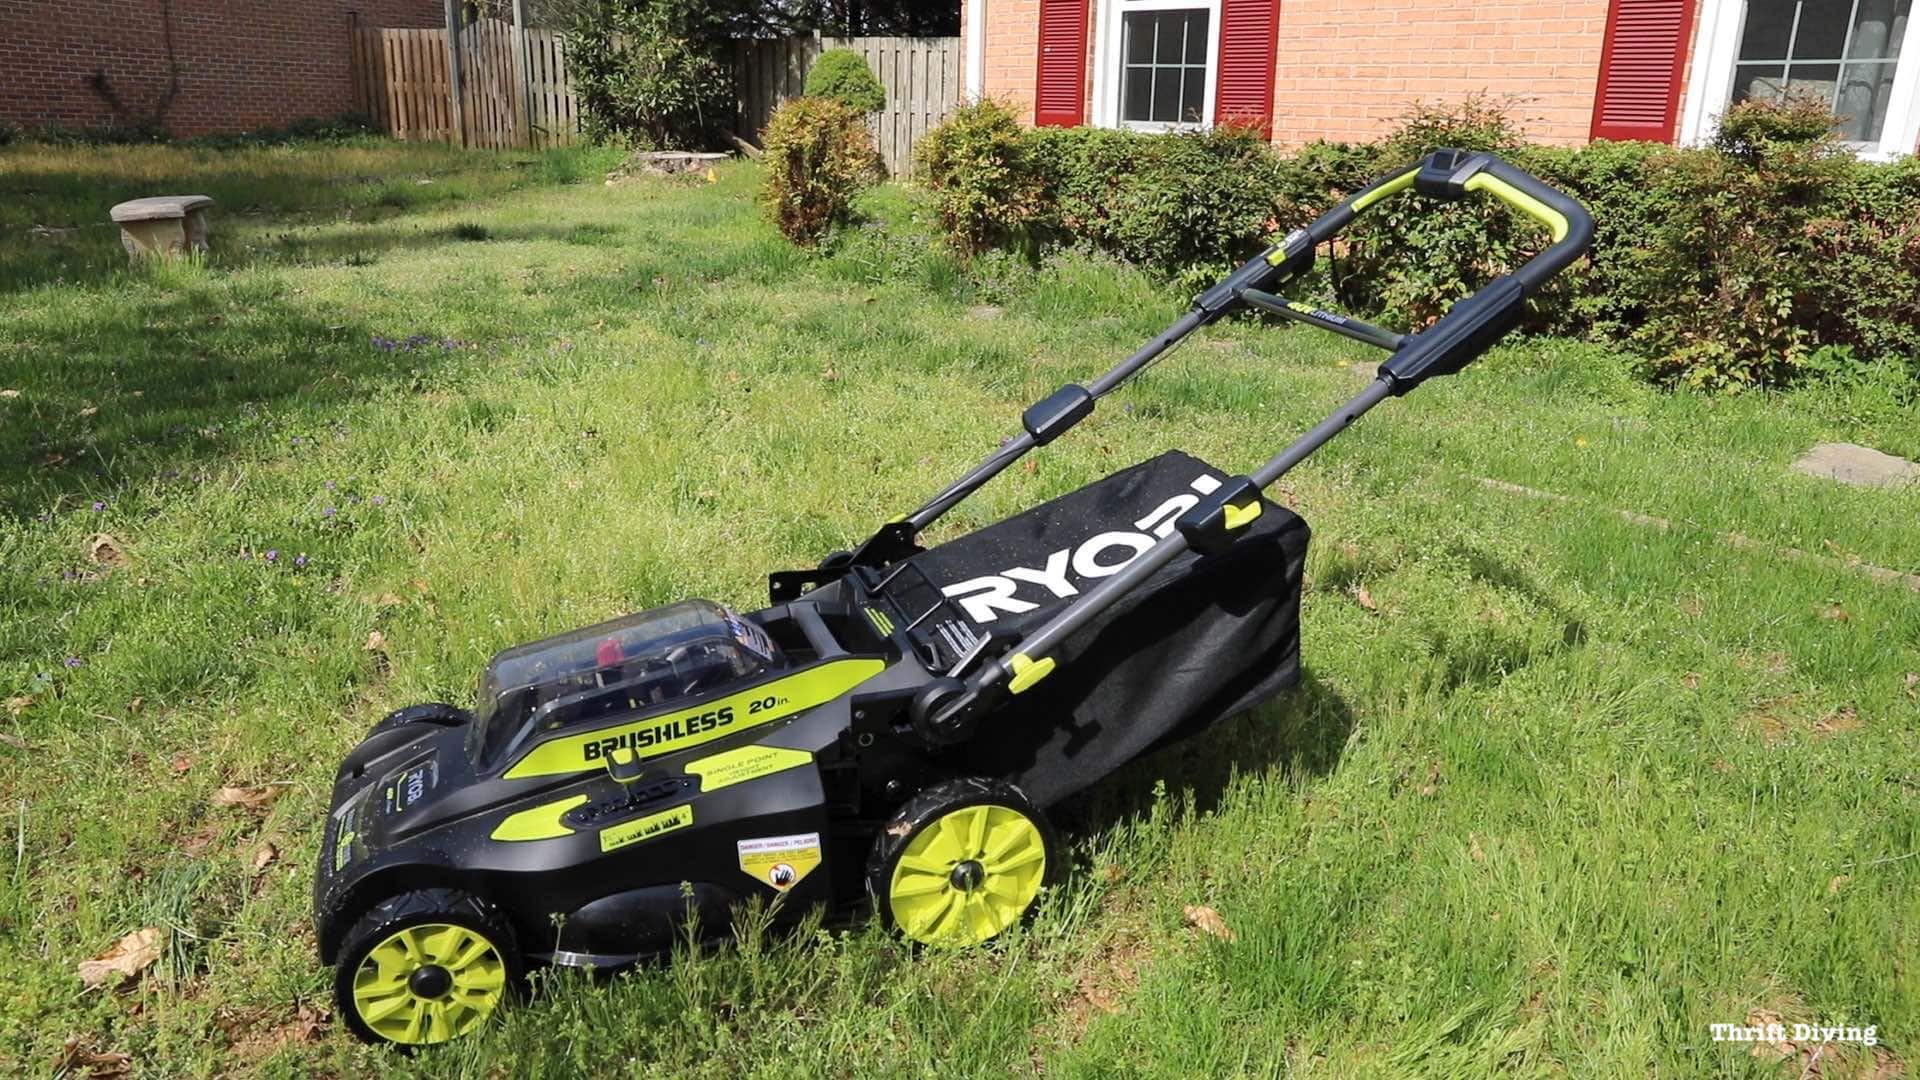
So at one of my recent blogging conferences, I hooked up with Ryobi Outdoor, who offered to send me one of their pressure washers. Um….thank you, Ryobi Outdoor! You have no idea how you’ve transformed my outdoor living space! (well, actually, keep reading to find out!)
Tip #1: Never Underestimate the Power of “P”
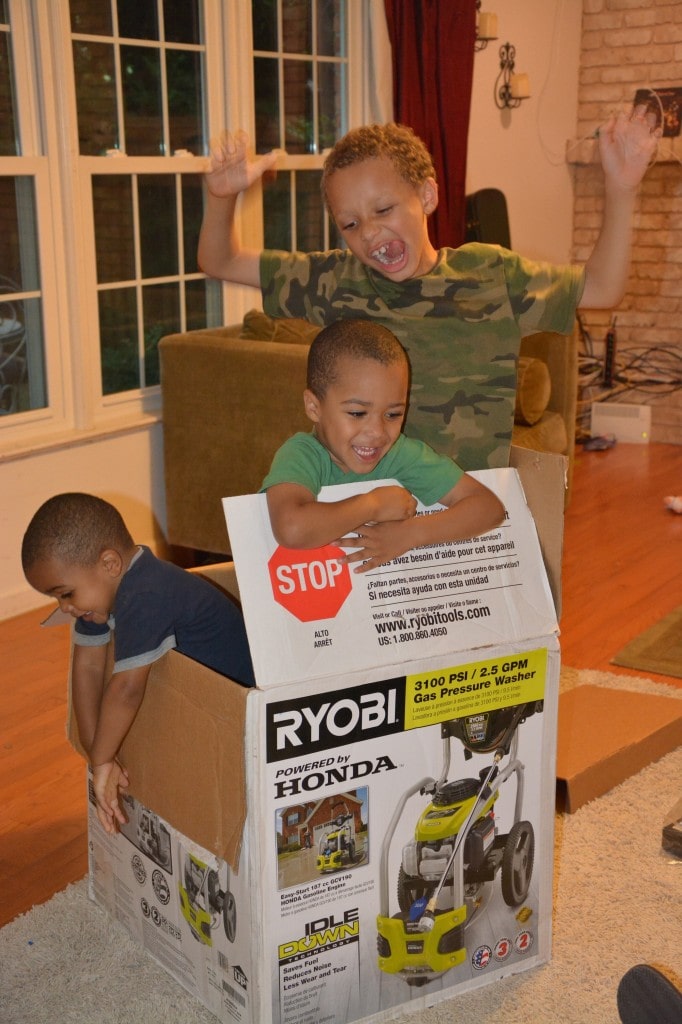
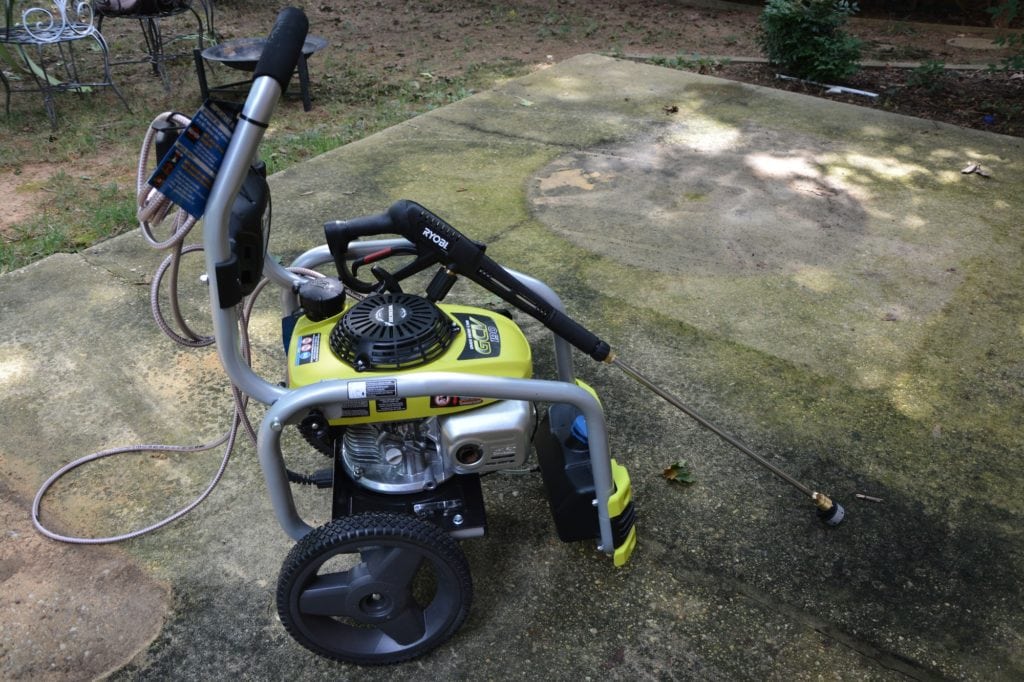
The power of pressure. Okay, make that “PW”: pressure washer! Seriously, I couldn’t wait to test drive the Ryobi Pressure Washer. When it came, of course the kids wanted the box. (My 7-year old is looking a little too much like Miley Cyrus in this picture with that tongue action! HA!)
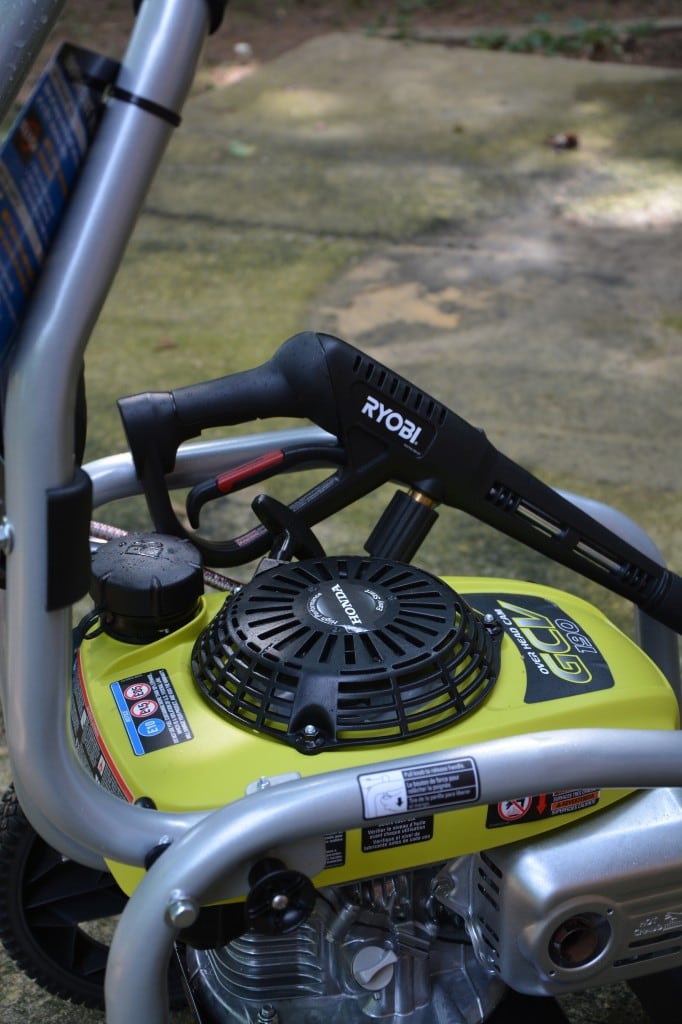
It runs on gas, and has 3100 PSI, which is more than enough to clean this patio without even needing soap (although I could have used it if I’d wanted to). Still, considering I had never used one, I was skeptical. I mean….do you see this gunk?! It’s black!!!

But I was totally ready: Ryobi and Serena vs. the Big Bad Nasty Patio!!
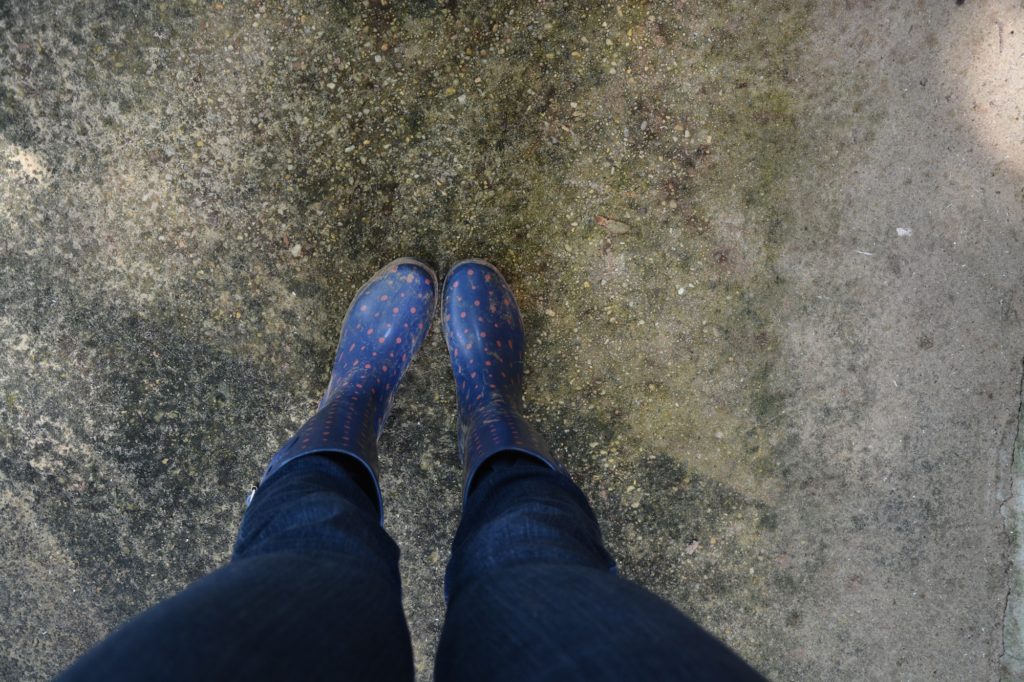
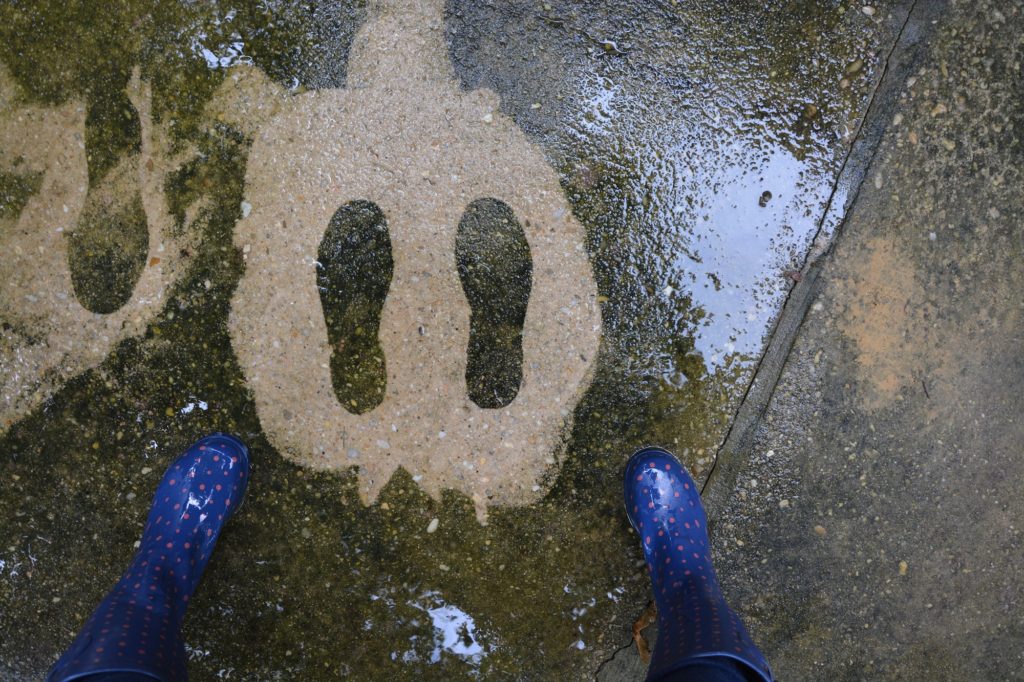
I even had cute rain boots 🙂 This was going to get messy. I could tell.
And it totally worked well!
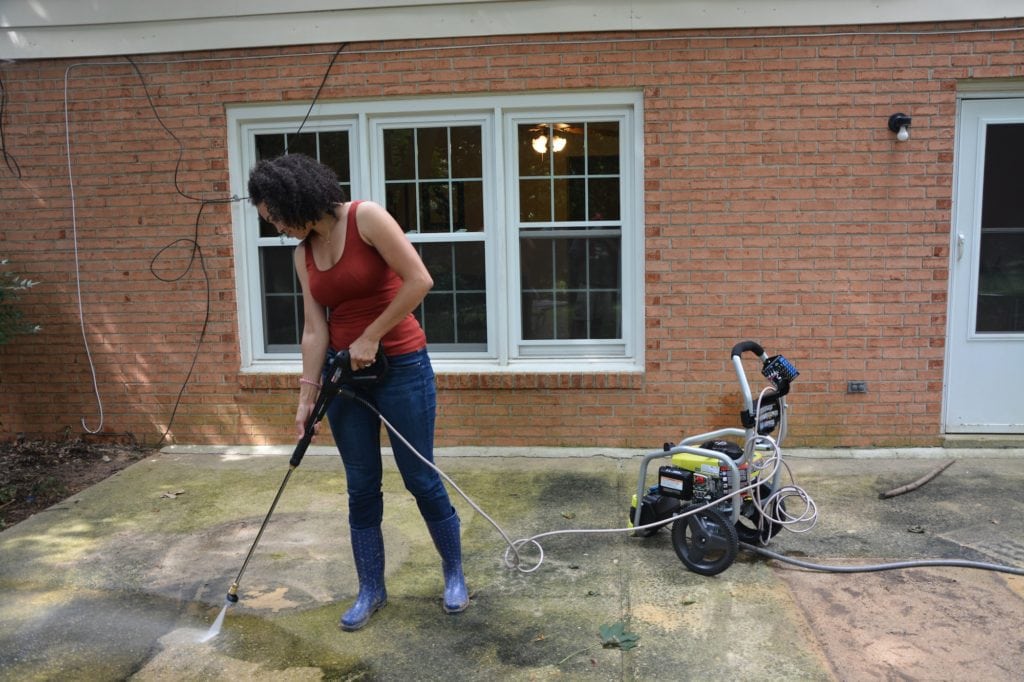
This gunk has nothing on me! This was WAR! (…and a lot of water. I hate to see what my water bill is gonna be!)

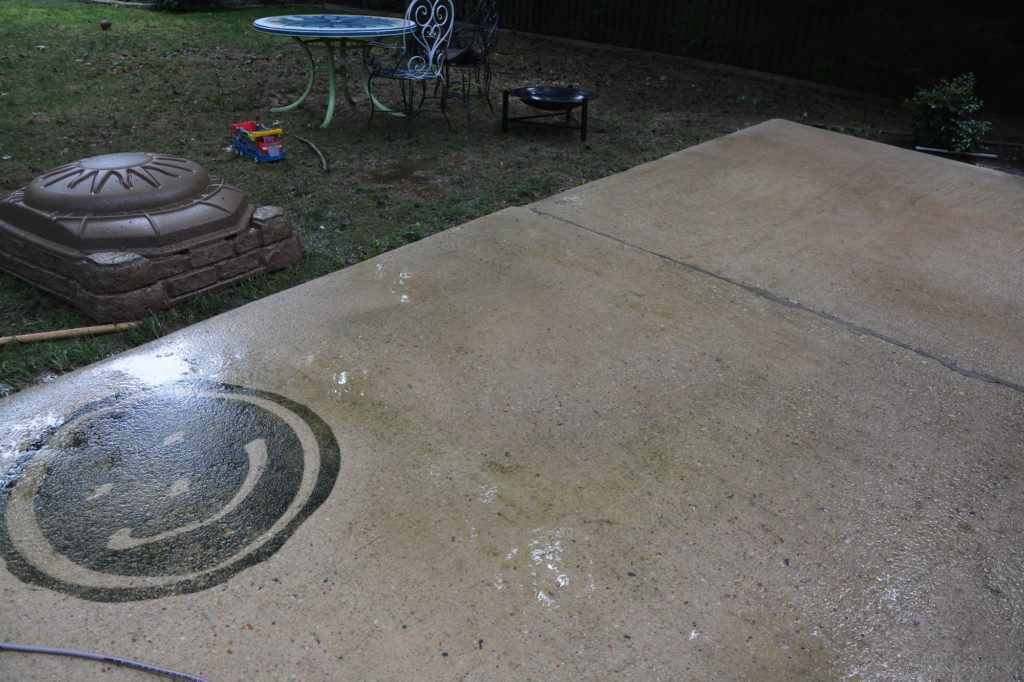
A little “Mildew Humor” kept the morning interesting, too….
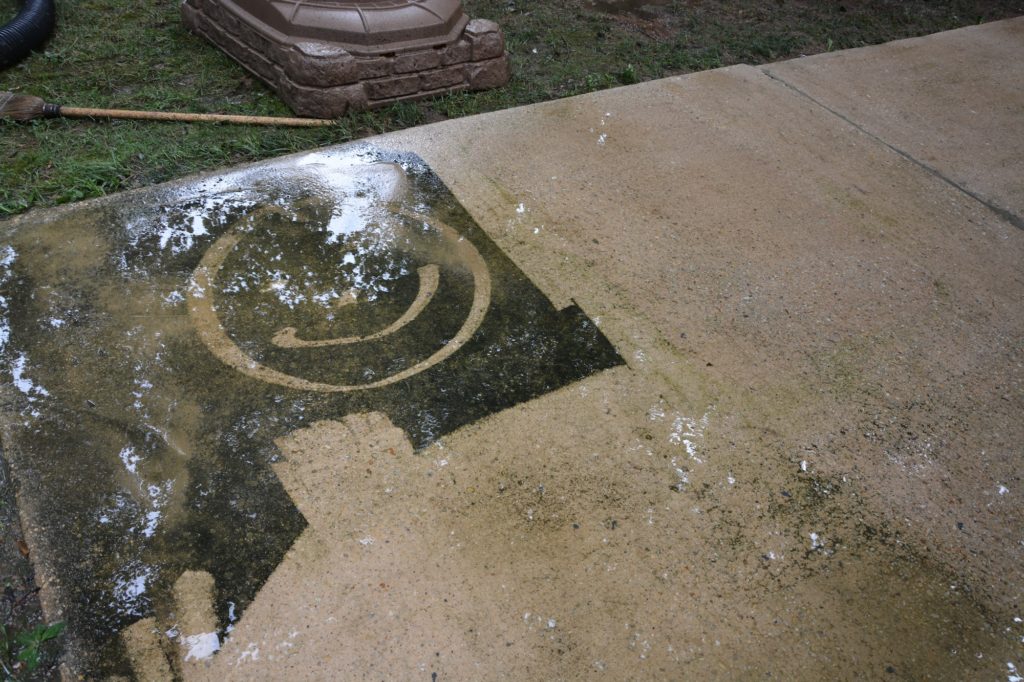
I even considered leaving the Gunk Face, but realized that it probably wouldn’t fit in with my decor. LOL
So who won??? Ryobi and I won! Isn’t it clean??
Excuse those wires hanging down. Can’t Verizon hide that better?? The black one is an old cable wire from our Comcast days, before we kissed them goodbye. I’m tempted to cut it…Hmmm….
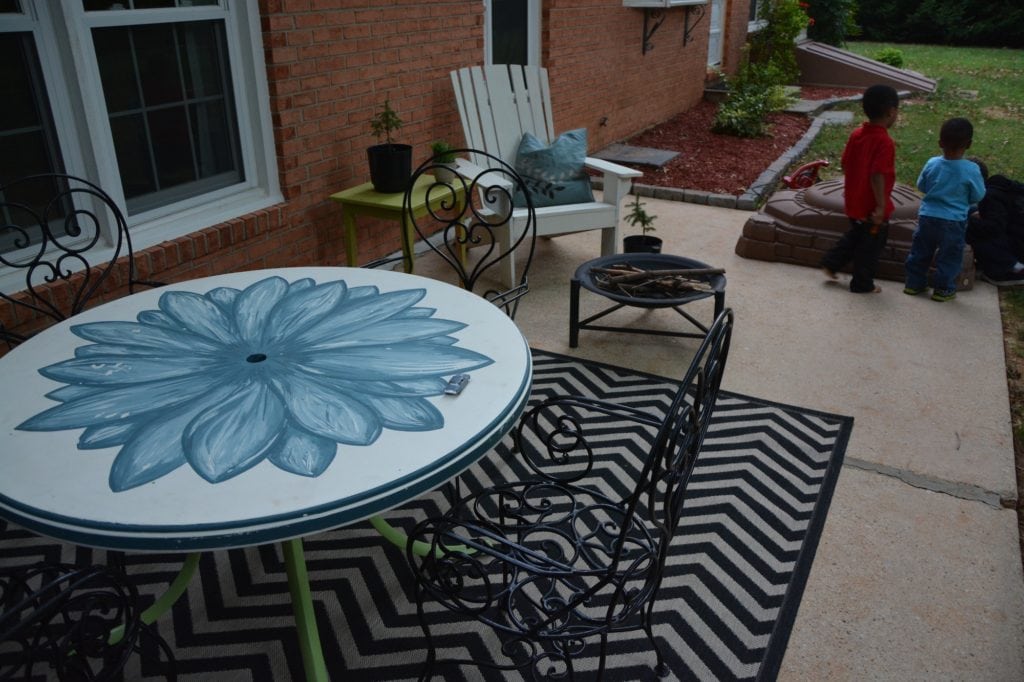
Tip #2: Get a Little Cozy
Nothing makes a space feel cozier than a rug. Plus, it just has this way of grounding whatever its underneath. It just looks more pulled together. Now….the truth is I hated that every DIY blogger and “they mama” were using chevron prints in every little thing. I have shied away from it. But when I was looked at the Ballard Designs website for an indoor/outdoor rug, this chevron outdoor rug caught my eye. It was on sale for $160 for a 5×7, and not only did I have a 10% off coupon for being a first-time customer, but I had a $100 gift card that I had won at the Haven Conference. With shipping and all, I paid a whopping $43 for it. BOOM! And I have to say, I actually love chevron. I can’t believe I am saying that. I feel like I’ve just hopped on a bandwagon or something. LOL
Tip #3: Raid the Thrift Store and Dumpsters
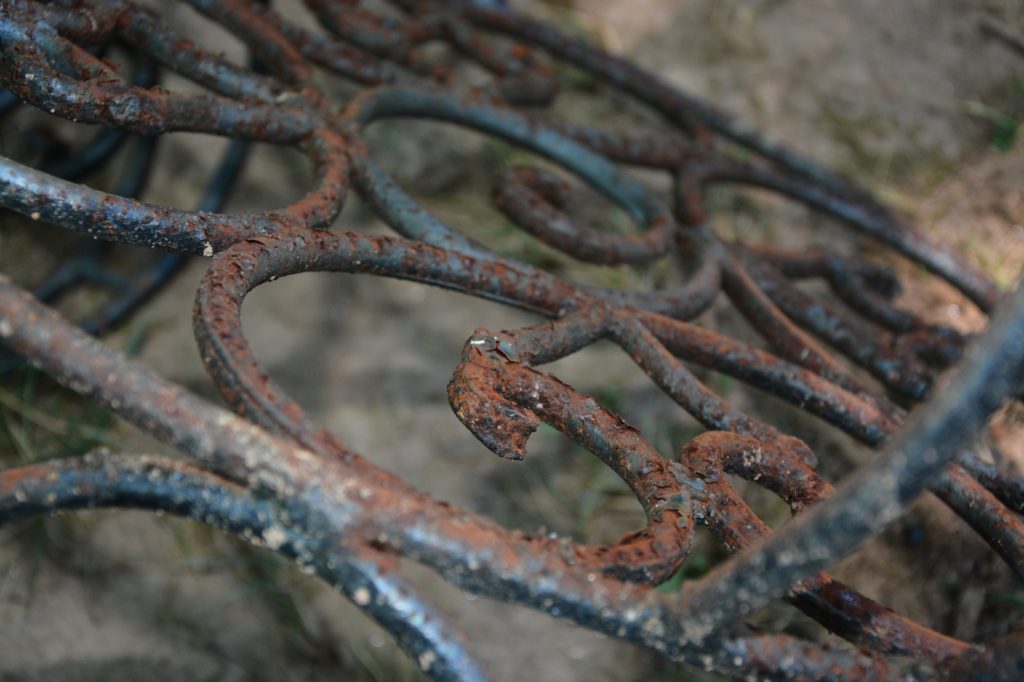
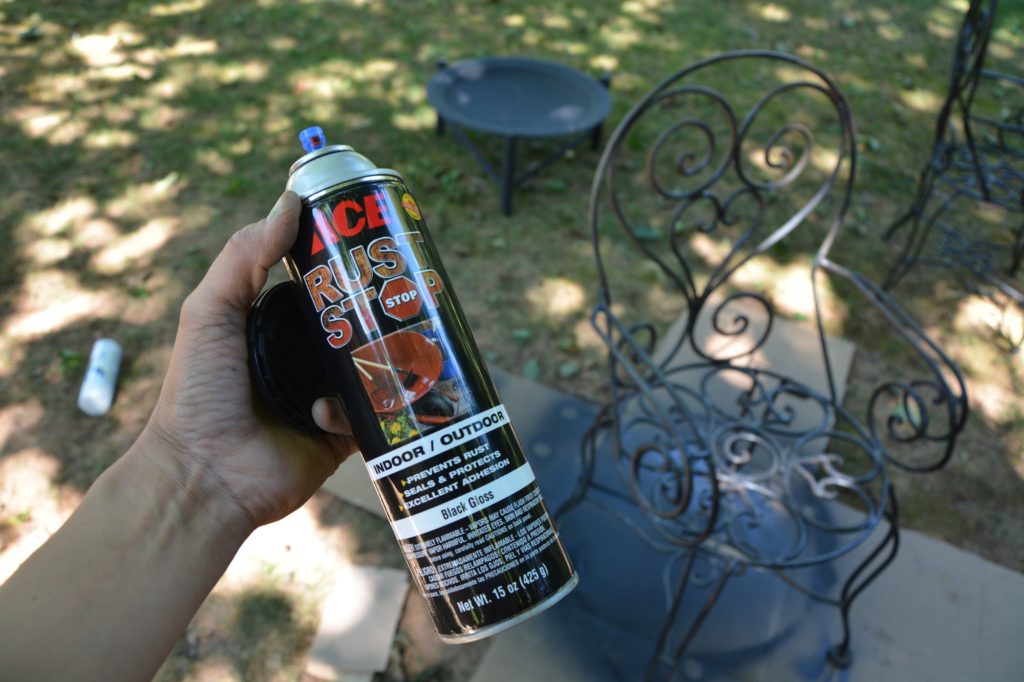
I get a little envious when I look at catalogs and every outdoor setting looks perfect and so well put together. Then you look at the prices and your eyeballs pop out. Say WHAT?! Who can afford those prices? That’s why I scavenged my patio table from the dumpster one day while leaving work and then painted a gigantic flower on top of it. The wrought iron chairs I had found last year at the thrift store for $15 each. Some parts of them were badly rusted so I tried to sand them down and spray them with something that looked like it would prevent more rust. I plan to paint the little cute heart shapes in the middle–maybe white? Or cream? I just haven’t had time to do it.
The idea here is to thrift as much stuff as you can, and then slather it with paint. Or better yet–use what you already have. You will save tons of money, and you’ll also get to create something a bit more unique than what you’ll find in a catalog.
BEFORE
Found next to a dumpster!

AFTER
BEFORE
AFTER (in progress)
I still need some round seat cushions, but I will probably have to make some myself. But now it’s a fresh black! Love it! And, again, I’m going to paint the inner heart to accentuate it.

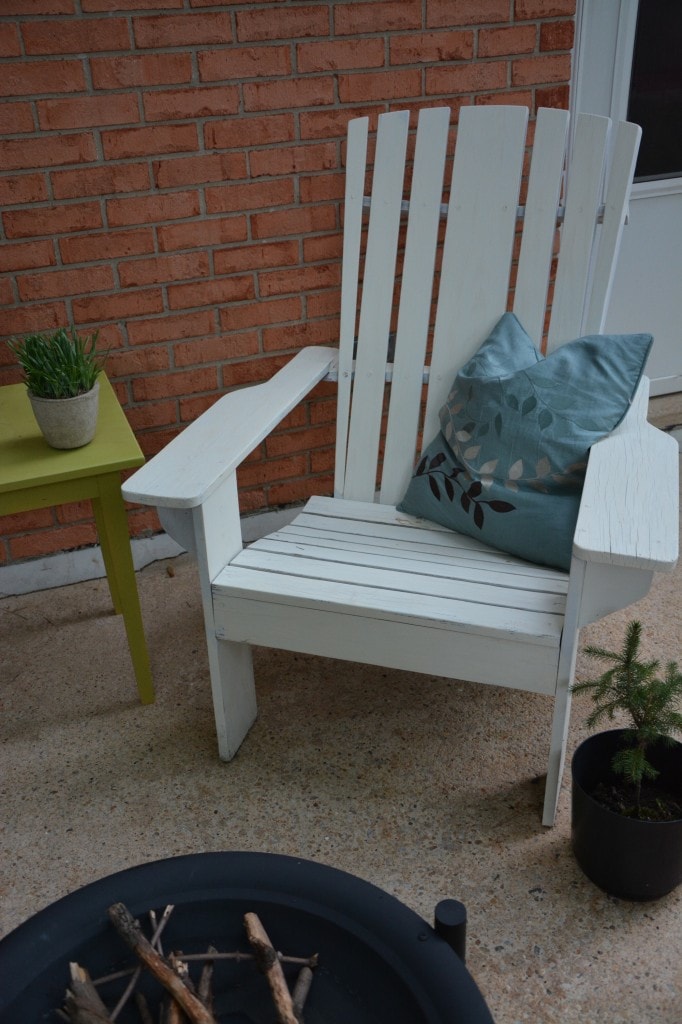
I also found this adirondack chair for $15 at the thrift store, and had originally spray painted it white. HORRIBLE. It chipped badly because I hadn’t protected it. I repainted it Annie Sloan Old White instead, which will be long-lasting in the outdoors. The little lime side table was $6 from the thrift store, too. 🙂
Tip #4: Stop trying to conquer the world.
Or, at least, stop trying to conquer your whole project! I do this allll the time. It’s easy to become overwhelmed by all the things you need to do for a project to really pull something together (hence the reason I avoided my patio–it was overwhelming!) But from my experience, when you start small, instead of trying to conquer the whole project, it’s easier to be productive and you find the momentum to keep going.
So that’s what I’m doing–starting small.
Right now I am focusing on the patio, mulch, and edgers. Once I’ve conquered that, I’ll focus on the grass, weeds, and more extensive pavers for a new walkway.
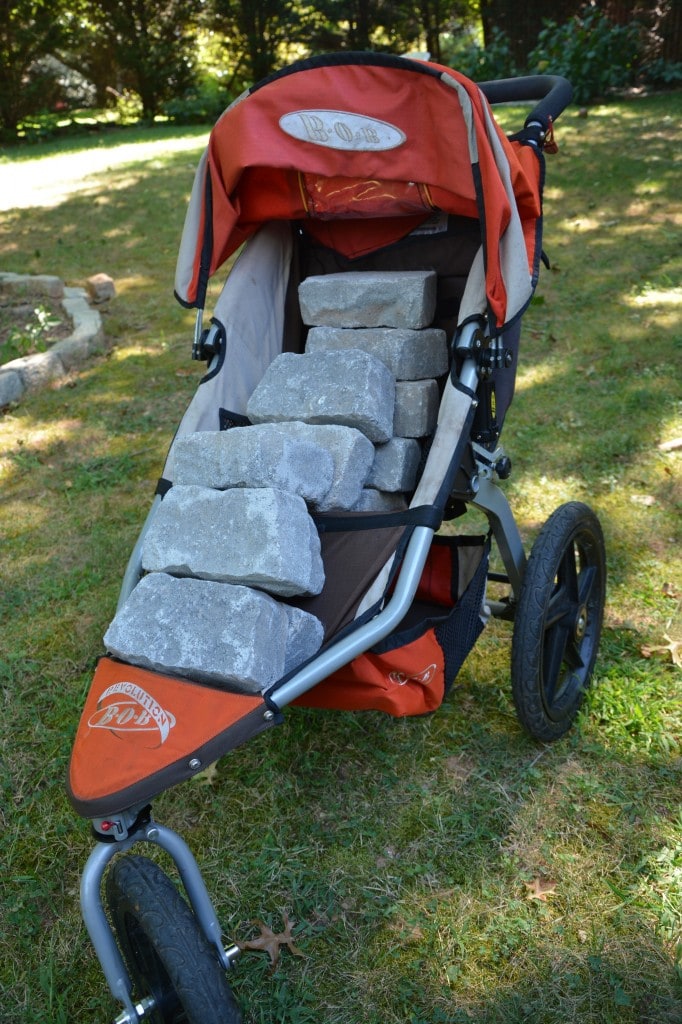
Here’s a nifty idea: If you’ve got a jogging stroller, use it as a makeshift wheel barrel. You might want to use a cover to keep the stroller clean. This saved me from lugging only 2 bricks at a time from my minivan to the backyard! (WARNING: You will look a tad bit “ghetto” if any of your neighbors see you pushing bricks down your drive way. Just sayin’. Don’t say I didn’t warn ya. HA!
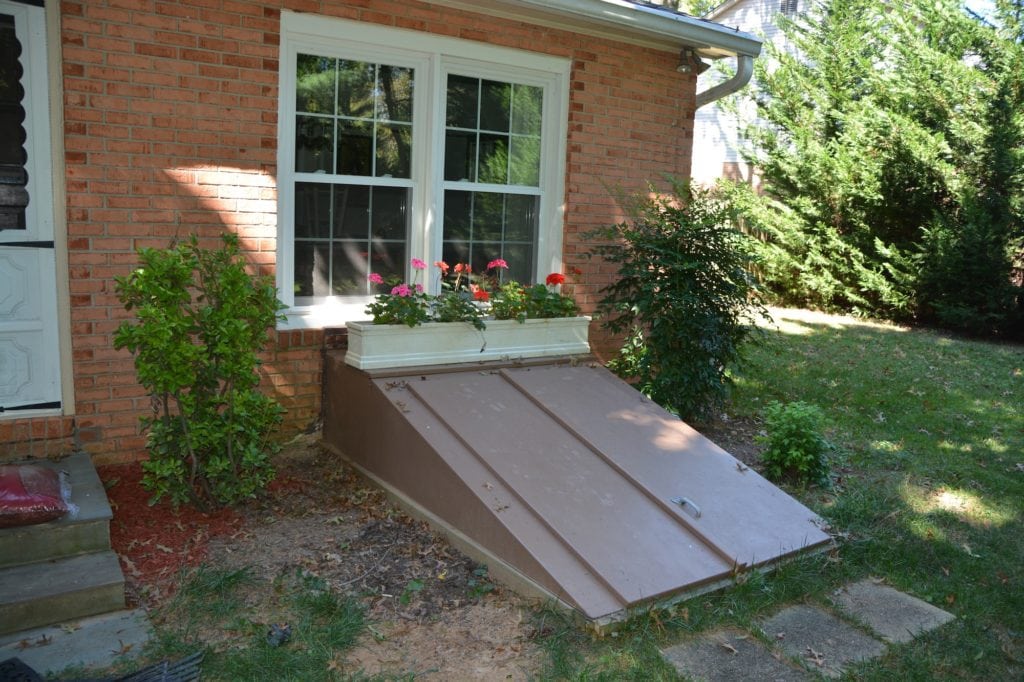
BEFORE
Don’t you love my Wizard of Oz bomb shelter? I know. Don’t be jealous…..Yeah, this is the door that cost us $2,200 to replace when we moved in!!!! UGH..I think we were ripped off…..But anyhow….This area needed some mulch and definition.

AFTER
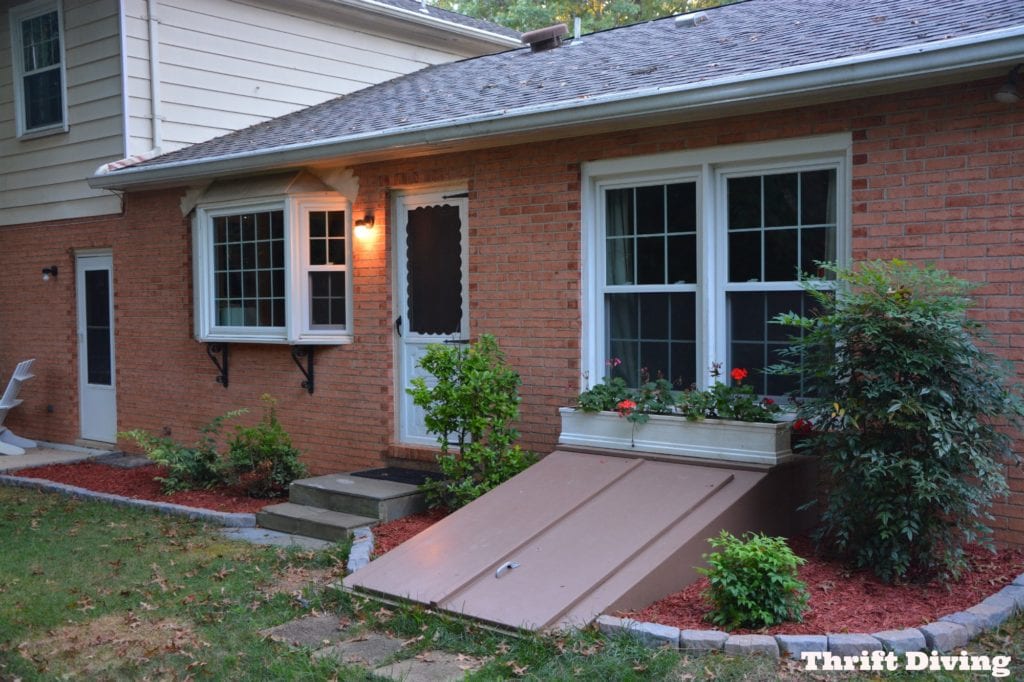
It’s amazing what some pretty red mulch (which I have heard holds its color longer) and some stone edging does to a house. Now if I can only take care of those brown spots that I always create by leaving stuff lying on my grass….. LOL
BEFORE
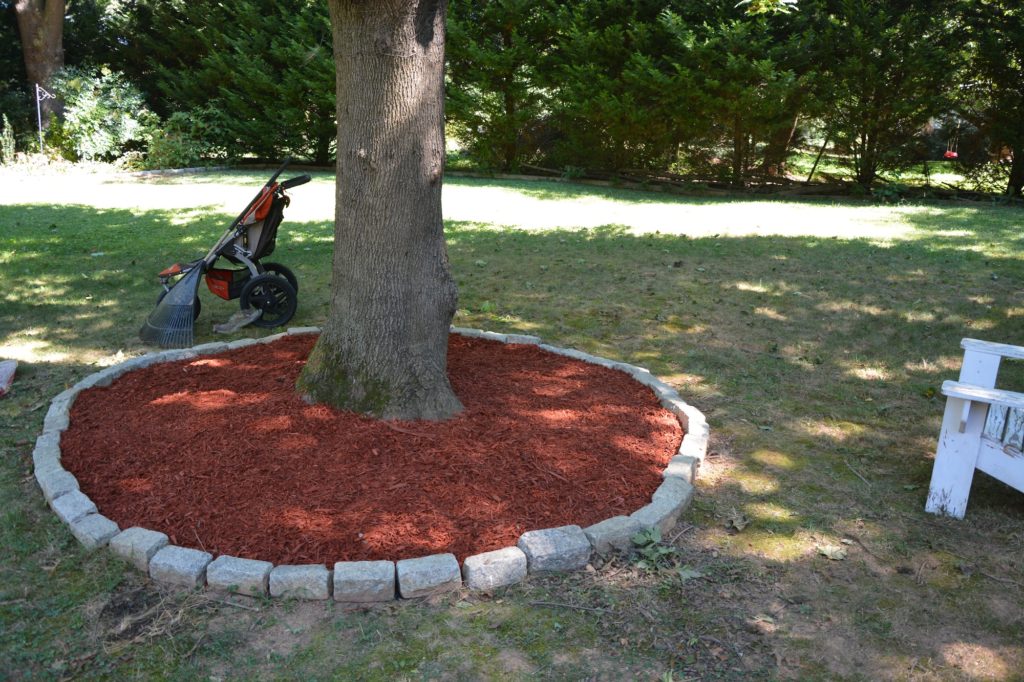
This sad, pathetic maple in our backyard was overcome with weeds and….where’d the mulch go??? Looking at it now, it looks like some sacrificial circle with those stones around it and no mulch. HAHAHA
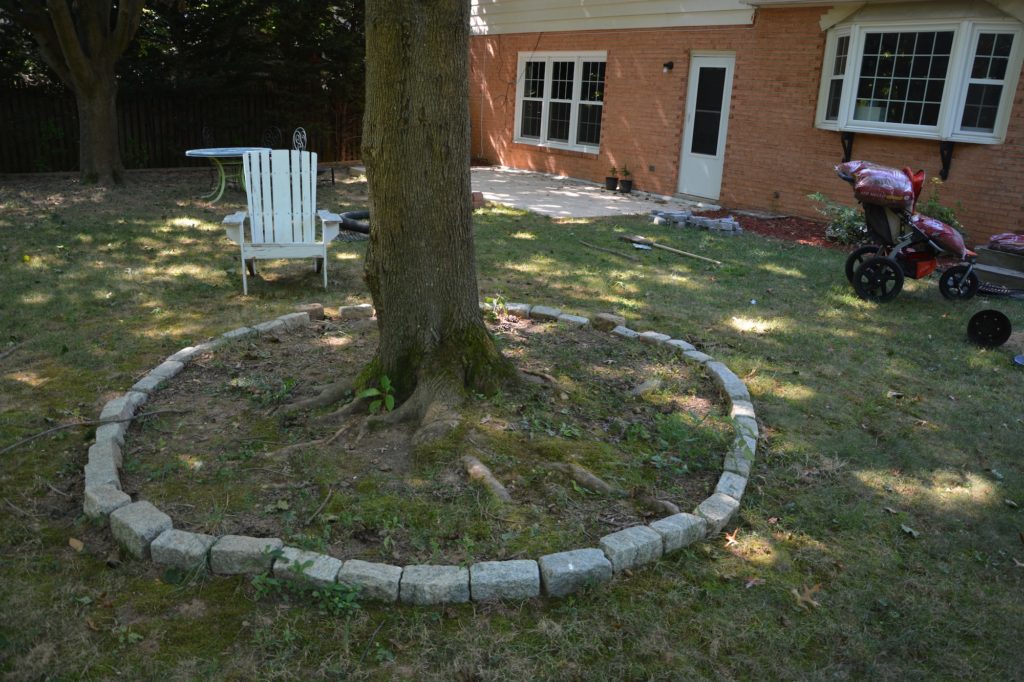
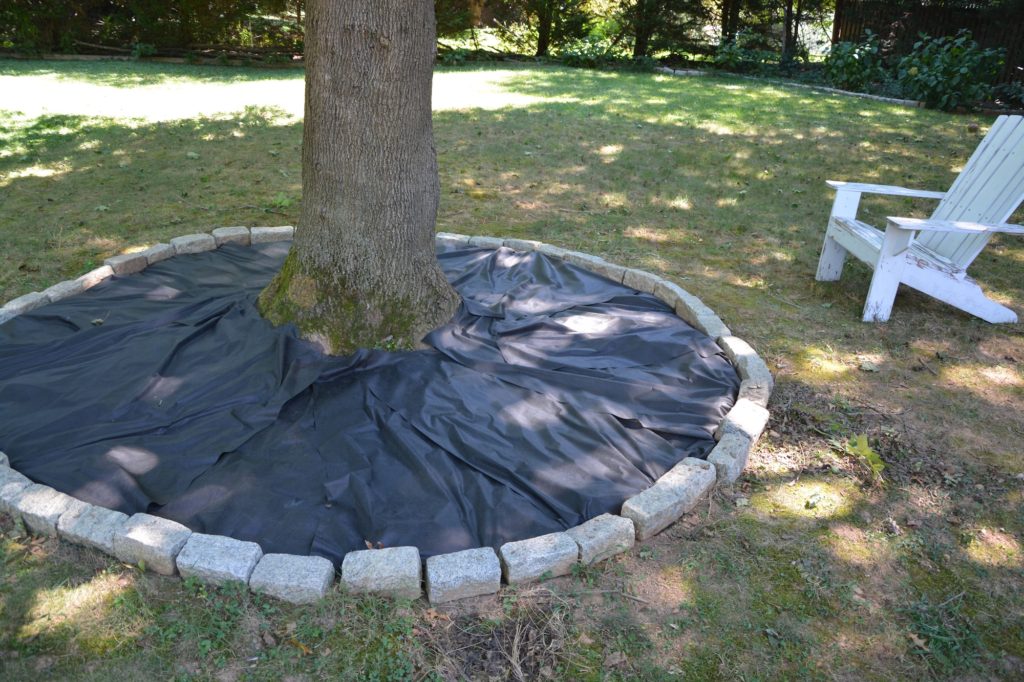
I laid down some landscaping canvas (duh–I should have used newspaper, which is free!)–to cover and kill the weeds.
Then I mulched. It took about 7 bags! Next time, I’m ordering a TRUCK full. It’s too expensive to buy individual bags. Since this is the first time mulching, I had no idea how many bags I would need.
Tip #5: Do the Math.
I spent over $200 on mulch and stones. I think I bought 19 bags and 60 stone edgers. I couldn’t believe I had spent that much money. I wish I would have budgeted it out, and planned ahead to know how much mulch I was going to need, and how much it would cost. I kept going back for 3 separate trips to Lowe’s, getting more mulch, because I kept running out, and my mulching has extended to other areas that I hadn’t considered. That’s extra gas that could have been saved if I had planned accordingly.
The Bottom Line
Some aspects of getting your outdoor area cleaned up and ready for a new season can be expensive, such as mulch and other decorative touches–or even the equipment to clean it (either buying or renting). But there are inexpensive things you can do to create an inviting outdoor area, such as a using indoor/outdoor rugs, stocking up on thrifted furniture, and planning which small chunk you’re going to focus on.

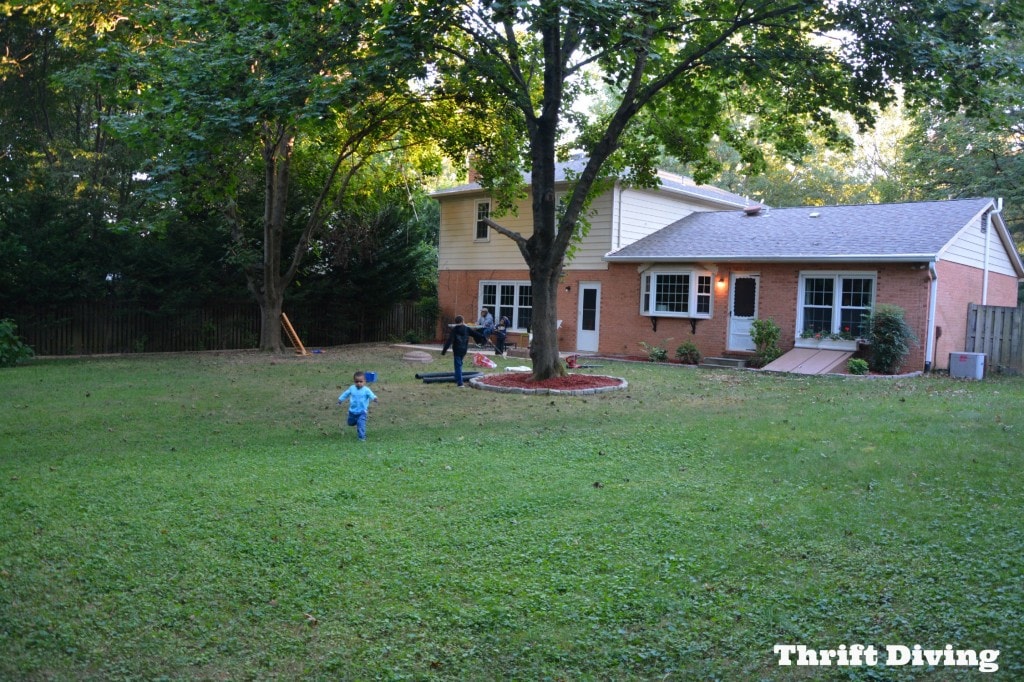
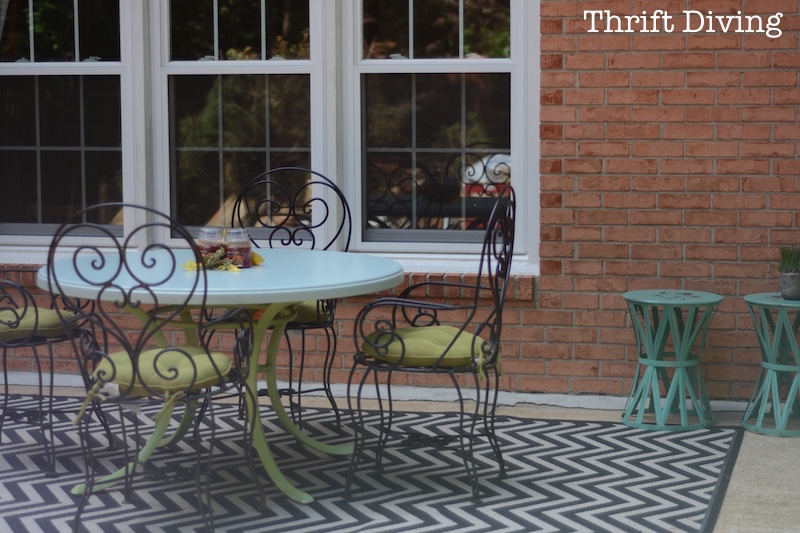
So now this is what we see when we look out the window from the family room:
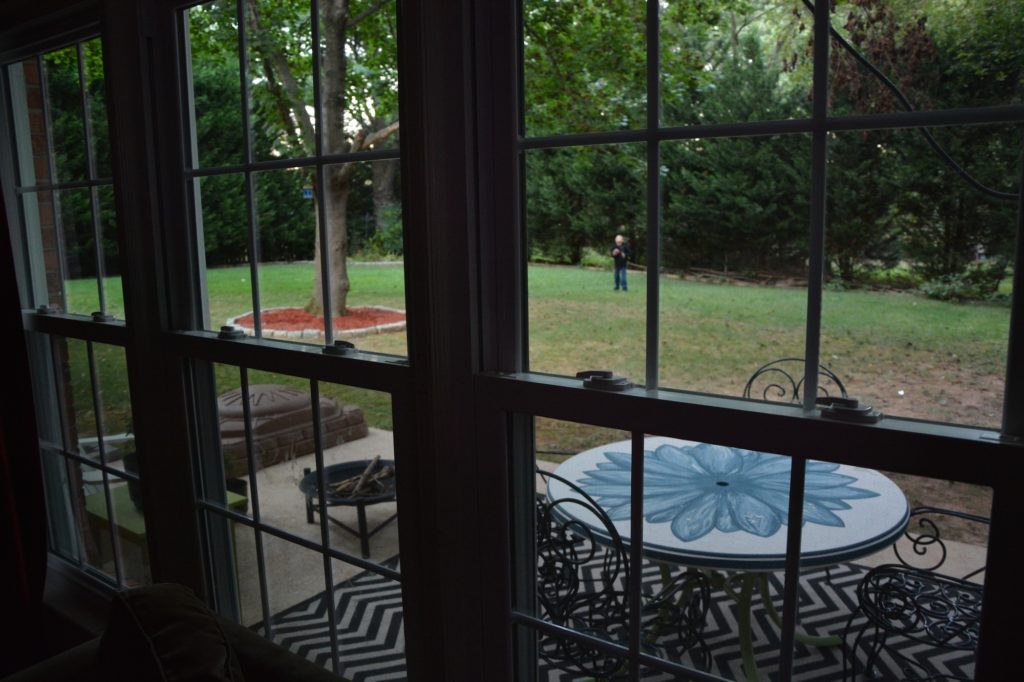
And my boys are able to go outside and play on a neat patio (so they can mess it up with sand and dirt–yep). LOL

Another look…
BEFORE
After
And my 8-year old can do his homework outside, while the two little ones play in the sandbox. All without the threat of MOLD and MILDEW at their fingertips!
Next Steps
I would love to hang some shutters on those windows…get a new exterior light….make cushions for the chairs…..to do, to do, to do….. One day soon 🙂
Your Turn!
How do you get your house ready for the colder months? Do you use your outdoor space? ? Leave a comment and let me know your thoughts!

Disclaimer: I have received a complimentary Ryobi Pressure Washer that I used in this post (BIG thanks to you, Ryobi!), but I have not been financially compensated. All opinions are my own, and will always be my own. Fo’ shizzle!
Download the 5 freebies!

Thrift Diving inspires women to decorate, improve, and maintain their home themselves...using paint, power tools, and thrift stores! Use these 5 printables, checklists, and ebooks to get started!

The power washer is AMAZING! My biggest outdoor enemy is weeds, specifically thistles. I live so close to a field, you would think that the herbicides would kill my weeds too lol
Nice job! I love what you did with the area. It looks great! Personally, though, I think you should have left the face… 😉
Oh Serena; I’m so envious. My front and back patio/porches look awful. Wish I could get a complimentary pressure washer. I’m to proud (or shy) to ask to borrow one. Thank you for posting this. I always enjoy your posts.
Oops, excuse my bad English. I meant “There are my foot prints!” Duh, Serena….
Wow, that looks fantastic, just like all of your projects! Your kids are so cute, too.
I like the smiley face and the boot prints. The first thing I thought was how weird it would feel to pressure wash around your feet in rubber boots, haha.
Thank you! Yeah, I kind of discovered how weird it was when I accidentally sprayed too close to my feet and was like, “whoa! There’s my foot prints!” I’m sure Ryobi would NOT advise to do that! It could probably damage toes if too close! So, I wouldn’t try that at home 🙂 LOL
WOW! You are an inspiration! My wrought iron railings (outside and in need some work) Did you scrape the rust off with anything prior to spray painting? Great job!
I sanded them down with rough sand paper as best as I could. Then I just spray painted. I hope it stops the rust!! Crossing my fingers. Lol. Thank you for your comment!
The weather is finally starting to cool off so we will be ripping off our front porch and starting over. I CAN”T wait to start it. Currently there is dry rot everywhere.
That sucks! Is it a large porch? Will you be getting down and dirty with tools? Cool!
Yep and we will be doing the whole project ourselves (well my husband and stepsons will, but I will probably make them cookies to cheer them on:). We started on it back in the spring but now it’s time to attack the actual porch.
http://thedomesticlady.com/2013/05/27/home-improvement-our-little-front-porch-makeover/
Amazing difference! It looks great girl. I bet your family really enjoys spending time out there now.
Thank you! We are definitely loving it!
This is an excellent upgrade! I’ve just moved from a flat into a 3 BR house with a garden so that area is next on my to-do list 🙂 You have so many great ideas here for pretty-fying up the space!
Glad I could help! I will surely be doing more things to my outdoors area, so I will keep you posted! Congrats on your move!
Wow! What an amazing transformation!! I know your family is enjoying your refurbished patio now that you’ve made it so pretty.
I also can’t resist peeping into a dumpster (inherited it from my dad) to see what treasures may be there. You were so lucky to find that great table! The flower you painted on it makes it so pretty.
This teacher gives you an A+ for this project!
Hey, Paula! So great to hear from you! So you love trash, too, huh? 🙂 And yes, the kids love it out there so much they don’t want to come in! I love it!