Recessed Lights and How to Retrofit with Clips for LED Downlights
There are only two reasons I can think of why you would ever need to retrofit recessed lights with clips for LED downlights:
- Your recessed lights are old and outdated and they don’t have c-clips attached to the inside of the housing, or:
- You totally installed the wrong recessed light housings in your “new construction” and the stupid housings don’t even have c-clips for the type of LED lights you wanted to use.
Save this tutorial on Pinterest.


You can add me to the #2 bucket of folks retrofitting their recessed lights due to stupid DIY mistakes [insert palm-slap to the forehead here].
You see…..My “she shed” was built 7 months ago, and the plan has always been to finish off as much of the interior as possible myself. This includes running my own interior electrical wiring, with the help of my awesome electrician instructor with whom I took a couple electrical wiring classes.
This included installing recessed lights and wiring them myself.
While I had asked him all the questions I thought necessary to ask him, including, “Hey, which recessed lights should I buy?” the one question I didn’t ask him (because I didn’t know) is, “Can you recommend a good recessed light housing that has c-clips in them already?”
I didn’t ask that because I didn’t know what a “c-clip” was. Nor did I know what a “downlight” was (it’s basically the same as a recessed light). Or that the LED downlights that I ordered have torsion springs that require the c-clip brackets to hold them in place.

Once I realized my error, I had to spend extra dinero on the housing c-clip brackets, along with a few tools in order to drill into the metal housing.
In this post, I’ll show you how to retrofit your recessed lights with clips for LED downlights if you’re trying to retrofit your recessed lights, too. But if you’ve got new construction in your shed (or other structure), just be sure to install recessed light cans that already have the clips installed in them.
Here’s how you change your recessed lights so that you can add clips and use those awesome LED downlights!
Watch the Video Tutorial!
If you’re a visual person, no worries, I got ya covered. Just watch the tutorial on my YouTube channel on how to upgrade your recessed lights with LEDs.
How to Retrofit Recessed Lights with Clips for LED Downlights
Here are the tools and materials you’ll need for this project. The total cost will depend on how many lights you’re retrofitting and if you have some of the items already in your toolbox. I spent about $60 – $70 total.
Tools & Materials Needed to Retrofit Your Recessed Lights
- Torsion Spring Bracket Clips (also known as c-clips). Order two per recessed light.
- Sheet metal screws – These should come with the c-clips, but if not, the size will be approximate a size 6 screw (although these sheet metal screws
- LED lights (Philips Color and Turnable White 5/6 inch LED Dimmable Smart Wi-Fi Downlights)
- Center punch
- Right-angle drill adaptor
- Power drill
- Socket adaptor
- Socket – sized to fit the sheet metal screws and adaptor.
- Sandpaper
- Tape measure
- Sharpie
- Safety glasses
- Dust mask

STEP 1: Measure and Mark the Recessed Lights Housing
The c-clips I had ordered require you to measure up 1-7/16″ from the bottom of the housing. You can measure and mark wherever you want, but make sure that you create an identical measurement directly opposite on the other side. You want the two marks and measurements to be across from each other so your downlights fit properly.


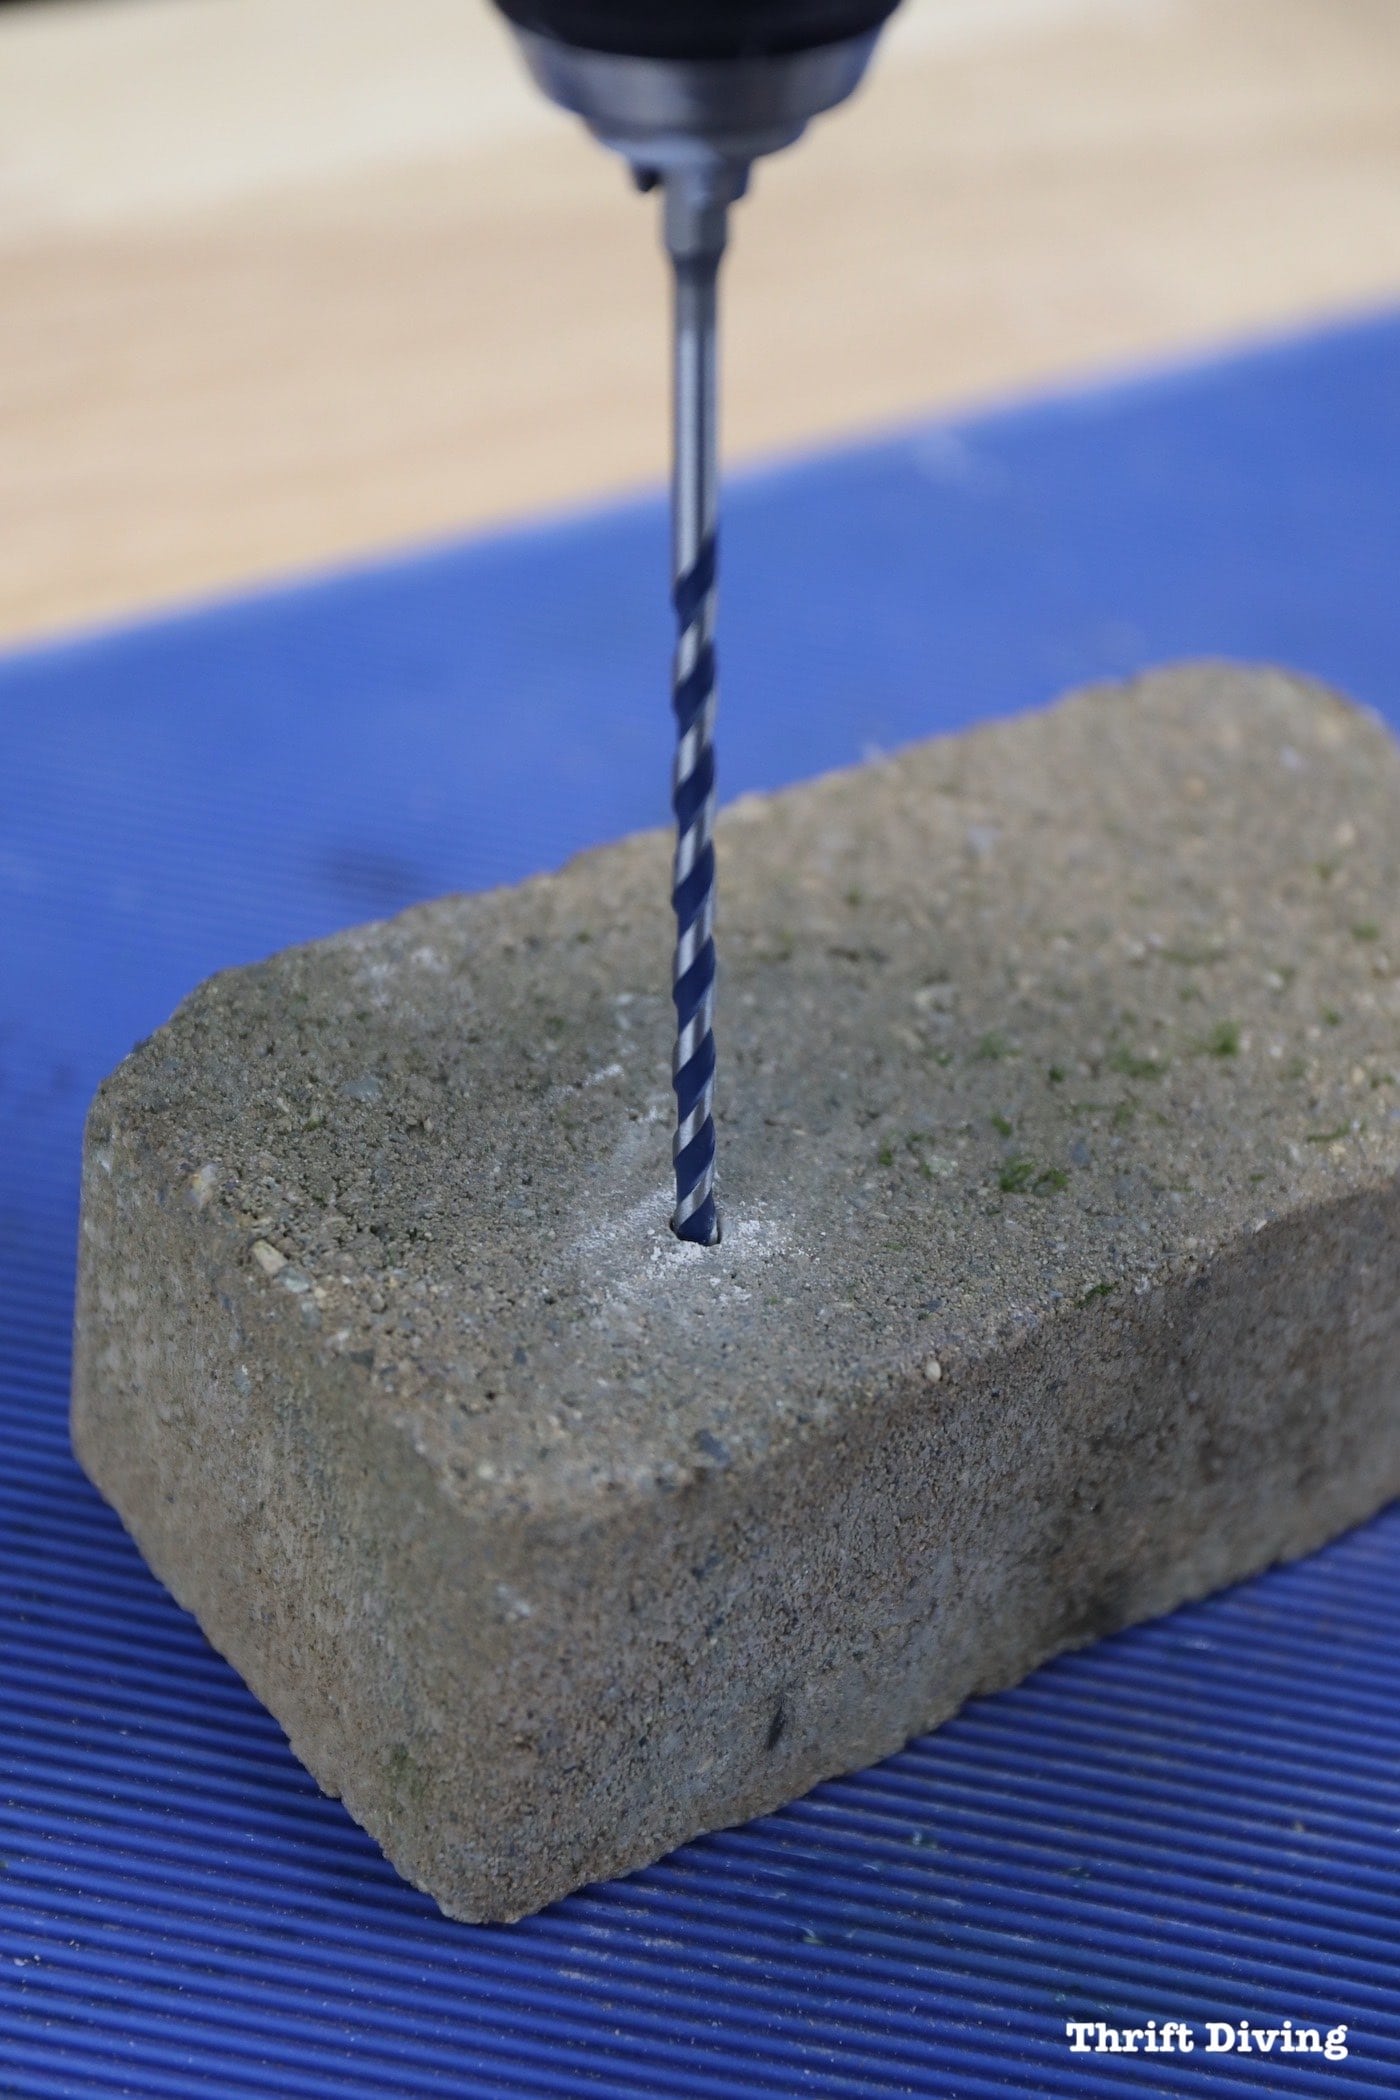
STEP 2: Use the Center Punch to Mark the Dot
This center punch will be your best friend when trying to retrofit c-clips into your metal recessed housings! It’s literally impossible to attach the clips without using a center punch. Believe me–I tried. Your sheet metal screws will “travel” without having a divot to keep it in place.
The center punch is spring-loaded. It can be adjusted based on the metal you’re punching, based on whether the metal is “Heavy” or “Light” metal. For recessed housings, twist it towards “Heavy.”

The black dot on the housing is where the screw will be placed. You’ll need two hands to use the center punch. Grab it in your fist and push. It will spring-load and then punch the metal.

Don’t expect the center punch to go all the way through. It won’t. It will literally just punch the metal, leaving a divot. But that’s all you need to help hold your sheet metal screw in place so it doesn’t “walk” when trying to screw the clip in place. I found that 3-4 punches were perfect.

STEP 3: Use a Right-Angle Drill Attachment to Screw in C-Clip Bracket
A recessed housing is pretty small. You won’t be able to get a full-sized drill up in there to attach brackets. You have to use a right-angle drill attachment with your power drill. Plus, a right-angle attachment is great to have in your toolbox because I guarantee you’ll have other tight spaces you’ll need to drive screws or drill holes in!

The c-clip brackets I ordered came with sheet metal screws that would need a socket wrench. Thankfully, I had a socket adapter to use with the right-angle adapter, and I had some sockets on hand already. The size of the socket was matched to the machine screws.


STEP 4: Repeat the Process for the Other C-Clip
The other clip will be installed within the recessed lights housing the same way. Again, just be sure it’s directly across from the other clip so the LED downlight will evenly fit.

STEP 5: Gently Sand the Rough Edges of the Drywall
Once the clips are installed, if necessary, sand the rough edges of the drywall where drywall mud may have gotten clumped around the edge. You don’t want any clumps to prevent the LED downlight from sitting flush to the ceiling.

STEP 6: Screw in the LED Downlights
The LED downlights simply screw into the recessed lights housing. Don’t over-screw too tight.

Once screwed into place, the LED downlight is ready to be set into place.

STEP 7: Insert the Torsion Springs of the LED Downlight Into the Clips
Grab the torsion springs on each side of the LED light, and guide the springs into the clips. Once the springs are secured by the c-clips, simply push the LED downlight into place. It should sit flush!

Let’s take a look at how my 16′ x 26′ “she shed” looked right after I got the electrical run and the lights installed. I had to install regular light bulbs until the drywall was installed.
BEFORE

Aaaaannnddd….voila! I’m super stoked how these LED downlights turned out in my vaulted ceiling! These particular LEDs are supposed to connect to the Wiz app so that they can be controlled by an app (and even work with Alexa, Google, etc.). But in my shed, I don’t have a strong signal coming from the house (yet). So I haven’t been successful yet in getting them to sync up with the Wiz app.
I’ll have Wi-Fi in there soon! When we did the electrical, I made sure that John, my electrician, included conduit with a string so that Verizon or Xfinity can simply pull through an ethernet cable to the shed so that I have a strong signal out there.
AFTER! (Still in Progress!)

There is still so much to do to get the interior of my “she shed” completed! It will be used as office space and a workshop for all my power tools and furniture makeovers. I can’t wait! Here are some of the other projects I have been doing in the shed. Follow along on my YouTube channel!
Planting Garden Beds in Front of My “She Shed”!
I finally was able to pretty up the exterior of my shed! Watch the garden transformation HERE on my YouTube channel.

Be sure to watch the entire “she shed” series HERE!
Download the 5 freebies!

Thrift Diving inspires women to decorate, improve, and maintain their home themselves...using paint, power tools, and thrift stores! Use these 5 printables, checklists, and ebooks to get started!