How to Insulate a Shed: From Start to Finish
If you’re wondering how to insulate a shed, I’ve got you covered! I bought a 16′ x 26′ prefabricated she (which will become my “she shed” workshop) and decided to do as much of the interior work myself, including running the electrical (under the advice of a master electrician who helped me), along with the insulating the ceiling and walls. (I didn’t insulate the shed floor because that’s something that would have had to be done when the pre-fabricated shed was being built).
I’ve learned some things along the way that will be helpful if you’re wondering how to insulate a shed. Let’s jump into it right now! (And if you’d like to keep reading about buying your own shed, read this helpful post on 10 Questions You MUST Ask Before Building a Shed).
Click here to save this project on Pinterest.

Watch This Project in Action!
Of course I recorded the entire project on YouTube, so you can go watch it on my channel or simply click below to watch it.
Materials Needed to Insulate a Shed
Below you will find the materials I used to insulate my shed. (Some of these links may be affiliate links).
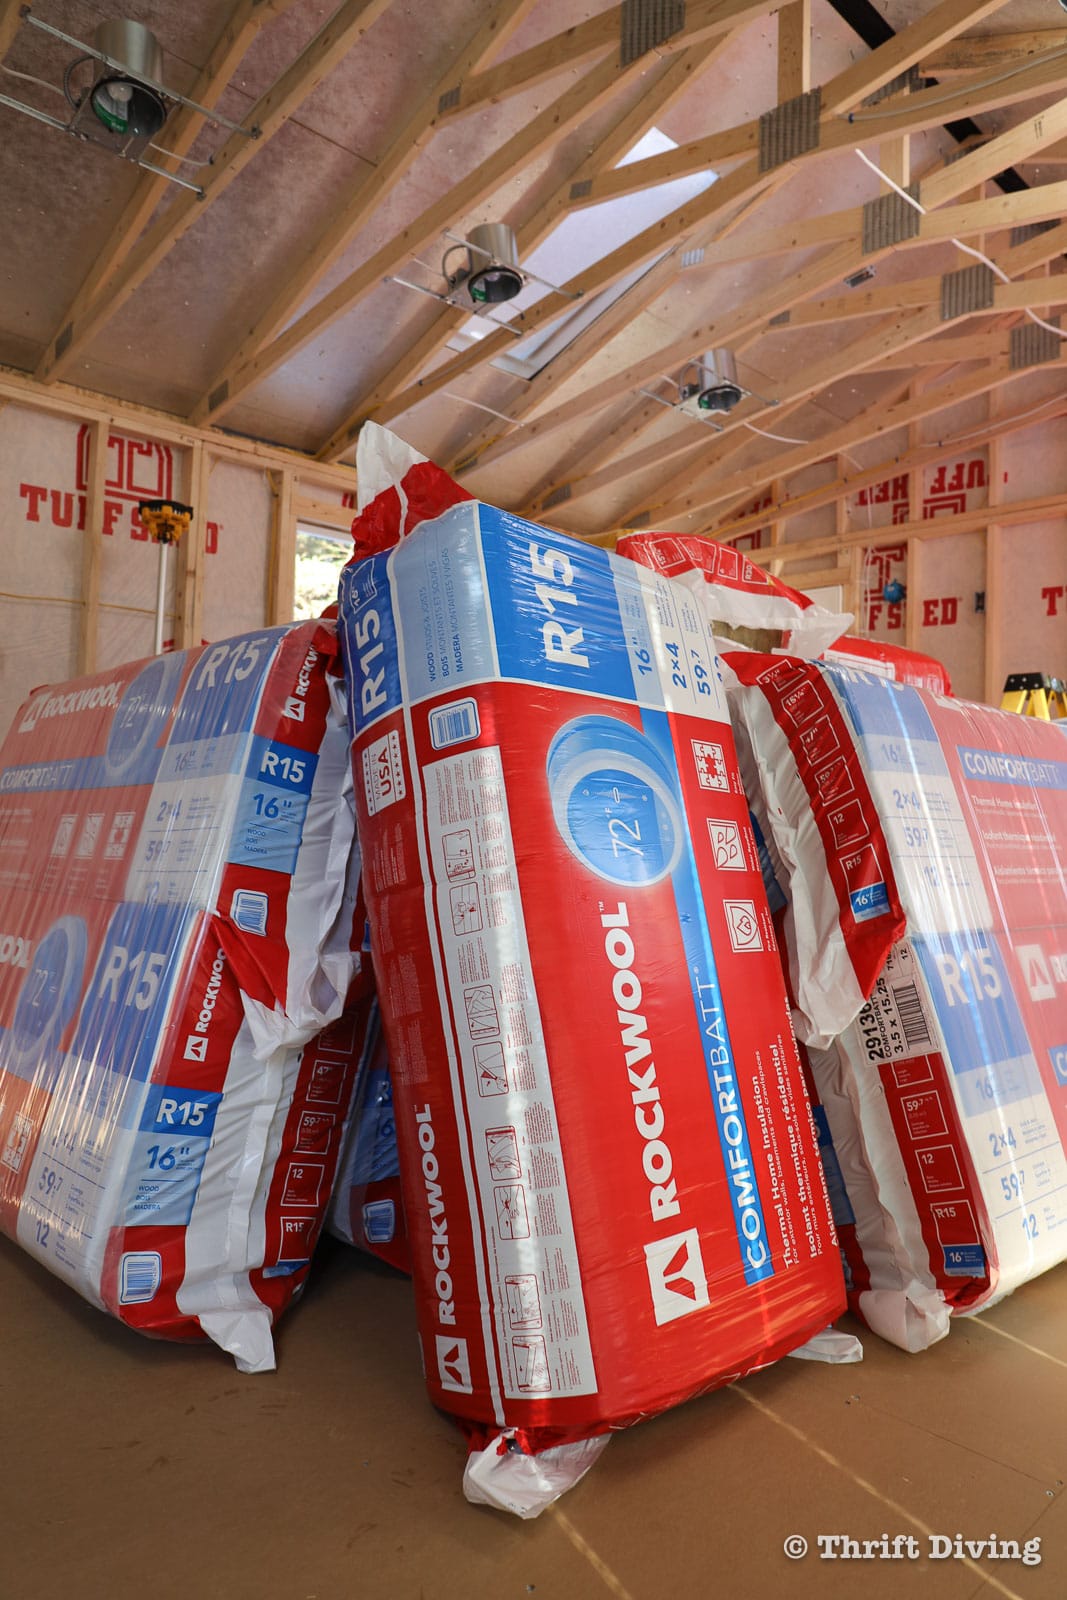
- Rockwool insulation (or your preferred insulation).
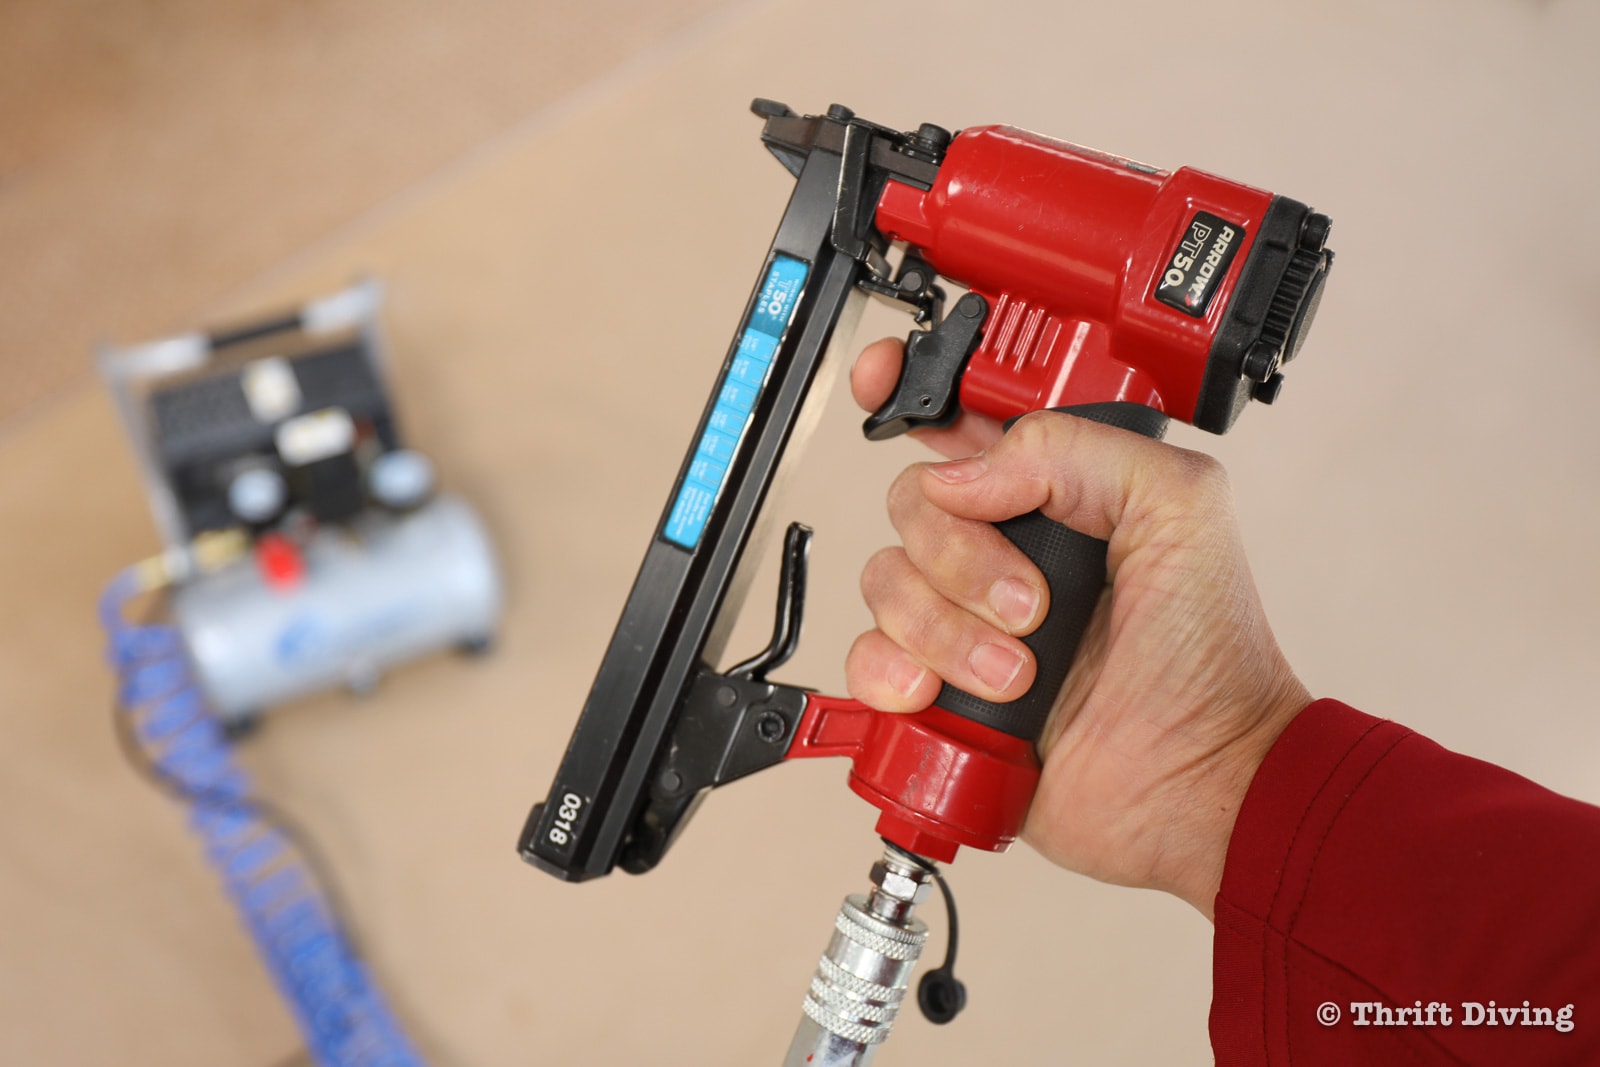
- Arrow Fastener T50 heavy duty stapler
- Arrow Fastener PT50 pneumatic stapler
- Air compressor (required if you use the pneumatic stapler. I like this model)
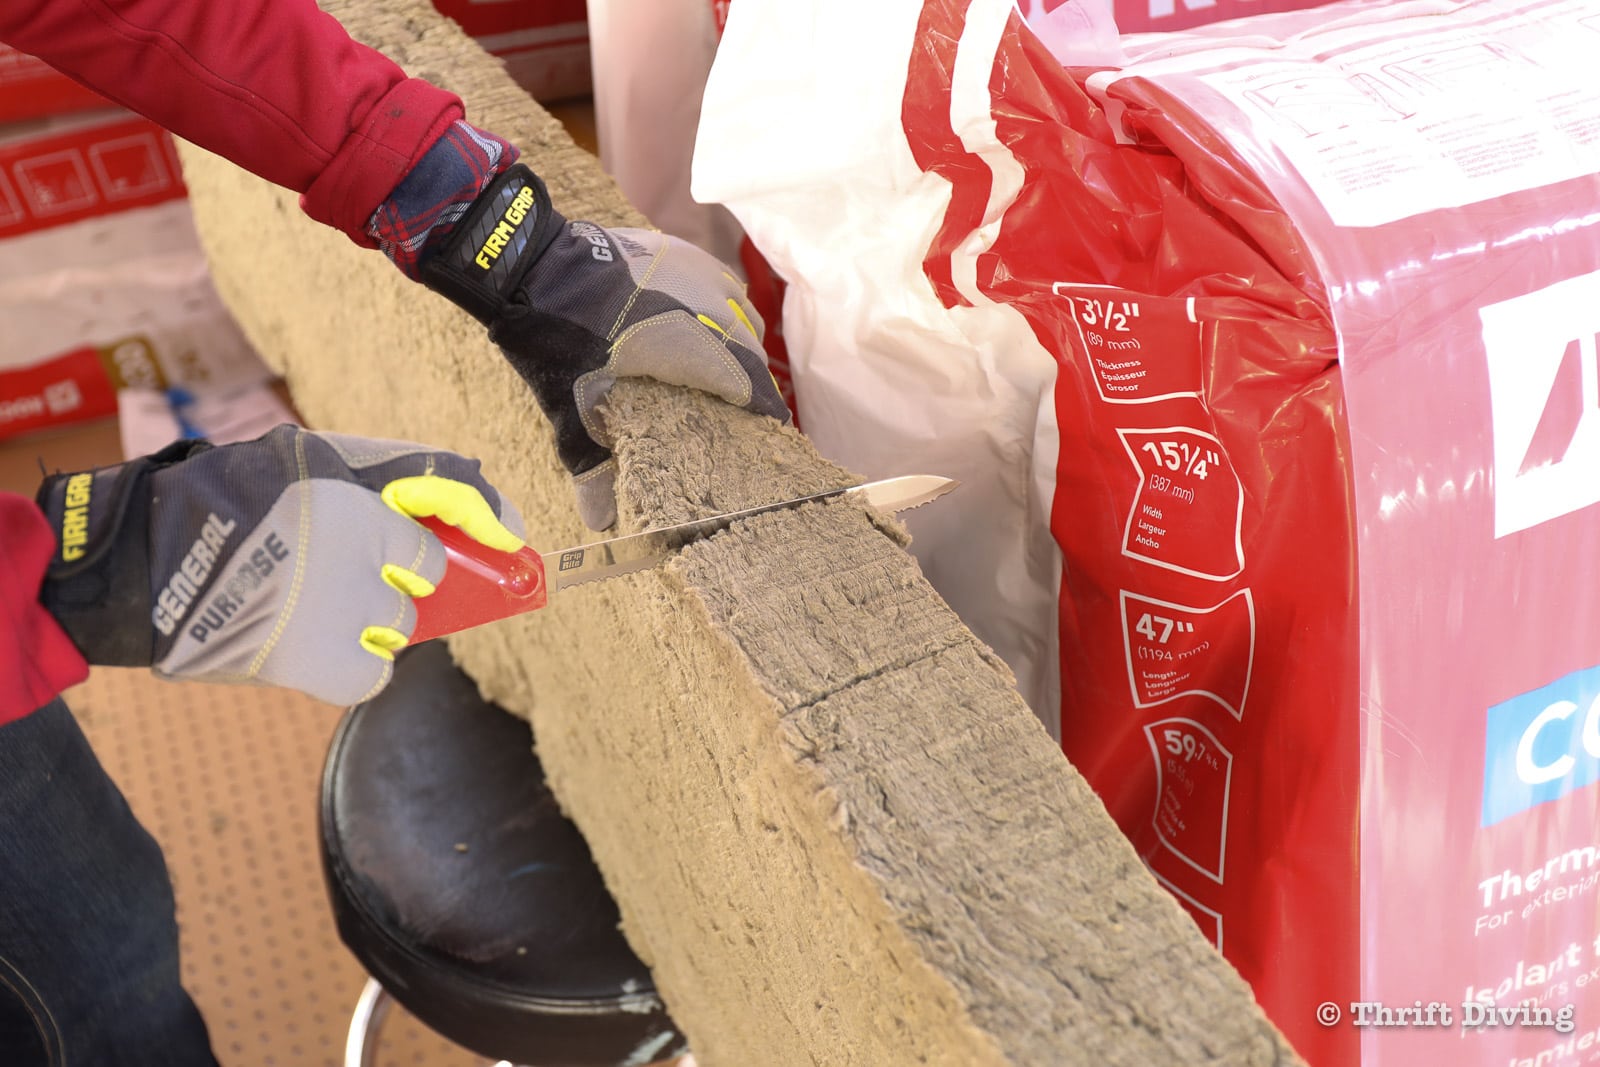
- Insulation knife (or bread knife)
- 6-mil plastic vapor barrier
- Tuck Tape (red or blue, but the blue Tuck Tape is formulated especially for vapor barriers and is thicker and stickier. You can’t buy Tuck Tape at any big box stores; only Amazon)
- Soffit vents or gable vents (use vents with insect screens built into them or vents constructed that don’t need screens)
- Baffles (also known a rafter vents; optional)
- Dust mask
- Safety glasses
- Tape measure
- Ladder or platform
- Spray foam
- Hole saw attachment for power drill (optional if adding soffit vents)
- Baby powder (to reduce itchiness from insulation particles!)
What Type of Insulation Should You Use to Insulate a Shed?
Walk through the aisles of a big box store and you’ll see several brands, sizes, and R-values of insulation to buy to insulate your shed. But which one should you buy?
For me, the choice was obvious. I wanted an insulation that was fire-proof, waterproof, soundproof, and wasn’t as itchy as the pink fiberglass insulation. And for all those reasons, I chose Rockwool insulation.
But regardless of the brand you choose, you’ll also need to choose the R-value for your shed based on its framing. My shed has 2×4 framing, which is 3.5″ deep, so an R-13 or R-15 fits perfectly at 3.5″ thickness. (The R-value is basically how well the insulation is able to resist heat; the bigger the number, the better job it does of resisting the transference of heat. But the size of your shed studs will also determine what R-value you can use).
Keep in mind, though: Rockwool doesn’t have a vapor barrier attached, so you’ll need a big roll of 6-mil plastic sheeting to cover it to prevent moisture!
Most of the pink fiberglass stuff you can buy with that paper backing on it which is the vapor barrier.
Just be prepared for the extra work required when installing insulation that requires a vapor barrier. It’s challenging doing it as one person, like how I did it! 😉
Rockwool Versus Fiberglass Insulation
I’m not an insulation professional. In fact, this was the one and only time I ever used Rockwool. But I did my research first before insulating my shed ceiling and walls and this is what I learned about the benefits of Rockwool over fiberglass insulation, which you can find all these benefits on their site:
- Rockwool is soundproofing. This was important for me because I planned to spend a lot of time in my shed, and would be using it as a workshop with power tools. I didn’t want to disturb the neighbors or my family.
- It’s less itchy than traditional fiberglass. I didn’t say it wasn’t itchy at all; just less itchy. 😉
- It’s mold and water resistant. I once had to remove and replace moldy fiberglass insulation and drywall in my basement. I didn’t want to tackle another one of those projects, so Rockwool’s mold and water-resistance insulation was a big factor for me.
- It’s fire-proof. Hello–remember that famous commercial of Sheryl’s “she shed” up in flames? HA! I didn’t want to be that homeowner on the phone with the insurance company, crying about a “she shed.”
Does a Shed Need Ventilation?
Before you go any further in insulating your shed, be sure to answer the important question about whether your shed needs ventilation.
This step confused me to no end because I couldn’t find a definitive answer on whether a shed needs ventilation or not. Here’s what I was able to gather:
Yes, a Shed Needs Ventilation if the Following is True:
If you are planning to heat and cool the interior of your shed (and I was) and you’re insulating your shed with fiberglass or Rockwool stone insulation, yes, your shed will need ventilation. Since you’re heating and cooling the interior of your shed, mixing interior conditioned heating and cooling with the elements could cause condensation. This is why the vapor barrier is important, to keep those elements separate. Also, though, with the ventilation, it keeps the warm air rising and out the ridge vent, while replacing the attic air above the insulation with cooler air from outside.
I also learned that if you’ve got a ridge vent (such as my shed does) at the peak of your shed roof, then soffit vents work best to keep that flow of fresh air. That’s why the baffles (aka “rafter vents” are so important for your shed because it allows that air flow to circulate from the soffit vents up to your ridge vent. Insulation could block that air flow if you don’t have baffles attached to your shed ceiling.
The best resource I was able to find on the topic of ventilation was from Fine Homebuilding: A Crash Course in Roof Venting.
No, a Shed Does NOT Need Ventilation if the Following is True:
The only times when you wouldn’t need a ventilation system, from my understanding, is if you’re using spray foam to insulate the ceiling, if your shed won’t be insulated, and if you’re not planning to heat or cool the interior of your shed.
Be sure to do your own research and make the best decision based on how you plan to use the shed.
STEP 1: Measure the Space Between the Studs
Wouldn’t it be nice if every single stud was 16″ part, from stud to stud? Yeah–fat chance when it came to my prefabricated shed! Because all of my studs aren’t 16″ on center, I had to measure each stud bay and then cut each piece of insulation to fit the space. I made sure that each piece was 1/2″ to 3/4″ bigger and longer than my measurements.
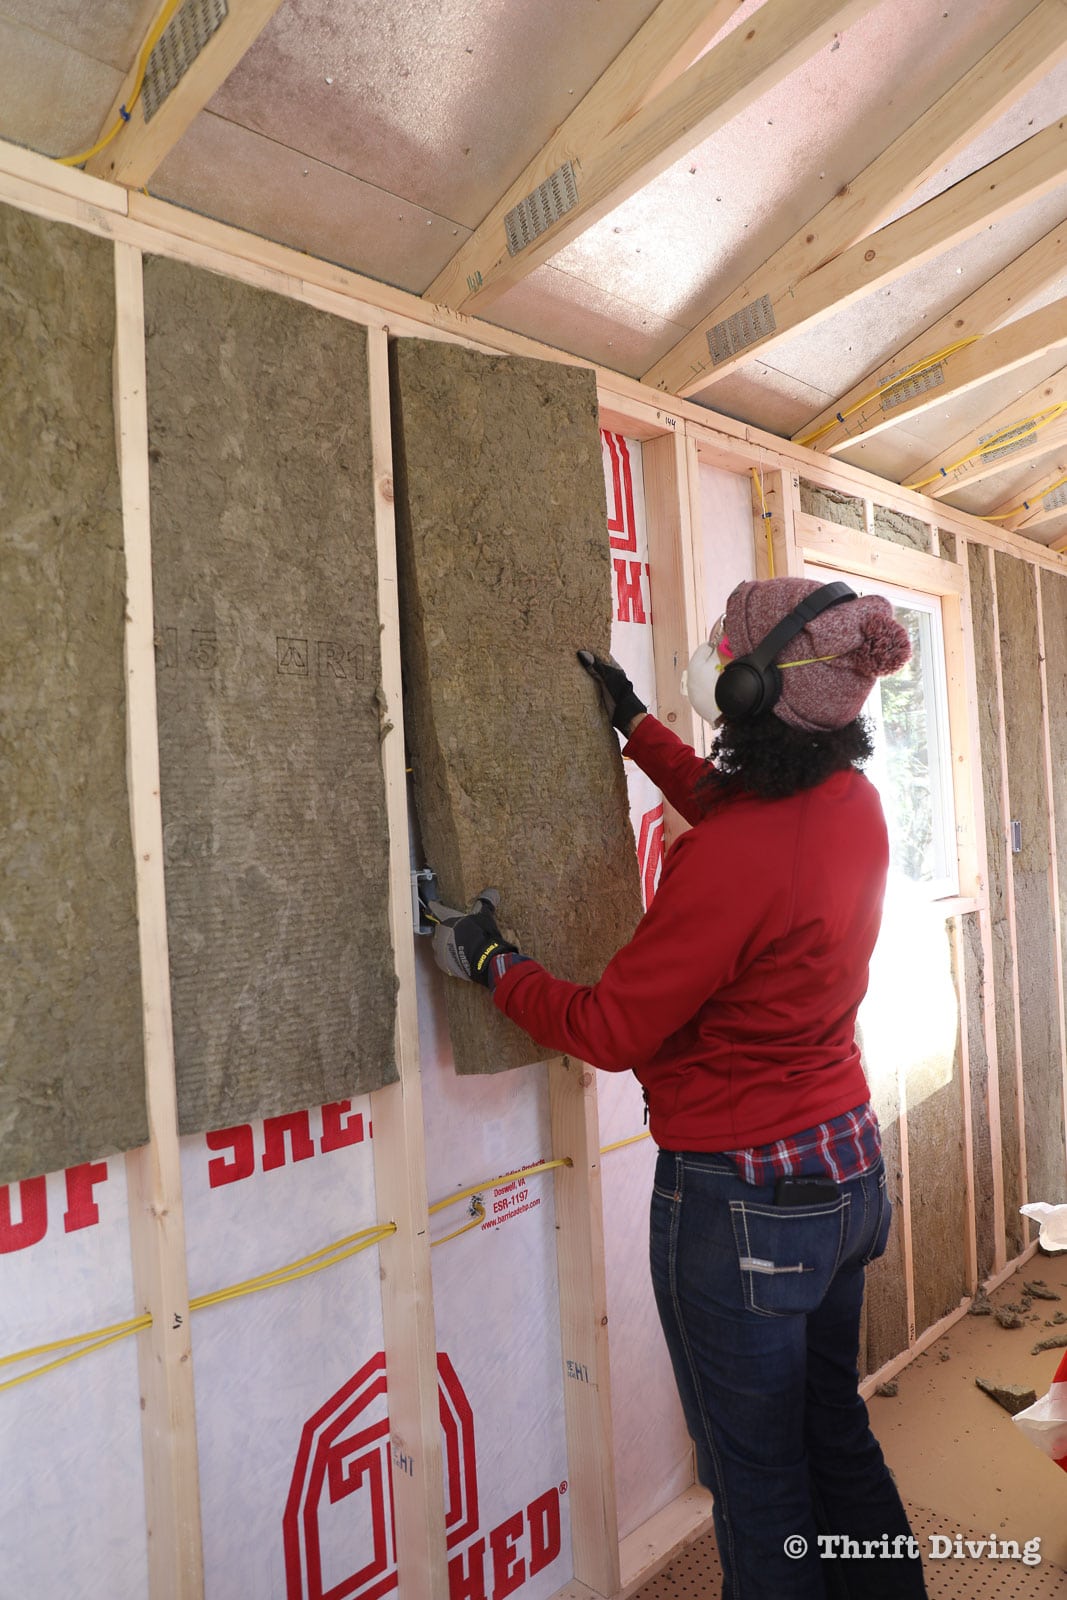
STEP 2: Place the Insulation Between the Studs
Because the insulation is a bit larger than the stud bay, the insulation should fit snugly. Since each piece is only 48″ long, you’ll need to stack your insulation between the studs to fill the whole cavity. You’ll likely have lots of trimming to do! Be sure to wear your dust mask, gloves, and eye protection. Some people have told me that rubbing baby powder on your skin prior to insulating your shed helps to keep the insulation off your skin and makes it way less itchy. Unfortunately, I didn’t have any baby powder and I bore the brunt of itchy skin every single night. (Lesson learned! HA!)
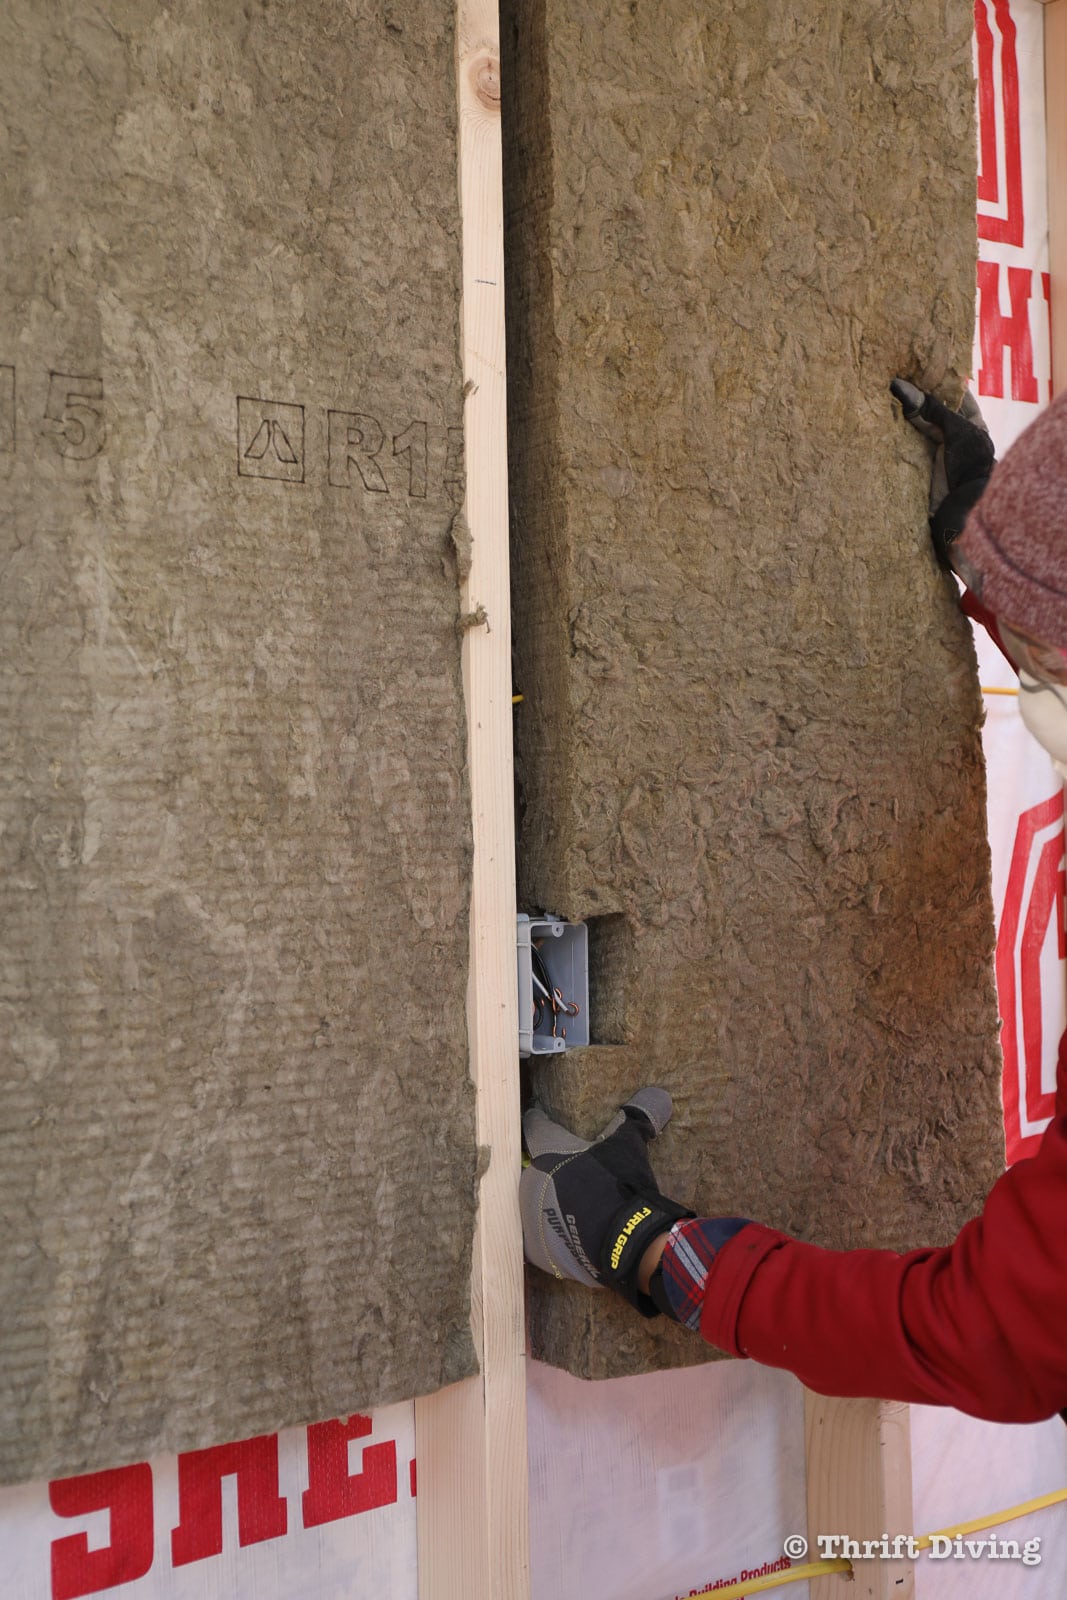
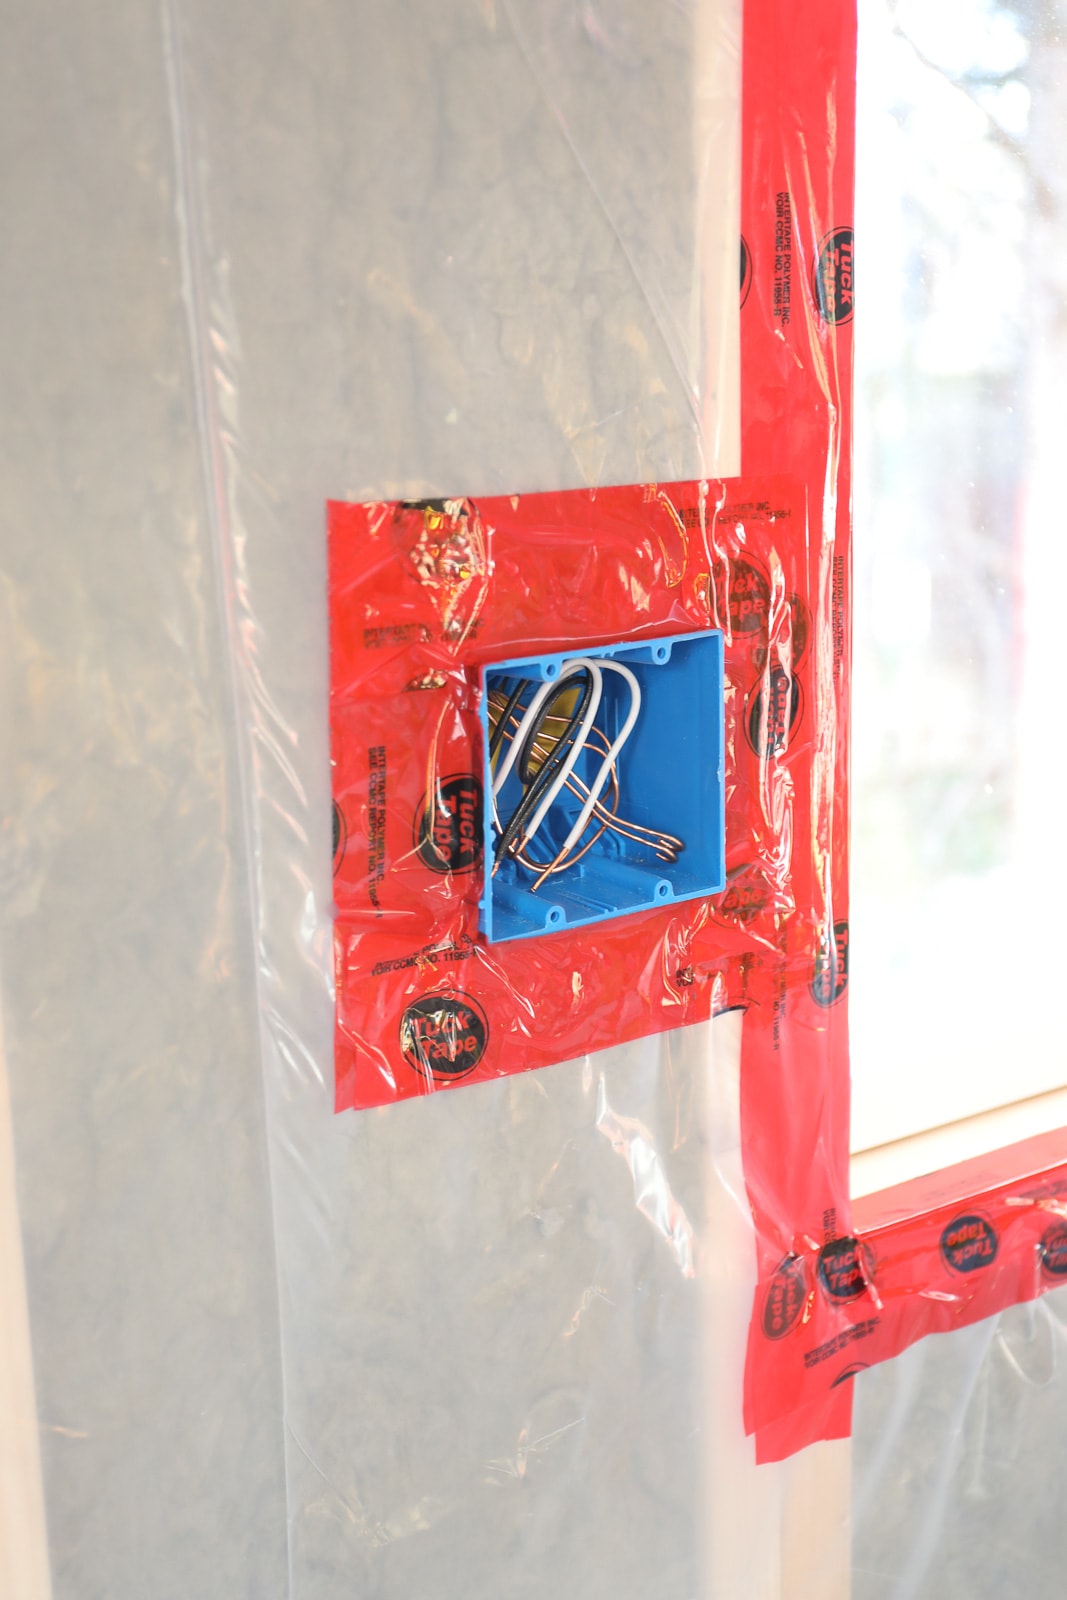
How to Fit Insulation Around Electrical Boxes and Wires
You’ll definitely have to fit the insulation around electrical boxes and wires, but it wasn’t too difficult.
For the boxes, use a tape measure or hold the insulation in place and place a cut mark carefully to indicate where you’ll need to trim. Be sure to measure your boxes so that you’ll know how deep to cut for each electrical box.
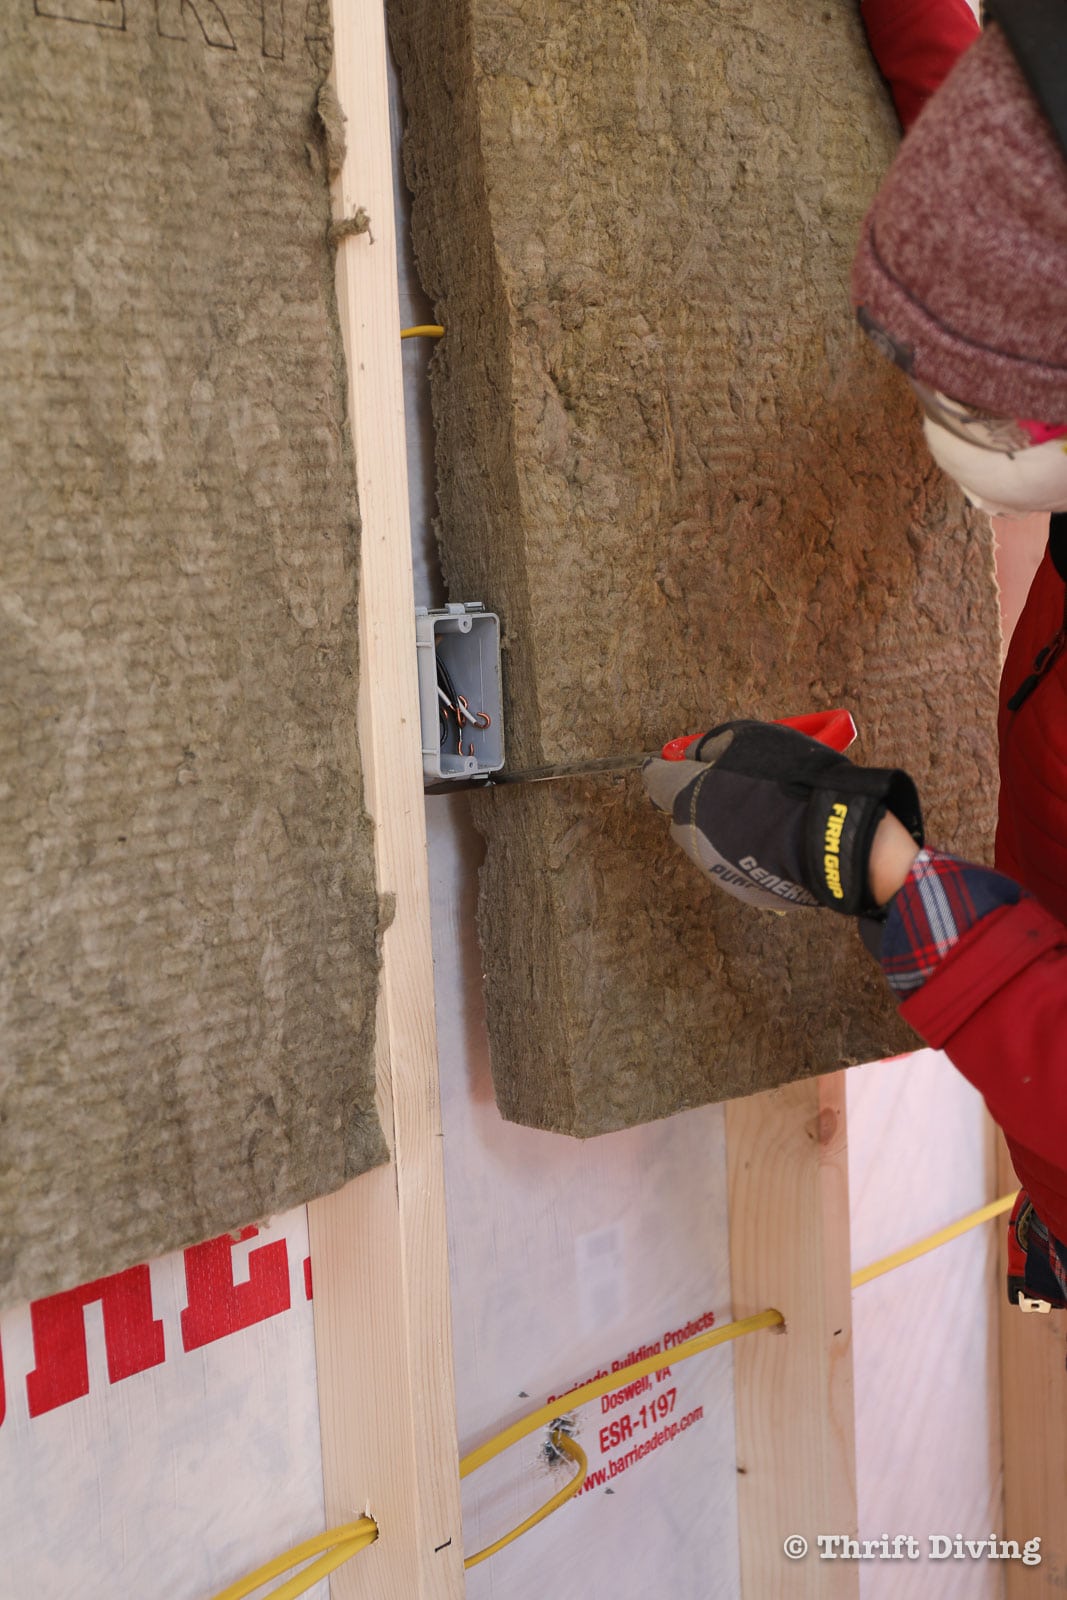
For the electrical wires, place a slit in the back of the Rockwool insulation (without cutting all the way through), at the location where the wire is located, and gently wrap the Rockwool insulation around wiring. This allows the insulation to not disturb the wiring and prevents the wiring from not fitting properly.
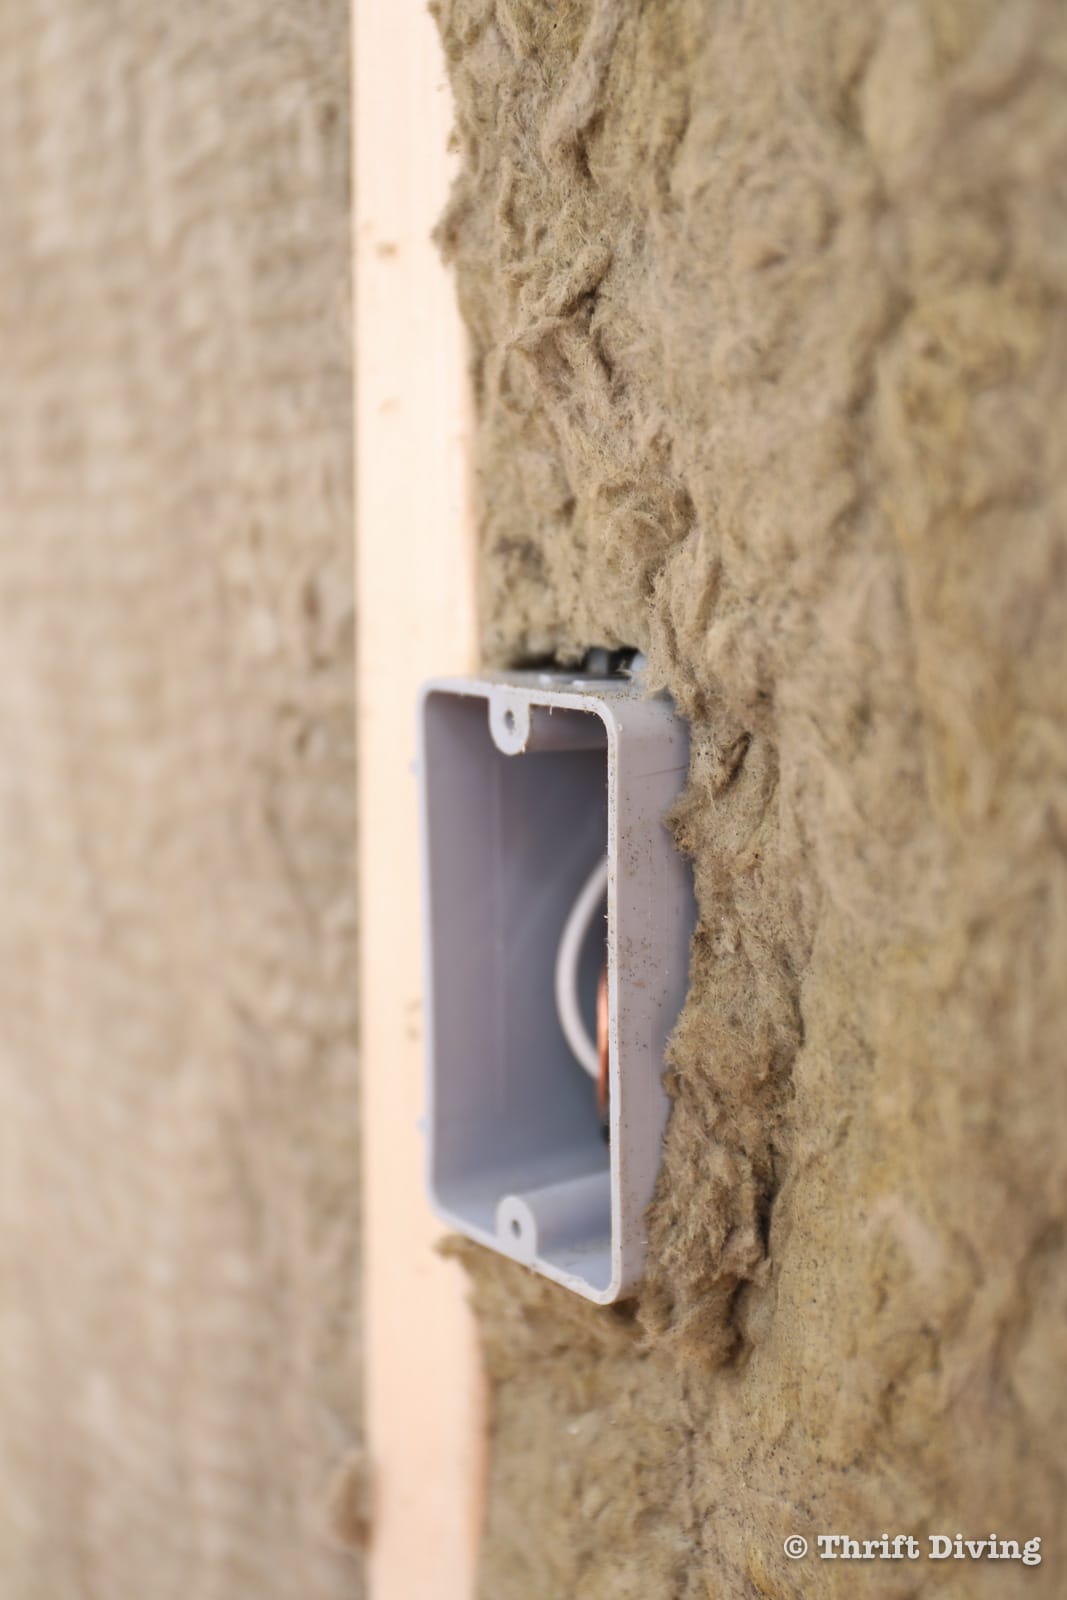
For electrical wires, make a slit along the back of the insulation (after taking measurements to be sure your slit is perfectly aligned). Don’t cut all the way through. Bend the insulation slightly and place the electrical wires into the slit of the insulation. This will allow the wires to be buried safely in the insulation without getting in the way.
For any spaces between the studs that have light boxes or lots of electrical wires, cut out enough insulation in order to fit around the electrical and boxes so that the insulation will still fit. Watch the video tutorial for more help with this step.
STEP 3: Add Ventilation to Your Shed
I mentioned above about how to tell if your shed needs ventilation or not. It doesn’t have to be done at this step; it could be done sooner. This is when I added ventilation to my shed, though.
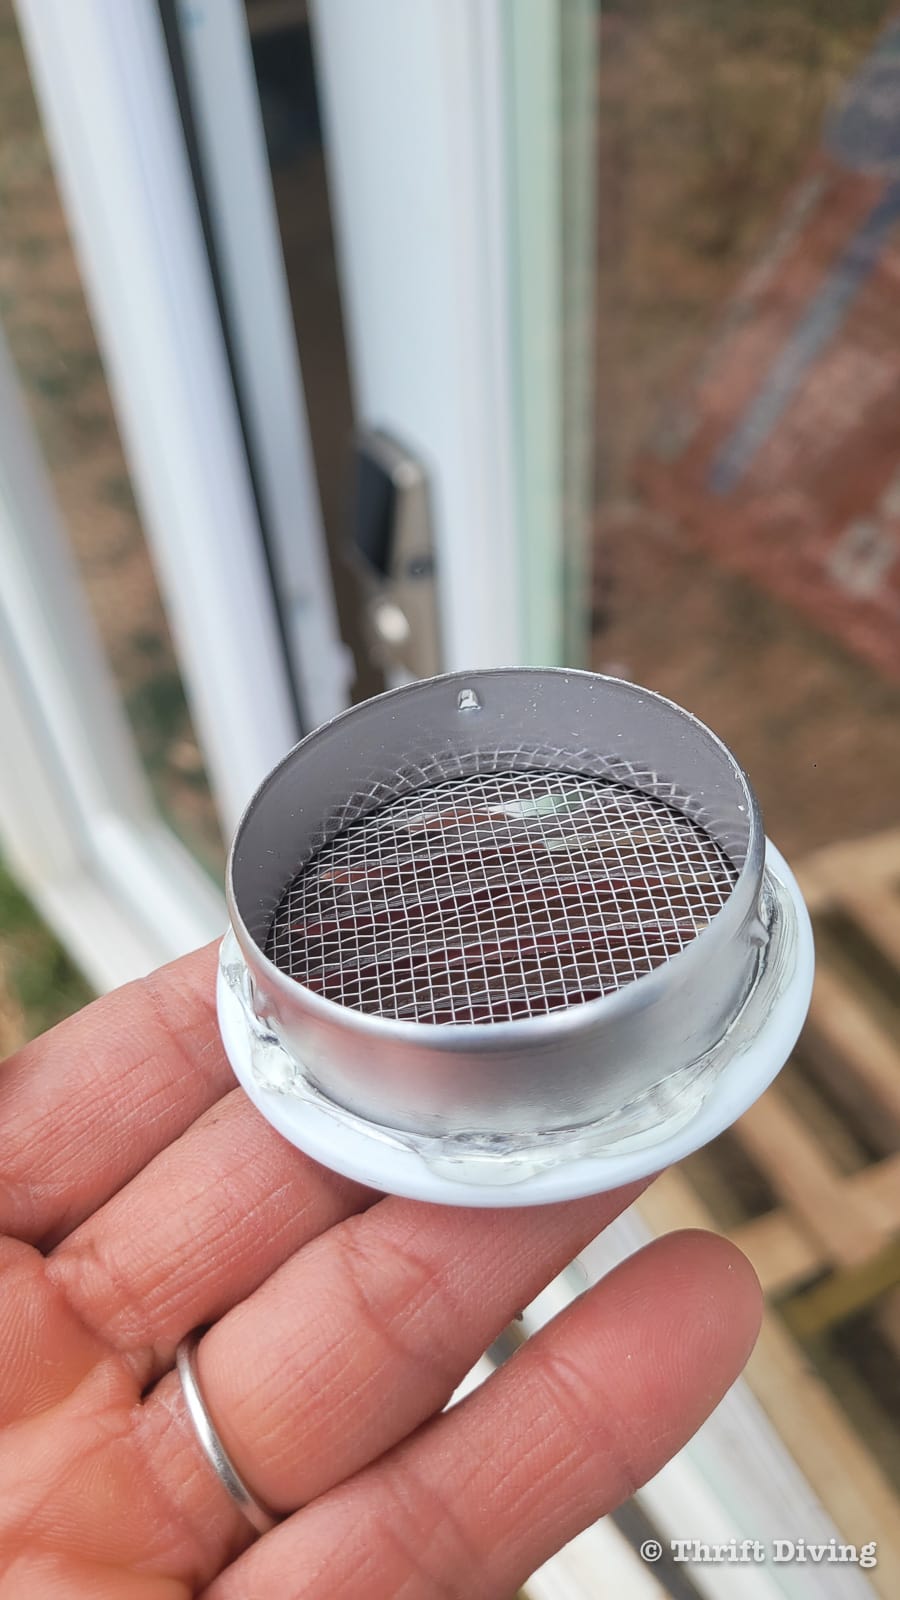
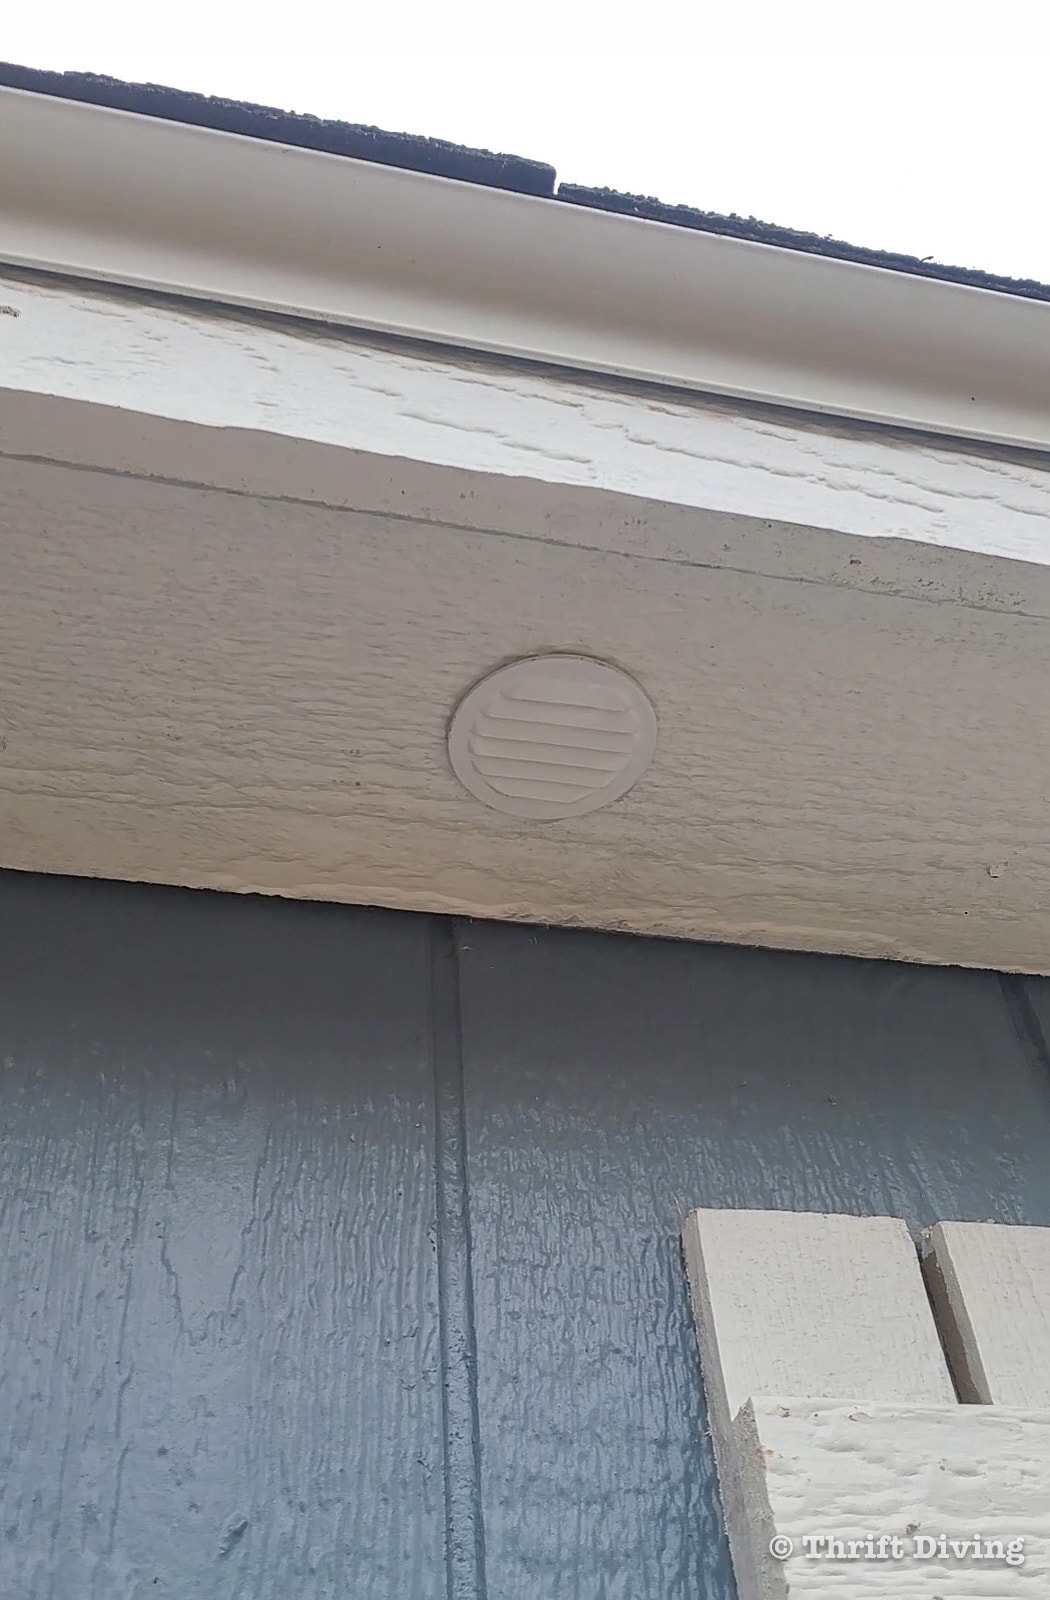
I decided on adding 2″ soffit vents spaced about every 24″ apart. I used soffit vents that have built-in insect screens ordered from Amazon, but you can also get them from Home Depot. I’m not sure, though, if the ones from Home Depot or Lowes have the screens built in, though, so be sure you check that before ordering.
First, I drilled the holes with the hole saw attachment, added a bead of caulk around the edge of the soffit vent, and inserted the vent into the hole.
To avoid having to do this step, when ordering your shed or having it built, make sure you ask about soffit vents. I ordered my shed from Tuff Shed, and they didn’t even mention this to me. Which is frustrating, because I had to find this out after-the-fact that ventilation was important. Read this blog post on 10 Questions You MUST Ask Before Building a Shed.

Installing Baffles for Ventilation
Hilarious, but for some time, I was calling these things “waffles.” HA! Nope, completely different.
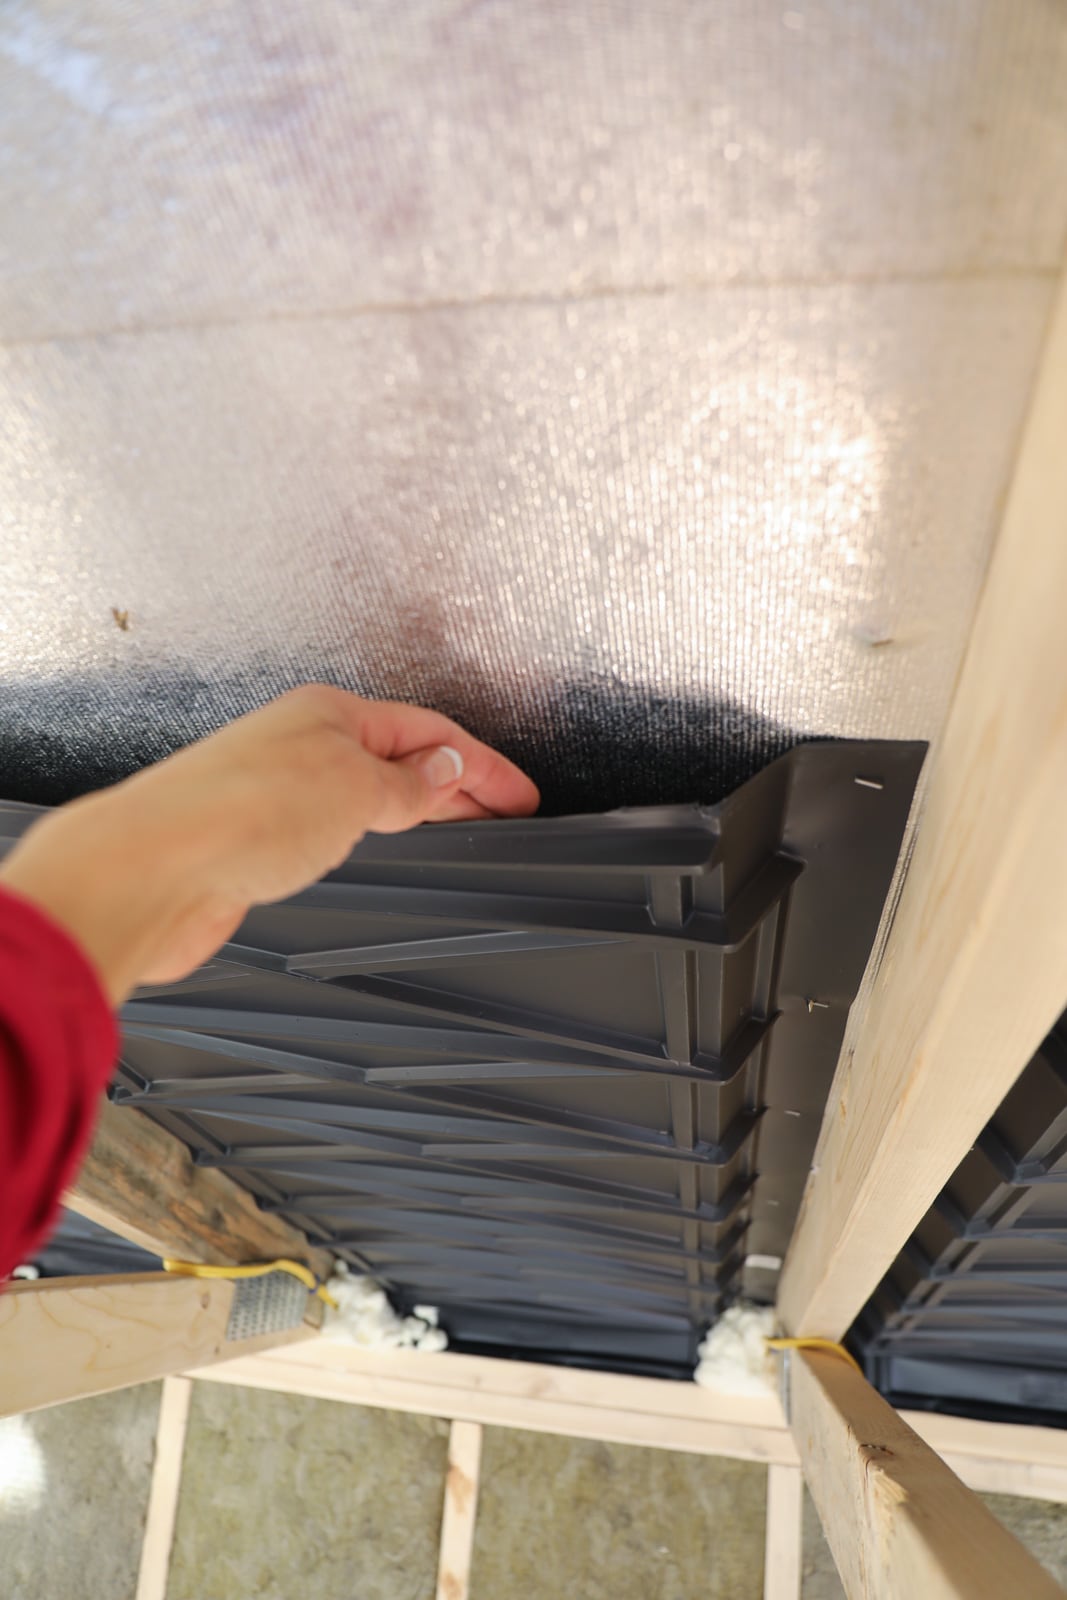
Baffles (aka “rafter vents) are attached to the underside of a roof with staples to protect the fresh airflow coming in from the outside of the shed via the soffit vents. You don’t want your roof insulation blocking that air flow.
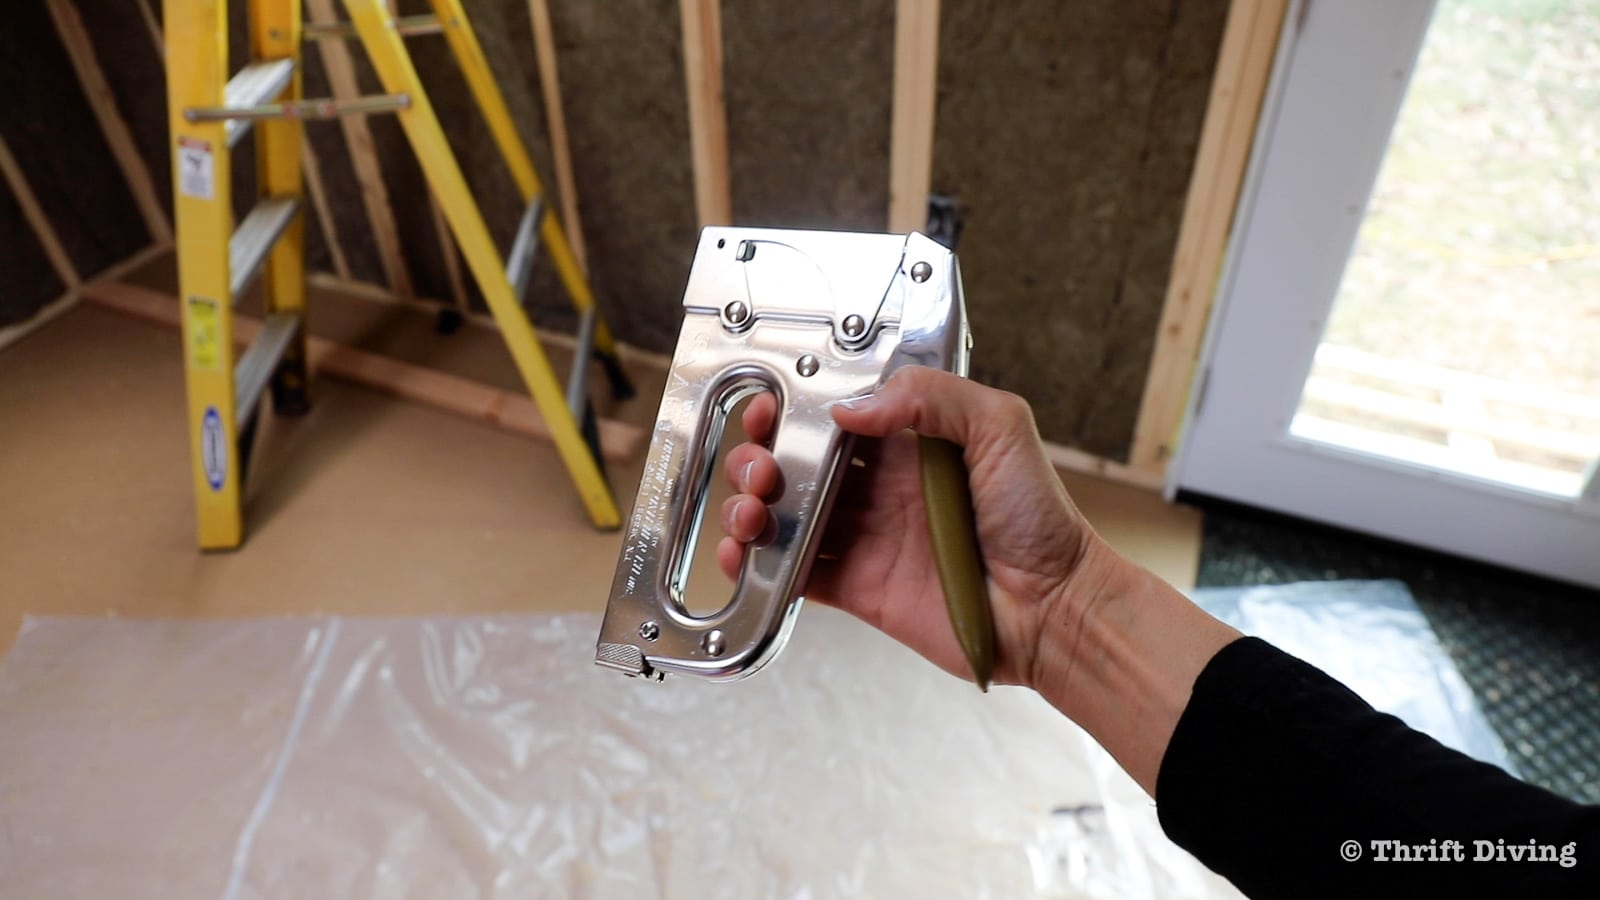
This is where the Arrow Fastener T50 heavy duty stapler (or the Arrow Fastener PT50 pneumatic stapler) comes in handy! (TIP: The pneumatic stapler, or even an electric stapler, makes things even easier than a manual stapler).

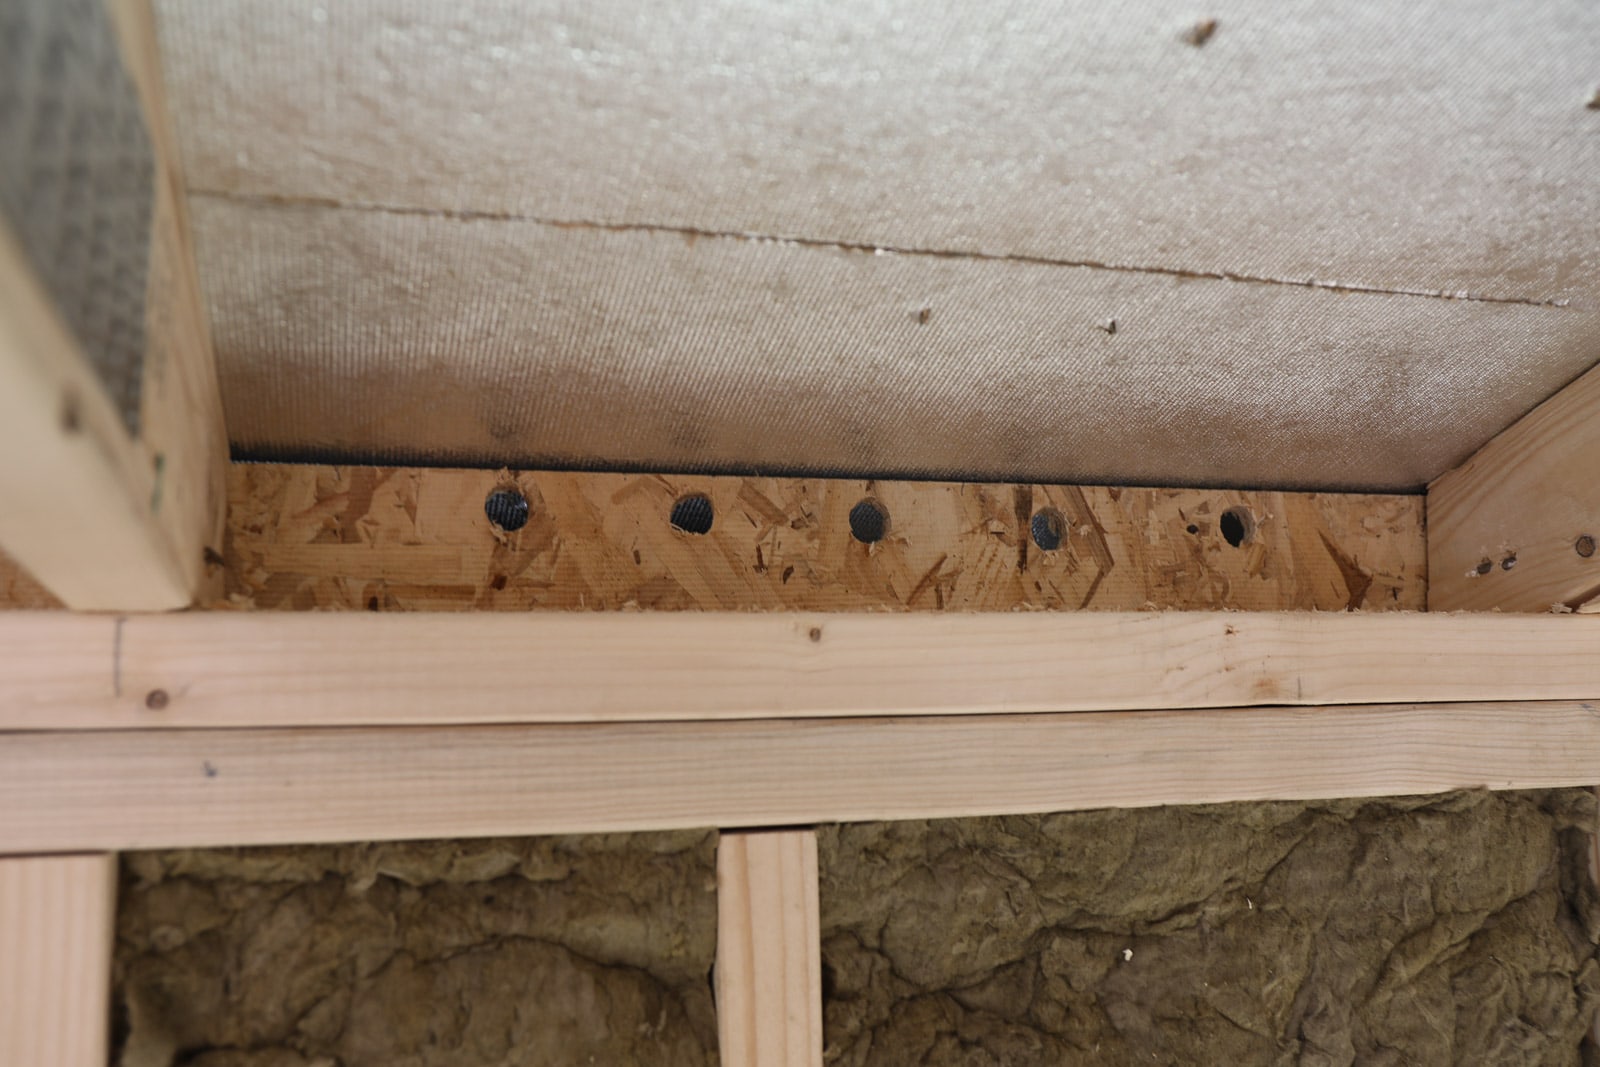
But first, I drilled some additional holes in the bays above the double top plate to allow for additional airflow. My shed isn’t built like a traditional construction on a new home, where there is an air gap between the overhang of the rafters or trusses.
My trusses stop at the edge of the double top plate, and the engineered wood wall meets the roof. Therefore, there really wasn’t a sufficient pathway of airflow. With these holes drilled at the same angle as the roof, the draft from the soffit vents should provide a good airflow! (At least, I hope!)
To keep the baffles in place, I stapled it to the underside of the roof. Here’s a TIP: The baffles do NOT have to go all the way up to the ridge vent. They’re really only important closer to where the rafters meet the wall, where the insulation could choke out the airflow. Once the air comes up through the baffles, it will easily flow out the ridge vent at the peak of your shed roof.
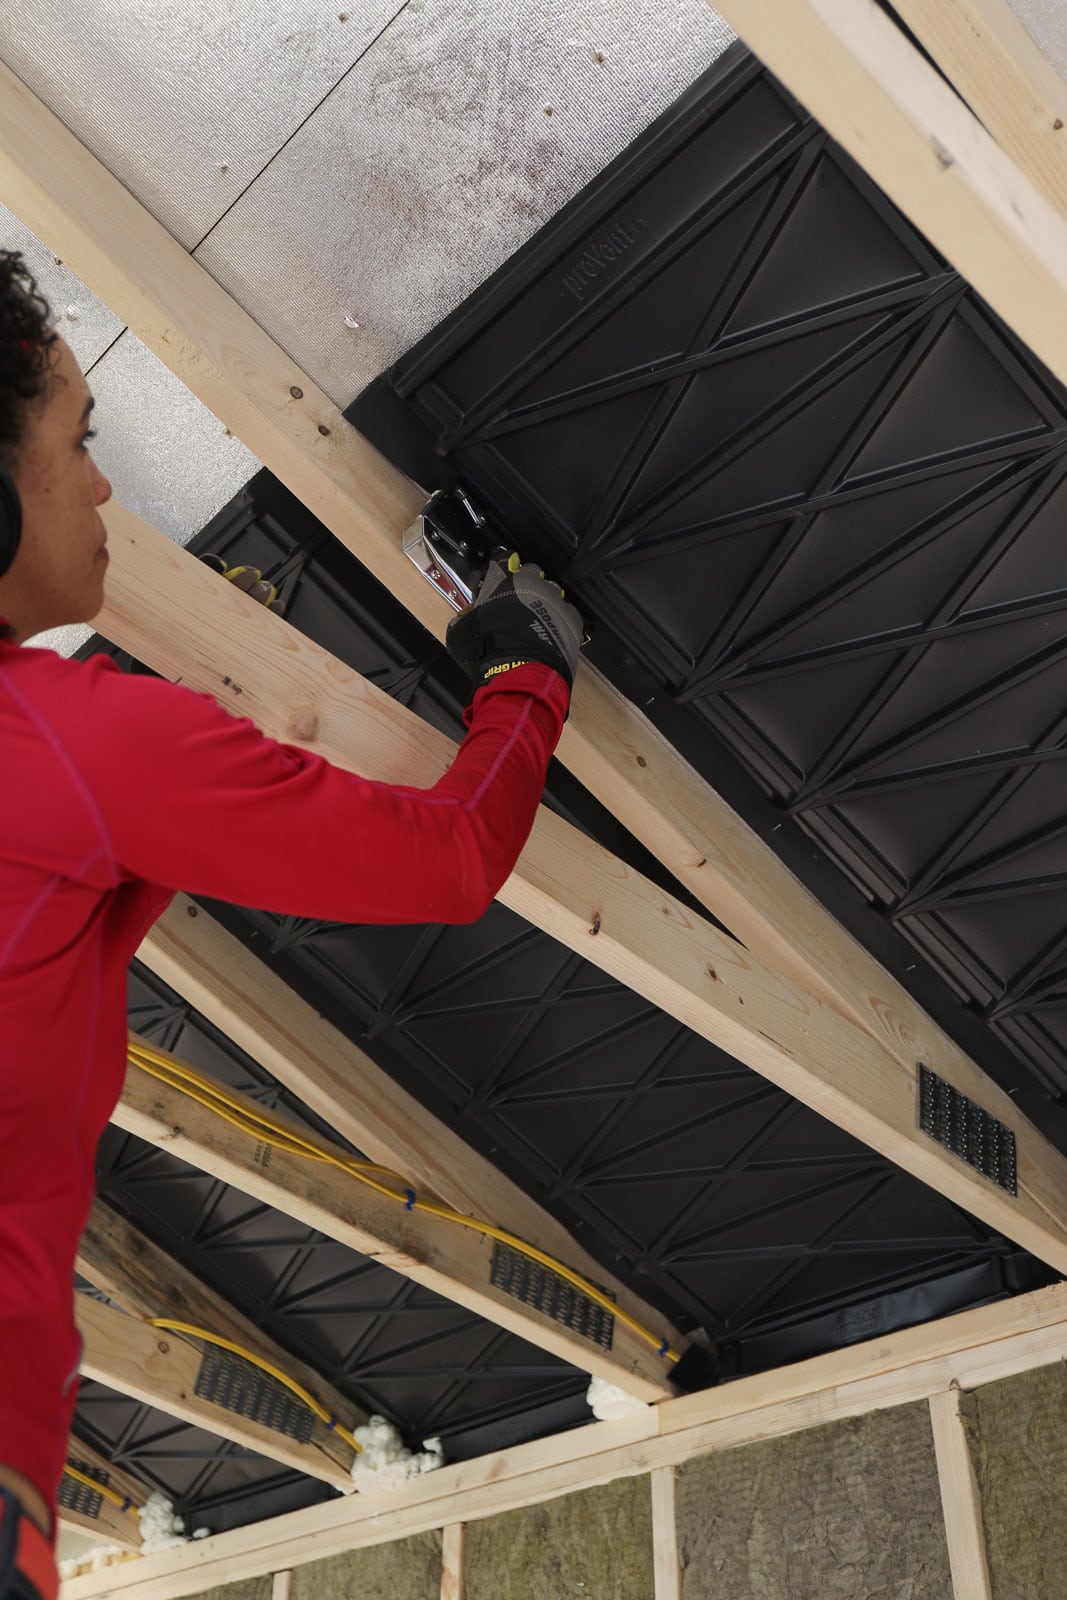
Once the baffles were all in place, I used spray foam to seal around the cracks and gaps of the baffles so that air flow doesn’t escape through the sides. I want that airflow to continue up through the baffles to the ridge vent, where the hot air can escape in the summer and where cool air can flow in the winter.
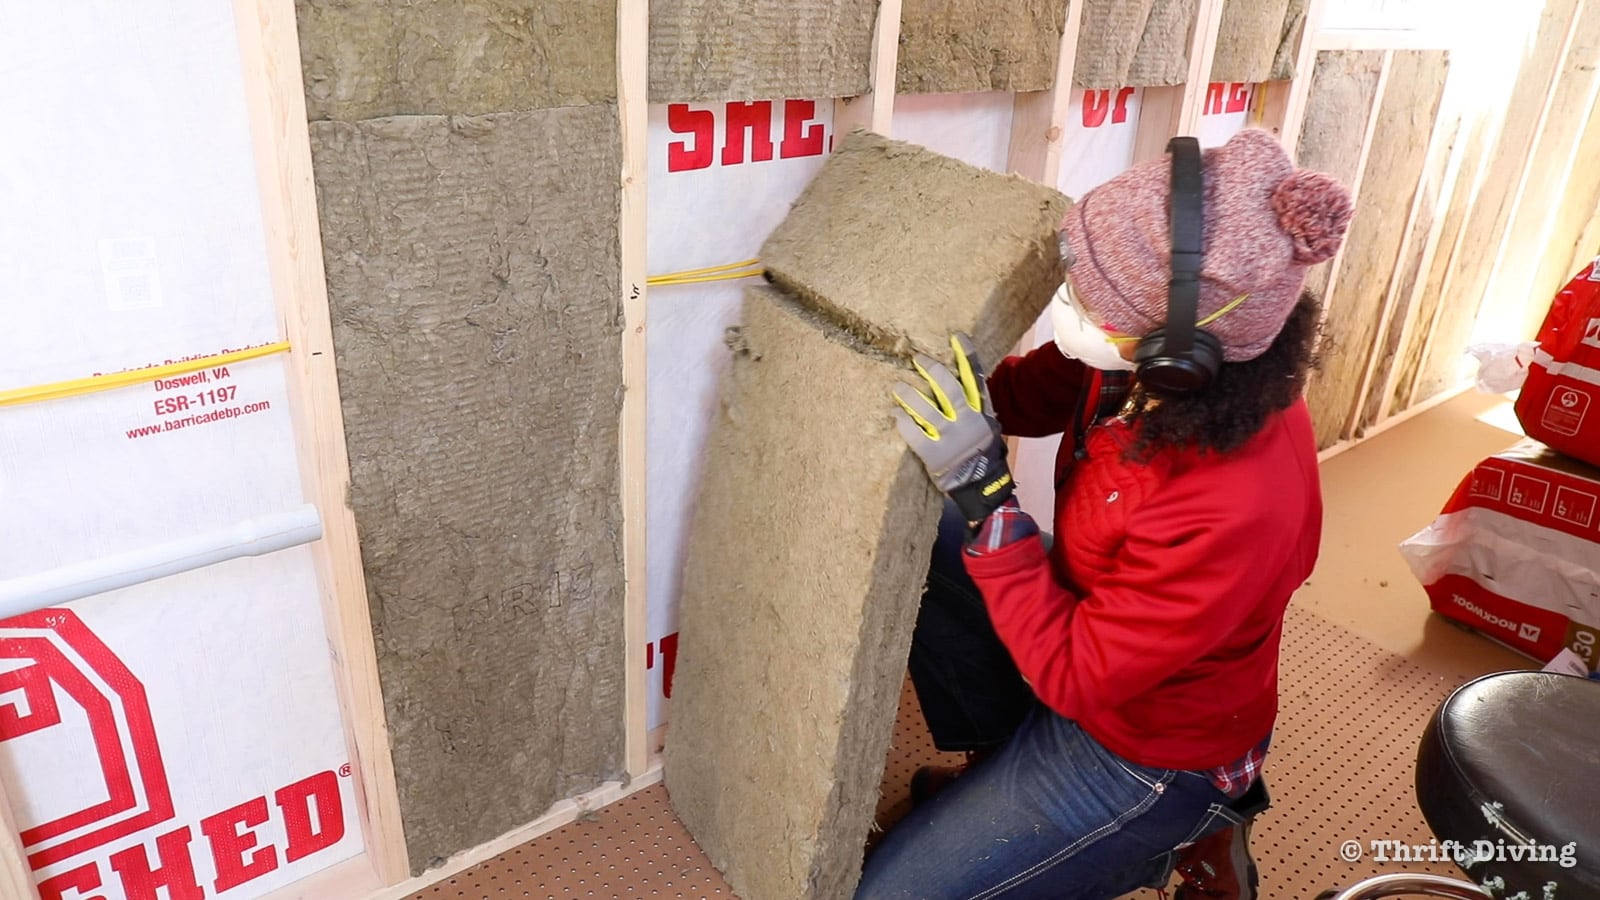
STEP 4: Insulate the Shed Ceiling or Roof
For this step in insulating my shed, I chose R-30 insulation, which is a thicker insulation batt and will prevent more heat loss in the winter and will keep more heat out in the summer.
The ceiling batts are also a bigger pain in the butt to install, especially when doing it by yourself! Rockwool tends to be very crumbly so you have to carefully hoist over your shoulder and have a method of keeping it in place.
I found that stapling smaller sheets of plastic in place first and then sliding the thicker insulation batts into place worked incredibly well. It kept the batts in place until a larger sheet of plastic vapor barrier could cover the entire ceiling.
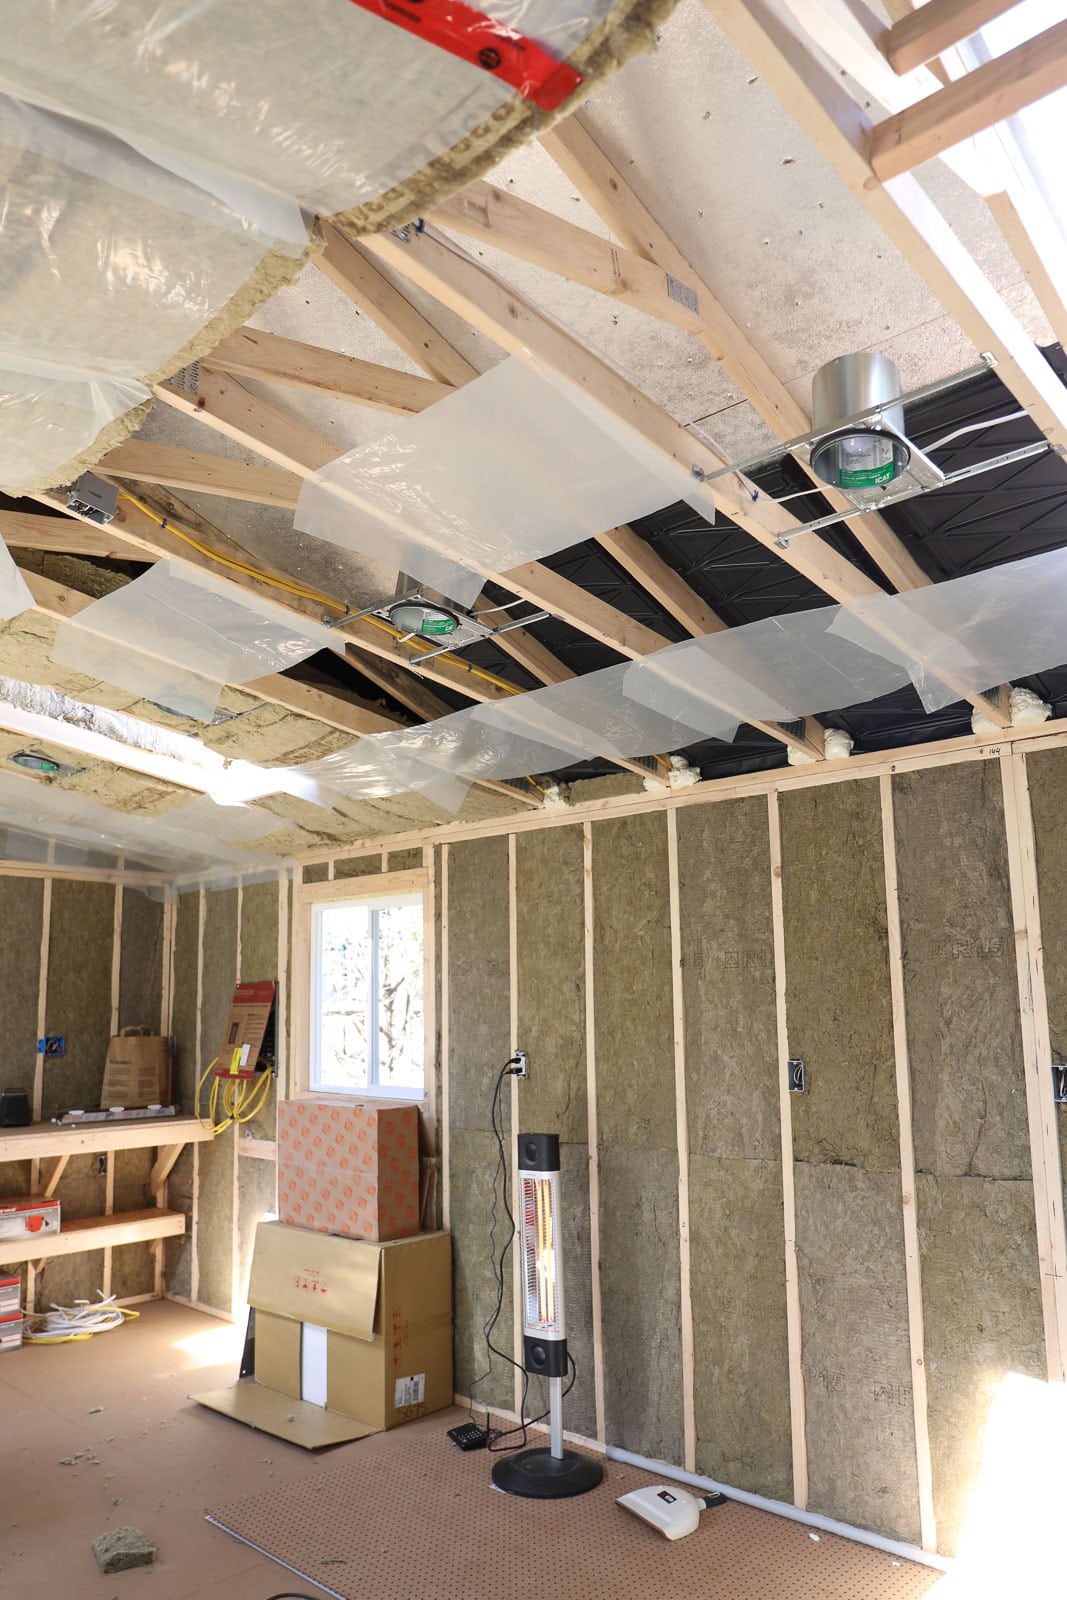
Insulating Around Recessed Lights
If your shed will have recessed lights such as mine, make sure they’re IC rated, which means “Insulation Contact” is allowed. Recessed lights can get hot with traditional bulbs and you don’t want to start a fire (by the way, Rockwool is fire-proof, but still….you don’t want to install the wrong can).
Many people are switching to LED lights, including the kind of lights that can simply be cut into the drywall after it’s been hung, and plopping them in that way.
(My light inserts will be LED, but the cans are traditional recessed cans).
Regardless, make sure the cans (if you install them) are rated “IC”.
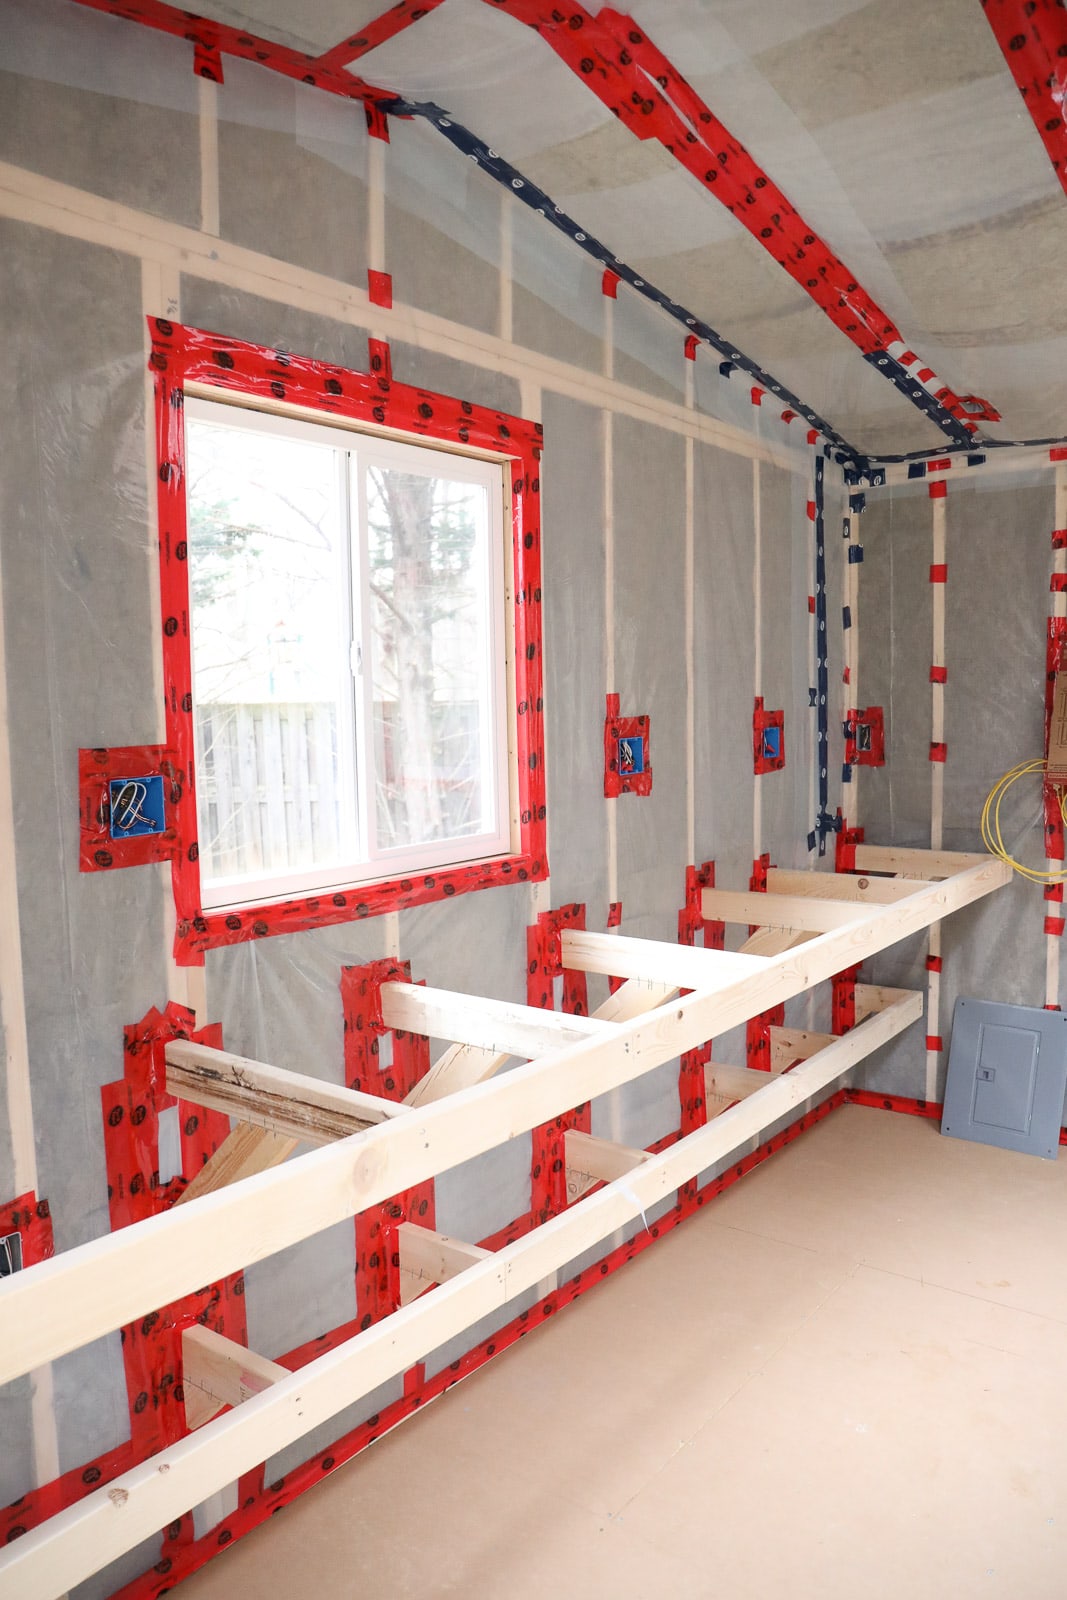
STEP 5: Install a 6-mil Vapor Barrier
Not all insulation will require this step because many insulations have the vapor barrier built in (which is the paper backing on fiberglass insulation). Rockwool, however, requires a minimum of a 6-mil vapor barrier, which is a huge sheet of plastic that will cover the stone insulation’s walls and ceiling.
Here are the rules for using a 6-mil vapor barrier. Be sure to:
- Overlap all your seams by several inches, and staple on the studs.
- Cut out the plastic over the windows and electrical boxes.
- Tape all seams with Tuck Tape so there are no gaps or airflow through the vapor barrier.
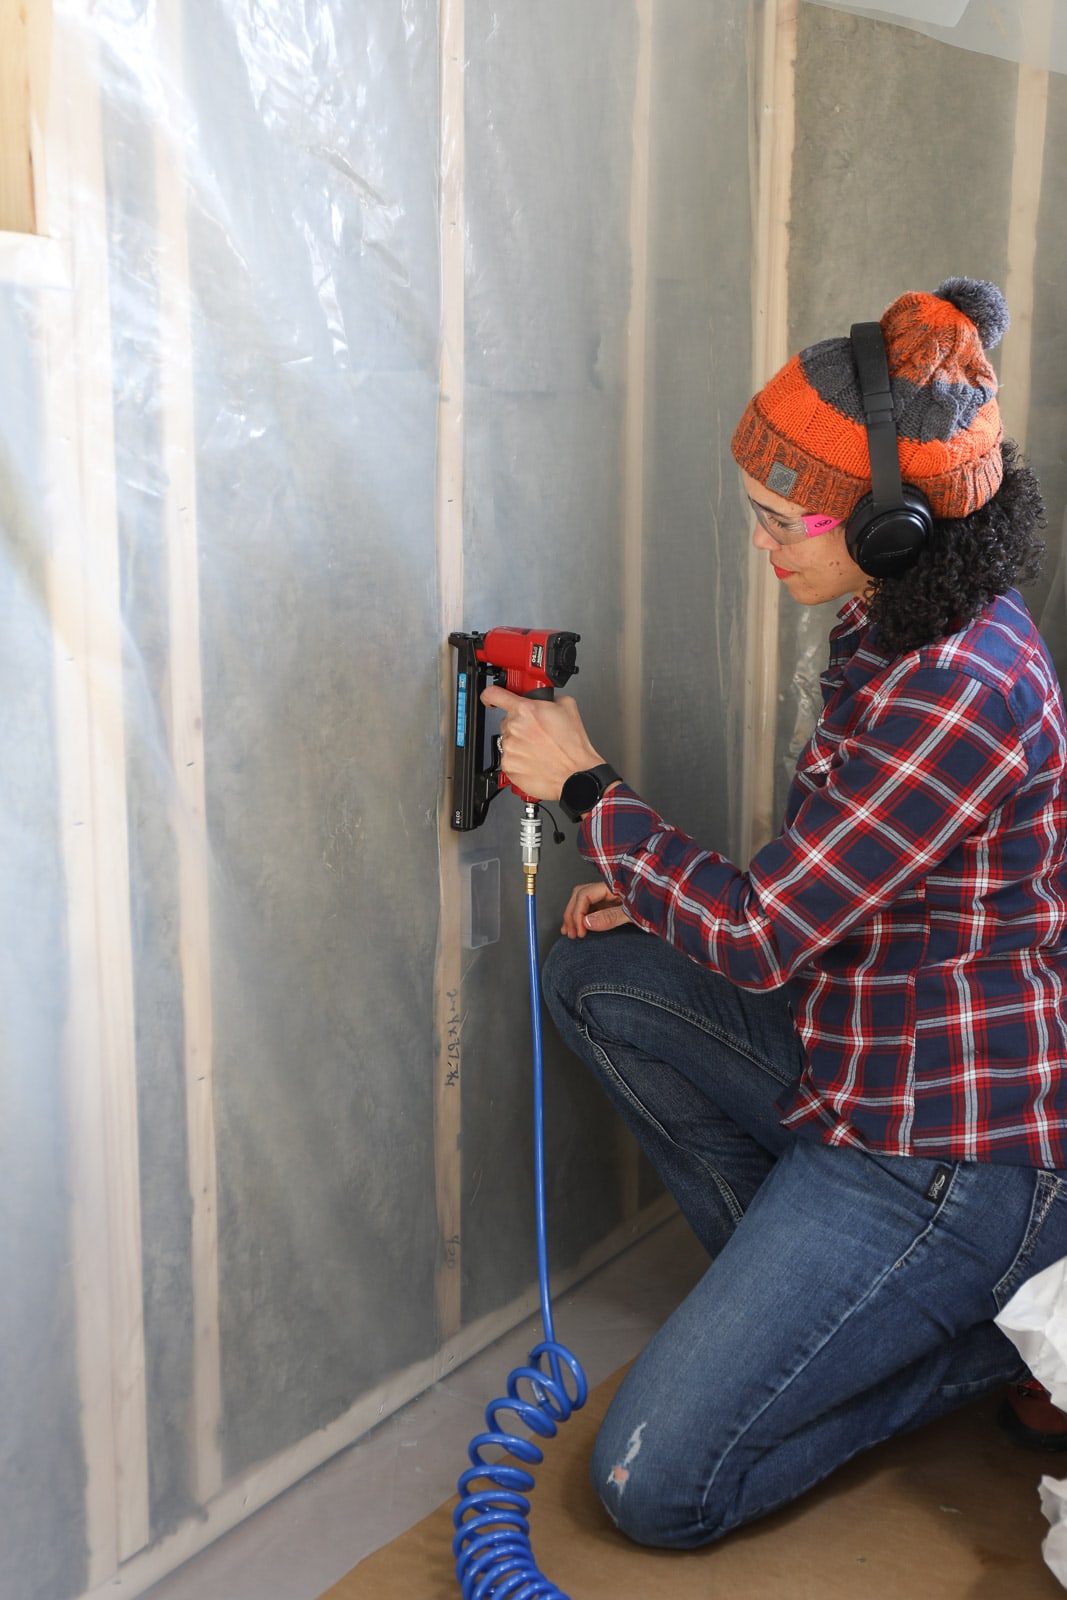
STEP 6: Cover All the Staples and Openings with Tuck Tape
As mentioned above, you don’t want to mix any of your conditioned space that will be heated and cooled with any air behind the vapor barrier in your walls or ceiling.
To prevent this, tape around the electrical boxes, recessed lights, and any staples, including any holes or tears in the plastic, around electrical boxes, recessed lights, etc.
I’ll admit that I likely “over” taped, but I would rather have over-taped than to not tape enough. By the time I was done, it looked like I walked onto the set of Showtime’s Dexter New Blood. HA!
Around my workbench, that was the hardest because of the 2x4s. In fact, I did over-tape in this area because later, when the drywallers came to install the drywall, I ended up having to remove some of the tape that extended past where the 1/2″ drywall would be so that the tape wasn’t exposed. Not a biggie, but just be mindful of not using too many staples in places where staples may not be needed, especially if you’re using large sheets of plastic that can stretch across the width without needing to overlap another piece.
Save Money…Spent Time
Installing your own insulation in your shed isn’t impossible, but definitely plan to take longer than you think it will! I thought it would literally take no more than a week, but due to the unfamiliarity with the project, along with running into issues related to figuring out ventilation requirements (not to mention working alone), it took much longer than expected.
You will save money by installing your own insulation, but expect to spend time instead.
Total cost for the insulation was just under $1,400, not including the batts, foam, soffits, etc. I didn’t add up those expenses, but add another hundred or two, and the total cost to do my own insulation was about $1,500 – $1,600.
I had received a quote for about $2,300 for spray foam walls and a fiberglass insulated ceiling. I chose not to do spray foam because I didn’t want to breathe in any off-gassing for years to come.
Did I save money??
Meh–a little bit. But I did get what I wanted, which was Rockwool. It was a lot of work, though, especially with the added step of the vapor barrier. But I couldn’t be happier that I got what I wanted, and that I did it myself!
If your shed is smaller than my 16’x26′ shed, it will take less time and money, but you’ll feel just as proud. 😉
Love this post?? Click here to save it on Pinterest!
![]()

Download the 5 freebies!

Thrift Diving inspires women to decorate, improve, and maintain their home themselves...using paint, power tools, and thrift stores! Use these 5 printables, checklists, and ebooks to get started!

Do Gable-end side vents suffice or do I need to close those off and add soffit vents?
Thanks for sharing your experience! Are your trusses also made of 2×4? If so, where did you find R-30 bats to fit? All the ones I’m seeing are too thick to fit in between 2x4s. Thanks in advance!
I’d like to provide some clarification on ventilation. It’s not solely about whether you’re cooling or heating your interior; it’s more about whether your interior is fully sealed or not from the beginning. Condensation issues often arise when there are air leaks during different seasons or due to a misunderstanding of how HVAC systems work.
If you’re seeking a genuine answer, there are alternative approaches to those homebuilder sites. Many of these sites focus on making money from DIY enthusiasts who might not be well-versed in marketing or understanding how people genuinely interested in building or remodeling may approach such projects. You don’t need a subscription to access half-answers and tips leading to other sites or books. Numerous YouTubers generously share their experiences, often repeating similar projects to cover all aspects, enabling you to be well-informed when tackling similar tasks yourself.
I must say, though, your work is truly exceptional and clean, akin to a movie set or a meticulously crafted how-to book that serves as a clear guide for viewers.
Thanks for the thorough response, Andre! Well, let’s just hope I did it right. And if I didn’t, then I’ll have to deal with that down the road. For now, it’s done. Thank you!
This is great and a huge help. I have a 12 x 12 shed that has been a storage shed for years. I am in the process of changing that and making it my art/metals studio. We are installing a new floor first, DH is helping with that. I will do the rest myself, though I’m sure he will step in saying I am doing stuff wrong, lol, and try to take over. If he wants to do all the work though I will let him. No, I do plan to do the majority of it. Lots to do, floor, roof vents, insulation, drywall or paneling, paint, hooking up the outlets to a solar setup (presuming they are still any good). It will get quite nice when I am done, nicer than the new shed my DH got himself, lol, though won’t cost as much. The solar stuff and the roof will be the biggest costs. So glad I found this though, invaluable information.
So glad that you’ve found this information helpful! 🙂 Good luck with your shed! I find that the fun is just getting there! Keep me posted on how it goes!
Hi Jeni! I put 13 soffit vents on the front and 13 on the back. I’m not sure if I should have spaced them closer, or put more, but I felt like one per area-between-the-rafter would be good. If you have a ridge vent (my shed has one), then you should have soffit vents, or at least vents on either side of your shed near the top. (You don’t want BOTH soffit vents and side vents, by the way; that would not cause the air to flow properly). Hope that helps!
Thanks for all the great info. How many soffit vents did you place? I have a 28×12 shed I am wanting to insulate for heat/ac. I didn’t know if I needed a soffit vent between each rafter.