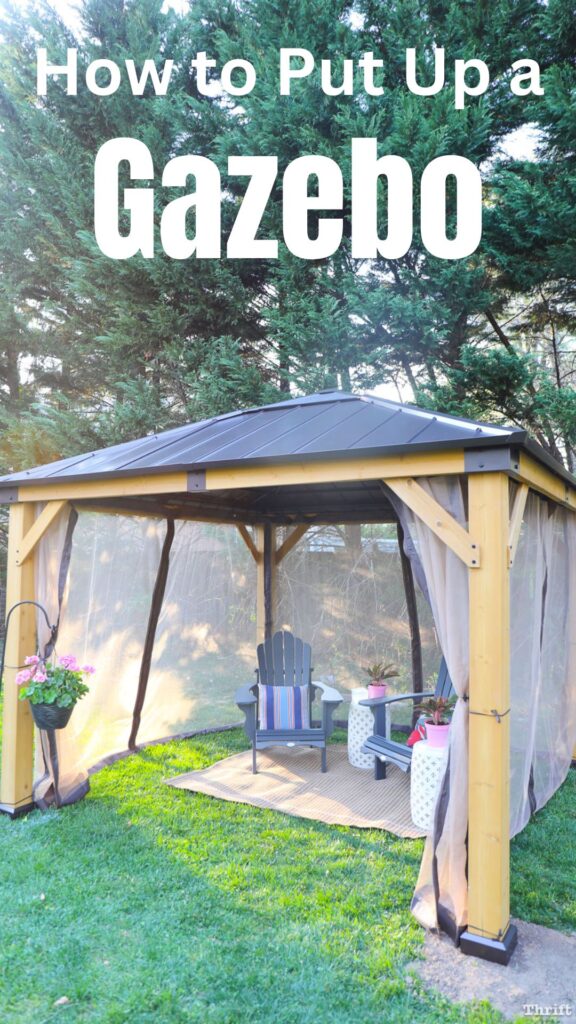
How to Put Up a Gazebo in Your Backyard
This tutorial on how to put up a gazebo is sponsored by Sunjoy.
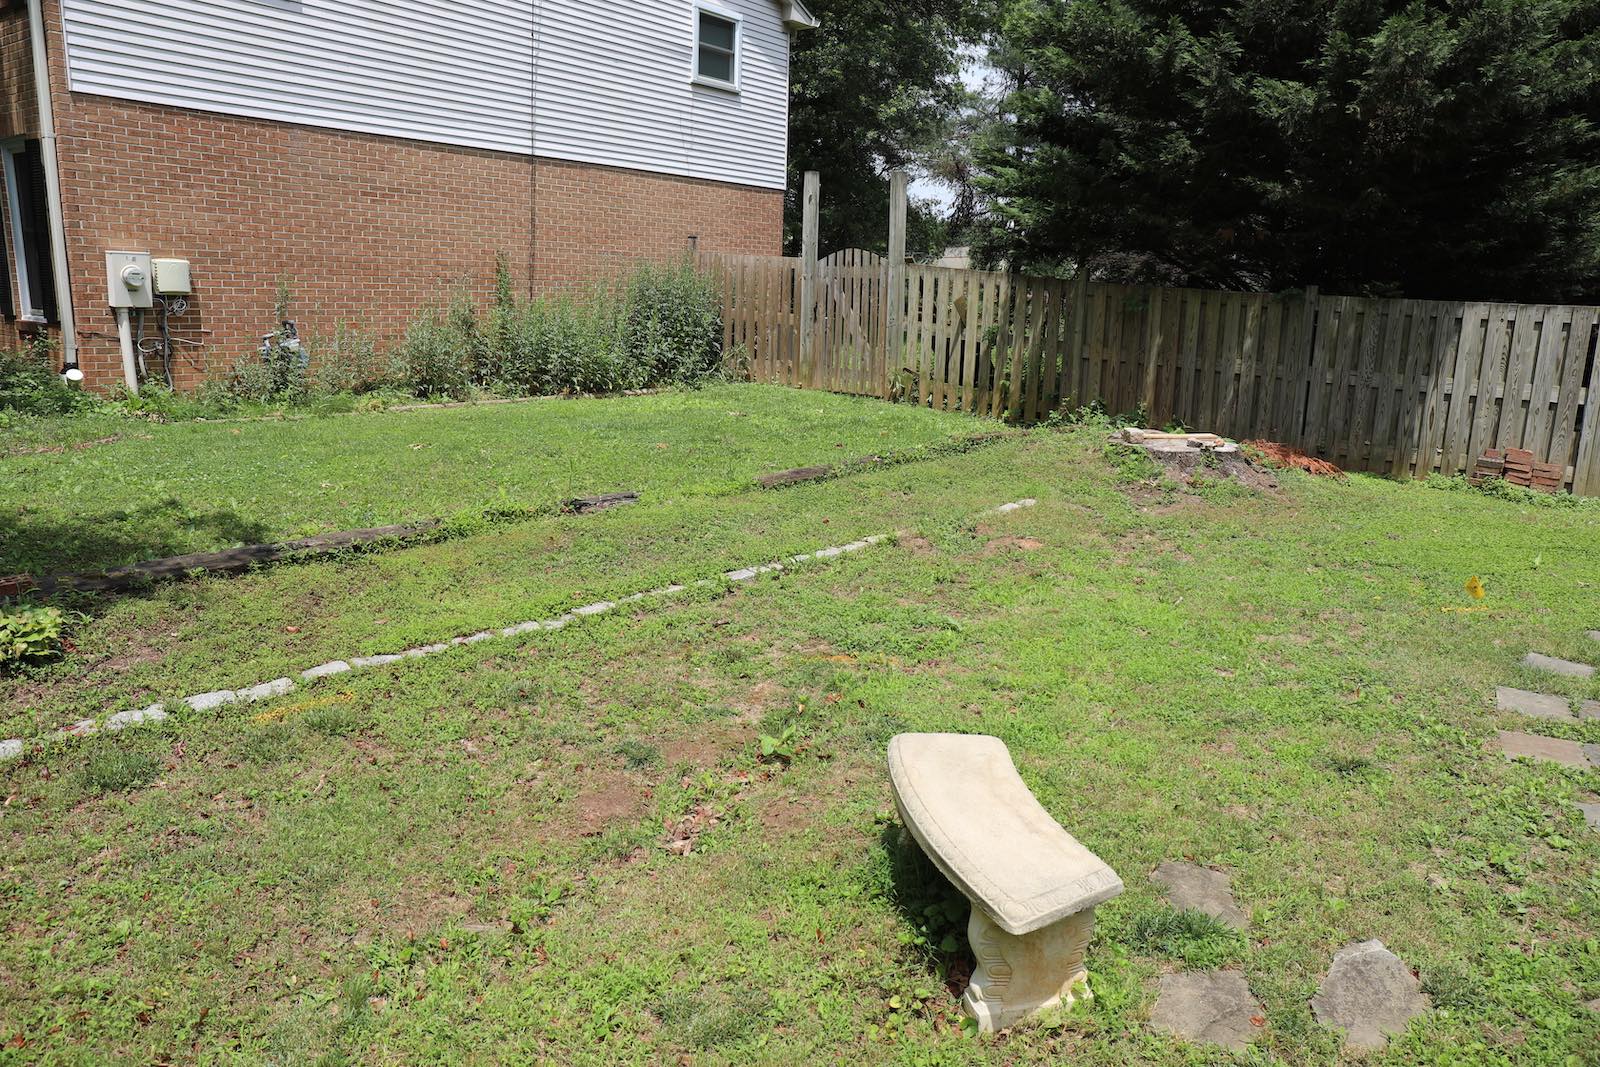
I’ve always had a “thing” for backyard gazebos, but I never thought I had the space for one.
I also didn’t want to put up a gazebo on my patio because I didn’t want it to block the sunlight coming into the windows of my family room.
Last year, though, I tried to make my own DIY shade canopy on my patio, thinking that the cloth top could easily be removed to allow for sunlight coming into my family room.
It ended up not being quite as easy to remove from the canopy, so it blocked a lot of the sunlight. Plus, the canopy collected rainwater which caused one of the thin pieces of wood on top to snap.
I decided it wasn’t worth fixing. Instead, a manufactured gazebo from Sunjoy next to my “she shed” would offer outdoor living space that would 1) hold up from season to season, and 2) wouldn’t block the sunlight coming into the house.
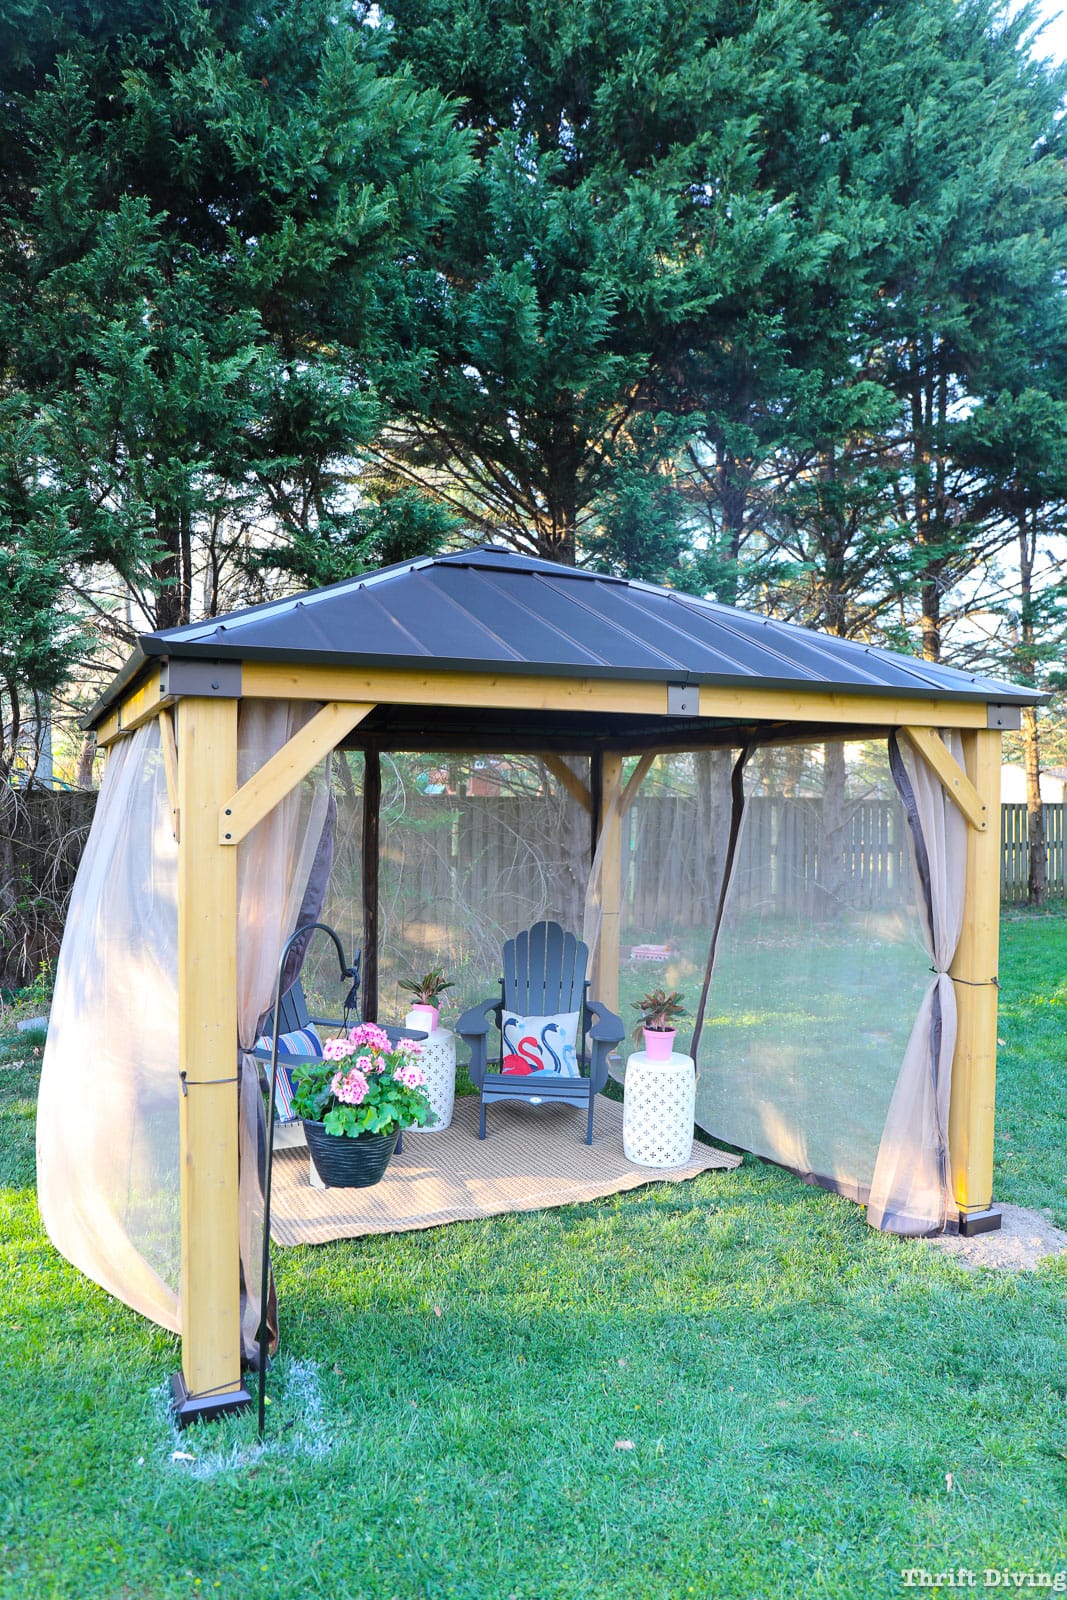
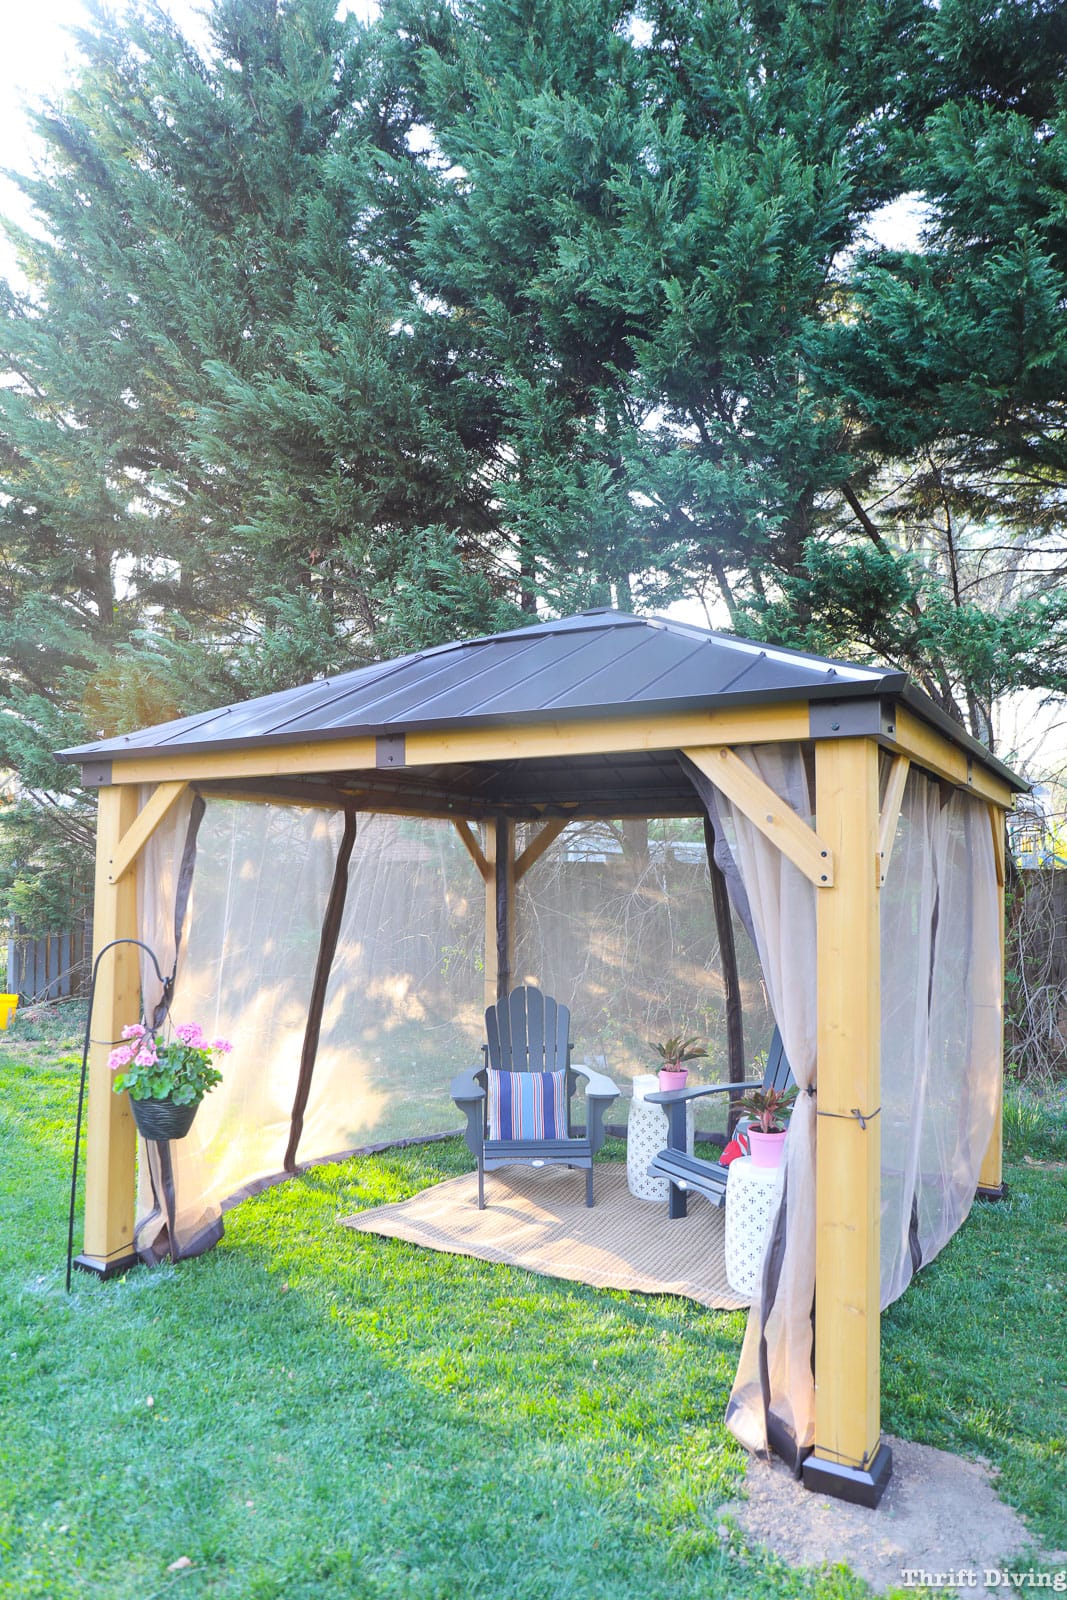
Here’s how it turned out after my family put up the gazebo!
Click here to save this post on Pinterest!

So in this post, I’m going to share with you how to put up your own gazebo without hiring a contractor to do it yourself. It’s really not difficult! It just takes a crew of people, along with the right tools and a weekend!
(Pssst! Use my coupon code THRIFTDIVING to save 13% off non-sale gazebos and other items at Sunjoy! No minimum required purchase amount or expiration date on the coupon code, and the code is good for one use per customer).
How to Put Up a Gazebo: Tools Needed
Here’s everything my family used to put up a gazebo in our backyard. Some of these links are affiliate links, which means if you purchase through my links, my blog will earn a commission at no cost to you. 🙂
- 11′ x 11′ Sunjoy Outdoor Patio Wooden Frame Hard Top Gazebo
- Universal Mosquito Netting and Curtains (optional)
- Power drill
- Drill bit for driving screws
- Socket ratchet
- 11/16 socket
- Sized 10 socket
- Hammer
- Safety glasses
- Ladder
- Level
- Square
- Tape measure
- Extra soil or sand for leveling the gazebo
- Tamper
- 4-5 people to help assemble the gazebo
Watch This Project in Action!
Of course I recorded the entire process for my Youtube channel. 🙂 You can watch here!

STEP 1: Unpack all the parts of the gazebo.
I was worried about what the packaging would look like when it arrived from the shipper. Thankfully, it was only these 2 boxes, but just know that these boxes are heavy! This 11′ x 11′ hardtop gazebo was just under 400 pounds combined for these two boxes.

There are tons of pieces that will have to be unpacked. I found it helpful to move all the pieces into my “she shed” so that the following day, when we were putting up the gazebo, everything would be ready to assemble. It’s a lot of plastic to open, too!
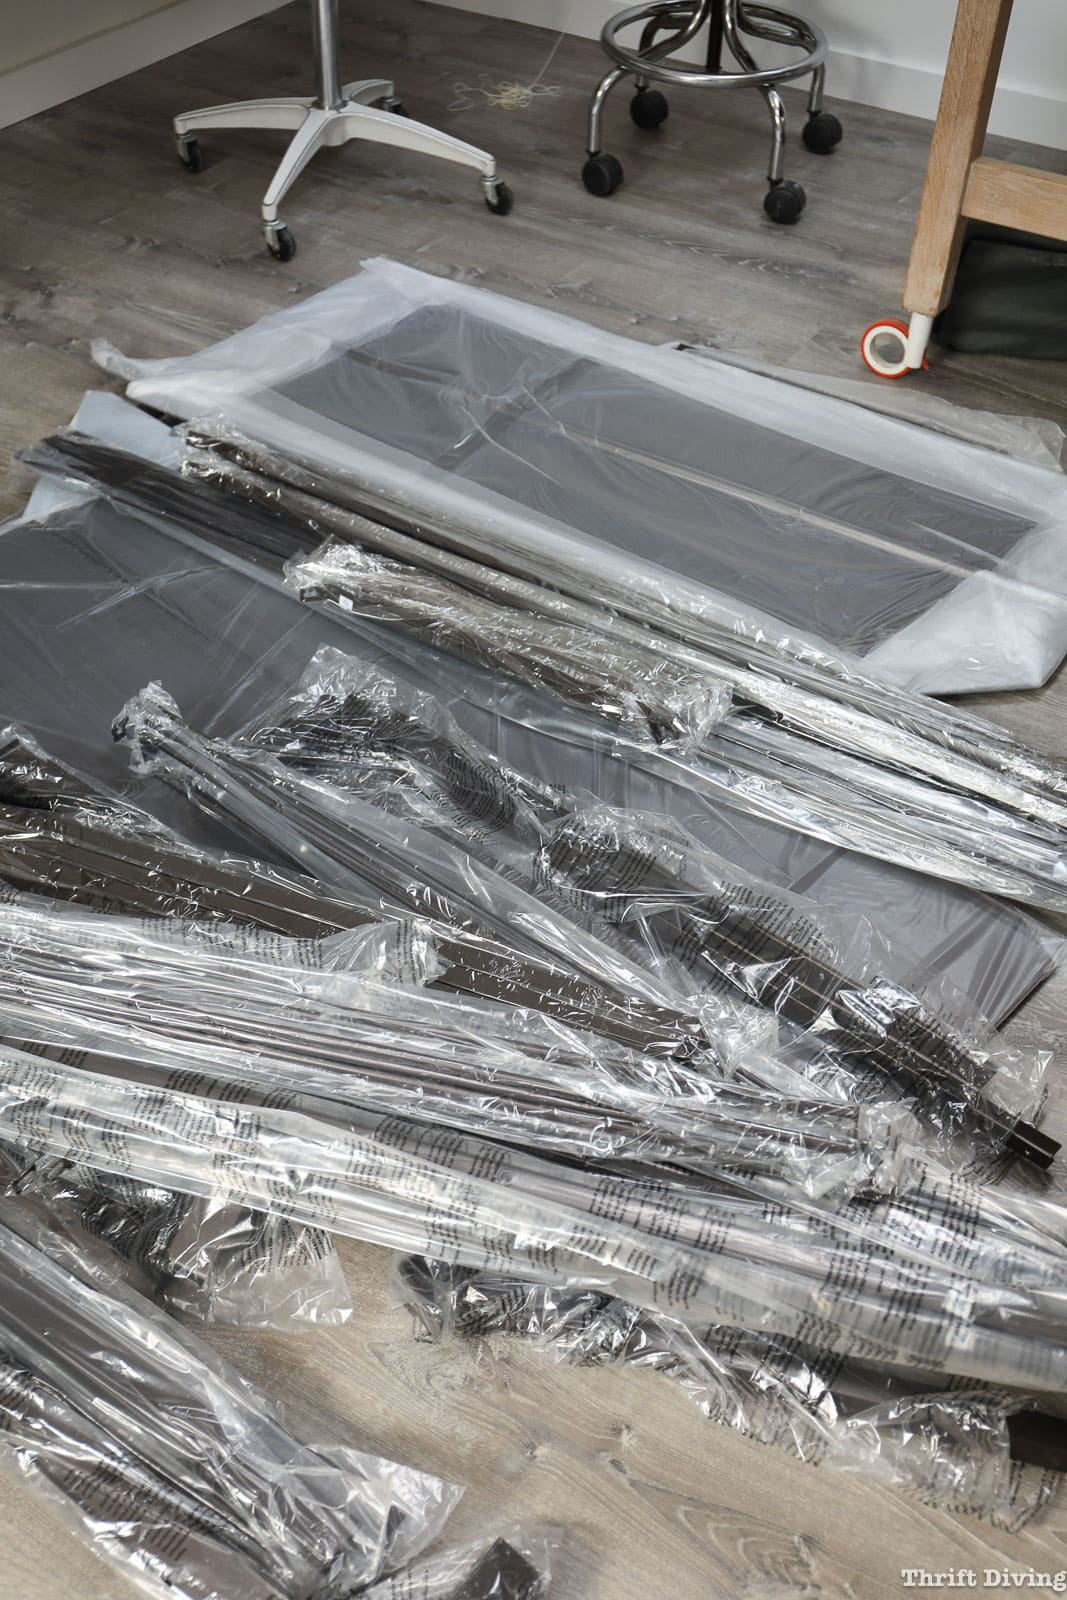

STEP 2: Organize the gazebo pieces by numbers and letters.
Because there are so many pieces, you have to organize them by numbers and letters. This is the best time to make sure that nothing is missing from the shipment, according to the manual.


You don’t have to organize these pieces indoors, but you will definitely want to have space nearby where you’re building in order to stack up the pieces, since there are so many components.

STEP 3: Attach the bases to the 6×6 gazebo posts.
The first step with putting up this Sunjoy gazebo is to screw on the bases to the bottom of the 6×6 gazebo posts. All the hardware to put up the gazebo will come with the gazebo and is labeled with letters and numbers, such as H7, H5, H15, etc.

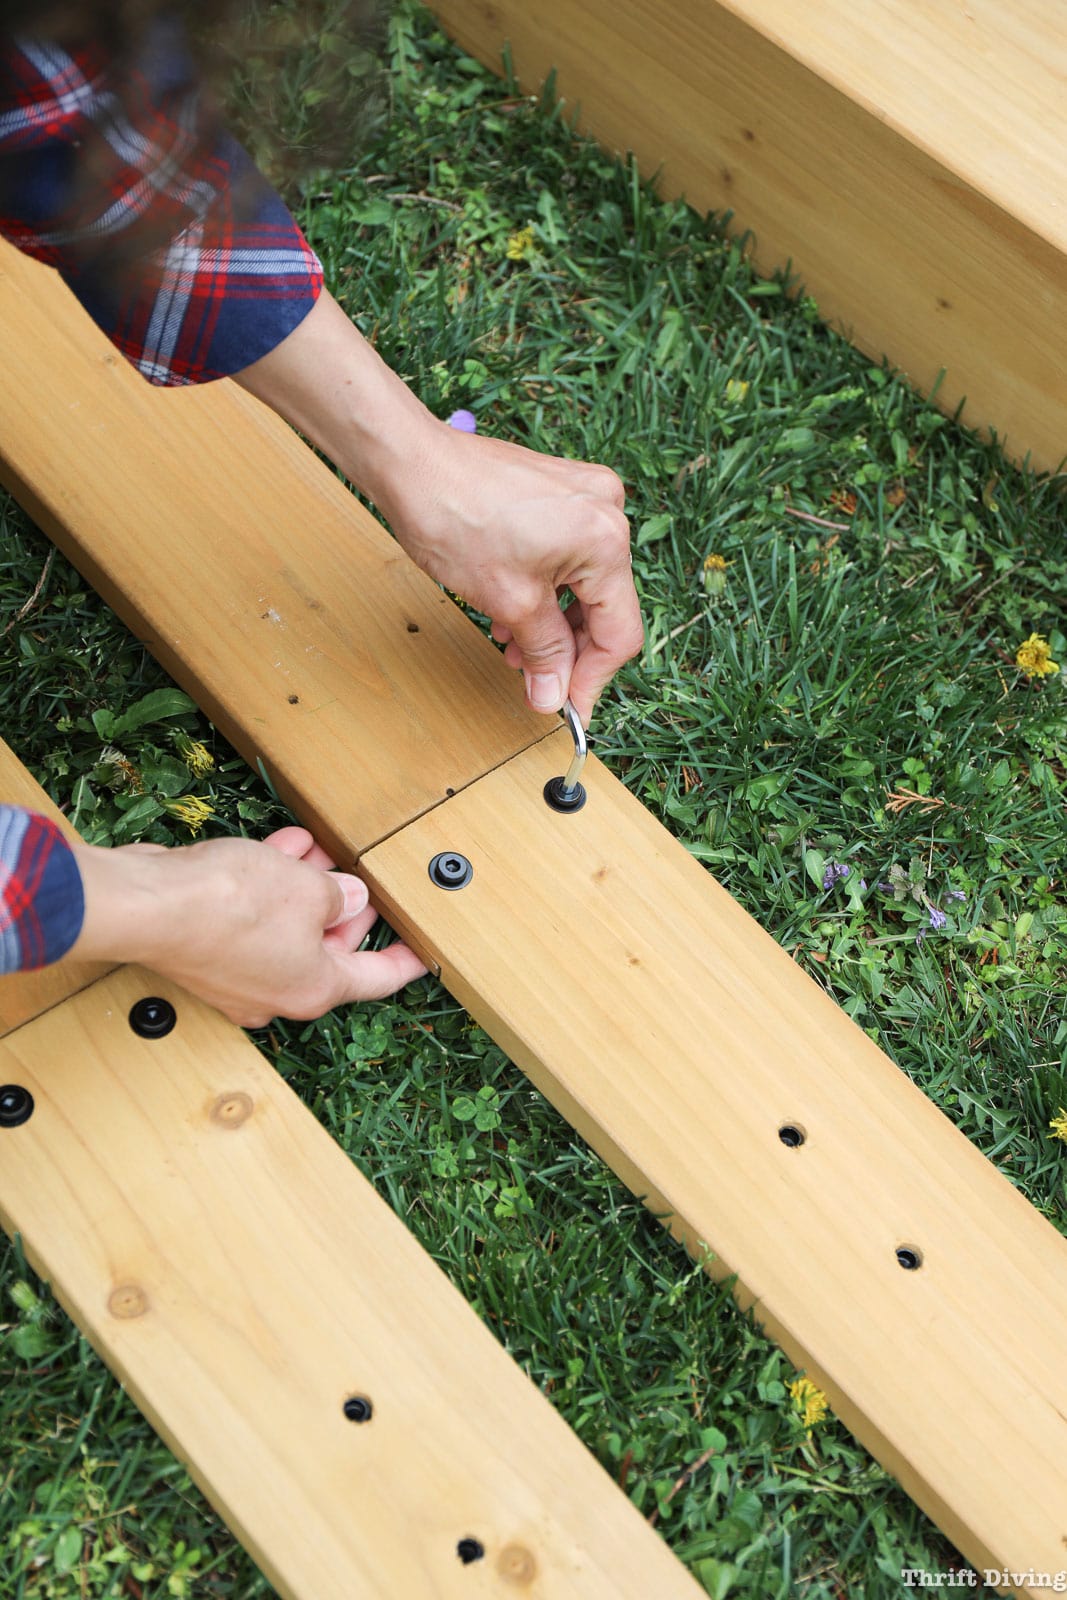
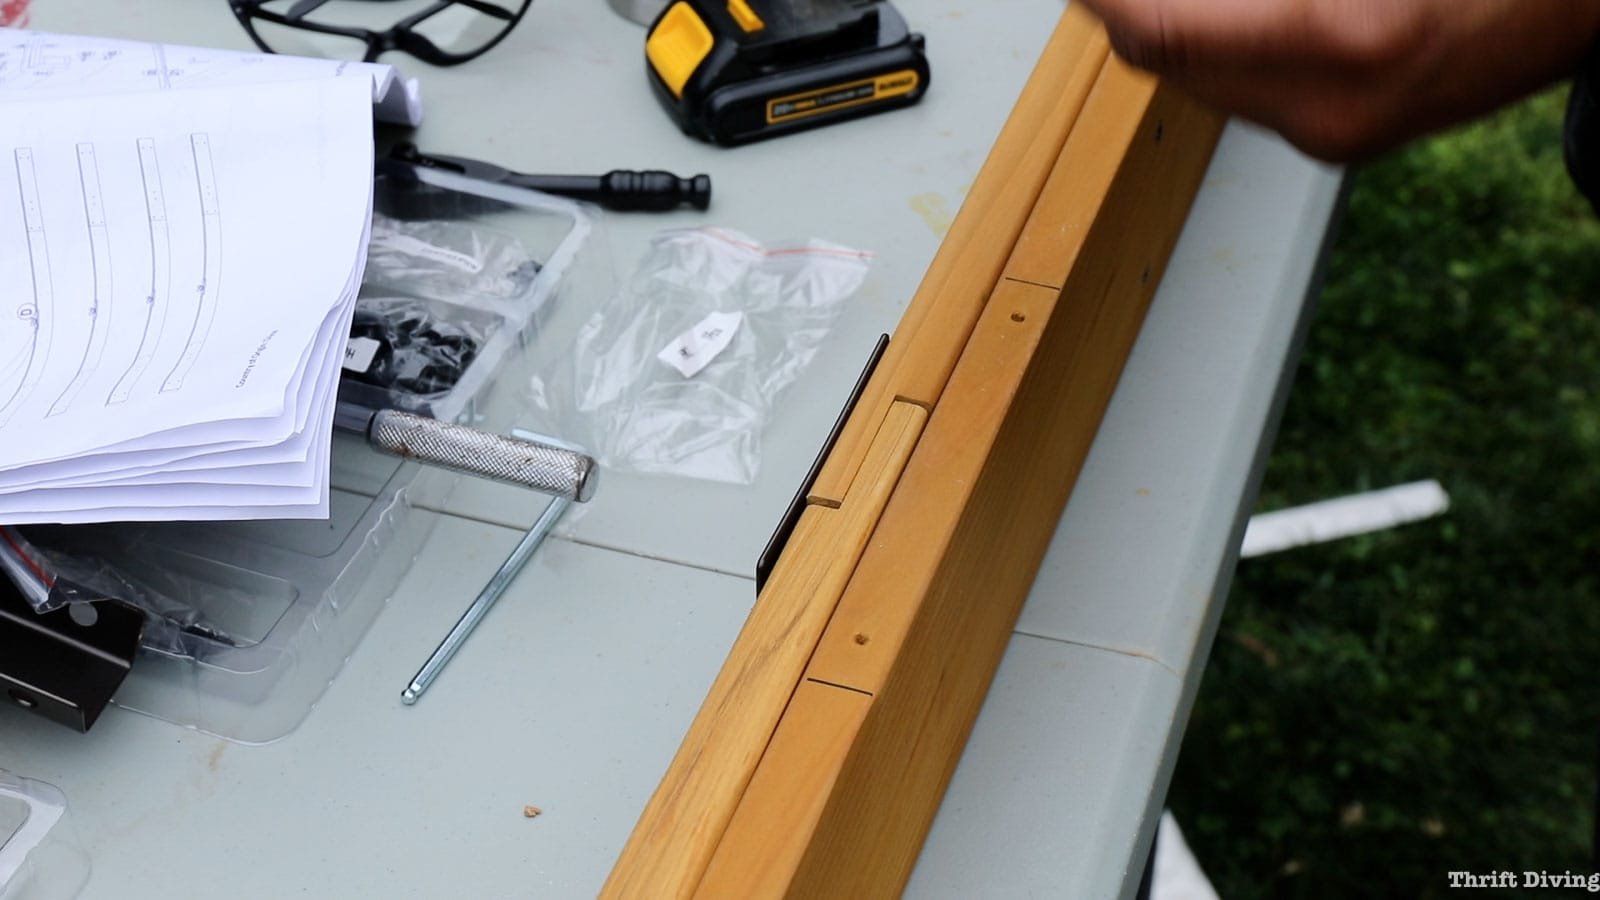
STEP 4: Insert the locking clips into the pre-drilled holes. Connect the cedar boards together.
Shipping a big ‘ole gazebo to your home would be difficult if all the pieces came “ready-made.” It does require a bit of screwing together in order to build up their length and strength.
The cedar boards have pre-drilled holes to hammer in these locking clips so that when the boards are screwed together, there is something for the screws to “grab” on to.
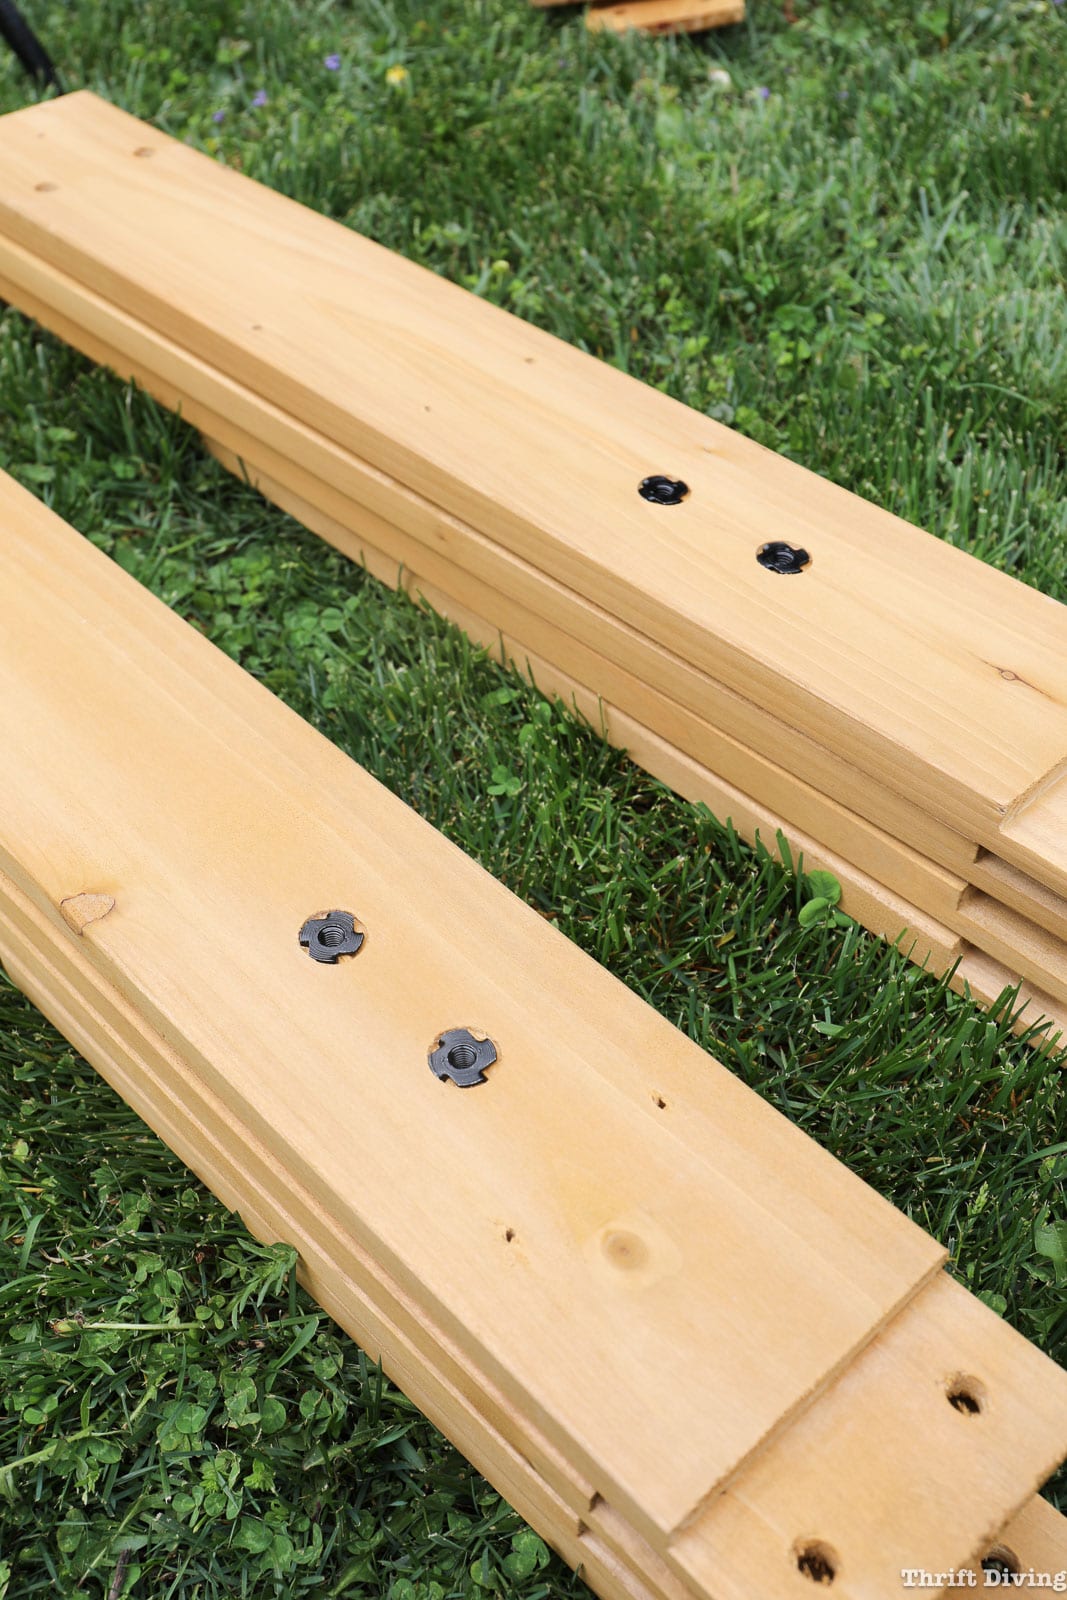
The 3/4″ thick cedar boards overlap to allow for them to be connected together to create the longer pieces to create the top sides of the gazebo.

Be careful not to over tighten the screws in the cedar because cedar is prone to cracking if put under a lot of pressure. Only tighten enough to be secure, but don’t overdo it. Go slowly, as well, when tightening up the screws with the allen wrench provided.
STEP 5: Attach the decorative middle brackets to the top cedar boards.
Now that the cedar boards are overlapped, attach the decorative middle brackets and tighten them with the allen wrench.
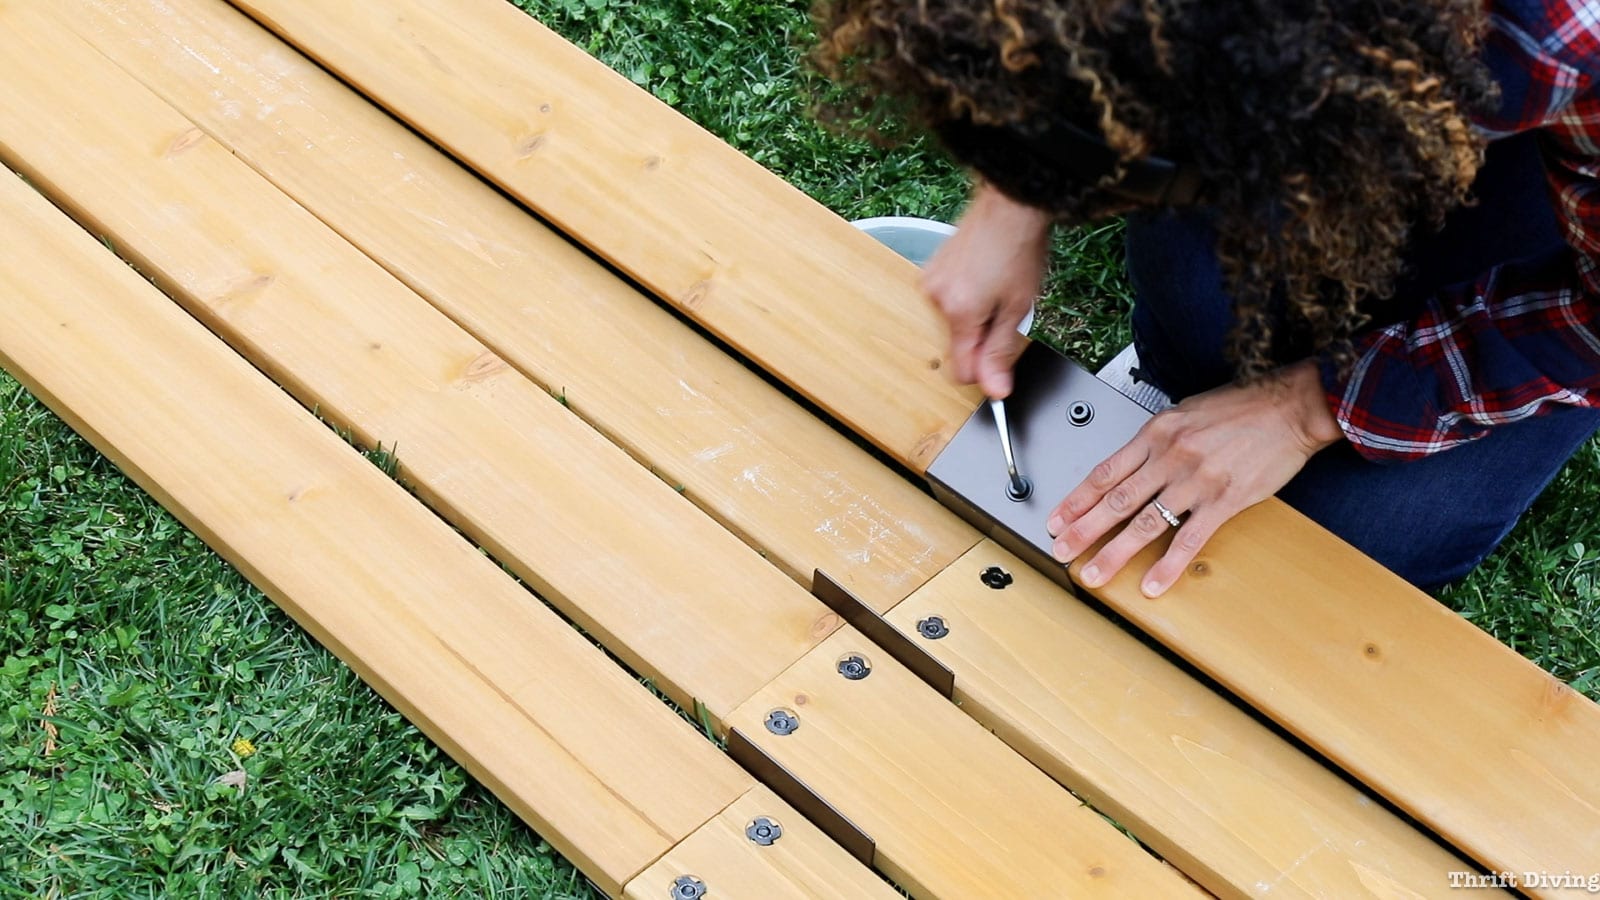
You’ll see that the decorative bracket is wide enough to support a second board. The two cedar boards should be overlapped.

Be sure not to cover up the markings and pilot holes with the decorative bracket that you’ll see on the edge of one of the boards when joining them together.

STEP 6: Screw the 3/4″ cedar boards together.
The top of the gazebo needs lots of strength. The best way to gain strength is to screw two boards together. They were doubled up in the previous step, but now you’ll need to secure them together. Make sure the pre-drilled holes (as seen below) are lined up before securing together. Drill slowly and don’t over tighten so that the cedar doesn’t crack.

STEP 7: Attach the medium beam connector.
The top of doubled-up cedar boards have those pilot holes and markings, as shown in a previous picture. This beam connector will be secured over those pilot holes and markings.

Insert screws into the pilot holes.
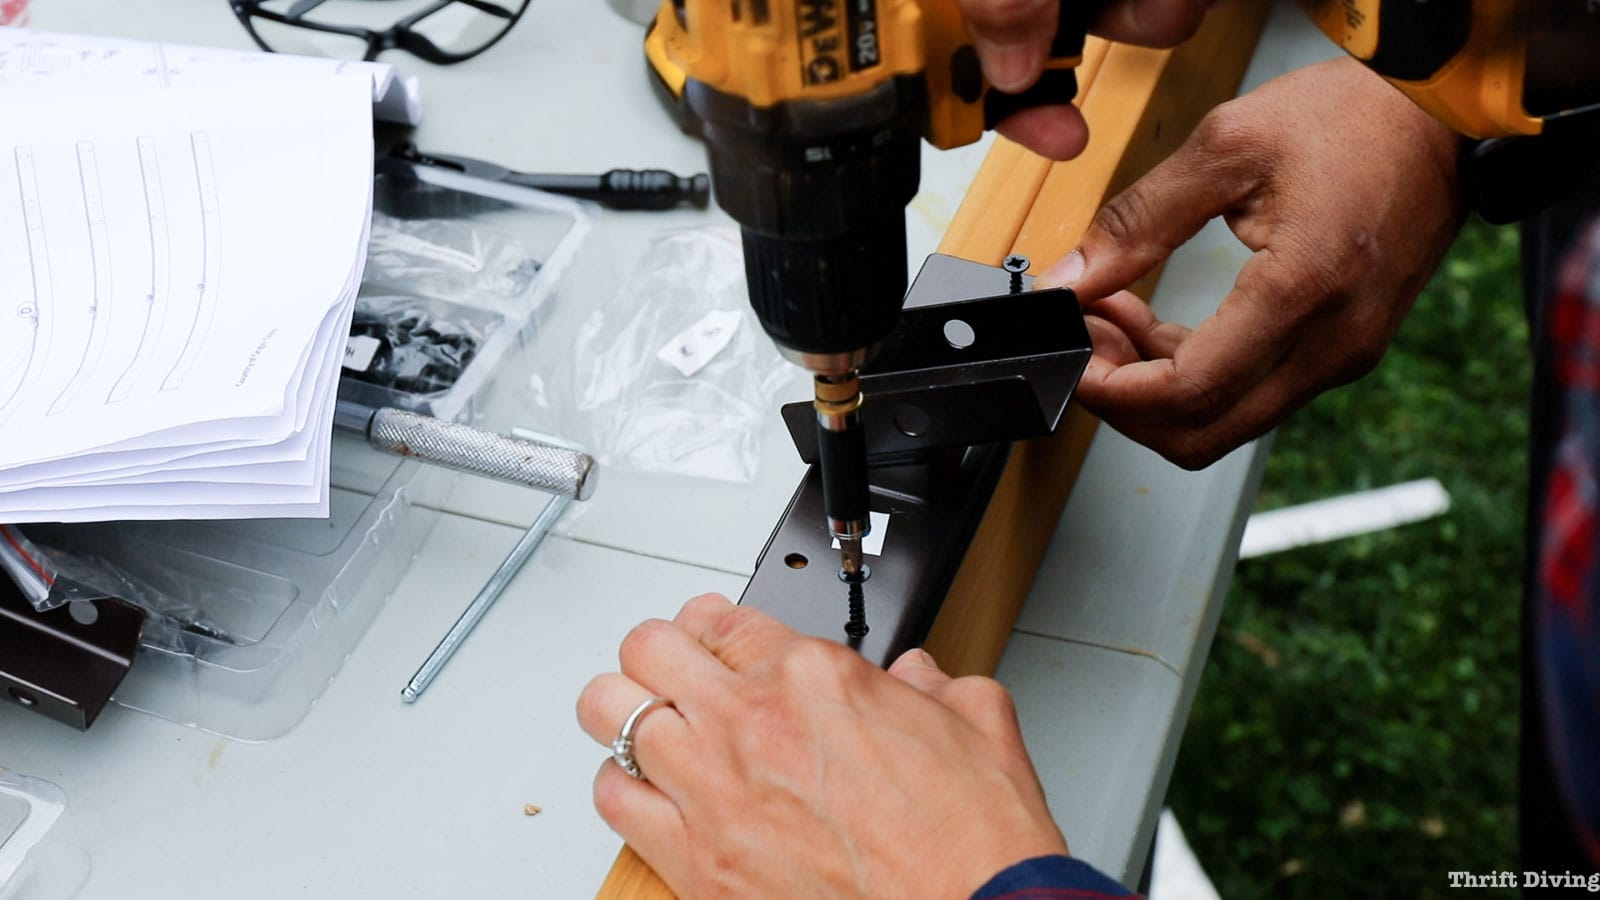
The other two holes of the connector will need pilot holes drilled using the drill bit provided in the hardware kit. Use a power drill to drill the pilot holes in the other two holes. Then insert screws into those pilot holes.

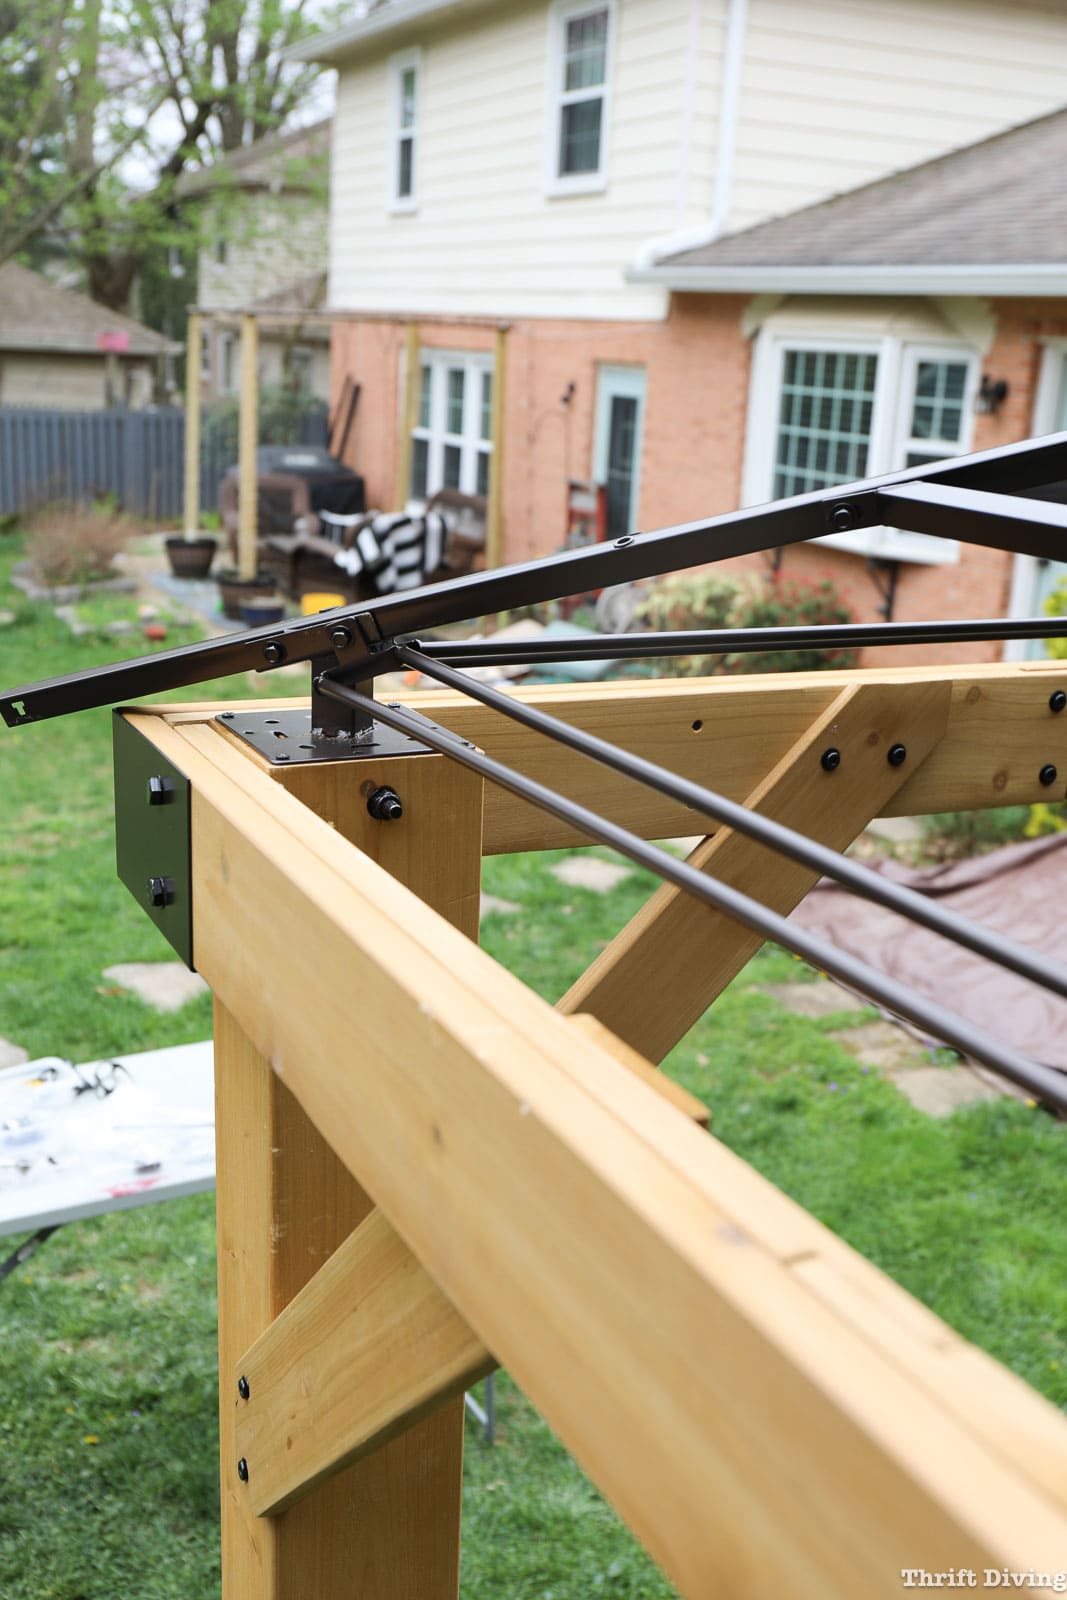
STEP 8: Attach the decorative corner, securing the top beams to the 6×6 posts.
The doubled up 3/4″ cedar boards will be attached to the tops of the 6×6 beams, while attaching the decorative corners. Lay out the posts and the doubled up cedar boards before attaching the decorative corner.


If you have trouble getting the large bolt inserted because things aren’t lining up properly, use a hammer to tap the bolt into place, and then secure it with a washer and nut.

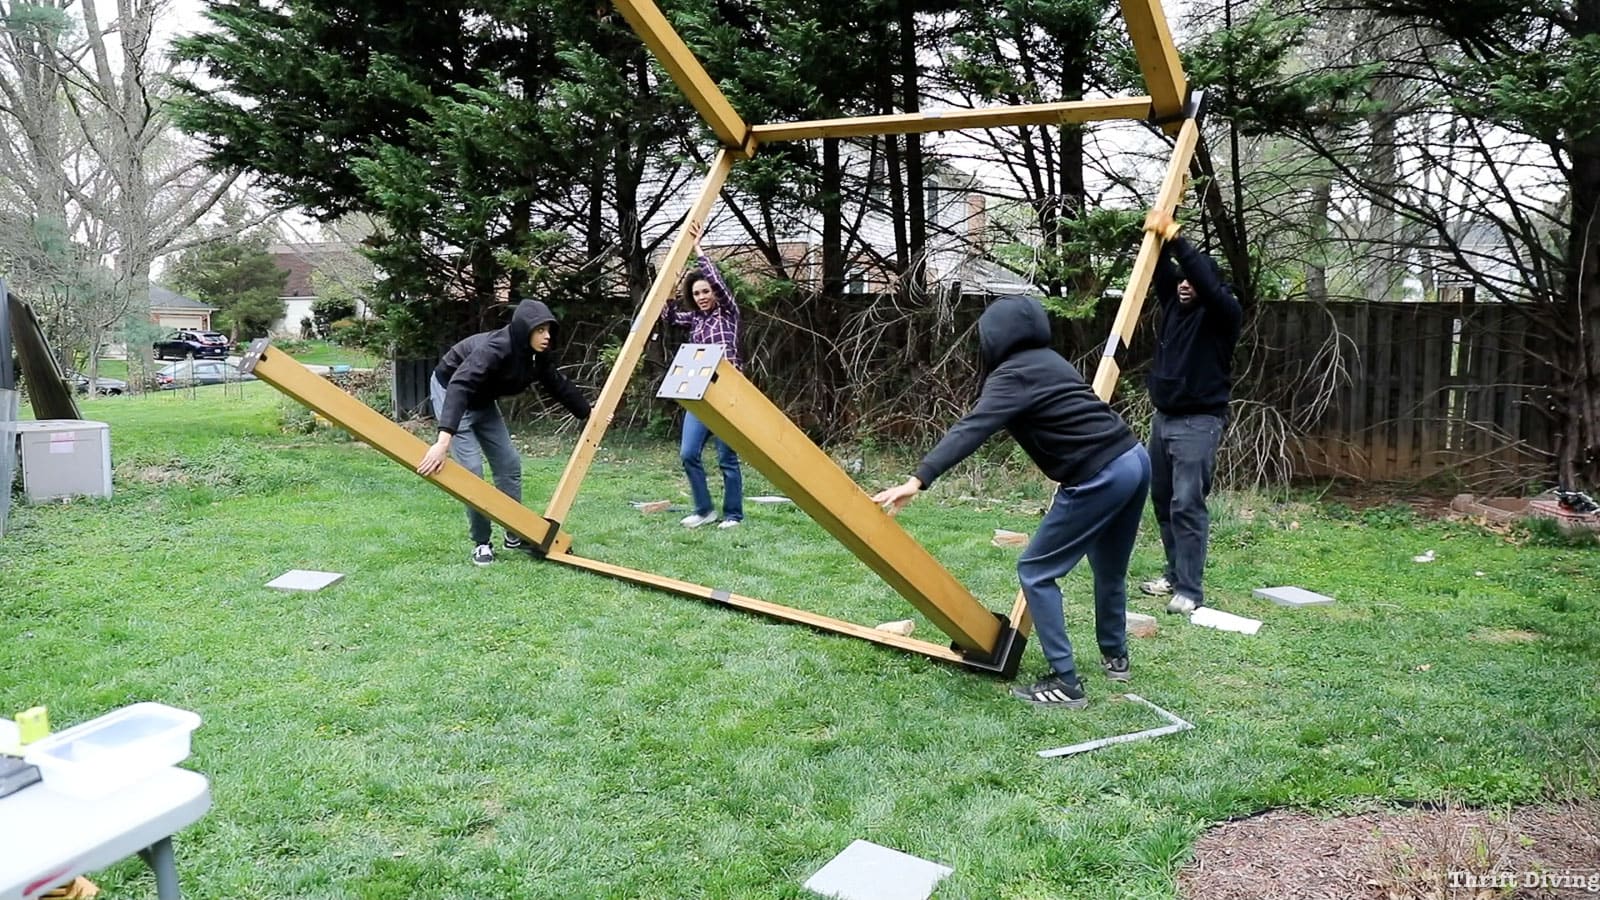
Should You Set Up a Gazebo Upside Down or Right-side Up?
This is where my family got stumped while putting up our gazebo. While we do have 3 kids and we had enough people to support the gazebo while putting it up, it seemed it would be easiest to assemble it while upside down, and then turn it right-side up.
I thought it would be best to assemble it right-side up while having the kids hold each end. But it seemed like right-side up would have required much more stability and support (and we had little faith the kids would be able to keep it up properly).


We ran into a challenge because while flipping the gazebo, one of the posts started to crack! My husband forgot to tighten the screws on one of the posts! For this reason, always put up your gazebo while it’s standing up-right! You’ll need more people to support the pieces while it’s being assembled, but it will be safer for everyone, and you’re less likely to damage your gazebo.
STEP 9: Level the gazebo on the grass.
Once the gazebo was in place, I used a long level to make sure the gazebo was on level ground in the grass. We thought we would set it on 12 x12 stones, but because the gazebo would be installed on grass, and it would require stakes to secure it to the ground, I removed the stones. The level showed that the front right post needed to be raised about 2″.
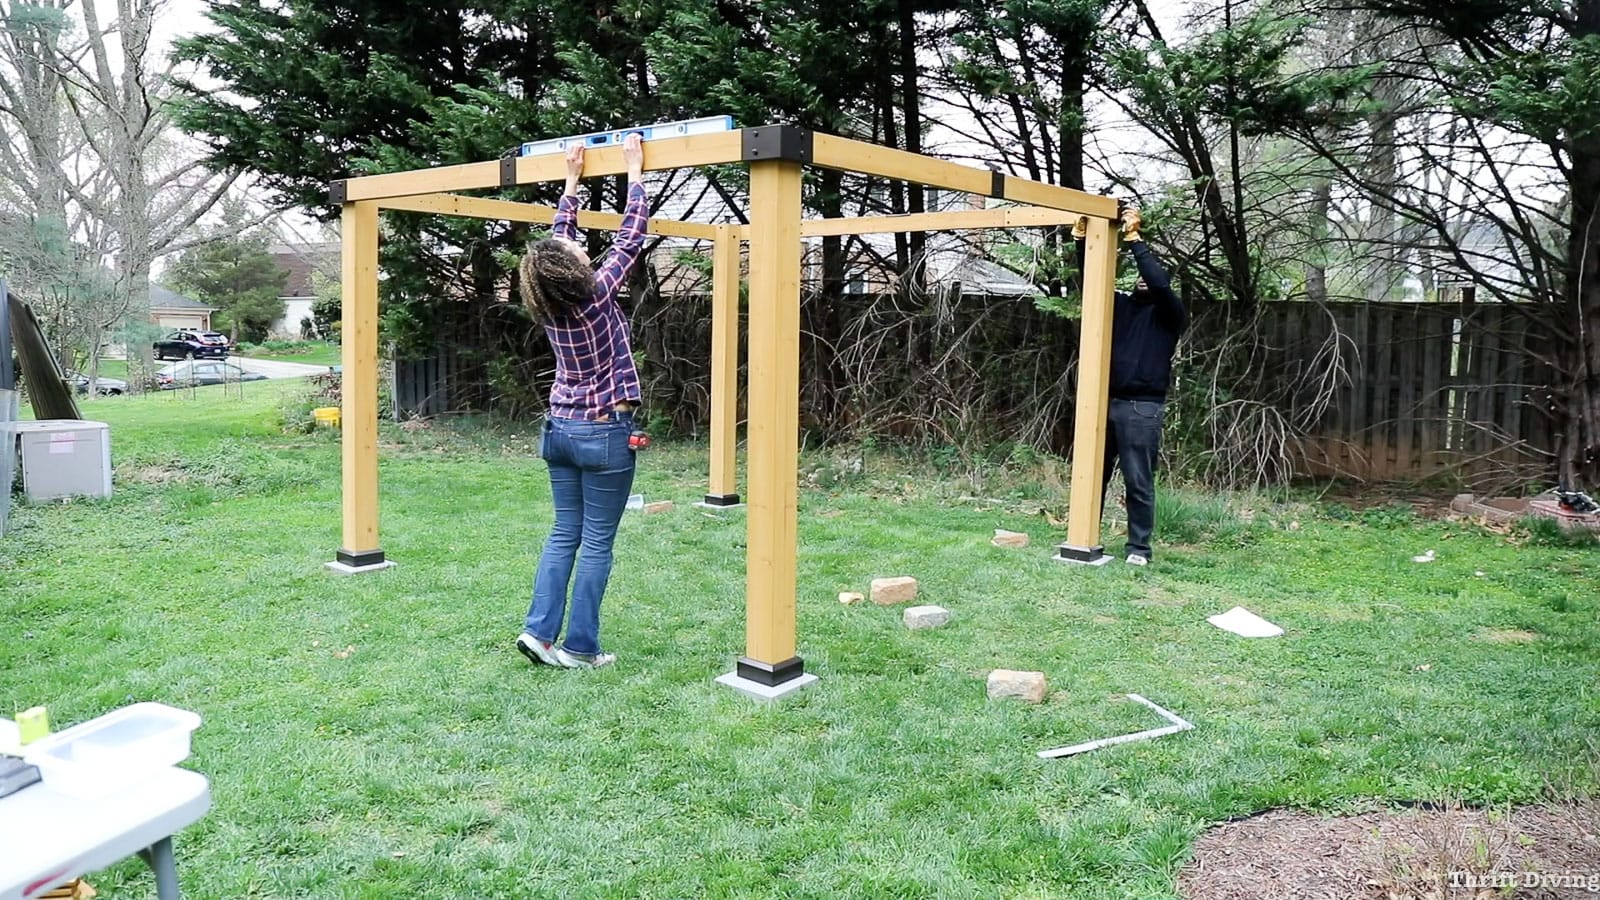
We had some extra soil, so we removed the grass under the front right leg (where the ground was slightly lower) and used a tamper to pack in the soil.
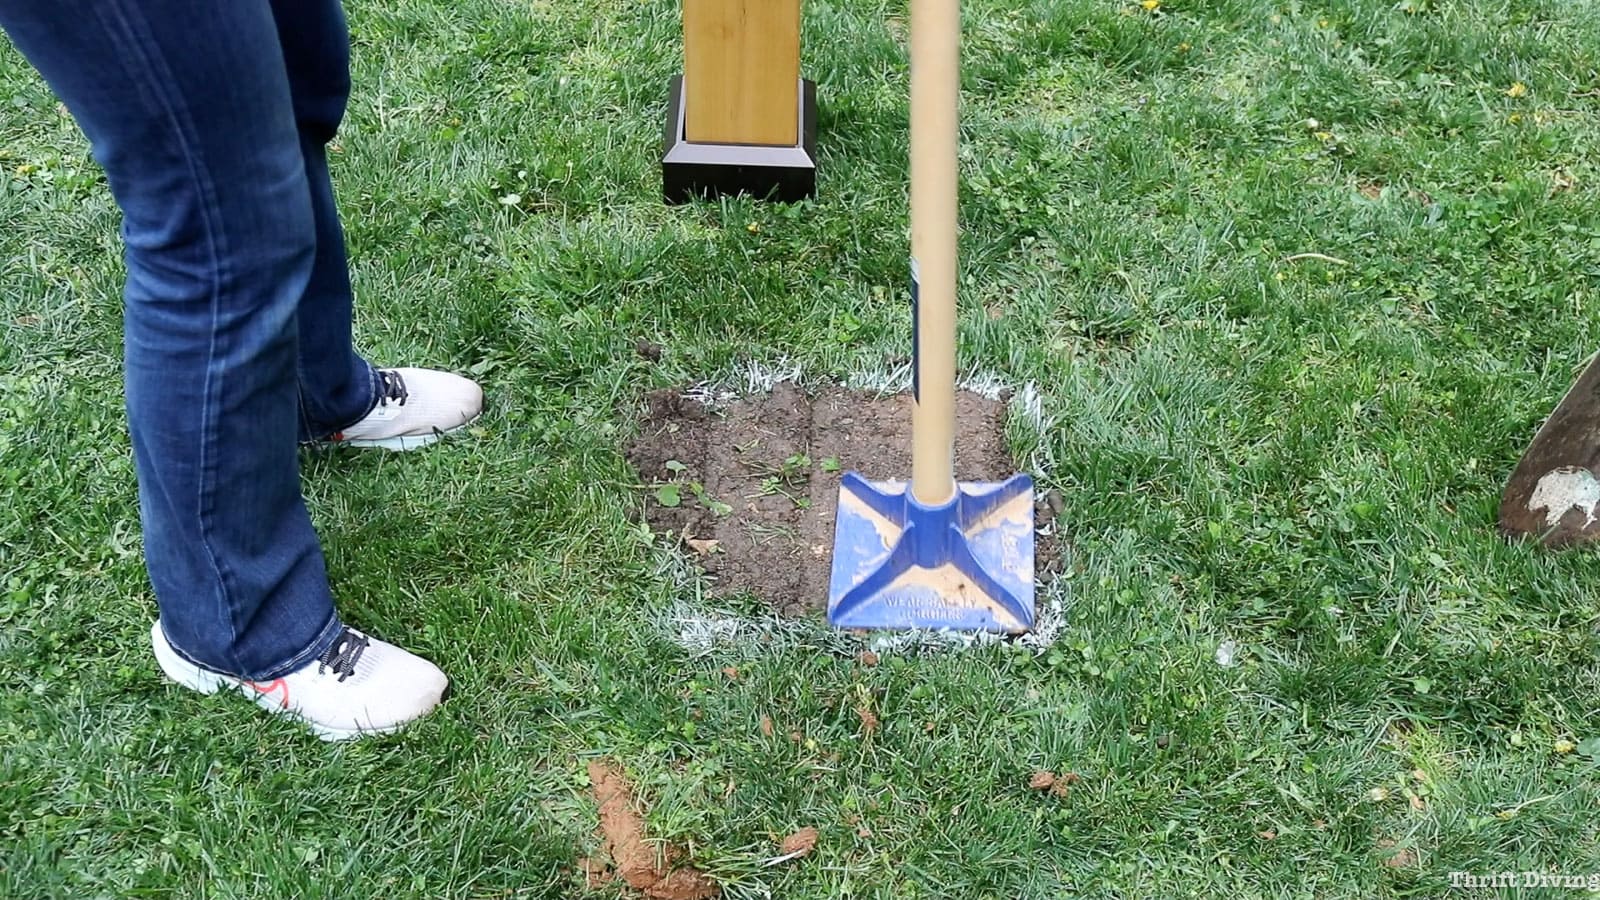
When we moved the gazebo back into place, the mount of compacted soil was perfect! The gazebo was level.

STEP 10: Use a tape measure to make sure the gazebo is square.
If something is square, the two measurements that you take from diagonal posts will both match. If they don’t, then you have to make some adjustments by moving in two opposite posts or bringing two opposite posts together. Our gazebo was just slightly off, so I made adjustments at the diagonal posts, and it was then evenly square. The two measurements were the same.
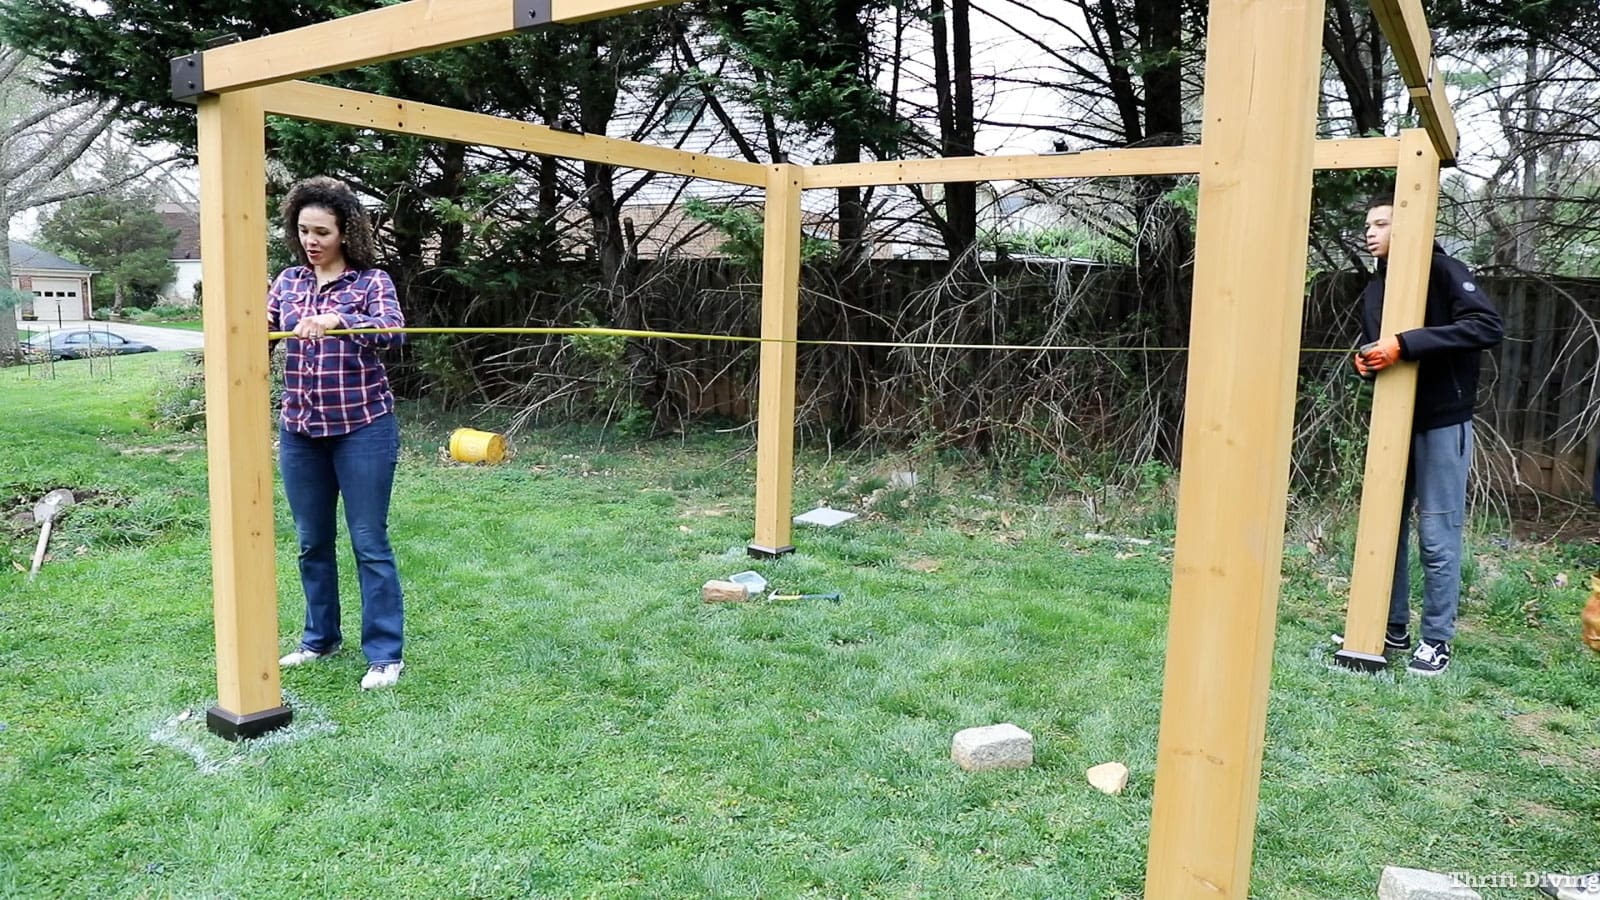
STEP 11: Attach the support posts.
This gazebo comes with support posts, which makes it even more sturdy.

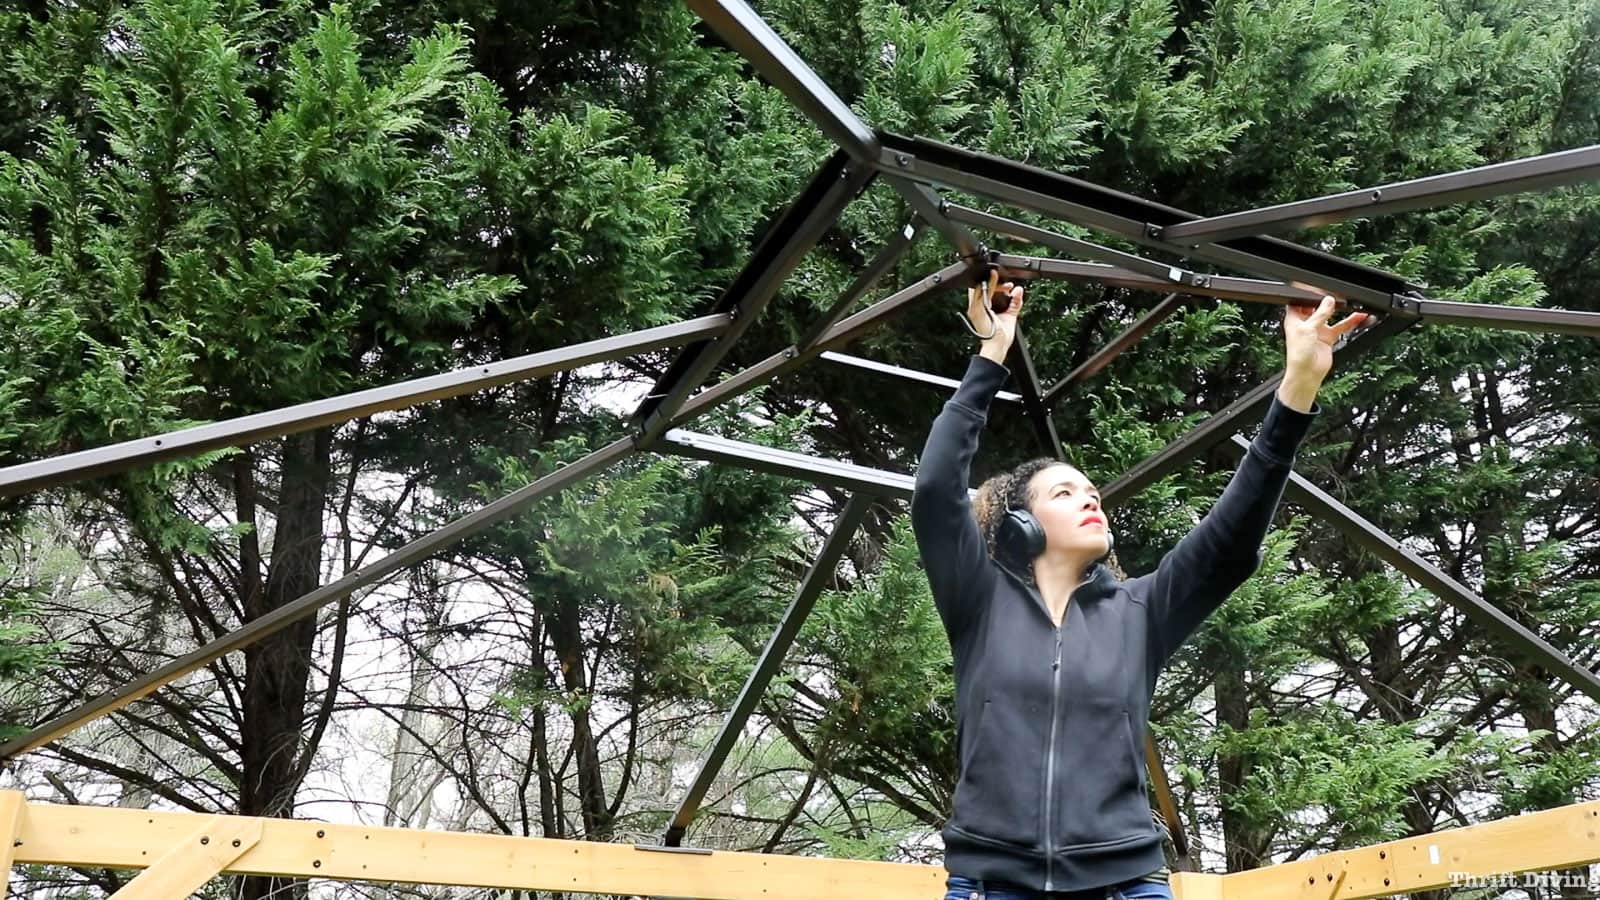
STEP 12: Build the roof structure with powder-coated steel framing.
There are a lot of metal parts for the roof of the gazebo. You can do this part yourself, but with at least one helper, it will go faster. You’ll need a tall ladder because you’ll be climbing up to the tippy-top of the gazebo. Be careful and use a spotter for the ladder whenever possible.
The roof is built from the top down, starting with putting these beans together to create a square, and then attaching the beams.

The beams will attach at the corners and middle of the other top posts, then secured with provided screws.


The top of this gazebo has 4 panels of polycarbonate plastic, which I love! It’s light enough to allow sunlight (so the interior of the gazebo doesn’t feel too dark inside), yet it blocks the UV rays. These are also secured with screws.
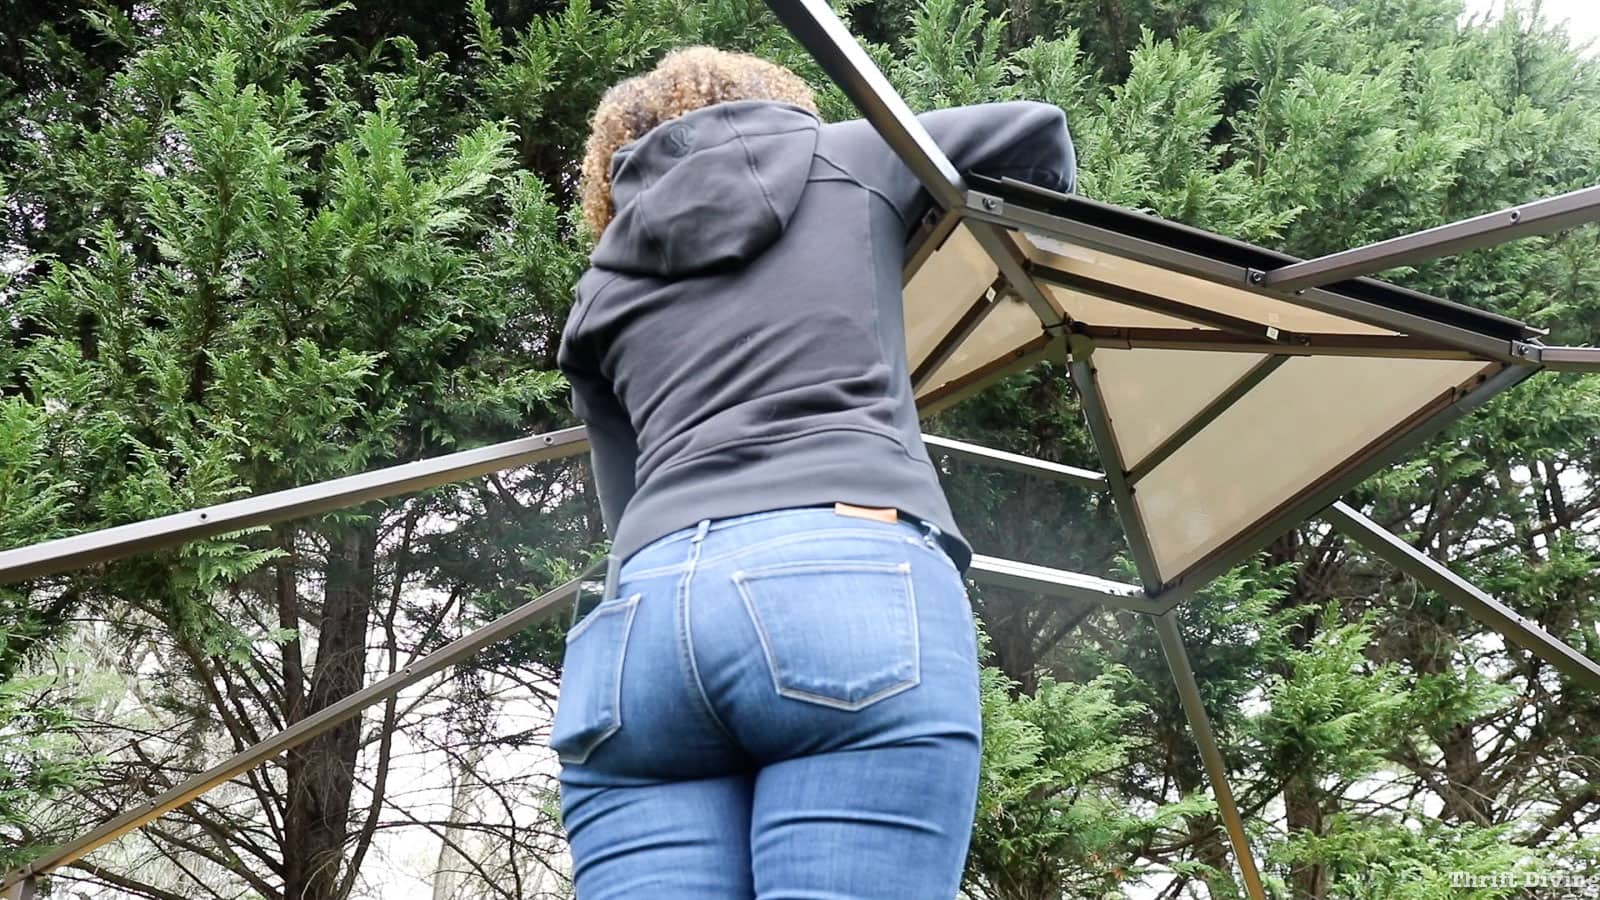
Continue building out the beams of the roof of the gazebo, securing it with screws.

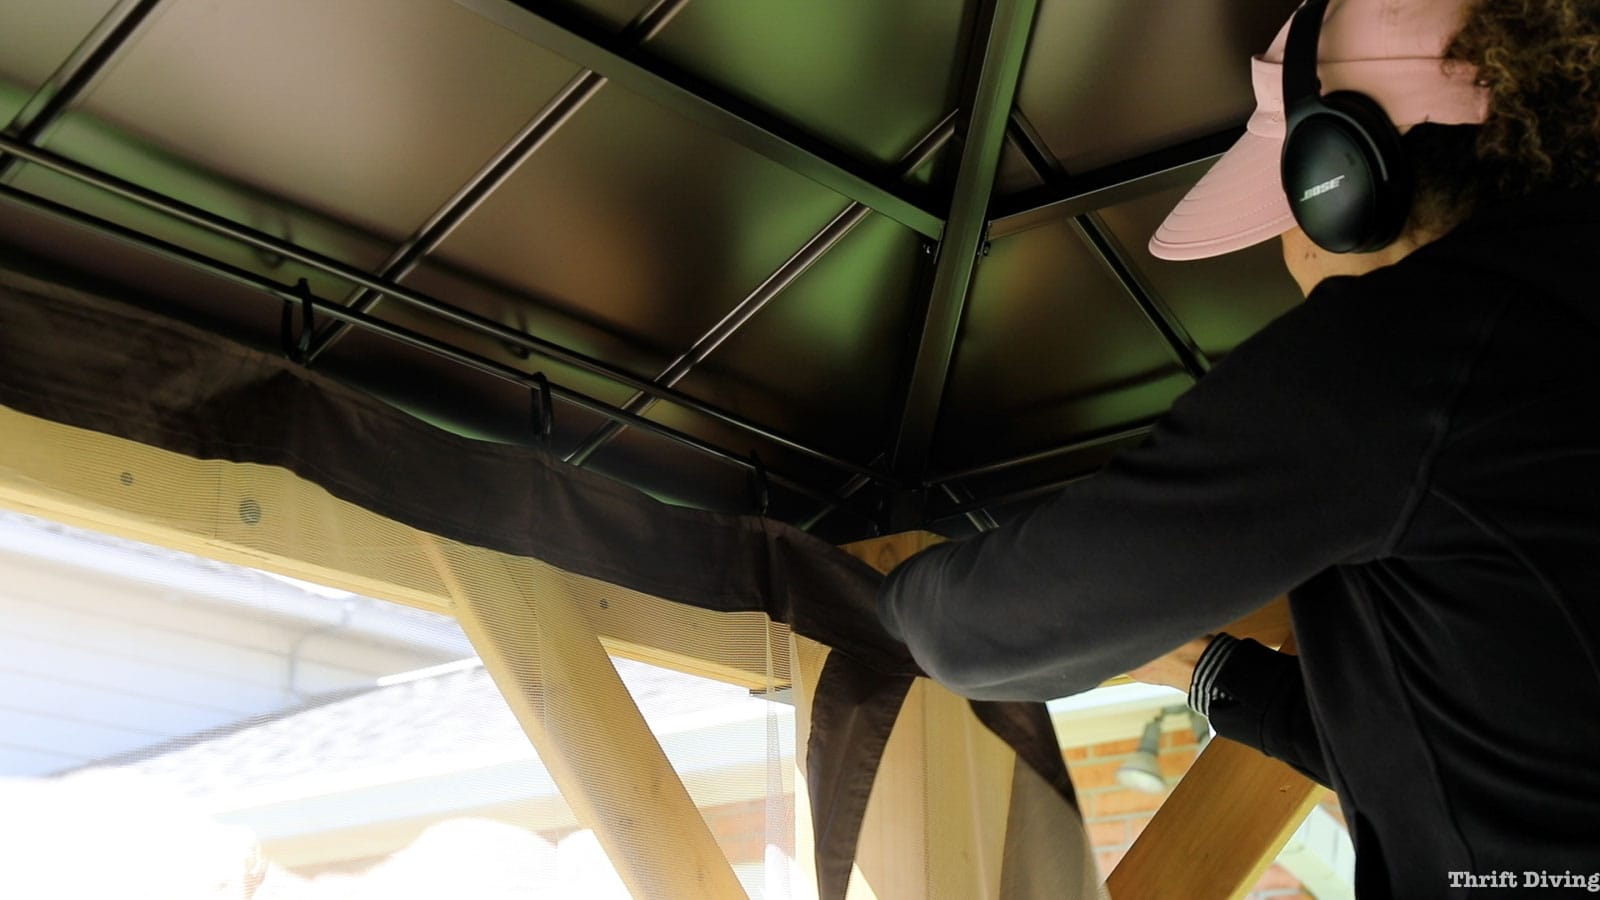
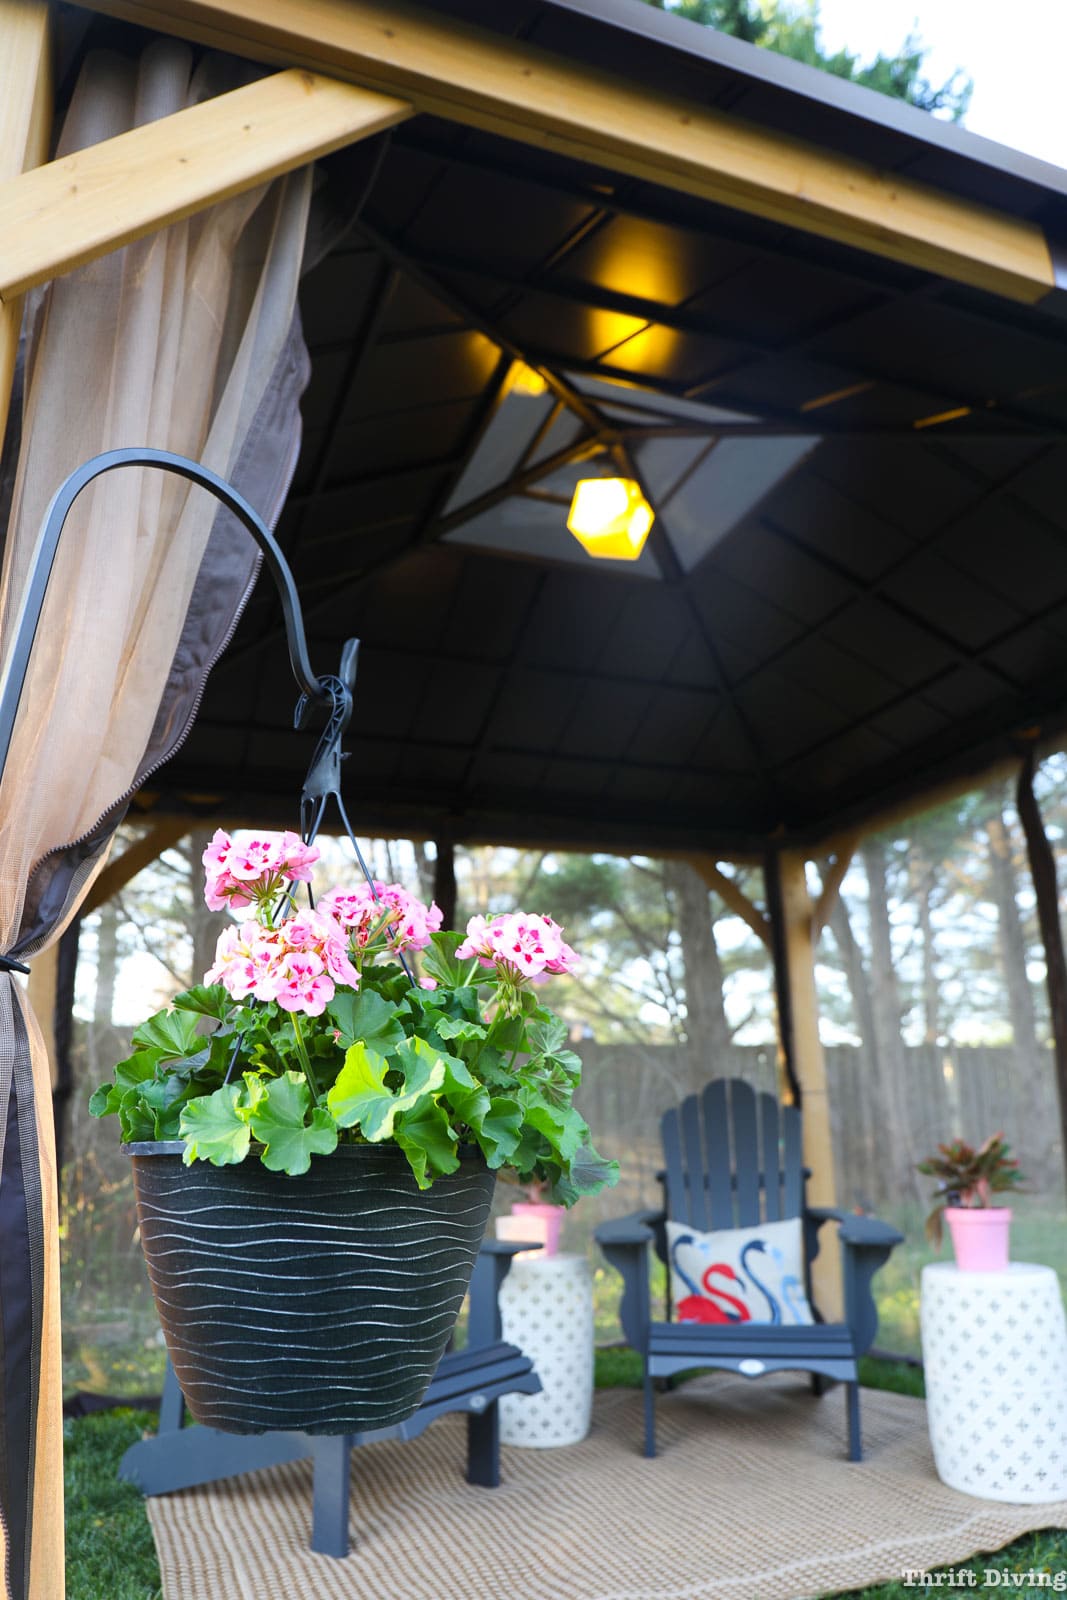
The instructions that come with this gazebo mislabeled some of these beams, but once you get started, it’s pretty self-explanatory. The instructions also don’t tell you when to install the mosquito netting rod. I added it as the last step of putting together the roof. It just attaches to the beam connector that is attached on the top of each gazebo post.
STEP 13: Add the durable steel panels to the roof.
I love that this gazebo has a hardtop! You can buy a gazebo from Sunjoy with a soft top, which makes it more removable if necessary (such as in high winds). But here in Maryland we don’t usually get very many high-wind events or storms. I also like that the steel top will last through all the seasons and can just be hosed off.
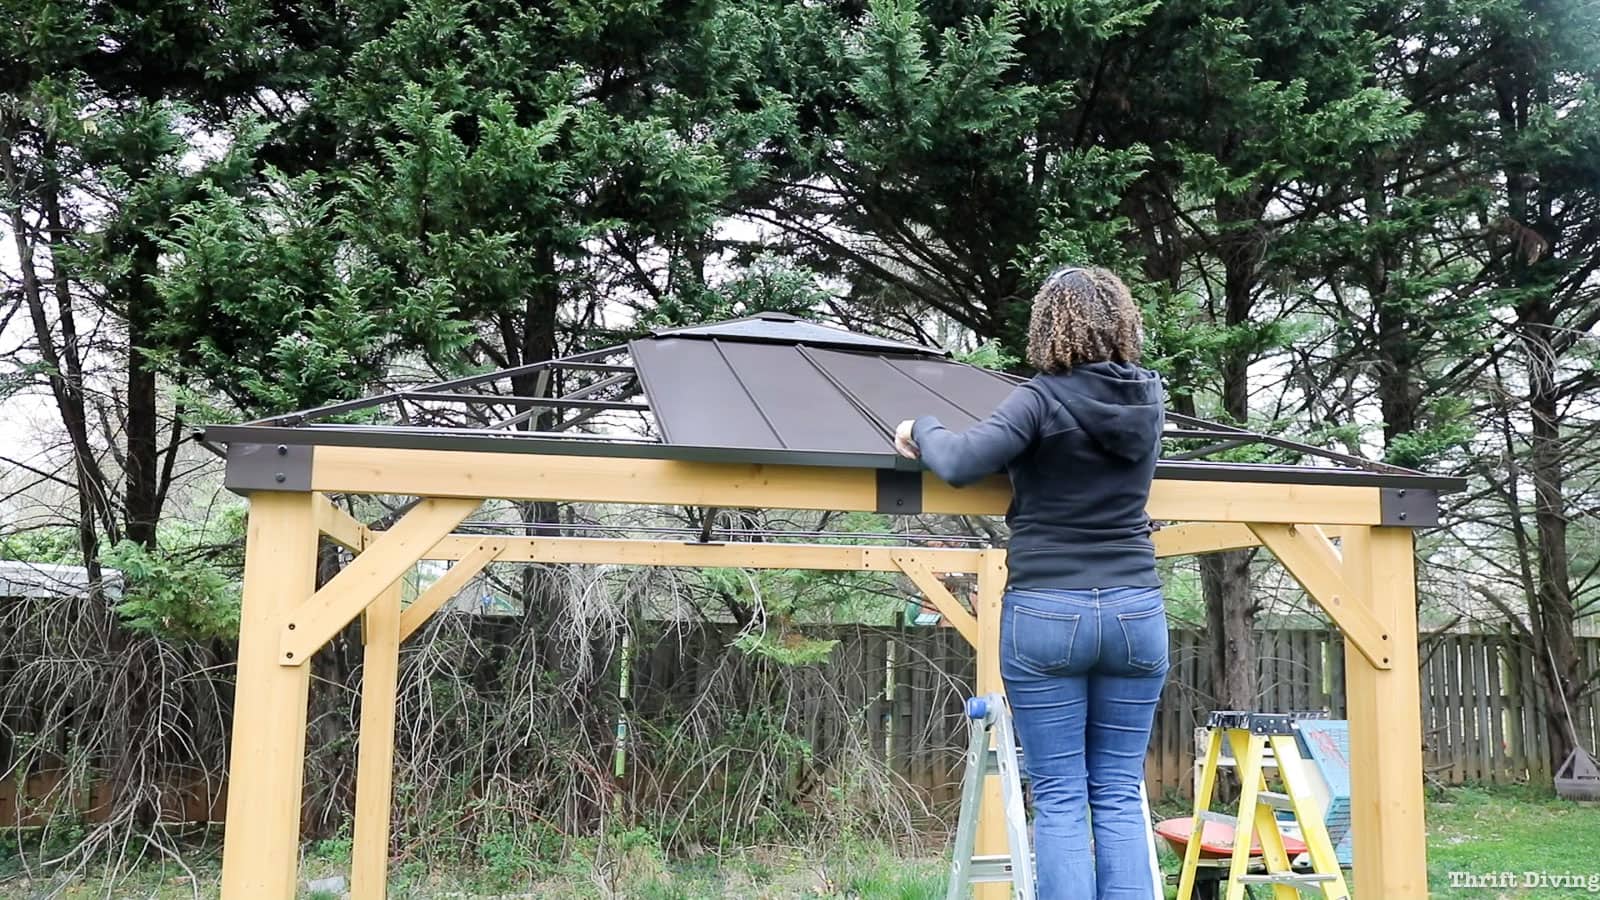
The middle two panels are installed first, and then the corners are secured.
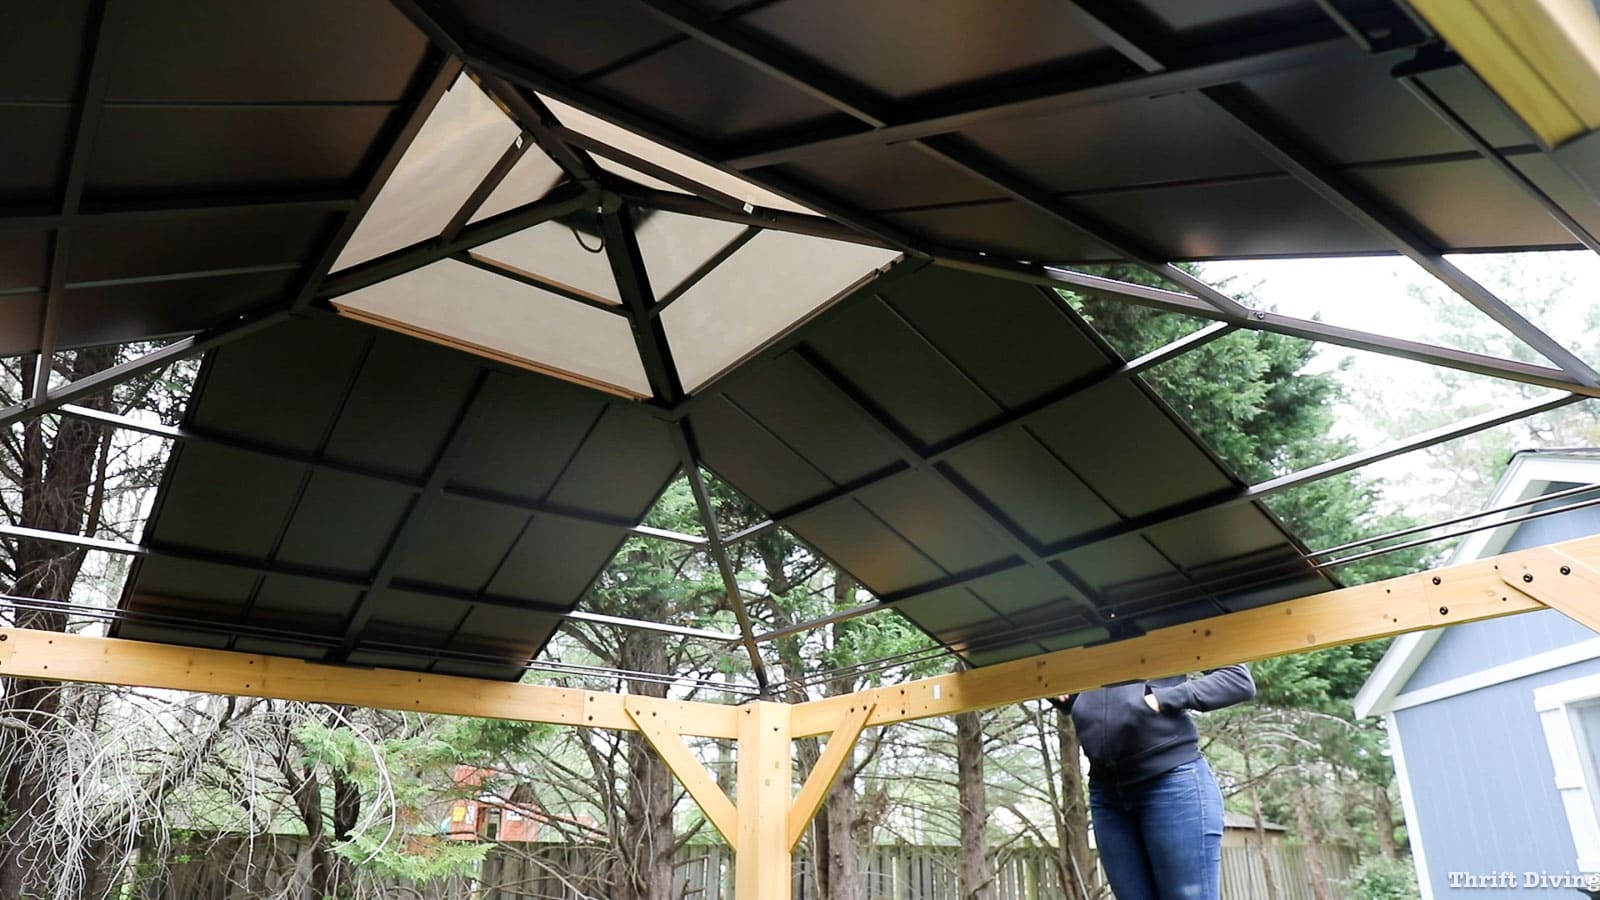

The last part of the roof assembly is to add the beam cover over the edges of the roof panels to cover the seams. It screws into place, as well.

STEP 14: Put up the mosquito netting and/or curtains.
What I love best about a gazebo is having the optional mosquito netting and curtains for privacy and keeping mosquitos out! The optional curtain set comes with clips that attach to the mosquito rod. I can’t wait to use the privacy curtains, too, which will make this gazebo feel cozy during family gatherings!
STEP 15: Hammer in the stakes into the grass to anchor your gazebo to the ground.
The hardware that comes with the gazebo only has 8 stakes, which allows for each post to get anchored with 2 of them. I’m going to buy an extra 8 so that I can add 2 more to each post, for a total of 4 for each post. This gazebo has a wind rating of 50 mph, which should be fine for Maryland, since it doesn’t get that windy or stormy. But having extra stakes would make me feel more secure.

So there you have it! It’s really not difficult to put up a gazebo yourself, and yes, you can install a gazebo on grass. While it would be nice to have a patio or deck to put it up on, it’s not required.
I found a rug that we weren’t using from my basement (use an indoor/outdoor rug), so I put that over the grass under the gazebo and moved a couple of chairs and stools (which are doubling as end tables), and flowers!
This gazebo also comes with a hook attached at the peak of the gazebo so you can add a light, a fan, flowers, or whatever you want. I added this cool power bank and solar-powered light to the top.
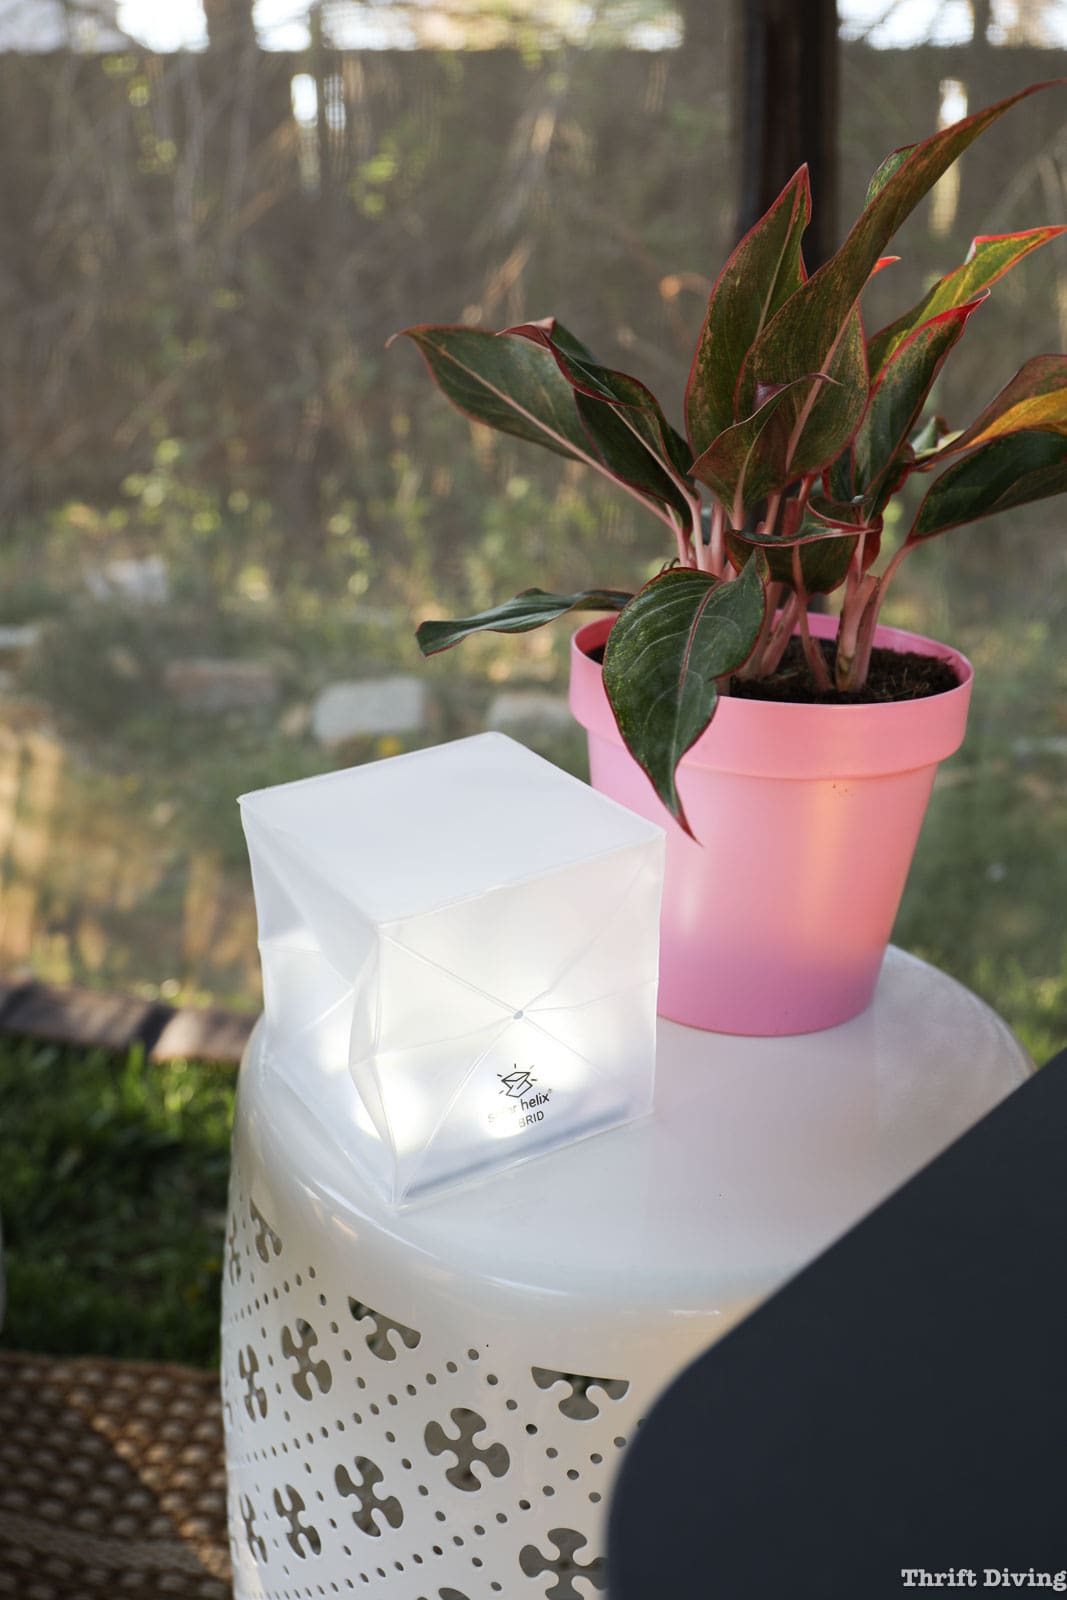
And on the other bench end table, I added this other solar-powered lantern from Solight Design which they sent to me to try. It’s perfect for gazebos or yards where you don’t have an outlet, or want something that can be recharged in the sunlight (no batteries!).

I absolutely love this gazebo! My favorite times to sit there is during the day and early evening! Hubby and I will even sit out there during the day for a few minutes and catch up in between meetings and projects. 🙂
(Pssst! Use my coupon code THRIFTDIVING to save 13% off non-sale gazebos and other items at Sunjoy! No minimum required purchase amount or expiration date on the coupon code, and the code is good for one use per customer).
If you’re looking to add more outdoor living space to your yard, definitely consider ordering a gazebo from Sunjoy!
Click here to save this tutorial for later!
![]()

Download the 5 freebies!

Thrift Diving inspires women to decorate, improve, and maintain their home themselves...using paint, power tools, and thrift stores! Use these 5 printables, checklists, and ebooks to get started!

i dont even have a backyard and i watched the whole video. I know the boys will try to claim that space this summer!!