Cutting a Dining Table in Half and Attaching to the Wall to Make Half Table
My husband gave me this idea of cutting a dining table in half and attaching it to the wall to make a half table.
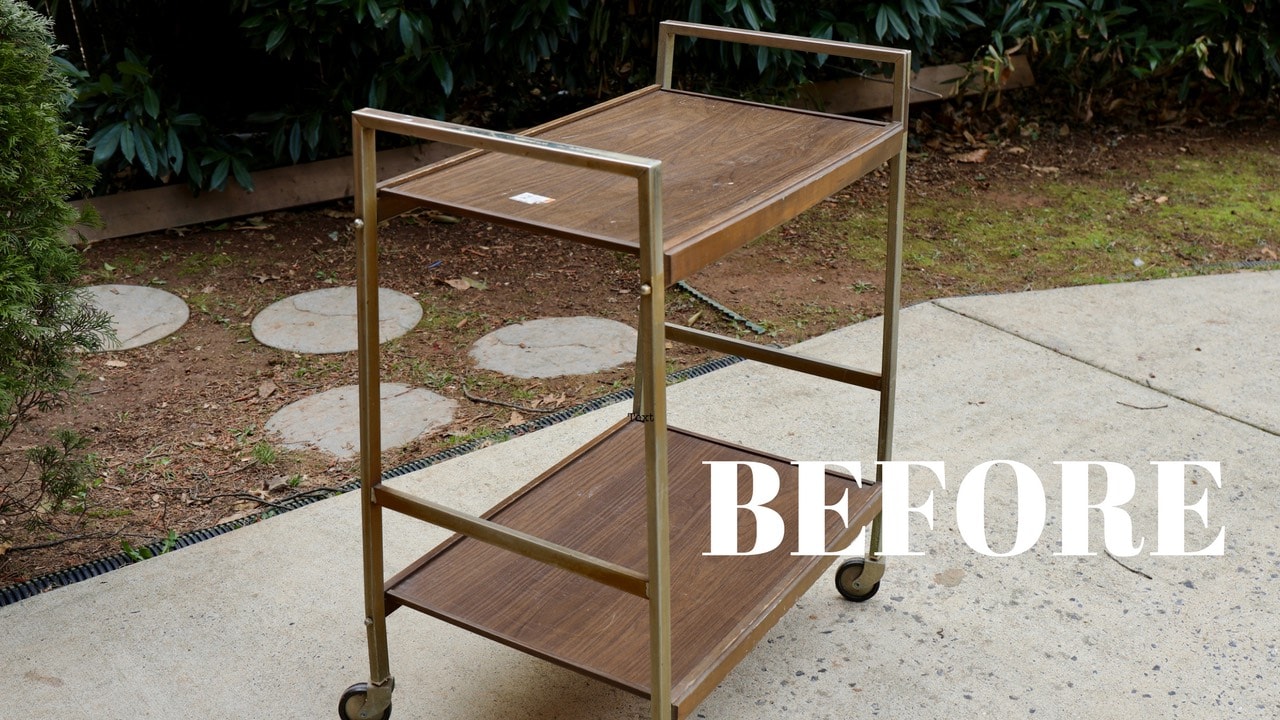
I found this amazing dining table at the thrift store for a mere–OMG— $24.
Yes, $24.
I know….a steal… It’s heavy, too!
What’s even better is that was exactly what I was looking for!
Because I wanted to cut this dining table in half.
BEFORE

AFTER!

This is the base cabinet that I had in my laundry room.

I removed them (and later turned them into a workstation for my garage) because I want a table in there that I can store laundry baskets underneath.
Usually, our dirty laundry looks like this all over the floor. Although I have a couple laundry baskets, I want something more organized and hidden underneath so that it doesn’t overflow into my line of vision. And it would be nice to walk through without tripping on Lightning McQueen undies. 🙂
BEFORE

Afterwards, it was soooo much more organized with laundry baskets under the separated and “cut” table so that the dirty laundry was out of the way.

My husband surprised me when he mentioned that I could “cut a table in half” and prop it up against the wall (how in the heck did he know about that design idea? And why didn’t I think of that??)
I was inspired!
How to Cut a Table in Half
The benefit of cutting a dining table in half is now you’ve got a shorter table. Those two shorter dining table pieces can now be attached to the wall to create a shorter table. It saves space. These half tables are perfect smaller homes that don’t have enough room for a large dining table, or maybe you want to create a countertop-style place for kids to eat. These half tables, when attached side by side, create long space-saving solutions for laundry rooms. Now you’ve got space to store laundry baskets underneath!
It’s really easy to create, depending on the type of table you’re wanting to cut in half.
Materials Needed
(Note: I participant in the Amazon Services LLC Associates Program, an affiliate advertising program designed to provide a means for me to earn fees by linking to Amazon.com and affiliated sites).
- Jigsaw or circular saw (optional depending on the table)
- Screw drive or power drill
- Corner L-brackets
- Wall anchors
- Stud finder (optional)
- Furniture paint
- Floral Stencil
- Clear furniture wax
STEP 1: Find Out if You Really Need to Cut It or Simply Unscrew It
Luckily, this table I bought is one of those tables that separates in the middle where a leaf is supposed to go. So, I wouldn’t need to cut this table in half. I would only need to remove the bolts that are holding it together!

But if your table needs to be cut in half, you could probably use a jigsaw or a circular saw.
Cutting a table in half, you’d need to make sure that the table is properly supported and that the blade is lowered or adjusted deep enough to safely cut the table in half.
If you’re a total newbie, I would ask someone who has power tool experience to do it for you.

STEP 2: Loosen the Screws Underneath the Table
Thankfully, my table only needed to have the screws loosened underneath the table and the ends pulled apart for the table halves to come free from each other.

Once separated, there should be two halves of the separated or cut table, each with just two legs on one side.

STEP 3: Add L-Brackets to the Cut Side
These corner L-brackets are what is going to hold the separated or cut table pieces to the wall.

The size you use will depend on the size of the table and the load the table will bear.
My recommendation would be to secure brackets into studs in the wall if possible, but if not possible, then use wall anchors. Again, this depends on load the table will bear.

STEP 4: Prop Up the Table and Paint It
This is probably easier to do when the table is whole, before separating or cutting it. 🙂
In my case, I waited until the table was already cut in half, which probably wasn’t the smartest thing because then I had to find a way to prop up the table while I painted and stenciled it.
But I didn’t want the finish to get ruined on the table, so for me, it was easier to do it this way.

Using my favorite floral stencil, I stenciled over the painted table. I had used Annie Sloan Paris Gray chalk paint.

It looked gorgeous!

Related Read: What’s the Best Paint for Furniture?
Watch This Project in Action: How to Stencil on Furniture
Here’s a video on my YouTube channel showing you how I stenciled on this table that I separated or cut in two.
STEP 5: Wax the Table to Protect the Paint
The last step is to add a coat of clear furniture wax over the paint to protect it.
The table will fully cure in about 2 weeks while the clear wax dries, so just be careful with your freshly painted table that you just separated or cut in half and stenciled.

Did you find this tutorial helpful? Click here to SAVE it.
![]()

So have you ever separated or cut a table in half? What purpose did you have for the table? Leave a comment and let’s chat about it!

Download the 5 freebies!

Thrift Diving inspires women to decorate, improve, and maintain their home themselves...using paint, power tools, and thrift stores! Use these 5 printables, checklists, and ebooks to get started!


I have found a thrift store that gets donations from Home Depot and Lowes of discontinued items, slightly damaged cabinets, and other good stuff. I picked up a couple gallons of Zinsser 123 primer for $4 each, some pretty Martha Stewart towel bars $4-$5 & towel hooks for $3. There seems to be something neat every time I go there.
Wow, where is that?! I would have to stop there every day to see what new stuff has come in! That’s amazing!
I had previously saved that same photo of the halved coffee table, turned twin benches – when looking for ideas for my mudroom. I ended up with a church pew, instead. 🙂
Can;t wait to see your finished product!!
I don’t think I have EVER heard of cutting a coffee table in half! 🙂 It’s such an ingenious idea. Don’t you love DIY’ers??!!!
Looking good Serena! Cant wait to see the final reveal! I like your paint colour choice, very fresh.Awesome Thrift store score!
Thank you, Angie! I had to custom mix the purple at least 3 times. PLUS I ended up adding white to lighten it up. LOL. But I love it now! Thank you. I can’t wait to finish!
You are so talented. Can’t wait for you list of all the good thrift stores .
Awww….thank you, Lonnie! I love this DIY stuff. Each time I do something, I feel like I increase my skill set 🙂 It’s so rewarding!!!
You thrifters are so lucky with the things that you find in stores in that part of the country (and the Upper Midwest, East, Southeast, South, basically anywhere but Texas). I never see things like that here except in antique stores at antique store prices. Maybe I just don’t get to them often enough. I do volunteer in a thrift store affiliated with our rural food pantry–and we rarely get such great things. Can’t wait to see the finished room and thanks for the preview.
Thanks so much, Bambi! Okay, I’m seriously going to have to find out where the good thrift stores are in Texas so I can send you on a road trip across the state :). Actually, I was trying to do that–find out where all the good thrift stores are nationally, based on my readers’ suggestions! I will keep you posted when it’s done!!! 🙂
Love the idea you have for the table and the tile sounds fabulous. I can’t wait to see more.
I am also in maryland what is your favorite thrift store here in maryland. I like edgewood thrift store because they still have 1/2 price colors daily. Tracy.
Awesome, where is the Edgewood thrift store? I love the Unique and Value Village thrift stores (check off of New Hampshire Ave, in the Hillandale shopping center). This one I went to yesterday was the Value Village off of Viers Mills!
Unbelievable!! I am planning a trip to Maryland in August. I am seriously thinking of just driving out there with a trailer now! Yikes!
Wow, are you? Where in Maryland? I’m in Silver Spring!
I have two sister who live in Severn! I hop e to be there for a week!
You should hit me up! We could go to my favorite thrift store! 🙂
I will, I promise!!!:) You rock!!!!!
I love the idea of halving the table and I love that you were able to find the perfect table at a great price at the thrift store! To add height to the table, you could also use a plain rectangular block of wood, which would mimic the look of the top of the leg. Just a thought…
Hey Nikky! Yeah, it was by accident that I happened to be at that thrift store yesterday! I was supposed to go to a different one with a coworker, but at the last minute, due to lack of time, I stopped off at a different one closer to work. SCORE!! I couldn’t believe I found the table and the hidden trash thing when I was JUST saying to myself I needed these things! 🙂 Thanks for the legs suggestion!
Wow! Everything looks spectacular! and I love the idea of halving, and can’t wait to see the finished room!
Thanks, Beth! I love the idea, too! I don’t know why I hadn’t thought of that 🙂 Thanks, hubby! 🙂 LOL