BEFORE & AFTER: DIY Dresser Makeover: French Provincial Dresser
This DIY dresser makeover on a French Provincial dresser was sponsored by Beyond Paint, but all opinions and ideas belong to Thrift Diving! 🙂
I think I’ve just set a new record: fastest DIY dresser makeover ever on this cute little French Provincial dresser!!
If you’ve been reading this blog for any length of time you’ll know that I’m infamous for lugging furniture and thrift store goodies home and hoarding letting it pile up in my garage for years.
It’s unheard of that I found this French Provincial dresser at the thrift store for a mere $40 and turned around and gave that baby a makeover so quickly!
There are several reasons for this, but the most important reason, folks, is that my garage is prime real estate now.
I’m down to narrow walkways that require the sucking in of one’s gut to get through.
As cute as this piece of furniture is, it just ain’t gotta home in my garage for longer than a week it needs to go.
Like this month.
But it also happens to be that my mother-in-law is in dire need of a dresser.
I love when the stars align like that….
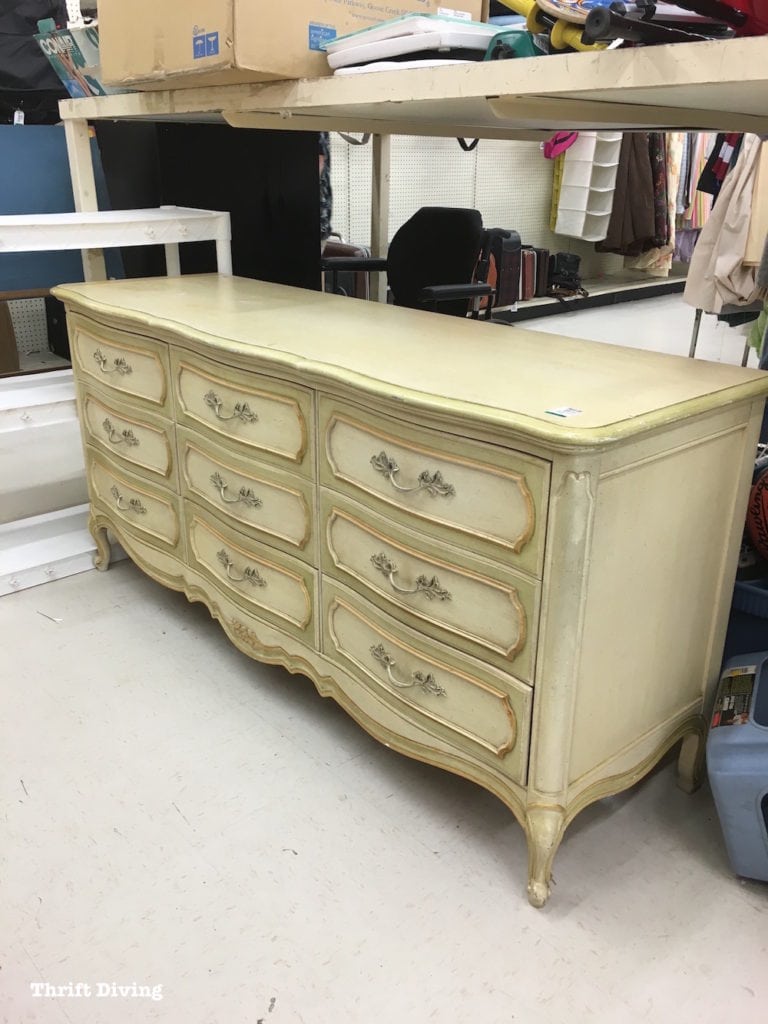
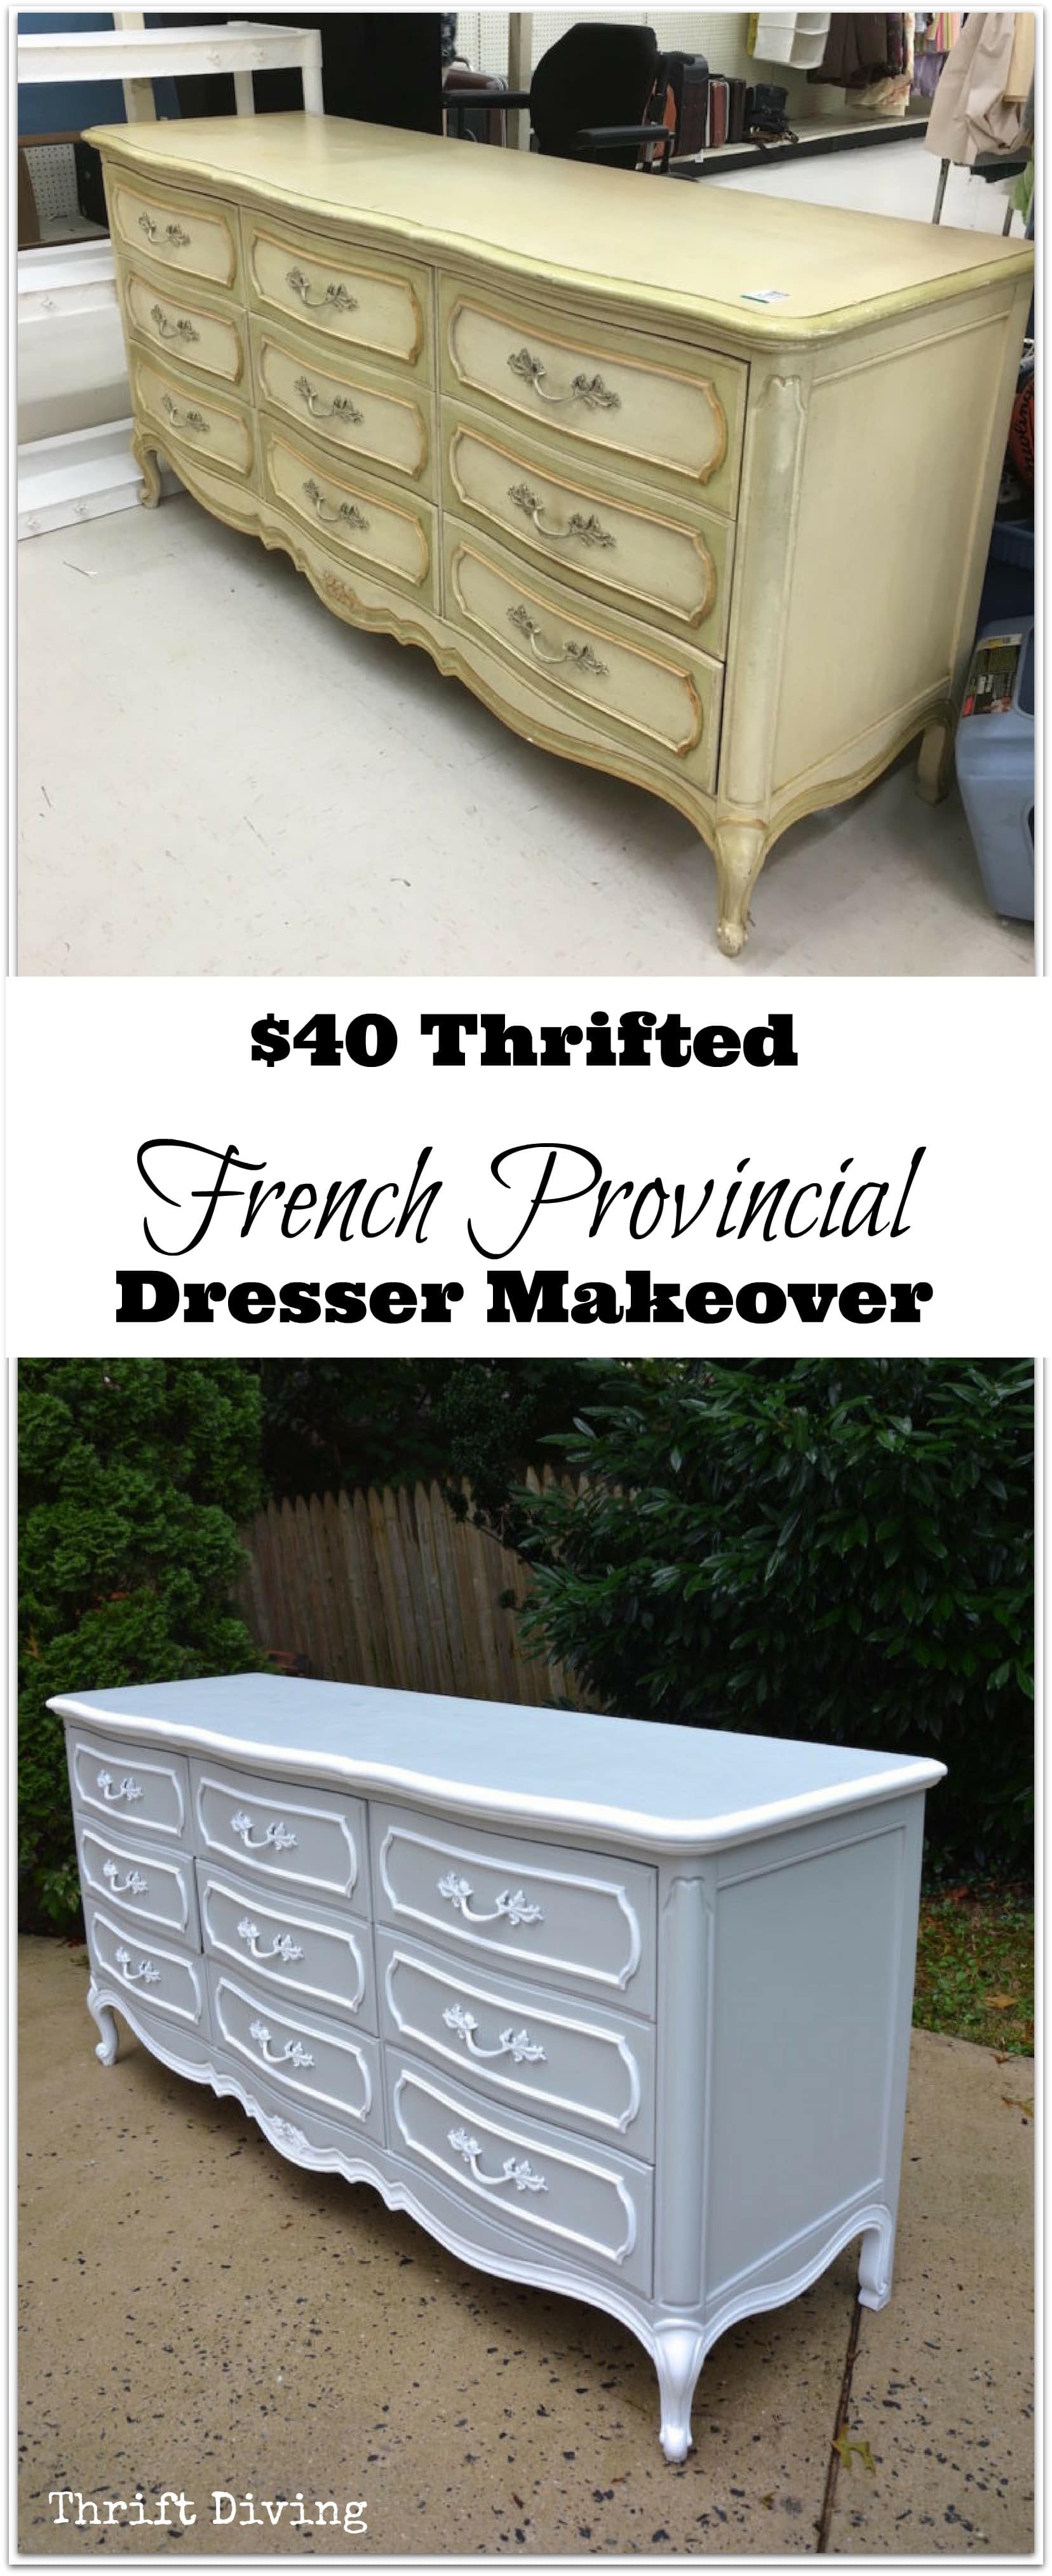
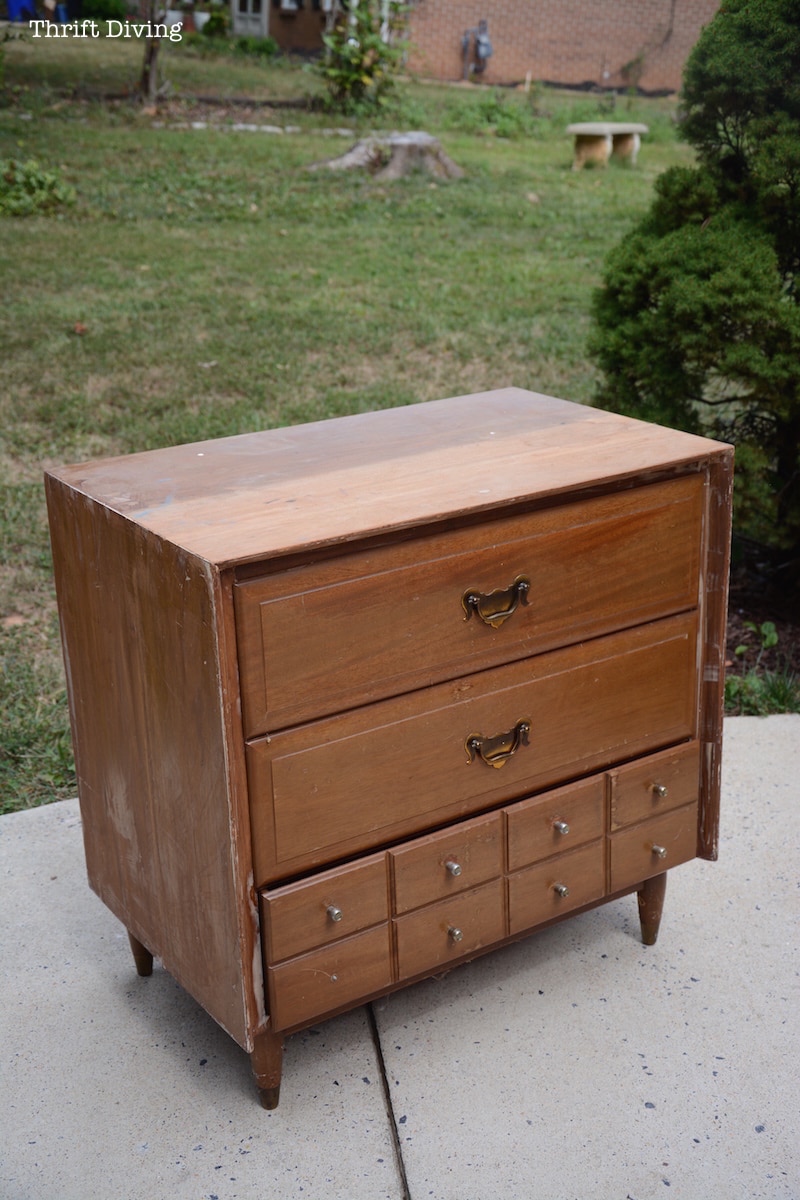
Here’s what it looked like when I stumbled upon it last week at the thrift store: solid, “clean,” with minor imperfections….
In other words, it was perfect.
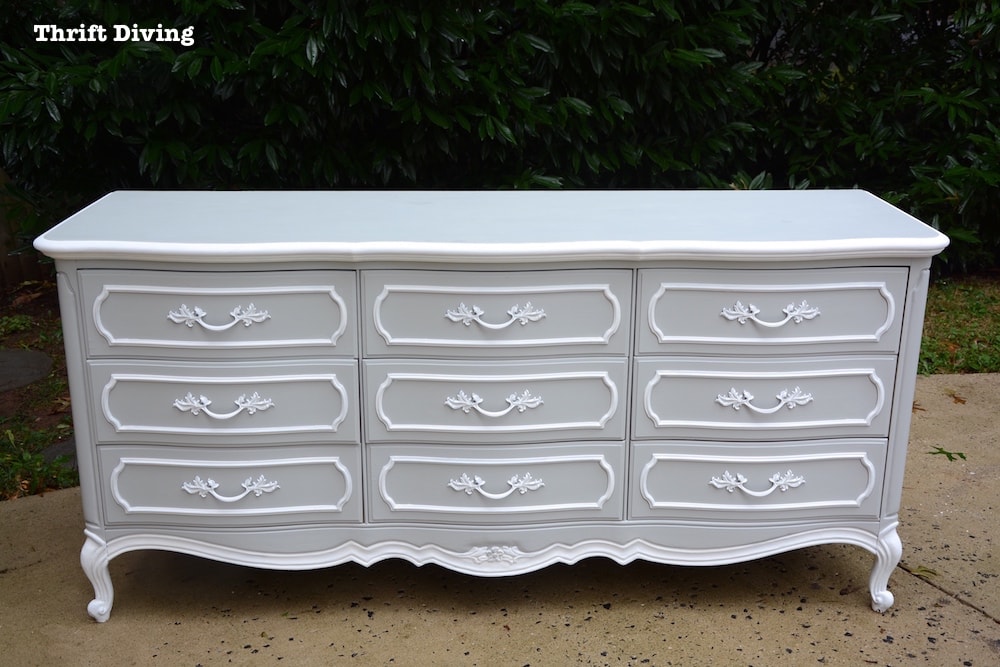
BEFORE
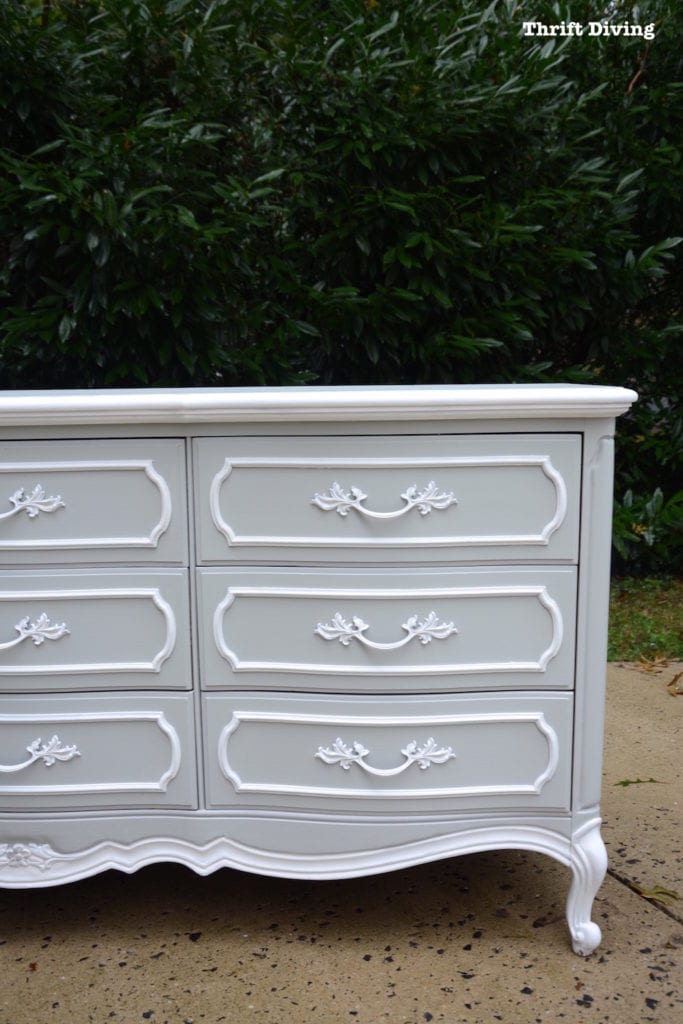
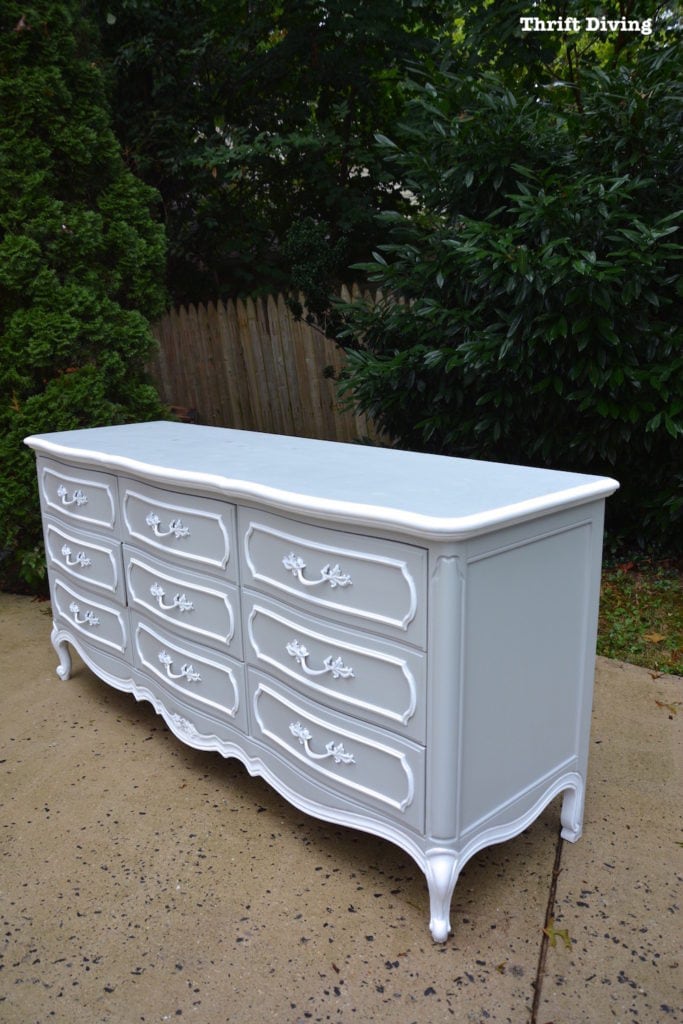
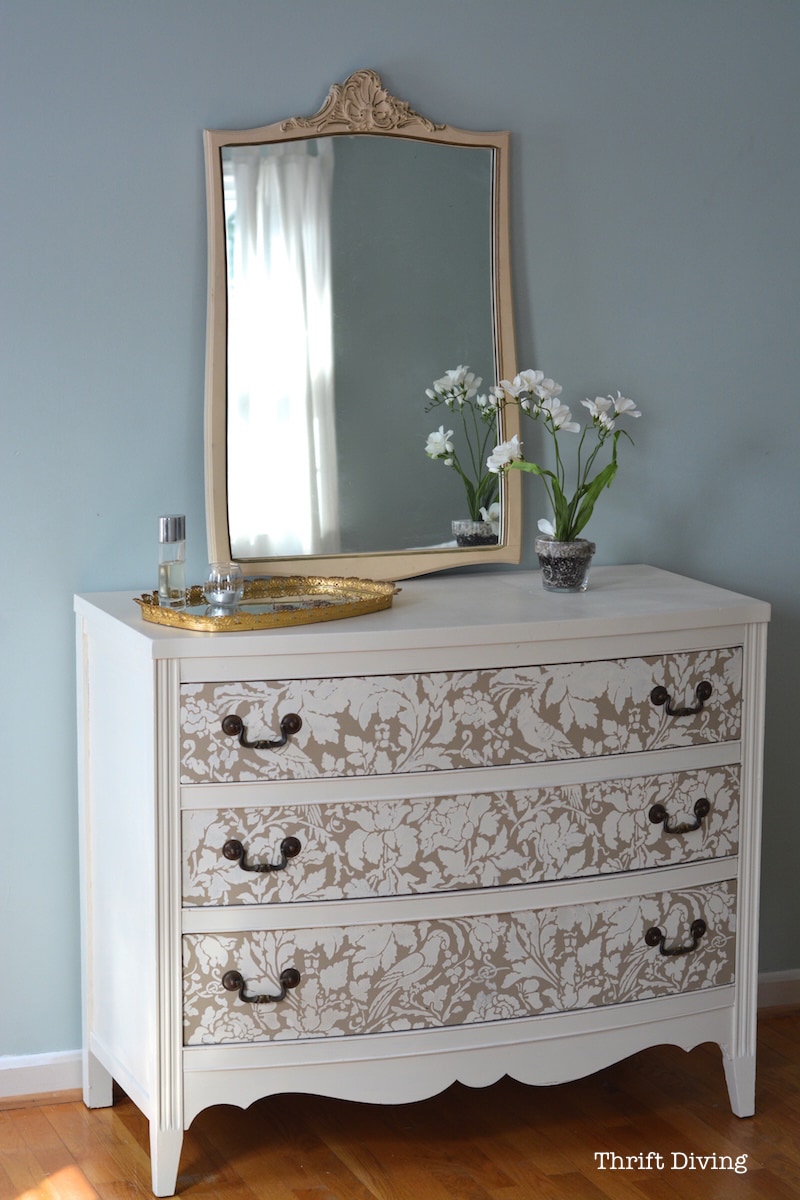
AFTER!
With a little bit of paint, it’s soooooo cute and almost ready for my mother-in-law’s house after I get back from my blogging conference!!
(And can you believe that hubby actually said it looks nice?? He’s a tough one to get compliments from. Maybe because he knows it’s going to his mama…..LOL).

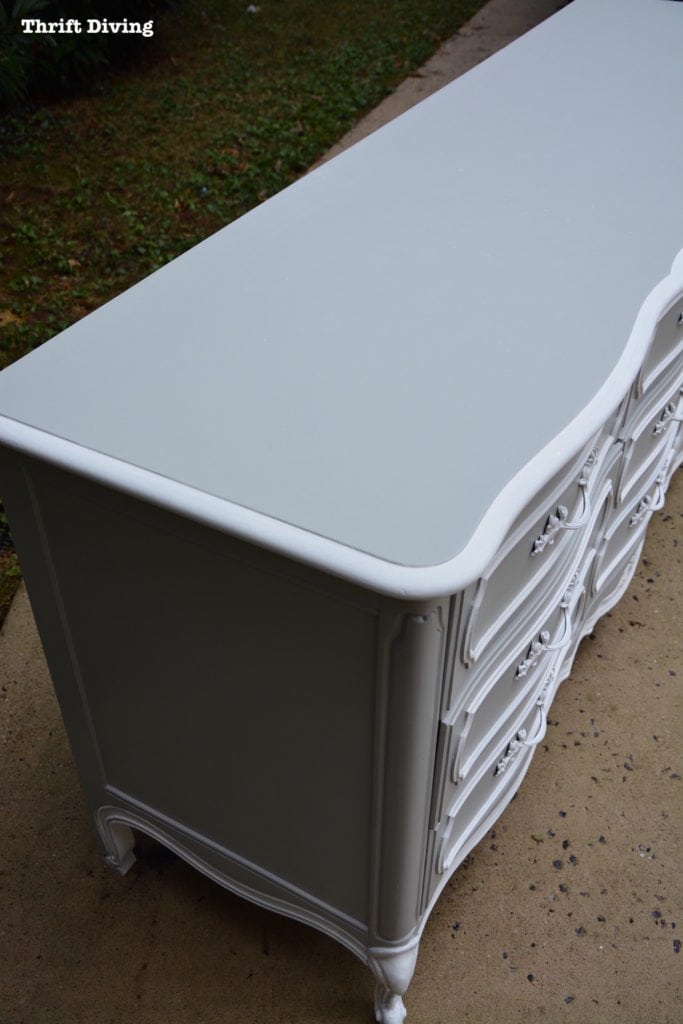
The subtle shade of Soft Gray and white make me wish that this was going into MY room!
But I don’t have space for it, unfortunately.
And how two-faced would that be to steal furniture from under the nose of family members?
I already promised it to my MIL.
LOL
Let’s Start With the Paint!
A lot of time, people are afraid to get started with painting furniture because they think it’s some Secret Society of Furniture Painters and they don’t know the password to get in.
But the truth is that if you’ve used a roller before (you’ve painted a room before, right??), then you can paint a piece of furniture with non-toxic Beyond Paint.
Beyond Paint recommends using a roller for best results and for reduced brush strokes. So you don’t have to feel like a putz because you don’t know how to do fancy, confusing furniture painting techniques! None of that is needed here.
And you can paint virtually any surface: wood, laminate, plastic, glass, masonry–the list is long!
See the other projects where I’ve used Beyond Paint:

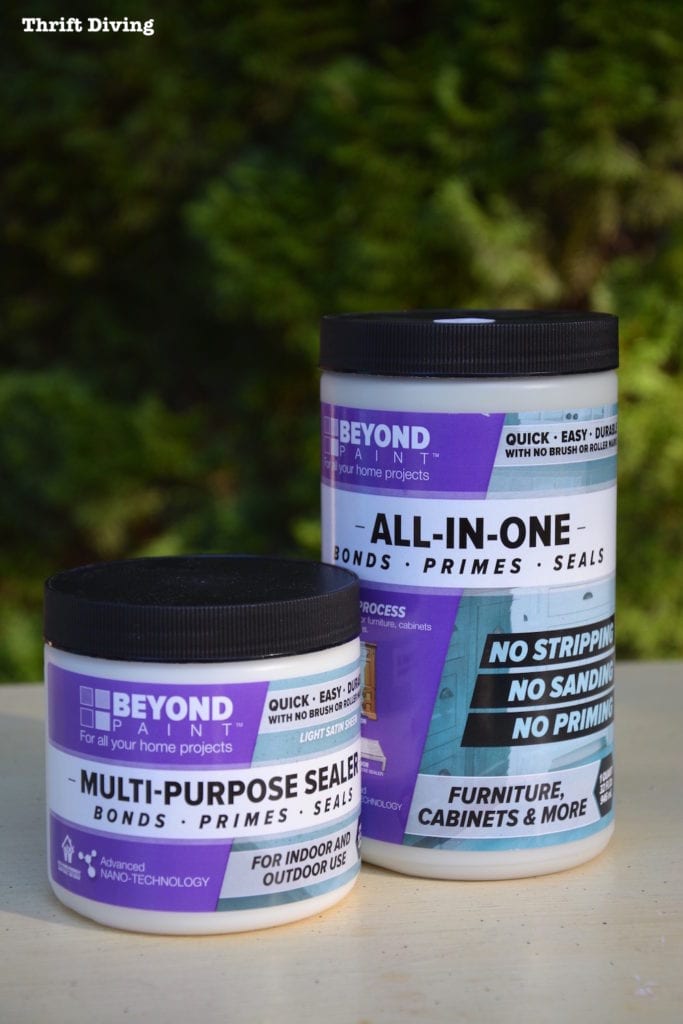
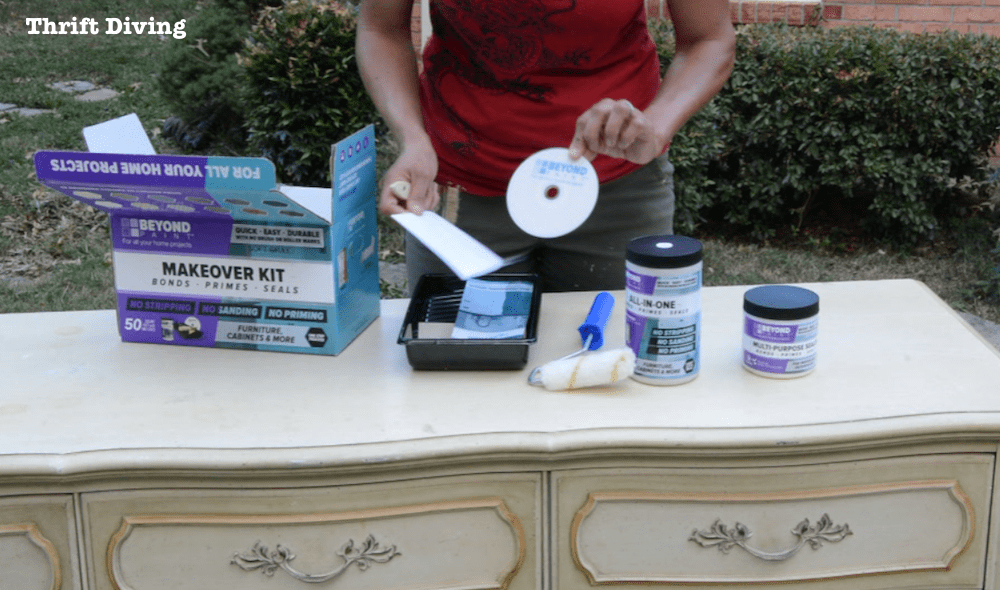
They had sent me this Makeover Kit, which was awesome, because it had everything in it that I needed, including 1 quart of Soft Gray paint, a roller handle and two rollers, a paint brush, paint tray, and sandpaper! I didn’t have to go and buy anything else or dig around trying to find rollers and sandpaper.
But check this out–it even had an instructional DVD included! How cool is that??
No Sanding or Priming!
These are the magic words when it comes to furniture makeovers, but it’s not always true.
Yes, you can use Beyond Paint on virtually any surface (wood, previously painted objects, plastic, laminate, cabinets, masonry, etc.).
Depending on the condition of your furniture piece, though, you might just have to do at least a small repair before you jump right in.
This French Provincial dresser is a great example.
It was in excellent condition but had a gouge on top.
Probably some snotty kid that ruined the top back in the 80’s when this style was popular. LOL
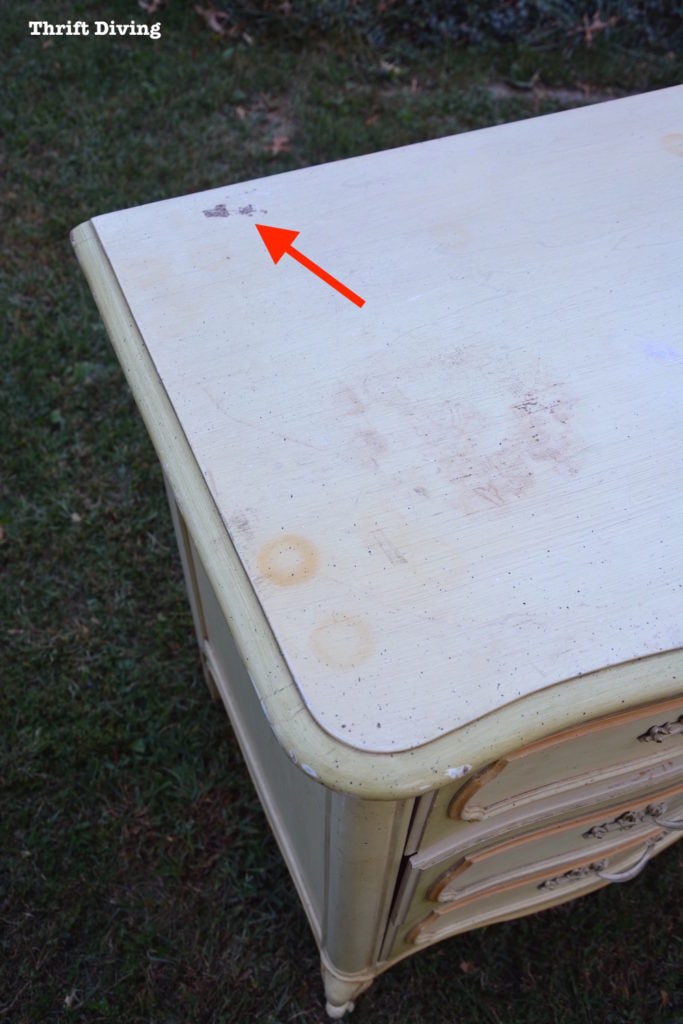
You don’t want to paint over that, no matter what brand of paint you’re using. It would look horrible painting over gouges!!
I used wood filler to fill it the gouge, let it dry, then sanded it smooth with the sandpaper that came with the makeover kit.
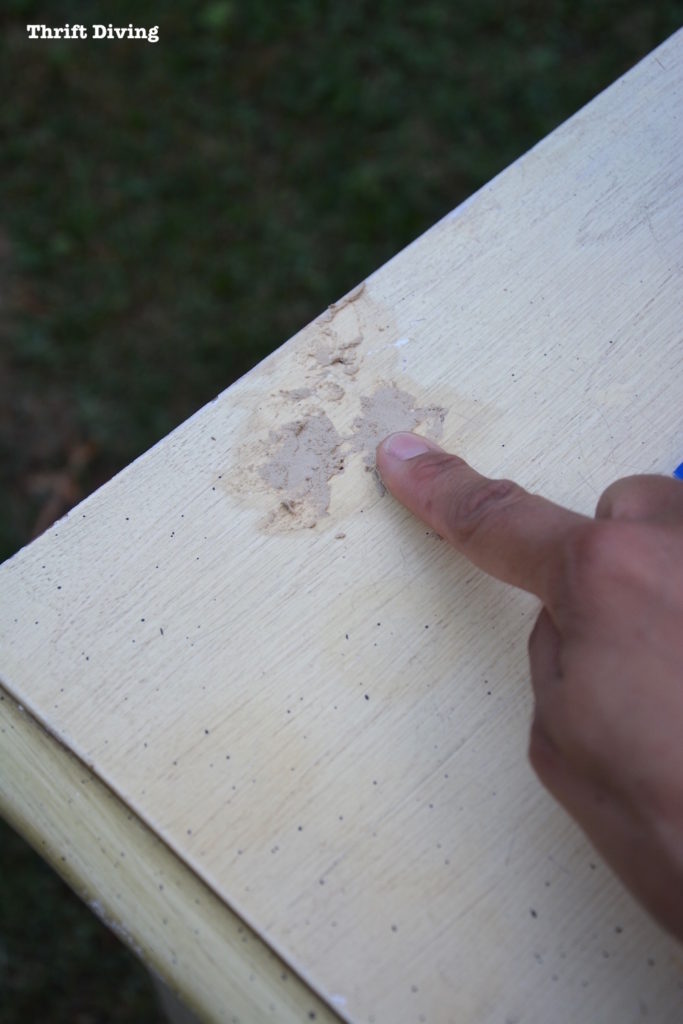
Once sanded, the top was ready for paint!
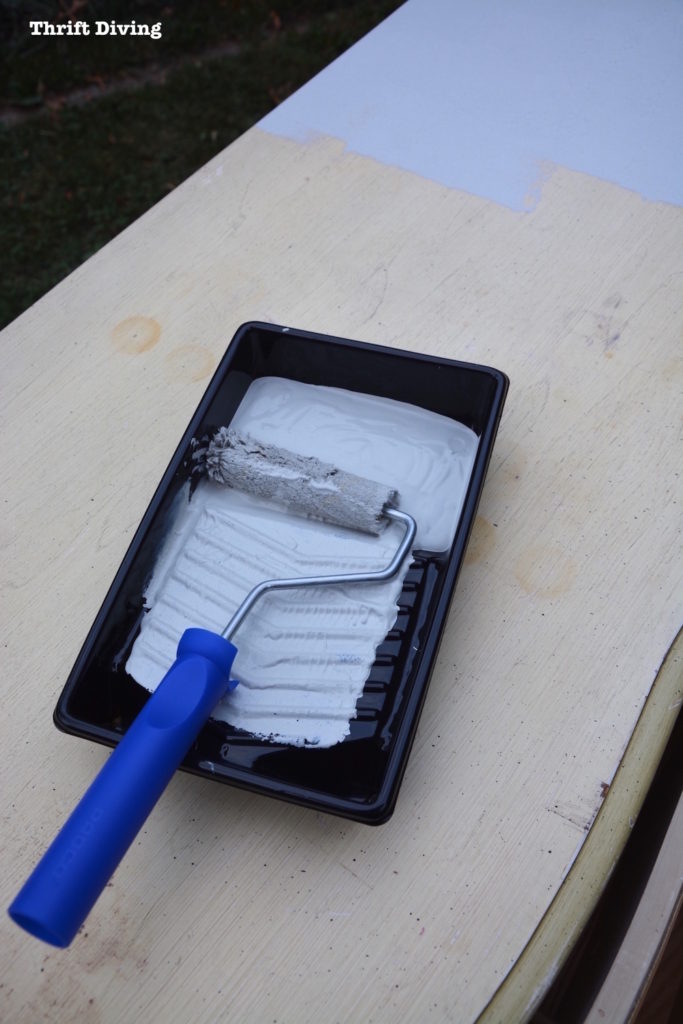
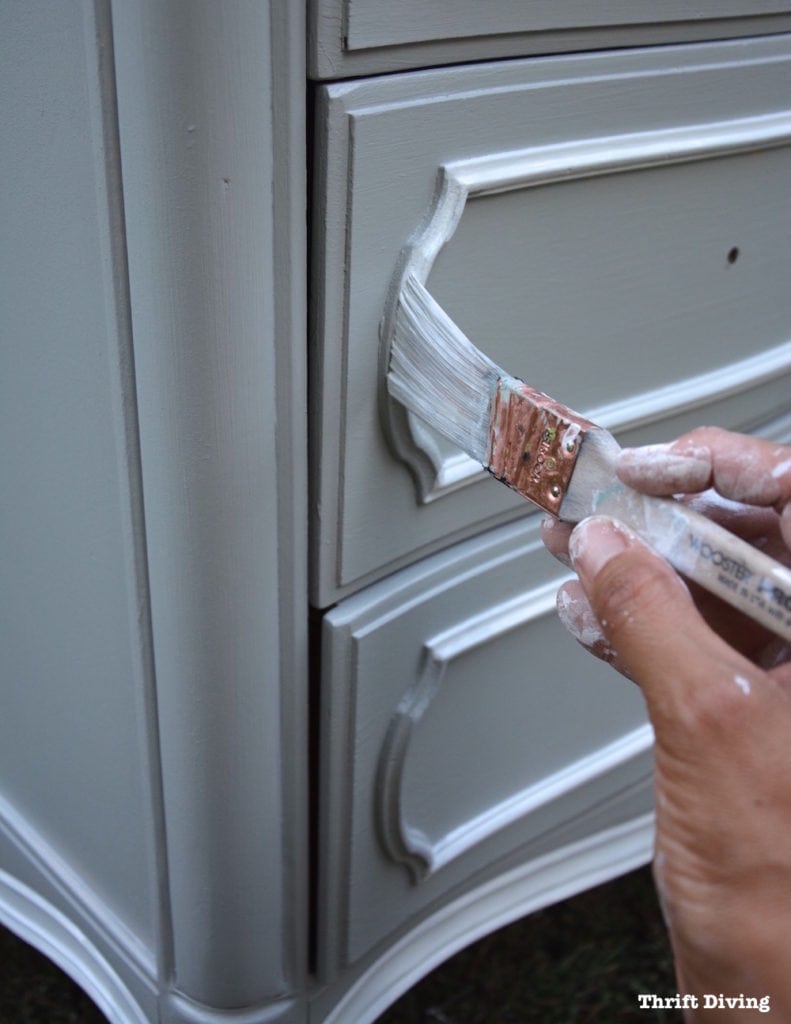
One thing I like about Beyond Paint is that it’s thick. I’m talking “thick-like-custard” thick.
But in a good way, because I feel like it goes on more smoothly than other paints I’ve used, so I’m able to spread it more easily and get done faster!
A little bit goes a long way.
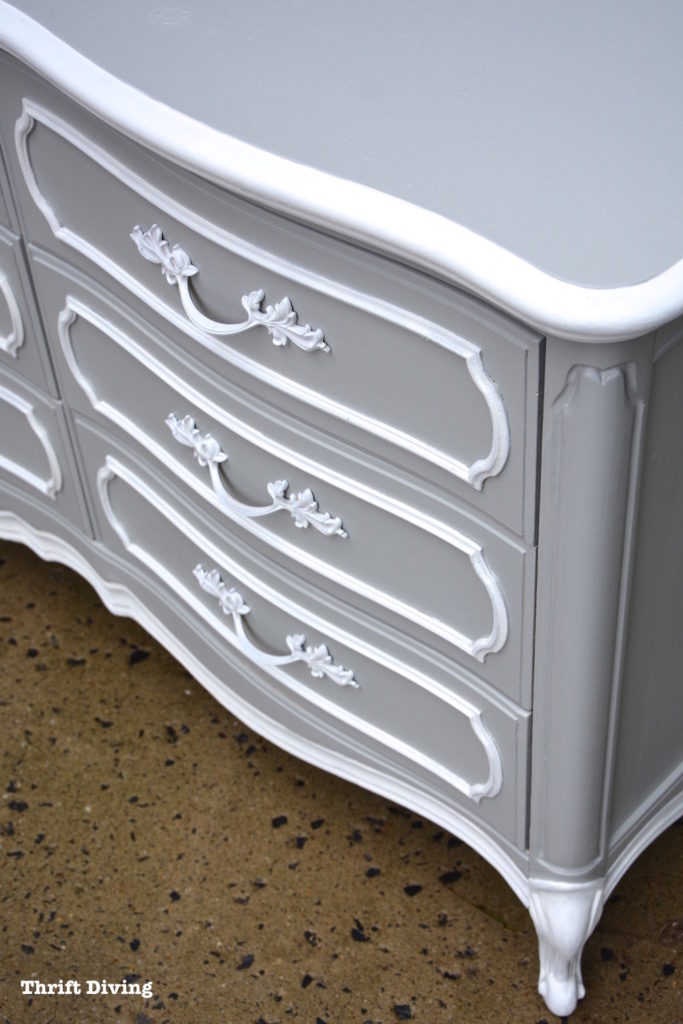
You can’t even see the uneven gouge now, can you? (Nope, that’s not Photoshopped!).
Working Outside
That is the reason I need to get my garage in order, guys!
As much as I love working outside on nice days, you’re a victim to the elements of cars passing by…insects…fading sunlight…rain…
Not to mention the embarrassment of crawling around on your hands and knees with a paint brush in hand!
I started this project late in the afternoon, right before sundown. I hoped to get it done before daylight was gone (doggone change of season).

But unfortunately, those moldings on the drawer required more time and effort than painting the body. I had to pick up where I left off the next afternoon.
For a good 24+ hours our lawn resembled the Beverly Hillbillies or Fred Sanford with this big ‘ole piece of furniture sitting there overnight!
Didn’t have to worry about robbers. Who would make off with this 2-ton thing?? 😉
Taping Off the Moldings
Remember I painted my kitchen and told you about that Sensitive Surfaces tape?
Well, it came in handy for this project!
I didn’t want regular painter’s tape to pull off fresh paint, so this helped to keep the finish looking good.
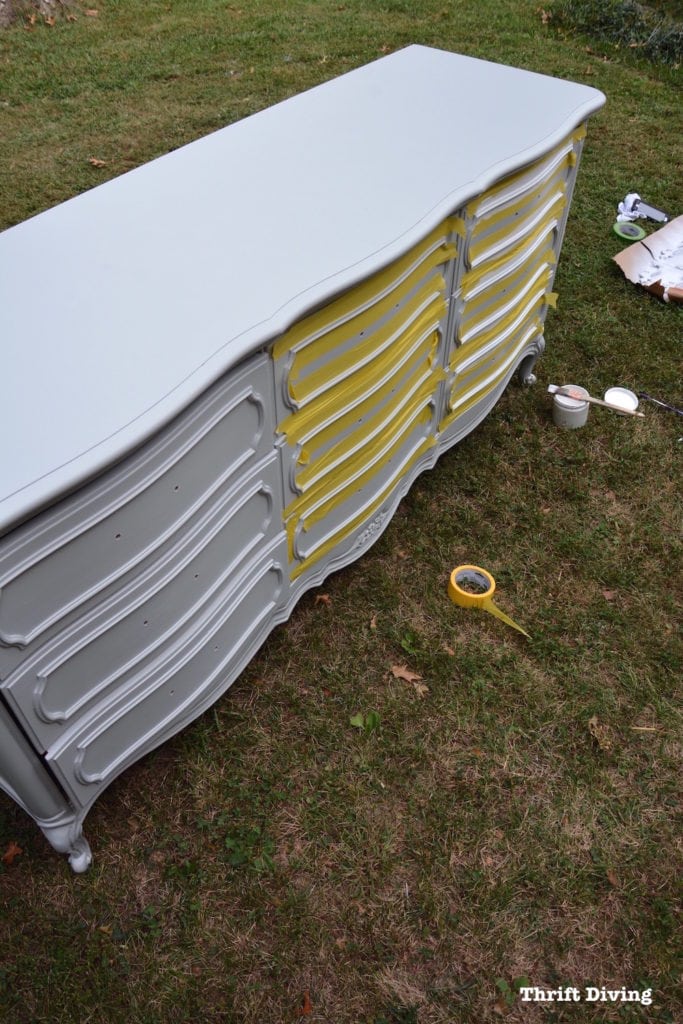
But taping around the curved parts was nearly impossible, so I just used an angled brush to paint the top of the curves and didn’t get all “Miss Perfection” about it!
Spray Painting French Provincial Dresser Pulls
Thankfully, I had some spray paint on hand to update the dresser pulls. I loved the crisp white!
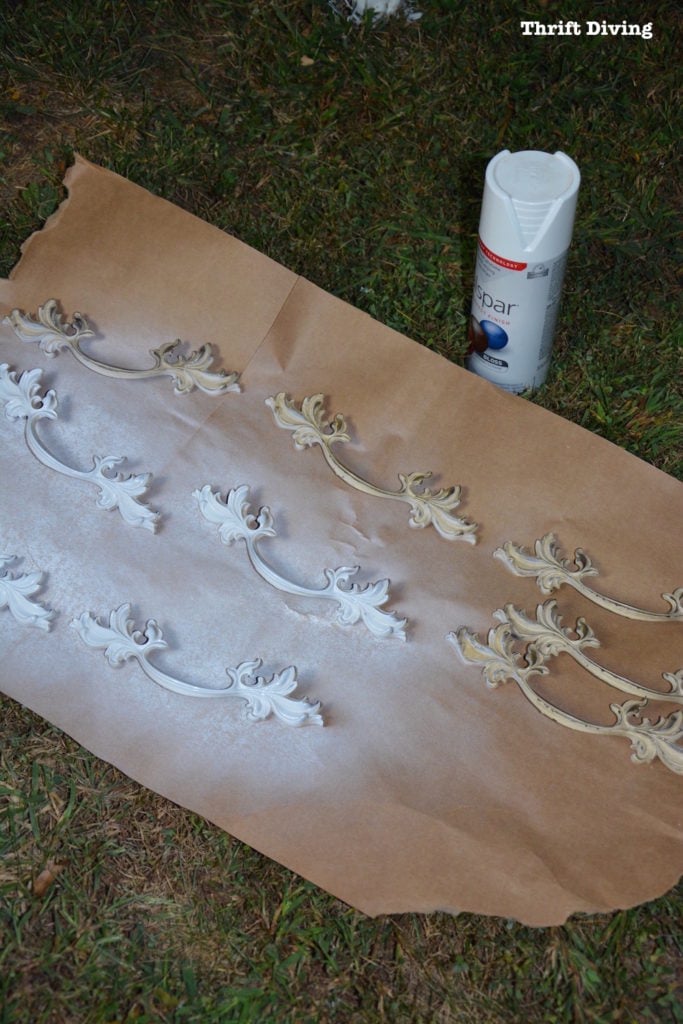
They turned out gorgeous!

To Seal or Not to Seal?
Yep, I’ll definitely be sealing the top of this dresser!
Dressers get a lot of “traffic,” which means you’ll always be setting lots of things on them, touching them, etc.
So I’ll use the Beyond Paint sealer on the top (2 coats), to make sure the surface is extra protected for my mother-in-law. You apply it with a roller, too.
But Beyond Paint is seal-sealing, so if something doesn’t get a ton of “traffic,” feel free to skip the sealer.
I hate waxing furniture, so anytime I can skip it–woo hoo!

Let’s have another look!
BEFORE
AFTER!
I’m just thankful that I took the initiative to get the dresser done quickly and that she’ll have something pretty in her room! She won’t have to remind me a year from now to complete it. HA!
Let’s hope I can get more projects done with this lightening speed. 😉
Anyhow, it feels good knowing that my DIY skills went to good use!
Watch This Project in Action!
I filmed the whole process, so check it out here: DIY Dresser Makeover: French Provincial Dresser
Where to Buy Beyond Paint
You can buy Beyond Paint at the following locations:
- BeyondPaint.com (only place that carries the new Soft Gray right now)
- HomeDepot.com
- HSN.com
Other Vintage Dresser Makeovers to Check Out
So what do you guys think of this awesome DIY dresser makeover on this French Provincial dresser?

Download the 5 freebies!

Thrift Diving inspires women to decorate, improve, and maintain their home themselves...using paint, power tools, and thrift stores! Use these 5 printables, checklists, and ebooks to get started!

Darn it, girl, I barely got to church and the grocery store this week, and you did a complete diy job on a $40 dresser. Color me green with envy! Terrific job by the way. You’ve sold me on Beyond paint. (I hate wax, too)
HAHA, Elizabeth! I was on a ROLL last week with projects! It was crazy! This week, not so much. I have a home show to present at so I’m leaving tomorrow for Jacksonville. And I JUST got back from San Diego. LOL 🙂 Let’s hope that next week I can move faster again! 🙂
Beautiful job on the dresser. It looks like it just came from a store. Hope your Mother-in-law will love it too.My favorite colors
My favorite colors, too, Betty! 🙂 Glad you like it! Thank you!
It’s beautiful! What a transformation!! (Oh, and I hate wax, too!)
Thanks, Karen! I think I am going to have to do a blog post called, “I Hate Waxing Furniture!” You’re the second person in the comments that they hate wax, too! 🙂 Hmmm…….I think I may have a new post. LOL
Beautiful job on this dresser Serena! It’s gorgeous. I’m sure your mother-in-law is in love with it.
gail
Thanks, Gail! I can’t wait to see what she thinks of it! I’ll add some sealer and then give it to her in a could weeks.
Great Job! Hope your mother-in-law loves it!
Thank you, Barb!! 🙂 I’ll keep you posted on what she said! I’ve been traveling and having had a chance to give it to her yet. I also need my brother-in-law to help my husband move it up her stairs. It’s HEEEAVVVVY!
Really Pretty!
Thanks, Lavins!!
Just lovely!
Thank you, Mimi!
Wow! Gorgeous! You do amazing work!!
So glad you liked it, Janice! 🙂 It’s one of my favorites!
It’s gorgeous Serena! Your MIL will love it!
Thank you, Florence! I’ll be giving her the dresser in a couple weeks after I seal the top! 🙂
OMG…This is stunning! I absolutely love it! This is my fave project you have done. I have a similar dresser & mirror that I painted a beach-blue, but I may have to repaint it now…w/your colors. You are so talented. BTW…I detest waxing furniture too. LOL!!
Hey, Pamm! That’s the beautiful thing about paint: when you get tired of the color you can just repaint it with a different color! And never have to get new furniture when your tastes or seasons change! 🙂 Thanks, girl!