How to Get a Straight Cut Using a Jigsaw and Circular Saw
When working with power tools and wood, the number one most important thing is to get a straight cut. (Of course, the next most important thing is that your cut is actually cut to the proper length!). Without a straight cut, you’re spending more time, more money replacing materials you screwed up, and overall, simply getting frustrated that it’s not working out well for you. That is not going to inspire you to keep going in your woodworking journey!
If you’re reading this blog post (or listening to this podcast), you might be someone with a little experience with power tools, such as a jigsaw and a circular saw, or you might be a complete newbie. I think this post will have some solutions for both of you, regardless of your level of experience.
So let’s first talk about the different types of cuts.
Click here to save this post on Pinterest.

Listen to the Podcast of this Blog Post
If you’re an auditory learner, I got you covered! Listen to Episode #50 of The Thrift Diving Podcast!
What are the Different Types of Cuts?
When you think about “cuts,” it’s not just cutting a piece of board. There are actually different types of cuts, depending on what you’re making or building. And the reason why this matters is because it can dictate what kind of accessories you can use in order to get the best cut.
For example, a rip cut is a cut that’s made along the long part of board that goes with the grain. If you’re cutting a 4’x8′ sheet of plywood, and you need to trim off a part so that it’s 3’x8′, somehow you will need to figure out how to accurately cut a straight 12″ off so that you’re left with a straight 3’x8′ board.
The length of an accessory that you use for making a cross cut, which is a cut that goes across the grain, may not work for a rip cut. For example, if you need to shorten the width of that 4′ x 8′ sheet of plywood to 4′ x 6′, you’ll need to cut 2′ (or 24″) off the end of the board. That cross cut is a shorter cut than making a long 8′ rip cut. Will the accessories that you have allow you to easily make both of these cuts? Keep reading to find out. 🙂
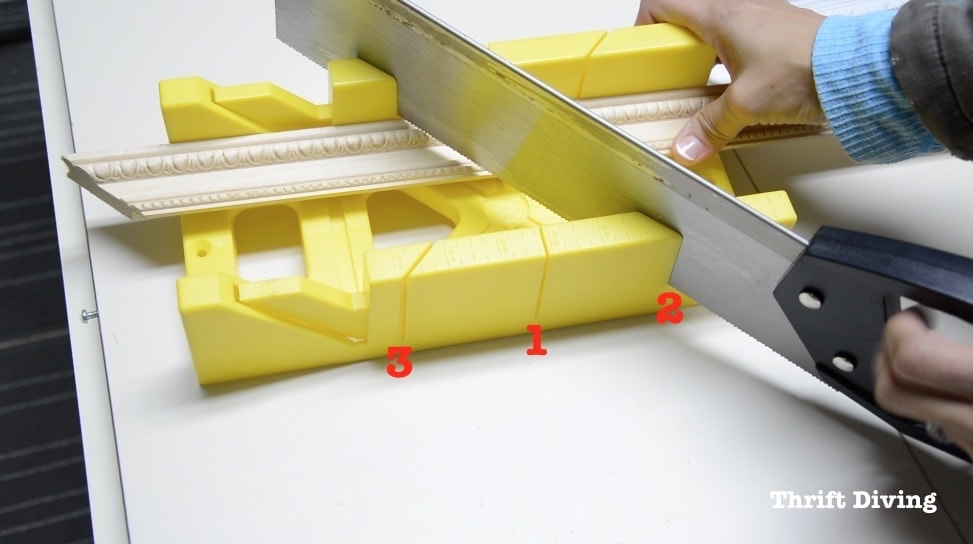
While we’re at it, I will also point out that another common cut is a miter cut, which is a cut that is at a 45-degree angle. These are cut very easily using a miter saw, but many newbies who are just learning to use power tools don’t have a miter saw, or are afraid to use it.
(FYI, a miter box like this one is a great alternative and can cut wood at a 90-degrees (#1 position) and on a 45-degree miter (#2 and #3 position).
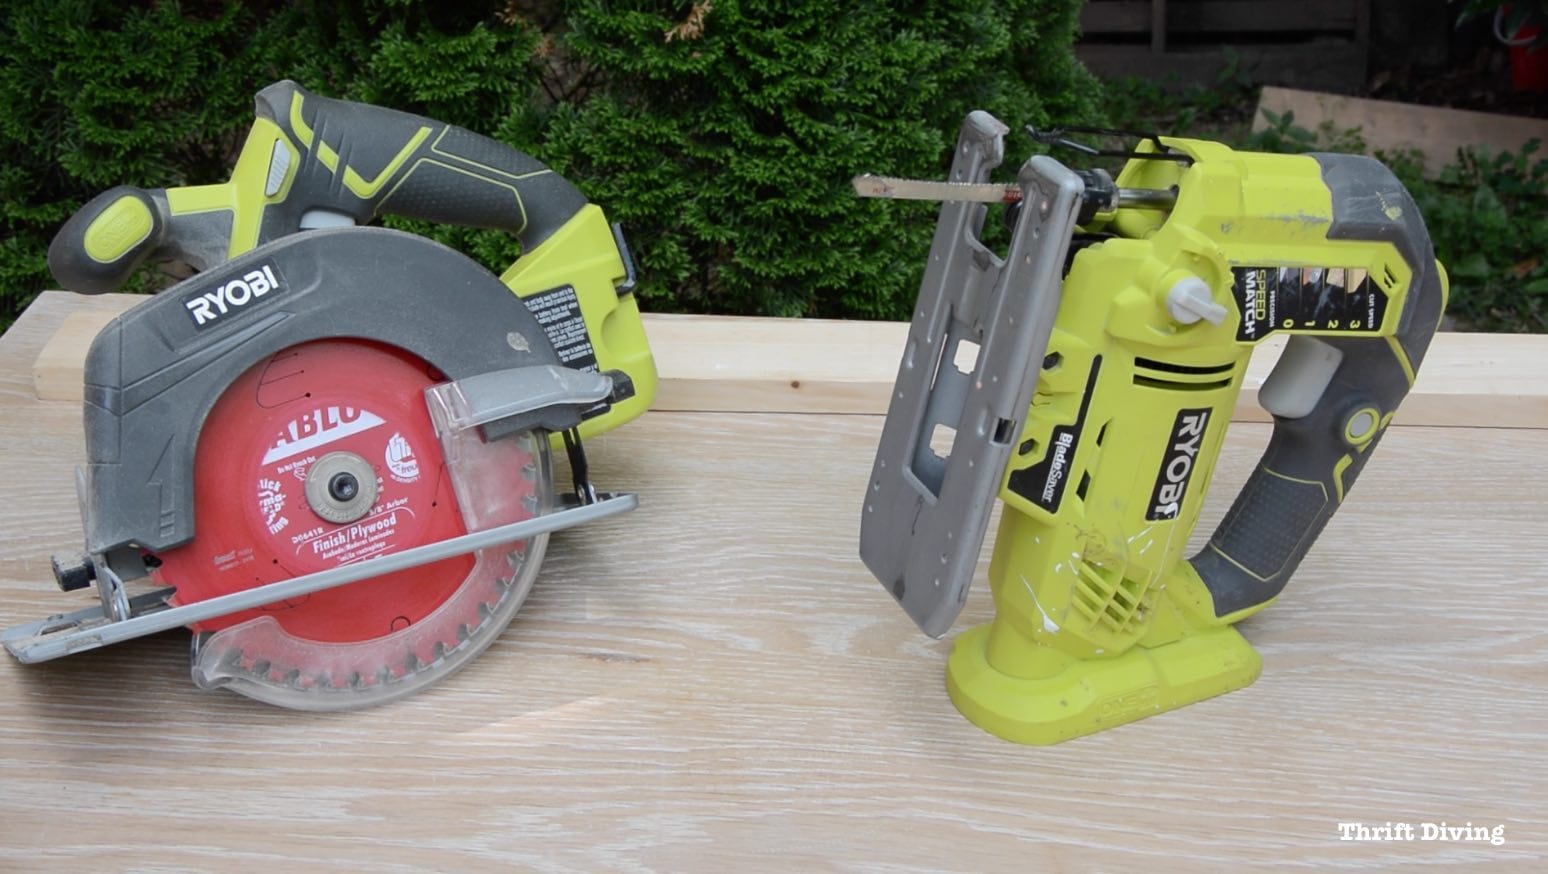
A beveled cut, which is also possible to do with a jigsaw and a circular saw (as well as a miter saw), is a cut that goes through the thickness of the wood, at a 45 degree angle. These types of cuts require you to adjust the angle of your blade to 45-degrees so that you can cut through its thickness. A bevel cut can be cut using a jigsaw, a circular saw, and a miter saw (and, of course, a table saw, but I’ll be honest: table saws have way too many accidents due to kick-back and sliced fingers that I choose not to even use a table saw).
7 Reasons It’s So Hard to Get a Straight Cut Using a Jigsaw or Circular Saw
As a newbie, you may not completely understand why the professionals and experienced DIYers are able to get a straight cut and why your cuts always are uneven, ill-fitting, or just plain wonky. There are a few reasons why this happens. Thankfully, they’re easy fixes.
Your line is too light and thin and you can’t see it.
For some reason, we’re usually so afraid of marking up our wood. So we use these itty bitty pencils and lightly mark it, for fear we’re going to destroy the wood. Well, that’s why it’s important to have some sandpaper or a good orbital sander in your DIY toolbox so that you can easily sand away any pencil marks! I typically use a mechanical pencil, which sucks, because the thin lead always breaks on me, but because they’re so so useful in allowing me to work with some of the rulers I use, which I’ll explain in just a moment), I tend to use those. But they do make mechanical pencils with heavier, thicker lead, which I need to buy. But another option is to use those heavy-duty carpenter’s pencils. You’ve seen them. They’re usually flat, and don’t look like they’ll fit in a pencil sharpener. In fact, carpenters will sharpen them with a utility knife.
The lead is thick and damn-near indestructible. They’re excellent for marking your wood because you can see it clearly. With darker, heavier lines, it gives you more of a guide on where to align your jigsaw or circular saw blade.
Even if you use a regular #2 pencil, don’t be shy about marking your wood. While you don’t want to force the pencil down and dent your wood, you can liberally write on it, knowing that you’ll be able to see a little better and you’ll be able to sand off any remaining pencil marks.
Also, add in extra light so you can actually see your markings if you’re working in an environment that doesn’t have a lot of light. (I love this DeWalt tripod light for lots of extra light).
You’re trying to cut free-handed.
When I first started learning to use power tools and to cut wood, I thought that you simply held the tool and cut free-handed. Then I’d wonder why my wood was jacked up and looked horrible. It definitely didn’t make me feel accomplished in what I had set out to do: to learn to use power tools to upcycle furniture, build furniture from scratch, and to do home improvement projects!
I thought there was something wrong with me.
But that wasn’t necessarily the case. I just didn’t know that any accomplished woodworker who knows this fact: any piece of wood that requires the cut to be clean, exact, precise, and right on point will never (or rarely) cut something free-handed.
The only time that sometime would be cut free-handed would be if you’ve drawn a straight line, and the cut isn’t depending on being perfect. This is typically the case with rough carpentry, like if you were cutting some 2x4s and they don’t have to be perfect. But for something like building furniture or some other cuts where the wood definitely needs to be accurate, you’d never want to cut free-handed. You would use accessories or devices called “jigs” that would help you get straight cuts.
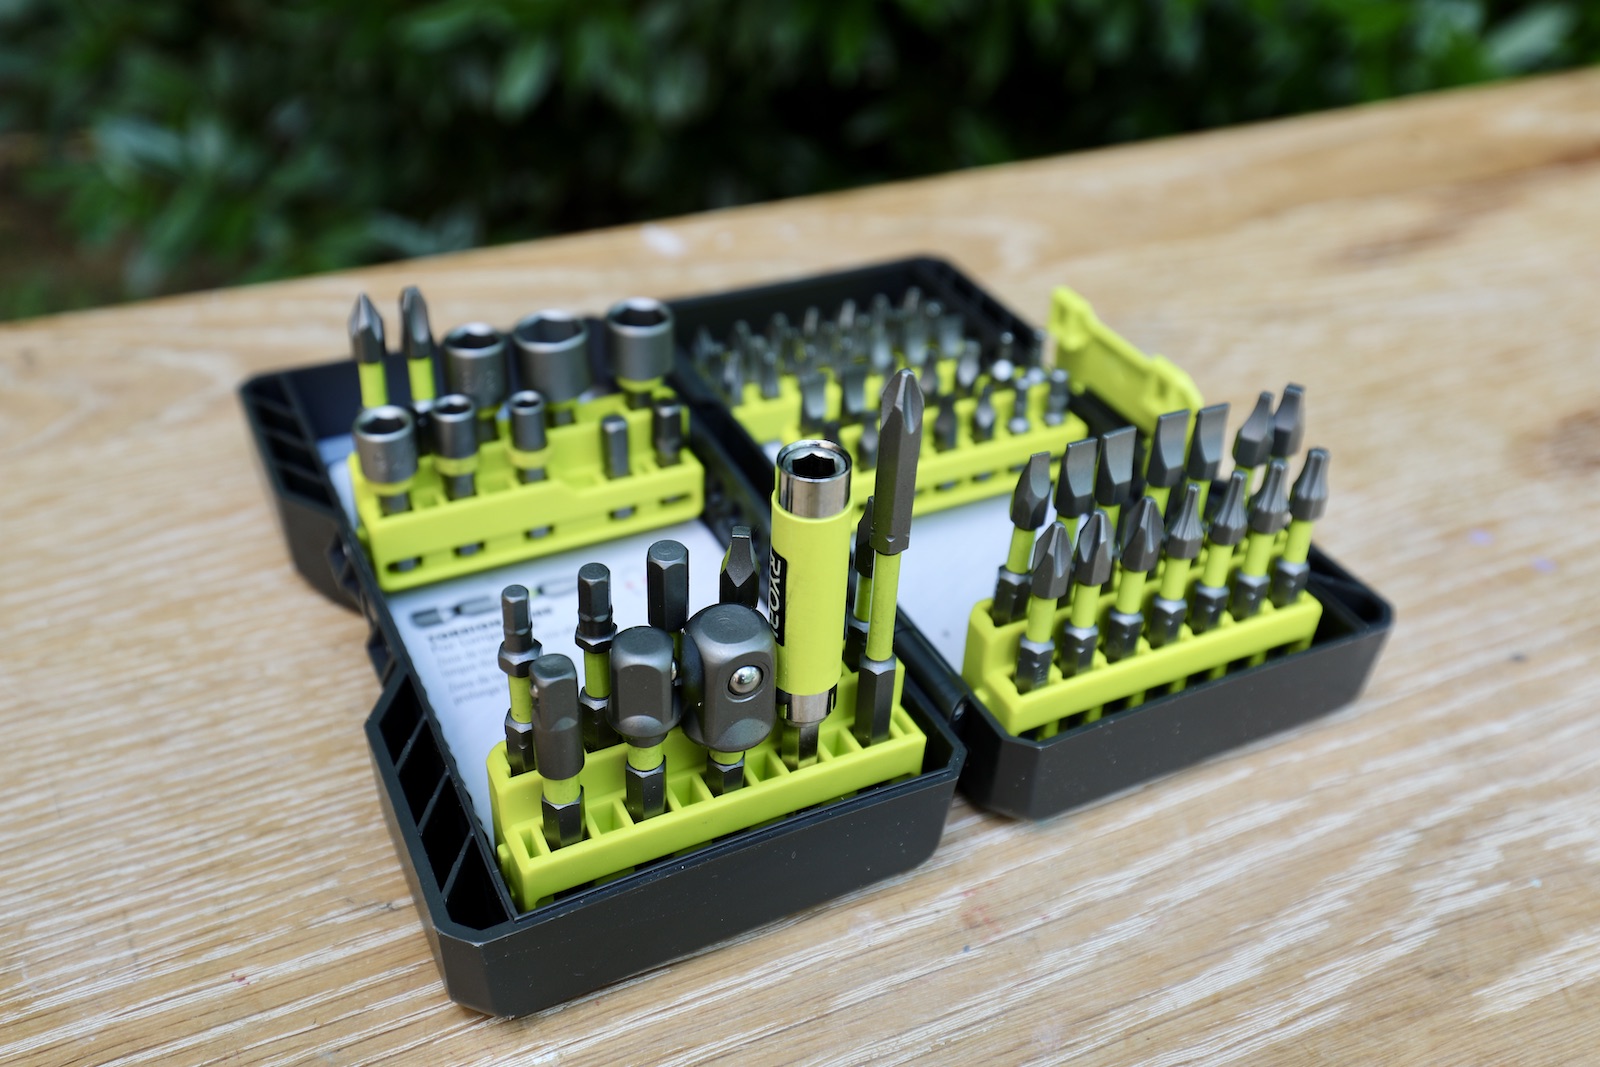
You don’t have the right accessories.
As I mentioned above, very rarely are cuts made free-handed. But if you’re a newbie, you may not even know that there are tons of accessories on the market that help DIYers, construction crews, woodworkers, etc., to get good cuts. Keep reading, because I’ll show you some accessories that you should have in your DIY toolbox.
You’re trying to cut too fast.
Newbies who don’t know much about woodworking or carpentry will cut their wood quickly because that is how they’ve seen the pros do it. I remember when I was first learning how to drive. I was out driving with my mom and came up on my first STOP sign. Instead of making a full stop, I simply slowed down and then made my right turn. My mom freaked out, “What are you doing?! You have to stop!” In my mind, though, I was trying to do it just like how any experienced driver does it. I mean, we know we’re supposed to stop fully, but by the time you become and experienced driver, you know the times when you have to fully, fully stop and when you think you can get away with simply “yielding.”
When you’re learning how to drive, you have to learn to fully stop….look both ways….take an extra look….then proceed.
The same is true when learning how to use power tools for woodworking. You can’t pick up a tool and think that you’ll be able to operate it the same speed as an experienced woodworker. You, oh inexperienced one, should proceed slowly and with caution. You’re more likely to be accurate with less speed when it’s an unfamiliar activity.
You’re stopping and starting the jigsaw and circular saw in the middle of a cut.
Sometimes this is to check to make sure that you’re straight. Or you might have to rotate the board to finish a cut. Whatever the reason, you’ve stopped and started at least once, sometimes several times.
These are all the reasons why your cuts might not be straight. The good news is that there are some things we can do about it! Before we jump into those, let’s talk about the different types of straight cuts you might be trying to achieve with a jigsaw or circular saw.
You Don’t Have a Proper Place to Cut
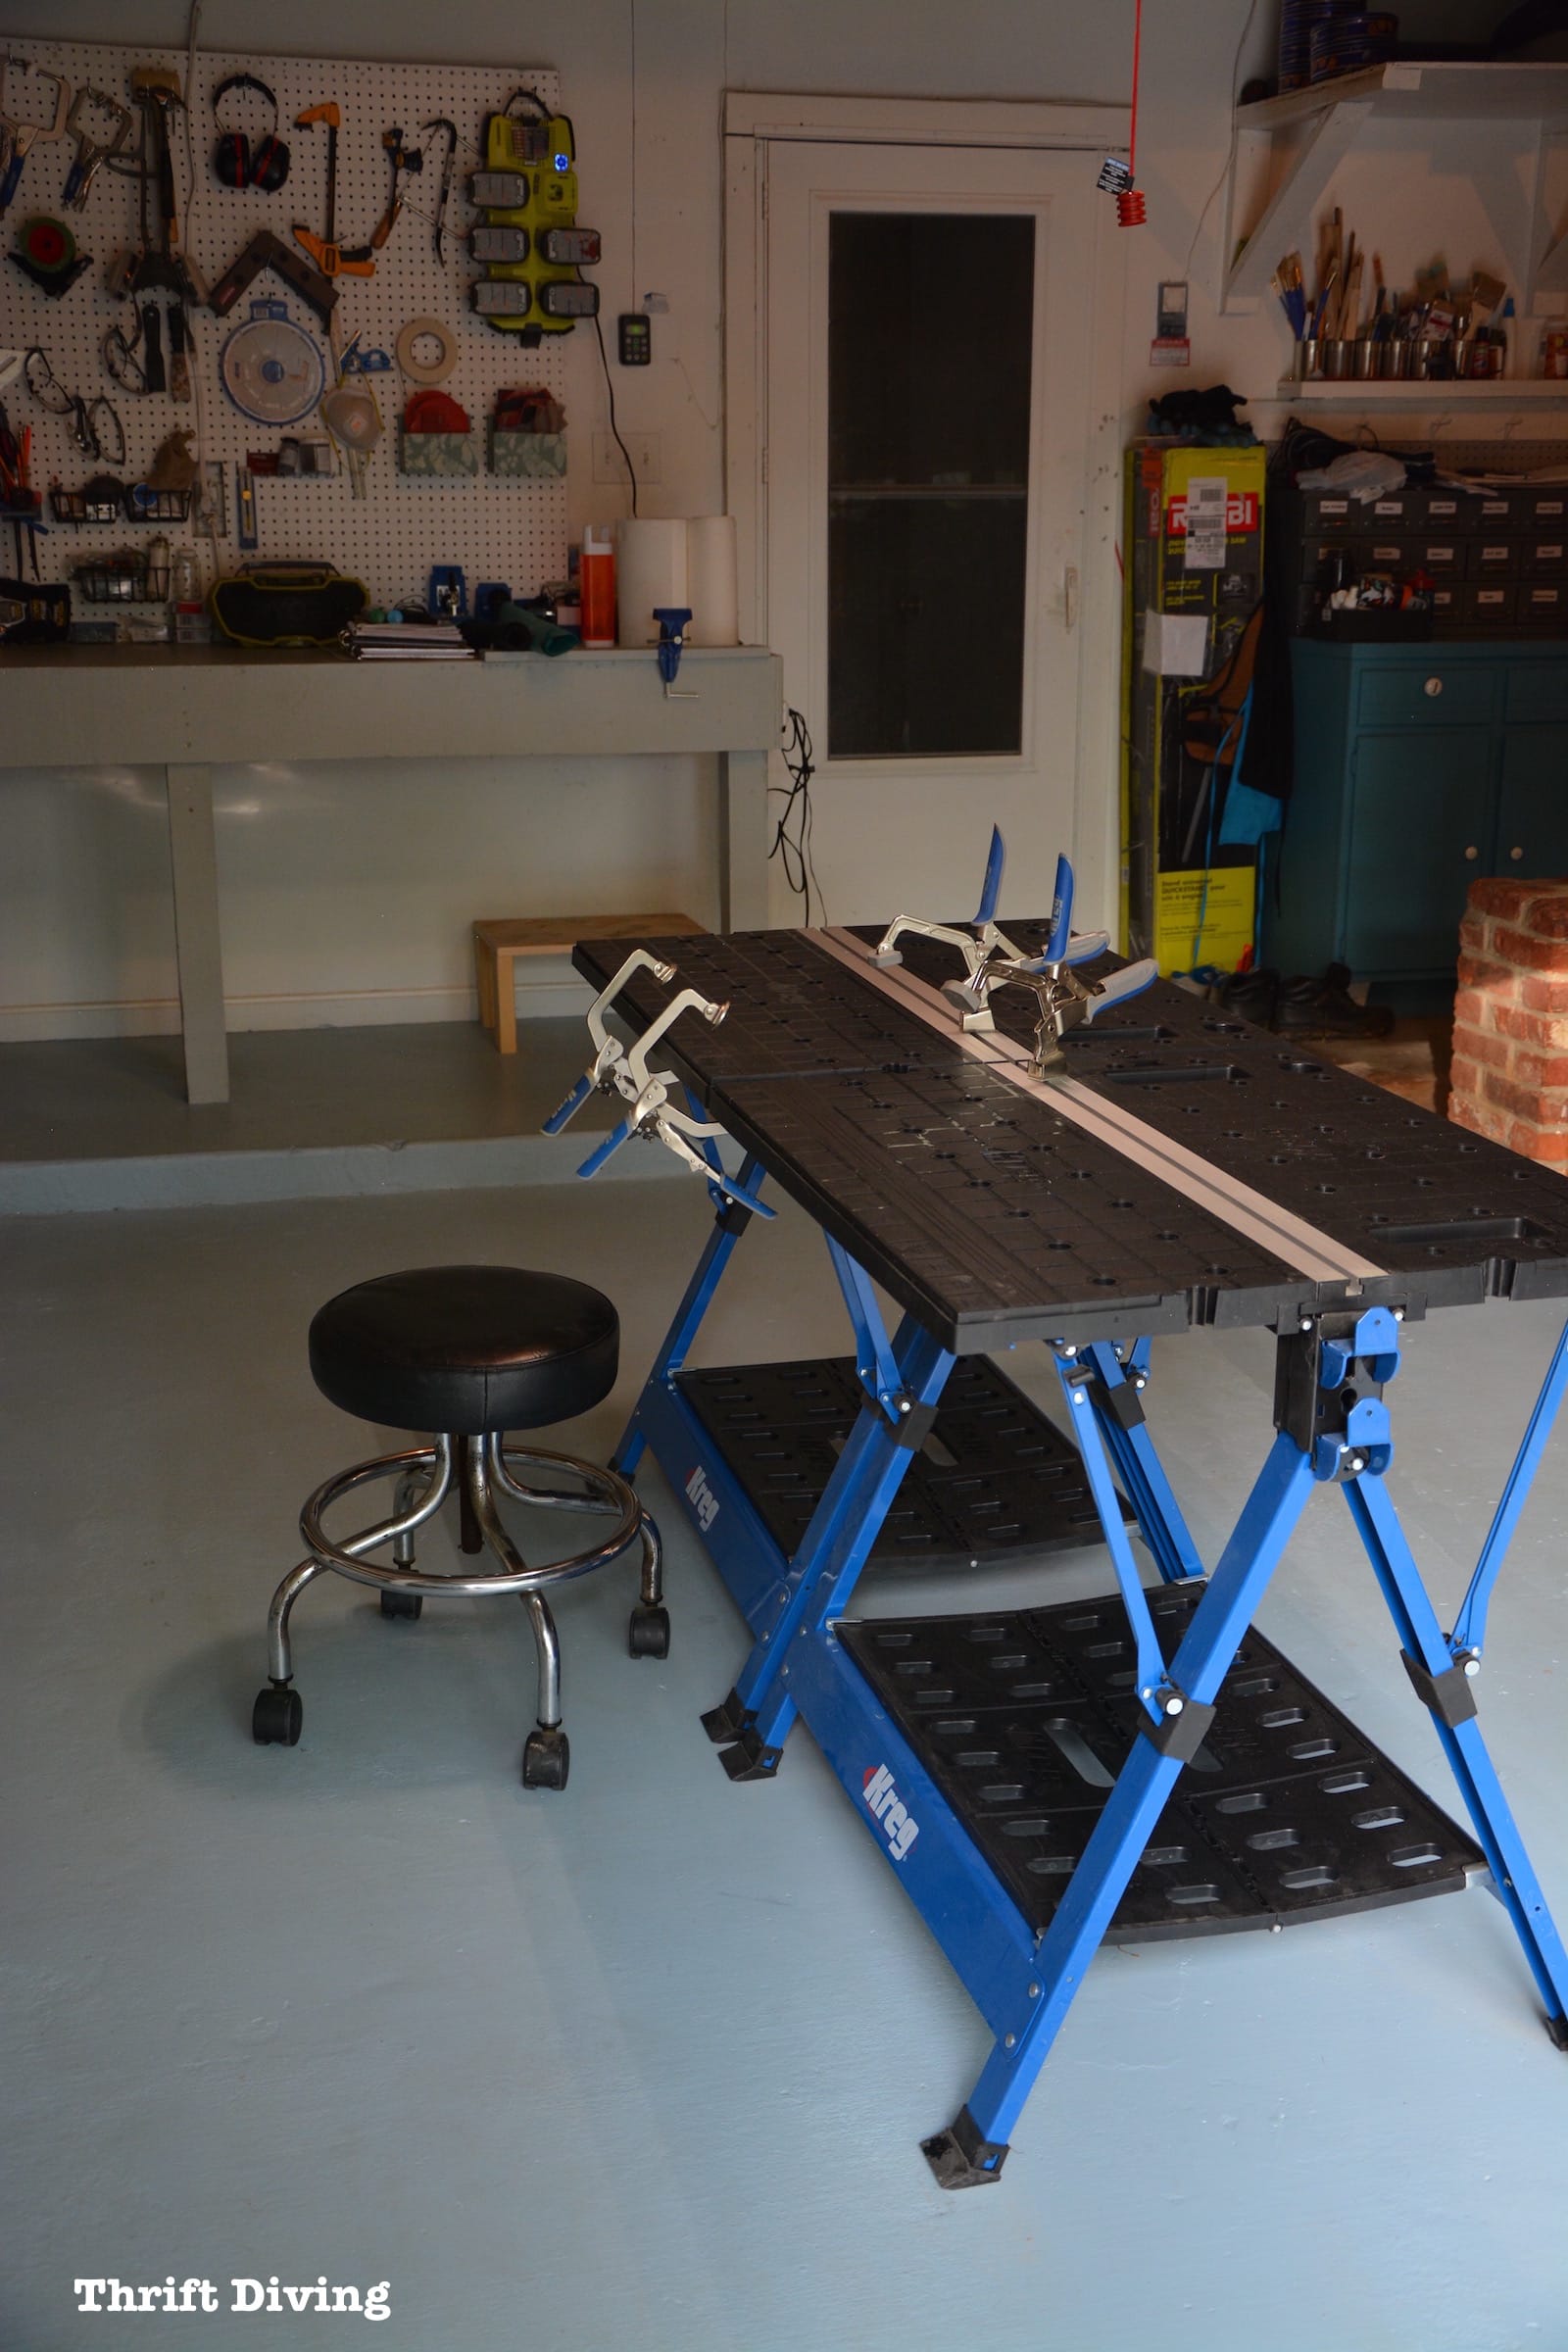
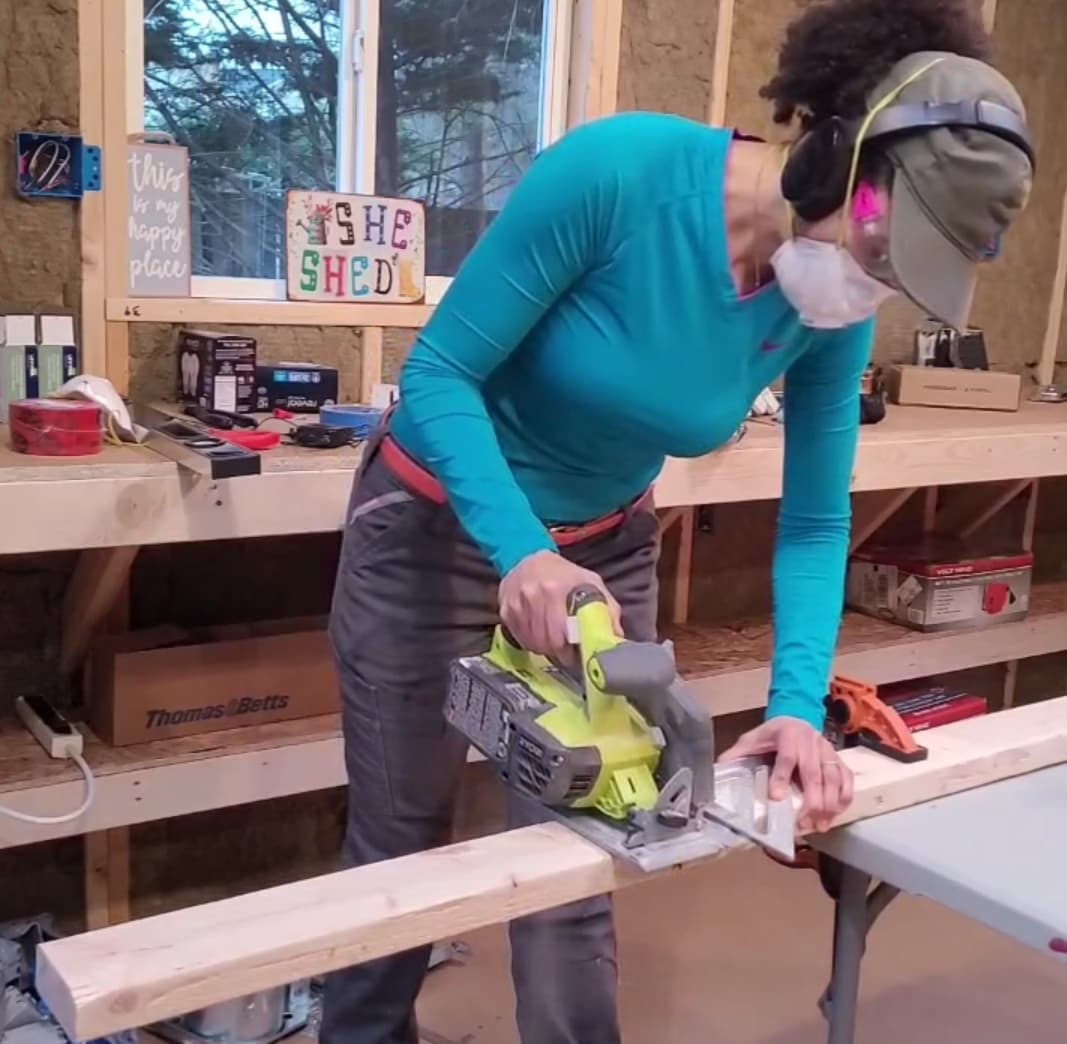
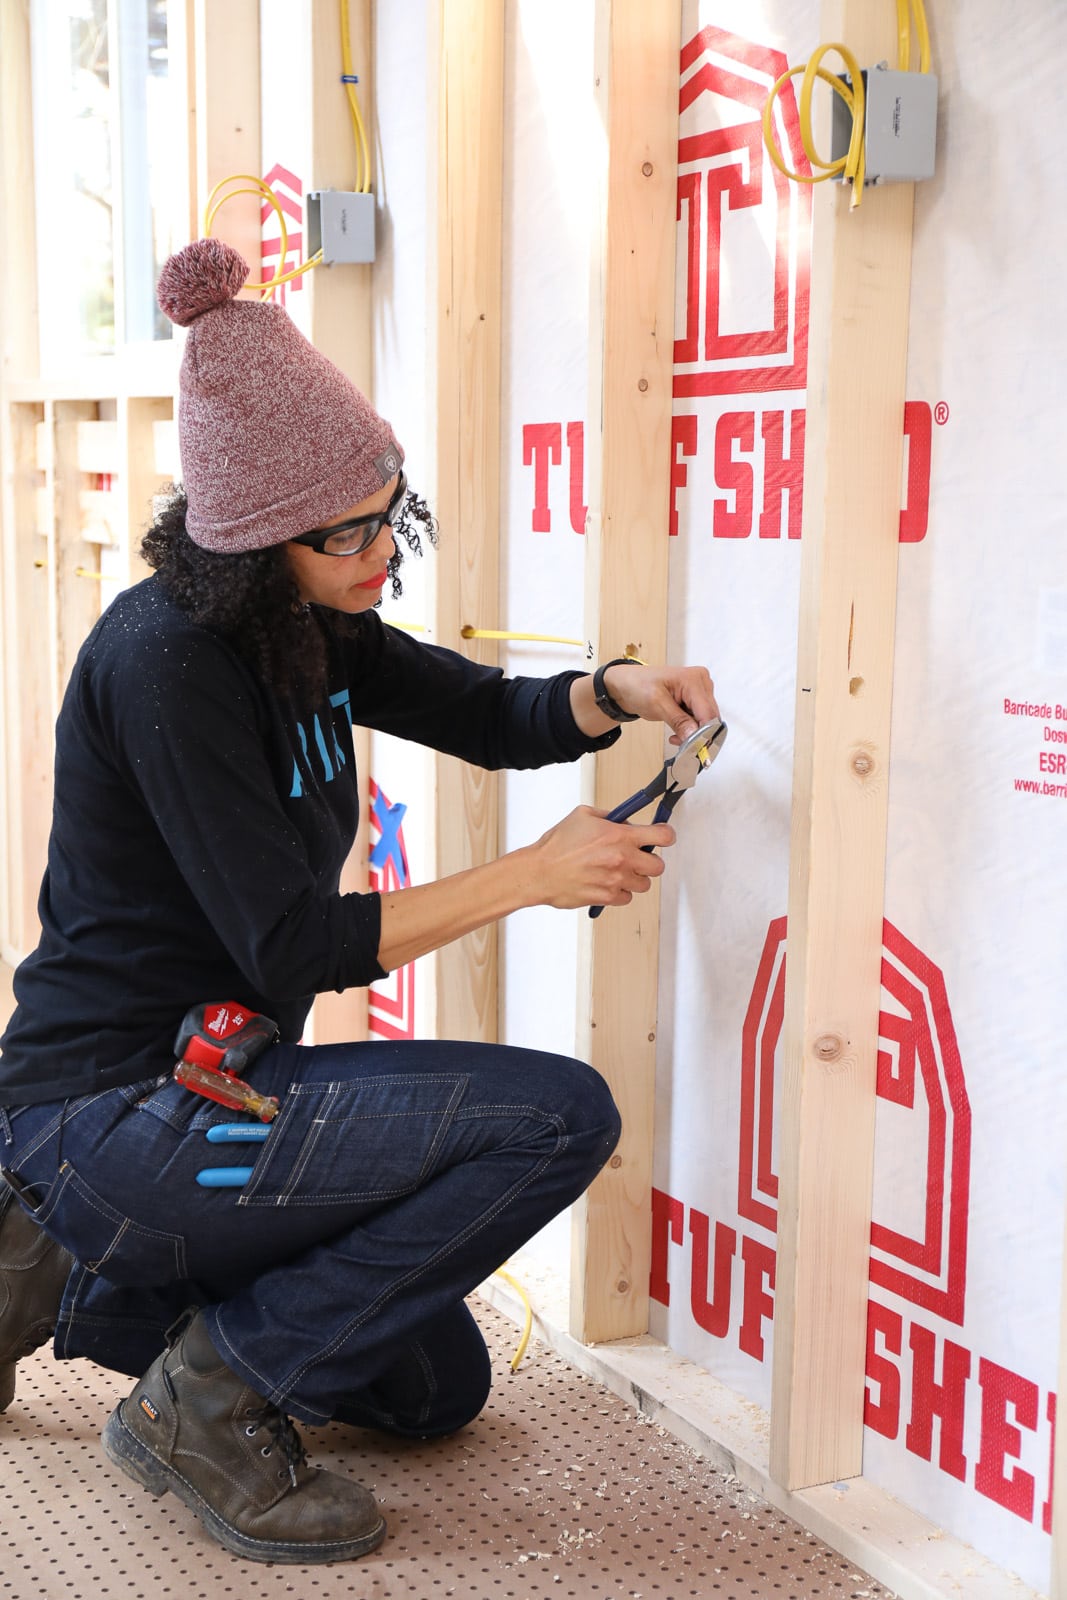
You’re only going to get good, clean, straight cuts if you have safe, secure place to cut your wood. One of my favorite places to work was in the garage (before I bought my “she shed” and started fixing up the interior to make it a new workshop). One of my favorite accessories were these Kreg Portable Workstations. You’ll notice the clamps that slide into the workstation, which are super important. If your wood is clamped down and isn’t shifting while cutting, you’re more likely to get a straight cut. It’s also much safer if the wood isn’t shifting around, either!
Make sure wherever you cut your wood that it’s properly anchored with clamps and not to move while cutting.
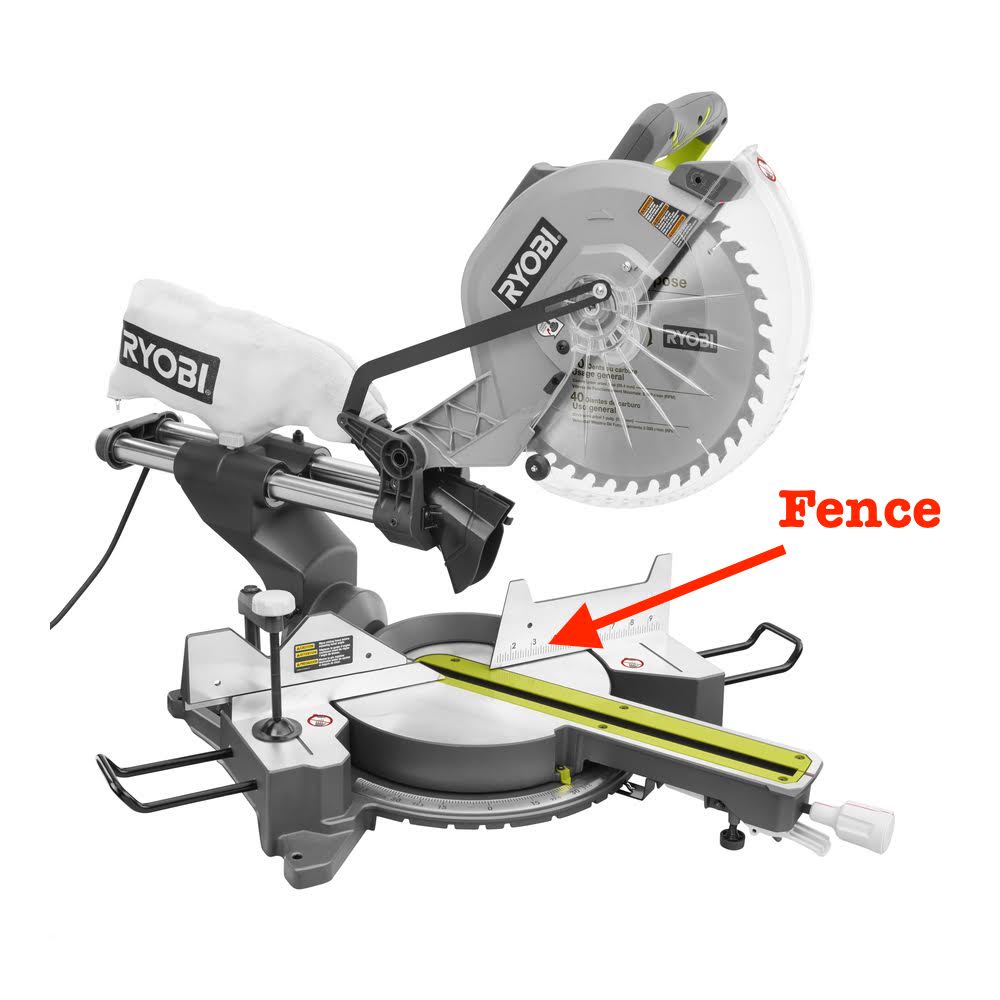
Some Tools Just Don’t Have a Built-in Fence
Absolutely no one has a hard time getting a straight cut when using a miter saw or a table saw because a miter saw and at table saw have something that a jigsaw and a circular saw doesn’t have: they have a built-in fence.

A fence is where the wood butts up against it, holding the wood tightly into position while the blade accurately cuts the wood. On a table saw, there is continuous pressure you must place on the wood against the fence to keep the wood from kicking back.
On a miter saw, the fence also holds the wood stationary and securely in place before the blade cuts it.
With a fence, and a properly aligned blade, you’re guaranteed to get a straight cut.
However, with a jigsaw or a circular saw, there is no fence to hold your wood in place. That’s where you have to create your own fence with available accessories.
Using the Right Accessories for a Straight Cut
The day that I realized that even professionals use accessories to get straight cuts, was the day I realized that the key to me improving my woodworking skills was simply to figure out what those accessories are. Some of those accessories were marking accessories, and some of those accessories allow you to keep a steady, straight hand. Also, some of them cost more than others, and others can be made into homemade DIY “jigs” that can be made with scrap wood!
Here are some of my favorite accessories that are important for getting straight marks and straight cuts with jigsaws and circular saws.
Pocket marketing tool
This is one of my favorite marking tools! The Kreg Multi-Mark marking tool allows you to set the measurement and then lock it in place with a big brass knob. For example, if you need to make 3″ marks along the edge of a board, it allows you to set the tool once, and simply move it and keep making repeatable marks.
Soooo much easier than pulling out a tape measure to make repeated measurements, right??
If you’ve got consistent marks, you’re more likely to get consistent cuts. Definitely add this tool to your DIY tool box.

Small speed square (also called a rafter square)
A speed square (also called a rafter square) is one of the most important tools in my DIY toolbox! I learned early on that this tool is the #1 accessory when marking straight lines onto your wood. Because, realistically, getting a straight cut starts with marking a straight line, right?
The speed square has a little “lip” edge that hooks onto the edge of the a board and allows you to draw straight lines which will be cut.
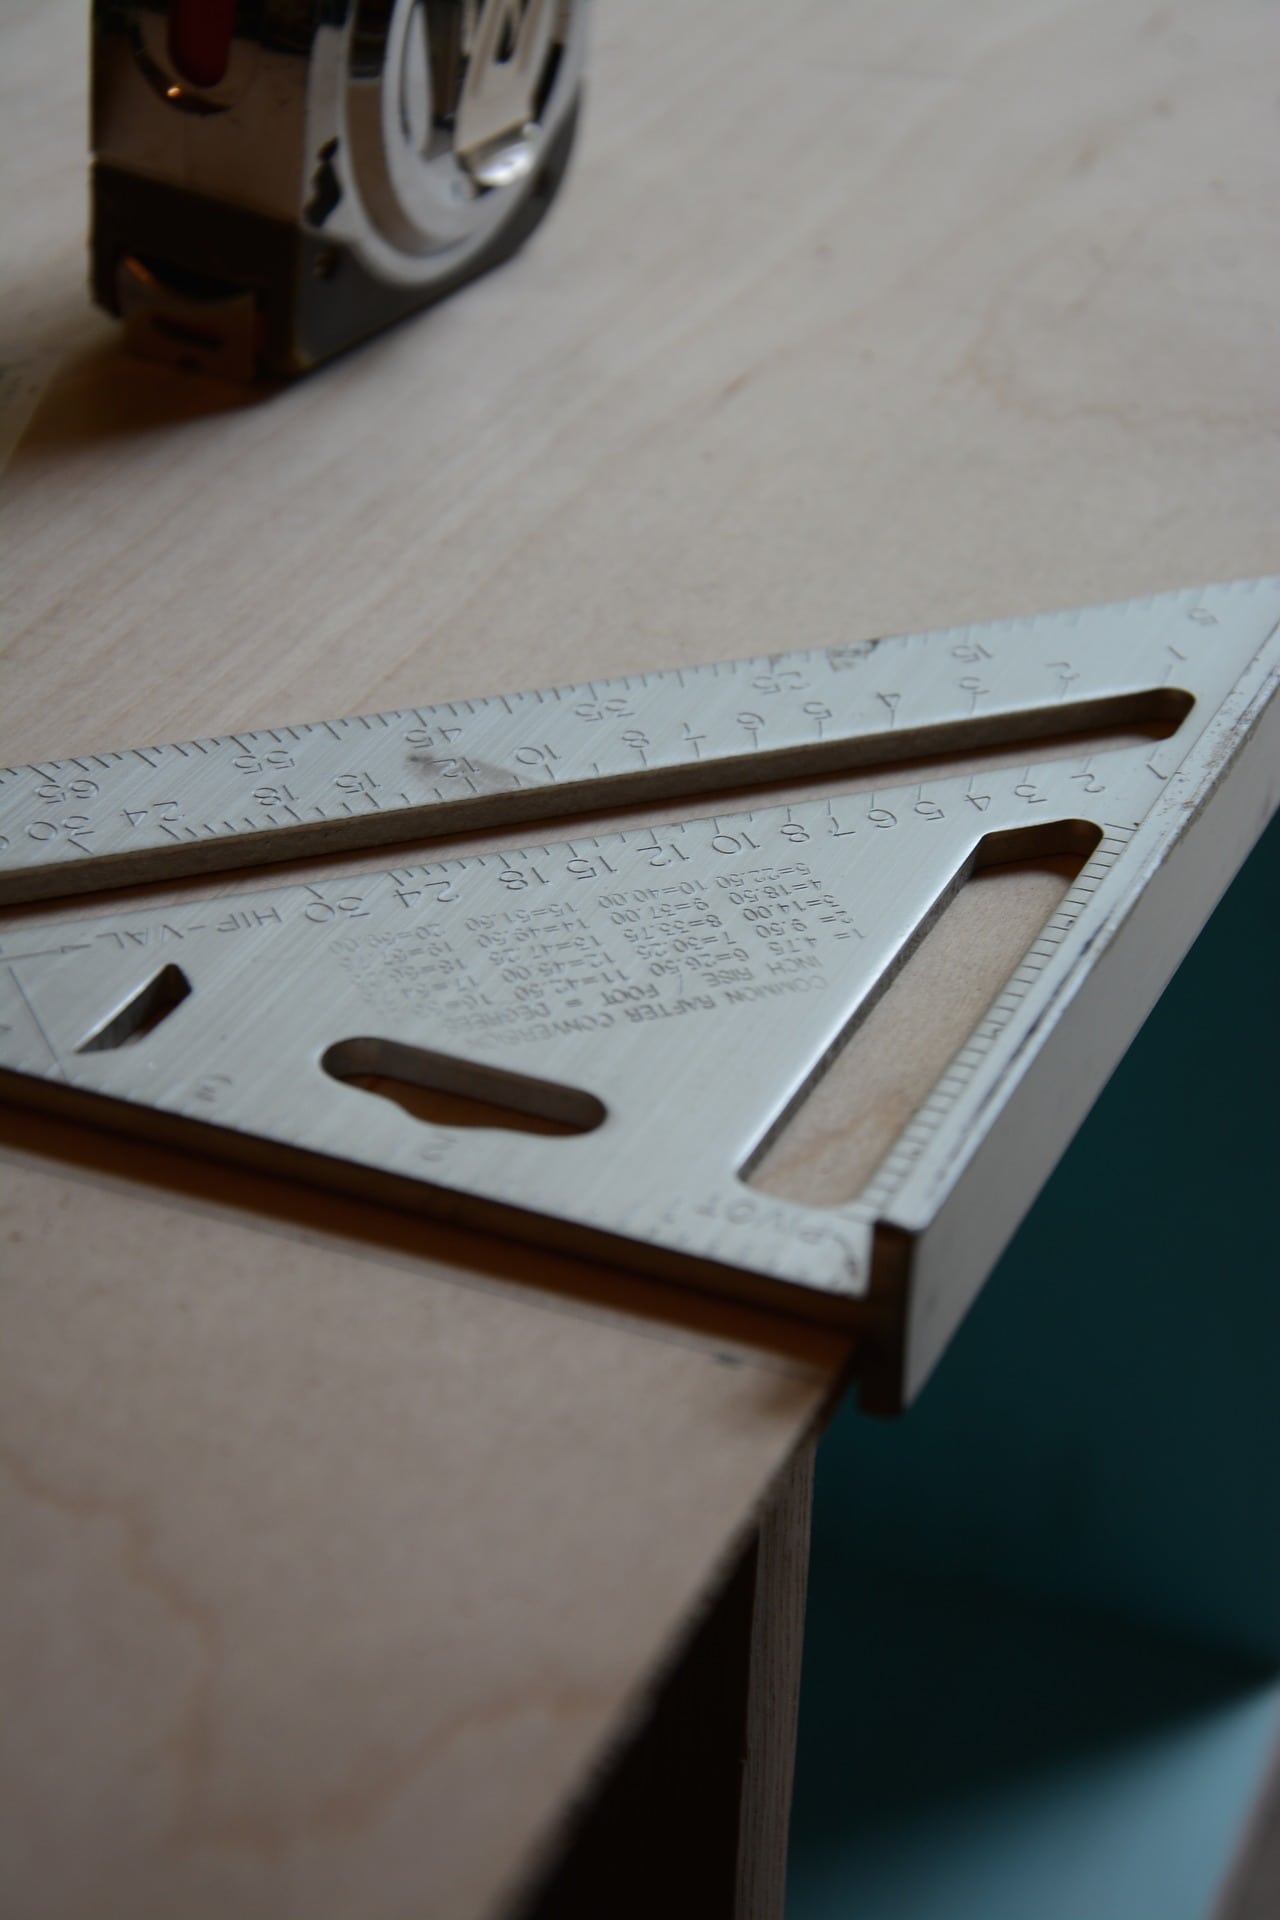
The only limitation, however, is that the most common speed square is 7″ in length. This is perfect for more narrow boards when you need to do quick cross cuts.
Secondly, with the edge of the board hooked onto the edge, you can now use the edge of the speed square as a fence for the jigsaw or circular saw. This is typically the only way that I will make a cross-cut when using a jigsaw and circular saw.
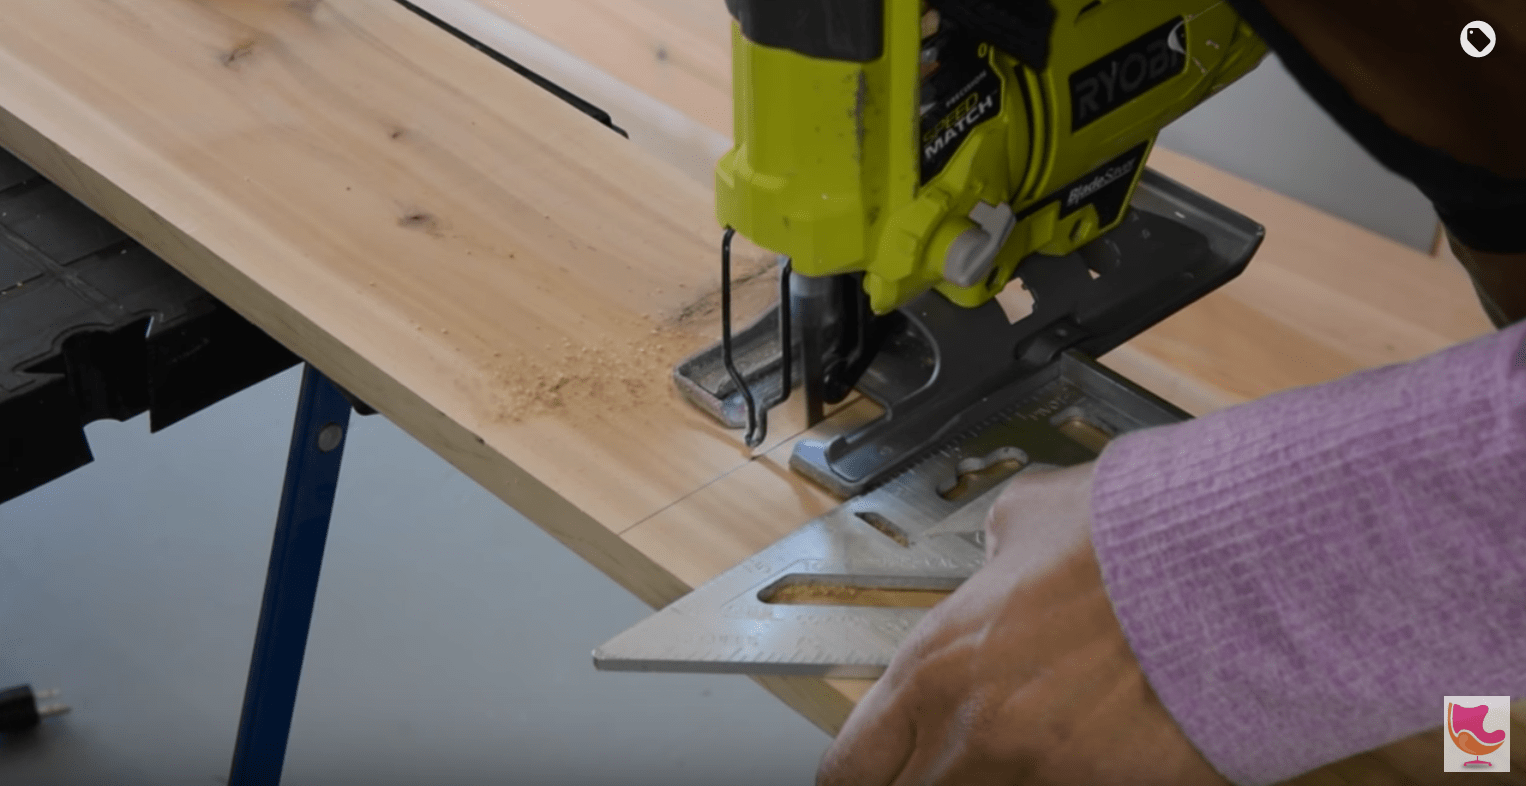
Overall, the speed square is one of those accessories that is an absolute must have.
Large Speed Square
Speed squares (again, also known as rafter squares) can be smaller but they can also be larger, around 12″ big. The blue one you see below is a 12″ speed square that I have used to cut wider sections of boards. It’s a little hard to use big squares on narrow boards, which is why you really do need a small one and a big one.
(FYI, I have also used speed squares to check to make sure that when I’m securing boards together, they boards are actually 90-degrees square. This is pretty important when building to make sure it all fits together nicely).
Husky makes this extendable speed square that is 6″ but it also has an extendable arm that allows the square to extend to 12″ for wider boards. Pretty neat accessory! This could potentially eliminate the need to have a small and big speed square, since this one is so flexible.

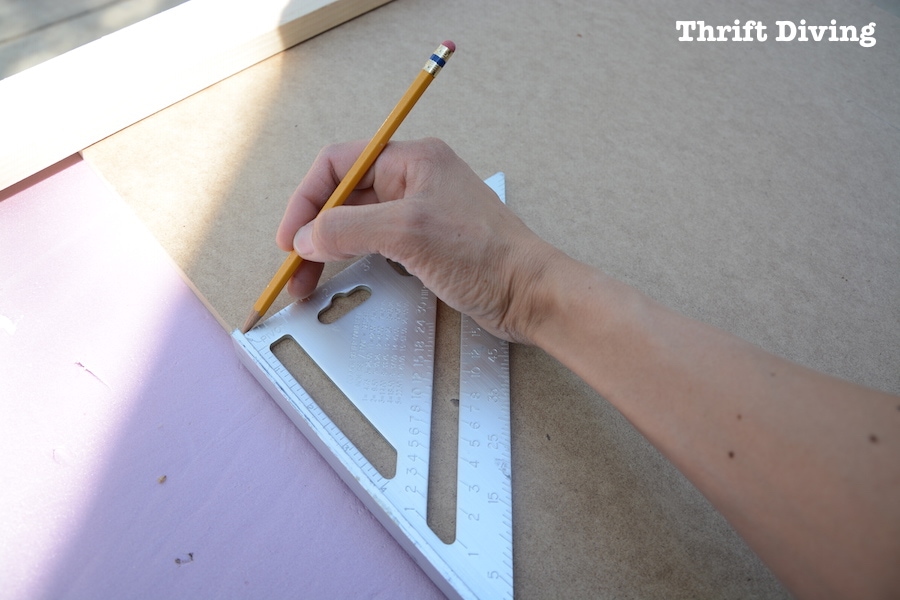
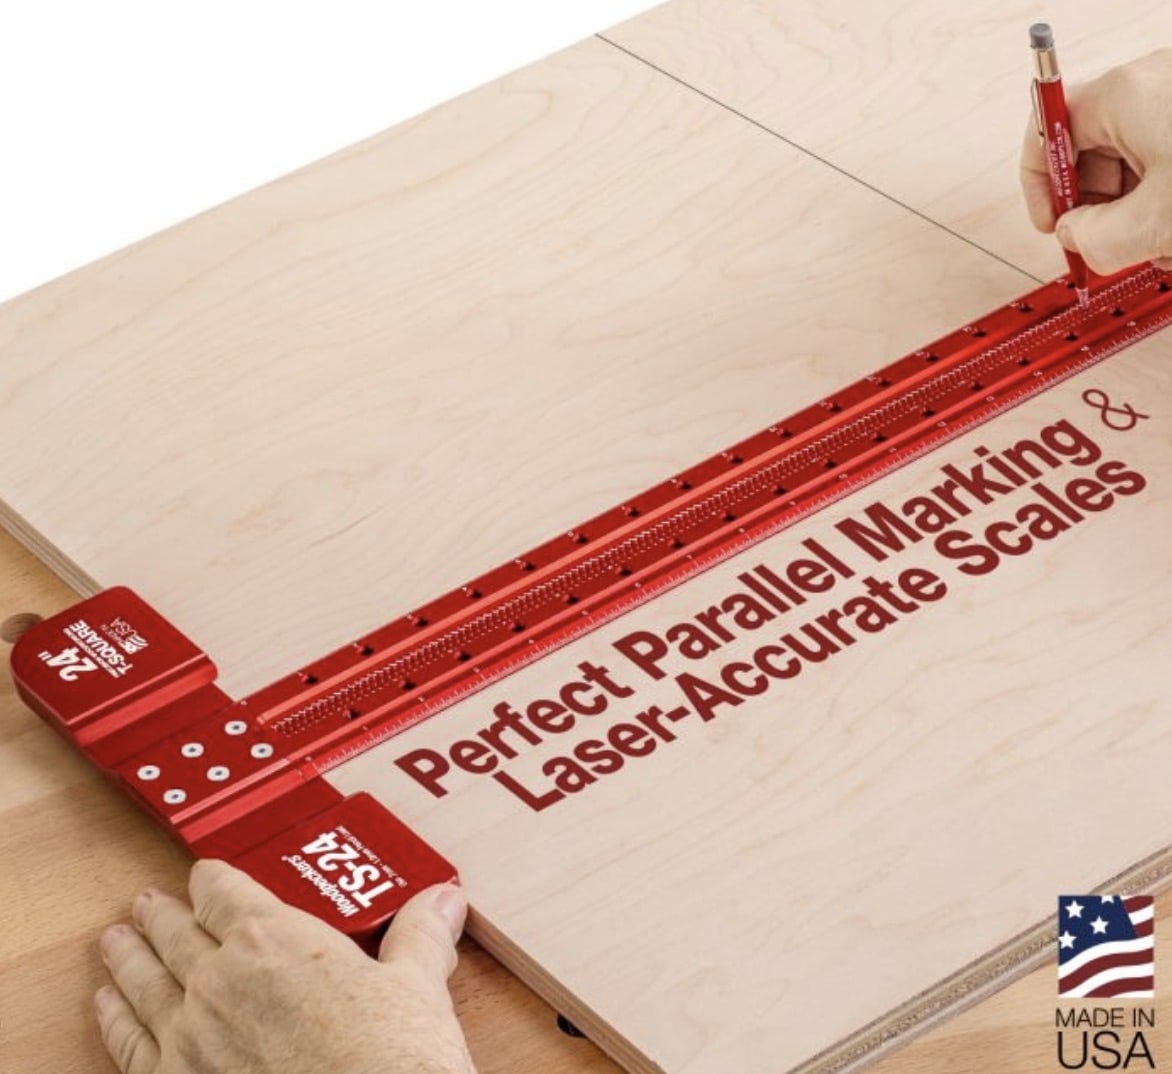
T-square
One of my all-time favorite tools for marking wood is the Woodpeckers T-Square. It’s got the same “lip” edge that catches on to the wood for accuracy, but it also has these little holes with each measurement. To mark the wood, you find the measurement you need, insert a mechanical pencil into the skinny hole, and drag the T-square along the edge, marking the wood at the measurement you’ve selected. Why this is such a great tool is that you’ve got a consistent measurement and line drawn from the top of your wood to the bottom.
When you cut along this line, as long as you’re consistent in cutting, the measurement should be straight and accurate along the entire piece of wood.
I highly recommend a T-square. Of course, there are limitations, such as if the measurement you need is longer than theT-square. In that case, a tape measure help to mark the measurements first, and then the T-square can ensure the line drawn is straight.
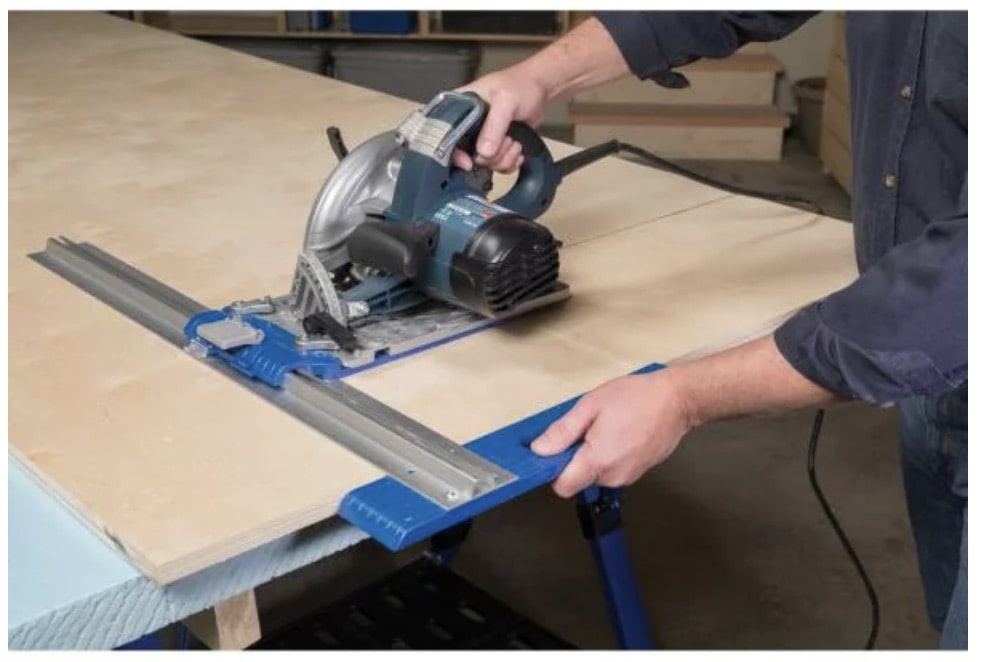
Kreg Rip-Cut Guide
Lots of DIYers love using the Kreg Rip-Cut Guide for their circular saw in order to get a straight cut. It’s not very expensive ($40 from The Home Depot) and can be used with virtually any model or brand of circular saws. One side of it acts as the fence, and you push this fence and the saw along the wood, keeping the fence tight to the end of the board. This helps to ensure you’ve got a straight cut.
What I don’t like about the Rip-Cut, however, is that if you need your saw for cutting something else, you have to unscrew the circular saw guide from the saw. Putting it back on and calibrating it each time is a pain in the butt.
My advice would be to either get all your straight cuts done in one “go” by batching them together, so as not to need to move the saw guide from the saw. Or, another option would be to have one saw dedicated to the Rip-Cut guide and then have another saw that is available for other cuts, if needed, such as quick cross-cuts on a 2×4 where a Rip-Cut guide wouldn’t be needed.
It really depends on what you’ll need to cut. However, this Rip-Cut is definitely a must-have tool if you’re a newbie!
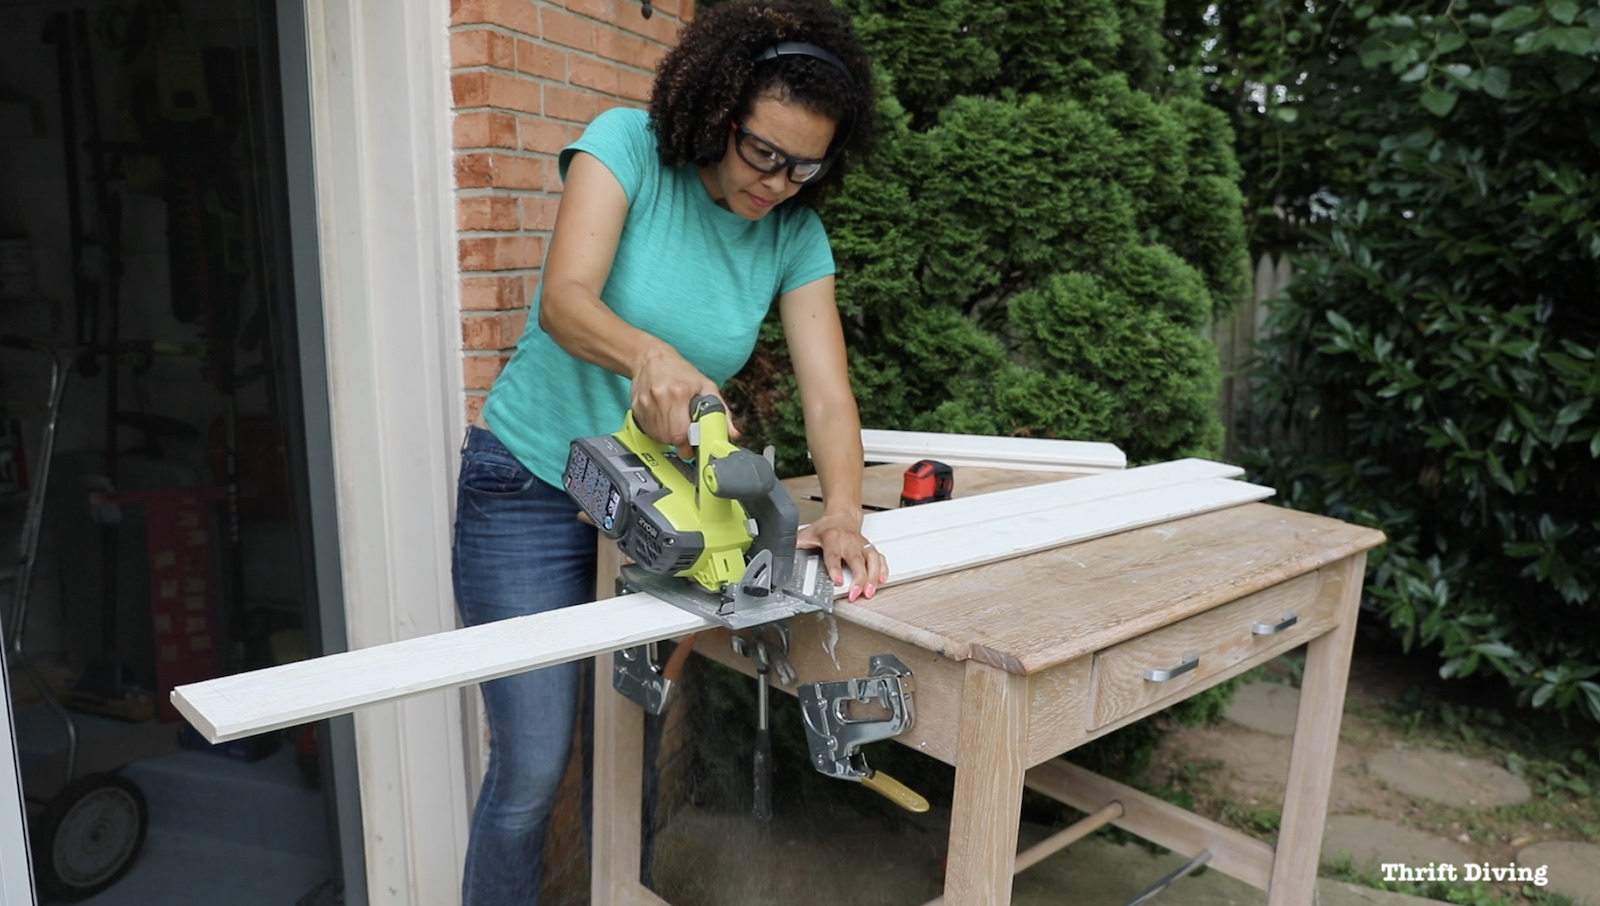
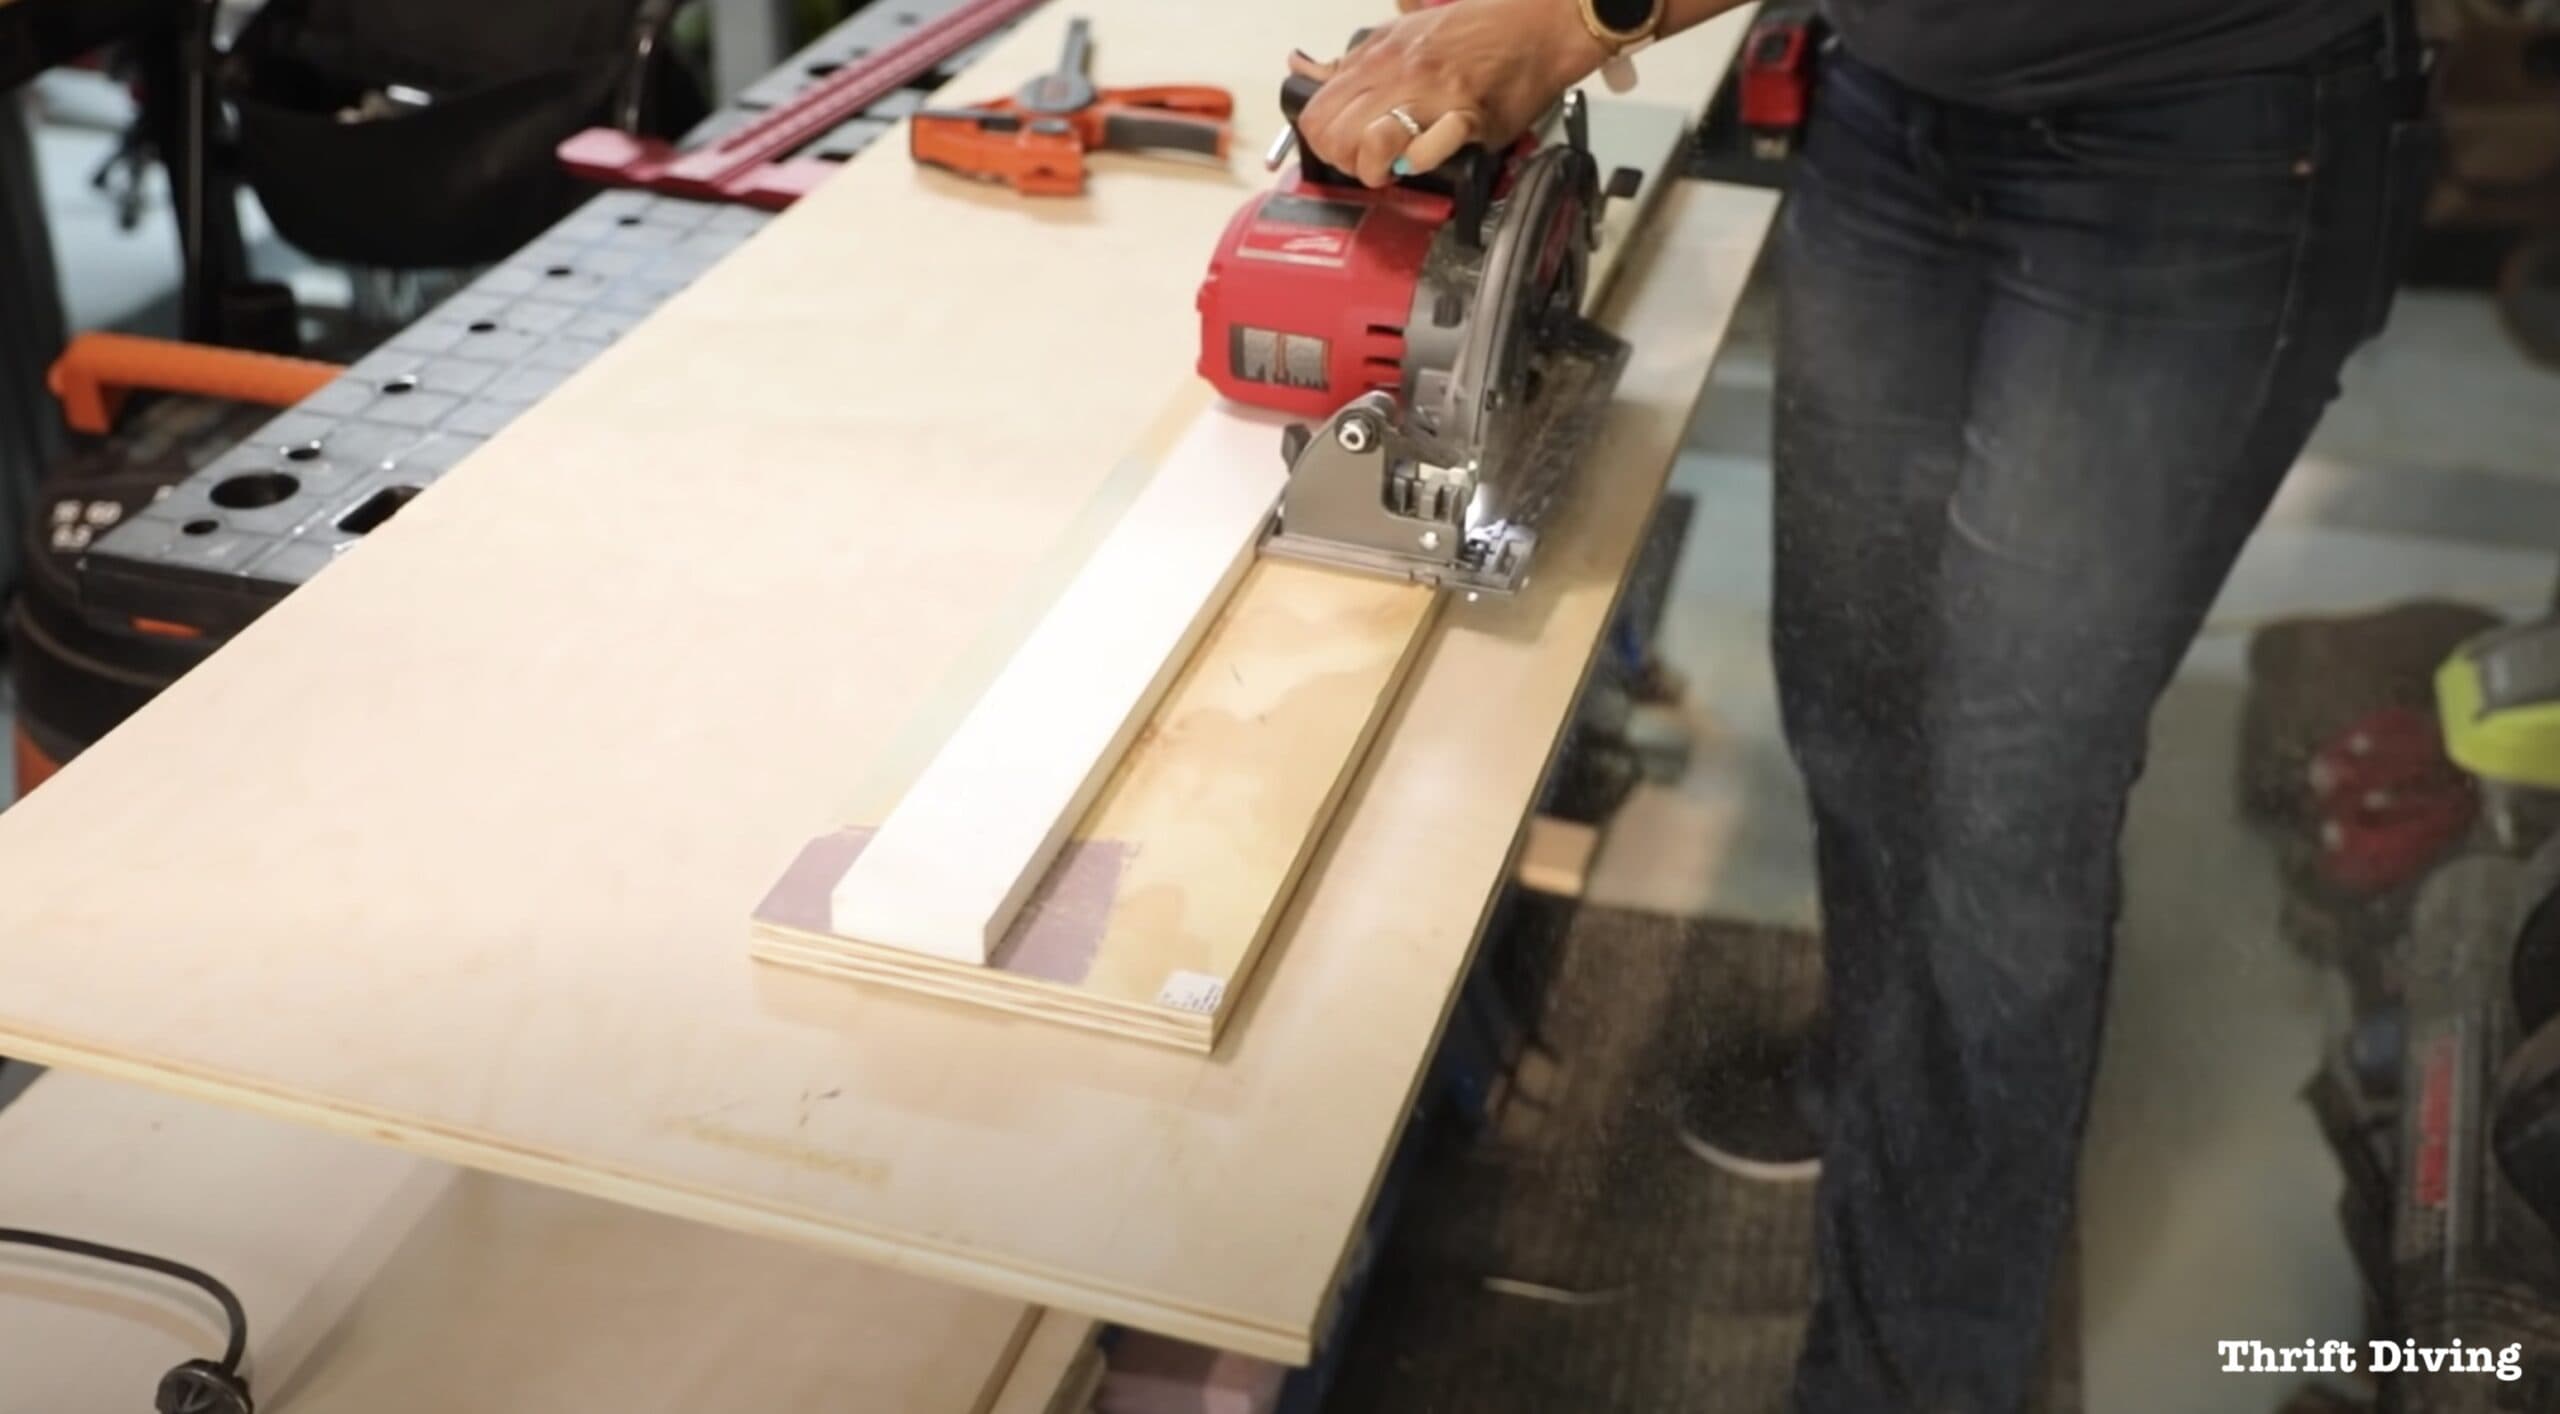
Homemade Circular Saw Guide
When I was building my closet organizer, I didn’t have a circular saw guide. Well, I did have a Kreg Rip-Cut Guide, but for some reason, I didn’t really like using it. I had had good success with a DIY circular saw guide years before, and decided that would suit me just fine for my project. It’s literally just a couple pieces of wood screwed together. In the picture before, the white board is screwed to the yellow pine board. The white board is acting as a fence. And the edge of the pine board is my cut line.
This circular saw guide allowed me to build my entire closet organizer and get pretty straight cuts!
It wasn’t completely ideal, but it was better than trying to cut the board free-handed, and there were no adjustments that needed to be made, such as when using the Kreg Rip-Cut.
To make your own circular saw guide, follow the instructions below from This Old House.
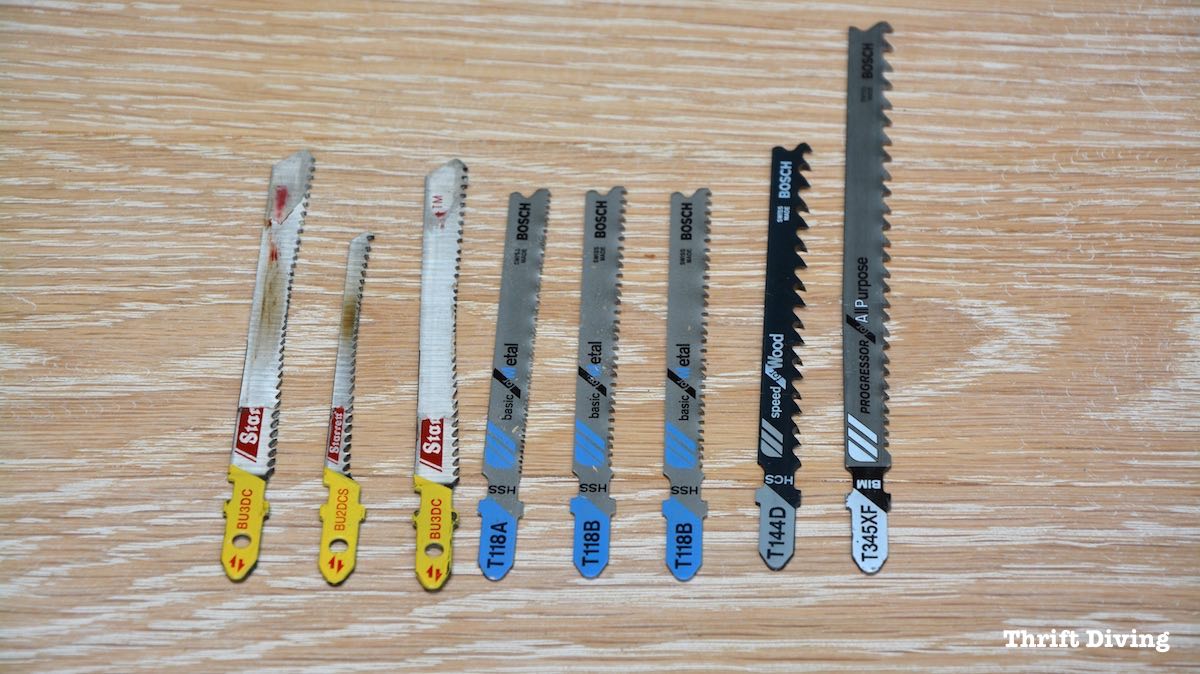
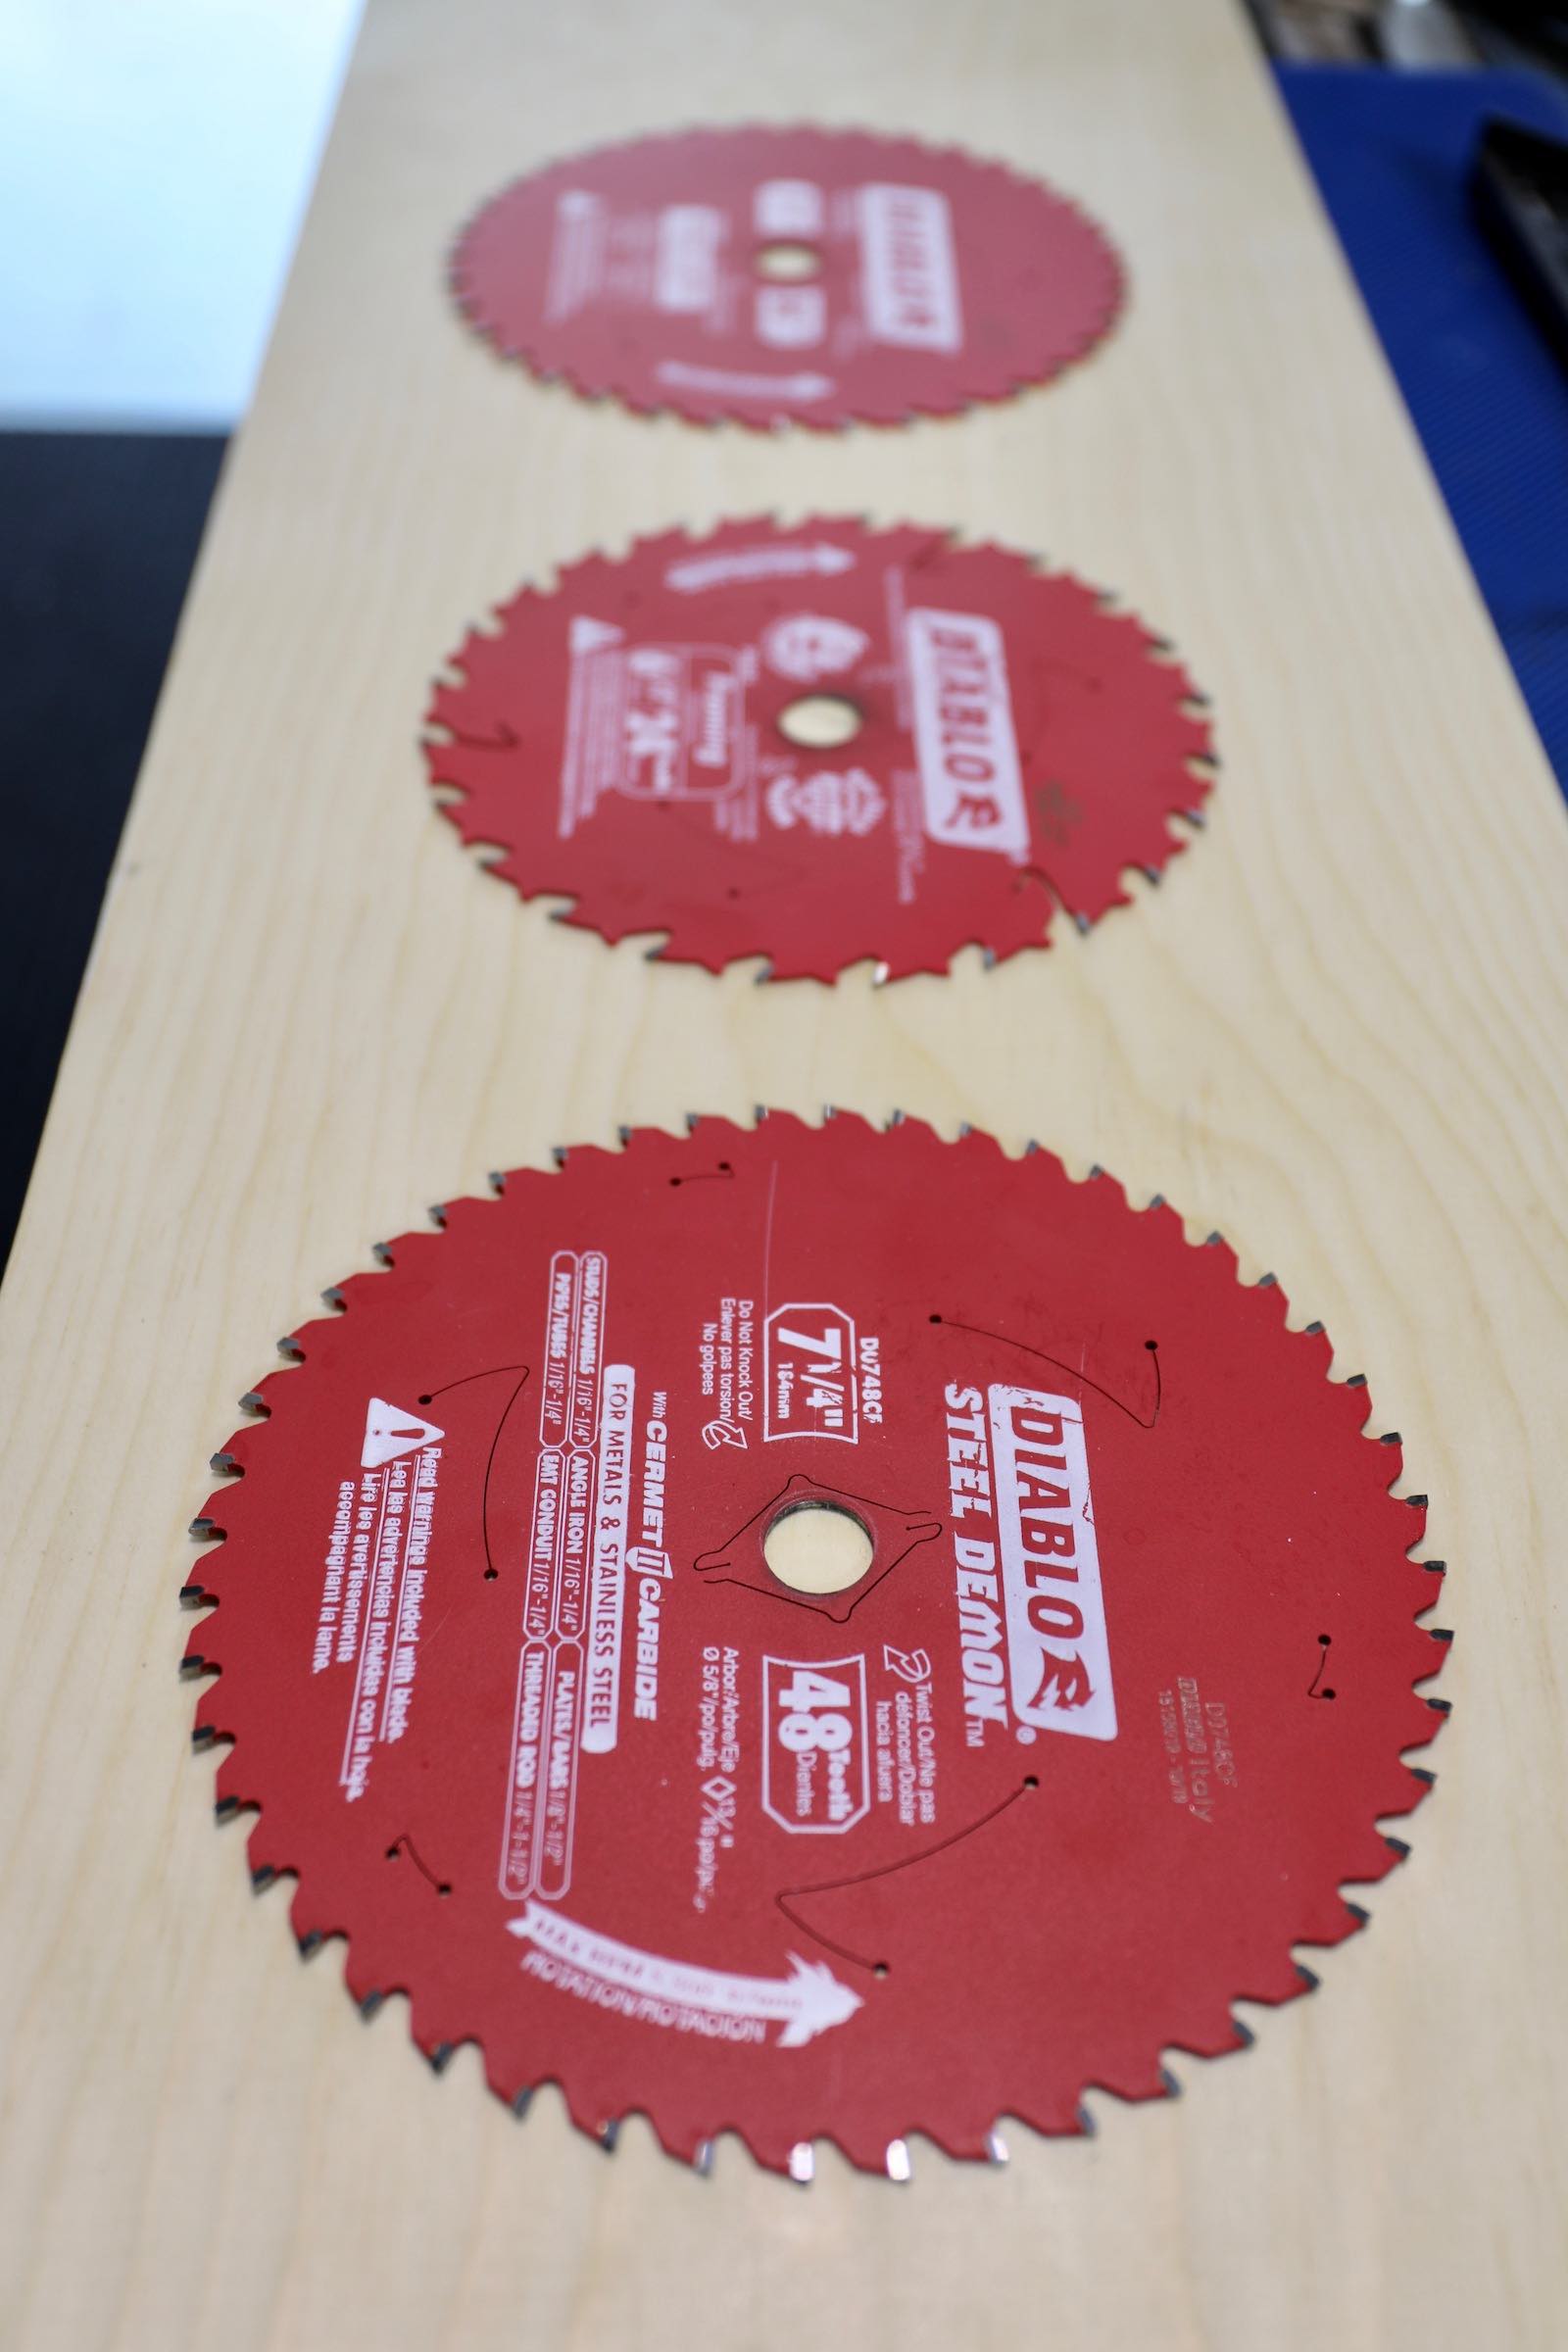
Using the Right Jigsaw Blade
Blades are so important when it comes to the jigsaw! For years when I would use the jigsaw, I couldn’t understand why my cuts weren’t straight and that they were lopsided. It’s because when the jigsaw is cutting down and up, the blade generally doesn’t cut in a completely straight line and it doesn’t cut on the downward stroke and upward stroke. Most jigsaw blades only cut on the up-stroke. Which means that not only is the blade flexible and moving around, but it’s only cutting on the up-stroke (see the dark gray blades below). The jigsaw is making you think your wood is cut nicely on the top, but then you flip it over and you see that it looks like a horrible mess.
The blades I like to use now exclusively are Starrett jigsaw blades, which as you can see below, cut on the down-stroke and the up-stroke. This makes a difference so that you’re getting a clean cut going both down and up. That’s going to help with getting a straighter, cleaner cut.
If you’re cutting a thicker piece of wood, say a 3/4″ piece of plywood, it still won’t be perfectly straight, because there will still be some deflection with the blade as it’s going back and forth, ripping into the wood. But it will be a cleaner, straighter cut, in general.
Circular saw blades, on the other hand, there’s no deflection in those blades. But what matters the most is the number of teeth per inch. Keep in mind that the more teeth, the finer the cut you’ll get. The less teeth, the rougher the cut you’ll get. That is true for any blade, actually. And while it doesn’t necessarily mean a straighter cut, it will mean a cleaner cut the more teeth your blade has.
This matters if you’re doing quick cuts that don’t matter if it’s neat, versus cuts that will matter because you’re building a cabinet that you want to look high-quality.
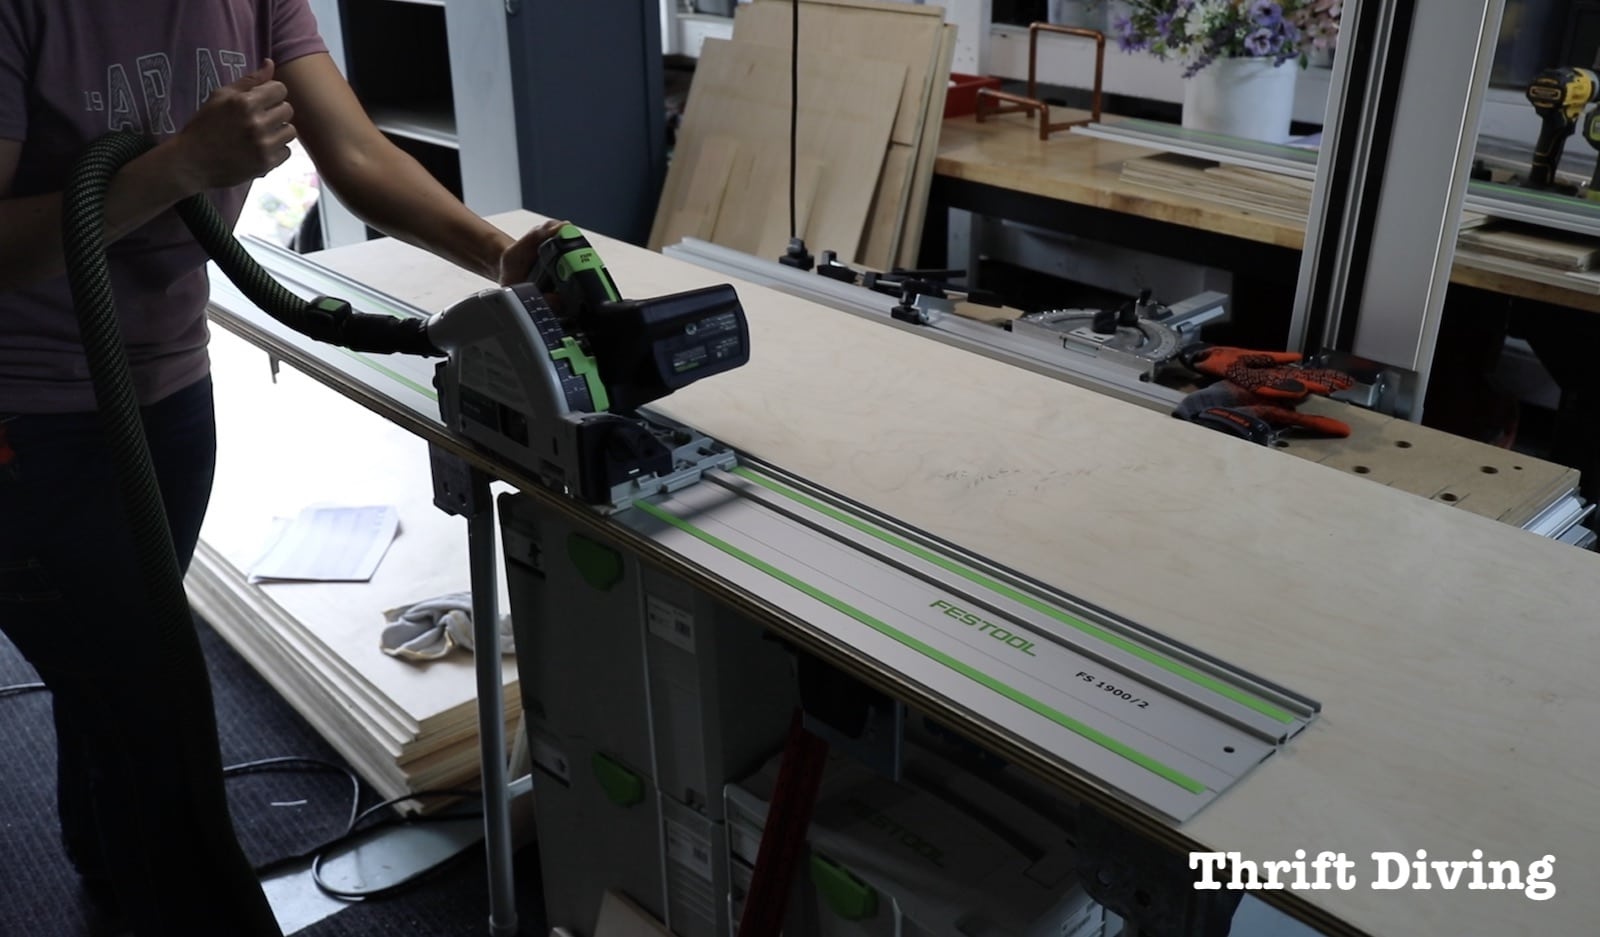
Buy a Track Saw If You Can Afford It
The absolute best decision I have ever made was the invest in a track saw. Right after I built my closet makeover, a long-time reader and friend mentioned to me that I needed to get a track saw. It has been on my list of things to consider, but you know how life is: you make do with the tools you have and you forget there are so many options out there that can make your projects easier.
That’s when I decided to get a Festool TS 55 track saw. I’ll tell ya, though… you do not have to go as expensive as I did with this tool. Festool makes a whole line of tools that are part of a great system, and I decided to invest in the system, which included buying the MT3 table, as well. But most people aren’t going to spend that amount of loot, especially not a newbie.
So the least expensive alternative is to look at the Kreg Cutting System Plunge Saw. Kreg also has its own system and people are sworn that it works well.
Track saws are the way to go if you’ve got a little money to invest without totally breaking the bank. They’re safe, they can produce repeatable cuts (with you can’t do by hand), and the edges of the wood are so clean that you can run your finger over the edge without even getting a splinter! I love my track saw!
Straight Cuts Aren’t Hard When You Have the Right Tools and Accessories
Getting straight cuts really isn’t that hard when you have the right tools and accessories! Of course, it can take money to get the things you want and need to get straight cuts, but that’s the point of growing your DIY toolbox over time. When I first started, I didn’t have any fancy tools. I have RYOBI tools, which were perfect for doing my projects (which I still own and use some of them, by the way). Don’t feel like you have to get everything at once.
My recommendation would be to invest money in the items listened above, and don’t worry as much about the brand name of the tools. The marking tools and straight edges are most important for getting quality, straight cuts with your jigsaw and circular saw.
Did you enjoy this post? Click here to SAVE it on Pinterest!
![]()

Download the 5 freebies!

Thrift Diving inspires women to decorate, improve, and maintain their home themselves...using paint, power tools, and thrift stores! Use these 5 printables, checklists, and ebooks to get started!


I just nodded my head through the whole podcast. Preach! I’ve been woodworking (off & on) since 2014 & I STILL struggle with straight cuts. I’m building a king size storage bed and let’s just say, there’s gonna be A LOT of sanding & caulking 🤦🏽♀️
I keep telling myself “no one’s gonna see ‘that part’” 🤞🏾🍀 👀😬👉🏾👈🏾
I can definitely say that I’ve learned a lot and improved from this experience & know what I’ll do better next time.
However, even with all the mishaps, I’ve kept this “Stick With It. You won’t always stink at it,” attitude & mantra. It keeps me going. Right now I’m learning to strive for completion rather than perfection, which is huge for me. Wonky or not hubby & I will be sleeping in that bed 😂😂
I am a tool junky & have a lot of tools & accessories. Eh, some women like to go on clothes & jewelry shopping sprees (don’t get me wrong, I do too) but put me in a hardware store…same result 😂😂
I LOVE tools.
And I have serious plans to invest in better brands of tools this year…but the Woodpecker, SawStop, & Festool (to name a few), those are my “dream car” tools because they’re what I consider fully loaded luxury tools.
But back to straight cuts. I have a Swanson straight edge that works pretty well but a speed square is a lifesaver for marking lines and cutting short pieces of wood. I’m a huge fan of Kreg too and have their RipCut, CrossCut, & AccuCut (plus a lot more) The AccuCut seems to like me best 😂😂.
I also find using clamps invaluable tools with keeping my straight edge tools secured while I cut & for a ton of other projects.
Ha! I know exactly the TOH video you’re referring to for the straight edge jig, Tom made it. Confession: I’ve watched that video so many times but have yet to actually make it. For some reason jigs intimidate me. I’m probably just overwhelmed from watching so many jig videos of push stickers, crosscut sleds, t-track tables, miter saw stops & tables, and table saw fences. Analysis Paralysis, I guess.
Finally, I just want to say that I am absolutely enjoying these podcasts! The information is invaluable. Each time I hear it differently & as I gain more experience, I can see (in my mind), comprehend & produce better results. So, thanks so much for sharing your experience, wisdom, honesty, & integrity. It definitely helps. Also, you make it fun & memorable. Looking forward to next time. Sorry this was so long.
Very informative post, as always. How do you keep the saw dust down to a minimum?
Thank you, Janet! Dust is a HUGE factor! A cheap option that I learned from woodworkers is to have a box fan and tape one of those 3M filters to it (the same pleated kind you’d put in your HVAC) in order to draw the dust in and away from where you’re working. For me, I actually upgraded my tools and got a dust extractor, which wasn’t cheap to do as part of the Festool system. For my shed, I’m also going to have a dust filter that was about $350 on a great Black Friday deal (the brand is Jet). I think anything you do to pull the dust away from your work area is good. But start with the box fan with the air filter attached. Hope that helps! And always wear a dust mask!
Awesome videos on cutting, Serena. As always…. you nailed it! Keep ’em coming.
Your workshed is looking fantastic, and I noticed you have a peg board. OMG – you need to check these out from Rockler..!!
https://www.rockler.com/talon-pegboard-toolholders
WONDERFUL tool holders, finally, peg board holders that don’t pop out and drop your tools on the floor.
PS – You’re right on the money with consistency. As Calvin Cooledge said so long ago… “Nothing in the world can take the place of persistence. Talent will not; nothing is more common than unsuccessful men with talent. Genius will not; unrewarded genius is almost a proverb. Education will not; the world is full of educated derelicts. Persistence and determination alone are omnipotent”.
Keep being YOU!!
Ruth