Mid-Century Modern Chair Makeover: PART 2
This project was sponsored by Rockler. All opinions are my own.
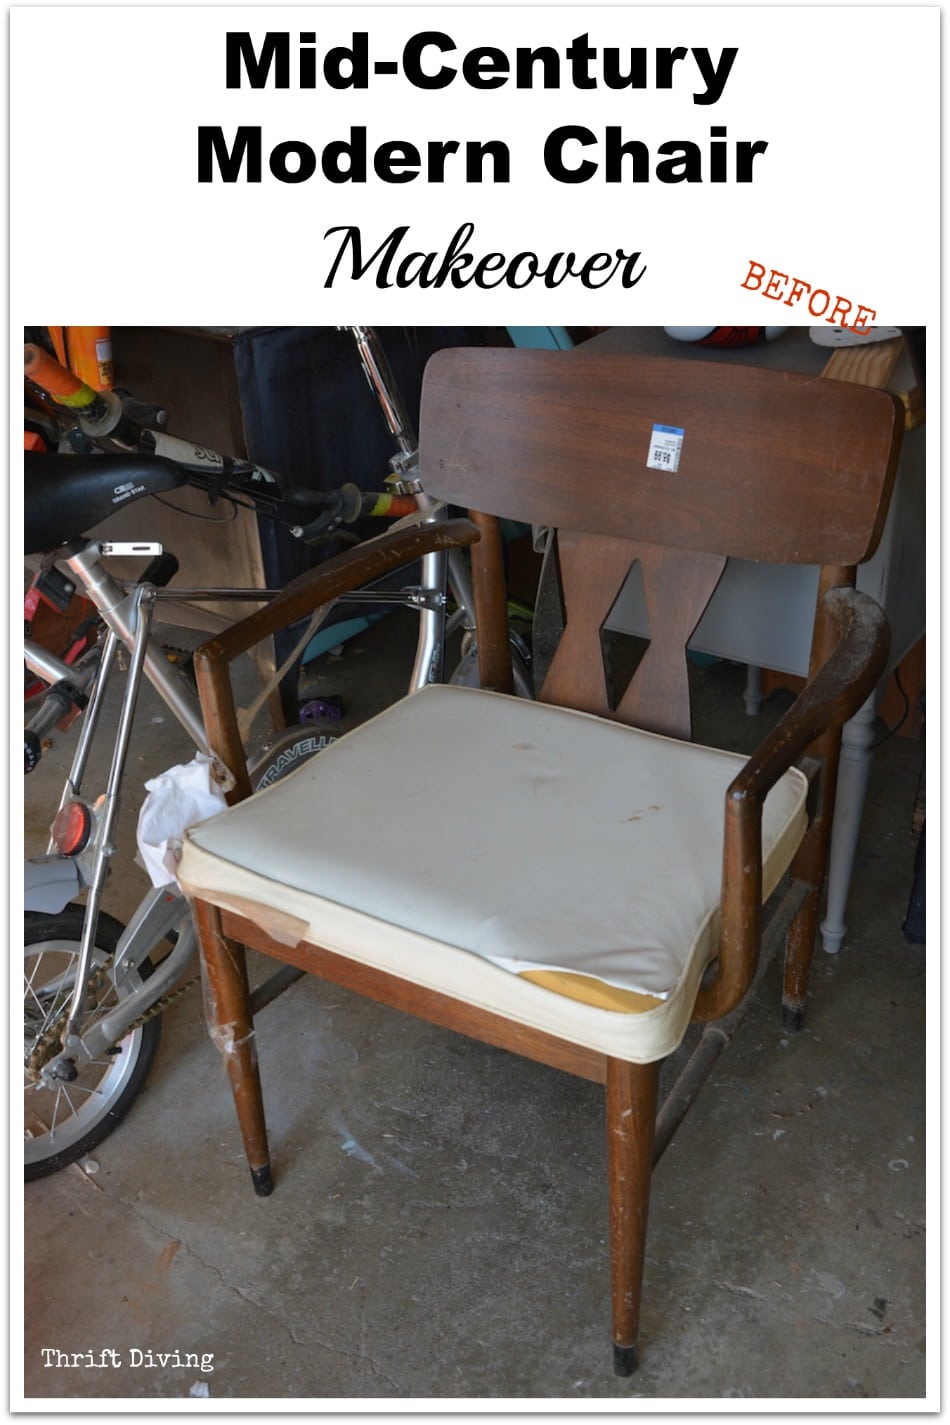
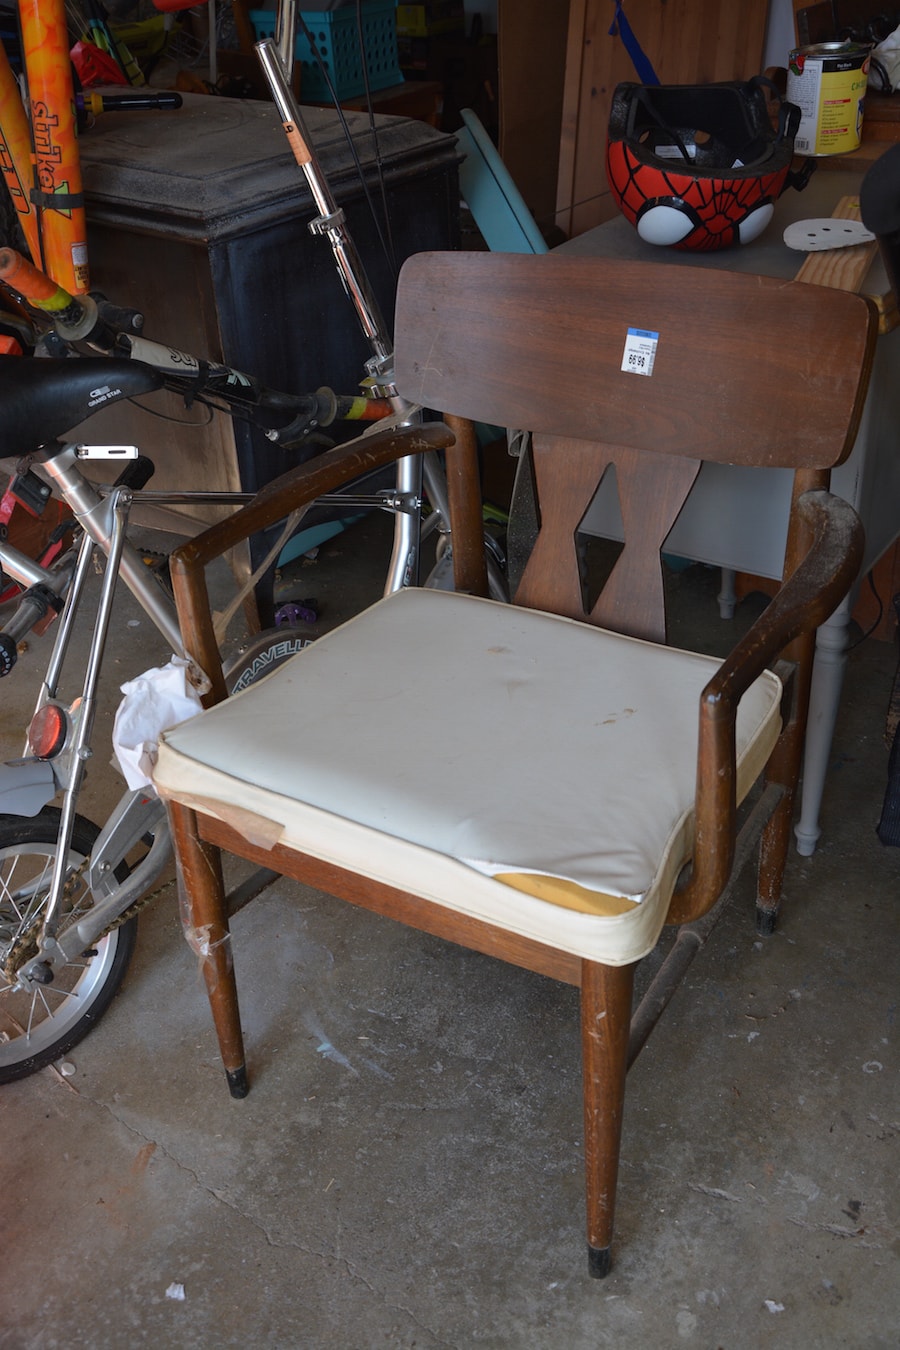
How could we forget this mid-century modern chair makeover…
You know, the one that I was ready to put a hammer to and (as one reader suggested) make firewood out of it. HA!
I had found it for about $7.00 one day at the thrift store, and for that price, I had to have it!
BEFORE

But it sat in my garage for so long, collecting dust, until recently I decided I was going to tackle it in hopes of working through a lot of the projects that I been hoarding in my garage.
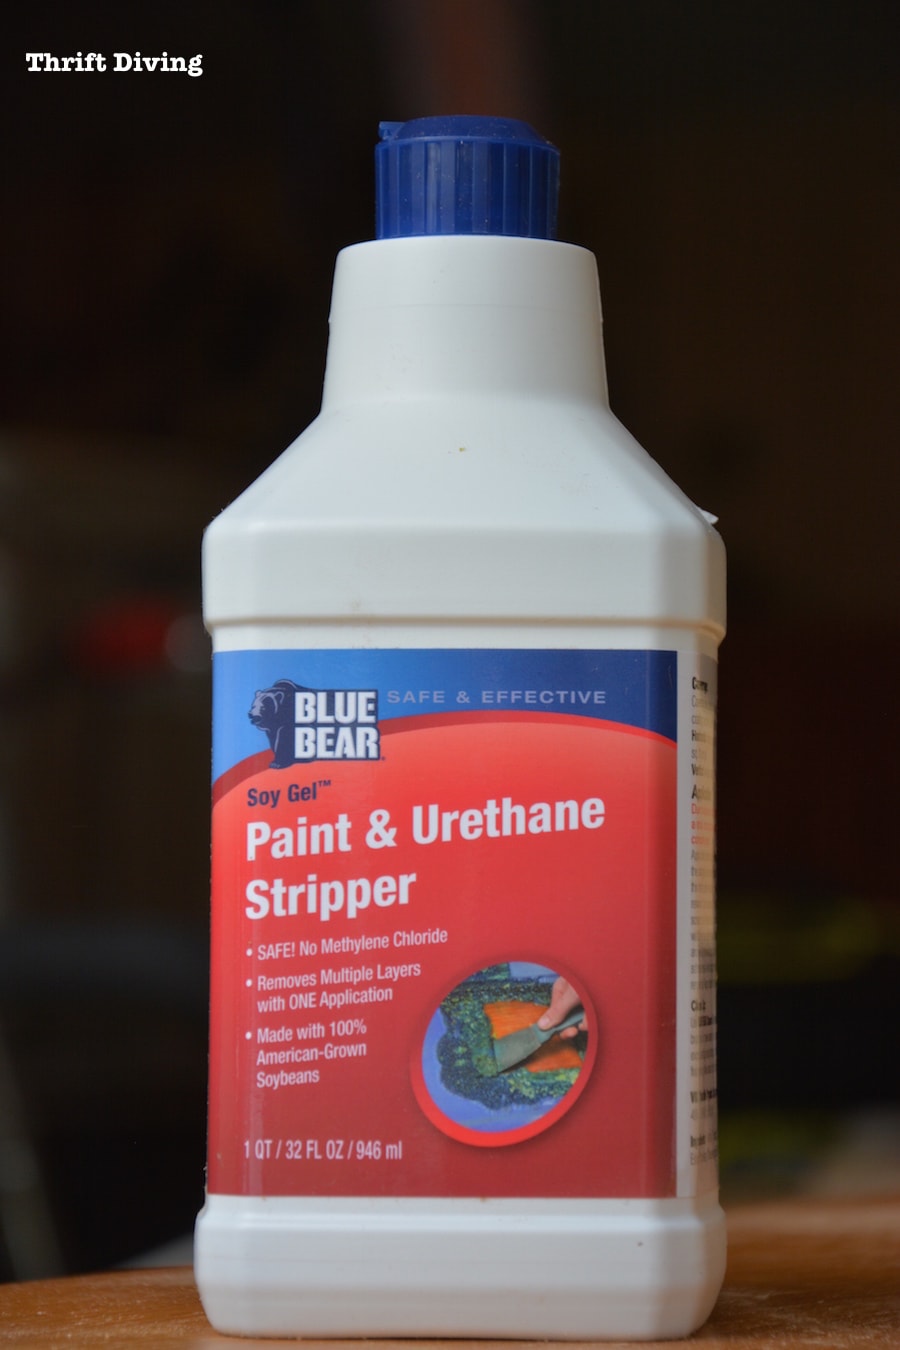
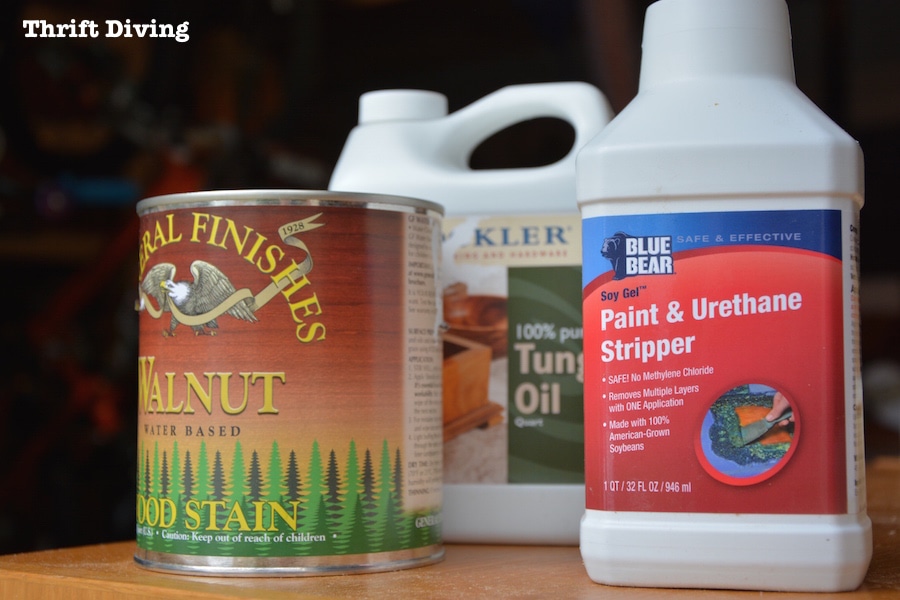
If you recall from Part 1 of this mid-century modern chair makeover, I had stripped the chair, most recently using Blue Bear Paint & Urethane Stripper from Rockler, which is a soy-based stripper (it has virtually no odor–LOVE LOVE LOVE).
While stripping the chair, I learned that the wood on the back of the chair was not the same wood as the body of the chair.
You awesome readers informed me that this was often done by cheap manufacturers to save money.
(…for unsuspecting DIY’ers like me to figure it out after all that stain is stripped away!)


I had decided to keep going because you never know–even with different tones, maybe it would look awesome after it was stained! (ahem, cought).
I had to get that stripper off, so I used a bucket of water and a scrub brush to clean it.

I sanded it down as best as I could, thinking that I had done the World’s Most Amazing Sand Job on this chair (HA! Little did I know…).
And that grain….it was soooooo beautiful!

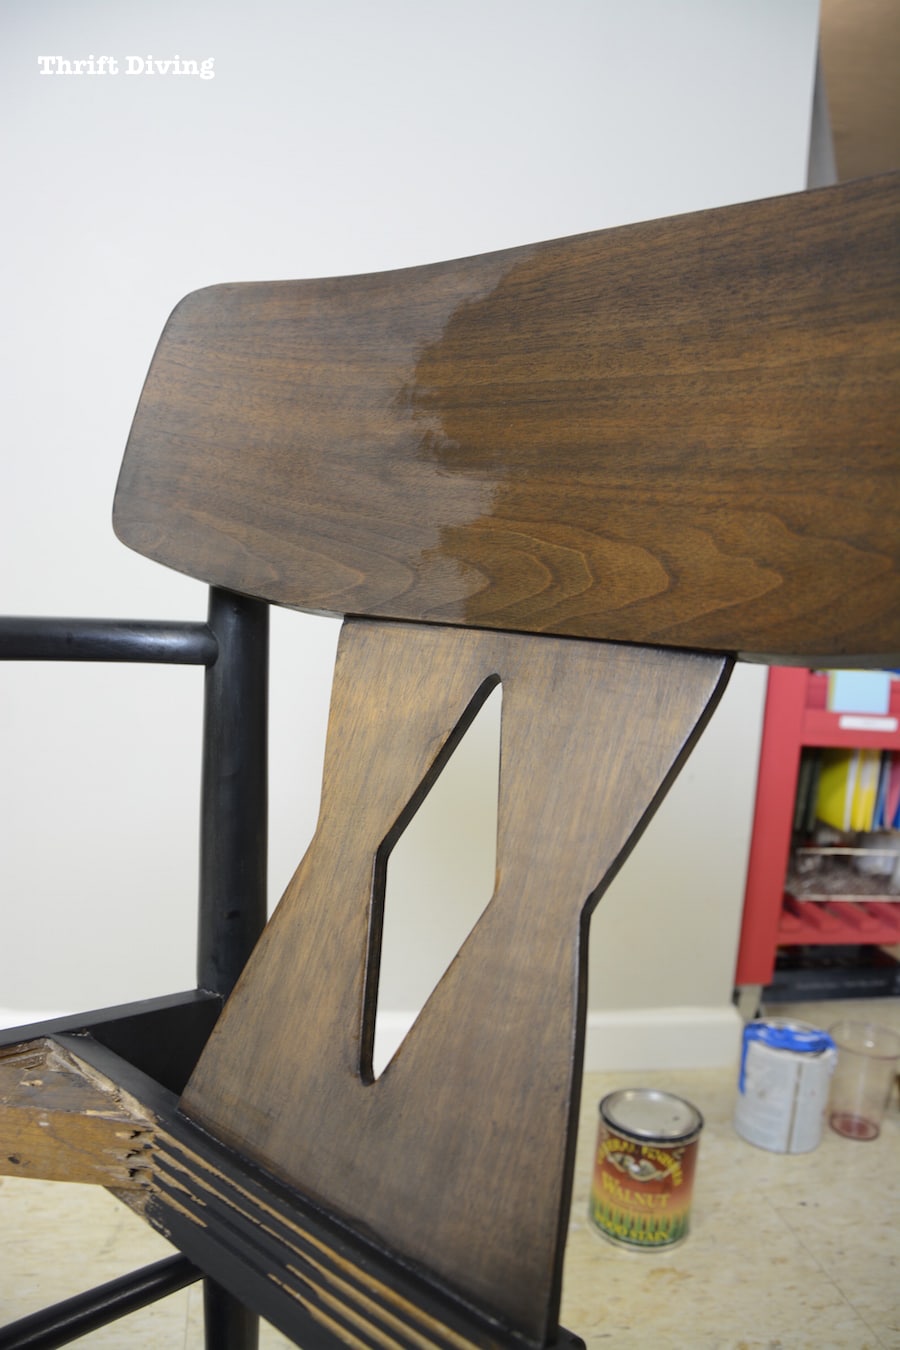
I applied the General Finishes water-based walnut stain. It’s much more natural than oil-based stain and you can’t smell it! If you’ve used oil-based stains, you know you’ve got to use that stuff outdoors and it’s pretty toxic.
I wanted to try it out to see how it would perform (and smell!) compared to the oil-based that I was familiar with.

The directions said you have to slather on a lot so that it’s easy to wipe off and get an even finish, so I painted it on and tried to wipe it off in even strokes.
But as I wrote in PART 1 of this mid-century modern chair makeover, it turned out an awful, blotchy mess because of the crap sand-job I must have done.
Plus, since this stain is more “gel-like” it requires a bit more carefulness. One wrong move of your cloth while wiping and you can easily brush stain again parts that are already stained. And that’s what happened to me.
The chair was a hot mess, all because of me.
As disappointed as I was, I had hoped I could salvage the chair.
I just needed to think about how I wanted to proceed.
This is how the chair looked when I walked away from it at the end of that day. Yikes.
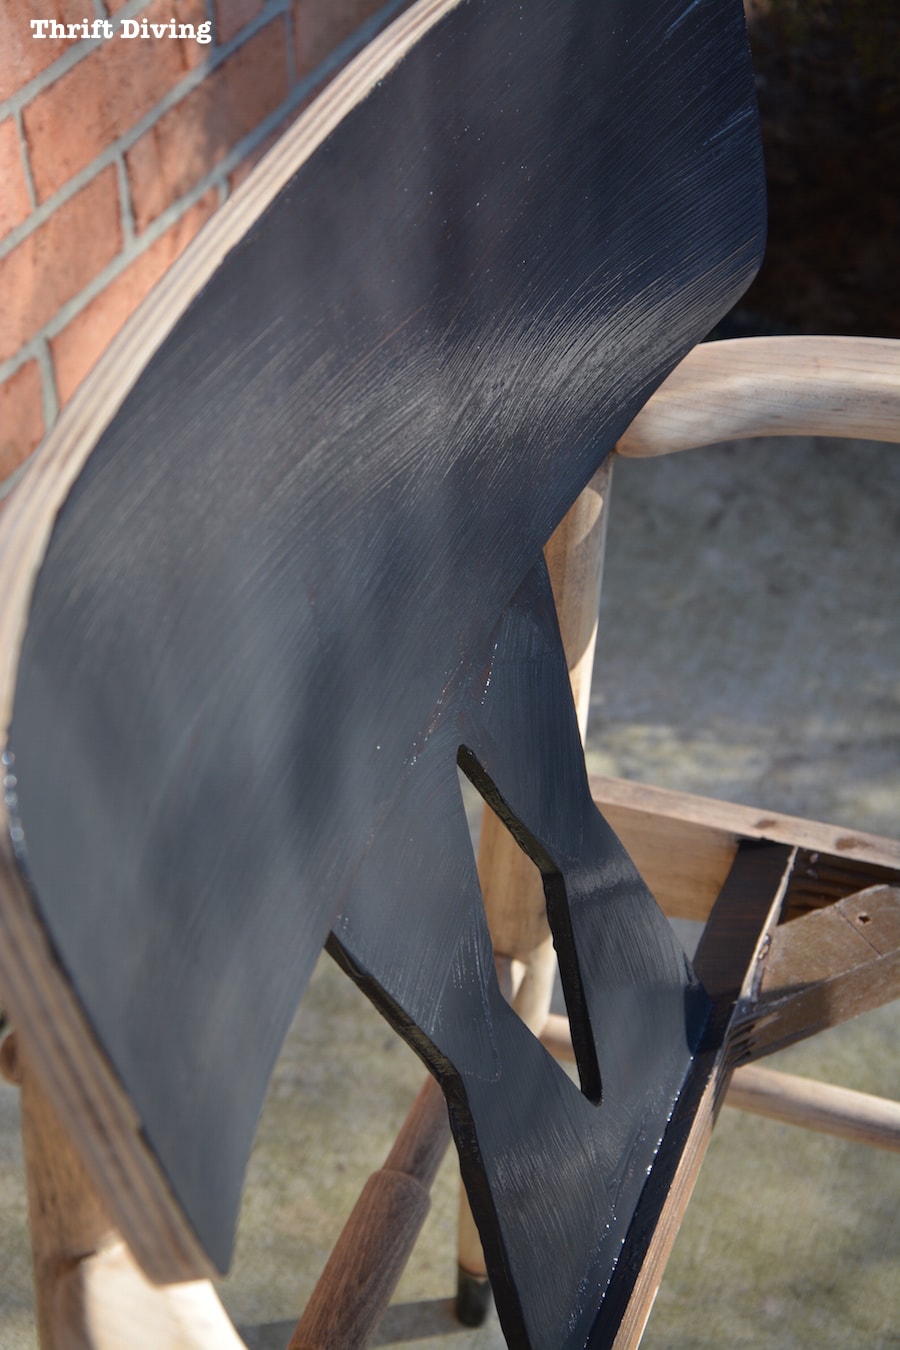
My first thought was to paint the body black while keeping the wood grain that I had stripped and re-stained.
So the body got a coat of black paint (I used Amy Howard–worked so well!), and I left the back wood-toned.
But I didn’t like the difference in painted wood and wood tones. LOL
Don’t you hate when that happens?? You get stuck and then have no desire to finish a project because you’re no longer inspired.
But I wasn’t going to let that happen. I don’t just give up on projects.
I use them as teachable moments and to train myself to think of solutions!
I decided to just keep going. It’s hard to say you don’t like a project when you haven’t even finished!
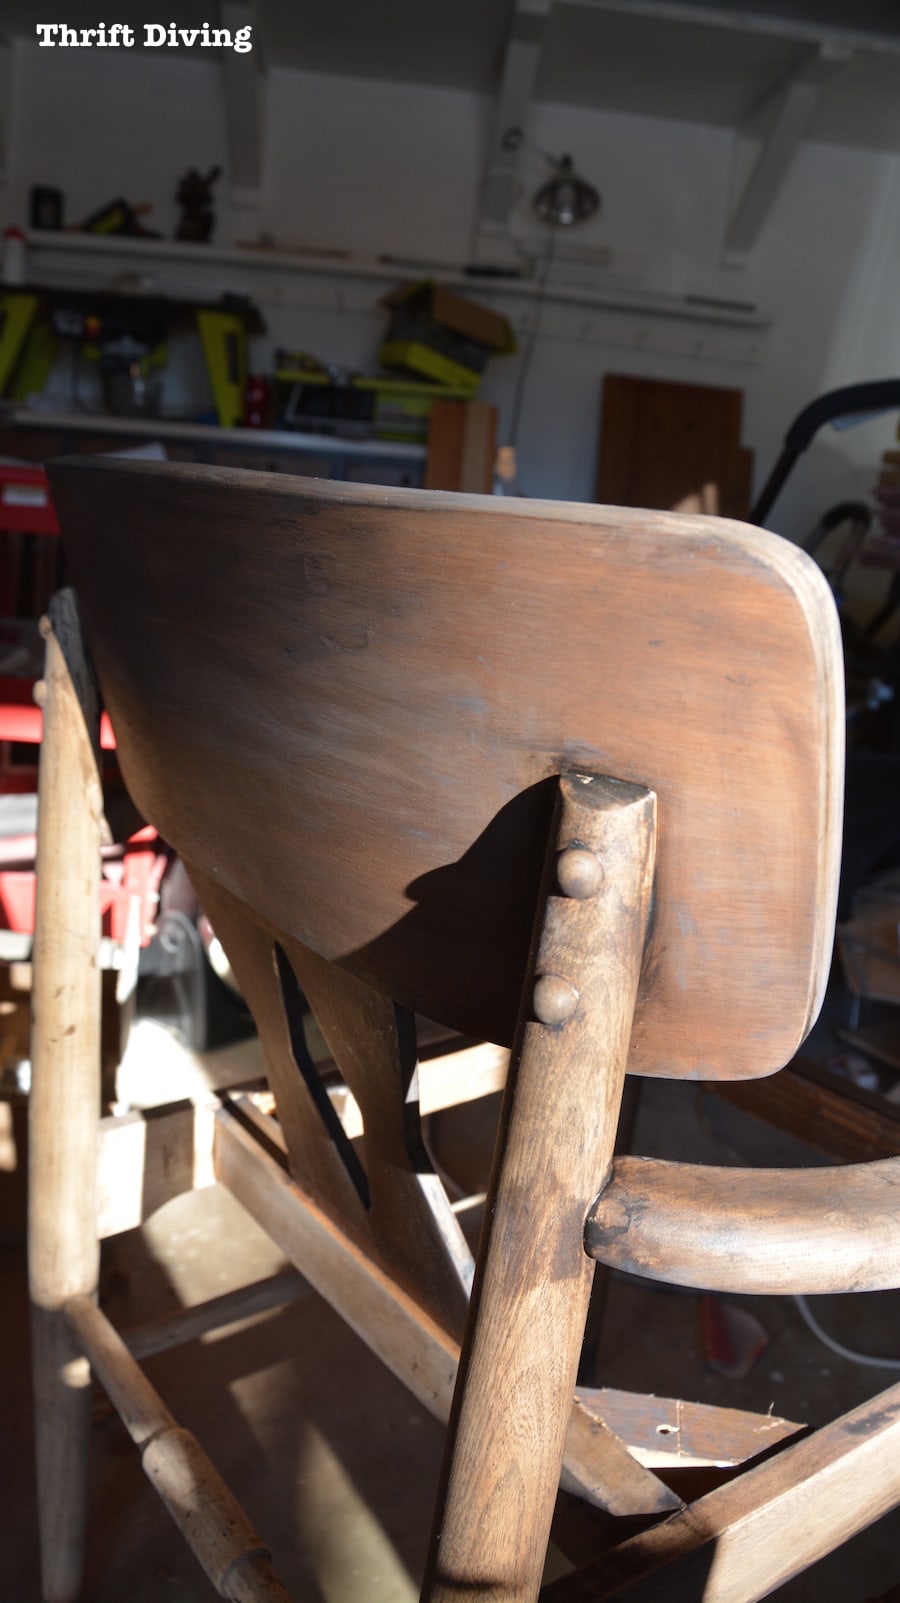
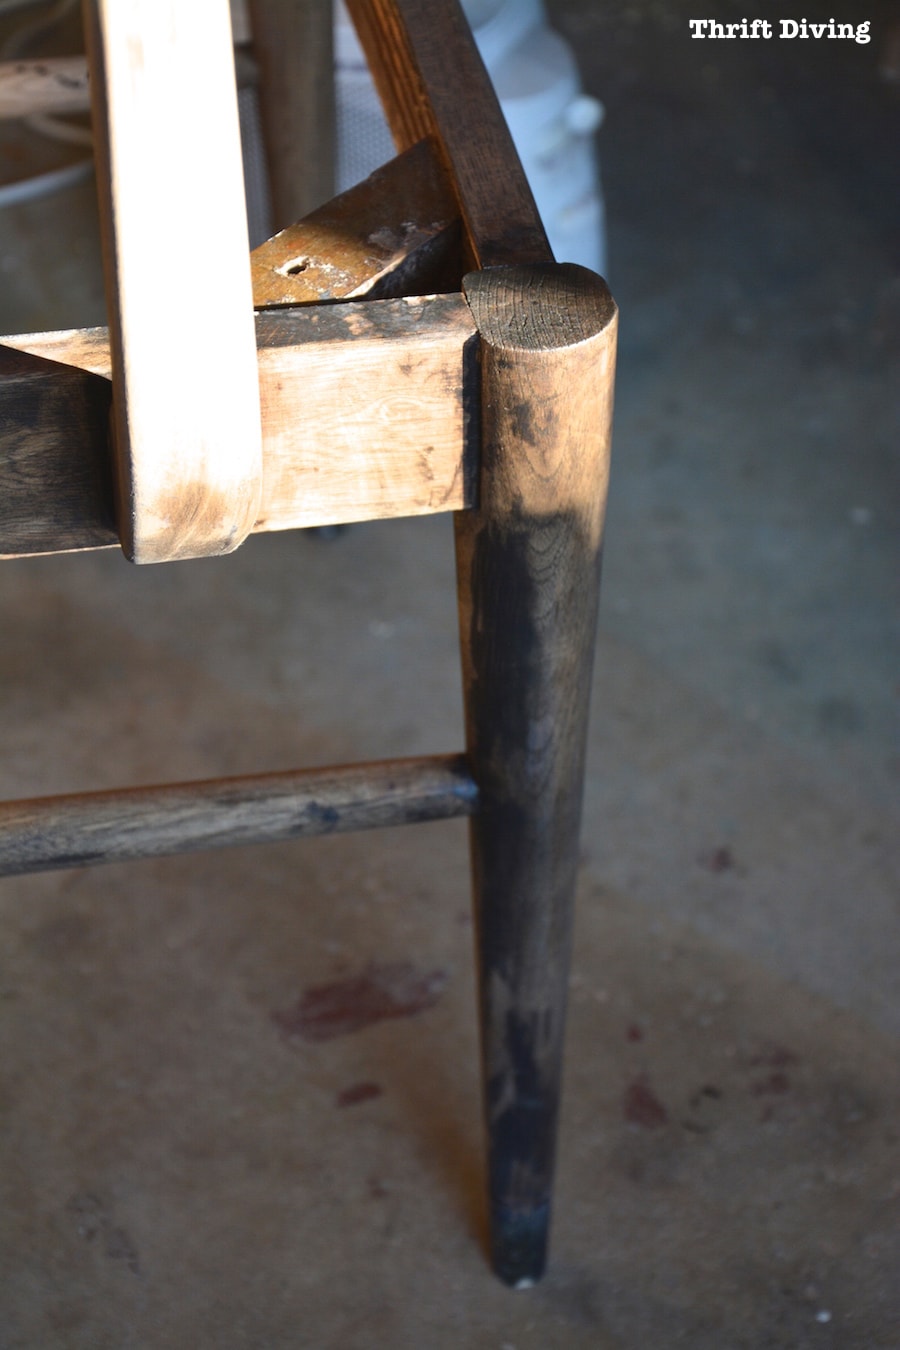
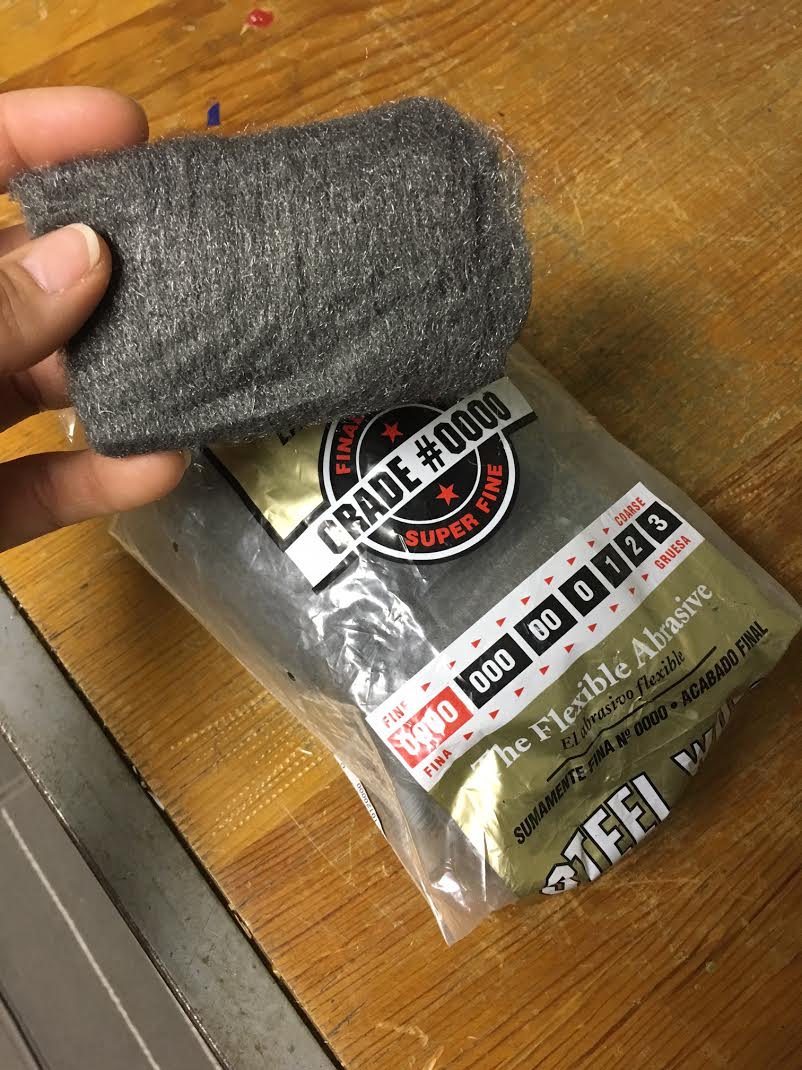
Someone in the comments section on Part 1 of this project reminded me about using steel wool, which is flexible and can work well on wood (especially rounded parts, like legs).
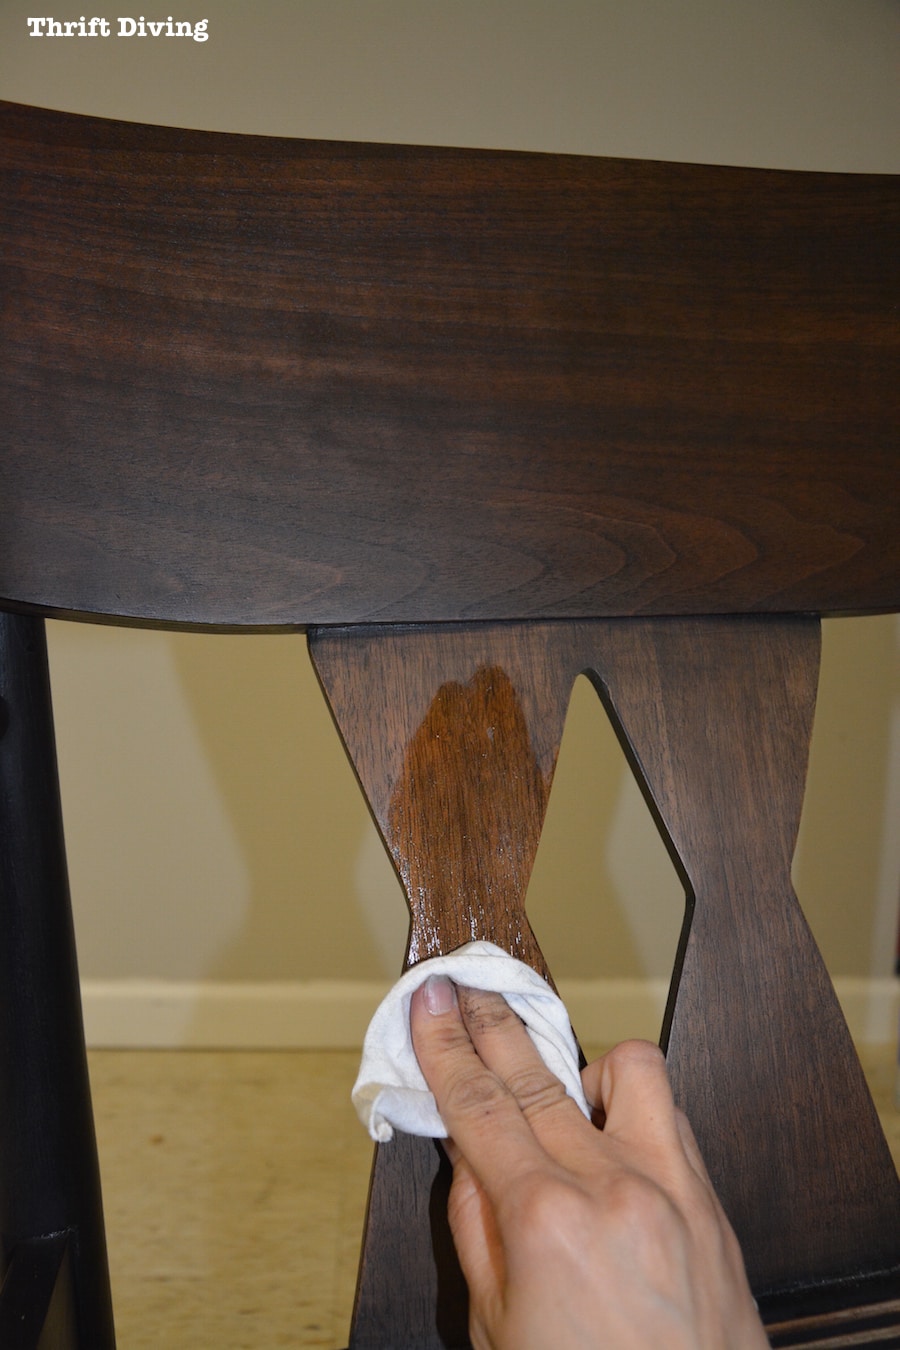
I actually have a ton of the stuff lying around and decided to use this really fine steel wool to smooth out the wood parts of the chair, which worked really well!
After a few passes with the steel wool, I wiped on some Rockler tung oil.
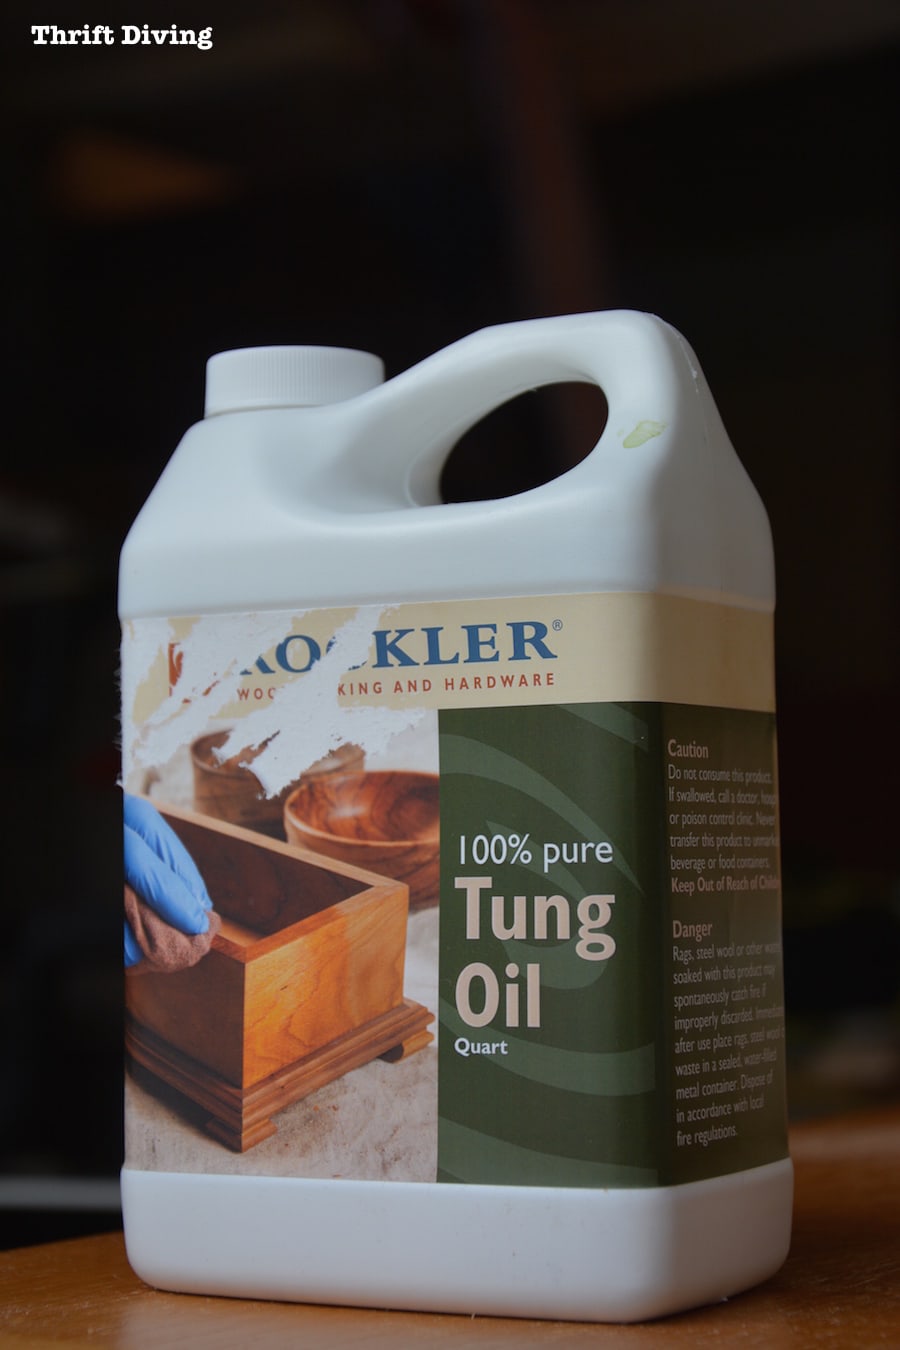
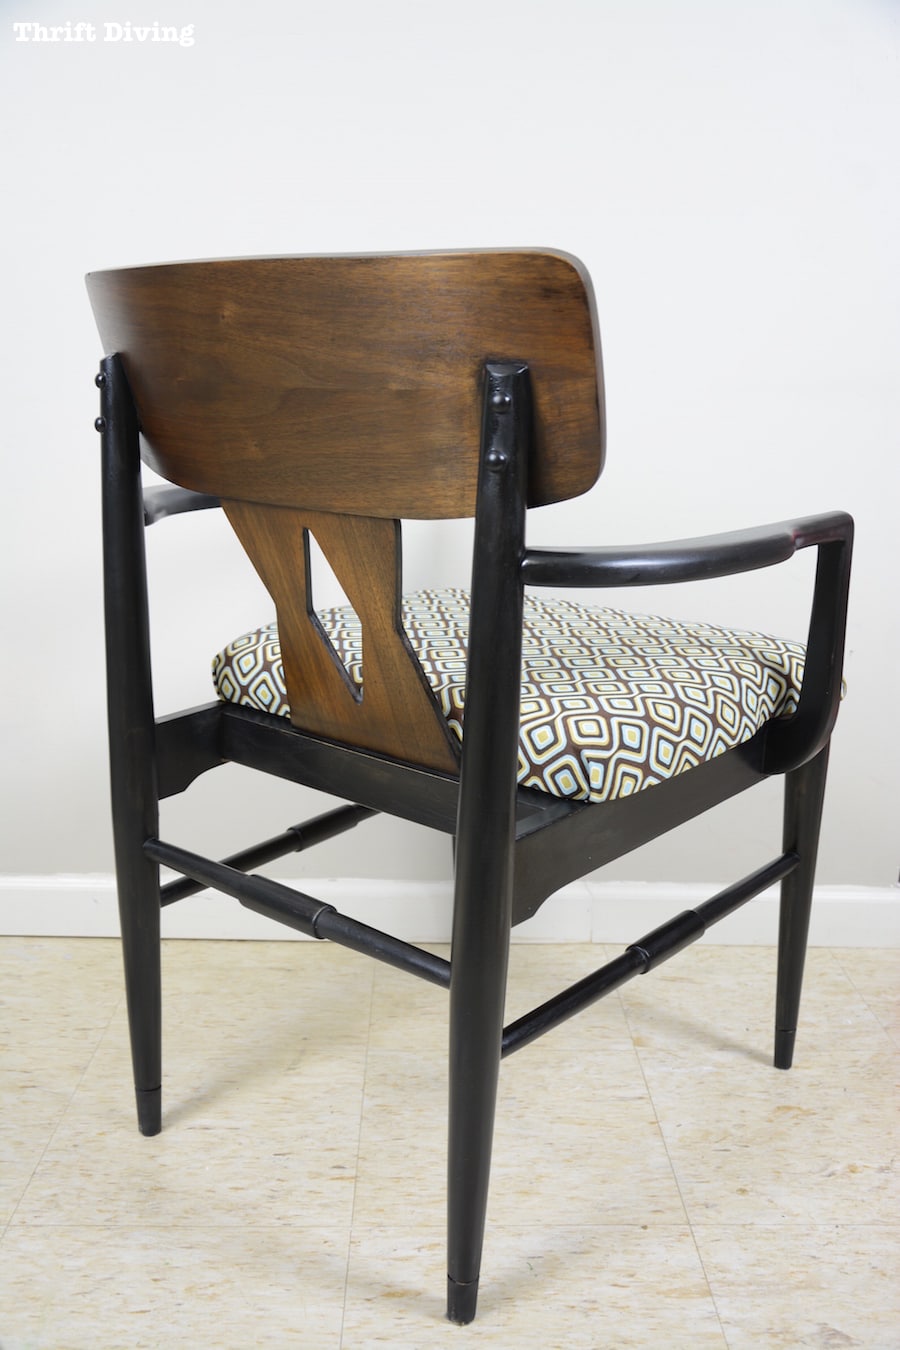
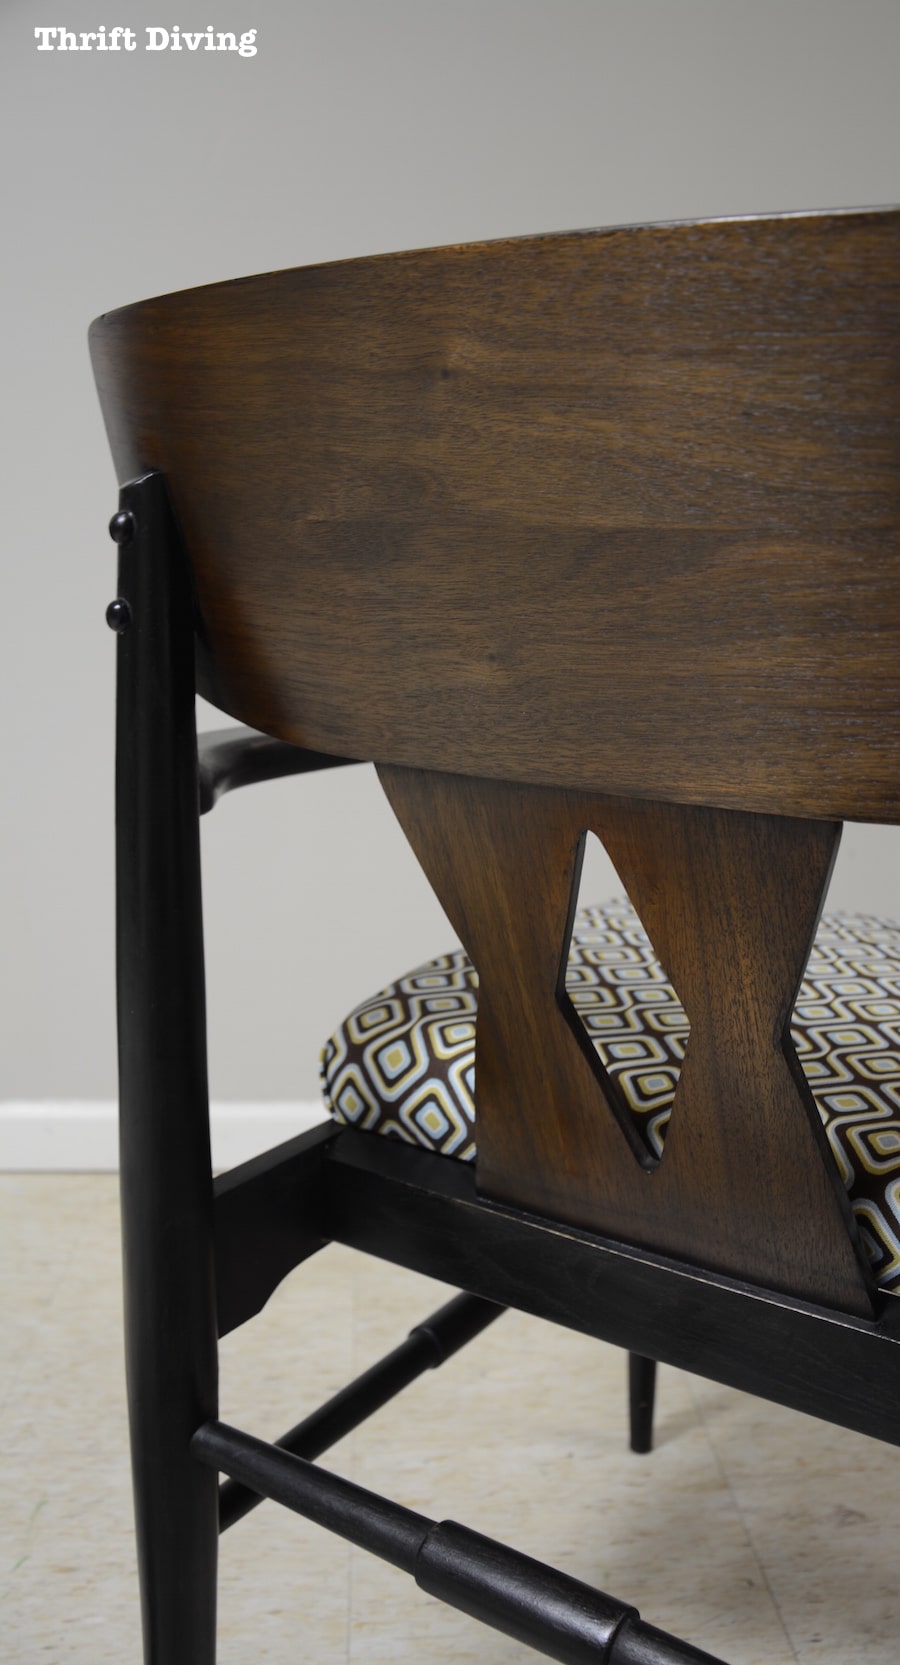
You can see how smooth the wood is after the steel wool, and adding that tung oil was like magic! The wood seemed to come alive!
It polished the wood so beautifully it made me wonder why I hadn’t been using tung oil sooner! (Thanks to the reader that put a bug in my ear to start using this!).
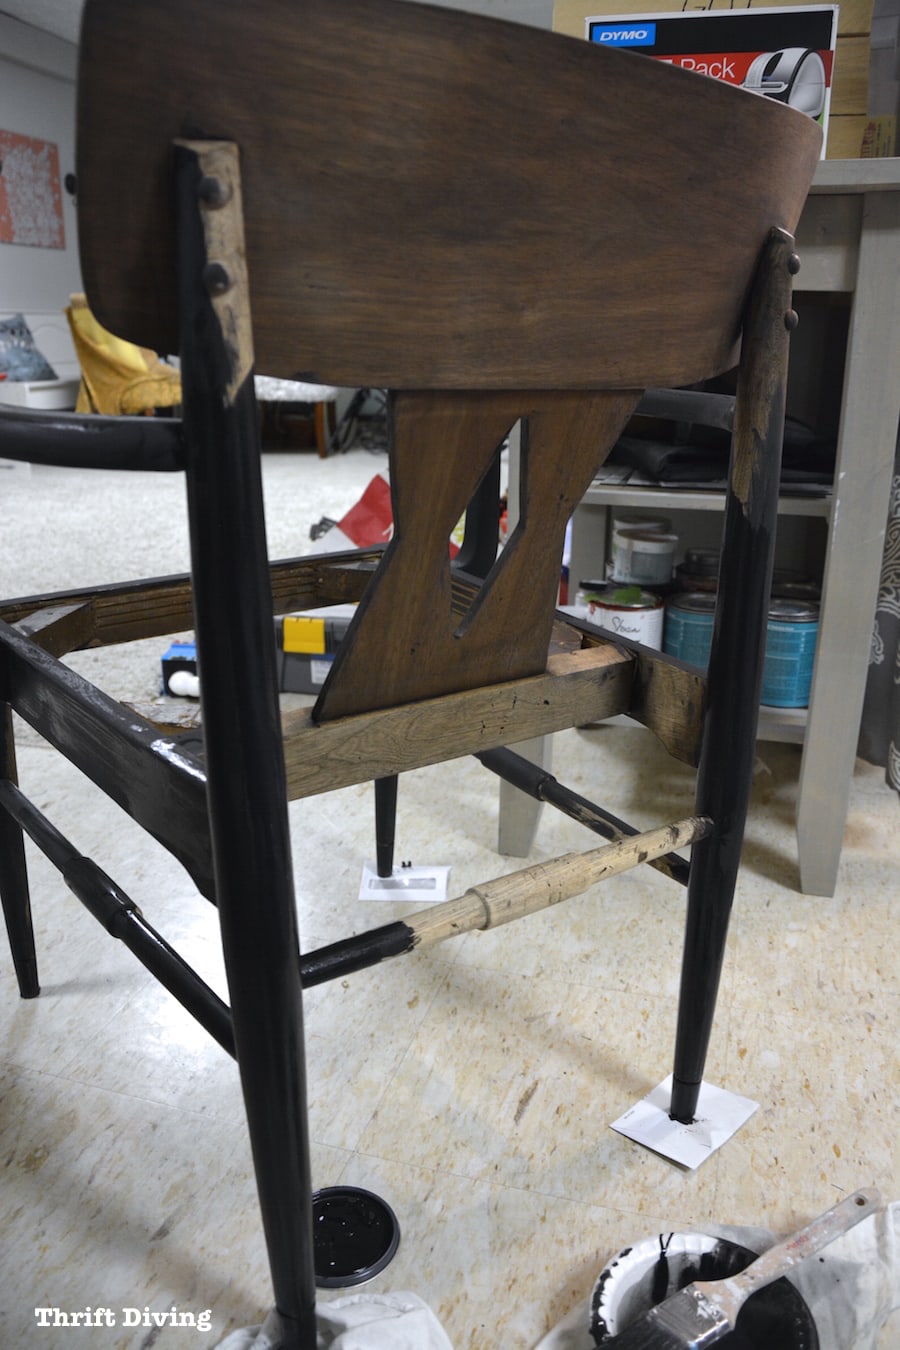
For the body of the chair, I used the steel wool on the black paint, too, and was surprised to see it begin to turn shiny, as if the steel wool was waxing the paint!
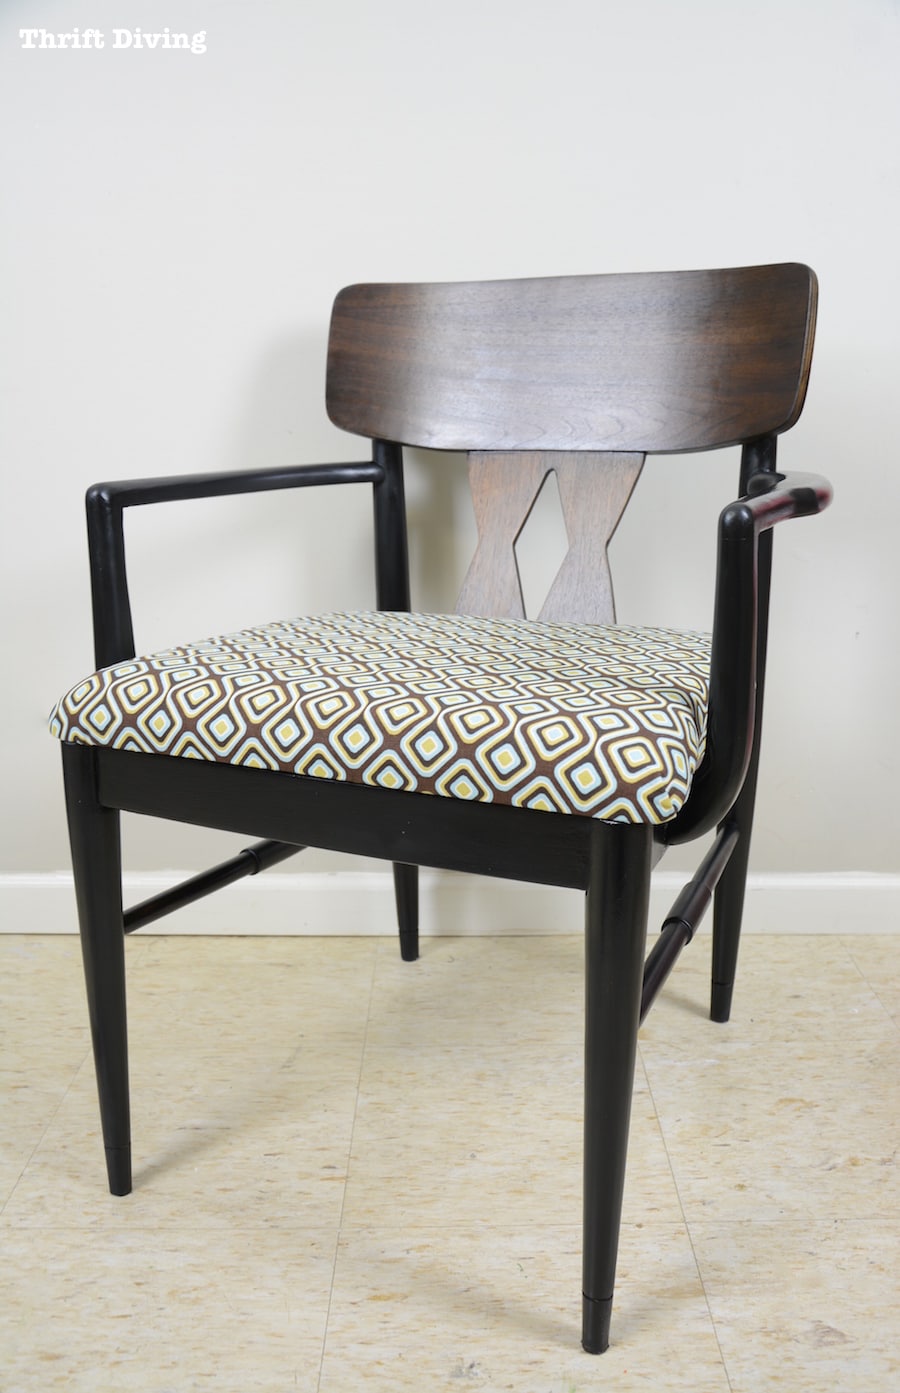
Once I added some Light Antiquing wax on the body afterward, it was turning into an amazing chair that I was actually proud of! And the way that black shined again the wood tones–loved it!
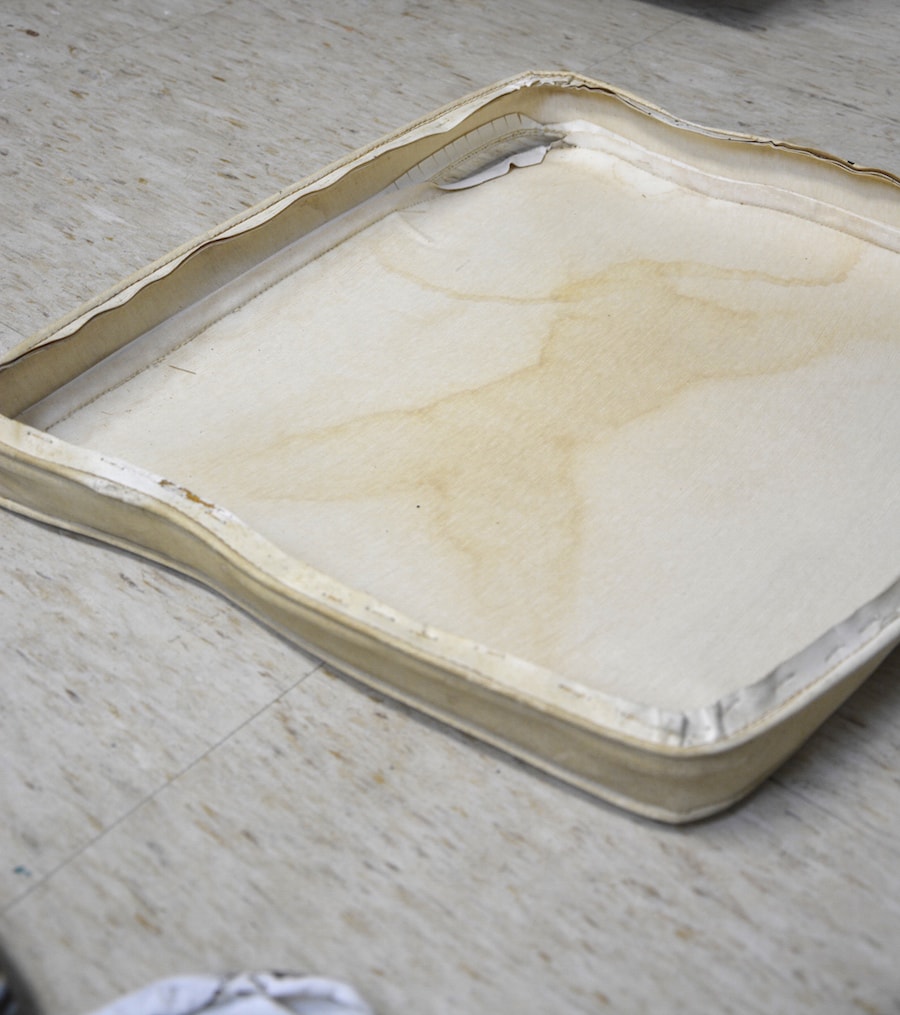
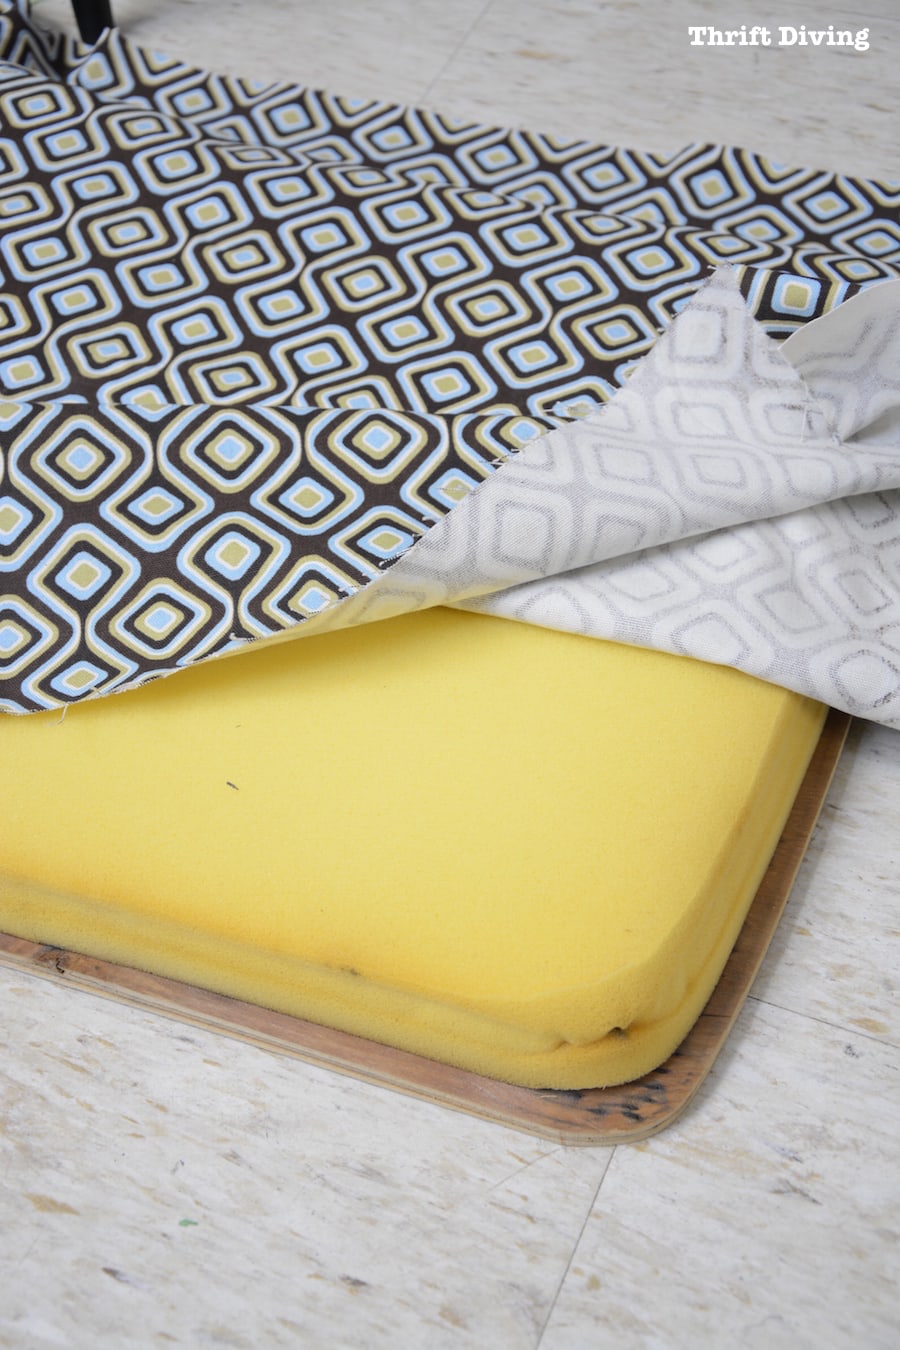
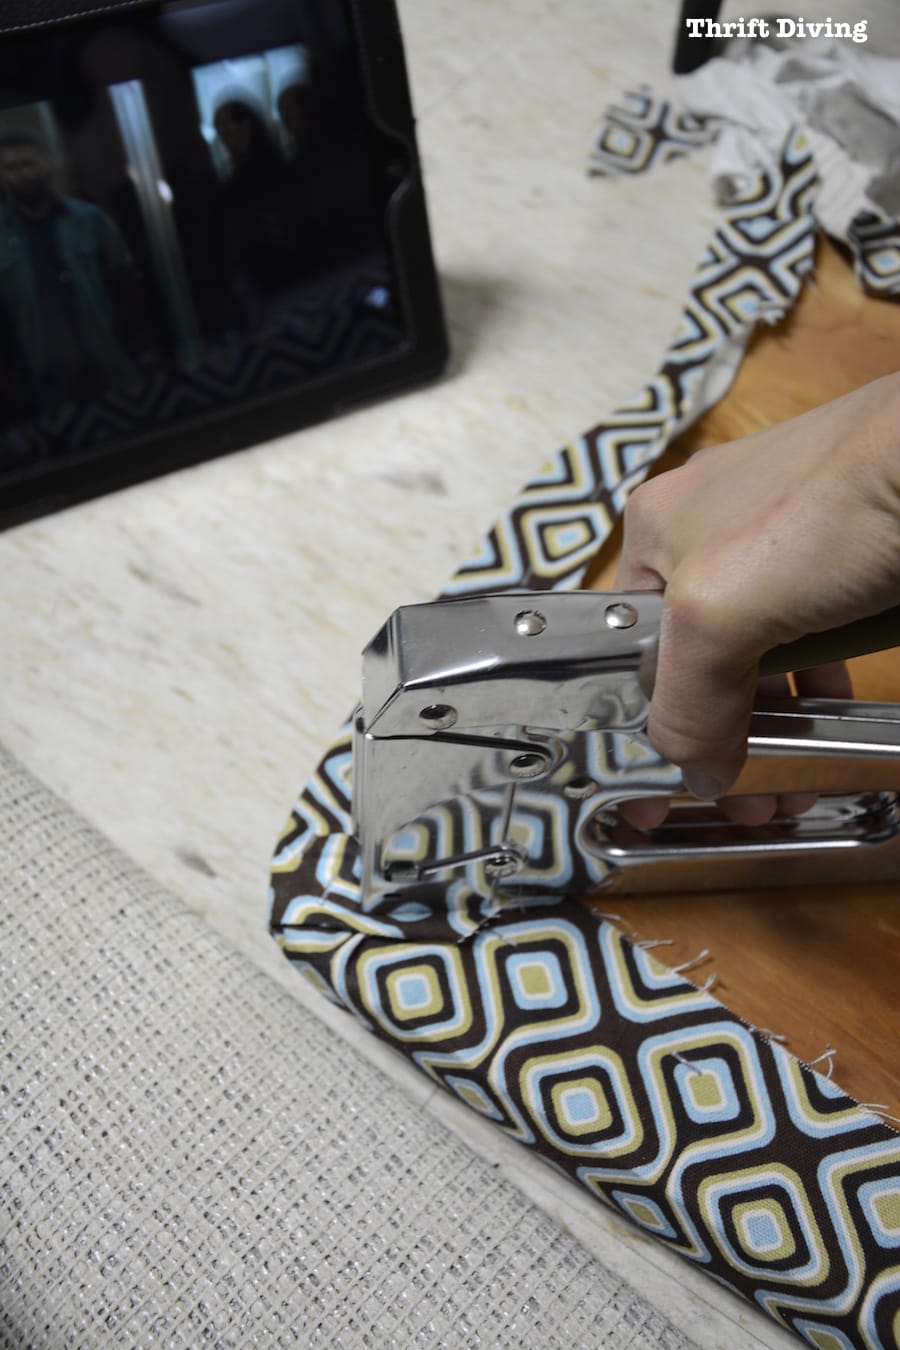
But the last thing I needed to do was cover the old seat by removing the old staples with a tack remover.
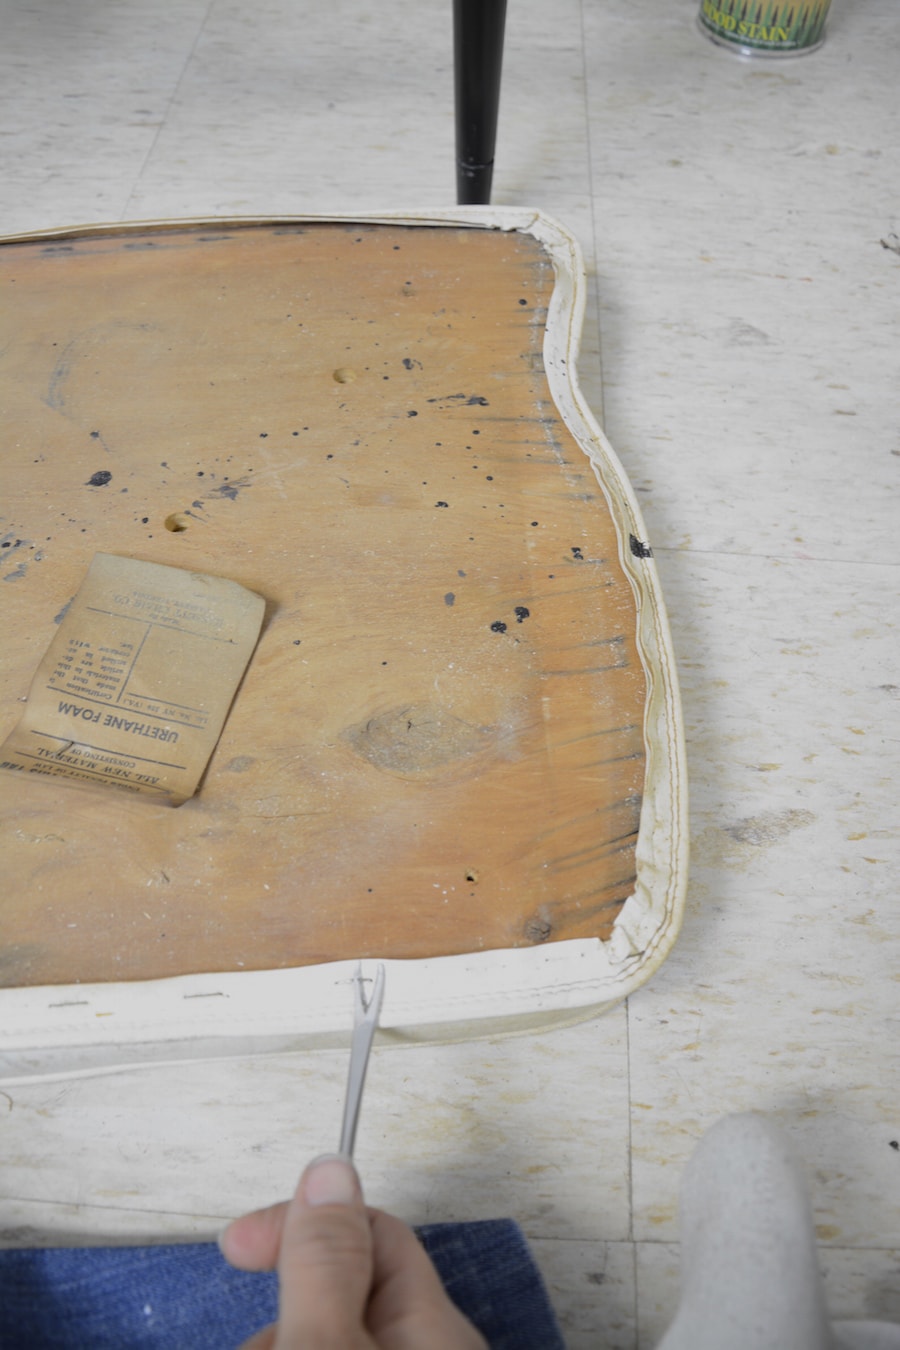
It was super icky!
I was too cheap to go and buy a new piece of wood for the seat, which I may decide to do later since this one was a bit warped. But I just worked with what I had!
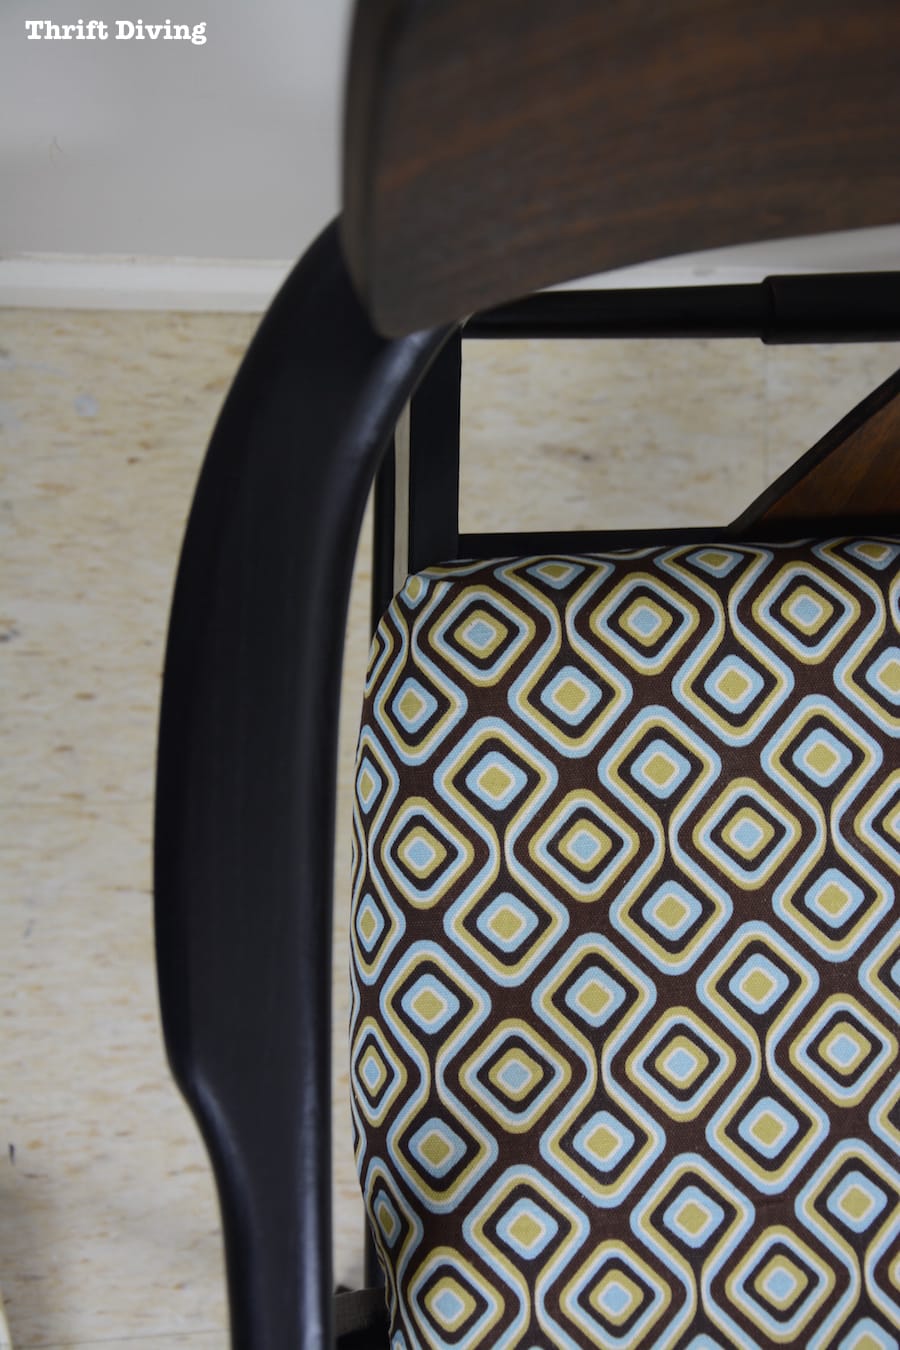
And I chose this fabric because 1) I already had it on-hand, and 2) I loved how the geometrical shape complimented the chairs diamond-shaped back.
(Don’t you love when you already have stuff on-hand?!?! I think it more than justifies the reason why we hoard craft supplies, don’t you? HA!)
And while there are still a few issues, like the fact that I have to fix a wobbly arm, and there’s still some discoloration in parts of the wood’s diamond-shaped part, you know what??
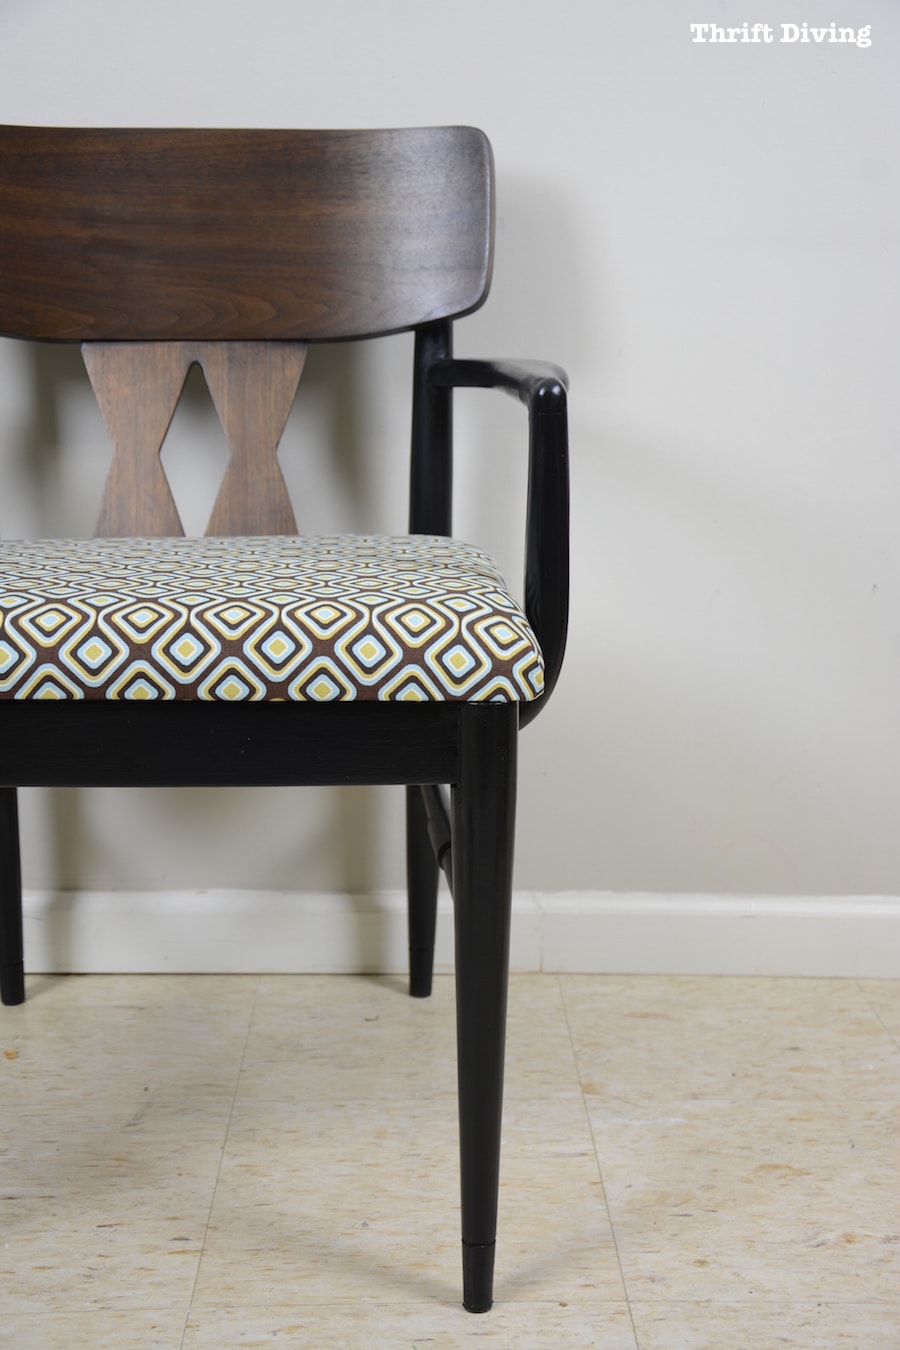
This chair actually turned out pretty cute!
AFTER!
Remember how the back was looking after my horrible stain-job?
IN PROGRESS
AFTER!
Well, it looks like a whole new chair now!
Lessons Learned
This project was challenging. But it taught several lessons that I thought I would include:
- Never give up. Yep, I just about wanted to throw in the towel on this project after the PART 1 debacle, but I kept going! It’s normal to become discouraged after a flop, but if you just step away, regroup, and think about solutions, you can usually keep moving forward.
- Steel wool is amazing! It was such a gentle abrasion and smoothed out parts of the wooden back that fine sandpaper would have probably scratched up. Glad I have lots of it on-hand!
- There are safe products for stripping! I’ve always used toxic products when stripping and staining, but I love the Blue Bear soy-based stripper, the General Finishes water-based walnut stain, and the Rockler tung oil, which are all more natural and can be used indoors because there are no harsh odors! I’ll be keeping these products stocked on my shelf from now on! Go to Rockler.com and find some safer refinishing products, too!
So what do you guys think of my mid-century modern chair makeover save?? 🙂 Leave a comment below and let’s talk about it!

Download the 5 freebies!

Thrift Diving inspires women to decorate, improve, and maintain their home themselves...using paint, power tools, and thrift stores! Use these 5 printables, checklists, and ebooks to get started!


Love, love, love it! Your projects are inspiring me to get up and do something creative. Thank you for that!
Awww…thanks so much for saying that, Debbie! That’s what I aspire to do: to inspire and motivate! 🙂 You are so welcome. And thank YOU for taking the time to read my blog!
You did a beautiful job. Never would have chosen that fabric . . . and it’s gorgeous!
Thank you, Margaret! I was cleaning out my craft closet last month and stumbled upon it! The pattern was perfect and I didn’t have to buy anything. Love that!
Very cool!!!!!!!!
Thanks, Julie!! 🙂 Glad you like it!
You have design savvy and there never is a good excuse to overlook a well priced, good bones Mid-Century Modern piece of furniture!
Thanks, Georgeanne!
SO pretty! Much better than firewood! Shame on me.
HAHAHA, Linda!! 🙂 Were you the one that said firewood? That was super clever! LOL
Oh how I have been there! I have had some seriously epic fails that really are depressing, including a vintage table refinish that I had to strip stain (fail) and then re-strip and re-stain. And then had bubbling in my wipe-on poly sealcoat. Omg, I cried over that one! But like you I just took some serious breaths and a sanity break and just kept on going. The table eventually turned out gorgeous but I thought that my client was going to sue me for ruining her grandparents’ legacy gate leg dining table.
The bones of that chair of yours were amazing and what you did to bring out its unique beauty was equally lovely! Bravo!
Oooh, that makes me hyperventilate just THINKING of ruining someone’s grandparents table! LOL. I’m glad you were able to turn it around and that you were paid big bucks for all the extra rework! 🙂
Crazy thing is, Serena, I felt so bad about all of the re-do-ing that was required, I didn’t charge her a penny. I know, I know, I totally shortchanged myself but I figured it would come back to me somehow… I under-sell myself a lot – not sure how to fix that but that’s a convo for another time!
Oh wow, Allison! I totally get it, though. I think you should have charged her the original feel discussed, but not for the extra work you had to do to fix it! But I also short-change myself for a lot of other things, too!!! LOL. I think we just have to get the confidence! 🙂 I’d love to see picture of it if you have it!
The back of that chair looks so awesome. I just want to run my hand across all of that beautifully grained wood. Nice save on that project.
The chair came out absolutely amazing. Makes me want to go hunt out a nice “new” chair and play with it. Good old Tung Oil. My grandfather used that a lot on his various projects but I had forgotten about it as well. I have to refinish the top of my dining room table as one of my dear adorable cats used is as a litterbox and the staining is awful. If Tung oil works on the top I will not have to change the colour of the whole suite.
There is another non toxic stripper that I like called Peel Away. You brush it on and then put the paper it comes with on top. You can leave it on up to 24 hours and then just peel the paper off. Lightly run a scraper over the surface to clean up the remainder and that is it. Once you run out of their paper I just use wax paper and it works great
The chair is way up there on the beautiful scale and you are a warrior. I love and admire the way you worked through all of the road blocks. I am inspired.
BTW, in the past, many craftsmen used different types of wood because that is what they had on hand just like we work with the materials we have available. My sister-in-law has a beautiful table made with three different types of wood. I have a blanket chest made by my great grandfather. The chest is made of cherry with walnut side panels.
Thanks so much for sharing this project.
Looks FANTASTIC! You did not do a bad sanding job:, a mass produced item is very heavily coated with stain. Often there is glue adhering to various sections of of the item because that process is not neat and glue moves around. The finish doesn’t adhere well to areas with glue or some other residue so to make up for that all potential messy bits are sprayed like crazy to get the color to match. That wood absorbed lots of that over-spray and will never look like it matches with other parts of the chair. In higher end items more care is given to the finishing process and over spray with stain is less common. Note, everything I’ve worked on was not high end enough to not have the same problem you had. The older an item is the more likely it is to have been finished better though. Sometimes newer is not better!
Mintchip