10 Steps to Create a DIY Puzzle Board with Drawers Tutorial
Have you heard that jigsaw puzzles are all the rage again?? I absolutely love puzzles and have been addicted to making DIY puzzle boards out of wood lately. So when I saw this meme popped up on Facebook feed, it drew my attention:
“Hot girl sh** sounds exhausting. I want to do old lady sh**: a puzzle, knit a sweater, sit in a chair while I shower.”
While I laughed at first read, the more I thought about it, that meme is actually pretty insulting. It also conjures up generalizing images of older folks and senior citizens being the only ones who enjoy knitting, falling into a good jigsaw puzzle (or even needing to shower sitting down!).
In fact, because of the pandemic, people of all ages have fallen back in love with the joy of jigsaw puzzles (and I’d been known to shower sitting down while in my 30’s when I had a tiled ledge to do it in my old condo)!
(By the way, did you know that many companies can’t even keep puzzles in stock because of this increase in demand?!).
One of the most satisfying phenomena is finding a puzzle piece that fits perfectly. Ahhhh….! That’s a pleasure that everyone can enjoy. And I’ve been telling everybody and their mama that they, too, should jump on this satisfying, stress-free bandwagon.
But along the way, though, I realize that there are some very real challenges that go along with having a puzzling hobby:
- Puzzles require space to stretch out, especially if you’re doing larger puzzles.
- Pets and little kids can wreck havoc on a puzzle, so leaving it out unattended may not be an option.
- You may live in a small apartment or home that doesn’t have a large enough space to do puzzles.
- Where the heck do you sort and store all the pieces while you’re working on it?
- What if you want to do puzzles on your bed and not at your dining room table??
- Ready-made puzzle boards can be too expensive for people on a budget.
All these challenges I have either experienced or heard from directly from my friends and family as I tried to spark their love of puzzles, too. Which lead me to researching how to make a DIY puzzle board.
Puzzle boards are hard, stable surfaces with raise edges upon which you can do a jigsaw puzzle anywhere and everywhere without your puzzle pieces sliding off. When you’re done working on the puzzle, you can easily store the puzzle board under the sofa or your bed (or anywhere out of the way). Some puzzle boards even have drawers to house the loose pieces or a cover to secure the top.
On Amazon, puzzle boards with drawers range from $80 – $139 (I’ve seen them as much as $200 in puzzle specialty stores!). If you’re on a fixed budget, spending that much on a puzzle board isn’t economical.
Making your own DIY puzzle board with drawers is completely possible, with just a few tools that you may have in your DIY toolbox! And if you don’t know how to use tools, or don’t own tools, go ahead and forward this tutorial to your handy friend or spouse and drop the hint that you’d like them to make you one as a gift. 🙂 Believe me, it’s pretty simple!
So let’s jump into this tutorial now!
Tools and Materials to Make a DIY Puzzle Board
- 3/16″ hardboard tempered
- Pine boards
- Wooden trim
- Jigsaw or other cutting tool
- Nailer (or hammer and nails)
- Speed square
- Tape measure
- Wood glue
- Miter box for angled cuts (optional)
- Clamps (or something heavy to hold things in place while the glue tries)
- Wooden knobs
- Handle (optional)
- Power drill with a drill bit (or drilling hole to attach knob)
- Pencil
- Top coat (2 coats, to protect the MDF board; optional)
Watch the Tutorial Here!
If you’re a visual learner, you can watch the tutorial on my YouTube channel. 🙂
DIY Wooden Puzzle Board Tips!
Before we go through the 10 steps of this tutorial, let me point out something that is the biggest problem you’ll run into when making a DIY puzzle board with drawers: YOU MIGHT MAKE THE WRONG SIZE.
It would be great to think that all 1000-piece puzzles are the same, but it really depends on two things:
- The brand.
- The size of the pieces.
Check the brands of puzzles that you like doing before making a DIY puzzle board to ensure it fits. The first puzzle board I made was 20″ x 24″ and was perfect for this 1000-piece puzzle.
However, for Ravensburger puzzles (one of the most popular puzzle brands) or for White Mountain puzzles, this was too small.
I had made this for my mom, only later to realize the brand of puzzles she was most interested in doing, this wasn’t going to work.
General Rules of Thumb for Puzzle Board Sizes
Although it depends on your specific favorite brand of puzzle, here are some good generalizations for puzzle board sizes”:
- 20″ x 28″ size = 1000 piece puzzle puzzle board
- 24″ x 32″ = 1500 piece puzzle board
- 27″ x 39″ = 2000 piece puzzle board
How to Make a DIY Puzzle Board Tutorial
Now, let’s just into the steps to create this MDF board.
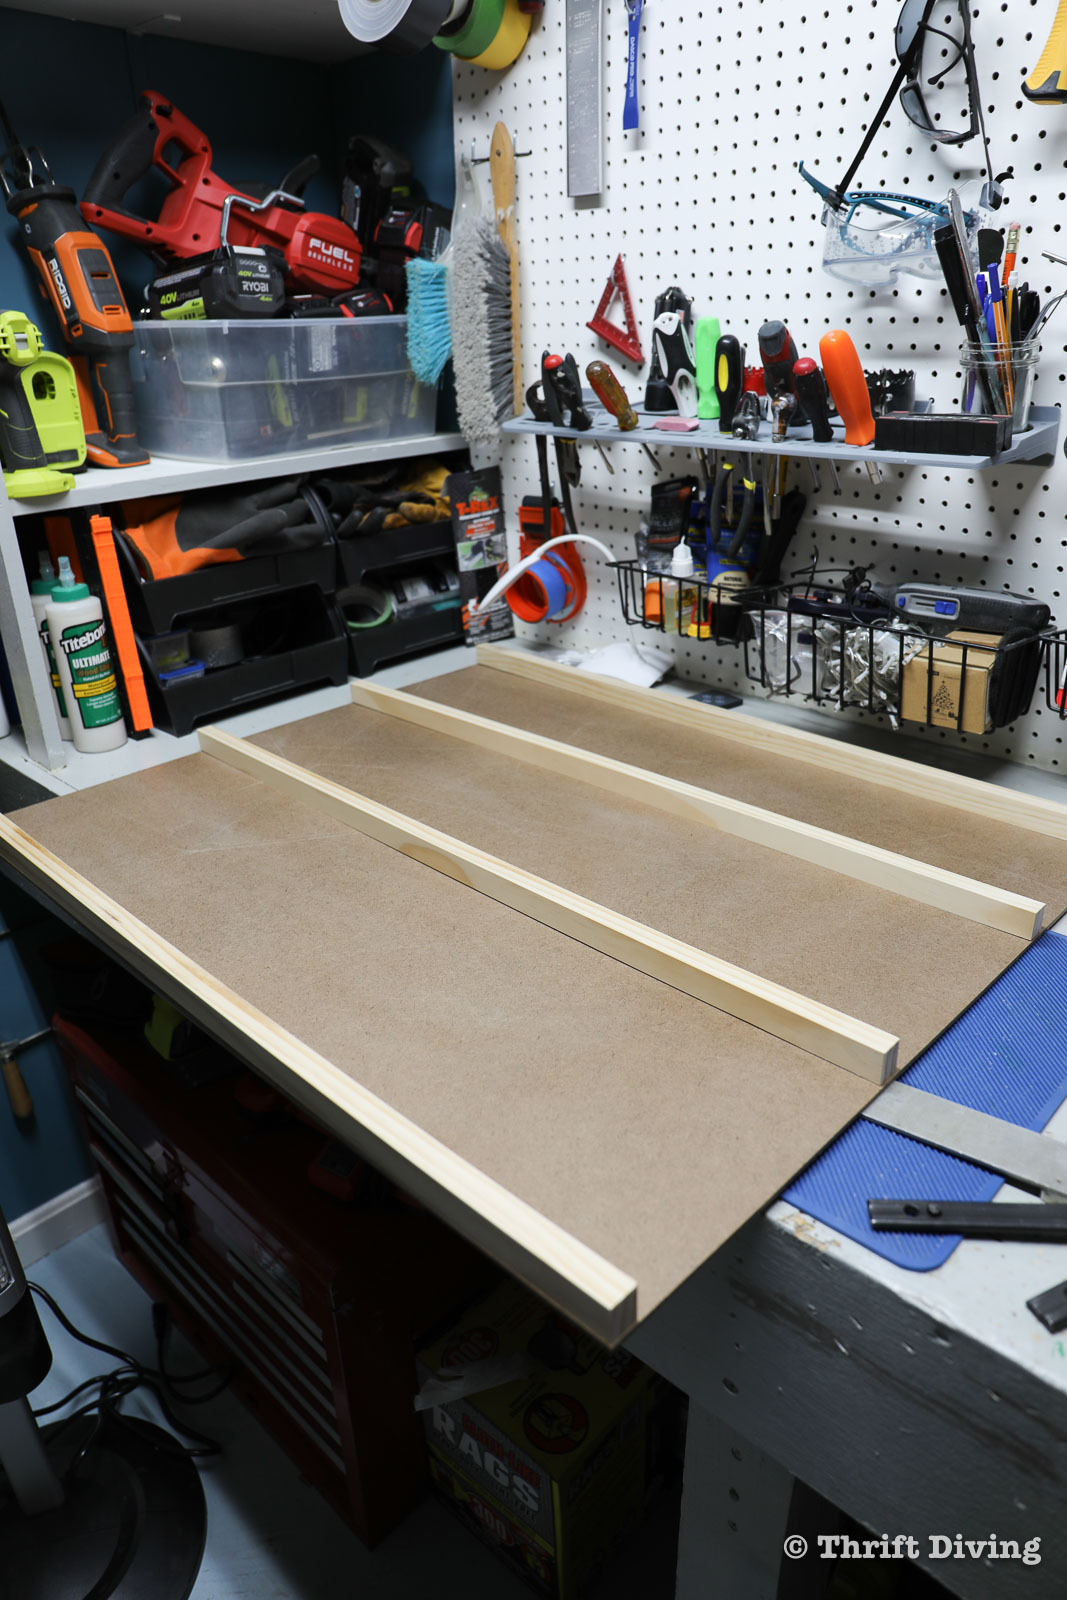
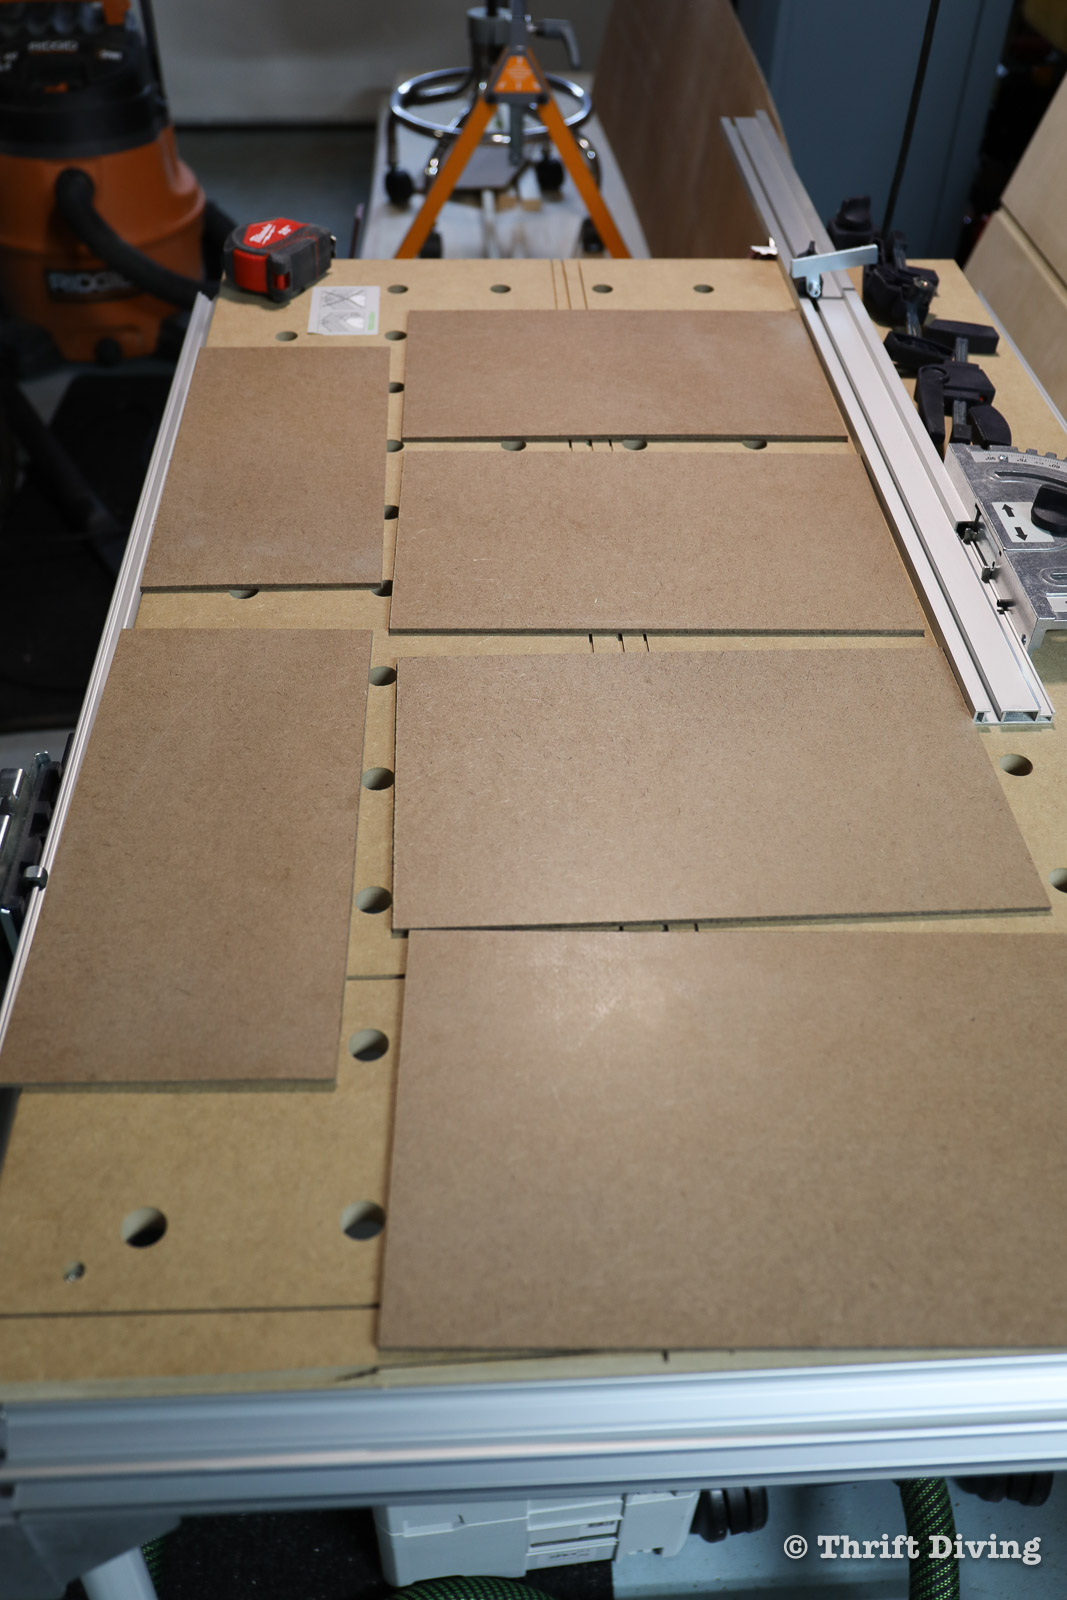
STEP 1: Cut Two Pieces of MDF
The top and base of your DIY puzzle board will be exactly the same length and width. The big question is, how big of a puzzle board do you need for 500-, 1000, or 2000 piece puzzle?
As I mentioned before, it really depends on the brand of puzzle you tend to love and put together.
Whatever size of puzzle board you decide to make, make the top and bottom MDF pieces the exact same measurement.
STEP 2: Cut 2-3 Pieces of Center Supports
The center supports will be 1″ tall. The easiest way to cut these pieces was with my track saw, but not everyone has a track saw. These pieces can be cut with a jig saw, however. If you’re using a jigsaw, it will be easier to buy a wider piece of pine board and simply cut strips from it in 1″ tall strips the width of your puzzle board.
STEP 3: Glue Center Supports to Base
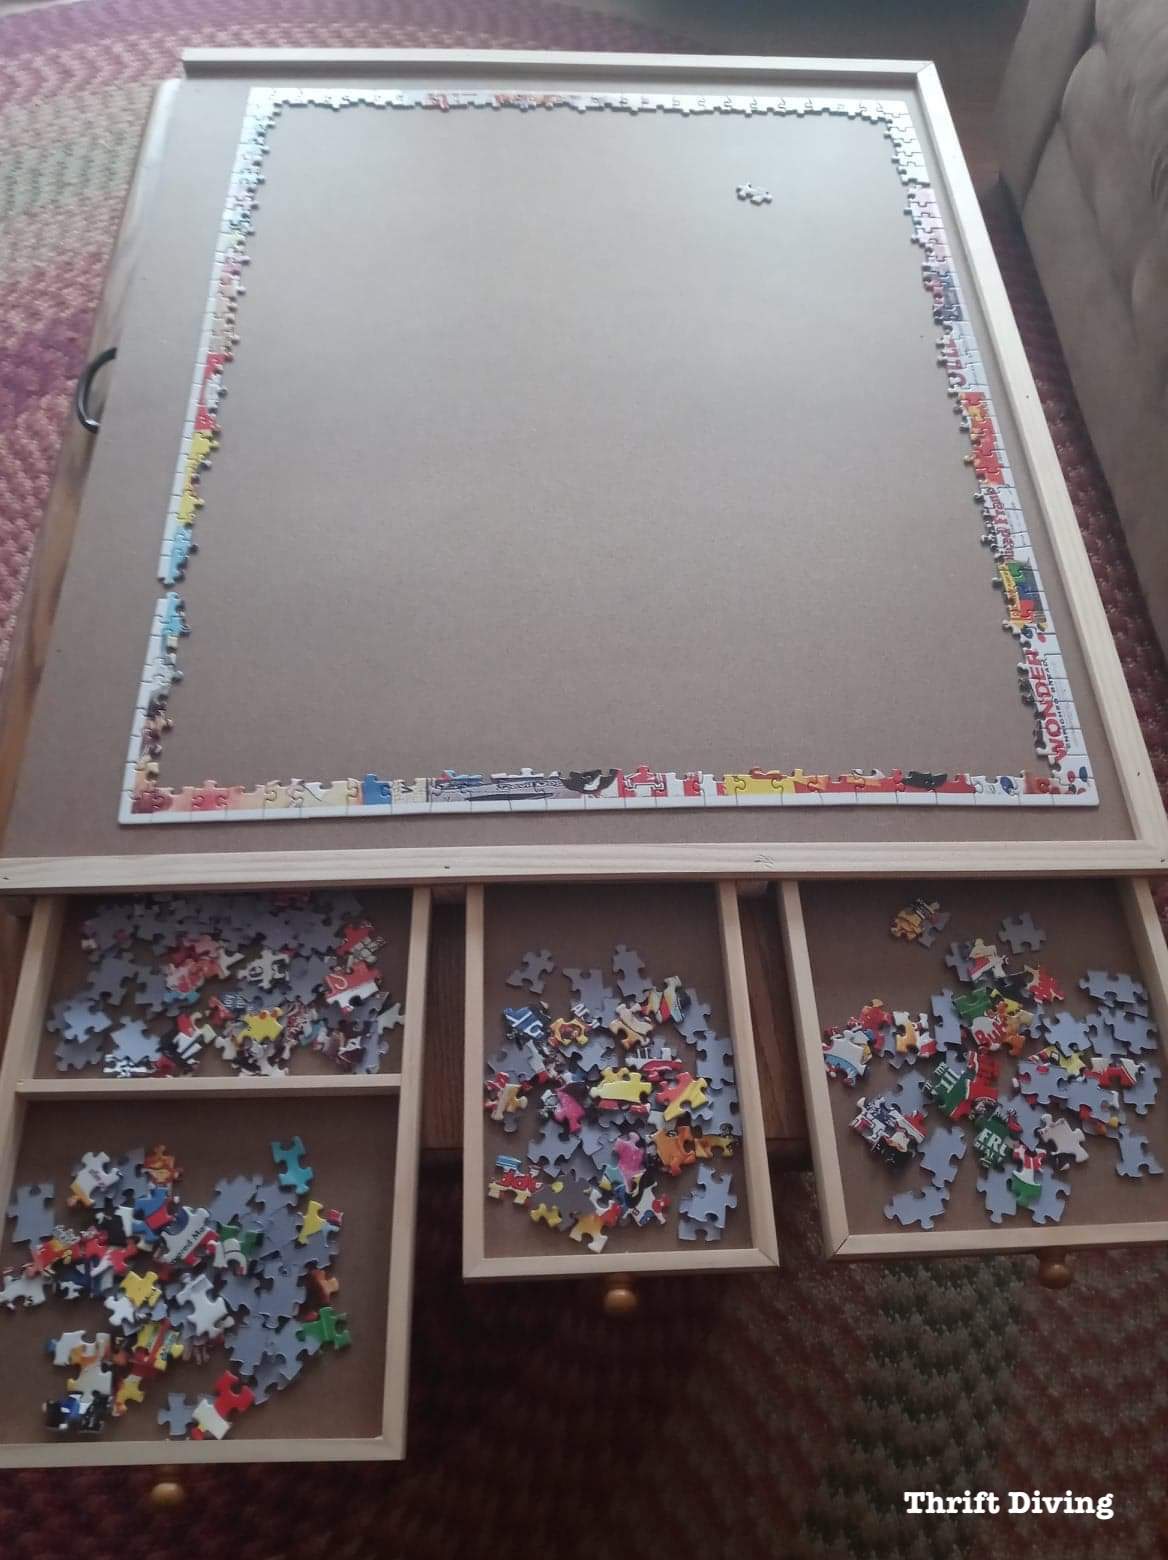
Inside of the puzzle board, there are center supports that attach not only the top and bottom of the puzzle board. But they also create cozy little places for the drawers to slide in and out of the puzzle board.
Use a little bit of wood glue and align the edge of the center supports along the top, bottom, and in the center. The spacing will depend on how wide you want your drawers to be.
For this puzzle board, I added 3 supports, which allowed me to create 4 drawers (two on each side).
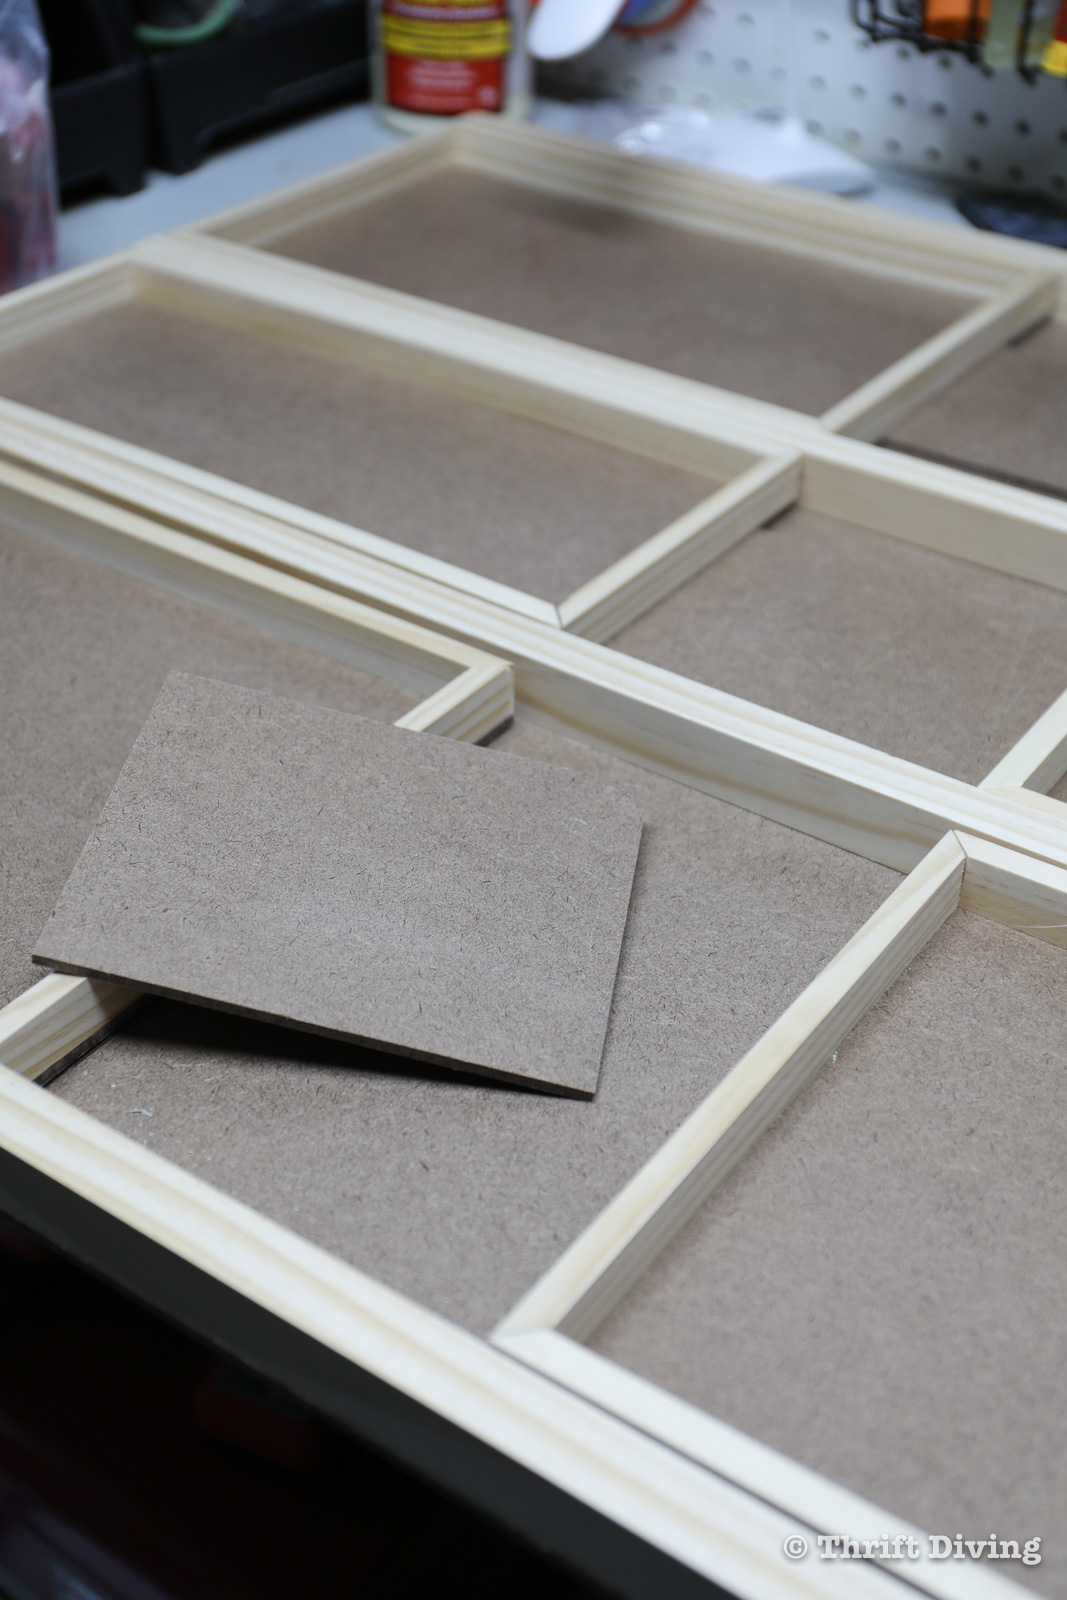
STEP 4: Cut the Drawer Bases
Depending on the size of your puzzle board, that will determine how wide your drawers will be. Mine were 9″ x 13″. And because my puzzle board was larger at 28″ x 34″, it was large enough to have two larger drawers at 9″ x 13″ and the smaller drawers were just over 6″ x 13″.
Cut the bottoms of the drawers using the 3/16″ thick tempered MDF.
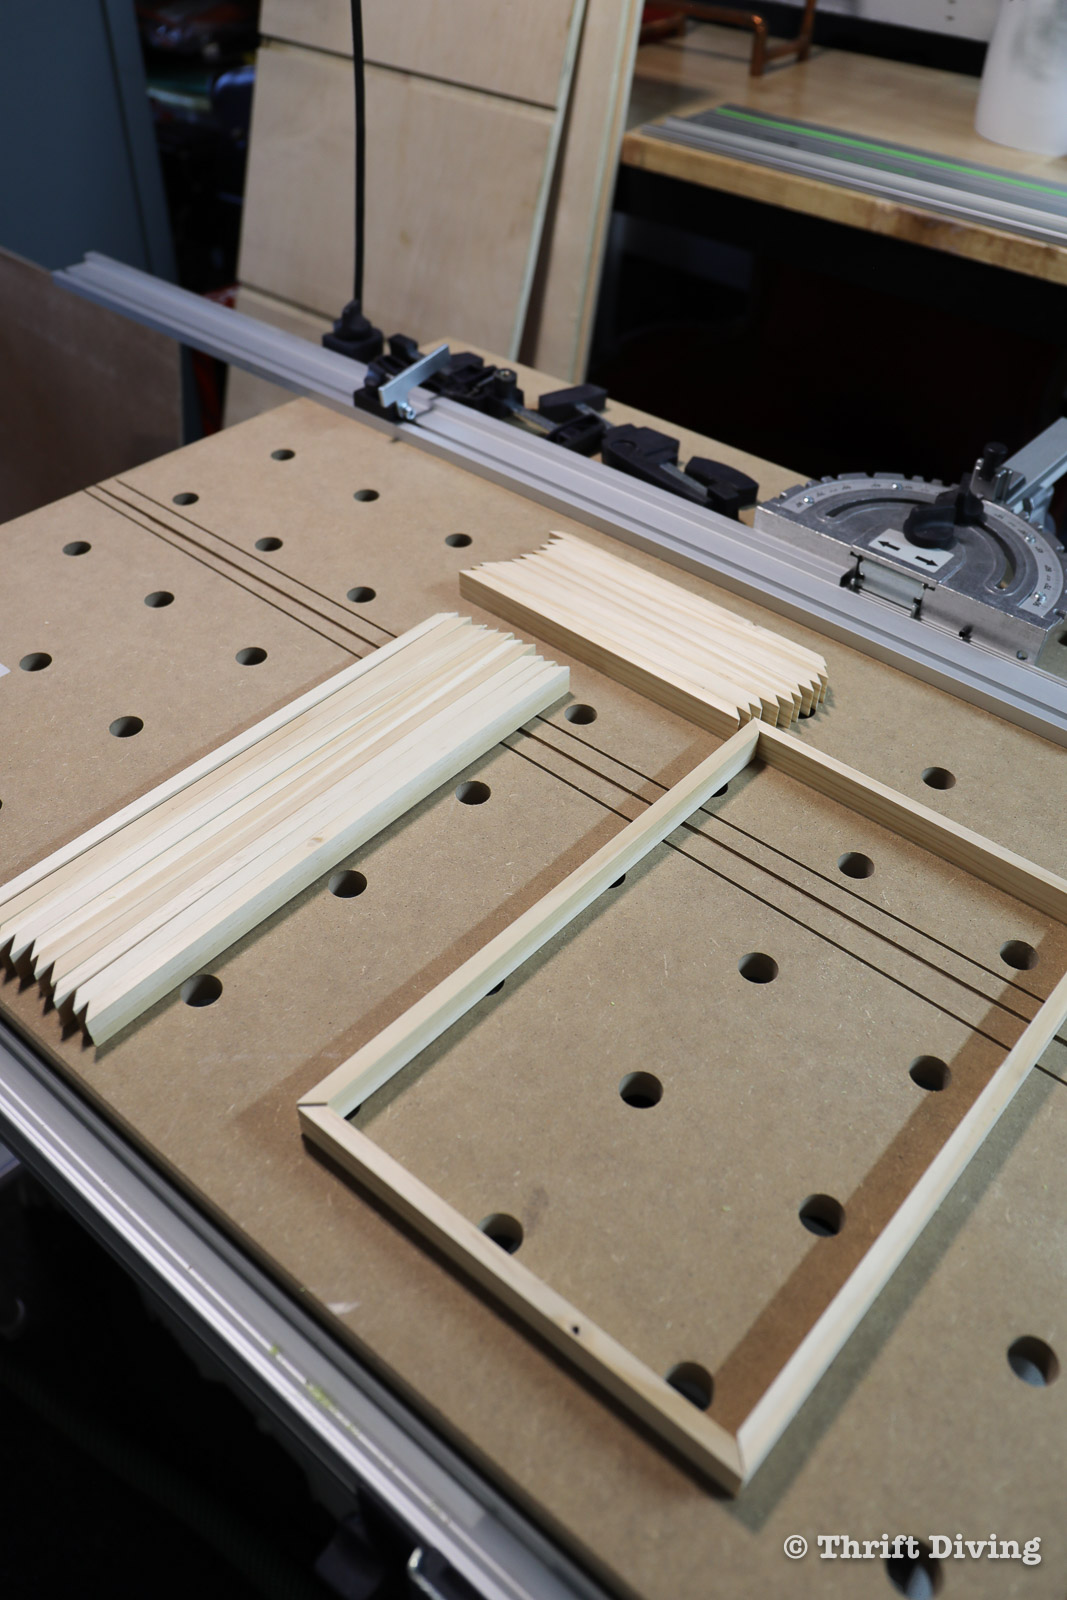
STEP 5: Cut, Glue, and Clamp the Puzzle Drawer Sides
For this project, you don’t have to cut your own small pieces to use for the drawers. You can use ready-made trim that can be bought from The Home Depot in the LUMBER section. It’s easier to buy it ready-made than to cut it yourself with a jigsaw. You’ll get a cleaner finish.
Thankfully, I used my track saw to cut them (you can use a table saw, too, but honestly–table saws scare the daylights out of me, LOL). A track saw is super easy to use and get accurate, safe, clean cuts.
I cut all the side pieces that I needed for the drawers, which were 5/8″ thick and 3/8″ wide.

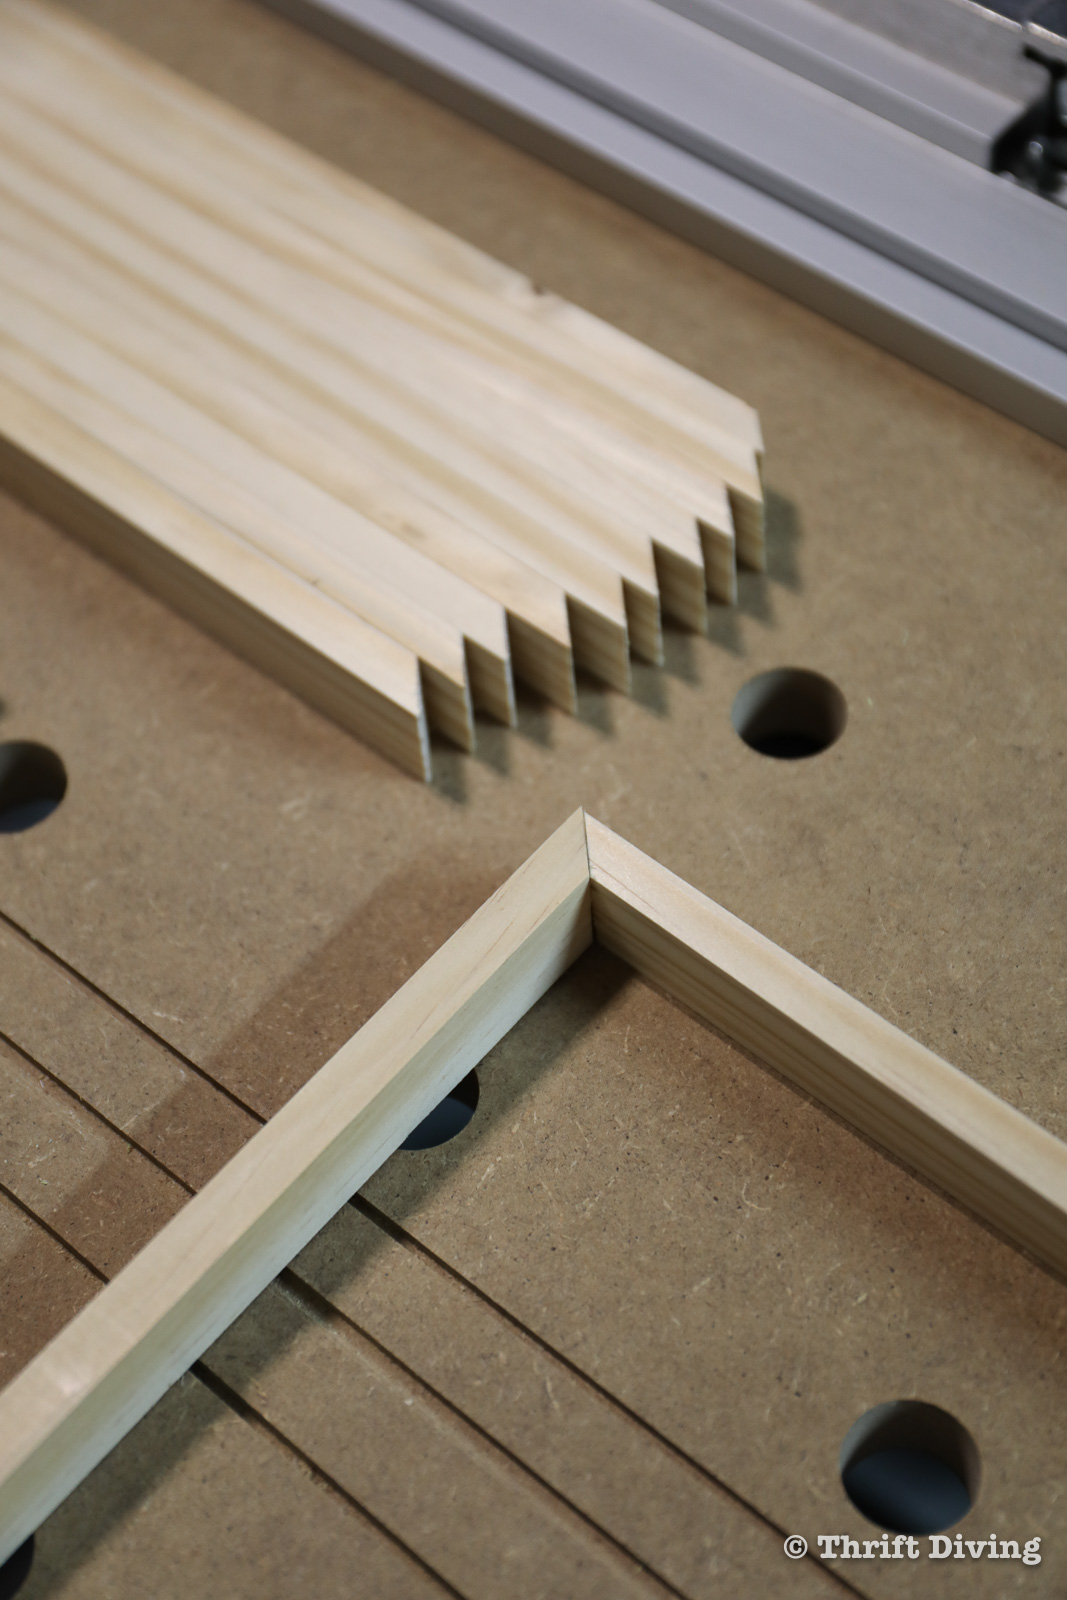
You also don’t have to cut the ends of your drawer sides at 45-degrees. Instead, you can use butt joints (which is just butting the flat ends up against each other). While this isn’t completely fitted, this gives you an idea of how you can try to plan your butt joints. With butt joins, you’ll need to make your side pieces a little shorter in order to fit properly.
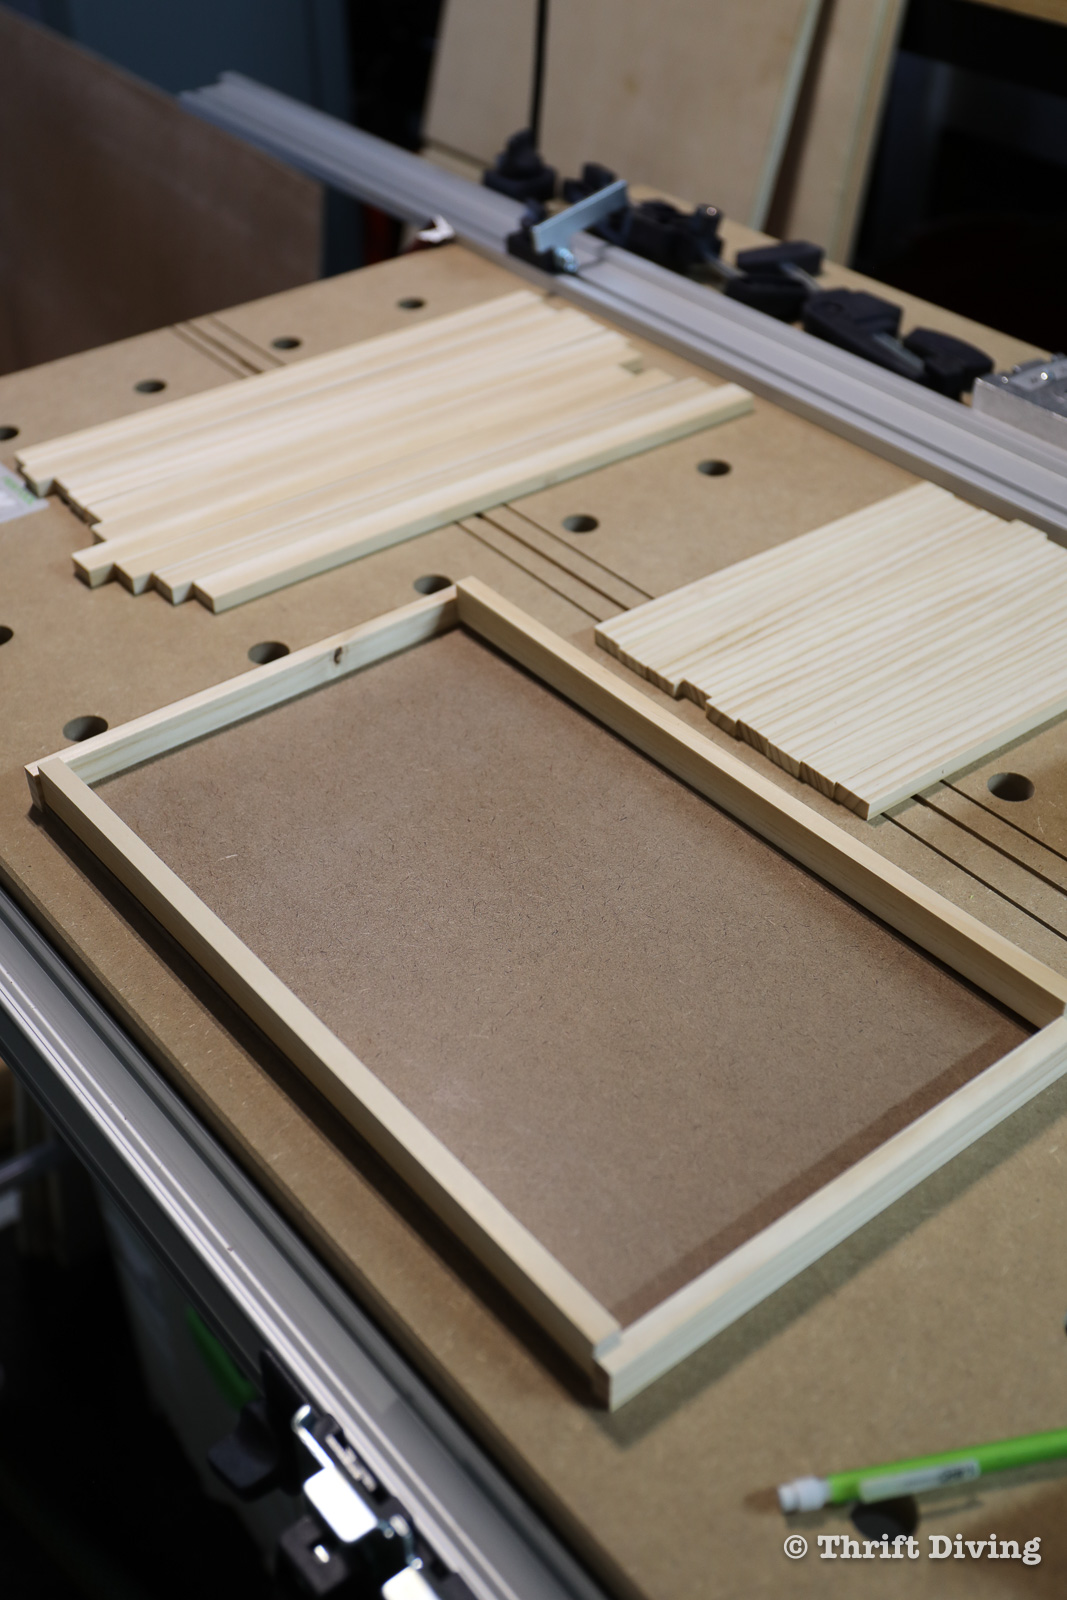
If you’re doing mitered corners, you can use a square with a 45-degree angle on it. And then use a miter box like this one for easily cutting them.
(NOTE: If you have a miter saw, you can cut them quickly and accurately instead).

With all the edges cut at 45-degrees, you can easily join the edges together to created mitered corners. Again, you don’t have to miter these corners–you can easily create a butt joint to make it easier. But I love the look of mitered corners. 🙂
If you’re creating a larger puzzle board with 6 drawers, you’ll end up with:
- 12 longer pieces
- 12 shorter end pieces
STEP 6: Nail Drawer Slides to Base
Next, glue the wooden frame on top of the puzzle drawer base. Use a nailer with short brad nails (or with small nails and a hammer) to secure the wooden frame to the base. (Be sure that you don’t shoot the nails through the wood crookedly so that they blow through the other side through your wood).
INSERT PICTURE HERE OF NAILING DRAWER SIDES TO BASE
STEP 7: Attach Drawer Knobs
You’ll need a drill bit and a power drill to create a hole in the front of each drawer so that the drawer knob can fit through. I happened to have these small knobs from a small dresser project, but you can order some similar small craft knobs on Amazon.
Use a screwdriver to tighten the knob to the puzzle board drawers.

STEP 8: Attach Stopping Blocks
Stopping blocks behind the drawers will prevent the drawers from falling inside of the puzzle board. It doesn’t have to be very thick–just thick enough for the drawers to stop.
Use wood glue to glue a stopping block into place between the drawers, making sure the block is positioned so that the drawers are even.
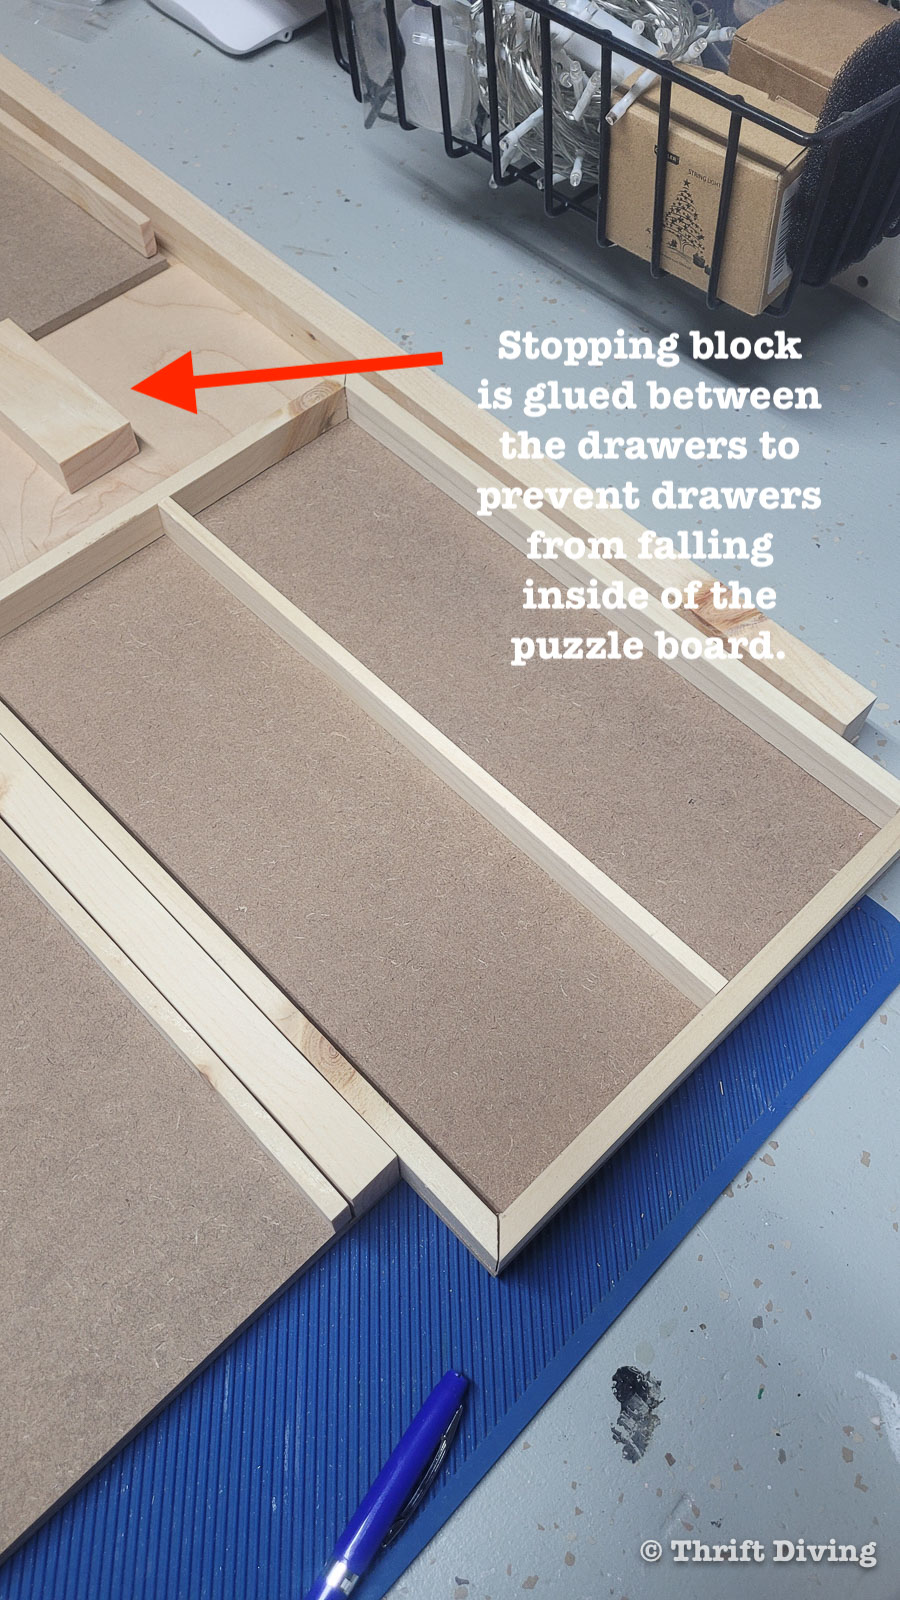
In the other puzzle board I made for my mom as a gift, I used a piece of the MDF to create the stopping blocks. From my experience, I prefer a thicker block so that the drawers can’t accidentally slide over the stop.
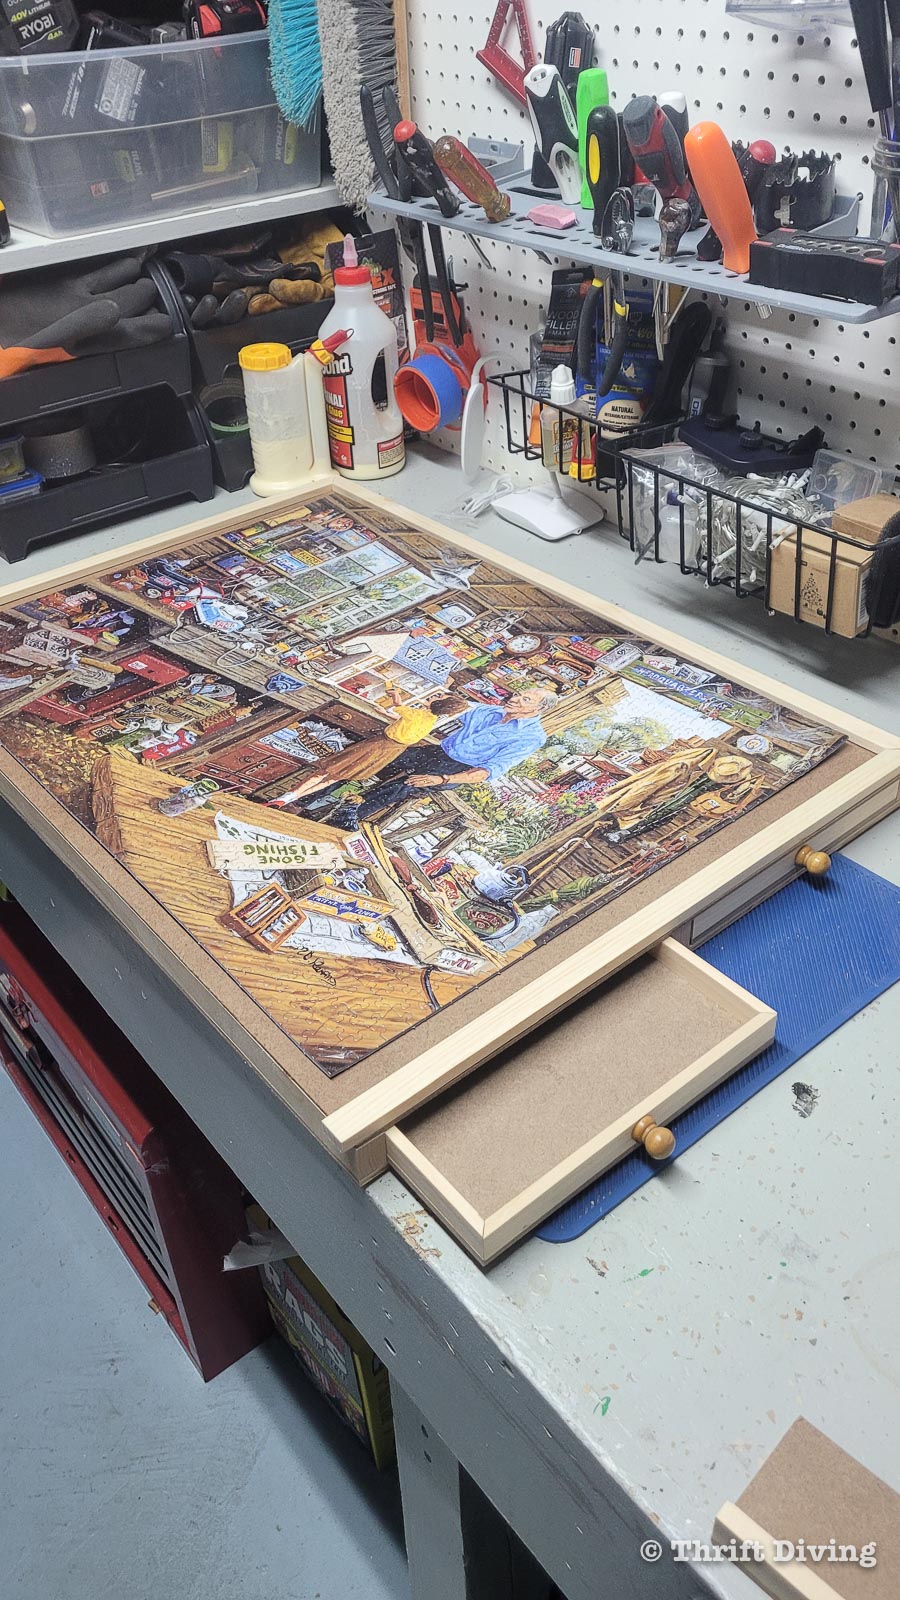
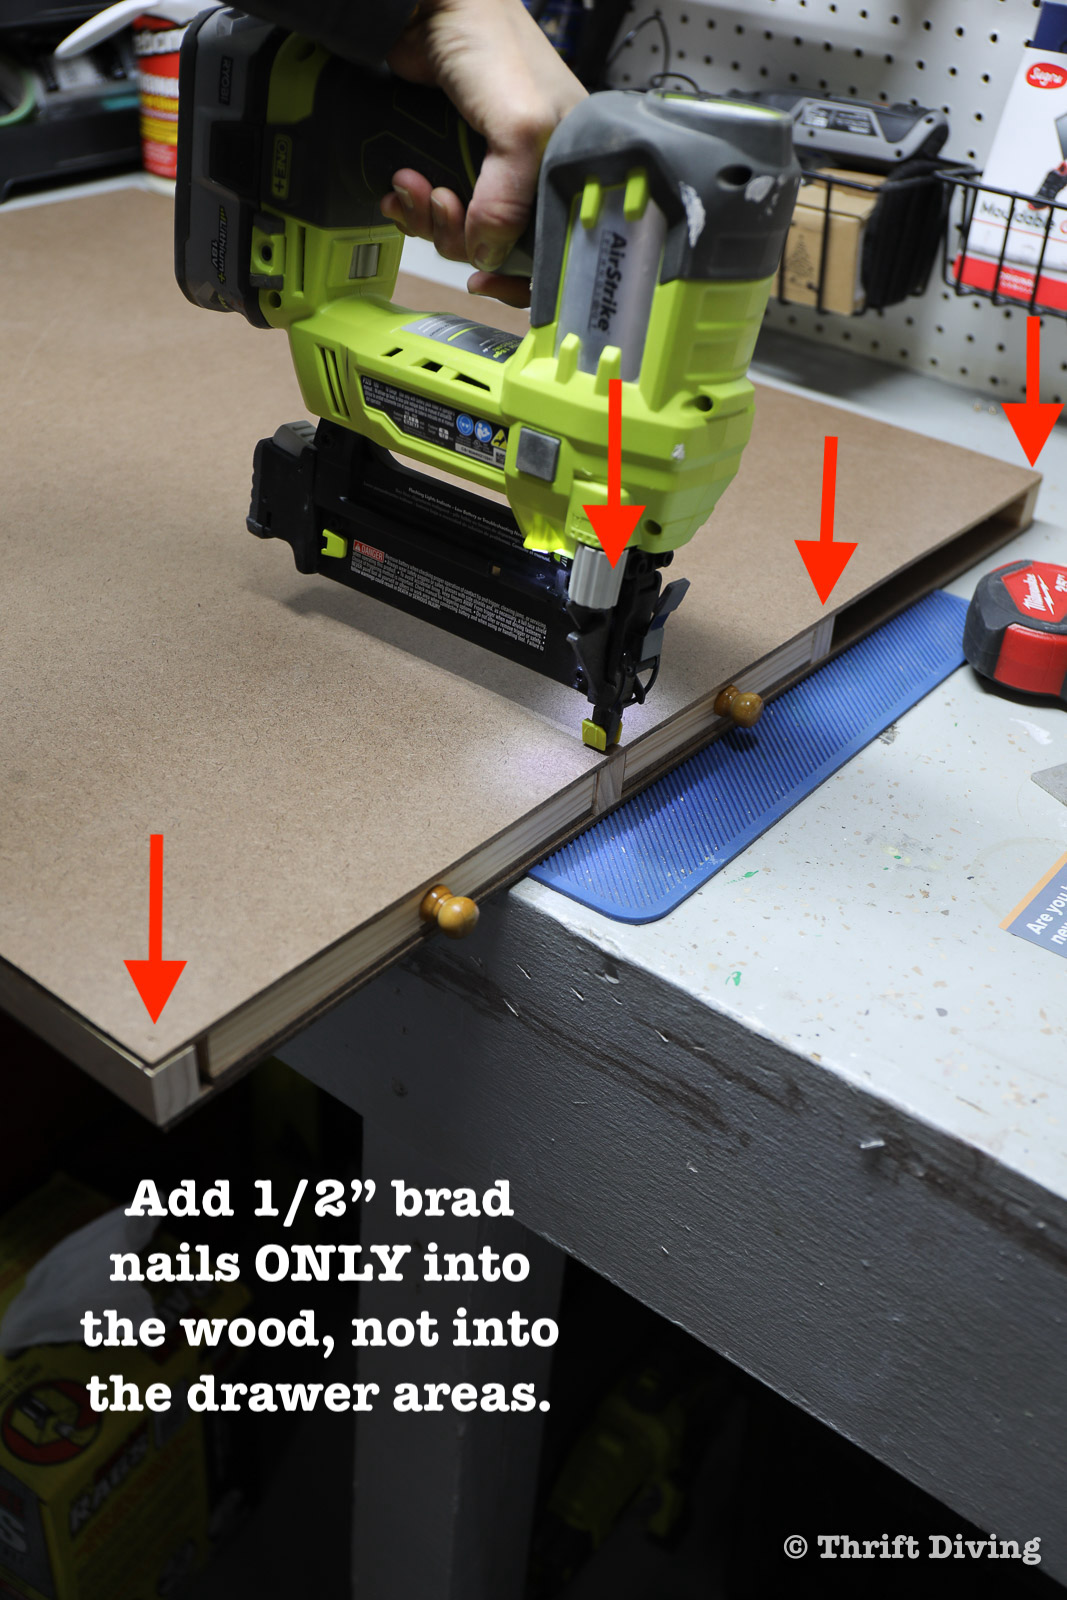
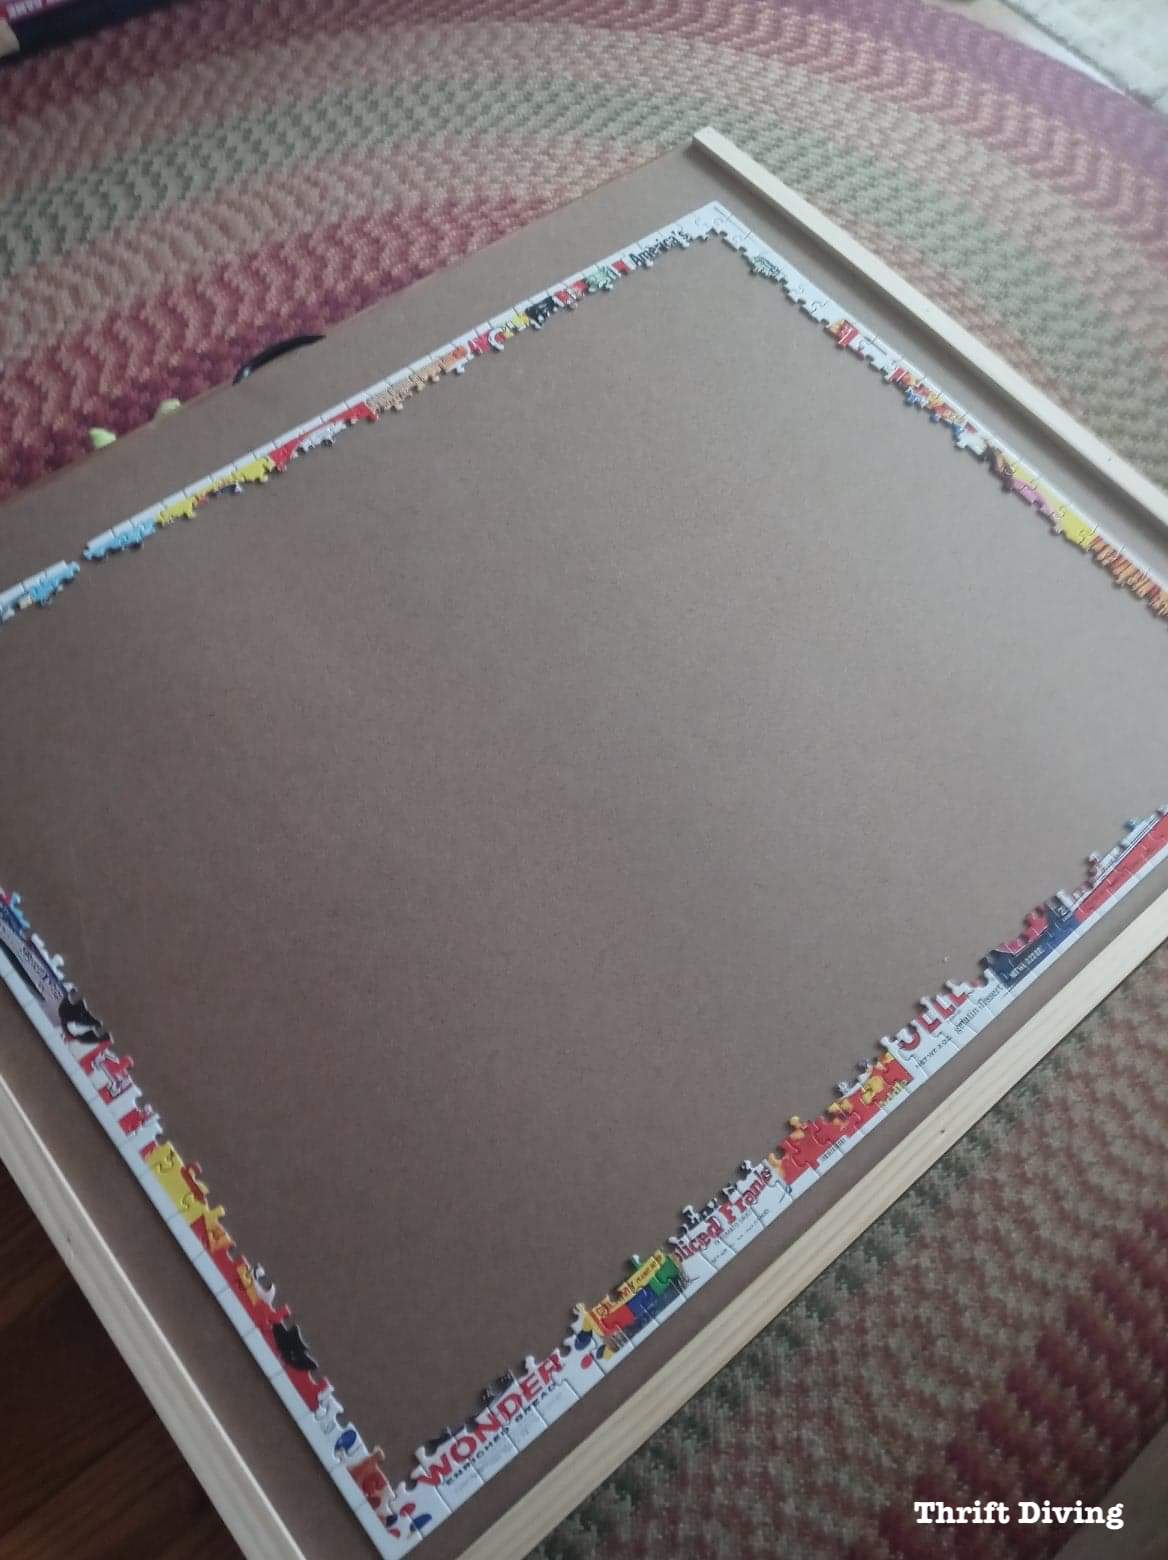
STEP 9: Glue the Hardboard Top to the Puzzle Board
Once the inside of the puzzle board is complete and you know that the drawers fit, it’s time to attach the MDF top of the puzzle board.
Use wood glue on the wooden supports, and then place the MDF top on top of them, lining up the edges as best as possible. Use clamps to secure the top to the puzzle board, wiping up any excess wood glue that seeps out the sides.

Once the wood glue has set, use a brad nailer (or a hammer and small nails) to nail down the top to the puzzle board. On the sides, ONLY shoot nails where you see the wooden supports, and do not shoot nails into the drawers. (See red arrows below, for example). If you shoot nails into the drawer areas, you won’t be able to open or close the drawers. Yikes! 🙂
For the top and bottom of the puzzle board, it’s safe to apply nails along the entire length, spaced 4″ to 6″ apart.
STEP 10: Cut and Glue Border Trim on Top
A puzzle board needs borders to prevent your puzzle from slipping off. That’s where border trim comes in handy! Again, you can either cut your own or you can use ready-made trim and glue it on top.
Another option is to miter the corners at 45-degrees or do a butt joint.
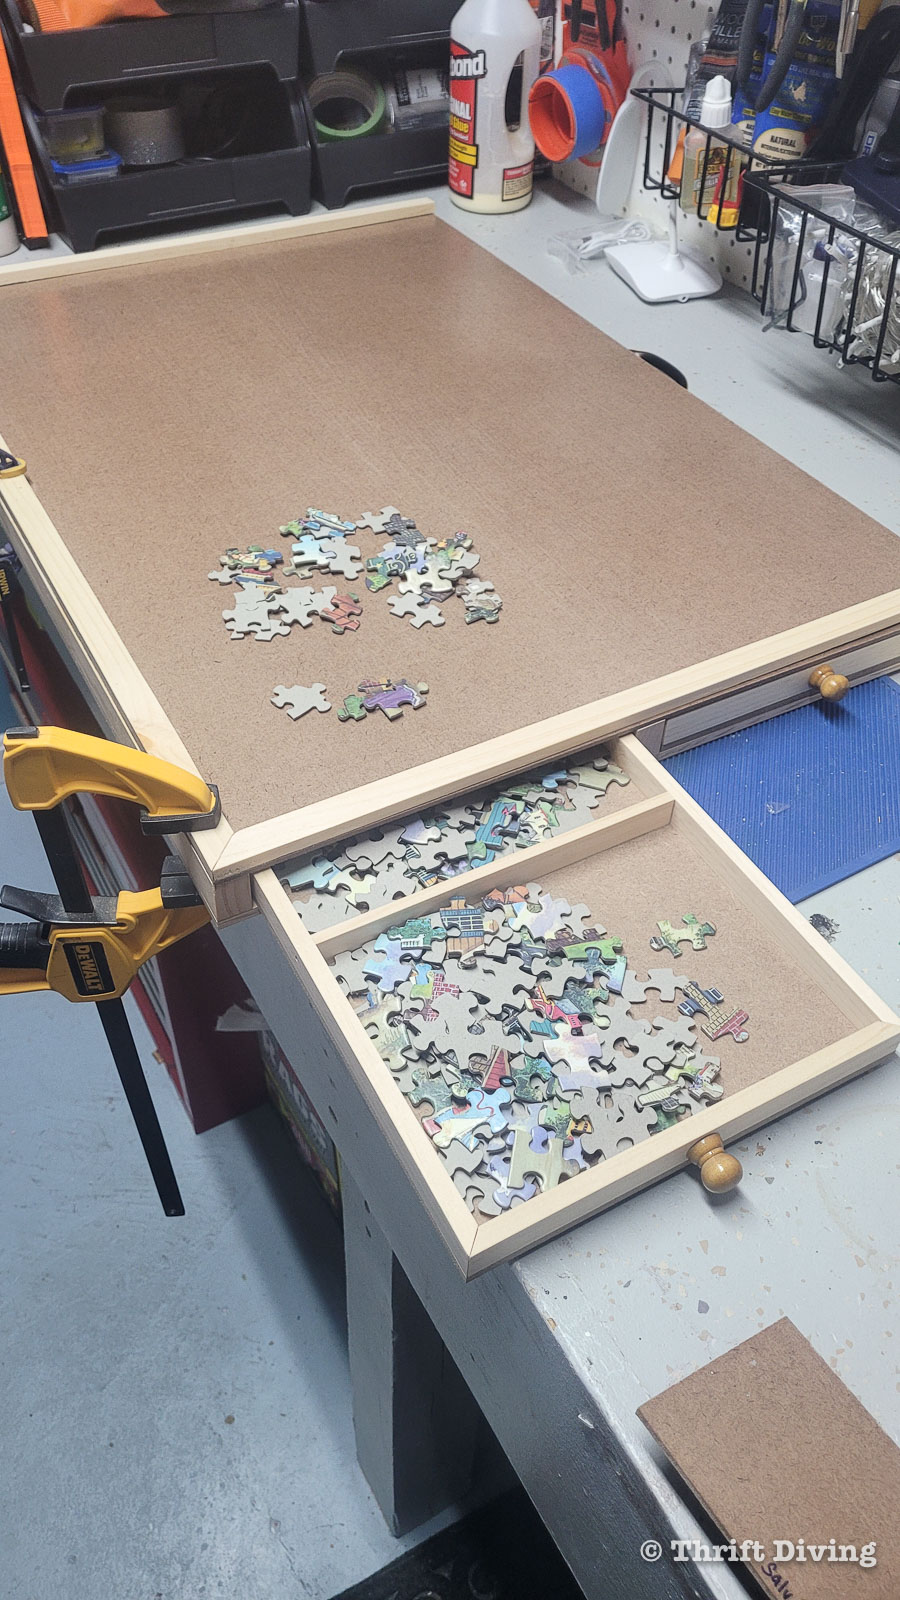
I got so excited that while the glue was drying, I started testing out the drawers! 🙂
Add an Optional Handle
The handle isn’t necessarily for carrying (although it does allow you to carry it…) but the handle is helpful for giving you a way to pull the puzzle board in and out from underneath of your sofa or bed. Especially the heavier it is, you’ll need to be able to get a grip on it. Adding a handle is a good idea!
A Puzzle Board for Your Favorite Puzzles!
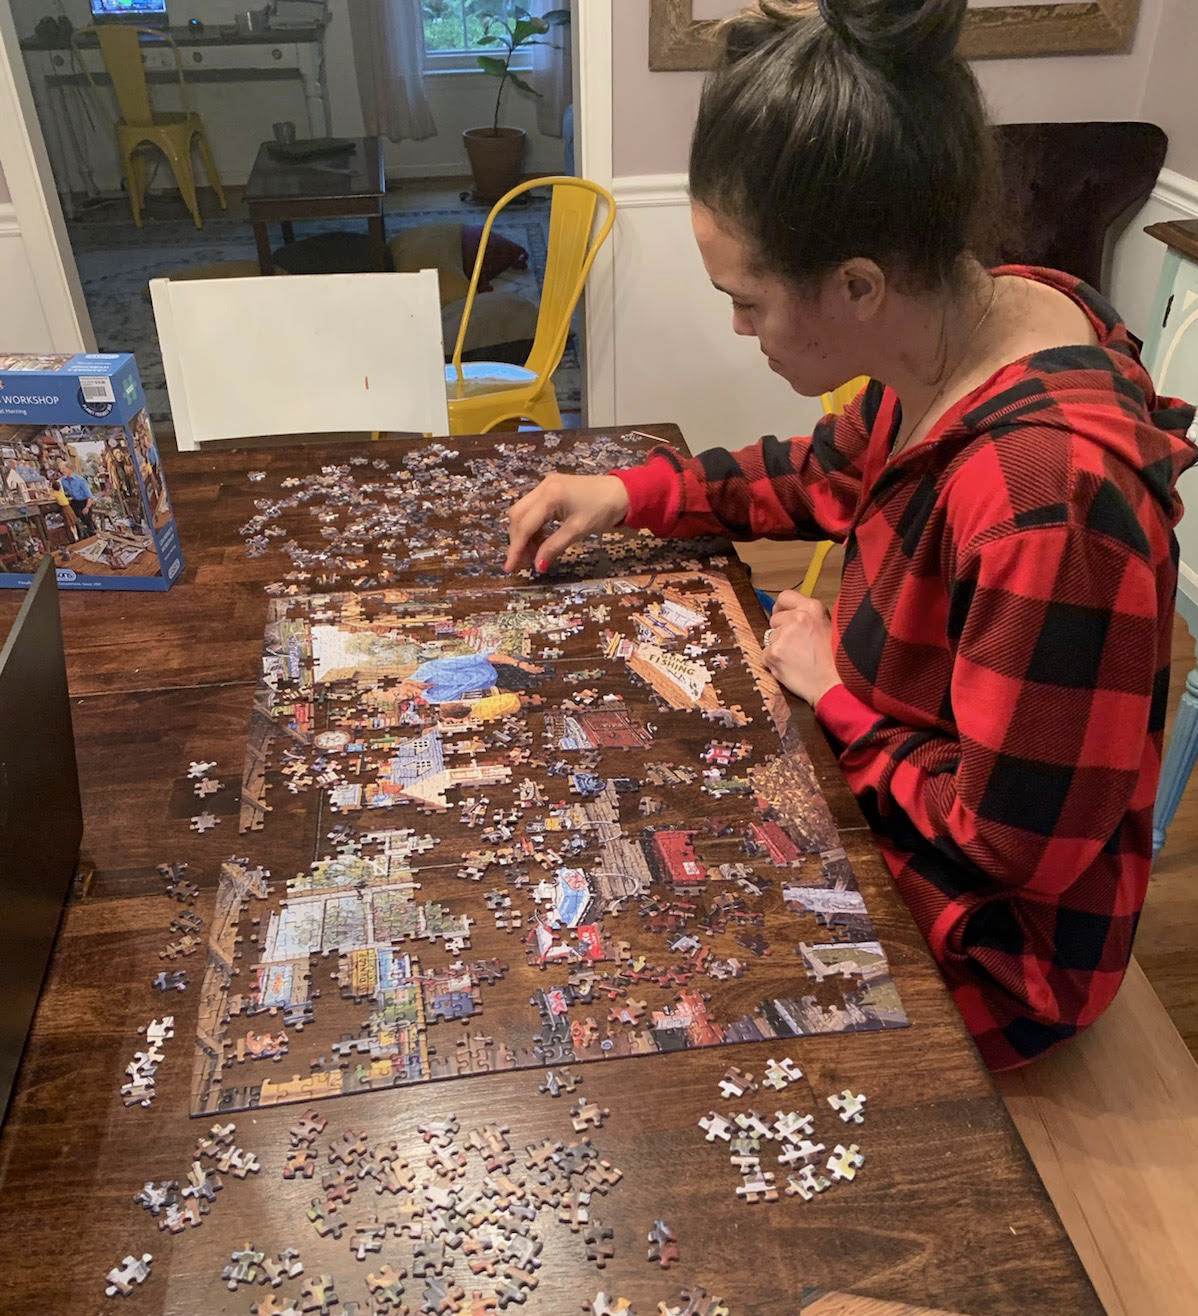
The larger of the puzzle boards I have made was for my mom. While this is a 1000 piece puzzle, the pieces on this White Mountain puzzle are larger, so this puzzle is huge!
My mom loved her homemade DIY puzzle board and sent me these pictures to show me how she’s already gotten started!
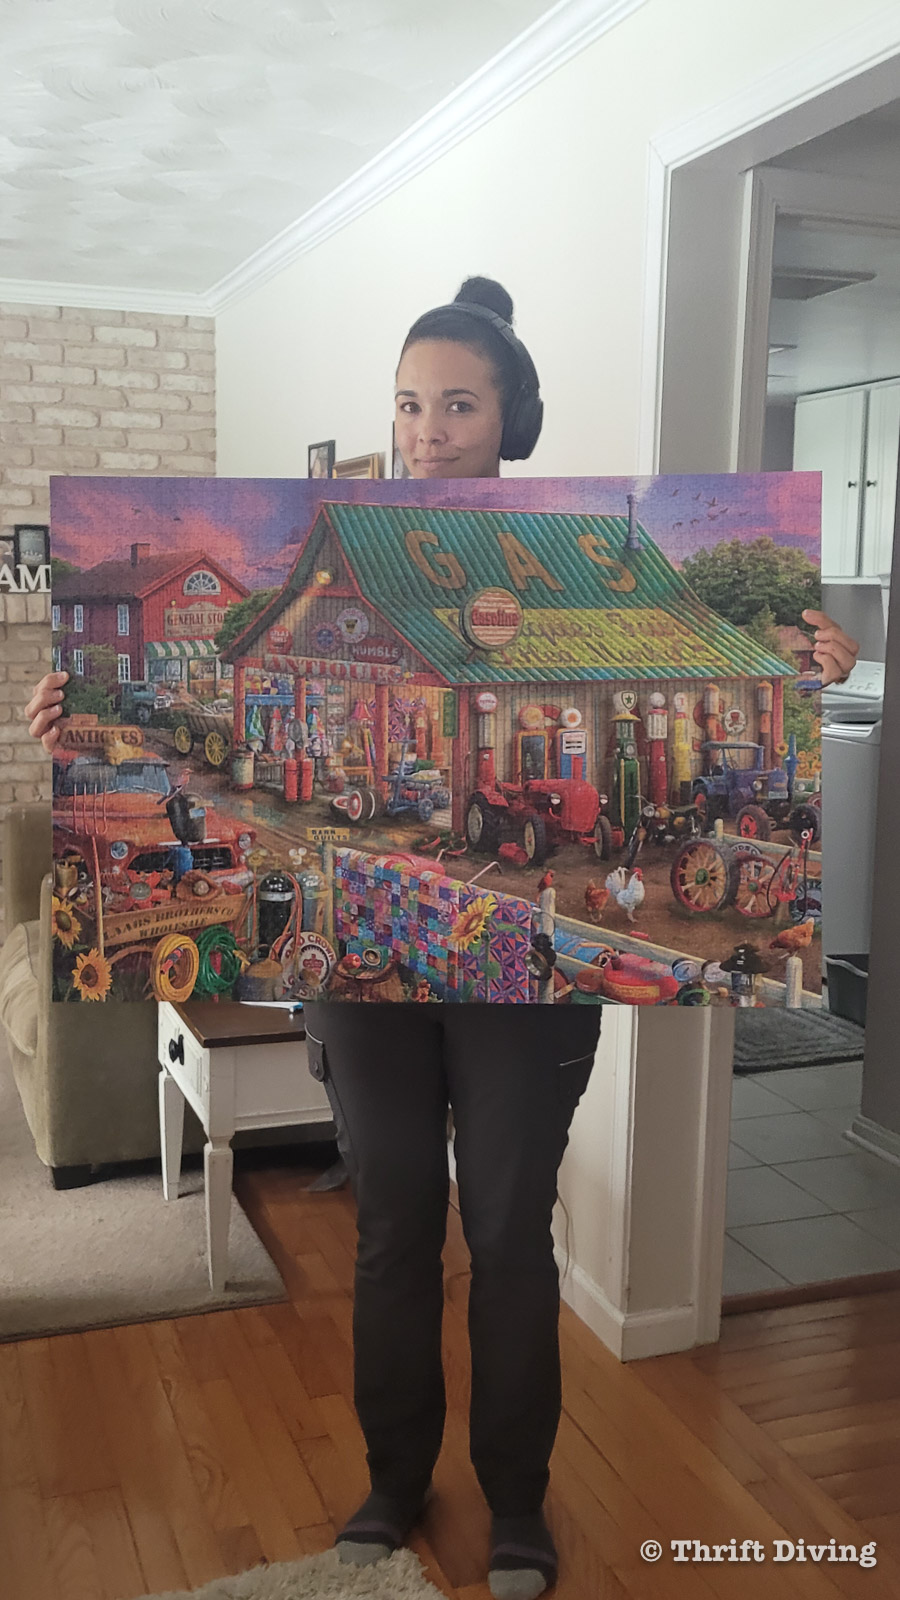
The last puzzle I enjoyed was this 2000-piece Antique Market puzzle by Buffalo Games. It was sooooo much fun! Difficult, but not too difficult to cause frustration. And yes, I glued that baby in place. No way I was taking this apart! LOL
If you enjoy puzzles as much as I do, but you really need the flexibility of being able to do your puzzle from anywhere in your home, whether at your table or on your bed or the floor of your living room, a puzzle board really does help with keeping everything neatly together! And the best thing is that it slides right under your sofa or bed!
Loved this tutorial?? Click here to save it on Pinterest!
![]()

Download the 5 freebies!

Thrift Diving inspires women to decorate, improve, and maintain their home themselves...using paint, power tools, and thrift stores! Use these 5 printables, checklists, and ebooks to get started!

Just made a puzzle board over the weekend using this format and it turned out perfect! Very easy to follow instructions and my wife loves it. Also the drawers work perfect and were a great idea. I ended up staining my pine boards a dark brown to match the brown hardwood particle board and it turned out amazing! Thanks for the great tutorial!
Awww, this is great to hear, Jim!! Wow, I would love to see it! Could you email me a picture of it? Serena@thriftdiving. Would be so fun to see! Glad it was helpful!!!
Love this. I have built the basic board (Top with edges all the way around and the four long supports under). The plan was to then build the drawers as i get time (the board is getting a great use and sturdy enough for my 5 year old to lean/kneel on it when puzzling). My dilemma is that now I want to build the draws it occurs to me the sides will need to be 3mm shorter that the 4 main support strips so the draw will fit in to the gap. Unless I am missing something very obvious. How did you achieve this. My local hardware does not have pine widths varying enough to get it off the shelf so I imagine I would have to cut them three mm shorter whcih is not easy with basic tools. Interested in your thoughts/advise)
Serena,
Thanks for sharing this tutorial. I started my first one this afternoon.
I am new to mitered edges but I do like the look. I think your larger drawers were 9″x13″. I am having trouble deciding how long to cut the long pieces and how long to cut the short pieces. It seems if I cut the pieces 9″ and 13″, then they might be too short after I make the miter cuts on each corner.
Is there an easy way to know how much extra length is needed (if any) on each piece?
My drawers will be 10.25″ x 15″. I am waiting to cut the trim pieces now. I just don’t want to end up wasting a lot of trim trying to figure this out.
Thanks for any help or insight!
Pam Frederick
he*****@***oo.com
My wife loves this Idea and wants me to build one for her and my daughter in law. Instructions are straight forward but would like a better list of materials what size are the pine boards, and wooden trim, what are the cut sizes for the drawers, etc. I
3/16″ tempered MDF
Pine boards
Wooden trim
Thanks
Jerry
I love this I just built it for my daughter. I went 32x 48. I did 4 drawers and made them wider I fronted the drawers with Coco Bolo wood some left here. I added felt and a top that swivels on She can now just close and carry like a briefcase without spoiling her puzzle. This was a lot of fun. Keep the ideas coming
PK
Oh my goodness, that sounds beautiful!! Wow, I love the Coco Bolo choice and the felt. I feel like I want to make another one and add these features. 🙂 The swivel sounds awesome. Thanks for sharing!