How to Make Your Own Garden Planters From Metal
Make Your Own Garden Planters: Watch This Project in Action
This year, I’ve made my own garden planters, which left me waving my DIY gardener flag in pride.
I’ve never been much of a gardener because much of what I try to grow dies.
(I often joke that it’s a wonder my kids have thrived…..LOL).
But I’ve become fascinated with making pretty DIY pots and planters, including those fun cedar hanging garden planters for the fence.
Even if I can’t make what’s inside the garden pots and planters stay alive, I can doggone sure have fun creating decorative ways to display them until I send the plants to their untimely deaths.
Now that fall is here, I couldn’t wait to buy some garden mums to liven up my front porch.
And I knew the perfect project: DIY garden planters made from decorative metal sheeting!
(I’ve teamed up with one of my sponsors, Arrow Fastener, to bring you this tutorial!).
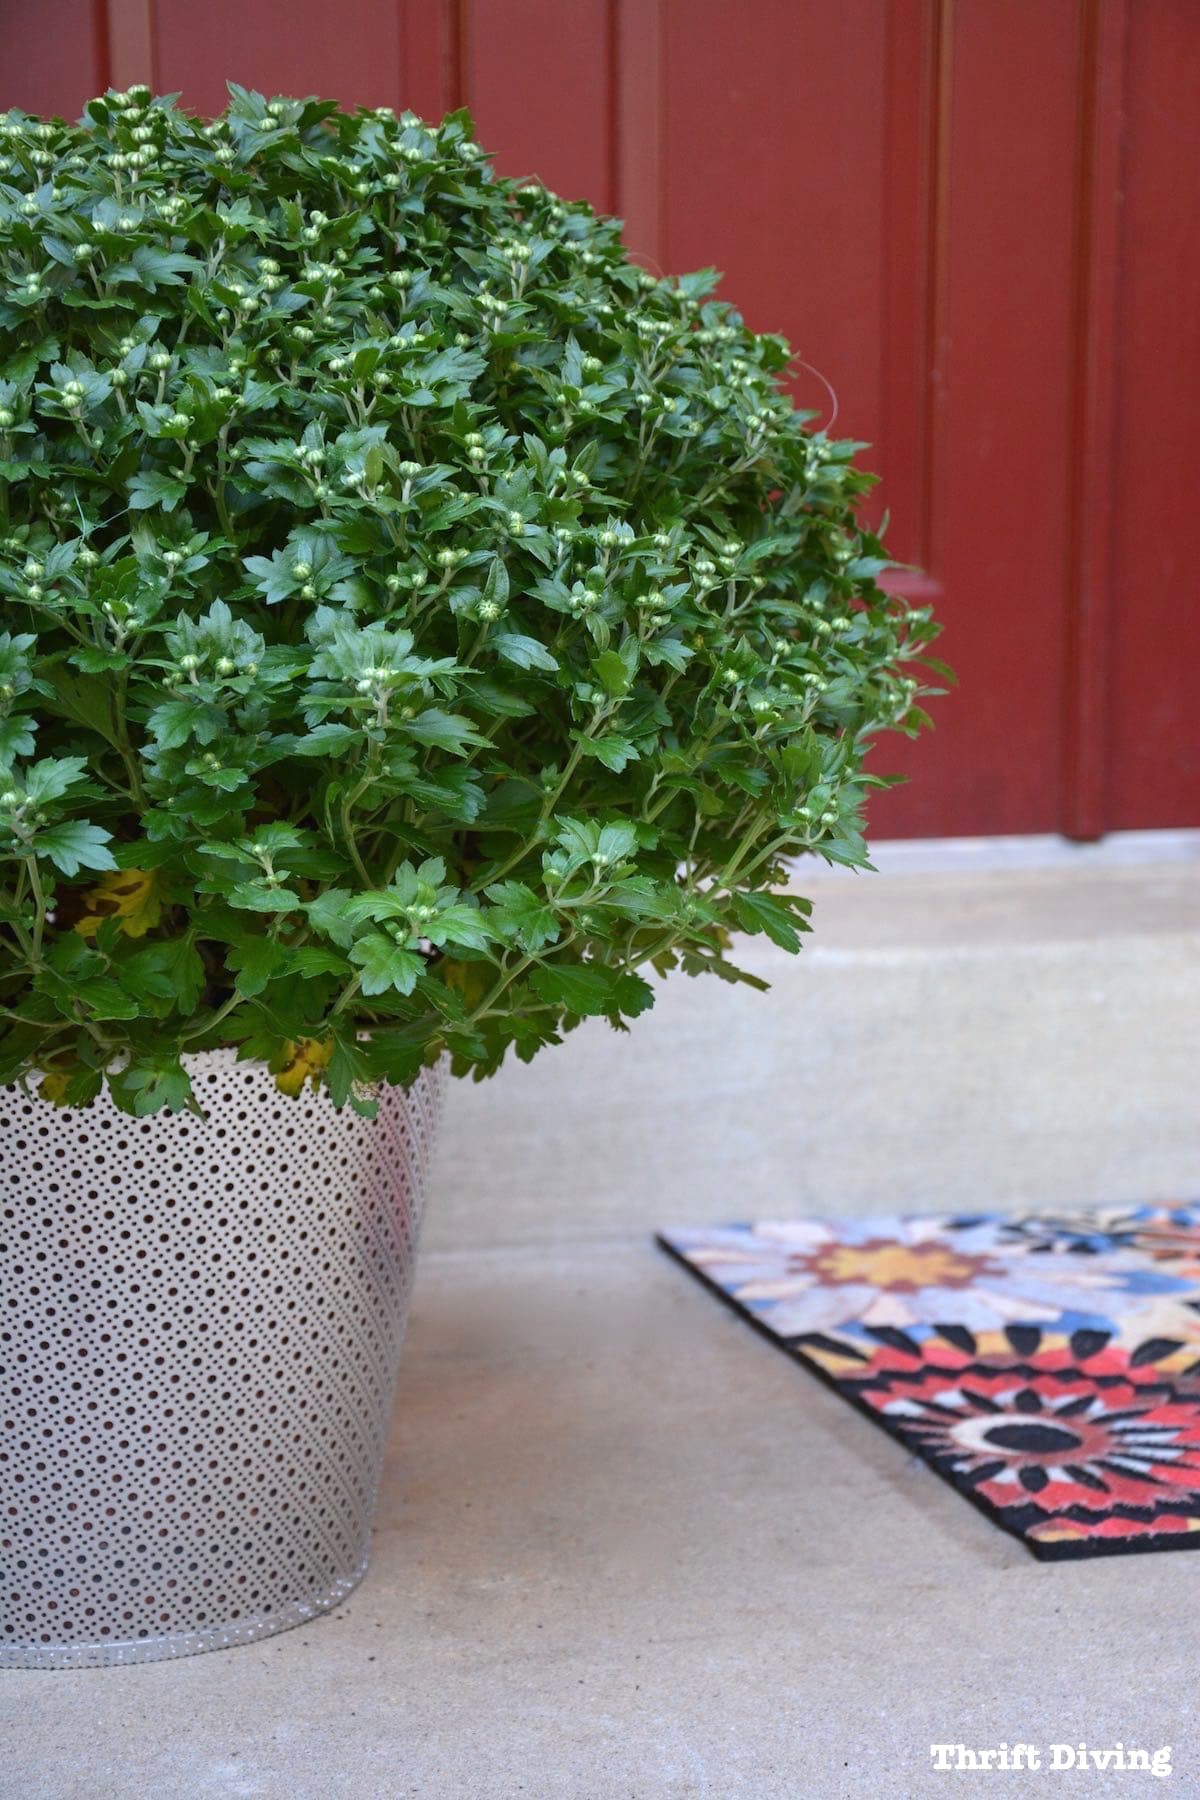
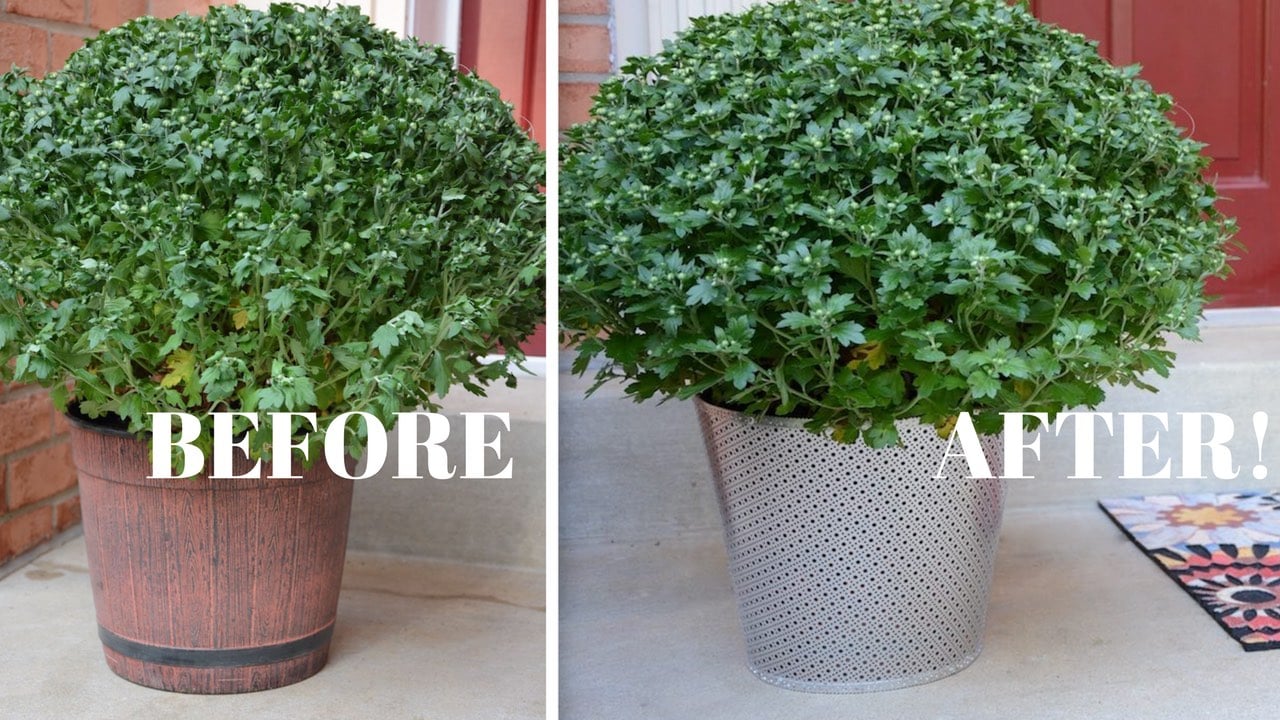
BEFORE – ORIGINAL GARDEN POT
I actually like these original garden planters from Costco that the mums came in (only $9.99!). Not only is my front door red, but the brick also has reddish-orange undertones which complimented the faux wood of the planters.

But I wanted to make my own garden decor planters out of decorative aluminum metal sheeting from the Home Depot.
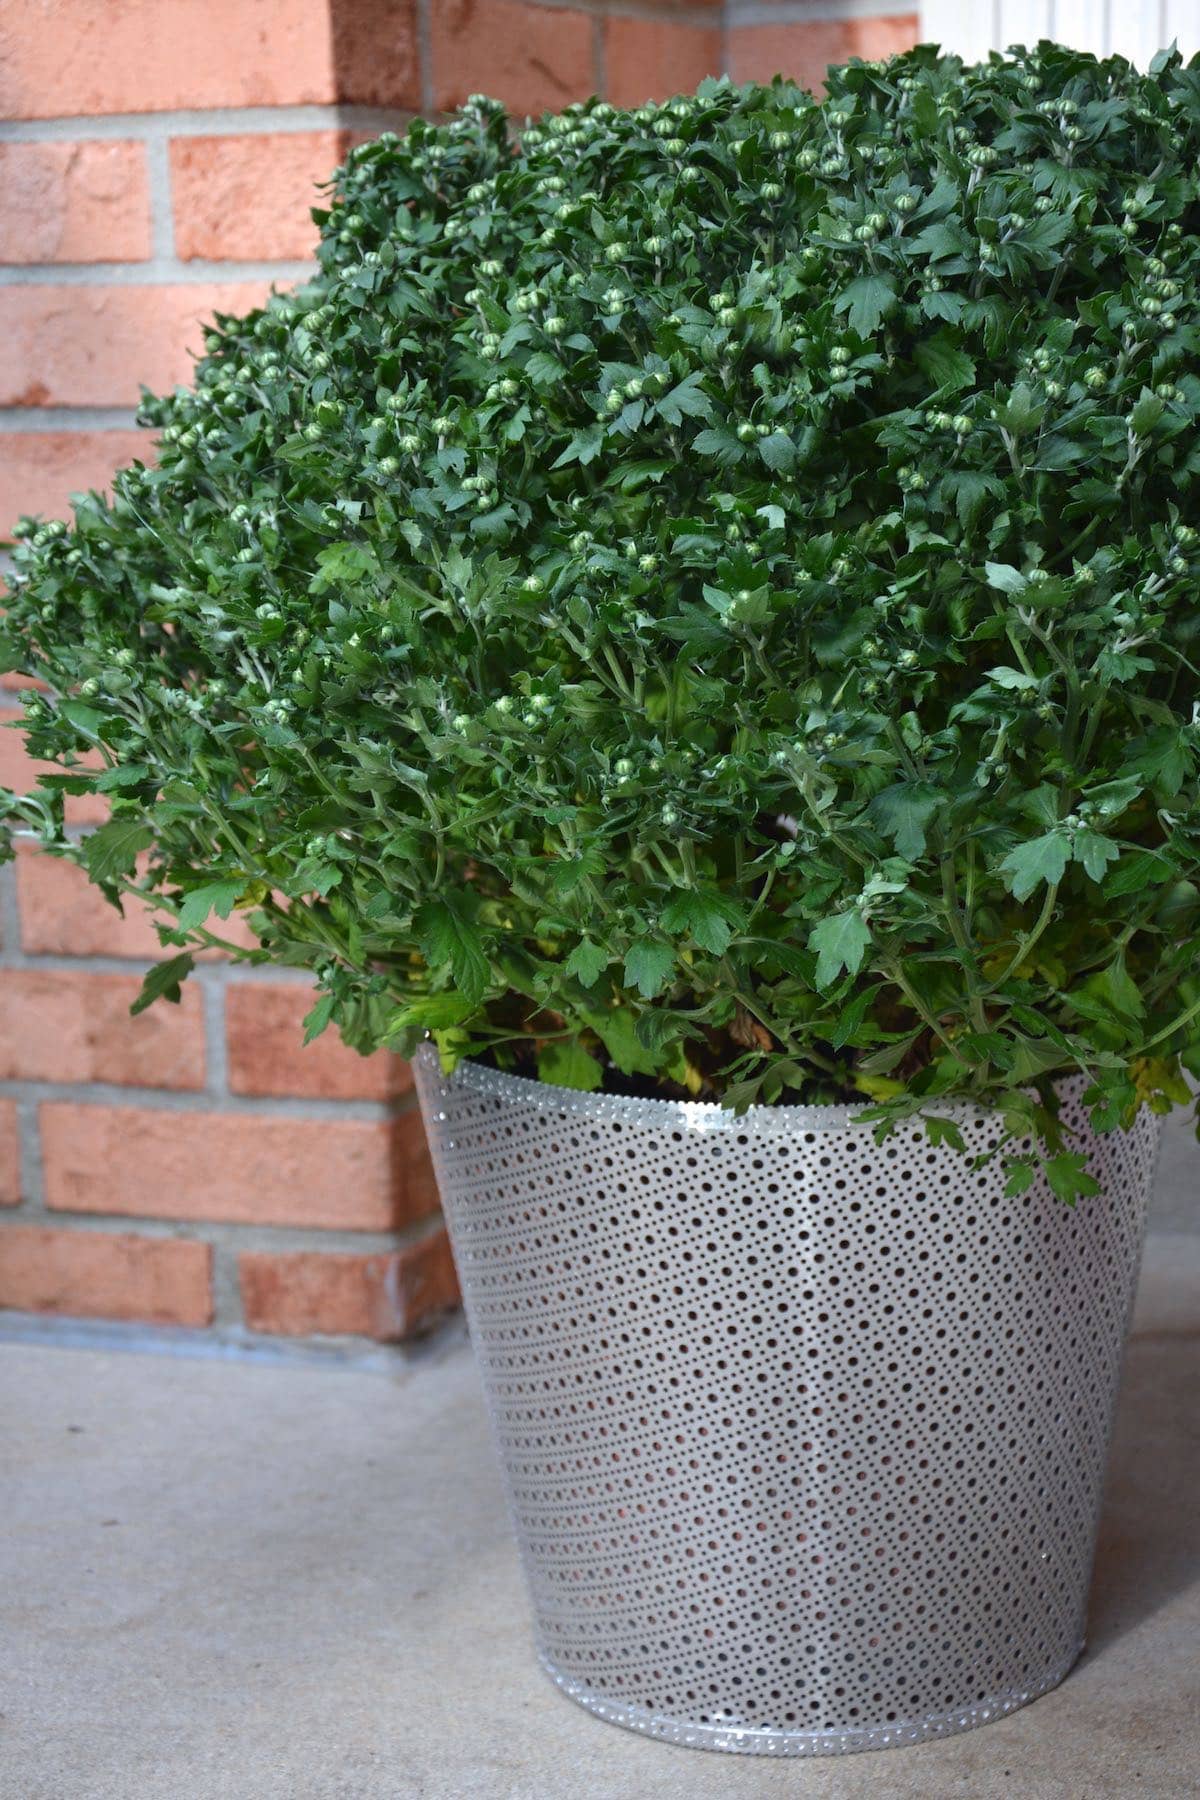
AFTER! – DIY METAL GARDEN PLANTERS
The Inspiration
Over the summer I went to the Haven DIY bloggers conference and the company that manufactures these decorative sheets of metal had a bunch of fun crafts in their booth–everything from metal-wrapped candles, metal baskets, framed jewelry hangers–you name it.
(If you’ve ever been to Home Depot, you have seen these metal sheets).
Each time I pass them, I stop and rack my brain for what I could do with them.
This summer, the idea came to me: decorative DIY garden planters!
As I mentioned earlier, Arrow Fastener is one of my partners here at Thrift Diving. Each month they challenge me to use their hand tools that they’ve sent, incorporating them into my projects.
When September came around, I had planned to make the garden planters from metal using one of my favorite Arrow Fastener favorite (the riveter), but I had no idea how I was going to do that–until I put two and two together and realized–YES!
Sheet metal with holes + rivets = awesome metal DIY garden planters!
(Don’t you love when ideas come to you like that??)

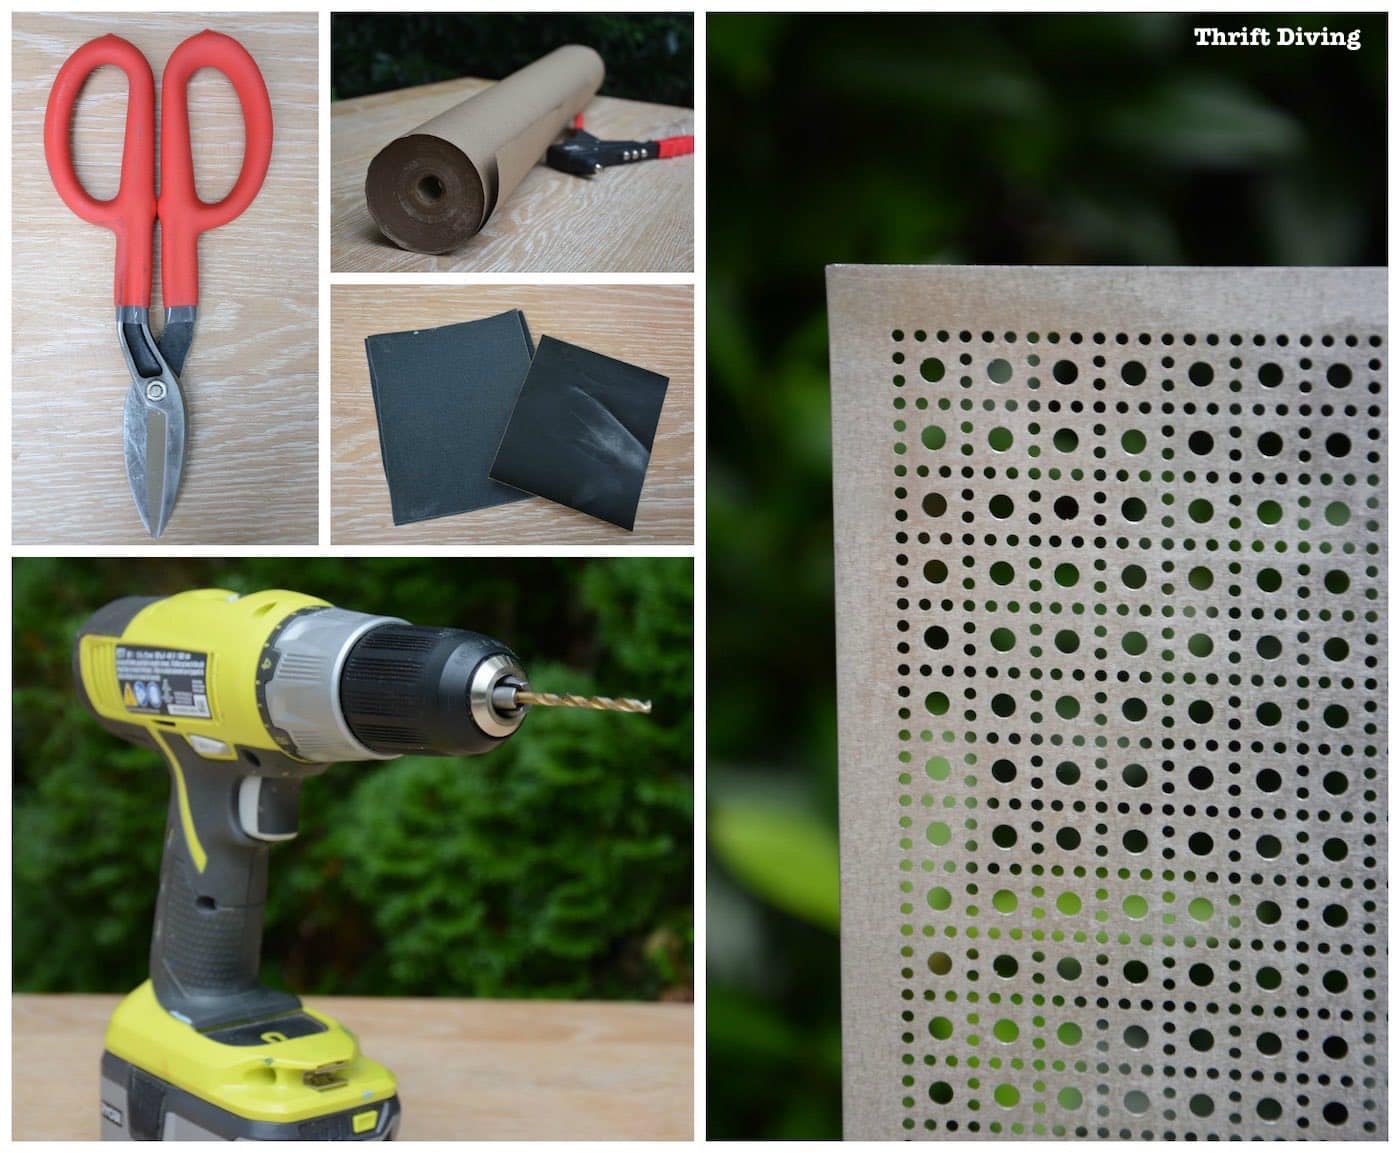
The Materials: How to Make a Garden Planter Out of Metal
I absolutely love using the riveter. In fact, this year, I’ve now made three projects using a riveter! Who know they were so cool and versatile?? (“Rosie” isn’t the only one can wield a riveter!)
Related:
- How to Make a Wooden Backpack With a Riveter
- How to Make a Bean Bag Toss Game With a Riveter

Here are all the materials I used:
- Arrow Fastener riveter
- Rivets – short 1/8″ rivets
- Rivet washers – 1/8″
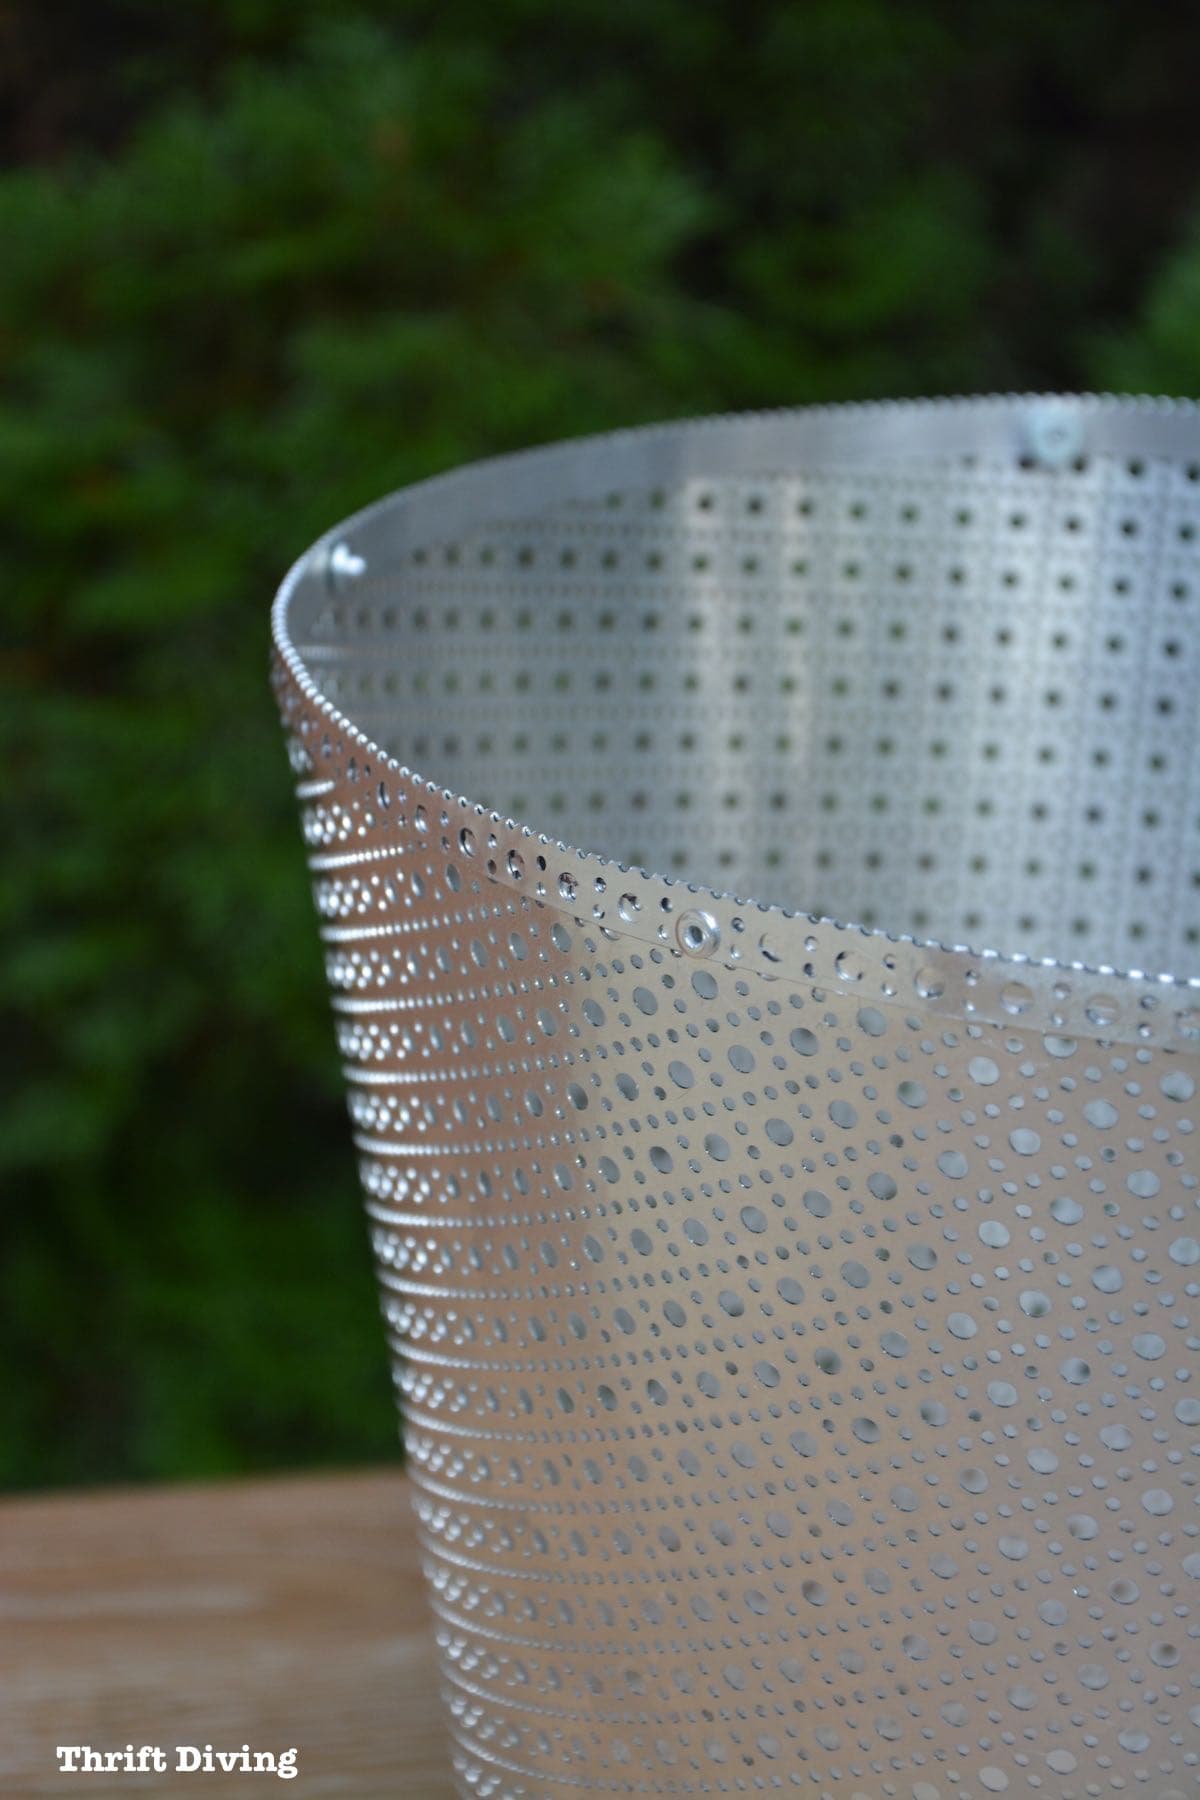
- 36″ x 36″ lincane aluminum sheet metal in silver
- Tin snips
- Thick gloves (to prevent cuts to your hands)
- Brown paper roll (for pattern making)
- Power drill
- 1/8″ drill bit
- Scissors
- Pen or pencil
- P220-grit sandpaper
How to Make a Garden Planter Out of Metal
STEP 1: Create a Garden Planter Template
Whenever you’ve got a cylinder-shaped planter for which you want to make a decorative cover, you’ve got to first make a template of it. (The same is true for making paper covers for ugly lampshades, t00).
Here’s how you do it:
Simply lay the garden pot down at a starting point (be sure to mark the bottom of your pot so you know where the starting mark is).
Use a marker to carefully trace along the path of the garden pot as you roll it until reaching the starting mark on the bottom of the paper.
Do the same for the top of the pot.
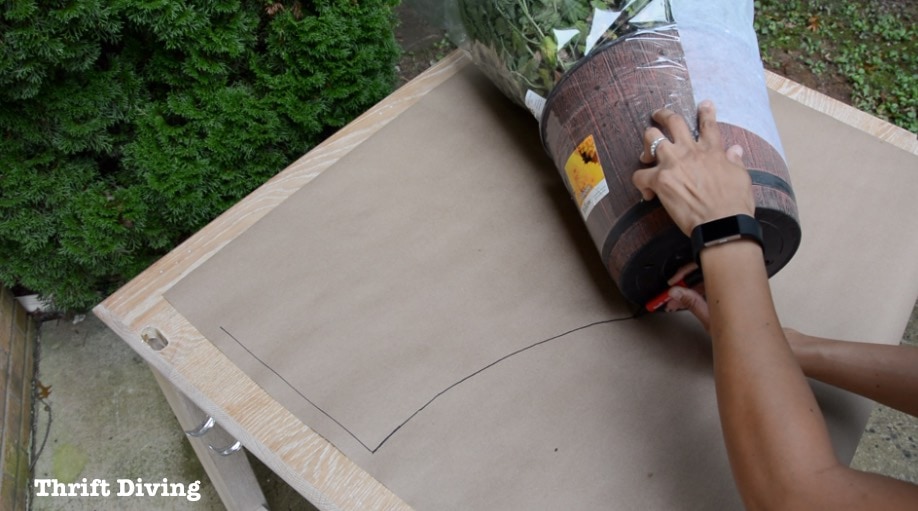
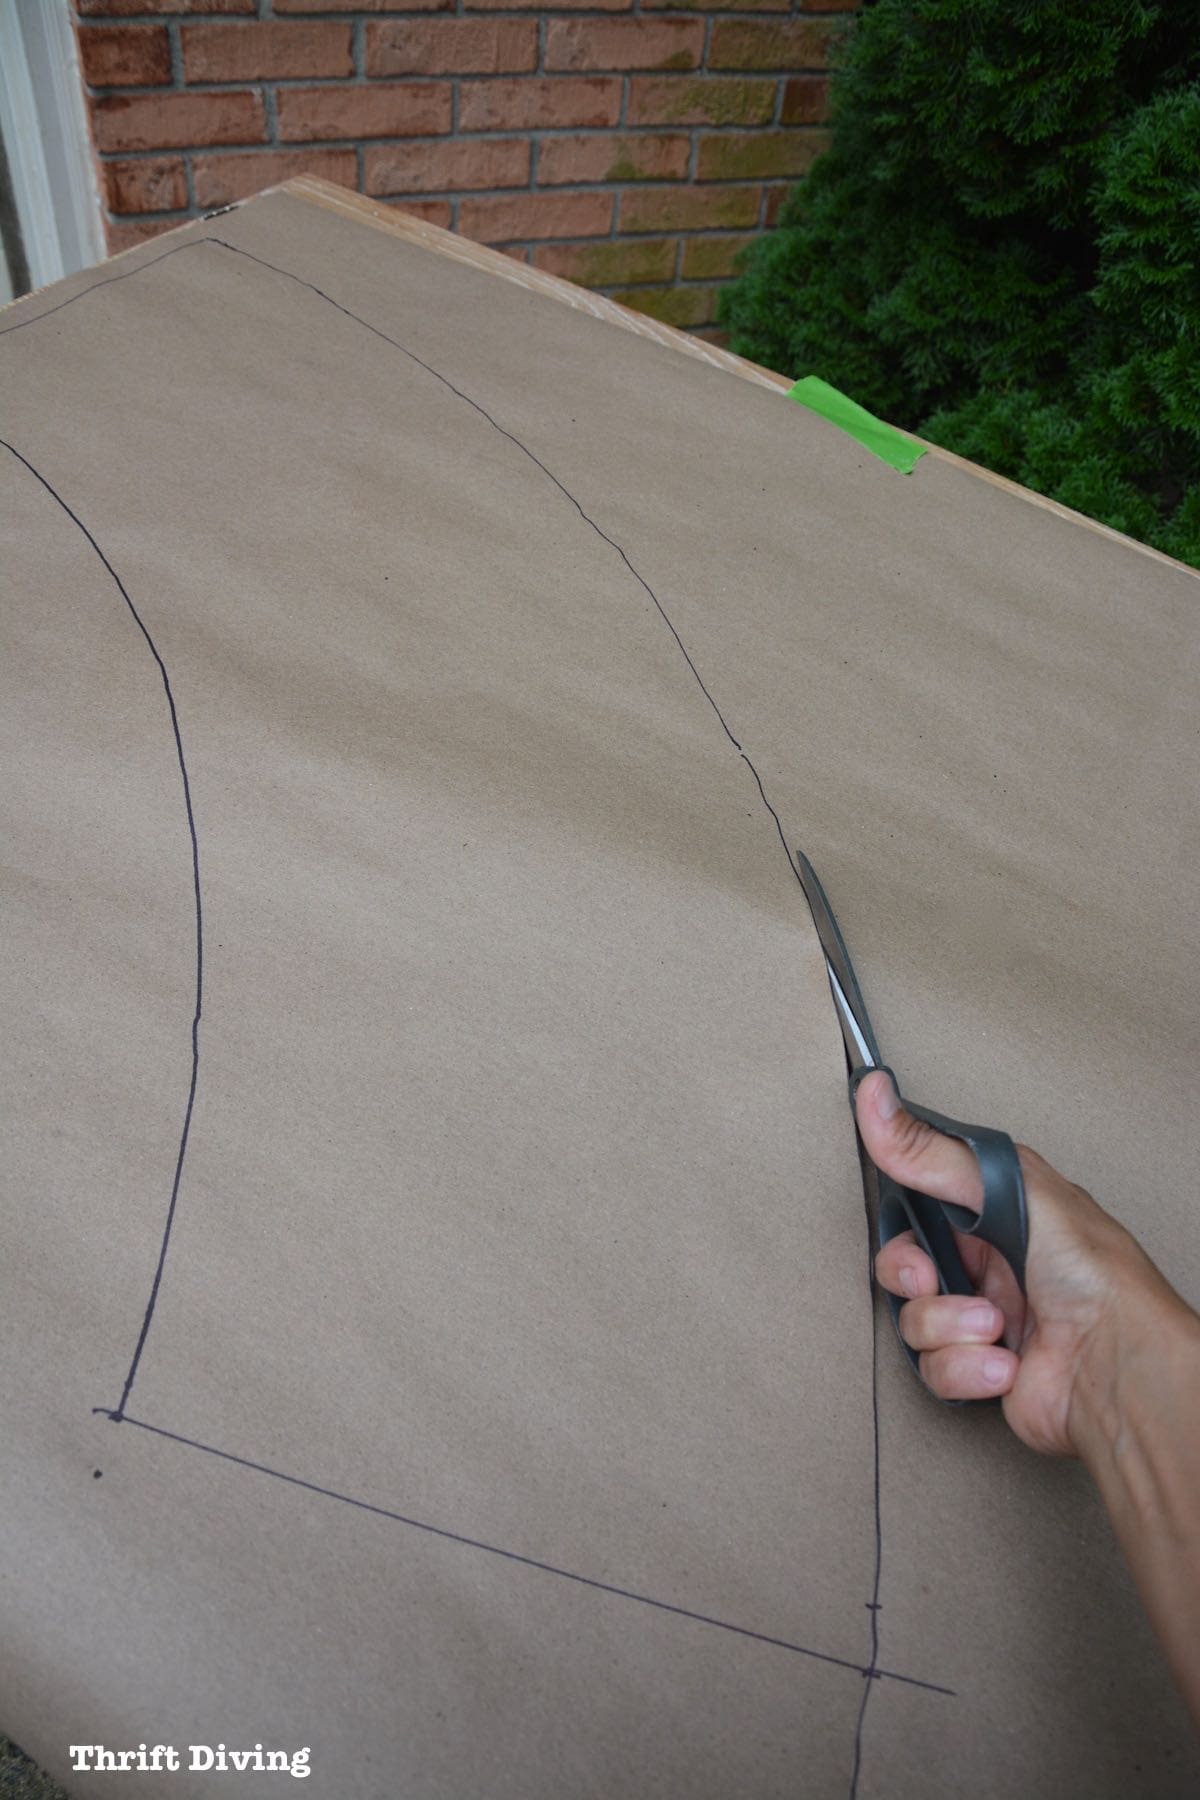
When done, you’ll have curved templates that look like this.
(TIP: Smaller pots will have smaller templates; bigger pots, bigger templates. Keep that in mind when choosing materials for the decorative garden pot covers).
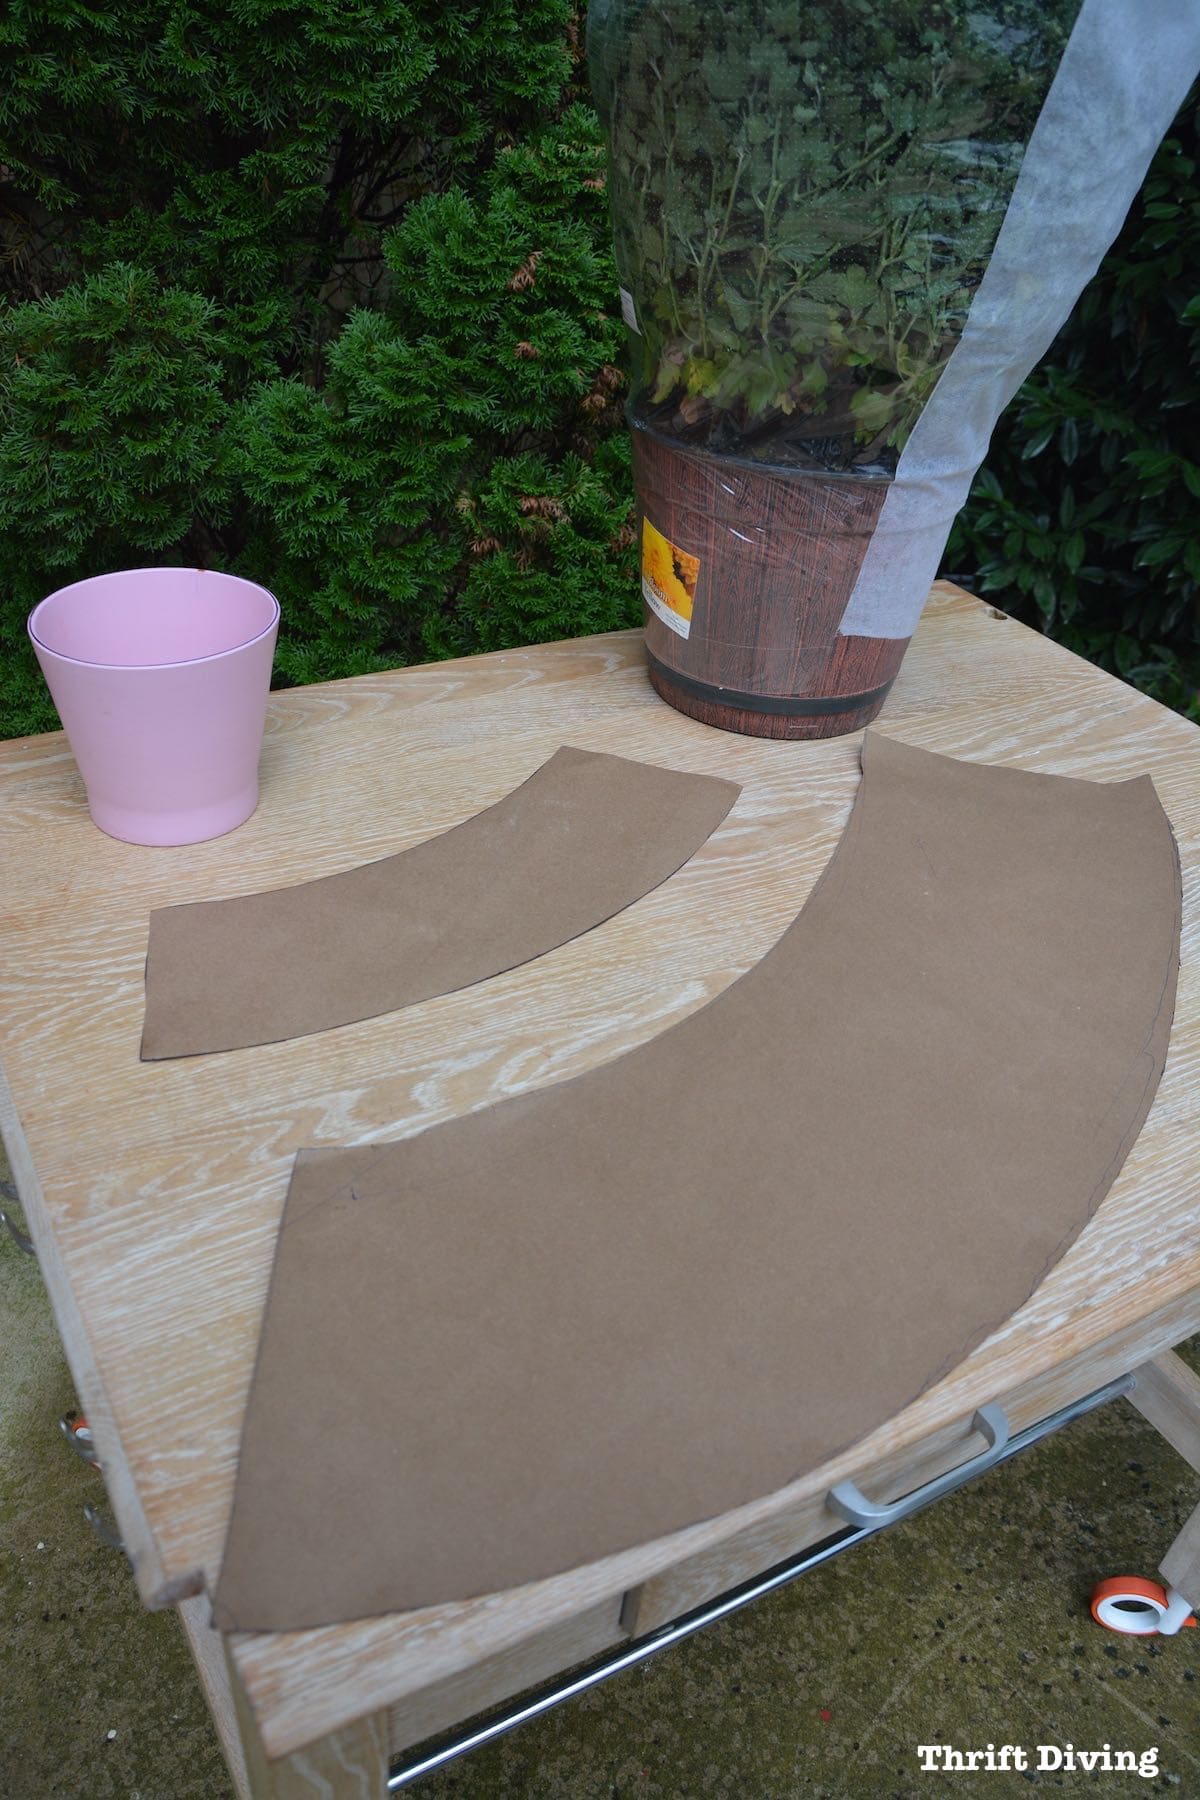
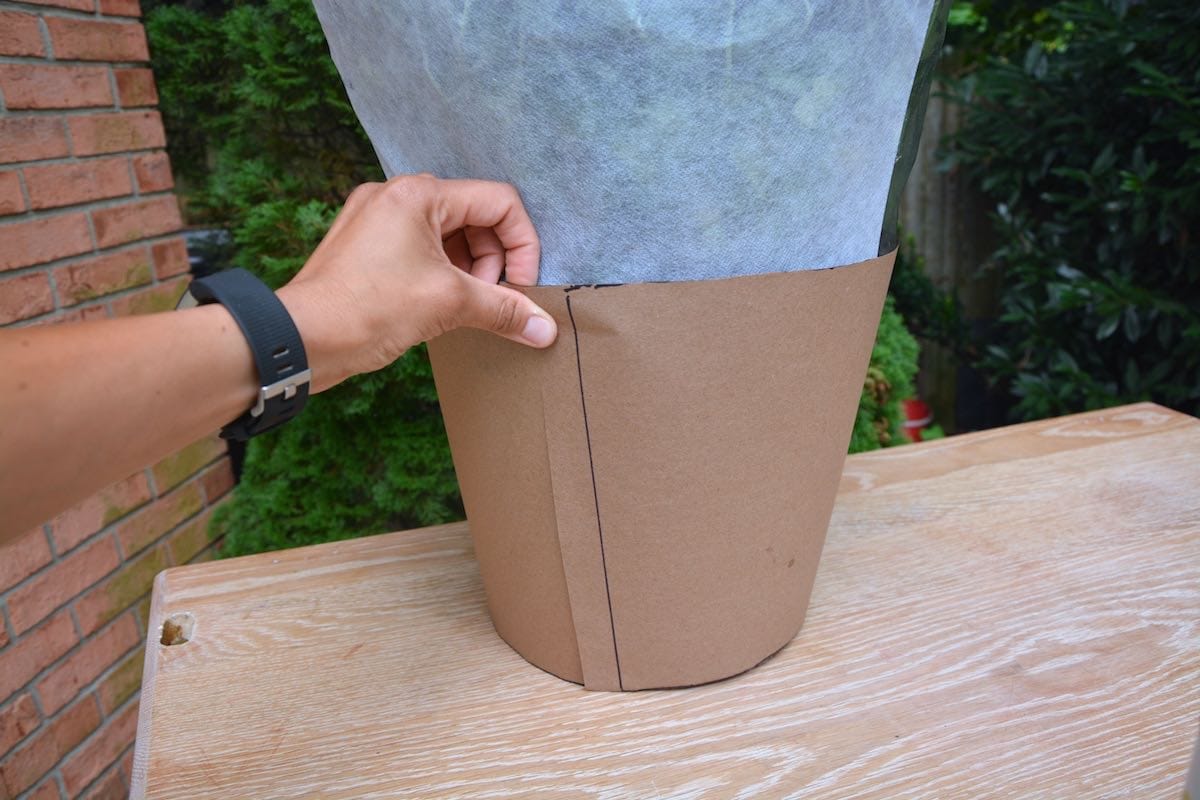
After I cut it out, I wrapped it around the garden mum pot to make sure it would fit.
It was a perfect fit! 🙂
STEP 2: Trace Out and Cut the Aluminum Sheet Metal
Now you’ve got to trace out the pattern on your metal sheeting.
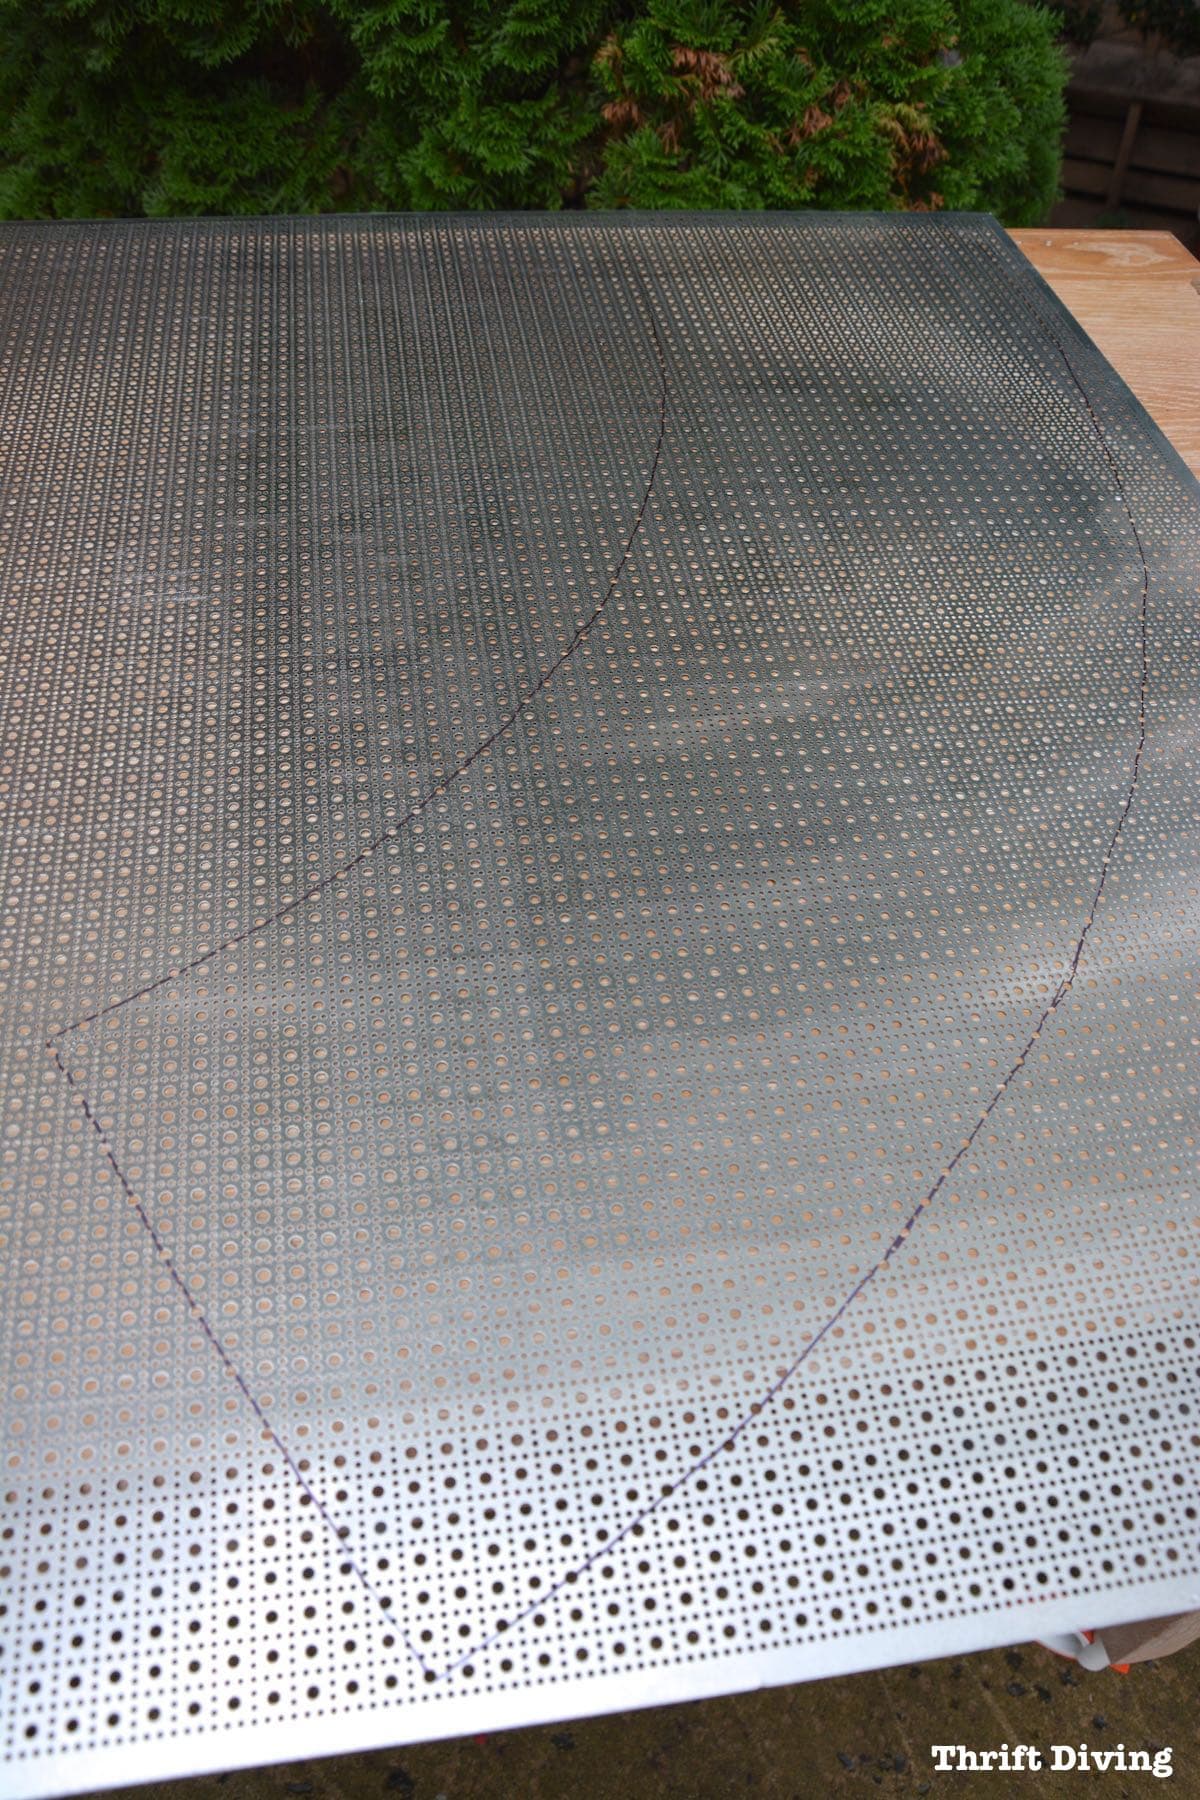
Be careful when cutting metal. That stuff gets sharp!
I walked away from this project with a few cuts before I got smart and realized–ooooh, yeah, I should be wearing thick work gloves. LOL
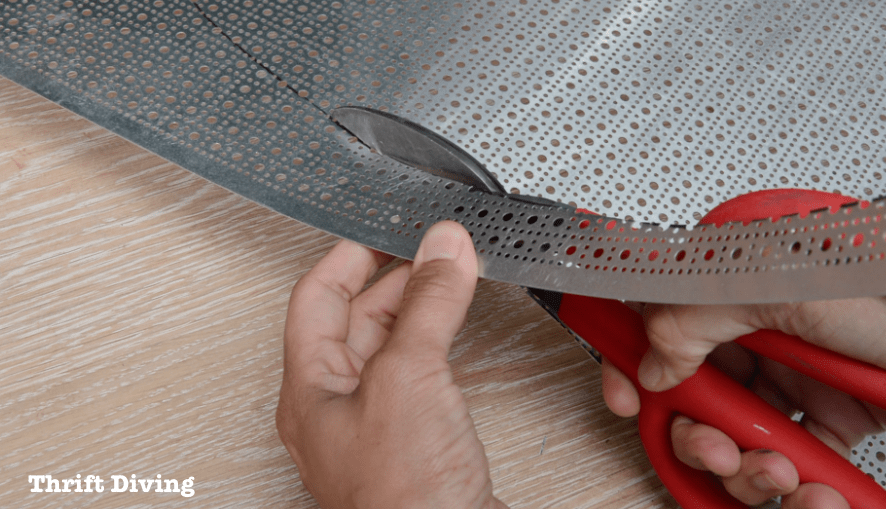
After you’ve done all the cutting, use your P220 grit sandpaper to smooth out the edges of the metal, being careful not to scratch the metal too much.
STEP 3: Insert Rivets
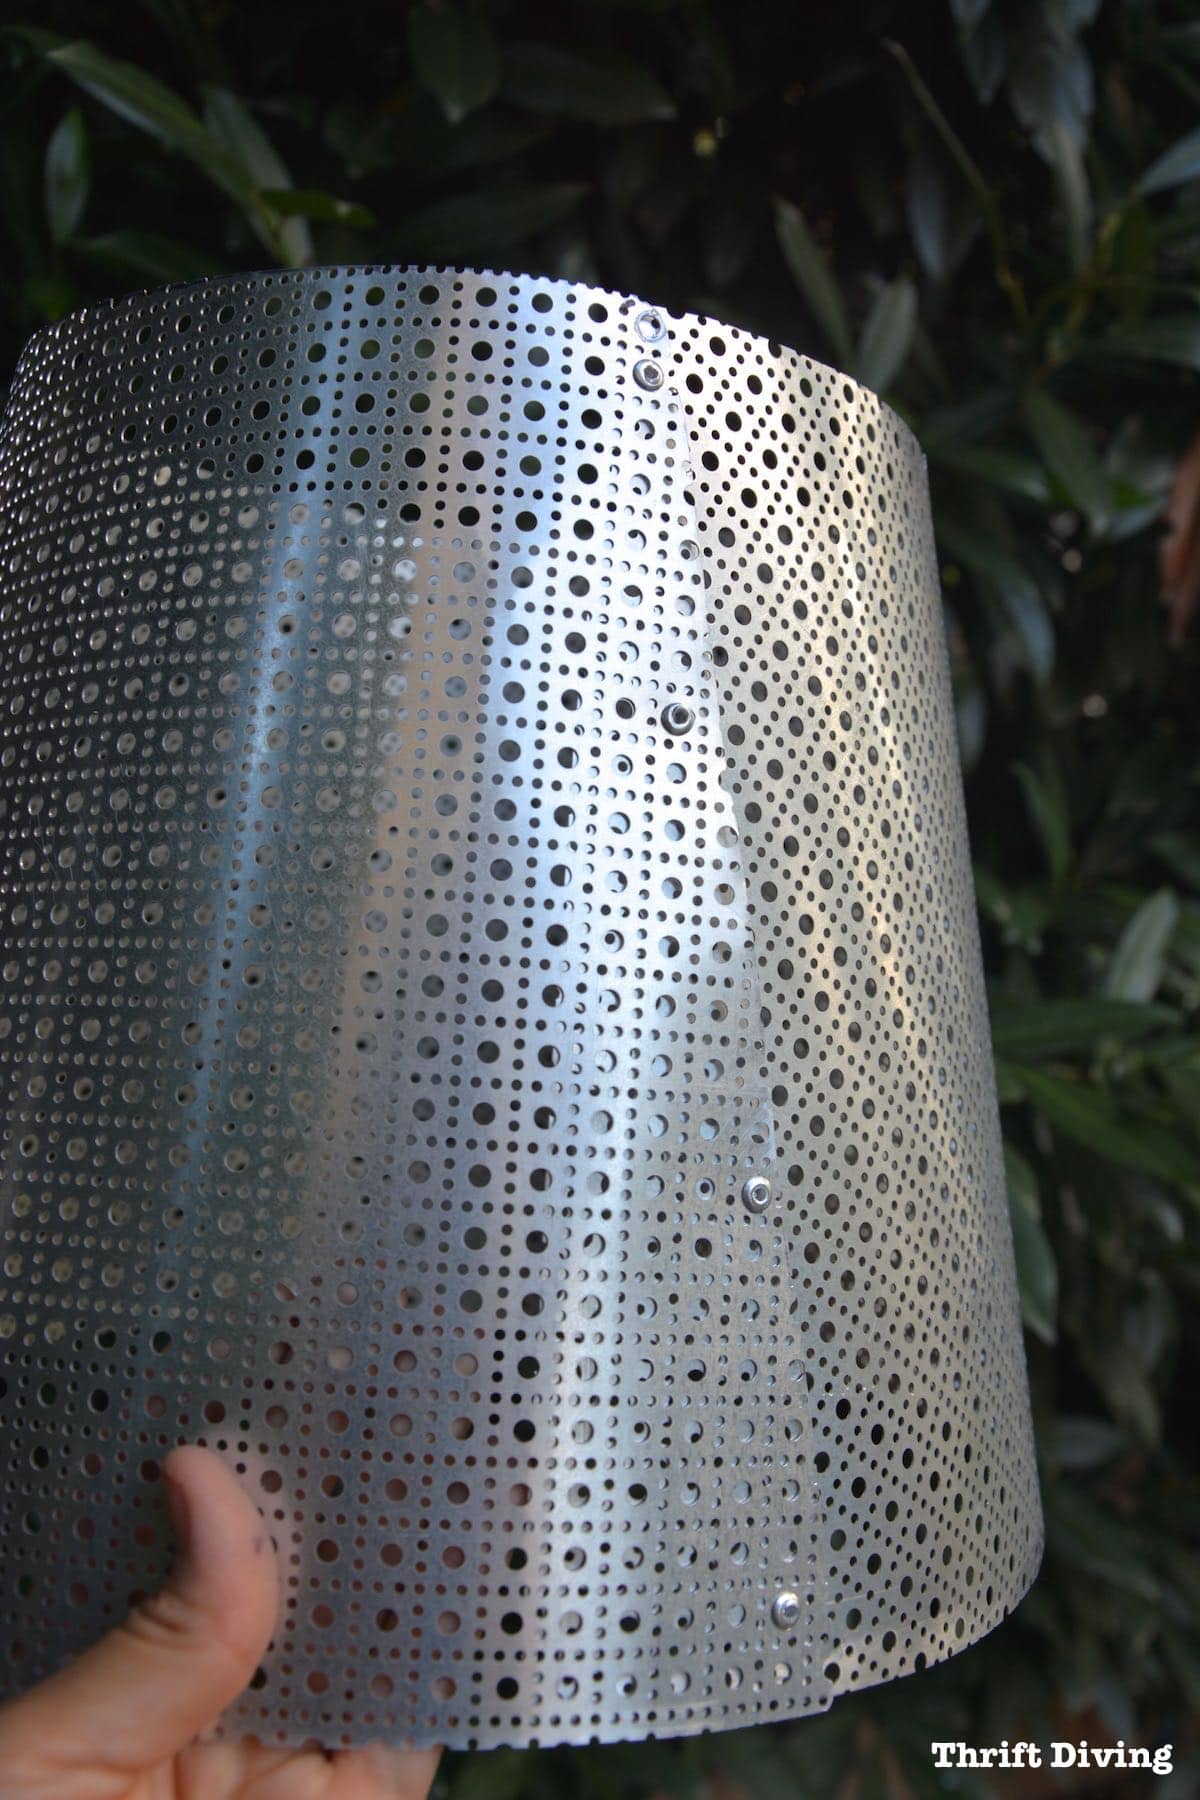
After I cut out the metal garden planter and seeing that it actually fit (YAY! No do-overs!), I marked where to insert the rivets to create the shape of the planter.
The holes won’t line up perfectly, so now is a good time to pull out the power drill and gently drill your own holes where you need.
For this project, I used the short rivets that are 1/8″ thick. They were perfect for this metal!
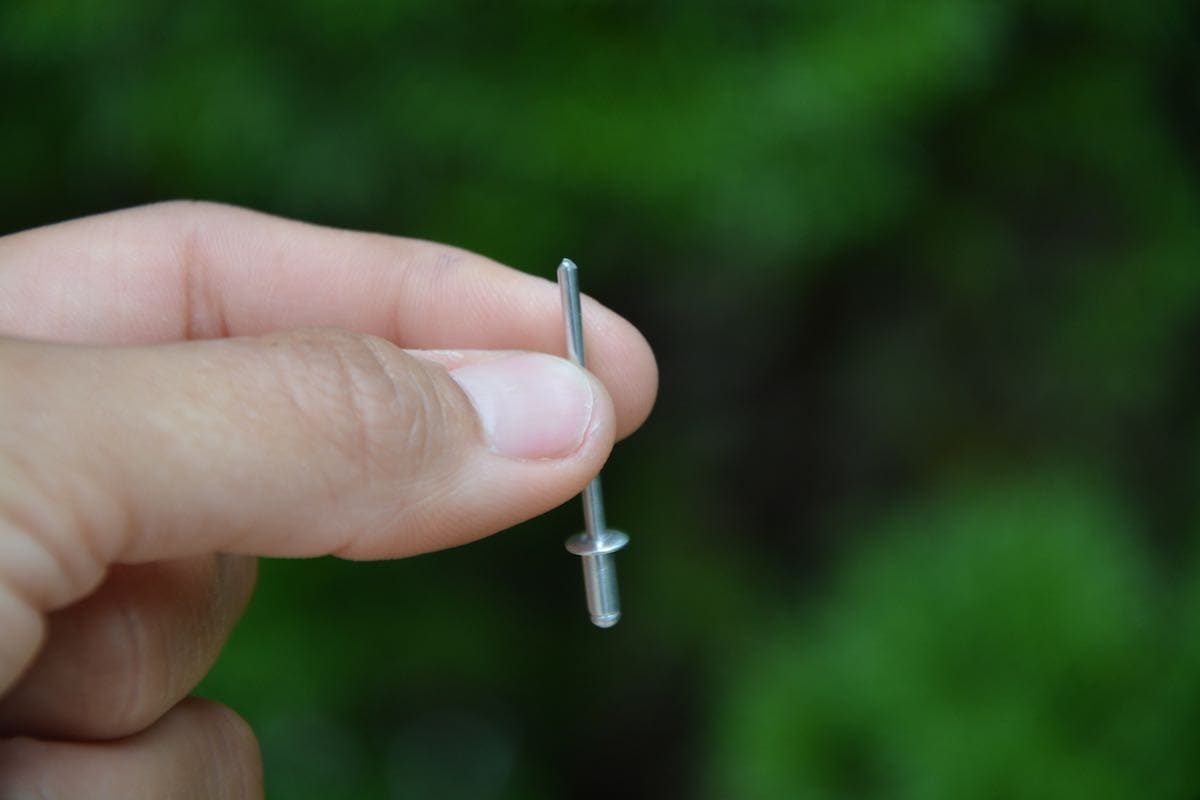
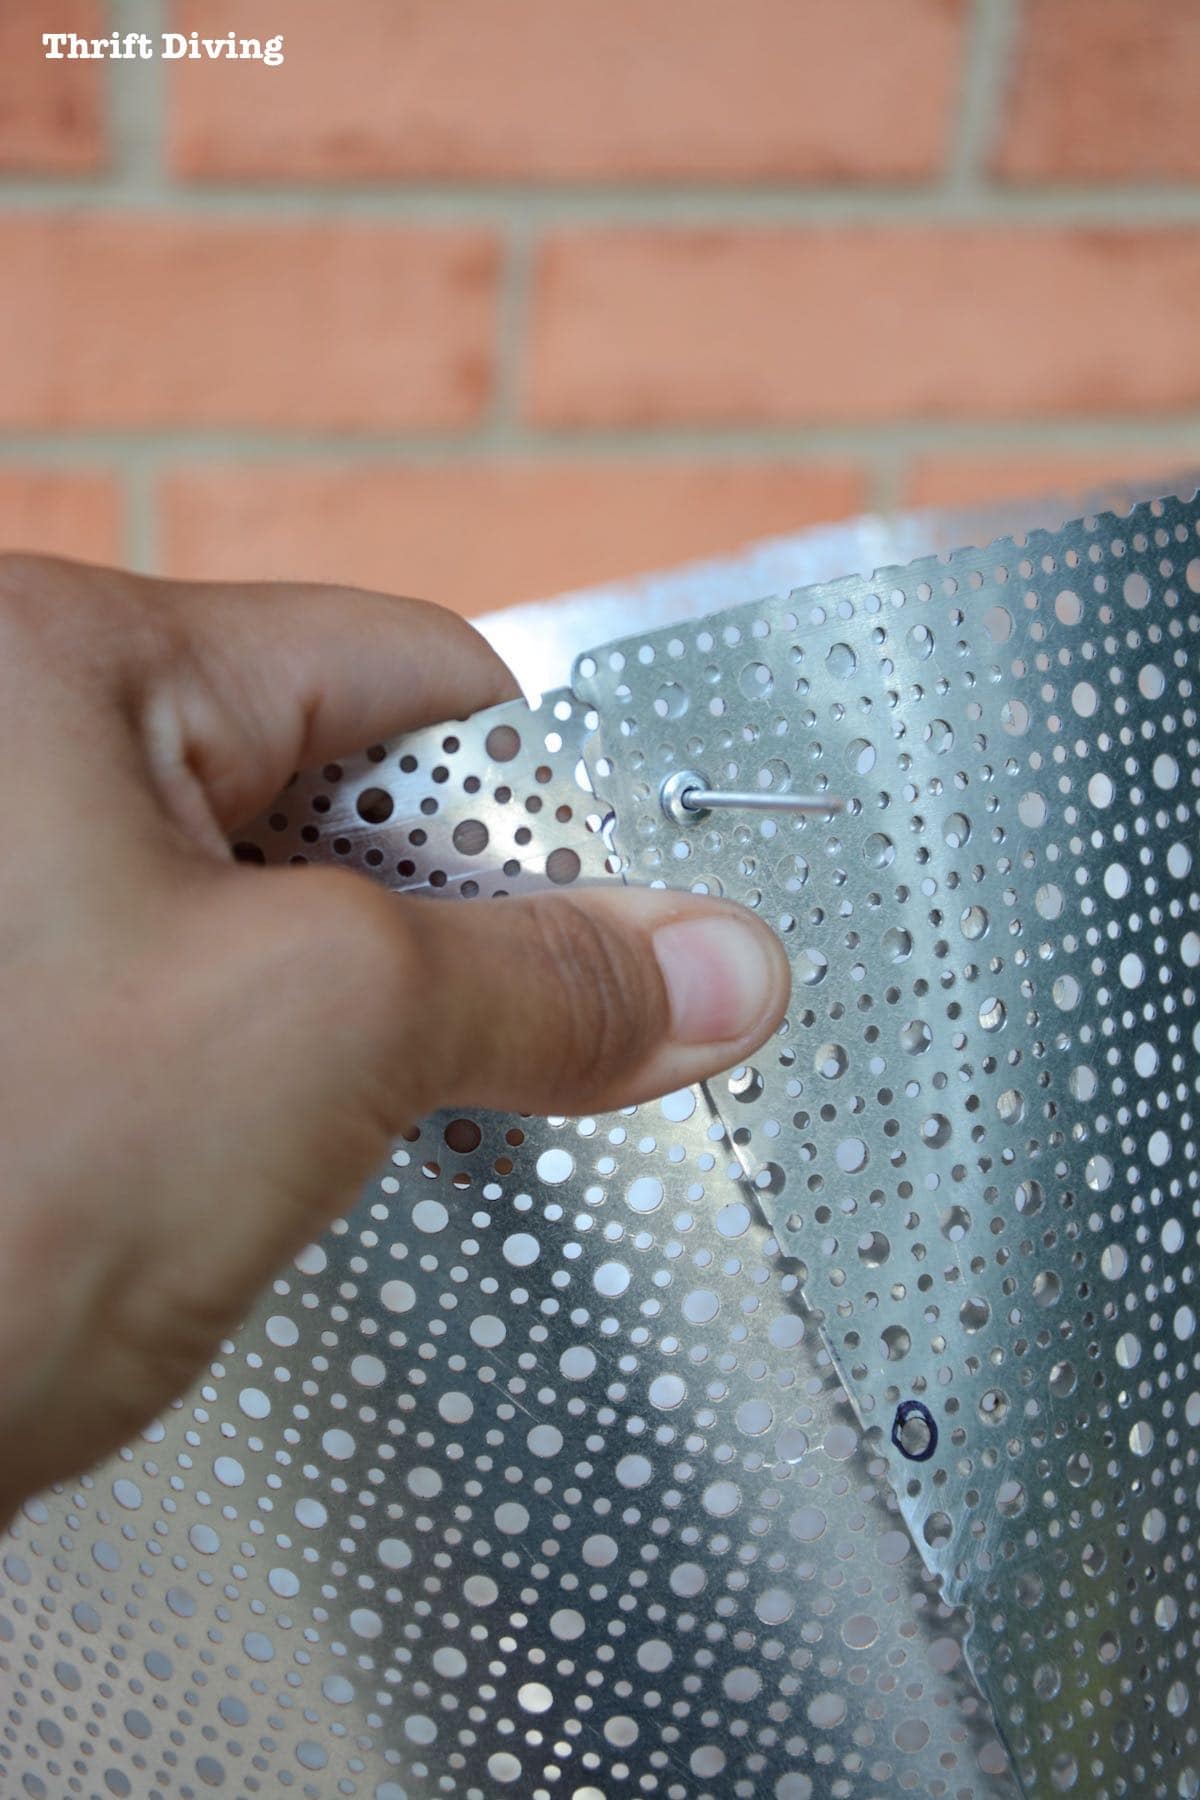
I put rivet washers on the back side to help keep the rivets in place.
The riveter slides down over the rivet stem and, when squeezed, breaks off the long stem, leaving only the rivet in place, holding the metal neatly in place.
Looooove the riveter!

STEP 4: Add Metal “Bias” Tape
Something about these edges intrigued me. So instead of just cutting out the metal garden planter and leaving the rest of the metal discarded, I decided to cut right where you see the dotted line in order to make metal “bias” tape.
For those of you who don’t sew, you may not know what in the heck I’m talking about. Let me explain.
Bias tape in the sewing world is a folded piece of fabric that’s sewed on to cover up a raw edge. It makes raw edges look finished.
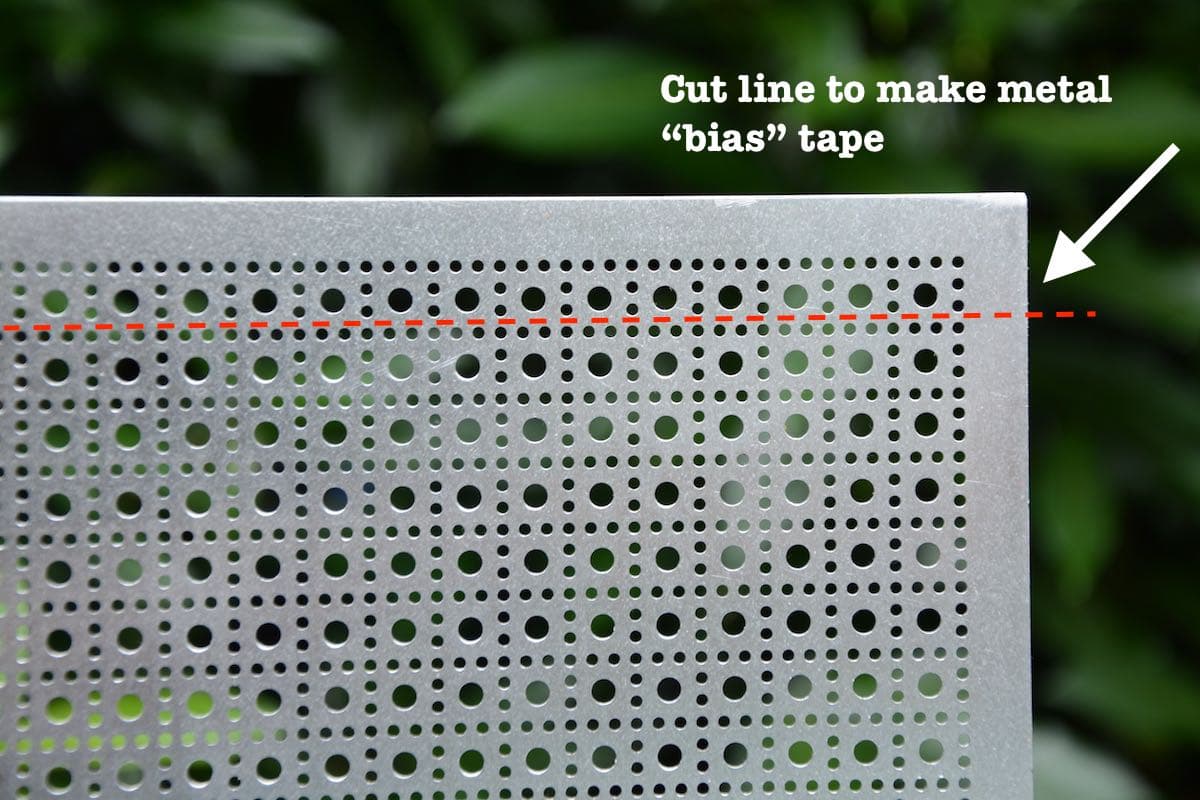
So that’s what I decided to do with this metal garden planter.
In order to bend it, I laid this piece on the edge of a table corner and bent it in half.
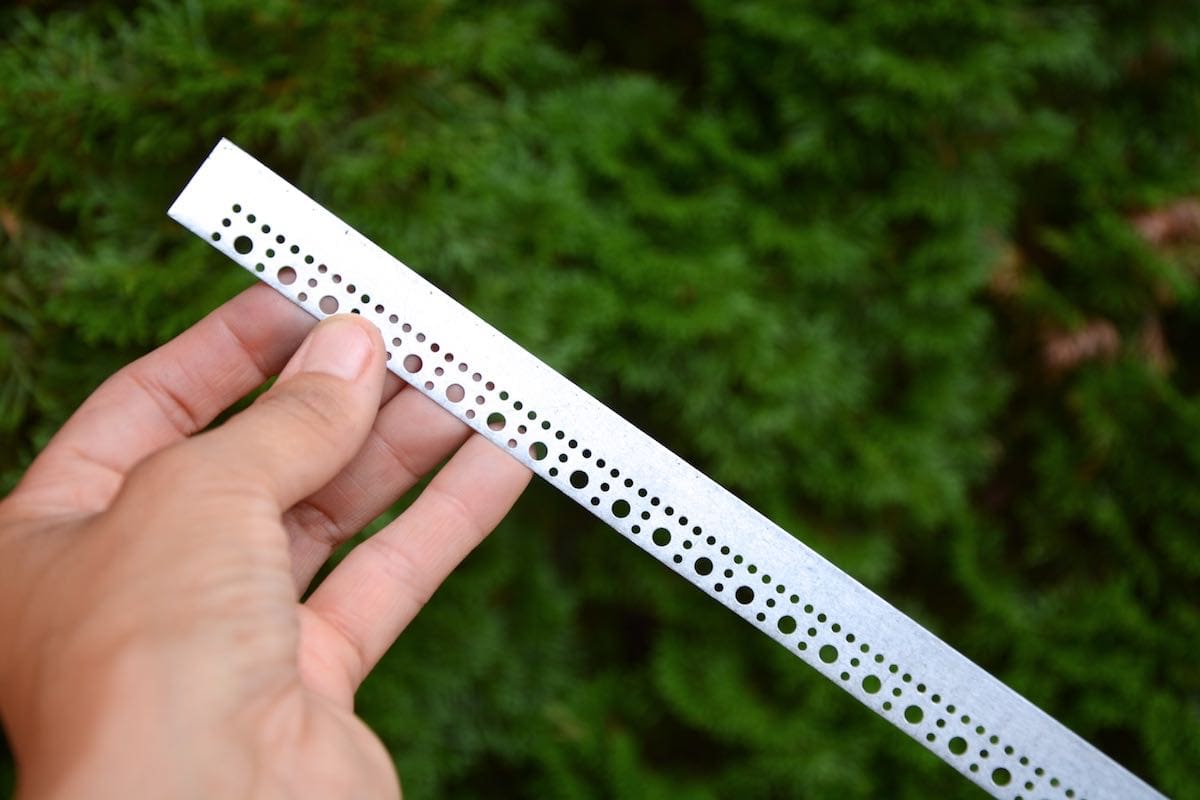
When the metal bias tape was folded in half, I could cover the raw top and bottom edge so it was more decorative and wasn’t quite as sharp. Plus, the extra metal helps to reinforce the top and bottom edges.
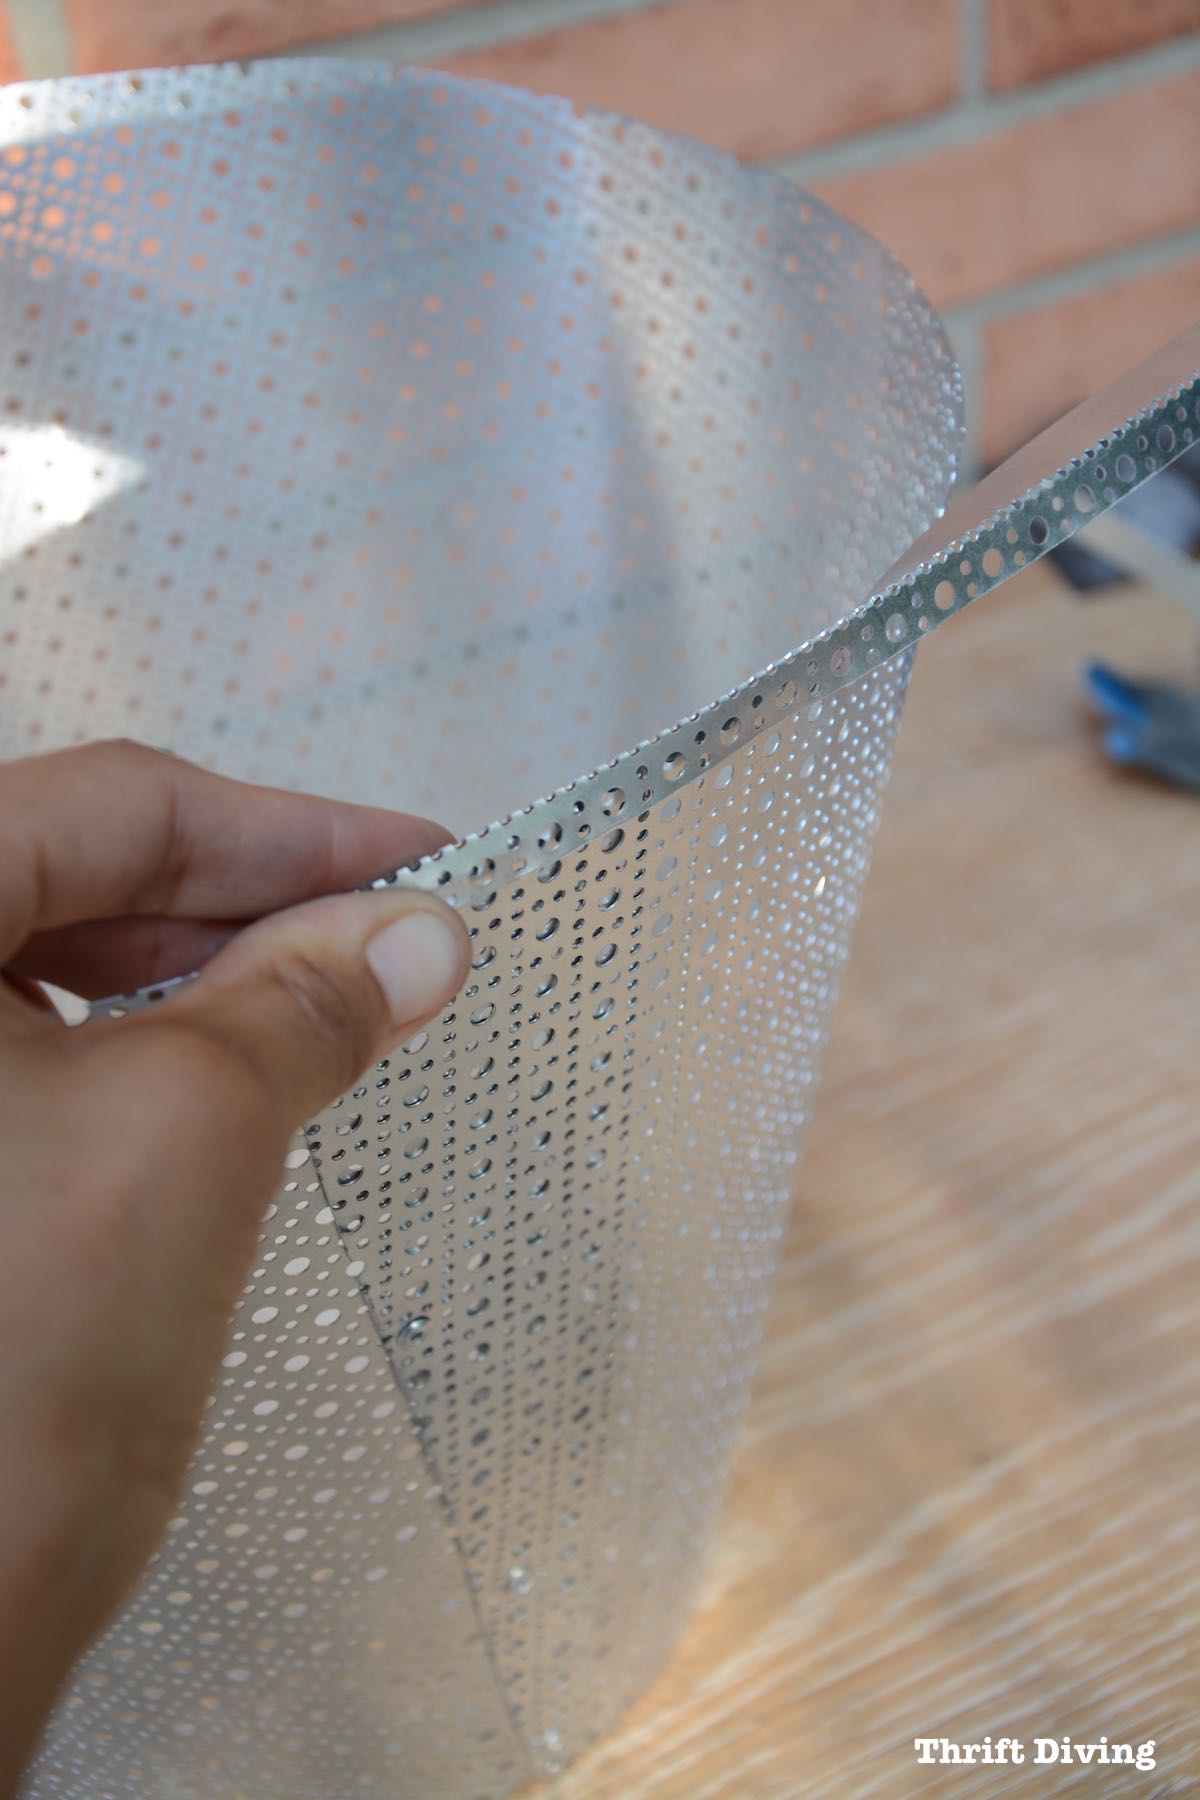
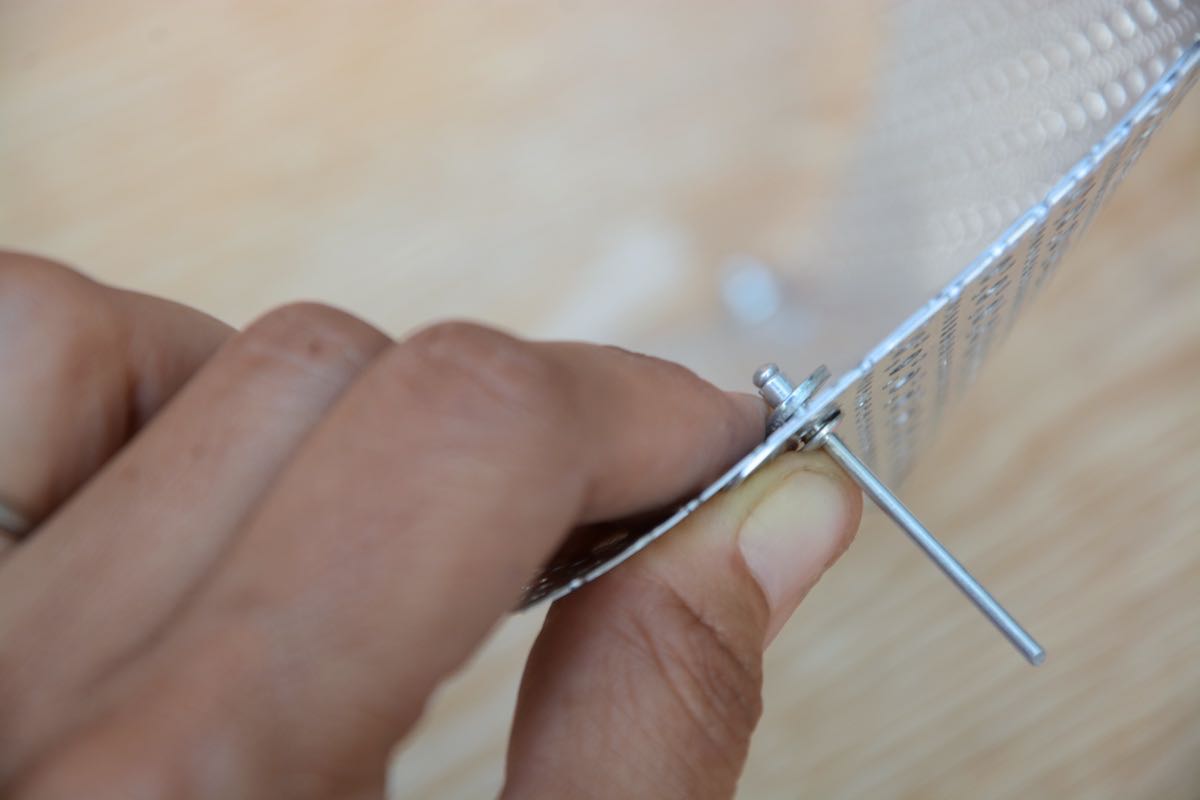
STEP 5: Attach “Bias” With Rivets to the Top and Bottom
In order to attach the metal bias, I had to drill 1/8″ holes to insert the rivets. As you can see here, the holes didn’t necessarily line up when folded on to each other. But it was super easy to drill through to create lined up 1/8″ holes for the rivets.
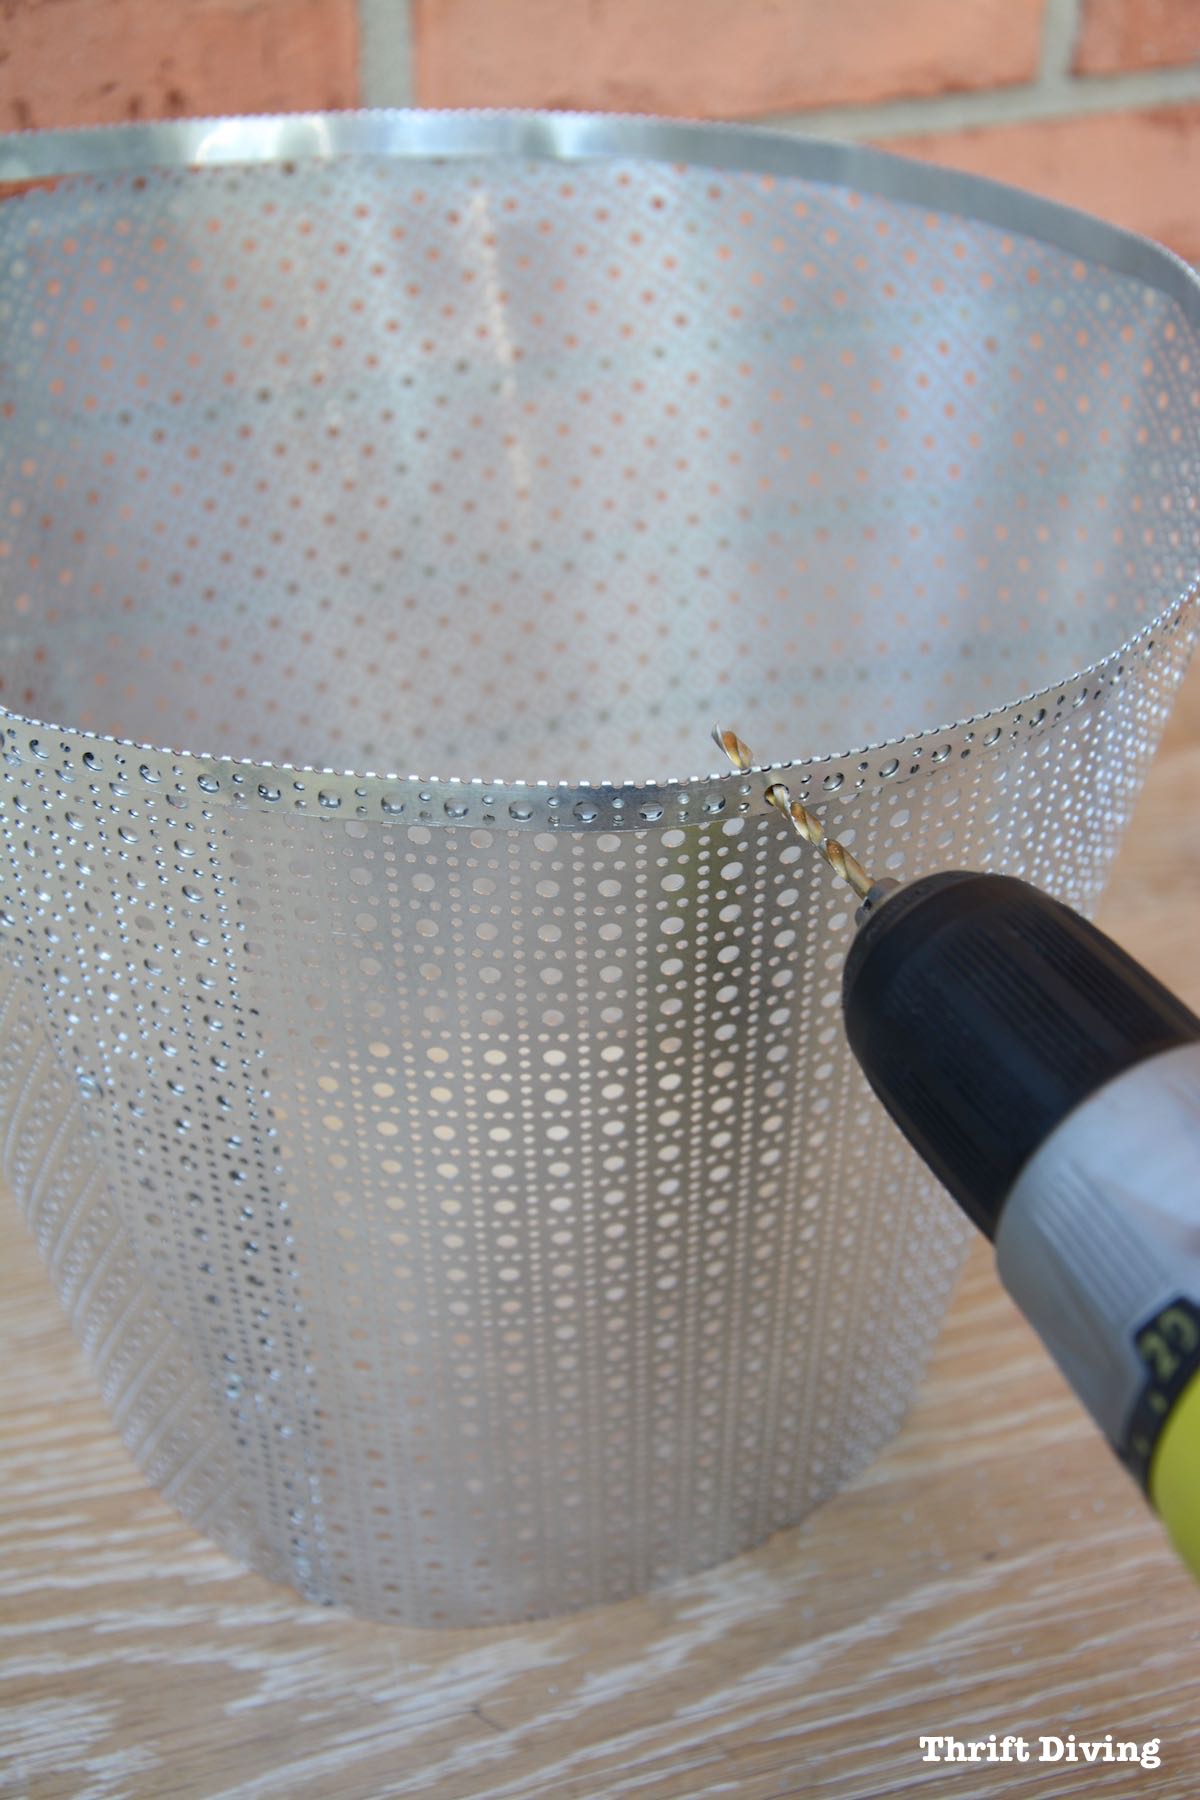
I inserted the rivet along with a rivet washer on the back, spacing the rivets out every 6-8 inches to hold the bias onto the metal garden planter.

I love the finished look!
And when turned upside down, as I was working it, they also looked like decorative metal lampshades! HMMMMM………Getting some ideas….
HMMMMM………metal pendant lamp, perhaps?
Maybe get some thrifted lamps and make your own metal lampshades?
The possibilities are endless.
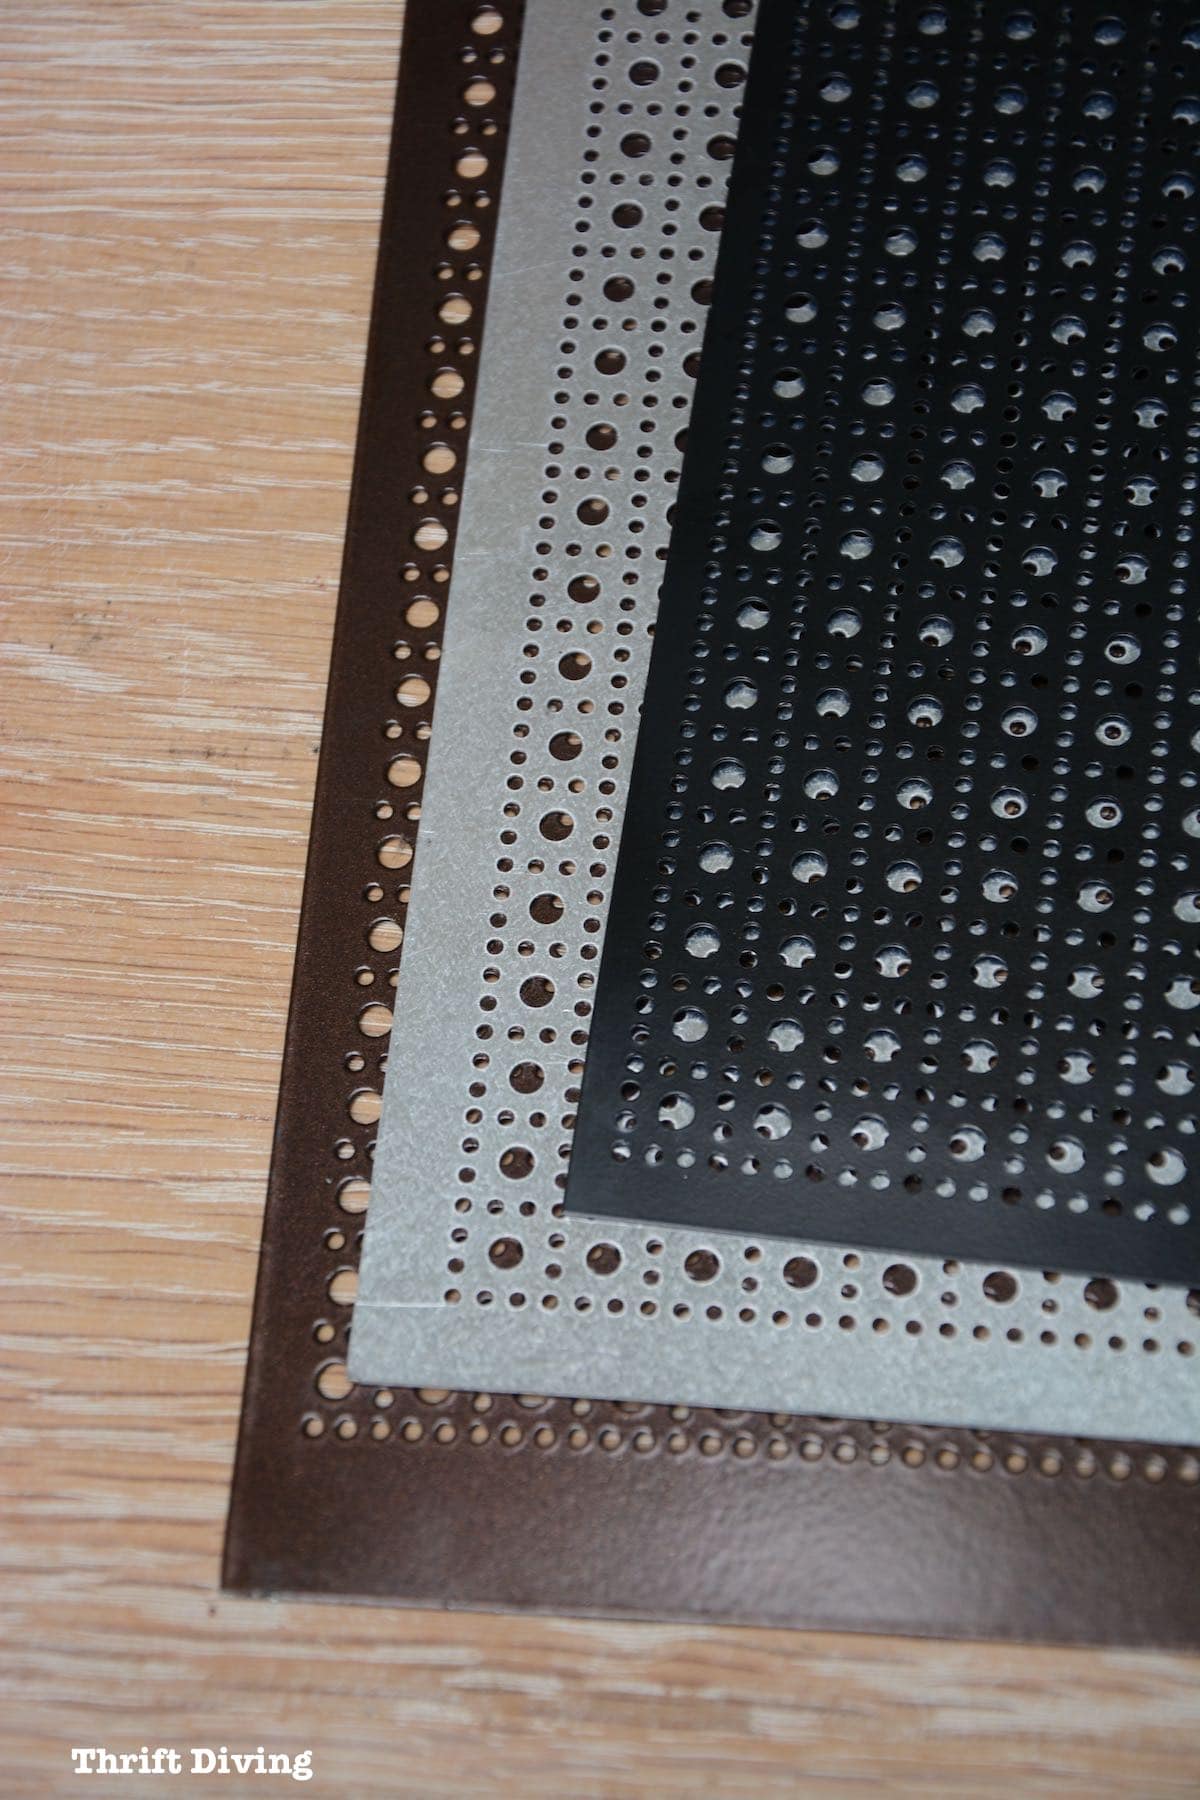
And what’s even cooler is that you can get several different sheets of aluminum metal sheets and mix and match it. I’ve only seen these lincane aluminum sheets in silver, black, and bronze. But if you want a little variety, you can do the bias in another color!
(Wouldn’t the black look great for Halloween garden planters?!!)
Arrow Fastener rivets only come in steel and aluminum but you could very well spray paint the metal and rivets to be any color you’d like.
So you’re not limited to these colors.
STEP 6: Insert the Plastic Garden Planter into the Metal Garden Planter
This was the moment of truth!
Would it fit?
Would it look polished?
Are these cooooooool enough??
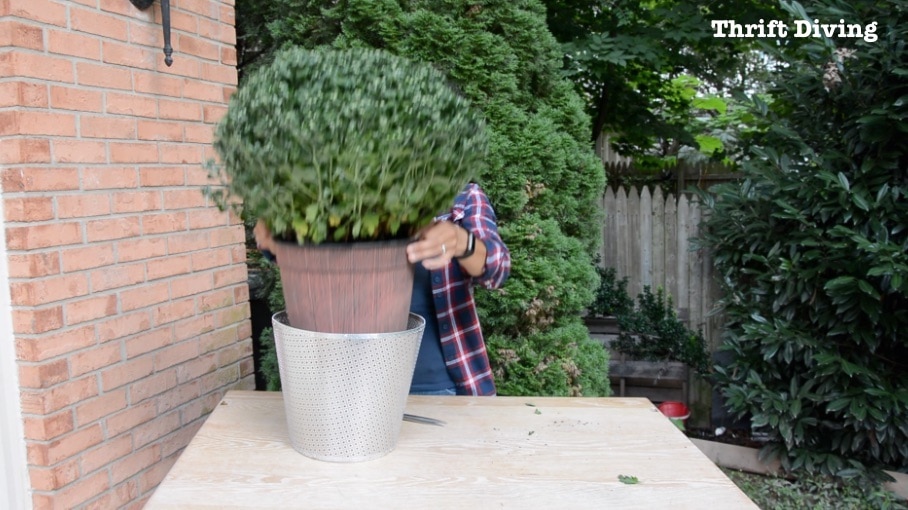
But thankfully, it turned out great!
Kojo wanted to help me set them in front of the house.

Once I get the front of the house pressure washed and cleaned up, I may go back and do some stenciling on them with “WELCOME” or “HELLO” or something simple.
Or, I may make more with the bronze aluminum sheet metal and then spray paint pumpkins on them for the fall!
Now that I know how to make these, I can make more and get really fancy-dancy with it. 🙂
I only wish my garden mums had bloomed in time for this post, but they’re super tightly closed.
I don’t blame them. It’s 80 degrees here this week! LOL
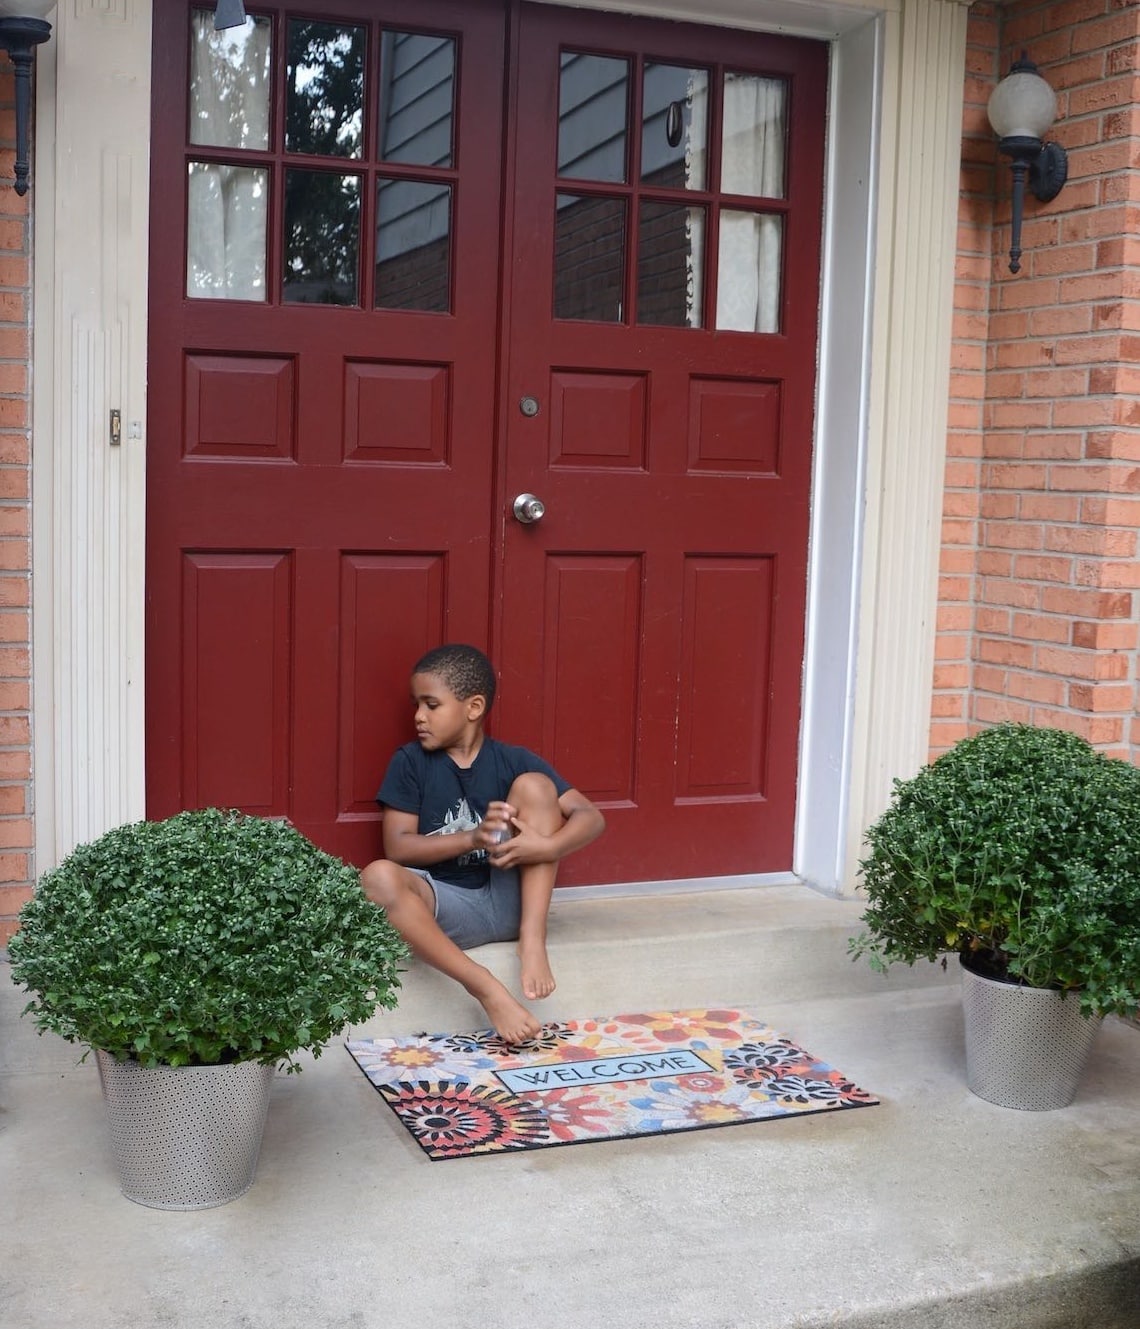
Kojo has a little fun with the metal and rivets, too. Some of my earlier test pieces looked like bracelets and, according to Kojo, crowns.
HA!
“King Kojo,” he said…….

Love Metal Decor?
You might also love this vintage metal cabinet makeover.
I love these planters! And I love that I can use them indoors or outdoors (the aluminum is rust-resistant).

Anyhow, the next thing on my To Do list is to pressure wash my porch, maybe make a fall wreath (even though I have never made a wreath), and to touch-up the front door paint since it’s been a few years since I painted it red.
So what about you guys? Have you ever made garden pots or garden planters? What about metal ones?
Leave a comment below and let’s talk about it! Plus, be sure to check out Arrow Fastener for more info on the cool riveter I used for this project!

Download the 5 freebies!

Thrift Diving inspires women to decorate, improve, and maintain their home themselves...using paint, power tools, and thrift stores! Use these 5 printables, checklists, and ebooks to get started!
What a satisfying project! It is gorgeous, inexpensive, and quick. I live in a bungalow, so I might try to find copper sheeting. I didn’t think copper colored rivets would be available, but Google has proven otherwise.
Kojo is an adorable young man. Front teeth missing puts him around first grade or so. What a wonderful age! Enjoy doing projects with him, he needs to learn all this stuff.
Loved the planters.
I am looking for some sheet metal like what you used but it doesn’t seem to exist in Canada anymore. Where did you get yours from? Maybe I can order what I need on line
Hey, Kathy! I got these pieces at Home Depot. But if you can’t find them there check out the website for M-D Building Products. They’re the manufacturer! Hope that helps! 🙂
P.S. Those cool front doors of yours are SCREAMING for a wreath on each one! ?
I know!! I seriously need to make some!! Something with yellow!
Just a thought to dress them up a bit. Make a big bow for each pot. Attach it to a stick so you can just stick it down into the dirt. You could do Halloween ones or just fall. Better yet do both and change them out after Halloween. It’s a fast and inexpensive way to show them off.
Fun idea! I thought of making stencils for them, but I don’t want anything seasonal that would let me only use them during certain times of the year. Something I can change out would be great!
I’ve never seen a riveter used before so thanks for this post. I’ve been sorting out my nails and screws recently and found a few of those rivets mixed in (people give me stuff) and I didn’t know what they were for. That front-tooth-missing picture of your son is priceless and looks like my grandson at that age. I really enjoy your posts because they are more personal than most. Thanks for sharing.
Hi, Pam! The riveter is such a great tool! This is the third project I have used it on and each project was so different: the first was a wooden backpack where I used rivets to attack vinyl to wood; the second was a bean bag toss game and I used rivets to attach the mesh to the pockets; and the third was this project. You’d enjoy using it!
And thank you Pam for enjoying my blog!! I put a lot of time into it and it’s my 4th baby, after my 3 sons. Lol. 🙂 I appreciate it!!
Ooohh, another cool tool to get, lol. The planter looks great, I think I really need to try this too. Your young model is so adorable!
Hi, Patty! Yep, I love my riveter! To come up with some creative ideas, think of things you’d like to join together where you couldn’t use nails, screws, or thread. That’s where the riveter comes in! 🙂
Awww…thanks for the compliments on my little guy!
Beautiful. I bought metal flashing ( not perforated like yours) years ago. To this day I still have it stashed somewhere and can’t remember what I was going to do with it. Does your project have a bottom? If so, waste basket. You mentioned lamp shades. Hopefully it wouldn’t get too hot and someone gets burned.
Great point about being burned! You’d have to make sure to use cool bulbs. Ones that don’t beat up much! The planter doesn’t have a bottom. But I did think of making one with a bottom to make a cute wastebasket!! Lol it wouldn’t me hard to cut a circle and rivet a piece to the bottom! I shall have to try. 🙂
Love this project and what a beautiful difference
Well done!
Thanks, Letia! I wanted to do some stenciling on them, too, but just didn’t have enough time to do that among all the other things I have going on! But it would be cool to add some lettering to them, or some stenciled pumpkins or something! 🙂 Glad you like them!!
There is always another project.;)
Serena, you are always trying something new! Though I’m not a fan of metal myself, I admire your skills and your personal aesthetic. Well done!
I love the candid shot of your son. I love all the shots of your young man, but the one on the doorstep is especially sweet.. They’re growing up!
Awww…thank you, Alys! I know….he just started Kindergarten! He is sitting here on my lap right now practicing the Pledge of Allegiance! LOL 🙂 My little guy…. And you’re right, I’m always trying something new! I haven’t done anything with metal, aside from covering a workstation with galvanized steel. I’m intrigued with this new material! Thanks for commenting, Alys! You’re the best!