BEFORE & AFTER: Vintage Cabinet Turned Into Hairpin Leg Side Table
See how I turned this vintage cabinet into a hairpin leg side table! It cost $7.00 from the thrift store. Cost after hairpin legs and materials: $91. Score!
Watch This Vintage Cabinet Makeover in Action!
I wouldn’t necessarily call myself an industrial furniture kind of girl, but this vintage metal cabinet makeover with hairpin legs may have converted me.
Several months ago while hanging out with Thrift Store Pete, he was showing me some pictures of projects he had done and sold at a show.
The hot item that people couldn’t get enough of were those vintage metals cabinets that Pete had been stripping and turning them into industrial mid-century modern pieces, like this one.

My mind instantly flashed to a bunch of industrial vintage metal cabinets that I had found over the years at the thrift store, stashed in my garage because I never knew what to do with them (other than stacking them up and holding hubby’s DVD collection).
Pete showed me one of his vintage metal cabinets that he had converted into an industrial furniture end table with hairpin legs.
Instantly, I shouted, “Oooh! I want to do that!”
I’d had a couple vintage metal cabinets on which I could replicate the same look, and I couldn’t wait to try!
Now……I’m not one to “steal” or even “borrow” project ideas from others because I love for my projects to be original….(You know how we bloggers do).
But Pete solved my problem of what to do with this industrial vintage metal cabinet that was just sitting in my garage, taking up space.
Times like this, you’re inspired and you don’t even care if you’re a copy cat!
 My Vintage Metal Cabinet Makeover With Hairpin Legs
If you recall, I wrote a post called Dip and Strip 101: Everything You Wanted to Know About Stripping Wood and Metal.
It was about hiring professional strippers to “dip and strip” your projects into big vats of a chemical stripper in order to restore it back to its original beauty.
Pete told me all about it, but I wanted to interview the owner of local “dip and strip” professional stripping business to get the inside scoop.
In addition to interviewing Mara, the owner of ChemStrip, I wanted to drop off my vintage metal cabinet to test out her services.
And since Pete sold me on the industrial vintage look, I couldn’t wait to see how this metal cabinet would look all stripped!
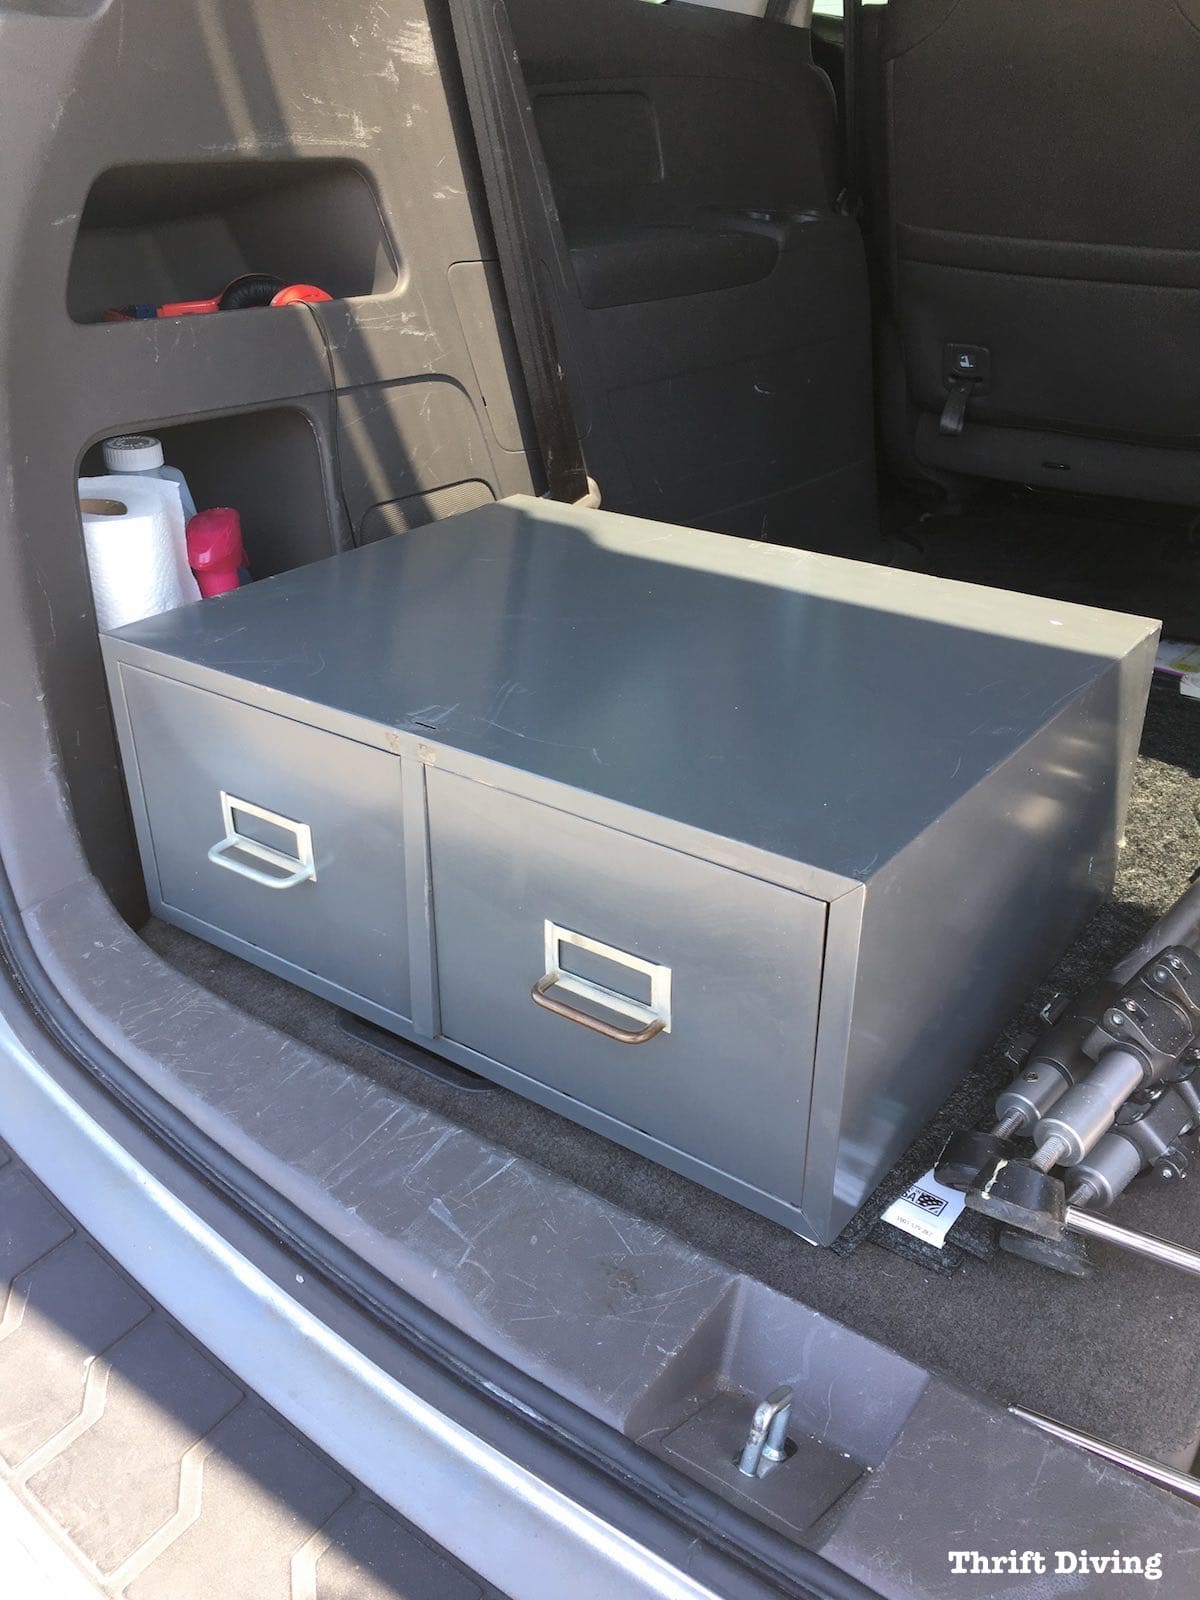
BEFORE
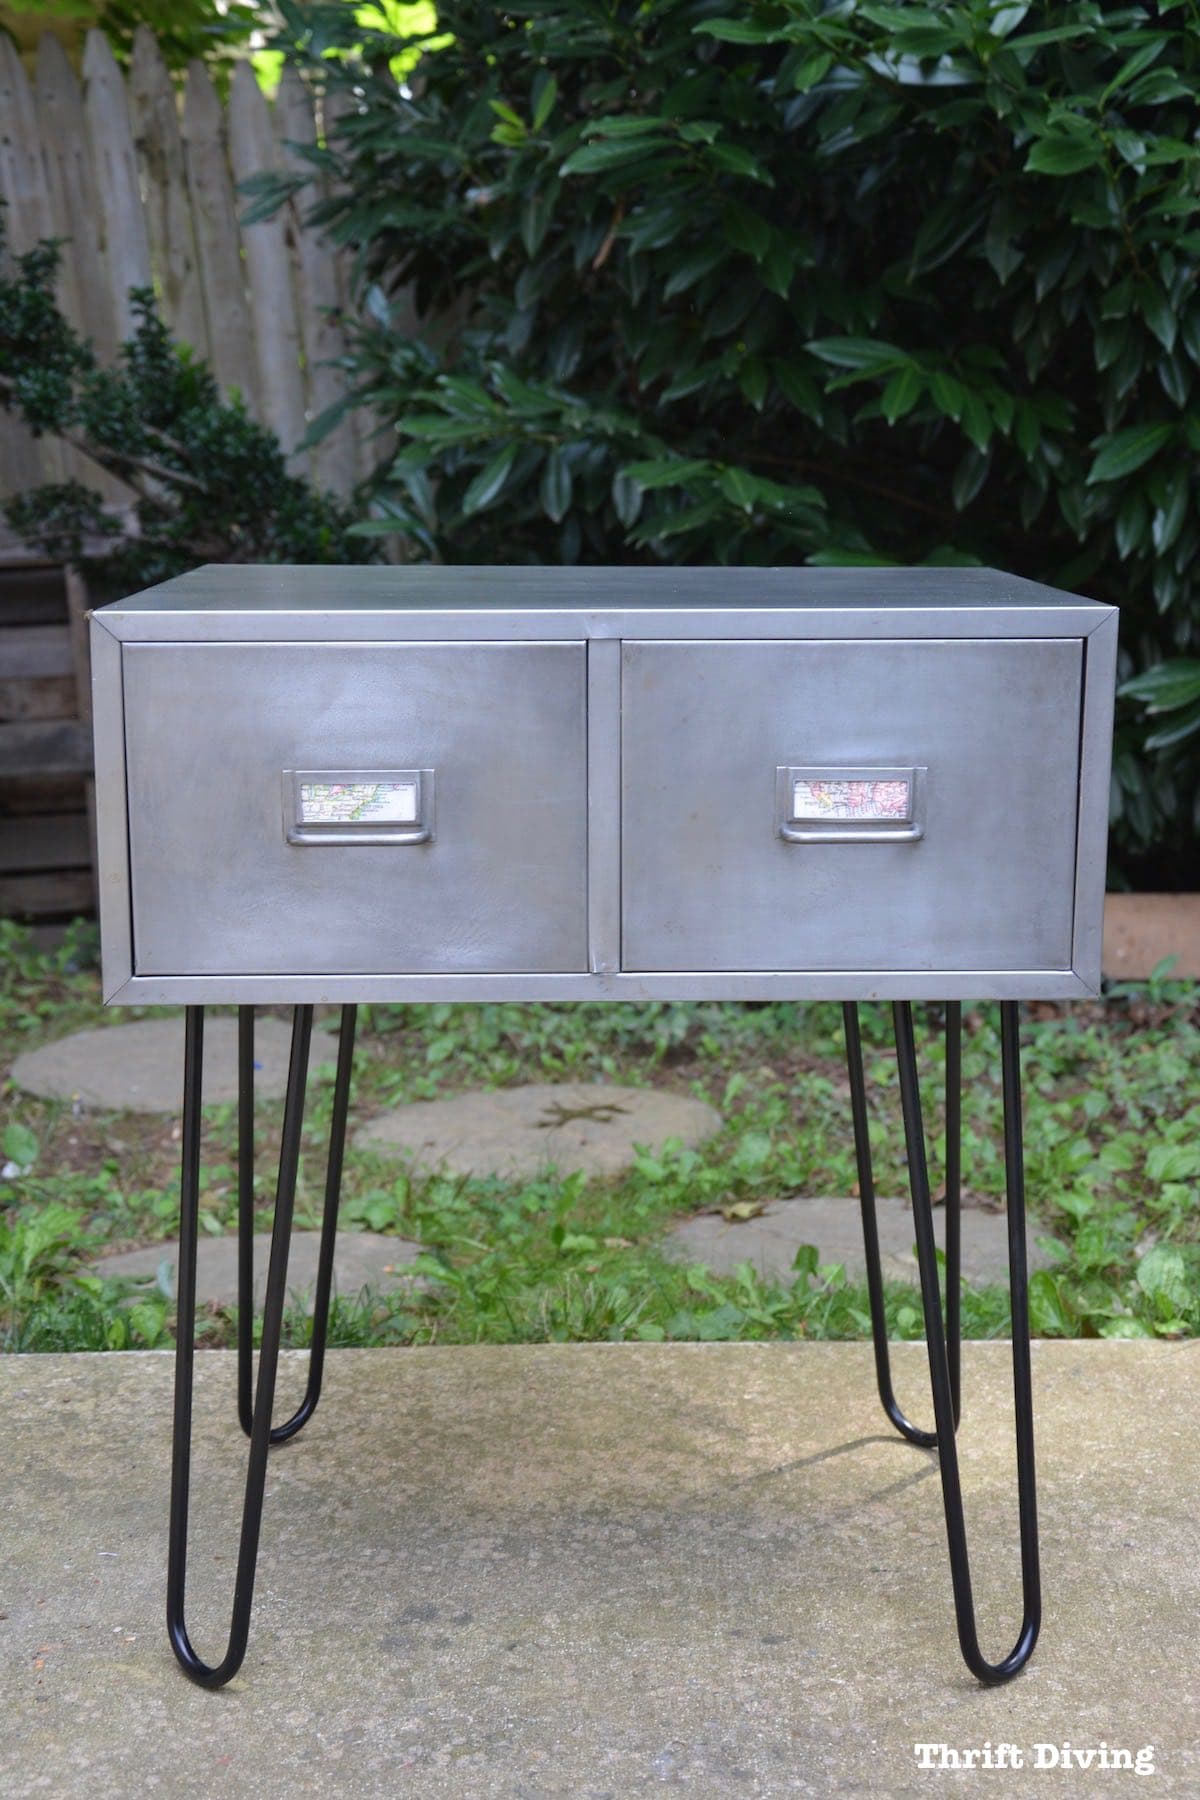
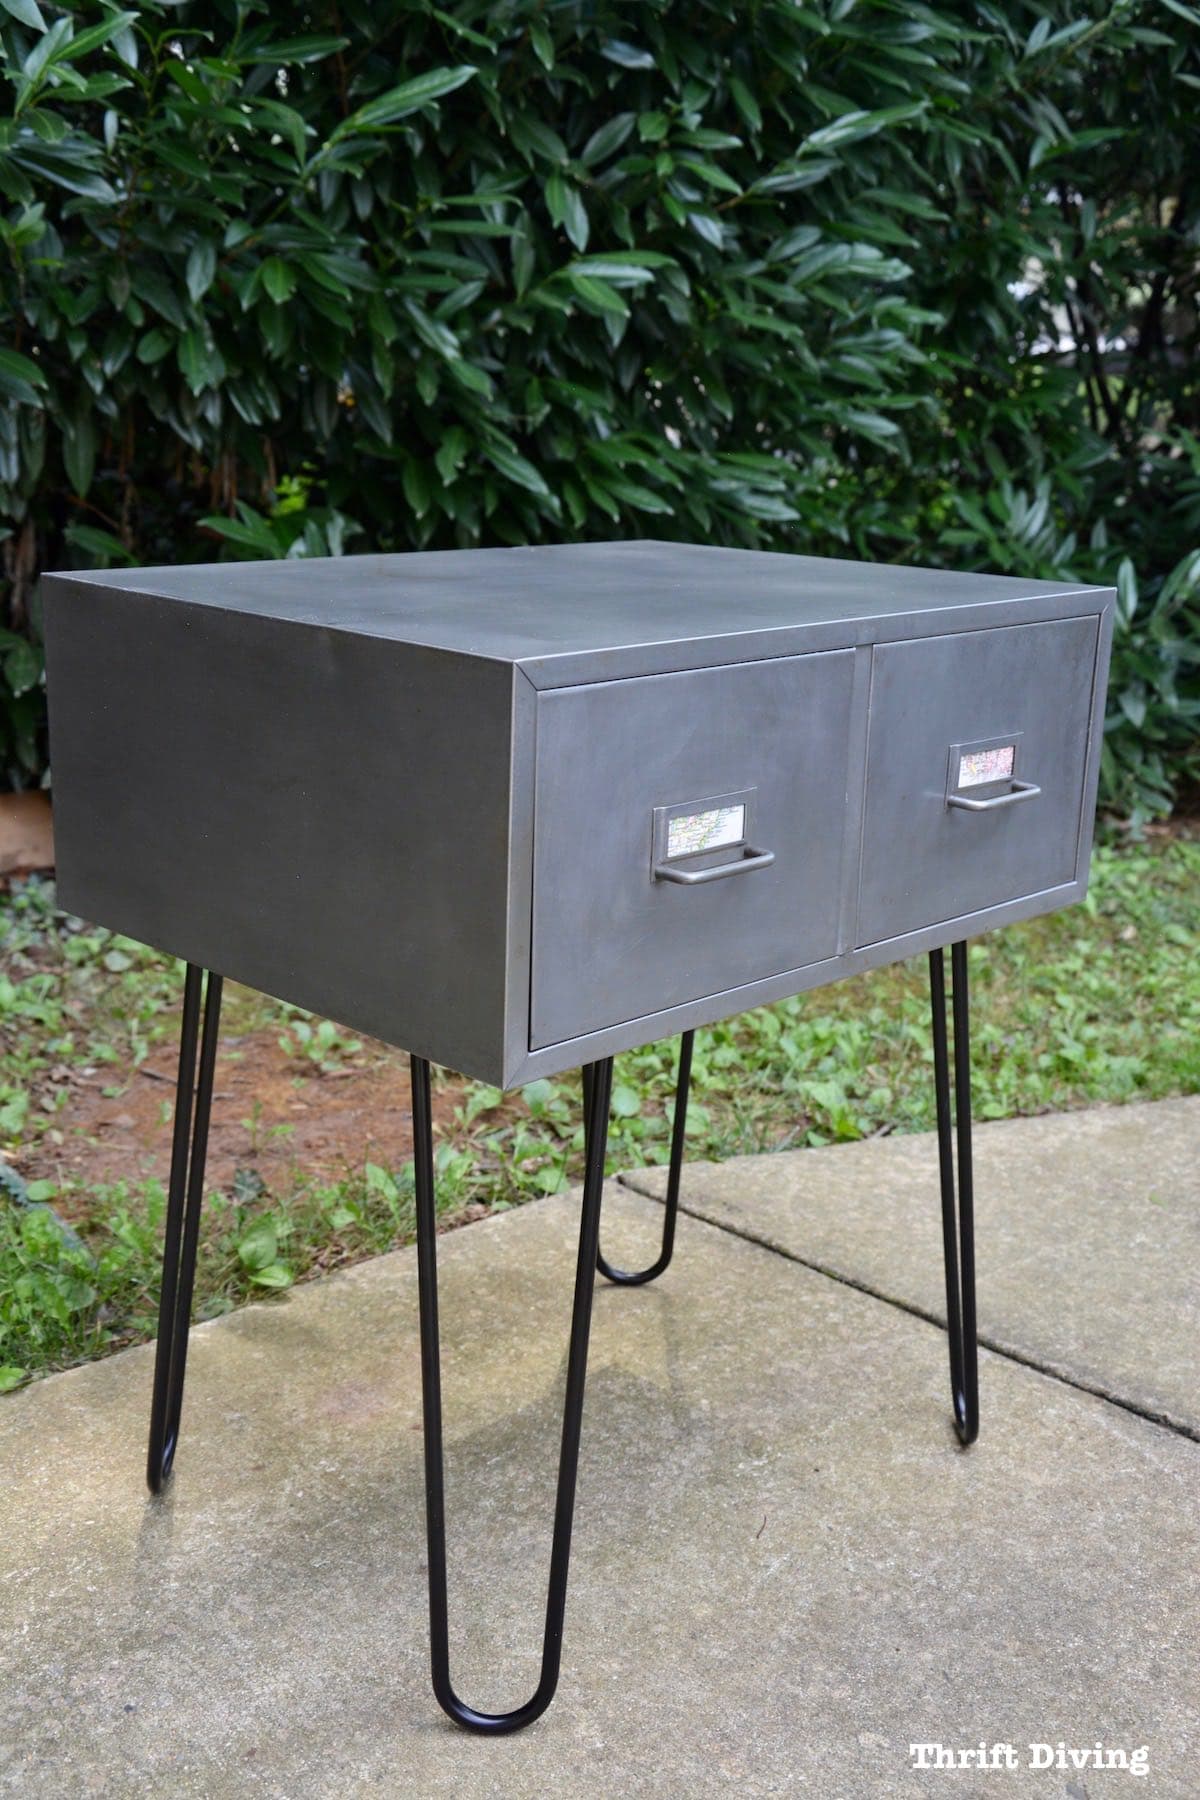
It turned it into the cutest DIY hairpin leg side table!
AFTER!
In order to create this look, I have to buy some things, but several items I had on hand already. This post contains affiliate links).
(This post contains affiliate links).
Materials
-
- 16″ Hairpin legs
- Vintage metal drawer or cabinets (like these on Etsy)
- Chemical stripper (or use professional chemical “dip and strip” services)
- 800-grit sandpaper
- 0000 Very Fine steel wool
- Dust mask
- Acetone (optional)
- Chemical gloves (optional)
- E6000 Adhesive
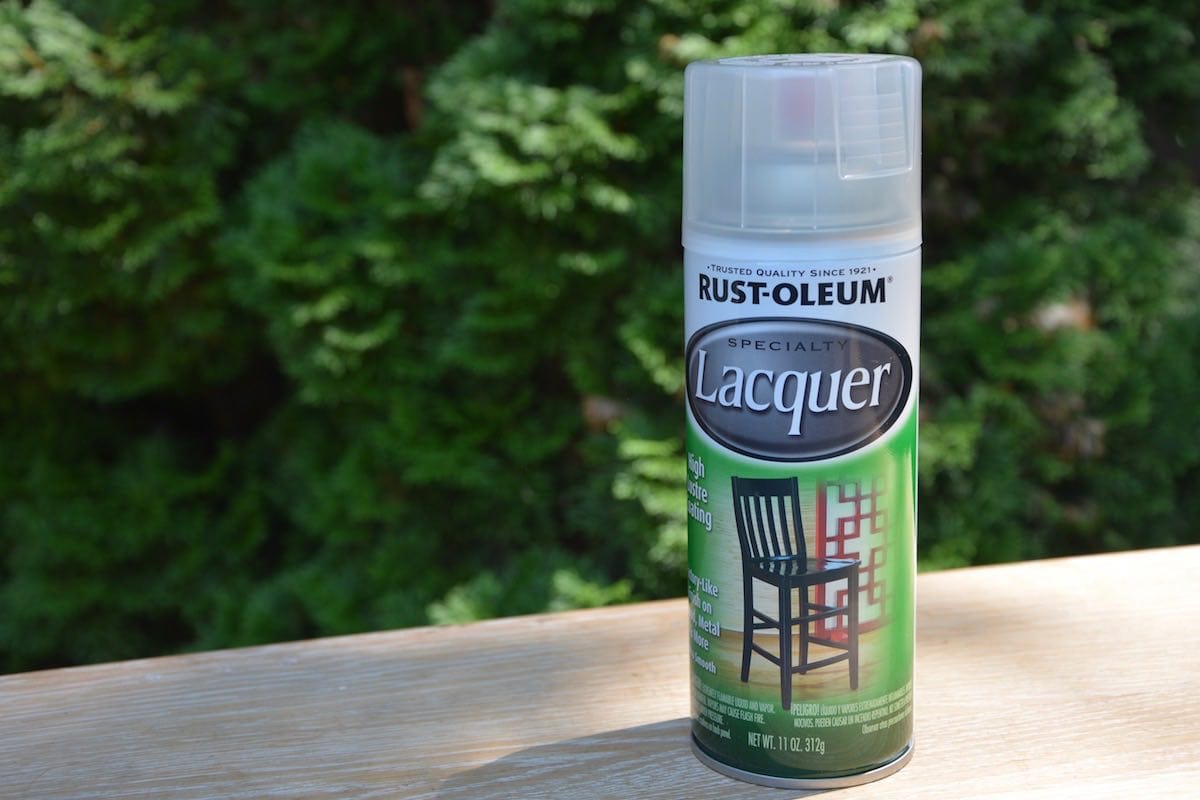
- Rust-Oleum clear spray lacquer
- 1/2″ or 3/4″ plywood
- Jigsaw
- Screws
- Lint-free cloths
Stripping Metal
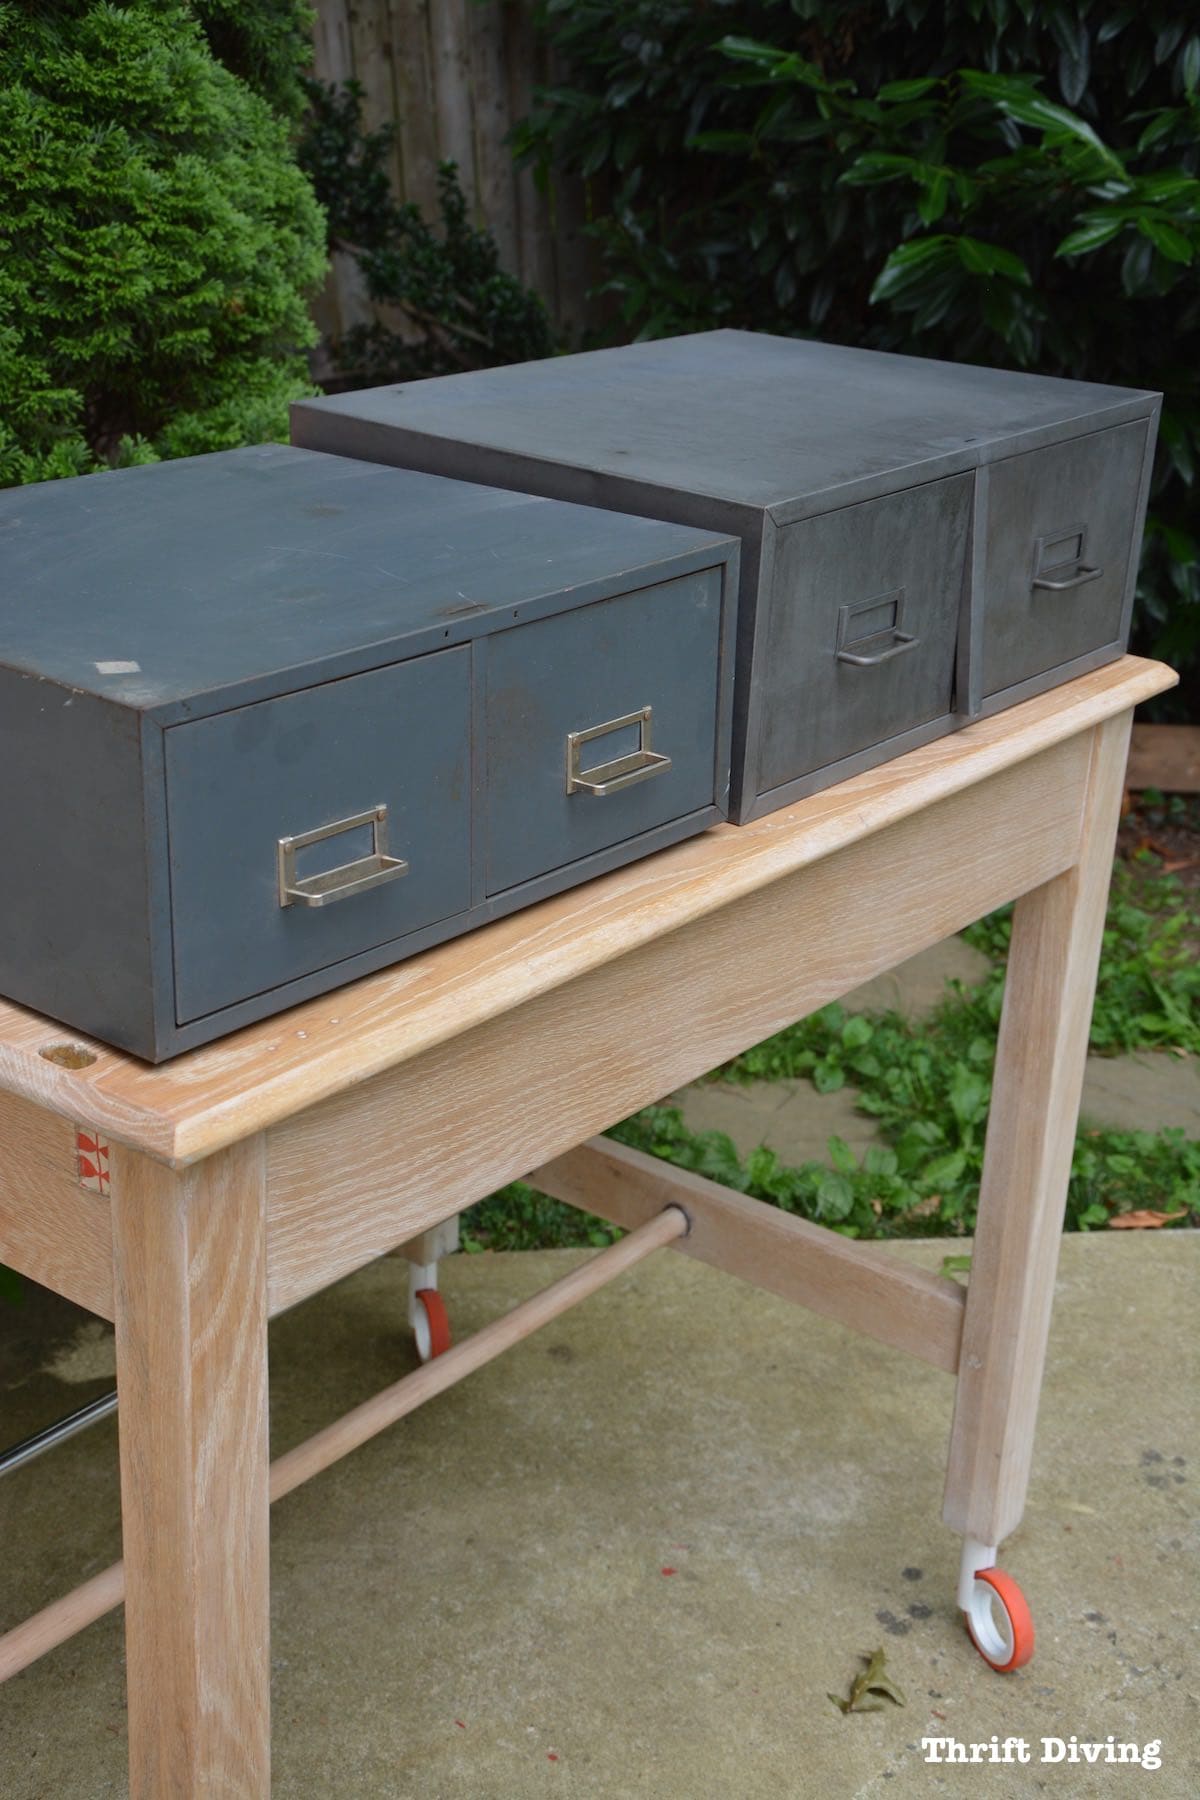
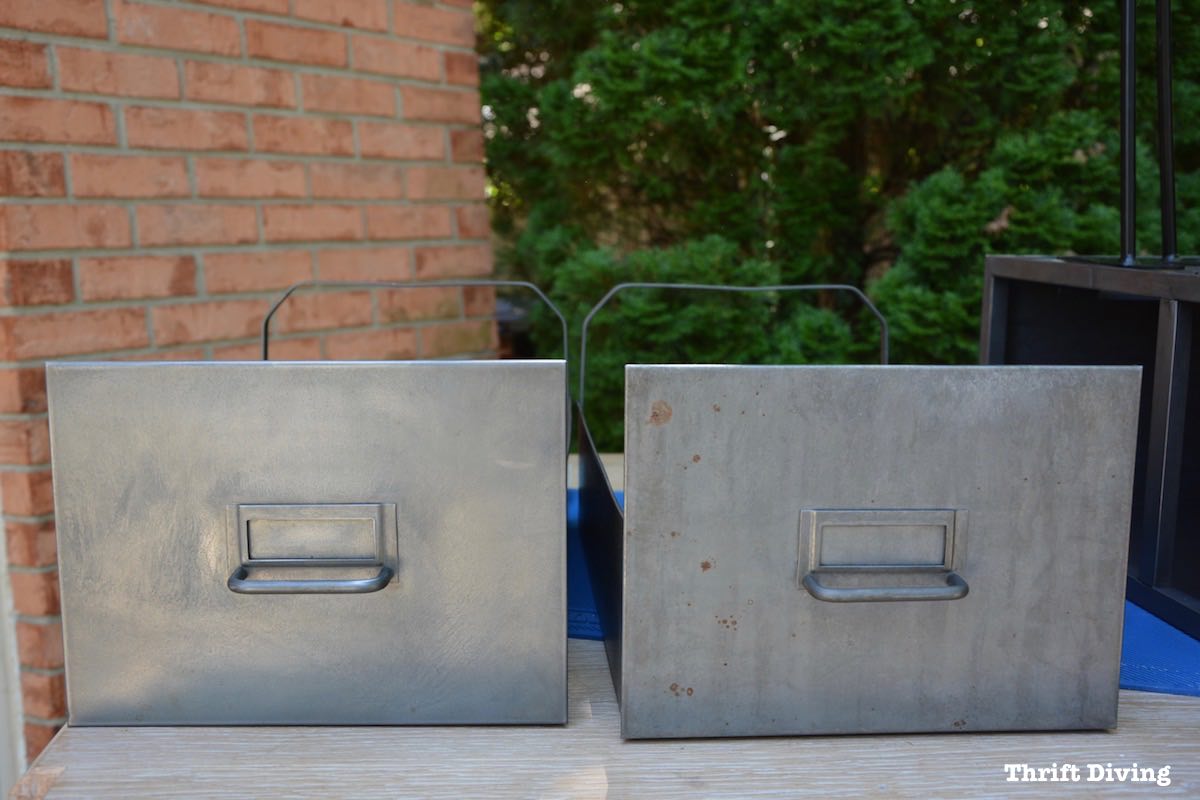
Before I kick off the tutorial, let me show you a side-by-side comparison.
The cabinet on the left is another one of my thrifted metal cabinets, and you can see if has a dull coating on it.
The one on the right is the cabinet I used for this makeover, and that is what it looked like after I brought it home from the professional strippers.
You can see the raw metal is a bit more trendy, but it definitely needed some cleaning up!
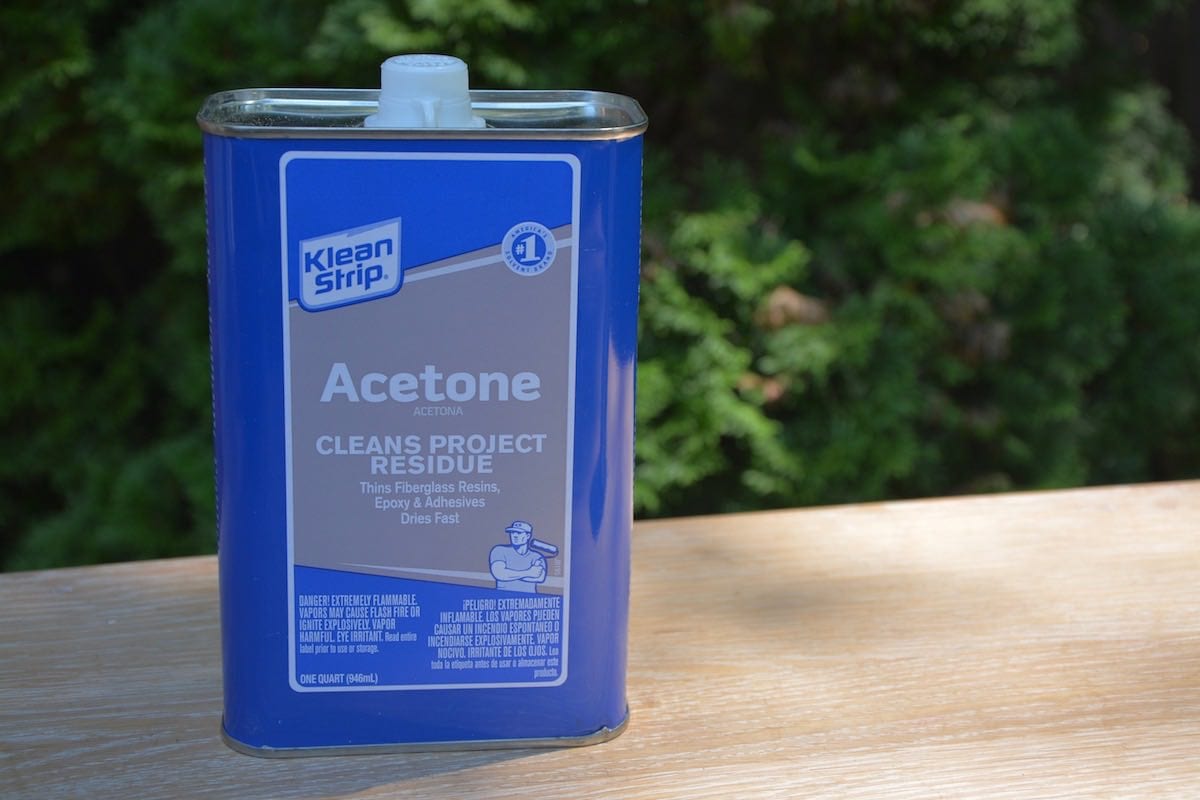
STEP 1: Clean the Metal Cabinet with Acetone
After the metal cabinet was professionally stripped, the refinishers applied a fine coat of oil to help minimize the quickness of the rusting. Thank God for that, because this cabinet sat in my garage and inside my house for a solid month or more before getting to this makeover! GASP!
During that time, it did start to rust a little, but thankfully, with the light coat of oil, it didn’t rust very much.
The folks at ChemStrip recommended I clean the metal cabinet with denatured alcohol or acetone in order to remove the light coating of oil before painting or spraying it.
I used a clean lint-free cloth to clean it and had on some big mama-jamma chemical gloves to make sure that stuff didn’t touch my skin!
STEP 2: Sand It Smooth With 800-grit Sandpaper
When I picked up the cabinet from ChemStrip, the back of the cabinet had a huge rust spot.
I’m not sure why this happened, other than it must have been exposed to the elements before it was coated to help slow the rusting process.
Whatever the reason, I had to do my best to sand out as much of the rust as possible.
I started with 220-grit sandpaper, but even as fine of a grit, that was way too scratchy and left the metal dulled and scratched.
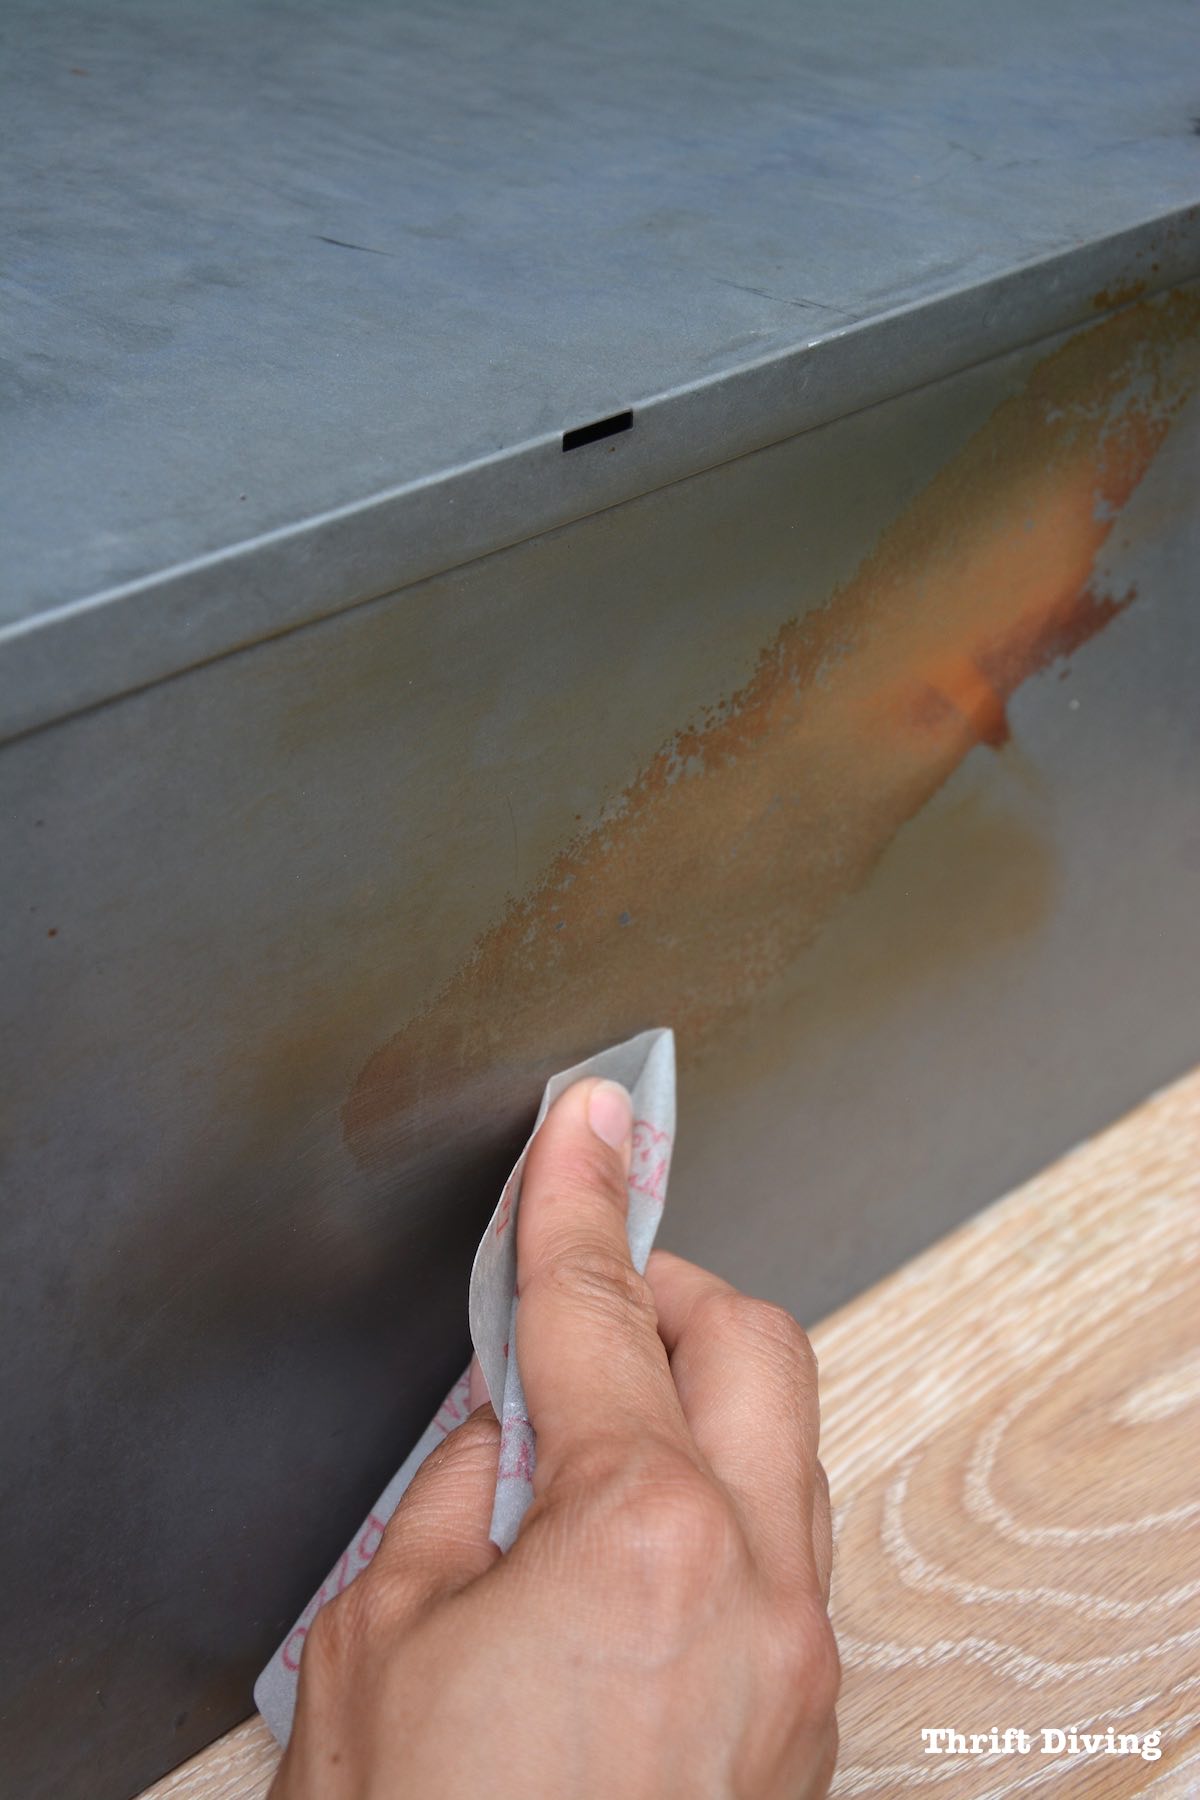
So I bought 800-grit sandpaper which was suuuuuper smooth, but just enough grit to polish out the metal and remove some of the rust (although it never came out completely).
TIP: Be sure you wear a dust mask when sanding, even if you can’t see the super fine dust!
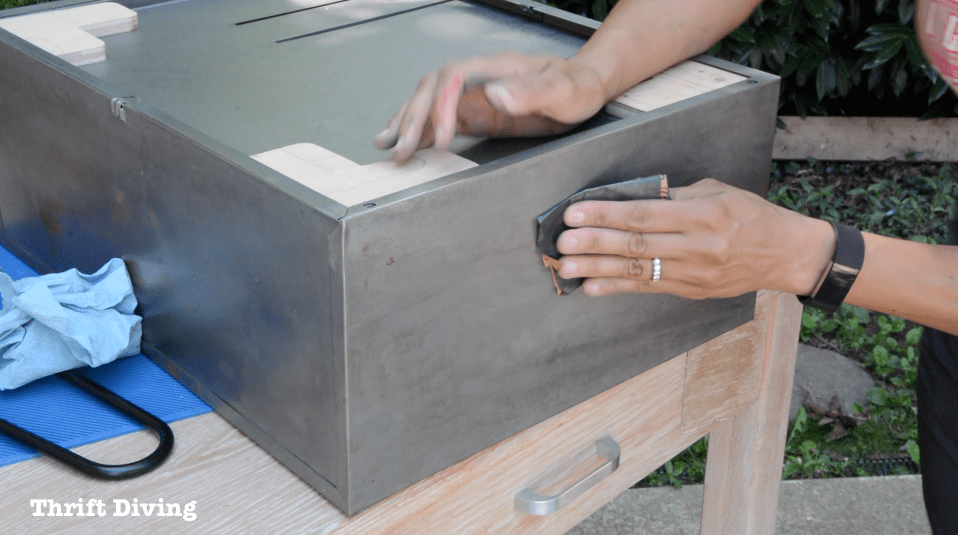
STEP 3: Smooth It Out With 0000 Very Fine Steel Wool
After sanding it down with 800-grit sandpaper, I followed up with 0000 Very Fine steel wool.
Here you can tell the huge difference between one drawer that was sanded and smoothed with the 800-grit sandpaper and very fine steel wool (LEFT) and the metal cabinet drawer that hadn’t been!
Rust will eat through metal soooo fast. Because I had left the cabinet sitting for a good while before refinishing it and spraying it with lacquer to protect it, it started developing some rust spots, as you can see above. But thankfully, I was able to sand it well and get rid of rust on the metal.
STEP 4: Wipe It Clean
This was the point where I had cleaned the metal cabinet with acetone. I kind of realized it after-the-fact, “Oh, hey, I should have cleaned this oil off first!”
But for the sake of this tutorial, the correct way is to clean off all the oil first and then sand and wipe off the dust. 🙂
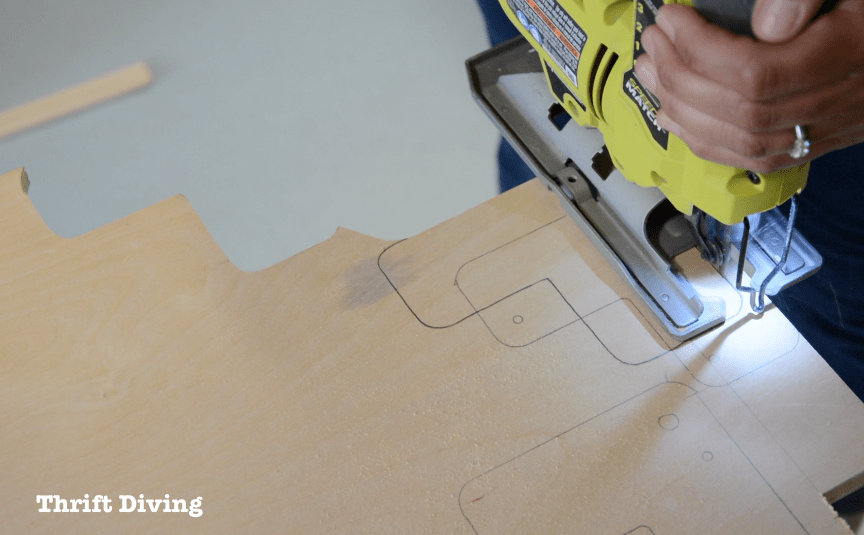
STEP 5: Cut a Base for the Drawer or Cabinet
At first, I thought it would be as simple as tracing out the shape of the hairpin legs on a sheet of 1/2″ plywood.

But then I realized that the vintage metal cabinet has a little “lip” on the bottom edges where the wood slid under nearly 1/2″.
So I decided to cut the pieces of wood a little bit longer so that about 1/2″ could slide under the lip, yet still be able to attach the hairpin leg accurately and securely.
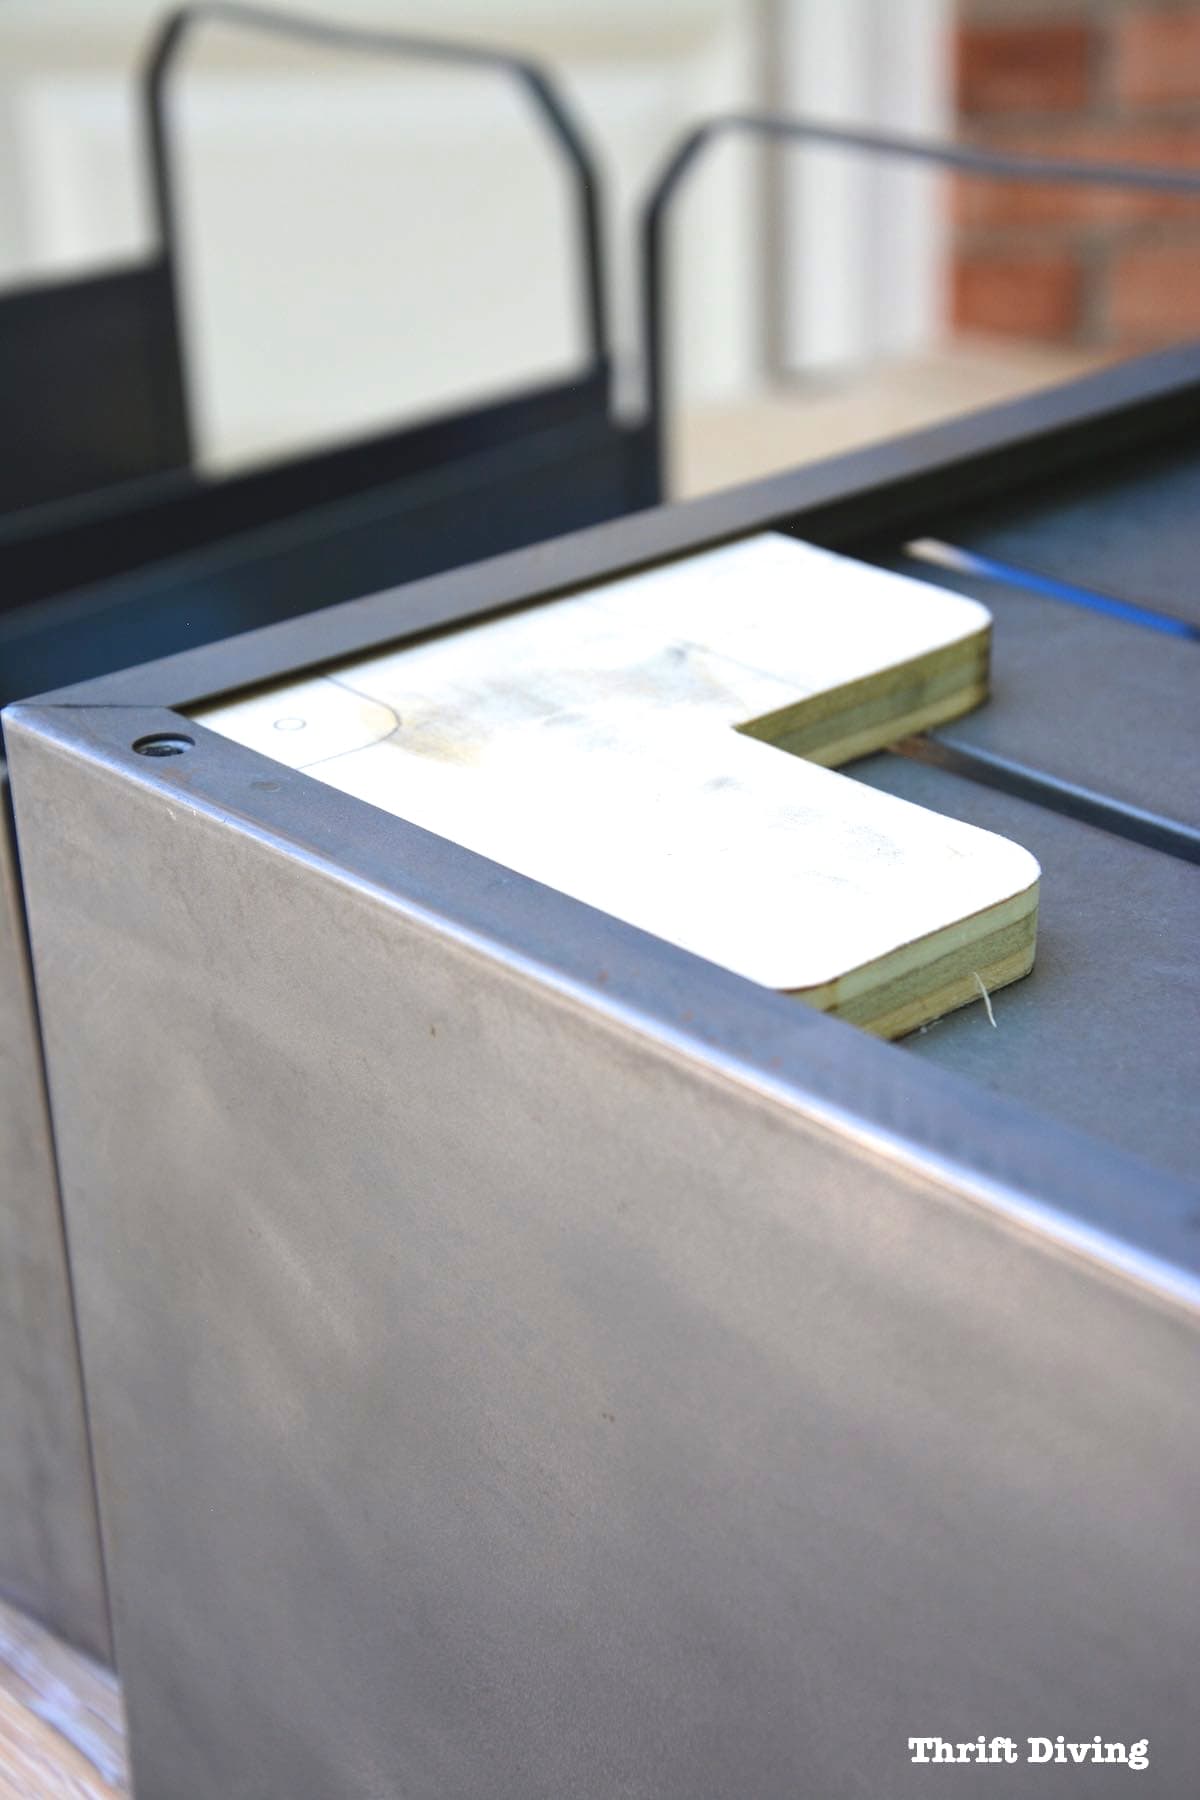
It fits! 🙂
READ: How to Use a Jig Saw (The Easiest Tutorial EVER for Newbies!)
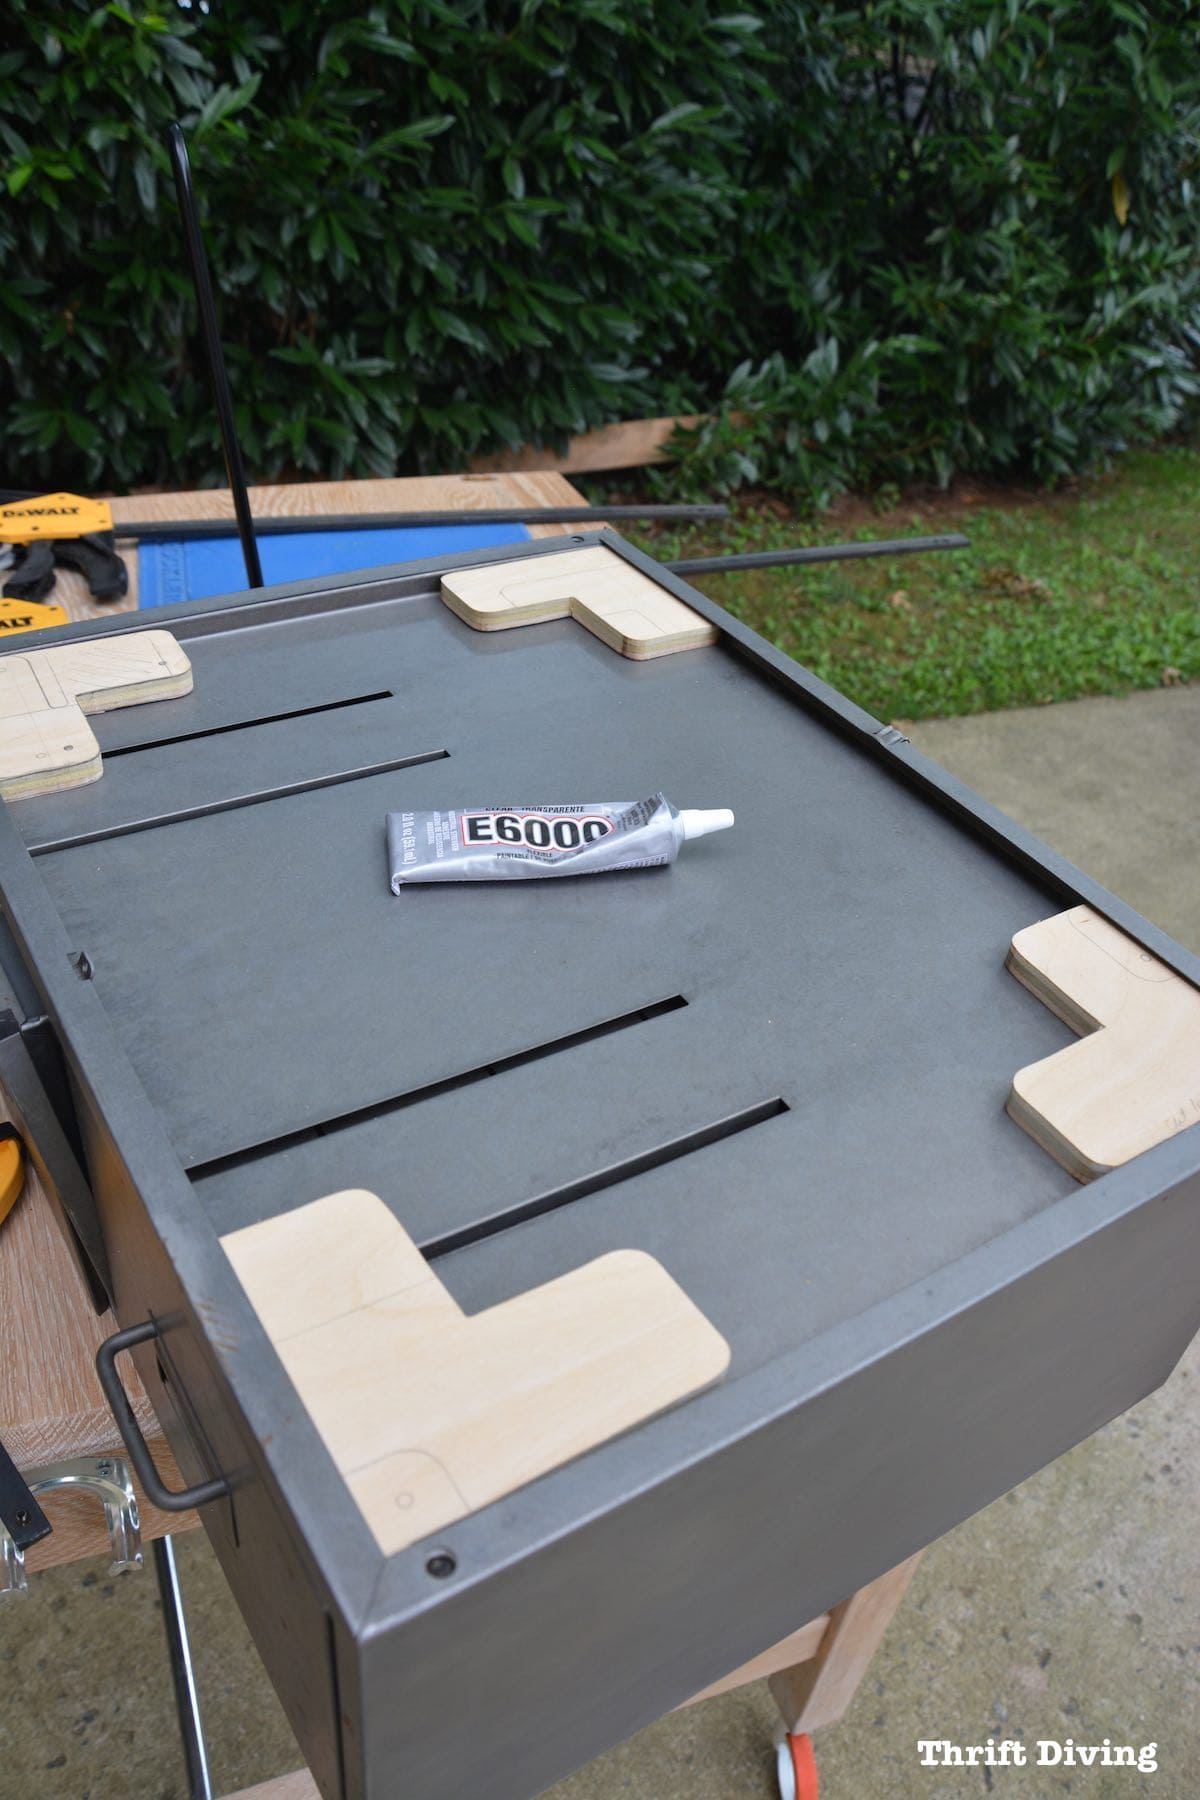
STEP 6: Glue on the Base to the Bottom of the Drawer
You never really know which adhesives to use, do you??
Yep, same here.
They all confuse me.
But a friend recently recommended I pick up a tube of strong adhesive called E6000. According to him, it works really well, and since he knows what he’s talking about 99.9% of the time, I took his advice.
Since I already had it on hand, I used this to glue down the wooden supports to the bottom of the vintage metal cabinet.
I needed clamps to keep those babies securely in place.
It usually takes 24 hours for E6000 to dry, but the tube says that it can take up to 72 hours for total adhesion to occur.
There were some other things I had going on, so I let it sit and harden for about a week, since I didn’t have time to work on it anyhow.
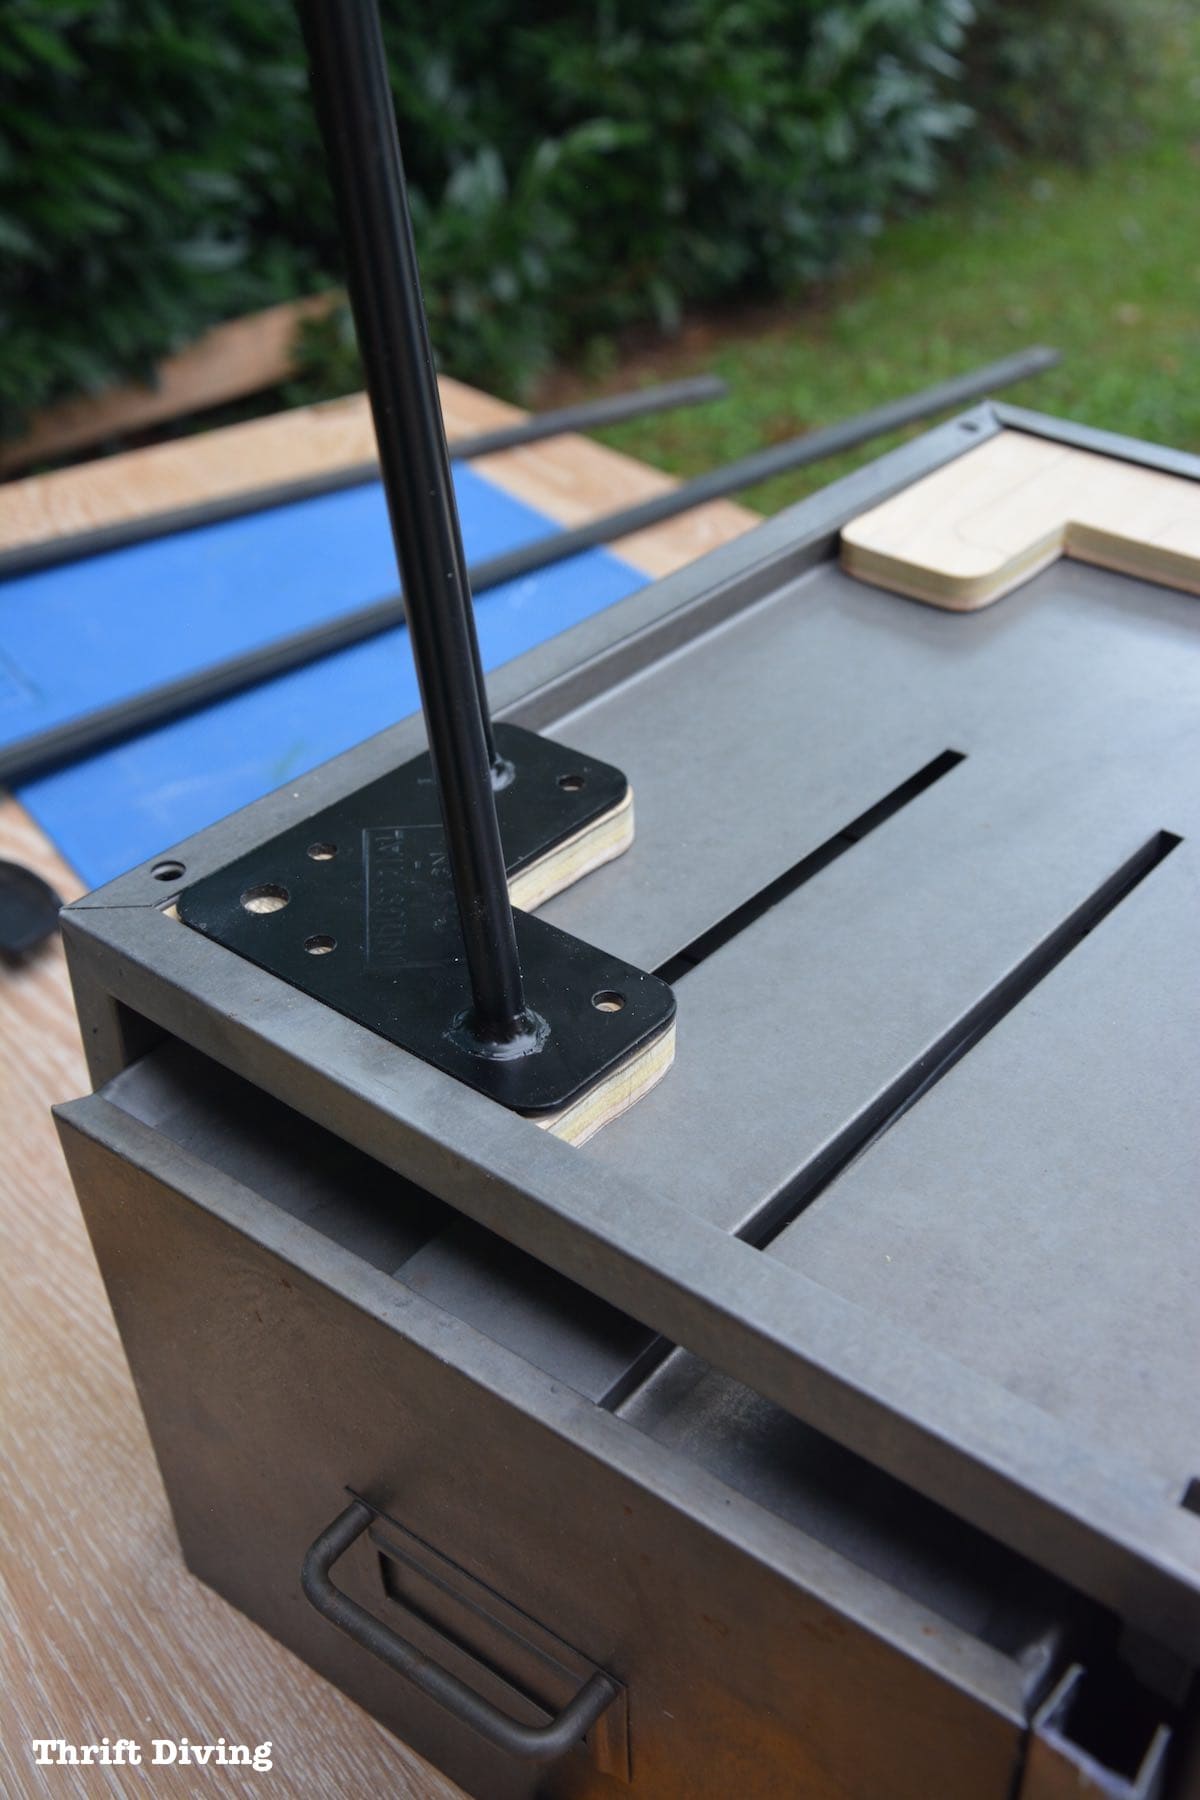
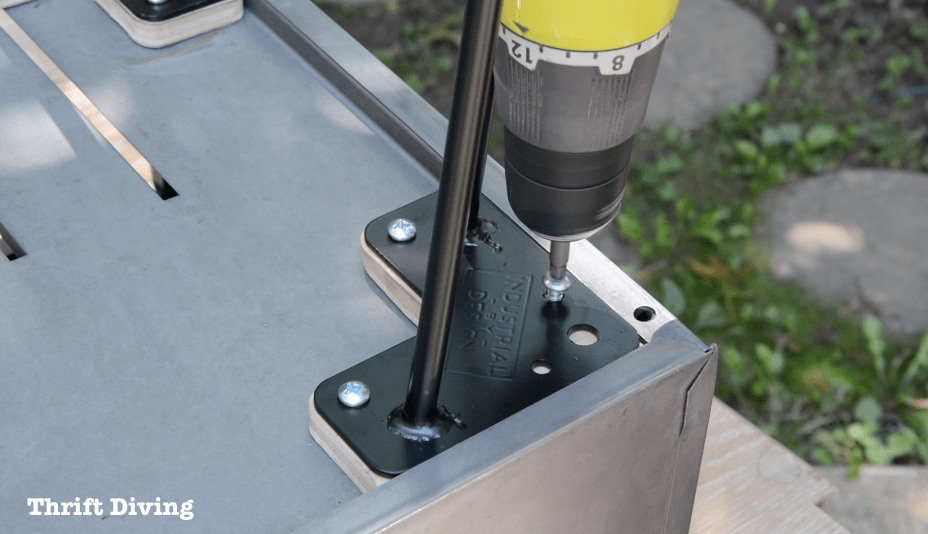
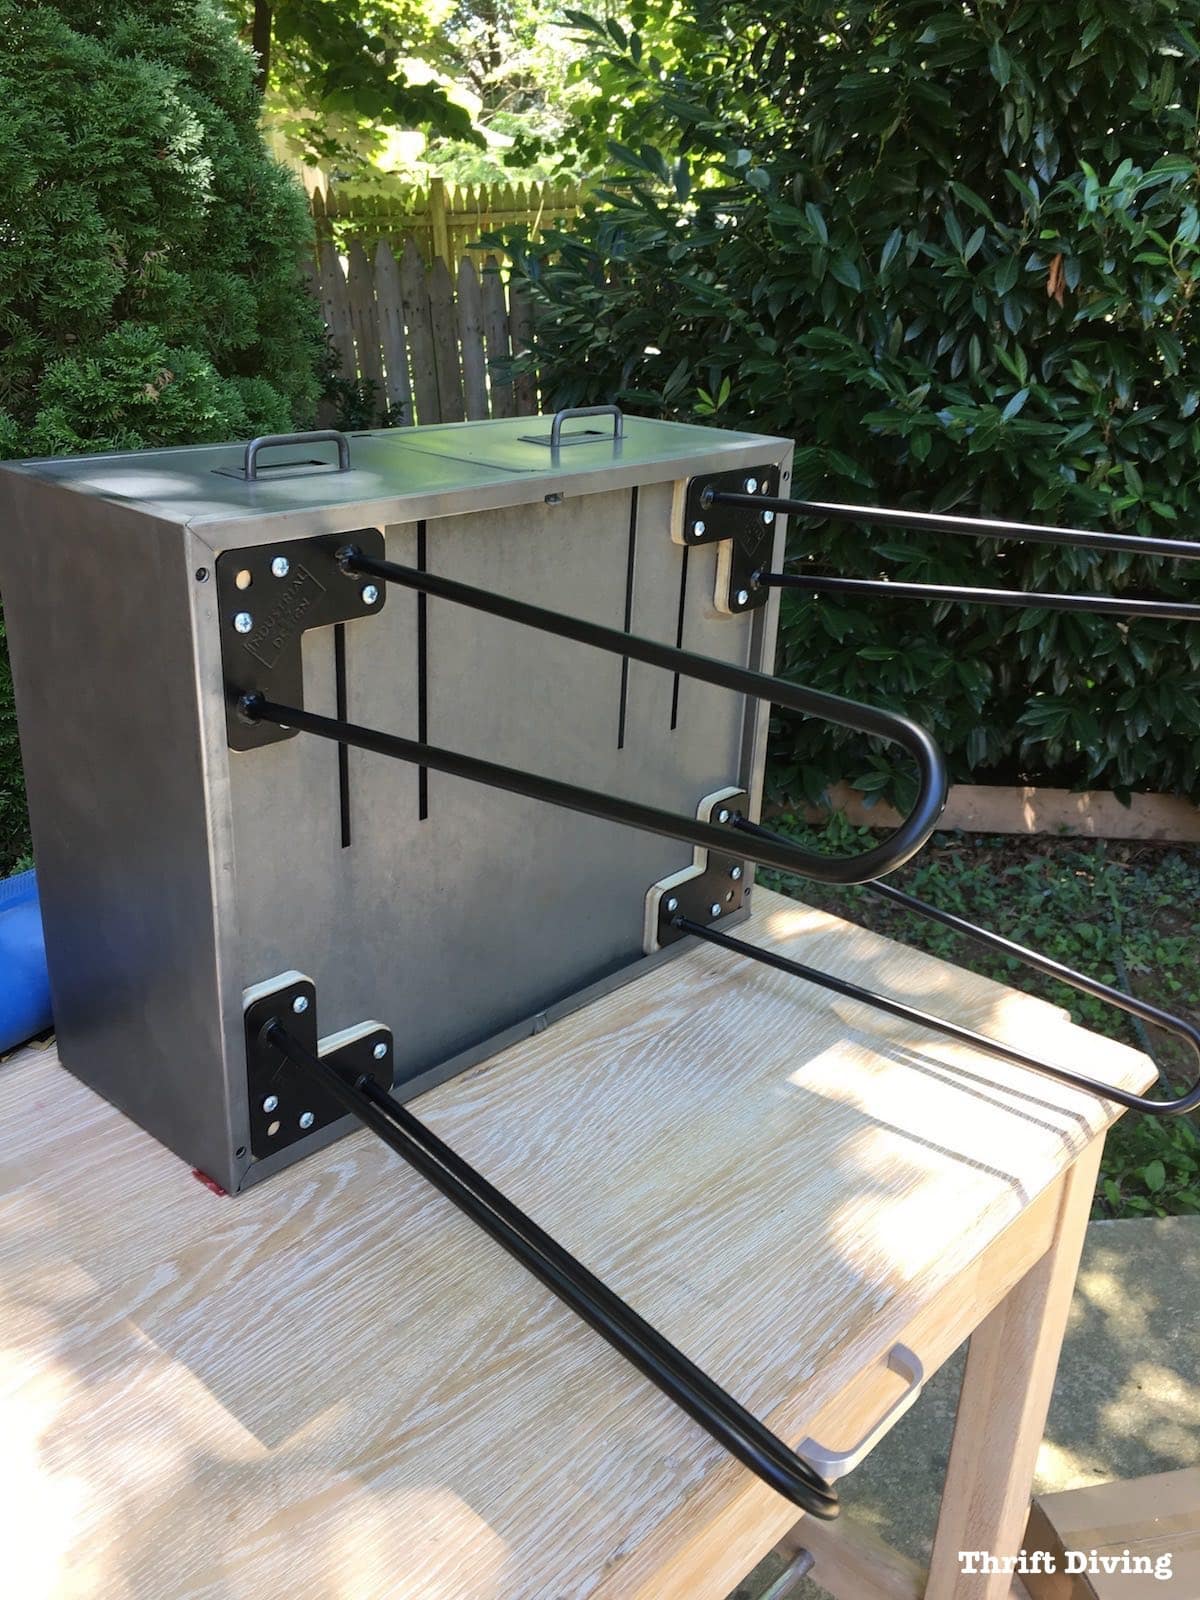
STEP 7: Attaching Hairpin Legs
After that week, I finally had some time, so I came back to work on it.
Next, all I had to do was sit the hairpin legs on the wooden base and then screw them down.
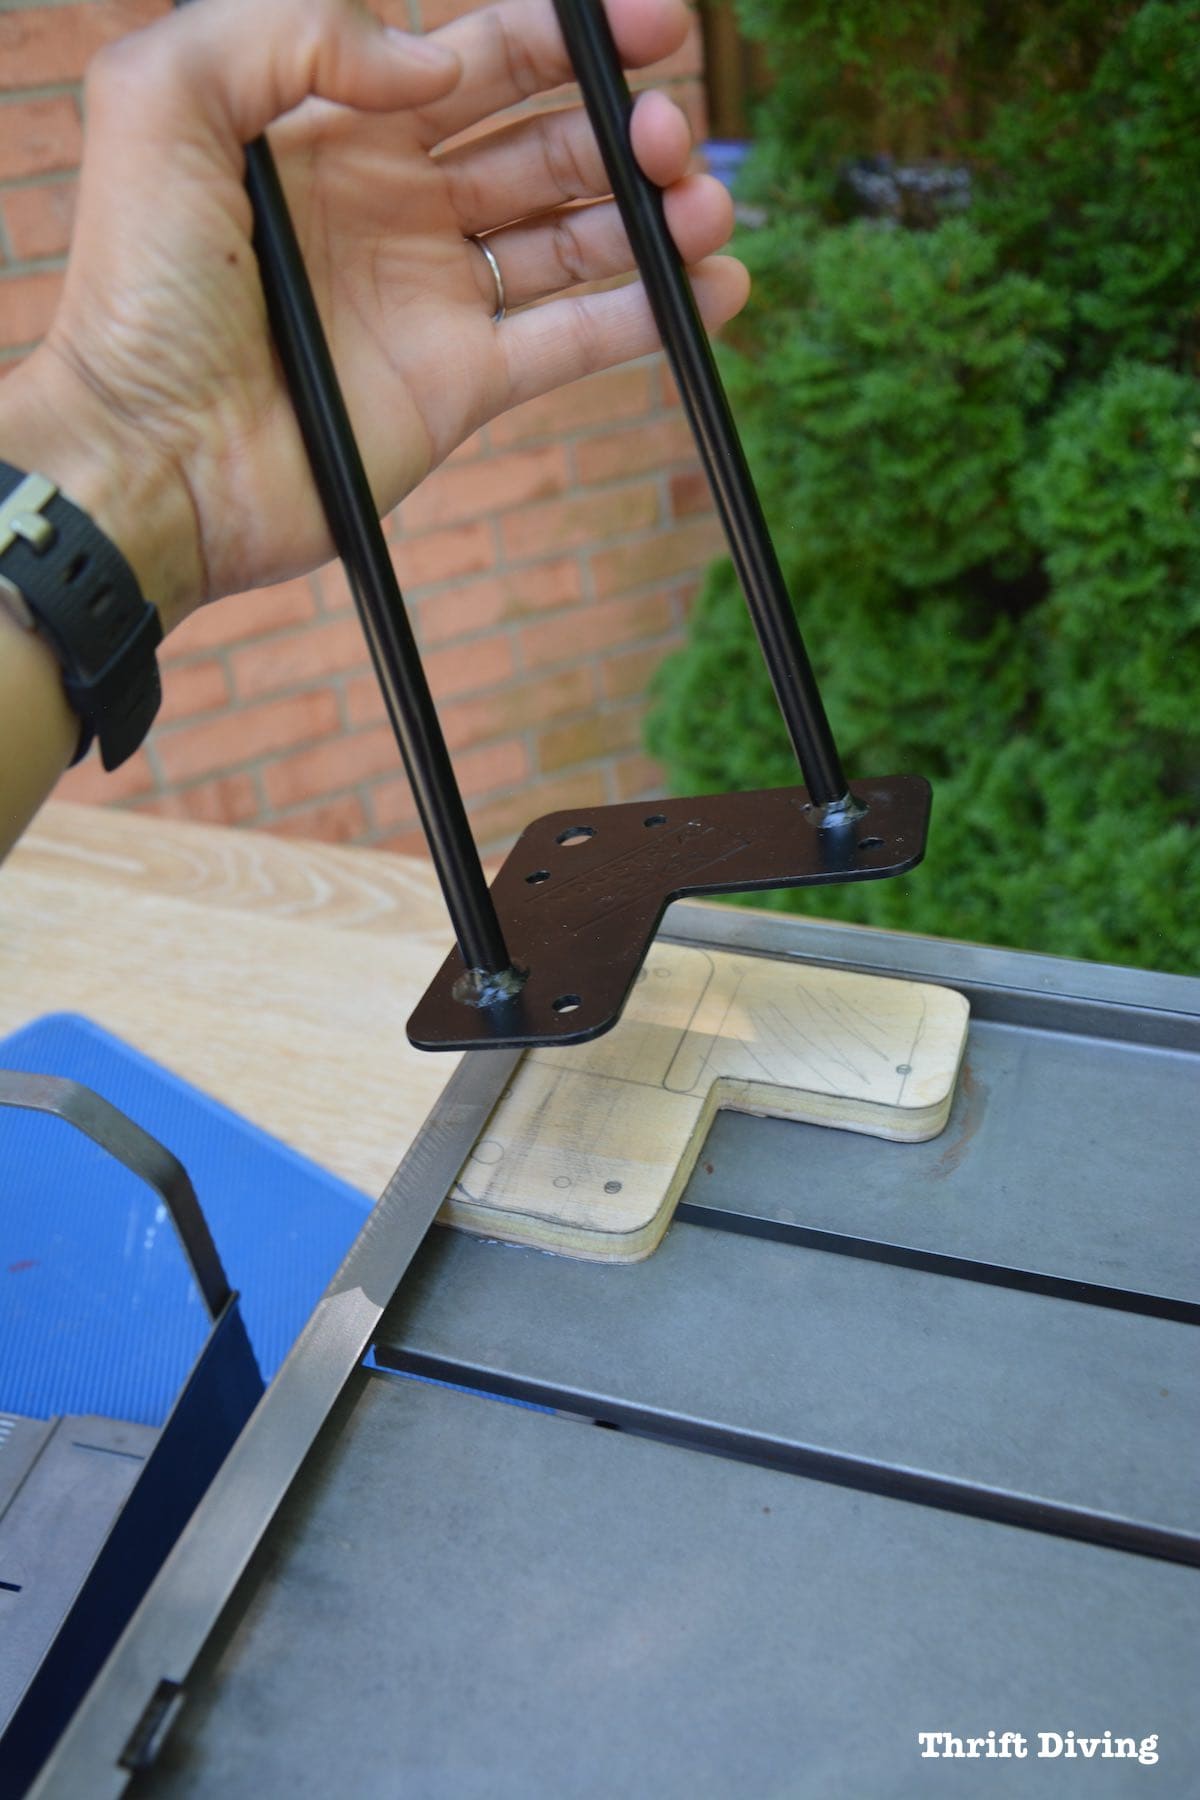
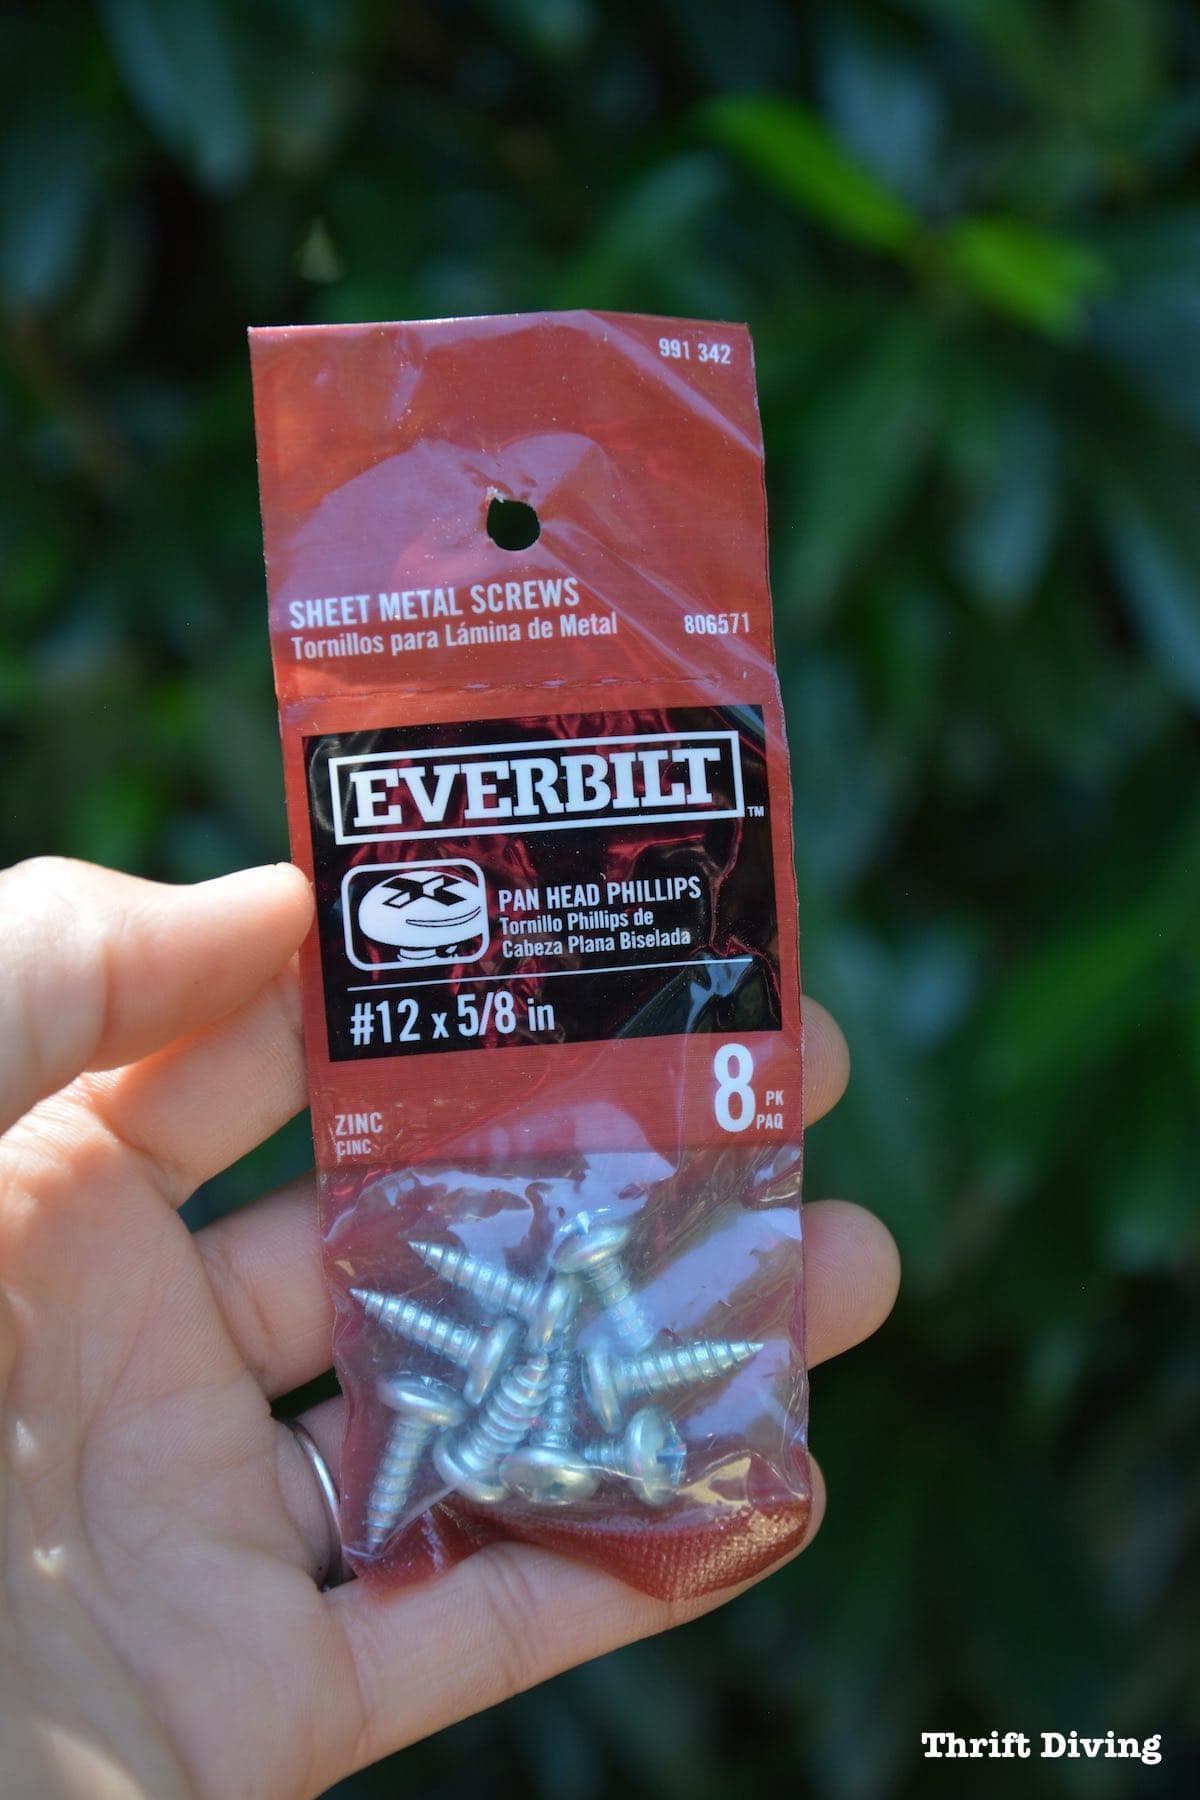
I wasn’t sure what screws to use, but I knew that I needed something fat enough and long enough to secure the legs so they wouldn’t loosen up over time.
I ended up going with these 5/8″ screws, which were juuuusssttt long enough to secure it but short enough not to poke a hole through the metal when attaching hairpin legs!
Where To Buy Hairpin Legs For Furniture
Before I continue with the tutorial, let me just say that I love hairpin legs, but they’re sooo expensive!! The most affordable place I could find for a set of 4 legs in a 16″ height (which is perfect for a side table or bedside table) is on Amazon from a brand called Industrial By Design.
For $50, they’re heavy duty, they ship really quickly, and are rated 5 stars on Amazon. Can’t beat that!
STEP 8: Spray 2-3 Coats of Spray Lacquer
My friend Pete suggested I use a clear spray lacquer to prevent rust on my metal cabinet. I wasn’t sure how shiny this would be, so I tried a clear matte spray, as well.
I much preferred how this Rust-Oleum lacquer looked and felt on this vintage metal cabinet! It felt very smooth and silky. 🙂
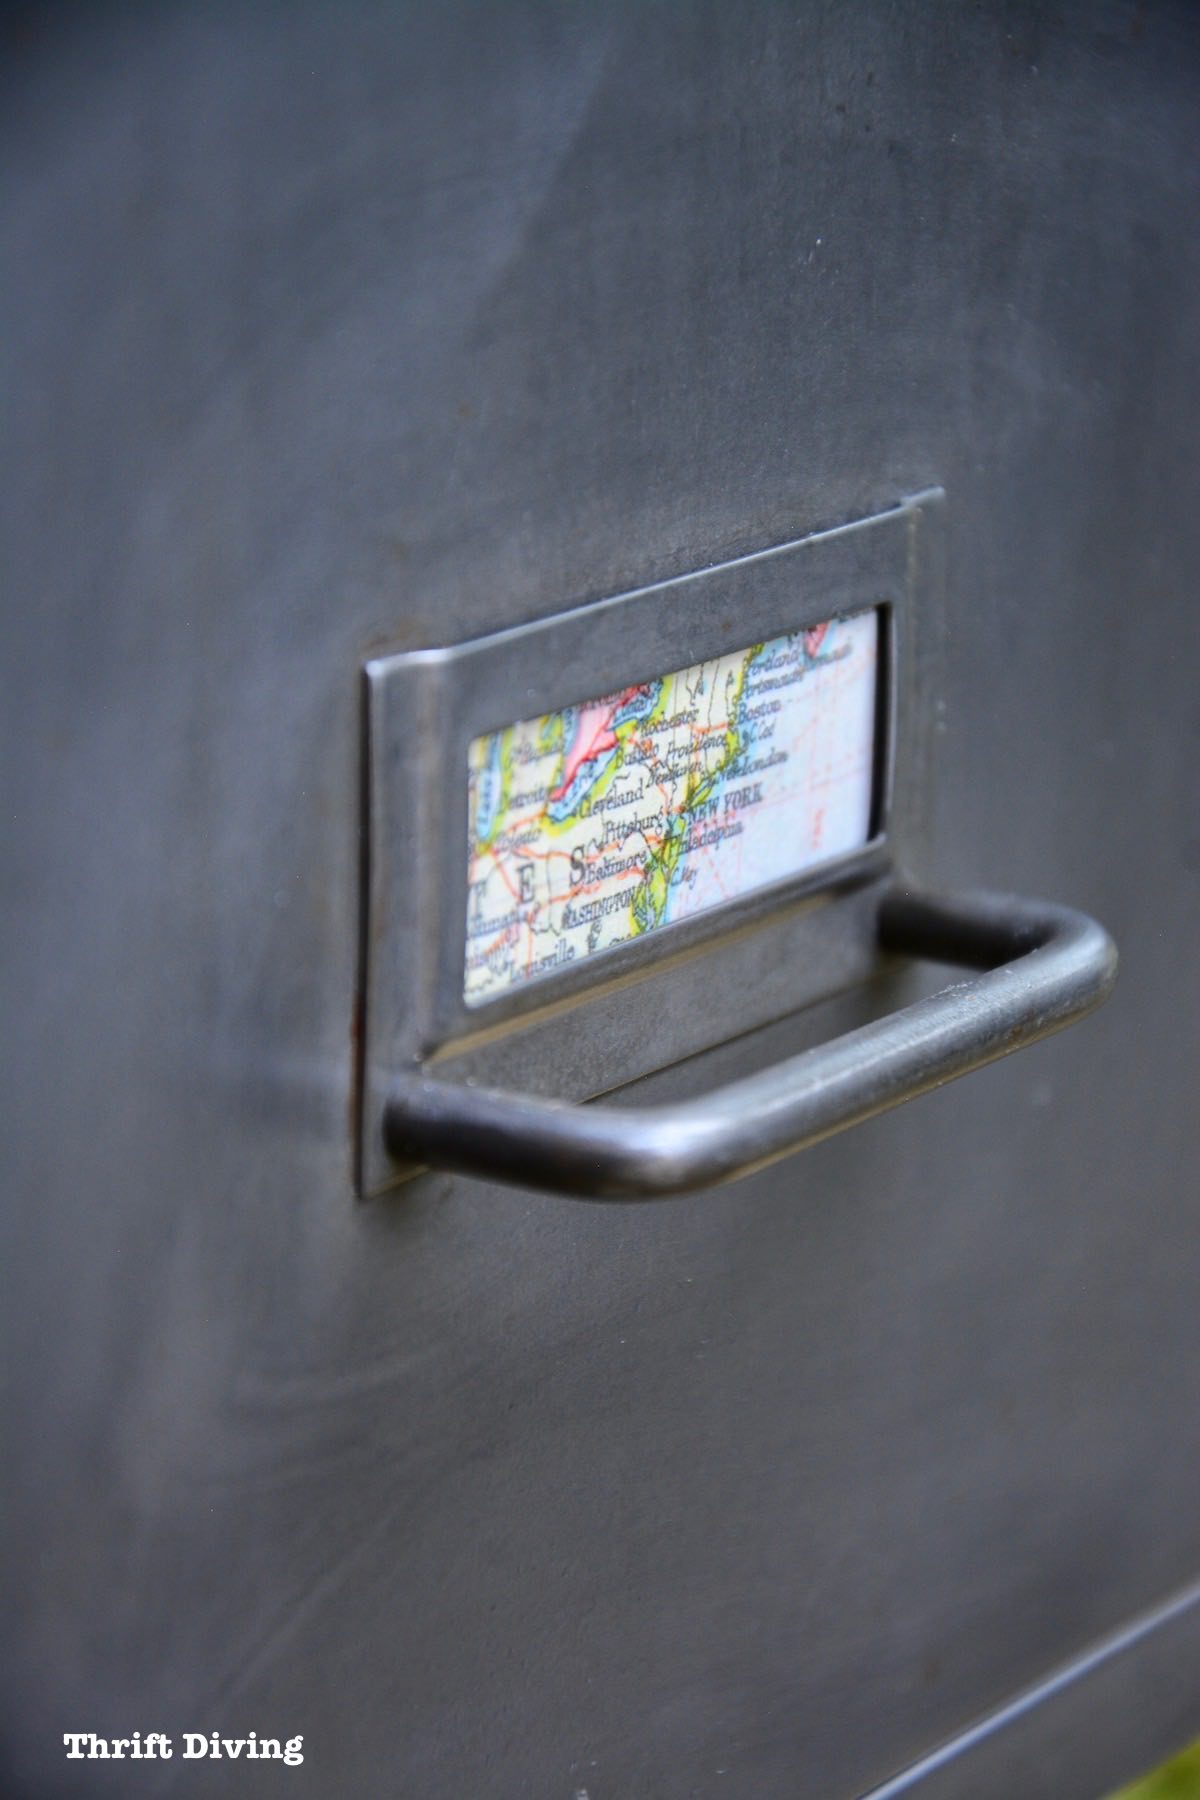
STEP 9: Add A Bit of Surprise to the Piece
How boring it would be to just add labels to this vintage metal cabinet!
I decided to cut out small rectangles from a map: one drawer with a map that includes Washington DC (my ‘hood….well, at least, the suburbs! LOL), and the other side with a map of Ghana, West Africa (gotta represent hubby’s homeland!).
STEP 10: Show It Off to Friends and Family!
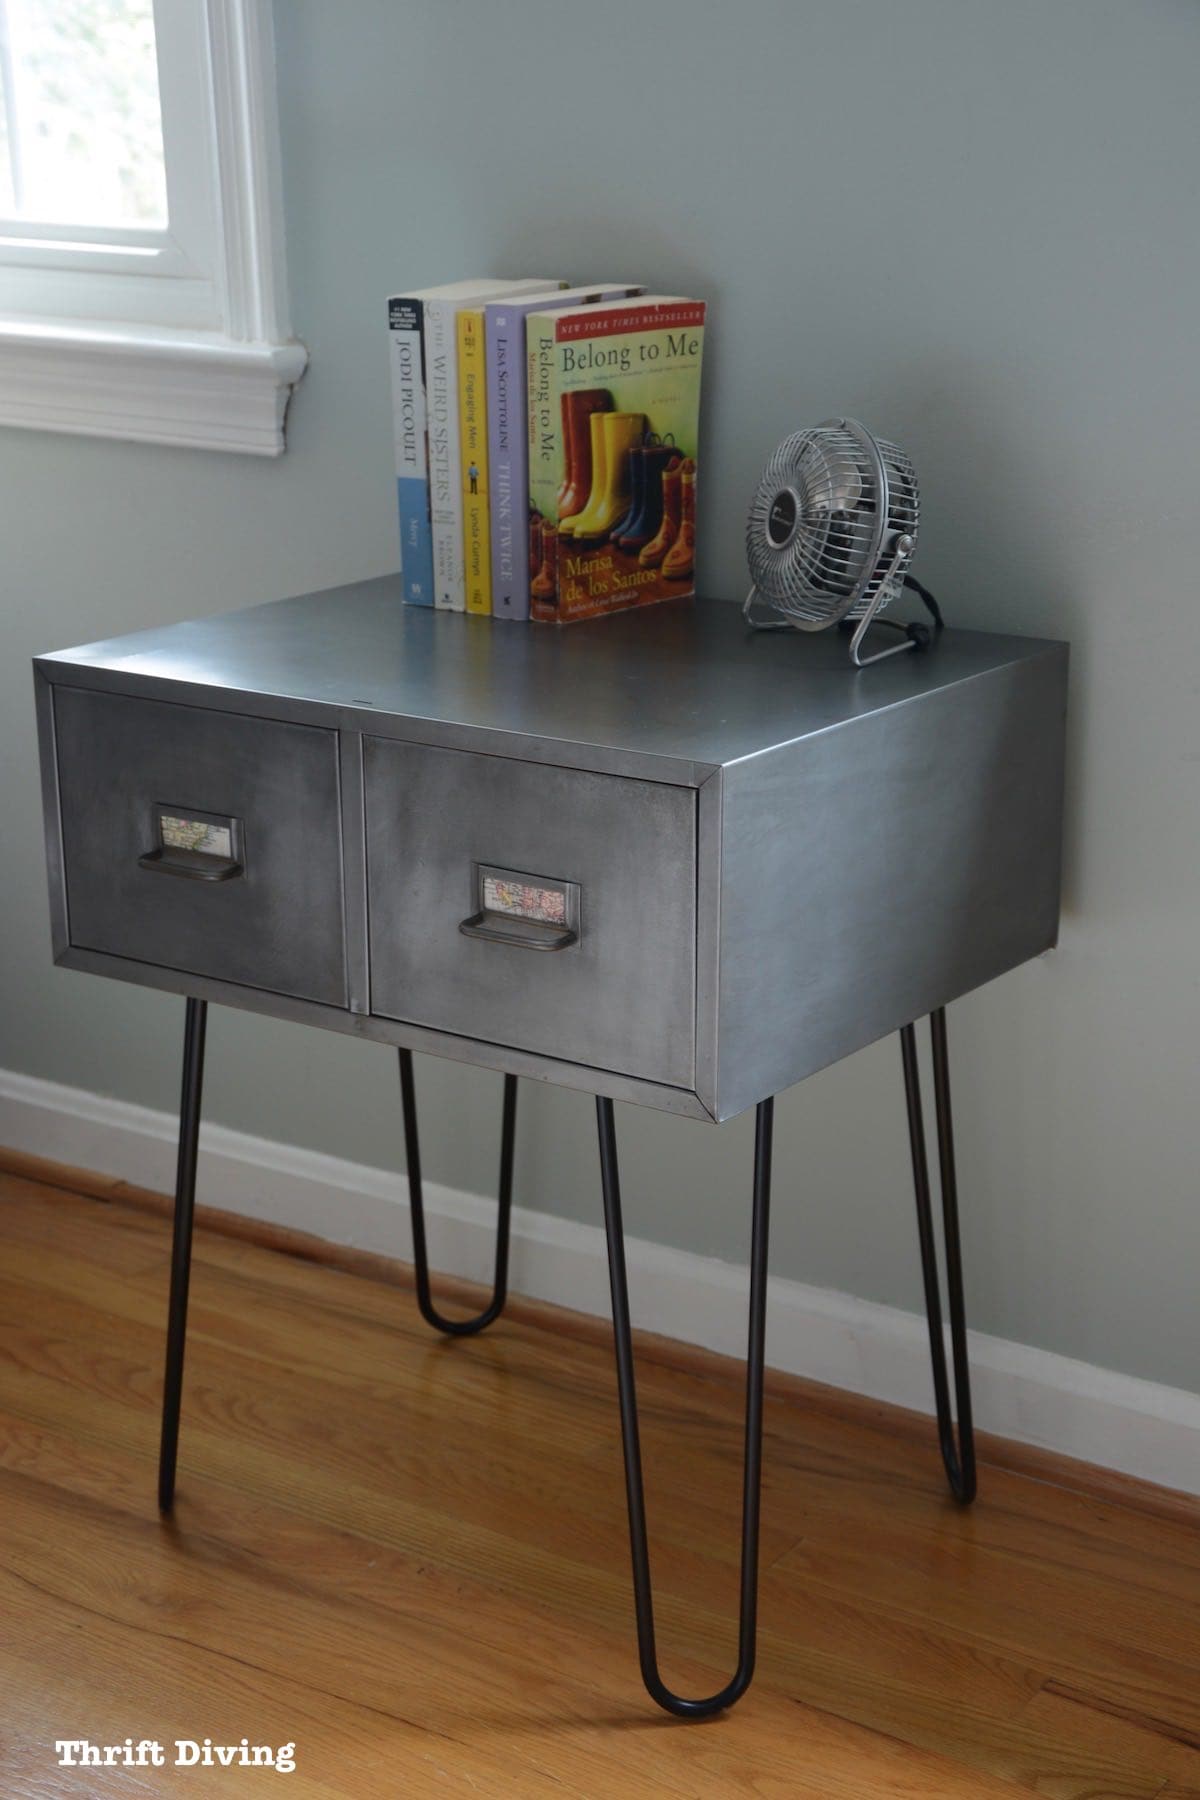
I wasn’t sure where in the world I was going to put this hairpin leg side table! I decided to put it in my bedroom for the time being, but I’ll likely have to find another place for it since this space is already occupied by my custom tile table top.

The Only Mishap!
PROBLEM: The only thing that didn’t turn out to my satisfaction is that there’s a slight wobble to my vintage metal cabinet! Waaaahhh!
But like I’ve said before, DIY isn’t perfect.
Perhaps if I had attached the hairpin legs to a solid 1/2″ piece of plywood glued to the bottom of the cabinet (like Pete had suggested) it would have been “perfect.” But I didn’t want to see a slab of plywood poking out like that.
So I’m okay with a little wobble, if it means the plywood is hidden. And who knows–maybe the cabinet is lopsided. 😉
UPDATE: To fix a wobbly leg, add small metal washers under the screw on the leg that is too short. A huge thanks to one of my YouTube viewers that suggested it! GENIUS!
Overall, I think it was a fun project and one of the more easier projects I have done in a while! 🙂
BEFORE & AFTER: Vintage Cabinet Turned Into Hairpin Leg Side Table

Turn a vintage cabinet into a hairpin leg side table! These metal cabinets can be found anywhere from $7.00 - $20 from the thrift store. Cost of this hairpin leg table and materials: $91. Score!
Materials
- 16" Hairpin legs
- Vintage metal cabinet or drawer
- Citristrip Stripping Gel (optional)
- 800-grit sandpaper
- 0000 Very Fine steel wool
- Dust mask
- Acetone (optional)
- Chemical gloves
- E6000 Adhesive
- Rust-Oleum clear spray lacquer
- 1/2" or 3/4" plywood
- Wood screws
- Lint-free clothes
Tools
Instructions
- Chemically strip or sand the metal cabinet to remove the existing finish.
- Clean the metal cabinet with acetone.
- Sand the metal smooth with 800-grit sandpaper.
- Smooth the the metal with 0000 Very Fine steel wool.
- Wipe the vintage cabinet clean.
- Outline and cut out a plywood base for the legs to attach.
- Glue plywood base to the bottom of the cabinet.
- Attach the hairpin legs.
- Spray 2-3 coats of spray lacquer.
Notes
Check your local thrift stores for vintage metal cabinets like these! You can usually find them for about $10! Happy thrift diving!
How Much Did This Hairpin Leg Side Table Cost?
Let’s have a look at the cost!
- $7.00 – Vintage metal cabinet from the thrift store.
- $0.00 – Professional stripping services – The owner was going to charge me $80 to strip it but decided not to charge me because the post I wrote Dip and Strip 101: Everything You Wanted to Know About Stripping Wood and Metal actually sent a customer her way, so she wanted to be nice and not charge me for my cabinet! 🙂
- $50.00 – 16″ Hairpin legs – (click here to buy these hairpin legs on Amazon)
- $6.00 – Sandpaper 800-grit
- $4.00 – Rust-Oleum Gloss Lacquer (1 can)
- $8.00 – Rust-Oleum Matte Clear Enamel (2 cans)
- $16.00 – Acetone
- All other materials I already had on hand and didn’t have to pay extra for.
TOTAL COST: Approximately $91.00
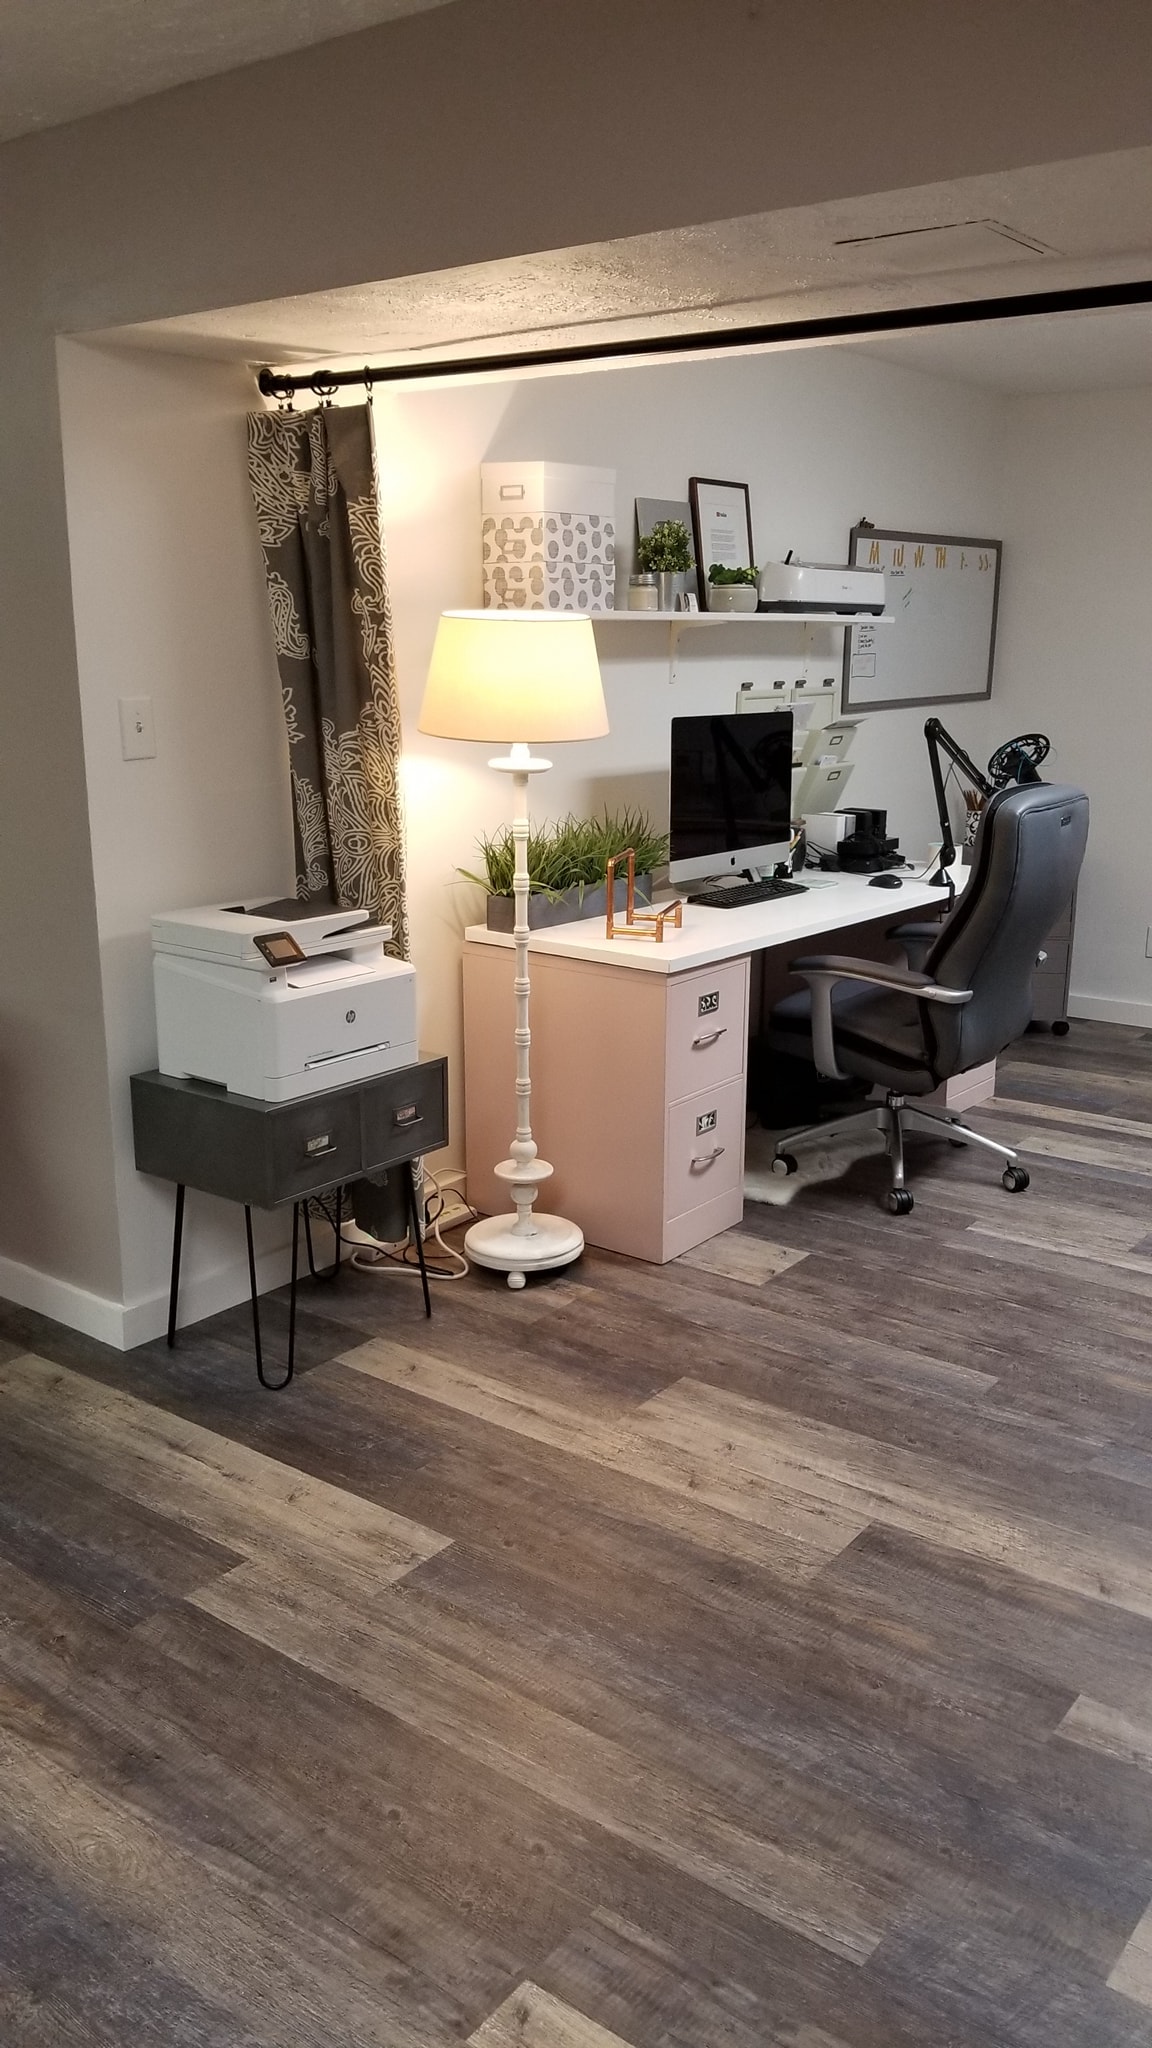
Later, when I did my basement makeover and was installing vinyl plank flooring, I was able to find the perfect spot for this vintage metal cabinet: under my big ‘ole laser jet printer!
(Loving this vintage cabinet makeover? Click here to SAVE IT!)
![]()
How Much Time to Make: Hairpin Leg Side Table?
From start to finish, about 1 week or more, only because I took the time to let the glue dry and got sidetracked with other stuff.
But the actual time invested:
About 2 hours total.
A very doable project if you’re short on time!
And I know metal cabinets aren’t just floating around your local thrift store all the time. 🙂 So think about building your own cabinet out of plywood and just spray paint it silver to look like industrial furniture!
You don’t even need to make drawers.
Just ask your local home improvement store to cut the wood for you, glue it all together, and spray paint it silver to look like your own creation! 🙂
So What Do You Think About Industrial Furniture??
I think I’m in love with the industrial furniture look, and I can’t wait to refinish more vintage cabinets! Next time I’ll try stripping them myself and I’ll let you know how that goes.
Leave a comment below and let’s chat about this fun hairpin leg side table!

Download the 5 freebies!

Thrift Diving inspires women to decorate, improve, and maintain their home themselves...using paint, power tools, and thrift stores! Use these 5 printables, checklists, and ebooks to get started!

This tutorial was great! I have done a number of similar tables with the old file cabinets and your method for securing the legs to the cabinet is brilliant! Thank you. I usually put a 3/4″ finished piece board and secure with small bolts (a pain!). One other thing that makes these versatile is lining the bottom of the drawers with 1/4″ hobby would you can find at big box store. Just cut to size and lay in with out securing down. Thanks again for the great step by step!