Understanding Wood Finishing: 10 Things I’ve Learned
Imagine spending a weekend….or even months!….building a project or stripping and sanding a piece of furniture down to the bare wood….only to ruin the piece with the finish.
Gah!
You didn’t get the results you were looking for….or maybe it started peeling or cracking….or maybe the color is all wrong and now you can’t figure out how to fix it. Then you end up having to sand or strip it back to bare wood.
Ugh….dude, that would suck. Like, seriously.
I’ve spent so much time painting furniture, and if I’d make a mistake–who cares!–I’d just slap on a new coat and keep it moving!
But wood stain, shellac, lacquer….there’s so much to learn…..it’s a whole new ball game for me.
Painted furniture is “in” right now, but the more I learn about wood, the more I have come to respect it and want to see more of that pretty grain.
Plus, if all you can do is paint furniture, you end up being a One Trick Pony, right? 🙂
Well, this pony is ready to take her DIY skills to new heights, and one of those levels is learning how to finish wood and get good results.
But it can be tricky to know what to do and how to achieve the look you’re going for.
That’s what I’ve set out to conquer.
Here are a few important things I’ve learned so far in the little bit of time I’ve spent researching it.
SKIP AROUND THIS POST
No time to read the whole article? Just click to skip!
Lesson #1: When You Build a Project, Spend Just as Much Time Finishing It
Lesson #2: There’s a Difference Between Wood Dyes and Wood Pigments?!
Lesson #3: You MUST Learn the Difference Between Polyurethane, Varnish, Shellac, and Lacquer
Lesson #4: Sanding Sealer is Your Best Friend
Lesson #5: What in the World is Grain Filler??
Lesson #6: What is Glue Size?
Lesson #7: Practice, Practice, Practice!
Lesson #8: Learning is Part of the Fun
Lesson #9: Don’t Be Afraid to Buy a Book
Lesson#10: Find a Good Woodworking Store Nearby
Pin this Article
Subscribe For Free
The Look I’m Craving: Weathered Oak
Before I get into what I’ve learned in my latest research, I wanted to share with you how this quest all started.
Remember that 60″ DIY bathroom vanity I’m building from scratch? (Check out my progress here).
I’ve gotten to the point in the project where I’m not really sure how to continue.
It has taken me months to makeover my master bathroom, and one large stopping block has been the vanity.
After figuring out how to build it, I realized I must figure out how to finish it off.
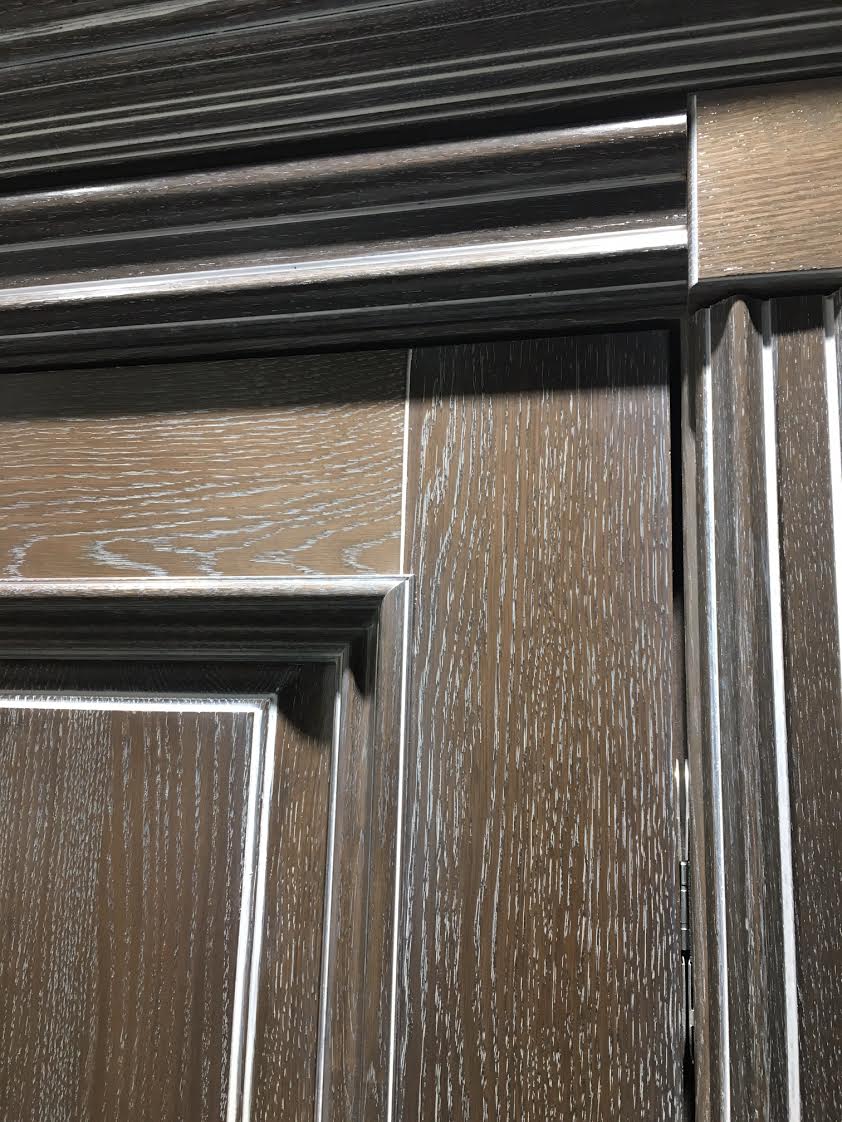
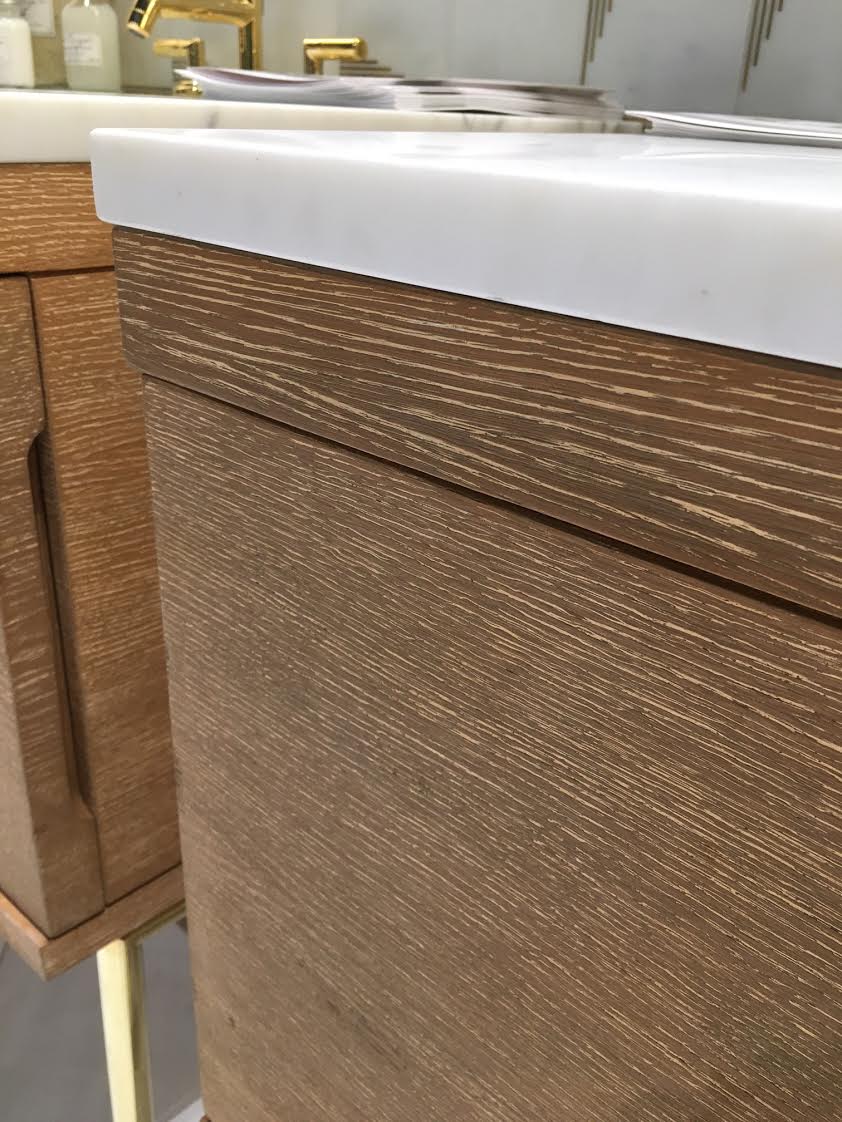
This is the look I am going for: weathered oak (also known as cerused oak), where you can see the grain of the Red Oak highlighted in white or with a lighter, contrasting color.
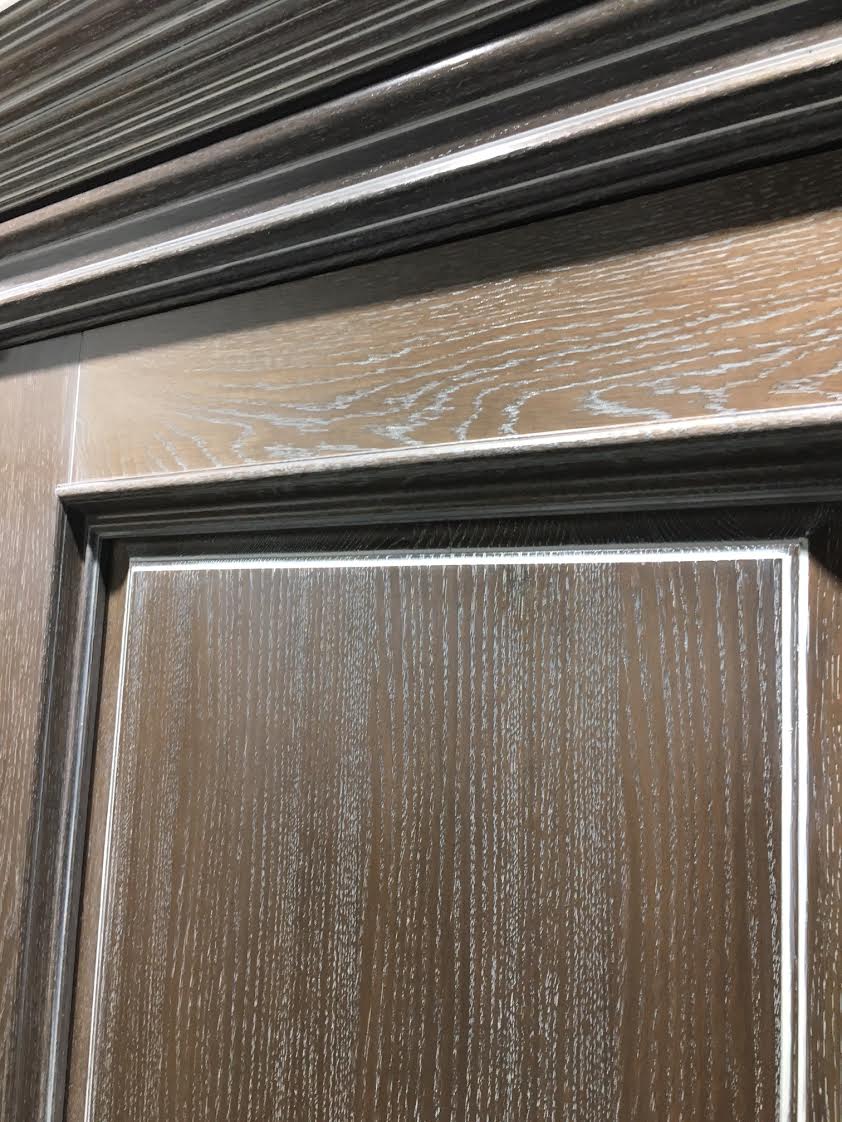
This is what I want for my bathroom vanity: a clear base color, yet with a well-defined white grain.
Isn’t this breathtaking??
So much more interesting with the highlighted grain!
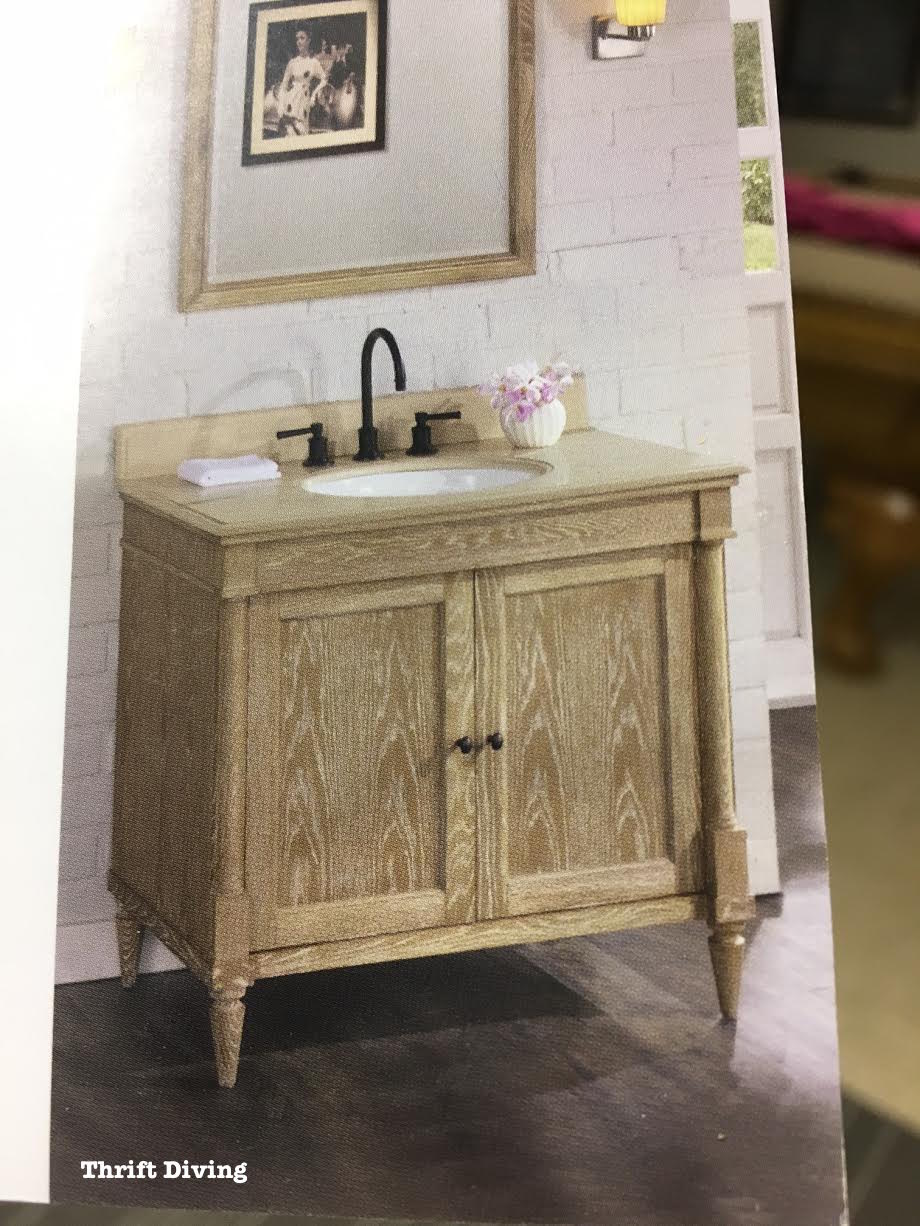
I also saw a cerused weathered oak vanity in a catalog and thought, “Yasssss….this is the look I’m going for!”
But I’ve been trying to achieve this cerused oak look and it’s not turning out exactly as I’d hoped.
As a result, trying to find answers to my problem led me down this path of understanding more about wood finishing.
Now, I feel hooked and soooo excited to discover a whole world of finishing that I didn’t know existed! I really think it causes you to look at furniture differently when you know how much time and effort goes into achieving a certain look.
So here’s just a sampling of what I’ve learned so far in my research.
Lesson Learned #1: When You Build a Project, You Should Spend Just as Much Time Finishing It!
Twice now I’ve heard woodworkers share a little secret with me:
When you build a project (or strip a second-hand piece of furniture), plan to spend equal amounts of time finishing it as you did building or stripping it.
That’s right.
Don’t think just because you’ve done the “hard work” of building something or stripping something that now you can just coast by and slap on any ‘ole finish. Not only does the type of wood matter (since different woods accept stains differently), but the product you use matters just as much.
Click here to find out more about different types of woods in The Wood Database.
You’re guaranteed to have wasted your time if you don’t carefully plan how you’ll finish off the piece with dyes or stains, topcoats, etc.
This isn’t a step you want to breeze right on through.
You have to make up tons of sample boards with small pieces of your project wood just to make sure you’ve got the right finish and the right look for your project. Otherwise, guess what?? You risk ruining your project.
I guess I shouldn’t be too worried that it’s taken me months to finish this doggone DIY bathroom vanity, huh? LOL
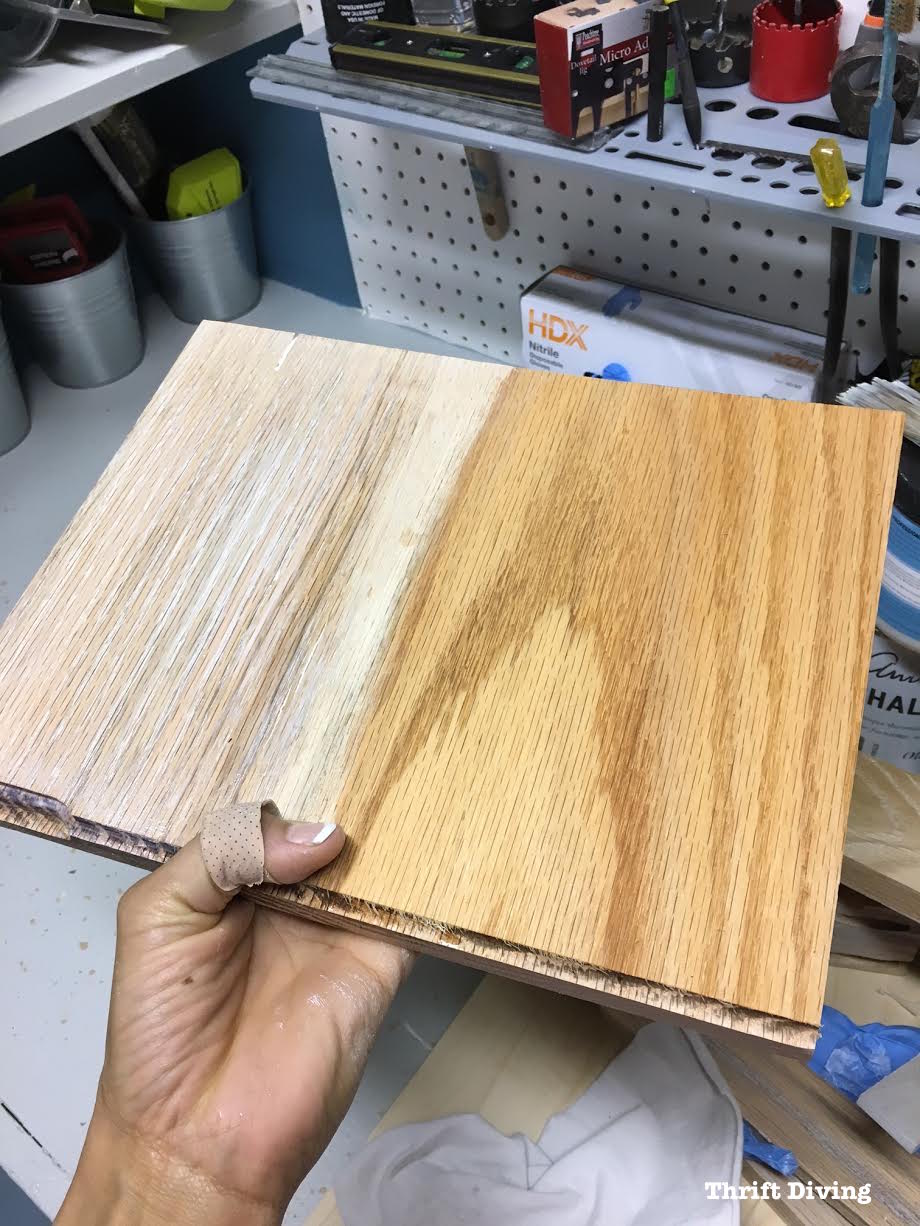
Here I’ve tested several large sample boards to see how different stains, waxes, finishes look.
Lesson Learned #2: There’s a Difference Between Wood Dyes and Wood Pigments?!
I’ll be honest with you.
I didn’t know there was such a thing as wood dyes. (I know, I’m a moron).
Because I’ve never worked with wood much (aside from painting it) I assumed that Minwax was the “end all, be all” of wood refinishing. I’m being fascitious, but really, aside from a few other products, I really didn’t think there was that many options to wood refinishing.
Like wood dye stains.
The stains I’m most familiar with are oil-based pigment stains (or water-based gel stains) that you can buy at The Home Depot.
What I didn’t know is that these types of pigment stains color wood by sitting on top of the wood.
There’s not much flexibility in changing the color. You can darken it up slightly, maybe add another color, and even mix them together to create different shades.
But there’s not much flexibility in changing the color much once you’ve applied it.
That’s not the case with most wood dyes.
Wood dyes actually penetrate the wood and color the wood itself. It’s more susceptible to fading so I’ve learned that you shouldn’t have it sitting in the direct sunlight.
But generally, these dyes are super flexible in being able to create the right shade.
They can be powdered, pre-mixed in liquid, or in a concentrated form that can be diluted or mixed in with topcoats for hints of color.
Everywhere that I researched said that water-soluble wood dyes (i.e. that can be mixed with water) are easier to work with and are more forgiving than alcohol-soluble dyes, in that they won’t dry out so quickly when applying.
And if you put on a water-soluble dye too dark?? Just wipe with water to remove some of the color.
Sounded very easy!
So off to the woodworking shop I went to get a few (at $12.50 each).

The ones I bought are called Homestead Transfast water-soluble wood dye stains.
(You can also buy them on Amazon.com).
Apparently, a little bit goes a looonnnng way, so you only have to mix a teeny bit of this powder with water to get a nice deep color.
P.S. The dye powder on the right is turquoise!
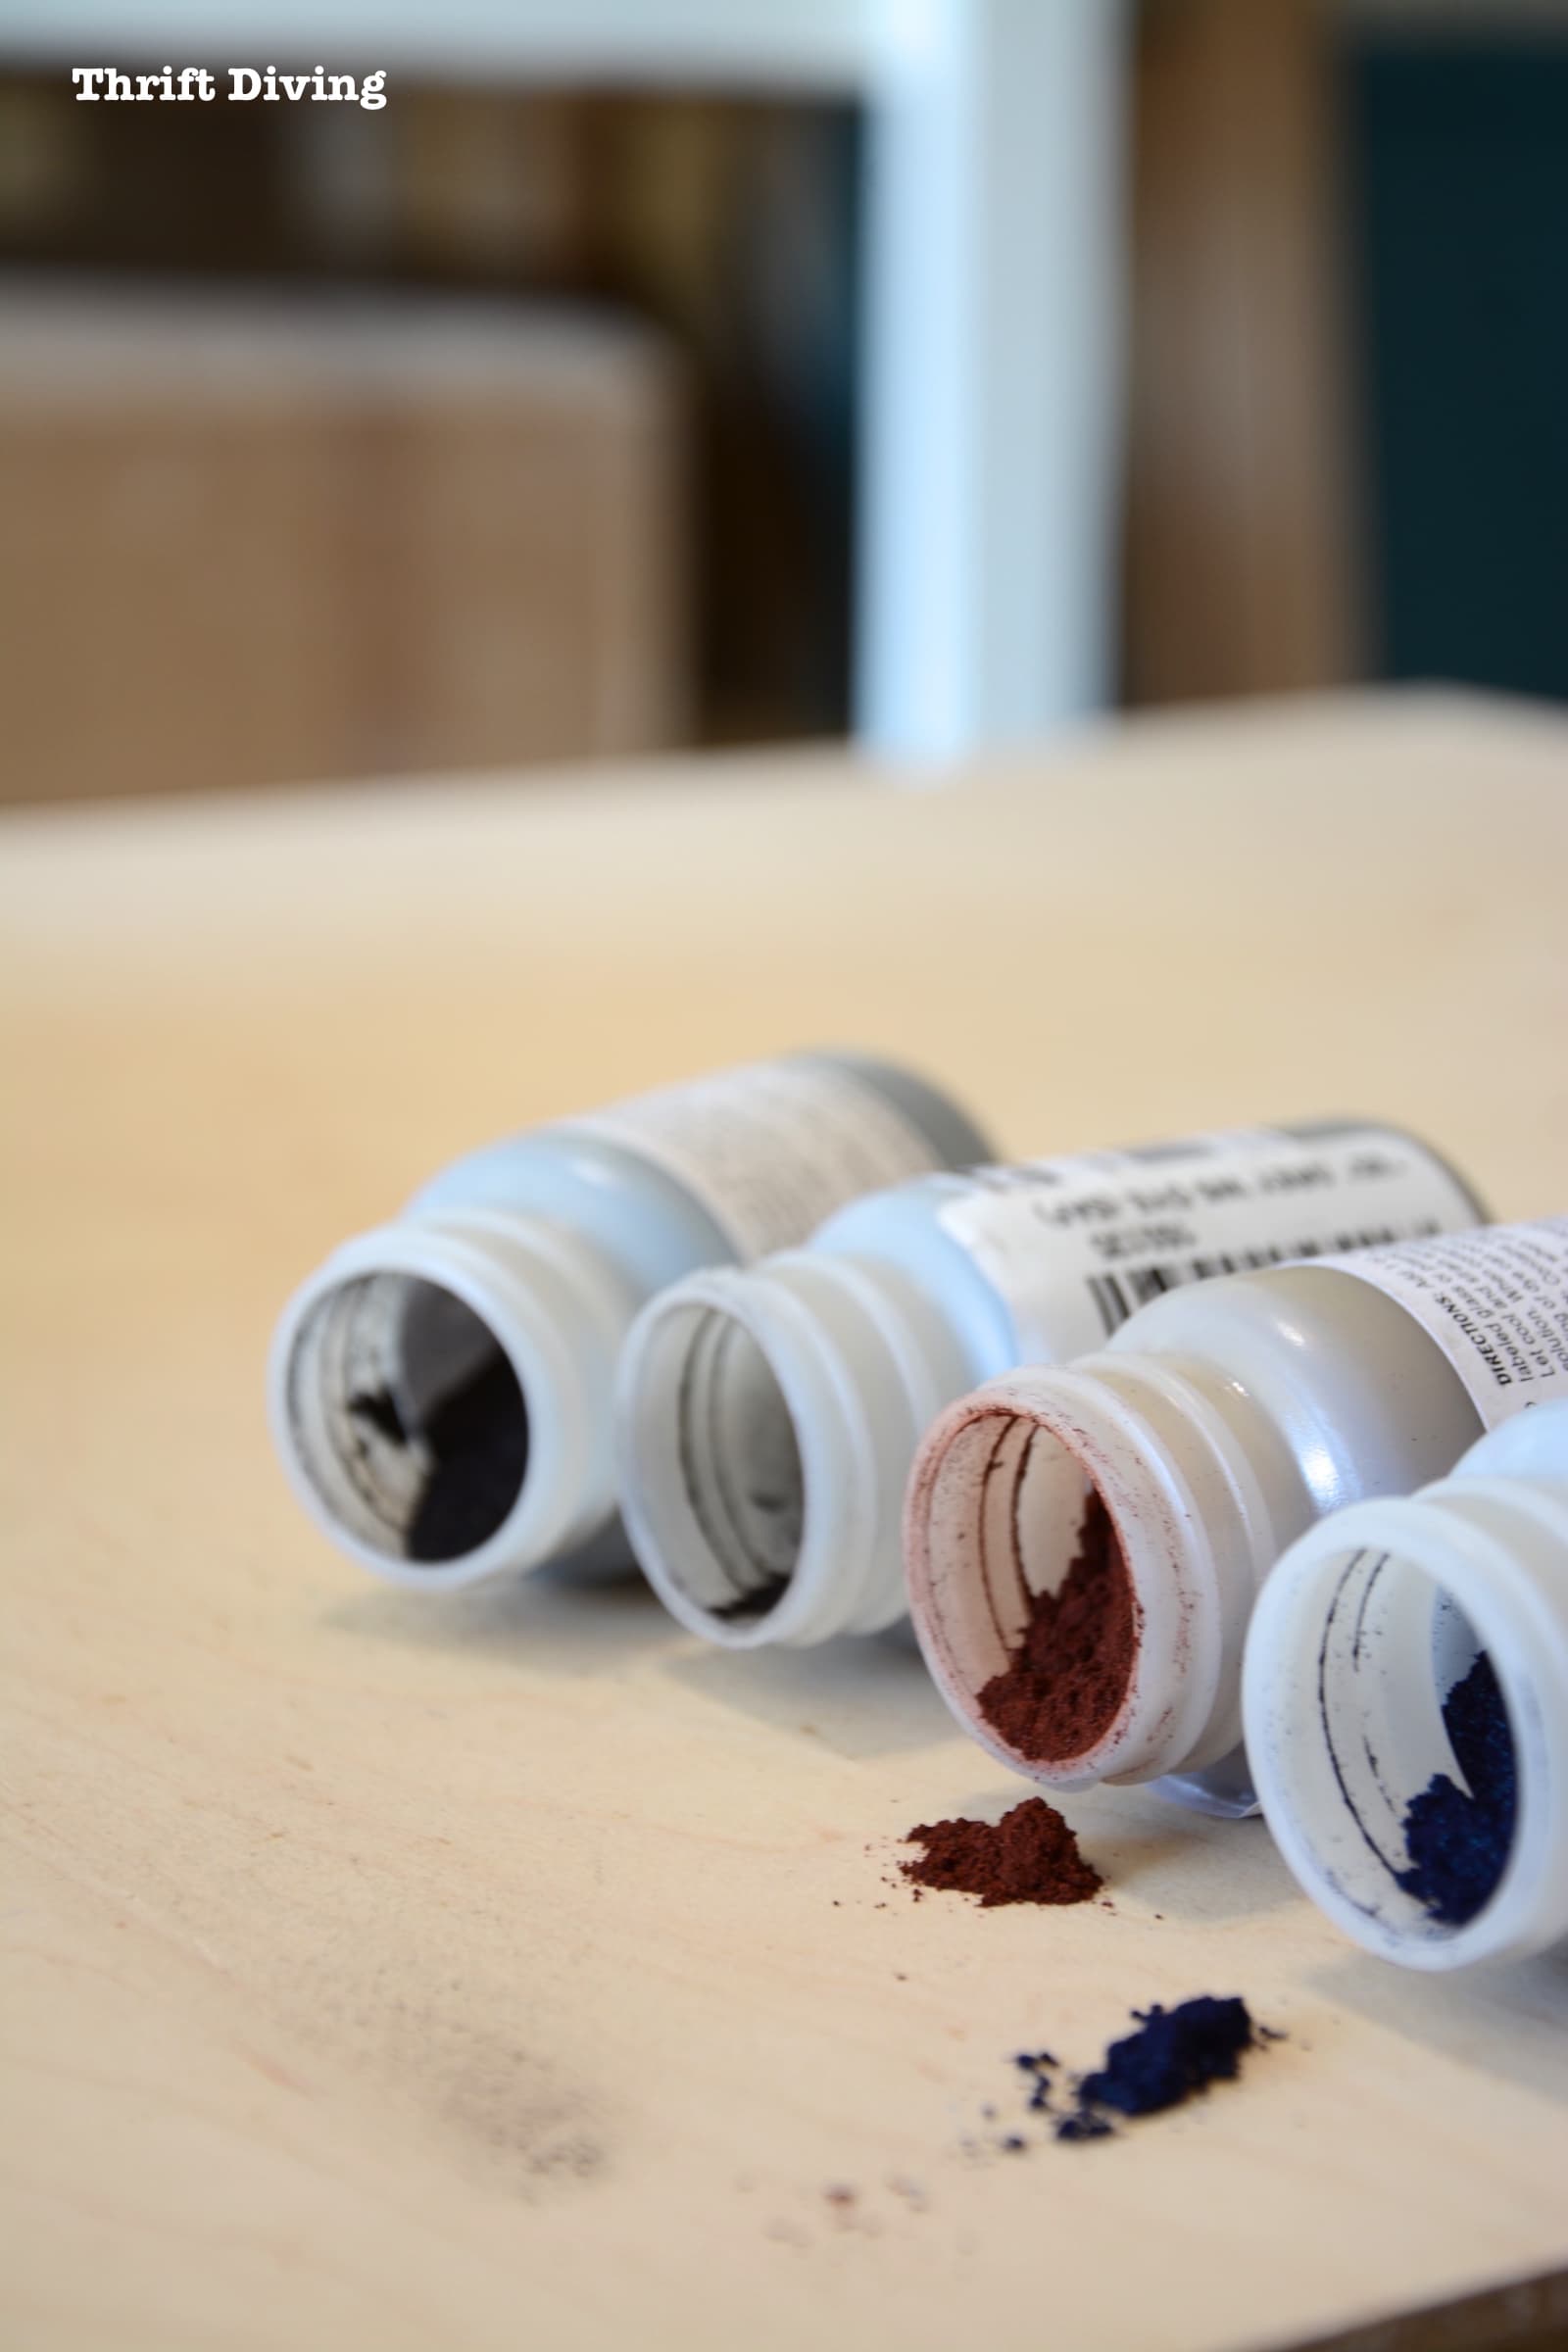
I haven’t sampled this wood dye stains yet but I’m itching to do it!
This YouTube video does an excellent demonstration on using wood dyes!
This video talks about using General Finishes dye stains, which come pre-mixed. I’m curious to try those, too!
Lesson Learned #3: You MUST Learn the Difference Between Polyurethane, Varnish, Shellac, and Lacquer
See the article link below for a good explanation of the differences.
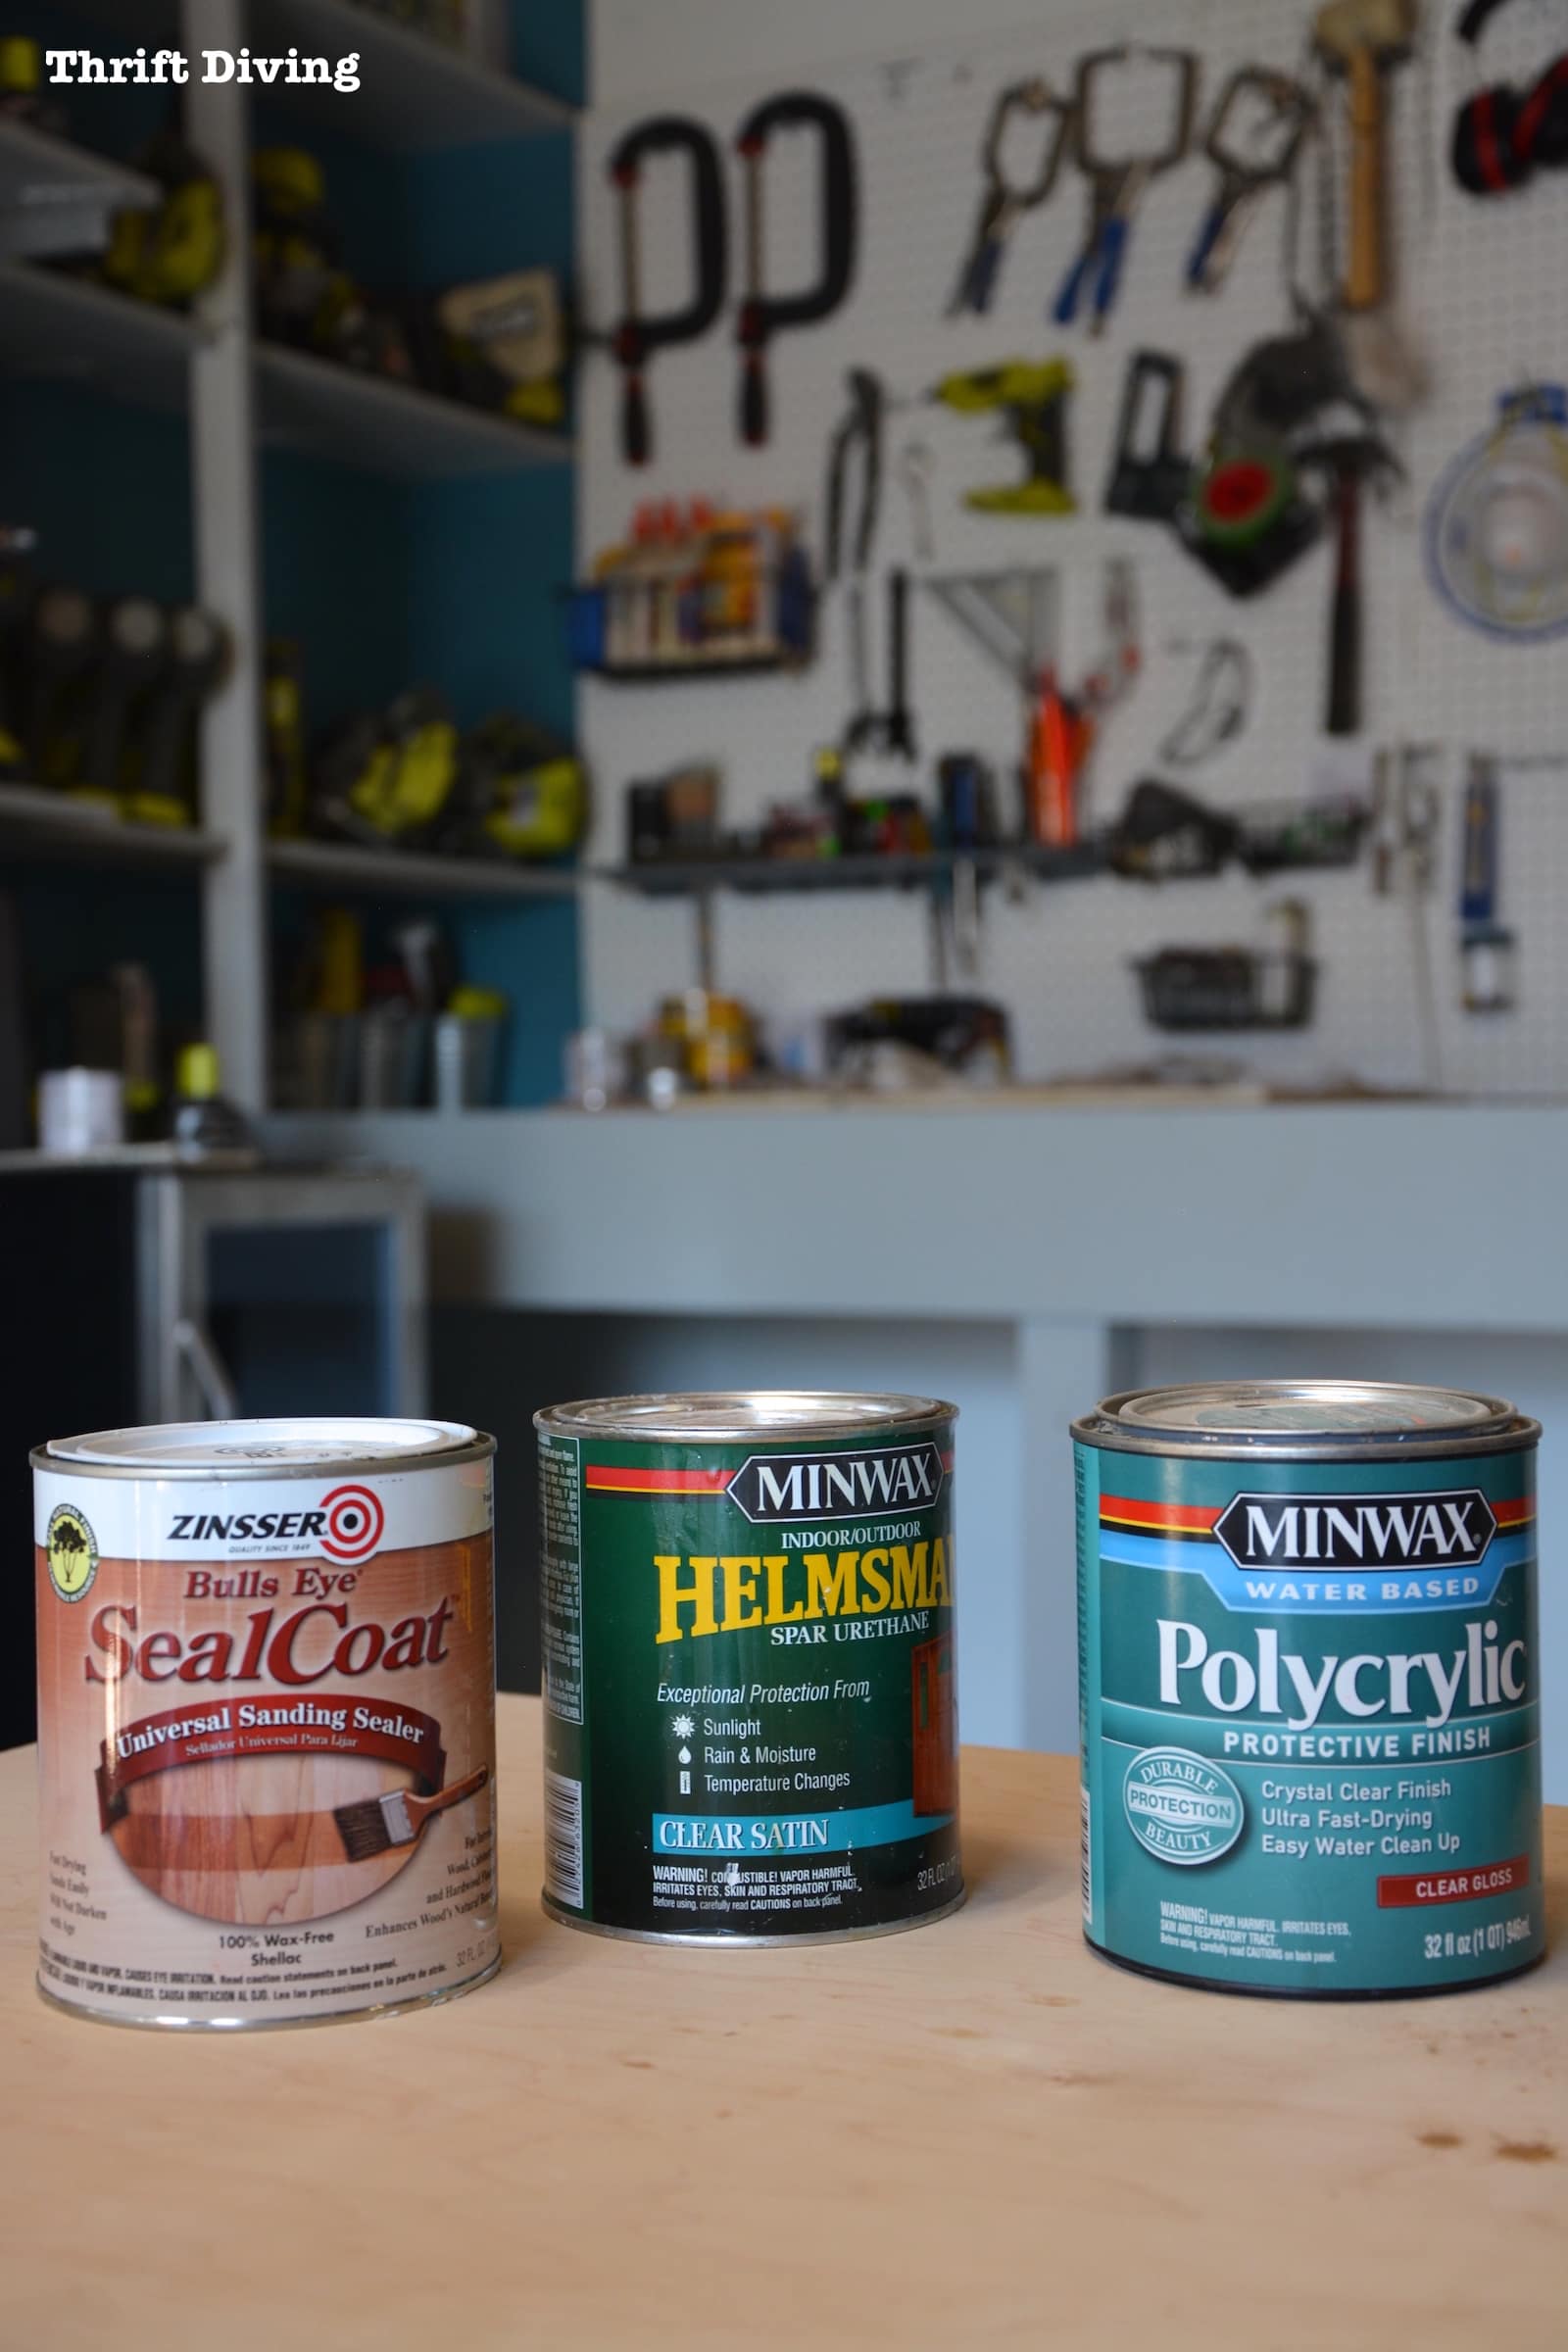
One thing to know is that oil-based polyurethanes can turn yellow when applied to light colors of paint. So it’s been recommended to use the water-based Polycrylic.
In my experience, however, I’ve even had Polycrylic turned light-colored chalk paint a nasty yellow color. Now, I won’t use it over light colored paints. But for stains, it has worked fine.
I am actually using the Spar Urethane (green can) on my bathroom vanity on the inside/backside of my vanity to help seal out moisture.
It would be so easy if someone would just make an app that you could plop in your wood type and a few other bits of info and it would just spit out a recipe for which products to use and how. Wouldn’t that be sweet? I think I need to jump on that…Could make millions, I tell ya….LOL
Click here to read an easy-to-understand article on understanding the differences between these finishes: What’s the Difference Between Polyurethane, Varnish, Shellac and Lacquer?
Lesson Learned #4: Sanding Sealer is Your Best Friend
Until recently, I had never even heard of sanding sealer!
But I’ve learned it can become your best friend because it has so many uses.
I won’t list them all here, but this article does a great job of explaining its many uses.
One benefit is that it helps to create barriers between wood dyes and top coats (watch the video above and you’ll understand what that means). With water-based wood dyes, when you’re applying your water-based top coat, it may cause some of the stain to come off. To help prevent that, a thin coat of sand sealer shellac is perfect for sealing in that dye. It must be the dewaxed shellac.
Also, have you ever sanded furniture and then get bleed through from the old stain into the fresh paint?
Well, a coat of sand sealer over the sanded down furniture can help prevent bleeding through of your paint.
There are so many other uses, but I won’t get into them all. Plus, I’m trying to still learn its many uses!
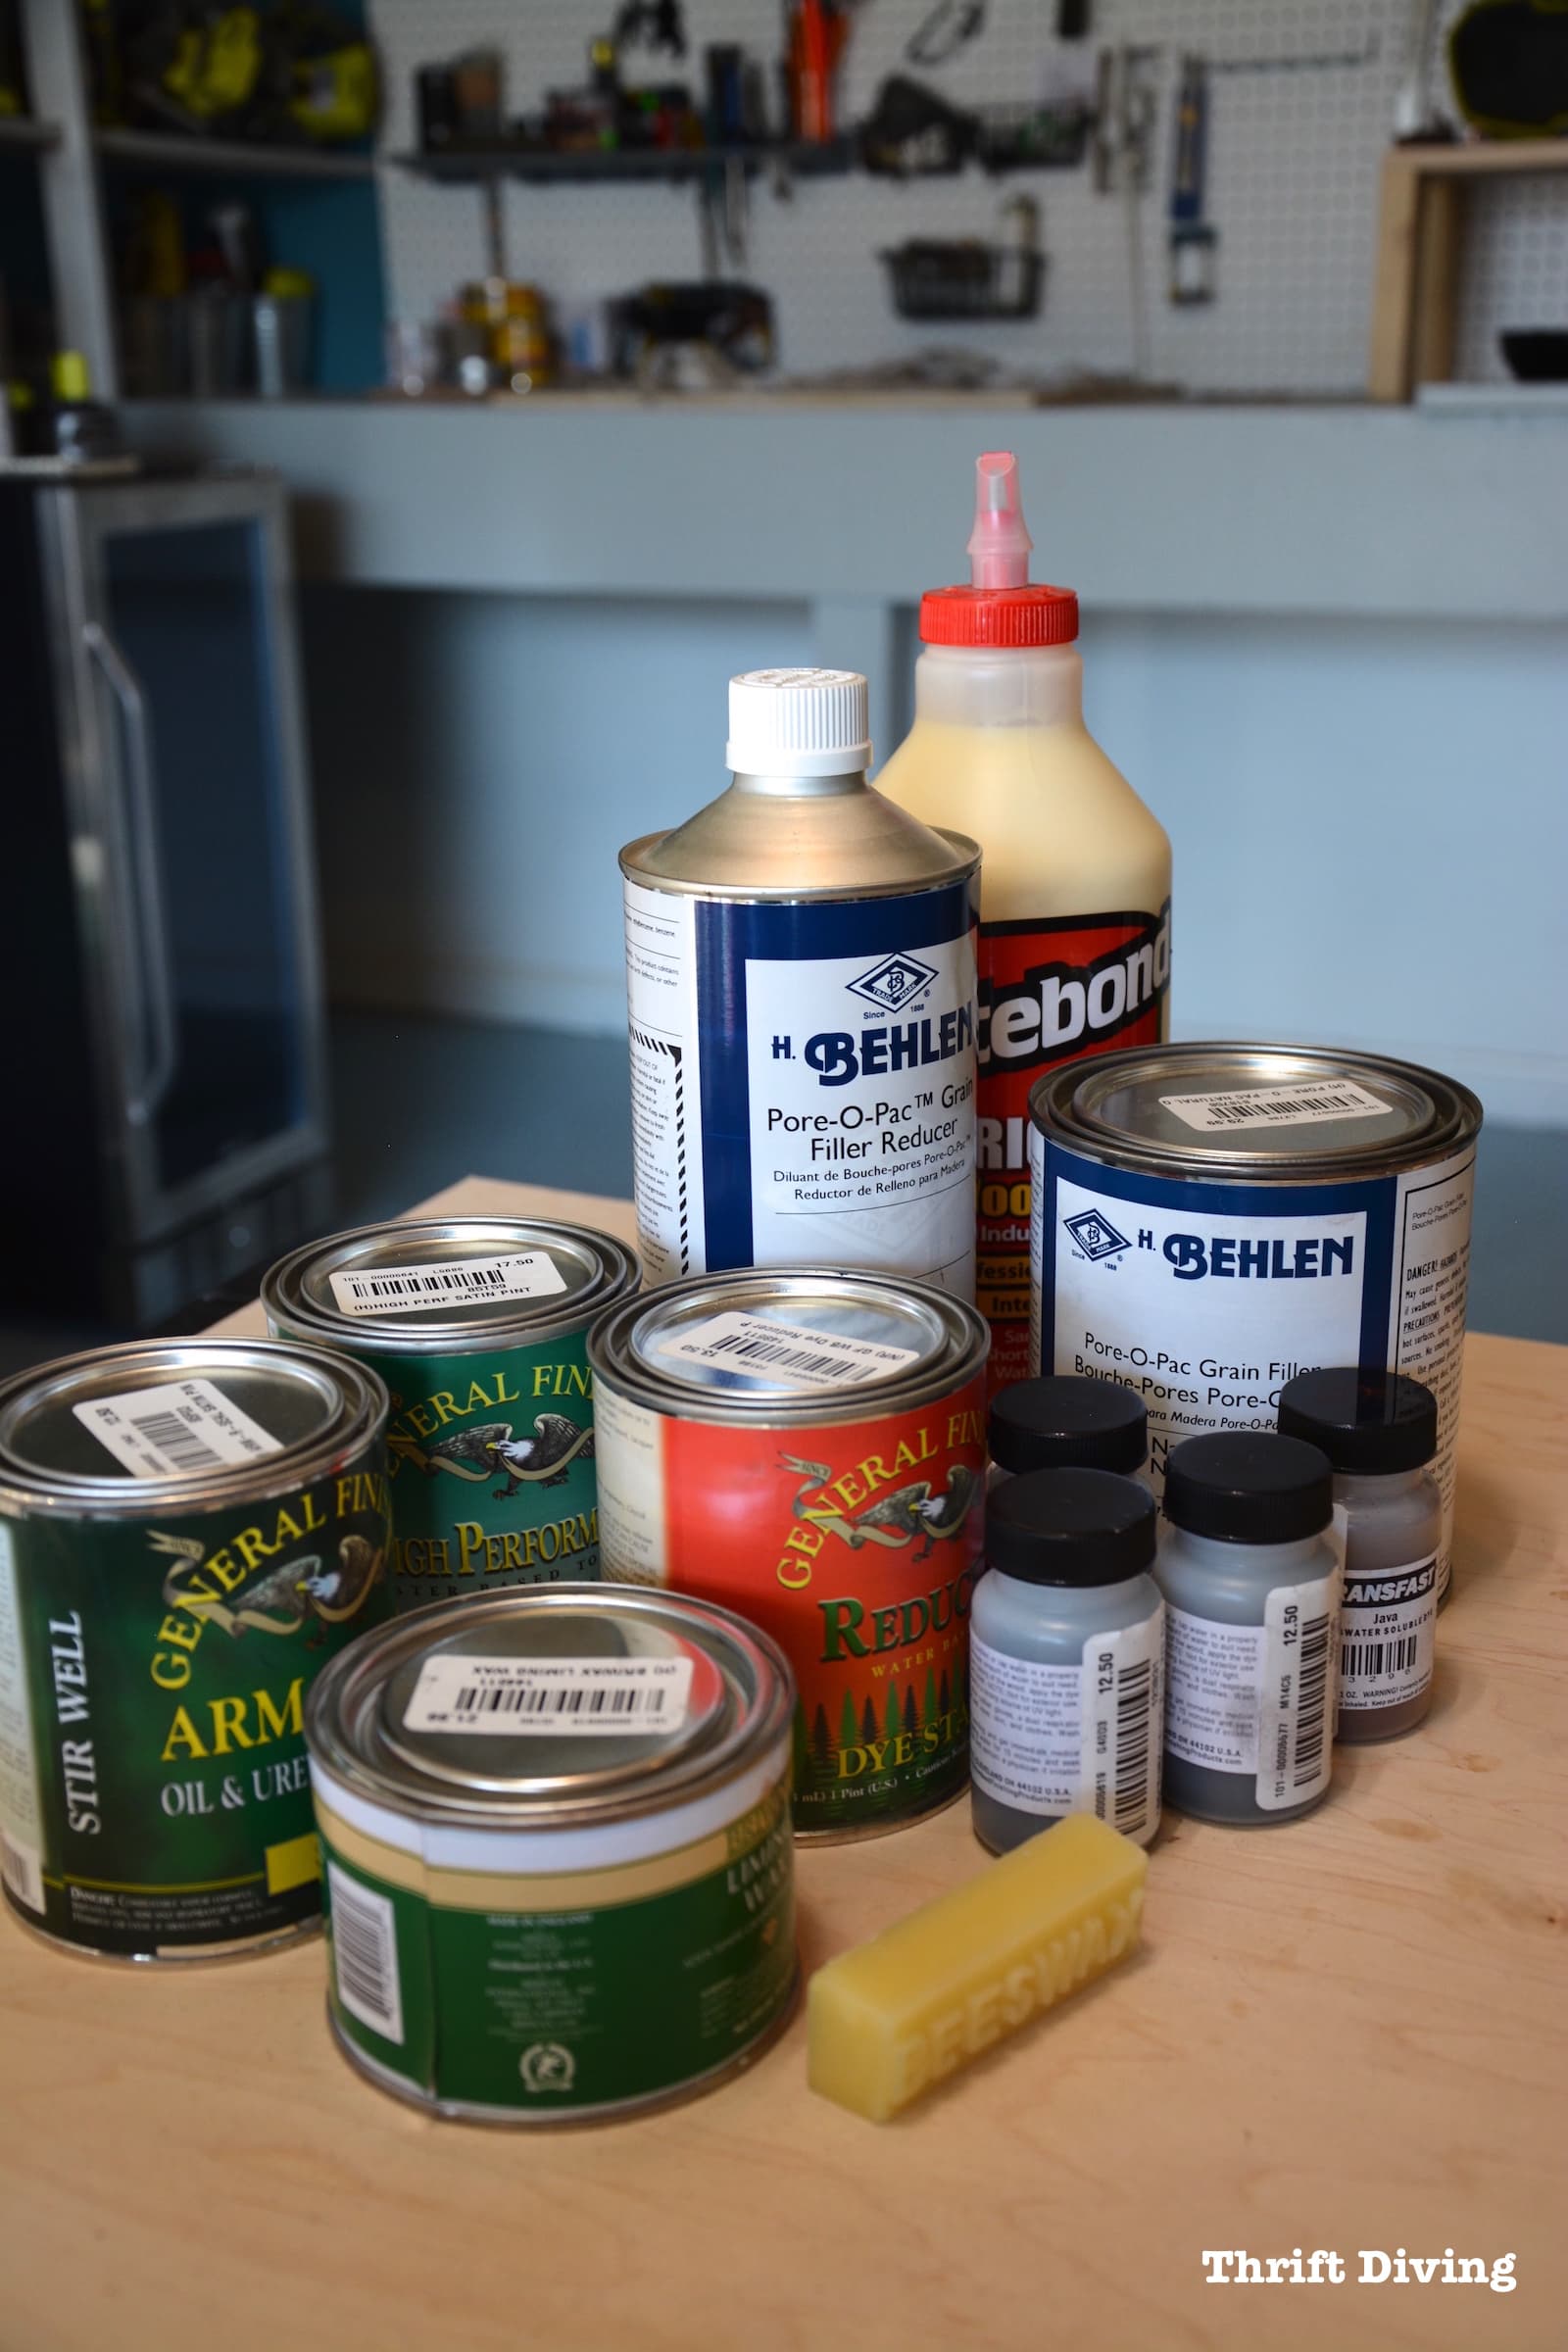
But….I do have to say, that you should have SealCoat dewaxed shellac in your DIY toolbox because I guarantee you’ll need this at some point. It sands easily, too.
You can’t buy it at The Home Depot or other big box stores. You’ll have to buy it on Amazon or at your local woodworking store.

Lesson Learned #5: What in the World is Grain Filler??
I have never heard of grain filler.
Until recently.
The basic idea is that porous woods should have their grain filled if you want them to be as smooth as glass.
Think of grain filler as the stuff that plugs up all the holes so that you’re left with a super smooth surface.
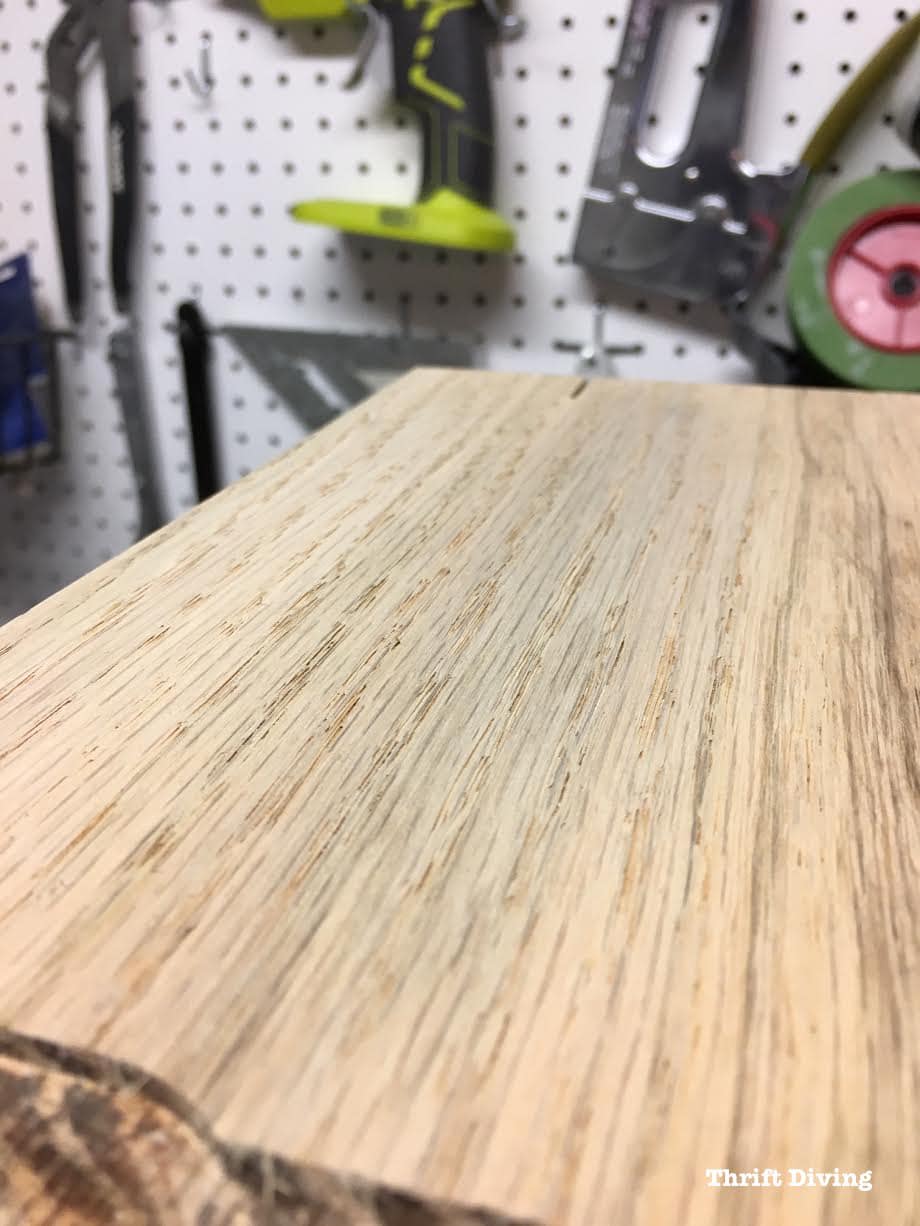
If you’re finishing something and want it to be smooth as butter, sand sealer is the way to go on very porous woods where you can see the grain (like Red Oak).
But I’ve learned that many woodworkers like the look of finished wood with a rough, bumpy open grain look. I think it all depends on the look you’re going for.
This is what Red Oak looks like when water touches the bare wood: the grain raises and suddenly it’s suuuuuper noticeable.
See all those pores??
I want a white grain on a natural or slightly tinted wood.
I think I may have figured out how to get the weathered oak look, but you’ll have to stay tuned until I figure out if this process will work for my DIY bathroom vanity! 🙂
This is the grain filler I bought, Pore-O-Pac by Behlen, Natural.
From what I’ve read, when you’re using this grain filler, you should use a filler reducer mixed in so that it prevents the grain filler from drying too quickly. This gives you time to work it into the grain and then remove it.
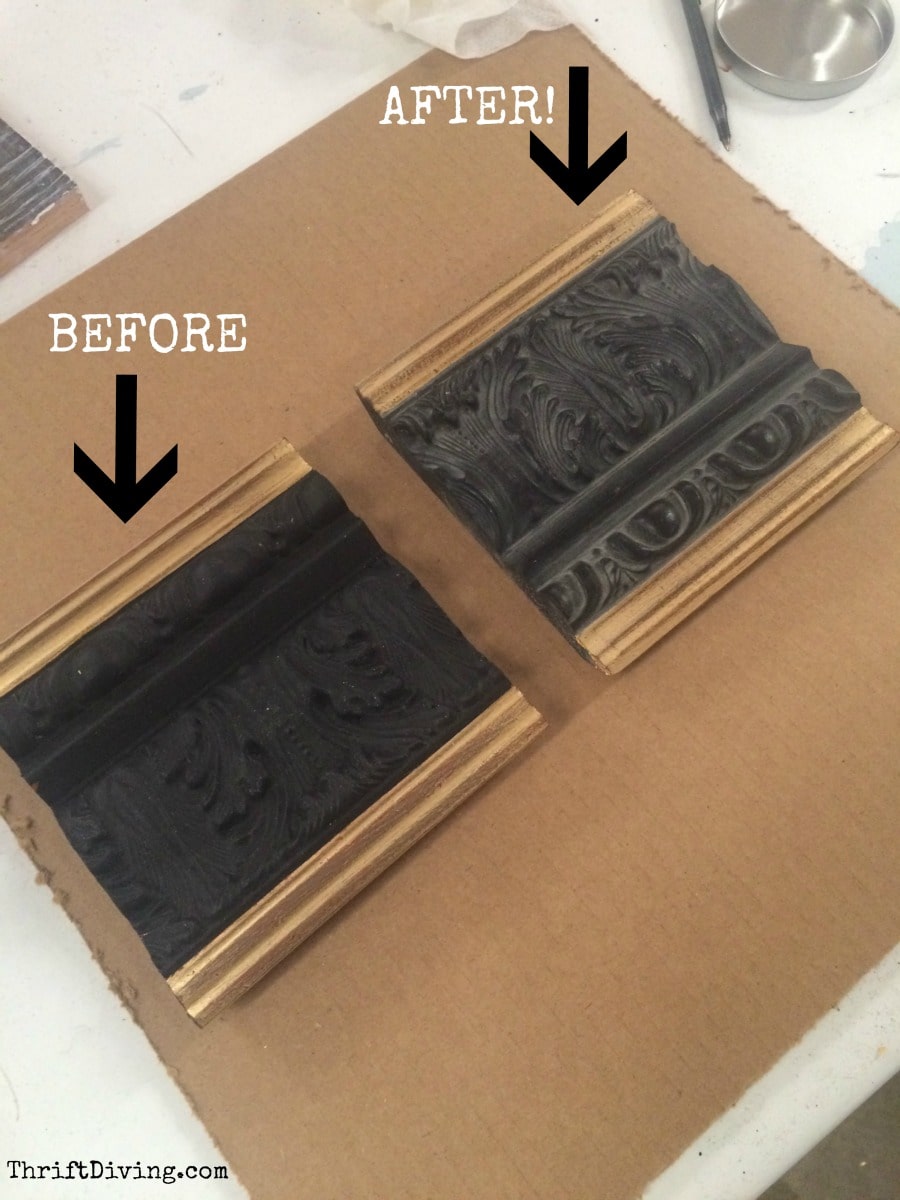
The secret to getting complimentary or contrasting grains in porous woods like Red Oak is to use a grain filler that’s colored!
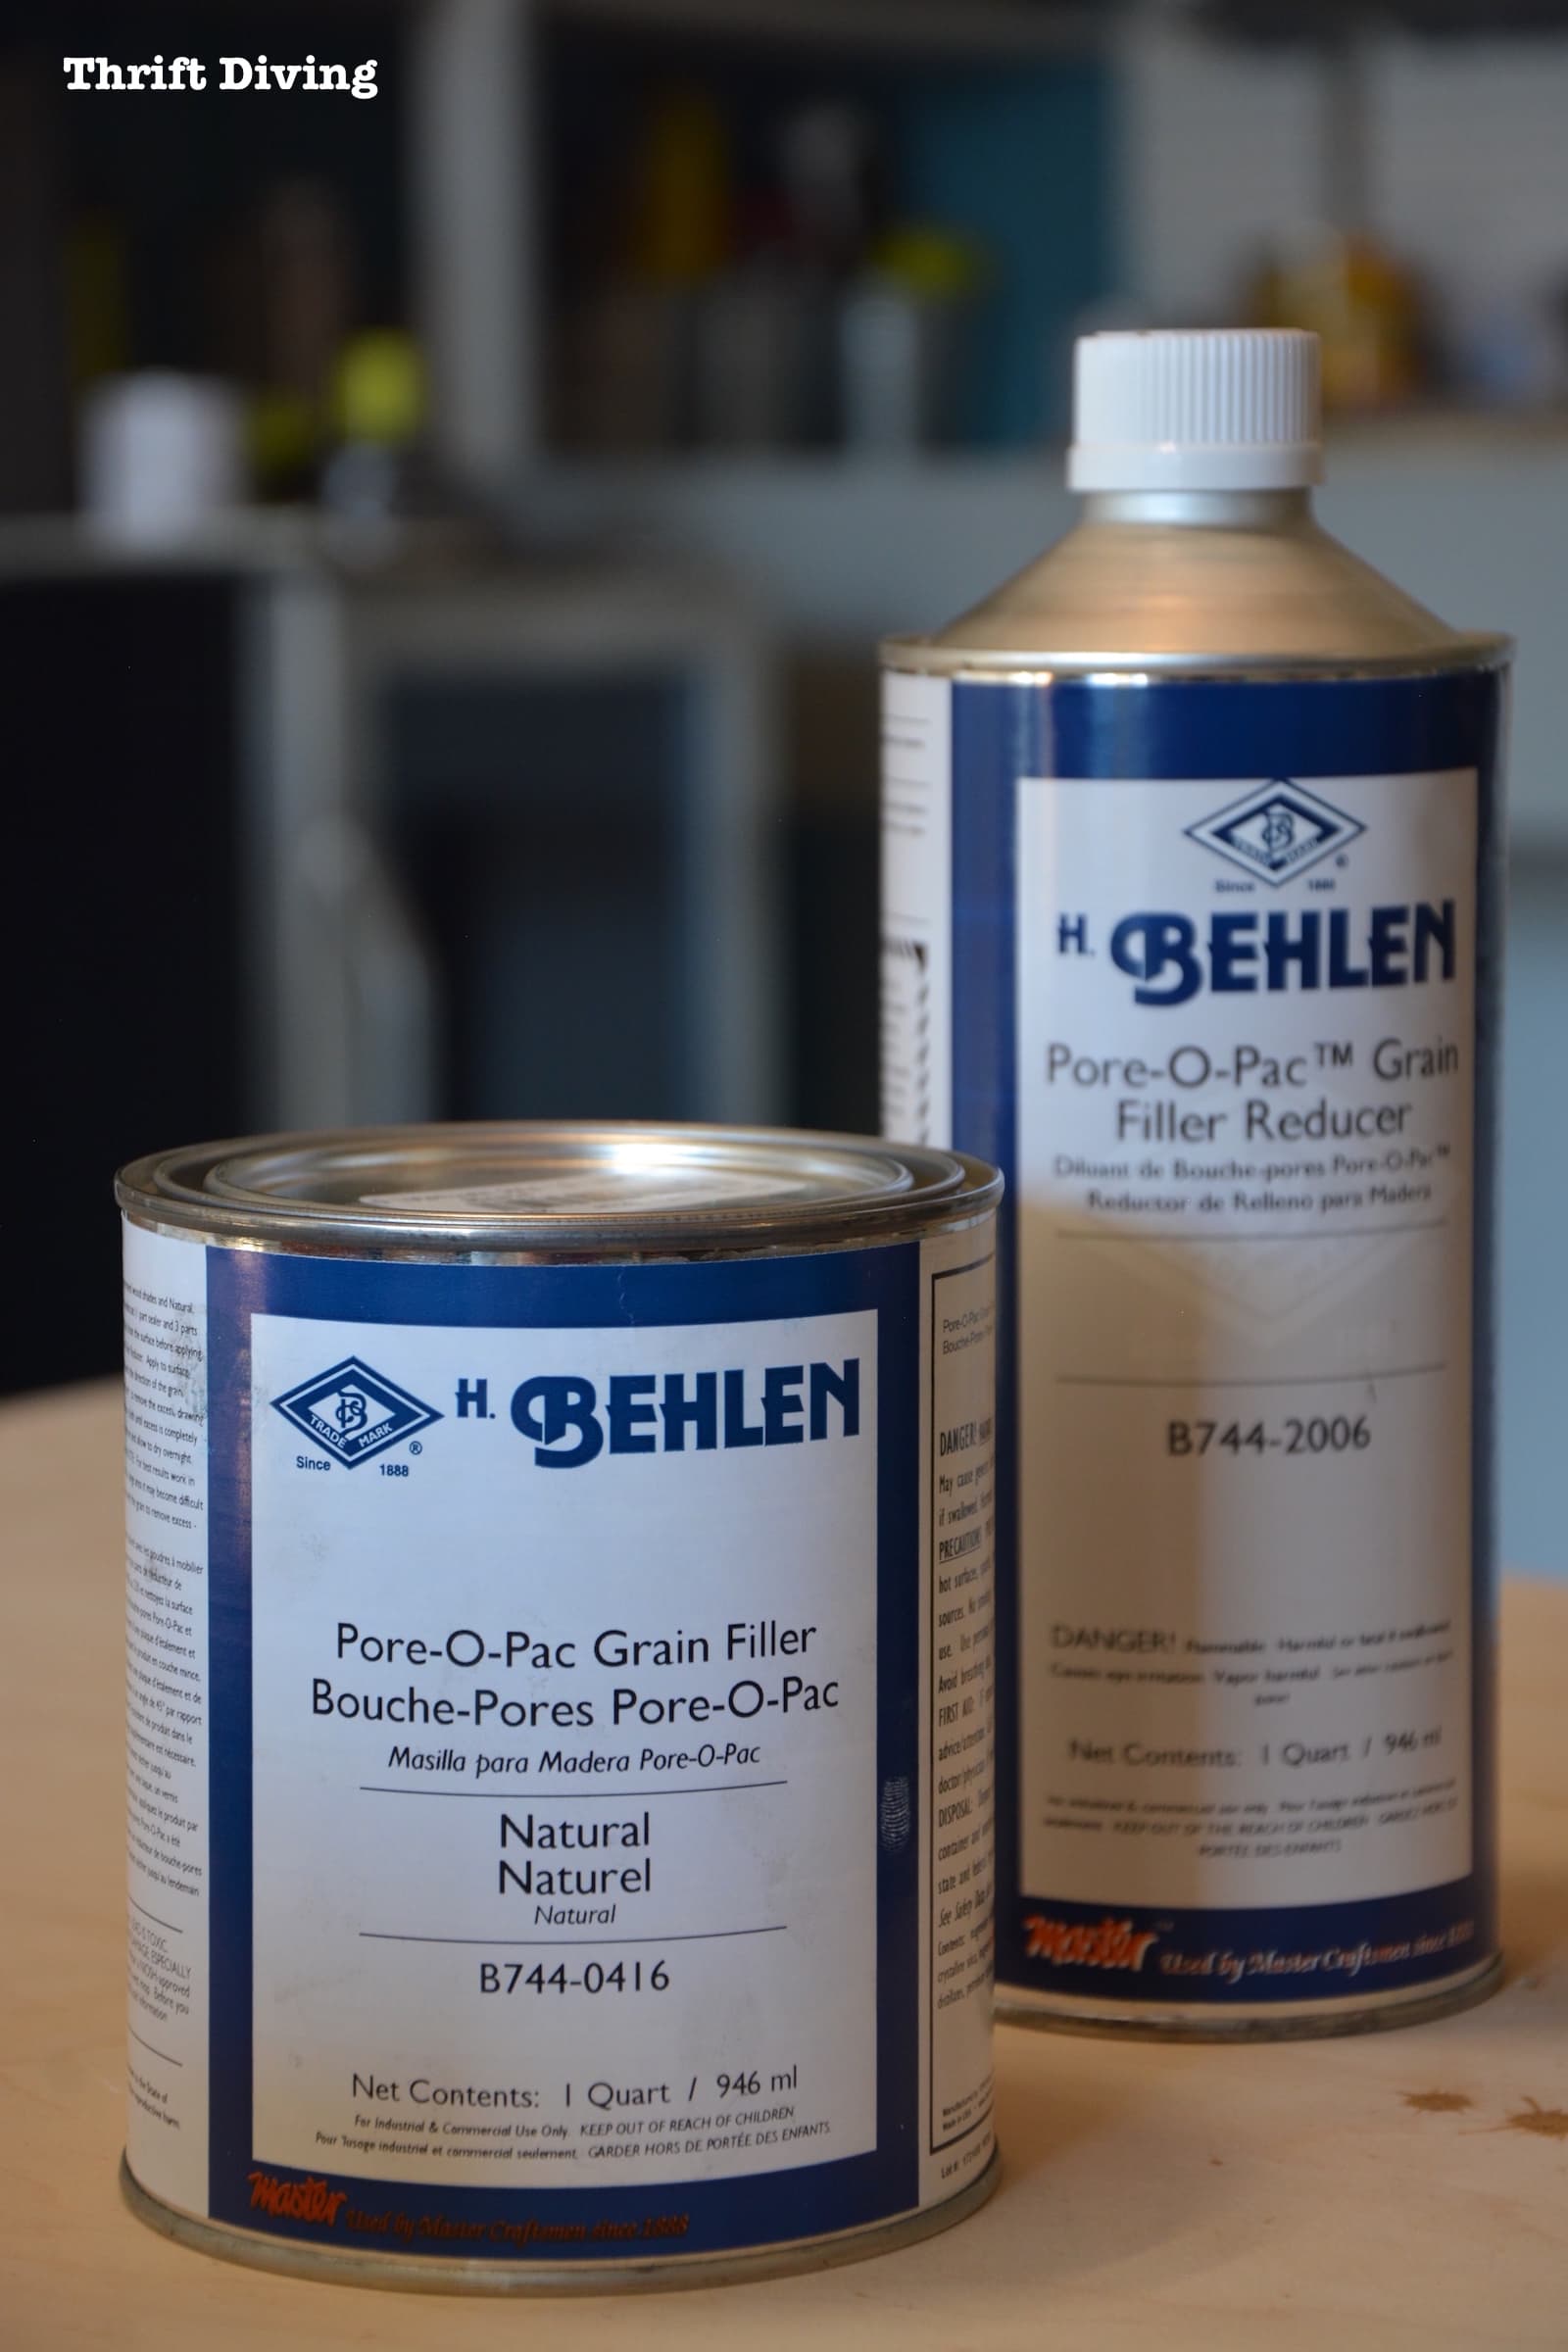
If you use a grain filler mixed with white universal tints (Oxide White), you can easily achieve a finish in Red Oak that looks like this bathroom vanity. Plus, it would smooth out the surface of the wood.
(P.S. I’ve not used my grain filler yet, so I can only speak to what I have read so far).
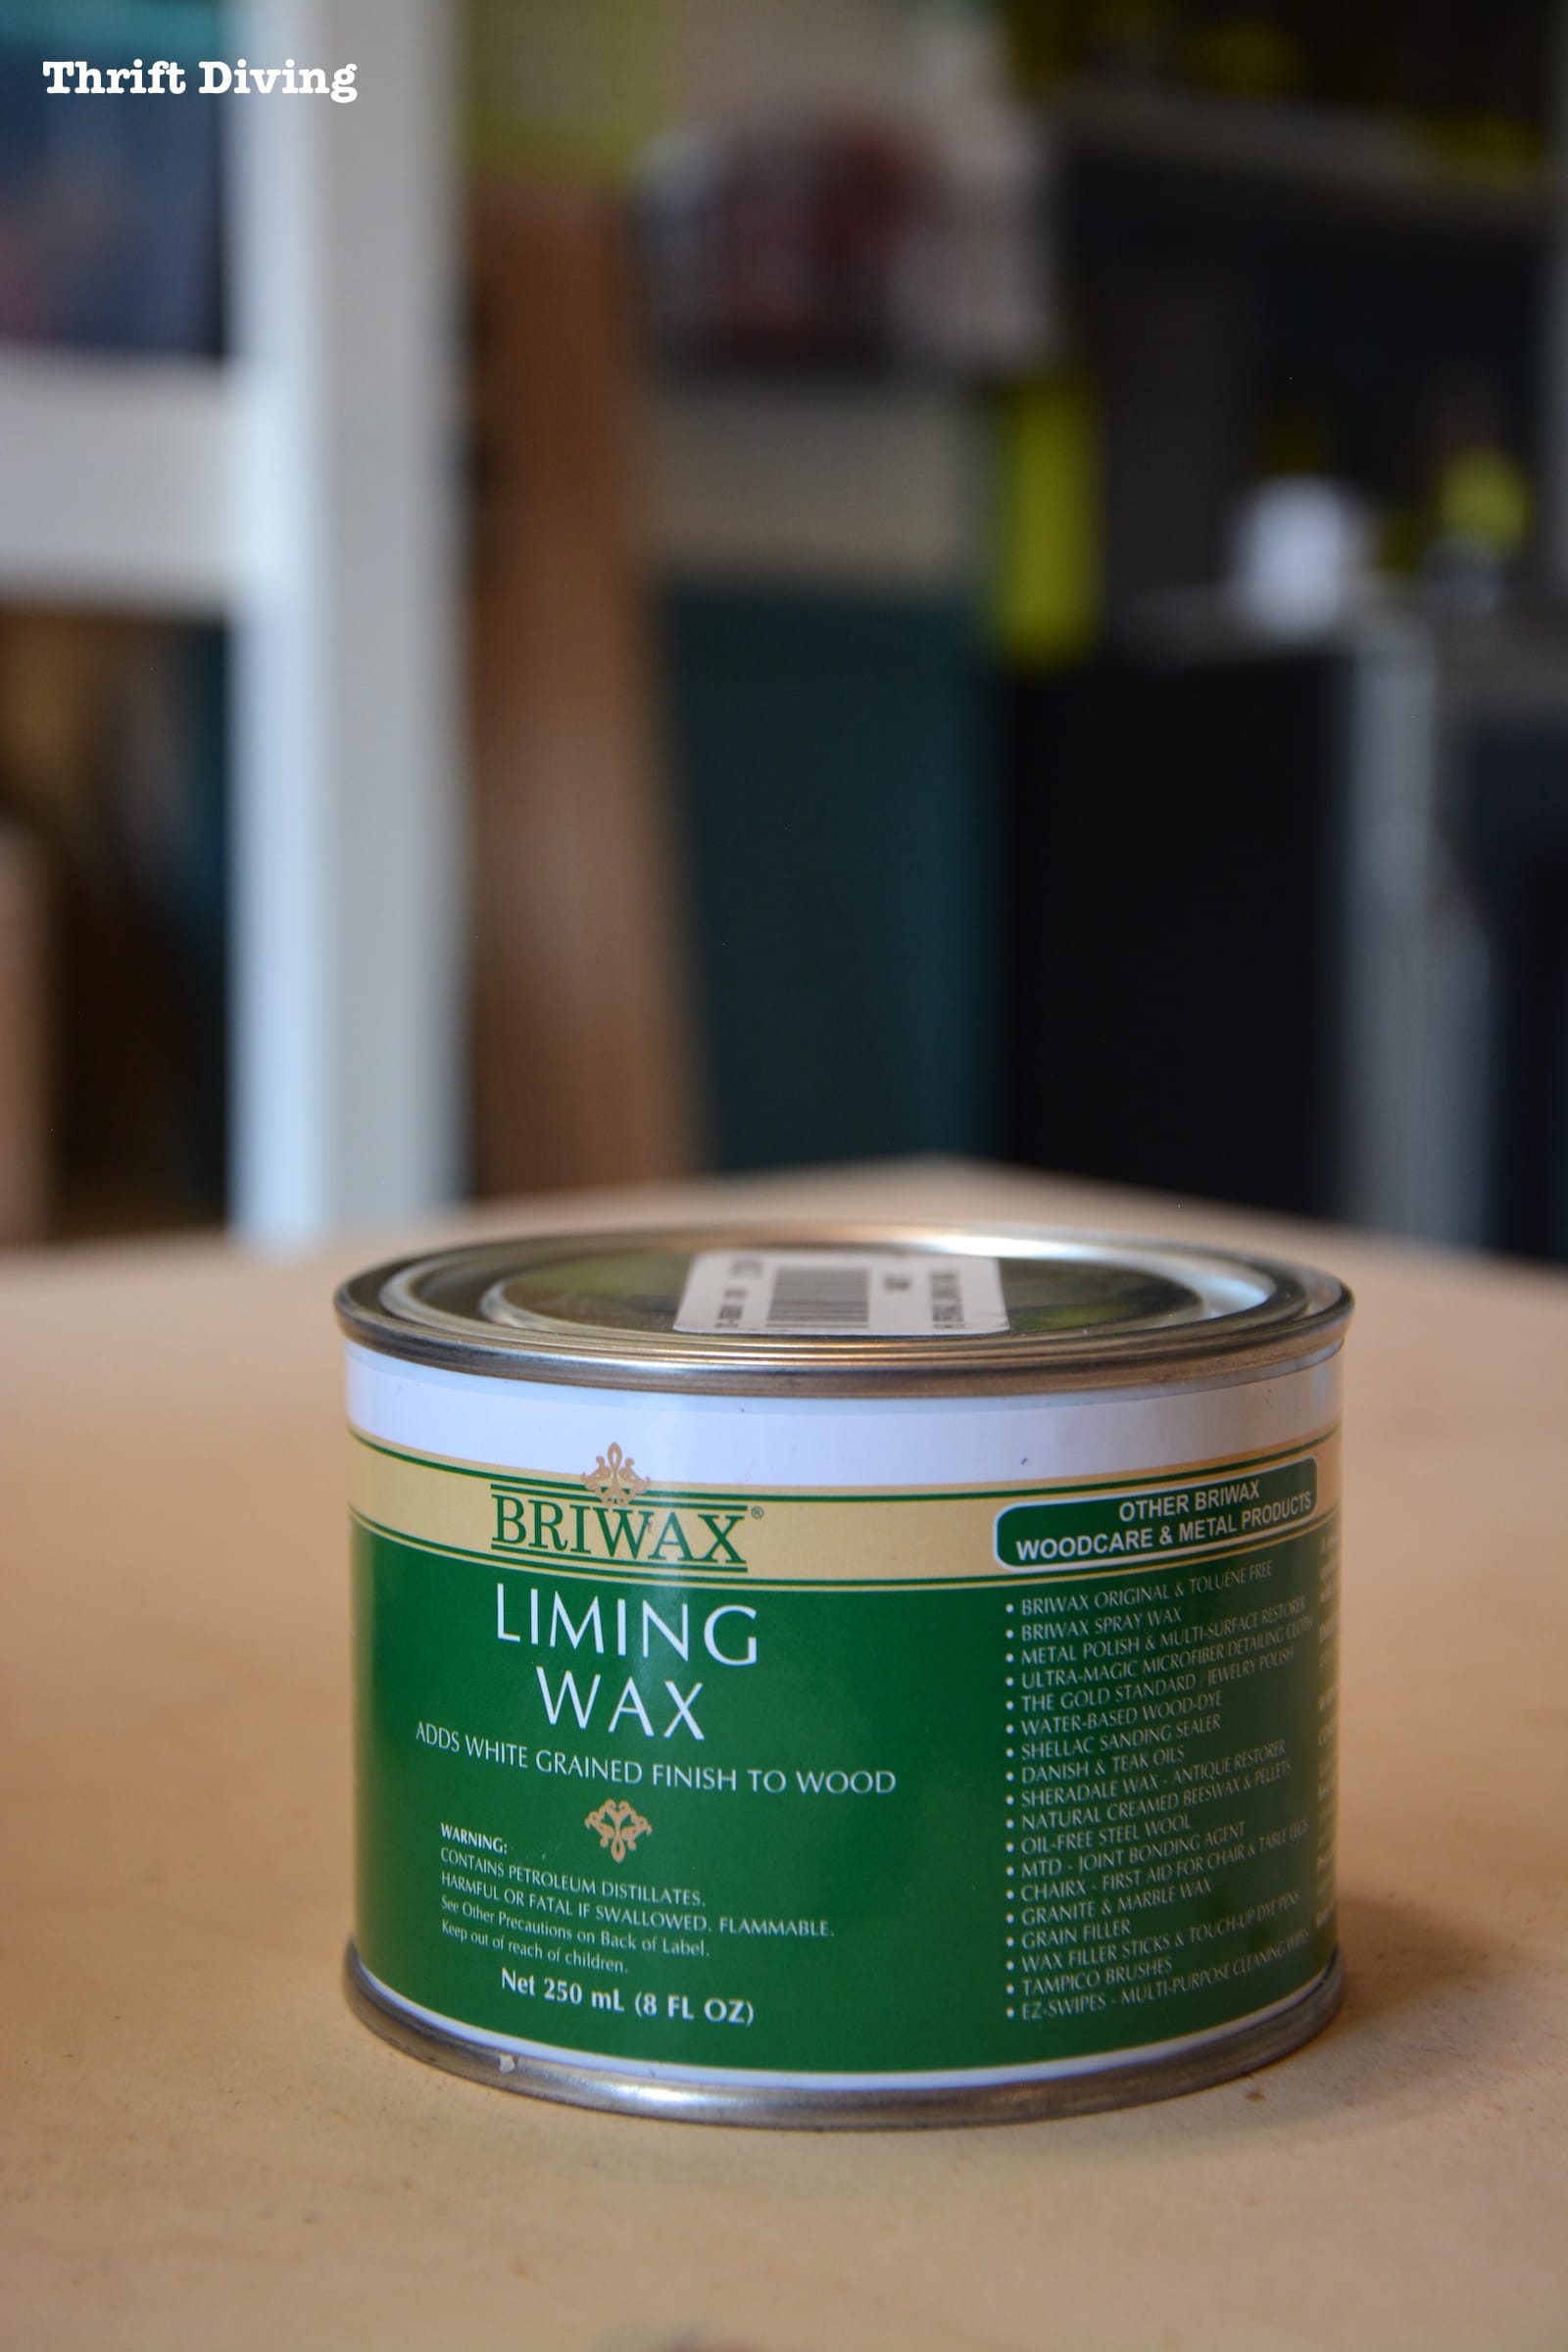
I also bought some white Briwax liming wax, which can also do the same thing to highlight the grain of Red Oak.
But I’m not sure yet if liming wax will do as great of a job as the white grain filler.
I’ll keep you posted on that experiment soon….You know I’ll be doing 10,000 more sample boards to find out! LOL
Lesson Learned #6: What is Glue Size?
Have you ever stained a project and the edges turned darker??
This is a good example below.
When I sanded down and restained this $5.00 thrifted oak coffee table, the ends were much darker than the top.
I just figured, “Oh well, that’s what wood stain does!”
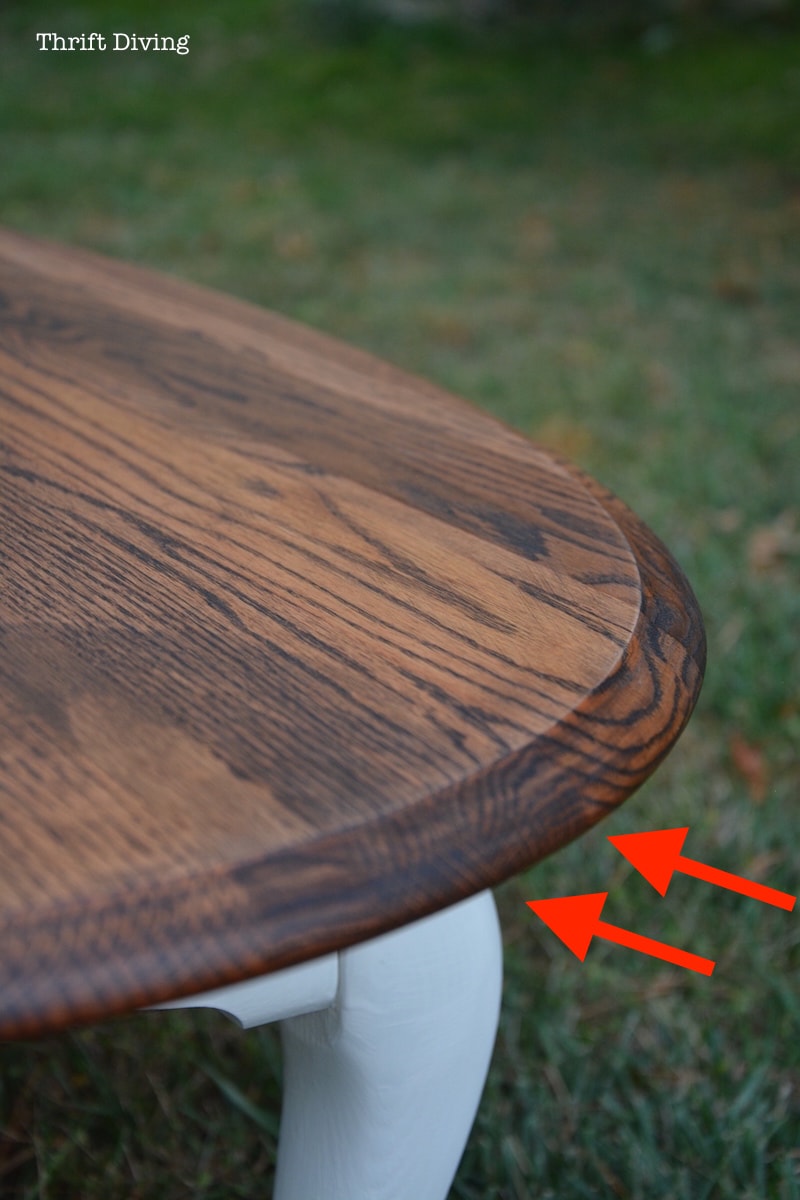
But the reason why is because the end of wood is like a straw. That’s how wood sucked up water when it was still a tree. 🙂
So if you’re staining a piece of wood, the end will suck up stain as it sucked up water–often times, way too much stain.
The result?
You get ends that are much darker than the face of the board. And then you’re kicking yourself on why it didn’t turn out right.
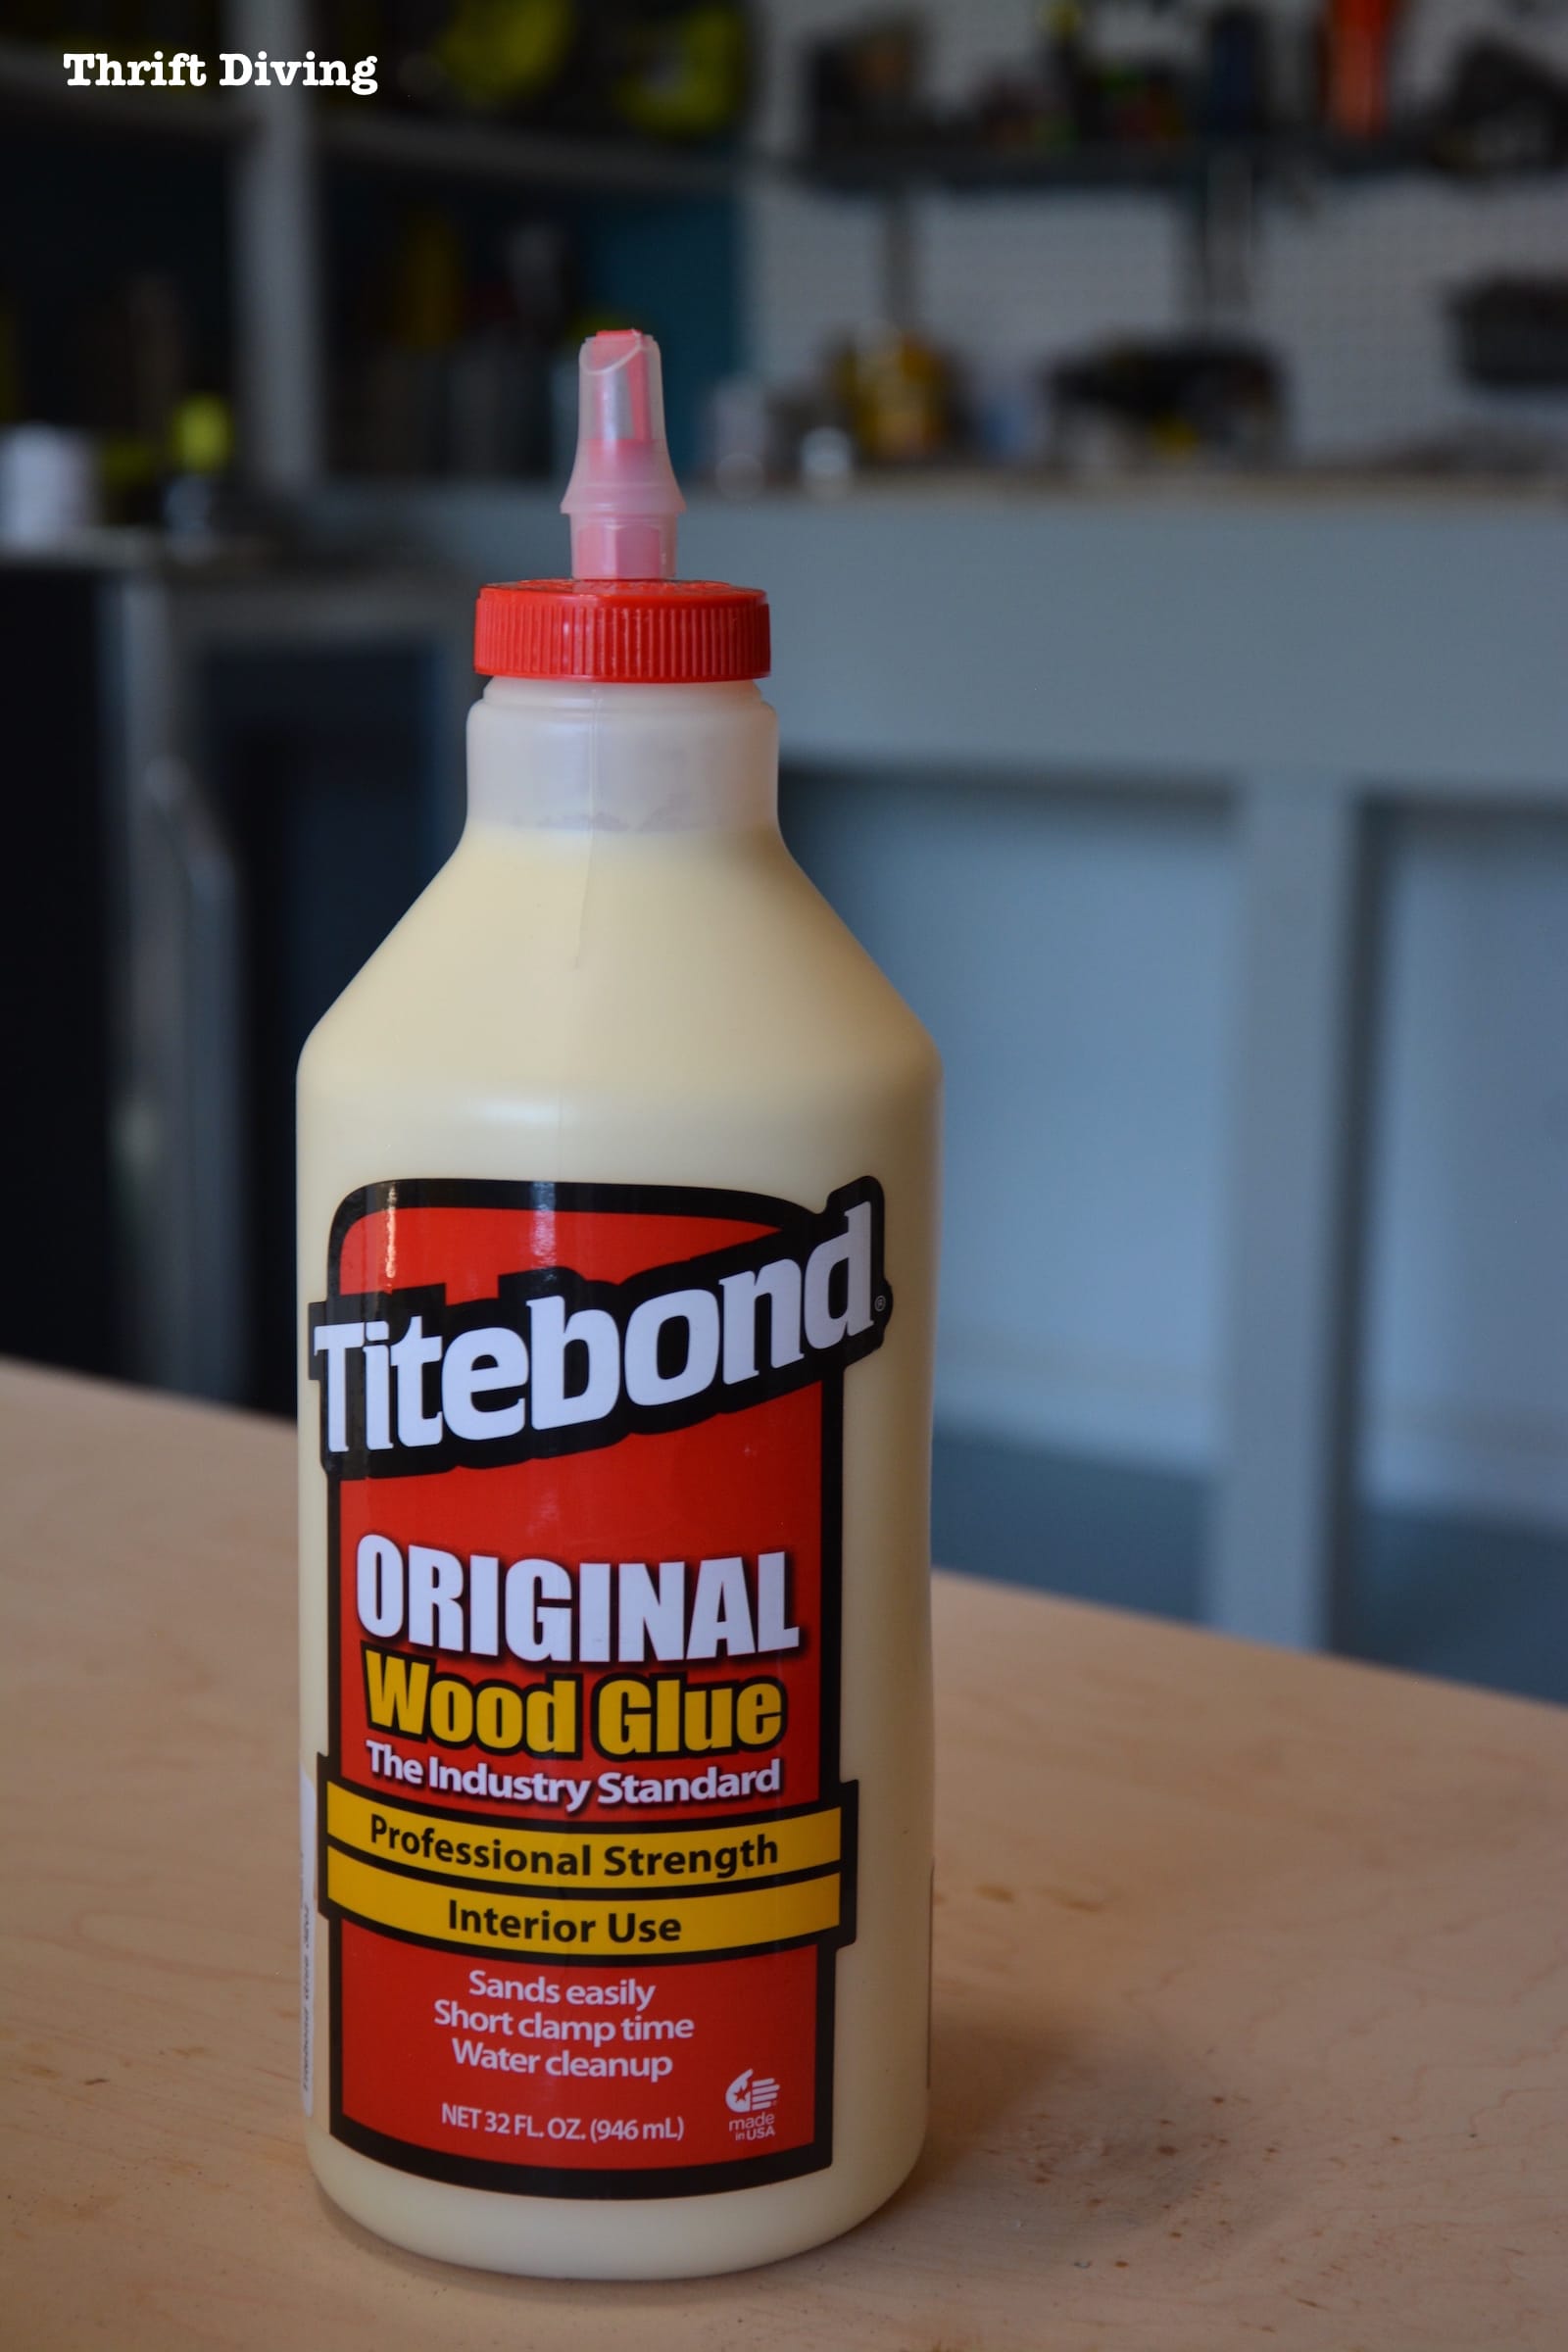
I just learned that you can prevent this dark end grain staining by adding a coat of glue size.
What in the World is “Glue Size”??
Glue size is a mixture of about 50% glue and 50% water.
Sizing the end of a board with a light layer of this glue size helps to plug up those thirsty pores and prevents excess amounts of stain from soaking in!
I found this great article on understanding glue sizing.
I just bought some Titebond glue, which I hear is really great and can be mixed with water.
Do some sample boards first, though, to make sure the results work for you before doing it on your furniture or project piece!
Lesson Learned #7: Practice, Practice, Practice!
When you’re trying out a new dye, a new stain, a new technique for finishing wood, always practice first on 10,000 pieces of sample boards!
Sometimes when you’ve found a great thrifted piece of furniture and you’ve stripped it, you may not have the ability to do this.
But if you can find an area where you can inconspicuously test, then test a small area first!
If you’re building something from scratch, buy extra wood and then practice, practice, practice.
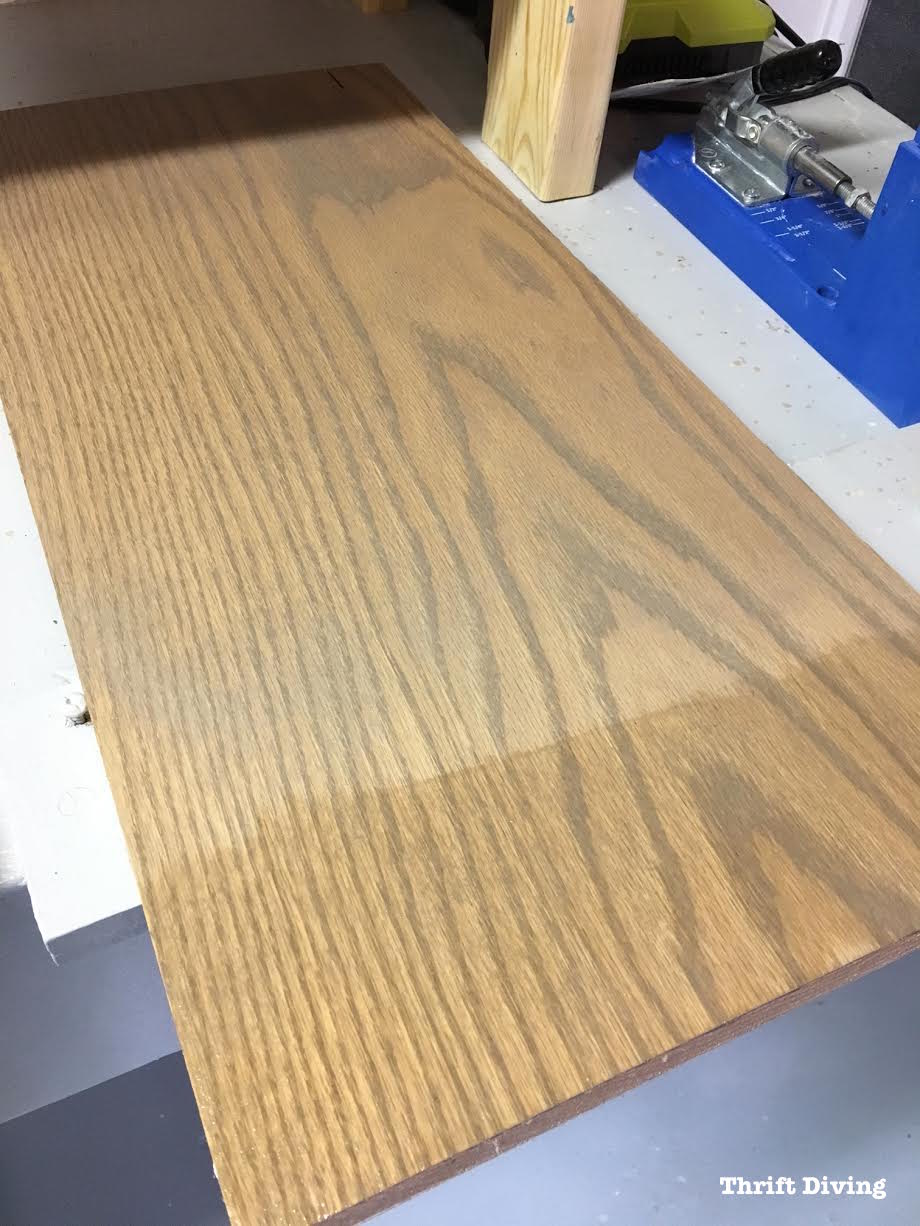
I’ve done so many sample boards for my Red Oak bathroom vanity already.
I’ve been afraid of moving forward because I haven’t liked any of them, which has been a little frustrating.
This is one I kind of like, which is a mixture of three different oil pigment stains: Early American, Sunbleached, and Classic Gray.
The various shades of the stains look so pretty on the grain, and it has a “subdued” kind of look, thanks to the Sunbleached that was added.
Lesson Learned #8: Learning is Part of the Fun!
Someone reminded me that finishing wood doesn’t have to be a frustrating process.
In fact, it should be fun!
Because you’re learning, experimenting, and becoming a sort of “chemist.”
You don’t know what unique finish you’ll get when you mix this with that and then layer it with this.
That’s part of the creative process!
So don’t lose the “fun” aspect!
Lesson Learned #9: Don’t Be Afraid to Buy a Book
As much info that’s available online, it’s hard to let go of your hard-earned cash to buy books.
I prefer to get as many as I can from the library.
But don’t overlook the benefit of having a library on-hand when you need to learn or reference something.
I picked up this book, The New Wood Finishing Book today and couldn’t believe the wealth of information inside!
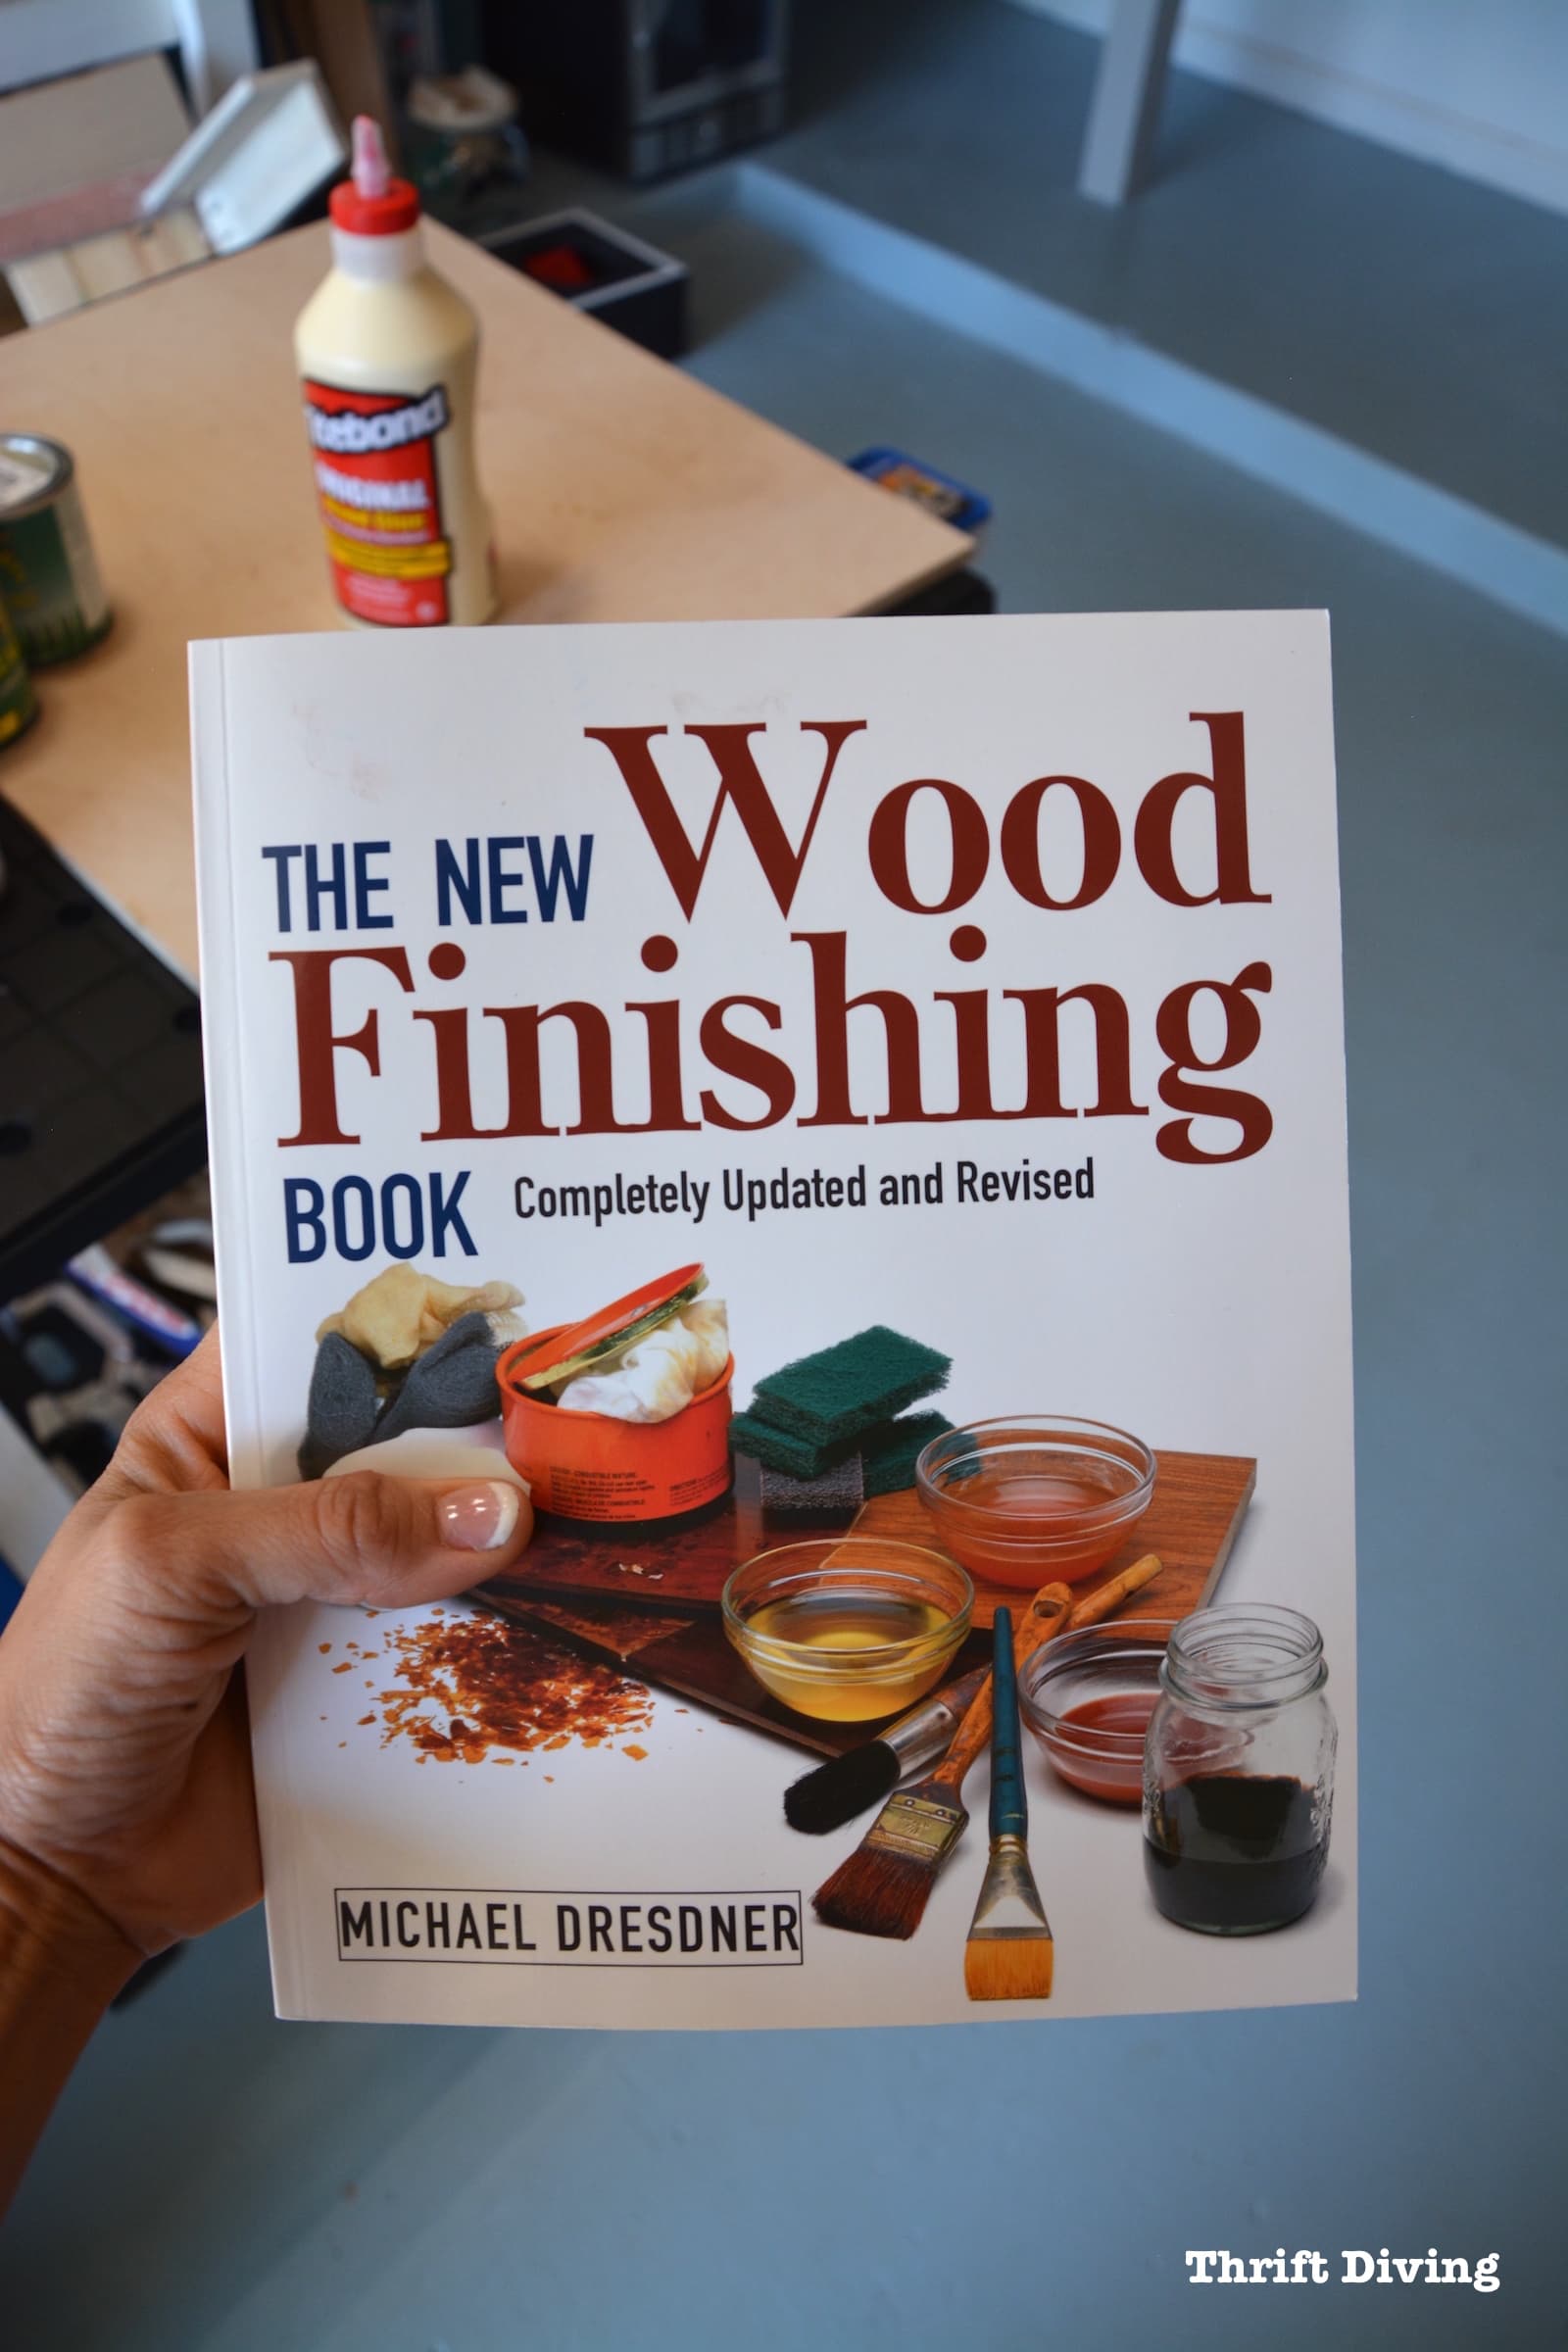
I’m sure it’s illegal for me to take a picture of the inside of the book due to copyright issues, but hey–one small page won’t hurt, I hope!
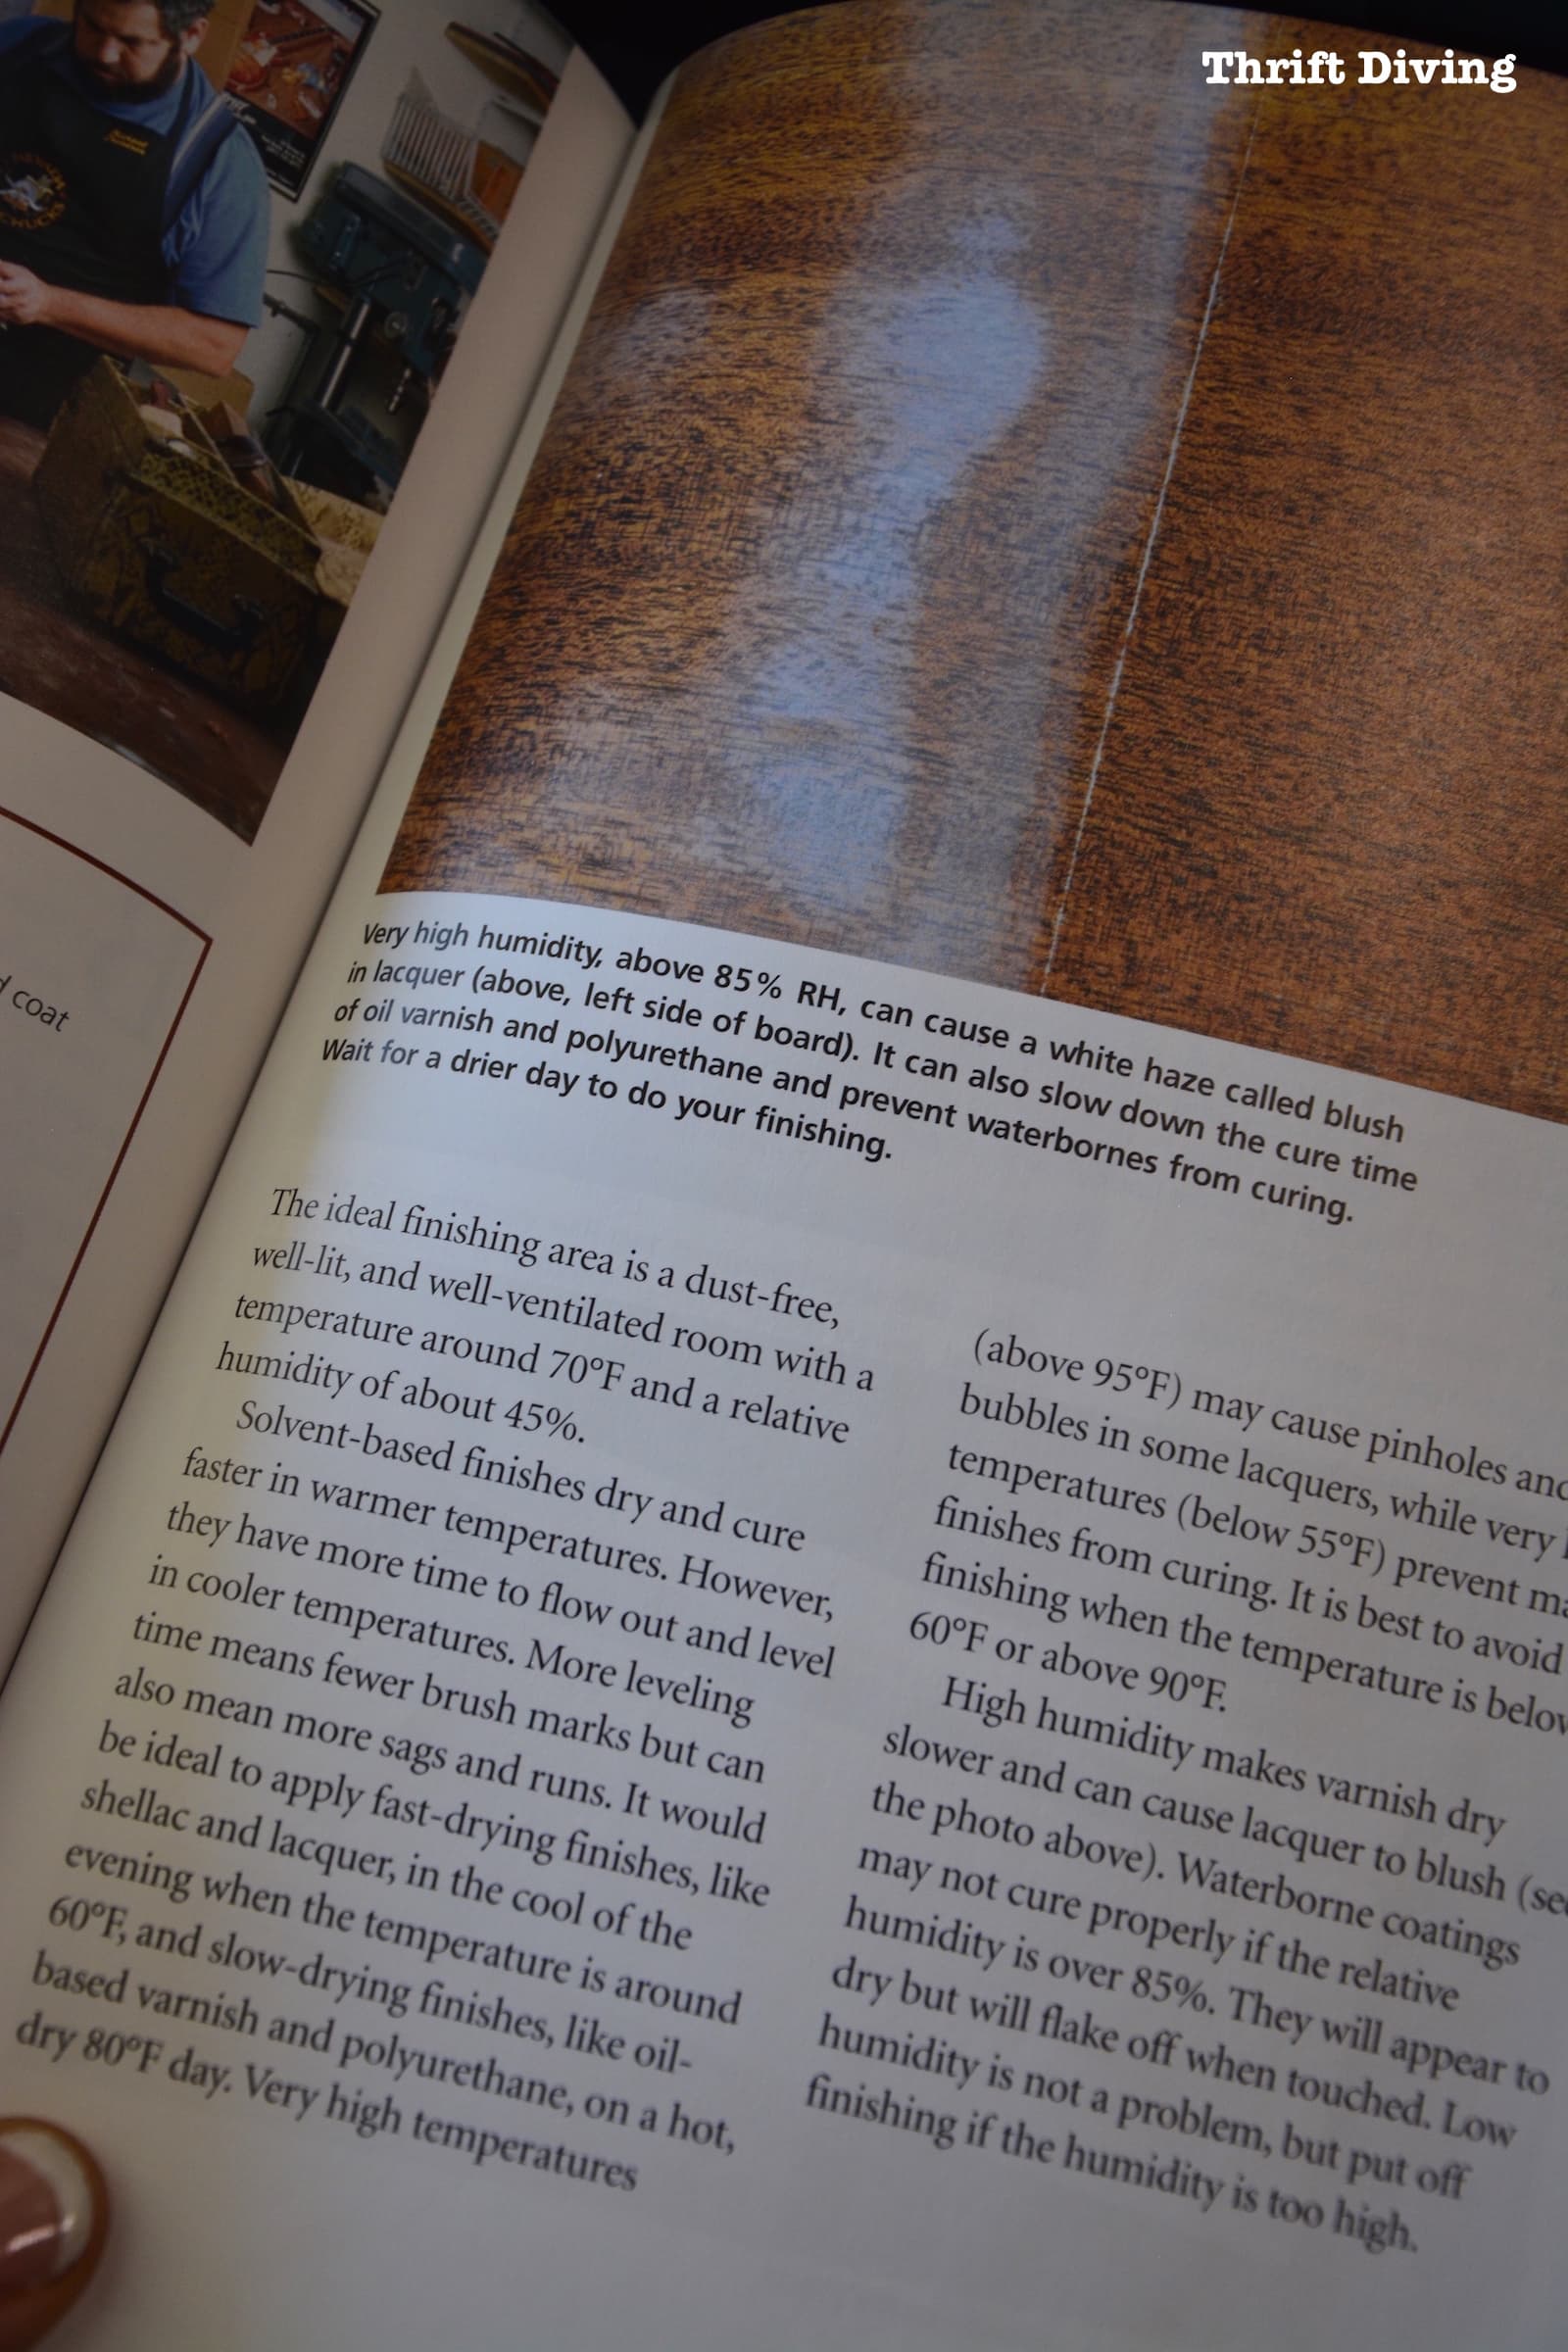
Remember I said in my last post on Understanding Wood: 7 Things You MUST Know Before You Refinish or Build Your Next Project that you should be mindful of the atmosphere when working on projects?
Well, this book explains why humidity is important:
Imagine curling up with a good highlighter and just marking all the info that will help you successfully complete your next project.
Exciting, isn’t it?!
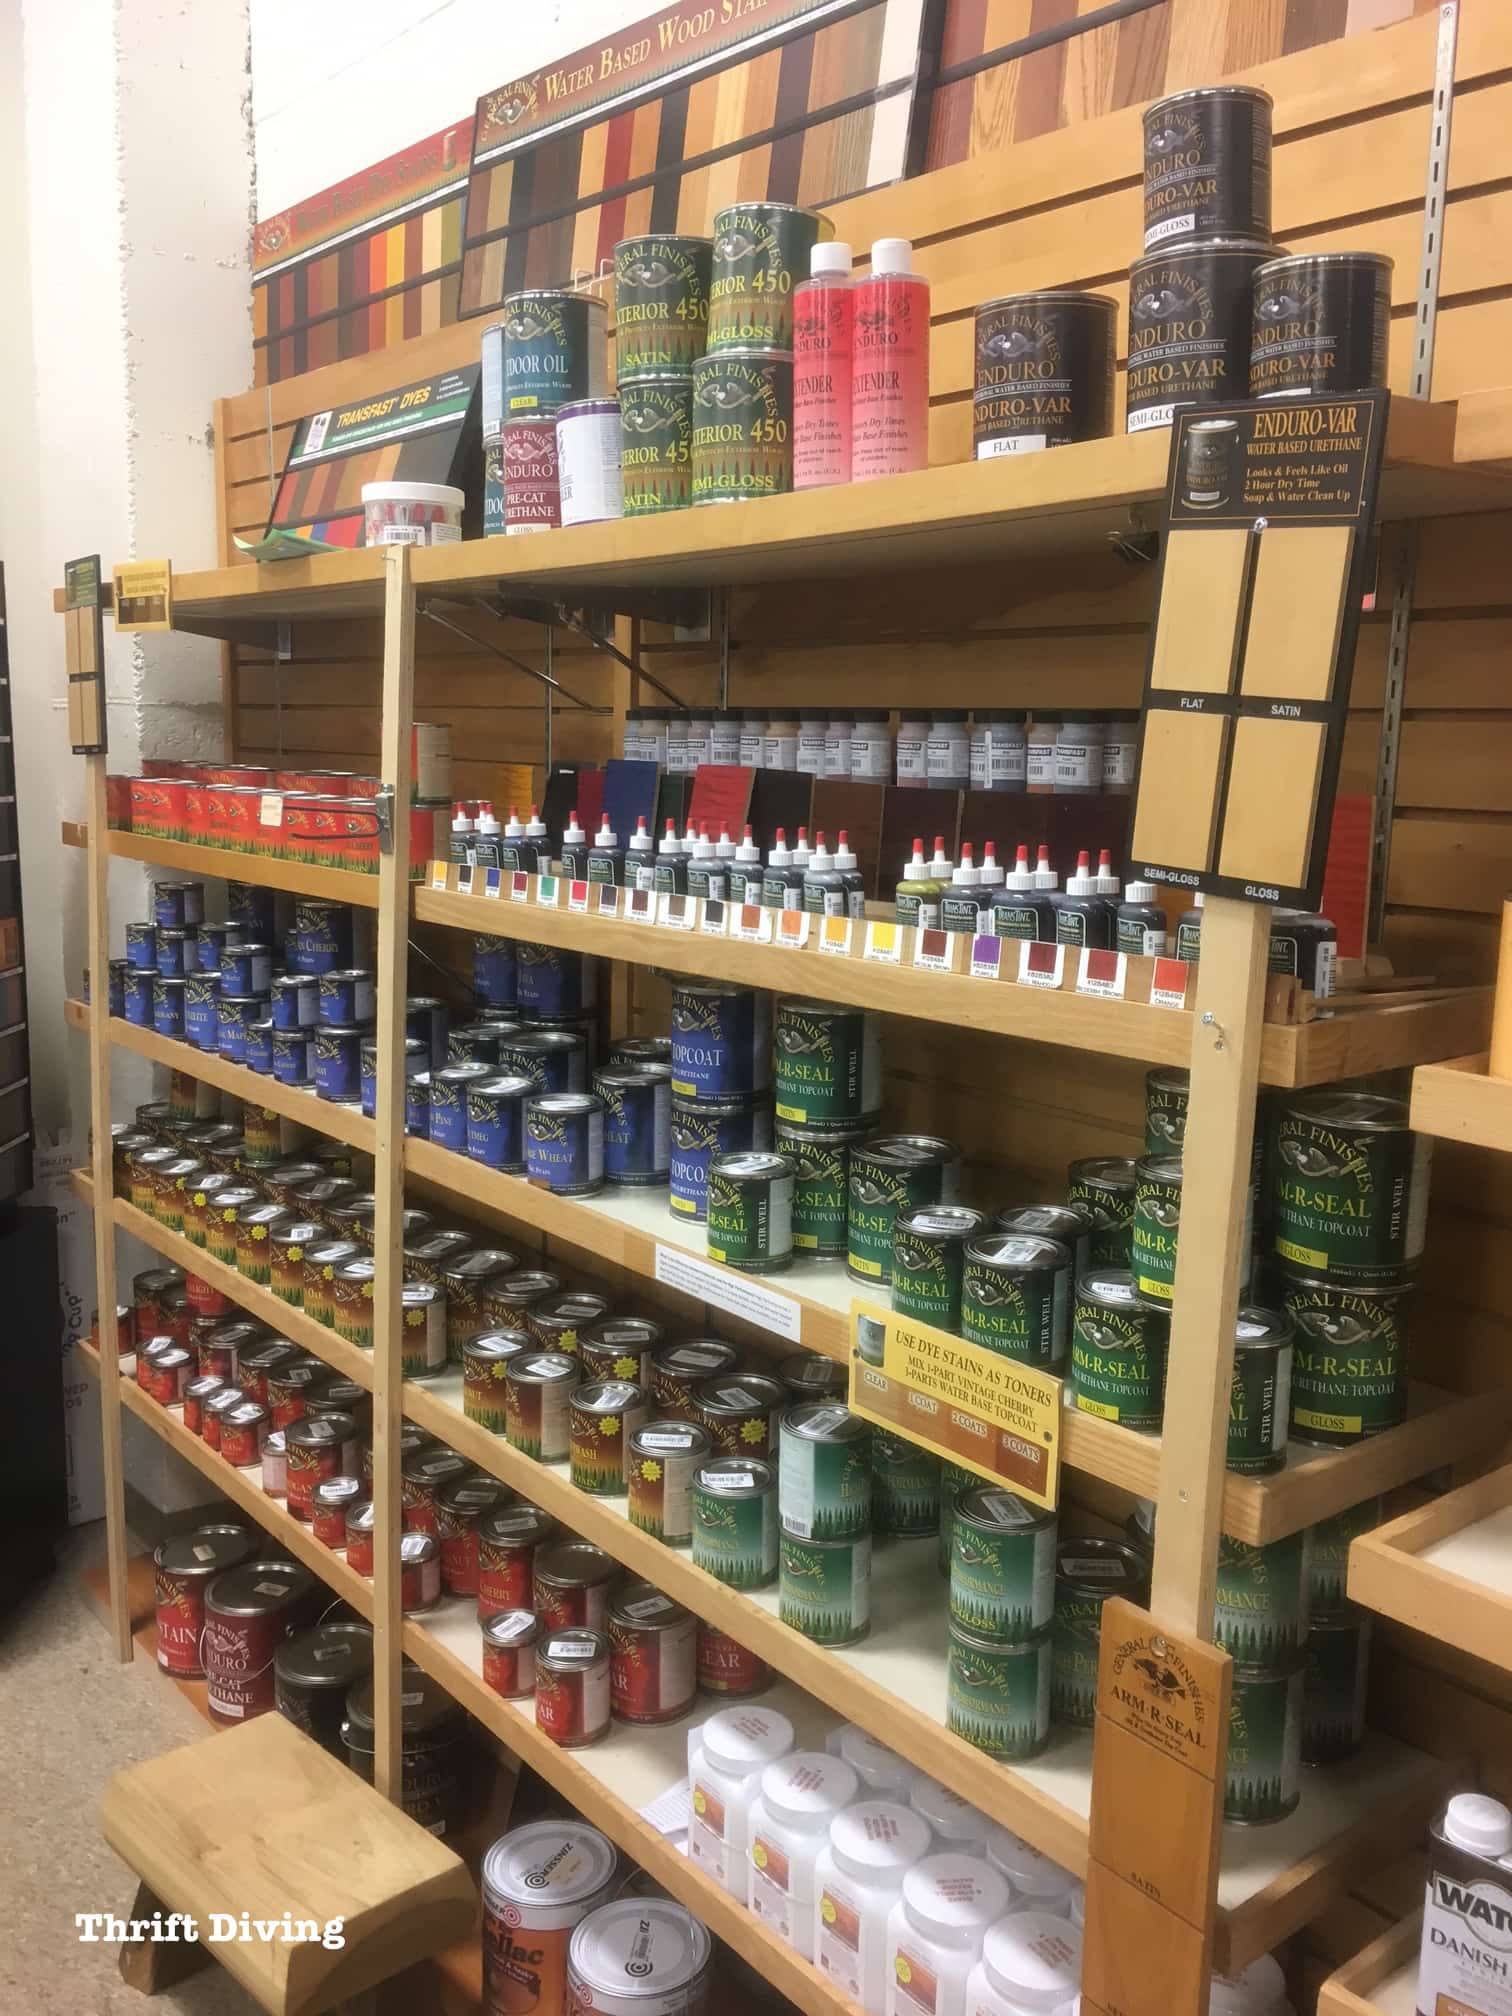
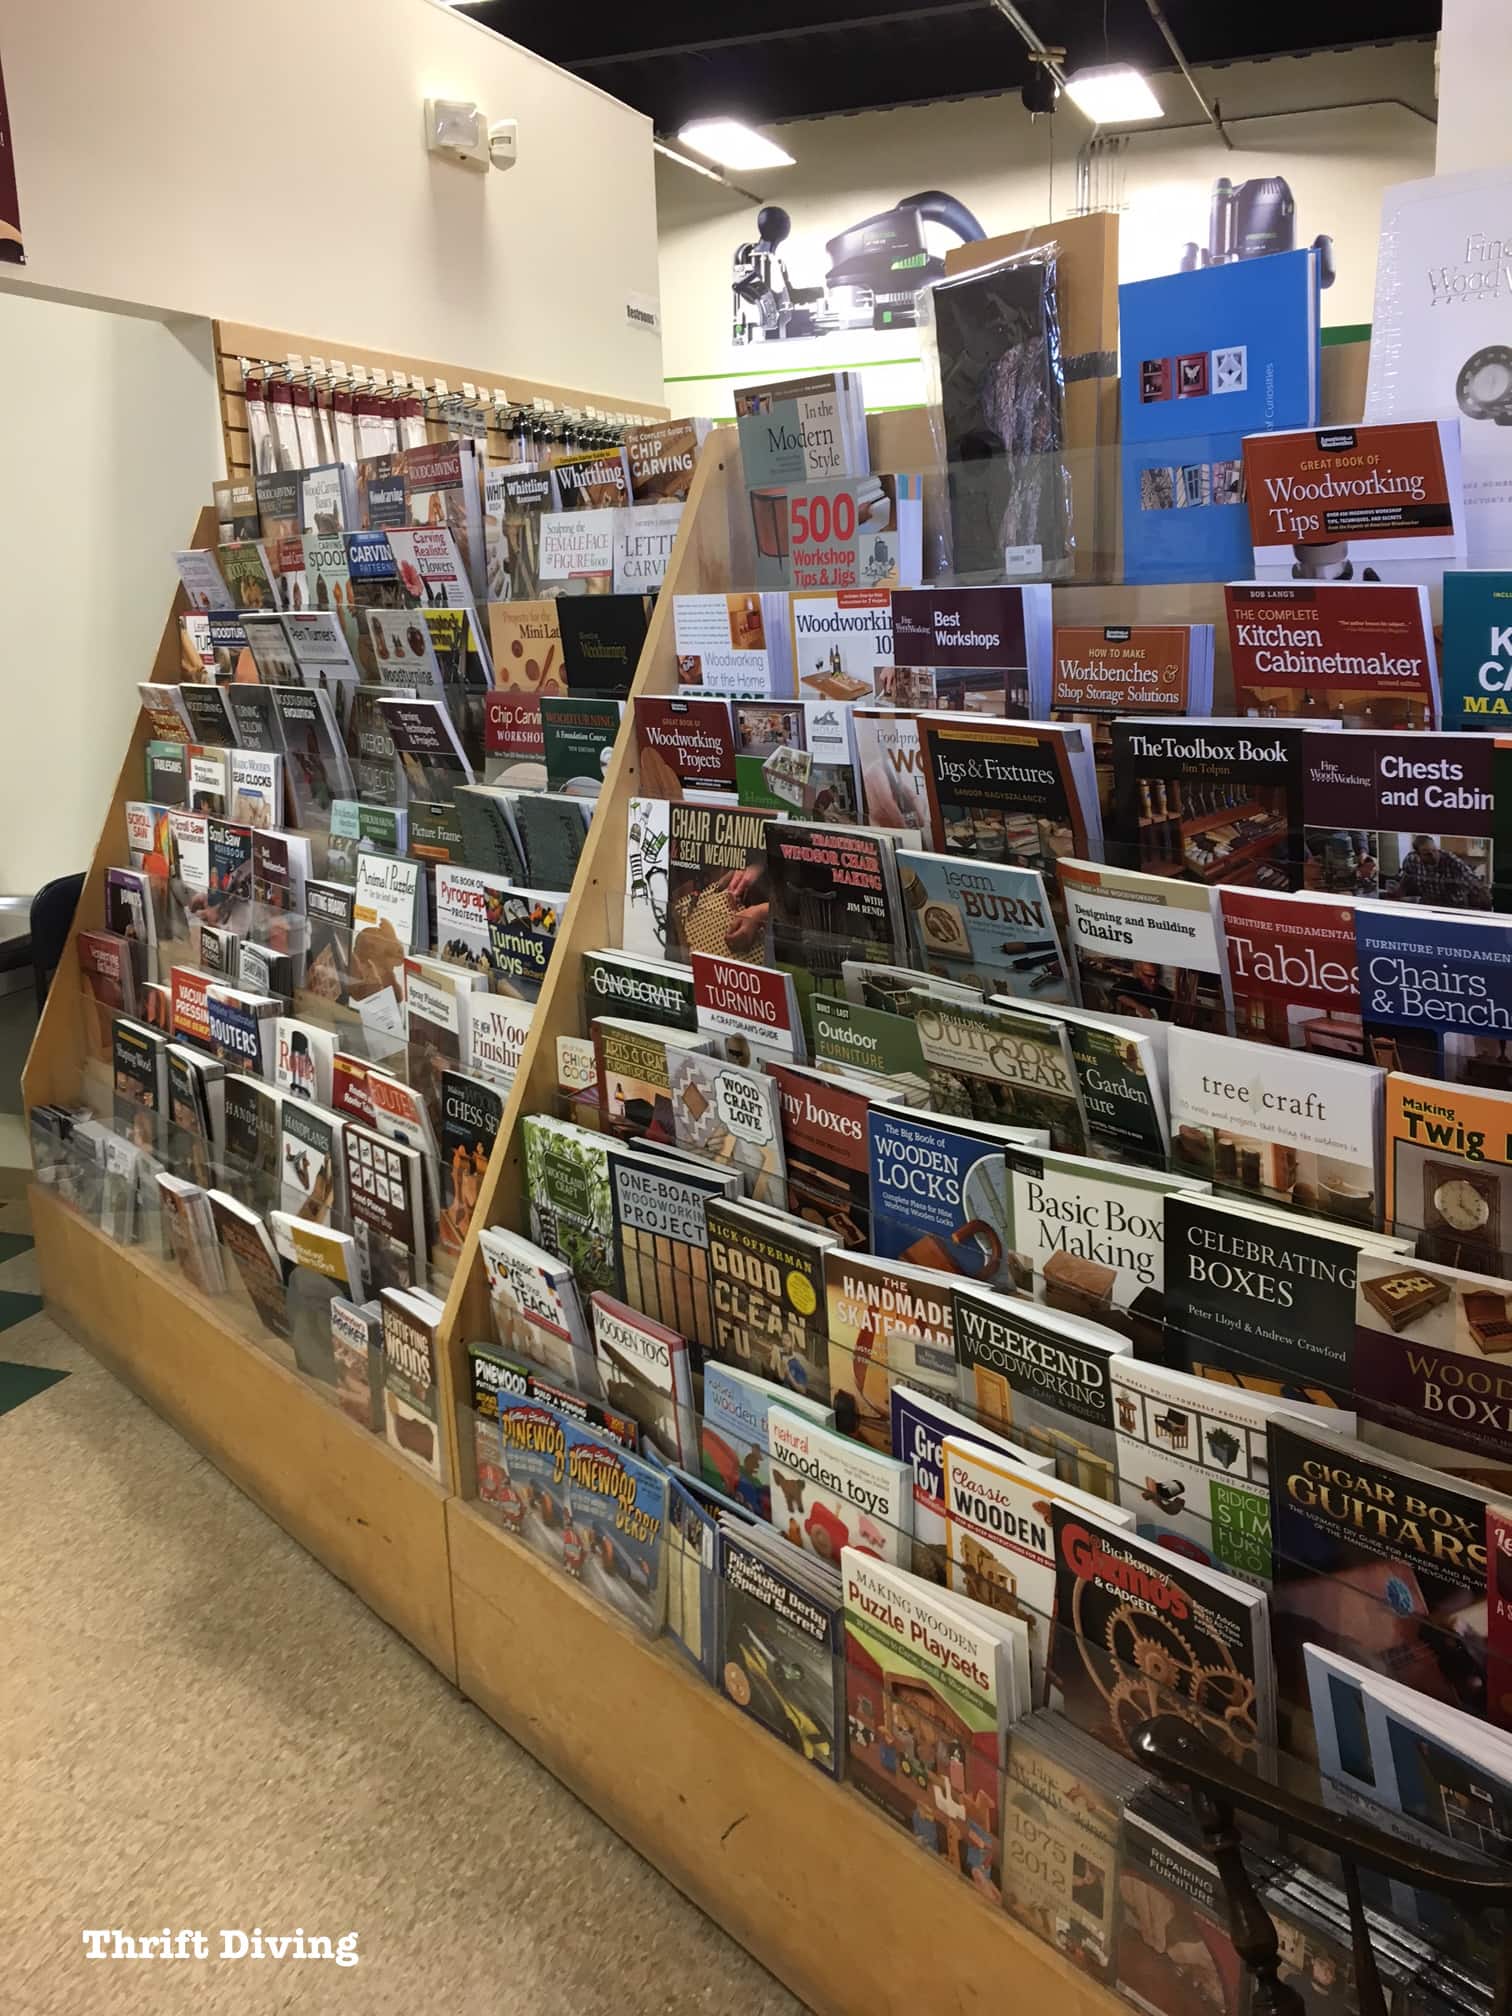
Lesson Learned #10: Find a Good Woodworking Store Nearby
You know how much I love Amazon, right?
Yes, but I love woodworking stores that much more when it comes to buying stains and other materials!
I forgot that I had one only 20 minutes from my house!
Not only can you ask questions and get help from people who know what they’re talking about, but you’ve got at your disposal tons of products to buy on the spot.
No 2-day waiting for Amazon Prime deliveries.
I think that’s worth it, even if you have to pay a few dollars more.
Because when I want to do a project, I.WANT.TO.DO.IT.RIGHT.NOW. 🙂
I don’t want to wait 2 days. Seriously.
I recommend finding a local woodworking supply shop if you can (I’m in Silver Spring, Maryland and there’s an awesome place called WoodCraft in Rockville).
When I stopped in there today, my eyes glazed over in excitement!
Everything I had been researching online about wood was right there at my fingertips!
I was most excited to pick up the wood dyes!
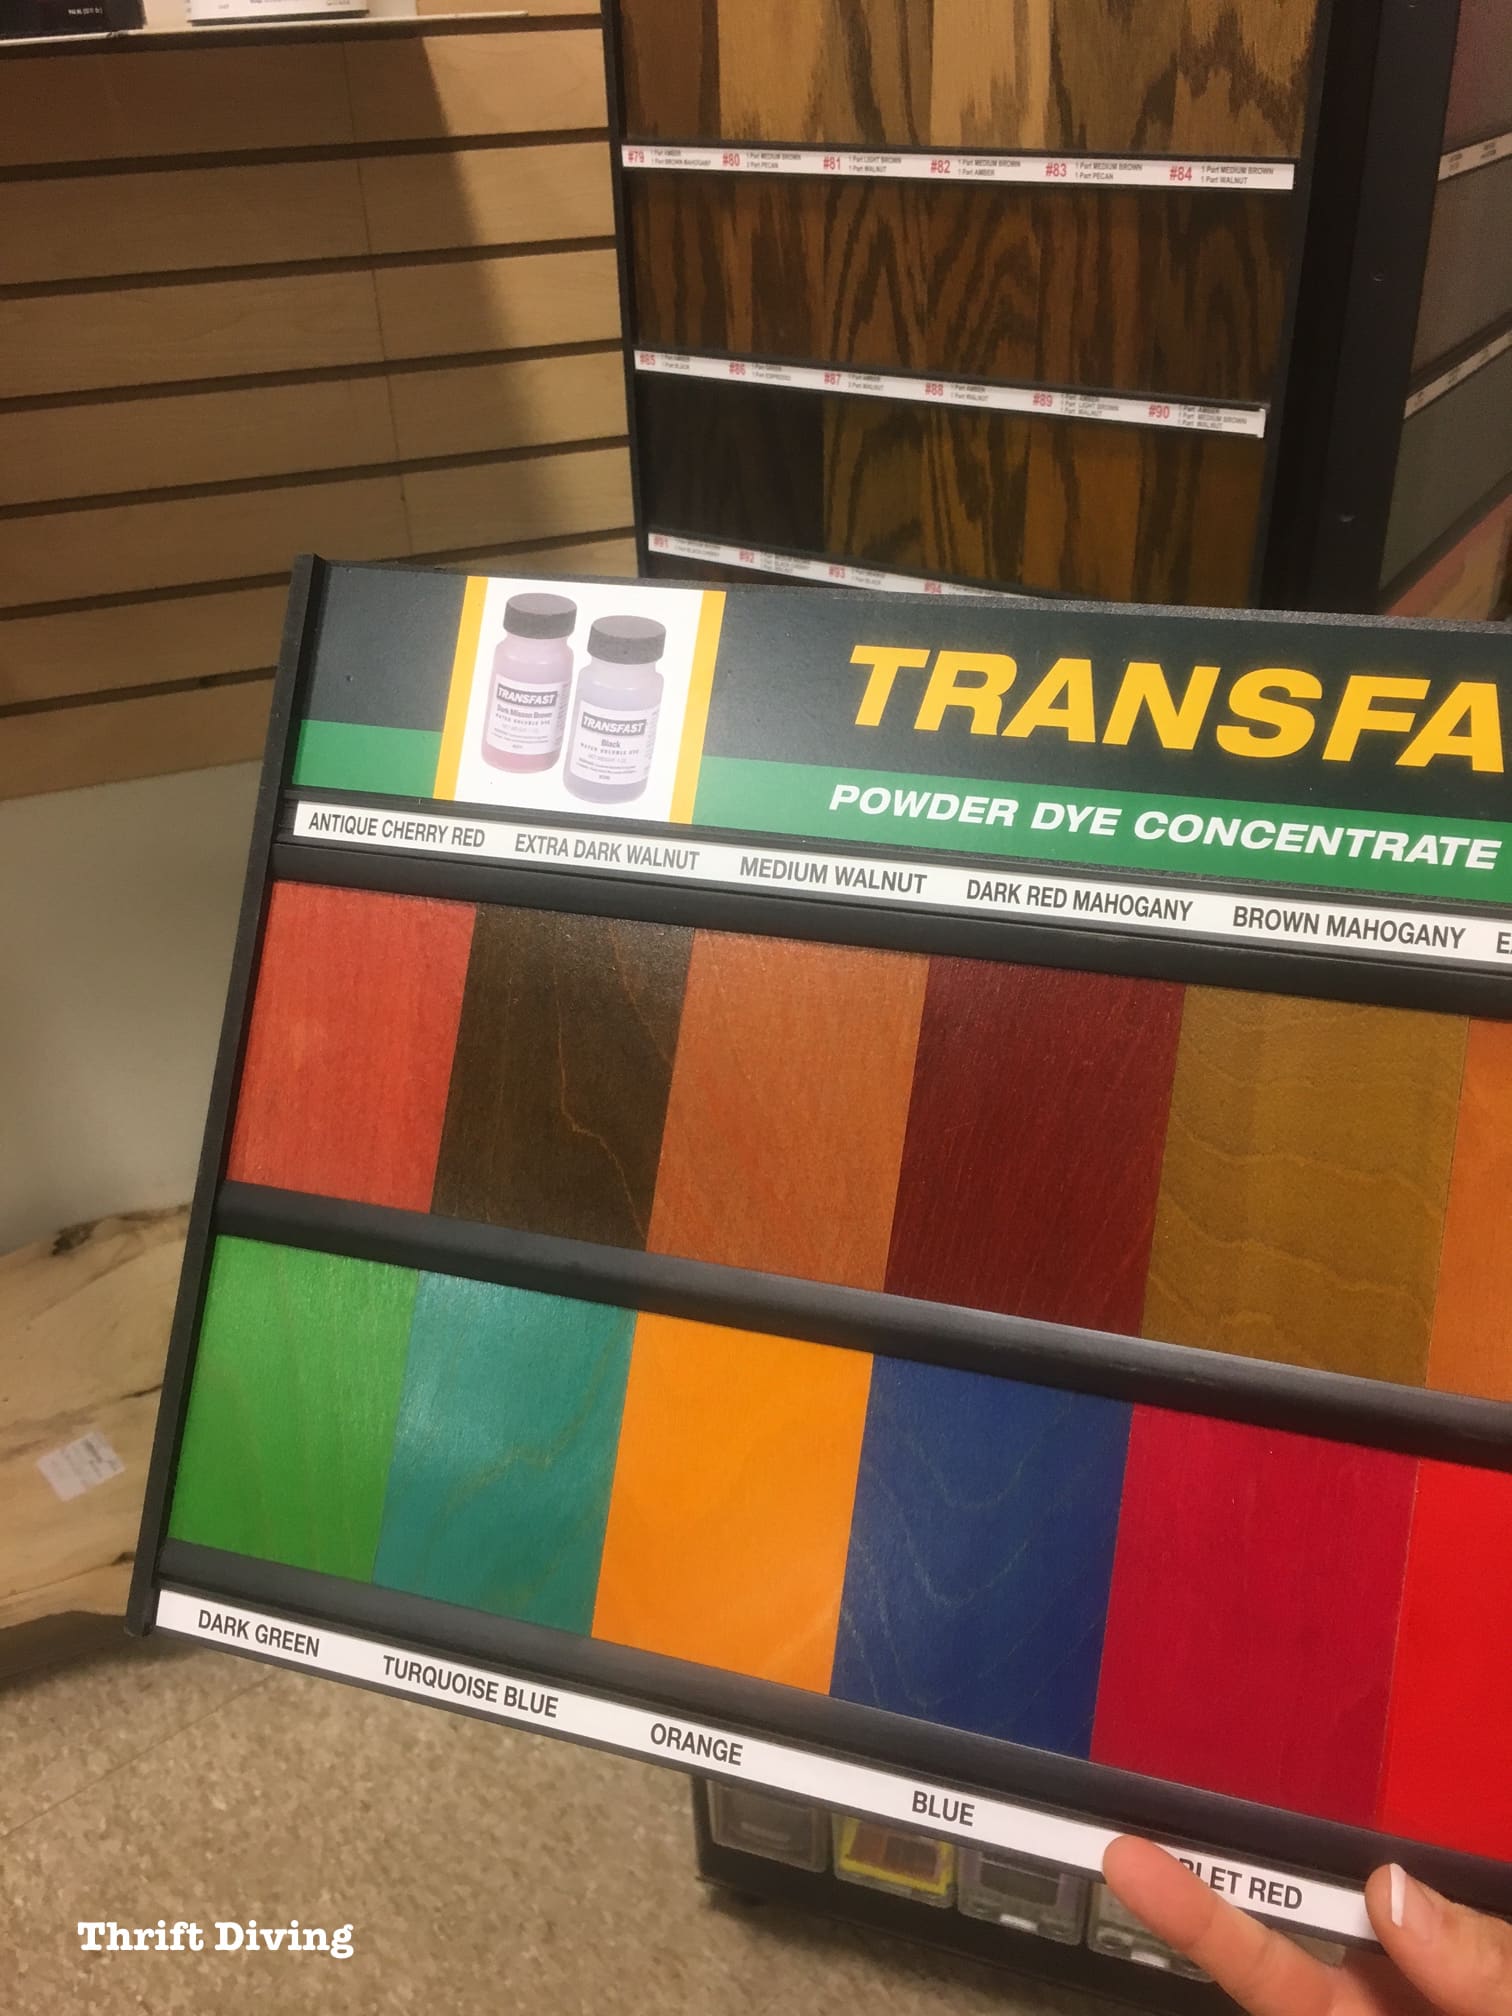

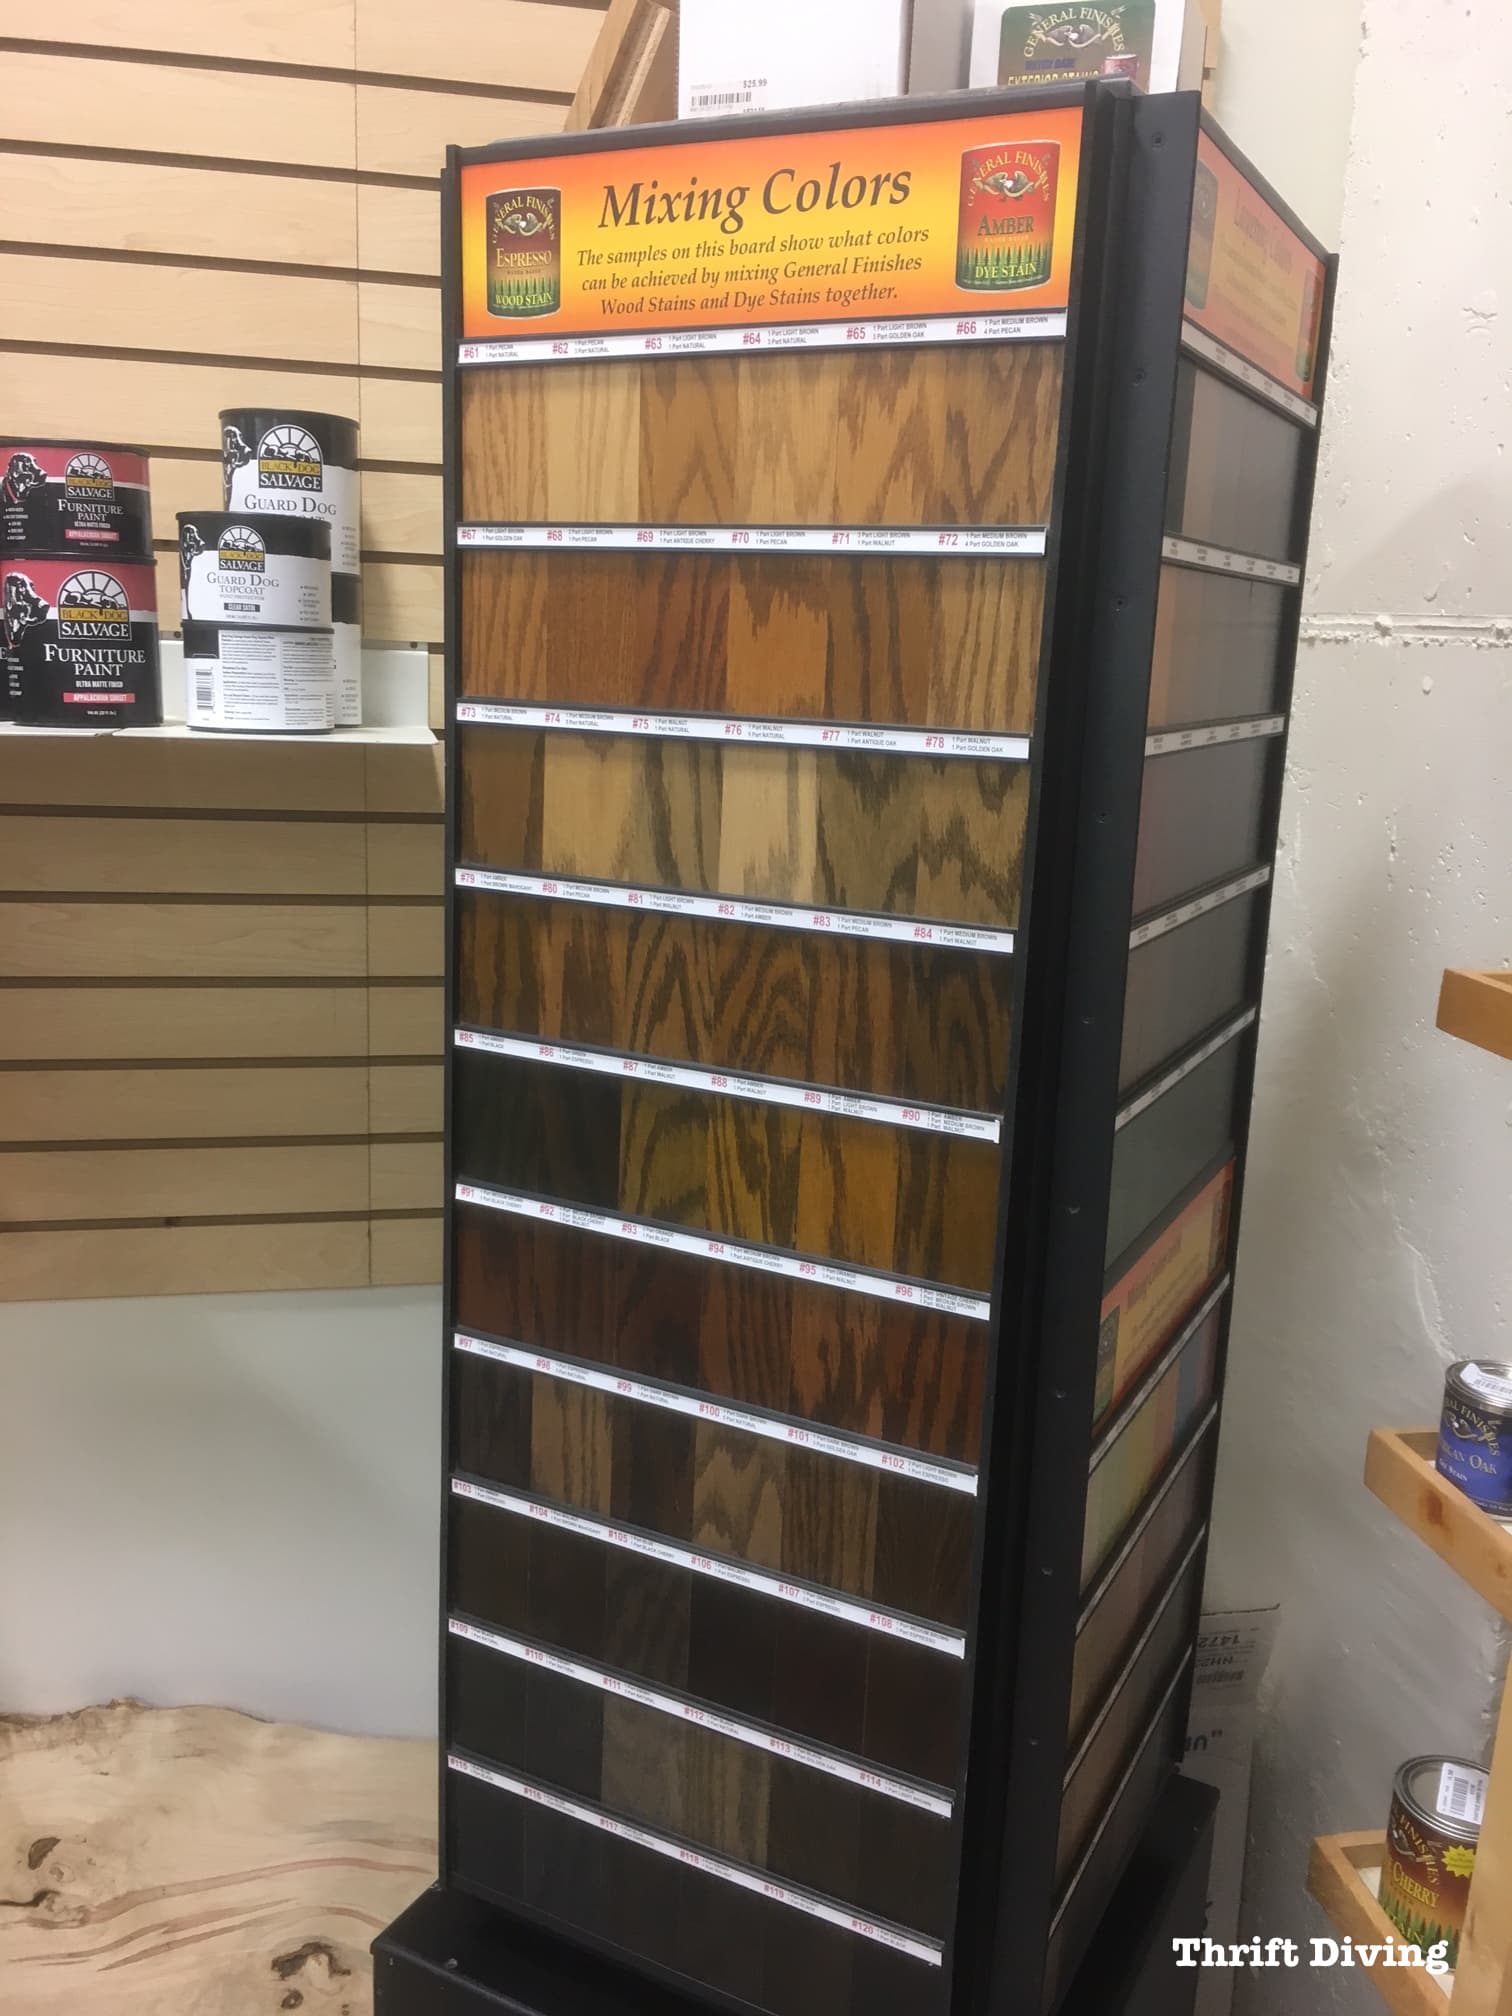
I also liked that they showed you all the different combinations you can get when mixing stains and dyes.
And the books……!!
Every book you can imagine on finishing, woodworking, building things…..They even had free coffee and a chair where I made myself at home for a good 30 minutes and just leafed through all the books.
By the time I left the woodworking store, I had spent a LOT of money on new products, stains, and topcoats!
I know that’s not possible for everyone, but since I’ll be using these materials for a bunch of other projects, it made sense for me to buy them.
If you can’t afford everything, start small. Try an inexpensive wood dye.
Later, add another fun supply and see what you can come up with.
So What’s Next?
Well, for me, that is finishing this doggone Red Oak DIY bathroom vanity.
I’m also going to be doing a lot more experimenting before I touch that vanity!
I want to be 100% positive I’m happy with the results before I move forward.
This is where it gets really interesting!
Now I Want to Hear From You!
Have you learned these things about finishing wood? Share your own tips in the comments section!
Loved this post? Save it for later on Pinterest!


Download the 5 freebies!

Thrift Diving inspires women to decorate, improve, and maintain their home themselves...using paint, power tools, and thrift stores! Use these 5 printables, checklists, and ebooks to get started!

Serena….love, love, love your blog….but I had trouble seeing the font…it is very light. I know my eyesight is going south with age, but could you maybe make your font more bold.,,,for all of the over 60 crafters out there!
Serena, This is a GREAT post. Very informative and helpful. Thank-you for the time to put it together. I had a little problem trying to read it with the options for sharing on the left side of the page and covering part of the content. Thanks again. Enjoy your blog.
“Plus, if all you can do is paint furniture, you end up being a One Trick Pony, right?”
So, so true… there’s a blog I just love, they do these skillful, gorgeous paint makeovers on thrift store furniture… but I do admit that I get very tired of seeing the exact same paint job applied to each and every piece of furniture. =( Come on, let me see some stain or – or – something!
I hadn’t heard of wood dyes before! Very cool. I hope you’ll be showing us a project with them soon! 😉
That sanding sealer looks great. But I admit, the grain filler… Dude, I’ve always just used wood putty for that! Mix a small amount of paint in if necessary, put on a thin coat, scrape it off with a plastic putty knife, then sand off the excess when it’s dried! Hah! I can imagine for a piece you’re going to leave unfinished or stain/dye/etc, rather than just paint, the grain filler would be a classier option. 😉
Dang, somehow I knew that the ends of wood were more absorbent, but I never put two and two together and figured out that was why stain was so dark on the ends… d’oh! Glue size is completely new to me, but what a handy dandy idea! Bookmarking this post for future reference. =)
I am also supremely jealous of your woodworking store nearby. I want ALL the books! Dude, the nearest Menards/Home Depot/Lowes/Walmart is an hour away, and Amazon dislikes my P.O. Box. I am super jealous. 😉 I’m not sure what I’d do with all those products… but I /want/ them. Maybe just hoard them like a dragon?
YES!! Exactly my point! As lovely as painted furniture is, I think to be able to paint AND stain are both amazing skills to develop. I feel the same way about thrift store furniture. As much as I love thrift store furniture, it’s even more rewarding learning how to build furniture. I’m very interested in woodworking and learning how to do mortise and tendon joints, along with using my new dovetail jig (I haven’t even opened it yet!!). It’s good to have a mix of skills so that you don’t become stale.
And OMG, you’re an hour away from a home improvement store or Walmart?! GASP! Then you really must plan properly, don’t you? I’m about 15 minutes away from Home Depot and it’s often that I forget or need something and–BAM–drop everything and head to the store.
The glue size is SUCH a great tip! When I was at the woodworking store, I was reading some of the finishing books and saw the tip in there. Project saver! I think I may do a separate post about it because it’s such a helpful tip for getting good results on projects!
Agreed on all accounts. 😉 Especially on the having a mix of skills so you don’t become stale. I think it applies to people in general: you want to build a variety of interests and skills so you don’t become stale yourself!
Ooh, you have a dovetail jig now?! I always thought making dovetail joints seemed so cool–can’t wait to see what you use it on!
I know, I’m truly beyond unfortunate. ;( So true, it does mean that my projects move along at a snail’s pace when I don’t have the right materials though! We have two cars and they’re normally in use… often have to wait at least a few weeks before I have a chance to go to town and get what I need, lol. Gives me plenty of time for research, at least! I’m envious of you! 😉
Do it!! I’m going to build a tall, thin chest of drawers to fit in the corner of my room (inspired by your gumption and vanity tutorial!) and I’ll definitely be referring back to your wood finishing tips. 😀
The different kind of wood finishes is the best I have read yet! Thanks for “teaching” and for inspiring all of us wanna be DIY’ers out here. Never have done any makeovers till I started reading your blog. You cease to amaze me with your knowledge! Thank you!
YAY! Well, I’m glad you have felt inspired to do projects, Patricia! I’m learning right along with you, girl. It’s exciting stuff!
As usual, you give us the best “must have” information we need to produce “Happy” results. This will come in handy to “reread” time and time again. I have some wood tray tables I have been wanting to try using dyes. Thanks again for your most useful and clear posts.
OOoh, you’ll love the dyes, Joan! From what I’ve learned, you should mix them a bit stronger than the manufacturer suggests so that you can decide for each project how much you want to lighten it. This applies to water-based dyes, that is. I just wrote up a post about it!
I’m so impressed with your research, and how well you explain what you have learned. Thank you so much for sharing your knowledge with your readers. It also is very useful that you include sources to buy the different products. Can’t wait to see your vanity finished. I love the weathered look that you have chosen, but had not been able to find easy to read information on how to achieve it. Your post on this subject is the best I’ve read!
Hi, Elisa! The good news is that I was playing around in the garage the other day and was able to create an awesome sample board with the dyes and liming wax! I wrote up a post about it that should be published later today. I hope you find it helpful!! 🙂
this is great! I have done strange things to wood, like after buying a huge sheet of plywood for a table, used grain filler and stain (not this kind perhaps) and it came out so homely that I’ve never looked at it since. If only I’d had this article then!
Oh no, Linda! LOL! What kind of plywood did you use? Red Oak? I’m itching to get my hands on this grain filler, but I’m scared because it looks MESSY! And all the tutorials I am watching are showing it on a flat surface. Well, I have already built my vanity so IT’S VERTICAL. I can imagine I would have stuff dripping everywhere! We shall see. I will do some more experiments and see where it leads me. Tell me more about how that project turned out. Where do you think the project went wrong?
Oh, don’t have a clue; I picked out the shade of stain, and bought what appeared to be one of the best grain fillers (and like you say, it was messy!) and took the appropriate time to wait between ..followed directions… it just is so far from pretty that it ain’t funny! It’s still here, waiting for a more ugly project to come up! Something where I could just paint it! Well, I have this article now, and I know this will help a lot! Thanks for looking out for us!
The link to the article in #3 doesn’t seem to be working. 🙁